

Page 1

CLIENT USER’S GUIDE
Dell® PowerEdge® Expandable RAID
Controller
Battery Backup Module Guide
Page 2

Dell® PowerEdge® Expandable RAID Controller
Information in this document is subject to change without notice.
1996 Dell Computer Corporation. All rights reserved.
1996 American Megatrends, Inc. All rights reserved.
Reproduction in any manner whatsoever without the written permission of Dell Computer Corporation is strictly forbidden.
Trademarks used in this text: Dell, the DELL logo, and PowerEdge are registered trademarks, and DellWare is a registered
service mark of Dell Computer Corporation; Intel is a registered trademark of Intel Corporation; Microsoft, Windows,
Windows NT, and MS-DOS are registered trademarks of Microsoft Corporation; SCO is a registered trademark of The Santa
Cruz Operations Inc.; UNIX is a registered trademark of UNIX System Laboratory Inc., a wholly owned subsidiary of Novell,
Inc.; Novell and NetWare are registered trademarks of Novell, Inc.; IBM and OS/2 are registered trademarks of International
Business Machines Corporation.
Other trademarks and trade names may be used in this document to refer to either the entities claiming the marks and names or
their products. Dell Computer Corporation disclaims any proprietary interest in trademarks and trade names other than its own.
Part Number 58296
PowerEdge Battery Backup Module User’s Guide
ii
Page 3

Preface
The PowerEdge Battery Pack Module is a mezzanine card that
mounts on top of the PowerEdge adapter card. The PowerEdge
Battery Backup Module provides emergency battery power for
the cache memory mounted on the PowerEdge adapter card..
Technical Support If you need technical assistance, see the “Getting Help” Chapter in the
Installation and Troubleshooting Guide that accompanied your
Dell computer.
Dell TechConnect BBS The TechConnect BBS permits you to access technical
information about the Dell PowerEdge Expandable RAID
Controller. For the correct BBS number in your area, see the
“Getting Help” chapter in the Installation and Troubleshooting
Guide that accompanied your Dell computer.
Web Site You can access the Dell Computer Corporation web site at:
http://www.us.dell.com
Preface
iii
Page 4

Page 5

1 Installing the Battery Pack
Overview
The PowerEdge Battery Backup Module protects the data handled
by the PowerEdge® Expandable RAID Controller by providing
protection from power supply interruptions to the PowerEdge
cache memory.
The PowerEdge Battery Backup Module monitors the voltage
level of the DRAM modules installed on the PowerEdge card and
supporting circuitry. If the voltage drops below a predefined level,
the Battery Backup Module switches the memory power source
from the PowerEdge card to the battery pack attached to the
PowerEdge Battery Backup Module.
As long as the voltage level is below the predefined value, the
PowerEdge Battery Backup Module provides the memory refresh
cycles necessary to retain the contents of the PowerEdge memory
modules.
If the voltage level returns to an acceptable level, the Battery
Backup Module switches the power source back to the
PowerEdge adapter card.
Cont’d
Chapter 1 Installing the Battery Pack 1
Page 6
Overview, Continued
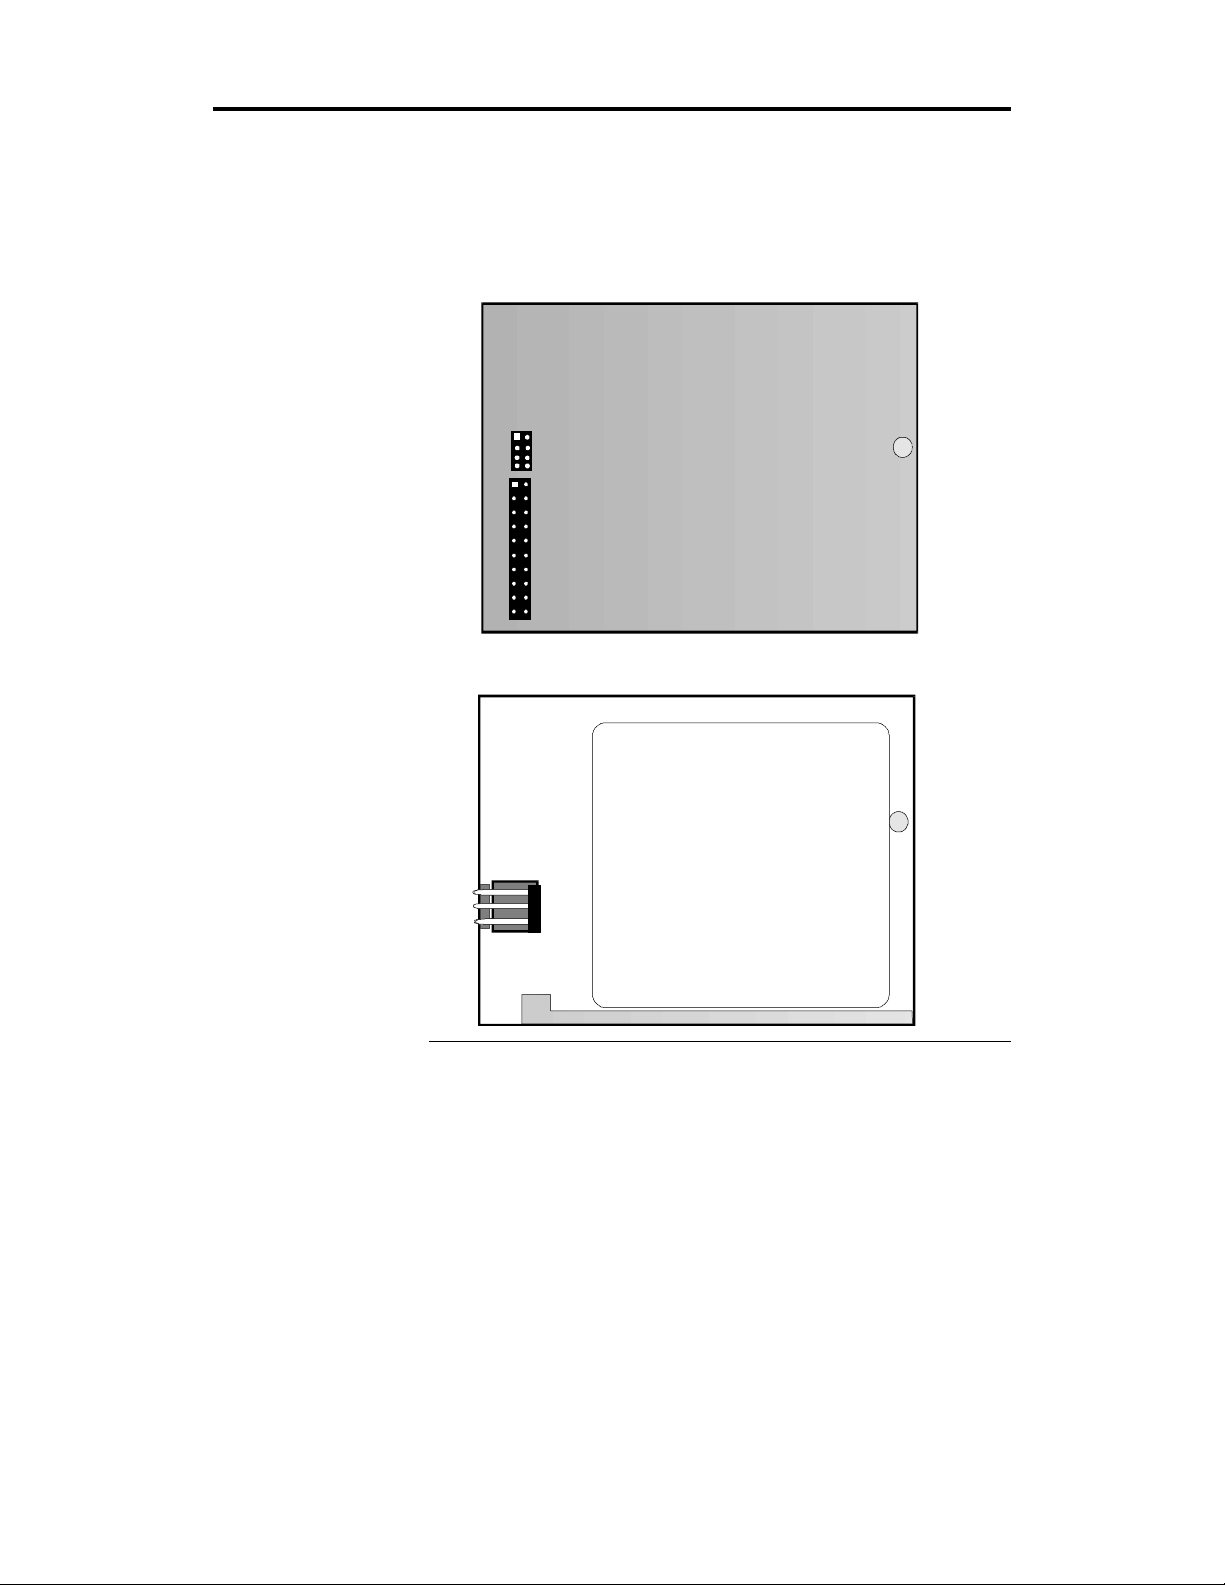
Battery Backup Module The backup module is shown below. There are no
jumpers to set. There are only two connectors that attach this
daughtercard to the PowerEdge controller card. Two three-pin
connectors (J1 and J2) attach the primary onboard battery pack
and a secondary battery pack.
Bottom of board
J5
J6
J2
Front of board
P/N: BAT-NIMH-4.8.01
CAUTION
ATTENTION
American Megatrends, Inc.
Danger o f ex plo sion if ba ttery is inco rrec tly replac ed. Replace
only with the same or equivalent type recom mended by the
ma nufacturer. D isp ose of used batteries according to the
ma nufacturer's instructio ns.
Il y a danger d'e xplosion s'il y a remp lac ement incorrect de la
batterie. Rem placer uniquement avec une batterie du mem e]
typ e o u d'un type equ iva len t recom mande p ar le c onstructeur.
Me ttre au rebut les batteries usagees conformement aux
instructions du fab ricant.
WARNING
PROMARK YYWW IIZ9503MSO
BEFORE ADDING OR REMOVING DRAM MODULE, DISCONNECT
BATTERY PACK FROM BATTERY BACKUP MODULE.
2 PowerEdge Battery Backup Module User’s Guide
Page 7

Installing the Battery Backup Module
Static Electricity The PowerEdge PC SCSI Disk Array adapter card and the PowerEdge
Battery Backup Module contain sensitive electronic components.
Make sure you ground yourself by wearing an antistatic
wristband or by maintaining contact with an electrical ground
while you are installing the PowerEdge Battery Backup Module.
Warning
Do not place the PowerEdge Battery Backup
Module or the PowerEdge adapter card on a
conductive surface while the battery is being
attached or after the battery is attached.
Installing Onboard Battery Pack
You should not have to install the onboard battery pack. It should
already be mounted on the Dell PowerEdge Battery Backup
Module.
Warning
Before changing the memory on the PowerEdge
card, you must disconnect the battery pack.
Chapter 1 Installing the Battery Pack 3
Page 8

Install the Battery Backup Card
Remove the PowerEdge card and place it on a flat, clean, staticfree surface. Remove the four shunts from the 8-pin connector.
Install the PowerEdge Battery Backup daughtercard on the
PowerEdge adapter card as shown below.
Warning
Do not place the PowerEdge Battery Backup Module or the
PowerEdge adapter card on a conductive surface while the battery
is being attached.
Cont’d
4 PowerEdge Battery Backup Module User’s Guide
Page 9

Install the Battery Backup Card, Continued
Attach Module to PowerEdge Controller Fasten the Battery Backup Module to the
PowerEdge RAID controller using the q” screw and nylon
washer supplied with the Battery Backup Module. First, insert the
screw through the nylon washer. Then insert the screw through
the hole on the PowerEdge controller, starting at the back of the
PowerEdge controller. Next, tighten the screw into the threaded
standoff on the Battery Backup Module. The screw must not be
as tight as you can make it. Tighten the screw so that it is flush
with the back of the PowerEdge controller, but not so tight that it
cannot be turned anymore.
Chapter 1 Installing the Battery Pack 5
Cont’d
Page 10

Install the Battery Backup Card, Continued
The PERC with the PowerEdge Battery Backup Module installed
on it should appear as follows:
Dirty
SCSI
Cache
Activity
i960
1
4.8V, NIMH 9634 PROMARK
AMERICAN MEGATRENDS
1 1
See the Dell PowerEdge RAID Controller User’s Guide for
additional information about installing the PowerEdge
Expandable RAID Controller.
6 PowerEdge Battery Backup Module User’s Guide
Page 11

Connecting Battery Packs
The PowerEdge Battery Backup Module usually is shipped with
an onboard four-cell Nickel- Metal Hydride battery pack already
installed. If this is the case, you must only insert the battery
connector into J2, as shown below. The battery cable connector is
keyed to make sure that the proper connection is made.
J2
CAUTION
American Megatrends, Inc. P/N: BAT-NIMH-4.8.01
ATTENTION
Danger of explosion if battery is incorrectly replaced. Replace
only with the same or equivalent type recommended by the
manufacturer. Dispose of used batteries according to the
manufacturer's instructions.
Il y a danger d'explosion s'il y a remplacement incorrect de la
WARNING
PROMARK YYWW IIZ9503MSO
BEFORE ADDING OR REMOVING DRAM MODULE, DISCONNECT
batterie. Remplacer uniquement avec une batterie du meme]
type ou d'un type equivalent recommande par le constructeur.
BATTERY PACK FROM BATTERY BACKUP MODULE.
Mettre au rebut les batteries usagees conformement aux
instructions du fabricant.
Attac h battery pack
conne ctor to J2
Install PowerEdge Card Install the PowerEdge card in the computer. See the Dell
PowerEdge RAID Controller User’s Guide for complete
installation instructions.
Chapter 1 Installing the Battery Pack 7
Page 12

8 PowerEdge Battery Backup Module User’s Guide
Page 13

2 Using the Battery Backup Module
Charging the Battery Pack
The battery pack is shipped uncharged. You must charge the
battery pack before you can use it. The minimum time that the
battery must be charged is:
AMI Part Number Description Time to Charge
BAT-NIMH-4.8-01 Battery, NIMH, 4.8V, 650mA onboard
battery pack with mounting brackets
BAT-NIMH-4.8-02 Battery, NIMH, 4.8, 1200mA external
offboard battery pack
The full data retention time is not available until the battery pack
is fully charged. It is a good idea to set the PowerEdge cache
write policy option to Write-Through during the battery pack
charging period. After the battery pack is fully charged, you can
change the cache write policy to Write-Back.
Removing the Battery Pack
A new battery pack should be installed in the battery backup
module every 3 to 5 years.
Primary - 12 hours (to 100%)
Primary - 6 hours (to 90%)
4 hours
Secondary - 60 hours
Step Action
1 Bring down the operating system properly. Make sure that cache memory has been
flushed. You must perform a system reset if operating under DOS. When the computer
reboots, the PowerEdge controller flushes cache memory.
2 Turn the computer power off.
3 Remove the computer cover.
4 Disconnect the battery pack from the battery backup module. Remove any other items
that you want to remove, such as the battery backup module, PowerEdge controller, or
DRAM modules.
5 Replace the computer cover and turn the computer power on.
Chapter 2 Using the Battery Backup Module 9
Page 14

Changing DRAM Modules
Important
The battery backup module must be disconnected
before you add or remove DRAMs to or from the
PowerEdge controller card.
Step Action
1 Bring down the operating system properly. Make sure that cache memory has been flushed.
You must perform a system reset if operating under DOS. When the computer reboots, the
PowerEdge controller flushes cache memory.
2 Turn the computer power off. Disconnect the power cables from the computer.
3 Remove the computer cover.
4 Disconnect the battery pack cable from the battery backup module.
5 Remove the PowerEdge controller.
6 You can now add or remove DRAM modules from the PowerEdge controller. Follow the
instructions in the PowerEdge RAID Controller User’s Guide.
7
Reinstall the PowerEdge controller in the computer. Follow the instructions in the PowerEdge
RAID Controller User’s Guide.
8 Reattach the battery pack cable to the battery backup module
9 Replace the computer cover and turn the computer power on.
Disposing of a Battery Pack
A new battery pack should be installed every 3 to 5 years. The
material in the battery pack contains heavy metals that can
contaminate the environment. Federal, state, and local regulations
prohibit the disposal of NIMH batteries in public landfills. These
batteries must be sent to a specific location for proper disposal.
You can call the Rechargeable Battery Recycling Corporation at
352-376-6693 (FAX: 352-376-6658) for an authorized battery
disposal site near you. For a list of battery disposal sites, write to:
Rechargeable Battery Recycling Corporation
2293 NW 41st Street
Gainesville FL 32606
Voice: 352-376-6693
FAX: 352-376-6658
10 PowerEdge Battery Backup Module User’s Guide
Page 15

3 Specifications
Fast Charge Rate 235 mA
Trickle Charge Rate 24 mA
Charge Time for Battery Packs The following time-to-charge values are
calculated assuming 80% efficiency in the charging process. The
time-to-charge values may vary depending on individual battery
packs.
AMI Part Number Description Time to Charge
BAT-NIMH-4.8-01 Battery, NIMH, 4.8V, 650mA
onboard battery pack with mounting
brackets
BAT-NIMH-4.8-02 Battery, NIMH, 4.8, 1200mA
external offboard battery pack
Primary - 12 hours (to 100%)
Primary - 6 hours (to 90%)
Retention Time for Cache Memory The retention time for cache memory will vary with
the SIMM size and number of DRAM SIMM banks used.
See Appendix A for the data retention time.
4 hours
Secondary - 60 hours
Chapter 3 Specifications 11
Page 16

Page 17

Appendix A Data Retention Time
The data retention time is a function of:
• the capacity of the battery pack, and
• the load of the backed up circuitry.
Capacity and Load Factors The data retention time as a function of the battery pack
capacity and load is listed below.
The load is the DRAM SIMM and the PERC Controller.
Battery Pack DRAM Size Data Retention Time
BAT-NIMH-4.8-01 1 Bank of 1 MBx36 (12 chips)
2 Banks of 1 MBx36 (12 chips)
BAT-NIMH-4.8-02 1 Bank of 1 MBx36 (12 chips)
2 Banks of 1 MBx36 (12 chips)
The information in this table is not complete. See the “Getting
Help” Chapter in the Installation and Troubleshooting Guide
that accompanied your Dell computer for additional information
about technical support.
See the Technical Update shipped
with the PERC or Dell Server.
Chapter 3 Specifications 13
 Loading...