

Page 1

Dell WM326
Wireless Mouse
User’s Guide
Page 2

Notes, Cautions, and Warnings
NOTE: A NOTE indicates important information that helps you make
better use of your Dell Wireless mouse.
CAUTION: A CAUTION indicates potential damage to hardware or loss
of data if instructions are not followed.
WARNING: A WARNING indicates a potential for property damage,
personal injury, or death.
Copyright © 2015 Dell Inc. All rights reserved. This product is protected by U.S. and international
copyright and intellectual property laws.
Dell™ and the Dell logo are trademarks of Dell Inc. in the United States and/or other jurisdictions.
All other marks and names mentioned herein may be trademarks of their respective companies.
2016-01 Rev. A00
Page 3

Contents
What’s in the box ................................ 4
Features ........................................ 5
Top View . . . . . . . . . . . . . . . . . . . . . . . . . . . . . . 5
Bottom View . . . . . . . . . . . . . . . . . . . . . . . . . . . . 6
Setting up your wireless mouse ................... 7
Dell Universal Receiver Feature for Windows ..... 10
Troubleshooting ............................... 11
Specifications .................................. 12
General . . . . . . . . . . . . . . . . . . . . . . . . . . . . . . 12
Electrical . . . . . . . . . . . . . . . . . . . . . . . . . . . . . 12
Physical Characteristics . . . . . . . . . . . . . . . . . . . . 12
Environmental. . . . . . . . . . . . . . . . . . . . . . . . . . 12
2.4 GHz wireless. . . . .
. . . . . . . . . . . . . . . . . . . . 12
Statutory information........................... 13
Warranty . . . . . . . . . . . . . . . . . . . . . . . . . . . . . 13
Limited Warranty and Return Policies . . . . . . . . . . . . . . . . . 13
For U.S. customers: . . . . . . . . . . . . . . . . . . . . . . . . . . . . 13
For European, Middle Eastern and African customers: . . . . . . . 13
For non-U.S. customers: . . . . . . . . . . . . . . . . . . . . . . . . . 13
Certifications .................................. 14
Microsoft WHQL Logo . . . . . . . . . . . . . . . . . . . . . 14
│ 3
Page 4
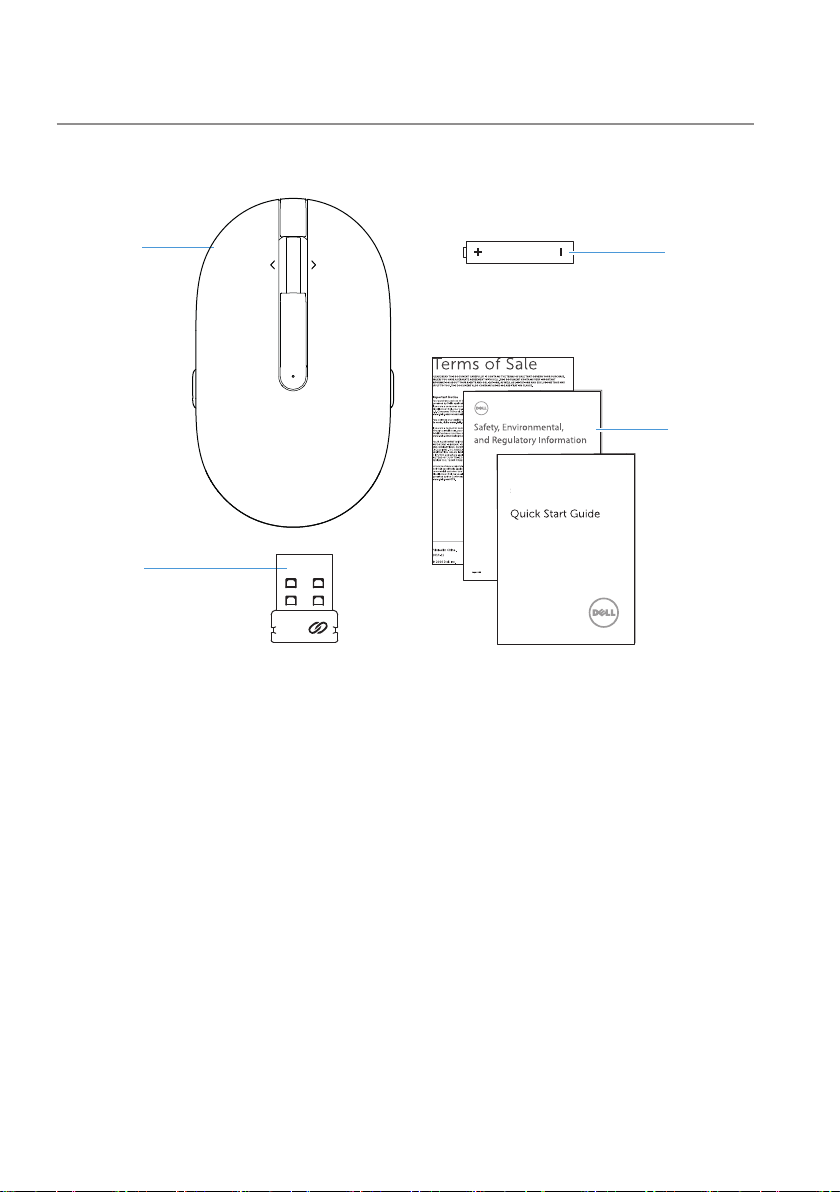
What’s in the box
1
2
AA
Dell Wireless Mouse
WM326
1 wireless mouse 2 USB receiver
3 documents 4 AA-type battery
4
3
4 │ What’s in the box
Page 5
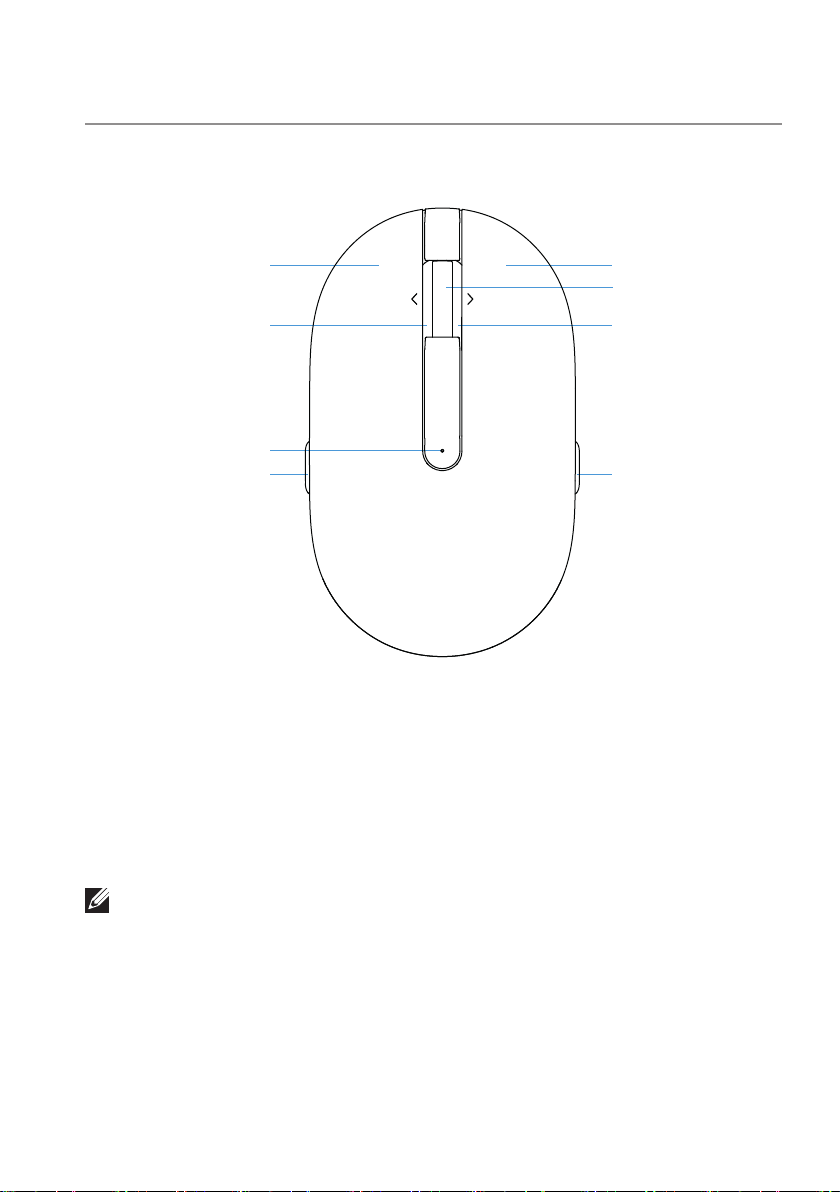
Features
Top View
1
2 6
3
4 5
8
7
1 left button 2 side scroll left tilt
3 battery status light 4 page backward
5 page forward 6 side scroll right tilt
7 scroll / middle button 8 right button
NOTE: When the battery power is low, the battery status light will be
solid amber.
Features │ 5
Page 6

Bottom View
1
2
1 power button
│ Features
6
2 optical sensor
Page 7

Setting up your wireless mouse
1. Remove the mouse cover.
2. Install the AA battery into the battery compartment.
Setting up your wireless mouse │ 7
Page 8

3. Remove the USB receiver.
4. Replace the mouse cover.
5. Insert the USB receiver into the USB port on your computer.
8 │ Setting up your wireless mouse
Page 9

6. Turn on your mouse.
NOTE: Make sure the distance between your computer and mouse is
within 10 meters.
Setting up your wireless mouse │ 9
Page 10

Dell Universal Receiver feature for
Windows
Dell Universal Receiver
The Dell Universal Receiver allows up to six Dell Universal compatible
wireless devices to be added to the receiver.
Dell Universal Receiver Control Panel
You can add Dell Universal compatible wireless devices to the receiver using
Dell Universal Receiver Control Panel.
Installing Dell Universal Receiver Control Panel
To install Dell Universal Control Panel:
1. Turn on the computer.
2. Open the web browser and navigate to www.dell.com/support.
3. Type in the Search bar “dell universal receiver”. Then click Search.
4. Download and install the Dell Universal Receiver software in your
system.
Using Dell Universal Receiver Control Panel
The receiver and mouse shipped with your system are paired at the factory.
Use the Dell Universal Receiver Control Panel to view the connection status
of your wireless mouse or pair the mouse with another receiver.
Follow the instructions on the screen to add a device or to remove pairing.
10 │ Dell Universal Receiver feature for Windows
Page 11

Troubleshooting
Problems Possible causes Possible solutions
Unable to use the
mouse
The white LED
indicator on the
top of the mouse
does not light up
when the mouse is
turned on
1. Check if the battery is inserted
correctly.
• Battery “+” and “-“ ends
should follow those
indicated on the battery
compartment label.
2. Check the battery level.
• If the mouse uses a
rechargeable battery, make
sure the battey is fully
charged.
• If the battery is exhausted,
replace it with a new one.
3.
• Check if the battery status
light is flashing amber
10 times, indicating the
battery power is low. If the
battery is fully depleted,
the battery status light will
not turn on.
4. Make sure the USB dongle is
directly connected to your
computer.
• Avoid using the port
replicators, USB hubs, etc.
5. Change the USB port.
• Insert the USB dongle into
another USB port on your
computer.
Troubleshooting │ 11
Page 12

Problems Possible causes Possible solutions
Mouse pointer
does not move
Left/right buttons
don’t work
Wireless
connection is lost
The mouse
pointer freezes
No response
when the left
or right mouse
button is pressed
Previously paired
mouse no longer
works on the
computer
1. Check the battery level.
• If the mouse uses a
rechargeable battery, make
sure the battery is fully
charged.
• If the battery is exhausted,
replace it with a new one.
2.
• Check if the battery status
light is flashing amber
10 times, indicating the
battery power is low. If the
battery is fully depleted,
the battery status light will
not turn on.
3. Restart your computer.
12 │ Troubleshooting
Page 13

Problems Possible causes Possible solutions
Unable to pair the
mouse with the
computer
Wireless pairing
error message is
received while
pairing the
mouse with the
computer
1. Check the battery level.
• If the mouse uses a
rechargeable battery, make
sure the battery is fully
charged.
• If the battery is exhausted,
replace it with a new one.
2.
• Check if the battery status
light is flashing amber
10 times, indicating the
battery power is low. If the
battery is fully depleted,
the battery status light will
not turn on.
3. Restart your computer.
4. Make sure the USB dongle is
connected directly to your
computer.
• Avoid using the port
replicators, USB hubs, etc.
5. Change the USB port.
• Insert the USB dongle into
another USB port on your
computer.
Troubleshooting │ 13
Page 14

Specifications
General
Model number WM326
Connection type 2.4 GHz wireless technology
System requirement Microsoft Windows 10/Microsoft Windows 8/
Microsoft Windows 7/Microsoft Windows XP/
Microsoft Windows Vista/ Server 2003/
Server 2008/Server 2012/Linux 6.x, Ubuntu,
Neokylin, Free DOS, Chrome and Android
Electrical
Operating voltage 1.0 V - 1.5 V
Battery required One AA alkaline
Physical Characteristics
Weight (without battery) 62.1 g (0.137 lb)
Dimensions
Length: 101.7 mm (3.335 in)
Width: 60.3 mm (1.977 in)
Height: 35.5 mm (1.164 in)
Environmental
Temperature
Operating: -10°C to 50°C
Storage: –40°C to 65°C
Storage Humidity 95% maximum relative humidity;
non-condensing
2.4 GHz wireless
Radio transmission Bi-directional communication
(Transceiver)
Range Up to 10 m
14 │ Specifications
Page 15

Statutory information
Warranty
Limited Warranty and Return Policies
Dell-branded products carry a 1-year limited hardware warranty.
For U.S. customers:
This purchase and your use of this product are subject to Dell’s end user
agreement, which you can find at http://www.dell.com/terms. This document
contains a binding arbitration clause.
For European, Middle Eastern and African customers:
Dell-branded products that are sold and used are subject to applicable
national consumer legal rights, the terms of any retailer sale agreement that
you have entered into (which will apply between you and the retailer) and
Dell’s end user contract terms.
Dell may also provide an additional hardware warranty – full details of
the Dell end user contract and warranty terms can be found by going to
http://www.dell.com, selecting your country from the list at the bottom of
the “home” page and then clicking the “terms and conditions” link for the end
user terms or the “support” link for the warranty terms.
For non-U.S. customers:
Dell-branded products that are sold and used are subject to applicable
national consumer legal rights, the terms of any retailer sale agreement
that you have entered into (which will apply between you and the retailer)
and Dell’s warranty terms. Dell may also
warranty – full details of Dell’s warranty terms can be found by going to
http://www.dell.com, selecting your country from the list at the bottom of
the “home” page and then clicking the “terms and conditions” link or the
“support” link for the warranty terms.
provide an additional hardware
Statutory information │ 15
 Loading...