

Page 1

Dell™ 3400MP Projector
Owner’s Manual
Model XXX
www.dell.com | support.dell.com
Page 2

Notes, Notices, and Cautions
NOTE: A NOTE indicates important information that helps you make better use
of your projector.
NOTICE: A NOTICE indicates either potential damage to hardware or loss of
data and tells you how to avoid the problem.
CAUTION: A CAUTION indicates a potential for property damage, personal
injury, or death.
____________________
Information in this document is subject to change without notice.
© 2005 Dell Inc. All rights reserved.
Reproduction in any manner whatsoever without the written permission of Dell Inc. is strictly
forbidden.
Trademarks used in this text: Dell , the DELL logo, Dimension, OptiPlex, Dell Precision, Lati-
tude, Inspiron, DellNet, PowerApp, PowerEdge, PowerConnect, and PowerVault are trademarks of Dell Inc.; DLP and Texas Instruments are trademarks of Texas Instruments
Corporation; Microsoft and Windows are registered trademarks of Microsoft Corporation;
Macintosh is a registered trademark of Apple Computer, Inc.
Other trademarks and trade names may be used in this document to refer to either the entities
claiming the marks and names or their products. Dell Inc. disclaims any proprietary interest in
trademarks and trade names other than its own.
Restrictions and Disclaimers
The information contained in this document, including all instructions, cautions, and regulatory
approvals and certifications, is based upon statements provided to Dell by the manufacturer and
has not been independently verified or tested by Dell. Dell disclaims all liability in connection
with any deficiencies in such information.
All statements or claims regarding the properties, capabilities, speeds, or qualifications of the
part referenced in this document are made by the manufacturer and not by Dell. Dell specifically disclaims any knowledge of the accuracy, completeness, or substantiation for any such
statements.
____________________
May 2005 Rev. A00
Page 3

Contents
1 Your Dell Projector
2 Connecting Your Projector
Connecting to a Computer . . . . . . . . . . . . . . 8
About Your Projector . . . . . . . . . . . . . . . 6
Connecting to a DVD Player
Connecting a DVD Player with an S-video Cable
Connecting a DVD Player with a Composite Cable
Connecting a DVD Player with a Component Cable
3 Using Your Projector
Turning Your Projector On . . . . . . . . . . . . . . . 11
Turning Your Projector Off
Adjusting the Projected Image . . . . . . . . . . . . 12
Raising the Projector Height
Lowering the Projector Height . . . . . . . . . . 12
Adjusting the Projector Zoom and Focus . . . . . . . . 13
Adjusting Projection Image Size
Using the Control Panel
. . . . . . . . . . . . . . 8
. . 8
. 9
9
. . . . . . . . . . . . . . 11
. . . . . . . . . . . 12
. . . . . . . . . . . 14
. . . . . . . . . . . . . . . . 15
Contents 3
Page 4

Using the Remote Control . . . . . . . . . . . . . . 16
Using the On-Screen Display
Image Settings
Audio Menu
Management Menu
Language Menu . . . . . . . . . . . . . . . . 21
Factory Reset Menu
Computer Source Menu
Video Source Menu . . . . . . . . . . . . . . . 22
. . . . . . . . . . . . . . . . . 18
. . . . . . . . . . . . . . . . . . 20
. . . . . . . . . . . . 18
. . . . . . . . . . . . . . . 20
. . . . . . . . . . . . . . 21
. . . . . . . . . . . . . 22
4 Troubleshooting Your Projector
Self-diagnostic for Video . . . . . . . . . . . . . . 26
Changing the Lamp
. . . . . . . . . . . . . . . . . 26
5 Specifications
6 Contacting Dell
7 Appendix: Regulatory Notices
FCC Notices (U.S. Only) . . . . . . . . . . . . . 61
NOM Information (Mexico Only) . . . . . . . . . 62
8 Glossary
9 Index
4 Contents
Page 5
1
Your Dell Projector
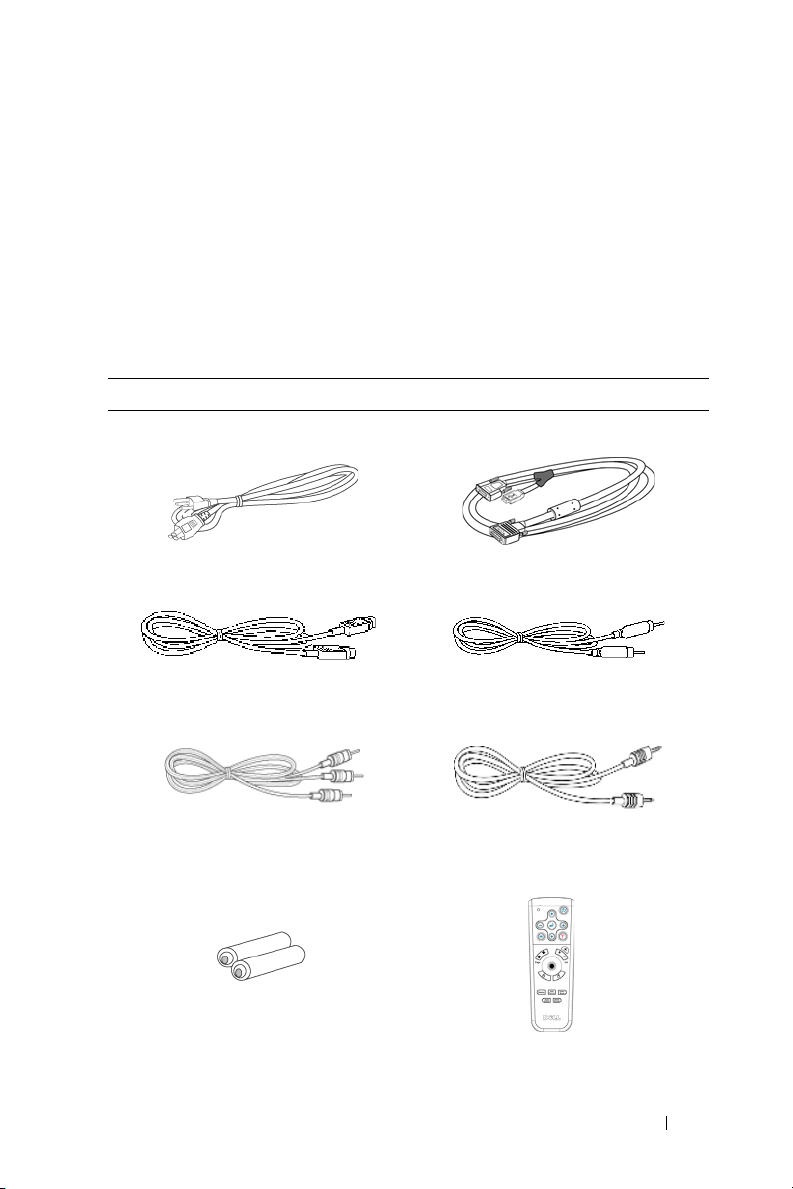
Your projector comes with all the items shown below. Ensure that you have all the
items, and contact Dell if anything is missing.
Package Contents
1.8m power cord (3.0m in Americas) 1.8m M1 to D-sub/USB cable
2.0m S-video cable 1.8m Composite Video cable
1.8m RCA to Audio cable 1.8m mini pin to mini pin cable
Batteries (2) Remote control
Your Dell Projector 5
Page 6
Package Contents
Documentation Carrying case
(continued)
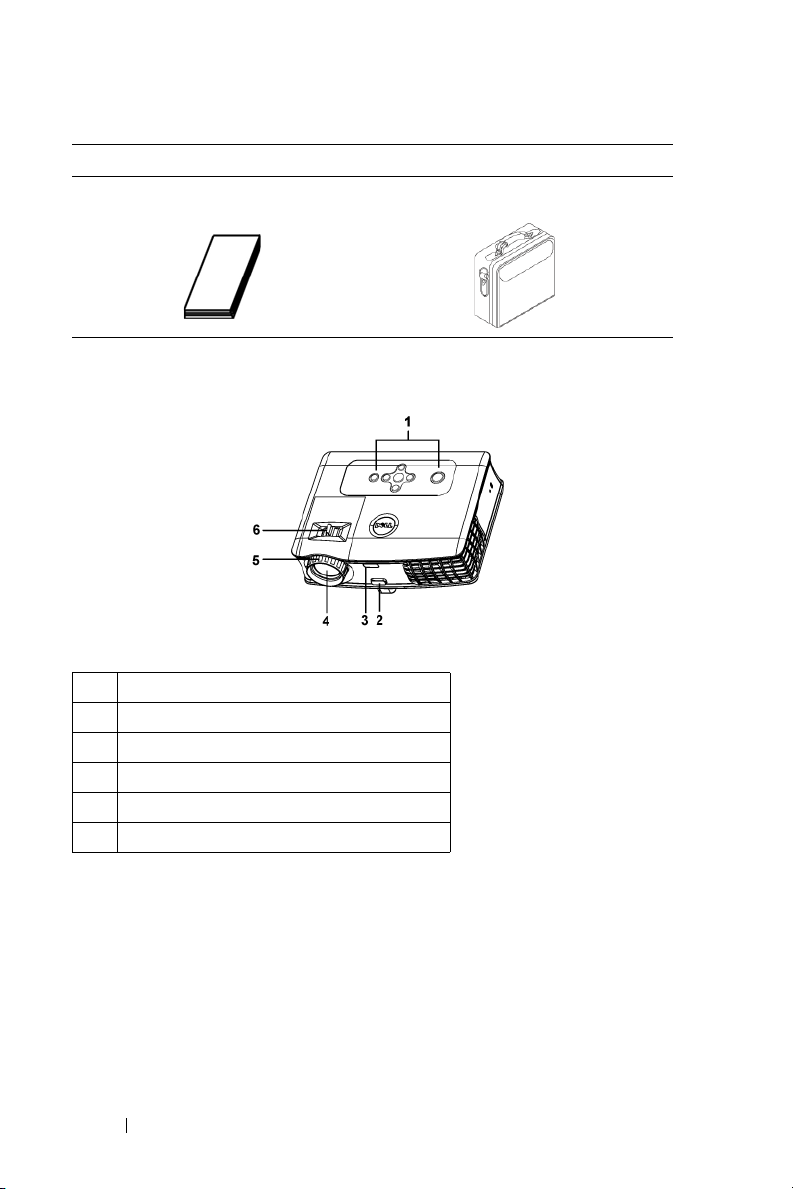
About Your Projector
www.dell.com | support.dell.com
1 Control panel
2 Elevator button
3 Remote control receiver
4 Lens
5 Focus ring
6 Zoom tab
6 Your Dell Projector
Page 7
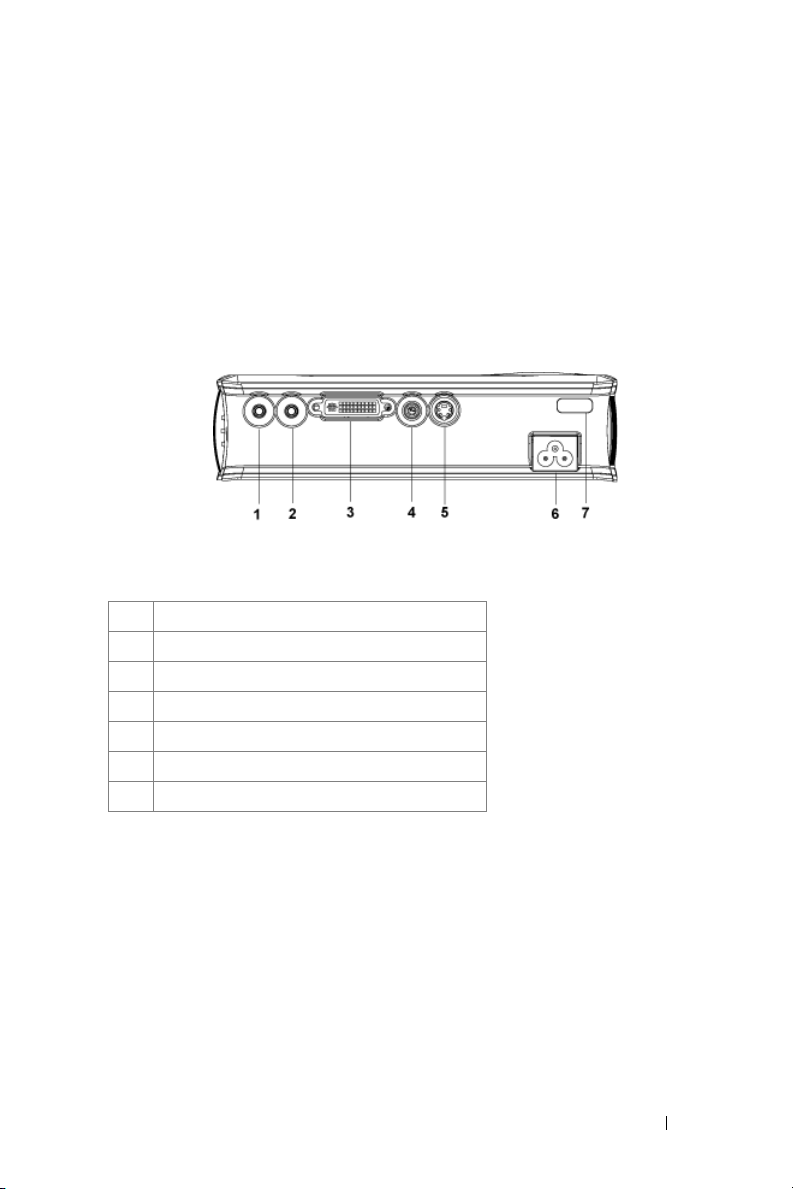
Connecting Your Projector
1 Audio output connector
2 Audio input connector
3 M1-DA connector
4 Composite video connector
5 S-video connector
6 Power cord connector
7 IR receiver
2
Connecting Your Projector 7
Page 8
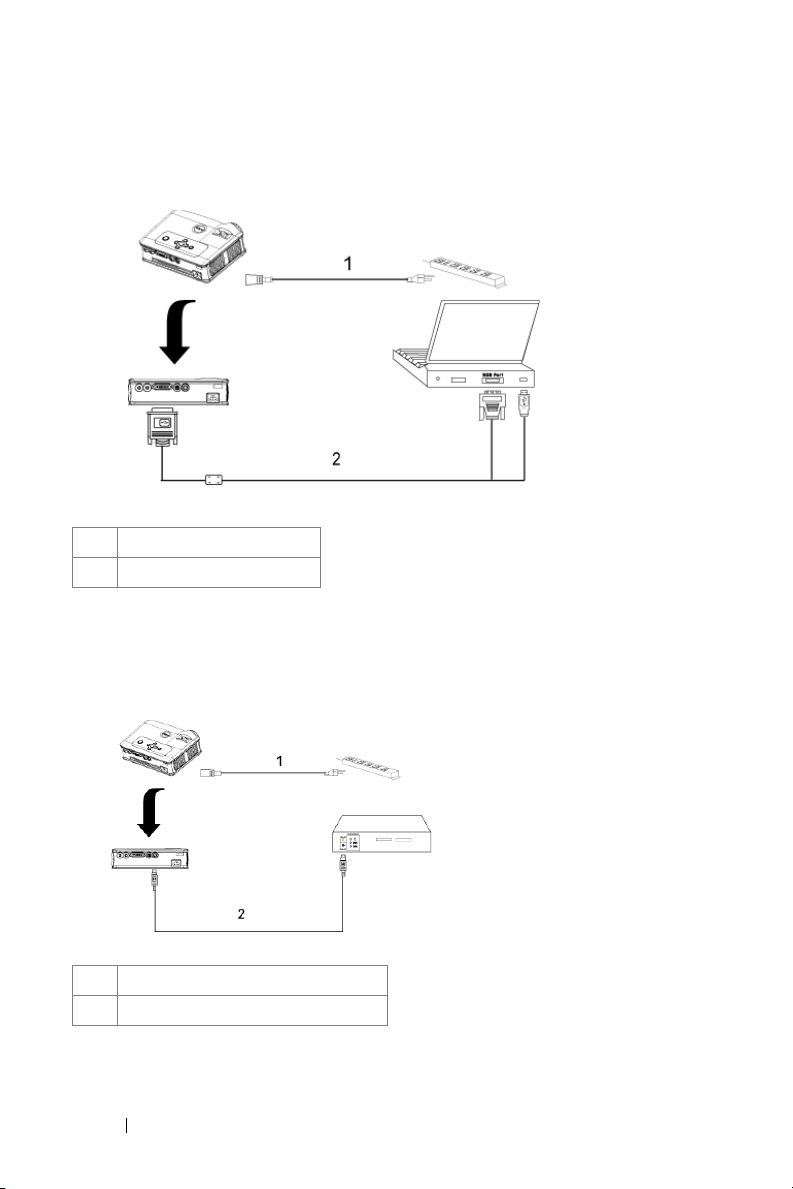
Connecting to a Computer
www.dell.com | support.dell.com
1 Power cord
2 M1A to D-sub/USB cable
Connecting to a DVD Player
Connecting a DVD Player with an S-video Cable
1 Power cord
2 S-video cable
8 Connecting Your Projector
Page 9
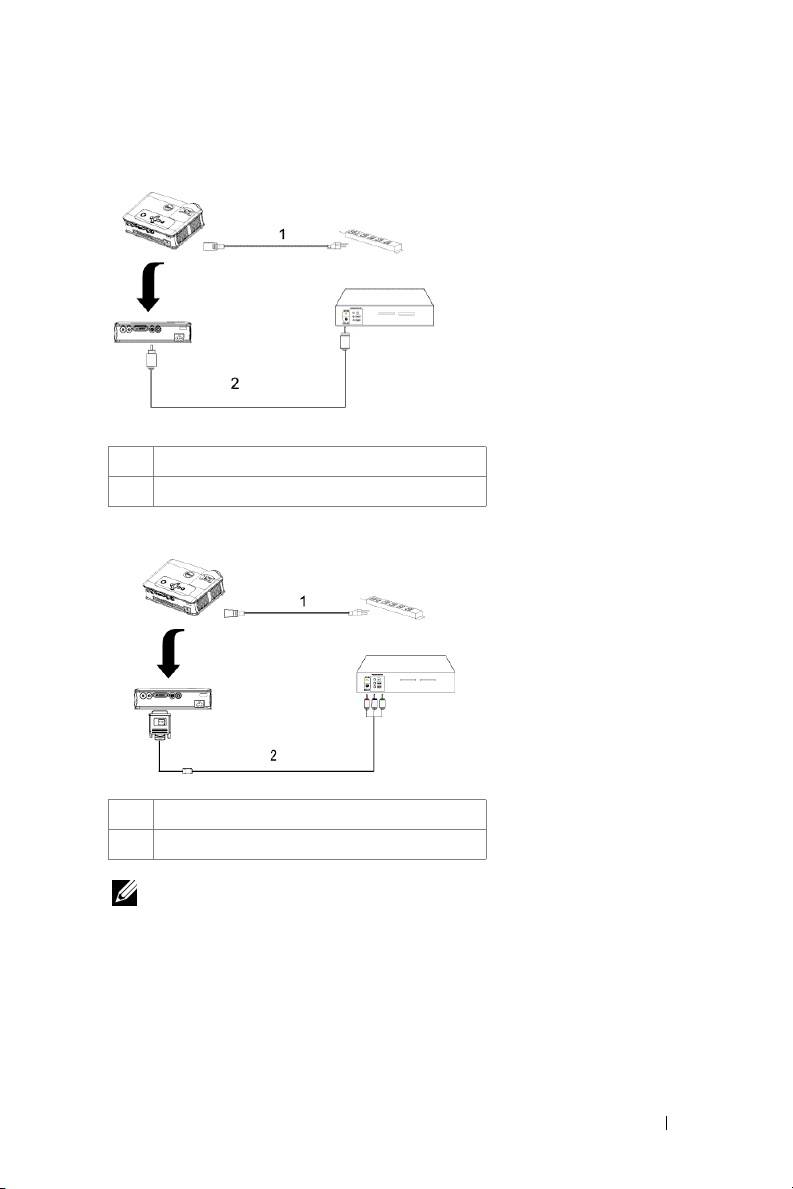
Connecting a DVD Player with a Composite Cable
1 Power cord
2 Composite video cable
Connecting a DVD Player with a Component Cable
1Power cord
2 M1-A to HDTV cable
NOTE: The M1-A to HDTV cable is not provided by Dell. Consult a professional
installer for the cable.
Connecting Your Projector 9
Page 10

www.dell.com | support.dell.com
10 Connecting Your Projector
Page 11

3
Using Your Projector
Turning Your Projector On
NOTE: Turn on the projector before you turn on the source. The power button
light blinks green until pressed.
1
Remove the lens cap.
2
Connect the power cord and appropriate signal cables. For information about
connecting the projector, see "Connecting Your Projector" on page 7.
3
Press the power button (see "Using the Control Panel" on page 15" to locate the
power button). The Dell logo displays for 30 seconds.
4
Turn on your source (computer, DVD player, etc.). The projector automatically
detects your source.
If the "Searching for signal..." message appears on the screen, ensure
that the appropriate cable(s) are securely connected.
If you have multiple sources connected to the projector, press the Source button
on the remote control or control panel to select the desired source.
Turning Your Projector Off
NOTICE: Do not unplug the projector before properly shutting down as
explained in the following procedure.
1
Press the power button.
2
Press the power button again. The cooling fans continue to operate for 90 seconds.
3
Disconnect the power cord from the electrical outlet and the projector.
NOTE: If you press the power button while the projector is running, the "Power
Off the Lamp?" message appears on the screen. To clear the message, press any
button on the control panel or ignore the message; the message disappears after 5
seconds.
Using Your Projector 11
Page 12
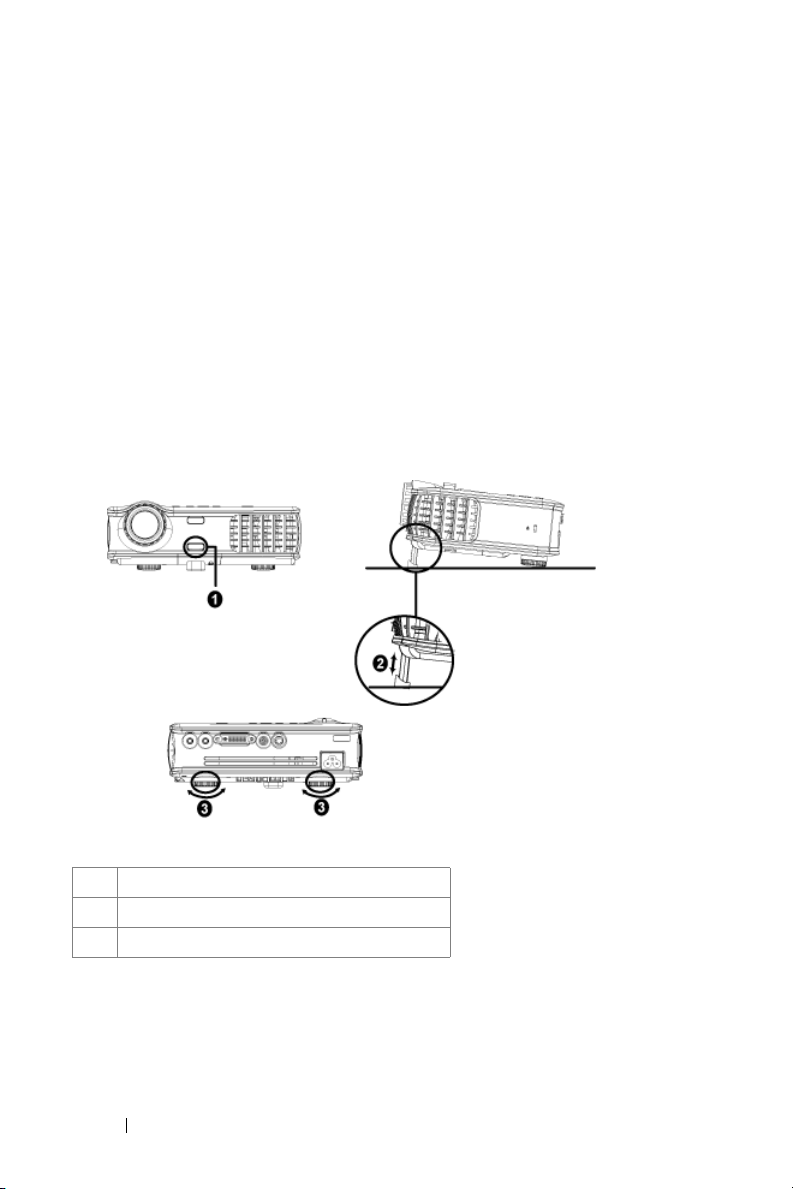
Adjusting the Projected Image
Raising the Projector Height
1
Press the elevator button.
2
Raise the projector to the desired display angle, and then release the button to
lock the elevator foot into position.
3
Use the tilt adjustment wheel to fine-tune the display angle.
Lowering the Projector Height
1
Press the elevator button.
2
Lower the projector, and then release the button to lock the elevator foot into
www.dell.com | support.dell.com
position.
1 Elevator button
2 Elevator foot
3 Tilt adjustment wheel
12 Using Your Projector
Page 13
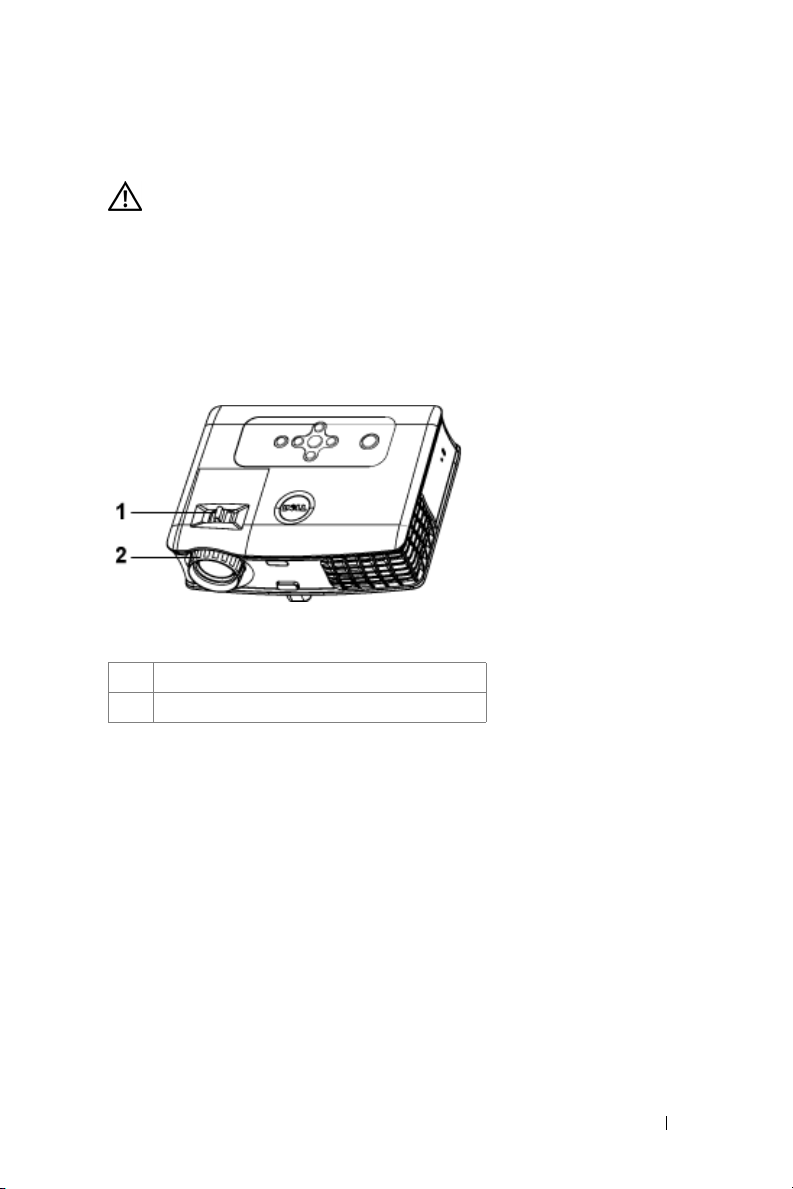
Adjusting the Projector Zoom and Focus
CAUTION: To avoid damaging the projector, ensure that the zoom lens and
elevator foot are fully retracted before moving the projector or placing the
projector in its carrying case.
1
Rotate the zoom tab to zoom in and out.
2
Rotate the focus ring until the image is clear. The projector focuses at distances
from 4.9 ft to 39.4 ft (1.5 m to 12 m).
1 Zoom tab
2 Focus ring
Using Your Projector 13
Page 14
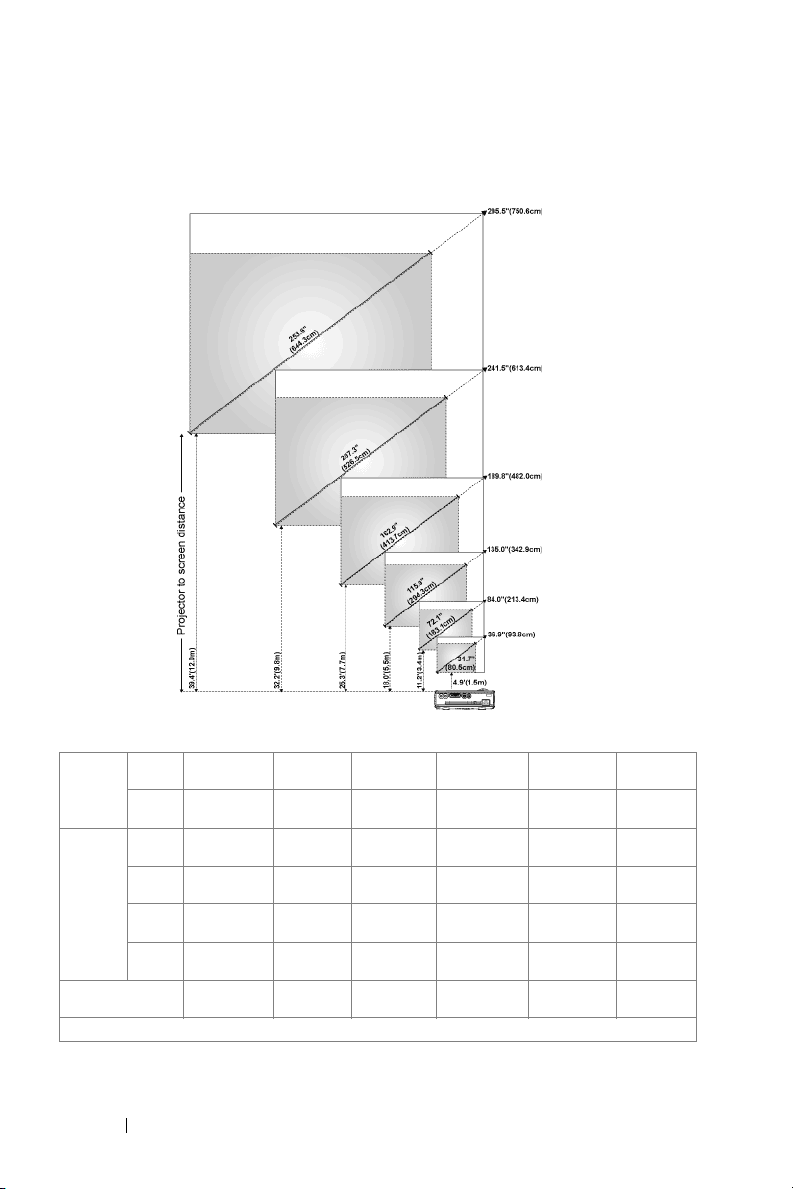
Adjusting Projection Image Size
www.dell.com | support.dell.com
Screen
(Diagonal)
Screen
Size
Distance 4.9' (1.5m) 11.2' (3.4m) 18.0' (5.5m) 25.3' (7.7m) 32.2' (9.8m) 39.4'
* This graph is for user reference only.
Max. 36.9"
Min. 31.7"
Max.
(WxH)
Min.
(WxH)
(93.8cm)
(80.5cm)
29.5"X22.1" 67.2" X50.4" 108.0" X
(75.0cm X
56.3cm)
25.3" X 19.0" 57.7" X
(64.4cm X
48.3cm)
84.0"
(213.4cm)
72.1"
(183.1cm)
(170.7cm X
128.0cm)
43.3"
(146.5cm X
109.9cm)
135.0"
(342.9cm)
115.9"
(294.3cm)
81.0"
(274.3cm X
205.7cm)
92.7" X 69.5" 130.3" X 97.7" 165.8" X
(235.5cm X
176.6cm)
189.8"
(482.0cm)
162.9"
(413.7cm)
151.8" X113.9" 193.2" X
(385.6cm X
289.2cm)
(331.0cm X
248.2cm)
241.5"
(613.4cm)
207.3"
(526.5cm)
144.9"
(490.7cm X
368.0cm)
124.4"
(421.2cm X
315.9cm)
295.5"
(750.6cm)
253.6"
(644.3cm)
236.4" X
177.3"
(600.5cmX
450.3cm)
202.9" X
152.2"
(515.4cm X
386.6cm)
(12.0m)
14 Using Your Projector
Page 15
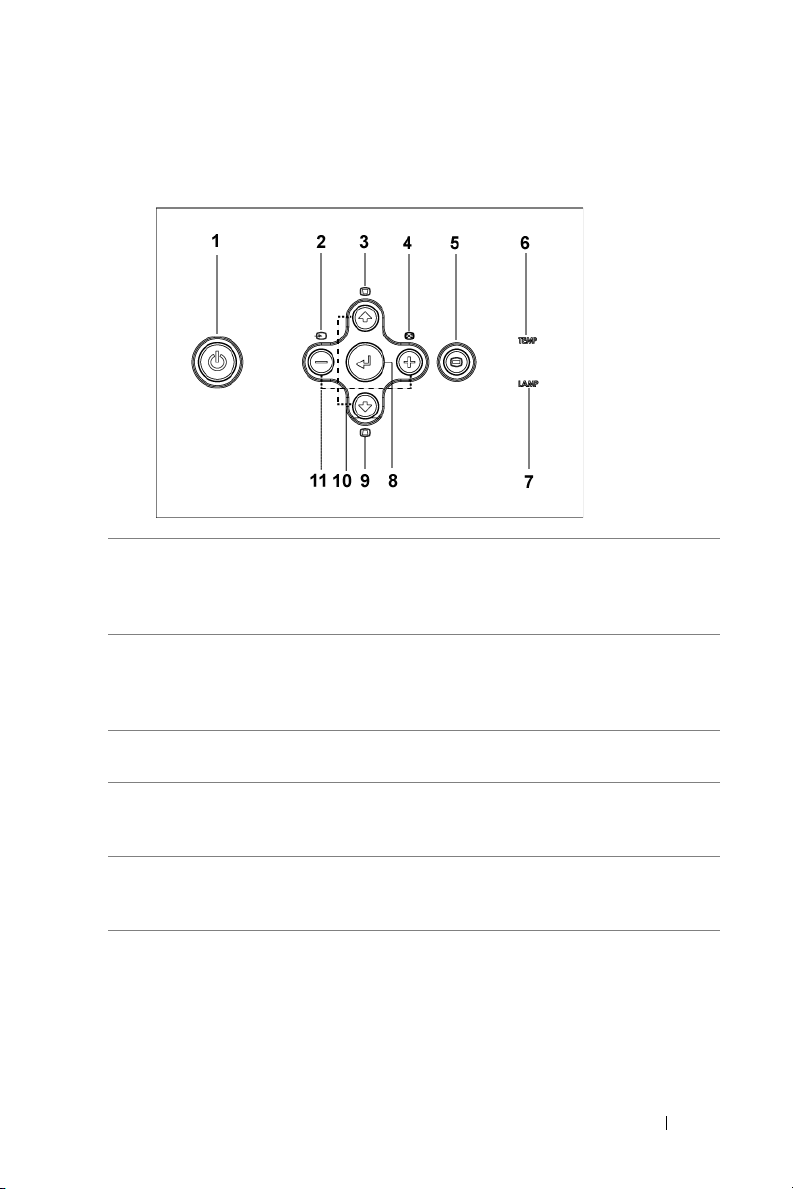
Using the Control Panel
1 Power Turn the projector on and off. For more
information, see "Turning Your Projector On" on
page 11 and "Turning Your Projector Off" on
page 11.
2 Source Press to toggle through Analog RGB, Composite,
Component-i, S-video, and Analog YPbPr sources
when multiple sources are connected to the
projector.
3 Keystone adjustment Press to adjust image distortion caused by tilting
the projector. (±16 degrees)
4 Resync Press to synchronize the projector to the input
source. Resync does not operate if the on-screen
display (OSD) is displayed.
5 Menu Press to activate the OSD. Use the directional
keys and Menu button to navigate through the
OSD.
Using Your Projector 15
Page 16
6 TEMP warning light
7 LAMP warning light If the LAMP light is solid orange, replace the
8 Enter Press to confirm the selection item.
www.dell.com | support.dell.com
9 Keystone adjustment Press to adjust image distortion caused by tilting
10 Up and Down Press to select the OSD items.
11 and buttons Press to adjust the OSD setting.
• If the TEMP light is solid orange, the projector
has overheated. The display automatically shuts
down. Turn the display on again after the
projector cools down. If the problem persists,
contact Dell.
• If the TEMP light is blinking orange, a projector
fan has failed and the projector automatically
shuts down. If the problem persists, contact
Dell.
lamp.
the projector. (±16 degrees)
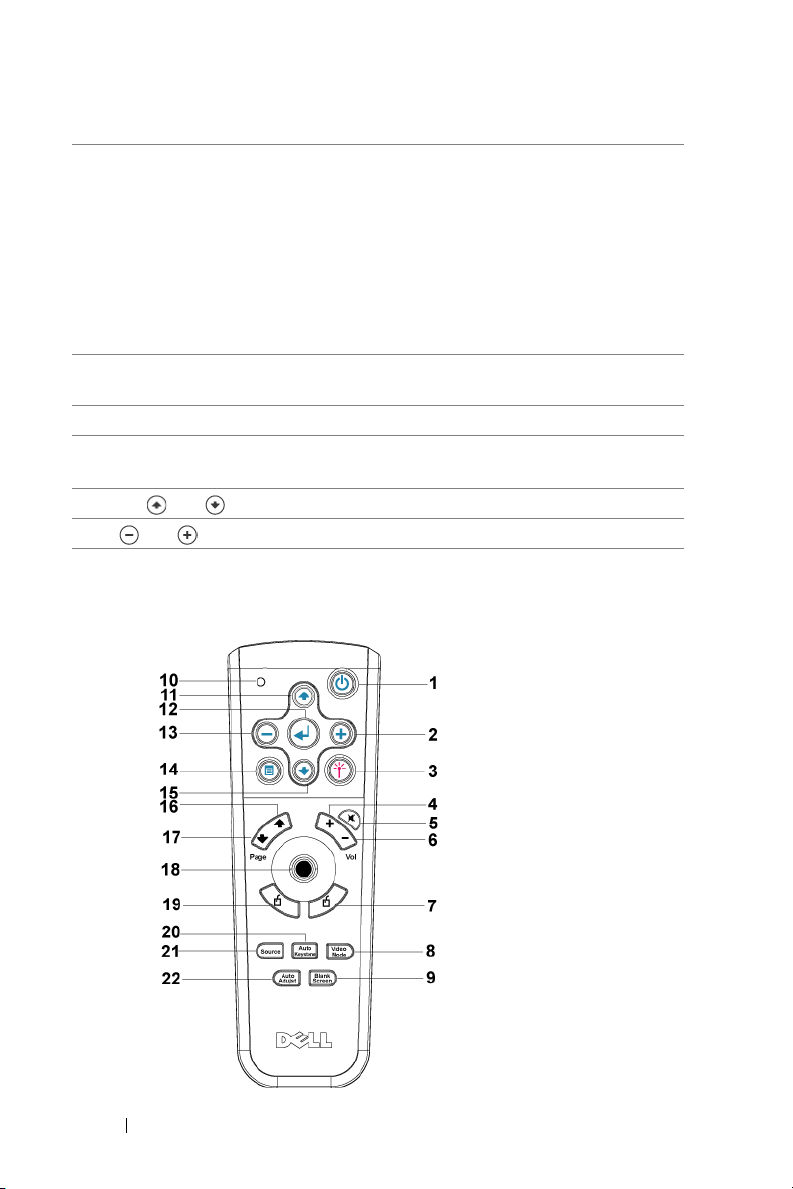
Using the Remote Control
16 Using Your Projector
Page 17
1 Power Turn the projector on and off. For more
information, see "Turning Your Projector On" on
page 11 and "Turning Your Projector Off" on
page 11.
2 Press to adjust the OSD setting.
3 Laser Aim the remote control at the screen, press and
hold the laser button to activate the laser light.
4 Volume Press to increase the volume.
5 Mute Press to mute or un-mute the projector speaker.
6 Volume Press to decrease the volume.
7 Right click Mouse right click.
8 Video mode The Dell 3400MP Micro-projector has preset
configurations that are optimized for displaying
data (PC Graphics) or video (movies, games,
etc.). Press Video Mode button to toggle between
PC mode, Movie mode, Game Mode, sRGB, or
User mode (for user to setup and save preferred
settings). Pressing the Video Mode button once
will show the current display mode. Pressing the
Video Mode button again will switch between
modes.
9 Blank screen Press to hide the image, press again to resume
display of the image.
10 LED light LED indicator.
11 Up button Press to select OSD items.
12 Enter button Press to confirm the selection.
13 Press to adjust the OSD setting.
14 Menu Press to activate the OSD.
15 Down button Press to select OSD items.
16 Page Press to move to previous page.
17 Page Press to move to next page.
18 Directional pad The directional pad can be used to control mouse
movement. The mouse function is enabled using
the M1 cable to connect your computer and the
projector.
Using Your Projector 17
Page 18
19 Left click Mouse left click
20 Auto keystone Press to enable the auto correction for image
distortion due to tilting the projector.
21 Source Press to switch between Analog RGB, Digital
RGB, Composite, Component-i, S-video, and
Analog YPbPr sources.
22 Auto adjust Press to synchronize the projector to the input
source. Auto adjust does not operate if the OSD
(On-Screen Display) is displayed.
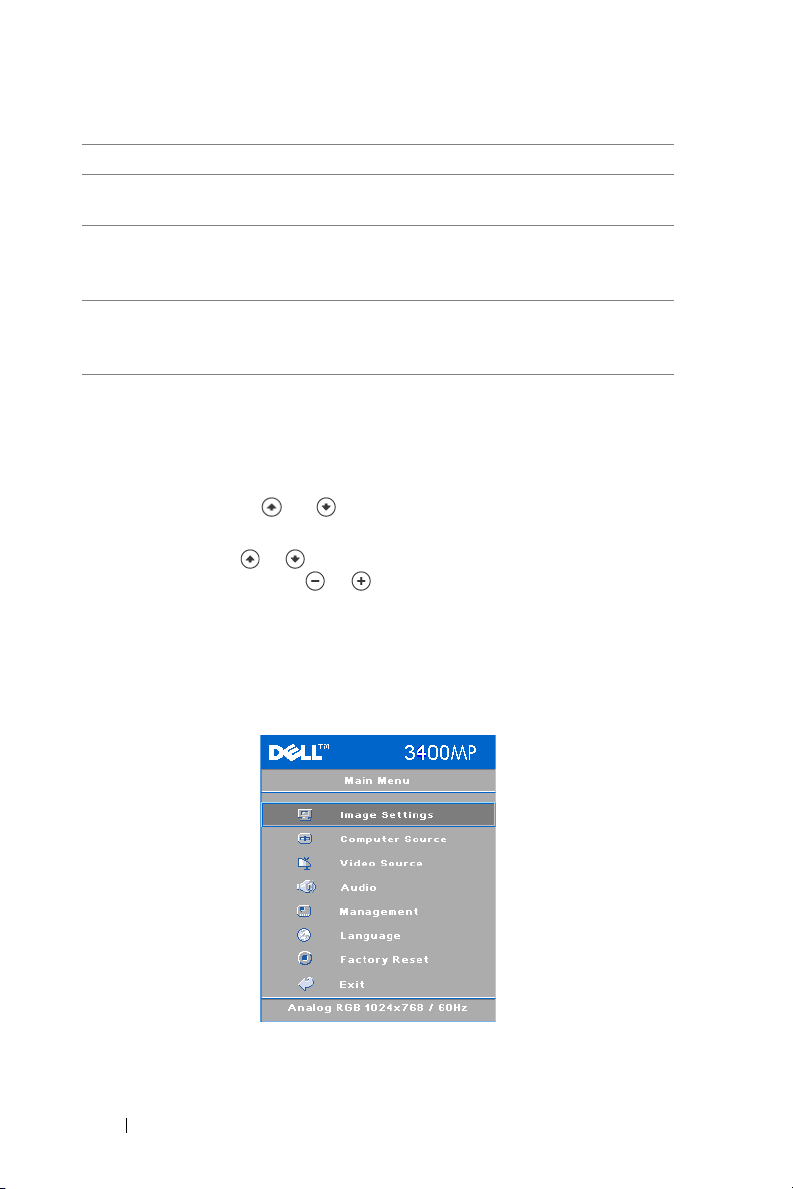
Using the On-Screen Display
www.dell.com | support.dell.com
The projector has a multi-language On-Screen Display (OSD) that can be
displayed with or without an input source present.
In the Main Menu, press or to navigate through the tabs. Press Enter
button on the control panel or the remote control to select a submenu.
In the submenu, press or to make a selection. When an item is selected, the
color changes to dark gray. Use or on the control panel or the remote
control to make adjustments to a setting.
To exit the OSD, go to Exit tab and press Enter button on the control panel or the
remote control.
Image Settings
18 Using Your Projector
Page 19
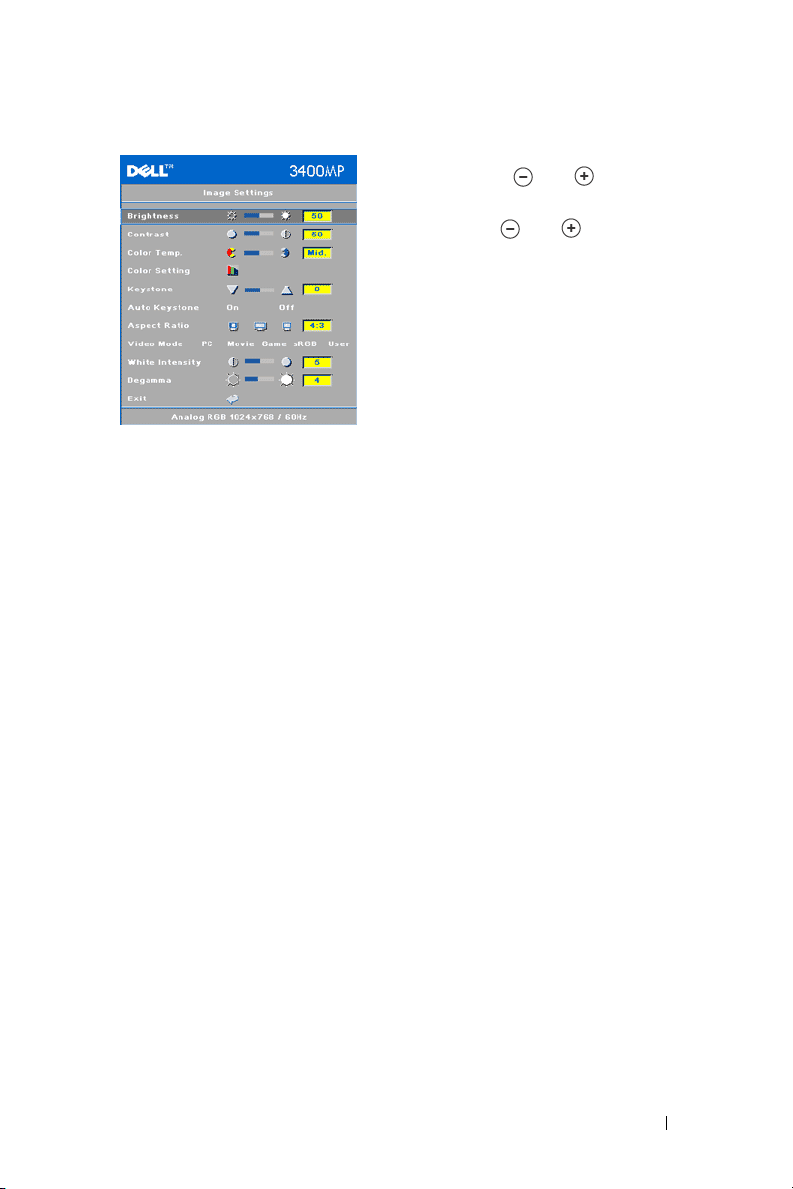
BRIGHTNESS—Use
and to
adjust the
brightness of the image.
ONTRAST—Use
C
and
to control the
degree of difference between the brightest
and darkest parts of the picture. Adjusting
the contrast changes the amount of black and
white in the image.
OLOR TEMP.—Adjust the color temperature.
C
The higher the temperature, the screen
appears more blue; the lower the
temperature, the screen appears redder. User
mode activates the values in the "color
setting" menu.
OLOR SETTING—Manually adjust red, green, and blue color.
C
EYSTONE—Adjust image distortion caused by tilting the projector (
K
±16 degrees).
AUTO KEYSTONE—Auto adjust the image distortion by tilting the projector.
SPECT RATIO—Select an aspect ratio to adjust how the image appears.
A
• 1:1 — The input source displays without scaling.
Use 1:1 aspect ratio if you are using one of the following:
– VGA cable and the computer has a resolution less than XGA (1024 x 768)
– Component cable (576p/480i/480p)
–S-Video cable
– Composite cable
• 16:9 — The input source scales to fit the width of the screen.
• 4:3 — The input source scales to fit the screen.
Use 16:9 or 4:3 if you are using one of the following:
– Computer resolution greater than XGA
– Component cable (1080i or 720p)
VIDEO MODE—Select a mode to optimize the display image based on how the
projector is being used: Movie, Game, PC, sRGB (provides more accurate color
representation), and User (set your preferred settings). If you adjust the settings
for White Intensity or Degamma, the projector automatically switches to User.
HITE INTENSITY—Setting 0 to maximize the color reproduction and 10 to
W
maximize the brightness.
EGAMMA—Adjust between 1 and 4 to change the color performance of the display.
D
Using Your Projector 19
Page 20

Audio Menu
Management Menu
www.dell.com | support.dell.com
VOLUME—Press
to decrease the volume
and to increase the volume.
MUTE—Allow to mute the volume.
MENU LOCATION—Select the location of the
OSD on the screen.
ROJECTION MODE—Select how the image
P
appears:
• Front Projection-Desktop (the default).
• Rear Projection-Desktop — The
projector reverses the image so you can project
from behind a translucent screen.
SIGNAL TYPE—Manually select signal type RGB,
YCbCr, YPbPr.
AMP HOUR—Display the operating hours since
L
the lamp timer reset.
AMP RESET—After you install a new lamp,
L
select Yes to reset the lamp timer.
OWER SAVING—Select Yes to set the power saving delay period. The delay period is
P
the amount of time you want the projector to wait without signal input. After that
set time, the projector enters power saving mode and turns off the lamp. The
projector turns back on when it detects an input signal or you press the power
button. After two hours, the projector turns off and you need to press the power
button to turn the projector on.
UTO SOURCE—
A
signals. When the projector is on and you press
finds the next available input signal. Select
signal. When
Select On (the default) to autodetect the available input
Off
is selected and you press
SOURCE
Off
to lock the current input
SOURCE
, it automatically
, you select which
input signal you want to use.
20 Using Your Projector
Page 21
ECO MODE—Select On to use the projector at a lower power level (136 Watts),
which may provide longer lamp life, quieter operating and dimmer luminance
output on the screen. Select Off to operate at normal power level (156 Watts).
ASSWORD ENABLE—Select On to set one password for individual. Select Off to
P
disable the password function.
HANGE PASSWORD—Press to change the password as your preference.
C
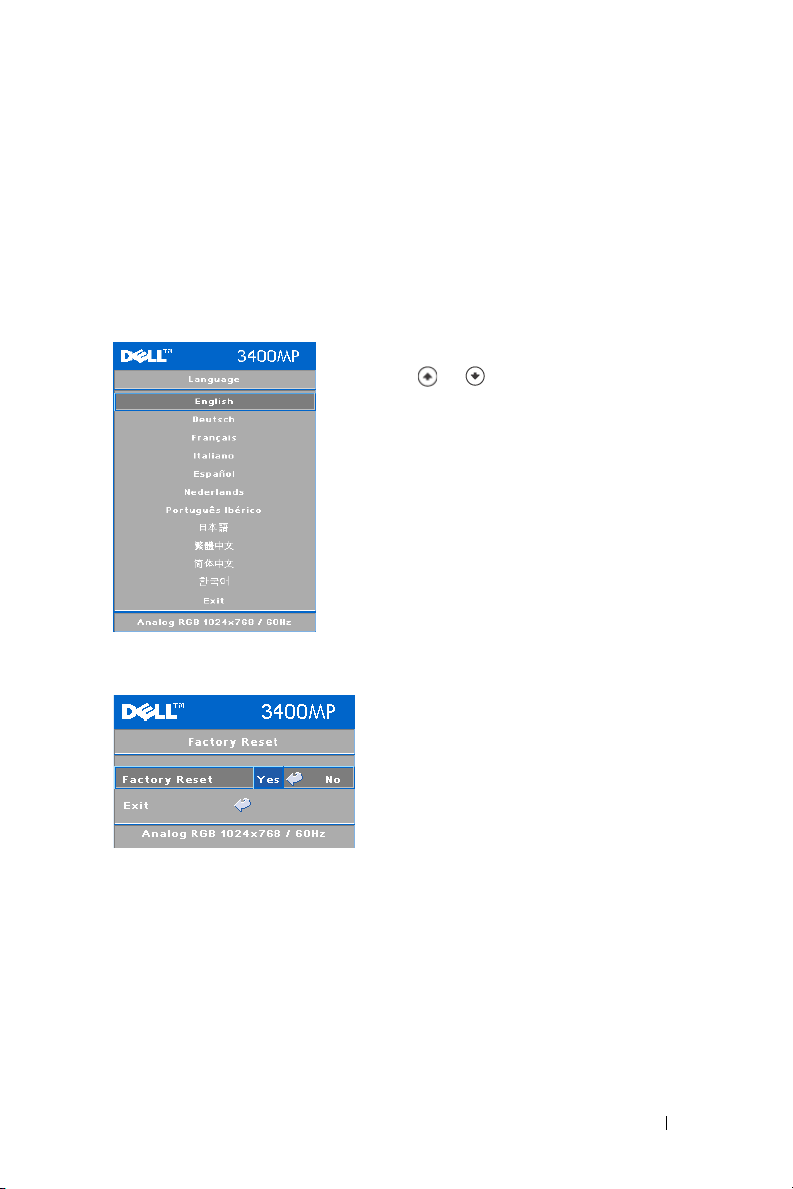
Language Menu
Press or to select the preferred
language for the OSD.
Factory Reset Menu
Factory Reset
--Select
Yes
to reset the
projector to its factory default settings.
Reset items include both computer sources
and video source settings.
Using Your Projector 21
Page 22
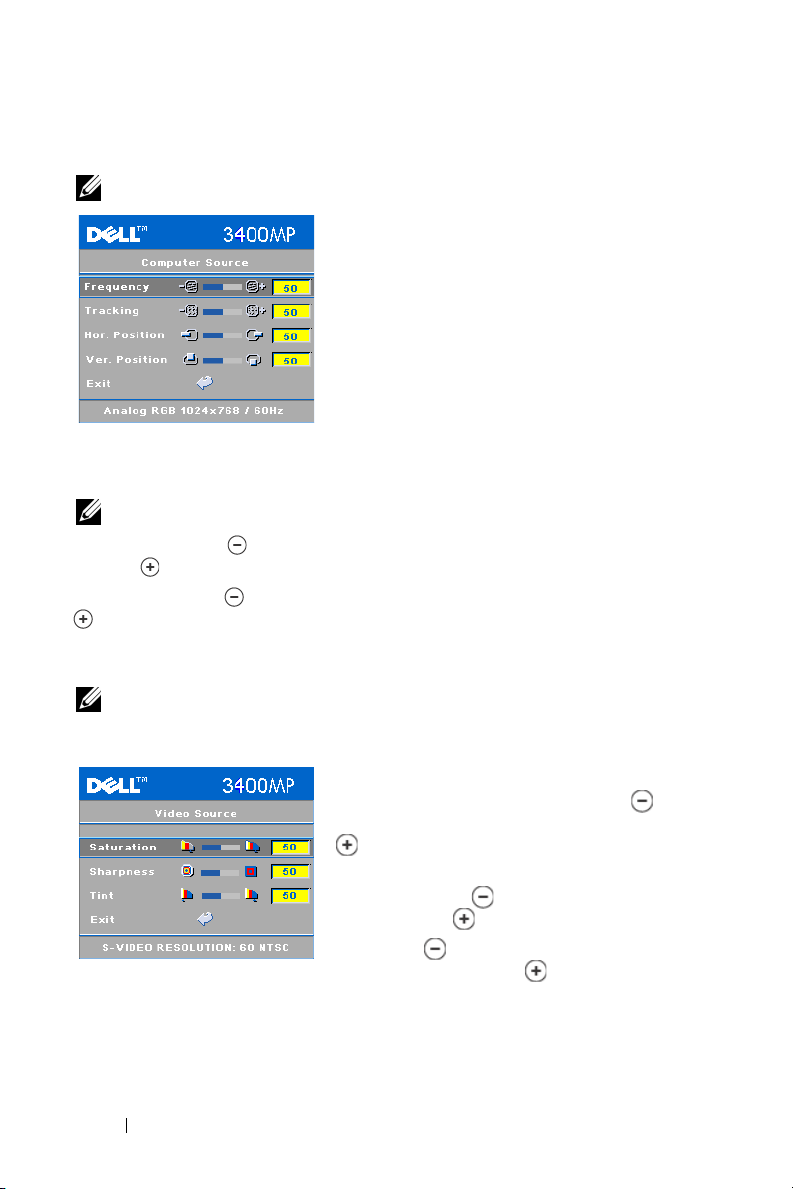
Computer Source Menu
NOTE: This menu is only available connected to a computer.
FREQUENCY—Change the display data clock
frequency to match the frequency of your
computer graphics card. If you see a vertical
flickering bar, use Frequency control to
minimize the bars. This is a coarse adjustment.
RACKING—Synchronize the phase of the
T
display signal with the graphic card. If you
experience an unstable or flickering image, use
www.dell.com | support.dell.com
NOTE: Adjust the Frequency first and then the Tracking.
OR. POSITION—Press
H
to adjust the horizontal position of the image to the
the Tra ck in g to correct it. This is a fine
adjustment.
left and to adjust the horizontal position of the image to the right.
VER. POSITION—Press
to adjust the vertical position of the image down and
to adjust the vertical position of the image up.
Video Source Menu
NOTE: This menu is only available with S-video, Video (composite) signal
connected.
22 Using Your Projector
ATURATION—Adjust a video source from black
S
and white to fully saturated color. Press to
decrease the amount of color in the image and
to increase the amount of color in the
image.
HARPNESS—Press
S
to decrease the
sharpness and to increase the sharpness.
TINT—Press
to increase the amount of
green in the image and to increase the
amount of red in the image.
Page 23

4
Troubleshooting Your Projector
If you experience problems with your projector, see the following troubleshooting
tips. If the problem persists, contact Dell.
Problem Possible Solution
No image appears on the
screen
• Ensure that the lens cap is removed and the
projector turned on.
• Ensure the external graphics port is enabled.
If you are using a Dell portable computer,
press . For other computers, see your
documentation.
• Ensure that all the cables are securely
connected. See "Connecting Your Projector"
on page 7."
• Ensure that the pins of the connectors are
not bent or broken.
• Ensure that the lamp is securely installed
(see "Changing the Lamp" on page 26").
• Run Self-diagnostic test. See "Self-diagnostic
for Video" on page 26. Ensure that the colors
of the test pattern are correct.
Troubleshooting Your Projector 23
Page 24
Problem
Partial, scrolling, or
incorrectly displayed image
(continued)
Possible Solution
1
Press the
(continued)
Resync
button on the remote
control or the control panel.
2
If you are using a Dell portable computer, set
the resolution of the computer to XGA
(1024 x 768):
a
Right-lick the unused portion of your
Windows desktop, click
then select
b
Verify the setting is 1024 x 768 pixels for
Settings
Properties
tab.
the external monitor port.
c
www.dell.com | support.dell.com
Press .
If you experience difficulty in changing
resolutions or your monitor freezes, restart all
the equipment and the projector.
If you are not using a Dell portable computer,
see your documentation.
The screen does not display
your presentation
If you are using a portable computer, press
.
Image is unstable or flickering Adjust the tracking in the OSD Computer
Source tab.
Image has vertical flickering
bar
Image color is not correct
Adjust the frequency in the OSD Computer
Source tab.
• If your graphic card output signal is sync on
Green, and you would like to display VGA at
60Hz signal, please go into OSD select
Management, select Signal Type and then
RGB
select
.
• Run the Self-diagnostic test (see "
diagnostic for video
") for preliminary
diagnostic on image color problem. Ensure
that the colors of the test pattern are correct.
Image is out of focus 1
Adjust the focus ring on the projector lens.
2
Ensure that the projection screen is within
the required distance from the projector
(4.9 ft [1.5 m] to 39.4 ft [12 m]).
and
Self-
24 Troubleshooting Your Projector
Page 25

Problem
The image is stretched when
displaying a 16:9 DVD
Image is reversed Select Management from the OSD and adjust
Lamp is burned out or makes
a popping sound
LAMP light is solid orange If LAMP light is solid orange, replace the
LAMP light is blinking
orange
TEMP light is solid orange The projector has overheated. The display
TEMP light is blinking
orange
The remote control is not
operating smoothly or in very
limited range
(continued)
Possible Solution
The projector automatically detects a 16:9
DVD and adjusts the aspect ratio to full
screen with a 4:3 (letter-box) default setting.
If the image is still stretched, adjust the aspect
ratio as follows:
• If you are playing a 16:9 DVD, select 4:3
aspect ratio type on your DVD player (if
capable).
• If you cannot select 4:3 aspect ratio type on
your DVD player, select 4:3 aspect ratio in
Image Settings
the
the projection mode.
When the lamp reaches its end of life, it may
burn out and may make a loud popping sound.
If this occurs, the projector does not turn back
on. To replace the lamp, see "Changing the
Lamp" on page 26.
lamp.
If the LAMP light is blinking orange, the lamp
cover is not closed properly. Close the lamp
cover properly. If the problem persists, contact
Dell.
automatically shuts down. Turn the display on
again after the projector cools down. If the
problem persists, contact Dell.
A projector fan has failed and the projector
will automatically shut down. If the problem
persists, contact Dell.
The battery may be low. Check if the laser
beam transmitted from the remote is too dim.
If so, replace with 2 new AA batteries.
(continued)
menu in the OSD.
Troubleshooting Your Projector 25
Page 26
Self-diagnostic for Video
Dell 3400MP Projector provides self-diagnostic test of the projector video display
(for Video, S-video, Component-i). Use this advanced feature for preliminary selfdiagnostic on your projector when encountering a display problem for video.
1
After turning on the projector, press "+" and "-" buttons on the control panel
simultaneously for 3 seconds and release the buttons when screen goes blank.
2
Press "+" and "-" buttons again to exit the diagnostic mode.
3
While in Self-diagnostic mode, the screen will run a seven-color-cycle test as
following:
Red--> Green--> Blue--> White--> Watchet Blue--> Dark Green--> Yellow.
Ensure that the colors of the test pattern are correct. Contact Dell if the colors are
not displayed correctly.
www.dell.com | support.dell.com
Changing the Lamp
Replace the lamp when you see "Lamp is approaching the end of its useful life in
full power operation. Replacement suggested! www.dell.com/lamps" appears on
the screen. If this problem persists after replacing the lamp, contact Dell.
CAUTION: The lamp becomes very hot when in use. Do not attempt to replace
the lamp until the projector has been allowed to cool down for at least 30
minutes.
CAUTION: Do not touch the bulb or the lamp glass at any time. The bulb may
explode due to improper handling, including the touching of the bulb or the
lamp glass.
1
Turn off the projector and disconnect the power cord.
2
Let the projector cool for at least 30 minutes.
3
Loosen the 2 screws that secure the lamp cover, and remove the cover.
4
Loosen the 2 screws that secure the lamp.
26 Troubleshooting Your Projector
Page 27
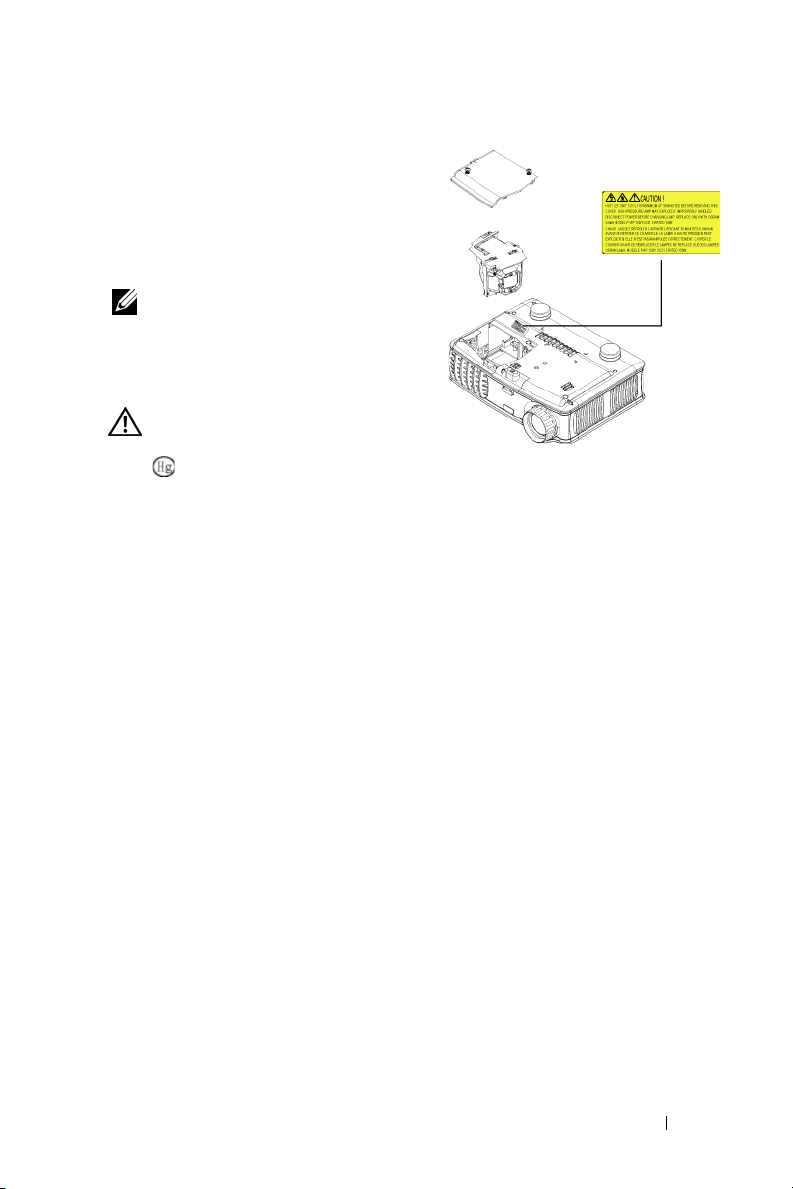
5
Pull up the lamp by its metal handle.
6
Reverse steps 1 through 5 to install the
new lamp.
7
Reset the lamp by usage time selecting
the left
Lamp Reset
Management
icon in the OSD
tab.
NOTE: Dell may require that lamps
replaced under warranty be returned to
Dell. Otherwise, contact your local
waste disposal agency for the address
of the nearest deposit site.
CAUTION: Lamp Disposal (for the US
only)
LAMP(S) INSIDE THIS PRODUCT CONTAIN MERCURY AND MUST BE
RECYCLED OR DISPOSED OF ACCORDING TO LOCAL, STATE OR FEDERAL
LAWS. FOR MORE INFORMATION, GO TO WWW.DELL.COM/HG OR CONTACT
THE ELECTRONIC INDUSTRIES ALLIANCE AT WWW.EIAE.ORG. FOR LAMP
SPECIFIC DISPOSAL INFORMATION CHECK WWW.LAMPRECYCLE.ORG.
Troubleshooting Your Projector 27
Page 28

www.dell.com | support.dell.com
28 Troubleshooting Your Projector
Page 29

Specifications
5
Light Valve Single-chip DLP™ DDR (double data
rate) technology
Brightness 1500 ANSI Lumens (Max.)
Contrast Ratio 2100:1 Typical (Full On/Full Off)
Uniformity 85% Typical (Japan Standard - JBMA)
Lamp 156-watt user-replaceable 3000-hour
lamp (up to 4000 hours in eco mode)
Number of Pixels 1024 x 768 (XGA)
Displayable Color 16.7M colors
Color Wheel Speed 100~127.5Hz (2X)
Projection Lens F/2.7~2.88, f=28.43~32.73 mm with
1.15x manual zoom lens
Projection Screen Size 31.7-246 inches (diagonal)
Projection Distance 4.9~39.4 ft (1.5 m~12 m)
Video Compatibility NTSC, NTSC 4.43, PAL, PAL-M, PAL-
N, SECAM, and HDTV (1080i, 720p,
576i/p, 480i/p) compatibility
Composite video, Component video
and S-video capability
H. Frequency 15kHz-80kHz (Analog/ Digital)
V. Frequency 50Hz-85Hz (Analog/ Digital)
Power Supply Universal 100-240V AC 50-60Hz with
PFC input
Power Consumption 195 watts typical, 165 watts in eco
mode
Audio 1 speaker, 1 watt RMS
5
Specifications 29
Page 30

Noise Level 38 dB(A) Full-on mode, 36 dB(A) Eco-
mode
Weight 2.4 lbs (1.09 kg)
Dimensions (W x H x D) External 8.0 x 6.0 x 2.9 ± 0.04 inches
(204 x 154 x 73.7 ± 1 mm)
o
Environmental Operating temperature: 5
(41
o
F- 95oF)
C - 35oC
Humidity: 80% maximum
o
Storage temperature: -20
C to 60oC
(-4oF to 140oF)
www.dell.com | support.dell.com
Humidity: 80% maximum
Regulatory FCC, CE, VCCI, UL, cUL, TüV- GS,
ICES-003, MIC, C-Tick, GOST,
PCBC, CCC, PSB, EZU, NOM, STu V / A r g e n t i n a
I/O Connectors Power: AC power input socket
Computer input: one M1-DA for
analog/digital/component, HDTV
input signals
Video input: one composite video RCA
and one S-video
Audio input: one phone jack (diameter
3.5 mm)
Audio output: one phone jack
(diameter 3.5 mm)
30 Specifications
Page 31

Compatibility Modes
Mode Resolution (ANALOG) (DIGITAL)
V. Frequency
(Hz)
VGA 640X350 70 31.5 70 31.5
VGA 640X350 85 37.9 85 37.9
VGA 640X400 85 37.9 85 37.9
VGA 640X480 60 31.5 60 31.5
VGA 640X480 72 37.9 72 37.9
VGA 640X480 75 37.5 75 37.5
VGA 640X480 85 43.3 85 43.3
VGA 720X400 70 31.5 70 31.5
VGA 720X400 85 37.9 85 37.9
SVGA 800X600 56 35.2 56 35.2
SVGA 800X600 60 37.9 60 37.9
SVGA 800X600 72 48.1 72 48.1
SVGA 800X600 75 46.9 75 46.9
SVGA 800X600 85 53.7 85 53.7
XGA 1024X768 60 48.4 60 48. 4
XGA 1024X768 70 56.5 70 56. 5
XGA 1024X768 75 60 75 60
XGA 1024X768 85 68.7 - -
*SXGA 1280X1024 60 63.98 60 63.98
*SXGA 1280X1024 75 79.98 - -
*SXGA+ 1400X1050 60 63.98 - -
*UXGA 1600x1200 60 75 - -
MAC LC13* 640X480 66.66 34.98 - -
MAC II 13* 640X480 66.68 35 - -
MAC 16* 832X624 74.55 49.725 - -
MAC 19* 1024X768 75 60.24 - -
*MAC 1152X870 75.06 68.68 - -
MAC G4 640X480 60 31.35 - -
IMAC DV 1024X768 75 60 - -
* Compressed computer image.
H. Frequency
(KHz)
V. Frequency
(Hz)
H. Frequency
(KHz)
Specifications 31
Page 32

www.dell.com | support.dell.com
32 Specifications
Page 33

Contacting Dell
To contact Dell electronically, you can access the following websites:
• www.dell.com
•
support.dell.com
•
premiersupport.dell.com
government, healthcare, and medium/large business customers,
including Premier, Platinum, and Gold customers)
For specific web addresses for your country, find the appropriate country
section in the table below.
NOTE: Toll-free numbers are for use within the country for which they are listed.
NOTE: In certain countries, technical support specific to Dell Inspiron™ XPS
computers is available at a separate telephone number listed for participating
countries. If you do not see a telephone number listed that is specific for Inspiron XPS
computers, you may contact Dell through the technical support number listed and
your call will be routed appropriately.
When you need to contact Dell, use the electronic addresses, telephone
numbers, and codes provided in the following table. If you need assistance in
determining which codes to use, contact a local or an international operator.
(technical support)
(technical support for educational,
Country (City)
International
Access Code
Country Code
City Code
Anguilla General Support
Antigua and
Barbuda
Department Name or Service Area,
Website and E-Mail Address
General Support
Area Codes,
Local Numbers, and
Toll-Free Numbers
toll-free: 800-335-0031
1-800-805-5924
Contacting Dell 33
Page 34

Country (City)
International
Department Name or Service Area,
Website and E-Mail Address
Access Code
Country Code
City Code
Argentina
(Buenos Aires)
International
Access Code: 00
Country Code: 54
City Code: 11
www.dell.com | support.dell.com
We bs it e : www.dell.com.ar
E-mail:
us_latin_services@dell.com
E-mail for desktop and portable
computers:
la-techsupport@dell.com
E-mail for servers and EMC
storage products:
la_enterprise@dell.com
Customer Care
Tech S u pp o rt
Tech Support Services
Sales
Aruba General Support
Area Codes,
Local Numbers, and
Toll-Free Numbers
®
toll-free: 0-800-444-0730
toll-free: 0-800-444-0733
toll-free: 0-800-444-0724
0-810-444-3355
toll-free: 800-1578
34 Contacting Dell
Page 35

Country (City)
International
Access Code
Country Code
City Code
Australia
(Sydney)
International
Access Code:
0011
Country Code: 61
City Code: 2
Department Name or Service Area,
Website and E-Mail Address
E-mail (Australia):
au_tech_support@dell.com
E-mail (New Zealand):
nz_tech_support@dell.com
Home and Small Business
Government and Business
Preferred Accounts Division
(PAD)
Customer Care
Technical Support (portables and
desktops)
Technical Support (servers and
workstations)
Corporate Sales
Tra n sa ct io n Sa le s
Fax
Area Codes,
Local Numbers, and
Toll-Free Numbers
1-300-655-533
toll-free: 1-800-633-559
toll-free: 1-800-060-889
toll-free: 1-800-819-339
toll-free: 1-300-655-533
toll-free: 1-800-733-314
toll-free: 1-800-808-385
toll-free: 1-800-808-312
toll-free: 1-800-818-341
Contacting Dell 35
Page 36

Country (City)
International
Department Name or Service Area,
Website and E-Mail Address
Access Code
Country Code
City Code
Austria (Vienna)
International
Access Code: 900
Country Code: 43
City Code: 1
We bs it e : support.euro.dell.com
E-mail:
tech_support_central_europe@
dell.com
Home/Small Business Sales
Home/Small Business Fax
www.dell.com | support.dell.com
Home/Small Business Customer
Care
Preferred Accounts/Corporate
Customer Care
Home/Small Business Technical
Support
Preferred Accounts/Corporate
Technical Support
Switchboard
Bahamas General Support
Barbados General Support
Area Codes,
Local Numbers, and
Toll-Free Numbers
0820 240 530 00
0820 240 530 49
0820 240 530 14
0820 240 530 16
0820 240 530 14
0660 8779
0820 240 530 00
toll-free: 1-866-278-6818
1-800-534-3066
36 Contacting Dell
Page 37

Country (City)
International
Access Code
Country Code
City Code
Belgium
(Brussels)
International
Access Code: 00
Country Code: 32
City Code: 2
Bermuda General Support
Bolivia General Support
Brazil
International
Access Code: 00
Country Code: 55
City Code: 51
British Virgin
Islands
Department Name or Service Area,
Website and E-Mail Address
We bs it e : support.euro.dell.com
E-mail for French-speaking
Customers:
support.euro.dell.com/be/fr/
emaildell/
Technical Support for Inspiron
XPS computers only
Technical Support for all other
Dell computers
Technical Support Fax
Customer Care
Corporate Sales
Fax
Switchboard
We bs it e : www.dell.com/br
Customer Support, Technical
Support
Technical Support Fax
Customer Care Fax
Sales
General Support
Area Codes,
Local Numbers, and
Toll-Free Numbers
02 481 92 96
02 481 92 88
02 481 92 95
0271315.65
02 481 91 00
02 481 92 99
02 481 91 00
1-800-342-0671
toll-free: 800-10-0238
0800 90 3355
51 481 5470
51 481 5480
0800 90 3390
toll-free: 1-866-278-6820
Contacting Dell 37
Page 38

Country (City)
International
Department Name or Service Area,
Website and E-Mail Address
Access Code
Country Code
City Code
Brunei
Country Code:
673
Customer Technical Support
(Penang, Malaysia)
Customer Service (Penang,
Malaysia)
Transaction Sales (Penang,
Malaysia)
Canada (North
www.dell.com | support.dell.com
York, Ontario)
International
Access Code: 011
Online Order Status:
www.dell.ca/ostatus
AutoTech (automated technical
support)
Customer Care (Home
Sales/Small Business)
Customer Care (med./large
business, government)
Technical Support (Home
Sales/Small Business)
Technical Support (med./large
bus., government)
Technical Support (printers,
projectors, televisions, handhelds,
digital jukebox, and wireless)
Sales (Home Sales/Small Business)
Sales (med./large bus.,
government)
Spare Parts Sales & Extended
Service Sales
Cayman Islands General Support
Chile (Santiago)
Country Code: 56
Sales, Customer Support, and
Technical Support
City Code: 2
Area Codes,
Local Numbers, and
Toll-Free Numbers
604 633 4966
604 633 4949
604 633 4955
toll-free: 1-800-247-9362
toll-free: 1-800-847-4096
toll-free: 1-800-326-9463
toll-free: 1-800-847-4096
toll-free: 1-800-387-5757
1-877-335-5767
toll-free: 1-800-387-5752
toll-free: 1-800-387-5755
1 866 440 3355
1-800-805-7541
toll-free: 1230-020-4823
38 Contacting Dell
Page 39

Country (City)
International
Access Code
Country Code
City Code
China (Xiamen)
Country Code: 86
City Code: 592
Department Name or Service Area,
Website and E-Mail Address
Technical Support website:
support.dell.com.cn
Technical Support E-mail:
cn_support@dell.com
Customer Care E-mail:
customer_cn@dell.com
Technical Support Fax
Technical Support (Dell™
Dimension™ and Inspiron)
Technical Support (OptiPlex™,
Latitude™, and Dell Precision™)
Technical Support (servers and
storage)
Technical Support (projectors,
PDAs, switches, routers, and so
on)
Technical Support (printers)
Customer Care
Customer Care Fax
Home and Small Business
Preferred Accounts Division
Large Corporate Accounts GCP
Large Corporate Accounts Key
Accounts
Large Corporate Accounts North
Large Corporate Accounts North
Government and Education
Large Corporate Accounts East
Large Corporate Accounts East
Government and Education
Area Codes,
Local Numbers, and
Toll-Free Numbers
592 818 1350
toll-free: 800 858 2969
toll-free: 800 858 0950
toll-free: 800 858 0960
toll-free: 800 858 2920
toll-free: 800 858 2311
toll-free: 800 858 2060
592 818 1308
toll-free: 800 858 2222
toll-free: 800 858 2557
toll-free: 800 858 2055
toll-free: 800 858 2628
toll-free: 800 858 2999
toll-free: 800 858 2955
toll-free: 800 858 2020
toll-free: 800 858 2669
Contacting Dell 39
Page 40

Country (City)
International
Department Name or Service Area,
Website and E-Mail Address
Access Code
Country Code
City Code
Large Corporate Accounts Queue
Te am
Large Corporate Accounts South
Large Corporate Accounts West
Large Corporate Accounts Spare
Par ts
www.dell.com | support.dell.com
Colombia General Support
Costa Rica General Support
Czech Republic
(Prague)
International
Access Code: 00
Country Code:
420
We bs it e : support.euro.dell.com
E-mail: czech_dell@dell.com
Technical Support
Customer Care
Fax
Tech Fax
Switchboard
Area Codes,
Local Numbers, and
Toll-Free Numbers
toll-free: 800 858 2572
toll-free: 800 858 2355
toll-free: 800 858 2811
toll-free: 800 858 2621
980-9-15-3978
0800-012-0435
22537 2727
22537 2707
22537 2714
22537 2728
22537 2711
40 Contacting Dell
Page 41

Country (City)
International
Access Code
Country Code
City Code
Denmark
(Copenhagen)
International
Access Code: 00
Country Code: 45
Dominica General Support
Dominican
Republic
Ecuador General Support
El Salvador General Support
Department Name or Service Area,
Website and E-Mail Address
We bs it e : support.euro.dell.com
E-mail:
support.euro.dell.com/dk/da/emai
ldell/
Technical Support for Inspiron
XPS computers only
Technical Support for all other
Dell computers
Customer Care (Relational)
Home/Small Business Customer
Care
Switchboard (Relational)
Switchboard Fax (Relational)
Switchboard (Home/Small
Business)
Switchboard Fax (Home/Small
Business)
General Support
Area Codes,
Local Numbers, and
Toll-Free Numbers
7010 0074
7023 0182
7023 0184
3287 5505
3287 1200
3287 1201
3287 5000
3287 5001
toll-free: 1-866-278-6821
1-800-148-0530
toll-free: 999-119
01-899-753-0777
Contacting Dell 41
Page 42

Country (City)
International
Access Code
Country Code
City Code
Finland
(Helsinki)
International
Access Code: 990
Country Code:
358
City Code: 9
www.dell.com | support.dell.com
Department Name or Service Area,
Website and E-Mail Address
We bs it e : support.euro.dell.com
E-mail:
support.euro.dell.com/fi/fi/
emaildell/
Technical Support
Customer Care
Fax
Switchboard
Area Codes,
Local Numbers, and
Toll-Free Numbers
09 253 313 60
09 253 313 38
09 253 313 99
09 253 313 00
42 Contacting Dell
Page 43

Country (City)
International
Access Code
Country Code
City Code
France (Paris)
(Montpellier)
International
Access Code: 00
Country Code: 33
City Codes: (1)
(4)
Department Name or Service Area,
Website and E-Mail Address
We bs it e : support.euro.dell.com
E-mail:
support.euro.dell.com/fr/fr/
emaildell/
Home and Small Business
Technical Support for Inspiron
XPS computers only
Technical Support for all other
Dell computers
Customer Care
Switchboard
Switchboard (calls from outside of
France)
Sales
Fax
Fax (calls from outside of France)
Corporate
Technical Support
Customer Care
Switchboard
Sales
Fax
Area Codes,
Local Numbers, and
Toll-Free Numbers
0825 387 129
0825 387 270
0825 823 833
0825 004 700
04 99 75 40 00
0825 004 700
0825 004 701
04 99 75 40 01
0825 004 719
0825 338 339
01 55 94 71 00
01 55 94 71 00
01 55 94 71 01
Contacting Dell 43
Page 44

Country (City)
International
Department Name or Service Area,
Website and E-Mail Address
Access Code
Country Code
City Code
Germany
(Langen)
International
Access Code: 00
Country Code: 49
City Code: 6103
www.dell.com | support.dell.com
We bs it e : support.euro.dell.com
E-mail:
tech_support_central_europe@
dell.com
Technical Support for Inspiron
XPS computers only
Technical Support for all other
Dell computers
Home/Small Business Customer
Care
Global Segment Customer Care
Preferred Accounts Customer
Care
Large Accounts Customer Care
Public Accounts Customer Care
Switchboard
Greece
International
Access Code: 00
Country Code: 30
We bs it e : support.euro.dell.com
E-mail:
support.euro.dell.com/gr/en/
emaildell/
Technical Support
Gold Service Technical Support
Switchboard
Gold Service Switchboard
Sales
Fax
Grenada General Support
Guatemala General Support
Guyana General Support
Area Codes,
Local Numbers, and
Toll-Free Numbers
06103 766-7222
06103 766-7200
0180-5-224400
06103 766-9570
06103 766-9420
06103 766-9560
06103 766-9555
06103 766-7000
00800-44 14 95 18
00800-44 14 00 83
2108129810
2108129811
2108129800
2108129812
toll-free: 1-866-540-3355
1-800-999-0136
toll-free: 1-877-270-4609
44 Contacting Dell
Page 45

Country (City)
International
Access Code
Country Code
City Code
Hong Kong
International
Access Code: 001
Country Code:
852
India Technical Support
Department Name or Service Area,
Website and E-Mail Address
We bs it e : support.ap.dell.com
Technical Support E-mail:
apsupport@dell.com
Technical Support (Dimension
and Inspiron)
Technical Support (OptiPlex,
Latitude, and Dell Precision)
Technical Support (PowerApp™,
PowerEdge™, PowerConnect™,
and PowerVault™)
Customer Care
Large Corporate Accounts
Global Customer Programs
Medium Business Division
Home and Small Business
Division
Sales (Large Corporate Accounts)
Sales (Home and Small Business)
Area Codes,
Local Numbers, and
Toll-Free Numbers
2969 3188
2969 3191
2969 3196
3416 0910
3416 0907
3416 0908
3416 0912
2969 3105
1600 33 8045
1600 33 8044
1600 33 8046
Contacting Dell 45
Page 46

Country (City)
International
Access Code
Country Code
City Code
Ireland
(Cherrywood)
International
Access Code: 16
Country Code:
353
City Code: 1
www.dell.com | support.dell.com
Department Name or Service Area,
Website and E-Mail Address
We bs it e : support.euro.dell.com
E-mail:
dell_direct_support@dell.com
Technical Support for Inspiron
XPS computers only
Technical Support for all other
Dell computers
U.K. Technical Support (dial
within U.K. only)
Home User Customer Care
Small Business Customer Care
U.K. Customer Care (dial within
U.K. only)
Corporate Customer Care
Corporate Customer Care (dial
within U.K. only)
Ireland Sales
U.K. Sales (dial within U.K. only)
Fax/Sales Fax
Switchboard
Area Codes,
Local Numbers, and
Toll-Free Numbers
1850 200 722
1850 543 543
0870 908 0800
01 204 4014
01 204 4014
0870 906 0010
1850 200 982
0870 907 4499
01 204 4444
0870 907 4000
01 204 0103
01 204 4444
46 Contacting Dell
Page 47

Country (City)
International
Access Code
Country Code
City Code
Italy (Milan)
International
Access Code: 00
Country Code: 39
City Code: 02
Jamaica General Support (dial from within
Japan (Kawasaki)
International
Access Code: 001
Country Code: 81
City Code: 44
Department Name or Service Area,
Website and E-Mail Address
We bs it e : support.euro.dell.com
E-mail:
support.euro.dell.com/it/it/
emaildell/
Home and Small Business
Technical Support
Customer Care
Fax
Switchboard
Corporate
Technical Support
Customer Care
Fax
Switchboard
Jamaica only)
We bs it e : support.jp.dell.com
Technical Support (servers)
Technical Support outside of
Japan (servers)
Technical Support (Dimension
and Inspiron)
Technical Support outside of
Japan (Dimension and Inspiron)
Technical Support (Dell Precision,
OptiPlex, and Latitude)
Technical Support outside of
Japan (Dell Precision, OptiPlex,
and Latitude)
Area Codes,
Local Numbers, and
Toll-Free Numbers
02 577 826 90
02 696 821 14
02 696 821 13
02 696 821 12
02 577 826 90
02 577 825 55
02 575 035 30
02 577 821
1-800-682-3639
toll-free: 0120-198-498
81-44-556-4162
toll-free: 0120-198-226
81-44-520-1435
toll-free:0120-198-433
81-44-556-3894
Contacting Dell 47
Page 48

Country (City)
International
Access Code
Country Code
City Code
www.dell.com | support.dell.com
Korea (Seoul)
International
Access Code: 001
Country Code: 82
City Code: 2
Department Name or Service Area,
Website and E-Mail Address
Technical Support (PDAs,
projectors, printers, routers)
Technical Support outside of
Japan (PDAs, projectors, printers,
routers)
Faxbox Service
24-Hour Automated Order Service
Customer Care
Business Sales Division (up to 400
employees)
Preferred Accounts Division Sales
(over 400 employees)
Large Corporate Accounts Sales
(over 3500 employees)
Public Sales (government
agencies, educational institutions,
and medical institutions)
Global Segment Japan
Individual User
Switchboard
Technical Support
Sales
Customer Service (Penang,
Malaysia)
Fax
Switchboard
Technical Support (Electronics
and Accessories)
Area Codes,
Local Numbers, and
Toll-Free Numbers
toll-free: 0120-981-690
81-44-556-3468
044-556-3490
044-556-3801
044-556-4240
044-556-1465
044-556-3433
044-556-3430
044-556-1469
044-556-3469
044-556-1760
044-556-4300
toll-free: 080-200-3800
toll-free: 080-200-3600
604 633 4949
2194-6202
2194-6000
toll-free: 080-200-3801
48 Contacting Dell
Page 49

Country (City)
International
Access Code
Country Code
City Code
Latin America Customer Technical Support
Luxembourg
International
Access Code: 00
Country Code:
352
Macao
Country Code:
853
Department Name or Service Area,
Website and E-Mail Address
(Austin, Texas, U.S.A.)
Customer Service (Austin, Texas,
U.S.A.)
Fax (Technical Support and
Customer Service) (Austin, Texas,
U.S.A.)
Sales (Austin, Texas, U.S.A.)
SalesFax (Austin, Texas, U.S.A.)
We bs it e : support.euro.dell.com
E-mail: tech_be@dell.com
Technical Support (Brussels,
Belgium)
Home/Small Business Sales
(Brussels, Belgium)
Corporate Sales (Brussels,
Belgium)
Customer Care (Brussels,
Belgium)
Fax (Brussels, Belgium)
Switchboard (Brussels, Belgium)
Technical Support
Customer Service (Xiamen,
China)
Transaction Sales (Xiamen,
China)
Area Codes,
Local Numbers, and
Toll-Free Numbers
512 728-4093
512 728-3619
512 728-3883
512 728-4397
512 728-4600
or 512 728-3772
3420808075
toll-free: 080016884
02 481 91 00
02 481 91 19
02 481 92 99
02 481 91 00
toll-free: 0800 105
34 160 910
29 693 115
Contacting Dell 49
Page 50

Country (City)
International
Department Name or Service Area,
Website and E-Mail Address
Access Code
Country Code
City Code
Malaysia
(Penang)
International
Access Code: 00
Country Code: 60
City Code: 4
www.dell.com | support.dell.com
We bs it e : support.ap.dell.com
Technical Support (Dell Precision,
OptiPlex, and Latitude)
Technical Support (Dimension,
Inspiron, and Electronics and
Accessories)
Technical Support (PowerApp,
PowerEdge, PowerConnect, and
PowerVault)
Customer Service (Penang,
Malaysia)
Tra n sa ct io n Sa le s
Corporate Sales
Mexico
Customer Technical Support
International
Access Code: 00
Sales
Country Code: 52
Customer Service
Main
Montserrat General Support
Netherlands
General Support
Antilles
Area Codes,
Local Numbers, and
Toll-Free Numbers
toll-free: 1 800 88 0193
toll-free: 1 800 88 1306
toll-free: 1800 88 1386
04 633 4949
toll-free: 1 800 888 202
toll-free: 1 800 888 213
001-877-384-8979
or 001-877-269-3383
50-81-8800
or 01-800-888-3355
001-877-384-8979
or 001-877-269-3383
50-81-8800
or 01-800-888-3355
toll-free: 1-866-278-6822
001-800-882-1519
50 Contacting Dell
Page 51

Country (City)
International
Access Code
Country Code
City Code
Netherlands
(Amsterdam)
International
Access Code: 00
Country Code: 31
City Code: 20
New Zealand
International
Access Code: 00
Country Code: 64
Nicaragua General Support
Department Name or Service Area,
Website and E-Mail Address
We bs it e : support.euro.dell.com
Technical Support for Inspiron
XPS computers only
Technical Support for all other
Dell computers
Technical Support Fax
Home/Small Business Customer
Care
Relational Customer Care
Home/Small Business Sales
Relational Sales
Home/Small Business Sales Fax
Relational Sales Fax
Switchboard
Switchboard Fax
E-mail (New Zealand):
nz_tech_support@dell.com
E-mail (Australia):
au_tech_support@dell.com
Technical Support (for desktop
and portable computers)
Technical Support (for servers and
workstations)
Home and Small Business
Government and Business
Sales
Fax
Area Codes,
Local Numbers, and
Toll-Free Numbers
020 674 45 94
020 674 45 00
020 674 47 66
020 674 42 00
020 674 4325
020 674 55 00
020 674 50 00
020 674 47 75
020 674 47 50
020 674 50 00
020 674 47 50
toll-free:
toll-free: 0800 443 563
0800 446 255
0800 446 255
0800 444 617
0800 441 567
0800 441 566
001-800-220-1006
Contacting Dell 51
Page 52

Country (City)
International
Department Name or Service Area,
Website and E-Mail Address
Access Code
Country Code
City Code
Norway (Lysaker)
International
Access Code: 00
Country Code: 47
We bs it e : support.euro.dell.com
E-mail:
support.euro.dell.com/no/no/emai
ldell/
Technical Support
Relational Customer Care
www.dell.com | support.dell.com
Home/Small Business Customer
Care
Switchboard
Fax Switchboard
Pan ama General Support
Peru General Support
Poland (Warsaw)
International
Access Code: 011
Country Code: 48
City Code: 22
We bs it e : support.euro.dell.com
E-mail:
pl_support_tech@dell.com
Customer Service Phone
Customer Care
Sales
Customer Service Fax
Reception Desk Fax
Switchboard
Area Codes,
Local Numbers, and
Toll-Free Numbers
671 16882
671 17575
23162298
671 16800
671 16865
001-800-507-0962
0800-50-669
57 95 700
57 95 999
57 95 999
57 95 806
57 95 998
57 95 999
52 Contacting Dell
Page 53

Country (City)
International
Access Code
Country Code
City Code
Portug al
International
Access Code: 00
Country Code:
351
Puerto Rico General Support
St. Kitts and
Nevis
St. Lucia General Support
St. Vincent and
the Grenadines
Singapore
(Singapore)
International
Access Code: 005
Country Code: 65
Department Name or Service Area,
Website and E-Mail Address
We bs it e : support.euro.dell.com
E-mail:
support.euro.dell.com/pt/en/emai
ldell/
Technical Support
Customer Care
Sales
Fax
General Support
General Support
We bs it e : support.ap.dell.com
Technical Support (Dimension,
Inspiron, and Electronics and
Accessories)
Technical Support (OptiPlex,
Latitude, and Dell Precision)
Technical Support (PowerApp,
PowerEdge, PowerConnect, and
PowerVault)
Customer Service (Penang,
Malaysia)
Tra n sa ct io n Sa le s
Corporate Sales
Area Codes,
Local Numbers, and
Toll-Free Numbers
707200149
800 300 413
800 300 410 or
800 300 411 or
800 300 412 or
21 422 07 10
21 424 01 12
1-800-805-7545
toll-free: 1-877-441-4731
1-800-882-1521
toll-free: 1-877-270-4609
toll-free: 1800 394 7430
toll-free: 1800 394 7488
toll-free: 1800 394 7478
604 633 4949
toll-free: 1 800 394 7412
toll-free: 1 800 394 7419
Contacting Dell 53
Page 54

Country (City)
International
Access Code
Country Code
City Code
Slovakia (Prague)
International
Access Code: 00
Country Code:
421
www.dell.com | support.dell.com
South Africa
(Johannesburg)
International
Access Code:
09/091
Country Code: 27
City Code: 11
Southeast Asian
and Pacific
Countries
Department Name or Service Area,
Website and E-Mail Address
We bs it e : support.euro.dell.com
E-mail: czech_dell@dell.com
Technical Support
Customer Care
Fax
Tech Fax
Switchboard (Sales)
We bs it e : support.euro.dell.com
E-mail:
dell_za_support@dell.com
Gold Queue
Technical Support
Customer Care
Sales
Fax
Switchboard
Customer Technical Support,
Customer Service, and Sales
(Penang, Malaysia)
Area Codes,
Local Numbers, and
Toll-Free Numbers
02 5441 5727
420 22537 2707
02 5441 8328
02 5441 8328
02 5441 7585
011 709 7713
011 709 7710
011 709 7707
011 709 7700
011 706 0495
011 709 7700
604 633 4810
54 Contacting Dell
Page 55

Country (City)
International
Access Code
Country Code
City Code
Spain (Madrid)
International
Access Code: 00
Country Code: 34
City Code: 91
Sweden
(Upplands Vasby)
International
Access Code: 00
Country Code: 46
City Code: 8
Department Name or Service Area,
Website and E-Mail Address
We bs it e : support.euro.dell.com
E-mail:
support.euro.dell.com/es/es/email
dell/
Home and Small Business
Technical Support
Customer Care
Sales
Switchboard
Fax
Corporate
Technical Support
Customer Care
Switchboard
Fax
We bs it e : support.euro.dell.com
E-mail:
support.euro.dell.com/se/sv/
emaildell/
Technical Support
Relational Customer Care
Home/Small Business Customer
Care
Employee Purchase Program
(EPP) Support
Technical Support Fax
Sales
Area Codes,
Local Numbers, and
Toll-Free Numbers
902 100 130
902 118 540
902 118 541
902 118 541
902 118 539
902 100 130
902 115 236
91 722 92 00
91 722 95 83
08 590 05 199
08 590 05 642
08 587 70 527
20 140 14 44
08 590 05 594
08 590 05 185
Contacting Dell 55
Page 56

Country (City)
International
Access Code
Country Code
City Code
Switzerland
(Geneva)
International
Access Code: 00
Country Code: 41
City Code: 22
www.dell.com | support.dell.com
Ta i wa n
International
Access Code: 002
Country Code:
886
Department Name or Service Area,
Website and E-Mail Address
We bs it e : support.euro.dell.com
E-mail:
Tech_support_central_Europe@
dell.com
E-mail for French-speaking HSB
and Corporate Customers:
support.euro.dell.com/ch/fr/
emaildell/
Technical Support (Home and
Small Business)
Technical Support (Corporate)
Customer Care (Home and Small
Business)
Customer Care (Corporate)
Fax
Switchboard
We bs it e : support.ap.dell.com
E-mail: ap_support@dell.com
Technical Support (OptiPlex,
Latitude, Inspiron, Dimension,
and Electronics and Accessories)
Technical Support (PowerApp,
PowerEdge, PowerConnect, and
PowerVault)
Tra n sa ct io n Sa le s
Corporate Sales
Area Codes,
Local Numbers, and
Toll-Free Numbers
0844 811 411
0844 822 844
0848 802 202
0848 821 721
022 799 01 90
022 799 01 01
toll-free: 00801 86 1011
toll-free: 00801 60 1256
toll-free: 00801 65 1228
toll-free: 00801 651 227
56 Contacting Dell
Page 57

Country (City)
International
Access Code
Country Code
City Code
Thailand
International
Access Code: 001
Country Code: 66
Trinidad/Tobago General Support
Turks and Caicos
Islands
Department Name or Service Area,
Website and E-Mail Address
We bs it e : support.ap.dell.com
Technical Support (OptiPlex,
Latitude, and Dell Precision)
Technical Support (PowerApp,
PowerEdge, PowerConnect, and
PowerVault)
Customer Service (Penang,
Malaysia)
Corporate Sales
Tra n sa ct io n Sa le s
General Support
Area Codes,
Local Numbers, and
Toll-Free Numbers
toll-free: 1800 0060 07
toll-free: 1800 0600 09
604 633 4949
toll-free: 1800 006 009
toll-free: 1800 006 006
1-800-805-8035
toll-free: 1-866-540-3355
Contacting Dell 57
Page 58

Country (City)
International
Department Name or Service Area,
Website and E-Mail Address
Access Code
Country Code
City Code
U.K. (Bracknell)
International
Access Code: 00
We bs it e : support.euro.dell.com
Customer Care website:
support.euro.dell.com/uk/en/ECare/Form/Home.asp
Country Code: 44
City Code: 1344
E-mail:
dell_direct_support@dell.com
www.dell.com | support.dell.com
Technical Support
(Corporate/Preferred
Accounts/PAD [1000+
employees])
Technical Support (direct and
general)
Global Accounts Customer Care
Home and Small Business
Customer Care
Corporate Customer Care
Preferred Accounts (500–5000
employees) Customer Care
Central Government Customer
Care
Local Government & Education
Customer Care
Health Customer Care
Home and Small Business Sales
Corporate/Public Sector Sales
Home and Small Business Fax
Uruguay General Support
Area Codes,
Local Numbers, and
Toll-Free Numbers
0870 908 0500
0870 908 0800
01344 373 186
0870 906 0010
01344 373 185
0870 906 0010
01344 373 193
01344 373 199
01344 373 194
0870 907 4000
01344 860 456
0870 907 4006
toll-free: 000-413-598-
2521
58 Contacting Dell
Page 59

Country (City)
International
Access Code
Country Code
City Code
U.S.A. (Austin,
Te xa s )
International
Access Code: 011
Country Code: 1
Department Name or Service Area,
Website and E-Mail Address
Automated Order-Status Service
AutoTech (portable and desktop
computers)
Consumer (Home and Home Office)
Technical Support
Customer Service
DellNet™ Service and Support
Employee Purchase Program
(EPP) Customers
Financial Services website:
www.dellfinancialservices.com
Financial Services (lease/loans)
Financial Services (Dell Preferred
Accounts [DPA])
Business
Customer Service and Technical
Support
Employee Purchase Program
(EPP) Customers
Printers and Projectors Technical
Support
Public (government, education, and healthcare)
Customer Service and Technical
Support
Employee Purchase Program
(EPP) Customers
Dell Sales
Local Numbers, and
Toll-Free Numbers
toll-free: 1-800-433-9014
toll-free: 1-800-247-9362
toll-free: 1-800-624-9896
toll-free: 1-800-624-9897
toll-free: 1-877-Dellnet
(1-877-335-5638)
toll-free: 1-800-695-8133
toll-free: 1-877-577-3355
toll-free: 1-800-283-2210
toll-free: 1-800-822-8965
toll-free: 1-800-695-8133
toll-free: 1-877-459-7298
toll-free: 1-800-456-3355
toll-free: 1-800-234-1490
toll-free: 1-800-289-3355
or toll-free: 1-800-879-
Area Codes,
3355
Contacting Dell 59
Page 60

Country (City)
International
Department Name or Service Area,
Website and E-Mail Address
Access Code
Country Code
City Code
U.S. Virgin
General Support
Islands
Vene zu el a General Support
www.dell.com | support.dell.com
Area Codes,
Local Numbers, and
Toll-Free Numbers
1-877-673-3355
8001-3605
60 Contacting Dell
Page 61

Appendix: Regulatory Notices
FCC Notices (U.S. Only)
Most Dell computer systems are classified by the Federal Communications Commission
(FCC) as Class B digital devices. To determine which classification applies to your computer
system, examine all FCC registration labels located on the bottom, side, or back panel of
your computer, on card-mounting brackets, and on the cards themselves. If any one of the
labels carries a Class A rating, your entire system is considered to be a Class A digital device.
If all labels carry an FCC Class B rating as distinguished by either an FCC ID number or the
FCC logo, ( ), your system is considered to be a Class B digital device.
Once you have determined your system’s FCC classification, read the appropriate FCC
notice. Note that FCC regulations provide that changes or modifications not expressly
approved by Dell could void your authority to operate this equipment.
This device complies with Part 15 of the FCC Rules. Operation is subject to the following
two conditions:
• This device may not cause harmful interference.
• This device must accept any interference received, including interference that may
cause undesired operation.
Class A
This equipment has been tested and found to comply with the limits for a Class A digital
device pursuant to Part 15 of the FCC Rules. These limits are designed to provide reasonable
protection against harmful interference when the equipment is operated in a commercial
environment. This equipment generates, uses, and can radiate radio frequency energy and, if
not installed and used in accordance with the manufacturer’s instruction manual, may cause
harmful interference with radio communications. Operation of this equipment in a
residential area is likely to cause harmful interference, in which case you will be required to
correct the interference at your own expense.
Class B
This equipment has been tested and found to comply with the limits for a Class B digital
device pursuant to Part 15 of the FCC Rules. These limits are designed to provide reasonable
protection against harmful interference in a residential installation. This equipment
generates, uses, and can radiate radio frequency energy and, if not installed and used in
accordance with the manufacturer’s instruction manual, may cause interference with radio
communications. However, there is no guarantee that interference will not occur in a
particular installation. If this equipment does cause harmful interference to radio or
television reception, which can be determined by turning the equipment off and on, you are
encouraged to try to correct the interference by one or more of the following measures:
Appendix: Regulatory Notices 61
Page 62

• Reorient or relocate the receiving antenna.
• Increase the separation between the equipment and the receiver.
• Connect the equipment into an outlet on a circuit different from that to which the
receiver is connected.
• Consult the dealer or an experienced radio/television technician for help.
FCC Identification Information
The following information is provided on the device or devices covered in this document in
compliance with FCC regulations:
• Product name: DLP Projector
• Model number: 3400MP/DELL
• Company name:
www.dell.com | support.dell.com
Dell Inc.
One Dell Way
Round Rock, Texas 78682 USA
512-338-4400
NOM Information (Mexico Only)
The following information is provided on the device(s) described in this document in
compliance with the requirements of the official Mexican standards (NOM):
Exporter: Dell Inc.
Importer: Dell Computer de México, S.A. de C.V.
Ship to: Dell Computer de México, S.A. de C.V.
Model Supply Voltage Frequency Current Consumption
3400MP AC 100-240 V 50-60 Hz 2.3 A
One Dell Way
Round Rock, TX 78682
Paseo de la Reforma 2620 - 11° Piso
Col. Lomas Altas
11950 México, D.F.
al Cuidado de Kuehne & Nagel de México S. de R.L.
Avenida Soles No. 55
Col. Peñon de los Baños
15520 México, D.F.
62 Appendix: Regulatory Notices
Page 63

Glossary
ANSI Lumens— A standard for measuring light output, used for comparing
projectors.
Aspect Ratio—The most popular aspect ratio is 4:3 (4 by 3). Early television and
computer video formats are in a 4:3 aspect ratio, which means that the width of
the image is 4/3 times the height.
Backlit (Backlight)—Refers to a remote control, or a projector control panel, that
has buttons and controls that are illuminated.
Bandwidth— The number of cycles per second (Hertz) expressing the difference
between the lower and upper limiting frequencies of a frequency band; also, the
width of a band of frequencies.
Brightness— The amount of light emitting from a display or projection display or
projection device. The brightness of projector is measured by ANSI lumens.
Color Temperature— A method of measuring the whiteness of a light source.
Metal halide lamps have a higher temperature compared to halogen or
incandescent lights.
Component Video—A method of delivering quality video in a format that
contains all the components of the original image. These components are referred
to as luma and chroma and are defined as Y'Pb'Pr' for analog component and
Y'Cb'Cr' for digital component. Component video is available on DVD players and
projectors.
Composite Video — The combined picture signal, including vertical and
horizontal blanking and synchronizing signals.
Compression— A function that deletes resolution lines from the image to fit in
the display area.
Compressed SVGA— To project an 800x600 image to a VGA projector, the
original 800x600 signal must be compressed down. The data displays all the
information with only two thirds of the pixels (307,000 vs 480,000). The resulting
image is SVGA page size but sacrifices some of the image quality. If you are using
an SVGA computers, connecting VGA to a VGA projector. provide better results.
Compressed SXGA— Found on XGA projectors, compressed SXGA handling
allows these projectors to handle up to 1280x1024 SXGA resolution.
Compressed XGA— Found on SVGA projectors, compressed XGA handling
allows these projectors to handle 1024x768 XGA resolution.
Glossary 63
Page 64

Contrast Ratio— Range of light and dark values in a picture, or the ratio between
their maximum and minimum values. There are two methods used by the
projection industry to measure the ratio:
1
Full On/Off
— measures the ratio of the light output of an all white image (full
on) and the light output of an all black (full off) image.
2
ANSI
— measures a pattern of 16 alternating black and white rectangles. The
average light output from the white rectangles is divided by the average light
ANSI
output of the black rectangles to determine the
contrast ratio.
Full On/Off contrast is always a larger number than ANSI contrast for the same
projector.
dB— decibel—A unit used to express relative difference in power or intensity,
usually between two acoustic or electric signals, equal to ten times the common
www.dell.com | support.dell.com
logarithm of the ratio of the two levels.
Diagonal Screen— A method of measuring the size of a screen or a projected
image. It measures from one corner to the opposite corner. A 9FT high, 12FT
wide, screen has a diagonal of 15FT. This document assumes that the diagonal
dimensions are for the traditional 4:3 ratio of a computer image as per the example
above.
DLP— Digital Light Processing—Reflective display technology developed by
Texas Instruments, using small manipulated mirrors. Light passes through a color
filter is sent to the DLP mirrors which arrange the RGB colors into a picture
projected onto screen, also known as DMD.
DMD— digital Micro- Mirror Device— Each DMD consists of thousands of
tilting, microscopic aluminum alloy mirrors mounted on a hidden yoke.
DVI— Digital Visual Interface— Defines the digital interface between digital
devices such as projectors and personal computers. For devices that support DVI, a
digital to digital connection can be made that eliminates the conversion to analog
and thereby delivers an unblemished image.
Focal Length— The distance from the surface of a lens to its focal point.
Frequency— It is the rate of repetition in cycles per seconds of electrical signals.
Measured in Hz.
Hz — Frequency of an alternating signal. See Frequency.
Keystone Correction— Device that will correct an image of the distortion
(usually a wide-top narrow-bottom effect) of a projected image caused by
improper projector to screen angle.
Laser Pointer— A small pen or cigar sized pointer that contains a small battery
powered laser, which can project a small, red (typically), high intensity beam of
light that is immediately very visible on the screen.
64 Glossary
Page 65

Maximum Distance— The distance from a screen the projector can be to cast an
image that is useable (bright enough) in a fully darkened room.
Maximum Image Size— The largest image a projector can throw in a darkened
room. This is usually limited by focal range of the optics.
Metal Halide Lamp— The type of lamp used in many medium and all high end
portable projectors. These lamps typically have a "half-life" of 1000-2000 hours.
That is they slowly lose intensity (brightness) as they are used, and at the "half-life"
point, they are half as bright as when new. These lamps output a very "hot"
temperature light, similar to mercury vapor lamps used in streetlights.. Their
whites are "extremely" white (with slight bluish cast.) and make Halogen lamp's
whites look very yellowish by comparison.
Minimum Distance— The closest position that a projector can focus an image
onto a screen.
NTSC— The United States broadcast standard for video and broadcasting.
PAL— A European and international broadcast standard for video and
broadcasting. Higher resolution than NTSC.
Power Zoom— A zoom lens with the zoom in and out controlled by a motor,
usually adjusted from the projector's control panel and also the remote control.
Reverse Image— Feature that allows you to flip the image horizontally. When
used in a normal forward projection environment text, graphics, etc, are
backwards. Reverse image is used for rear projection.
RGB— Red, Green, Blue— typically used to describe a monitor that requires
separate signals for each of the three colors.
S-Video—A video transmission standard that uses a 4-pin mini-DIN connector to
send video information on two signal wires called luminance (brightness, Y) and
chrominance (color, C). S-Video is also referred to as Y/C.
SECAM— A French and international broadcast standard for video and
broadcasting. Higher resolution than NTSC.
SVGA— Super Video Graphics Array— 800 x 600 pixels count.
SXGA— Super Ultra Graphics Array,—1280 x 1024 pixels count.
UXGA— Ultra Extended Graphics Array—1600 x 1200 pixels count.
VGA— Video Graphics Array—640 x 480 pixels count.
XGA— Extra Video Graphics Array— 1024 x 768 pixels count.
Glossary 65
Page 66

Zoom Lens— Lens with a variable focal length that allows operator to move the
view in or out making the image smaller or larger.
Zoom Lens Ratio— Is the ratio between the smallest and largest image a lens can
projector from a fixed distance. For example, a 1.4:1 zoom lens ratio means that a
10 foot image without zoom would be a 14 foot image with full zoom.
www.dell.com | support.dell.com
66 Glossary
Page 67

Index
A
Adjusting Projection Image
Size 26
Adjusting the Projected Image 12
Adjusting the Projector
Height 12
lower the projector
Elevator button 12
Elevator foot 12
Tilt adjustment
wheel 12
Adjusting the Projector
Zoom and Focus 13
Focus ring 13
Zoom tab 13
C
Changing the Lamp 26
Connecting the Projector
Composite video cable 9
Connecting with a Com-
ponent Cable 9
Connecting with a Com-
posite Cable 9
Connecting with an S-
video Cable 8
M1A to D-sub/SUB cable
8
M1-A to HDTV cable 9
Power cord 8, 9
Professional Installation
Options 9
S-video cable 8
To Computer 8
Connection Ports
Audio input connector 7
Audio output connector
7
Composite video connec-
tor 7
IR receiver 7
M1-DA connector 7
Power cord connector 7
S-video connector 7
Control Panel 15
D
Dell
contacting 33
M
Main Unit 6
Control panel 6
Elevator button 6
Focus ring 6
Index 67
Page 68

Lens 6
Remote control receiver
6
Zoom tab 6
O
On-Screen Display 18
Audio Menu 20
Computer Source Menu
22
Factory Reset Menu 21
Image Settings Menu 18
Language Menu 21
Management Menu 20
Video Source Menu 22
P
Powering On/Off the Projector
Powering Off the Projec-
tor 11
Powering On the Projec-
tor 11
R
Remote Control 6, 16
S
Specifications
Audio 29
Brightness 29
Color Wheel Speed 29
Compatibility Modes 31
Contrast Ratio 29
Dimensions 30
Displayable Color 29
Environmental 30
H. Frequency 29
I/O Connectors 30
Lamp 29
Light Valve 29
Noise Level 30
Number of Pixels 29
Power Consumption 29
Power Supply 29
Projection Distance 29
Projection Lens 29
Projection Screen Size 29
Regulatory 30
Uniformity 29
V. Frequency 29
Video Compatibility 29
Weight 30
support
contacting Dell 33
T
Troubleshooting 23
contact Dell 23
Self-diagnostic 26
68 Index
Page 69

Projecteur Dell™ 3400MP
Manuel de l'utilisateur
Modèle XXX
www.dell.com | support.dell.com
Page 70

Remarques, notice, et précautions
REMARQUE : Une REMARQUE indique une information importante qui vous
permettra de mieux utiliser votre projecteur.
NOTICE : Une NOTICE indique soit une détérioration potentielle du matériel ou
une perte de données et vous indique comment éviter le problème.
ATTENTION: Un AVERTISSEMENT indique des risques potentiels de
détérioration de propriétés, de blessures corporelles, ou de mort.
____________________
Les informations contenues dans ce document peuvent être modifiées sans avertissement
préalable.
© 2005 Dell Inc. Tous droits réservés.
Toute reproduction sans la permission écrite de Dell Inc. est strictement interdite.
Les marques utilisées dans ce texte : Dell , le logo DELL, Dimension, OptiPlex, Dell Precision,
Latitude, Inspiron, DellNet, PowerApp, PowerEdge, PowerConnect, et PowerVault sont des
marques commerciales de Dell Inc.; DLP et Texas Instruments sont des marques commerciales
de Texas Instruments Corporation; Microsoft et Windows sont des marques déposées de
Microsoft Corporation; Macintosh est une marque déposée d'Apple Computer, Inc.
D’autres marques et appellations commerciales peuvent être utilisées dans le présent document
pour désigner soit les entités revendiquant les marques et les noms, soit leurs produits. Dell Inc.
rejette tout intérêt de propriété dans les marques et noms autres que les siens.
Restrictions et Limites de Garantie
Les informations contenues dans ce document, y compris toutes les instructions, les précautions, et les règlements d'approbation et de certification, sont basés sur les déclarations fournies
à Dell par le fabricant et n'ont pas été indépendamment vérifiés ou testés par Dell. Dell rejette
toute responsabilité concernant les anomalies pouvant apparaître dans ces informations.
Toutes les déclarations et revendications concernant les propriétés, capacités, vitesses ou qualifications des parties référencées dans ce document sont faites par le fournisseur et non par Dell.
Dell démentit avoir la connaissance de l'exactitude, perfection ou la vérification de telles déclarations.
____________________
Rév. Mai 2005 A00
Page 71

Table des matières
1 Votre projecteur Dell
A propos de votre projecteur . . . . . . . . . . . 74
2 Connexion de votre projecteur
Connexion à un ordinateur . . . . . . . . . . . . . . 76
Connexion à un lecteur DVD
Connexion à un lecteur DVD avec un
câble S-vidéo
Connexion d’un lecteur DVD avec un câble
composite . . . . . . . . . . . . . . . . . . . . 77
Connexion d’un lecteur DVD avec un câble
composantes
. . . . . . . . . . . . . . . . . . 76
. . . . . . . . . . . . . . . . . . 77
. . . . . . . . . . . . . 76
3 Utilisation de votre projecteur
Mise en marche de votre projecteur . . . . . . . . . . 79
Extinction de votre projecteur
Réglage de l'image projetée . . . . . . . . . . . . . 80
Réglage de la hauteur du projecteur
Abaissement du projecteur . . . . . . . . . . . . 80
Réglage du zoom et de la mise au point du projecteur . 81
Réglage de la taille de l'image projetée
. . . . . . . . . . . . . 79
. . . . . . . 80
. . . . . . . . 82
Contents 71
Page 72

Utilisation du panneau de contrôle . . . . . . . . . . 83
Utilisation de la télécommande
Utilisation de l'affichage d'écran . . . . . . . . . . 87
Paramètres de l'image
Menu Audio . . . . . . . . . . . . . . . . . . 89
Menu Gestion
Menu Langue
Menu Réinit. d'Usine . . . . . . . . . . . . . . 91
Menu source de l'ordinateur
Menu de source vidéo
. . . . . . . . . . . . . . . . . . 90
. . . . . . . . . . . . . 87
. . . . . . . . . . . . . . . . . 89
. . . . . . . . . . . . . 92
4 Dépanner votre projecteur
Auto-diagnostic pour vidéo . . . . . . . . . . . . . 96
Remplacer la lampe
. . . . . . . . . . . . . . . . . 96
5 Spécifications
6 Contacter Dell
. . . . . . . . . . . 85
. . . . . . . . . . 91
7 Appendice : Notices de Réglementation
Notices de la FCC (U.S. Seulement) . . . . . . . 133
Information NOM (Mexique Seulement)
8 Glossaire
9 Index
72 Contents
. . . . . 135
Page 73

1
Votre projecteur Dell
Votre projecteur est livré avec tous les éléments présentés ci-dessous. Assurez-vous
que votre appareil est complet, et contactez Dell s'il manquait un des composants.
Contenu de l'Emballage
Cordon d'alimentation de 1,8m
(3,0m en Amérique)
Câble S-vidéo de 2,0m Câble vidéo composite de 1,8m
Câble audio vers RCA de 1,8m Câble mini broche vers mini broche de
Câble de 1,8 m M1 vers D-sub/USB
1,8m
Piles (2) Télécommande
Votre projecteur Dell 73
Page 74

Contenu de l'Emballage
Documentation Mallette de transport
(suite)
A propos de votre projecteur
www.dell.com | support.dell.com
1 Panneau de contrôle
2 Bouton élévateur
3 Récepteur de télécommande
4 Objectif
5 Bague de mise au point
6 Ergot du zoom
74 Votre projecteur Dell
Page 75

Connexion de votre projecteur
1 Connecteur de sortie audio
2 Connecteur d'entrée audio
3 Connecteur M1-DA
4 Connecteur vidéo composite
5 Connecteur S-vidéo
6 Connecteur de cordon d’alimentation
7 Récepteur IR
2
Connexion de votre projecteur 75
Page 76

Connexion à un ordinateur
www.dell.com | support.dell.com
1 Cordon d’alimentation
2 Câble M1A vers D-sub/USB
Connexion à un lecteur DVD
Connexion à un lecteur DVD avec un câble S-vidéo
1 Cordon d’alimentation
2 Câble S-vidéo
76 Connexion de votre projecteur
Page 77

Connexion d’un lecteur DVD avec un câble composite
1 Cordon d’alimentation
2 Câble vidéo composite
Connexion d’un lecteur DVD avec un câble composantes
1 Câble d'alimentation
2Câble M1-A vers HDTV
REMARQUE : le câble M1-A vers HDTV n'est pas fourni par Dell. Faites appel à
un installateur professionnel pour le câble.
Connexion de votre projecteur 77
Page 78

www.dell.com | support.dell.com
78 Connexion de votre projecteur
Page 79

3
Utilisation de votre projecteur
Mise en marche de votre projecteur
REMARQUE : Allumer le projecteur avant d'allumer la source. Le témoin du
bouton d'alimentation clignote jusqu'à ce qu'il soit enfoncé.
1
Retirez le cache de l’objectif.
2
Connectez le cordon d'alimentation et les câbles de signal appropriés. Pour plus
d'informations sur la connexion du projecteur, voir « Connexion de votre
projecteur» à la page 75.
3
Appuyez sur le bouton d'alimentation (voir « Utilisation du panneau de contrôle»
à la page 83 pour repérer le bouton d'alimentation). Le logo Dell s'affiche pendant
30 secondes.
4
Allumez votre source (ordinateur, lecteur DVD, etc.). Le projecteur détecte
automatiquement votre source.
Si le message «Recherche du signal…» apparaît à l'écran, vérifiez que le(s)
câble(s) approprié(s) sont correctement connecté(s).
Si vous avez plusieurs sources connectées au projecteur, appuyez sur le bouton
Source sur la télécommande ou sur le panneau de contrôle pour sélectionner la
source désirée.
Extinction de votre projecteur
Remarque : ne débranchez pas le projecteur avant de l'avoir correctement
éteint comme expliqué dans la procédure suivante.
1
Appuyez sur le bouton d'alimentation.
2
Appuyez à nouveau sur le bouton d'alimentation. Les ventilateurs de
refroidissement continuent de tourner pendant environ 90 secondes.
3
Débranchez le cordon d'alimentation de la prise de courant et du projecteur.
Utilisation de votre projecteur 79
Page 80

REMARQUE : si vous appuyez sur le bouton d'alimentation quand le
projecteur fonctionne, le message «Eteindre la lampe?» apparaît à l'écran. Pour
effacer ce message, appuyez sur un bouton du panneau de contrôle ou ignorez le
message ; le message disparaît au bout de 5 secondes.
Réglage de l'image projetée
Réglage de la hauteur du projecteur
1
Appuyez le bouton élévateur.
2
Elevez le projecteur de l'angle d'affichage désiré, puis relâchez le bouton afin de
verrouiller le pied élévateur dans la position voulue.
3
Utilisez la molette de réglage d'inclinaison pour régler avec précision l'angle
www.dell.com | support.dell.com
d'affichage.
Abaissement du projecteur
1
Appuyez le bouton élévateur.
2
Abaissez le projecteur, puis relâchez le bouton afin de verrouiller le pied élévateur
dans la position voulue.
1 Bouton élévateur
2 Pied élévateur
80 Utilisation de votre projecteur
Page 81

3 Molette de réglage d'inclinaison
Réglage du zoom et de la mise au point du
projecteur
ATTENTION : pour éviter d'endommager le projecteur, assurez-vous que le
zoom de l'objectif et le pied élévateur sont entièrement rétractés avant de
déplacer le projecteur ou de le ranger dans son étui de transport.
1
Tournez l’ergot du zoom pour rapprocher et éloigner l'image.
2
Faites tourner la bague de mise au point jusqu'à ce que l'image soit nette. La mise
au point du projecteur peut être réglée dans les distances comprises entre 3,9
pieds et 39,4 pieds (1,5 m à 12 m).
1 Ergot du zoom
2 Bague de mise au point
Utilisation de votre projecteur 81
Page 82

Réglage de la taille de l'image projetée
www.dell.com | support.dell.com
Ecran
(Diagonale)
Taille de
l'écran
Distance 4,9'(1,5 m) 11,2'(3,4 m) 18,0'(5,5 m) 25,3'(7,7 m) 32,2'(9,8 m) 39,4'(12,0 m)
* Ce tableau n'est fourni à l'utilisateur qu'à titre de référence.
Max. 36,9"
(93,8 cm)
Min. 31,7"
(80,5 cm)
Max.
(l x H)
(l x H)
29,5"X22,1" 67,2"X50,4" 108,0" X
(75,0 cm X
56,3 cm)
Min.
25,3" X 19,0" 57,7" X
(64,4 cm X
48,3 cm)
84,0"
(213,4 cm)
72,1"
(183,1 cm)
(170,7 cm X
128,0 cm)
43,3"
(146,5 cm X
109,9 cm)
135,0"
(342,9 cm)
115,9"
(294,3 cm)
81,0"
(274,3 cm X
205,7 cm)
92,7" X 69,5" 130,3" X 97,7" 165,8" X
(235,5 cm X
176,6 cm)
189,8"
(482,0 cm)
162,9"
(413,7 cm)
151,8"X113,9" 193,2" X
(385,6 cm X
289,2 cm)
(331,0 cm X
248,2 cm)
241,5"
(613,4 cm)
207,3"
(526,5 cm)
144,9"
(490,7 cm X
368,0 cm)
124,4"
(421,2 cm X
315,9 cm)
295,5" (750,6
cm)
253,6" (644,3
cm)
236,4" X 177,3"
(600,5 cmX
450,3 cm)
202,9" X 152,2"
(515,4 cm X
386,6 cm)
82 Utilisation de votre projecteur
Page 83

Utilisation du panneau de contrôle
1 Alimentation Appuyez pour allumer et éteindre le projecteur.
Pour plus d'informations, voir « Mise en marche
de votre projecteur» à la page 79 et « Extinction
de votre projecteur» à la page 79.
2 Source Appuyez pour sélectionner la source (RVB,
analogique, composite, Composantes-i, S-vidéo
et YPbPr analogique) quand plusieurs sources
sont connectées au projecteur.
3 Réglage du trapèze Appuyez pour régler la déformation de l'image
provoquée par l'inclinaison du projecteur. (± 16
degrés)
4 Resync Appuyez pour synchroniser le projecteur sur la
source d'entrée. Resync ne fonctionne pas si
l'affichage d'écran (OSD) est affiché.
5 Menu Appuyez pour activer l'OSD. Utilisez les touches
de direction et le bouton Menu pour naviguer
dans l'OSD.
Utilisation de votre projecteur 83
Page 84

6 Indicateur
d'avertissement TEMP
• Si l'indicateur TEMP s'allume en continu en
orange, cela signifie que le projecteur
surchauffe. L'affichage s'éteint
automatiquement. Essayez de rallumer
l'affichage quand le projecteur aura refroidi. Si
le problème persiste, contactez Dell.
•Si l'indicateur TEMP clignote en orange, cela
signifie qu'un ventilateur du projecteur est
tombé en panne et le projecteur s'éteindra
automatiquement. Si le problème persiste,
contactez Dell.
7 Indicateur
www.dell.com | support.dell.com
d'avertissement LAMP
Si l'indicateur LAMP s'allume en orange fixe,
remplacez la lampe.
8 Entrée Appuyez pour confirmer la sélection de l'élément.
9 Réglage du trapèze Appuyez pour ajuster la déformation de l'image
provoquée par l'inclinaison du projecteur. (± 16
degrés)
10 Haut et Bas Appuyez pour sélectionner les éléments de
l'OSD.
11 Boutons et Appuyez pour ajuster le paramètre de l'OSD.
84 Utilisation de votre projecteur
Page 85

Utilisation de la télécommande
1 Alimentation Appuyez pour allumer et éteindre le projecteur.
Pour plus d'informations, voir « Mise en marche
de votre projecteur» à la page 79 et « Extinction
de votre projecteur» à la page 79.
2 Appuyez pour ajuster le paramètre de l'OSD.
3 Laser Dirigez la télécommande vers l'écran, appuyez sur
le bouton laser en le maintenant enfoncé pour
activer le faisceau laser.
4 Volume Appuyez pour augmenter le volume.
5 Muet Appuyez pour activer ou désactiver le haut-
parleur du projecteur.
6 Volume Appuyez pour diminuer le volume.
7 Clic droit Clic droit de la souris.
Utilisation de votre projecteur 85
Page 86

8 Mode Vidéo Le Microprojecteur Dell 3400MP dispose de
configurations préréglées optimisées pour afficher
des données (Graphismes PC) ou vidéo (films,
jeux, etc.). Appuyez sur le bouton mode Vidéo
pour permuter entre le mode PC, mode Film,
mode Jeu, sRVB ou mode Utilisateur
(permettant d'enregistrer vos propres
paramètres). Appuyez une fois sur le bouton
mode Vidéo pour afficher le mode d’affichage
actuel. Appuyez à nouveau sur le bouton mode
Vidéo pour passer d’un mode à l’autre.
9 Écran vide Appuyez pour masquer l’image, appuyez à
www.dell.com | support.dell.com
nouveau pour rétablir l’affichage de l’image.
10 Lumière LED Indicateur LED.
11 Bouton haut Appuyez pour sélectionner les éléments de
l'OSD.
12 Bouton Entrée Appuyez pour confirmer la sélection.
13 Appuyez pour ajuster le paramètre de l'OSD.
14 Menu Appuyez pour activer l'OSD.
15 Bouton Bas Appuyez pour sélectionner les éléments de
l'OSD.
16 Page Appuyez pour atteindre la page précédente.
17 Page Appuyez pour atteindre la page suivante.
18 Pavé directionnel Le pavé directionnel peut être utilisé pour
contrôler le mouvement de la souris. La fonction
souris est activée lorsque vous utilisez le câble M1
pour connecter votre ordinateur et le projecteur.
19 Clic gauche Clic gauche de la souris
20 Trapèze Auto Appuyez sur Oui pour activer la correction auto
de la déformation de l’image dûe à l’inclinaison
du projecteur.
21 Source Appuyez pour permuter entre les sources RVB
Analogique, RVB Numérique, Composite,
Composantes-i, S-vidéo et YpbPr Analogique.
22 Réglage auto Appuyez pour synchroniser le projecteur sur la
source d'entrée. Réglage auto ne fonctionne pas
lorsque l'OSD (Affichage d'écran) est affiché.
86 Utilisation de votre projecteur
Page 87

Utilisation de l'affichage d'écran
Le projecteur possède un affichage d'écran (OSD) multilingue qui peut être
affiché avec ou sans source d'entrée présente.
Dans le menu Principal, appuyez sur ou pour naviguer parmi les onglets.
Appuyez sur le bouton Entrée sur le panneau de contrôle ou sur la télécommande
pour sélectionner un sous-menu.
Dans le sous-menu, appuyez sur ou pour marquer une sélection. Quand un
élément est sélectionné, la couleur passe au gris foncé. Utilisez ou sur le
panneau de contrôle ou su la télécommande pour effectuer le réglage d'un
paramètre.
Pour quitter l'OSD, allez à l'onglet Quitter et appuyez sur le bouton Entrée sur le
panneau de contrôle ou sur la télécommande.
Paramètres de l'image
Utilisation de votre projecteur 87
Page 88

LUMINOSITÉ—Utilisez
et
pour régler la
luminosité de l'image.
ONTRASTE—Utilisez
C
et
pour contrôler
la différence entre les parties les plus
lumineuses et les parties les plus sombres de
l'image. Le fait régler le contraste modifie la
quantité de noir et de blanc dans l'image.
EMP. COULEUR—Permet de régler la
T
température de couleur. Plus la température
de couleur est élevée, plus l'écran paraît bleu,
moins la température est élevée, plus l'écran
www.dell.com | support.dell.com
apparaît rouge. Le mode utilisateur active les
valeurs dans le menu «Param. Couleur».
ARAM. COULEUR—Permet de régler le rouge, vert et bleu manuellement.
P
RAPÈZE—Permet de régler la déformation de l'image dûe à l'inclinaison du
T
projecteur (± 16 degrés).
ÉGLAGE AUTO—Permet de régler automatiquement la déformation de l'image en
R
inclinant le projecteur.
PROPORTIONS—Permet de régler automatiquement la déformation de l'image en
inclinant le projecteur.
ORMAT DE L'IMAGE—Permet de sélectionner un format d'image pour définir la
F
manière dont l'image apparaît.
• 1:1 — La source d'entrée s'affiche sans échelle.
Utilisez le format d'image 1:1 si vous utilisez un des éléments suivants :
– Câble VGA et l'ordinateur a une résolution inférieure à XGA (1024 x 768)
– Câble composantes (576p/480i/480p)
–Câble S-Vidéo
–Câble composite
• 16:9 — La source d'entrée est mise à l’échelle pour s’adapter à la largeur de l’écran.
• 4:3 — La source d'entrée est mise à l'échelle pour s'adapter à l'écran.
Utilisez 16:9 ou 4:3 si vous utilisez un des éléments suivants :
– Résolution d'ordinateur supérieure à XGA
– Câbles composantes (1080i ou 720p)
MODE VIDÉO—Permet de sélectionner un mode pour optimiser l'image d'affichage
en vous basant sur la manière dont le projecteur est utilisé : Film, Jeu, PC, sRVB
(offre une présentation de couleur plus exacte), et Utilisateur (définissez vos
88 Utilisation de votre projecteur
Page 89

paramètres personnels). Lorsque vous réglez les paramètres sur Intensité de Blanc
ou Degamma, le projecteur passera automatiquement sur Utilisateur.
NTENSITÉ DE BLANC—Sélectionnez 0 pour optimiser la reproduction de couleur et
I
10 pour optimiser la luminosité.
EGAMMA—Sélectionnez entre 1 et 4 pour changer les performances de couleur de
D
l'affichage.
Menu Audio
VOLUME—Appuyez sur
pour diminuer le
volume et sur pour l'augmenter le
volume
.
UET—Permet de couper le son.
M
Menu Gestion
EMLAC. MENU—Permet de sélectionner
l'emplacement de l'OSD à l'écran.
MODE PROJECT—Permet de sélectionner la
manière dont l'image apparaît :
• Projection Avant-Bureau (par défaut).
• Projection Arrière-Bureau — Le
projecteur inverse l'image de sorte que vous
pouvez projeter derrière un écran translucide.
TYPE DE SIGNAL—Permet de sélectionner
manuellement le type de signal RVB, YCbCr,
YPbPr.
EURE LAMPE—Permet d'afficher les heures
H
d'utilisation depuis la réinitialisation de la
lampe.
ÉINIT DE LAMPE—Après avoir installé une
R
lampe neuve, sélectionnez Oui pour réinitialiser la minuterie de la lampe.
E
CONOMIE ENERGIE—Sélectionnez Oui pour définir le délai d'économie d'énergie. Le
délai est la durée pendant laquelle vous voulez que votre projecteur attende sans
Utilisation de votre projecteur 89
Page 90

signal d'entrée. Après ce délai, le projecteur entre en mode d'économie d'énergie et
éteint la lampe. Le projecteur se rallume quand il détecte un signal d'entrée ou
quand vous appuyez sur le bouton d'alimentation. Au bout de deux heures, le
projecteur s'éteint et vous devez appuyer sur le bouton d'alimentation pour le
rallumer.
OURCE AUTO—
S
Sélectionnez
Act
(par défaut) pour détecter automatiquement
les signaux d'entrée disponibles. Quand le projecteur est allumé et que vous
appuyez sur
disponible suivant. Sélectionnez
actuel. Quand
SOURCE
Désac
, il trouve automatiquement le signal d'entrée
Désac
pour verrouiller le signal d'entrée
est sélectionné et que vous appuyez sur
SOURCE
vous sélectionnez le signal d'entrée que vous voulez utiliser.
MODE ECO—Sélectionnez Act pour utiliser le projecteur à un niveau d'intensité plus
www.dell.com | support.dell.com
faible (136 Watts), ce qui peut offrir une plus grande durabilité de la lampe, un
fonctionnement plus silencieux et une luminance plus faible à l'écran.
Sélectionnez Désac pour une utilisation à un niveau d'intensité normal
(156 Watts).
OT DE PASSE ACTIF —Sélectionnez Act pour définir un mot de passe individuel.
M
Sélectionnez Désac pour désactiver la fonction de mot de passe.
MOD. MOT DE PASSE—Permet de pour changer le mot de passe à votre
convenance.
Menu Langue
Appuyez sur ou pour sélectionner la
langue de votre choix pour l'OSD.
,
90 Utilisation de votre projecteur
Page 91

Menu Réinit. d'Usine
Réinit. d'Usine
-- Sélectionnez Oui pour
rétablir les paramètres par défaut du
projecteur. Les éléments de réinitialisation
comprennent à la fois les paramètres
sources de l'ordinateur et les paramètres de
source vidéo.
Menu source de l'ordinateur
REMARQUE : ce menu est disponible uniquement lors d'une connexion à un
ordinateur.
RÉQUENCE—Permet de modifier la fréquence
F
d'horloge des données d'affichage pour qu'elles
correspondent à la fréquence de la carte
graphique de votre ordinateur. Si vous voyez
une barre verticale scintillante, utilisez
Contrôle de fréquence pour diminuer les
barres. Il s'agit d'un réglage approximatif.
UIVI—Permet de synchroniser la phase du
S
signal d'affichage avec la carte graphique. Si
l'image est instable ou scintillante, utilisez
Suivi pour la corriger. Il s'agit d'un réglage précis.
REMARQUE : réglez tout d’abord la Fréquence puis le Suivi.
OSITI. H—Appuyez sur
P
gauche et sur pour régler la position horizontale de l'image à droite.
POSIT. V—Appuyez sur
et sur pour régler la position verticale de l'image vers le haut
pour régler la position horizonale de l'image à
pour régler la position verticale de l'image vers le bas
.
Utilisation de votre projecteur 91
Page 92

Menu de source vidéo
REMARQUE : ce menu est uniquement disponible avec les signaux S-vidéo,
vidéo (composite) connectés.
SATURATION—Permet de régler la couleur d'une
source vidéo depuis le noir et blanc à une
couleur complètement saturée. Appuyez sur
pour diminuer la quantité de couleur dans
l'image et sur pour augmenter la quantité
de couleur dans l'image.
FFINEMENT—Appuyez sur
A
www.dell.com | support.dell.com
la netteté et sur pour l'augmenter la
netteté.
TEINTE—Appuyez sur
quantité de vert dans l'image et sur pour augmenter la quantité de rouge.
pour diminuer
pour augmenter la
92 Utilisation de votre projecteur
Page 93

4
Dépanner votre projecteur
Si vous rencontrez des problèmes avec le projecteur, reportez-vous aux conseils de
dépannage suivants. Si le problème persiste, contactez Dell.
Problème Solution Possible
Aucune image n'apparaît à
l'écran.
• Assurez-vous que le cache de l'objectif est
retiré et que le projecteur est allumé.
• Assurez-vous que le port graphique externe
est activé. Si vous utilisez un ordinateur
portable Dell, appuyez sur Erreur ! Nom du
fichier non spécifié.Erreur ! Nom du fichier
non spécifié.. Pour les autres
ordinateurs, voyez votre documentation.
• Vérifiez que tous les câbles sont
correctement connectés. Voir«Connexion de
votre projecteur» à la page 75.
• Assurez-vous que les broches des
connecteurs ne sont pas tordues ou cassées.
• Assurez-vous que la lampe est correctement
installée (voir «Remplacer la lampe» à la
page 96).
• Exécutez le test d'auto diagnostique.
Voir«Auto-diagnostic pour vidéo» à la
page 96 . Assurez-vous que les couleurs du
modèle de test sont correctes.
Dépanner votre projecteur 93
Page 94

Problème
(continued)
Image partielle, qui défile ou
affichée de façon incorrecte.
www.dell.com | support.dell.com
L'écran n'affiche pas votre
présentation
L'image est instable ou
vacillante
L'image présente une barre
verticale vacillante
La couleur de l'image n'est
pas correcte
Solution Possible
1
Appuyez sur le bouton
(continued)
Resync
sur la
télécommande ou sur le panneau de
contrôle.
2
Si vous utilisez un ordinateur portable Dell,
paramétrez la résolution de l'ordinateur sur
XGA (1024 x 768):
a
Faites un clic droit sur une portion non
utilisée de votre bureau de Windows,
cliquez sur
Propriétés
ensuite l'onglet
b
Vérifiez que le paramètre est 1024 x 768
et sélectionnez
Para mè tres
.
pixels pour le port du moniteur externe.
c
Appuyez sur .
Si vous rencontrez des difficultés pour
changer les résolutions ou que votre moniteur
se fige, redémarrez l'ensemble de l'équipement
ainsi que le projecteur.
Si vous n'utilisez un ordinateur portable Dell,
reportez-vous à votre documentation.
Si vous utilisez un ordinateur portable,
appuyez sur .
Réglez le suivi dans l'onglet Source
d'ordinateur de l'OSD.
Réglez la fréquence dans l'onglet Source
d'ordinateur de l'OSD.
• Si le signal de sortie de votre carte graphique
est sync sur Vert, et que vous voulez afficher
un signal VGA à 60Hz, allez à OSD
sélectionnez Gestion, sélectionnez Type de
RVB
Signal et sélectionnez ensuite
.
• Exécutez le Test d'auto diagnostic (voir
«Auto-diagnostic pour vidéo
» ) pour le
diagnostic préliminaire concernant les
problèmes de couleur. Assurez-vous que les
couleurs du modèle de test sont correctes.
94 Dépanner votre projecteur
Page 95

Problème
(continued)
L'image a une mauvaise mise
au point
Solution Possible
1
Ajustez la Bague de mise au point située sur
(continued)
l'objectif du projecteur.
2
Assurez-vous que l'écran de projection se
trouve à la bonne distance du projecteur
(4,9 pieds [1,5 m] à 39,4 pieds [12 m]).
L'image est allongée en
affichage DVD de 16:9
Le projecteur détecte automatiquement un
DVD de 16:9 et ajuste le format de l'image en
plein écran avec un paramètre par défaut de
4:3 (boîte à lettres).
Si l'image est encore trop allongée, vous aurez
alors besoin d'ajuster les proportions comme
suit:
• Veuillez sélectionner, si possible, le type de
format d'image 4:3 sur votre lecteur de DVD
(s'il en a la capacité).
• Si vous ne pouvez pas sélectionner le type de
format d'image 4:3 sur votre lecteur DVD,
sélectionnez le format d'image 4:3 dans le
Paramètres d'image
menu
dans l'OSD.
L'image est inversée Sélectionnez Gestion dans l'OSD et réglez le
mode de projection.
La lampe est grillée ou émet
des crépitements
Quand la lampe du projecteur atteint sa fin de
vie, elle peut griller et produire un fort
crépitement. Si cela se produit, le projecteur
ne se rallumera pas. Pour remplacer la lampe,
voir«Remplacer la lampe» à la page 96.
Le témoin LAMP s'allume en
orange fixe
Le témoin LAMP clignote en
orange
Si le témoin LAMP s'allume en orange fixe,
remplacez la lampe.
Si le témoin LAMP clignote en orange, le
capot de la lampe n'est pas fermé
correctement. Fermez correctement le capot
de la lampe. Si le problème persiste, contactez
Dell.
Le témoin TEMP s'allume en
orange fixe
Le projecteur a surchauffé. L'affichage s'éteint
automatiquement. Essayez de rallumer
l'affichage quand le projecteur aura refroidi. Si
le problème persiste, contactez Dell.
Dépanner votre projecteur 95
Page 96

Problème
Le témoin TEMP clignote en
orange
La télécommande ne
fonctionne pas correctement
ou dans une plage très limitée
(continued)
Solution Possible
Un ventilateur de projecteur est en panne et le
projecteur va s'arrêter automatiquement. Si le
problème persiste, contactez Dell.
La pile est peut-être déchargée. Vérifiez si le
rayon laser émis par la télécommande est trop
faible. Si c’est le cas, remplacez les 2 piles AA
par des neuves.
(continued)
Auto-diagnostic pour vidéo
Le projecteur Dell 3400MP offre un test d’auto-diagnostic de l’affichage vidéo du
www.dell.com | support.dell.com
projecteur (pour Vidéo, S-vidéo, Composant-i). Utilisez cette fonctionnalité
avancée pour l’auto-diagnostic préliminaire sur votre projecteur quand vous
rencontrez des problèmes d’affichage pour la vidéo.
1
Après avoir allumé le projecteur, appuyez simultanément pendant 3 secondes sur
les boutons "+" et "-" sur le panneau de commande et relâchez les boutons quand
l'écran se vide.
2
Appuyez à nouveau sur les boutons "+" et "-" pour quitter le mode de diagnostic.
3
En mode d’Auto diagnostic, l’écran exécutera un test avec cycle de sept couleurs
comme ci-après :
Rouge--> Vert--> Bleu--> Blanc--> Bleu Clair --> Vert Foncé--> Jaune. Assurezvous que les couleurs du modèle de test sont correctes. Contactez Dell si les
couleurs ne sont pas affichées correctement.
Remplacer la lampe
Remplacez la lampe quand le message suivant apparaît à l'écran «La lampe
approche la fin de sa durée de vie en fonctionnement en pleine puissance.
Remplacement conseillé !» www.dell.com/lamps apparaît à l'écran. Si ce problème
persiste après avoir remplacé la lampe, contactez Dell.
ATTENTION: La lampe devient très chaude en cours d'utilisation. Pour
remplacer la lampe attendez que le projecteur ait refroidi pendant au moins 30
minutes.
ATTENTION: Ne touchez l'ampoule ou le verre de la lampe à aucun moment.
L'ampoule pourrait exploser si vous ne la manipulez pas correctement, comme
par exemple si vous touchez l'ampoule ou le verre de la lampe.
1
Eteignez le projecteur et débranchez le cordon d’alimentation.
96 Dépanner votre projecteur
Page 97

2
Laisser refroidir le projecteur pendant au moins 30 minutes.
3
Desserrez les 2 vis de fixation du couvercle de la lampe, et retirez le couvercle.
4
Desserrez les 2 vis de fixation de la lampe.
5
Soulevez la lampe en la tenant par sa
partie métallique.
6
Suivez les étapes 1 à 5 à rebours pour
installer la nouvelle lampe.
7
Réinitialisez le temps d'utilisation de la
lampe en sélectionnant l'icône de gauche
Réinitialisation de la Lampe
Gestion de l'OSD
.
dans l'onglet
REMARQUE : Dell peut demander que
les lampes remplacées durant la
période de garantie lui soient
renvoyées. Sinon, contactez votre
agence de recyclage des déchets pour
obtenir l'adresse du dépôt le plus
proche.
ATTENTION: Elimination des lampes (pour les US seulement)
LES LAMPES À L'INTÉRIEUR DE CE PRODUIT CONTIENNENT DU MERCURE
ET DOIVENT ÊTRE RECYCLÉES OU ÉLIMINÉES CONFORMÉMENT AUX LOIS
LOCALES, DE L'ÉTAT OU FÉDÉRALES EN VIGUEUR. POUR PLUS
D'INFORMATIONS, ALLEZ À WWW.DELL.COM/HG OU CONTACTEZ L'ALLIANCE
DES INDUSTRIES ÉLECTRONIQUES À WWW.EIAE.ORG. POUR LES
INFORMATIONS D'ÉLIMINATION SPÉCIFIQUE DES LAMPES ALLEZ À
WWW.LAMPRECYCLE.ORG.
Dépanner votre projecteur 97
Page 98

www.dell.com | support.dell.com
98 Dépanner votre projecteur
Page 99

Spécifications
5
Valve légère Technologie simple circuit DDR
(double vitesse de transfert) DLP™
Luminosité 1500 Lumens ANSI (Max.)
Taux de contraste 2100:1 type (Full On / Full Off)
Uniformité 85% type (Standard du Japon - JBMA)
Lampe Lampe de 156 watts 3000 heures
remplaçable par l'utilisateur (jusqu'à
4000 heures en mode éco)
Nombre de Pixels 1024 x 768 (XGA)
Couleurs affichables 16,7M de couleurs
Vitesse de roue chromatique 100~127,5Hz (2X)
Objectif de projection F/2,7~2.88, f=28,43~32,73 mm avec
objectif zoom manuel 1.15x
Taille d'Ecran de projection 31,7-246 pouces (diagonale)
Distance de Projection 4.9~39,4 pieds (1,5 m~12 m)
Compatibilité vidéo Compatible avec NTSC, NTSC4.43,
PAL, PAL-M, PA L-N, SECAM et
HDTV (1080i, 720p, 576i/p, 480i/p)
Capacité vidéo composite, vidéo
composantes et S-vidéo
H. Fréquence 15kHz/-80kHz (Analogique/
Numérique)
V. Fréquence 50Hz/-85Hz (Analogique / Numérique)
Alimentation Universelle 100-240 V CA 50-60 Hz
avec entrée PFC
Consommation de courant 195 watts type, 165 watts en mode éco
5
Spécifications 99
Page 100

Audio 1 haut-parleur, 1 watts RMS
Niveau de bruit 38 dB(A) mode Full-on, 36 dB(A)
mode Eco
Poids 2,4 lbs (1,09 kg)
Dimensions (l x H x P) Externe 8,0 x 6,0 x 2,9 ± 0,04 pouces
(204 x 154 x 73,7 ± 1 mm)
Environnement Température de fonctionnement : 5
°
C (41°F- 95°F)
- 35
Humidité: 80% maximum
Température de stockage : -20
www.dell.com | support.dell.com
(-4°F a 140°F)
Humidité: 80% maximum
Réglementation FCC, CE, VCCI, UL, cUL, TüV- GS,
ICES-003, MIC, C-Tick, GOST,
PCBC, CCC, PSB, EZU, NOM, S-
Tu V / A r g e n t i n e
Connecteurs d'E/S Alimentation: Prise d'entrée
d’alimentation CA
Entrée ordinateur : Une M1-DA pour
signaux d'entrée analogique /
numérique / composantes, HDTV
Entrée vidéo : une vidéo composite
RCA et une S-vidéo
Entrée audio : une prise téléphone
(diamètre 3,5 mm)
Sortie audio : une prise téléphone
(diamètre 3,5 mm)
°
C à 60°C
°
C
100 Spécifications
 Loading...