

Dell 3200 Service Manual

Please check out our eBay auctions for more great
deals on Factory Service Manuals:

®
'HOO,QVSLURQ
5()(5(1&($1'
7528%/(6+227,1*
*8,'(
ZZZGHOOFRP

_____________________
Information in this document is subject to change without notice.
1994–1997 Dell Computer Corpor at ion. All rights reserved.
Reproduction in any ma nner whatsoever without the w rit ten permission of Dell Compu ter Corporation is strictly forbidden.
Trademarks used in this text: Dell, the DELL logo, and Dell Dimension are registered trademarks, DellWare is a registered service mark, and Inspiron
is a trademark of Dell Com puter Corporation; Micro s oft , MS-DOS, and Wi ndows are registered tradema rks of Mic rosoft Corporation; Intel and
Pentium are register ed tr ademar ks an d MMX is a trademark of Intel Corporation; CompuServe is a registered trademark of CompuServe, Inc.; Lotus
is a registered trademark of Lotus Development Corporation.
Other trademarks and trade names may be used in this document to refer to either the entities claiming the marks and names or their products. Dell
Computer Corporation disclaims any propriet ary interest in trademar ks and trade names other than its own .
November 1997 P/N 55899 Rev. A01

Safety Instructions
U
se the following safety guidelines to he lp protect
your computer from potential damage and to help ensure
your own personal safety.
W
hen Using Your Computer
As you use your computer, observe the following safety
guidelines:
•
When setting up the computer for work, place it on a
level surface.
•
When traveling, do not check the computer as baggage. You can put your computer through an X-ray
security machine, but never put your computer
through a metal detector. If you have the computer
checked by hand, be sure to have a charged battery
available in case you are asked to turn on the
computer.
•
When traveling with the hard-disk drive removed
from the computer, wrap the drive in a nonconducting
material, such as cloth or paper. If you have the drive
checked by hand, be ready to install the drive in the
computer. You can put the hard-disk drive through an
X-ray security machine, but never put the drive
through a metal detector.
•
When traveling, do not place the computer in overhead storage compartments where it could slide
around. Do not drop your computer or subject it to
other mechanical shocks.
•
Do not carry a battery in your pock et, pur se, o r other
container where metal objects (such as car keys)
could short-circuit the battery terminals. The resulting excessive current flow can cause extremely high
temperatures and may result in damage from burns.
•
Protect your computer, battery, and hard-disk drive
from environmental hazards such as dirt, dust, food,
liquids, temperature extremes, and overexposure to
sunlight.
•
When you move your computer between environments with very different temperature and/or
humidity range s, condensation may form on or
within the computer. To avoid damaging the computer, allow sufficient time for the moisture to
evaporate before using the computer.
CAUTION: When taking the computer from
low-temperature conditions into a warmer
environment or from high-temperature conditions into a cooler environment, allow the
computer to acclimate to room temperature
before turning on power.
•
If using alternating current (AC) power, plug the AC
adapter power cable into a properly gr ounded power
source. Be sure that nothing rests on your adapter’s
power cable and that the cable is not located where it
can be tripped over or stepped on.
•
When you disconnect a cable, pull on its connector
or on its strain-relief loop, not on the cable itself. As
you pull out the connector, keep it evenly aligned to
avoid bending any connector pins. Also, before you
connect a cable make sure both connectors are correctly oriented and aligned.
•
Do not attempt to service the computer yourself.
Always follow installation instructions closely.
•
Handle components with care. Hold a component
such as a memory module by its edges, not its pins.
•
When removing a memory module from the system
board or disconnecting a peripheral device from the
v

computer, wait 5 seconds after turning off the computer before removing the memory module or
disconnecting the device to help avoid possible damage to the system board.
•
Before you clean your computer, turn it off, unplug it
from its power source, and remove the battery.
•
Clean your computer with a soft cloth dampened
with water rather than with liquid or aerosol
cleaners.
Clean the display with a soft, clean cloth and commercial window cleaner that does not contain wax or
abrasives. Apply the cleaner to the cloth; then strok e
the cloth across the display in one direction, moving
from the top of the display to the bottom. If the display contains grease or some other contaminant, use
isopropyl alcohol instead of commercial window
cleaner.
•
If your computer gets wet or is damaged, follow the
procedures described in Chapter 3, “Troublesho oti ng
Your Computer.” If, after following these procedures,
you confirm that your computer is not operati ng pr operly, contact Dell Computer Corporation. (See
Chapter 5, “Getting Help,” for the appropriate telephone number.)
•
When using an external monitor with your co mputer,
set the monitor at a comfortable viewing distance
(usually 510 to 610 millimeters [20 to 24 inches]
from your eyes). Make sure the monitor screen is at
eye level or slightly lower when you are sitting in
front of the monitor.
•
Use a chair that provides good lower-back support.
•
Keep your forearms horizontal with your wrists in a
neutral, comfortable position while using the keyboard, trackba ll, touch pad, or external mouse.
•
Always use the palmrest with the keyboard, touch
pad, or trackball. Leave space to rest your hands
when using an external mouse.
•
Let your upper arms hang naturally at your sides.
•
Sit erect with your feet resting on the floor and your
thighs level.
•
When sitting, make sure the weight of your legs is on
your feet and not on the front of your chair seat.
Adjust your chair’s height or use a footrest, if necessary, to maintain proper posture.
•
Vary your work activities. Try t o organize your work
so that you do not have to type for extended periods
of time. When you stop typing, try to do things that
use both hands.
E
rgonomic Computing Habits
WARNING: Improper or prolonged keyboard use
may result in injury.
For comfort and efficiency, observe the following ergonomic guidelines when setting u p an d using your
computer:
•
Position your computer directly in front of you as
you work.
•
Adjust the tilt of the computer’s display, its contrast
and/or brightness settings, and the lighting around
you (such as overhead lights, desk lamps, and the
curtains or blinds on nearby windows) to minimize
reflections and glare on the display.
vi
W
hen Removing or Instal ling
Memory Modules
Before removing o r installing memory mod ul es, perform
the following steps in the sequence indicated.
CAUTION: The only time you should ever access
the inside of your computer is when you are installing memory modules.
Wait 5 seconds after turning off the computer
before disconnecting a peripheral device or removing a memory module to help prevent possible
damage to the system board.
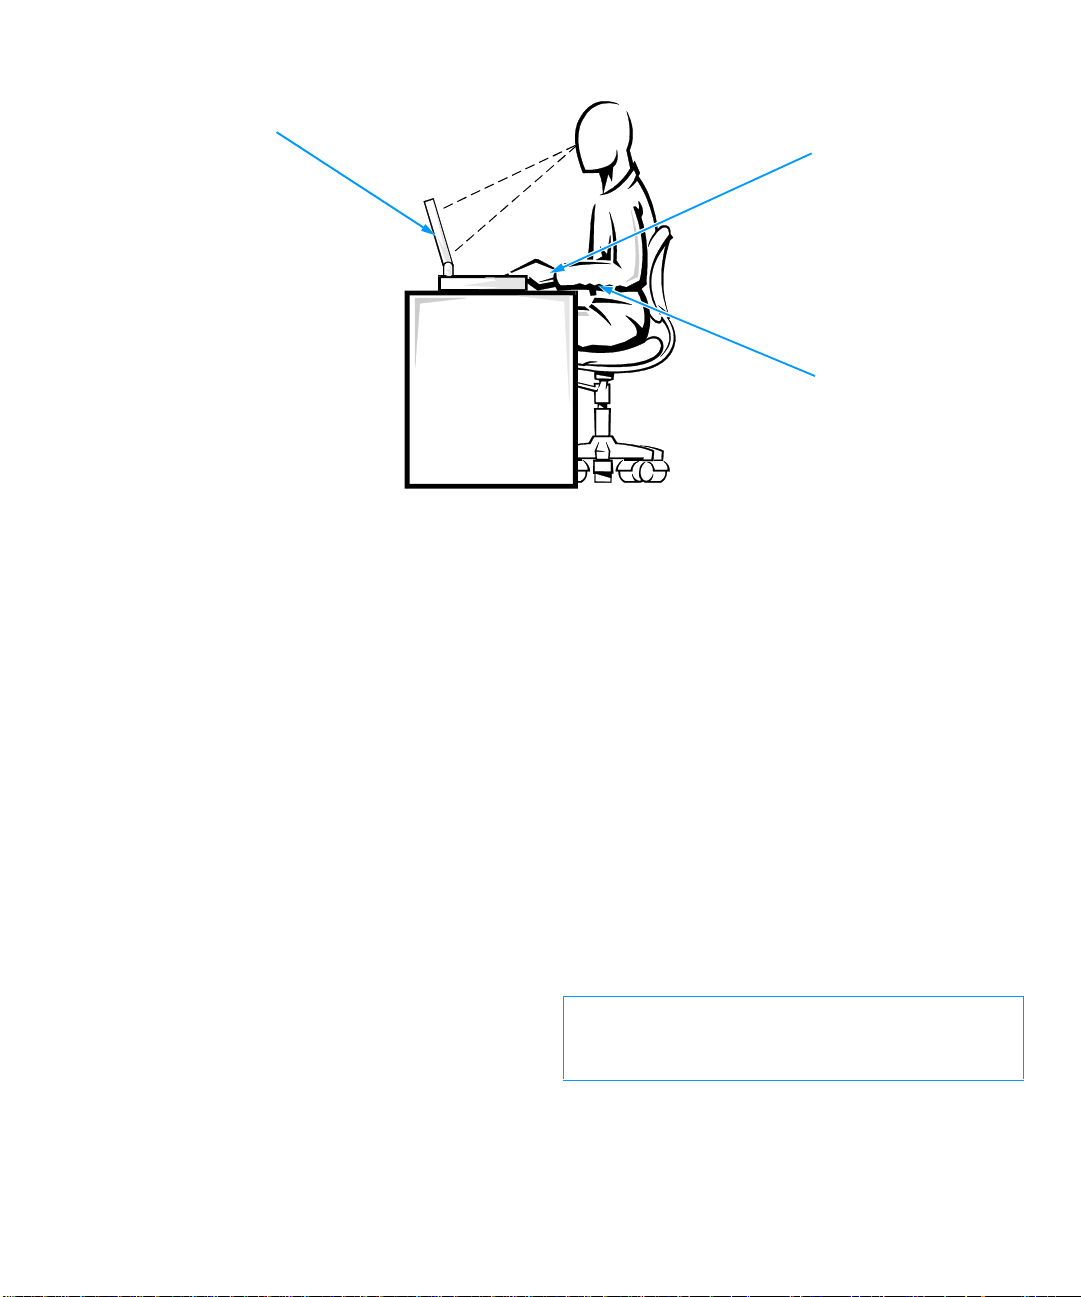
computer positioned
directly in front of user
wrists relaxed and flat
arms at desk level
1. Turn off your computer and any attached
peripherals.
2. Disconnect your computer and peripherals from
AC power to reduce the potential for personal
injury or shock. Also, disconnect any telephone or
telecommunication lines from the computer.
3. Remove the main battery from the battery com-
partment and, if necessary, the secondary battery
from the options bay.
4. Ground yourself by touching the unpainted metal
surface of the I/O panel on the back of the
computer.
While you work, periodically touch the I/O panel to
dissipate any static electricity that might harm
internal components.
P
rotecting Against Electrostatic
Discharge
Static electricity can harm electronic components inside
your computer. To prevent static damage, discharge static
electricity from your body before you touch any of your
computer’s electronic components, such as a memory
module. You can do so by touching an unpainted metal
surface on the computer’s I/O panel.
As you continue to work inside the computer, periodically touch an I/O connector to remove any static charge
your body may have accumulated.
You can also take the following steps to prevent damage
from electrostatic discharge (ESD):
When unpacking a static-sensitive component from
•
its shipping carton, do not remove the component
from the antistatic packing material until you are
ready to install the component. Just before unwrapping the antistatic packaging, be sure to discharge
static electricity from your body.
When transporting a sensitive component, first place
•
it in an antistatic container or packaging.
Handle all sensitive components in a static-safe area.
•
If possible, use antistatic floor pads and workbench
pads.
The following caution may appear throughout this document to remind you of these precautions:
CAUTION: See “Protecting Against Electrostatic
Discharge” in the safety instructions at the front of
this guide.
vii

viii

Preface
A
bout This Guide
This guide is intended for anyone who uses the Dell
Inspiron 3000 portable computer. It can be used by both
first-time and experienced computer users who want to
learn about the features of the computer. This guide also
provides basic troublesh ooti ng procedu r es and inst r uctions for using the Dell Diagnostics to test your computer
and its components.
Summaries of the chapters and appendixes of this guide
follow:
•
Read Chapter 1, “Introduction,” for an overview of
the computer features and a list of available
upgrades.
•
Read Chapter 2, “Customizing System Features,” to
learn how to access the Setup program, which allows
you to change system settings, such as your computer’s power conservation features.
•
Read Chapter 3, “Troubleshoot ing Your C omputer,”
for some initial checks and procedures that can be
used to solve basic computer problems and fo r some
general guidelines on analyzing software prob lems.
This chapter also discusses messages and beep
codes.
•
Read Chapter 4, “Running the Dell Diagnostics,” for
hardware-related problems. The Dell Diagnostics
checks your computer’s hardware and isolates
component problems.
•
Chapter 5, “Getting Help,” describes the help tools
Dell provides to assist you if you have a problem
with the computer. It also explains how and when to
call Dell for technical assistance.
•
Appendix A, “Technical Specifications,” is intended
primarily as reference material if you are interested
in learning more about the details of your computer.
•
Appendix B, “Diagnostic Video Tests,” provides
samples of screens displayed when you run the
Video Test Group of the Dell Diagnostics. These
screens help you check a particular video functi on or
group of functions on the built-in display or on an
external monitor.
•
Appendix C, “Regulatory Notices,” is for users who
are interested in which regulatory agencies have
tested and approved the Dell Inspiron 3000 portable
computer.
•
Appendix D, “Warranties and Return Policy,”
describes the warranty and return policy for your
Dell computer.
W
arranty and Return Policy
Information
Dell Computer Corporation (“Dell”) manufactures its
hardware products from parts and components that are
new or equivalent to new in accordance with industrystandard practices.
For information about the Dell warranty and return policy, see Appendix D, “Warranties and Return Policy.”
ix
O
ther Documents You May Need
N
otational Conventions
Besides this Reference and Troubleshooting Guide, the following online documentation is included with your
computer:
The Windows-based Sys tem User’s Guide contains essential information you need to use
your portable computer. Look for the System
User’s Guide icon in the Dell Accessories folder.
The Dell Program Diskette Maker helps you
with one of the most critical parts of setting up
your system—creating program diskette sets.
Look for the Dell Program Diskette Maker icon in the
Dell Accessories folder.
The Dell Service and Support Polici es provides
information about service and suppor t policies,
guarantees, and warranties (in the United
States only). Look for the Dell Services and Support Policies icon in the Dell Accessories folder.
You may also have one or more of the following
documents.
NOTE: Documentation updates are sometimes included
with your computer to describe changes to your computer or software. Always read these updates before
consulting any other documentation because the updates
contain the latest information.
The Dell-Installed Microsoft Windows 95 Setup
•
Guide, which describes how to set up the Microsoft
Windows 95 operating system on your Dell
computer.
Microsoft Windows 95 operating system documenta-
•
tion is included i f you order ed your operating sys tem
from Dell. This documentation describes how to
configure and use your operating system software.
Documentation is included with any options you
•
purchase separately from your computer. This documentation includes information that you need to
configure and install these options in your Dell
computer.
“Readme” files may be installed on your hard-disk
•
drive to provide last-minute updates about technical
changes to your computer or advanced technical reference material intended for experienced users or
technicians.
The following subsections list notational conventions
used in this document.
Warnings, Cautions, and Notes
Throughout this guide, there may be blocks of text
printed in color or in italic type. These blocks are warnings, cautions, and notes, and they are used as follows:
WARNING: A WARNING indicates the potential
for bodily harm and tells you how to avoid the
problem.
CAUTION: A CAUTION indi cates either potential
damage to hardware or loss of data and tells you
how to avoid the problem.
NOTE: A NOTE indicates important information that
helps you make better use of your computer.
Typographical Conventions
The following list defines (where appropriate) and illustrates typographical conventions used as visual cues for
specific elements of text throughout this document:
Keycaps, the labeling that appears on the keys on a
•
keyboard, are enclosed in angle brackets.
Example: <Enter>
Key combinations are series of keys to be pressed
•
simultaneously (unless otherwise indicated) to perform a single function.
Exa mple: <Ctrl><Alt><Enter>
Commands presented in lowercase bold are for ref-
•
erence purposes only and are not intended to be
typed at that particular point in the discussion.
Example: “Use the setup command to . . . .”
In contrast, commands presented in th e Courier New
font are intended to be typed as part of an
instruction.
Example: “Type format
drive A.”
to format the diskette in
x

•
Filenames and directory names are presented in
lowercase bold.
Examples: autoexec.bat and c:\windows
•
Syntax lines consist of a command and all its possible parameters. Commands are displayed in
lowercase bold; variable parameters (those for which
you substitute a value) are displayed in lowercase
italics; constant parameters are displayed in lowercase bold. The brackets indicate items that are
optional.
Example: del [drive:] [[path]filename] [/p]
•
Command lines consist of a command and may
include one or more of the command’s possible
parameters. Command lines are presented in the
Courier New font.
Example:
del c:\myfile.doc
•
Screen text is text that appears on the screen of your
display or external monitor. It can be a system message, for example, or it can be text that you are
instructed to type as part of a command (referred to
as a command line). Screen text is presented in the
Courier New font.
Example: The following message appears on your
screen:
No boot device available
•
Variables are symbols for which you substitu te a
value. They are presented in italics.
Example: module n (where n represents the memory
module number)
xi

xii

Contents
Chapter 1
Introduction . . . . . . . . . . . . . . . . . . . . . . . . . . . . . . . . . . . . . . . . . . . 1-1
Hardware Features. . . . . . . . . . . . . . . . . . . . . . . . . . . . . . . . . . . . . . . . . . . . . . . . . . . . 1-2
Software Features . . . . . . . . . . . . . . . . . . . . . . . . . . . . . . . . . . . . . . . . . . . . . . . . . . . . 1-4
Using the Power Button . . . . . . . . . . . . . . . . . . . . . . . . . . . . . . . . . . . . . . . . . . . . . . .1-4
Accessing Online Documentation. . . . . . . . . . . . . . . . . . . . . . . . . . . . . . . . . . . . . . . . 1-4
Available Options . . . . . . . . . . . . . . . . . . . . . . . . . . . . . . . . . . . . . . . . . . . . . . . . . . . . 1-4
Getting Help . . . . . . . . . . . . . . . . . . . . . . . . . . . . . . . . . . . . . . . . . . . . . . . . . . . . . . . .1-5
Chapter 2
Customizing System Features . . . . . . . . . . . . . . . . . . . . . . . . . . . . 2-1
System Utilities . . . . . . . . . . . . . . . . . . . . . . . . . . . . . . . . . . . . . . . . . . . . . . . . . . . . . . 2-1
Setup Program. . . . . . . . . . . . . . . . . . . . . . . . . . . . . . . . . . . . . . . . . . . . . . . . . . . . . . . 2-2
Accessing the Setup Program. . . . . . . . . . . . . . . . . . . . . . . . . . . . . . . . . . . . . . . . 2-2
Main Menu Options. . . . . . . . . . . . . . . . . . . . . . . . . . . . . . . . . . . . . . . . . . . . . . . 2-2
System Time . . . . . . . . . . . . . . . . . . . . . . . . . . . . . . . . . . . . . . . . . . . . . . . . . 2-3
System Date . . . . . . . . . . . . . . . . . . . . . . . . . . . . . . . . . . . . . . . . . . . . . . . . . 2-3
Floppy Drive. . . . . . . . . . . . . . . . . . . . . . . . . . . . . . . . . . . . . . . . . . . . . . . . .2-3
Hard Disk . . . . . . . . . . . . . . . . . . . . . . . . . . . . . . . . . . . . . . . . . . . . . . . . . . . 2-3
Quiet Boot. . . . . . . . . . . . . . . . . . . . . . . . . . . . . . . . . . . . . . . . . . . . . . . . . . . 2-3
Video Display Device. . . . . . . . . . . . . . . . . . . . . . . . . . . . . . . . . . . . . . . . . . 2-3
System Memory . . . . . . . . . . . . . . . . . . . . . . . . . . . . . . . . . . . . . . . . . . . . . . 2-4
Extended Memory. . . . . . . . . . . . . . . . . . . . . . . . . . . . . . . . . . . . . . . . . . . . . 2-4
System Devices Menu Options . . . . . . . . . . . . . . . . . . . . . . . . . . . . . . . . . . . . . . 2-4
PS/2 Mouse. . . . . . . . . . . . . . . . . . . . . . . . . . . . . . . . . . . . . . . . . . . . . . . . . . 2-5
IDE Controller . . . . . . . . . . . . . . . . . . . . . . . . . . . . . . . . . . . . . . . . . . . . . . . 2-5
FDD Controller. . . . . . . . . . . . . . . . . . . . . . . . . . . . . . . . . . . . . . . . . . . . . . . 2-5
CD-ROM Drive Speed . . . . . . . . . . . . . . . . . . . . . . . . . . . . . . . . . . . . . . . . . 2-5
Plug & Play O/S . . . . . . . . . . . . . . . . . . . . . . . . . . . . . . . . . . . . . . . . . . . . . . 2-5
Serial Port . . . . . . . . . . . . . . . . . . . . . . . . . . . . . . . . . . . . . . . . . . . . . . . . . . . 2-5
xiii

Infrared Port. . . . . . . . . . . . . . . . . . . . . . . . . . . . . . . . . . . . . . . . . . . . . . . . . 2-5
Parallel Port . . . . . . . . . . . . . . . . . . . . . . . . . . . . . . . . . . . . . . . . . . . . . . . . . 2-5
Audio . . . . . . . . . . . . . . . . . . . . . . . . . . . . . . . . . . . . . . . . . . . . . . . . . . . . . . 2-6
Security Menu Options . . . . . . . . . . . . . . . . . . . . . . . . . . . . . . . . . . . . . . . . . . . . 2-6
System Password . . . . . . . . . . . . . . . . . . . . . . . . . . . . . . . . . . . . . . . . . . . . . 2-7
Set System Password . . . . . . . . . . . . . . . . . . . . . . . . . . . . . . . . . . . . . . . . . . 2-7
Password on Boot. . . . . . . . . . . . . . . . . . . . . . . . . . . . . . . . . . . . . . . . . . . . . 2-7
Power Menu Options. . . . . . . . . . . . . . . . . . . . . . . . . . . . . . . . . . . . . . . . . . . . . . 2-7
Power Management Mode. . . . . . . . . . . . . . . . . . . . . . . . . . . . . . . . . . . . . . 2-8
Smart CPU Mode. . . . . . . . . . . . . . . . . . . . . . . . . . . . . . . . . . . . . . . . . . . . . 2-8
Standby Time-Out . . . . . . . . . . . . . . . . . . . . . . . . . . . . . . . . . . . . . . . . . . . . 2-8
Suspend Time-Out . . . . . . . . . . . . . . . . . . . . . . . . . . . . . . . . . . . . . . . . . . . . 2-8
Suspend Mode . . . . . . . . . . . . . . . . . . . . . . . . . . . . . . . . . . . . . . . . . . . . . . . 2-9
Resume on Modem Ring . . . . . . . . . . . . . . . . . . . . . . . . . . . . . . . . . . . . . . . 2-9
Resume on Time of Day . . . . . . . . . . . . . . . . . . . . . . . . . . . . . . . . . . . . . . . 2-9
Resume Time . . . . . . . . . . . . . . . . . . . . . . . . . . . . . . . . . . . . . . . . . . . . . . . . 2-9
Boot Menu Options. . . . . . . . . . . . . . . . . . . . . . . . . . . . . . . . . . . . . . . . . . . . . . . 2-9
Exit Menu Options . . . . . . . . . . . . . . . . . . . . . . . . . . . . . . . . . . . . . . . . . . . . . . 2-10
Save Changes and Exit. . . . . . . . . . . . . . . . . . . . . . . . . . . . . . . . . . . . . . . . 2-11
Discard Changes and Exit . . . . . . . . . . . . . . . . . . . . . . . . . . . . . . . . . . . . . 2-11
Get Default Values. . . . . . . . . . . . . . . . . . . . . . . . . . . . . . . . . . . . . . . . . . . 2-11
Load Previous Values . . . . . . . . . . . . . . . . . . . . . . . . . . . . . . . . . . . . . . . . 2-11
Save Changes. . . . . . . . . . . . . . . . . . . . . . . . . . . . . . . . . . . . . . . . . . . . . . . 2-11
Reinstalling Utilities and Drivers. . . . . . . . . . . . . . . . . . . . . . . . . . . . . . . . . . . . . . . 2-11
Reinstalling Video Drivers . . . . . . . . . . . . . . . . . . . . . . . . . . . . . . . . . . . . . . . . 2 -12
Reinstalling Touch Pad Drivers . . . . . . . . . . . . . . . . . . . . . . . . . . . . . . . . . . . . 2-13
Reinstalling Audio Drivers . . . . . . . . . . . . . . . . . . . . . . . . . . . . . . . . . . . . . . . . 2-13
Reinstalling the Soft Wavetable . . . . . . . . . . . . . . . . . . . . . . . . . . . . . . . . . . . . 2-13
Reinstalling Infrared Drivers. . . . . . . . . . . . . . . . . . . . . . . . . . . . . . . . . . . . . . . 2-13
Creating the Save-to-Disk Suspend File. . . . . . . . . . . . . . . . . . . . . . . . . . . . . . 2-13
Reinstalling the System User’s Guide. . . . . . . . . . . . . . . . . . . . . . . . . . . . . . . . 2-14
Chapter 3
Troubleshooting Your Computer. . . . . . . . . . . . . . . . . . . . . . . . . . 3-1
Backing Up Your Files. . . . . . . . . . . . . . . . . . . . . . . . . . . . . . . . . . . . . . . . . . . . . . . . 3-1
Basic Checks . . . . . . . . . . . . . . . . . . . . . . . . . . . . . . . . . . . . . . . . . . . . . . . . . . . . . . . 3-1
Checking Connections. . . . . . . . . . . . . . . . . . . . . . . . . . . . . . . . . . . . . . . . . . . . . 3-2
Look and Listen . . . . . . . . . . . . . . . . . . . . . . . . . . . . . . . . . . . . . . . . . . . . . . . . . . . . . 3-3
Setup Options . . . . . . . . . . . . . . . . . . . . . . . . . . . . . . . . . . . . . . . . . . . . . . . . . . . 3-4
xiv

Messages and Codes . . . . . . . . . . . . . . . . . . . . . . . . . . . . . . . . . . . . . . . . . . . . . . . . . .3-5
System Beep Codes . . . . . . . . . . . . . . . . . . . . . . . . . . . . . . . . . . . . . . . . . . . . . . . 3-7
Finding Software Solutions. . . . . . . . . . . . . . . . . . . . . . . . . . . . . . . . . . . . . . . . . . . . . 3-9
Installing and Configuring Software . . . . . . . . . . . . . . . . . . . . . . . . . . . . . . . . . . 3-9
Start-Up Files . . . . . . . . . . . . . . . . . . . . . . . . . . . . . . . . . . . . . . . . . . . . . . . . 3-9
Using Software. . . . . . . . . . . . . . . . . . . . . . . . . . . . . . . . . . . . . . . . . . . . . . . . . . . 3-9
Error Messages . . . . . . . . . . . . . . . . . . . . . . . . . . . . . . . . . . . . . . . . . . . . . . . 3-9
Input Errors. . . . . . . . . . . . . . . . . . . . . . . . . . . . . . . . . . . . . . . . . . . . . . . . . 3-10
Memory-Resident Programs. . . . . . . . . . . . . . . . . . . . . . . . . . . . . . . . . . . . 3-10
Program Conflicts. . . . . . . . . . . . . . . . . . . . . . . . . . . . . . . . . . . . . . . . . . . . 3-10
Avoiding Interrupt Assignment Conflicts. . . . . . . . . . . . . . . . . . . . . . . . . . 3-10
Troubleshooting Procedures . . . . . . . . . . . . . . . . . . . . . . . . . . . . . . . . . . . . . . . . . . . 3-11
Troubleshooting a Wet Computer . . . . . . . . . . . . . . . . . . . . . . . . . . . . . . . . . . . 3-11
Troubleshooting a Damaged Computer. . . . . . . . . . . . . . . . . . . . . . . . . . . . . . . 3-12
Troubleshooting a Power Failure. . . . . . . . . . . . . . . . . . . . . . . . . . . . . . . . . . . .3-13
Total Power Failure When Using the AC Adapter. . . . . . . . . . . . . . . . . . . 3-13
Total Power Failure When Using a Battery . . . . . . . . . . . . . . . . . . . . . . . . 3-14
No Power to a Part of the Computer. . . . . . . . . . . . . . . . . . . . . . . . . . . . . . 3-15
Troubleshooting the Diskette Drive. . . . . . . . . . . . . . . . . . . . . . . . . . . . . . . . . . 3-15
Troubleshooting the CD-ROM Drive . . . . . . . . . . . . . . . . . . . . . . . . . . . . . . . . 3-15
Troubleshooting the Hard-Disk Drive . . . . . . . . . . . . . . . . . . . . . . . . . . . . . . . . 3-16
Troubleshooting an External Keyboard. . . . . . . . . . . . . . . . . . . . . . . . . . . . . . . 3-17
Troubleshooting Memory. . . . . . . . . . . . . . . . . . . . . . . . . . . . . . . . . . . . . . . . . . 3-18
Troubleshooting the Built-In Display . . . . . . . . . . . . . . . . . . . . . . . . . . . . . . . . 3-18
Troubleshooting an External Monitor . . . . . . . . . . . . . . . . . . . . . . . . . . . . . . . . 3-19
Troubleshooting the Serial and Parallel Ports . . . . . . . . . . . . . . . . . . . . . . . . . .3-20
Troubleshooting the Basic I/O Functions. . . . . . . . . . . . . . . . . . . . . . . . . .3-20
Troubleshooting a Parallel Printer . . . . . . . . . . . . . . . . . . . . . . . . . . . . . . . 3-21
Troubleshooting a Serial I/O Device . . . . . . . . . . . . . . . . . . . . . . . . . . . . . 3-21
Troubleshooting the Infrared Port. . . . . . . . . . . . . . . . . . . . . . . . . . . . . . . . 3-22
Troubleshooting the Touch Pad. . . . . . . . . . . . . . . . . . . . . . . . . . . . . . . . . . . . . 3-22
Troubleshooting Audio Functions . . . . . . . . . . . . . . . . . . . . . . . . . . . . . . . . . . . 3-23
Chapter 4
Running the Dell Diagnostics. . . . . . . . . . . . . . . . . . . . . . . . . . . . . 4-1
Features of the Dell Diagnostics . . . . . . . . . . . . . . . . . . . . . . . . . . . . . . . . . . . . . . . . . 4-1
When to Use the Dell Diagnostics . . . . . . . . . . . . . . . . . . . . . . . . . . . . . . . . . . . . . . . 4-1
Before You Start Testing. . . . . . . . . . . . . . . . . . . . . . . . . . . . . . . . . . . . . . . . . . . . . . . 4-2
Starting the Dell Diagnostics. . . . . . . . . . . . . . . . . . . . . . . . . . . . . . . . . . . . . . . . . . . . 4-2
xv

Completing the Dell Diagnostics . . . . . . . . . . . . . . . . . . . . . . . . . . . . . . . . . . . . . . . . 4-3
How to Use the Dell Diagnostics . . . . . . . . . . . . . . . . . . . . . . . . . . . . . . . . . . . . . . . . 4-3
Confirming the System Configuration Information. . . . . . . . . . . . . . . . . . . . . . . . . . 4-4
How to Use the Menu. . . . . . . . . . . . . . . . . . . . . . . . . . . . . . . . . . . . . . . . . . . . . . . . . 4-5
Main Menu Options . . . . . . . . . . . . . . . . . . . . . . . . . . . . . . . . . . . . . . . . . . . . . . . . . . 4-5
Run . . . . . . . . . . . . . . . . . . . . . . . . . . . . . . . . . . . . . . . . . . . . . . . . . . . . . . . . . . . 4-5
Select. . . . . . . . . . . . . . . . . . . . . . . . . . . . . . . . . . . . . . . . . . . . . . . . . . . . . . . . . . 4-5
Subtest. . . . . . . . . . . . . . . . . . . . . . . . . . . . . . . . . . . . . . . . . . . . . . . . . . . . . . . . . 4-5
Run (Under Subtest). . . . . . . . . . . . . . . . . . . . . . . . . . . . . . . . . . . . . . . . . . . 4-5
Select (Under Subtest) . . . . . . . . . . . . . . . . . . . . . . . . . . . . . . . . . . . . . . . . . 4-6
Options (Under Subtest). . . . . . . . . . . . . . . . . . . . . . . . . . . . . . . . . . . . . . . . 4-6
Test Limits (Under Subtest). . . . . . . . . . . . . . . . . . . . . . . . . . . . . . . . . . . . . 4-6
About (Under Subtest). . . . . . . . . . . . . . . . . . . . . . . . . . . . . . . . . . . . . . . . . 4-6
Key-Help (Under Subtest) . . . . . . . . . . . . . . . . . . . . . . . . . . . . . . . . . . . . . . 4-6
Quit Menu (Under Subtest) . . . . . . . . . . . . . . . . . . . . . . . . . . . . . . . . . . . . . 4-6
Options . . . . . . . . . . . . . . . . . . . . . . . . . . . . . . . . . . . . . . . . . . . . . . . . . . . . . . . . 4-6
Number of Times to Repeat Test(s). . . . . . . . . . . . . . . . . . . . . . . . . . . . . . . 4-7
Maximum Errors Allowed. . . . . . . . . . . . . . . . . . . . . . . . . . . . . . . . . . . . . . 4-7
Pause for User Response . . . . . . . . . . . . . . . . . . . . . . . . . . . . . . . . . . . . . . . 4-7
Output Device for Status Messages. . . . . . . . . . . . . . . . . . . . . . . . . . . . . . . 4-8
Output Device for Error Messages. . . . . . . . . . . . . . . . . . . . . . . . . . . . . . . . 4-8
Test Limits. . . . . . . . . . . . . . . . . . . . . . . . . . . . . . . . . . . . . . . . . . . . . . . . . . . . . . 4-8
About. . . . . . . . . . . . . . . . . . . . . . . . . . . . . . . . . . . . . . . . . . . . . . . . . . . . . . . . . . 4-9
Key-Help. . . . . . . . . . . . . . . . . . . . . . . . . . . . . . . . . . . . . . . . . . . . . . . . . . . . . . . 4-9
Quit . . . . . . . . . . . . . . . . . . . . . . . . . . . . . . . . . . . . . . . . . . . . . . . . . . . . . . . . . . . 4-9
Tests in the Dell Diagnostics . . . . . . . . . . . . . . . . . . . . . . . . . . . . . . . . . . . . . . . . . . . 4-9
Error Messages. . . . . . . . . . . . . . . . . . . . . . . . . . . . . . . . . . . . . . . . . . . . . . . . . . . . . 4-12
RAM Test Group . . . . . . . . . . . . . . . . . . . . . . . . . . . . . . . . . . . . . . . . . . . . . . . . . . . 4-12
Why Run a RAM Test?. . . . . . . . . . . . . . . . . . . . . . . . . . . . . . . . . . . . . . . . . . . 4-12
Subtests . . . . . . . . . . . . . . . . . . . . . . . . . . . . . . . . . . . . . . . . . . . . . . . . . . . . . . . 4-12
System Set Test Group. . . . . . . . . . . . . . . . . . . . . . . . . . . . . . . . . . . . . . . . . . . . . . . 4-12
Why Run a System Set Test? . . . . . . . . . . . . . . . . . . . . . . . . . . . . . . . . . . . . . . 4-12
Subtests . . . . . . . . . . . . . . . . . . . . . . . . . . . . . . . . . . . . . . . . . . . . . . . . . . . . . . . 4-13
Video Test Group. . . . . . . . . . . . . . . . . . . . . . . . . . . . . . . . . . . . . . . . . . . . . . . . . . . 4-13
Why Run a Video Test? . . . . . . . . . . . . . . . . . . . . . . . . . . . . . . . . . . . . . . . . . . 4-14
Subtests . . . . . . . . . . . . . . . . . . . . . . . . . . . . . . . . . . . . . . . . . . . . . . . . . . . . . . . 4-14
Keyboard Test Group. . . . . . . . . . . . . . . . . . . . . . . . . . . . . . . . . . . . . . . . . . . . . . . . 4-14
Why Run a Keyboard Test? . . . . . . . . . . . . . . . . . . . . . . . . . . . . . . . . . . . . . . . 4-14
Subtests . . . . . . . . . . . . . . . . . . . . . . . . . . . . . . . . . . . . . . . . . . . . . . . . . . . . . . . 4-15
xvi

Mouse Test . . . . . . . . . . . . . . . . . . . . . . . . . . . . . . . . . . . . . . . . . . . . . . . . . . . . . . . . 4-15
Why Run the Mouse Test?. . . . . . . . . . . . . . . . . . . . . . . . . . . . . . . . . . . . . . . . . 4-15
Subtests . . . . . . . . . . . . . . . . . . . . . . . . . . . . . . . . . . . . . . . . . . . . . . . . . . . . . . . 4-15
Diskette Drives Test Group. . . . . . . . . . . . . . . . . . . . . . . . . . . . . . . . . . . . . . . . . . . . 4-15
Why Run a Diskette Drives Test? . . . . . . . . . . . . . . . . . . . . . . . . . . . . . . . . . . . 4-16
Subtests . . . . . . . . . . . . . . . . . . . . . . . . . . . . . . . . . . . . . . . . . . . . . . . . . . . . . . . 4-16
Hard-Disk Drives (Non-SCSI) Test Group . . . . . . . . . . . . . . . . . . . . . . . . . . . . . . . . 4-16
Why Run a Hard-Disk Drives Test? . . . . . . . . . . . . . . . . . . . . . . . . . . . . . . . . . 4-16
Subtests . . . . . . . . . . . . . . . . . . . . . . . . . . . . . . . . . . . . . . . . . . . . . . . . . . . . . . . 4-17
IDE CD ROM Drives Test Group. . . . . . . . . . . . . . . . . . . . . . . . . . . . . . . . . . . . . . . 4-17
Why Run an IDE CD ROM Drives Test? . . . . . . . . . . . . . . . . . . . . . . . . . . . . . 4-17
Subtests . . . . . . . . . . . . . . . . . . . . . . . . . . . . . . . . . . . . . . . . . . . . . . . . . . . . . . . 4-17
Serial/Infrared Ports Test Group. . . . . . . . . . . . . . . . . . . . . . . . . . . . . . . . . . . . . . . . 4-18
Why Run a Serial/Infrared Ports Test? . . . . . . . . . . . . . . . . . . . . . . . . . . . . . . . 4-18
Subtests . . . . . . . . . . . . . . . . . . . . . . . . . . . . . . . . . . . . . . . . . . . . . . . . . . . . . . . 4-18
Parallel Ports Test Group . . . . . . . . . . . . . . . . . . . . . . . . . . . . . . . . . . . . . . . . . . . . . 4-18
Why Run a Parallel Ports Test? . . . . . . . . . . . . . . . . . . . . . . . . . . . . . . . . . . . . . 4-18
Subtests . . . . . . . . . . . . . . . . . . . . . . . . . . . . . . . . . . . . . . . . . . . . . . . . . . . . . . . 4-19
Audio Test Group . . . . . . . . . . . . . . . . . . . . . . . . . . . . . . . . . . . . . . . . . . . . . . . . . . . 4-19
Why Run an Audio Test?. . . . . . . . . . . . . . . . . . . . . . . . . . . . . . . . . . . . . . . . . . 4-19
Subtests . . . . . . . . . . . . . . . . . . . . . . . . . . . . . . . . . . . . . . . . . . . . . . . . . . . . . . . 4-19
Chapter 5
Getting Help . . . . . . . . . . . . . . . . . . . . . . . . . . . . . . . . . . . . . . . . . . . 5-1
Technical Assistance. . . . . . . . . . . . . . . . . . . . . . . . . . . . . . . . . . . . . . . . . . . . . . . . . . 5-1
Help Tools. . . . . . . . . . . . . . . . . . . . . . . . . . . . . . . . . . . . . . . . . . . . . . . . . . . . . . . . . . 5-2
Dell Q&A. . . . . . . . . . . . . . . . . . . . . . . . . . . . . . . . . . . . . . . . . . . . . . . . . . . . . . . 5-3
System User’s Guide . . . . . . . . . . . . . . . . . . . . . . . . . . . . . . . . . . . . . . . . . . . . . . 5-3
Reference and Troubleshooting Guide. . . . . . . . . . . . . . . . . . . . . . . . . . . . . . . . . 5-3
World Wide Web on the Internet. . . . . . . . . . . . . . . . . . . . . . . . . . . . . . . . . . . . . 5-3
Commercial Online Service. . . . . . . . . . . . . . . . . . . . . . . . . . . . . . . . . . . . . . . . . 5-3
Dell Diagnostics Program . . . . . . . . . . . . . . . . . . . . . . . . . . . . . . . . . . . . . . . . . . 5-3
AutoTech Service. . . . . . . . . . . . . . . . . . . . . . . . . . . . . . . . . . . . . . . . . . . . . . . . . 5-3
TechFax Service. . . . . . . . . . . . . . . . . . . . . . . . . . . . . . . . . . . . . . . . . . . . . . . . . . 5-4
TechConnect BBS . . . . . . . . . . . . . . . . . . . . . . . . . . . . . . . . . . . . . . . . . . . . . . . . 5-4
Automated Order-Status System . . . . . . . . . . . . . . . . . . . . . . . . . . . . . . . . . . . . . 5-4
Technical Support Service . . . . . . . . . . . . . . . . . . . . . . . . . . . . . . . . . . . . . . . . . . 5-4
Problems With Your Order. . . . . . . . . . . . . . . . . . . . . . . . . . . . . . . . . . . . . . . . . . . . . 5-5
Product Information . . . . . . . . . . . . . . . . . . . . . . . . . . . . . . . . . . . . . . . . . . . . . . . . . . 5-5
xvii

Returning Items for Warranty Repair or Credit . . . . . . . . . . . . . . . . . . . . . . . . . . . . . 5-5
Before You Call . . . . . . . . . . . . . . . . . . . . . . . . . . . . . . . . . . . . . . . . . . . . . . . . . . . . . 5-5
Dell Contact Numbers . . . . . . . . . . . . . . . . . . . . . . . . . . . . . . . . . . . . . . . . . . . . . . . . 5-7
Appendix A
Technical Specifications. . . . . . . . . . . . . . . . . . . . . . . . . . . . . . . . . A-1
Appendix B
Diagnostic Video Tests. . . . . . . . . . . . . . . . . . . . . . . . . . . . . . . . . . B-1
Video Memory Test . . . . . . . . . . . . . . . . . . . . . . . . . . . . . . . . . . . . . . . . . . . . . . . . . . B-1
Video Hardware Test . . . . . . . . . . . . . . . . . . . . . . . . . . . . . . . . . . . . . . . . . . . . . . . . . B-1
Text Mode Character Test . . . . . . . . . . . . . . . . . . . . . . . . . . . . . . . . . . . . . . . . . . . . . B-1
Character Attributes Subtest (80 x 25) . . . . . . . . . . . . . . . . . . . . . . . . . . . . . . . . B-2
Character Set Subtest (80 x 25). . . . . . . . . . . . . . . . . . . . . . . . . . . . . . . . . . . . . . B-2
Character Attributes Subtest (40 x 25) . . . . . . . . . . . . . . . . . . . . . . . . . . . . . . . . B-2
Character Set Subtest (40 x 25). . . . . . . . . . . . . . . . . . . . . . . . . . . . . . . . . . . . . . B-2
Text Mode Color Test . . . . . . . . . . . . . . . . . . . . . . . . . . . . . . . . . . . . . . . . . . . . . . . . B-3
Color Attributes Subtest (80 x 25) . . . . . . . . . . . . . . . . . . . . . . . . . . . . . . . . . . . B-3
Color Attributes Subtest (40 x 25) . . . . . . . . . . . . . . . . . . . . . . . . . . . . . . . . . . . B-4
Color Bars Subtest. . . . . . . . . . . . . . . . . . . . . . . . . . . . . . . . . . . . . . . . . . . . . . . . B-4
Text Mode Pages Test . . . . . . . . . . . . . . . . . . . . . . . . . . . . . . . . . . . . . . . . . . . . . . . . B-4
Graphics Mode Test . . . . . . . . . . . . . . . . . . . . . . . . . . . . . . . . . . . . . . . . . . . . . . . . . . B-4
320 x 200 Graphics Mode Screens . . . . . . . . . . . . . . . . . . . . . . . . . . . . . . . . . . . B-4
320 x 200 16-Color Graphics Mode Screen . . . . . . . . . . . . . . . . . . . . . . . . . . . . B-4
640 x 200 16-Color Graphics Mode Screen . . . . . . . . . . . . . . . . . . . . . . . . . . . . B-4
640 x 350 16-Color Graphics Mode Screen . . . . . . . . . . . . . . . . . . . . . . . . . . . . B-4
640 x 480 2-Color Graphics Mode Screen . . . . . . . . . . . . . . . . . . . . . . . . . . . . . B-4
640 x 480 16-Color Graphics Mode Screen . . . . . . . . . . . . . . . . . . . . . . . . . . . . B-5
320 x 200 256-Color Graphics Mode Screen . . . . . . . . . . . . . . . . . . . . . . . . . . . B-5
640 x 480 256-Color Graphics Mode Screen . . . . . . . . . . . . . . . . . . . . . . . . . . . B-5
800 x 600 16-Color Graphics Mode Screen . . . . . . . . . . . . . . . . . . . . . . . . . . . . B-5
800 x 600 256-Color Graphics Mode Screen . . . . . . . . . . . . . . . . . . . . . . . . . . . B-5
1024 x 768 16-Color Graphics Mode Screen . . . . . . . . . . . . . . . . . . . . . . . . . . . B-5
1024 x 768 256-Color Graphics Mode Screen . . . . . . . . . . . . . . . . . . . . . . . . . . B-5
Color Palettes Test . . . . . . . . . . . . . . . . . . . . . . . . . . . . . . . . . . . . . . . . . . . . . . . . . . . B-5
Solid Colors Test . . . . . . . . . . . . . . . . . . . . . . . . . . . . . . . . . . . . . . . . . . . . . . . . . . . . B-6
xviii

Appendix C
Regulatory Notices . . . . . . . . . . . . . . . . . . . . . . . . . . . . . . . . . . . . . C-1
FCC Class B Notice (U.S. Only). . . . . . . . . . . . . . . . . . . . . . . . . . . . . . . . . . . . . . . . .C-1
Modem Requirements. . . . . . . . . . . . . . . . . . . . . . . . . . . . . . . . . . . . . . . . . . . . . . . . .C-2
Type of Service . . . . . . . . . . . . . . . . . . . . . . . . . . . . . . . . . . . . . . . . . . . . . . . . . .C-2
Telephone Company Procedures . . . . . . . . . . . . . . . . . . . . . . . . . . . . . . . . . . . . .C-2
If Problems Arise . . . . . . . . . . . . . . . . . . . . . . . . . . . . . . . . . . . . . . . . . . . . . . . . .C-2
Installation and Labeling . . . . . . . . . . . . . . . . . . . . . . . . . . . . . . . . . . . . . . . . . . .C-2
Load Number . . . . . . . . . . . . . . . . . . . . . . . . . . . . . . . . . . . . . . . . . . . . . . . . . . . .C-2
IC Notice (Canada Only). . . . . . . . . . . . . . . . . . . . . . . . . . . . . . . . . . . . . . . . . . . . . . .C-2
Canadian Modem Requirements . . . . . . . . . . . . . . . . . . . . . . . . . . . . . . . . . . . . .C-3
EN 55022 Compliance (Czech Republic Only) . . . . . . . . . . . . . . . . . . . . . . . . . . . . .C-3
CE Notice . . . . . . . . . . . . . . . . . . . . . . . . . . . . . . . . . . . . . . . . . . . . . . . . . . . . . . . . . .C-3
VCCI Notices (Japan Only) . . . . . . . . . . . . . . . . . . . . . . . . . . . . . . . . . . . . . . . . . . . .C-4
Class A ITE . . . . . . . . . . . . . . . . . . . . . . . . . . . . . . . . . . . . . . . . . . . . . . . . . . . . .C-4
Class B ITE . . . . . . . . . . . . . . . . . . . . . . . . . . . . . . . . . . . . . . . . . . . . . . . . . . . . .C-4
Korean Regulatory Notice. . . . . . . . . . . . . . . . . . . . . . . . . . . . . . . . . . . . . . . . . . . . . .C-4
Class A Device. . . . . . . . . . . . . . . . . . . . . . . . . . . . . . . . . . . . . . . . . . . . . . . . . . .C-4
Class B Device. . . . . . . . . . . . . . . . . . . . . . . . . . . . . . . . . . . . . . . . . . . . . . . . . . .C-4
Polish Center for Testing and Certification Notice. . . . . . . . . . . . . . . . . . . . . . . . . . .C-5
8ZNBHBOJB1PMTLJFHP$FOUSVN#BEBËJ$FSUZGJLBDKJ
1P[PTUBFJOTUSVLDKFCF[QJFD[FËTUXB
NOM 024 Information (Mexico Only) . . . . . . . . . . . . . . . . . . . . . . . . . . . . . . . . . . . .C-6
Información para NOM 024 (únicamente para México). . . . . . . . . . . . . . . . . . . . . . .C-6
. . . . . . . . . . . . . . . . . . . . . . . . . . . . . . . . . . . . . . C-5
. . . . . . . . . . . . . . . . . . . . . . . .C-5
Appendix D
Warranties and Return Policy. . . . . . . . . . . . . . . . . . . . . . . . . . . . . D-1
Limited One-Year Warranty(U.S. and Canada Only). . . . . . . . . . . . . . . . . . . . . . . . .D-1
Limited Three-Year Warranty (U.S. and Canada Only) . . . . . . . . . . . . . . . . . . . . . . .D-2
Coverage During Year One . . . . . . . . . . . . . . . . . . . . . . . . . . . . . . . . . . . . . . . . .D-2
Coverage During Years Two and Three . . . . . . . . . . . . . . . . . . . . . . . . . . . . . . .D-3
General. . . . . . . . . . . . . . . . . . . . . . . . . . . . . . . . . . . . . . . . . . . . . . . . . . . . . . . . .D-3
“Total Satisfaction” Return Policy (U.S. and Canada Only) . . . . . . . . . . . . . . . . . . .D-4
Index
xix

Figures
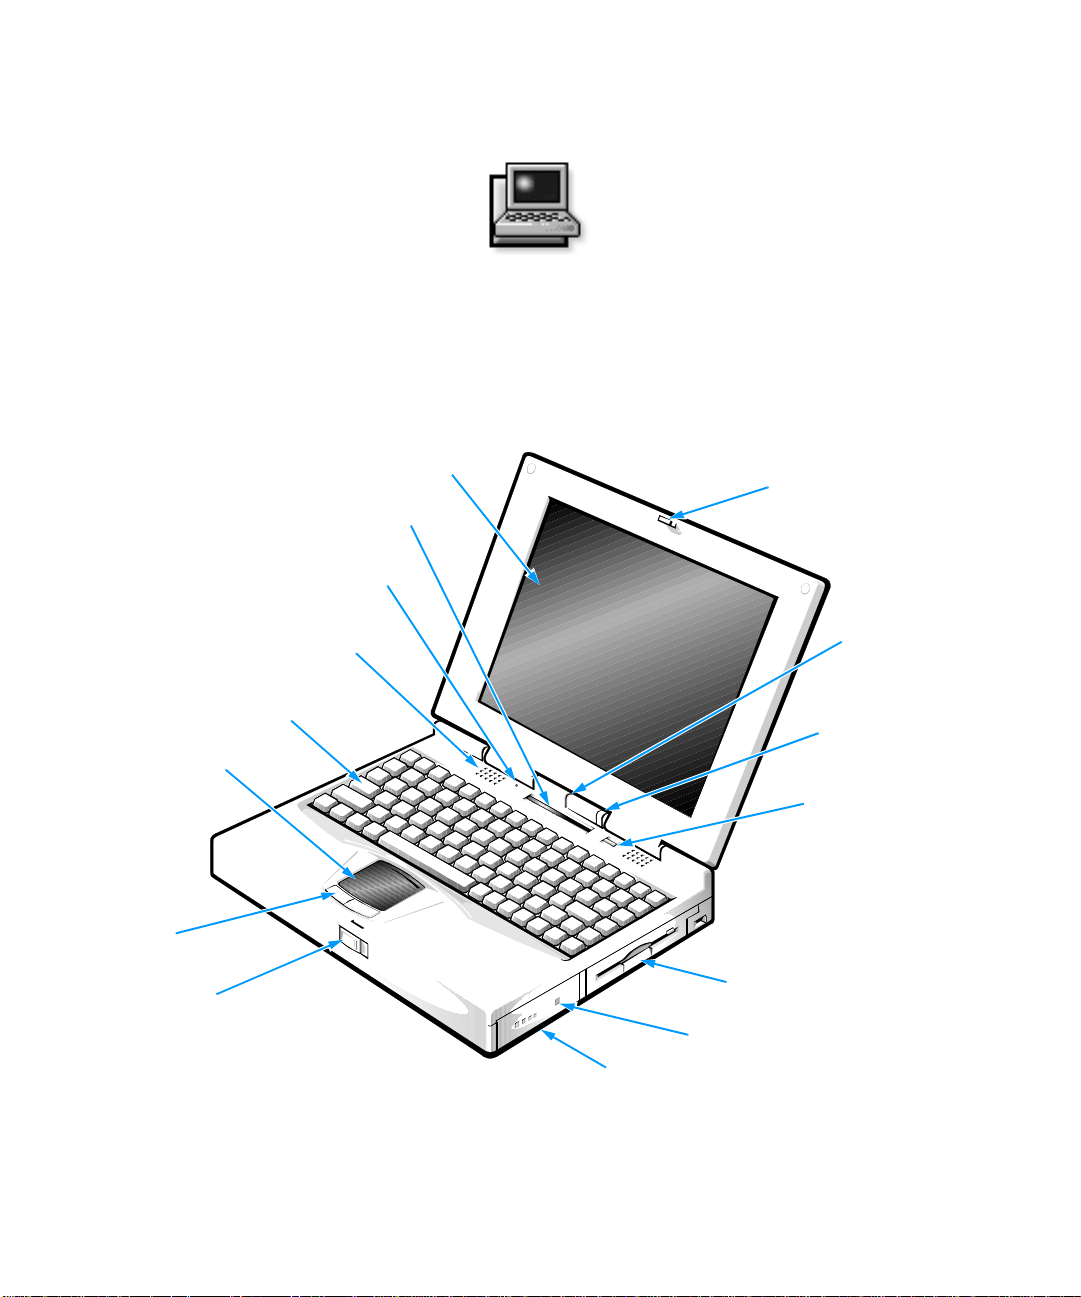
Figure 1-1. Front View of the Portable Computer . . . . . . . . . . . . . . . . . . . . . . . . 1-1
Figure 1-2. Back View of the Portable Computer . . . . . . . . . . . . . . . . . . . . . . . . 1-2
Figure 2-1. Main Menu of Setup Program . . . . . . . . . . . . . . . . . . . . . . . . . . . . . . 2-3
Figure 2-2. System Devices Menu of Setup Program . . . . . . . . . . . . . . . . . . . . . 2-4
Figure 2-3. Security Menu of Setup Program. . . . . . . . . . . . . . . . . . . . . . . . . . . . 2-6
Figure 2-4. Power Menu of Setup Program . . . . . . . . . . . . . . . . . . . . . . . . . . . . . 2-7
Figure 2-5. Boot Menu of Setup Program . . . . . . . . . . . . . . . . . . . . . . . . . . . . . 2-10
Figure 2-6. Exit Menu of Setup Program. . . . . . . . . . . . . . . . . . . . . . . . . . . . . . 2-11
Figure 3-1. AC Adapter and Power Cable . . . . . . . . . . . . . . . . . . . . . . . . . . . . . . 3-2
Figure 3-2. Checking the Battery . . . . . . . . . . . . . . . . . . . . . . . . . . . . . . . . . . . . . 3-2
Figure 3-3. Checking an Optional Device . . . . . . . . . . . . . . . . . . . . . . . . . . . . . . 3-3
Figure 3-4. I/O Panel Connectors for External Devices. . . . . . . . . . . . . . . . . . . . 3-3
Figure 4-1. Diagnostics Menu . . . . . . . . . . . . . . . . . . . . . . . . . . . . . . . . . . . . . . . 4-3
Figure 4-2. Main Screen of the Dell Diagnostics. . . . . . . . . . . . . . . . . . . . . . . . . 4-4
Figure 5-1. Diagnostics Checklist. . . . . . . . . . . . . . . . . . . . . . . . . . . . . . . . . . . . . 5-6
Figure B-1. 80-Column x 25-Line Character Set Subtest Screen. . . . . . . . . . . . . B-2
Figure B-2. 40-Column x 25-Line Character Set Subtest Screen. . . . . . . . . . . . . B-2
Figure B-3. 640 x 480 2-Color Graphics Mode Screen . . . . . . . . . . . . . . . . . . . . B-5
Tables
Table 3-1. Boot Routine Indications. . . . . . . . . . . . . . . . . . . . . . . . . . . . . . . . . . 3-4
Table 3-2. System Error Messages . . . . . . . . . . . . . . . . . . . . . . . . . . . . . . . . . . . 3-5
Table 3-3. Beep Codes . . . . . . . . . . . . . . . . . . . . . . . . . . . . . . . . . . . . . . . . . . . . 3-8
Table 3-4. IRQ Line Assignments. . . . . . . . . . . . . . . . . . . . . . . . . . . . . . . . . . . 3-10
Table 4-1. Option Parameters . . . . . . . . . . . . . . . . . . . . . . . . . . . . . . . . . . . . . . . 4-7
Table 4-2. Dell Diagnostics Tests . . . . . . . . . . . . . . . . . . . . . . . . . . . . . . . . . . . 4-10
Table 5-1. Help Tools . . . . . . . . . . . . . . . . . . . . . . . . . . . . . . . . . . . . . . . . . . . . . 5-2
Table 5-2. International Dialing Codes. . . . . . . . . . . . . . . . . . . . . . . . . . . . . . . . 5-8
Table 5-3. Dell Contact Numbers . . . . . . . . . . . . . . . . . . . . . . . . . . . . . . . . . . . . 5-9
Table A-1. Technical Specifications . . . . . . . . . . . . . . . . . . . . . . . . . . . . . . . . . .A-1
Table B-1. Color Attributes . . . . . . . . . . . . . . . . . . . . . . . . . . . . . . . . . . . . . . . . . B-3
xx

Figures
Figure 1-1. Front View of the Portable Computer. . . . . . . . . . . . . . . . . . . . . . . . . 1-1
Figure 1-2. Back View of the Portable Computer. . . . . . . . . . . . . . . . . . . . . . . . . 1-2
Figure 2-1. Main Menu of Setup Program . . . . . . . . . . . . . . . . . . . . . . . . . . . . . . 2-3
Figure 2-2. System Devices Menu of Setup Program. . . . . . . . . . . . . . . . . . . . . . 2-4
Figure 2-3. Security Menu of Setup Program . . . . . . . . . . . . . . . . . . . . . . . . . . . . 2-6
Figure 2-4. Power Menu of Setup Program. . . . . . . . . . . . . . . . . . . . . . . . . . . . . . 2-7
Figure 2-5. Boot Menu of Setup Program. . . . . . . . . . . . . . . . . . . . . . . . . . . . . . 2-10
Figure 2-6. Exit Menu of Setup Program . . . . . . . . . . . . . . . . . . . . . . . . . . . . . . 2-11
Figure 3-1. AC Adapter and Power Cable. . . . . . . . . . . . . . . . . . . . . . . . . . . . . . . 3-2
Figure 3-2. Checking the Battery . . . . . . . . . . . . . . . . . . . . . . . . . . . . . . . . . . . . . 3-2
Figure 3-3. Checking an Optional Device. . . . . . . . . . . . . . . . . . . . . . . . . . . . . . . 3-3
Figure 3-4. I/O Panel Connectors for External Devices . . . . . . . . . . . . . . . . . . . . 3-3
Figure 4-1. Diagnostics Menu. . . . . . . . . . . . . . . . . . . . . . . . . . . . . . . . . . . . . . . .4-3
Figure 4-2. Main Screen of the Dell Diagnostics . . . . . . . . . . . . . . . . . . . . . . . . . 4-4
Figure 5-1. Diagnostics Checklist . . . . . . . . . . . . . . . . . . . . . . . . . . . . . . . . . . . . . 5-6
Figure B-1. 80-Column x 25-Line Character Set Subtest Screen . . . . . . . . . . . . .B-2
Figure B-2. 40-Column x 25-Line Character Set Subtest Screen . . . . . . . . . . . . .B-2
Figure B-3. 640 x 480 2-Color Graphics Mode Screen . . . . . . . . . . . . . . . . . . . . .B-5
DELL CONFIDENTIAL Preliminary 2/4/98
xxiii

xxiv
DELL CONFIDENTIAL Preliminary 2/4/98

Tables
Table 3-1. Boot Routine Indications . . . . . . . . . . . . . . . . . . . . . . . . . . . . . . . . . . 3-4
Table 3-2. System Error Messages. . . . . . . . . . . . . . . . . . . . . . . . . . . . . . . . . . . .3-5
Table 3-3. Beep Codes. . . . . . . . . . . . . . . . . . . . . . . . . . . . . . . . . . . . . . . . . . . . . 3-8
Table 3-4. IRQ Line Assignments . . . . . . . . . . . . . . . . . . . . . . . . . . . . . . . . . . . 3-10
Table 4-1. Option Parameters. . . . . . . . . . . . . . . . . . . . . . . . . . . . . . . . . . . . . . . . 4-7
Table 4-2. Dell Diagnostics Tests . . . . . . . . . . . . . . . . . . . . . . . . . . . . . . . . . . . 4-10
Table 5-1. Help Tools. . . . . . . . . . . . . . . . . . . . . . . . . . . . . . . . . . . . . . . . . . . . . . 5-2
Table 5-2. International Dialing Codes . . . . . . . . . . . . . . . . . . . . . . . . . . . . . . . . 5-8
Table 5-3. Dell Contact Numbers . . . . . . . . . . . . . . . . . . . . . . . . . . . . . . . . . . . . 5-9
Table A-1. Technical Specifications. . . . . . . . . . . . . . . . . . . . . . . . . . . . . . . . . . .A-1
Table B-1. Color Attributes . . . . . . . . . . . . . . . . . . . . . . . . . . . . . . . . . . . . . . . . .B-3
DELL CONFIDENTIAL Preliminary 2/4/98
xxv

xxvi
DELL CONFIDENTIAL Preliminary 2/4/98
Chapter 1
Introduction
he Dell® Inspiron™ 3000 is an expandable, multi-
T
media portable computer designed around the Intel
Pentium
Peripheral Component Interconnect (PCI) technology.
®
microprocessor with MMX™ technology and
display
status display panel
display close/suspend button
speakers (2)
keyboard
touch pad
®
This chapter describes the major hardware and software
features of your computer, provides information about
accessing the online documentation, and tells you where
to find help when needed.
display latch
microphone
indicator light
power button
touch pad
buttons (2)
display release
Figure 1-1. Front View of the Portable Computer
options bay
charge gauge button
main battery
Introduction 1-1
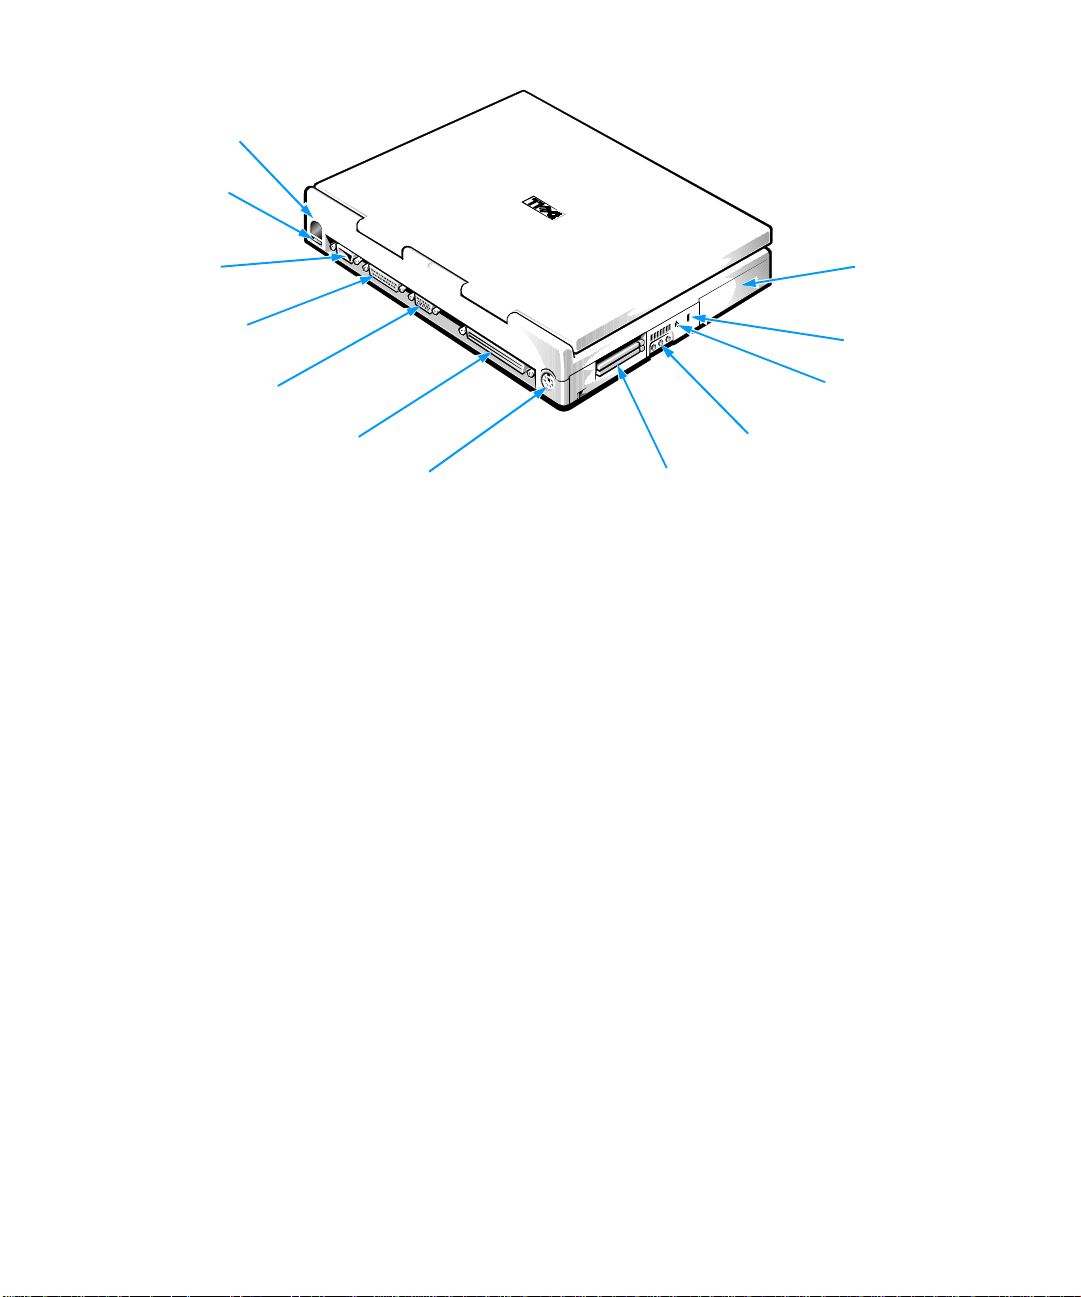
infrared port
USB connector
serial connector
parallel connector
monitor connector
docking connector
PS/2 connector
Figure 1-2. Back View of the Portable Computer
H
ardware Features
Your Dell computer has the following features:
•
An Intel Pentium microprocessor with MMX technol-
ogy running at 166, 200, or 233 megahertz (MHz).
•
Full multimedia capability through the following
standard features:
— A CD-ROM drive that can be used in the
options bay. When you unpack your computer,
look for the CD-ROM drive in the accessories
box of the shipping carton.
— Built-in microphone and stereo speakers.
— Jacks for connecting external speakers, head-
phones, or a microphone to your computer.
NOTE: Your computer was shipped with a diskette drive
in the options bay. When you want to use the CD-ROM
drive, turn off the computer, remove the diskette drive,
and install the CD-ROM drive. For ins tructions and
hard-disk drive
security cable slot
AC adapter
connector
audio jacks (3)
PC Card slots
more information, see the topic titled “Options Bay” in
the online System User’s Guide.
•
A 12.1-inch active-matrix super video graphics array
(SVGA) color display or a 13.3-inch active-matrix
extended graphics array (XGA) color display.
•
Extended battery power with a lithium ion main battery, and an optional secondary battery that can be
used in the options bay to double battery life.
The battery charges in approximately 1.5 hours,
using an alternating current (AC) power source, if
the computer is off; the battery charges in approximately 2.5 hours if the computer is on. You can
expect 2.5 to 3.5 hours of battery life with a single
battery, and 5 to 7 hours of battery life with two
batteries.
NOTES: Battery performance features such as
charge time, operating time, and life span can va ry
according to the conditions under which the computer and battery are used.
1-2 Dell Inspiron 3000 Reference and Troubleshooting Guide

The battery is designed to work on ly with Dell
Inspiron 3000 computers. Do not attempt to use the
battery with other computers.
WARNING: Do not puncture or incinerate the
battery. When your battery no longer holds a
charge, call your local waste dispos al agency or
environmental agency for advice on disposing
of the computer’s lithium ion battery. The lithium ion technology used in the battery is
significantly les s haz ard ou s t o th e en viron m ent
than the lithium metal technology used in some
other batteries (such as watch batteries).
•
Cache memory that enhances the speed of many
microprocessor operations by storing the most
recently accessed contents of system memory. Dell
Inspiron 3000 M166ST co mputers have 32 kilobytes
(KB) of internal cache on the microprocessor and
256 KB of static random-access memory (SRAM)
level 2 (L2) cache. Dell Inspiron 3000 M200ST and
M233XT computers have 512 KB of SRAM L2
cache.
•
Sixteen megabytes (MB) of nonremovable memory
on the system board. Memory on a ny Dell Inspiron
3000 system can be increased up to 144 MB by
installing a combination of 16-, 32-, or 64-MB
3.3-volt (V) small-outline, dual in-line memory
modules (SoDIMMs) in the two memory module
sockets on the system board.
•
Three power conservation modes—standby mode,
save-to-RAM suspend mode, and save-to-disk suspend mode—which help you conserve battery power.
If the batteries run out of power, save-to-disk suspend mode prevents data loss by copying all system
data to the hard-disk drive and turning off the
computer.
•
A special options bay that extends the functionality
of your computer by letting you use a CD-ROM
drive, a diskette drive, or an optional secondary
battery.
•
Support for up to two 3.3-V or 5-V PC Cards. The
computer supports up to two type I or type II cards
(in any combination) or one type III card.
Dell-installed device drivers on the hard-disk drive
supp ort the operation of many standard PC Cards.
•
A basic input/output system (BIOS) that resides in
flash memory and can be upgraded by diskette. A
BIOS upgrade, if required, can be obtained on diskette from Dell or can be downloaded from Dell’s
TechConnect BBS. See Chapter 5, “Getting Help,”
for more information on Dell’s online services.
•
High-performance parallel and serial ports, and a
multipurpose Personal System (PS)/2 connector for
attaching external devices. There is also a monitor
connector for attaching an external monitor to your
computer.
NOTE: If you need to connect an external diskette
drive and you did not order a diskette drive cable
with your computer, contact Dell to order the appropriate cable. For information on contacting Dell, see
Chapter 5,“Getting Help.”
•
A PS/2-compatible touch pad that gives your computer full mouse functionality.
•
An infrared port for use with compatible external
devices. The infrared port permits file transfers without using cable connections. Fast infrared
technology is also available.
•
Universal Serial Bus (USB) capability, which can
simplify connecting peripheral devices such as mice,
printers, and computer speakers. The USB co nnector
on your computer’s back panel provides a single
connection point for multiple USB-compliant
devices. USB-compliant devices can also be connected and disconnected while the system is running.
•
On hard-disk drives with higher capacities, the Ultra
DMA/33 data transfer protocol for the advanced
technology attachment (ATA)/integrated drive electronics (IDE) hard-disk drive interface. Ultra DMA/
33 allows for data transfer rates of up to 33 MB/sec.
Lower-capacity hard-disk drives have standard ATA
technology.
Introduction 1-3

S
oftware Features
®
Dell has installed the Microsoft® Windows
system on your hard-disk drive. The following software
is also included with your Dell computer:
•
A Setup program and system utilities th at let you
customize the operation of your computer. Also
included are drivers that tell your computer how to
communicate with various types of hardware, such
as printers and external monitors. For more information, see Chapter 2, “Customizing System Features,”
and the “Software Features” section of the online
System User’s Guide.
NOTE: The system utilities and drivers are available
separately on diskette from Dell for customers who
installed their own version of Windows 95. See
Chapter 5, “Getting Help,” for the ap pr op riate contact information in your locatio n.
•
The Dell Diagnostics for evaluating your computer’s
components and devices. For more information, see
Chapter 4, “Running the Dell Diagnostics.”
After you turn on your computer the first time, accep t the
software licenses agreement. Then complete the installation of your operating system.
Next, use the Dell Program Diskette Maker in the Dell
Accessories folder to create a program diskette set and
back up your drivers and utilities. These diskettes can be
used to reinstall or reconfigure the software if necessary.
The online instructions in the Dell Program Diskette
Maker tell you how many blank diskettes are needed .
U
sing the Power Button
Under normal circumstances, you should only use the
power button to turn on the computer or to resume from
suspend mode. To shut down the computer, click the Start
button in Windows 95, and then click Shut Down.
If the computer is hung and the operating system does not
respond, press and hold the power button until the system
turns off completely (this may take several seconds).
95 operating
A
ccessing Online
Documentation
The online Dell Inspiron 3000 System User’s Guide
installed on your hard-di sk dr ive cont ains i nformati on on
the following topics:
•
System features
•
Traveling with the computer
•
Customizing system configuration
•
Powering the computer and extending battery life
•
Connecting external devices
•
Maintaining the system
•
Contacting Dell
The guide also contains a glossary of commonly used
computer terms and abbreviations.
To access this guide, select the System User’s
Guide icon in the Dell Accessories folder.
To print any screen from the online System
User’s Guide, display the screen you want, and select
Print Topic from the File menu.
A
vailable Options
Dell offers the following devices and upgrade options:
•
External devices, such as pointing devices, printers,
external monitors, external keyboards, and numeric
keypads, that connect to ports on the back of the
computer
•
AC adapters
•
Batteries
•
Diskette-drive cables
•
Hard-disk drives
•
Modem PC Cards
•
Network PC Cards
•
Dell Inspiron Port Replicator I
1-4 Dell Inspiron 3000 Reference and Troubleshooting Guide

•
Memory modules (16-, 32-, and 64-MB capacities)
•
Carrying cases
•
Auto adapter
•
Microphone
•
External speakers
•
Headphones
Instructions for connecting or installing these options are
contained in the online System User’s Guide or are included
in the upgrade kit you received from Dell.
G
etting Help
If at any time you don’t und erstand a procedur e described
in this guide, or if your computer does not perform as
expected, Dell provides a number of tools to help you.
For more information, see Chapter 5, “Getting Help.”
Introduction 1-5

1-6 Dell Inspiron 3000 Reference and Troubleshooting Guide

Chapter 2
Customizing System Features
s your computing environment changes, you may
A
want to customize the configuration of your computer.
The system utilities and the Setup program let you control various hardware and software features of your
computer and allow you to monitor and reduce power
consumption when your computer is running on battery
power. This chapter explains how to access and use the
system utilities and the Setup program.
S
ystem Utilities
If Dell installed your operating system, the sy stem utilities are on the hard-disk drive that came with the
computer.
Dell highly recommends that you use the Dell Program
Diskette Maker in the Dell Accessories folder to back up
the system utilities. If your hard- disk dri ve becomes cor rupted, you can use the program diskettes to rein st all the
utilities.
NOTE: The system utilities are availa ble separately on
diskettes for those who installed their own version of the
Microsoft Windows 95 operating system. To order these
diskettes from Dell, see Chapter 5, “Getting Help,” for
the appropriate telephone number in your location.
Use system utilities to:
•
Configure PC Cards
If you are using Windows 95, use the PC Card utility
that comes with the operating system. Click the Start
button, point to Settings, and click Control Panel.
Double-click the PC Card (PCMCIA) icon.
For more information, see the topic titled “Configuring PC Cards” in the online System User’s Guide.
•
Change video resolution
In Windows 95, click the Start button, point to Set-
tings, and click Control Panel. Double-click the
Display icon and click the Settings tab. To change
other video settings, such as the refresh rate or external monitor settings, click the NeoMagic tab.
For more information, see the topic titled “Adjusting
Video Resolution and Refresh Rate” in the online
System User’s Guide.
•
Adjust audio properties
In Windows 95, click the Start button, point to Set-
tings, and then click Control Panel. Double-click the
Multimedia icon. Alternatively, right-click the Audio
icon in the taskbar.
•
Customize touc h pad and cursor features
In Windows 95, click the Start button, point to Set-
tings, and then click Control Panel. Double-click the
Mouse icon.
For more information, see the topic titled “Touch
Pad” in the online System User’s Guide.
•
Check battery status
In Windows 95, see the operating system documen-
tation for instructions on using the battery status
utility that comes with the operating system.
•
Manage power consumption when using a battery
The Power menu in the Setup program lets you
adjust the computer’s po wer manag e ment opt i o ns to
suit your working environment.
For more information about saving battery power,
see the topic titled “Conserving Battery Power” in
the online System User’s Guide.
Customizing System Features 2-1
 Loading...