

Dell 2130 Color Laser Printer User Manual
Dell™2130cnColorLaserPrinterUser'sGuide
Notes, Notices, and Cautions
Information in this document is subject to change without notice.
©2008 Dell Inc. All rights reserved.
Reproduction in any manner whatsoever without the written permission of Dell Inc. is strictly forbidden.
Trademarks used in this text: Dell, the DELL logo, Inspiron, Dell Precision, Dimension, OptiPlex, Latitude, PowerEdge, PowerVault, PowerApp, and Dell OpenManage
are trademarks of Dell Inc.; Intel, Pentium, and Celeron are registered trademarks of Intel Corporation; Microsoft, Windows, Windows Server, MS-DOS and
Windows Vista are either trademarks or registered trademarks of Microsoft Corporation in the United States and/or other countries. EMC is the registered
trademark of EMC Corporation; ENERGY STAR is a registered trademark of the U.S. Environmental Protection Agency. As an ENERGY STAR Partner, Dell Inc. has
determined that this product meets the ENERGY STAR guidelines for energy efficiency; Adobe and Photoshop are registered trademarks or trademarks of
Adobe Systems Incorporated in the United States and/or other countries.
Other trademarks and trade names may be used in this document to refer to either the entities claiming the marks and names or their products. Dell Inc.
disclaims any proprietary interest in trademarks and trade names other than its own.
Our printer software uses some of the codes defined by the Independent JPEG Group.
UNITED STATES GOVERNMENT RESTRICTED RIGHTS
This software and documentation are provided with RESTRICTED RIGHTS. Use, duplication or disclosure by the Government is subject to restrictions as set
forth in subparagraph (c)(1)(ii) of the Rights in Technical Data and Computer Software clause at DFARS 252.227-7013 and in applicable FAR provisions: Dell
Inc., One Dell Way, Round Rock, Texas, 78682, USA.
November 2008 Rev. A01
Dell™2130cnColorLaserPrinterUser'sGuide
Finding Information
About Your Printer
Installing the Print Head Device (PHD) Unit and Toner Cartridges
Connecting Your Printer
Dell Printer Configuration Web Tool
Installing Optional Modules
Print Media Guidelines
Loading Print Media
Operator Panel
Printer Settings
Understanding the Tool Box Menus
Understanding the Printer Menus
Understanding Your Printer Software
Printing
Setting Up for Shared Printing
Understanding Fonts
Understanding Printer Messages
Clearing Jams
Troubleshooting Guide
Installing Printer Drivers
Printing With Web Services on Devices (WSD)
Maintaining Your Printer
Removing Options
Printer Specifications
Appendix
NOTE: A NOTE indicates important information that helps you make better use of your printer.
NOTICE: A NOTICE indicates either potential damage to hardware or loss of data and tells you how to avoid the problem.
CAUTION: A CAUTION indicates a potential for property damage, personal injury, or death.

Back to Contents Page
Print Media Guidelines
Paper
Envelopes
Labels
Storing Print Media
Identifying Print Media Sources and Specifications
Print media is paper, labels, envelopes, and coated paper among others. Your printer provides high-quality printing on a variety of print media. Selecting the
appropriate print media for your printer helps avoid printing troubles. This section describes selecting print media, caring for print media, and loading the print
media in the standard 250-sheet tray or optional 250-sheet feeder.
Paper
For the best print quality in color, use 75 g/m2 (20 lb) xerographic, grain long paper. For the best print quality in black and white, use 90 g/m2 (24 lb)
xerographic, grain long paper. Before buying large quantities of any print media, it is recommended that you try a sample first.
When loading paper, identify the recommended print side on the paper package, and load the paper accordingly. See "Loading Print Media in the Standard
250-Sheet Tray and Optional 250-Sheet Feeder" and "Loading the Single Sheet Feeder" for detailed loading instructions.
Paper Characteristics
The following paper characteristics affect print quality and reliability. It is recommended that you follow these guidelines when evaluating new paper stock.
Weight
The standard 250-sheet tray automatically feeds paper weights from 60 to 216 g/m2 (16 to 80 lb bond) grain long. The single sheet feeder automatically feeds
paper weights from 60 to 216 g/m2 (16 to 80 lb bond) grain long. Paper lighter than 60 g/m2 (16 lb) may not feed properly, and could cause paper jams. For
best performance, use 75 g/m2 (20 lb bond) grain long paper.
Curl
Curl is the tendency of print media to curve at its edges. Excessive curl can cause paper feeding problems. Curl usually occurs after the paper passes through
the printer, where it is exposed to high temperatures. Storing paper unwrapped, even in the paper tray, can contribute to paper curling prior to printing and
cause feeding problems regardless of humidity. When printing on curled paper, straighten the paper and then insert it into the single sheet feeder.
Smoothness
The degree of paper smoothness directly affects print quality. If the paper is too rough, the toner does not fuse to the paper properly, resulting in poor print
quality. If the paper is too smooth, it can cause paper feeding problems. Smoothness between 150 and 250 Sheffield points produces the best print quality.
Moisture Content
The amount of moisture in the paper affects both print quality and the ability of the printer to feed the paper properly. Leave the paper in its original
packaging until you are ready to use it. This limits the exposure of the paper to moisture changes that can degrade its performance.
Grain Direction
Grain refers to the alignment of the paper fibers in a sheet of paper. Grain is either grain long, running the length of the paper, or grain short, running the
width of the paper. For 60 to 135 g/m2 (16 to 36 lb bond) paper, grain long fibers are recommended. For paper heavier than 135 g/m2 (36 lb bond), grain
short is preferred.
Fiber Content
Most high-quality xerographic paper is made from 100% chemically pulped wood. Paper containing fibers such as cotton possess characteristics that can result
in degraded paper handling.
NOTE: The optional 250-sheet feeder automatically feeds paper weights from 60 to 105 g/m2 (16 to 80 lb bond) grain long. Paper lighter than 60 g/m2
(16 lb) may not feed properly, and could cause paper jams. For best performance, use 75 g/m2 (20 lb bond) grain long paper.

Recommended Paper
To ensure the best print quality and feed reliability, use 75 g/m2 (20 lb) xerographic paper. Business paper designed for general business use also provide
acceptable print quality. Only use paper able to withstand high temperatures without discoloring, bleeding, or releasing hazardous emissions. The laser
printing process heats paper to high temperatures. Check with the manufacturer or vendor to determine whether the paper you have chosen is acceptable for
laser printers.
Unacceptable Paper
The following paper types are not recommended for use with the printer:
l Chemically treated paper used to make copies without carbon paper, also known as carbonless paper, carbonless copy paper (CCP), or no carbon
required (NCR) paper
l Preprinted paper with chemicals that may contaminate the printer
l Preprinted paper that can be affected by the temperature in the fuser
l Preprinted paper that require a registration (the precise print location on the page) greater than ±0.09 inches, such as optical character recognition
(OCR) forms
In some cases, you can adjust registration with your software program to successfully print on these forms.
l Coated paper (erasable bond), synthetic paper, thermal paper
l Rough-edged, rough or heavily textured surface paper, or curled paper
l Recycled paper containing more than 25% post-consumer waste that do not meet DIN 19 309
l Multiple-part forms or documents
l Print quality may deteriorate (blank spaces or blotches may appear in the text) when printing on talc or acid paper.
Selecting Paper
Proper paper selection helps prevent jams and ensures trouble-free printing.
To help avoid jams or poor print quality:
l Always use new, undamaged paper.
l Before loading the paper, identify the recommended print side of the paper. This information is usually indicated on the paper package.
l Do not use paper that you have cut or trimmed yourself.
l Do not mix print media sizes, weights, or types in the same source. This may result in a paper jam.
l Do not remove the tray while a job is printing.
l Ensure that the paper is properly loaded in the tray.
l Flex paper back and forth, and then fan them. Straighten the edges of the stack on a level surface.
Selecting Preprinted Form and Letterhead
When selecting preprinted forms and letterhead paper for the printer:
l Use grain long paper for best results.
l Use only forms and letterhead printed using an offset lithographic or engraved printing process.
l Select paper that absorb ink, but do not bleed.
l Avoid paper with rough or heavily textured surfaces.
l Use paper printed with heat-resistantinksdesignedforuseinxerographiccopiers.Theinkmustwithstandtemperaturesof225°C(437°F)without
melting or releasing hazardous emissions.
l Use inks that are not affected by the resin in toner or the silicone in the fuser. Inks that are oxidation-set or oil-based should meet these requirements;
latex inks might not. If you are in doubt, contact your paper supplier.
NOTE: Always print several samples before buying large quantities of any type of print media. When choosing any print media, you should consider the
weight, fiber content, and color.
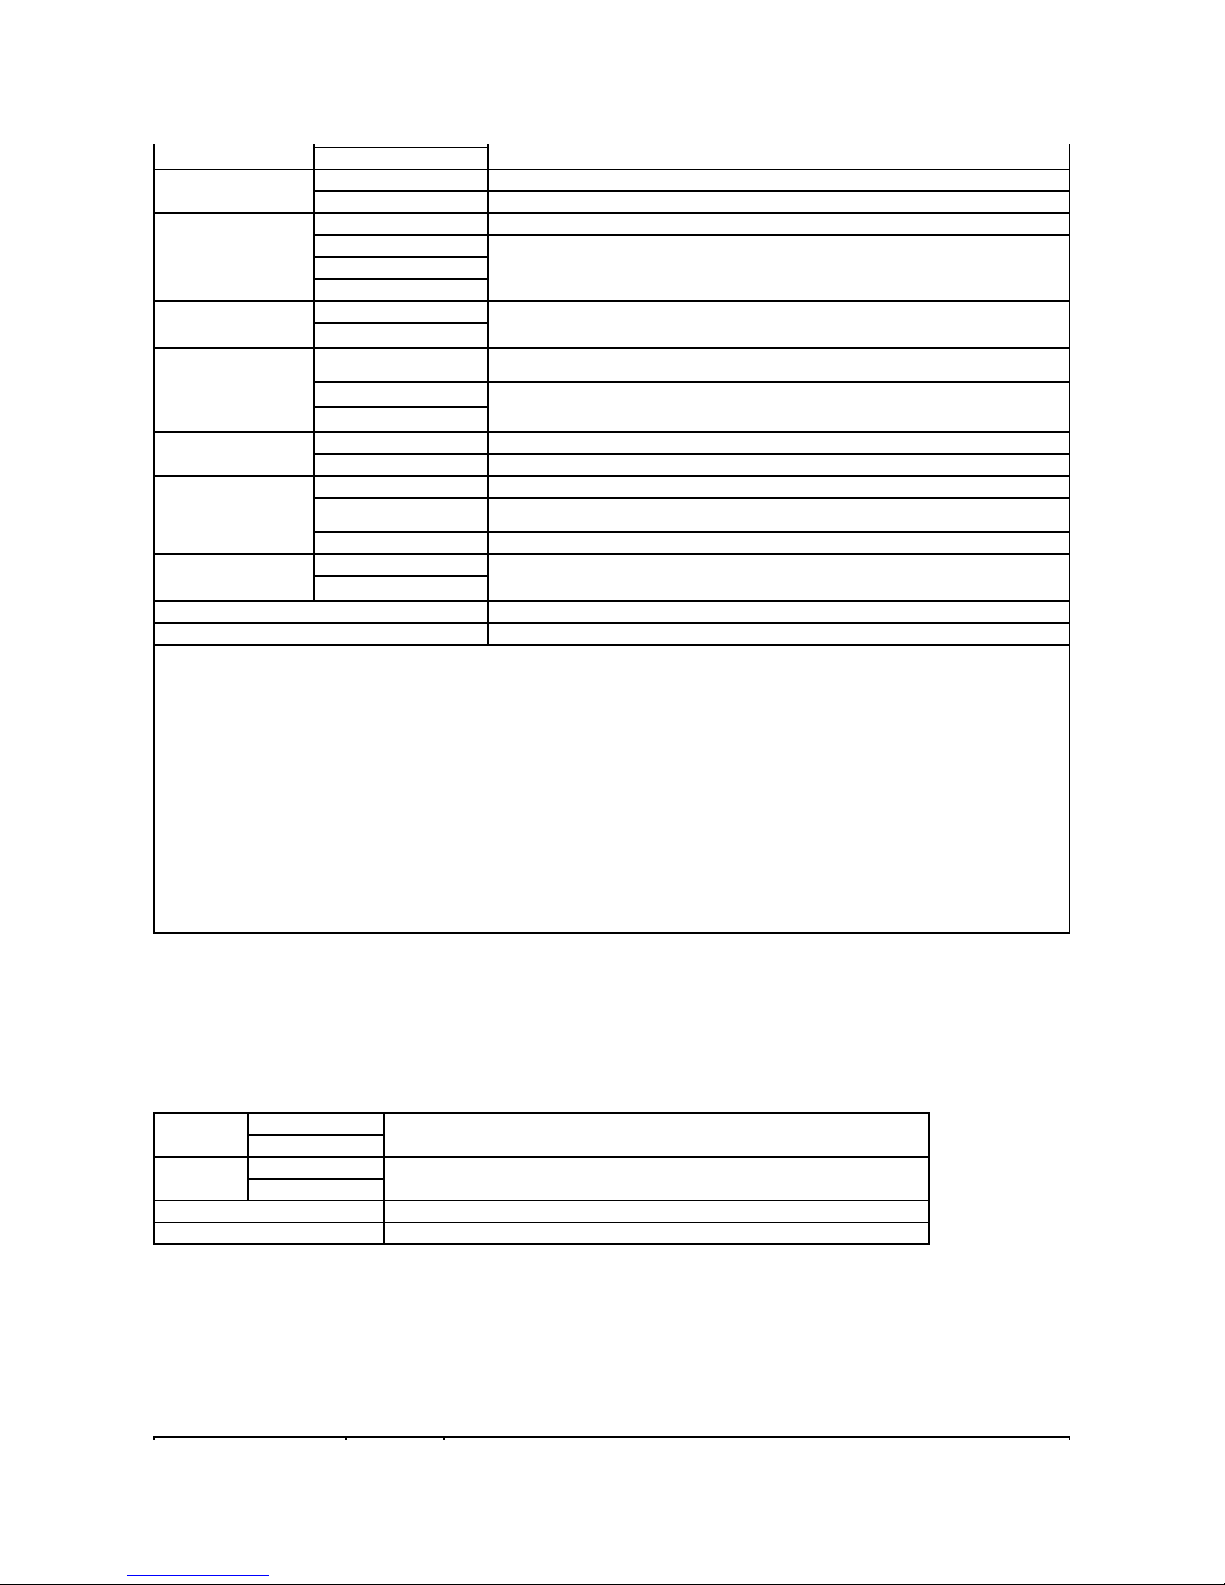
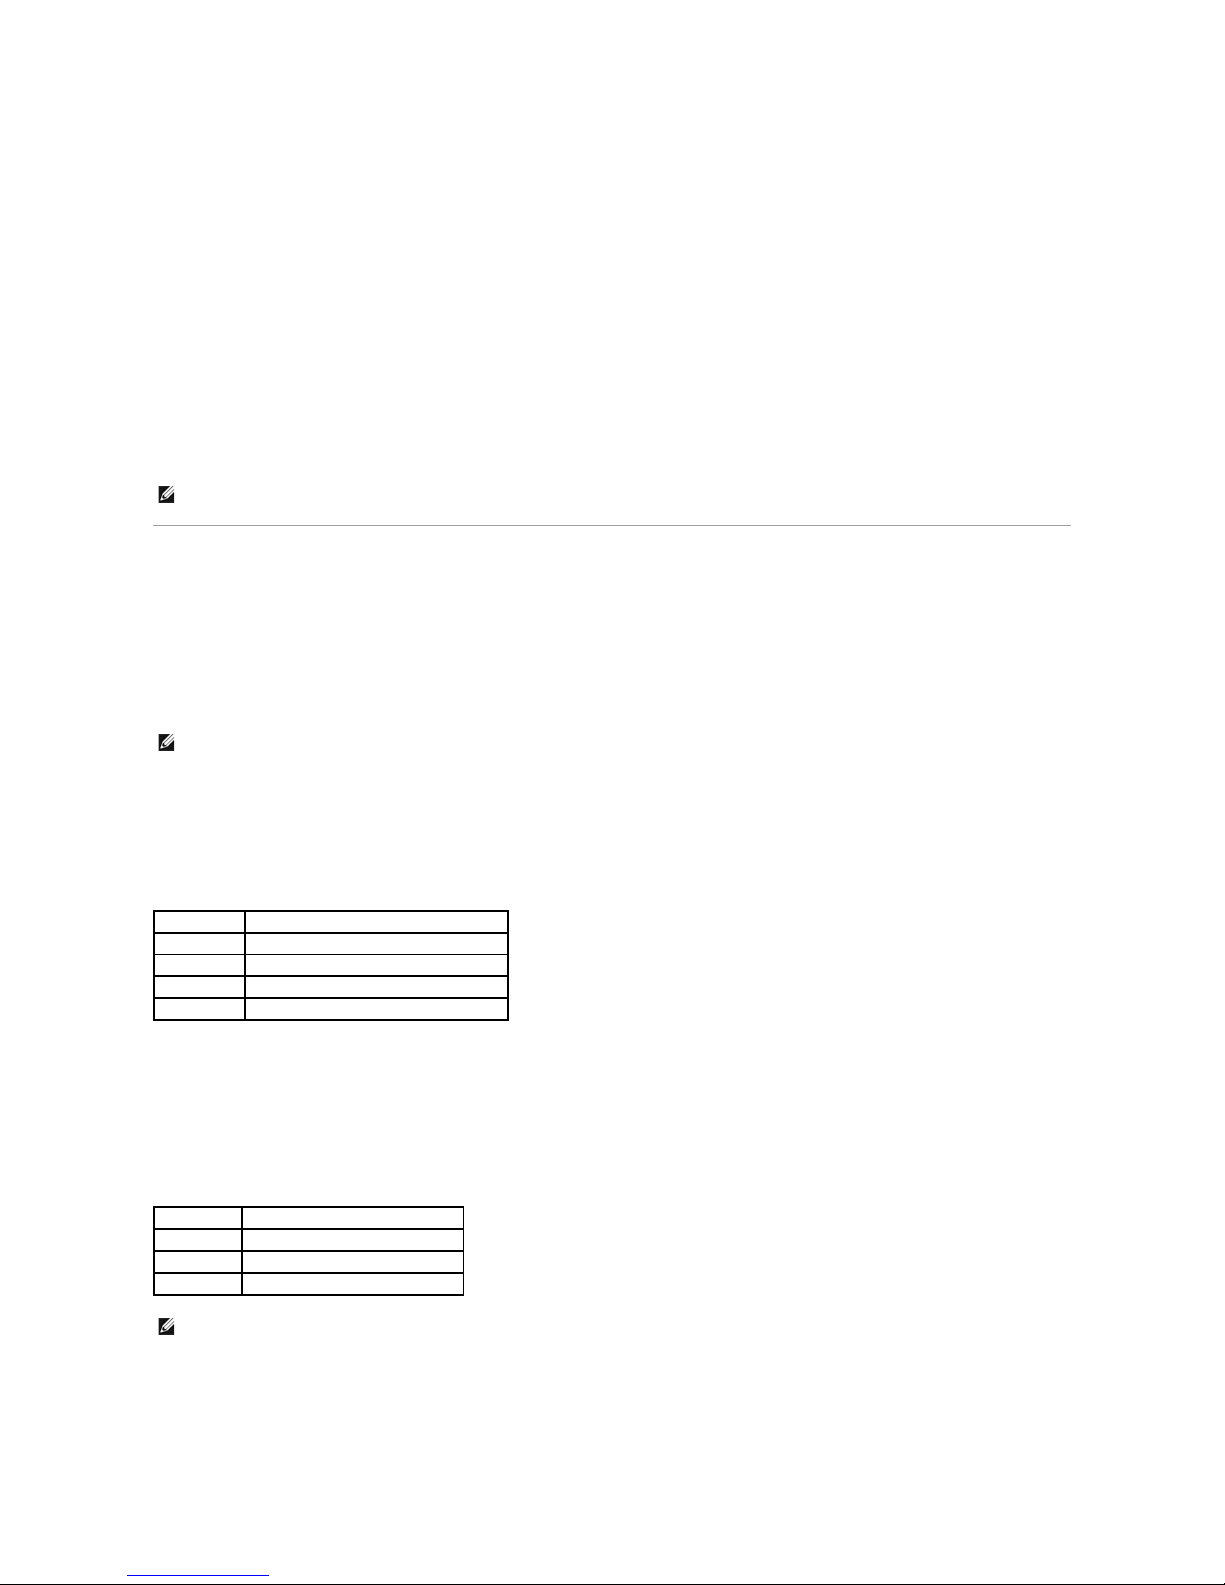
Printing on Letterhead
Check with the manufacturer or vendor to determine whether the pre-printed letterhead you have selected is acceptable for laser printers.
Page orientation is important when printing on letterhead. Use the following table for help when loading letterhead in the print media sources.
Selecting Pre-Punched Paper
Pre-punched paper brands can differ in the number and placement of holes and in manufacturing techniques. However, it may not be possible to print on the
paper to depending on the placement of holes on the paper.
To select and use pre-punched paper:
l Test paper from several manufacturers before ordering and using large quantities of pre-punched paper.
l Paper should be punched at the paper manufacturer and not drilled into paper already packaged in a ream. Drilled paper can cause jams when multiple
sheets feed through the printer. This may result in a paper jam.
l Pre-punched paper can include more paper dust than standard paper. Your printer may require more frequent cleaning and feed reliability may not be
as good as standard paper.
l Weight guidelines for pre-punched paper are the same as non-punched paper.
Envelopes
Depending on the choice of envelopes, it is possible to expect variable levels of light wrinkling. Before buying large quantities of any print media, it is
recommended that you try a sample first. See "Loading Print Media in the Standard 250-Sheet Tray and Optional 250-Sheet Feeder" or "Loading the Single
Sheet Feeder" for instructions on loading an envelope.
When printing on envelopes:
l Use only high-quality envelopes that are designed for use in laser printers.
l Set the print media source to the single sheet feeder or standard 250-sheet tray. Set the paper type to Envelope, and select the correct size of
envelope from the printer driver.
l For best performance, use envelopes made from 75 g/m
2
(20 lb bond) paper. You can use up to 105 g/m2 (28 lb bond) weight for the envelope feeder
as long as the cotton content is 25% or less. Envelopes with 100% cotton content must not exceed 90 g/m2 (24 lb bond) weight.
l Use only freshly unpackaged, undamaged envelopes.
l Useenvelopesthatcanwithstandtemperaturesof205°C(401°F)withoutsealing,excessivecurling,wrinkling,orreleasinghazardousemissions.If
you have any doubts about the envelopes you are considering, check with the envelope supplier.
l Adjust the guide to fit the width of the envelopes.
l To load envelope in the single sheet feeder, insert the envelope with the flaps closed and the short-edge of the envelope facing into the printer. The
print side must be facing down.
l See "Loading Print Media in the Standard 250-Sheet Tray and Optional 250-Sheet Feeder" or "Loading the Single Sheet Feeder" for instructions on
loading an envelope.
l Use one envelope size during a print job.
l Ensure the humidity is low because high humidity (more than 60%) and the high printing temperatures may seal the envelopes.
l For best performance, do not use envelopes that:
Print media source
Print side
Page orientation
Standard 250-Sheet Tray
Optional 250-Sheet Feeder
Face up
Letterhead enters the printer last
Single Sheet Feeder
Face down
Letterhead enters the printer first

¡ Have excessive curl or twist
¡ Are stuck together or damaged in any way
¡ Contain windows, holes, perforations, cutouts, embossing
¡ Use metal clasps, string ties, or metal folding bars
¡ Have an interlocking design
¡ Have postage stamps attached
¡ Have any exposed adhesive when the flap is in the sealed or closed position
¡ Have nicked edges or bent corners
¡ Have rough, cockle, or laid finishes
Labels
Your printer can print on many labels designed for use with laser printers. Label adhesives, face sheet (printable stock), and topcoats must be able to
withstandtemperaturesof205°C(401°F)andpressureof25poundspersquareinch(psi).Beforebuyinglargequantitiesofanyprintmedia,itis
recommended that you try a sample first.
When printing on labels:
l Set the paper type to Label from the printer driver.
l Do not load labels together with paper in the same tray. This may result in a jam.
l Do not use label sheets with a slick backing material.
l Do not print within 1 mm (0.04 inches) of the die cut.
l Use full label sheets. Partial sheets may cause labels to peel off during printing, resulting in a jam. Partial sheets also contaminate your printer and your
cartridge with adhesive, and could void your printer and cartridge warranties.
l Uselabelsthatcanwithstandtemperaturesof205°C(401°F)withoutsealing,excessivecurling,wrinkling,orreleasinghazardousemissions.
l Do not print within 1 mm (0.04 inches) of the edge of the label, of the perforations, or between die-cuts of the label.
l Do not use label sheets that have adhesive to the edge of the sheet. It is recommended that zone coating of the adhesive is done at least 1 mm (0.04
inches) away from the edges. Adhesive material contaminates your printer and could void your warranty.
l If zone coating of the adhesive is not possible, a 3 mm (0.125 inches) strip should be removed on the leading and driver edge, and a non-oozing
adhesive should be used.
l Remove a 3 mm (0.125 inches) strip from the leading edge to prevent labels from peeling inside the printer.
l Portrait orientation is preferred, especially when printing bar codes.
l Do not use labels that have exposed adhesive.
Storing Print Media
For proper print media storage, the following guidelines help avoid media feeding problems and uneven print quality.
l Forbestresults,storeprintmediainanenvironmentwherethetemperatureisapproximately21°C(70°F)andtherelativehumidityis40%.
l Store cartons of print media on a pallet or shelf, rather than directly on the floor.
l If you store individual packages of print media out of the original carton, ensure that they rest on a flat surface so that the edges do not buckle or curl.
l Do not place anything on top of the print media packages.
Identifying Print Media Sources and Specifications
The following tables provide information on standard and optional print media sources.
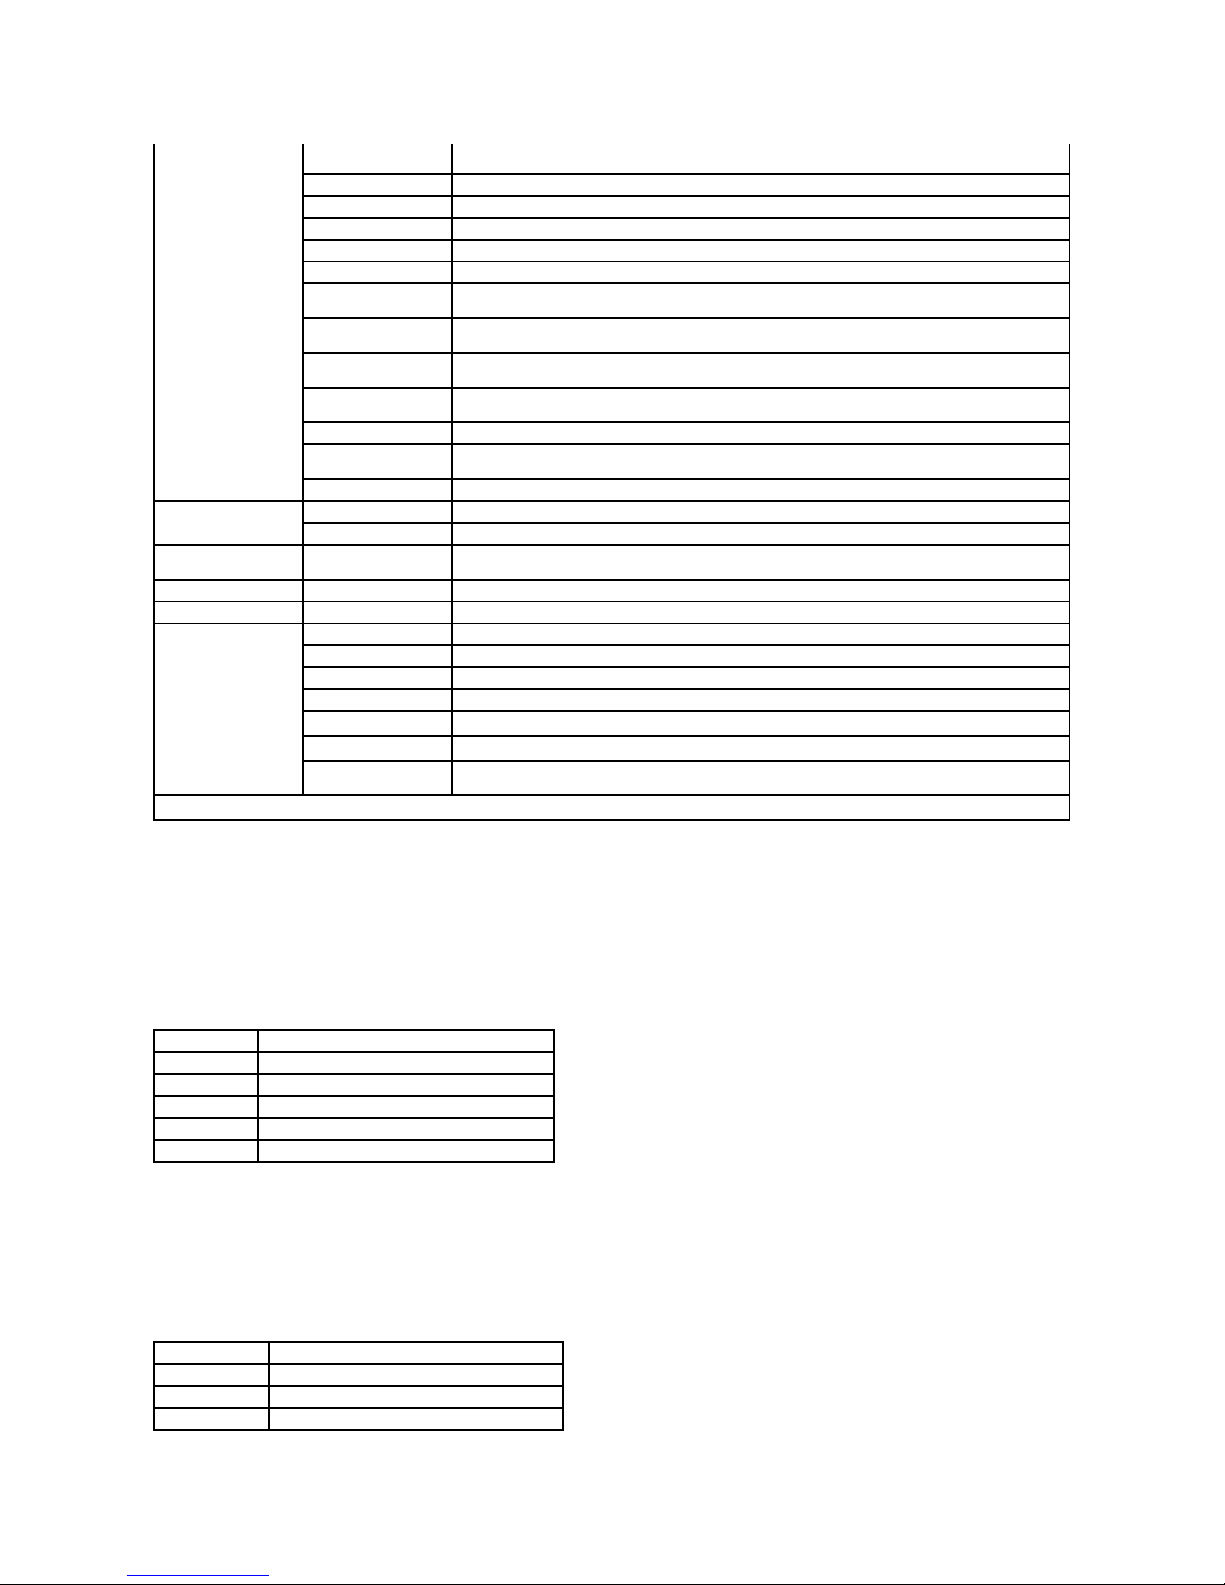
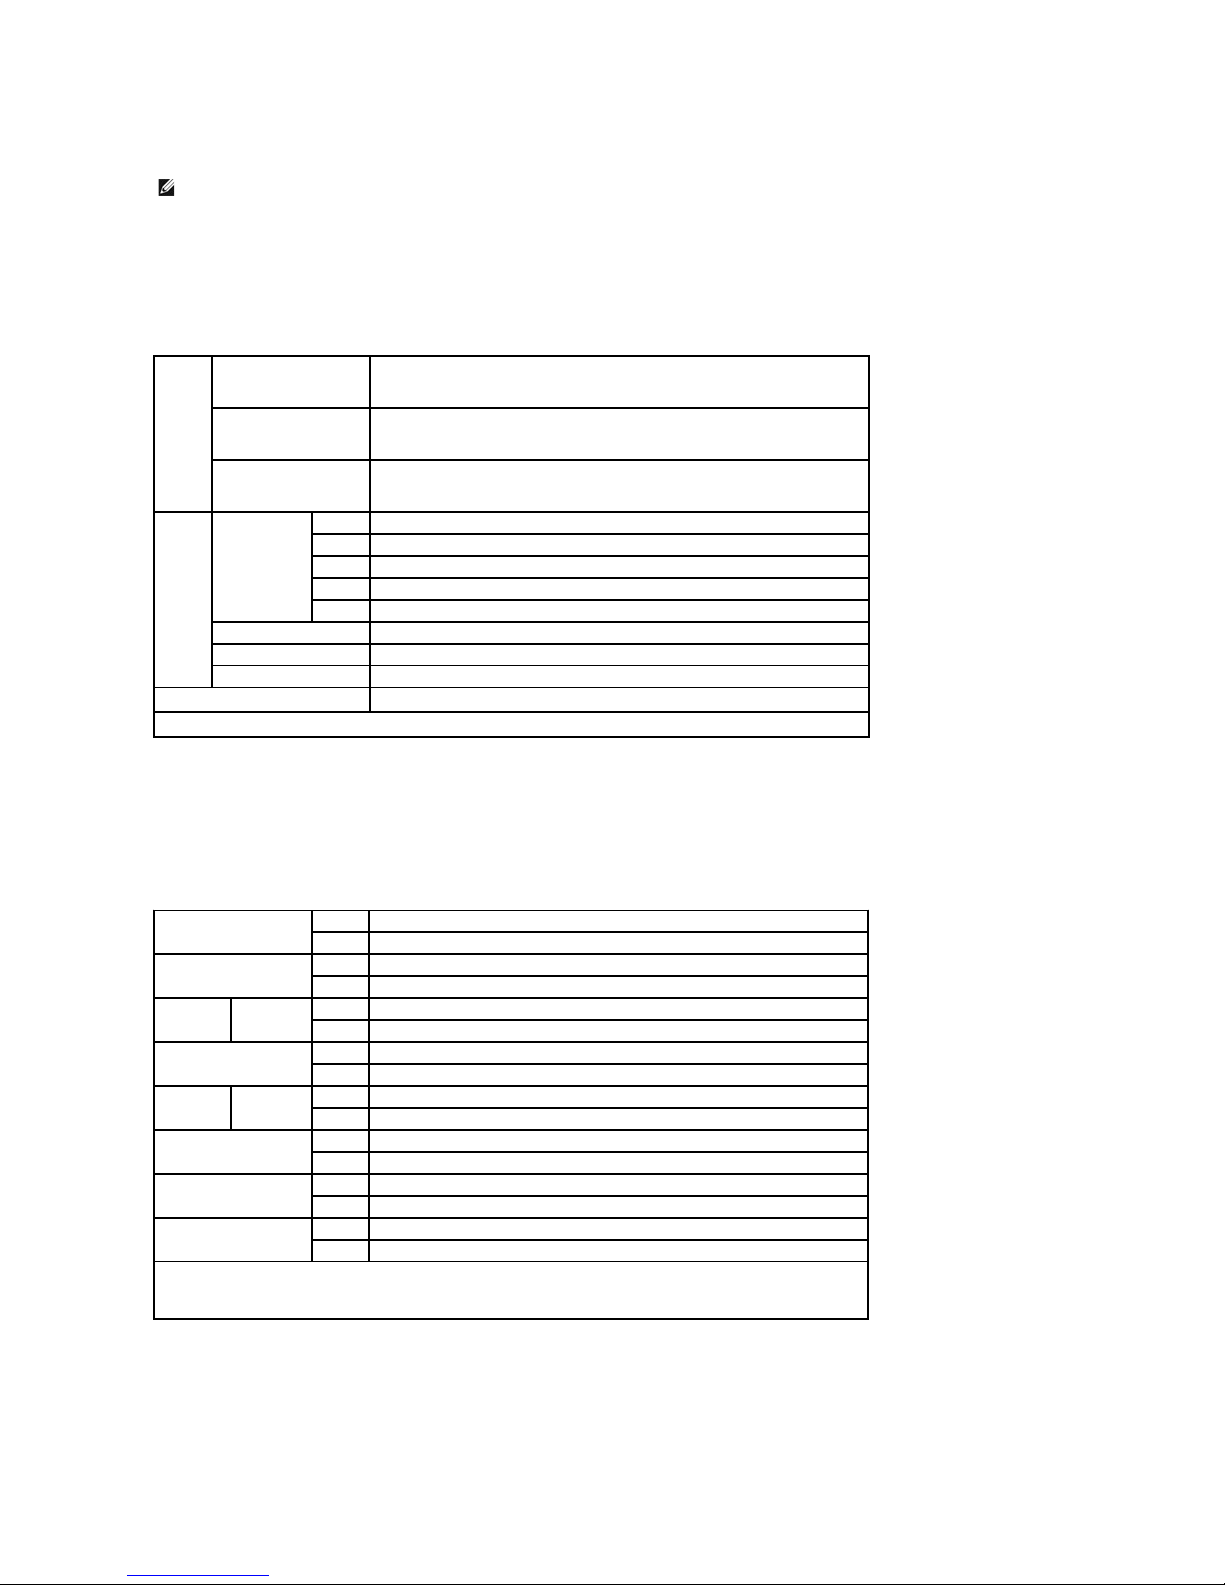
Supported Paper Sizes
Single Sheet Feeder
Standard 250-Sheet Tray
Optional 250-Sheet Feeder
Duplexer
A4 (210x297 mm)
Y Y Y Y B5 (182x257 mm)
Y Y Y N A5 (148x210 mm)
Y Y Y N C5 (162x229 mm)
Y Y N N Monarch (3.875x7.5 in)
Y Y N
N
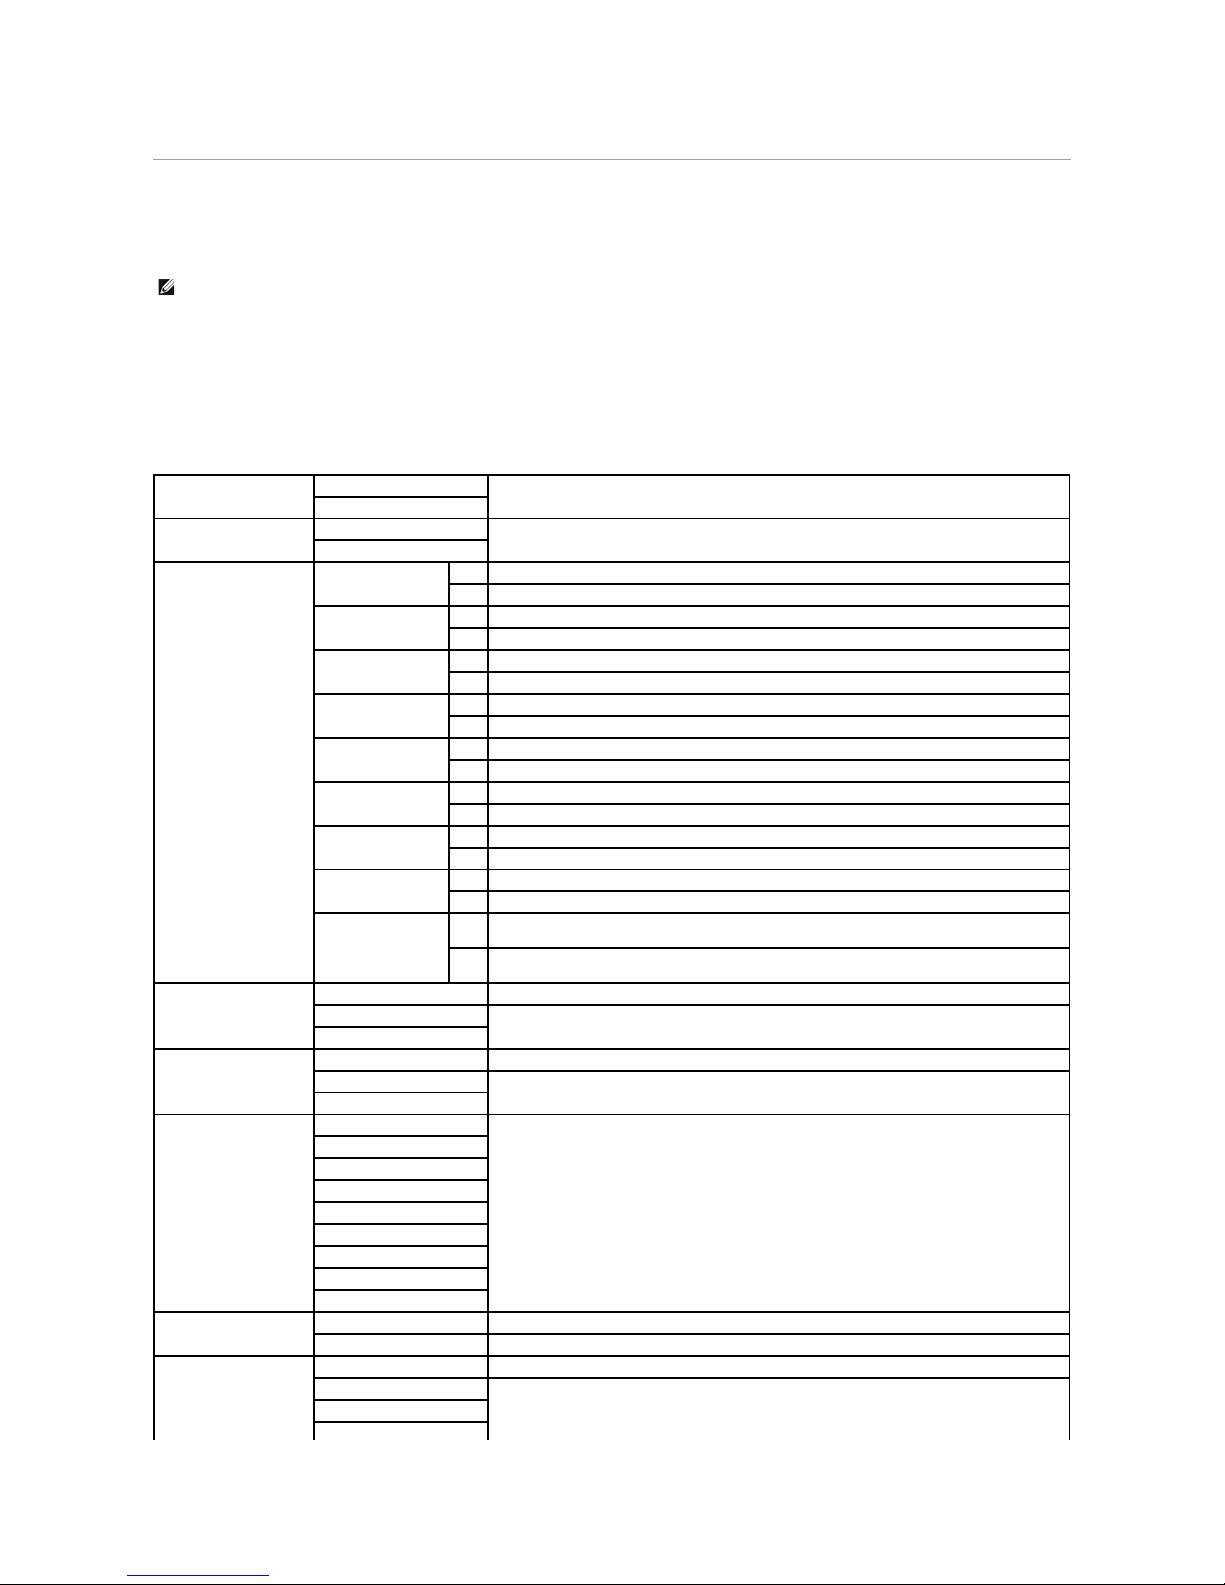
Supported Paper Types
Paper Type Specifications
Back to Contents Page
Monarch LEF (7.5x3.875 in)*
1
N Y N
N
Envelope #10 (4.125x9.5 in)
Y Y N N DL (110x220 mm)
Y Y N N DL LEF (220x110 mm)*
1
N Y N
N
Letter (8.5x11 in)
Y Y Y Y Legal (8.5x14 in)
Y Y Y Y Folio (8.5x13 in)
Y Y Y Y Executive (7.25 x 10.5 in)
Y Y Y N Custom*2*
3
Y Y N
N
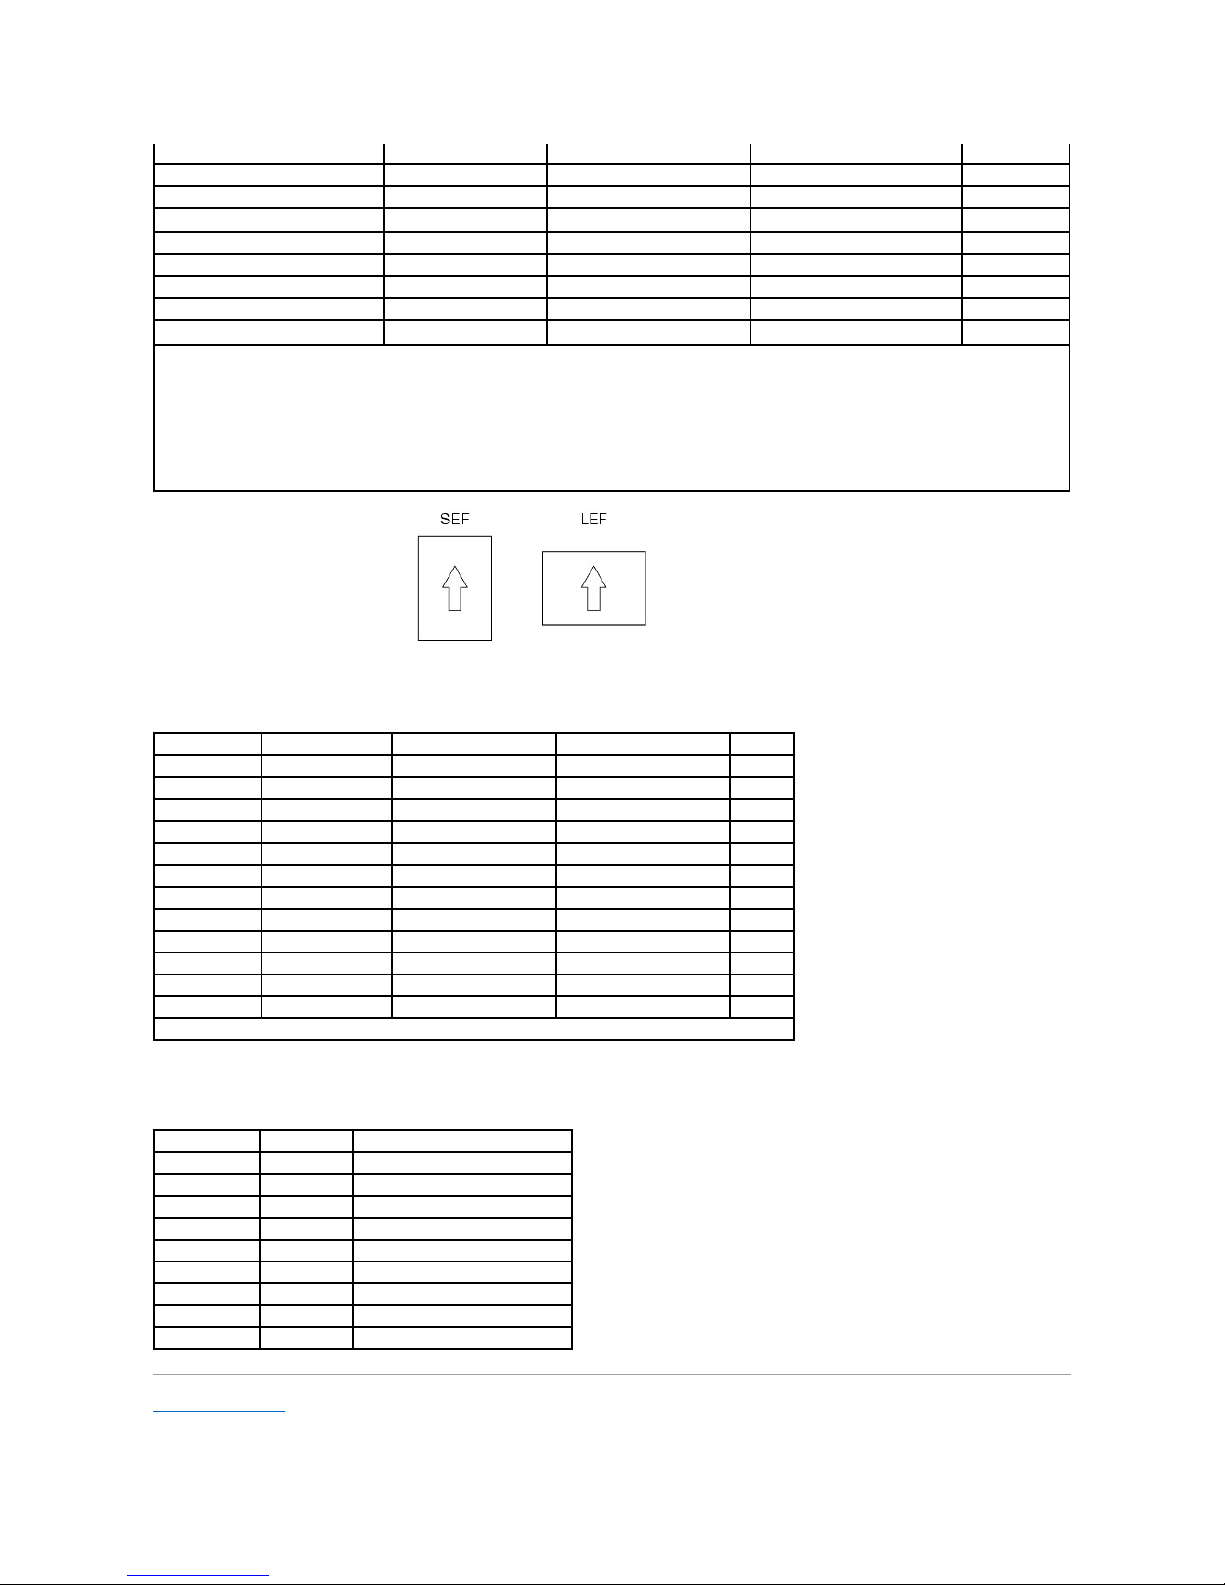
*1 You can load the paper in two kinds of the paper orientation, the short-edge feed (SEF) and the long edge feed (LEF). The SEF is the paper orientation
that is load the paper into the printer from short edge. The LEF is the paper orientation that is load the paper into the printer from long edge. The following
illustration shows SEF and LEF. The arrow mark in the illustration shows the orientation of the paper loading.
*2 Custom width: 76.2 mm (3.00 inches) to 215.9 mm (8.5 inches)
Custom length: 127 mm (5.00 inches) to 355.6 mm (14.00 inches)
*3 Only the administrator user can set the custom size from the printer driver.
Media
Single Sheet Feeder
Standard 250-Sheet Tray
Optional 250-Sheet Feeder
Duplexer
Plain
Y*
Y*
Y*
Y*
Plain Side 2
Y Y Y N Plain Thick
Y Y Y Y Plain Thick Side 2
Y Y Y N Recycled
Y Y Y Y Recycled Side 2
Y Y Y N Label Y Y N N
Covers
Y Y N N Covers Thick
Y Y N N Envelope
Y Y N N Coated
Y N N N Coated Thick
Y N N N * Values marked by an asterisk (*) are the factory default menu settings.
Paper type
Weight (gsm)
Remarks
Plain Paper
60-90 - Plain Thick Paper
80/90-105
-
Covers
106-163
-
Covers Thick
164-216
-
Coated
106-163
Inkjet printer paper cannot be used.
Coated Thick
164-216
Inkjet printer paper cannot be used.
Label
3R97408
Inkjet printer paper cannot be used.
Envelopes
- - Recycled
-
-


Back to Contents Page
Loading Print Media
Standard 250-Sheet Tray and Optional 250-Sheet Feeder
Loading Print Media in the Standard 250-Sheet Tray and Optional 250-Sheet Feeder
Single Sheet Feeder
Loading the Single Sheet Feeder
Using the Duplex Function
Using the Output Tray
Using the Output Tray Extension
Loading print media properly helps prevent jams and ensures trouble-free printing.
Before loading print media, identify the recommended print side of the print media. This information is usually on the print media package.
Standard 250-Sheet Tray and Optional 250-Sheet Feeder
Capacity
The standard 250-sheet tray and optional 250-sheet feeder can hold:
l 250 sheets of the standard paper.
Print Media Dimensions
The standard 250-sheet tray accepts print media within the following dimensions:
l Width - 76.2 mm (3.00 inches) to 215.9 mm (8.5 inches)
l Length - 127 mm (5.00 inches) to 355.6 mm (14.00 inches)
The optional 250-sheet feeder accepts print media within the following dimensions:
l Width - 148 mm (5.82 inches) to 215.9 mm (8.5 inches)
l Length - 210 mm (8.27 inches) to 355.6 mm (14.00 inches)
Loading Print Media in the Standard 250-Sheet Tray and Optional 250-Sheet Feeder
All trays are loaded the same way.
1. Pull the tray out of the printer about 200 mm. Hold the tray with both hands, and remove it from the printer.
2. Adjust the paper guides.
NOTE: To avoid paper jams, do not remove the tray while printing is in progress.
NOTE: Use only laser print media. Do not use ink jet paper in this printer.
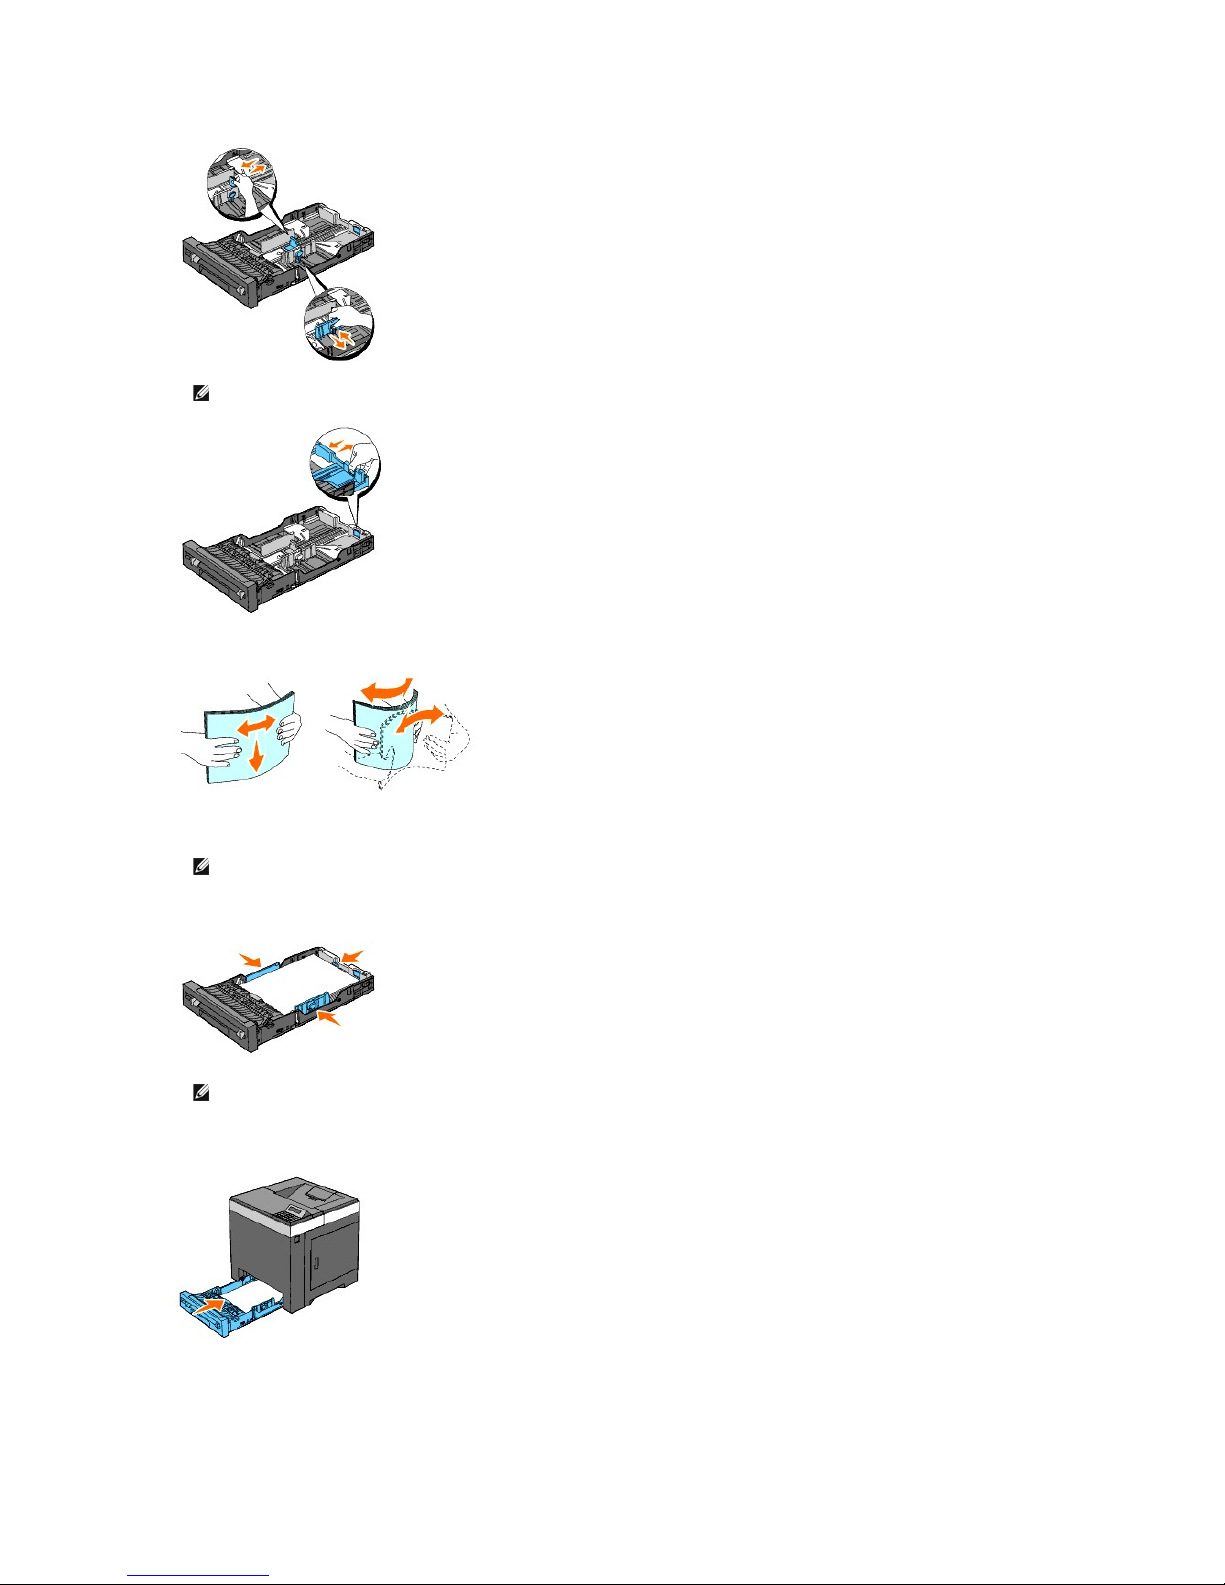
3. Before loading the print media, flex the sheets back and forth, and then fan them. Straighten the edges of the stack on a level surface.
4. Place the print media into the tray with the recommended print side facing up.
5. Adjust the width guides and length guides until they rest lightly against the edges of the stack of paper.
6. After confirming that the guides are securely adjusted, insert the tray into the printer.
7. Select the paper type from the operator panel if any print media other than plain print media is loaded. If a user-specified print media is loaded in the
standard 250-sheet tray, you must specify the paper size setting by using the operator panel.
8. Press Menu button.
NOTE: When you feed paper from the tray loaded with Legal size paper, extend the rear side of the tray.
NOTE: Do not exceed the maximum fill line in the tray. Overfilling the tray may cause paper jams.
NOTE: When loading user-specified print media, adjust the width guides and slide the extendable part of the tray by squeezing the length guide
and sliding it until it rests lightly against the edge of the stack of paper.

9. Press or button until Tray Settings appears, and then press (Set) button.
10. Press or button until Tray 1 appears, and then press (Set) button.
11. Press or button until Paper Type appears, and then press (Set) button.
12. Press or button until the desired paper types appears, and then press (Set) button.
13. Press button.
14. Press or button until Paper Size appears, and then press (Set) button.
15. Press or button until Custom Size appears, and then press (Set) button.
16. Press or button until the desired paper size appears, and then press (Set) button.
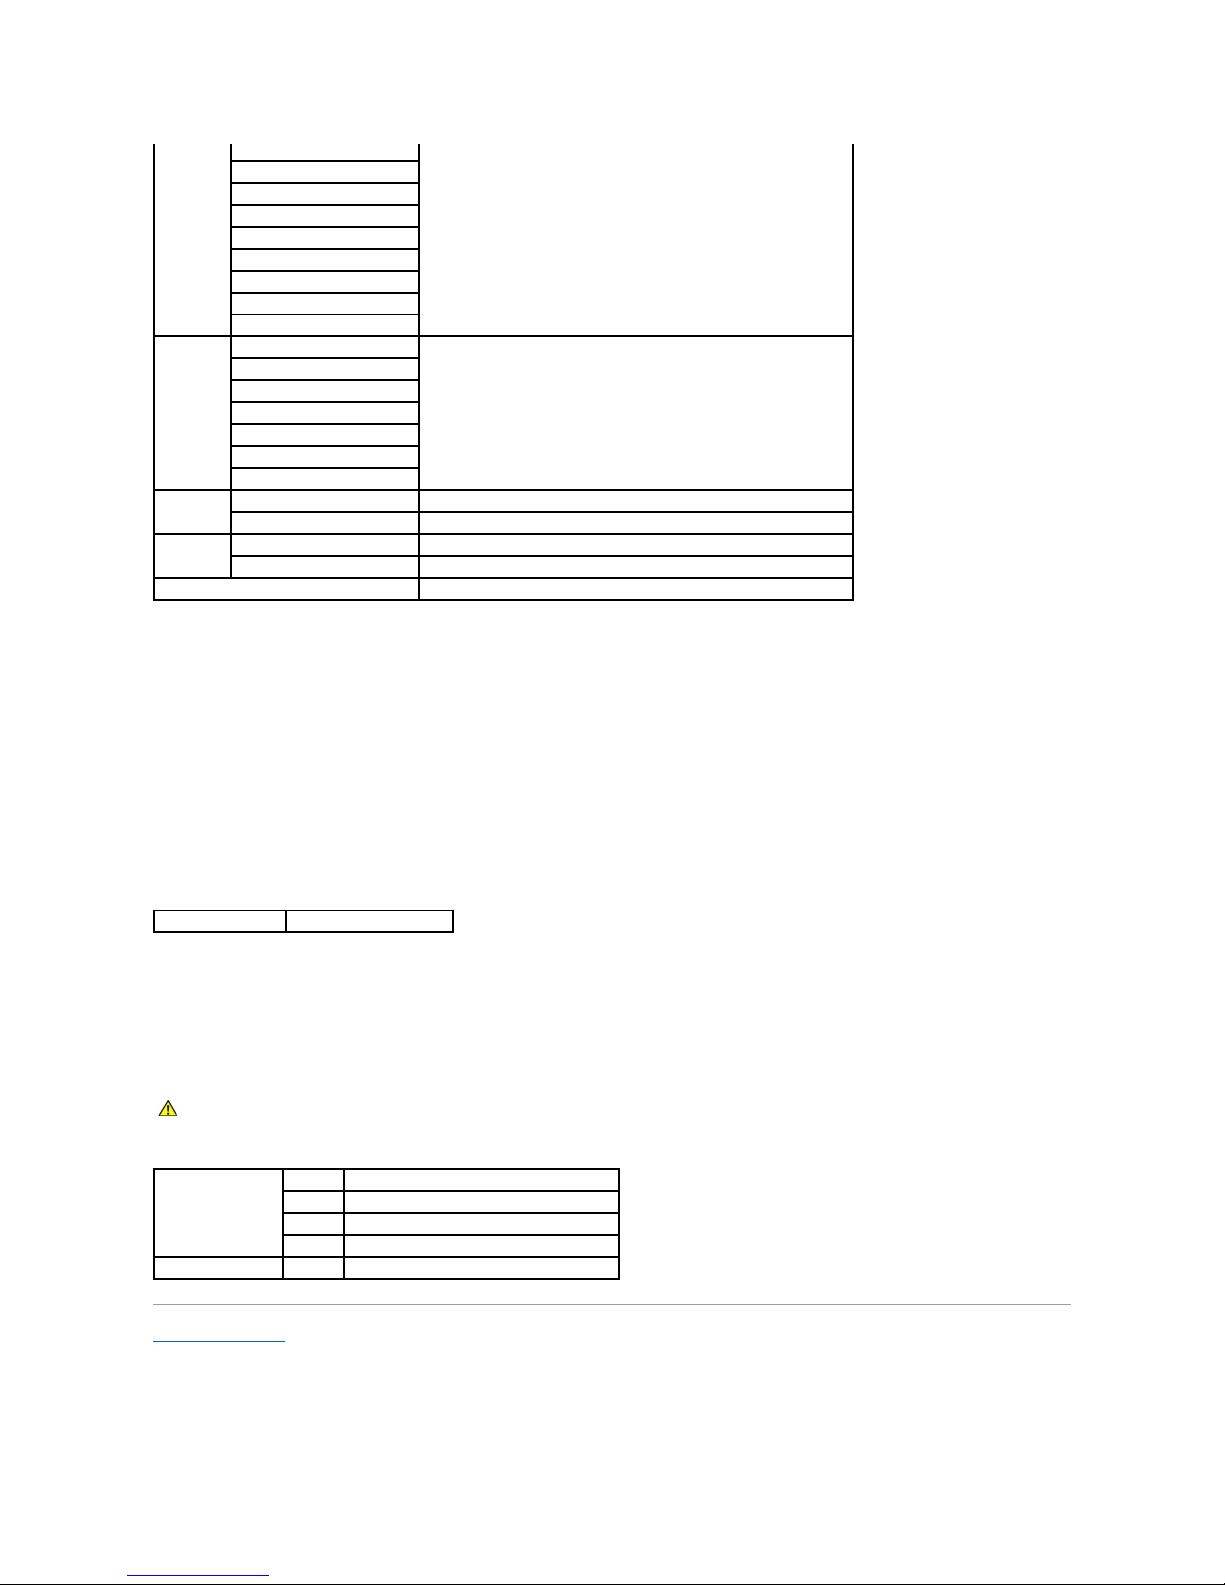
Loading Letterhead
When using the standard 250-sheet tray or optional 250-sheet feeder, the letterhead enters the printer last with the print side facing up.
When using the single sheet feeder, the letterhead enters the printer first with the print side facing down.
Loading Envelopes
Use the following guidelines when loading envelopes in the standard 250-sheet tray:
Envelope#10
Load the envelopes short edge feed with the flaps closed and the print side up. Ensure that the flaps come at the right when you face towards the printer.
Print media source
Print side
Page orientation
Standard 250-Sheet Tray
Optional 250-Sheet Feeder
Face up
Letterhead enters the printer last
Single Sheet Feeder
Face down
Letterhead enters the printer first
NOTE: If you do not load envelopes in the standard 250-sheet tray right after they have been removed from the packaging, they may bulge. To avoid
jams, flatten them as shown below before loading them in the standard 250-sheet tray.
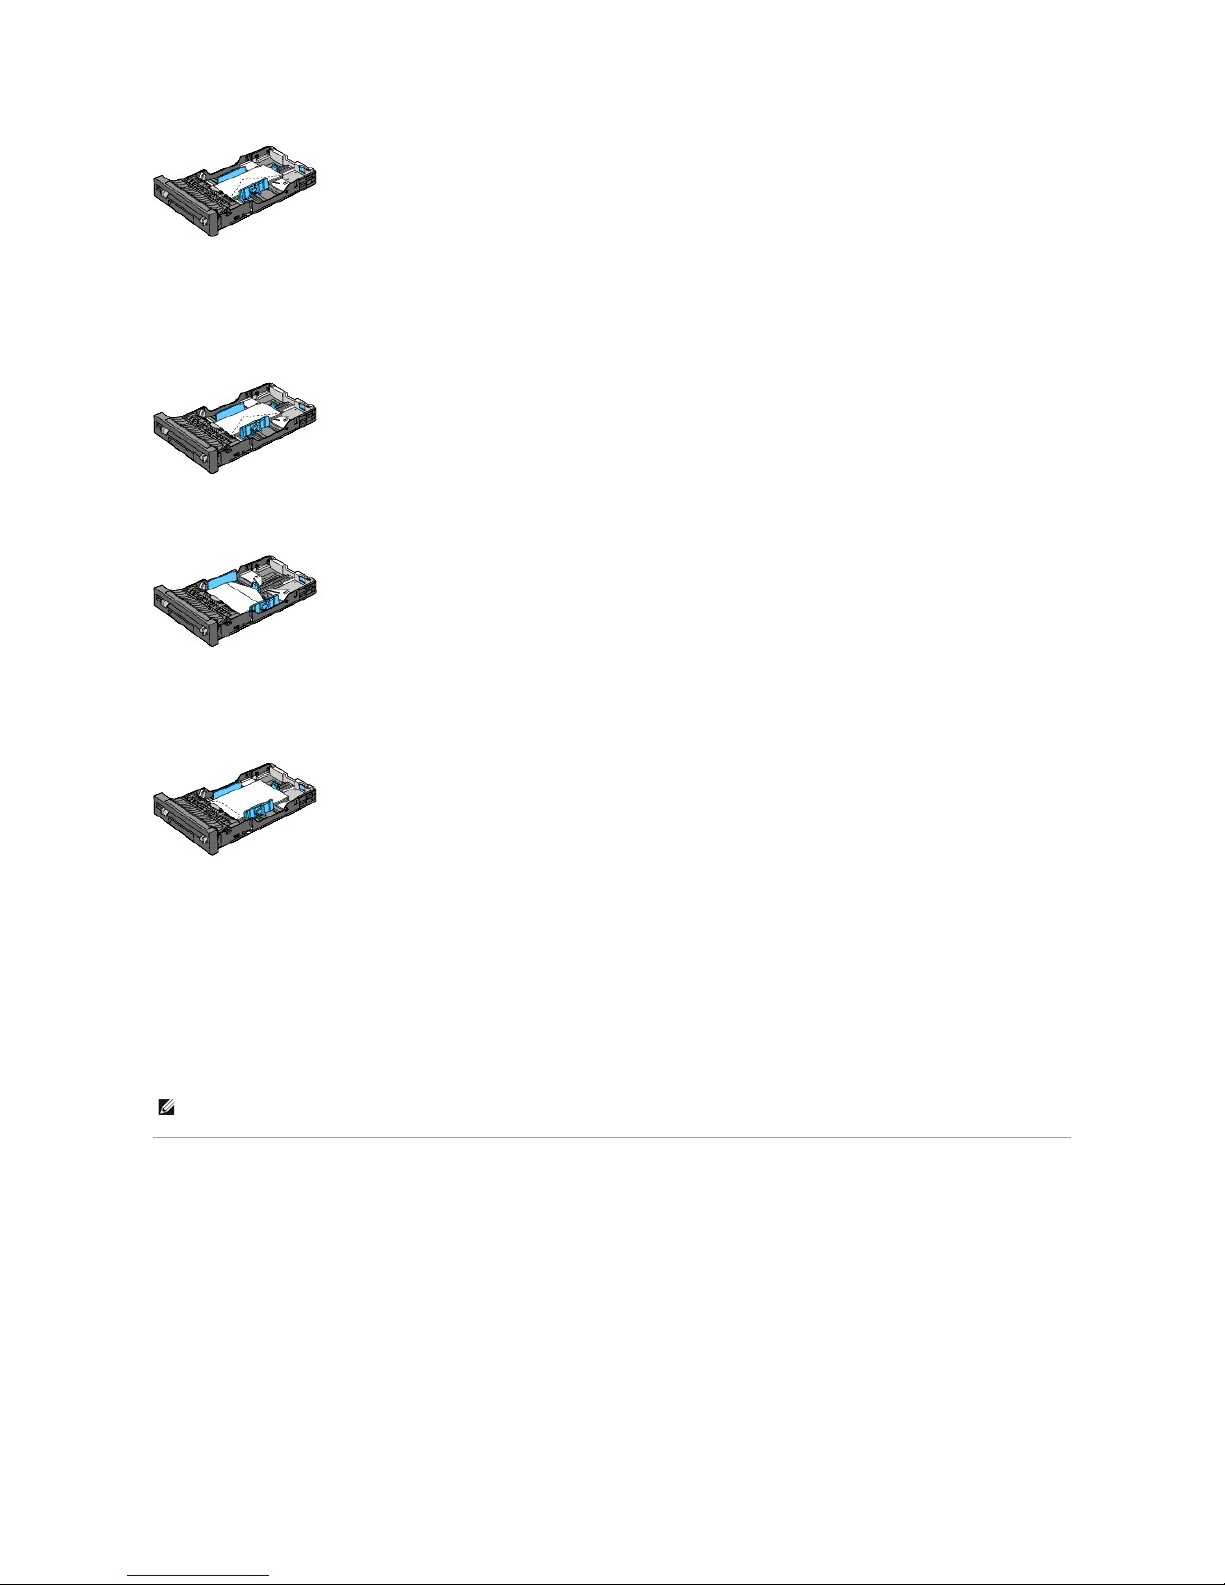
Monarch or DL
The Monarch or DL envelopes can be loaded in one of the following ways:
Load the envelopes short edge feed with the flaps closed and the print side up. Ensure that the flaps come at the right when you face towards the printer.
OR
Load the envelopes long edge feed (LEF) with the flaps open and the print side up. Ensure that the flaps come at the top when you face towards the printer.
C5
Load the envelopes short edge feed with the flaps closed and the print side up. Ensure that the flaps come at the bottom when you face towards the printer.
Linking Trays
Tray linking allows you to load the same size and type of print media in the standard 250-sheet tray and optional 250-sheet feeder. The printer automatically
links the trays and will use the first tray until it runs out of media, then switch to the linked tray.
If you load the same size print media in each tray, ensure that the type of media is same.
When the selected trays are loaded with the same size and type of print media, select the Paper Type settings in the Tray Settings for each source.
To disable tray linking, set the Paper Type to a unique value in each one of the trays. If all trays do not have the same type of print media when linked, you
could mistakenly print a job on the wrong paper type.
Single Sheet Feeder
Capacity
The single sheet feeder can hold:
l 1 sheet of the standard paper.
Print Media Dimensions
The single sheet feeder accepts print media within the following dimensions:
NOTE: If the paper type is not specified in the printer driver, the printer automatically links the trays (even if there are different types of print media
loaded in them).
l Width - 76.2 mm (3.00 inches) to 215.9 mm (8.5 inches)
l Length - 127 mm (5.00 inches) to 355.6 mm (14.00 inches)
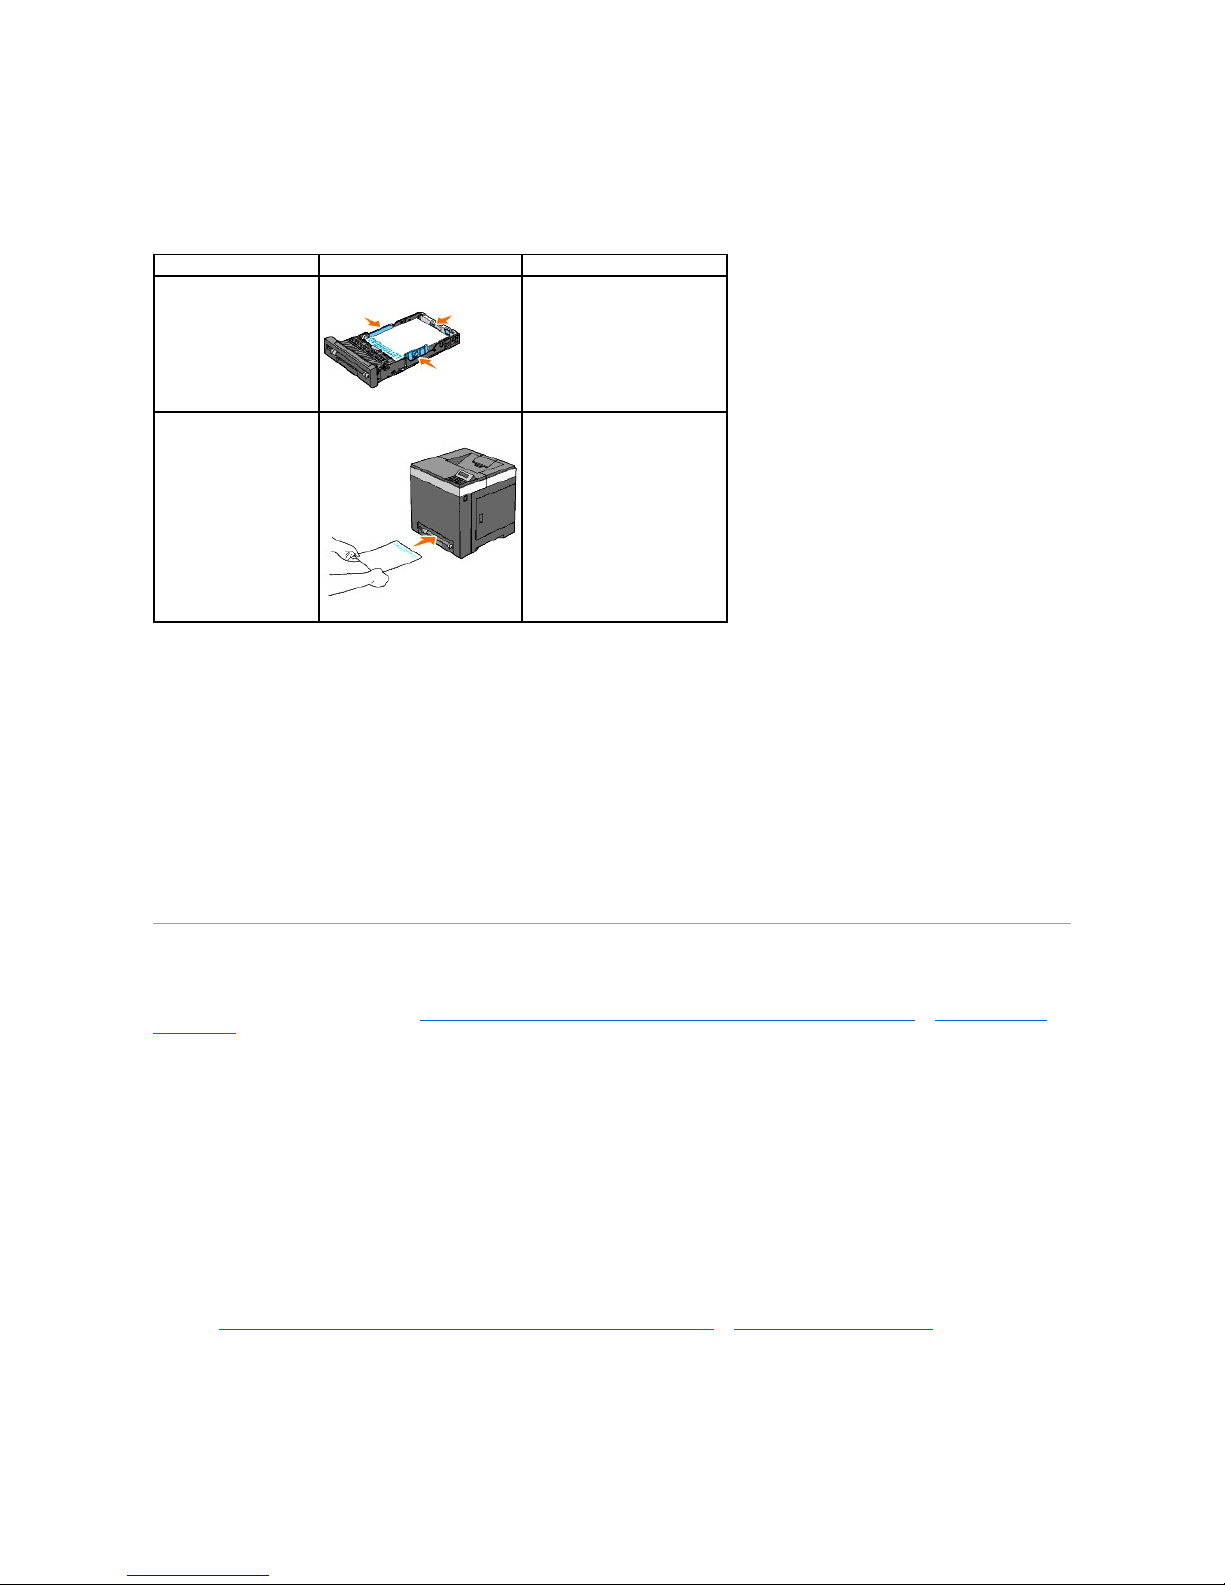
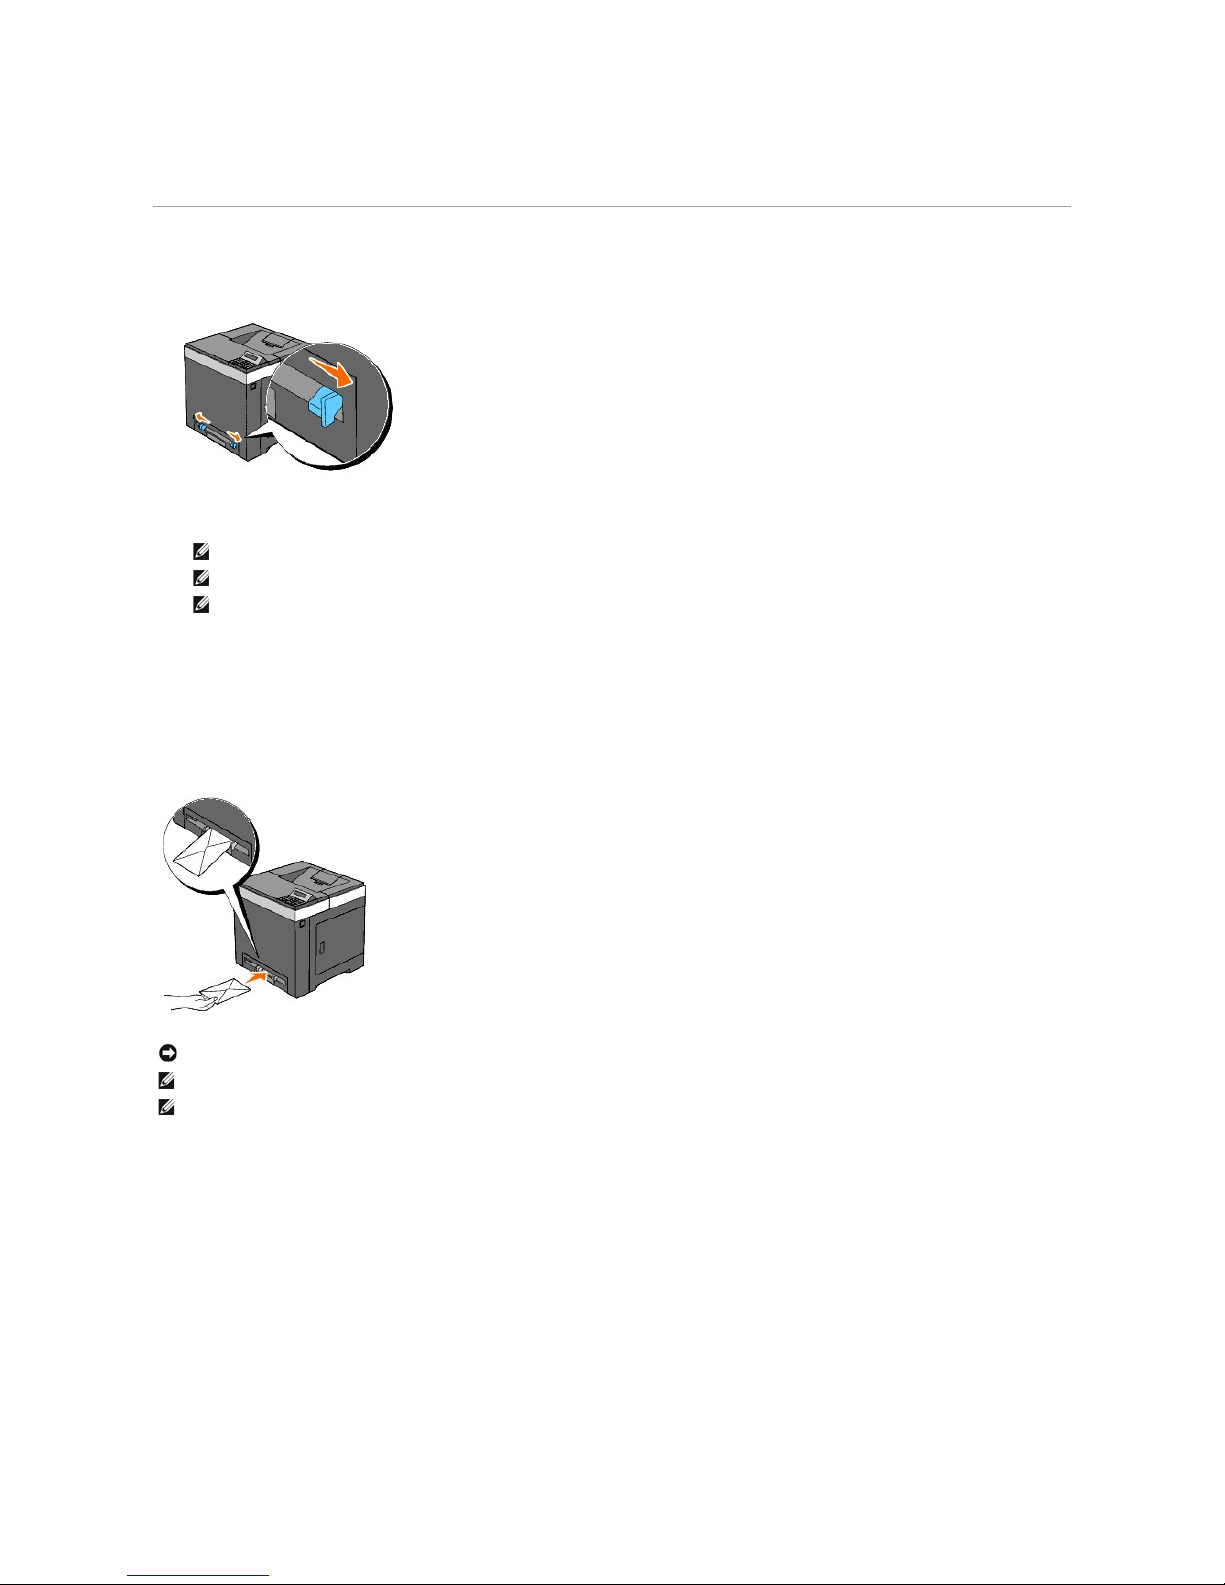
Loading the Single Sheet Feeder
1. Adjust the width guides to the print media's width.
2. Hold both sides of the print media facing down close to the single sheet feeder, and push it into the printer until it automatically feeds.
Loading an Envelope
Envelope#10, Monarch, or DL
To load an envelope into the single sheet feeder, insert the envelope short edge feed with the flap closed and the print side down. Ensure that the flap comes
at the right when you face towards the printer.
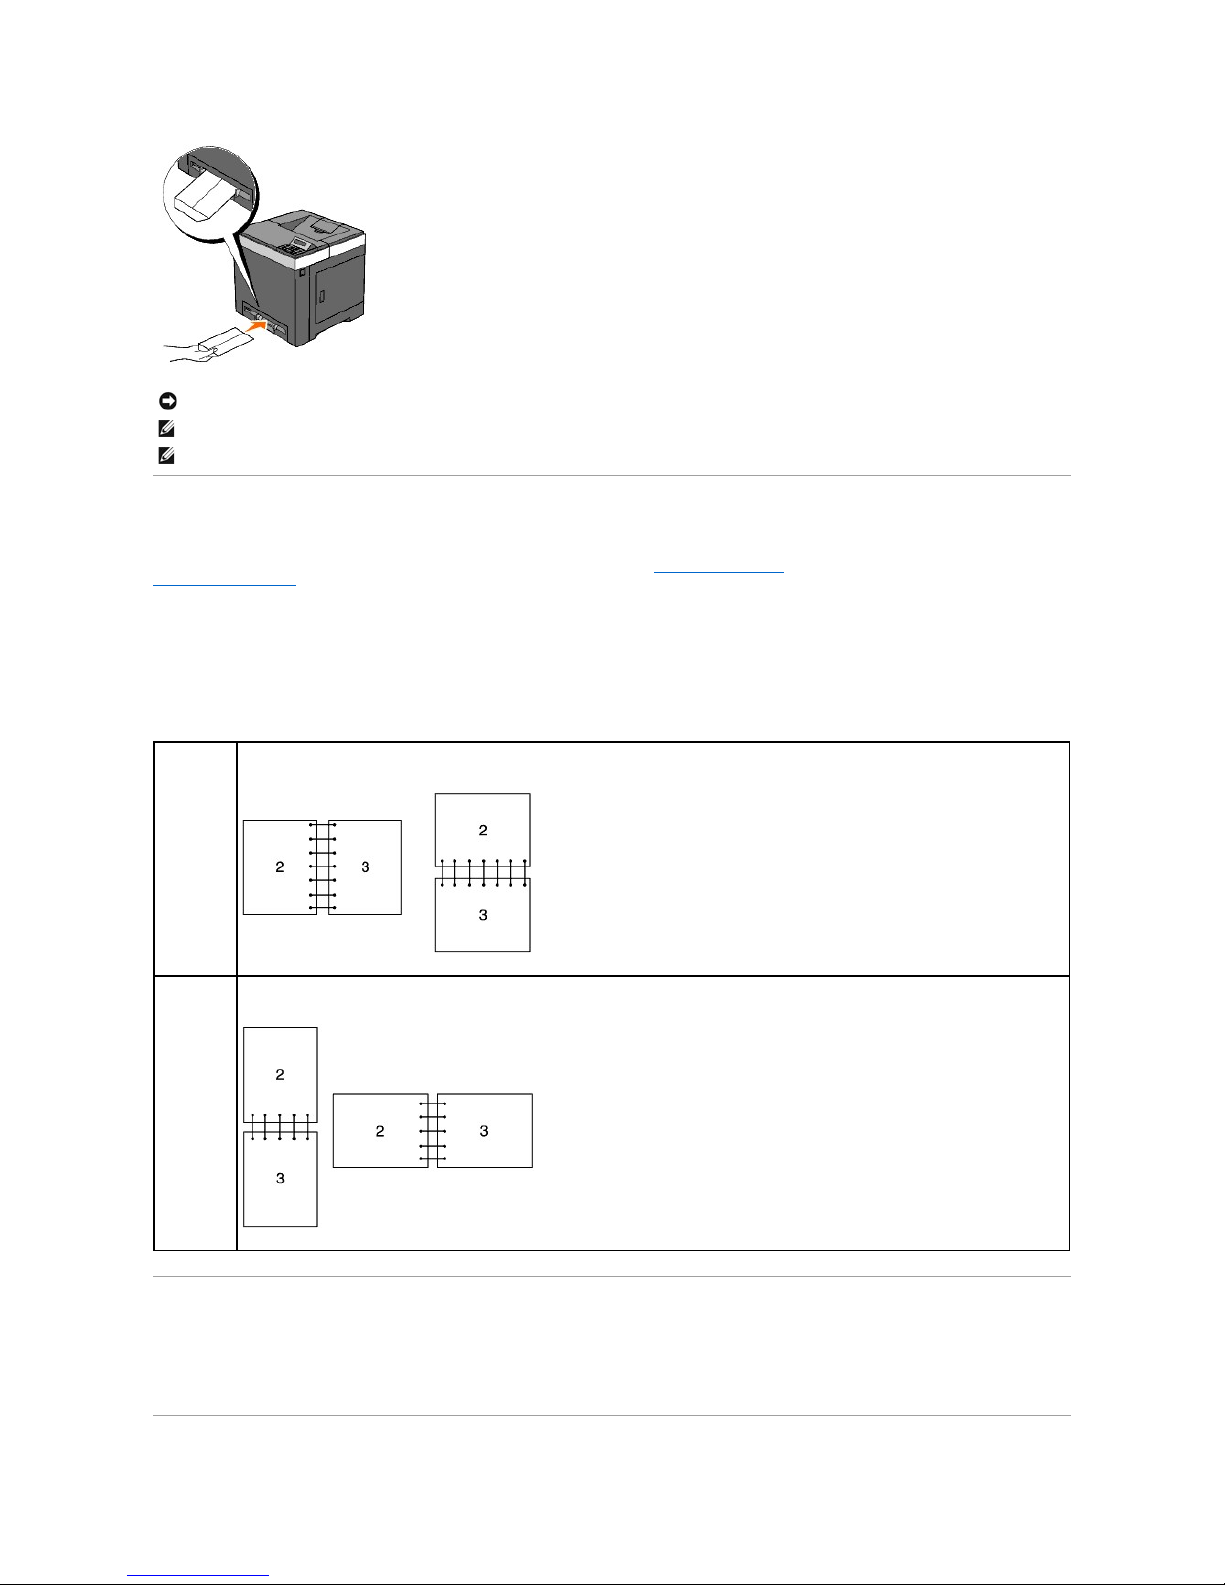
C5
To load an envelope into the single sheet feeder, insert the envelope short edge feed with the flap open and the print side down. Ensure that the flap comes
at the bottom when you face towards the printer.
NOTE: Do not force the print media into the single sheet feeder.
NOTE: Load letterhead face-down, with the top of the sheet entering the printer first.
NOTE: If you experience problems with paper feed, turn the paper around.
NOTICE: Never use envelopes with windows, coated linings, or self-stick adhesives. These lead to paper jams and can damage the printer.
NOTE: Ensure that you load an envelope with the flap completely closed.
NOTE: Insert an envelope with the flap side face up and with the stamp area on the top right side.
Using the Duplex Function
Duplex printing (or two-sided printing) allows you to print on both sides of a sheet of paper automatically. Duplex printing is only available when the optional
duplexer is installed on the printer. For information on how to install the duplexer, see "Installing a Duplexer". For sizes that are acceptable for duplexer, see
"Supported Paper Sizes".
Using Booklet Print
To use booklet print, you must select either Flip on Short Edge or Flip on Long Edge from the Duplex menu in the printer properties dialog box and then
select Booklet Creation in the Booklet/Poster/Mixed Document dialog box displayed by clicking the Booklet/Poster/Mixed Document button. From the
Duplex menu, you can define the way 2-sided print pages are bound, and how the printing on the back of the sheet (even-numbered pages) is oriented in
relation to the printing on the front (odd-numbered pages).
Using the Output Tray
The output tray holds up to:
l 150 sheets of plain paper
NOTICE: Never use envelopes with windows, coated linings, or self-stick adhesives. These lead to paper jams and can damage the printer.
NOTE: Ensure that you load an envelope with the flap completely opened.
NOTE: Insert an envelope with the flap side face up and with the stamp area on the bottom right side.
Flip on Long
Edge
Assumes binding along the long edge of the page (left edge for portrait orientation and top edge for landscape orientation). The following
illustration shows long-edge binding for portrait and landscape pages:
Flip on Short
Edge
Assumes binding along the short edge of the page (top edge for portrait orientation and left edge for landscape orientation). The following
illustration shows short-edge binding for portrait and landscape pages:
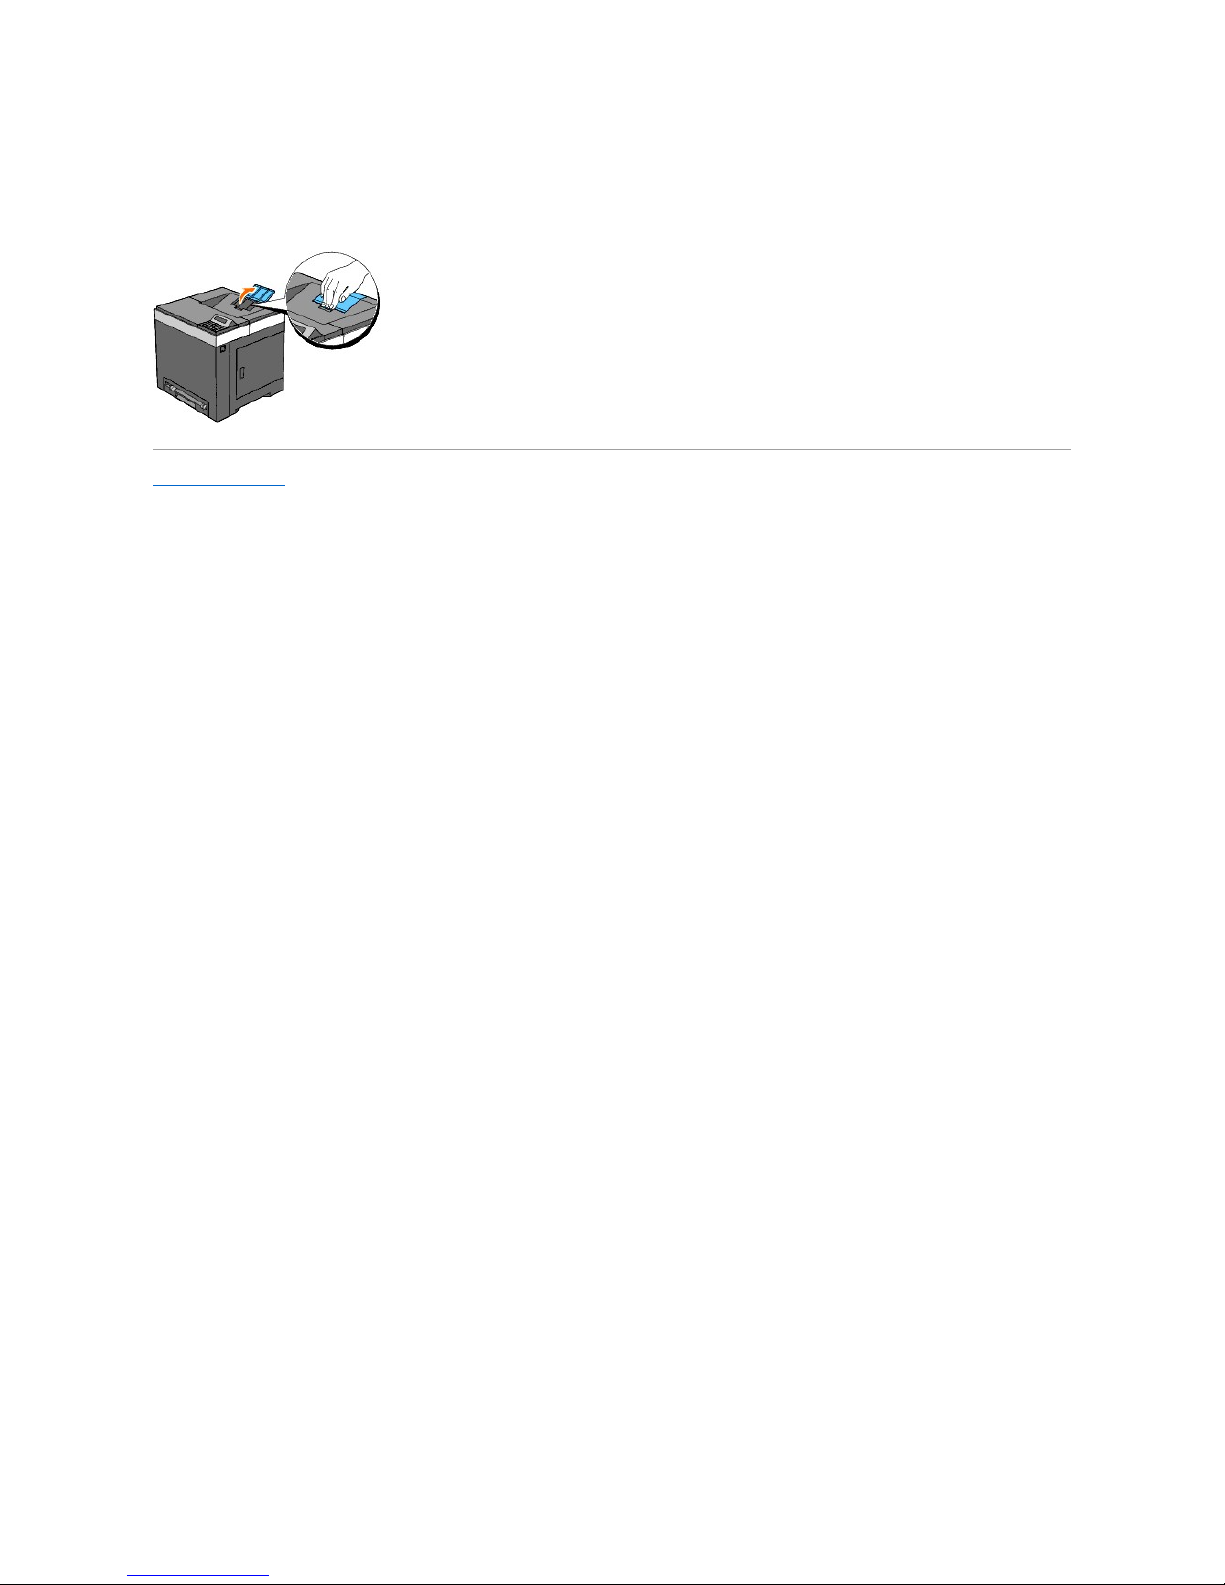
Using the Output Tray Extension
The output tray extension is designed to prevent print media from falling from the printer after the print job is complete.
Before printing a document, ensure the output tray extension is fully extended.
Back to Contents Page

Back to Contents Page
Printer Settings
Printing a Printer Settings Page
Using the Operator Panel to Change Printer Settings
Using the Tool Box to Change the Printer Settings
Using the Dell Printer Configuration Web Tool to Change Printer Settings
Resetting Defaults
Initializing NVRAM for Network Settings
You can change most system settings from your software programs. If your printer is attached to the network, you can change settings from the Dell Printer
Configuration Web Tool. To launch the Dell Printer Configuration Web Tool, type the printer's IP address in your Web browser. To find your printer's IP
address, see "Printing a Printer Settings Page".
Settings from the software program update the default printer settings for the printer. Settings from the printer driver only apply to the job you are sending to
the printer.
If you cannot change a setting from your software program, use the operator panel, Tool Box or the Dell Printer Configuration Web Tool. Changing a printer
setting from the operator panel, Tool Box or from the Dell Printer Configuration Web Tool makes that setting the user default.
Printing a Printer Settings Page
You can verify the detailed printer settings by printing a printer settings page.
When Using the Operator Panel
1. Press Menu button.
2. Press button until Report/List appears, and then press (Set) button.
3. Printer Setting is displayed. Press (Set) button.
The printer settings page is printed.
When Using the Tool Box
1. Click start® All Programs® Dell Printers® Dell 2130cn Color Laser Printer® Tool Box.
The Select Printer dialog box opens.
2. Click the name of this printer listed in Printer Name, and then click OK.
The Tool Box opens.
3. Click the Printer Settings Report tab.
4. Select Reports from the list at the left side of the page.
The Reports page is displayed.
5. Click the Printer Settings button.
The printer settings page is printed.
Using the Operator Panel to Change Printer Settings
You can select menu items and corresponding values from the operator panel.
When you first enter the menus from the operator panel, you see an asterisk (*) next to a value in the menus.
This asterisk indicates the factory default menu setting. These settings are the original printer settings.
NOTE: Factory defaults may vary for different countries.
When you select a new setting from the operator panel, an asterisk appears next to the setting to identify it as the current user default menu setting.
These settings are active until new ones are selected or the factory defaults are restored.
To select a new value as a setting:
1. Press Menu button.
2. Press or button until the desired menu appears, and then press (Set) button.
3. Press or button until the desired menu or menu item appears, and then press (Set) button.
l If the selection is a menu, the menu is opened and the first system setting in the menu appears.
l If the selection is a menu item, the default menu setting for the menu item appears. (The current user default menu setting has an asterisk (*)
beside it.)
Each menu item has a list of values for the menu item. A value can be:
l A phrase or word to describe a setting
l A numerical value that can be changed
l An On or Off setting
l Press or buttons at the same time. This will restore the factory default menu settings. Press (Set) button to return the settings to the
factory default menu settings.
4. Press or button to scroll until the desired value appears.
5. Press (Set) button.
This enables the setting value, which is indicated by an asterisk (*) next to the setting value.
6. Press Cancel or button to return to the previous menu.
To continue setting other items, select the desired menu. To quit setting new values, press Cancel button.
Driver settings may override changes previously made and may require you to change the operator panel defaults.
Using the Tool Box to Change the Printer Settings
You can select menu items and corresponding values from the Tool Box.
These settings are active until new ones are selected or the factory defaults are restored.
To select a new value as a setting:
1. Click start® All Programs® Dell Printers® Dell 2130cn Color Laser Printer® Tool Box.
The Select Printer dialog box opens.
2. Click the name of this printer listed in Printer Name, and then click OK.
The Tool Box opens.
3. Click the Printer Maintenance tab.
4. Select the desired menu item.
Each menu item has a list of values for the menu item. A value can be:
l A phrase or word to describe a setting
l A numerical value that can be changed
l An On or Off setting
5. Select the desired value, and then click the associated button with each menu item.
Driver settings may override changes previously made and may require you to change the Tool Box defaults.
NOTE: Factory defaults may vary for different countries.
Using the Dell Printer Configuration Web Tool to Change Printer Settings
If your printer is connected to the network, you can change the device settings from your Web browser. If you are a network administrator, you can clone the
printer settings of one printer to one or all printers on the network.
Type your printer's IP address in your Web browser. Choose Printer Settings from the topics list, and then select the System Settings you want to change.
To copy your printer settings to another printer on the network, choose Copy Printer Settings from the topics list, and then type the other printer's IP
address.
If you do not know your printer's IP address, see the printer settings page. To print a printer settings page:
When Using the Operator Panel
1. Press Menu button.
2. Press button until Report/List appears, and then press (Set) button.
3. Printer Setting is displayed. Press (Set) button.
The printer settings page is printed.
When Using the Tool Box
1. Click start® All Programs® Dell Printers® Dell 2130cn Color Laser Printer® Tool Box.
The Select Printer dialog box opens.
2. Click the name of this printer listed in Printer Name, and then click OK.
The Tool Box opens.
3. Click the Printer Settings Report tab.
4. Select Reports from the list at the left side of the page.
The Reports page is displayed.
5. Click the Printer Settings button.
The printer settings page is printed.
Resetting Defaults
After executing this function and rebooting the printer, all the menu parameters, except the parameters for the network, are reset to their default values.
When Using the Operator Panel
1. Press Menu button.
2. Press button until Admin Menu appears, and then press (Set) button.
3. Press button until Maintenance appears, and then press (Set) button.
4. Press button until Reset Defaults appears, and then press (Set) button.
5. The Are you sure? message appears on the operator panel. Press (Set) button.
6. Turn off the printer, and then on again to apply the settings.
When Using the Tool Box
1. Click start® All Programs® Dell Printers® Dell 2130cn Color Laser Printer® Tool Box.
The Select Printer dialog box opens.
2. Click the name of this printer listed in Printer Name, and then click OK.
The Tool Box opens.
3. Click the Printer Maintenance tab.
4. Select Reset Defaults from the list at the left side of the page.
The Reset Defaults page is displayed.
5. Click the Start button.
The printer is turned off automatically to apply the settings.
Initializing NVRAM for Network Settings
You can initialize the IP address and network-related settings by initializing NVRAM for Network settings.
1. Press Menu button.
2. Press button until Admin Menu appears, and then press (Set) button.
3. Press button until Network appears, and then press (Set) button.
4. Press button until Reset LAN appears, and then press (Set) button.
5. The Are you sure? message appears on the operator panel. Press (Set) button.
6. Turn off the printer, and then on again to apply the settings.
Back to Contents Page
Back to Contents Page
Understanding the Tool Box Menus
Printer Settings Report
Printer Maintenance
Diagnosis
The Tool Box allows you to view or specify the printer settings. You can also diagnose the printer settings by using the Tool Box.
The Tool Box consists of the Printer Settings Report, Printer Maintenance, and Diagnosis tabs.
Printer Settings Report
The Printer Settings Report tab includes the Printer Information, Menu Settings, Reports, Network Settings, and TCP/IP Settings pages.
Printer Information
Purpose:
To display the printer's system information.
Values:
Menu Settings
Purpose:
To display the printer's menu settings.
Values:
NOTE: A Password dialog box appears the first time you try to change settings on ToolBox when Panel Lock is set on the printer. In this case, input
the password you specified, and click OK to apply the settings.
NOTE: Values marked by an asterisk (*) are the factory default menu settings.
Dell Service Tag Number
Displays Dell's service tag number.
Printer Serial Number
Displays the printer's serial number.
Printer Type
Displays the type of printing for the printer. Color Laser is displayed normally.
Asset Tag Number
Displays the printer's asset tag number.
Memory Capacity
Displays the memory capacity.
Processor Speed
Displays the processing speed.
Firmware Version
Displays the version of the controller.
Network Firmware Version
Displays the NIC version.
MCU Firmware Version
Displays the version of the MCU firmware.
Printing Speed (Color)
Displays the speed for color printing.
Printing Speed (Monochrome)
Displays the speed for monochrome printing.
Power Saver Timer
Mode 1
Displays the amount of time before the printer enters the power saver timer mode 1 after it finishes a
job.
Power Saver Timer
Mode 2
Displays the amount of time before the printer enters the power saver timer mode 2 after it goes into the
power saver timer mode 1.
Control Panel Tone
Displays whether to emit the tone when the operator panel input is correct. Off indicates that the tone is
disabled.
Invalid Key Tone
Displays whether to emit the tone when the operator panel input is incorrect. Off indicates that the tone
is disabled.
Machine Ready Tone
Displays whether to emit the tone when the printer becomes ready. Off indicates that the tone is
disabled.
Job Complete Tone
Displays whether to emit the tone when a job is complete. Off indicates that the tone is disabled.
Fault Tone
Displays whether to emit the tone when a job ends abnormally. Off indicates that the tone is disabled.
Alert Tone
Displays whether to emit the tone when a problem occurs. Off indicates that the tone is disabled.
Out of Paper Alert
Tone
Displays whether to emit the tone when the printer runs out of paper. Off indicates that the tone is
disabled.
Low Toner Alert Tone
Displays whether to emit the tone when the toner or some other consumable is low. Off indicates that
the tone is disabled.
Reports
Purpose:
To print the printer's settings and history information.
The reports are printed in the paper size specified in printer settings. The default is A4 or Letter.
Values:
TCP/IP Settings
Purpose:
To display the current settings of TCP/IP (Transmission Control Protocol/Internet Protocol) protocol.
Values:
System Settings
Base Tone
Displays whether to emit the tone when the operator panel is returned to the default by scrolling the
loop menu. Off indicates that the tone is disabled.
Fault Time-Out
Displays the amount of time the printer cancels for a job stops abnormally.
Time-Out
Displays the amount of time the printer waits for data to arrive from the computer.
Panel Language
Displays the language to be used on the operator panel.
Auto Log Print
Displays whether the printer outputs a log of completed jobs from the printer automatically.
Print ID
Displays where to print a user ID on the output paper.
Print Text
Displays whether the printer outputs PDL (Page Description Language) data, which is not supported by
the printer, as text when the printer receives it.
Banner Sheet Insert
Position
Displays where to insert a banner sheet.
Banner Sheet Specify
Tray
Displays which input tray to use to insert a banner sheet.
RAM Disk
Displays whether to allocate RAM for the file system for the Secure Print and Proof Print features.
This item is only available when the 512 MB, or higher, optional memory is installed.
Odd Page 2 Sided
Displays how the odd last page is printed when using duplex printing.
Substitute Tray
Displays whether to use another size paper when the paper that is loaded in the specified tray does not
match the paper size settings for the current job.
mm/inch
Displays the measurement unit used on the operator panel.
Paper Density
Plain
Displays the plain paper density settings.
Label
Displays the label paper density settings.
Auto Registration
Adjustment
Auto Registration
Adjustment
Displays whether to automatically adjust color registration.
Adjust Altitude
Adjust Altitude
Displays the altitude of the location where the printer is installed.
Non-Dell Toner
Non-Dell Toner
Displays whether or not to use another manufacturer's toner cartridge.
Tray Settings
Tray 1 Paper Type
Displays the paper type setting of the standard 250-sheet tray.
Tray 1 Paper Size
Displays the paper size setting of the standard 250-sheet tray.
Tray 1 Custom Size - Y
Displays the length of custom size paper loaded in the standard 250-sheet tray.
Tray 1 Custom Size - X
Displays the width of custom size paper loaded in the standard 250-sheet tray.
Tray 2 Paper Type*
1
Displays the paper type setting of the optional 250-sheet feeder.
Tray 2 Paper Size*
1
Displays the paper size setting of the optional 250-sheet feeder.
Display Popup
Displays a popup menu that prompts to set the paper size and type when paper is loaded in the
standard 250-sheet tray or optional 250-sheet feeder.
*1 This item is only available when the optional 250-sheet feeder is installed.
Printer Settings
Click to print a detailed list of the printer settings.
Panel Settings
Click to print a detailed list of the panel settings.
Job History
Click to print the printer's Completed Jobs history.
Error History
Click to print the printer's error history.
Print Meter
Click to print the print meter.
Color Test Page
Click to print a color test page.
IP Address Mode
Displays the method for acquiring the IP address.
IP Address
Displays the printer's IP address.
Subnet Mask
Displays the subnet mask.
Gateway Address
Displays the gateway address.
Printer Maintenance
The Printer Maintenance tab includes the System Settings, Paper Density, Registration Adjustment, Adjust Altitude, Reset Defaults, Non-Dell Toner,
Initialize PrintMeter, Tray Settings, TCP/IP Settings, and Network Settings pages.
System Settings
Purpose:
To Use these settings to configure the printer's power management, warning tones, time-out time, operator panel language setting, job log auto print,
position of the Print ID, setting of the dump print, setting of the additional memory, setting of the substitute sheet, mm/inch setting, and duplex print settings.
Values:
NOTE: Values marked by an asterisk (*) are the factory default menu settings.
Power Saver Timer
Mode 1*
1
1-30 Min.
Specifies the time before the printer enters the power saver timer mode 1(sleep mode) after it
finishes a job.
3 Min.*
Power Saver Timer
Mode 2*
1
5-60 Min.
Specifies the time before the printer enters the power saver timer mode 2 (deep sleep mode) after
it goes into the power saver timer mode 1.
10 Min*
Audio Tones
Control Panel Tone
Off*
Does not emit a tone when the operator panel input is correct.
On
Emits a tone when the operator panel input is correct.
Invalid Key Tone
Off*
Does not emit a tone when the operator panel input is incorrect.
On
Emits a tone when the operator panel input is incorrect.
Machine Ready Tone
Off*
Does not emit a tone when the printer becomes ready.
On
Emits a tone when the printer becomes ready.
Job Complete Tone
Off*
Does not emit a tone when a job is complete.
On
Emits a tone when a job is complete.
Fault Tone
Off*
Does not emit a tone when a job ends abnormally.
On
Emits a tone when a job ends abnormally.
Alert Tone
Off*
Does not emit a tone when a problem occurs.
On
Emits a tone when a problem occurs.
Out of Paper Alert
Tone
Off*
Does not emit a tone when the printer runs out of paper.
On
Emits a tone when the printer runs out of paper.
Low Toner Alert
Tone
Off*
Does not emit a tone when toner or some other consumable is low.
On
Emits a tone when toner or some other consumable is low.
Base Tone
Off*
Does not emit a tone when the operator panel display is returned to the default settings by
scrolling the loop menu.
On
Emits a tone when the operator panel display is returned to the default settings by scrolling the
loop menu.
Fault Time-Out
0
Disables the fault time-out.
3-300 sec
Specifies the amount of time the printer cancels for a job stops abnormally.
60 sec*
Time-Out
0
Disables the job time-out.
5-300 sec
Specifies the amount of time before the printer cancels for jobs that stop abnormally.
30 sec*
Panel Language
English*
Specifies the language to be used on the operator panel.
French
Italian
German
Spanish
Dutch
Danish
Norwegian
Swedish
Auto Log Print
Off*
Does not automatically output a log of completed jobs from the printer.
On
Outputs a log of completed jobs from the printer automatically.
Print ID
Off*
Does not print the user ID.
Top Left
Prints the user ID on the specified location.
Top Right
Bottom Left
Paper Density
Purpose:
To specify the paper density settings.
Values:
Registration Adjustment
Purpose:
To set Color Registration Adjustment (individual yellow, magenta, cyan correction) settings. When Auto Registration Adjustment is set to On, the printer
prints the color registration chart and adjusts the color registration by using the chart. This function is required after the printer is set up or moved.
Values:
Bottom Right
Print Text
Off
Does not print the received PDL data as text data.
On*
Prints the received PDL data as text data.
Banner Sheet Insert
Position
Off*
Does not insert the banner sheet.
Front
Inserts the banner sheet to the specified position.
Back
Front & Back
Banner Sheet Specify
Tray
Tray 1*
Specifies the input tray to insert the banner sheet.
Tray 2*
2
RAM Disk*
3
Disable
Does not allocate RAM for the disk file system. Secure Print, and Proof Print jobs will abort and be
recorded to the job log.
50–500MB*
4
Allocates RAM for the disk file system automatically.
50–1000MB*
5
Odd Page 2 Sided
1 Sided*
Prints the odd last page upside down to the paper.
2 Sided
Prints the odd last page in normal direction to the paper.
Substitute Tray
Off
No tray size substitute accepted.
Larger Size
Substitutes paper of next largest size. When there is no larger paper size, the printer substitutes
paper of nearest size.
Nearest Size*
Substitutes paper of nearest size.
mm/inch
millimeter (mm)*
Selects millimeter or inch as the default measurement unit.
inch (") *
6
Apply New Settings
After you complete the settings, press the Apply New Settings button to apply the changes.
Restart printer to apply new settings
Press the Restart printer to apply new settings button to apply the changes.
*1 Enter 3 to put the printer in the power saver timer mode three minutes after it finishes a job. This uses much less energy, but requires more warm-up
time for the printer. Enter 3 if your printer shares an electrical circuit with room lighting and you notice lights flickering.
Select a high value if your printer is in constant use. Under most circumstances, this keeps the printer ready to operate with minimum warm-up time. Select a
value between 1 and 30 minutes for the power saver timer mode if you want a balance between energy consumption and a shorter warm-up period.
The printer automatically returns to the standby mode from the power saver timer mode when it receives data from the computer. You can also return the
printer to the standby mode by pressing any button on the operator panel.
*2 This item is only available when the optional 250-sheet feeder is installed.
*3 This item is only available when the 512 MB, or higher, optional memory is installed.
*4 Only displayed when the optional 512 MB memory is installed.
*5 Only displayed when the optional 1024 MB memory is installed.
*6 The factory default setting of mm/inch is set to inch(") in the United States.
Plain
Normal*
Specifies plain paper density settings.
Light
Label
Normal*
Specifies label paper density settings.
Light
Apply New Settings
After you complete the settings, press the Apply New Settings button to apply the changes.
Restart printer to apply new settings
Press the Restart printer to apply new settings button to apply the changes.

Adjust Altitude
Purpose:
To specify the altitude of the location where the printer is installed.
The discharge phenomenon for charging the photo conductor varies with barometric pressure. Adjustments are performed by specifying the altitude of the
location where the printer is being used.
Values:
Reset Defaults
Purpose:
To initialize the NV (nonvolatile) memory for system parameters. After executing this function to automatically restart the printer, the menu parameters, or
data are reset to their default values.
Values:
Non-Dell Toner
When Non-Dell toner cartridge is used, the printer may be severely damaged and may not be covered by your warranty.
Purpose:
To specify whether or not to use another manufacturer's toner cartridge.
Values:
Auto Registration Adjustment
Off
Does not perform color registration automatically.
On*
Performs color registration automatically.
Auto Correct
Click Start to perform color registration automatically.
Color Regi Chart
Click Start to print a color registration chart.
Color Registration Adjustment
1 (Lateral)
Yellow
-9+9
Specifies lateral (perpendicular to paper feed direction) color adjustment values that are found in the color
registration chart individually for Yellow, Magenta, and Cyan.
0*
Magenta
-9+9
0*
Cyan
-9+9
0*
Color Registration Adjustment
2 (Process)
Yellow
-9+9
Specifies process (paper feed direction) color adjustment values that are found in the color registration
chart individually for Yellow, Magenta, and Cyan.
0*
Magenta
-9+9
0*
Cyan
-9+9
0*
Apply New Settings
After you complete the settings, press the Apply New Settings button to apply the changes.
Restart printer to apply new settings
Press the Restart printer to apply new settings button to apply the changes.
0 meter*
Specifies the altitude of the location where the printer is installed.
1000 meters
2000 meters
3000 meters
Apply New Settings
After you complete the settings, press the Apply New Settings button to apply the changes.
Restart printer to apply new settings
Press the Restart printer to apply new settings button to apply the changes.
Start
Initializes system parameters.
Non-Dell Toner
Off*
Disables the use of another manufacturer's toner cartridge.
On
Enables the use of another manufacturer's toner cartridge.

Initialize PrintMeter
Purpose:
To initialize the printer's PrintMeter. Executing this function restarts the printer, and the value of the meter resets to 0.
Values:
Tray Settings
Purpose:
To specify the paper types and sizes for input trays respectively.
Values:
Apply New Settings
After you complete the settings, press the Apply New Settings button to apply the changes.
Restart printer to apply new settings
Press the Restart printer to apply new settings button to apply the changes.
Initialize PrintMeter
Click Start to initialize the PrintMeter.
Tray 1 Paper Type
Plain*
Specifies the type of paper loaded in the standard 250-sheet tray.
Plain Thick
Covers
Covers Thick
Label
Recycled
Envelope
Plain S2*
1
Plain Thick S2*
1
Recycled S2*
1
Tray 1 Paper Size
A4 (210 x 297 mm)*
Specifies the size of paper loaded in the standard 250-sheet tray.
A5 (148 x 210 mm)
B5 (182 x 257 mm)
Letter (8.5 x 11")
Folio (8.5 x 13")
Legal (8.5 x 14")
Executive (7.25 x
10.5")
Monarch (3.875 x
7.5")
Monarch LEF (7.5 x
3.875")
DL (110 x 220 mm)
DL LEF (220 x 110
mm)
C5 (162 x 229 mm)
Envelope #10 (4.125
x 9.5")
Custom Size
Tray 1 Custom Size - Y
Specifies the length of custom size paper loaded in the standard 250-sheet tray. The available range is from 127 mm (5.0 in.) to
355 mm (14.0 in.).
Tray 1 Custom Size - X
Specifies the width of custom size paper loaded in the standard 250-sheet tray. The available range is from 77 mm (3.0 in.) to
215 mm (8.5 in.).
Tray 2 Paper Type*
2
Plain*
Specifies the type of paper loaded in the optional 250-sheet feeder.
Plain Thick
Recycled
Plain S2*
1
Plain Thick S2*
1
Recycled S2*
1
A4 (210 x 297 mm)*
A5 (148 x 210 mm)
B5 (182 x 257 mm)

TCP/IP Settings
Purpose:
To configure TCP/IP settings.
Values:
Network Settings
Purpose:
To display the server settings of the Dell Printer Configuration Web Tool.
Values:
Diagnosis
Tray 2 Paper Size*
2
Specifies the size of paper loaded in the optional 250-sheet feeder.
Letter (8.5 x 11")
Folio (8.5 x 13")
Legal (8.5 x 14")
Executive (7.25 x
10.5")
Display Popup
Off
Does not display a popup message that prompts to set paper size and type when paper is loaded in the
standard 250-sheet tray and optional 250-sheet feeder.
On*
Displays a popup message that prompts to set paper size and type when paper is loaded in the
standard 250-sheet tray and optional 250-sheet feeder.
Apply New Settings
After you complete the settings, press the Apply New Settings button to apply the changes.
Restart printer to apply
new settings
Press the Restart printer to apply new settings button to apply the changes.
*1 "S2" means the print side 2 of the paper.
*2 This item is only available when the optional 250-sheet feeder is installed.
IP Address
Mode
AutoIP*
Automatically sets the IP address.
A random value in the range of 169.254.1.0 to 169.254.254.255 that is not currently in use on the network is set as the IP
address. The subnet mask is set as 255.255.0.0.
DHCP
Sets the IP address using DHCP.
BOOTP
Sets the IP address using BOOTP.
RARP
Sets the IP address using RARP.
Manually Set
Manually sets the IP address.
IP Address*
1
Manually sets the IP address allocated to the printer.
It is allocated to the printer using the format nnn.nnn.nnn.nnn. Each octet that makes up nnn.nnn.nnn.nnn is a value in the
range of 0 to 254.
Subnet Mask*
2
Manually sets the subnet mask.
It is specified using the format nnn.nnn.nnn.nnn. Each octet that makes up nnn.nnn.nnn.nnn is a value in the range of 0 to
255.
Gateway Address*
1
Manually sets the gateway address.
It is specified using the format nnn.nnn.nnn.nnn. Each octet that makes up nnn.nnn.nnn.nnn is a value in the range of 0 to
254.
Apply New Settings
After you complete the settings, press the Apply New Settings button to apply the changes.
Restart printer to apply new
settings
Press the Restart printer to apply new settings button to apply the changes.
*1 127 and any value in the range of 224 to 254 cannot be specified for the first octet of a gateway address.
*2 255.255.255.255 cannot be specified as the subnet mask.
NOTE: When the printer is connected to the local port, this setting cannot be displayed.
Display
Displays the server settings of the Dell Printer Configuration Web Tool.
Display of EWS
Off
Disable to display the server settings of the Dell Printer Configuration Web Tool.
On*
Enable to display the server settings of the Dell Printer Configuration Web Tool.

The Diagnosis tab includes the Chart Print, Machine Check, Paper Wrinkle Check Mode, Environment Sensor Info, Developer Stir Mode, and Refresh
Mode pages.
Chart Print
Purpose:
To print various charts that can be used for the printer's diagnosis.
Values:
Machine Check
Purpose:
To check the operation of the printer's components.
Values:
Paper Wrinkle Check Mode
Purpose:
To determine whether or not paper is wrinkled in the fuser.
This function stops printing before the paper enters the fuser. After you remove the paper inside the printer, check the following:
l If the paper is wrinkled, the wrinkle occurred in the part other than fuser.
l If the paper is not wrinkled, the wrinkle occurred in the fuser.
Values:
NOTE: Values marked by an asterisk (*) are the factory default menu settings.
Pitch Configuration Chart
Outputs full halftone pages for yellow, magenta, cyan, and black. Also outputs pages to check the pitch. A total of five pages
are output. The chart is output to A4 or Letter size paper.
Ghost Configuration Chart
Outputs a chart to check for ghost printing. One page is output. The chart is output to A4 or Letter size paper.
4 Colors Configuration
Chart
Bands of yellow, magenta, cyan, and black are output with varying density. One page is output. The chart is output to A4 or
Letter size paper.
MQ Chart
Outputs charts to check for the binding in A4 or Letter.
Alignment Chart
Outputs a chart to check for proper alignment of the print image on the paper. One page is output. The chart is output to A4 or
Letter size paper.
PHD Refresh
Configuration Chart
Outputs a chart to check the light fatigue of the PHD unit. One page is output. The chart is output to A4 or Letter size paper.
Machine
Check
Main Motor Operation Check*
Click Start to operate the main motor inside the printer. Confirm the motor sound.
Fuser Motor Operation Check
Click Start to operate the fuser motor. Confirm the motor sound.
Feed Roll Operation Check*1
Click Start to operate the feed roll. Confirm the motor sound.
REGI CLUTCH Operation
Check
Click Start to operate the REGI CLUTCH. Confirm that you can hear the clutch clicking.
Dispense Motor Check
(Yellow)
Click Start to operate the dispense motor for each toner cartridge. Confirm the motor sound.
Dispense Motor Check
(Magenta)
Dispense Motor Check (Cyan)
Dispense Motor Check
(Black)
Play of Sound
Plays back through your computer's speakers a recording of the normal sound for the currently selected
Machine Check item.
Start
Click this button to check the operation of the items selected with Machine Check and output the results to
Result.
*1 When performing the feed roll operation check, remove the standard 250-sheet tray from the printer.
A4 (210 x 297 mm)
A5 (148 x 210 mm)
B5 (182 x 257 mm)
Letter (8.5 x 11")
Environment Sensor Info
Purpose:
To output the printer's internal environment sensor information to Result by pressing the Get Environment Sensor Info button.
Developer Stir Mode
Purpose:
To rotate the developer motor and stir the toner in the toner cartridge.
Values:
Refresh Mode
Purpose:
To use up a toner cartridge or PHD unit when you need to replace it before the end of its life, or to stir the toner in a new toner cartridge.
Values:
Back to Contents Page
Paper Size
Specifies the size of paper to be used by the Paper Wrinkle Check Mode.
Folio (8.5 x 13")
Legal (8.5 x 14")
Executive (7.25 x 10.5")
Monarch (3.875 x 7.5")
Monarch LEF (7.5 x 3.875")
DL (110 x 220 mm)
DL LEF (220 x 110 mm)
C5 (162 x 229 mm)
Envelope #10 (4.125 x 9.5")
Paper Type
Plain*
Specifies the type of paper to be used by the Paper Wrinkle Check Mode.
Plain Thick
Covers
Covers Thick
Label
Recycled
Envelope
Rear side
Off*
Does not use the Print side 2 of the paper.
On
Uses the Print side 2 of the paper.
Color Mode
Color*
Prints in color mode.
Black
Prints in monochrome mode.
Start
Click this button to print in the specified paper size, type, and color mode.
Developer Stir Mode
Click Start to stir the toner.
CAUTION: Using the Refresh Mode consumes extra toner.
Toner Refresh Mode
Yellow
Click Yellow to clean the yellow cartridge.
Magenta
Click Magenta to clean the magenta cartridge.
Cyan
Click Cyan to clean the cyan cartridge.
Black
Click Black to clean the black cartridge.
PHD Refresh Mode
PHD
Click PHD to clean the PHD unit.

Back to Contents Page
Understanding the Printer Menus
Report/List
Admin Menu
Tray Settings
Stored Print
Setting Panel Lock
When your printer is configured as a network printer available to a number of users, the access to the Admin Menu menus can be limited. This prevents other
users from using the operator panel to inadvertently change a printer user default that has been set by the administrator. In this case, you can access the
Stored Print, and Tray Settings menus only.
However, you can use your printer driver to override printer user defaults and select settings for individual print jobs.
To complete print jobs, you may also need to modify tray settings.
Report/List
Use the Report/List menu to print various types of reports and lists.
Printer Setting
Purpose:
To print a list of the current user default values, the installed options, the amount of installed print memory, and the status of printer supplies.
Panel Settings
Purpose:
To print a detailed list of all the settings on the operator panel menus.
PCL Fonts List
Purpose:
To print a sample of the available PCL fonts.
See also:
"Understanding Fonts", "Printing a Font Sample List"
PCL Macro List
Purpose:
To print the information on the downloaded PCL macro.
Job History
Purpose:
To print a detailed list of the print jobs that have been processed. This list contains the last 20 jobs.
Error History
Purpose:
To print a detailed list of paper jams and fatal errors.
Print Meter
Purpose:
To print the reports for the total number of pages printed. When printed using either the printer control panel or Dell Printer Configuration Web Tool, the
report will be titled Print Volume Report.
Color Test Page
Purpose:
To print a page for testing colors.
Stored Document
Purpose:
To print a list of all files that are stored for Secure Print and Proof Print in the RAM disk.
Admin Menu
Use the Admin Menu menu to configure a variety of printer features.
Network
Use the Network menu to change the printer settings affecting jobs sent to the printer through the wired or wireless network.
Ethernet
Purpose:
To specify the communication speed and the duplex settings of Ethernet. Any changes made become effective after the printer is turned off and then on.
Values:
Status
Purpose:
To display the information on the wireless signal strength. Any change cannot be made on the operator panel to improve the status of the wireless
connection.
Values:
Reset Wireless
Purpose:
NOTE: The Stored Document is displayed only when the 512 MB or more optional memory is installed on the printer and RAM Disk under System Settings
is enabled.
NOTE: Values marked by an asterisk (*) are the factory default menu settings.
Auto*
Detects the Ethernet settings automatically.
10Base Half
Uses 10base-T half-duplex.
10Base Full
Uses 10base-T full-duplex.
100Base Half
Uses 100base-TX half-duplex.
100Base Full
Uses 100base-TX full-duplex.
Good
Indicates good signal strength.
Acceptable
Indicates marginal signal strength.
Low
Indicates insufficient signal strength.
No Reception
Indicates that no signal is received.
NOTE: This item is only displayed when an optional wireless printer adapter is installed.
To initialize wireless network settings. After executing this function and rebooting the printer, all wireless network settings are reset to their default values.
TCP/IP
Purpose:
To configure TCP/IP settings. Any changes made become effective after the printer is turned off and then on.
Values:
Protocol
Purpose:
To enable or disable each protocol. Any changes made become effective after the printer is turned off and then on.
Values:
IP Filter
Purpose:
NOTE: This item is only displayed when an optional wireless printer adapter is installed.
IP Mode
Dual Stack*
Uses both IPv4 and IPv6 to set the IP address.
IPv4 Mode
Uses IPv4 to set the IP address.
IPv6 Mode
Uses IPv6 to set the IP address.
IPv4
Get IP Address
AutoIP*
Automatically sets the IP address.
BOOTP
Uses BOOTP to set the IP address.
RARP
Uses RARP to set the IP address.
DHCP
Uses DHCP to set the IP address.
Panel
Enables the IP address entered on the operator panel.
IP Address
Sets the IP address allocated to the printer by using the keys on the operator panel.
Subnet Mask
Sets the subnet mask.
Gateway Address
Sets the gateway address.
IPsec*
1
Disables IPsec.
*1 Only displayed when an optional network protocol adapter is installed and IPsec is enabled.
LPD
Enable*
Enables the LPD port.
Disable
Disables the LPD port.
Port9100
Enable*
Enables the Port9100 port.
Disable
Disables the Port9100 port.
NetWare*
1
NetWare IP
Enable*
Uses IP for NetWare.
Disable
Does not use IP for NetWare.
WSD*
1
Enable*
Enables the WSD port.
Disable
Disables the WSD port.
SNMP
SNMP UDP
Enable*
Enables the UDP.
Disable
Disables the UDP.
E-Mail Alert
Enable*
Enables the Email Alerts feature.
Disable
Disables the Email Alerts feature.
EWS
Enable*
Enables an access to Dell Printer Configuration Web Tool embedded in the printer.
Disable
Disables an access to Dell Printer Configuration Web Tool embedded in the printer.
HTTP-SSL/TLS*
2
Enable*
Enable the HTTP-SSL/TLS.
Disable
Disable the HTTP-SSL/TLS.
*1 Only displayed when an optional network protocol adapter is installed.
*2 Only displayed when an optional network protocol adapter is installed and which is authenticated by EWS.
 Loading...