

Page 1

Page 2
Page 3
9/20/12
Documentation
1/10
support.dell.com/support/edocs/monitors/2007FP/en/ug/about.htm#Front View
Keyw ord or E-Value Code Search
My Account My Order Status Feedback
United States
Contact Us Premier Login
Shop Support Community
Support Home Page
Back to Contents Page
About Your Monitor
Dell™ 2007FP Flat Panel Monitor
Front View
Back View
Side View
Bottom View
Monitor Spe cifications
Universal Serial Bus (USB) Interface
Plug and play capability
Caring for Your Monitor
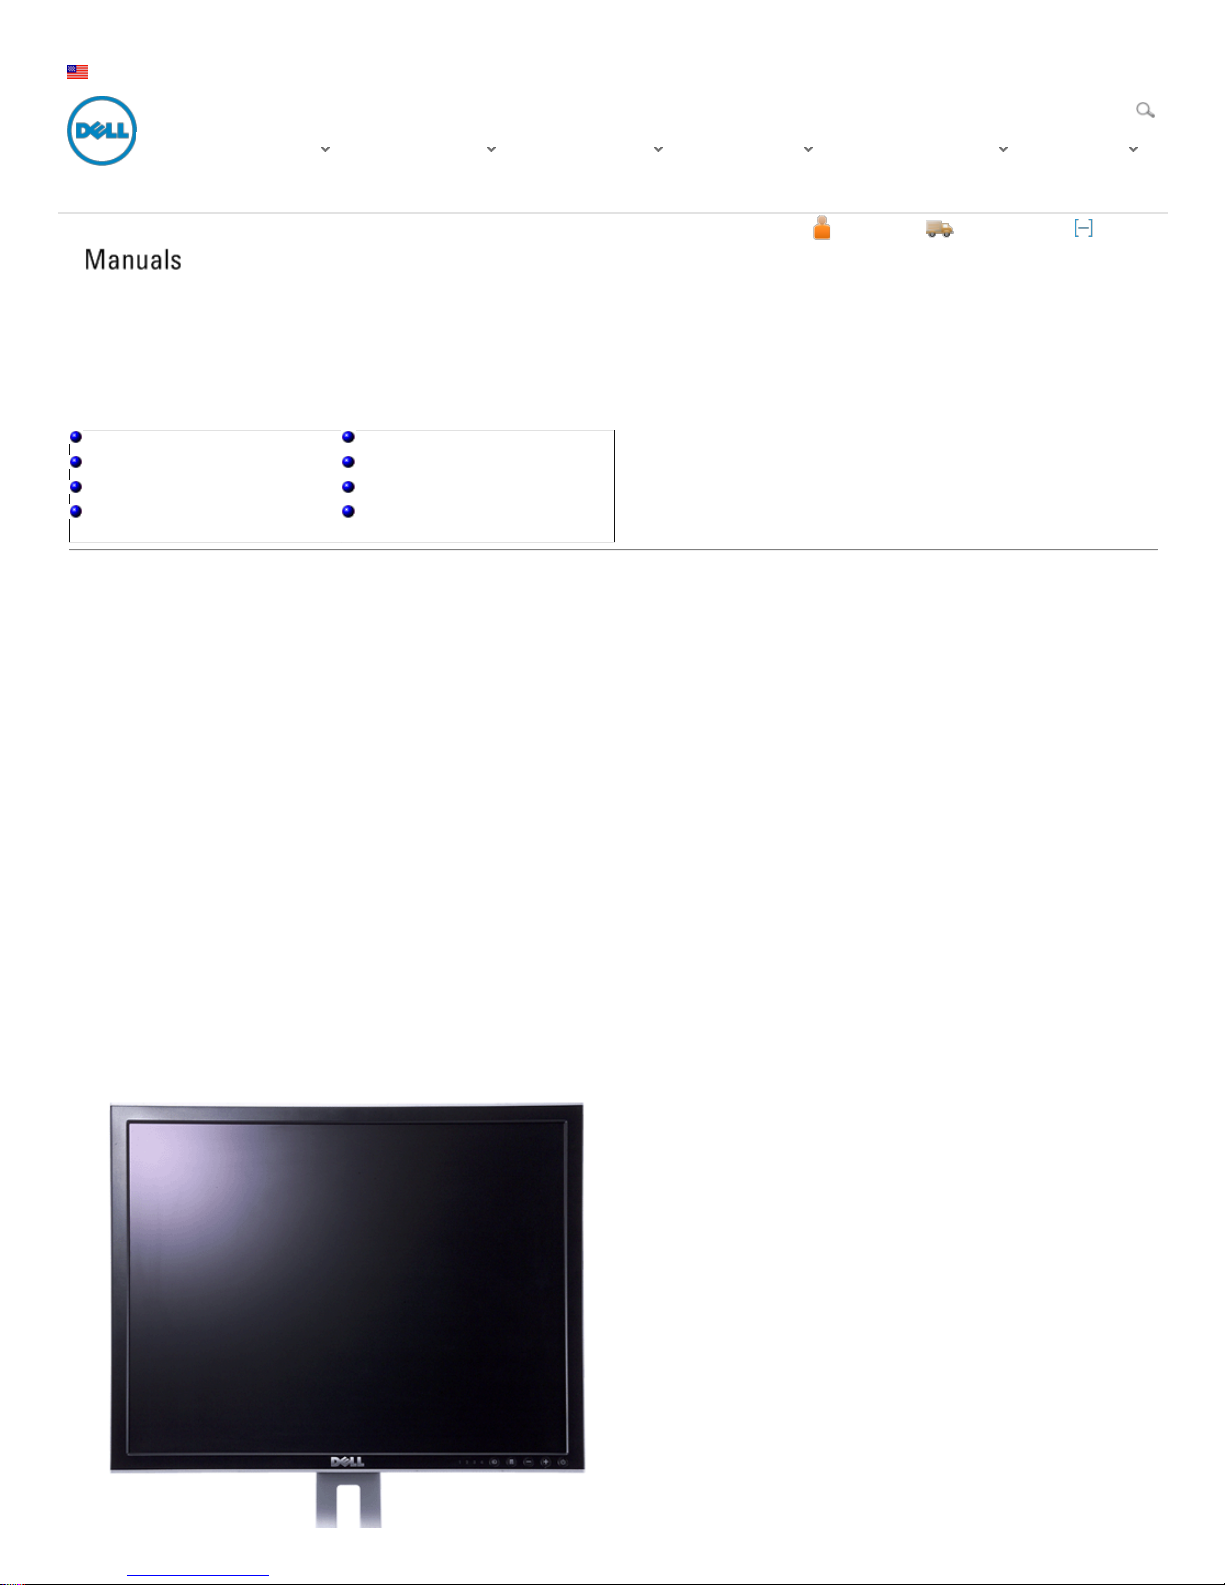
Front View
Drivers and Dow nloads Product Suppor t Suppor t by Top ic Ord er Suppor t Warrant y Infor mat ion V iew Mor e
Sign In Cart
Page 4
9/20/12
Documentation
2/10
support.dell.com/support/edocs/monitors/2007FP/en/ug/about.htm#Front View
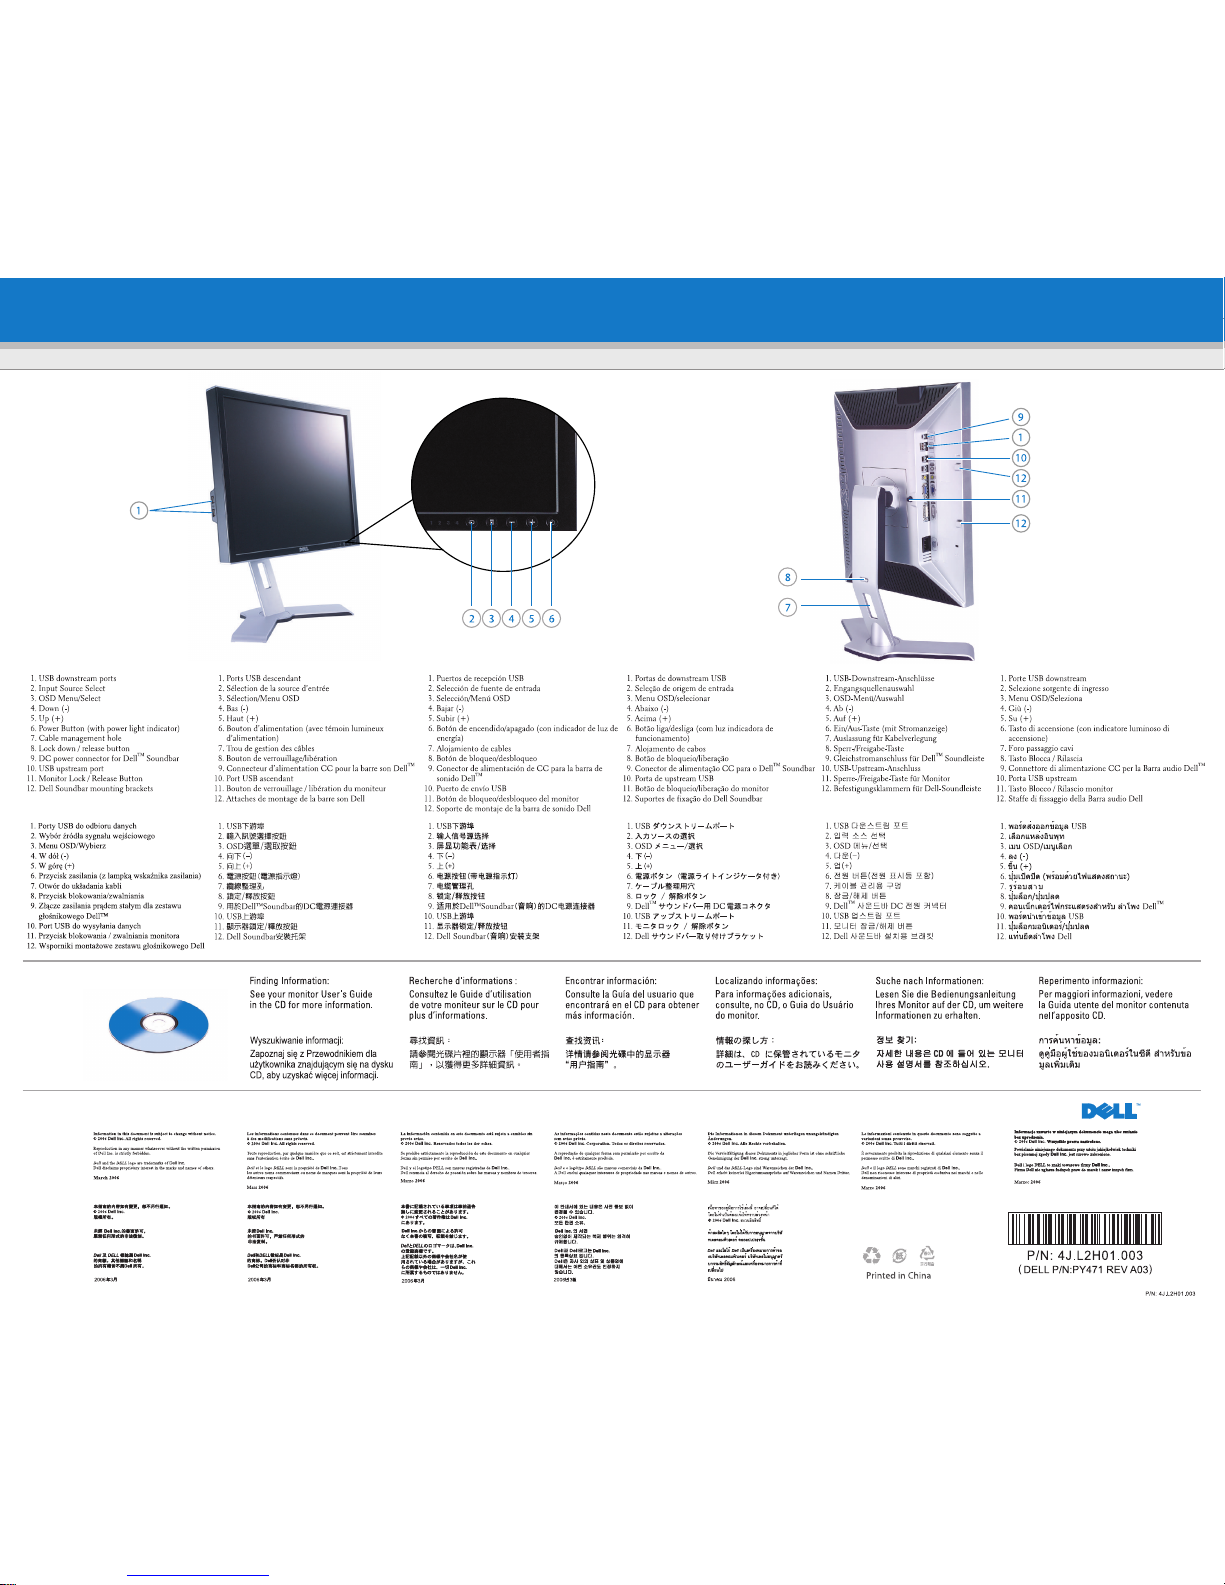
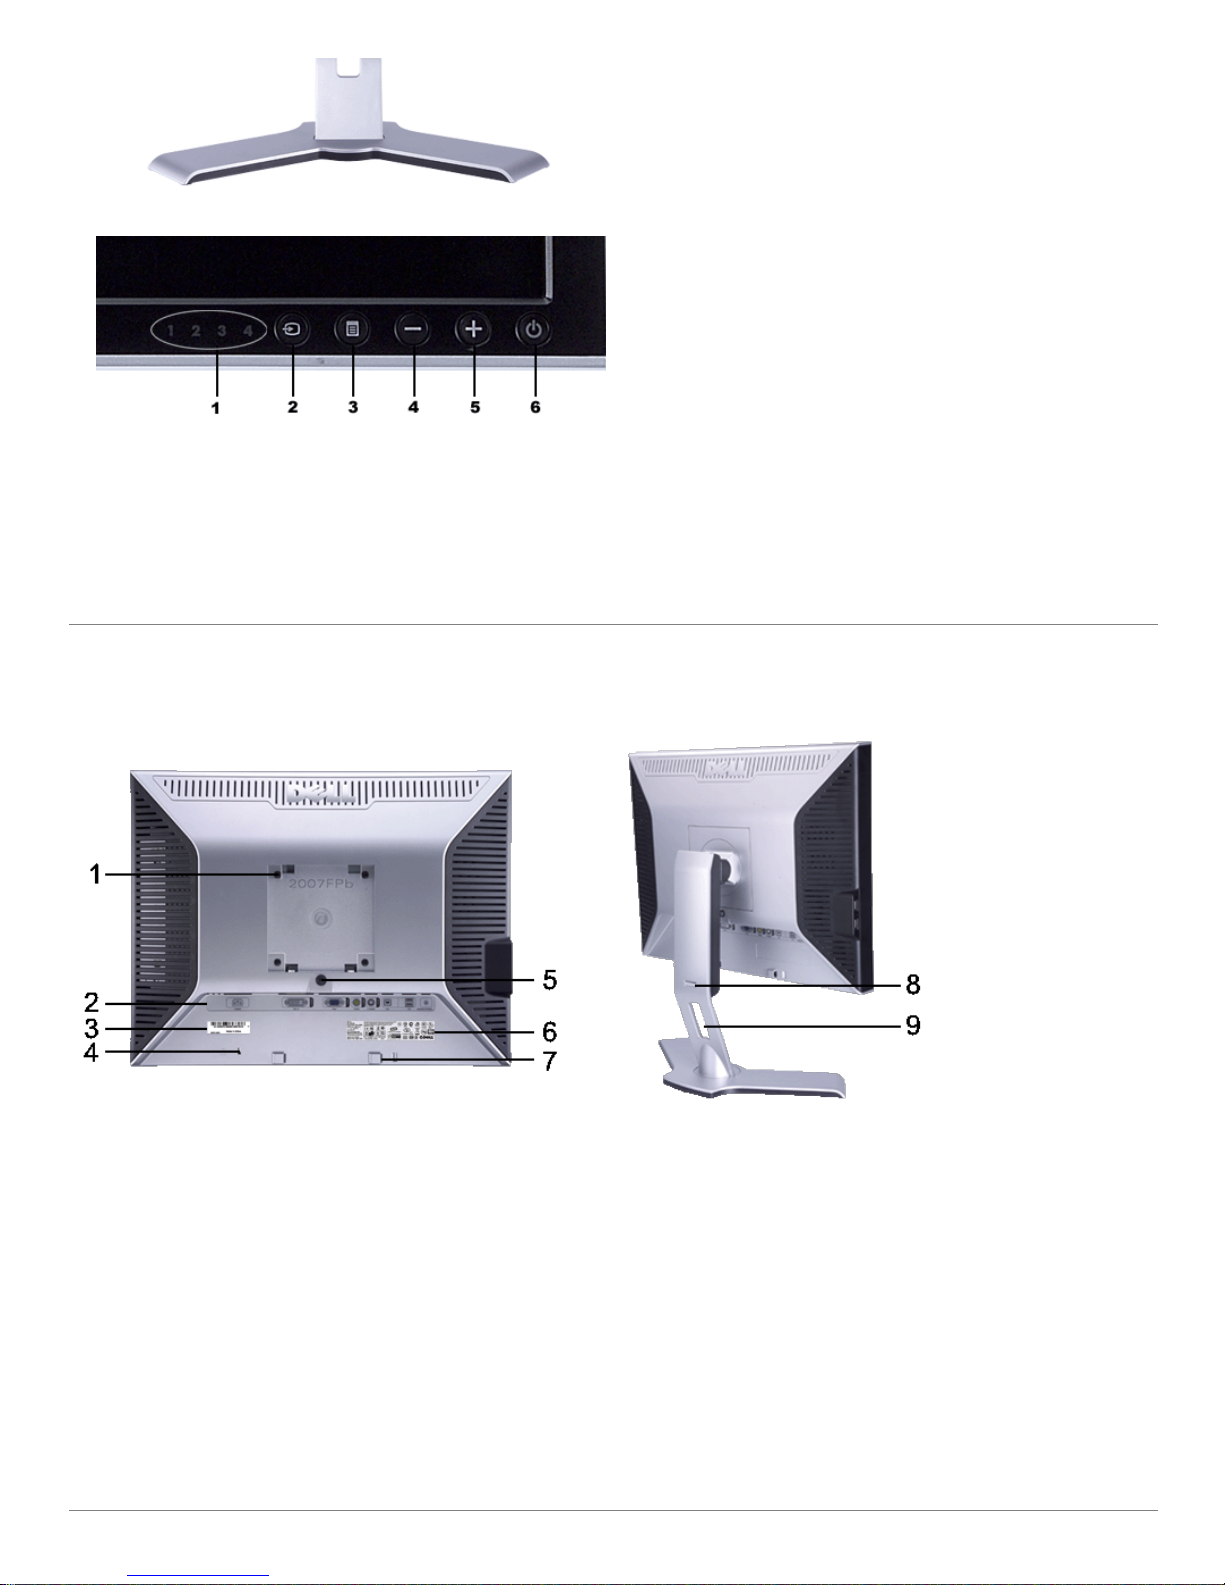
1 Input indicato rs
2 Input Source Select
3 OSD Menu / Select
4 Dow n (-)
5 Up (+)
6 Po wer button (with pow er light indicato r)
Back View
1
VESA mounting holes (100mm)
(Behind atta ched base plate)
Use to mount the monitor.
2 Conne ctors labe l Indicate the po sitions a nd types of connecto rs.
3 Barcode serial nu mber label
Refer to this labe l if you nee d to contact Dell for
technical sup port.
4 Security lock slot
Use a s ecurity lock w ith the slot to he lp secure your
monitor.
5 Monito r Lock/Release Button Pre ss to release the sta nd from the monitor.
6 Regulato ry rating la bel List th e regulatory appro vals.
7 Dell Sound ba r mounting bracke ts Attach the o ptional Dell Soundbar.
8
Lock do wn/release bu tton
Pus h the monito r dow n, press the button to unlock
the monitor, an d the n lift the monitor to the des ired
height.
9 Cable management hole
Help o rganize cable s by placing them through the
hole .
Page 5

9/20/12
Documentation
3/10
support.dell.com/support/edocs/monitors/2007FP/en/ug/about.htm#Front View
Side View
Right side
Page 6
9/20/12
Documentation
4/10
support.dell.com/support/edocs/monitors/2007FP/en/ug/about.htm#Front View
Left side
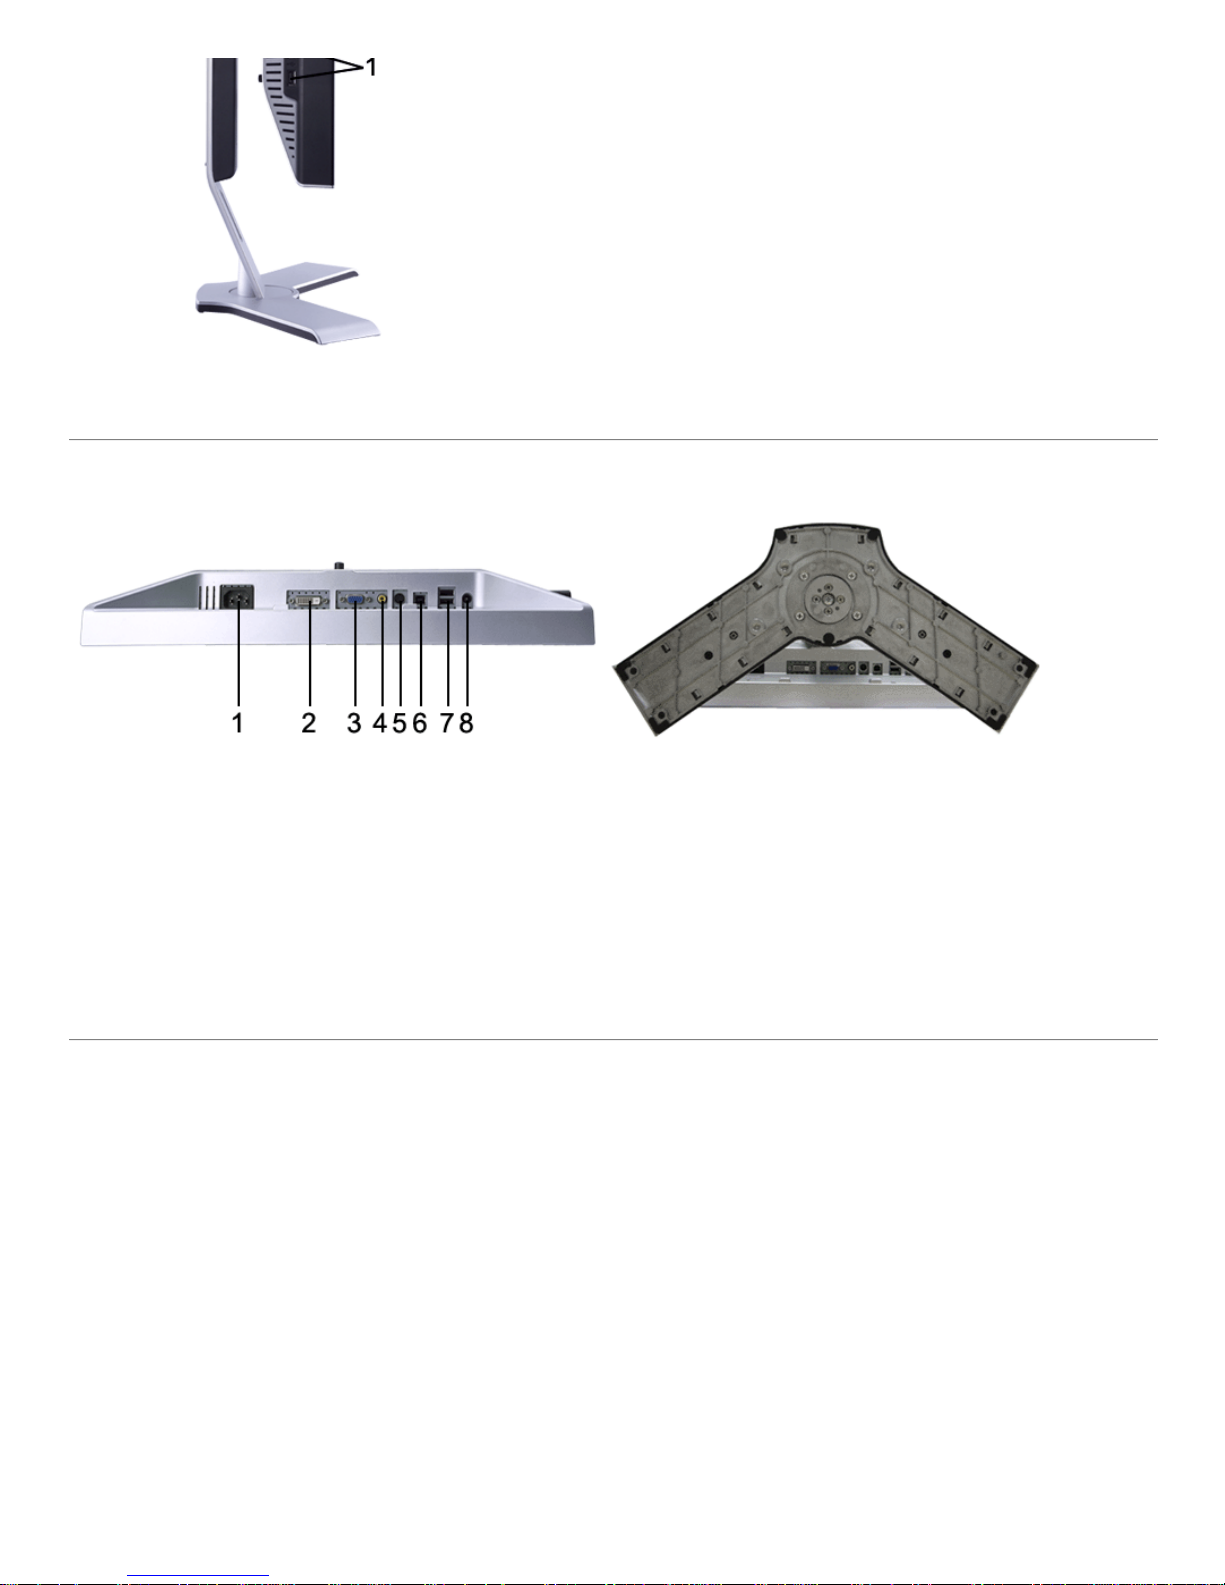
1 USB dow ns tream ports
Bottom View
1 AC powe r cord conne ctor
2 DVI connector
3 VGA con nector
4 Composite video connecto r
5 S-Video connector
6 USB upstrea m port
7 USB dow ns tream ports
8 DC powe r conn ecto r for Dell™ Soundba r
Monitor Specifications
General
Mode l numbe r 2007 FP
Flat Panel
Screen type Active matrix - TFT LCD
Screen dimensions 20.1 inche s (20.1-inch view a ble imag e s ize)
Pre se t display area:
Horizo nta l 408 mm (16.1 inches)
Vertical 306 mm (12.1 inches)
Pixel pitch 0.255 mm
View ing angle +/- 89° (vertical) typ, +/- 89° (horizo nta l) typ
Page 7
9/20/12
Documentation
5/10
support.dell.com/support/edocs/monitors/2007FP/en/ug/about.htm#Front View
Luminance output 300 cd/m ²(typ)
Contrast ratio 800:1 (typ)
Face plate coa ting Antiglare with hard-coating 3H
Backlight CCFL (6) edge light system
Respon se Time 16ms typical
Resolution
Horizo nta l scan range 30 kHz to 81 kHz (automatic)
Vertical scan range 56 Hz to 76 Hz , exception 16 00 x 1200 at 60 Hz only
Optimal preset resolution 1600 x 1200 a t 60 Hz
Highe st preset re so lution 1600 x 1200 a t 60 Hz
Video Supported Modes
Video display capabilities (DVI playback) 480p /576p/720p
Video display capabilities (Compo site playb ack) NTSC/PAL
Video display capabilities (S-Vide o pla yback) NTSC/PAL
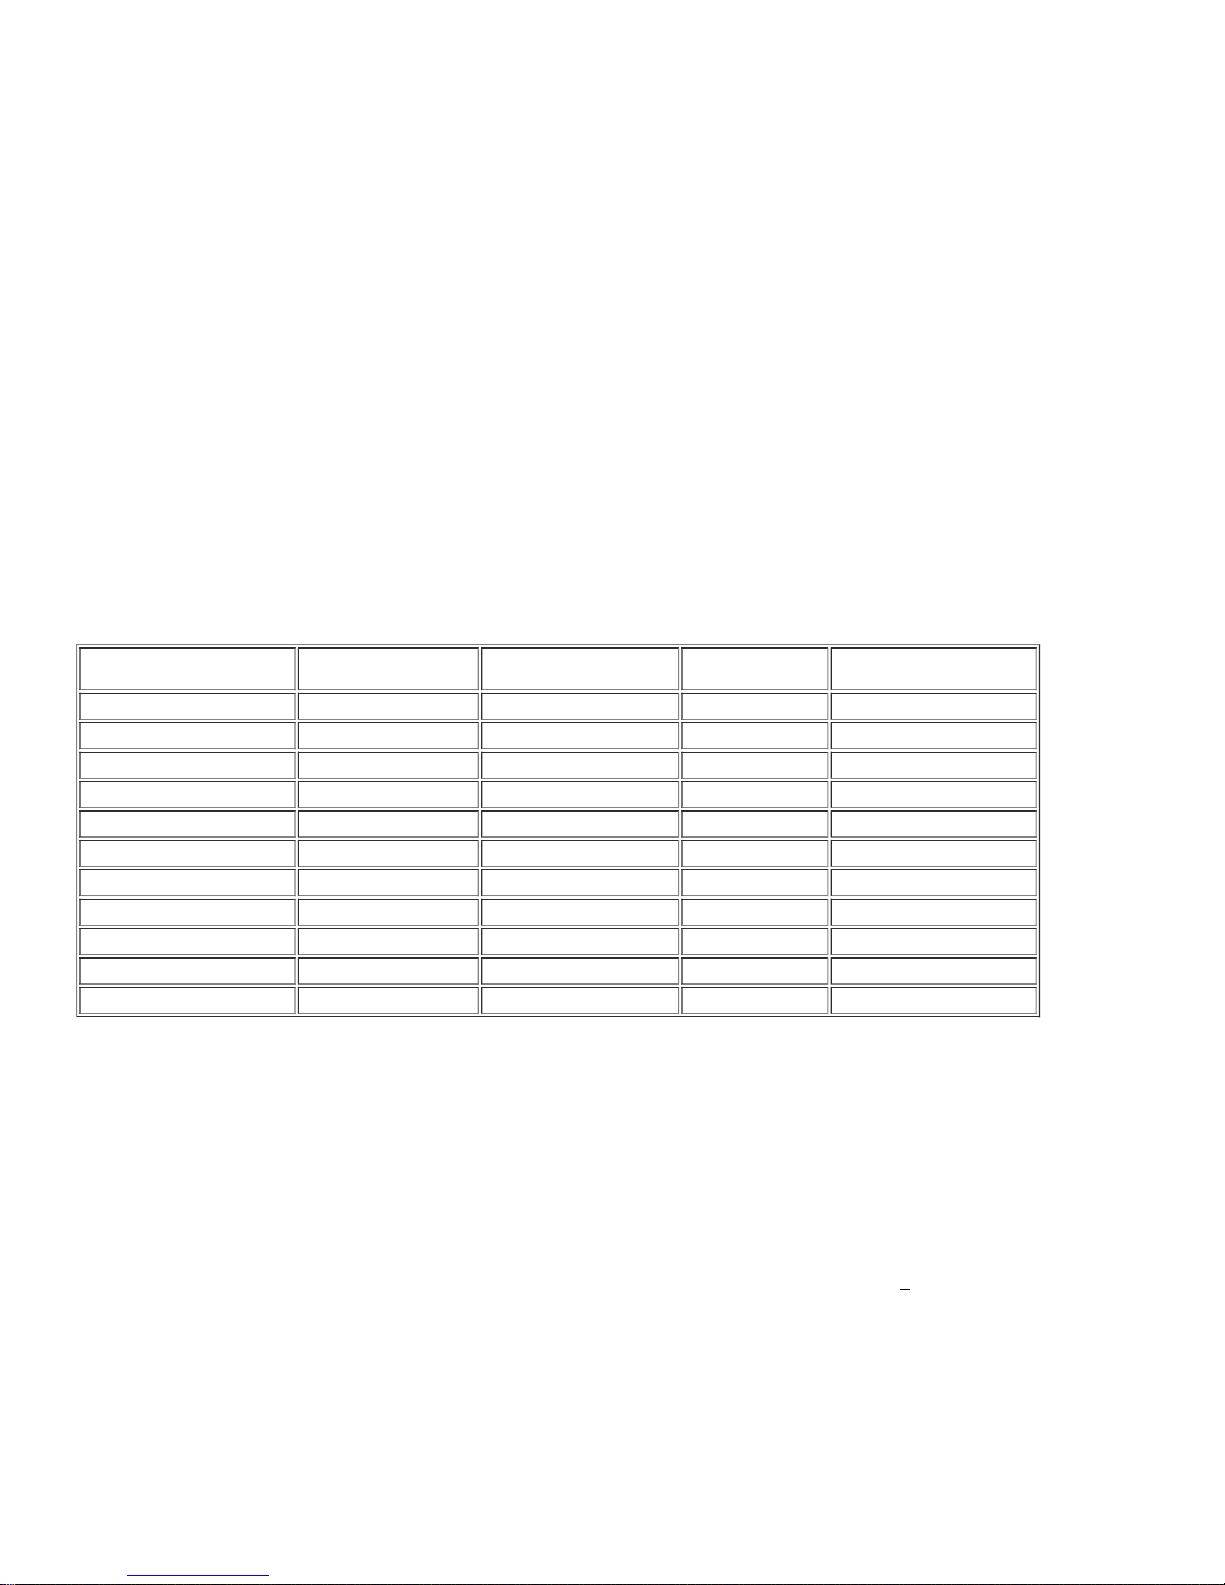
Preset Display Modes
Dell™ gua rantee s imag e s ize and cente ring for all preset modes listed in the follow ing ta ble.
Display Mode Horizontal Frequency
(kHz)
Vertical Frequency (Hz) Pixel Clock (MHz) Sync Polarity
(Horizontal/Vertical)
VGA, 720 x 400 31.5 70.1 28.3 -/+
VGA, 640 x 480 31.5 59.9 25.2 -/-
VESA, 640 x 480 37.5 75.0 31.5 -/-
VESA, 800 x 600 37.9 60.3 40.0 +/+
VESA, 800 x 600 46.9 75.0 49.5 +/+
VESA, 1024 x 768 48.4 60.0 65.0 -/-
VESA, 1024 x 768 60.0 75.0 78.8 +/+
VESA, 1152 x 864 67.5 75.0 108.0 +/+
VESA, 1280 x 1024 64.0 60.0 108.0 +/+
VESA, 1280 x 1024 80.0 75.0 135.0 +/+
VESA, 1600 x 1200 75.0 60.0 162.0 +/+
Electrical
Video input signa ls Analog RGB, 0.7 Volts +/-5%, 75 ohm input impedance
Digital DVI-D TMDS, 600mV for e ach differential line, 50 ohm
input impe da nce
S-video, Y input 1 volt(p-p), C input 0.286 volt(p-p), 75 ohm input
impeda nce
Composite, 1 volt(p-p), 75 oh m input impedance
Synchronization inpu t sign als se pa rate horizontal an d vertical,
3.3V CMOS or 5V TTL leve l, positive or ne ga tive s ync.
SOG (Sync on gree n)
AC input voltage / frequen cy / current 100 to 240 VAC / 50 or 60 Hz + 3 Hz / 2.0A (Max.)
Inrush current 120V: 40A (Max.)
240V: 80A (Max.)
Physical Characteristics
Signal cable type D-sub: Detacha ble, Ana log, 15pin, shipped attache d to the
monitor
DVI-D: Detachable, Digital, 24pin, shippe d deta ched from the
monitor
S-video: Not included with display
Page 8
9/20/12
Documentation
6/10
support.dell.com/support/edocs/monitors/2007FP/en/ug/about.htm#Front View
Composite: Not included w ith display
Dimensions (w ith stand ):
Heigh t (fully extended in portrait mode ) 547.6 mm (21.6 inches)
Heigh t (compresse d/locked in landscap e mode) 367 mm (14.5 inches)
Width 445.3 mm (17.5 inches)
Depth 193.50 mm ( 7.6 inches)
We ight
Monito r (Stand and Head) 6.9 Kg (15.2 lb)
Monito r Flat pa ne l only (VESA Mode) 5.2 Kg (11.5 lb)
We ight with packaging 9.6 Kg (21.2 lb)
Environmental
Tempera ture :
Ope rating 5° to 35°C (41° to 95°F)
Non-operating Stora ge: 0° to 60°C (32° to 14 0°F)
Shipping : -20° to 60°C(-4° to 140°F)
Humidity:
Ope rating 10% to 80% (non-conde ns ing)
Non-operating Stora ge: 5% to 90% (no n-cond ensing)
Shipping : 5% to 90%(non-condensing )
Altitude :
Ope rating 3,657.6 m (12,000 ft) max
Non-operating 12,192 m (40,000 ft) max
Thermal dissipa tion 256.0 BTU/hou r (maximum)
187.66 BTU/hour (typical)
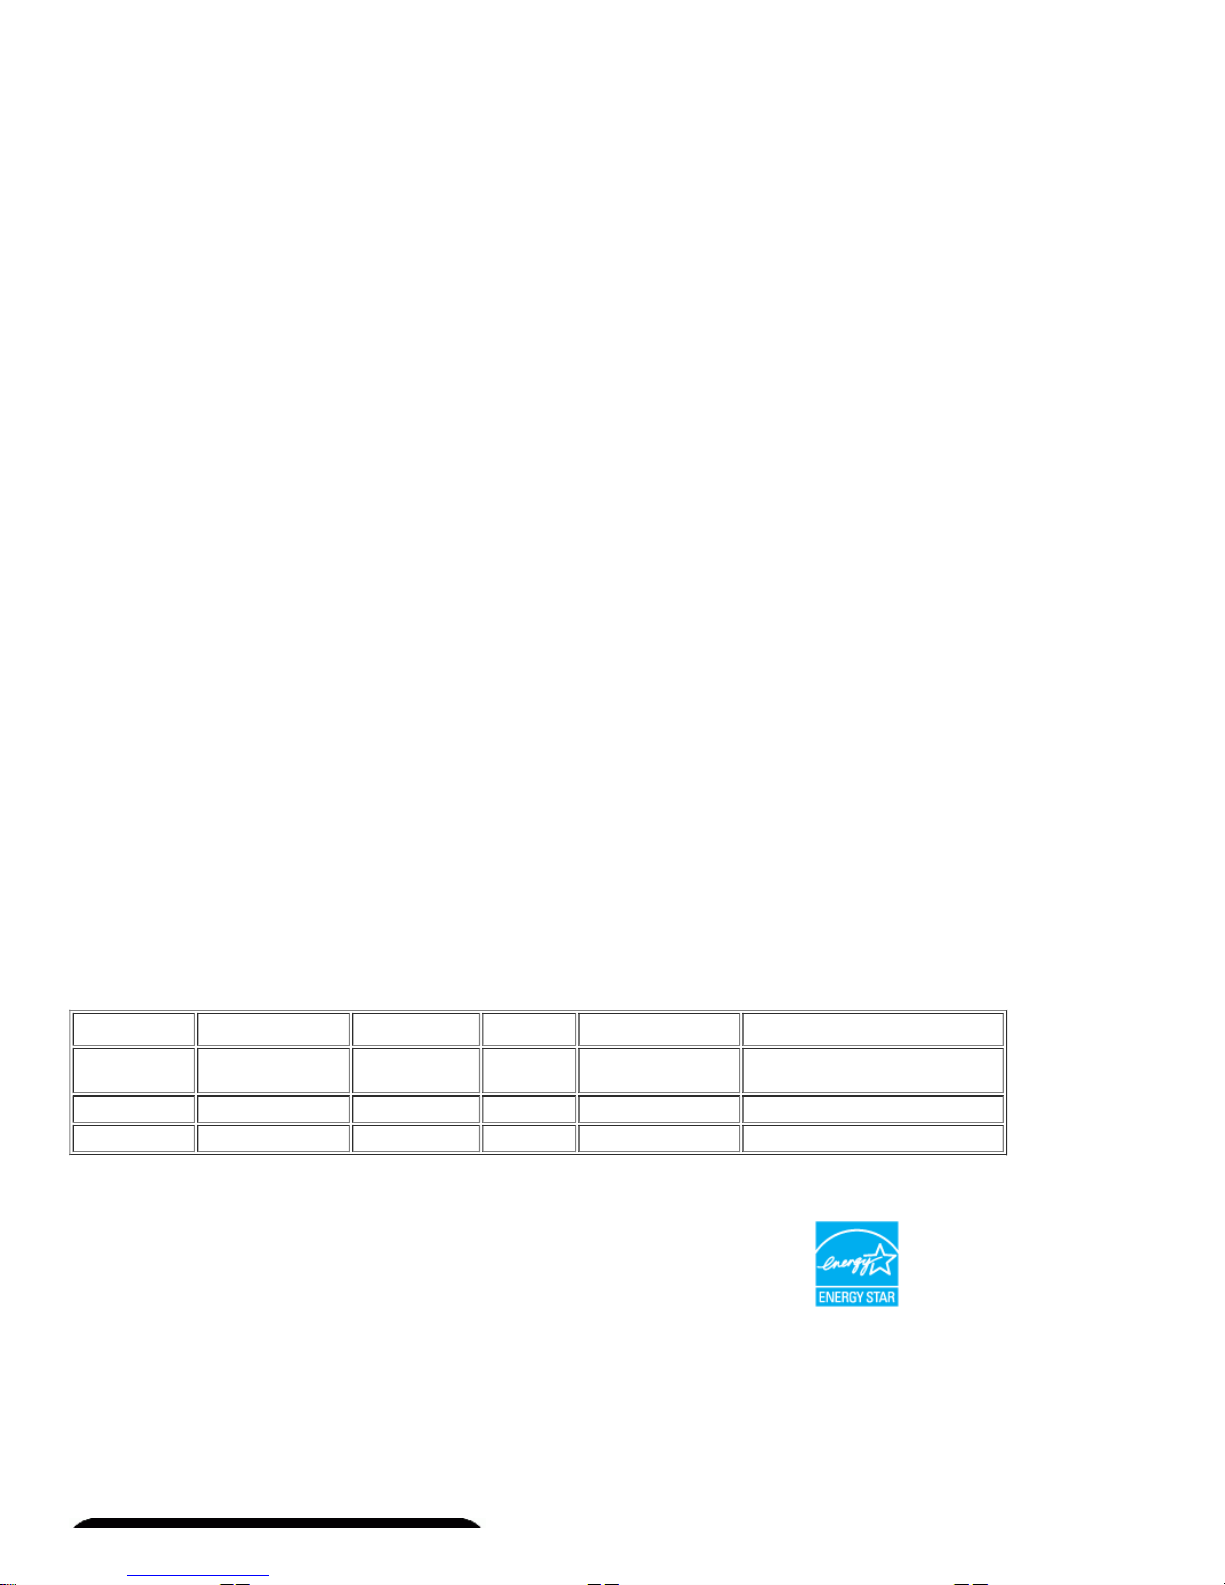
Power Management Modes
If you ha ve VESA's DPMS compliance dis play card or softw are installed in your PC , the monitor can auto matically reduce its pow e r consumption when not
in use . This is refe rred to as 'Po wer Save Mode'*. If activity from keyboard, mous e o r othe r input devices is dete cted by the compute r, the monitor w ill
automatically "wa ke up ". The following tab le show s the pow er consumption a nd signa ling of this automatic pow er saving feature:
VESA Modes Horizontal Sync Vertical Sync Video Power Indicator Power Consumption
Normal
operation
Active Active Active Green 75W (maximum)*
55W (normal)**
Active-off mode Inactive Inactive Blanked Amber Les s than 2 W
Switch o ff - - - Off Les s th an 1 W (at 230 V)
* With Audio + USB
** W itho ut Audio + USB
This monitor is ENERGY STAR®-compliant as well as TCO '99/ TCO '03 pow e r manag ement compatible.
* Zero pow e r consumption in OFF mode can only be a chieve d by disconn ecting the main cable from the monito r.
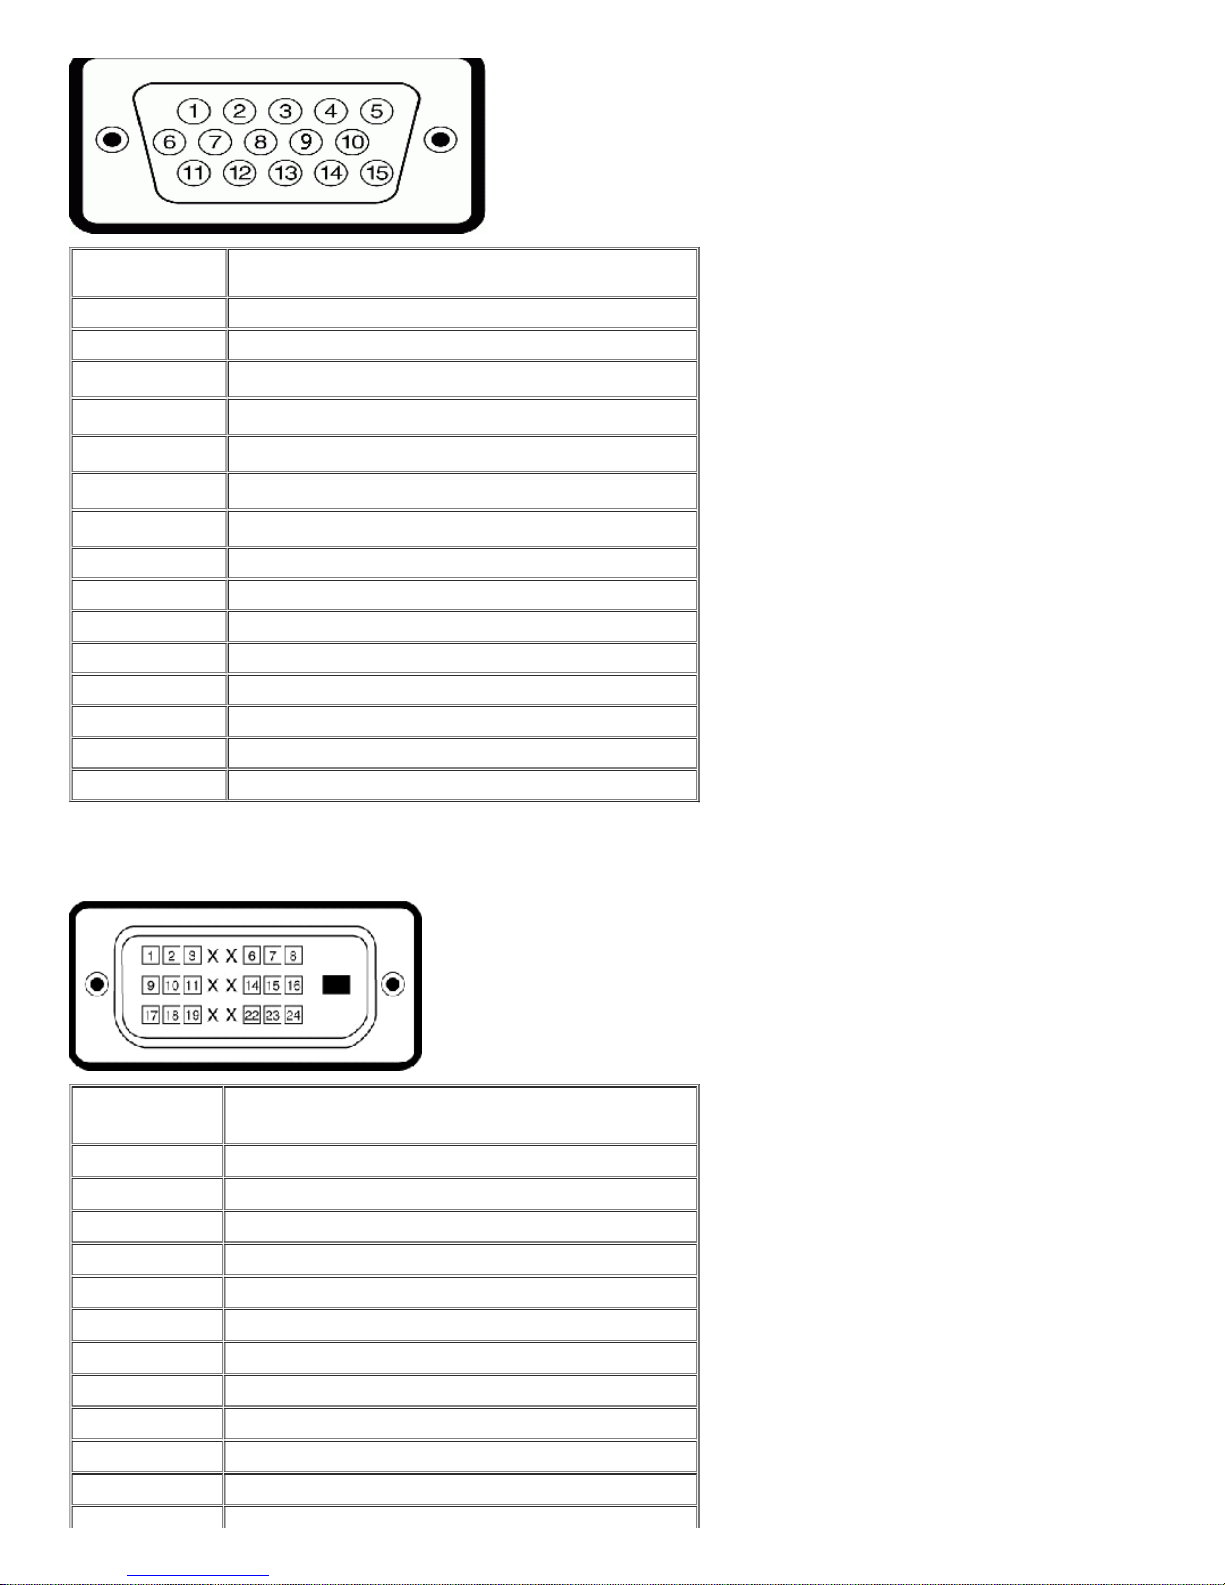
Pin Assignments
VGA Connector
Page 9
9/20/12
Documentation
7/10
support.dell.com/support/edocs/monitors/2007FP/en/ug/about.htm#Front View
Pin Number 15-pin Side of the Connected Signal Cable
1 Video-Red
2 Video-Green
3 Video-Blue
4 GND
5 Self-test
6 GND-R
7 GND-G
8 GND-B
9 Computer 5V/3.3V
10 GND-s ync
11 GND
12 DDC data
13 H-s ync
14 V-sync
15 DDC clock
DVI Connector
Pin Number 24-pin Side of the Connected Signal Cable
1 TMDS RX2-
2 TMDS RX2+
3 TMDS Ground
4 Floating
5 Floating
6 D DC Clock
7 D DC Data
8 Floating
9 TMDS RX1-
10 TMDS RX1+
11 TMDS Ground
12 Floating
Page 10
9/20/12
Documentation
8/10
support.dell.com/support/edocs/monitors/2007FP/en/ug/about.htm#Front View
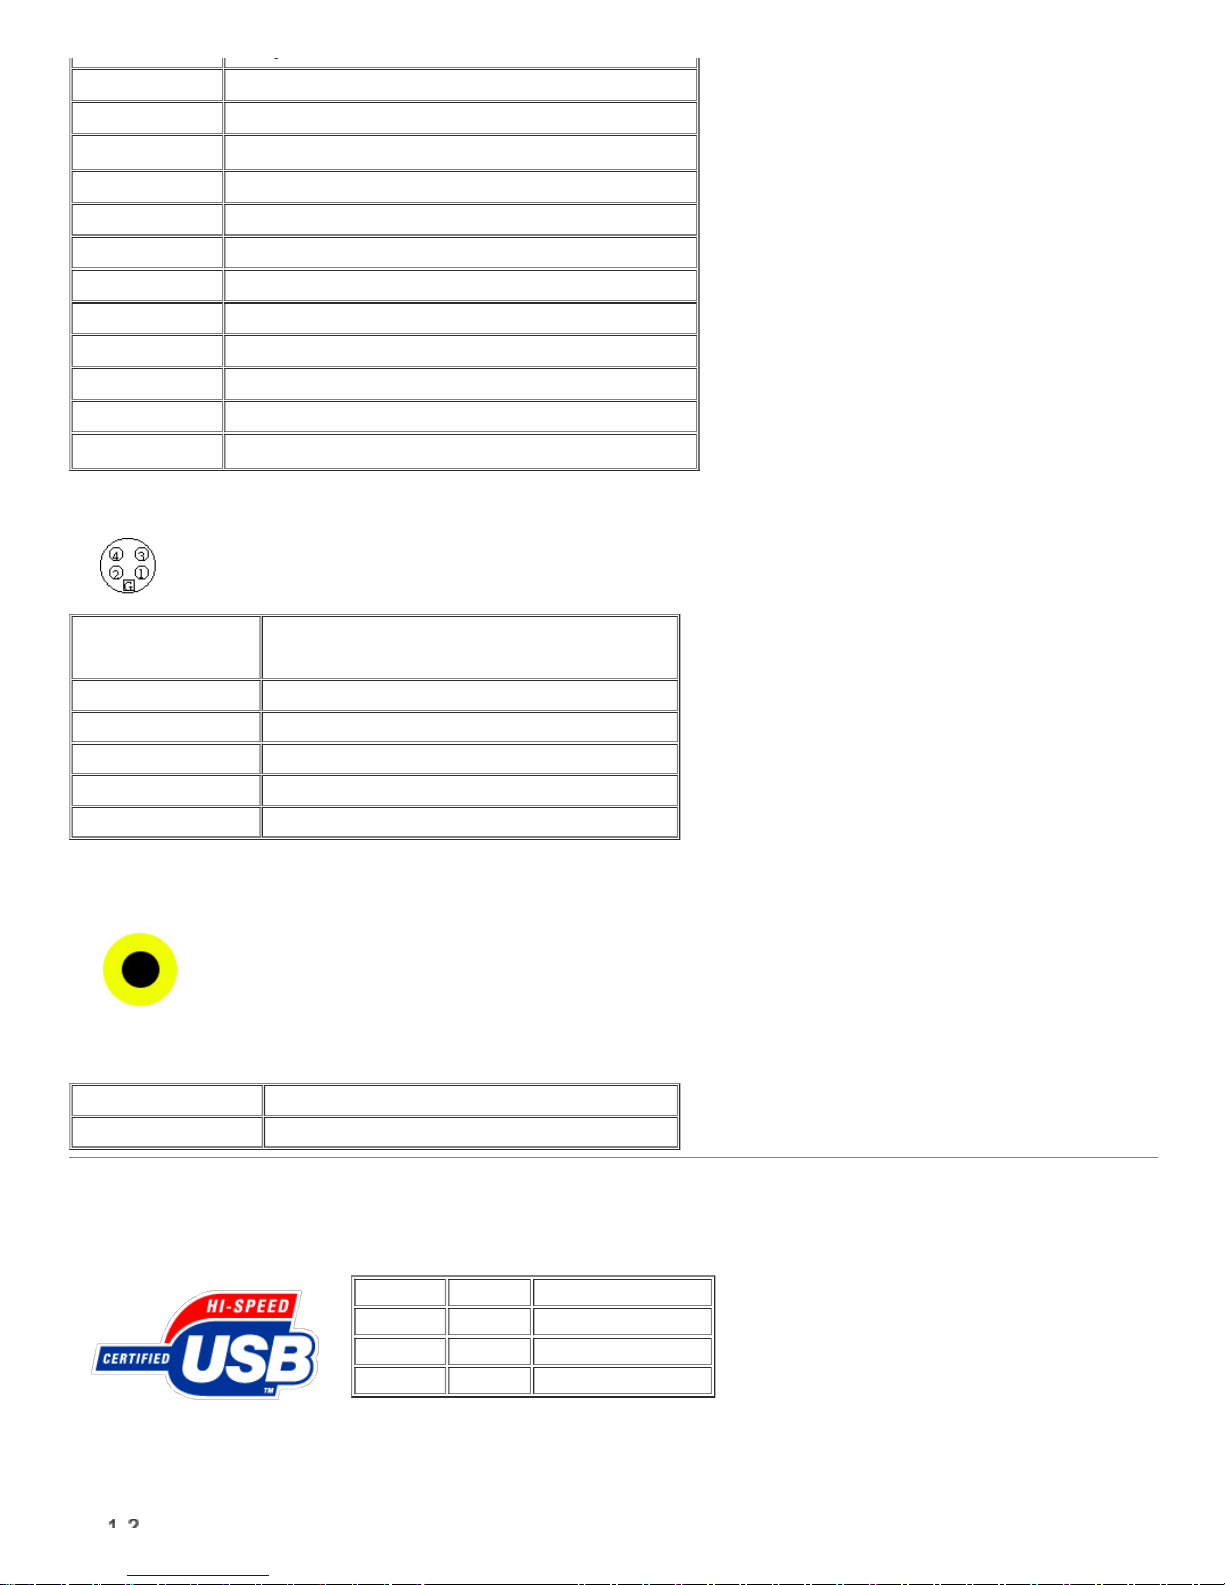
12 Floating
13 Floating
14 +5V / +3.3V pow er
15 Self test
16 Hot Plug Detect
17 TMDS RX0-
18 TMDS RX0+
19 TMDS Ground
20 Floating
21 Floating
22 TMDS Ground
23 TMDS Clock+
24 TMDS Clock-
S-video Connector
Pin Number 5-pin Side of the Connected Signal Cable (Cable not included)
1 GND
2 GND
3 LUMA
4 CHROMA
5 GND
Composite Video Connector
Pin Number 1-pin Side of the Connected Signal Cable (cable not included)
1 LUMA COMPOSITE CHROMA
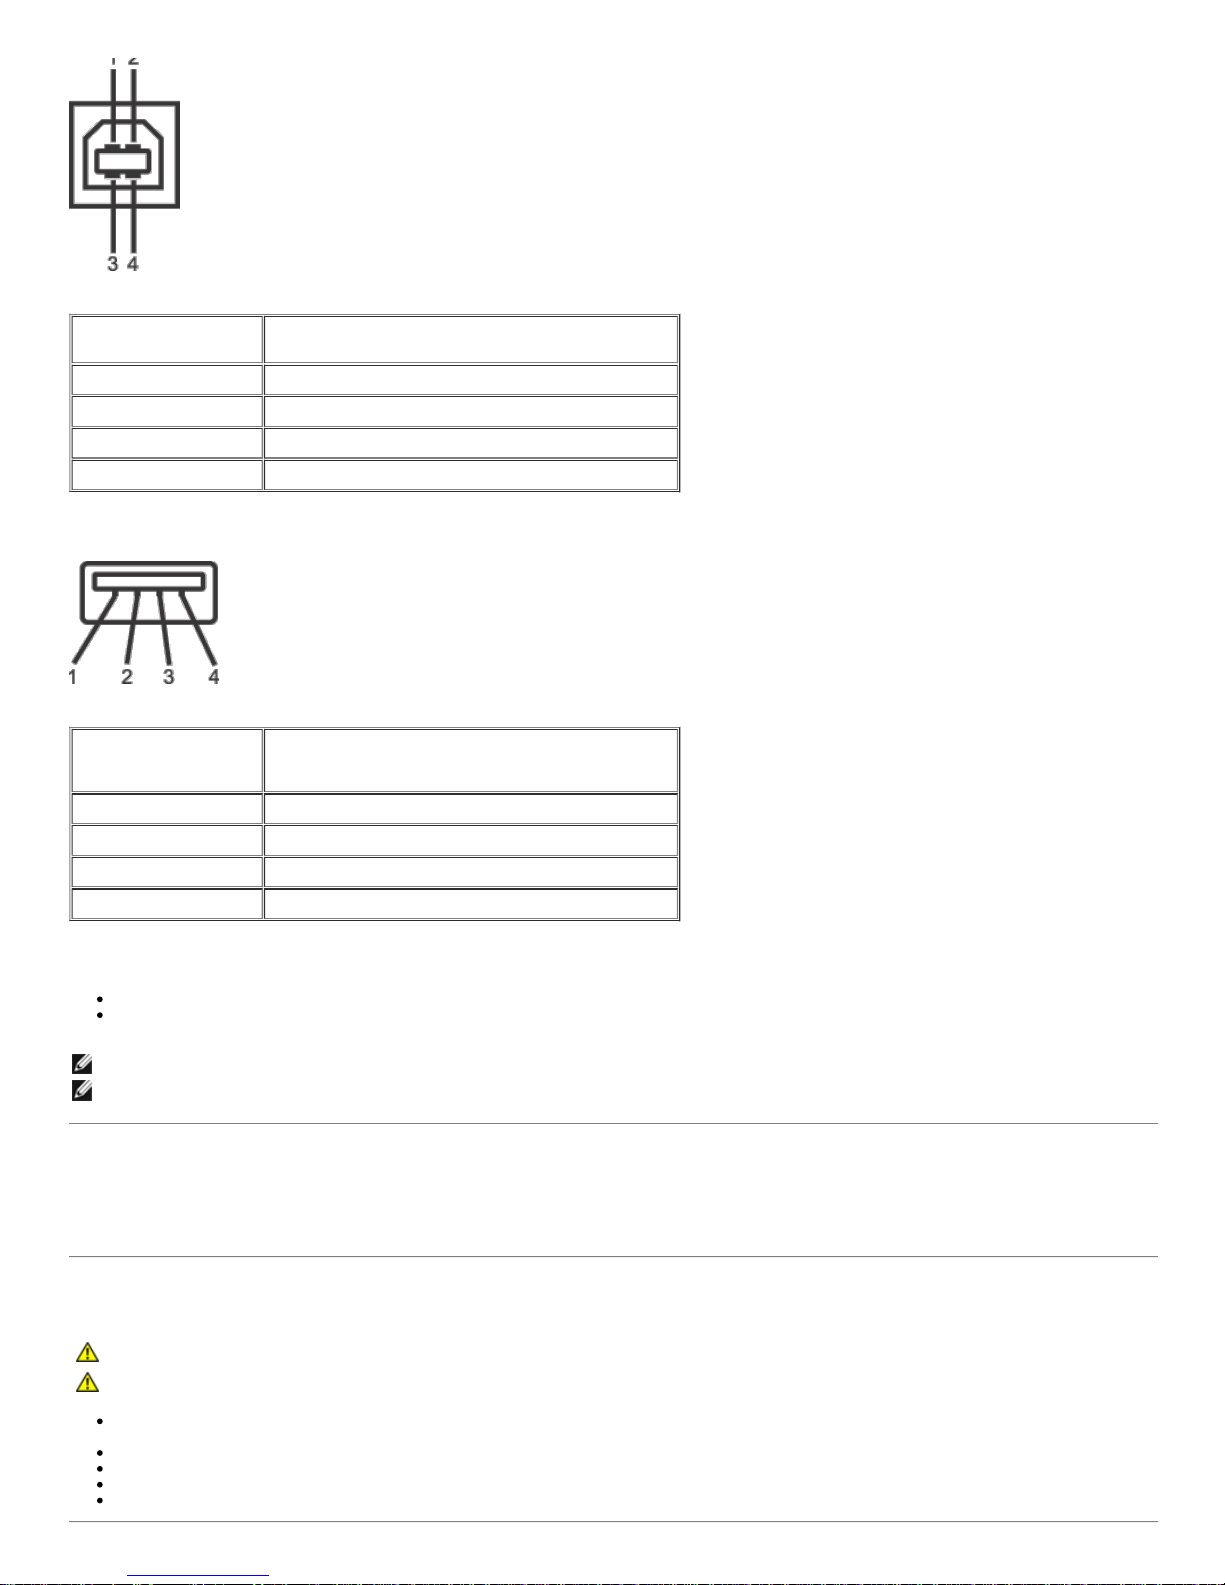
Universal Serial Bus (USB) Interface
This monitor supports High-Spe ed Certified USB 2.0 interface.
Data Rate Pow e r Con sumption
High sp ee d 480 Mbps 2.5W (Max., each port)
Full spe ed 12 Mbps 2.5W (Max., each po rt)
Low speed 1.5 Mbps 2.5W (Max., each port)
USB Upstream Connector
Page 11
9/20/12
Documentation
9/10
support.dell.com/support/edocs/monitors/2007FP/en/ug/about.htm#Front View
Pin Number 4-pin Side of the connector
1 DMU
2 VCC
3 DPU
4 GND
USB Downstream Connector
Pin Number 4-Pin Side of the Signal Cable
1 VCC
2 DMD
3 DPD
4 GND
USB Ports
1 ups tream - rear
4 down stre am - 2 on re ar; 2 on left side
NOTE: USB 2.0 capa bility requires 2.0 capa ble compute r
NOTE: The monitor's USB inte rface w orks only whe n the monito r is on o r in pow e r save mode , If you sw itch the monito r off and then on,
attache d pe riphe rals may take a few secon ds to resume normal function ality.
Plug and Play Capability
You can insta ll the monitor in any Plug a nd P lay-compatible syste m. The monitor automatically provide s the computer syste m with its Extende d Displa y
Identification Data (EDID) using Display Data Channe l (DDC) protocols so the system can configure itself and optimize the monito r se ttings. If des ired,
the use r can s ele ct different se tting s, but in most cas es monito r insta llation is automatic.
Caring for Your Monitor
CAUTION: Rea d and follow the s afety ins tructions be fore clean ing the monito r.
CAUTION: Before clea ning th e monitor, unplug the monitor pow er cable from the ele ctrical outle t.
To clean your antistatic scre en, lightly dampen a s oft, clean cloth w ith w ater. If pos sible , use a special scree n-cleaning tissue or solutio n suitable
for the antista tic coating. Do not use be nze ne , thinne r, ammonia, ab ras ive cleaners , or compressed a ir.
Use a lightly-dampen ed, warm cloth to clea n the plastics. Avoid using d ete rge nt o f any kind a s s ome dete rge nts leave a milky film on the plas tics.
If you notice a w hite po wder w he n you unpack your monito r, wipe it off with a cloth. This white po wder occurs du ring the shipping of the monitor.
Handle your monitor w ith care as darker-colore d pla stics may scratch a nd s how w hite scuff marks more than lighte r-colored monitor.
To help maintain the bes t image qua lity on your monitor, use a dynamically chang ing screen sa ver and po w er off your monitor w he n no t in use.
Page 12

9/20/12
Documentation
10/10
support.dell.com/support/edocs/monitors/2007FP/en/ug/about.htm#Front View
Support Home Page
Large Text
Back to Contents Page
Shop
Why Buy Dell?
Laptops & Netboo ks
Des ktops & Workstations
Servers, Storage & Networking
Printers & Ink
Electronics & Access ories
Support
All Support Options
Drivers and Downloads
Order Status
Getting Started
Product Support
Parts & Upgrades
Community
Join the Discuss ion
Share Your Ideas
Read our Blog
Ratings & Reviews
Com munity Home
Company Information
About Dell
Corporate Res pons ibility
Careers
Investors
News room
My Account
Sign-in / Regis ter
Order Status
Care Service Reques t (SR)
Status
Make a Payment
Laptops | Desktops | Business Laptops | Business Desktops | Workstations | Servers | Storage | Services | Monitors | Printers | LCD TVs |
Electronics
© 2012 Dell | About Dell | Terms & Conditions | Unresolved Issues | Privacy Statement | Ads and Emails | Dell Recycling | Contact | Site Map | Visit ID |
Feedback
* O ffers s ubje c t to c hange . Ta xe s , shi ppi ng, han dli ng an d ot her fe es app ly . U.S . Del l S mal l Bu s ine s s n ew purc hase s onl y. LI MI T 5 DI SC O UN T E D O R P RO M O T I O NA L IT EM S P ER C U S T O M E R.
LI MI T 5 V O ST RO OR I NS PI RO N U NI T S P ER C U ST OM ER . Del l re se rv es righ t to ca nc el orde rs ari s ing fro m pric ing or o the r erro rs .
snE B13
Page 13
9/20/12
Documentation
1/3
support.dell.com/support/edocs/monitors/2007FP/en/ug/stand.htm#Attaching the Stand
Keyw ord or E-Value Code Search
My Account My Order Status Feedback
United States
Contact Us Premier Login
Shop Support Community
Support Home Page
Back to Contents Page
Using Your Adjustable Monitor Stand
Dell™ 2007FP Flat Panel Monitor
Attaching the Stand
Organizing Your Cables
Using the Tilt, Swivel and Vertical Extens ion
Removing the Stand
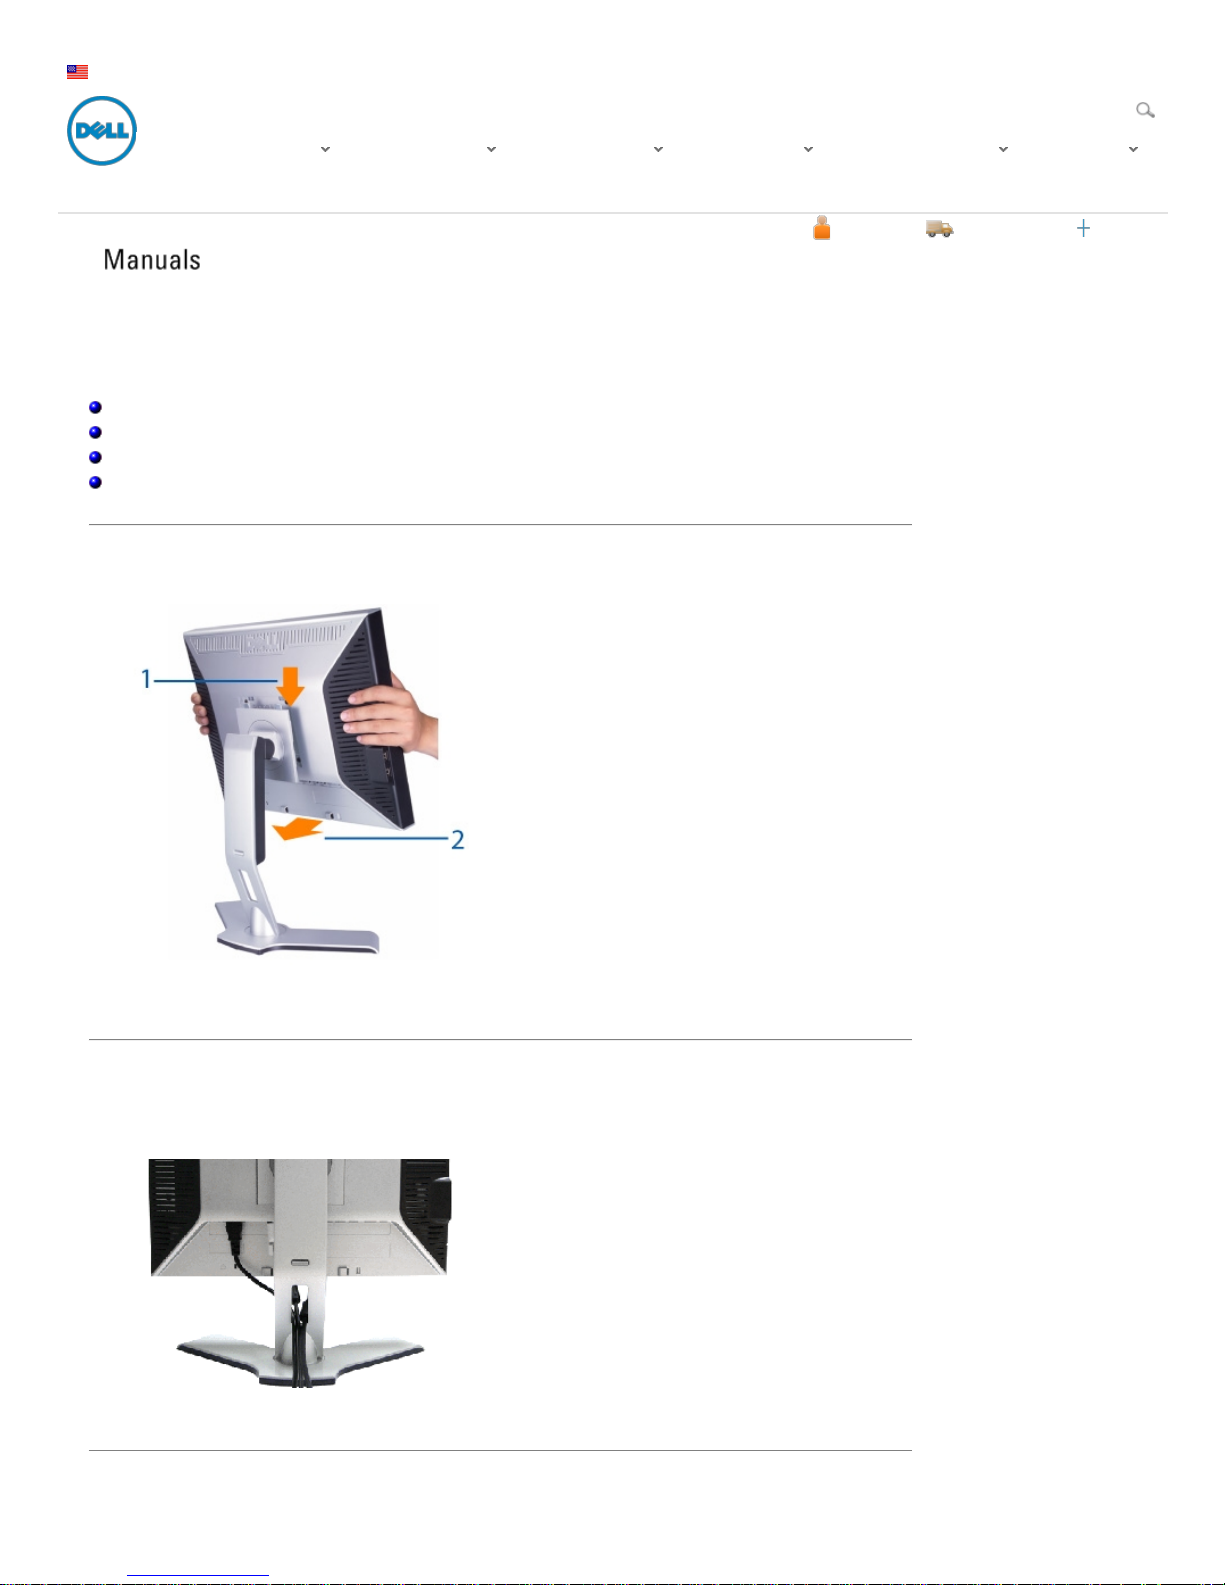
Attaching the Stand
1. Place the stand on a flat surface.
2. Fit the groove on the back of the monito r onto the 2 tabs o f upper stand .
3. Low er the monito r so that the monitor moun ting a rea sna ps on or locks to sta nd.
Organizing Your Cables
After attaching all necessary cables to your monitor and compute r, (See Connecting Your Monitor for cable
attachment,) use the C able mana ge ment ho le to neatly organize a ll cables as sho w n ab ove .
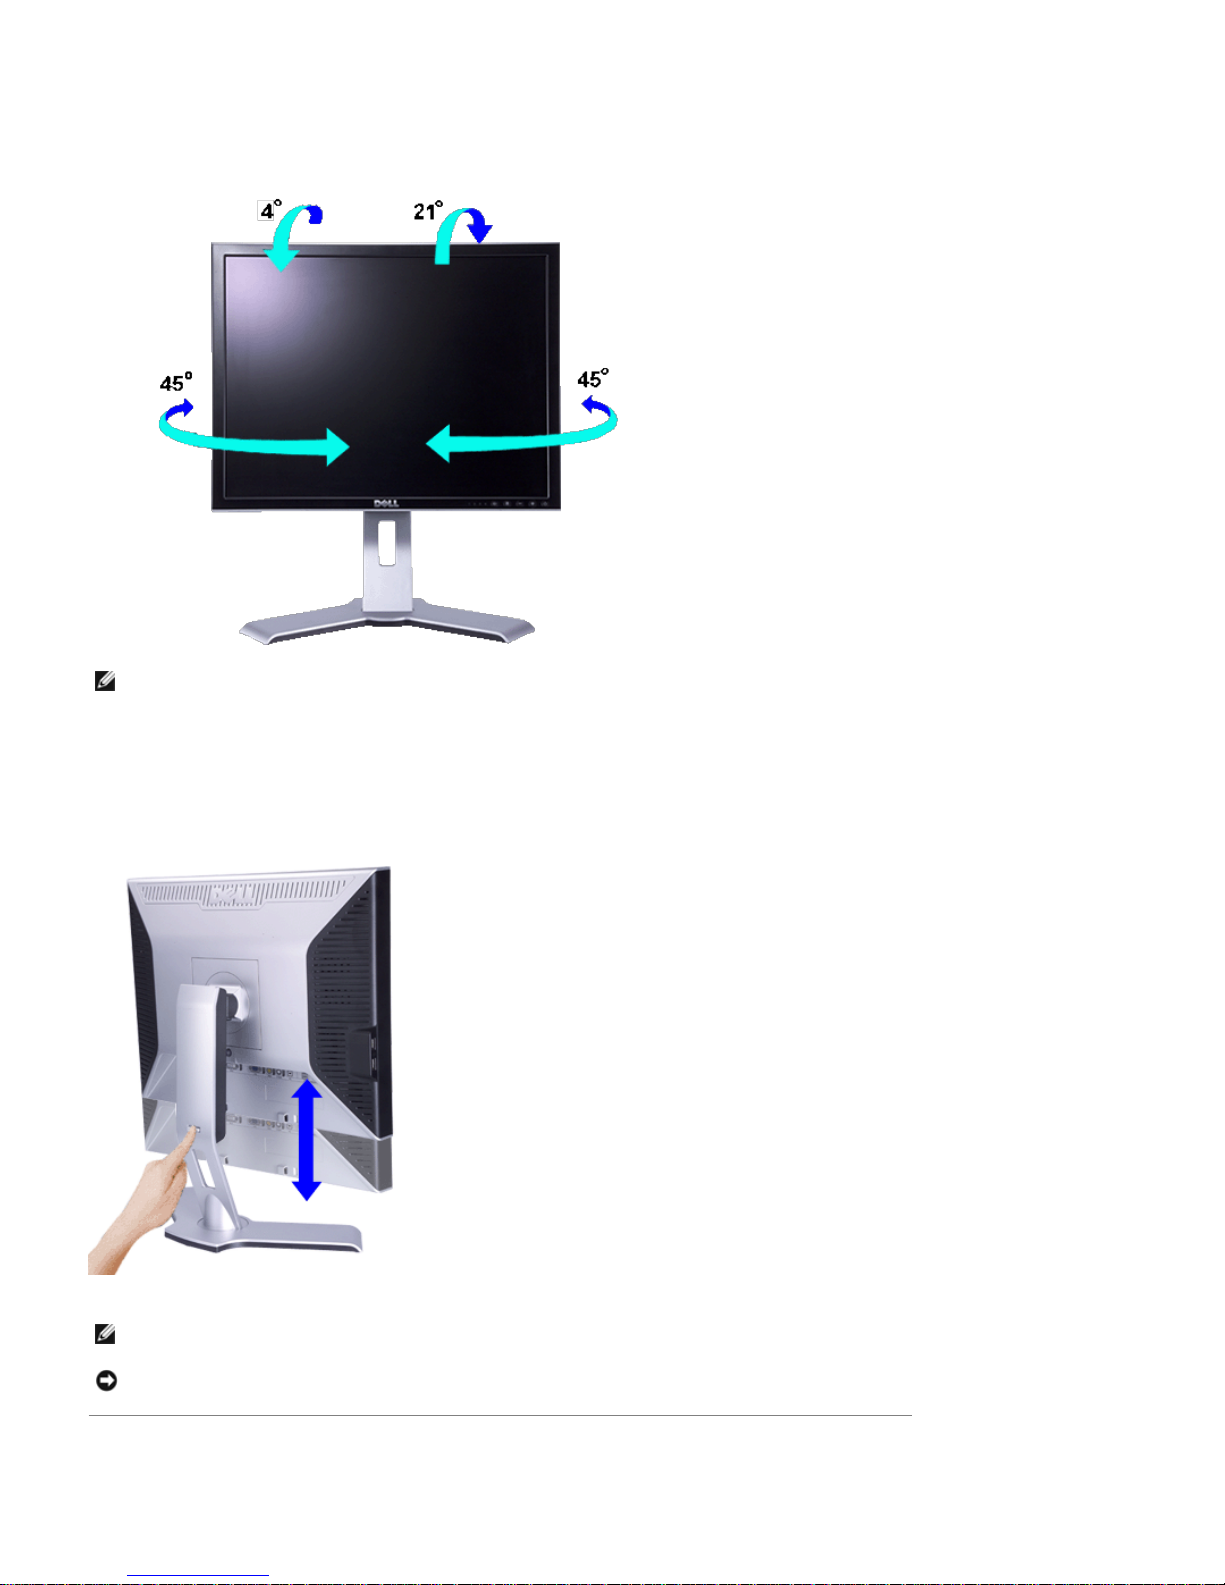
Using the Tilt, Swivel and Vertical Extension
Drivers and Dow nloads Product Suppor t Suppor t by Top ic Ord er Suppor t Warrant y Infor mat ion V iew Mor e
Sign In Cart
Page 14
9/20/12
Documentation
2/3
support.dell.com/support/edocs/monitors/2007FP/en/ug/stand.htm#Attaching the Stand
Tilt/Swivel
With the built-in ped es ta l, you can tilt and/or swive l the monitor for the most comfortab le view ing angle.
NOTE: Stan d is de ta ched and exte nded when th e monitor is sh ippe d from the factory.
Vertical Extension
Stand exte nd s vertically up to 130mm via the Lo ck dow n / releas e button.
NOTE: If locked in th e dow n po sition, pres s th e Lo ck dow n / rele as e butto n on the bottom rear of sta nd. Lift
the front pane l up and e xten d the stand to the de sire d he ight.
NOTICE: Before relocating or moving the monito r to a different location, make s ure that the s tand is
LOC KED DOWN. To lock it do wn, lower the height of the pane l until it clicks and is locked into place.
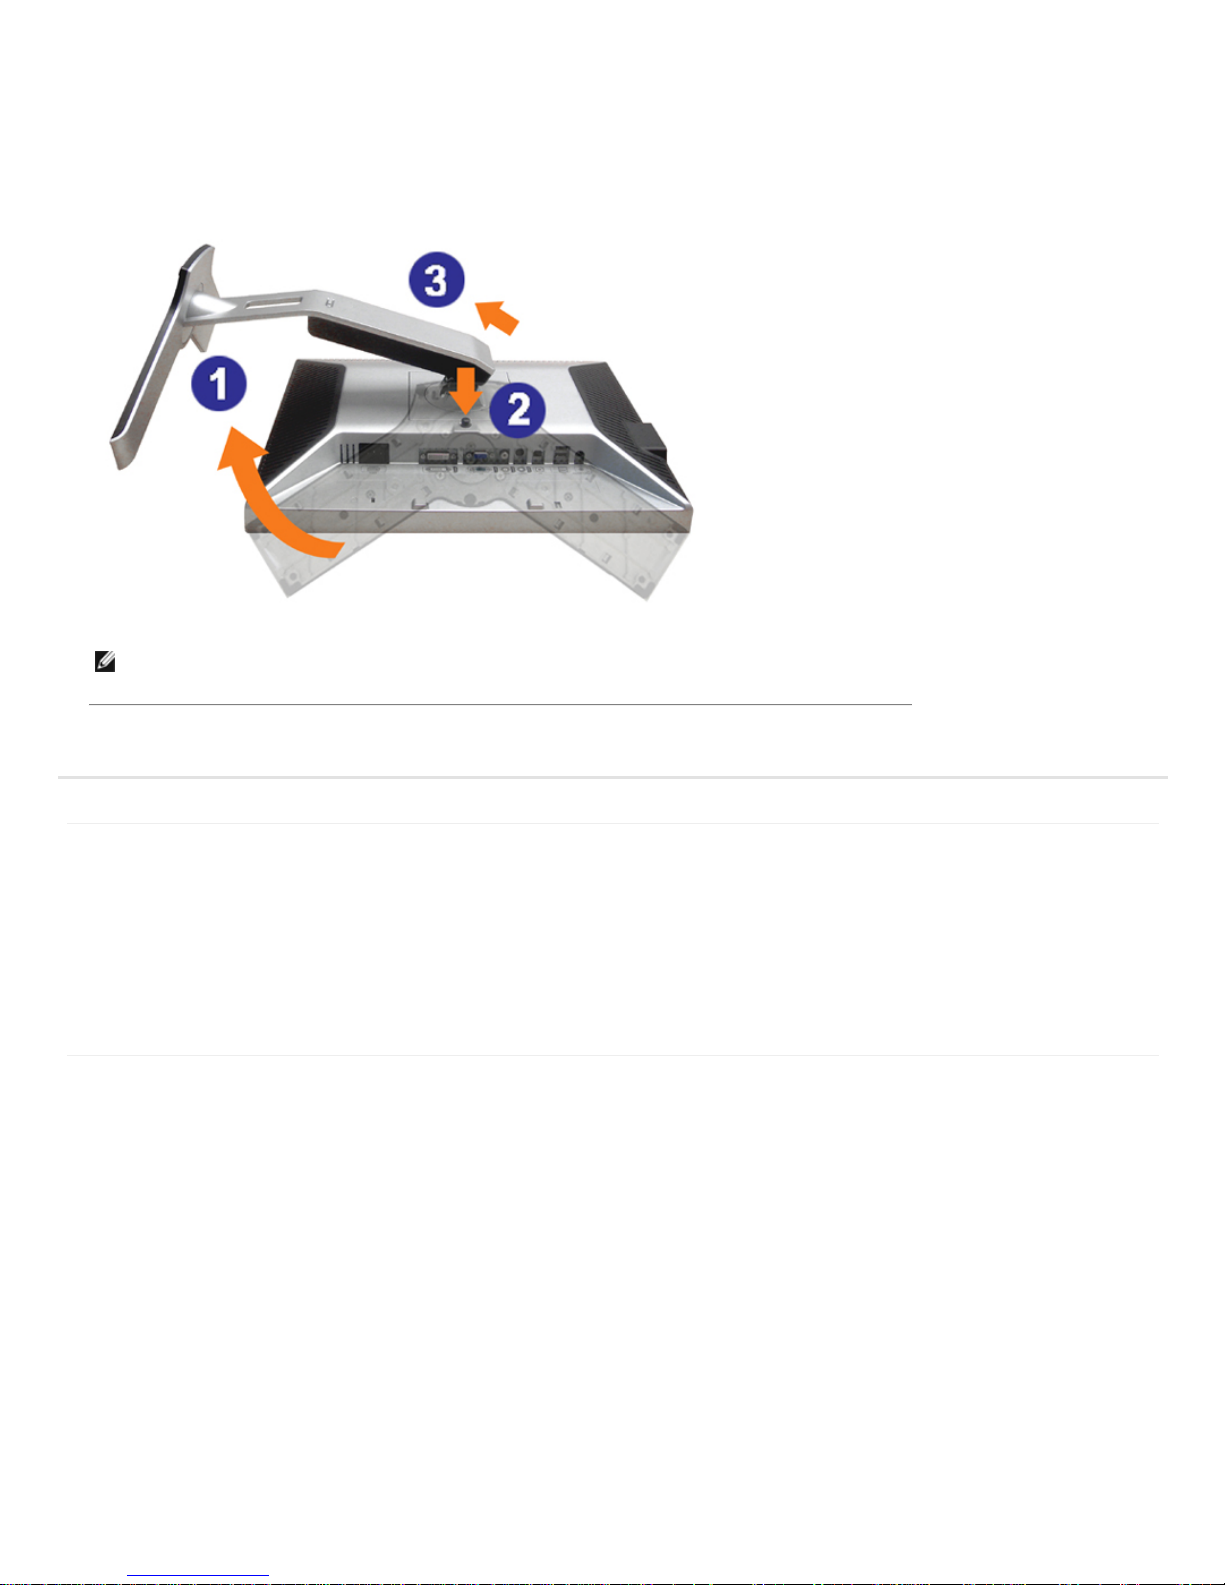
Removing the Stand
After placing the monitor pa ne l on a soft cloth or cus hion, press and ho ld the Monito r Lock / Relea se Butto n, and
the n remove the sta nd.
Page 15
9/20/12
Documentation
3/3
support.dell.com/support/edocs/monitors/2007FP/en/ug/stand.htm#Attaching the Stand
Support Home Page
Large Text
NOTE: To pre vent scratches on th e LC D scree n w hile re moving the stand , ens ure that the monitor is pla ced
on a clean surfa ce.
Back to Contents Page
Shop
Why Buy Dell?
Laptops & Netboo ks
Des ktops & Workstations
Servers, Storage & Networking
Printers & Ink
Electronics & Access ories
Support
All Support Options
Drivers and Downloads
Order Status
Getting Started
Product Support
Parts & Upgrades
Community
Join the Discuss ion
Share Your Ideas
Read our Blog
Ratings & Reviews
Com munity Home
Company Information
About Dell
Corporate Res pons ibility
Careers
Investors
News room
My Account
Sign-in / Regis ter
Order Status
Care Service Reques t (SR)
Status
Make a Payment
Laptops | Desktops | Business Laptops | Business Desktops | Workstations | Servers | Storage | Services | Monitors | Printers | LCD TVs |
Electronics
© 2012 Dell | About Dell | Terms & Conditions | Unresolved Issues | Privacy Statement | Ads and Emails | Dell Recycling | Contact | Site Map | Visit ID |
Feedback
* O ffers s ubje c t to c hange . Ta xe s , shi ppi ng, han dli ng an d ot her fe es app ly . U.S . Del l S mal l Bu s ine s s n ew purc hase s onl y. LI MI T 5 DI SC O UN T E D O R P RO M O T I O NA L IT EM S P ER C U S T O M E R.
LI MI T 5 V O ST RO OR I NS PI RO N U NI T S P ER C U ST OM ER . Del l re se rv es righ t to ca nc el orde rs ari s ing fro m pric ing or o the r erro rs .
snE B13
Page 16
1/16
support.dell.com/support/edocs/monitors/2007FP/en/ug/setup.htm#Connecting Your Monitor
Keyw ord or E-Value Code Search
My Account My Order Status Feedback
United States
Contact Us Premier Login
Shop Support Community
Support Home Page
Back to Contents Pag e
Setting Up Your Monitor
Dell™ 2007FP Flat Panel Monitor
Connecting Your Monitor
Using the Front Panel Buttons
Using the OSD
Setting the Optimal Re solution
Using the Dell ™ Sound bar (Optional)
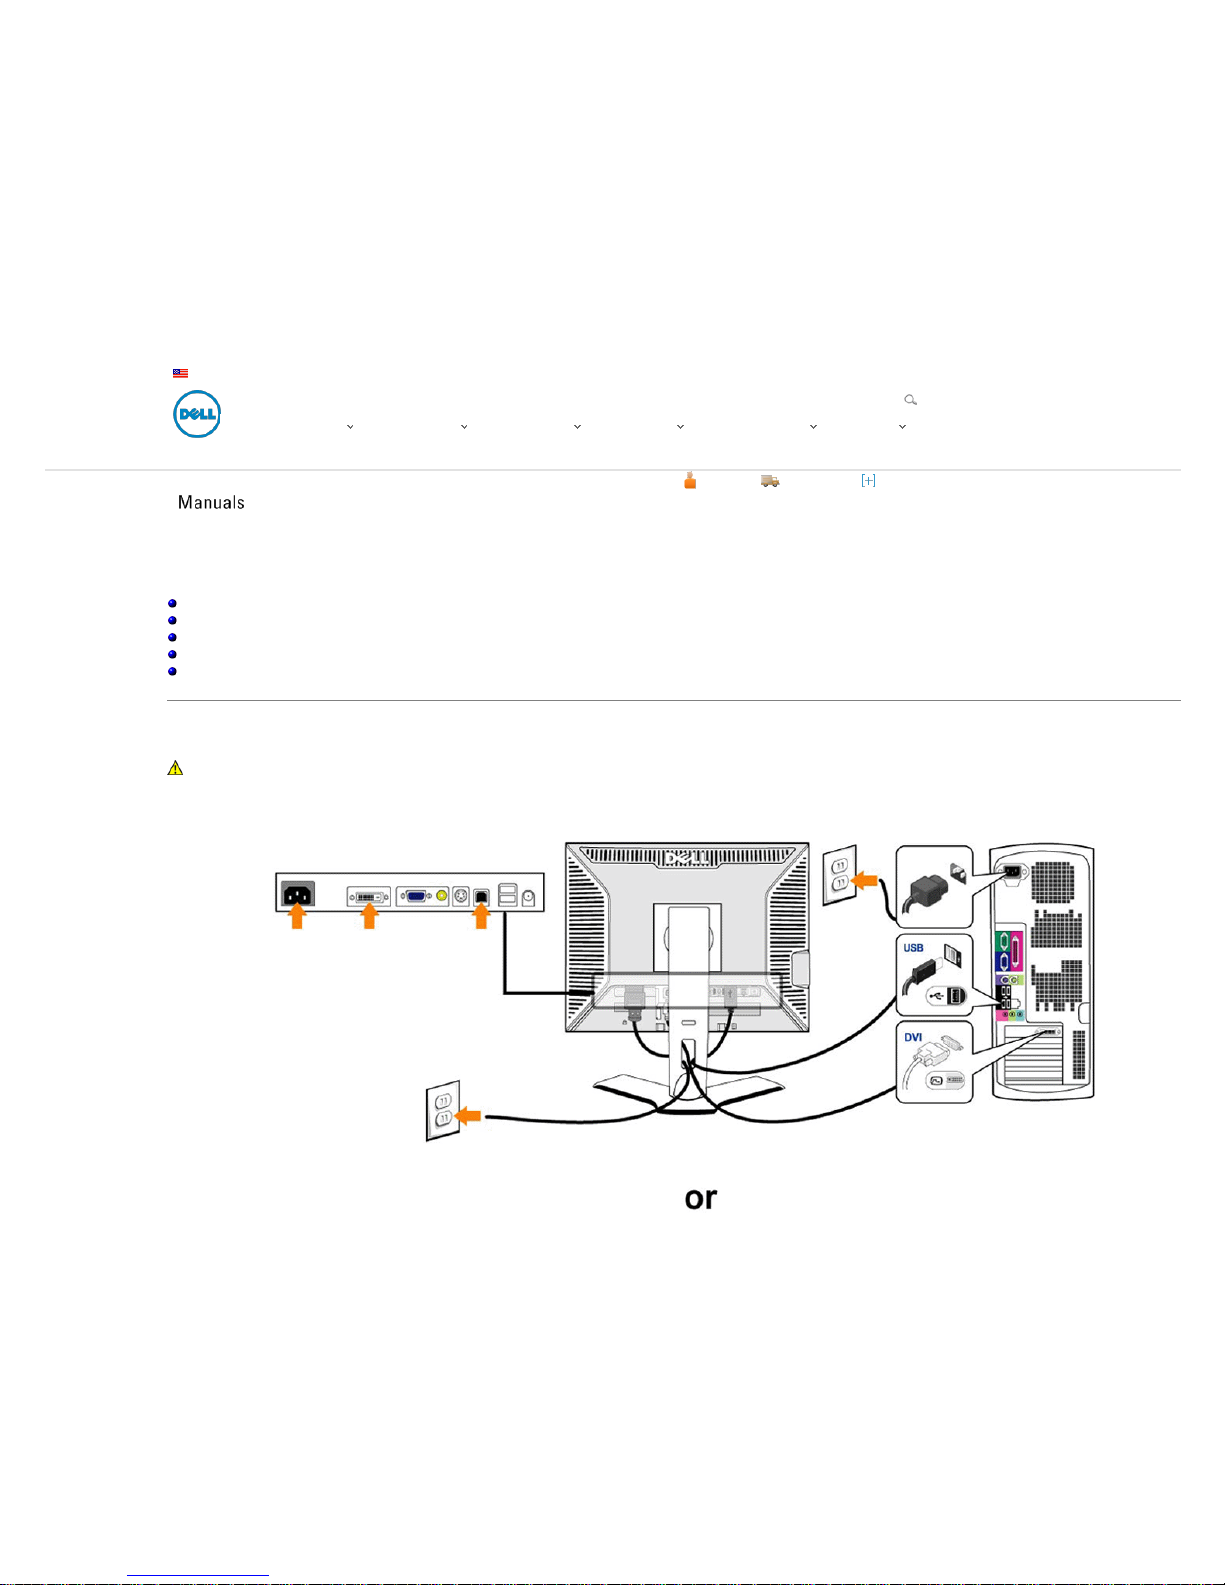
Connecting Your Monitor
CAUTION: Before you be gin any o f the proce dure s in this s ection, follow the Safety Ins tructions .
Drivers and Downloads Product Supp ort Suppor t by Topic Order Suppor t Warranty Inf ormation V iew M ore
Sign In Cart
Page 17
2/16
support.dell.com/support/edocs/monitors/2007FP/en/ug/setup.htm#Connecting Your Monitor
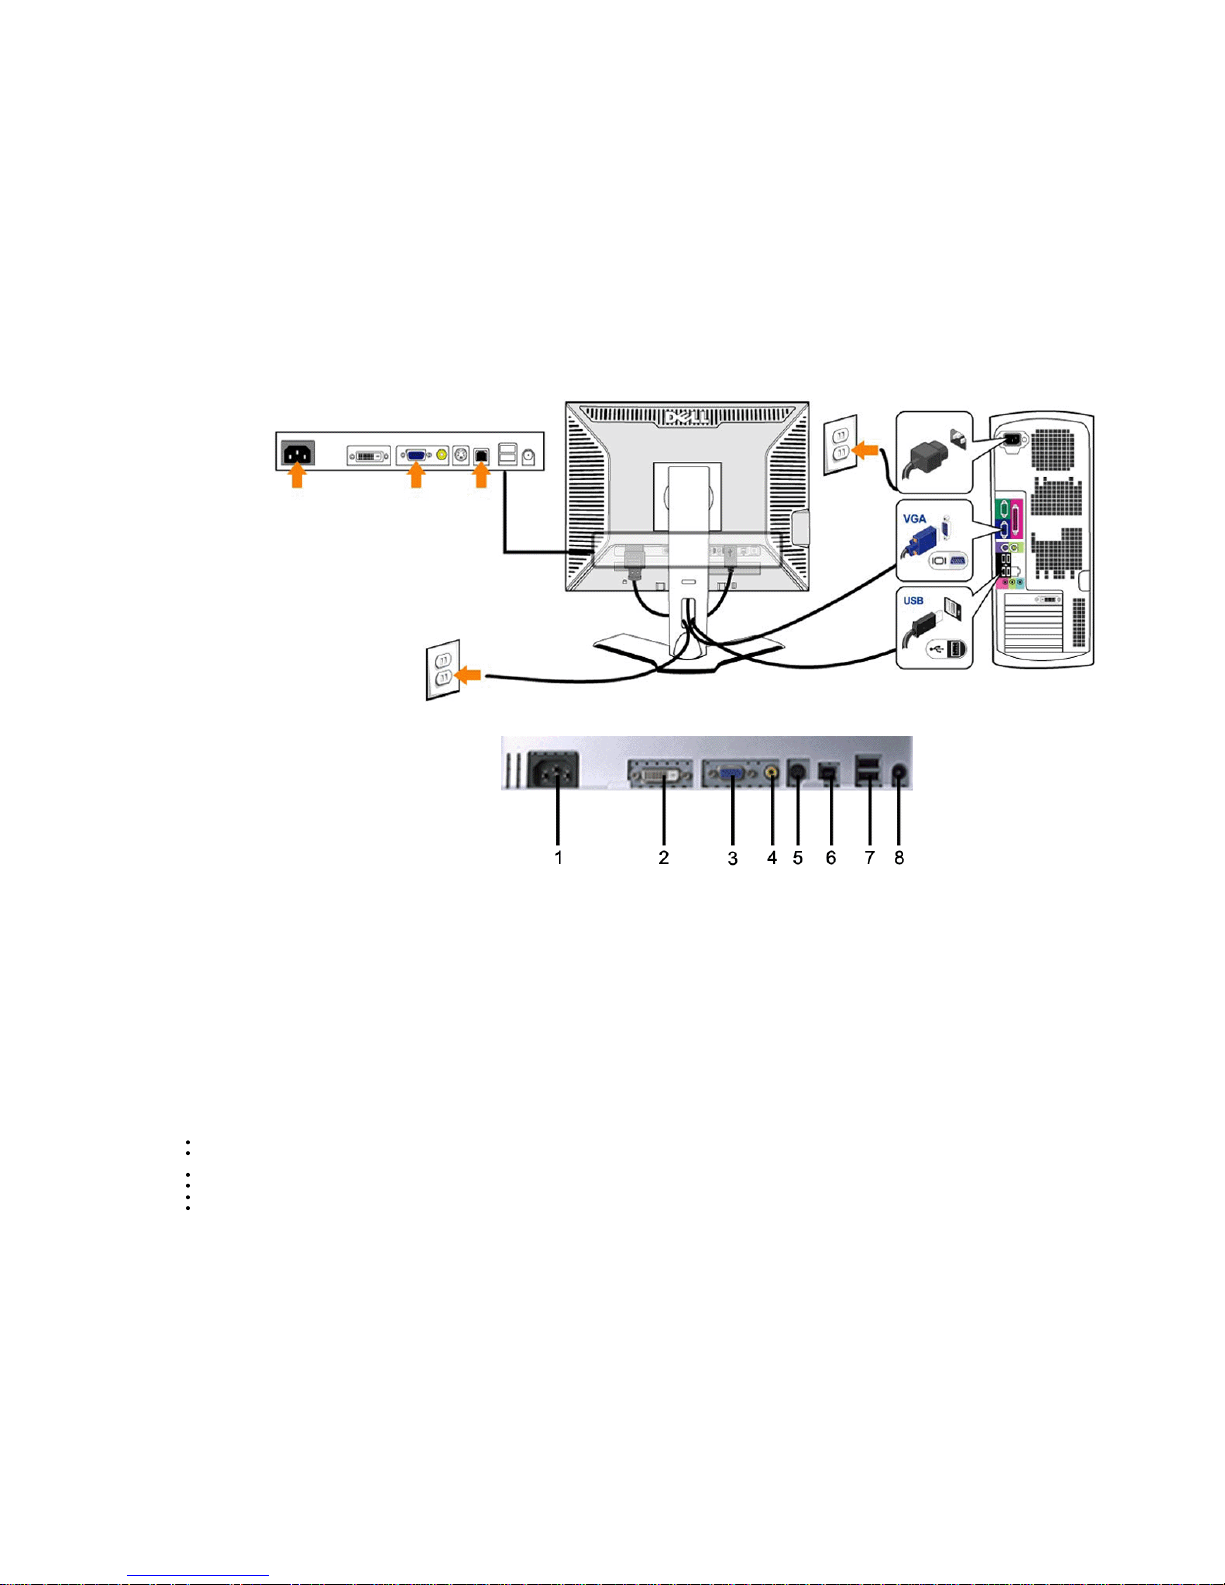
1 AC powe r cord conn ector
2 DVI conn ector
3 VGA conne ctor
4 Composite video connecto r
5 S-Video conne ctor
6 USB upstrea m port
7 USB downs trea m ports
8 DC powe r conne ctor for Dell™ Soun dbar
To connect your monitor to the computer perform the following steps/instructions.
Turn off your comput er and disconn ect the pow er cable .
Con nect eith er the white (digital DVI-D) or the blue (an alog VGA) displa y conne ctor cable to the co rrespo nding video po rt on the back of yo ur computer. Do no t use both cables on the same compu ter. The
only cas e in wh ich both cab les can be us ed is if the y are con necte d to tw o differe nt compute rs with appro priate video s ystems . (Grap hics are fo r illustration only. System app eara nce may vary).
Con nect the upst ream USB port (cable supp lied) to a n appro priate USB port on yo ur compute r .
Con nect USB perip herals to the dow nstre am USB ports (rea r or side ) on the monitor. (See rear o r bottom view for deta ils.)
Plug th e pow er cables fo r your compute r and monito r into a ne arby o utlet.
Turn on the monitor a nd compute r.
Page 18
3/16
support.dell.com/support/edocs/monitors/2007FP/en/ug/setup.htm#Connecting Your Monitor
If your monitor dis plays a n image, inst allation is complete . If it does no t displa y an image , see Sol ving Proble ms.
Use the cab le holde r on the monitor st and to nea tly organ ize the cables .
NOTE: If your compute r doe s not suppo rt the DVI connector, you can leave the ca ble unco nnecte d or remo ve it.
NOTE: For USB pe ripherals alrea dy conne cted to your compute r, changing the USB conn ection to your monitor is not ne cess ary.
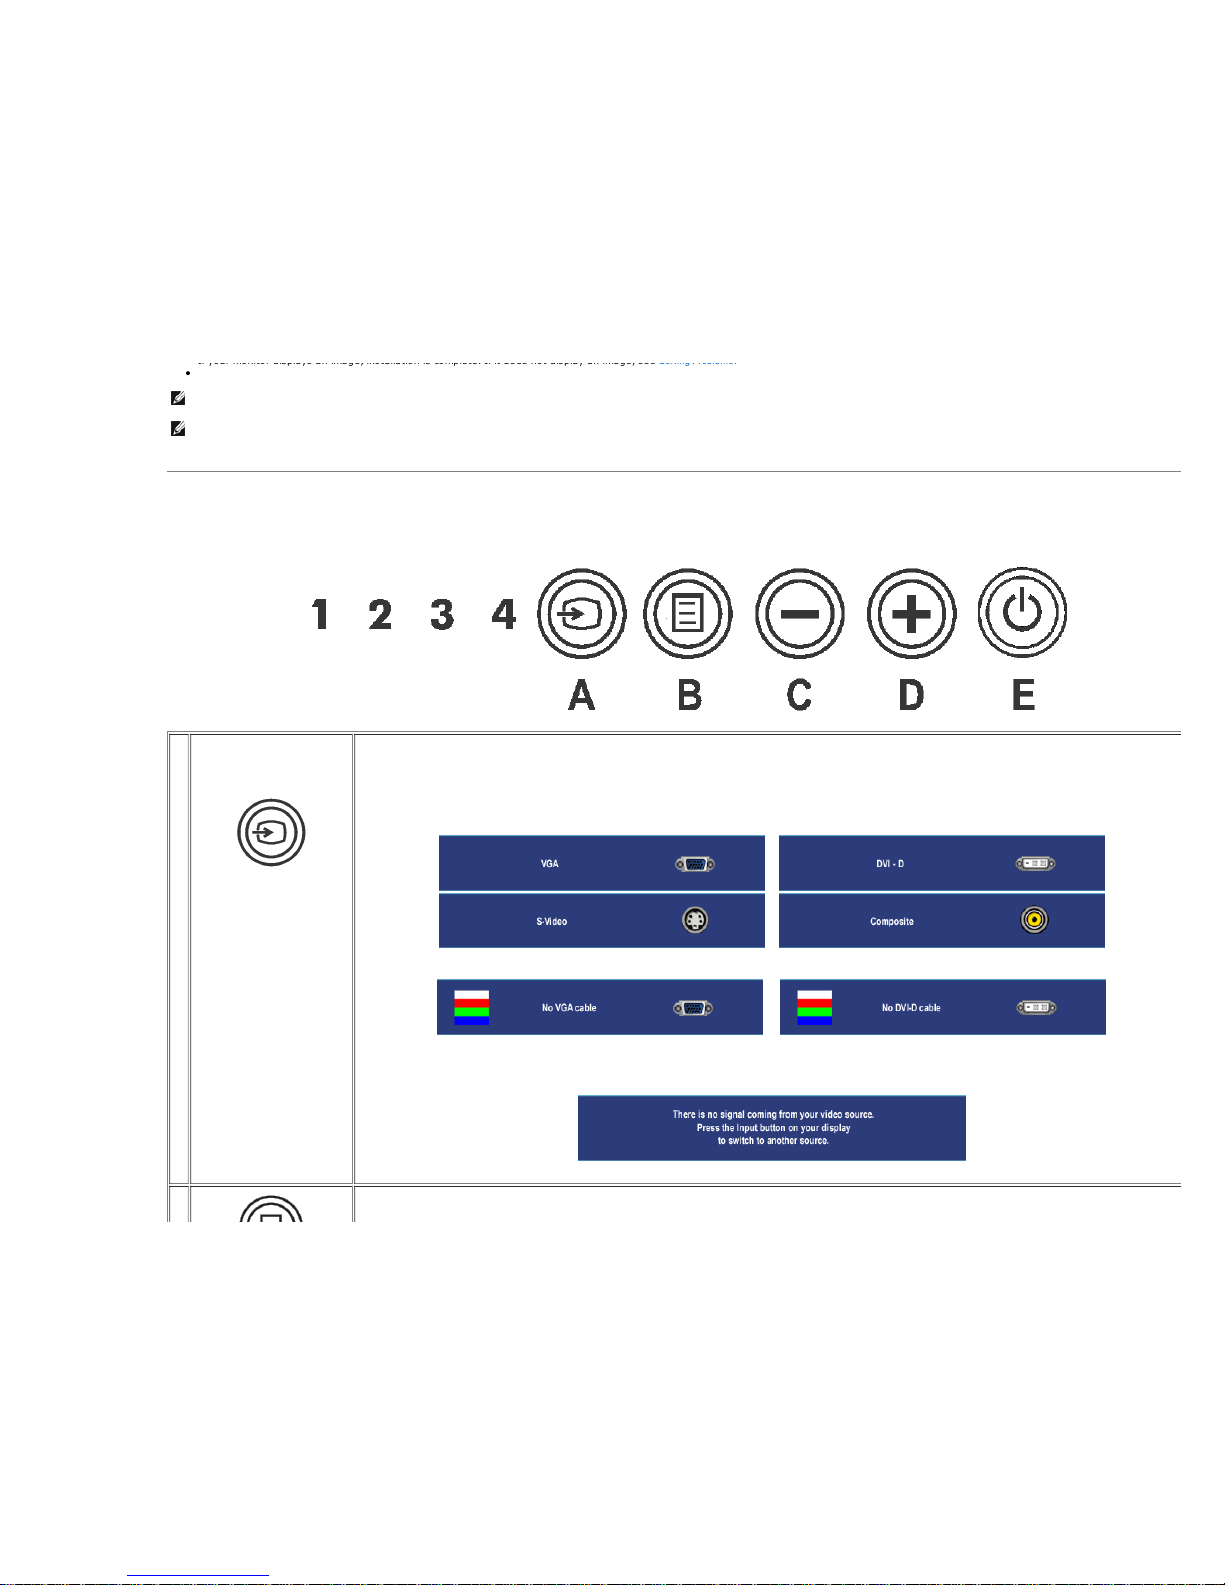
Using the Front Panel Buttons
Use the cont rol butto ns on the fron t of the mon itor to ad just th e chara cteristics o f the image being d isplaye d. As you us e the se b utton s to a djust th e cont rols, an OSD s how s the ir numeric values a s the y change .
A
Input Source Select
Use Input Sou rce Select bu tton to sele ct betw een four differe nt video signa ls that may be conn ected to your monito r.
1. VGA input
2. DVI-D input
3. S- Vide o input
4. Compos ite video input
As you cycle thro ugh th e inputs you w ill see th e follow ing mess age s to ind icate curre ntly sele cted inpu t sou rce. It may take 1 o r 2 secon ds for th e image to app ear.
or
or
If either VGA or DVI-D input is se lected and b oth VGA and DVI-D cables are n ot conne cted , a floating dialog b ox as s how n be low w ill appe ar.
or
If either S-Video or Compo site inp ut is se lected and b oth cab les are not con necte d or the video s ource is turned off, the scre en w ill not have an image. If an y button is
pres sed (except po we r butto n), the monito r displays the follow ing mes sag e:
B The MENU bu tton is u sed to launch the on -screen display(OSD) and sele ct the OSD Men u. See Access ing the Menu System .
Page 19
4/16
support.dell.com/support/edocs/monitors/2007FP/en/ug/setup.htm#Connecting Your Monitor
OSD Menu / Select
C
,D
Down (-) and Up (+)
Use thes e butt ons fo r navigat ing and adjus ting the slider-ba r(decrea se/increa se range s) controls in the OSD.
E
Power button
(with power light indicator)
The gre en LED ind icates the monito r is on an d fully functional. An ambe r LED indicate s DPMS pow er save mode .
The Po we r butto n turns th e monitor o n and off.
Using the OSD
Accessing the Menu System
NOTE: If you chan ge th e se ttings a nd the n eithe r proce ed to anot her menu , or exit the O SD menu, the monito r automa tically saves thos e chan ges . The chang es a re also save d if you chan ge the set tings
and t hen w ait for the OSD menu to disapp ea r.
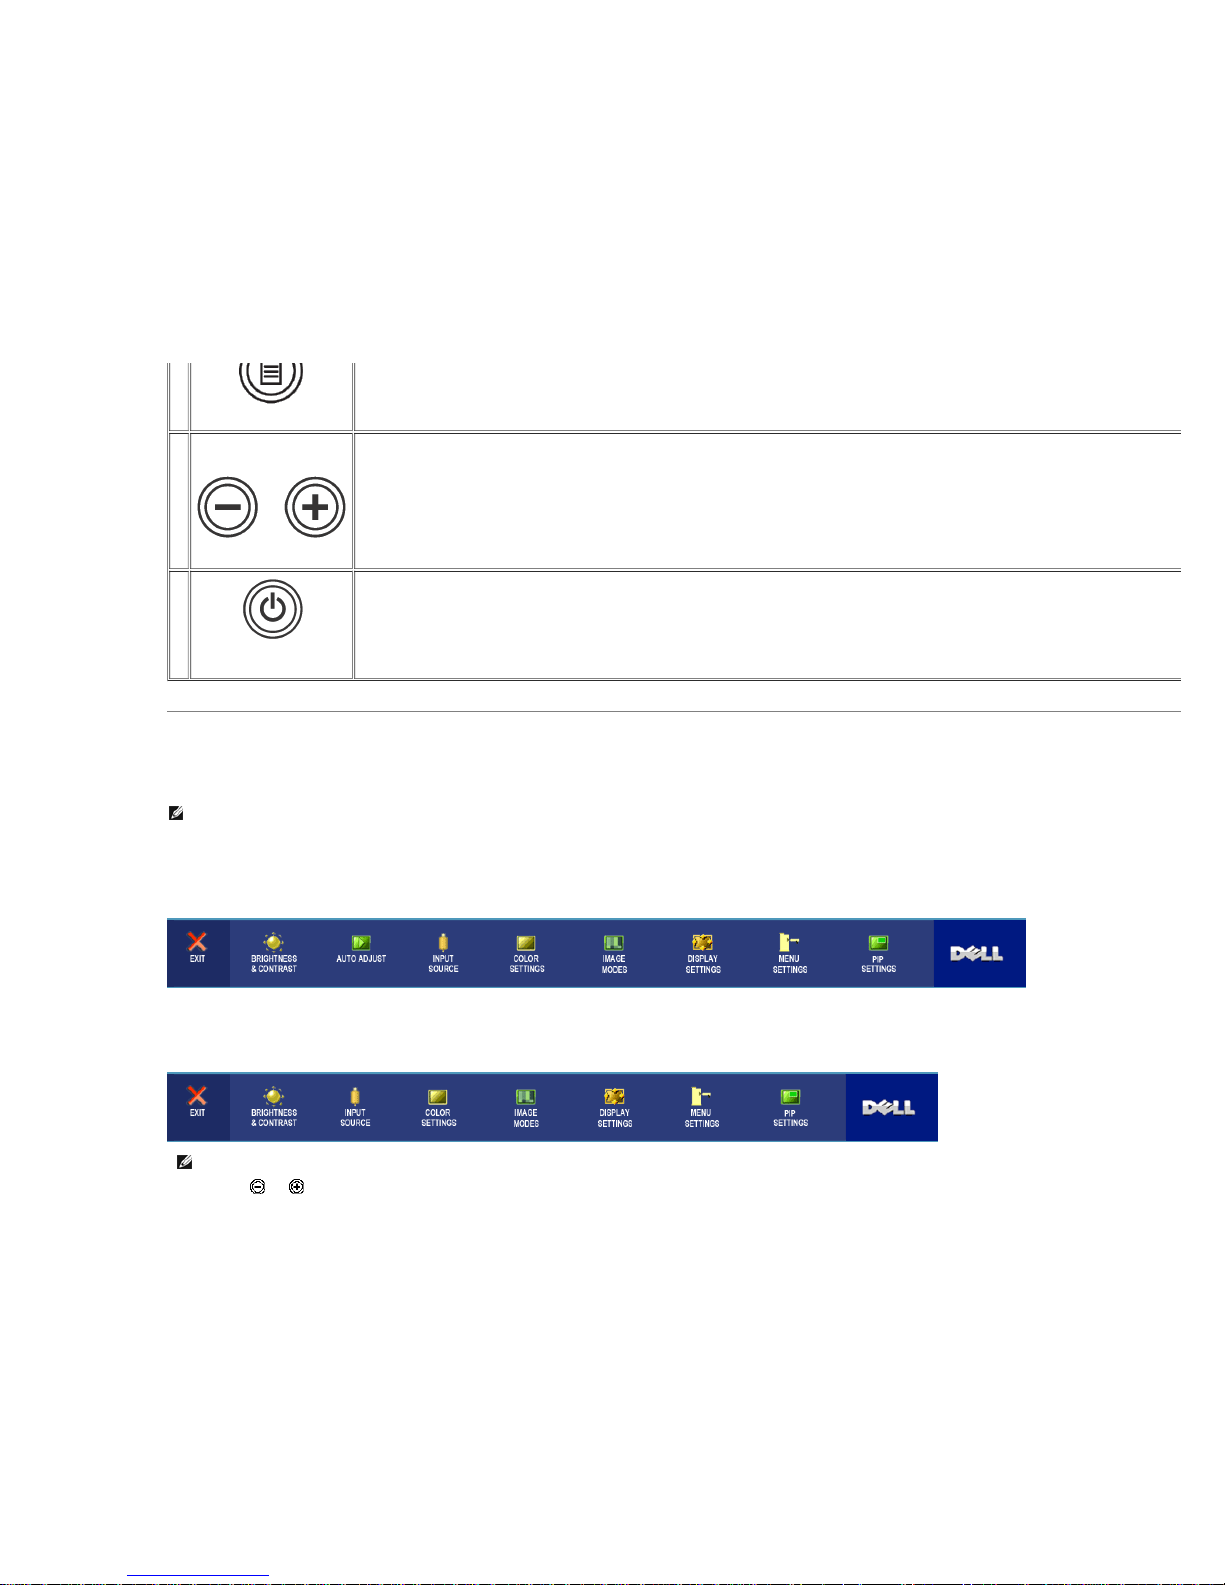
1. Push the MENU butto n to lau nch the OSD menu and display th e main menu.
Main Menu for Analog (VGA) Input
Or
Main Menu for non Analog (non VGA) Input
NOTE: AUTO ADJUST is only availab le whe n you a re usin g the a nalog (VGA) conne ctor.
2. Push the and butt ons to move be twe en th e se tting op tions . As you move from one icon to a nothe r, the op tion na me is highlight ed. See the ta ble for a complete list o f all the op tions availab le for
the mon itor.
Page 20
5/16
support.dell.com/support/edocs/monitors/2007FP/en/ug/setup.htm#Connecting Your Monitor
3. Push the MENU butto n once to activa te the highlighte d opt ion.
4. Push and button t o se lect the d esire d para meter.
5. Push MENU to ente r the slide bar a nd the n use the and button s, according to the indicators on the menu, to make your chang es.
6. Select the "b ack" opt ion to re turn to th e main menu o r "exit" to exit the OSD menu.
Icon Menu and Submenus Description
EXIT
Select to exit the main men u.
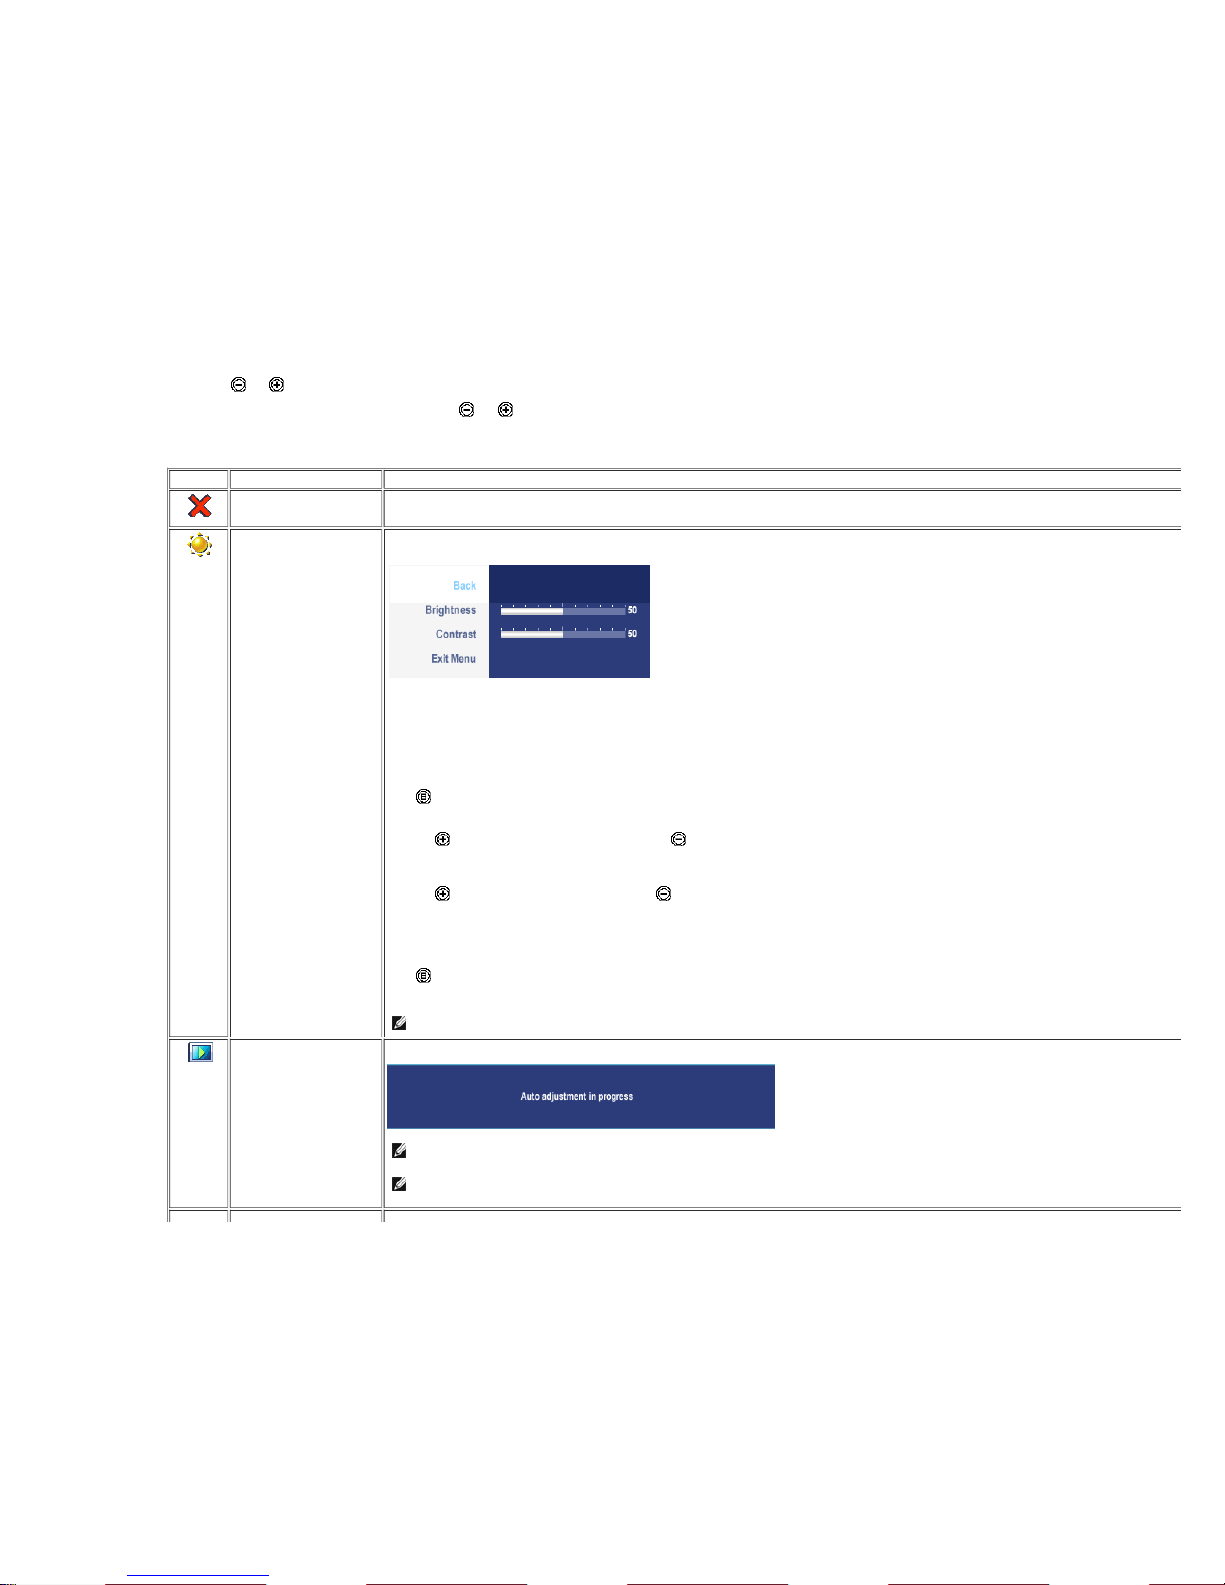
BRIGHTNESS
& CONTRAST
Back
Brightness
Contrast
Exit Menu
This menu is to activate Brightne ss/Co ntras t adjus tment.
Pus h to se lect Back to go back to th e main menu.
Brightne ss a djusts the luminan ce of the backlight.
Pus h the but ton to increase bright ness and push th e butto n to de crea se brig htnes s (min 0 ~ max 100).
Adjust Bright nes s first, and then a djust C ontra st on ly if furthe r adjus tment is ne ces sary.
Pus h the bu tton to increas e contra st a nd pus h the bu tton to decre ase contras t (min 0 ~ max 100).
The Co ntras t function a djusts the d egre e of differe nce be twe en d arknes s an d lightne ss o n the monito r scree n.
Pus h to exit the OSD main menu.
NOTE: Wh en us ing DVI source , the contra st ad justmen t is not a vailable .
AUTO ADJUST
Even th ough your compute r recogn izes your monitor on startu p, the Auto Adjustme nt function o ptimizes the dis play se ttings for use w ith you r particular s etup.
NOTE: In most ca ses , Auto Adjust produce s the bes t image for you r configurat ion.
NOTE: AUTO ADJUST option is o nly available whe n you a re using the a nalog (VGA) conne ctor.
Page 21
6/16
support.dell.com/support/edocs/monitors/2007FP/en/ug/setup.htm#Connecting Your Monitor
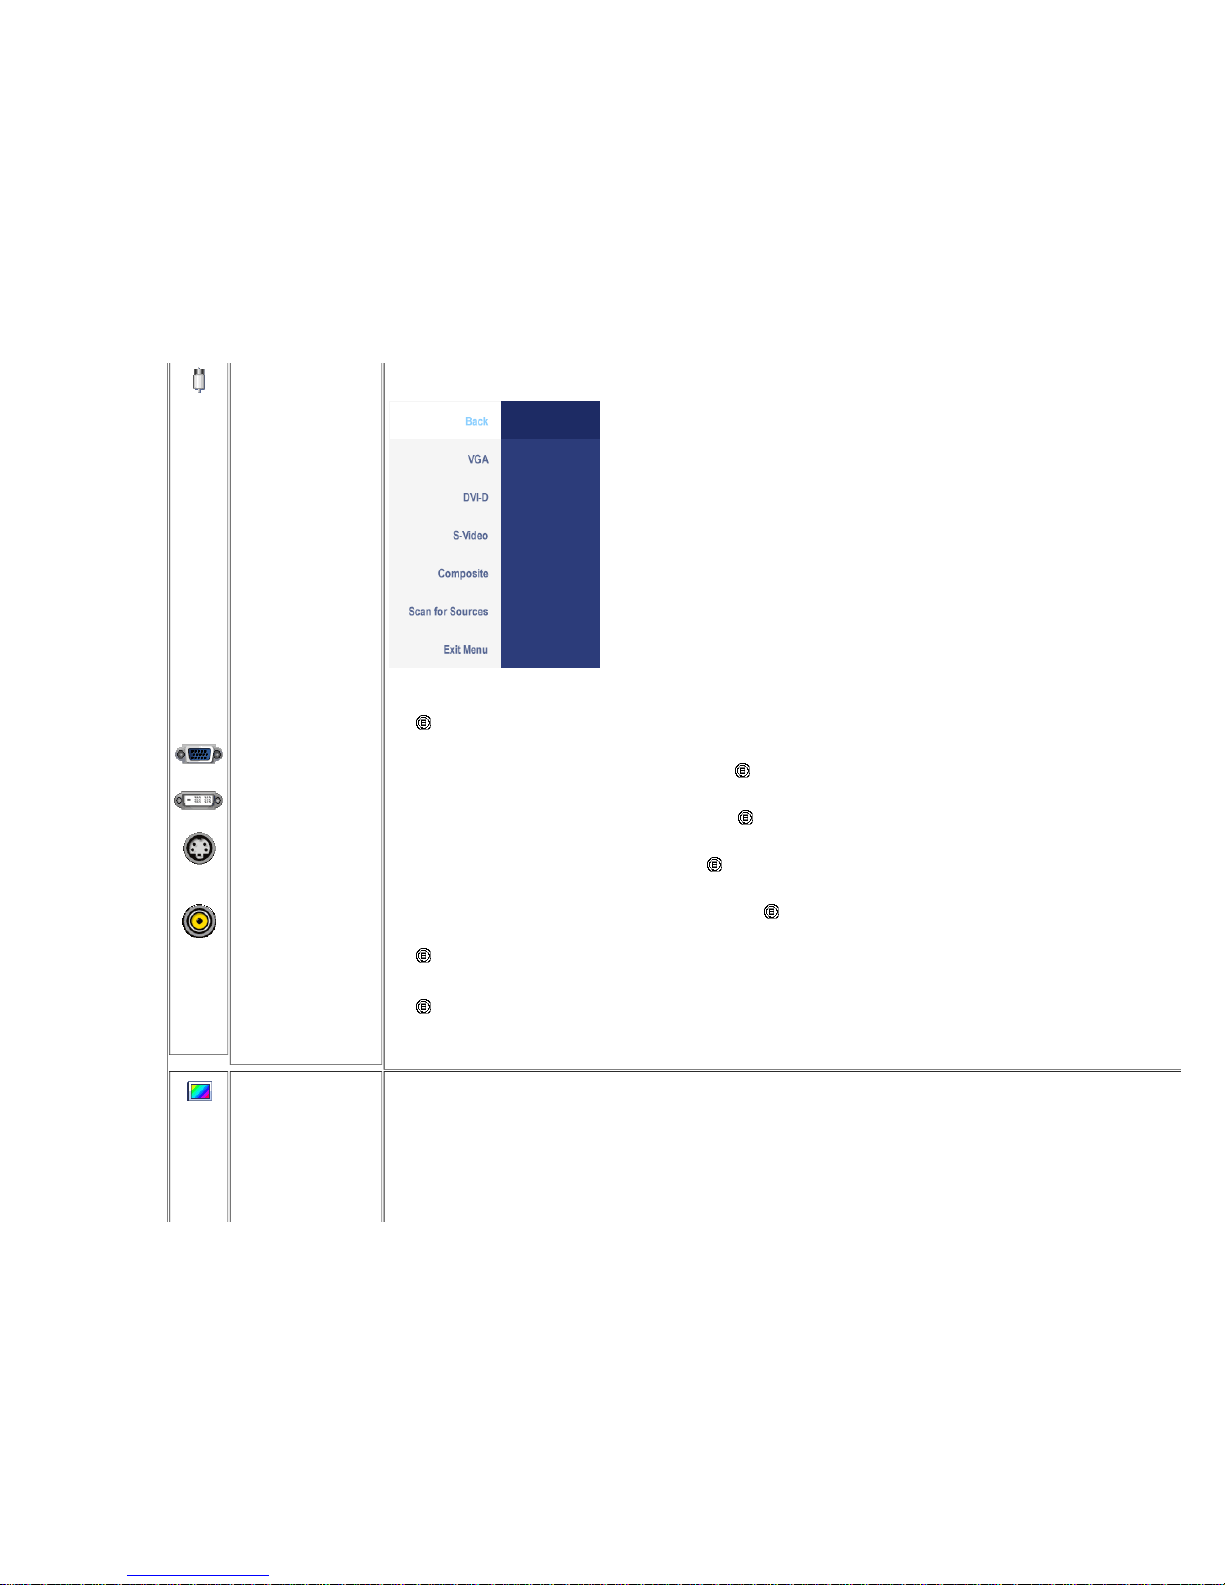
INPUT
SOURCE
Back
VGA
DVI-D
S-Video
Composite
Scan for Sources
Exit Menu
The INPUT SOURC E menu is to sele ct betw ee n different video s ignals th at may be conne cted to your monitor.
Pus h to se lect Back to go back to th e main menu.
Select VGA input w hen you are using th e ana log (VGA) connecto r. Push to sele ct the VGA input s ource.
Select DVI-D input w hen yo u are us ing the Digital (DVI) conn ector. Pu sh to s elect th e DVI input so urce.
Select S-Video input w hen yo u are us ing S-Video co nnecto r. Push to sele ct the S-Video input so urce.
Select Co mposite input w hen you are using compo site vide o conn ector. Pu sh to s elect th e compos ite inpu t source .
Pus h butto n to sca n for availa ble input signals .
Pus h to exit the OSD main menu.
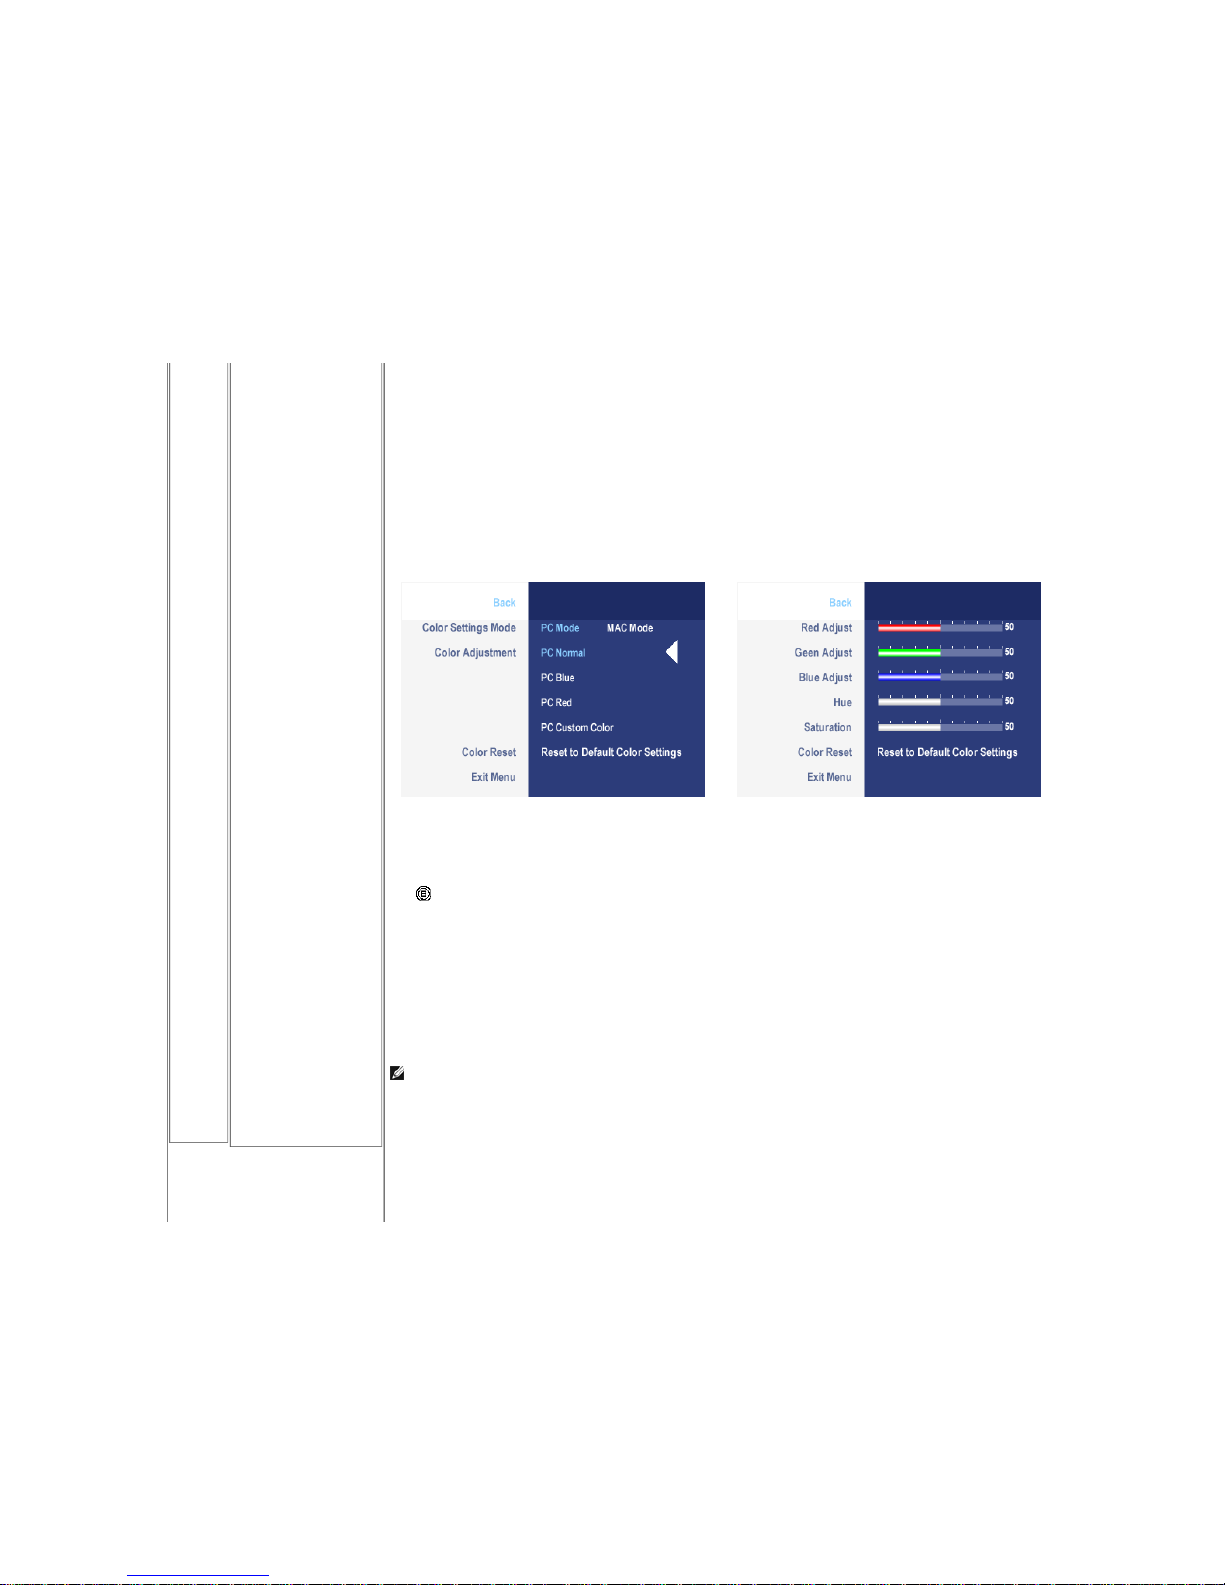
COLOR
SETT INGS
Colo r Settings adjus ts the color se tting mode and co lor tempera ture.
There a re differe nt color se tting s ub-menus for VGA/DVI-D and Vide o input .
Color setting submenu for VGA/DVI-D input Color setting submenu for Video input
Page 22
7/16
support.dell.com/support/edocs/monitors/2007FP/en/ug/setup.htm#Connecting Your Monitor
Back
Color Settings Mode
(VGA/DVI-D)
Color Adjustment
Color Reset
Exit Menu
or
Pus h to se lect Back to go back to th e main menu.
To achieve the d ifferent colo r mode for PC and Ma c.
PC Blue : PC Blue is s electe d to ob tain a bluish tint. This colo r settin g is typically use d for te xt base d ap plications (Spread shee ts, Programming, Text Edito rs etc.).
PC Red : Red Pre set is s electe d to o btain a redde r tint. This color s etting is typically use d for color inte nsive a pplication s (Pho togra ph Image Editing, Multimedia ,
Movies etc.).
PC C usto m: Use the p lus and minus butto ns to increas e or de creas e ea ch of the three colors (R, G, B) indep ende ntly, in single digit increment s, from '0' to '100'.
NOTE: Colo r tempera ture is a measu re of the 'warmth' o f the image colors (red/gre en/blue ). The tw o availa ble pre sets ('Blue' and 'Red ') favor blue a nd red
according ly. Select each one to see how each range suits yo ur eye....or utilize th e 'Cus tom Colo r' option to custo mize the co lor set tings to your exa ct choice.
Page 23
8/16
support.dell.com/support/edocs/monitors/2007FP/en/ug/setup.htm#Connecting Your Monitor
Return yo ur monitor color s etting s to tho se that w ere set a t the time o f manufacture .
Pus h to exit the OSD main menu.
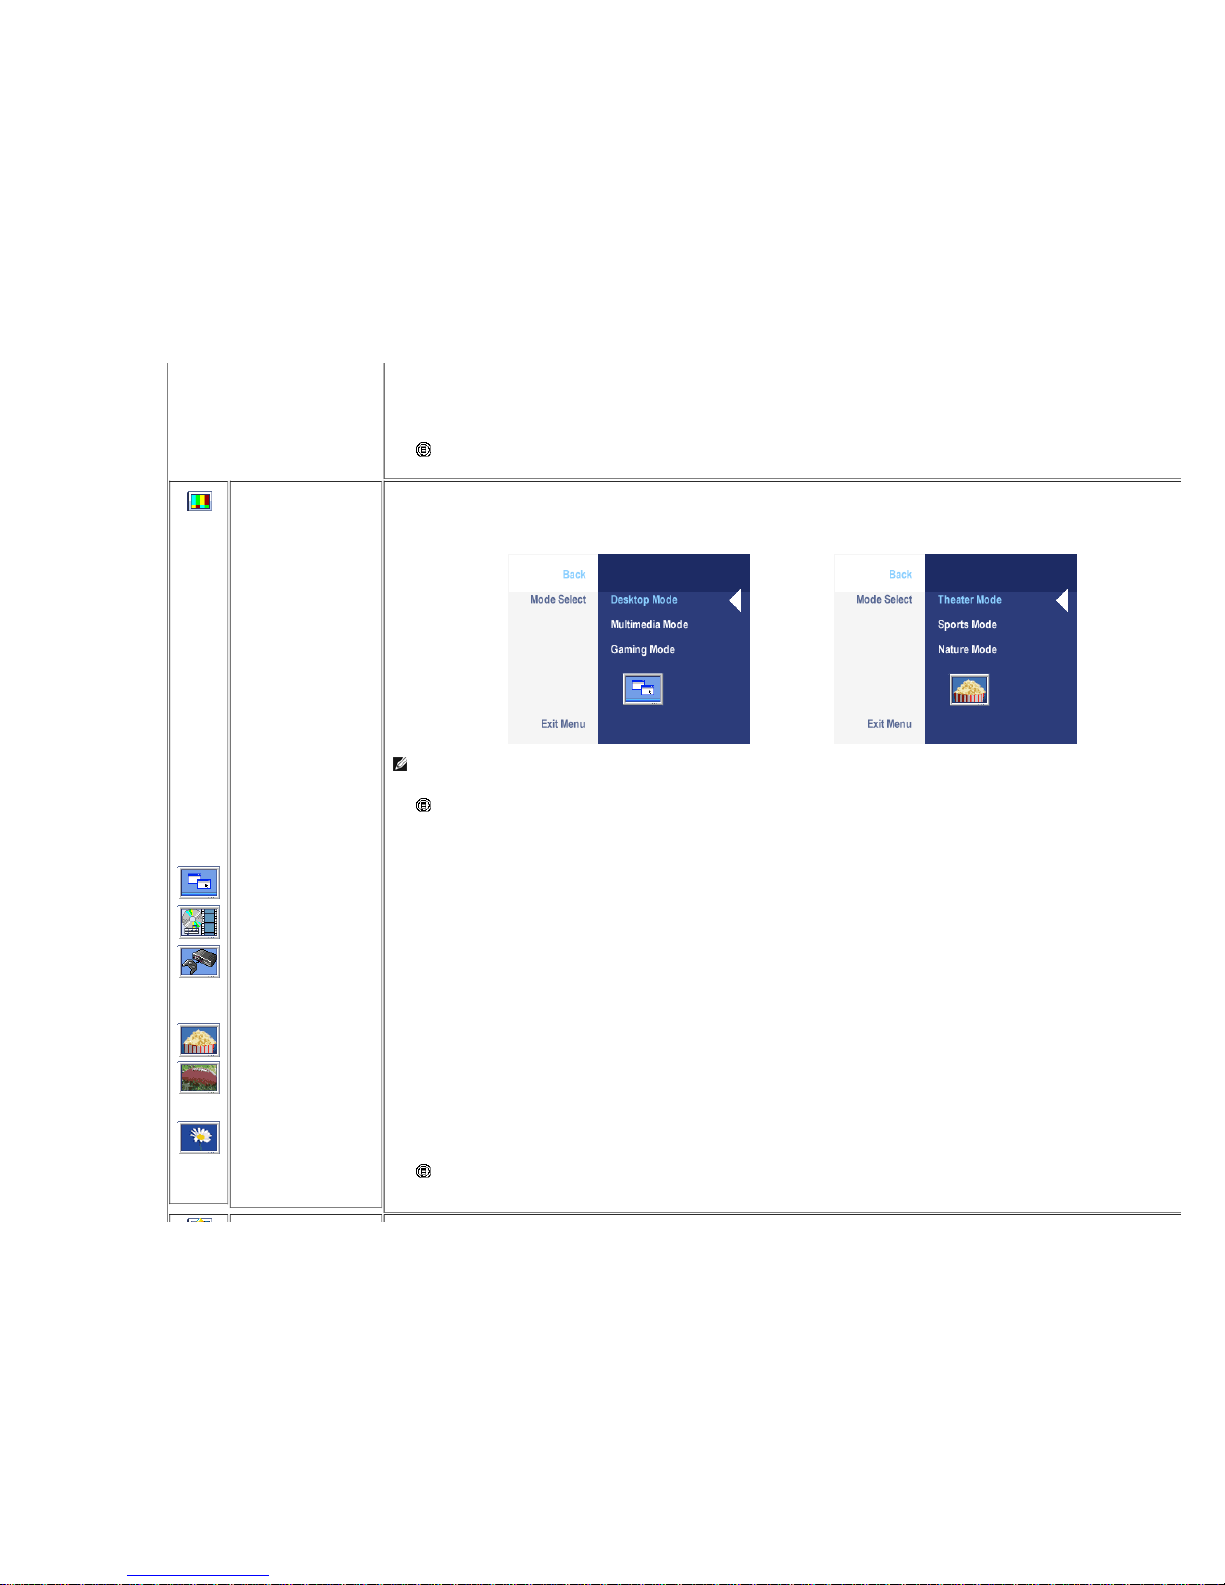
IMAGE
MODES
Back
VGA/DVI-D input
Desktop Mode
Multimedia Mode
Gaming Mode
Video input
Theater Mode
Sports Mode
Nature Mode
Exit Menu
There a re 3 image modes for different u sag e.
Image mode submenu for VGA/DVI-D input Image mode submenu for Video input
or
NOTE: Image modes a re differe nt bet we en the VGA/DVI-D and Vide o input s
Pus h to se lect Back to go back to th e main menu.
Mode suitab le for de sktop applicatio ns.
Mode for multimedia app lications , eg video playba ck.
Mode suitab le for ga ming applicatio ns.
Mode suitab le for movie pla yback.
Mode suitab le for sp orts s cenes .
Mode suitab le for nat ure sce nes .
Pus h to exit the OSD main menu.
Page 24
9/16
support.dell.com/support/edocs/monitors/2007FP/en/ug/setup.htm#Connecting Your Monitor
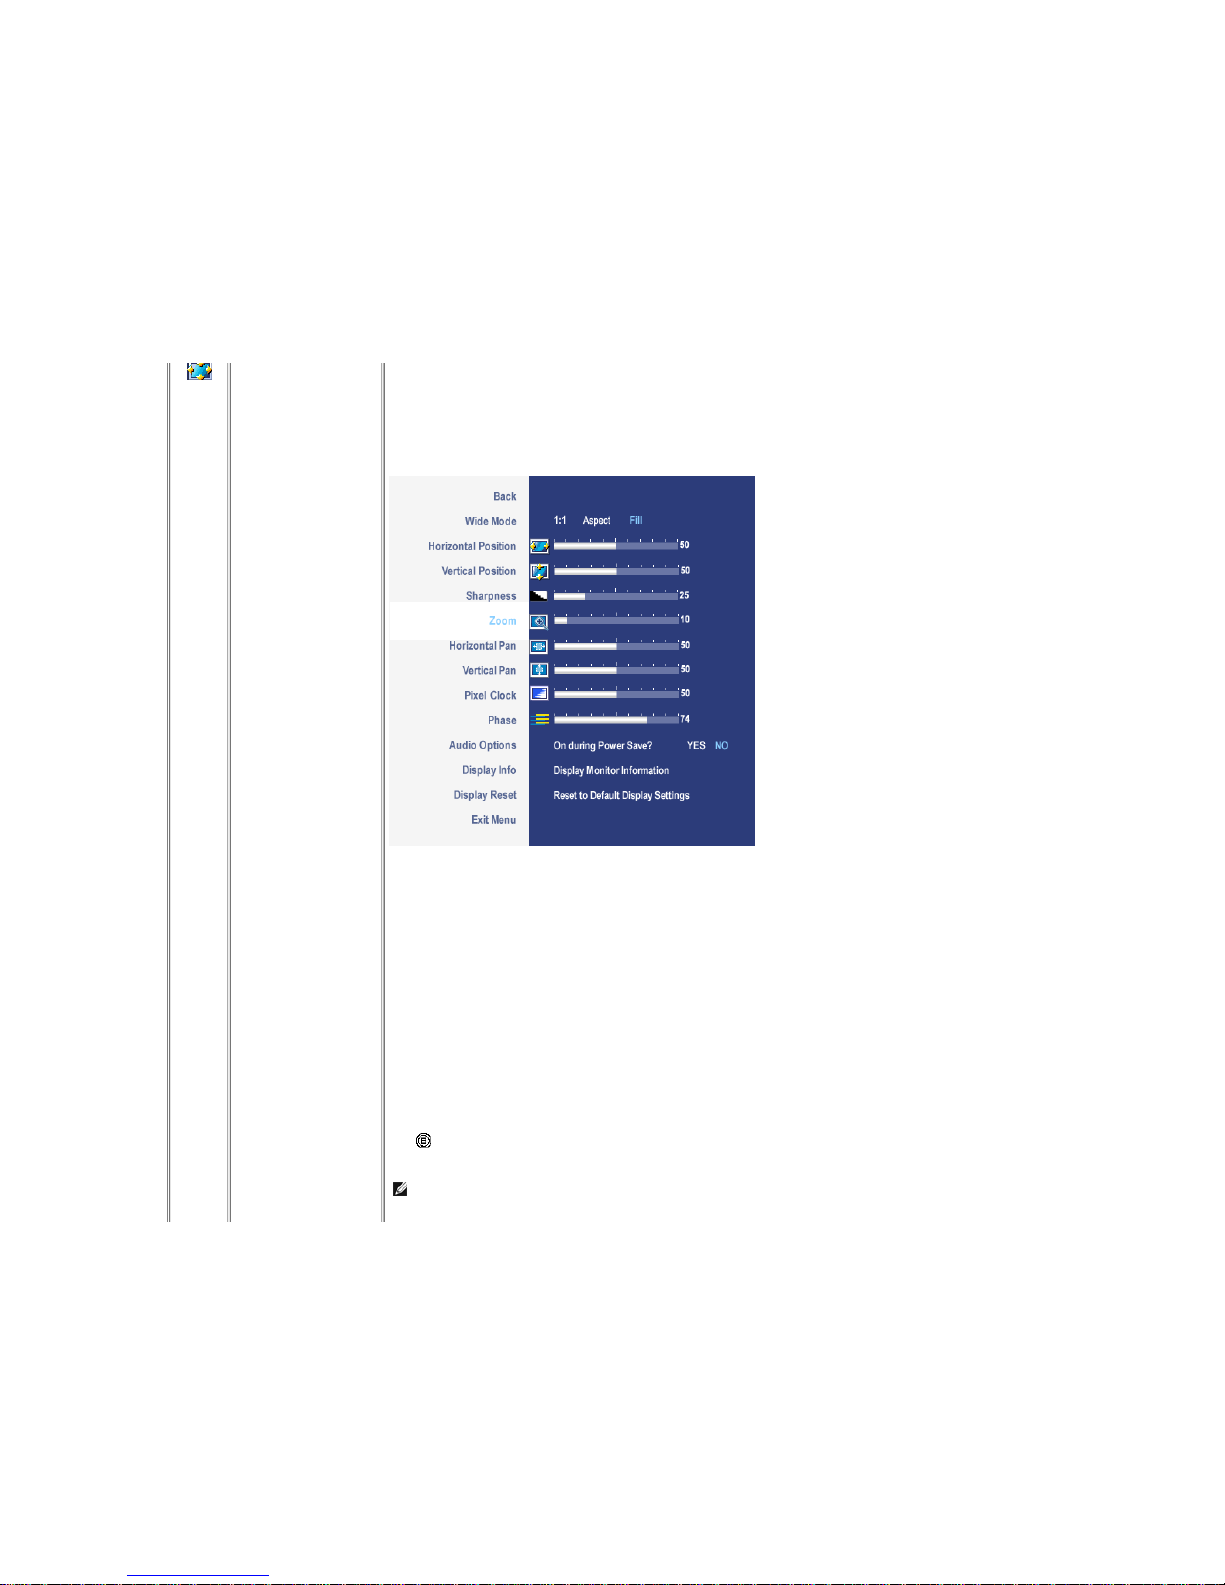
DISPLAY
SETT INGS
Back
Wide Mode
H Position
V Position
Sharpness
Zoom
Horizontal Pan
Vertical Pan
Pixel Clock
Phase
Audio Option
Pus h to se lect Back to go back to th e main menu.
Adjust th e image ratio as 1:1, aspe ct or full scree n.
NOTE: Wide Mode adjus tment is n ot req uired at optimal pres et re solutio n 1600 x 12 00.
Page 25
10/16
support.dell.com/support/edocs/monitors/2007FP/en/ug/setup.htm#Connecting Your Monitor
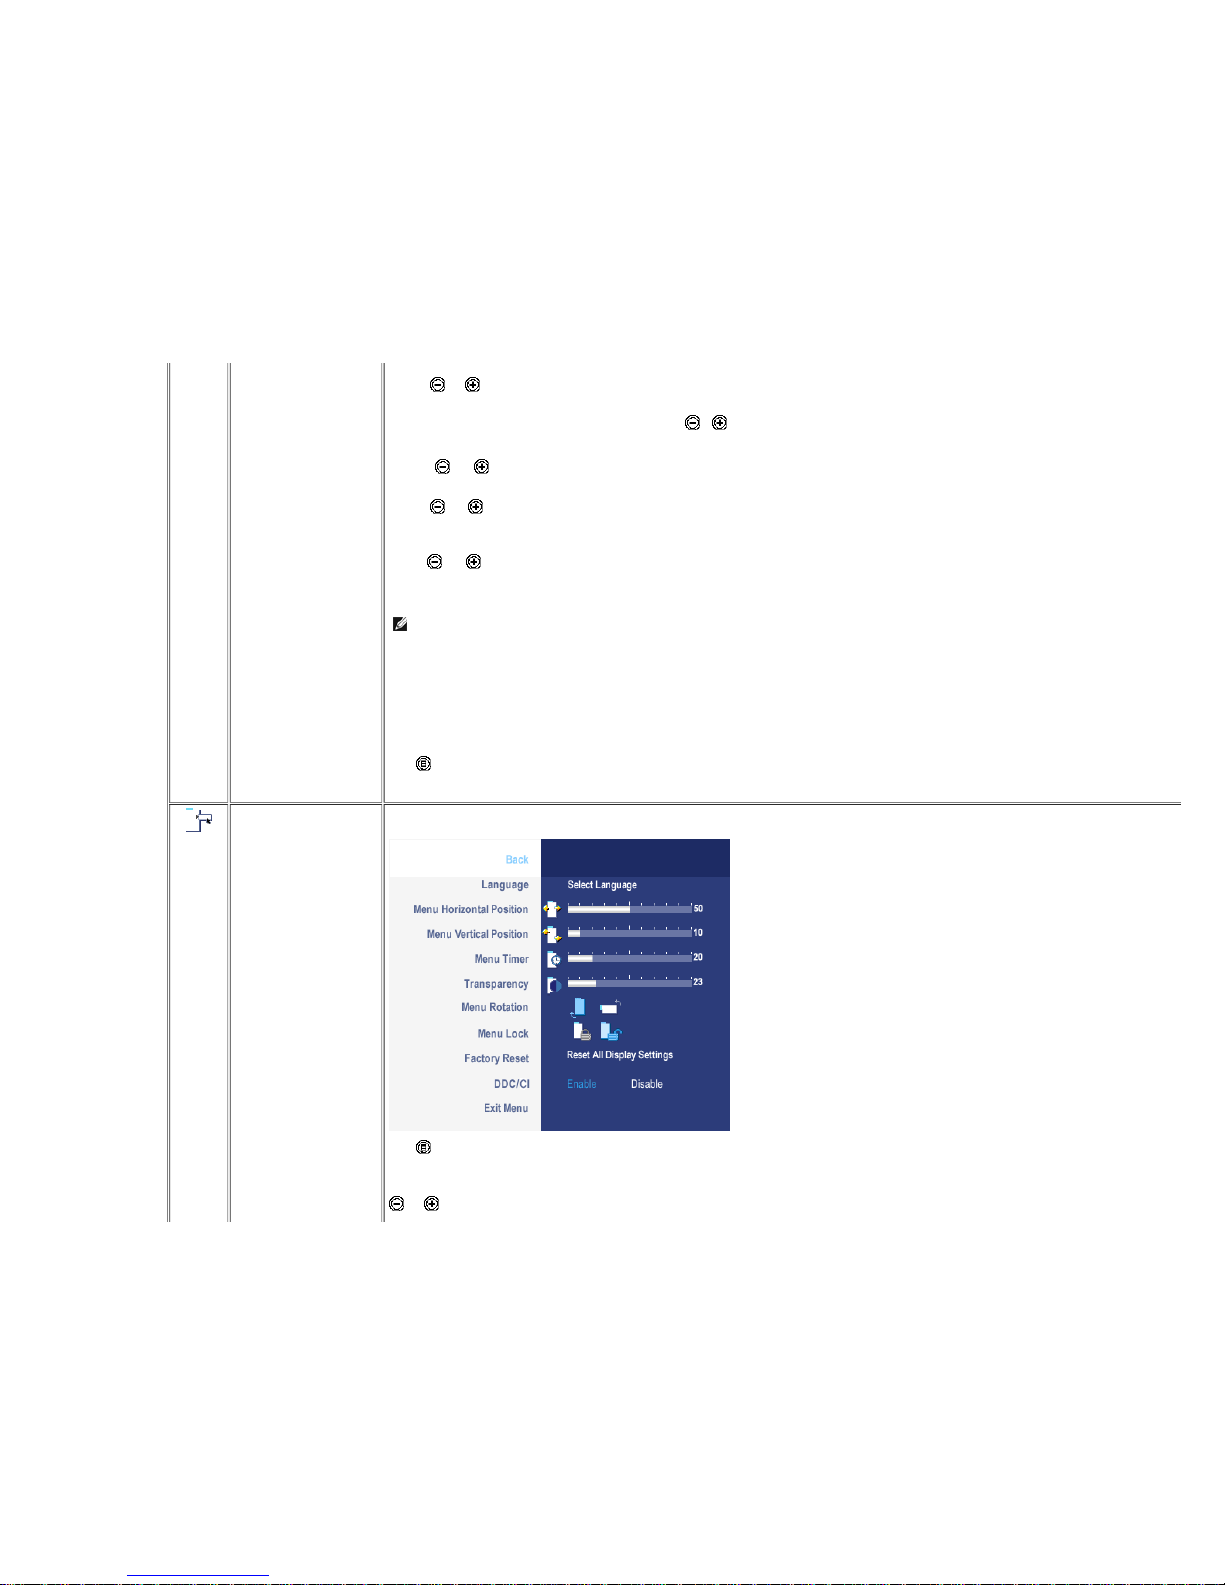
Display Info
Display Reset
Exit Menu
Whe n making cha nges to eith er the 'Horizonta l' or 'Vertical' se ttings , no chang es w ill occur to the s ize o f the view ing are a: the imag e will simply be s hifted in
resp ons e to you r sele ction/chang e.
Use the an d button s to a djust image to le ft/right and u p/dow n. Minimum is '0' (-). Maximum is '100' (+).
This feat ure can make the image look s harpe r or so fter. Use o r to adjus t the s harpn ess from '0' to '100' .
Use the Zoo m function to zo om in to sp ecific area o f interes t.
Using th e and keys to z oom in and out.
Whe n usin g the z oom function .
Use the and button s to a djust image to le ft/right and u p/dow n. Minimum is '0' (-). Maximum is '100' (+).
The Ph ase and P ixel Clock adju stments allow you to a djust your monitor to your prefe rence . These setting s are access ed t hrough the main OSD menu , by selecting
'Image Set tings'.
Use the an d buttons to adjust for be st image qua lity.
If satis factory res ults are not o btaine d usin g the P has e ad justment , use the Pixel Clo ck (coarse) ad justmen t and th en us e Ph ase (fine), again.
NOTE: Pixel Clo ck and Ph ase Adjustme nts are only ava ilable for "VGA" inp ut.
To turn on or off Audio P owe r during P ow er Save mod e.
All the se ttings re late d to this monitor.
Rese t the image to th e origina l factory se tting.
Pus h to exit the OSD main menu.
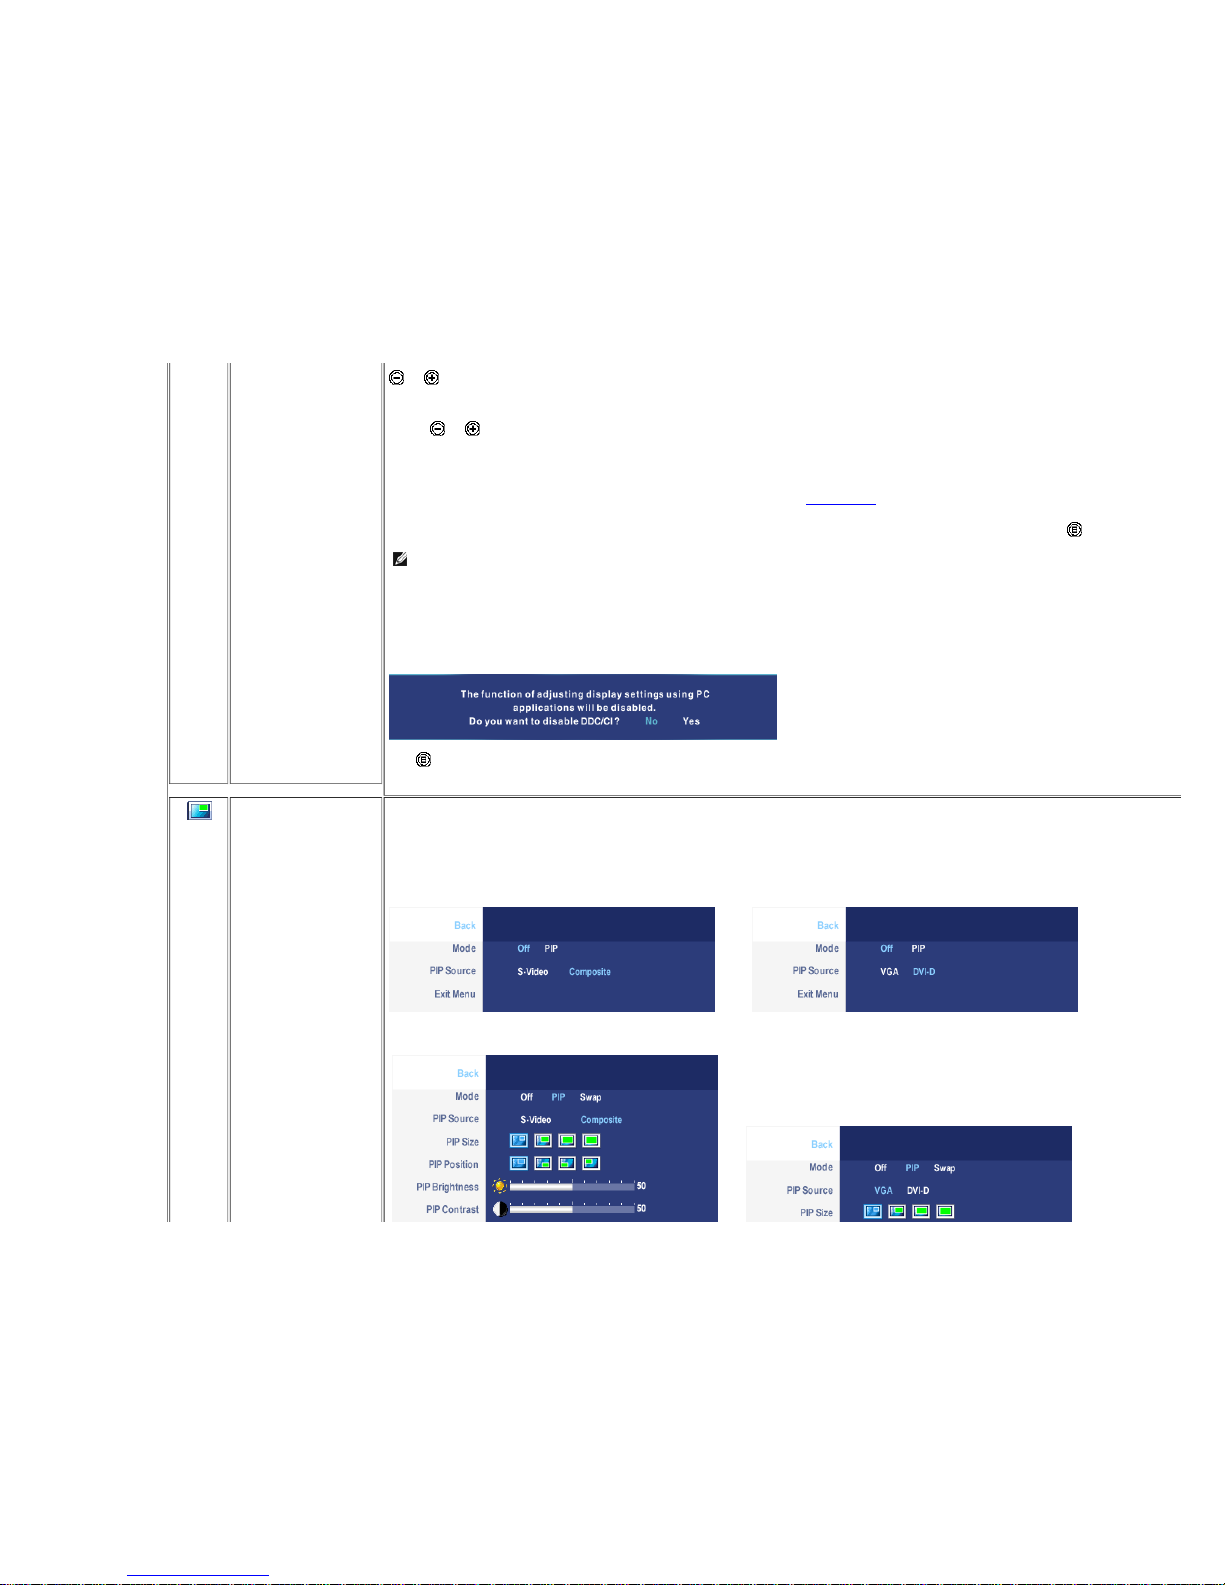
MENU
SETT INGS
Back
Language
Menu Horizontal Position
Pus h to se lect Back to go back to th e main menu.
Lang uage opt ion to s et the OSD displa y to one of five langu age s (English , Espan ol, Francais , Deutsch, Jap anes e).
and bu ttons move OSD to th e left an d right.
Page 26
11/16
support.dell.com/support/edocs/monitors/2007FP/en/ug/setup.htm#Connecting Your Monitor
Menu Vertical Position
Menu Timer
Transparency
Menu Rotation
Menu Lock
Factory Reset
DCC/CI
Exit Menu
and bu ttons move OSD up a nd do wn.
OSD Hold Time: Sets the lengt h of time the O SD will remain active a fter the last time you press ed a butto n.
Use the an d button s to a djust the slide r in 5 seco nd incremen ts, from 5 to 60 s econd s.
This function is used to ad just the OSD backgro und from op aque to tran spa rent.
Rotate s the OSD by 90 de gree s coun ter-clockwis e. Your can a djust a ccording to your Dis play Rotation.
Con trols us er acces s to a djust ments. W hen 'Yes ' (+) is se lected , no use r adjus tments a re allow ed. All buttons a re locked except the menu button .
NOTE: Wh en the OSD is locked, pre ssin g the men u butto n will take the us er directly to the OSD se ttings menu, with 'OSD Lock' pre-se lected o n ent ry. Select
No(-) to unlock an d allow use r access to all app licable se ttings.
Rese t all OSD set tings to the facto ry pres et value s.
DDC/CI (Display Data Chan nel/Co mmand Interfa ce) allows your monito r paramet ers (bright nes s, color bala nce e tc) to be ad justa ble via s oftwa re o n your PC . You
can disa ble this feat ure by se lecting " Disable" .
Enab le this fe ature for bes t use r experie nce an d optimum perfo rmance of you r monitor.
Pus h to exit the OSD main menu.
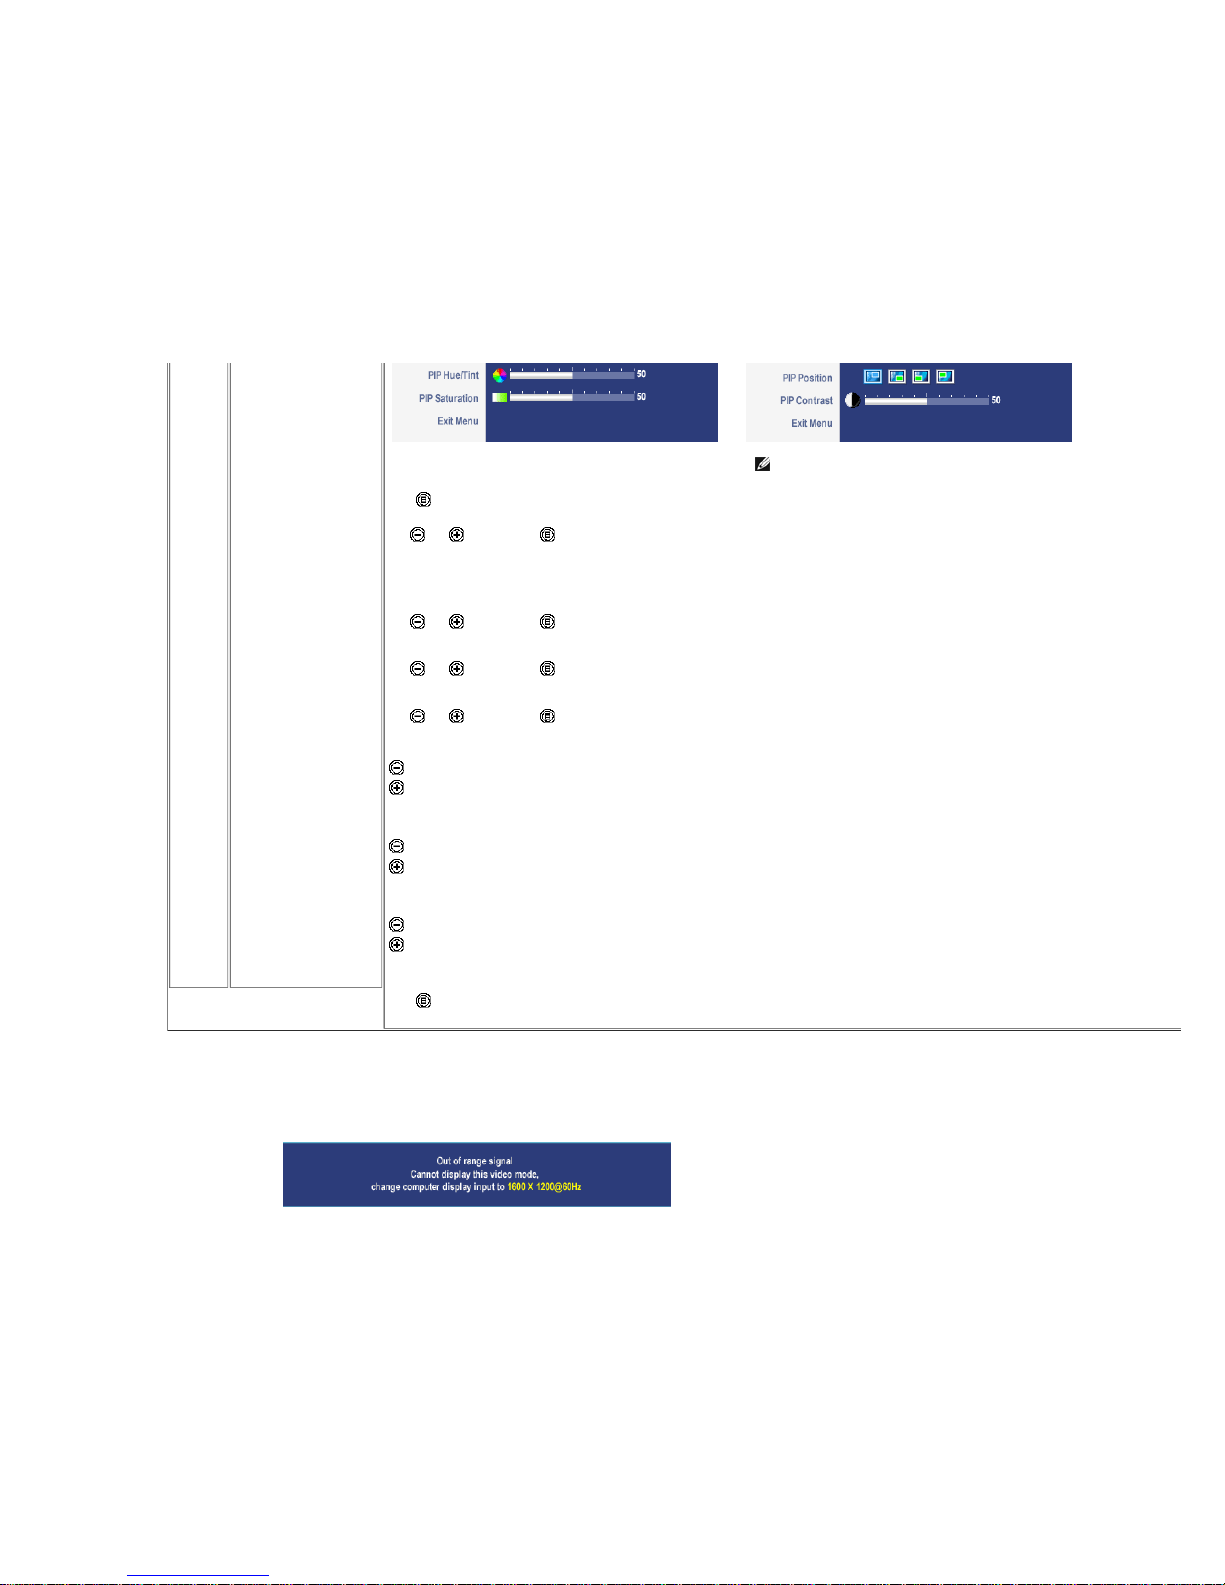
PIP
SETT INGS
This function b rings up a wind ow d isplaying image from ano ther inpu t sou rce.
PIP submenu when PIP OFF ( main source is VGA/DVI-D input) PIP submenu when PIP OFF ( main source is Video input)
or
PIP submenu when PIP ON (main source is VGA/DVI-D input) PIP submenu when PIP ON (main source is Video input)
Page 27
12/16
support.dell.com/support/edocs/monitors/2007FP/en/ug/setup.htm#Connecting Your Monitor
Back
Mode
When selected PIP
PIP Source
PIP Position
PIP Size
PIP Contrast
PIP Hue/Tint
PIP Saturation
Exit Menu
or
NOTE: Wh en us ing DVI source , the contra st a djustmen t is not a vailable .
Pus h to se lect Back to go back to th e main menu.
There is one mod e: PIP (Picture in Picture)
Use and to bro ws e and to sele ct "Off" or "P IP".
Whe n PIP on, choo se "SW AP" to sw itch the main-scre en an d sub -screen in PIP mode .
Select a n input sig nal for PIP . (VGA/DVI/S-Vide o/Compo site)
Use and to bro ws e and to sele ct.
Select P IP wind ow positio n.
Use and to bro ws e and to sele ct.
Select P IP wind ow size.
Use and to bro ws e and to sele ct.
Adjust th e cont rast leve l of the p icture in PIP Mode.
reduce the con trast
increas es th e cont rast
This function s hifts the color of PIP image to gree n or purple . This is use d to ad just for d esire d flesh to ne colo r.
shifts imag e color to ward s gre en
shifts imag e color to ward s purp le
Adjust th e color s atura tion of P IP image.
makes th e image look more mono chrome
makes th e image look more colo rful
Pus h to exit the OSD main menu.
OSD Warning M essages
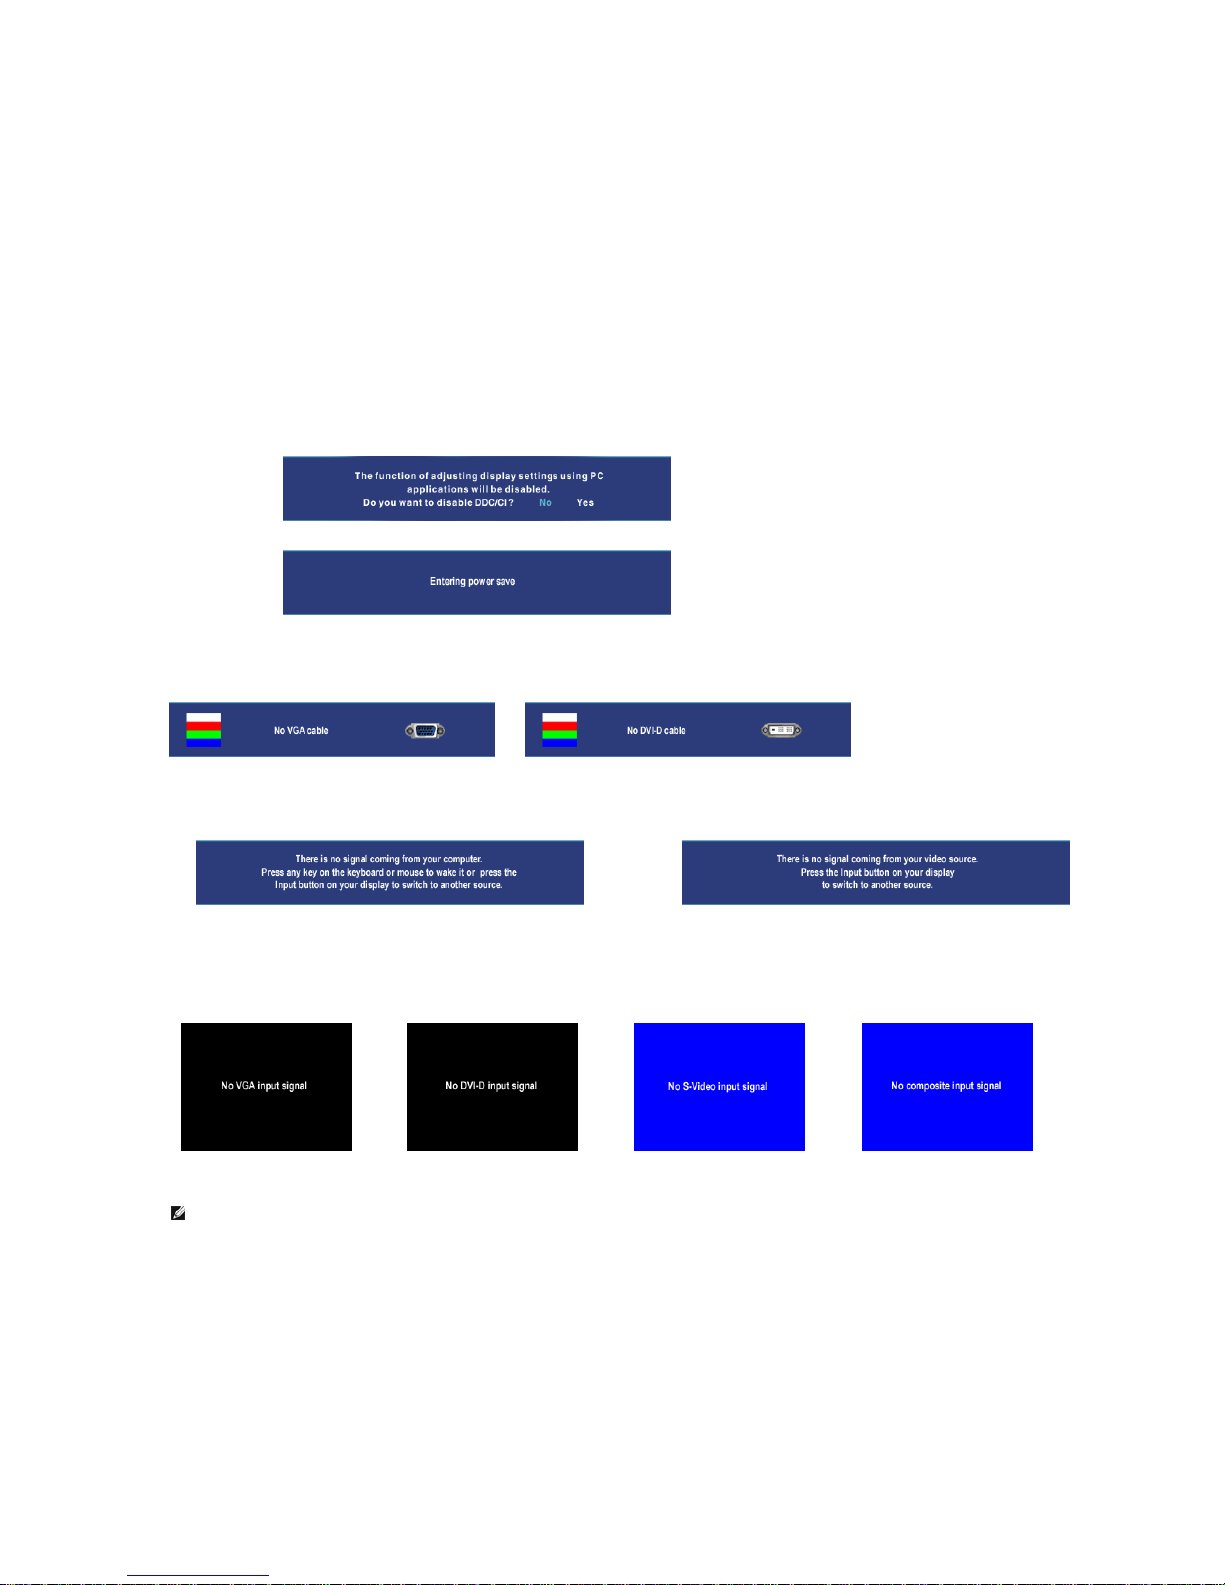
When the monitor does not support a part icular resolution mode you w ill see the f ollowing message:
Page 28
13/16
support.dell.com/support/edocs/monitors/2007FP/en/ug/setup.htm#Connecting Your Monitor
If either VGA or DVI-D input is se lected and b oth VGA and DVI-D cables are n ot conne cted , a floating dialog b ox as s how n be low w ill appe ar.
or
This means that the monito r cannot synchroniz e w ith the s ignal tha t it is receiving fro m the compute r. Either the signa l is too
high or to o low for the mon itor to us e. See Monitor Speci fication s for the Horizo nta l and Vertical freq uen cy ranges add ress able
by this monito r. Recommended mode is 16 00 X 1200 @ 60 Hz.
You will se e the follow ing messa ge before the DDC/CI functio n is disa bled.
Whe n monitor g et into P ow er Save mode, one of the following messa ges will appe ar de pen ding upo n the sele cted inpu t.
Activate th e compute r and w ake up the monitor to ga in acces s to th e OSD
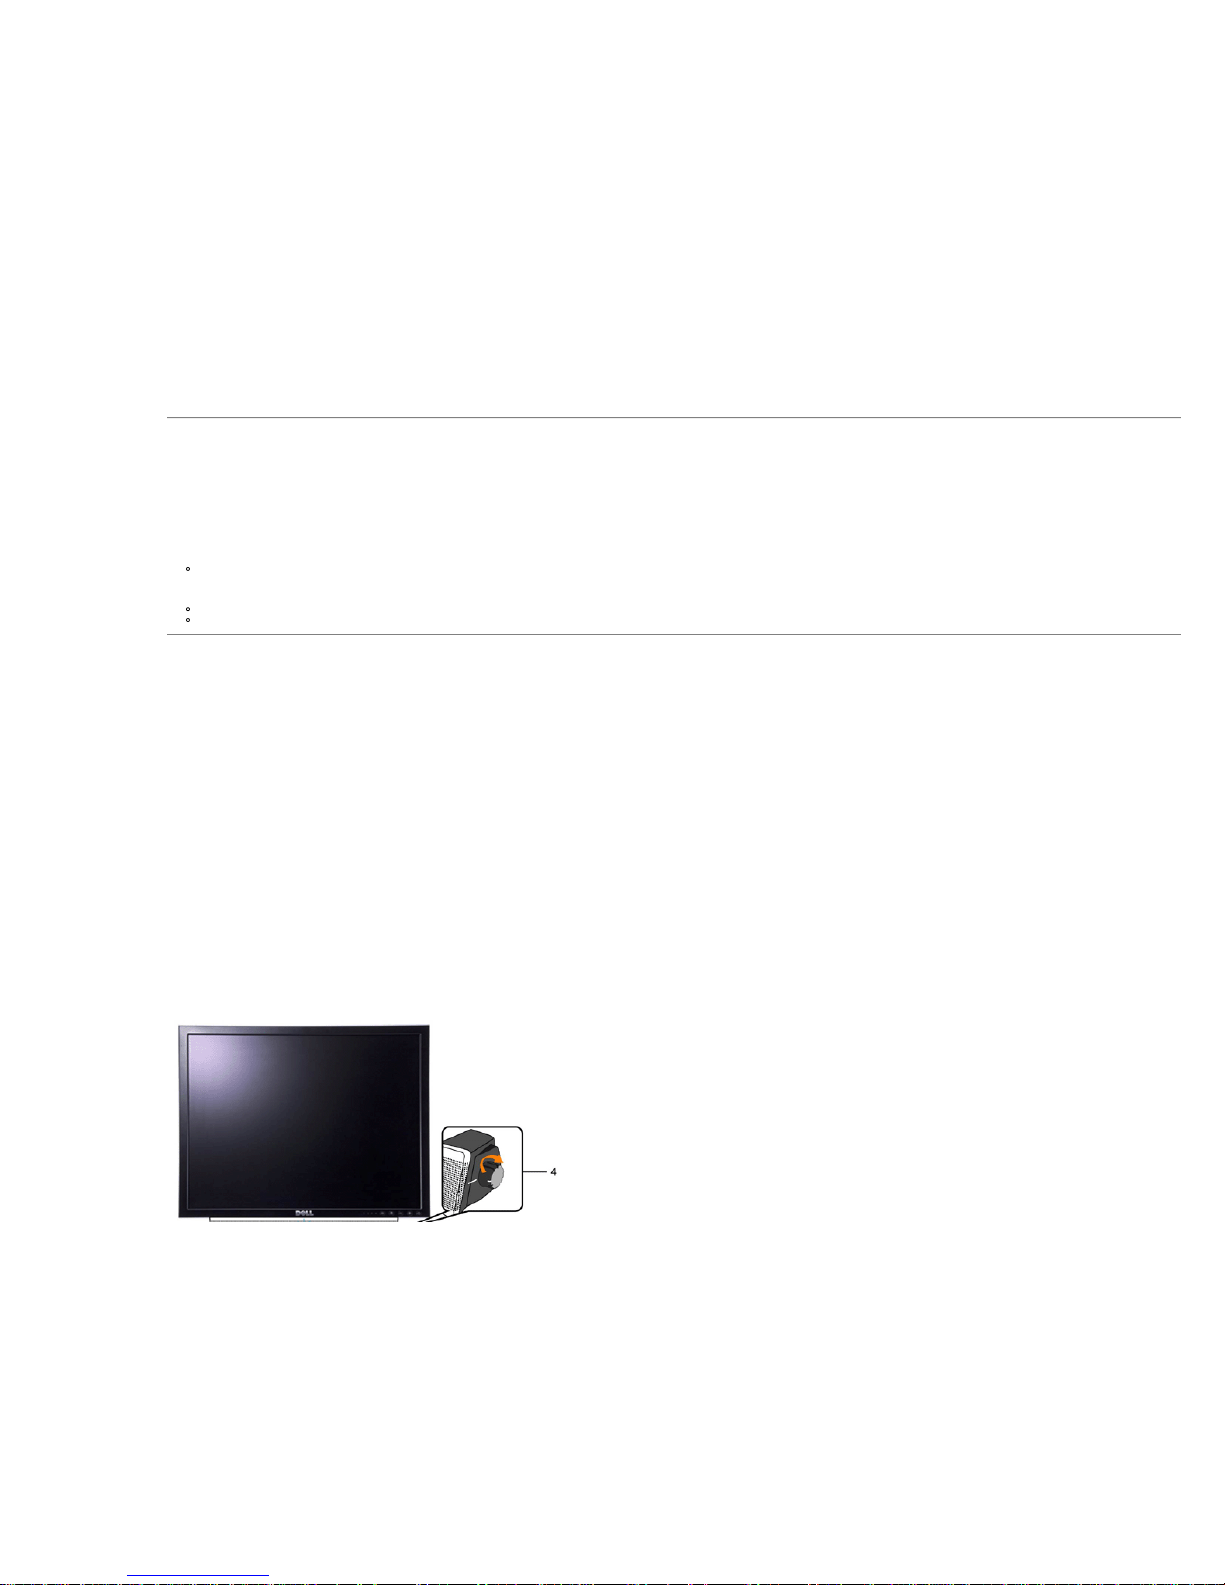
Whe n the monitor doe s not sen se th e se lected video inp ut, one o f the follow ing mes sag es w ill appe ar de pen ding upo n the selecte d input as lon g as yo u pres s any b utton othe r than po we r
butto n.
VGA / DVI-D input Video Input
or
Occasio nally, no w arning mes sag e ap pea rs, but the scree n is bla nk: this could a lso indica te tha t the mon itor is not synchroniz ing with the comput er or the monitor is in a p owe r
save mode.
In PIP mod e, whe n the monitor do es no t se nse t he se lected seco nd sign al input, on e of the followin g messa ge s will app ear d epe nding up on the sele cted inp ut as long as the OSD
scree n is close d.
1. VGA 2. DVI-D 3. S-Video 4 . Composite
or
or
or
NOTE: Wh en the cable is connecte d back to the inp ut of the monitor, any a ctive PIP w indo w w ill disapp ear. Ple ase ente r PIP s ubmenu to bring ba ck the PIP wind ow.
Page 29
14/16
support.dell.com/support/edocs/monitors/2007FP/en/ug/setup.htm#Connecting Your Monitor
See Sol ving Proble ms for more informat ion.
Setting the Optimal Resolution
1. Right-click on the de sktop and s elect Properties.
2. Select the Settings tab .
3. Set the screen reso lution to 1 600 x 1200 .
4. Click OK.
If you do n ot se e 1600 x 1200 as an op tion, you may ne ed to upda te you r graph ics driver. Depe nding o n your compute r, complete o ne of th e follow ing proce dure s.
If you have a Dell™ de sktop or porta ble comput er:
Go to support.dell.com, enter your s ervice tag , and do wnlo ad the late st driver fo r your graph ics card.
If you are using a non-Dell™ compute r (porta ble or d eskto p):
Go to the sup port site for your comput er and dow nload the lat est graphic drivers .
Go to you r graphics card we bsite and d ow nload the late st gra phic drivers .
Using the Dell™ Soundbar (Optional)
Page 30
15/16
support.dell.com/support/edocs/monitors/2007FP/en/ug/setup.htm#Connecting Your Monitor
Support Home Page
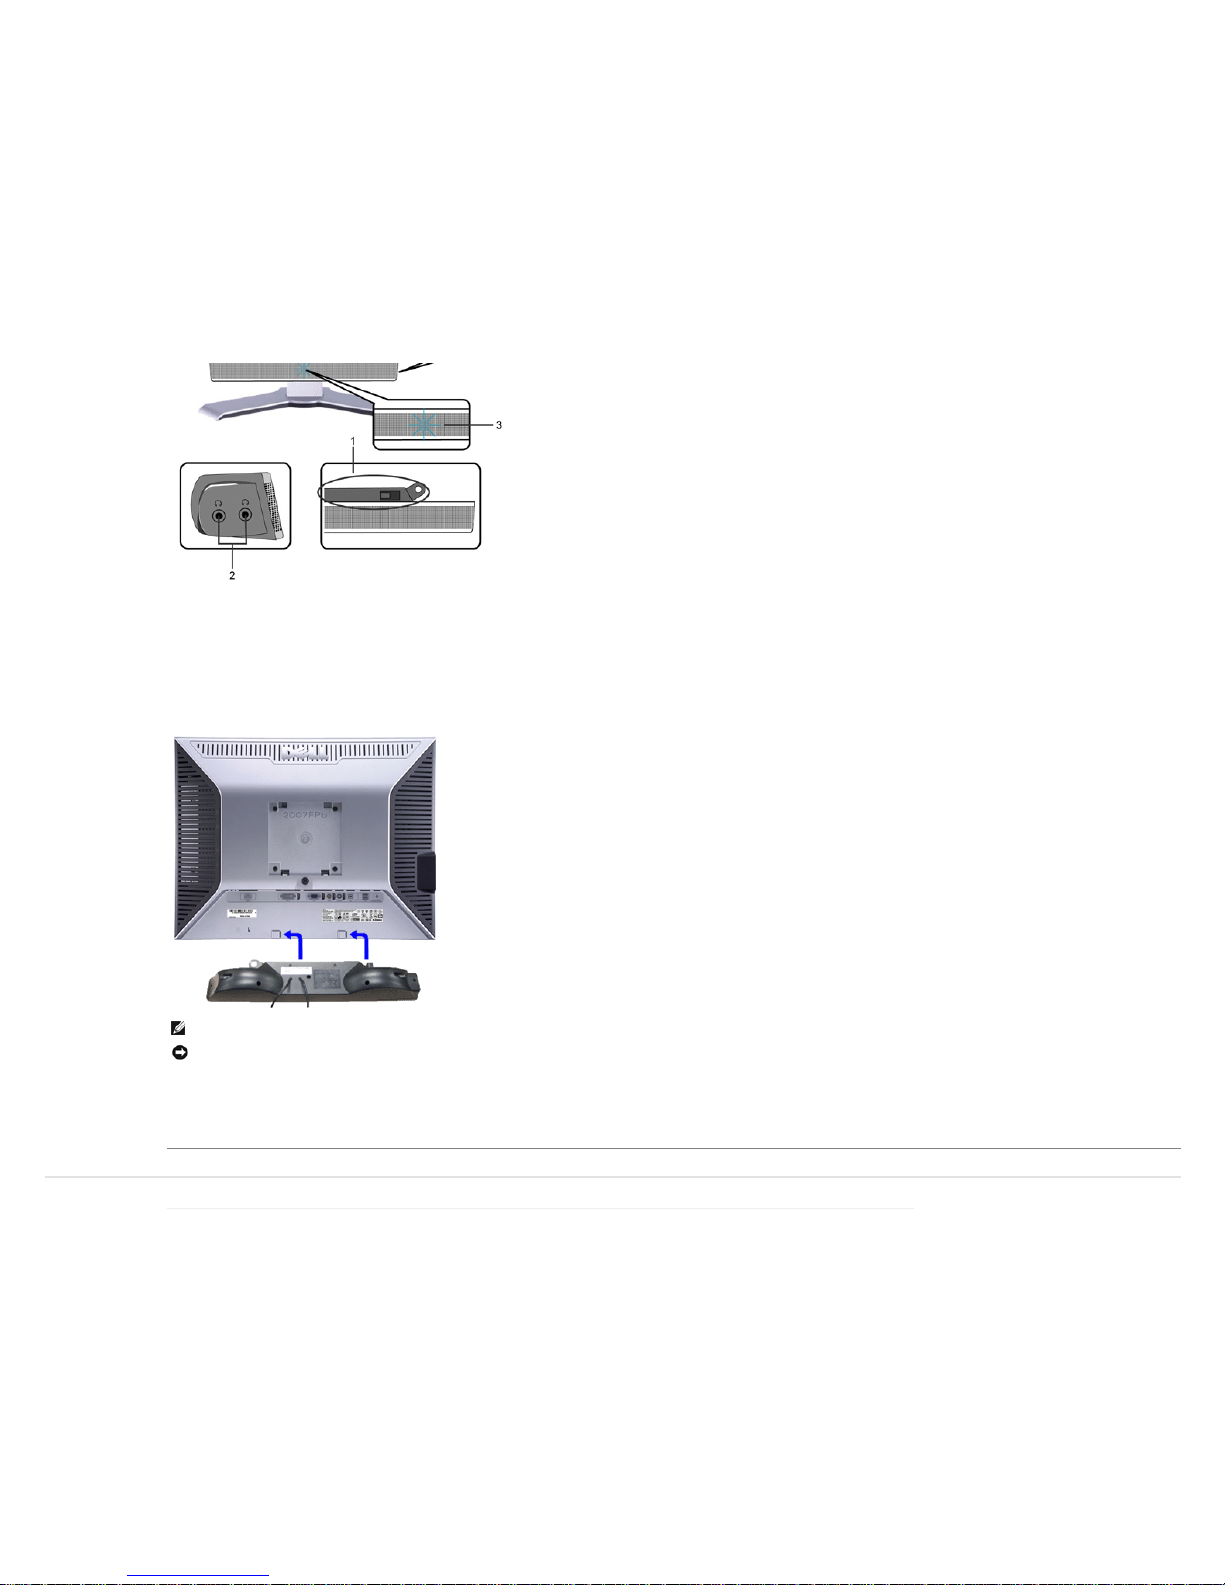
1. Atta ch mechanis m
2. Hea dph one co nnecto rs
3. Po we r indicator
4. Po we r/Volume contro l
Soundbar Attachment to the Monitor
NOTE: Sound bar Po we r Conn ector - 12V DC ou tput is fo r optiona l Dell™ Sound bar on ly.
NOTICE: DO NOT USE WITH ANY DEVICE OTHER THAN DELL Soun dbar.
1. Working from the rear of th e monitor, at tach Soun dba r by aligning th e two slots with th e tw o tab s alon g the b otto m rear of the monitor.
2. Slide the Sou ndba r to the le ft until it sna ps into place.
3. C onne ct the So undba r with th e DC po we r connecto r.
4. Insert the mini stereo plug from the rear of the Soun dbar into the compu ter's a udio ou tput ja ck.
Back to Contents Pag e
Page 31

16/16
support.dell.com/support/edocs/monitors/2007FP/en/ug/setup.htm#Connecting Your Monitor
Large Text
Shop
Why Buy Dell?
Laptops & Netbooks
Desktop s & Workstations
Servers, Storage & Networkin g
Printers & Ink
Electronics & Access ories
Support
All Support Options
Drivers and Do wnloads
Order Status
Getting Started
Product Support
Parts & Upgrad es
Community
Join the Dis cussio n
Share Your Ideas
Read our Blo g
Ratings & Reviews
Comm unity Home
Company Information
About Dell
Corporate Re sponsi bility
Careers
Investors
News room
My Account
Sign-in / Regi ster
Order Status
Care Service Reque st (SR)
Status
Make a Payment
Laptops | Desktops | Business Laptops | Business Desktops | Workstations | Servers | Storage | Services | Monitors | Printers | LCD TVs |
Electronics
© 2012 Dell | About Dell | Terms & Conditions | Unresolved Issues | Privacy Statement | Ads and Emails | Dell Recycling | Contact | Site Map | Visit ID |
Feedback
*O ffers subjec t to ch ange. Ta xes , s hipping, ha ndling an d other fee s appl y. U.S. De ll Smal l Bus iness new purc hase s only . LI MI T 5 D ISC O UNT ED OR P RO MO TI ON AL I TE MS P ER C US TO ME R.
LI MIT 5 V OS TRO O R IN SPI RO N UN IT S PE R CU ST OM ER. De ll res erves right to c anc el orders aris ing from pri cing or o ther erro rs.
snEB10
Page 32
1/3
suppo rt.dell.com/supp ort/edo cs/monitors/2007FP/en/u g/ro tating .htm#Chang ing the Rotation of You r Mo nitor
Keyw ord or E-Value Code Search
My Account My Order Status Feedback
United States
Contact Us Premier Login
Shop Support Community
Support Home Page
Back to Contents Page
Rotating Your Monitor
Dell™ 2007FP Flat Panel Monitor
Changing the Rotation of Your Monitor
Rotating Your Operating System
Changing the Rotation of Your Monitor
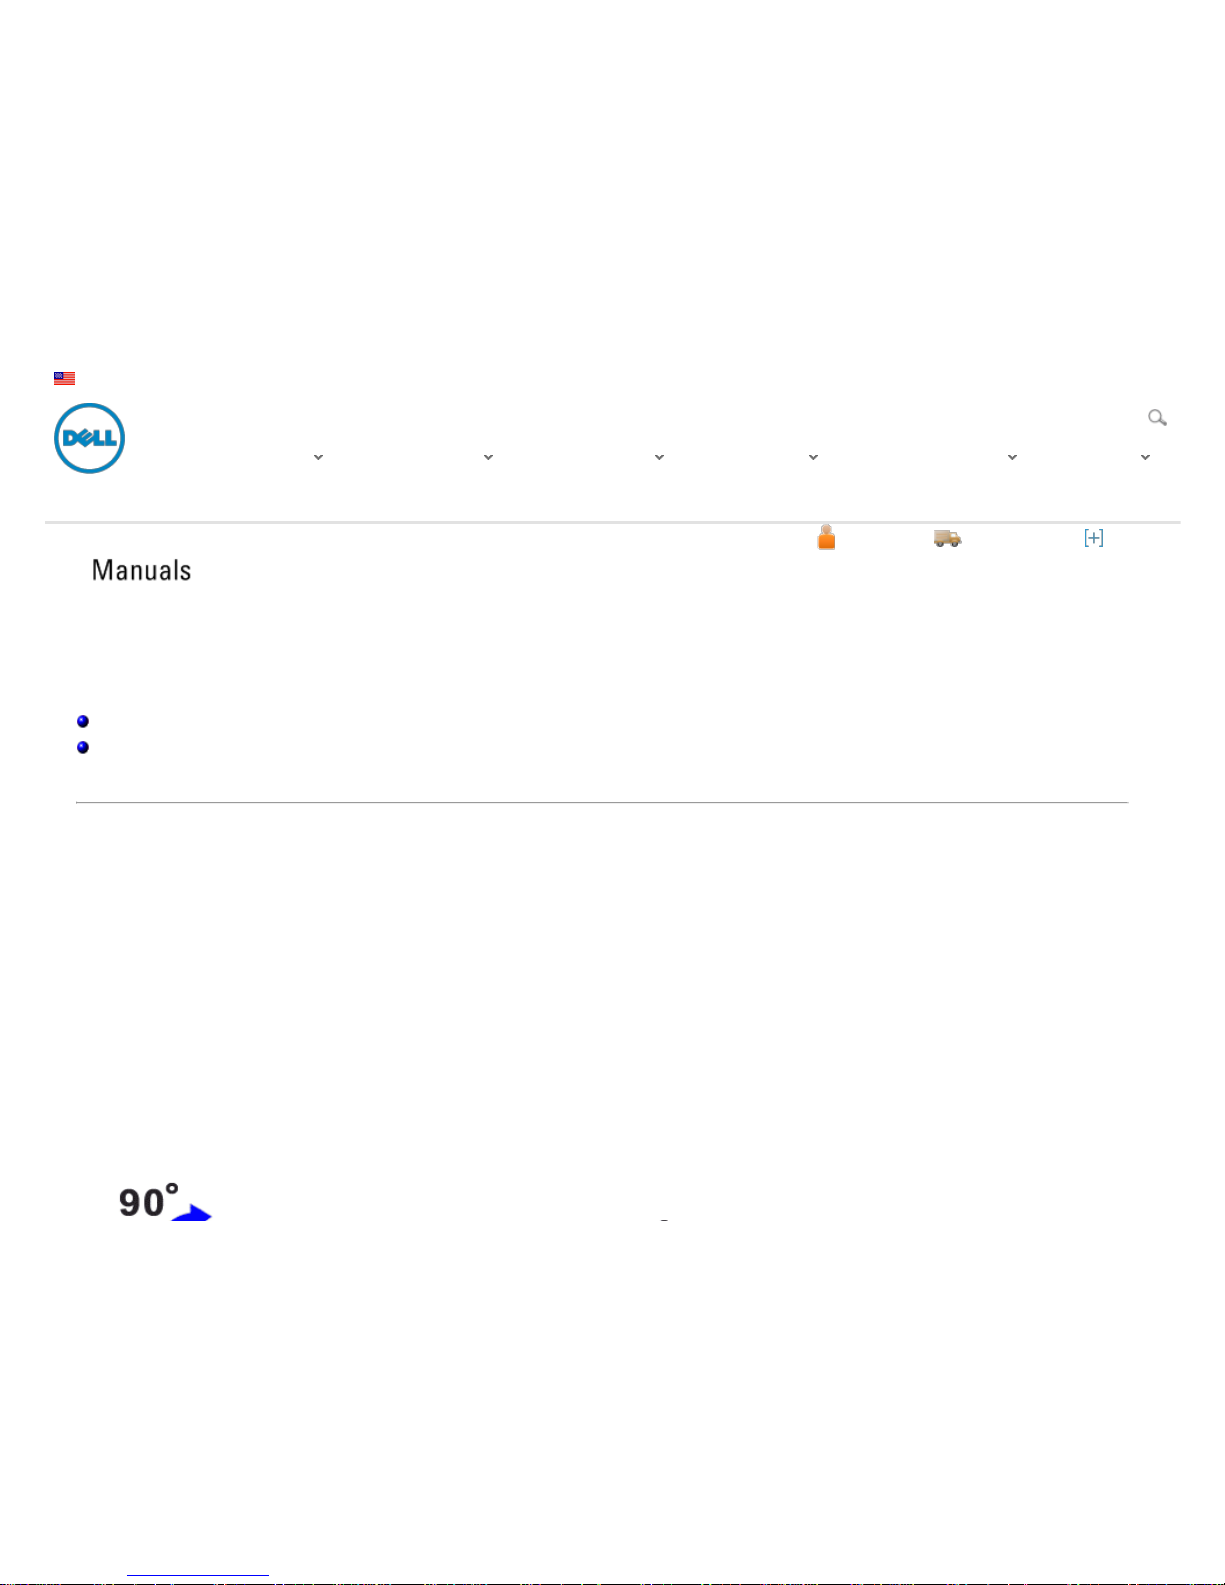
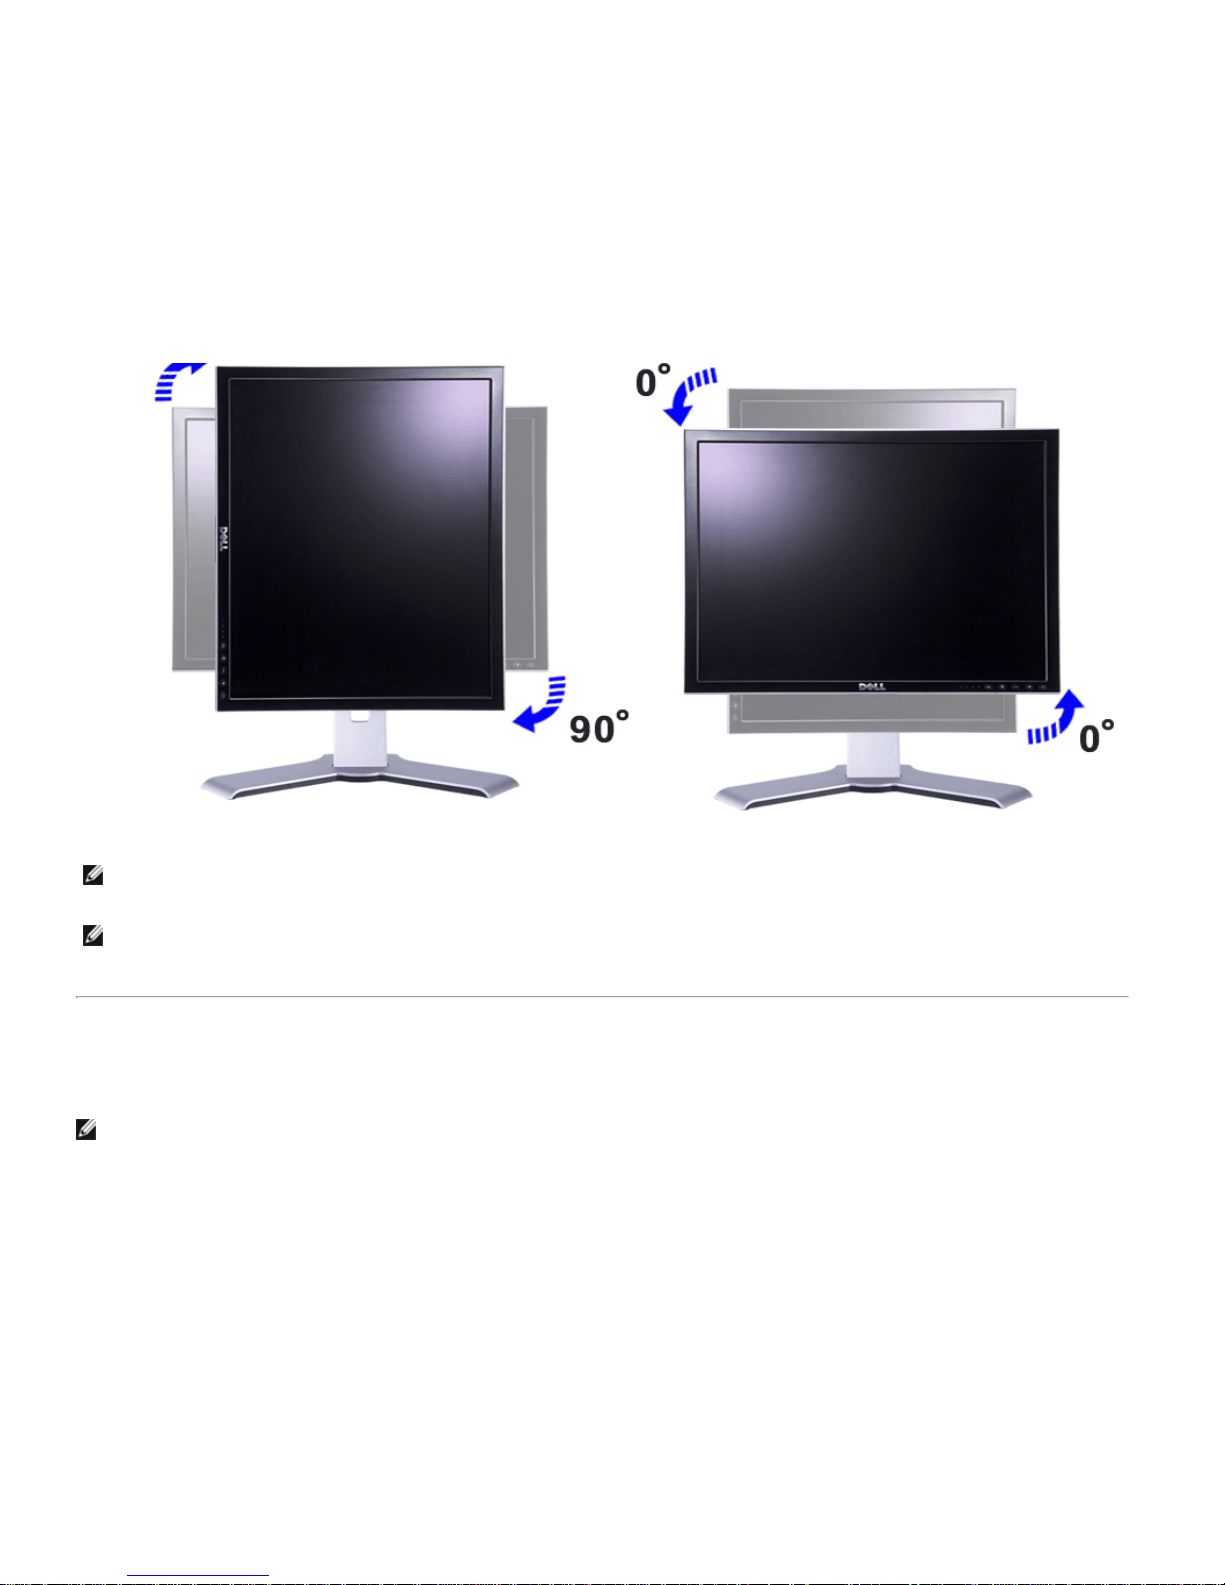
Before you rotate the monito r, your monito r sho uld be fully vertically exte nded (Vertical Extension) and fully tilted (Tilt) up to avoid hitting the
bottom ed ge of the monitor.
Drivers and Dow nloads Product Suppor t Support b y Topic Order Suppor t Warr anty Inform ation V iew More
Sign In Cart
Page 33
2/3
suppo rt.dell.com/supp ort/edo cs/monitors/2007FP/en/u g/ro tating .htm#Chang ing the Rotation of You r Mo nitor
NOTE: To take advan tage o f the "Display Rotation" function (La nds cap e versus Po rtrait view) an update d graph ics driver is re quire d for
your Dell™ Computer not included w ith this monitor. Ple as e dow nload the graphics driver from suppo rt.dell.com and refe r to the
"do w nloa d" section for "Video Drivers" for lates t driver upda te s.
NOTE: When in "Po rtrait View Mo de ", you may experience perfo rmance degrada tion in grap hic-intensive a pplications (3D Gaming etc.)
Rotating Your Operating System
After you have rota ted your monitor, you nee d to complete the procedure be low to rotate yo ur opera ting s yste m.
NOTE: If you are us ing the monito r with a no n-Dell compute r, you need to go to the graph ics driver w ebsite or your compute r
manufa cturer we bsite for information o n rotating your operating system.
1. Right-click on the desktop and click Properties.
2. Select the Settings tab and click Advanced.
3. If you have ATI, select the Rotation tab and set the preferred rota tion.
Page 34

3/3
suppo rt.dell.com/supp ort/edo cs/monitors/2007FP/en/u g/ro tating .htm#Chang ing the Rotation of You r Mo nitor
Support Home Page
Large Text
If you ha ve nVidia , click the nVidia tab, in the left-ha nd column select NVRotate, and then se lect the pre ferred rotation.
If you ha ve Intel, select the Intel graphics ta b, click Graphic Properties, sele ct the Rotation tab, and the n se t the pre ferre d rotation.
NOTE: If you do not se e th e rotation option or it is not wo rking corre ctly, go to support.dell.com and dow nlo ad the latest driver for your
graphics card.
Back to Contents Page
Shop
Why Buy Dell?
Laptops & Netbooks
Des ktops & Workstations
Servers, Storage & Networking
Printers & Ink
Electronics & Access ories
Support
All Support Options
Drivers and Downloads
Order Status
Getting Started
Product Support
Parts & Upgrades
Community
Join the Discuss ion
Share Your Ideas
Read our Blog
Ratings & Reviews
Com munity Home
Company Information
About Dell
Corporate Res pons ibility
Careers
Investors
News room
My Account
Sign-in / Regis ter
Order Status
Care Service Reques t (SR)
Status
Make a Payment
Laptops | Desktops | Business Laptops | Business Desktops | Workstations | Serv ers | Storage | Services | Monitors | Printers | LCD TVs |
Electronics
© 2012 Dell | A bout Dell | Terms & Conditions | Unresolved Issues | Privacy Statement | Ads and Emails | Dell Recycling | Contact | Site Map | Visit ID |
Feedback
* O ffers s ubje c t to ch ang e. T ax es , s hipp ing , handl ing and othe r fee s a ppl y. U .S. D el l Sm all Bus ines s new pur c has e s o nly . LI M I T 5 DI SC O UN T E D O R P RO M O TI O NA L IT EM S P ER C UST O M E R.
LI MI T 5 V O ST RO O R I N SP IR O N U N IT S P E R C US T O ME R. D el l res erve s right to c ance l o rder s a ris ing from pr ic ing or ot her e rrors .
snEB10
Page 35
1/7
suppo rt.dell.com/supp ort/edo cs/monitors/2007FP/en/u g/solv e.htm#Monitor Sp ecific Troubleshooting
Keyw ord or E-Value Code Search
My Account My Order Status Feedback
United States
Contact Us Premier Login
Shop Support Community
Support Home Page
Back to Contents Page
Solving Problems
Dell™ 2007FP Flat Panel Monitor
Monitor Spe cific Troubleshooting
Common Problem s
Video Problem s
Product Specific Problem s
Universal Serial Bus (USB) Specific Problem s
Dell™ Soundbar (Option al) Troubleshooting
CAUTION: Before you begin any of the proce dure s in this se ction, follow the Safety Instructions.
Monitor Specific Troubleshooting
Self-Test Feature Check
Your monito r provide s a se lf-test feature that allow s you to check whether your monito r is functioning pro pe rly. If your monitor and computer are
prop erly connecte d but the monitor scree n remains dark, run the monitor self-test by performing the following steps:
1. Turn off both your computer a nd th e monitor.
2. Unplug the video cable from the ba ck of the compute r. To ens ure prop er Self-Tes t op era tion, remove both Digital (white conn ecto r) and the
Analog (blue conne ctor) cab les from the back of computer.
3. Turn on the monito r.
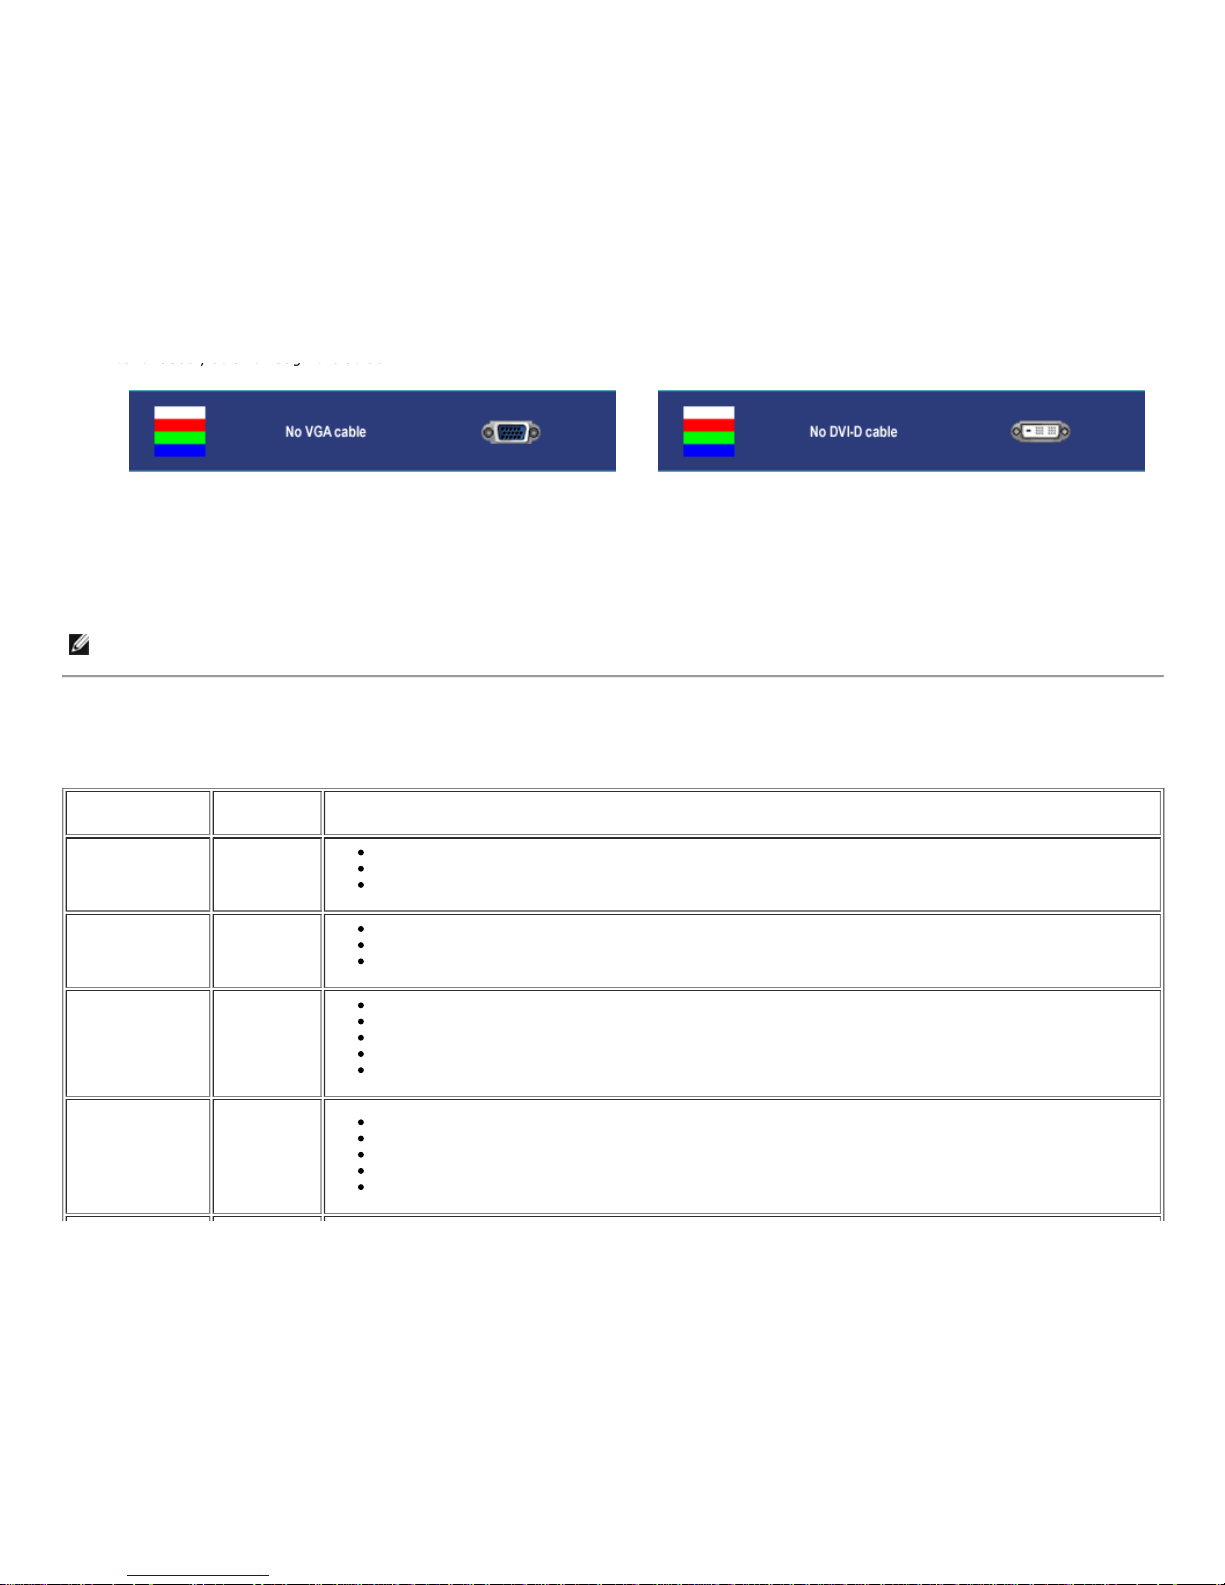
The floa ting dialog box s hould ap pe ar on-scree n (ag ains t a black backgroun d) if the monito r cannot sense a video signal and is wo rking
correctly. While in se lf-test mode, the pow er LE D remains gree n. Also, depe nd ing upon the s ele cted input, one of the dialogs s hown below will
continuously scroll through the scree n.
Drivers and Dow nloads Product Suppor t Support b y Topic Order Suppor t Warr anty Inform ation V iew More
Sign In Cart
Page 36
2/7
suppo rt.dell.com/supp ort/edo cs/monitors/2007FP/en/u g/solv e.htm#Monitor Sp ecific Troubleshooting
continuously scroll through the scree n.
or
4. This box a lso app ea rs during no rmal system operation if the video cable becomes disconnected or da mage d.
5. Turn off your monito r and recon nect the video cable; then turn on both your computer and the monitor.
If your monitor scree n remains bla nk afte r you use the previous procedure , check your vide o controller and compute r system, beca use you r monitor is
functioning pro pe rly.
NOTE: Self test feature check is not a vailable for S-Video and Co mposite vide o modes.
Common Problems
The following tab le contains ge ne ral information about common monitor proble ms you might encounte r.
COMMON
SY MPTOMS
WHAT YO U
EXPERIENCE
POS SIBLE SOLUTIONS
No Video/ Po wer
LED off
No picture Che ck connection integ rity at bo th e nds of the vide o cab le
Electric outlet verification
Ens ure pow e r button depresse d fully
No Video/ Po wer
LED on
No picture or
no
brightness
Increa se brightness & contra st controls via OSD
Pe rform monitor se lf-tes t fea ture check
Che ck for bent or broken pins
Po or Focus Picture is
fuzz y, blurry
or ghosting
Auto Adjust via OSD
Adjust Phase and Pixel Clock controls via OSD
Eliminate video exte nsion cab les
Pe rform monitor res et
Low e r video resolutio n or increase font size
Shaky/Jittery
Video
Wa vy picture
or fine
movement
Auto Adjust via OSD
Adjust Phase and Pixel Clock controls via OSD
Pe rform monitor res et
Che ck environmental factors
Reloca te and tes t in another roo m
Page 37
3/7
suppo rt.dell.com/supp ort/edo cs/monitors/2007FP/en/u g/solv e.htm#Monitor Sp ecific Troubleshooting
Missing Pixels LCD scree n
has sp ots
Cycle po w er on-off
Thes e a re pixels that are pe rmane ntly off and is a natural de fect that occurs in LC D technolog y
Stuck-on Pixels LCD screen
has bright
spots
Cycle po w er on-off
Thes e a re pixels that are pe rmane ntly on and is a natural defect tha t occurs in LCD te chno logy
Brightne ss
Problems
Picture too
dim or too
bright
Pe rform monitor res et on "Facto ry Rese t"
Auto Adjust via OSD
Adjust brightnes s & contra st controls via OSD
NOTE: When using '2: DVI-D', the contras t ad justment is not a vailab le.
Geometric
Distortion
Screen not
centered
correctly
Pe rform monitor res et on "Display Rese t"
Auto Adjust via OSD
Adjust brightnes s & contra st controls via OSD
Ens ure monitor is in pro pe r video mode
NOTE: When using '2: DVI-D', the po sitio ning a djus tments are no t ava ilable .
Horizo nta l/Vertical
Lines
Screen has
one or more
lines
Pe rform monitor res et on "Display Rese t"
Auto Adjust via OSD
Adjust Phase and Pixel Clock controls via OSD
Pe rform monitor se lf-tes t fea ture check an d de te rmine if thes e line s are also in s elf-tes t mode
Che ck for bent or broken pins
NOTE: When using '2: DVI-D', the Pixel Clock an d Ph as e a djus tments are no t ava ilable .
Sync Prob lems Screen is
scrambled or
appears torn
Pe rform monitor res et on "Display Rese t"
Auto Adjust via OSD
Adjust Phase and Pixel Clock controls via OSD
Pe rform monitor se lf-tes t fea ture check to determine if scrambled screen appears in self-test mode
Che ck for bent or broken pins
Boot up in the "s afe mode"
LCD Scratche d Screen has
scratches or
smudg es
Turn monitor off and clean the s cree n
For clea ning instruction, see Caring for Your Monitor.
Safety Relate d
Issues
Visible s igns
of smoke or
sparks
Do not perform any trou blesho oting steps
Monito r needs to be re placed
Inte rmittent
Problems
Monito r
malfunctions
on & off
Ens ure monitor is in pro pe r video mode
Ens ure video cable conne ction to computer and to the flat pa nel is secure
Pe rform monitor res et on "Facto ry Rese t"
Pe rform monitor se lf-tes t fea ture check to determine if the intermitte nt proble m occurs in se lf-test mode
Page 38
4/7
suppo rt.dell.com/supp ort/edo cs/monitors/2007FP/en/u g/solv e.htm#Monitor Sp ecific Troubleshooting
Missing Color Picture
missing color
Pe rform monitor se lf-tes t fea ture check
Che ck connection integ rity at bo th e nd of the video cable
Che ck for bent or broken pins
Wro ng Color Picture colo r
not goo d
Cha nge the color to "P C Custom Color" or "MAC Cus tom Co lor"
Adjust R/G/B value of "PC Cus to m Color" or "MAC Custom Color"
Image Retention
from a sta tic
image left on th e
monitor for a
long period of
time
Faint
Shad ow from
the sta tic
image
displayed
appears on
the scree n
Use the Po wer Man agemen t fea ture to turn off the monitor a t all times w he n no t in us e
Alterna tively, use a dynamically changing s cree nsave r
Video Problems
COMMON SYMPTO MS WHAT YOU EXPERIENCE POS SIBLE SOLUTIONS
No Video No signal indicator is displayed Check Video Input Sele ction
Composite: Yellow colore d RCA jack
S-Video: Typically a round 4 pin jack
Low Qu ality DVD
playback
Picture not crisp and so me color
distortion
Che ck DVD connection
Composite gives go od picture
S-Video gives better picture
NOTE: W hen choo sing S-Video, Co mpos ite vide o, Auto Adjus t function is not available.
Product Specific Problems
SPECIFIC SY MPTOMS WHAT YOU EXPERIENCE POS SIBLE SOLUTIONS
Screen image is too small Image is centere d on screen, but does not fill entire
view ing area
Pe rform monitor res et on "Facto ry Rese t"
Page 39
5/7
suppo rt.dell.com/supp ort/edo cs/monitors/2007FP/en/u g/solv e.htm#Monitor Sp ecific Troubleshooting
Canno t ad just the monitor w ith
the buttons on the front pa ne l
OSD doe s not a ppea r on the screen Turn the monitor off and unp lug the po w er
cord and then plug ba ck and powe r on
The monito r will not go into
powe r sa ving mode .
No picture, the LED light is green. When pres s "+",
"-" or "Menu" key, the mess age " No S-Video input
signal " or " No Co mpos ite input signal " will
appear.
Move mouse or hit a ny key on the
keyboard on the computer or activate
video playe r, then acces s th e OSD to se t
Audio to " off " state.
No Input Signa l when use r
contro ls pre ssed
No picture, the LED light is green. When pres s "+",
"-" or "Menu" key, the mess age " No S-Video input
signal " or " No Co mpos ite input signal " will
appear.
Che ck the signal so urce Make sure th e
Computer is not in pow er saving by moving
mouse or pressing any key on the
keyboard.
Che ck to make sure Video Source to SVideo , Compo site or Co mponent is
powe red and playing video media.
Che ck wh ether the signal cable is plugged
in and se ated properly. Re-plug the signal
cable if neces sary.
Re-boot the computer or video playe r.
The monito r will not fill the entire
screen.
The picture can't fill the height or width of the
screen.
Due to the non-sta nda rd formats of DVDs,
the monitor may no t show the full scree n
pictures.
NOTE: When choo sing DVI-D mode , Auto Adjust function is not available.
Universal Serial Bus (USB) Specific Problems
SPECIFIC SY MPTOMS WHAT YOU EXPERIENCE POS SIBLE SOLUTIONS
USB interface is no t working USB peripherals a re no t w orking Che ck that your monito r is po were d ON.
Reconnect the upstrea m cable to your computer.
Reconnect the USB pe riphe rals (dow ns tream conne ctor).
Switch o ff and then turn on the monitor aga in.
Rebo ot the computer.
High Spe ed USB 2.0 interface
is slow.
High Spe ed USB 2.0 periph era ls w orking
slowly or no t at all.
Che ck that your computer is USB 2.0 capable.
Verify USB 2.0 source on your computer.
Reconnect the upstrea m cable to your computer.
Reconnect the USB pe riphe rals (dow ns tream conne ctor).
Page 40
6/7
suppo rt.dell.com/supp ort/edo cs/monitors/2007FP/en/u g/solv e.htm#Monitor Sp ecific Troubleshooting
Rebo ot the computer.
Dell™ Soundbar (Optional) Troubleshooting
COMMON
SY MPTOMS
WHAT YO U EXPERIENCE POSS IBLE SOLUTIONS
No Sound No pow er to Soundbar - the
powe r indicator is off.
(built-in DC pow e r sup ply. i.e.
2007 FP )
Turn the Po wer/Volume kno b on the Soundba r clockwise to the middle po sition; check if the
powe r indicator (gree n LED) on the front of the Soundbar is illuminated.
Confirm tha t the po wer cab le from the Soundba r is plugged into the monitor.
Confirm tha t the monito r has powe r.
If the monitor has no powe r, see Monitor Specific Troubles hooting for monito r common prob lem.
No Sound Soundbar ha s pow er - po wer
indicator is on .
Plug the audio line-in cable into the compute r's au dio o ut jack.
Set a ll Windo w s volume contro ls to their maximum.
Play some audio content on the computer (i.e. aud io CD, or MP3 ).
Turn the Po wer/Volume kno b on the Soundba r clockwise to a higher volume se tting.
Clean a nd re se at the audio line-in plug .
Test the Sound ba r using ano the r audio s ource (i.e. portable CD player).
Distorted
Sound
Computer's so und card is
used a s th e a udio source.
Clear any obs tructions betw e en the Sound ba r and the use r.
Confirm tha t the audio line -in plug is completely inserted into the jack of the soun d card.
Set a ll Windo w s volume contro ls to their midpo ints.
Decrea se the volume of the aud io ap plication.
Turn the Po wer/Volume kno b on the Soundba r counter-clockwise to a lower volume setting.
Clean a nd re se at the audio line-in plug .
Trouble shoot the compute r's soun d card.
Test the Sound ba r using ano the r audio s ource (i.e. portable CD player).
Distorted
Sound
Other au dio s ource is us ed . Clear any obstructions be tw ee n the Sou ndb ar and the us er.
Confirm tha t the audio line -in plug is completely inserted into the jack of the audio source.
Decrea se the volume of the aud io so urce.
Turn the Po wer/Volume kno b on the Soundba r counter-clockwise to a lower volume setting.
Clean a nd re se at the audio line-in plug .
Unba lanced
Sound Output
Sound from only one side o f
Soundba r
Clear any obs tructions betw e en the Sound ba r and the use r.
Confirm tha t the audio line -in plug is completely inserted into the jack of the soun d card or
audio source.
Set a ll Windo w s audio bala nce controls (L-R) to th eir midpoints.
Clean a nd re se at the audio line-in plug .
Trouble shoot the compute r's soun d card.
Test the Sound ba r using ano the r audio s ource (i.e. portable CD player).
Page 41
7/7
suppo rt.dell.com/supp ort/edo cs/monitors/2007FP/en/u g/solv e.htm#Monitor Sp ecific Troubleshooting
Support Home Page
Large Text
Low Volume Volume is to o low. Clear any obstructions be tw ee n the Soundb ar and the us er.
Turn the Po wer/Volume kno b on the Soundba r clockwise to the maximum volume s etting.
Set a ll Windo w s volume contro ls to their maximum.
Increa se the volume o f the audio application .
Test the Sound ba r using ano the r audio s ource (i.e. portable CD player).
Back to Contents Page
Shop
Why Buy Dell?
Laptops & Netbooks
Des ktops & Workstations
Servers, Storage & Networking
Printers & Ink
Electronics & Access ories
Support
All Support Options
Drivers and Downloads
Order Status
Getting Started
Product Support
Parts & Upgrades
Community
Join the Discuss ion
Share Your Ideas
Read our Blog
Ratings & Reviews
Com munity Home
Company Information
About Dell
Corporate Res pons ibility
Careers
Investors
News room
My Account
Sign-in / Regis ter
Order Status
Care Service Reques t (SR)
Status
Make a Payment
Laptops | Desktops | Business Laptops | Business Desktops | Workstations | Serv ers | Storage | Services | Monitors | Printers | LCD TVs |
Electronics
© 2012 Dell | A bout Dell | Terms & Conditions | Unresolved Issues | Privacy Statement | Ads and Emails | Dell Recycling | Contact | Site Map | Visit ID |
Feedback
* O ffers s ubje c t to ch ang e. T ax es , s hipp ing , handl ing and othe r fee s a ppl y. U .S. D el l Sm all Bus ines s new pur c has e s o nly . LI M I T 5 DI SC O UN T E D O R P RO M O TI O NA L IT EM S P ER C UST O M E R.
LI MI T 5 V O ST RO O R I N SP IR O N U N IT S P E R C US T O ME R. D el l res erve s right to c ance l o rder s a ris ing from pr ic ing or ot her e rrors .
snEB10
Page 42
9/20/12
Documentation
1/22
support.dell.com/support/edocs/monitors/2007FP/en/ug/appendx. htm#FCC Identification Information
Keyw ord or E-Value Code Search
My Account My Order Status Feedback
United States
Contact Us Premier Login
Shop Support Community
Support Home Page
Back to Contents Page
Appendix
Dell™ 2007FP Flat Panel Monitor
FCC Identification Inform ation
Safety Instruction s
Contacting De ll
FCC Identification Information
FCC Class B
This eq uipment gen era tes , use s, an d can ra diate rad io frequ ency energy and , if no t insta lled a nd used in accordance with the manufacture r's ins truction manual, may
caus e inte rfere nce w ith radio and te levision reception. This equipment ha s be en tes ted and found to comply with the limits for a Class B digital de vice pursuan t to P art 15
of the FCC Rules.
This de vice complies with P art 15 of the FCC Rule s. Ope rat ion is s ubje ct to the follow ing tw o conditio ns:
1. This device may not cau se harmful interfe rence .
2. This device must accept an y interference receive d, including inte rfere nce th at may cau se unde sire d op era tion.
NOTICE: The FC C reg ulatio ns p rovide that chang es or modification s no t expressly app rove d by Dell™ Inc. could vo id your a utho rity to op era te th is eq uipment.
Thes e limits are des igne d to provide rea sonab le protection against harmful interfe rence in a reside ntial ins tallation. How ever, there is no gua rantee that interfe rence will
not occur in a pa rticular installatio n. If this eq uipment doe s cause harmful interference with radio or television recep tion, w hich can be de termined by turn ing the eq uipment
off and on, you are encou rage d to try to corre ct the interfe rence by one or more of the following meas ure s:
Reorie nt the rece iving antenn a.
Reloca te th e syste m with res pe ct to the rece iver.
Move the s yste m away from the re ceiver.
Plug the s yste m into a different outle t so that the s yste m and th e receiver are on different bran ch circuits.
If necessary, consult a rep res entative of Dell™ Inc. or an e xpe rience d radio/tele vision te chnician for add itiona l sugg es tions.
The follow ing information is provide d on the device or devices cove red in this do cument in compliance w ith the FCC regulations:
Drivers and Dow nloads Product Suppor t Suppo rt by To pic Orde r Suppor t War ranty Inf orm ation V iew More
Sign In Cart
Page 43
9/20/12
Documentation
2/22
support.dell.com/support/edocs/monitors/2007FP/en/ug/appendx. htm#FCC Identification Information
Product na me: Dell™ 2007FP
Mode l number: Dell™ 2007FP b
Company na me:
Dell Inc.
Wo rldw ide Regulat ory Co mpliance & Environmental Affairs
One Dell Wa y
Round Rock, Texas 78682 USA
512-338-4400
NOTE: For Further regulatory informatio n, see you r Product Information Guide.
CAUTION: Safety Instructions
CAUTION: Use of controls, adjustments, or procedures other than those specified in this documentation may result in exposure to shock, electrical hazards,
and/or mechanical hazards.
Read and follow the se instructio ns w he n connecting and using your comput er monito r:
To help avoid damag ing you r computer, be su re tha t the volta ge sele ction s witch o n the powe r sup ply for the compute r is se t to match the a lterna ting current (AC)
pow e r available a t your loca tion:
115 vo lts (V)/60 hertz (Hz) in mos t of North and South America and some Fa r Eas te rn count ries s uch as Japa n, South Korea (also 220 volts (V)/60 hertz (Hz)),
and Taiwa n.
230 vo lts (V)/50 hertz (Hz) in mos t of Europe , the Midd le Ea st, an d the Far Ea st.
Alwa ys be sure tha t your monito r is ele ctrically rated to op era te w ith th e AC pow er available in your loca tion.
NOTE: This monito r doe s no t ne ed or have a voltage se lection sw itch for se tting the AC voltag e inpu t. It will automatically accept an y AC input vo ltage according to the
rang es define d in the "Ele ctrical Specification s" sectio n in the Use r's Guide.
Do not sto re or use the monitor in locatio ns that a re e xpos ed to he at , direct sun light, or extreme cold.
Avoid moving th e monito r betwe en locations w ith larg e te mpera ture differences.
Do not sub ject the monitor to se vere vibratio n or high impact conditio ns. Fo r example , do no t place the monitor insid e a car trunk.
Do not sto re or use the monitor in locatio ns e xpo se d to high humidity or du sty e nvironmen t.
Do not allow wate r or oth er liquids to s pill on or into the monitor.
Keep flat pa ne l mon itor in roo m tempera ture conditio ns. Excessive cold or ho t conditions can ha ve a n ad vers e effect on th e liquid crystal of the display.
Neve r insert anyth ing meta llic into the monitor op enings. Doing so may create the danger o f electric sho ck.
To avo id electric shock, neve r touch the ins ide of the monitor. Only a q ualified technician sho uld open the monitor cas e.
Neve r use your monito r if the po wer cable has be en damag ed. Ensure tha t nothing rests on your compute r's cables a nd th at the cab les are no t located where they
can be stepp ed on or tripped over.
Be su re to gras p the plug, not the cable , whe n dis connecting th e monito r from an electric socket.
Page 44
9/20/12
Documentation
3/22
support.dell.com/support/edocs/monitors/2007FP/en/ug/appendx. htm#FCC Identification Information
Ope nings in the monitor cabinet are provide d for ven tilation . To preve nt ove rhe ating , thes e o penings sho uld no t be blocked or cove red. Avoid u sing the monito r on a
bed, sofa , rug, or oth er soft su rface, as doing so may block the ventilation o penings in the botto m of the ca binet. If you place the mon itor in a bo okca se or an
enclose d sp ace, be sure to provide ade quate ventilation a nd a ir flow.
Place your monito r in a location w ith low humidity an d minimum dus t. Avoid places s imilar to a da mp bas ement or du sty ha llwa y.
Do not expo se the monitor to rain or us e it ne ar w ater (in kitchens , next to sw imming poo ls, etc.). If the monitor accidentally gets w et, unplug it an d cont act an
aut horized dea ler immed iate ly. You can clea n the monitor w ith a d amp cloth w he n ne ces sa ry, being s ure to unp lug the monitor first.
Place the monitor on a solid surface and tre at it care fully. The scree n is made of gla ss and can be da maged if dropp ed or hit sharply.
Loca te yo ur monitor ne ar an ea sily accessible ele ctric outlet.
If your monitor doe s no t operate no rmally - in pa rticular, if there are a ny unusua l sou nds or smells coming from it - unplug it immed iate ly and contact an au tho rized
dealer o r service cente r.
Do not atte mpt to remove th e ba ck cover, as you w ill be expos ed to an electrical shock haza rd. The ba ck cover s hou ld only be remove d by qualified s ervice
person nel.
High te mperatures can cause prob lems. Don't use your monitor in direct sun light, and kee p it aw ay from heaters, stove s, fireplaces, and ot her s ource s of heat.
Unplug the monitor w hen it is going to be left unuse d for an extend ed period of time.
Unplug your monito r from the e lectric outle t be fore a ny se rvice is pe rformed.
LAMP(S) INSIDE T HIS PRODUCT CONTAIN(S) MERCURY AND MUST BE RECYCLED OR DISPOSED OFF ACCORDING TO LOCAL, STATE OR FEDERAL LAWS.
FOR MORE INFORMATION, GO TO W WW .DELL.COM/HG OR CONTACT T HE ELECTRONIC INDUSTRIES ALLIANCE AT WWW.EIAE.ORG.
Contacting Dell
To conta ct Dell ele ctronically, you can acces s the follow ing we bsites:
www.dell.com
support.dell.com (technical sup port)
For sp ecific we b ad dresse s fo r your coun try, find the a ppro priat e country se ction in the table be low .
NOTE: Toll-free nu mbers a re for use within the cou ntry for w hich the y are listed.
NOTE: In certain countries, support specific to DellTM XPST computers is available at a separate telephone number listed for participating countries. If you do
not see a telephone number listed that is specific for XPS computers, you may contact Dell through the support number listed and your call will be routed
appropriately.
Wh en yo u ne ed to contact Dell, use the electronic addres se s, te lephone numbe rs, and code s pro vided in the follow ing table. If you ne ed assistance in determining w hich
code s to use , conta ct a loca l or an inte rna tiona l ope rator.
NOTE: The contact info rmation p rovide d was dee med corre ct at th e time tha t this document w ent to print a nd is subject to cha nge.
Country (City)
International Access Code Country Code
City Code
Department Name or Service Area,
Website and E-Mail Address
Area Codes,
Local Numbers, and
Toll-Free Numbers
Page 45
9/20/12
Documentation
4/22
support.dell.com/support/edocs/monitors/2007FP/en/ug/appendx. htm#FCC Identification Information
Anguilla
We bs ite: w ww .de ll.com.ai
E-mail: la-te chsu ppo rt@de ll.com
Technical Sup port toll-free: 800 -335-0031
Antigua and Barbuda
We bs ite: w ww .de ll.com.ag
E-mail: la-te chsu ppo rt@de ll.com
Technical Sup port 1-800-805-5924
Aomen
Technical Sup port (Dell™ Dimens ionT, Dell InsprionT, Dell
OptiplexT, Dell Latitud eT, and Dell PrecisionT)
0800 -105
Technical Sup port (servers and sto rage) 0800 -105
Argentina ( Buenos Aires )
Inte rnatio nal Acces s Code : 00
Country Co de : 54
City Co de: 11
We bs ite: www.dell.com.ar
E-mail: la-te chsu ppo rt@de ll.com
E-mail: us_latin_ se [email protected]
E-mail for des ktop and porta ble co mputers:
la-techsupport@d ell.com
E-mail for serve rs and EMC storage prod ucts:
la_e nte rprise @de ll.com
Cus tomer Care toll-free: 0-800-44 4-0730
Tech Supp ort toll-free : 800-222-0154
Tech Supp ort Services toll-free: 0-800-444-0724
Sales 0-810-444-3355
Aruba
We bs ite: w ww .de ll.com.aw
E-mail: la-te chsu ppo rt@de ll.com
Technical Sup port toll-free: 800-1578
Australia ( Sydney )
Inte rnatio nal Acces s Code : 0011
Country Co de : 61
City Co de: 2
We bs ite: suppo rt.ap.dell.com
E-mail:suppo rt.ap .dell.com/contactus
Gene ral Supp ort 1 3DELL-133355
Austria
Inte rnatio nal Acces s Code : 900
Country Co de : 43
We bs ite: support.euro.dell.com
E-mail: tech_su ppo rt_central_e uro [email protected]
Home/Small Business Sales 0820 240 530 00
Home/Small Business Fax 0820 240 530 49
Home/Small Business Customer Ca re 0820 240 530 14
Pre ferred Accounts /Corp orate Cu sto mer Ca re 0820 240 530 16
Suppo rt for XPS 0820 240 530 81
Page 46
9/20/12
Documentation
5/22
support.dell.com/support/edocs/monitors/2007FP/en/ug/appendx. htm#FCC Identification Information
City Co de: 1
Home/Small Business Suppo rt for all other Dell compute rs 0820 240 530
Pre ferred Accounts /Corp orate Support 0820 240 530 17
Switchb oa rd 0820 240 530 00
Bahamas
We bs ite: w ww .de ll.com.bs
E-mail: la-te chsu ppo rt@de ll.com
Technical Sup port toll-free: 1-866-874-3038
Barbados
We bs ite: w ww .de ll.com/bb
E-mail: la-te chsu ppo rt@de ll.com
Technical Sup port 1-800-534-3142
Belgium ( Brussels )
Inte rnatio nal Acces s Code : 00
Country Co de : 32
City Co de: 2
We bs ite: support.euro.dell.com
Technical Sup port for XPS 02 481 92 96
Technical Sup port for all othe r Dell compute rs 02 481 92 88
Technical Sup port Fax 02 481 92 95
Cus tomer Care 02 713 15
Corpora te Sa les 02 481 91 00
Fax 02 481 92 99
Switchb oa rd 02 481 91 00
Bermuda
We bs ite: w ww .de ll.com/bm
E-mail: la-te chsu ppo rt@de ll.com
Technical Sup port toll-free 1-877-890-07 754
Bolivia
We bs ite: w ww .de ll.com/bo
E-mail: la-te chsu ppo rt@de ll.com
Gene ral Supp ort toll-free: 800-10-0238
Brazil
Inte rnatio nal Acces s Code : 00
Country Co de : 55
City Co de: 51
We bs ite: www.dell.com/br
E-mail: BRmailto:la-techsup [email protected]
Cus tomer Support and Tech Support 0800 90 3355
Technical Sup port Fax 51 2104 5470
Cus tomer Care Fax 51 210 4 5480
Sales 0800 722 3498
British Virgin Islands Genera l Suppo rt toll-free: 1-866-27 8-6820
Page 47
9/20/12
Documentation
6/22
support.dell.com/support/edocs/monitors/2007FP/en/ug/appendx. htm#FCC Identification Information
Brunei
Country Co de : 673
Technical Sup port ( Pena ng , Malaysia ) 604 63 3 4966
Cus tomer Care ( Pena ng , Malaysia ) 604 633
Transaction Sales ( Pena ng , Malaysia ) 604 633 495 5
Canada ( North York , Ontario )
Inte rnatio nal Acces s Code : 011
Online Orde r Status: www.dell.ca/ostatus
AutoTe ch (auto mated Hardwa re a nd W arra nty) toll-free : 1-800-247-9362
Cus tomer Service (Home Sales/Small Busines s) to ll-free: 1-800-847 -4096
Cus tomer Service (med./large b usine ss , gove rnment) toll-free: 1-800-326-9463
Cus tomer Service (printer, pro jecto rs, tele visions ,
han dhe lds, digital jukeb ox, and wire less)
toll-free: 1-800-847-4096
Hardw a re W arranty Supp ort (Home Sales/Small
Busine ss )
toll-free:1-800-906-3355
Hardw a re W arranty Supp ort (med./large bus .,
gove rnment)
toll-free: 1-800-387-5757
Hardw a re W arrantu Sup port (printers,projecto rs,
tele visions, han dhe lds,digital jukeb ox, and wireles s)
1-877-335-5767
Sales (Home Sale s/Small Busines s) toll-free: 1-800-387-5752
Sales (med./large bus., go vernmen t) toll-free: 1-800-387-5755
Spare Pa rts Sales & Extend ed Service Sales 1 866 440 335 5
Cayman Islands E-mail: la-te chsu ppo rt@de ll.com
Technical Support 1-877-26 1-0242
Chile ( Santiago )
Country Co de : 56
City Co de: 2
We bs ite: w ww .de ll.com/cl
E-mail: la-te chsu ppo rt@de ll.com
Sales and Cus tomer Suppo rt toll-free: 1230-020-48 23
Technical Sup port (CTC) toll-free: 800730222
Technical Sup port (ENTEL) toll-free: 1230-020-37 62
Technical Sup port we bsite : support.dell.com.cn
Technical Sup port E-mail: cn_suppo rt@de ll.com
Cus tomer Care E-mail: [email protected]
Technical Sup port Fax 592 818 1350
Technical Sup port (Dimens ion and Ins piron) toll-free: 800 858 29 69
Technical Sup port (OptiPlexT, Latitude T, and De ll
Pre cisionT)
toll-free: 800 858 09 50
Technical Sup port (servers and sto rage) toll-free: 800 858 09 60
Page 48
9/20/12
Documentation
7/22
support.dell.com/support/edocs/monitors/2007FP/en/ug/appendx. htm#FCC Identification Information
China ( Xiamen )
Country Co de : 86
City Co de: 592
Technical Sup port (projecto rs, PDAs, switche s, rou ters ,
and so on)
toll-free: 800 858 29 20
Technical Sup port (printers) toll-free: 800 858 23 11
Cus tomer Care toll-free: 800 858 20 60
Cus tomer Care Fax 592 81 8 1308
Home and Small Busine ss toll-free: 800 858 22 22
Pre ferred Accounts Division to ll-free: 800 85 8 2557
Larg e Co rpo rate Accounts GCP to ll-free: 800 85 8 2055
Larg e Co rpo rate Accounts Key Accounts toll-free: 800 858 26 28
Larg e Co rpo rate Accounts North toll-free: 800 858 299 9
Larg e Co rpo rate Accounts North Go vernmen t and
Education
toll-free: 800 858 29 55
Larg e Co rpo rate Accounts Eas t toll-free: 800 858 20 20
Larg e Co rpo rate Accounts Eas t Gove rnment a nd
Education
toll-free: 800 858 26 69
Larg e Co rpo rate Accounts Que ue Team to ll-free : 800 85 8 2572
Larg e Co rpo rate Accounts South toll-free: 800 858 2355
Larg e Co rpo rate Accounts We st toll-free: 800 858 28 11
Larg e Co rpo rate Accounts Spare Pa rts toll-free: 800 858 26 21
Colombia
We bs ite: w ww .de ll.com/cl
E-mail: la-te chsu ppo rt@de ll.com
Technical Sup port 1-800-915 -570 4
Costa Rica
We bs ite: w ww .de ll.com/cr
E-mail: la-te chsu ppo rt@de ll.com
Technical Sup port to ll free: 800-012-0232
Czech Republic ( Prague )
Inte rnatio nal Acces s Code : 00
Country Co de : 420
We bs ite: support.euro.dell.com
E-mail: cze [email protected]
Technical Sup port 22537 2727
Cus tomer Care 22537 2707
Fax 2253 7 2714
Page 49
9/20/12
Documentation
8/22
support.dell.com/support/edocs/monitors/2007FP/en/ug/appendx. htm#FCC Identification Information
Technical Fa x 2253 7 2728
Switchb oa rd 2253 7 2711
Denmark ( Copenhagen )
Inte rnatio nal Acces s Code : 00
Country Co de : 45
We bs ite: support.euro.dell.com
Technical Sup port for XPS 70 10 007 4
Technical Sup port for all othe r Dell compute rs 7023 0182
Cus tomer Care (Relation al) 702 3 0184
Home/Small Business Customer Ca re 3287 5505
Switchb oa rd (Relational) 3287 1200
Switchb oa rd Fax (Relationa l) 3287 1201
Switchb oa rd (Home/Small Busines s) 3287 5000
Switchb oa rd Fax (Home/Small Busine ss ) 3287 5001
Dominica
We bs ite: w ww .de ll.com/dm
E-mail: la-te chsu ppo rt@de ll.com
Gene ral Supp ort toll-free : 1-866-278-6821
Dominican Republic
We bs ite: w ww .de ll.com/do
E-mail: la-te chsu ppo rt@de ll.com
Technical Sup port
toll free : 1-888-156-1834 or
toll free : 1-888-156-1584
Ecuador
We bs ite: w ww .de ll.com/ec
E-mail: la-te chsu ppo rt@de ll.com
Gene ral Supp ort (calling from Quito ) toll-free: 999-119 - 877-655-3355
Gene ral Supp ort (calling from Guaya quil) toll-free : 1800-999-119 -877-65 5-3355
El Salvador
We bs ite: w ww .de ll.com/ec
E-mail: la-te chsu ppo rt@de ll.com
Technical Sup port (Tele pho nica) t oll free: 8006170
Page 50
9/20/12
Documentation
9/22
support.dell.com/support/edocs/monitors/2007FP/en/ug/appendx. htm#FCC Identification Information
Finland ( Helsinki )
Inte rnatio nal Acces s Code : 990
Country Co de : 358
City Co de: 9
We bs ite: support.euro.dell.com
E-mail: fi_su ppo rt@de ll.com
Technical Sup port 0207 533 555
Cus tomer Care 0 207 53 3 538
Switchb oa rd 0207 533 533
Sales under 500 employe es 0207 533 540
Fax 020 7 533 530
Sales ove r 500 employee s 02 07 533 533
Fax 020 7 533 530
France ( Paris ) ( Montpellier )
Inte rnatio nal Acces s Code : 00
Country Co de : 33
City Co des: (1) (4)
We bs ite: support.euro.dell.com
Home and Small Business
Technical Sup port for XPS 0825 387 129
Technical Sup port for all othe r Dell compute rs 0825 387 270
Cus tomer Care 0 825 82 3 833
Switchb oa rd 0825 004 700
Switchb oa rd (calls from outs ide of France ) 04 99 75 40 00
Sales 0825 004 700
Fax 082 5 004 701
Fax (calls from out side of France ) 04 99 75 40 01
Corporate
Technical Sup port 0825 004 719
Cus tomer Care 0 825 33 8 339
Switchb oa rd 01 55 94 71 00
Sales 01 55 94 71 00
Page 51
9/20/12
Documentation
10/22
support.dell.com/support/edocs/monitors/2007FP/en/ug/appendx. htm#FCC Identification Information
Fax 01 55 94 71 01
Germany (Frankfurt)
Inte rnatio nal Acces s Code : 00
Country Co de : 49
City Co de: 69
We bs ite: support.euro.dell.com
E-mail: tech_su ppo rt_central_e uro [email protected]
Technical Sup port for XPS 069 97 92 7222
Technical Sup port for all othe r Dell compute rs 069 9792-7200
Home/Small Business Customer Ca re 0180 -5-224400
Global Segment Customer Ca re 069 9792 -7320
Pre ferred Accounts Cus tomer Care 069 9792-7320
Larg e Accounts Cu sto mer Ca re 069 97 92-732 0
Pub lic Accoun ts C ustomer Ca re 069 9792-7320
Switchb oa rd 069 97 92-700 0
Greece
Inte rnatio nal Acces s Code : 00
Country Co de : 30
We bs ite: support.euro.dell.com
Technical Sup port 00800-44 14 95 18
Gold Service Technical Support 0080 0-44 14 00 83
Switchb oa rd 210812981 0
Gold Service Sw itchbo ard 2108129811
Sales 2108 129800
Fax 2108 129812
Grenada
E-mail: la-te chsu ppo rt@de ll.com
Gene ral Supp ort toll-free : 1-866-540-3355
Guatemala
E-mail: la-te chsu ppo rt@de ll.com
Gene ral Supp ort 1 -800-999-01 36
Guyana
E-mail: la-te chsu ppo rt@de ll.com
Page 52
9/20/12
Documentation
11/22
support.dell.com/support/edocs/monitors/2007FP/en/ug/appendx. htm#FCC Identification Information
Gene ral Supp ort toll-free : 1-877-270-4609
Hong Kong
Inte rnatio nal Acces s Code : 001
Country Co de : 852
We bs ite: support.ap.dell.com
Technical Sup port E-mail: HK_suppo [email protected]
Technical Sup port (Dimens ion and Ins piron) 00852-2969 318 8
Technical Sup port (OptiPlex, Latitud e, and Dell Precision) 0085 2-2969 3191
Technical Sup port (servers and sto rage) 00852-2969 3196
Technical Sup port (projecto rs, PDAs, switche s, rou ters ,
and so on)
0085 2-3416 0906
Cus tomer Care 00852 -3416 09 10
Larg e Co rpo rate Accounts 0085 2-3416 0907
Global Customer Pro grams 00852-34 16 090 8
Medium Bus ines s Division 00852-341 6 0912
Home and Small Busine ss Division 0085 2-2969 3105
India
E-mail: india_s uppo rt_des ktop@dell .com
india_support_n [email protected]
india_ sup port_Serve [email protected]
Technical Sup port 1600 33 8045 and 1600 44 8046
Sales (Large Co rpora te Accounts) 1600 33 804 4
Sales (Home an d Small Busines s) 1600 33 8046
We bs ite: support.euro.dell.com
E-mail: dell_direct_support@d ell.com
Sales
Irelan d Sale s 01 204 4444
Dell Outle t 1850 200 778
Online Orde ring HelpDesk 1 850 20 0 778
Customer Care
Page 53
9/20/12
Documentation
12/22
support.dell.com/support/edocs/monitors/2007FP/en/ug/appendx. htm#FCC Identification Information
Ireland (Cherrywood)
Inte rnatio nal Acces s Code : 00
Country Co de : 353
City Co de: 1
Home Us er Cu sto mer Care 01 20 4 4014
Small Busines s Custo mer Ca re 01 204 40 14
Corpora te C ustomer Ca re 1850 200 982
Technical Support
Technical Sup port for XPS 1850 200 722
Technical Sup port for all othe r Dell compute rs 1850 543 543
Gene ral
Fax/Sale s Fax 01 204 0103
Switchb oa rd 01 204 4444
U.K. Custo mer Care (dial w ithin U.K. only) 0870 906 0010
Corpora te C ustomer Ca re (da il within U.K. only) 087 0 907 4499
U.K. Sales (dial w ithin U.K. only) 0870 907 4000
Italy ( Milan )
Inte rnatio nal Acces s Code : 00
Country Co de : 39
City Co de: 02
We bs ite: support.euro.dell.com
Home and Small Business
Technical Sup port 02 577 826 90
Cus tomer Care 02 69 6 821 14
Fax 02 696 821 13
Switchb oa rd 02 696 821 12
Corporate
Technical Sup port 02 577 826 90
Cus tomer Care 02 57 7 825 55
Fax 02 575 035 30
Switchb oa rd 02 577 821
E-mail: la-te chsu ppo rt@de ll.com
Page 54
9/20/12
Documentation
13/22
support.dell.com/support/edocs/monitors/2007FP/en/ug/appendx. htm#FCC Identification Information
Jamaica
Technical Sup port (dial from within Jamaica o nly)
toll free : 1-800-326-6061 or
toll free : 1-800-975-1646
Japan ( Kawasaki )
Inte rnatio nal Acces s Code : 001
Country Co de : 81
City Co de: 44
We bs ite: support.jp.dell.com
Technical Sup port (servers) to ll-free : 0120-19 8-498
Technical Sup port outs ide o f Japan (serve rs) 81-44-556-4162
Technical Sup port (Dimens ion and Ins piron) toll-free: 0120-198-22 6
Technical Sup port outs ide o f Japan (Dimension and
Insp iron)
81-44-520-1435
Technical Sup port (Dell Precision, OptiPle x, and La titud e) toll-free:0120-198-433
Technical Sup port outs ide o f Japan (Dell Precision,
OptiPlex, and Latitude )
81-44-556-3894
Technical Sup port (PDAs, projectors, printers, routers ) toll-free: 0120-981-69 0
Technical Sup port outs ide o f Japan (PDAs, proje ctors ,
printe rs, routers)
81-44-556-3468
Faxbox Service 044-556-34 90
24-Hour Automate d Ord er Status Service 044-556-38 01
Cus tomer Care 044-556-424 0
Busine ss Sales Division (up to 400 e mployee s) 044 -556-1465
Pre ferred Accounts Division Sale s (ove r 400 employee s) 044-556-3433
Pub lic Sales (go vernmen t agencies, educational
institu tions , and medical institu tions )
044-556-5963
Global Segment Japan 044 -556-3469
Individua l Use r 044-556-1760
Switchb oa rd 044-556 -4300
Korea ( Seoul )
Inte rnatio nal Acces s Code : 001
Country Co de : 82
E-mail: Krsuppo [email protected]
Suppo rt toll-free : 080-200-3800
Suppo rt (Dimen sion , PDA, Electronics and Accesso ries ) toll-free: 080-200-380 1
Sales toll-free: 080-200-360 0
Page 55
9/20/12
Documentation
14/22
support.dell.com/support/edocs/monitors/2007FP/en/ug/appendx. htm#FCC Identification Information
City Co de: 2
Fax 2194 -6202
Switchb oa rd 2194 -6000
Latin America
Cus tomer Technical Supp ort ( Austin , Texa s , U.S.A. ) 51 2 728-4093
Cus tomer Service ( Austin , Texas , U.S.A. ) 512 72 8-3619
Fax (Technical Support and Customer Service) ( Austin ,
Texas , U.S.A. )
512 72 8-3883
Sales ( Austin , Texas , U.S.A. ) 512 728-4397
Sales Fax ( Aust in , Texas , U.S.A. )
512 72 8-4600
or 512 728-377 2
Luxembourg
Inte rnatio nal Acces s Code : 00
Country Co de : 352
We bs ite: support.euro.dell.com
Suppo rt 342 08 08 075
Home/Small Business Sales
+32 (0)2 713 15 96
Corpora te Sa les 26 25 77 81
Cus tomer Care +32 (0)2 481 91 19
Fax 26 25 77 82
Macao
Country Co de : 853
Technical Sup port toll-free: 0800 105
Cus tomer Service ( Xiamen , China ) 34 160 910
Transaction Sales ( Xiamen , China ) 2 9 693 115
Malaysia ( Penang )
Inte rnatio nal Acces s Code : 00
Country Co de : 60
City Co de: 4
We bs ite: support.ap.dell.com
Technical Sup port (Dell Precision, OptiPle x, and La titud e) toll-free: 1 800 880 193
Technical Sup port (Dimens ion, Inspiron, an d Electronics
and Access ories )
toll-free: 1 800 881 306
Technical Sup port (Pow erApp , Pow e rEdge,
Po we rCo nne ct, and Pow erVault)
toll-free: 1800 881 386
Cus tomer C are toll-free: 1 800 881 306 (opt ion 6)
Transaction Sales toll-free: 1 800 888 202
Corpora te Sa les toll-free: 1 800 888 213
E-mail: la-te chsu ppo rt@de ll.com
Page 56
9/20/12
Documentation
15/22
support.dell.com/support/edocs/monitors/2007FP/en/ug/appendx. htm#FCC Identification Information
Mexico
Inte rnatio nal Acces s Code : 00
Country Co de : 52
Technical Sup port (TelMe x) toll-free : 1-866-563-4425
Sales
50-81-8800
or 01-800-888-335 5
Cus tomer Service
001-877-384-897 9
or 001 -877-269-33 83
Main
50-81-8800
or 01-800-888-335 5
Montserrat
E-mail: la-te chsu ppo rt@de ll.com
Gene ral Supp ort toll-free : 1-866-278-6822
Netherlands Antilles
E-mail: la-te chsu ppo rt@de ll.com
Gene ral Supp ort 001-800-882 -1519
Netherlands ( Amsterdam )
Inte rnatio nal Acces s Code : 00
Country Co de : 31
City Co de: 20
We bs ite: support.euro.dell.com
Technical Sup port for Inspiron XPS computers o nly 020 67 4 45 94
Technical Sup port for all othe r Dell compute rs 020 674 45 00
Technical Sup port Fax 020 674 47 66
Home/Small Business Customer Ca re 020 67 4 42 00
Relatio nal Customer Ca re 020 674 4325
Home/Small Business Sales 02 0 674 55 00
Relatio nal Sales 020 67 4 50 00
Home/Small Business Sales Fax 020 67 4 47 75
Relatio nal Sales Fa x 0 20 674 47 50
Switchb oa rd 020 674 50 00
Switchb oa rd Fax 020 674 47 50
New Zealand
Inte rnatio nal Acces s Code : 00
Country Co de : 64
We bs ite: suppo rt.ap.dell.com
E-mail: suppo rt.ap.dell.com/contactu s
Gene ral Supp ort 0800 44 1 567
Page 57
9/20/12
Documentation
16/22
support.dell.com/support/edocs/monitors/2007FP/en/ug/appendx. htm#FCC Identification Information
Nicaragua
E-mail: la-te chsu ppo rt@de ll.com
Technical Sup port to ll-free: 001-800-220-1378
Norway (Lysaker)
Inte rnatio nal Acces s Code : 00
Country Co de : 47
We bs ite: support.euro.dell.com
Technical Sup port for XPS
815 35 043
Technical Sup port for all othe r Dell products 671 16882
Relatio nal Customer Ca re 671 1757 5
Home/Small Business Customer Ca re 2 3162 298
Switchb oa rd 671 168 00
Fax Sw itchboard 67 1 1686 5
Panama
E-mail: la-te chsu ppo rt@de ll.com
Technical Sup port toll-free: 1-800-507-1385
Technical Sup port (CLARACOM)
toll-free: 1-800-633-4097
Peru
E-mail: la-te chsu ppo rt@de ll.com
Technical Sup port toll-free : 0800-50-869
Poland ( Warsaw )
Inte rnatio nal Acces s Code : 011
Country Co de : 48
City Co de: 22
We bs ite: support.euro.dell.com
E-mail: pl_supp ort_tech@d ell.com
Cus tomer Service Pho ne 57 95 700
Cus tomer Care 57 95 99 9
Sales 57 95 999
Cus tomer Service Fax 57 95 80 6
Recep tion De sk Fax 57 95 998
Switchb oa rd 57 95 999
Portugal
We bs ite: support.euro.dell.com
Technical Sup port 70 7200 149
Page 58
9/20/12
Documentation
17/22
support.dell.com/support/edocs/monitors/2007FP/en/ug/appendx. htm#FCC Identification Information
Inte rnatio nal Acces s Code : 00
Country Co de : 351
Cus tomer Care 8 00 300 413
Sales
800 30 0 410 or 800 300 411 o r 800 300 412 or
21 422 07 10
Fax 21 424 01 12
Puerto Rico
E-mail: la-te chsu ppo rt@de ll.com
Technical Sup port to ll-free: 1-866-390-4695
St. Kitts and Nevis
We bs ite: w ww .de ll.com/kn
E-mail: la-te chsu ppo rt@de ll.com
Technical Sup port to ll-free: 1-866-540-3355
St. Lucia
We bs ite: w ww .de ll.com/lc
E-mail: la-te chsu ppo rt@de ll.com
Technical Sup port to ll-free: 1-866-464-4352
St. Vincent and the Grenadines
We bs ite: w ww .de ll.com/vc
E-mail: la-te chsu ppo rt@de ll.com
Technical Sup port toll-free: 1-866-464-4353
Singapore ( Singapore )
Inte rnatio nal Acces s Code : 005
Country Co de : 65
NOTE: The phone numbe rs in this se ction should be
called from within Singa pore or Malaysia only.
We bs ite: support.ap.dell.com
Technical Sup port (Dimens ion, Inspiron, an d Electronics
and Access ories )
toll-free: 1800 394 7430
Technical Sup port (OptiPlex, Latitud e, and Dell Precision) to ll-free : 1800 394 748 8
Technical Sup port (Pow erApp , Pow e rEdge,
Po we rCo nne ct, and Pow erVault)
toll-free: 1800 394 7478
Cus tomer Care
toll-free: 1800 394 7430
(optio n 6)
Transaction Sales toll-free: 1 800 39 4 7412
Corpora te Sa les
toll-free: 1 800 394 7419
Slovakia ( Prague )
Inte rnatio nal Acces s Code : 00
Country Co de : 421
We bs ite: support.euro.dell.com
E-mail: cze [email protected]
Technical Sup port 02 5441 5727
Cus tomer Care 420 22537 2707
Fax 02 5441 832 8
Page 59
9/20/12
Documentation
18/22
support.dell.com/support/edocs/monitors/2007FP/en/ug/appendx. htm#FCC Identification Information
Tech Fax 02 5441 83 28
Switchb oa rd (Sales ) 02 5441 7585
South Africa ( Johannesburg )
Inte rnatio nal Acces s Code :
09/09 1
Country Co de : 27
City Co de: 11
We bs ite: support.euro.dell.com
E-mail: dell_za _suppo rt@de ll.com
Gold Queue 011 709 77 13
Technical Sup port 011 70 9 7710
Cus tomer Care 0 11 709 7707
Sales 011 70 9 7700
Fax 011 706 0495
Switchb oa rd 011 70 9 7700
Southeast Asian and Pacific Countries
Technical Sup port, Custo mer Service, an d Sales ( Penang
, Malaysia )
604 63 3 4810
Spain ( Madrid )
Inte rnatio nal Acces s Code : 00
Country Co de : 34
City Co de: 91
We bs ite: support.euro.dell.com
Home and Small Business
Technical Sup port 9 02 100 130
Cus tomer Care 9 02 118 540
Sales 902 11 8 541
Switchb oa rd 902 118 541
Fax 902 11 8 539
Corporate
Technical Sup port 9 02 100 130
Cus tomer Care 9 02 115 236
Switchb oa rd 91 722 92 00
Fax 91 722 95 83
Sweden (Upplands Vasby)
Inte rnatio nal Acces s Code : 00
Country Co de : 46
City Co de: 8
We bs ite: support.euro.dell.com
Technical Sup port for XPS 0771 340 340
Technical Sup port for all othe r Dell products 08 590 05 199
Relatio nal Customer Ca re 08 590 05 642
Home/Small Business Customer Ca re 08 587 70 527
Employee Pu rchas e P rogra m (EPP) Support 0 20 140 14 44
Page 60
9/20/12
Documentation
19/22
support.dell.com/support/edocs/monitors/2007FP/en/ug/appendx. htm#FCC Identification Information
Technical Sup port Fax 08 590 05 594
Sales 08 590 05 185
Switzerland ( Geneva )
Inte rnatio nal Acces s Code : 00
Country Co de : 41
City Co de: 22
We bs ite: support.euro.dell.com
E-mail: Tech_ sup port_central_Eu rope @de ll.com
Technical Sup port for XPS 0848 33 88 57
Technical Sup port (Home and Small Busines s) for all oth er
Dell products
0844 811 411
Technical Sup port (Corpo rate ) 0 844 822 844
Cus tomer Care (Home and Small Busines s) 0848 802 202
Cus tomer Care (Corpo rate ) 0848 821 72 1
Fax 022 799 01 90
Switchb oa rd 022 799 01 01
Taiwan
Inte rnatio nal Acces s Code : 002
Country Co de : 886
We bs ite: support.ap.dell.com
E-mail: ap_su ppo rt@de ll.com
Technical Sup port (OptiPlex, Latitud e, Inspiron,
Dimension , and Electronics and Accessories )
toll-free: 00801 86 1011
Technical Sup port (servers and sto rage) toll-free: 00801 60 1256
Cus tomer Care
toll-free: 00801 60 1250
(optio n 5)
Transaction Sales toll-free: 00801 65 1228
Corpora te Sa les t oll-free: 00801 651 227
Thailand
Inte rnatio nal Acces s Code : 001
Country Co de : 66
We bs ite: support.ap.dell.com
Technical Sup port (OptiPlex, Latitud e, and Dell Precision) toll-free: 1800 0060 07
Technical Sup port (Pow erApp , Pow e rEdge,
Po we rCo nne ct, and Pow erVault)
toll-free: 1800 060 0 09
Cus tomer Care
toll-free: 1800 006 007
(optio n 7)
Corpora te Sa les to ll-free: 1800 006 009
Transaction Sales to ll-free : 1800 006 006
Trinidad/Tobago
We bs ite: w ww .de ll.com/tt
E-mail: la-te chsu ppo rt@de ll.com
Technical Sup port to ll-free: 1-888-799-5908
We bs ite: w ww .de ll.com/tc
Page 61
9/20/12
Documentation
20/22
support.dell.com/support/edocs/monitors/2007FP/en/ug/appendx. htm#FCC Identification Information
Gene ral Supp ort toll-free : 1-877-441-4735
U.K. ( Bracknell )
Inte rnatio nal Acces s Code : 00
Country Co de : 44
City Co de: 1344
We bs ite: support.euro.dell.com
E-mail: dell_direct_support@d ell.com
Cus tomer Care we bs ite: support.euro.dell.com/uk/en/ECare/Form/Home.asp
Sales
Home and Small Busine ss Sales 0870 907 4000
Corpora te/Public Sector Sales 0134 4 860 456
Customer Care
Home and Small Busine ss Cus tomer Care 0870 906 0010
Corpora te C ustomer Ca re 01344 373 185
Pre ferred Accounts (500-5000 employe es ) Customer
Care
0870 906 0010
Global Accou nts Customer Ca re 01344 373 186
Ce ntral Gove rnment Cus tomer Care 01344 373 19 3
Loca l Governmen t & Education Cus tomer Care 0134 4 373 199
Hea lth Cus tomer Care 0134 4 373 194
Technical Support
Technical Sup port for XPS (Sasi: do w e nee d to cha nge to
XPSTM)
0870 366 4180
Technical Sup port (Corpo rate /Prefe rred Accounts /PAD
[1000+ employe es ])
0870 908 0500
General
Technical Sup port for all othe r prod ucts 0870 90 8 0800
Home and Small Busine ss Fax 0 870 907 4006
Uruguay
We bs ite: w ww .de ll.com/tt
E-mail: la-te chsu ppo rt@de ll.com
Technical Sup port toll-free: 413 -598-2522
Automated Order-Status Service toll-free: 1-800-433-901 4
AutoTe ch (porta ble a nd d es ktop computers) t oll-free: 1-800-247-9362
Page 62
9/20/12
Documentation
21/22
support.dell.com/support/edocs/monitors/2007FP/en/ug/appendx. htm#FCC Identification Information
U.S.A. ( Austin , Texas )
Inte rnatio nal Acces s Code : 011
Country Co de : 1
AutoTe ch (porta ble a nd d es ktop computers) t oll-free: 1-800-247-9362
Hardw a re and W arranty Support (Dell TV, Printers, and
Projectors ) for Relatio nsh ip custo mers
toll-free: 1-800-459-7298
Americas Co ns umer XPS su ppo rt toll-free : 1-800-232-8544
Consumer (Home and Home office) Supp ort for a ll othe r
Dell products
toll-free: 1-800-624-9896
Cus tomer Service toll-free: 1-800 -624-9897
Employee Pu rchas e P rogra m (EPP) Cus tomers toll-free: 1-800-695-8133
Financial Services w ebsite : www.dellfinancialservices.com
Financial Services (lea se /loans) to ll-free: 1-877-577-3355
Financial Services (Dell Pre ferred Accounts [DPA]) toll-free: 1-800-283-2210
Business
Cus tomer Service and Suppo rt toll-free: 1-800-456-3355
Employee Pu rchas e P rogra m (EPP) Cus tomers toll-free: 1-800-695-8133
Suppo rt for printe rs, pro jectors, PDAs, an d MPS pla yers toll-free: 1-877-459-7298
Public (government, educa tion, and he alth care)
Cus tomer Service and Technical Support toll-free: 1-800-456-3355
Employee Pu rchas e P rogra m (EPP) Cus tomers toll-free: 1-800-695-8133
Dell Sales
toll-free: 1-800-289-3355
or toll-free : 1-800-879-3355
Dell Outle t Store (Dell refurbished computers ) to ll-free : 1-888-798 -7561
Softw are and Pe riphera ls Sale s to ll-free: 1-800-671 -3355
Spare Pa rts Sales toll-free : 1-800-357-33 55
Extende d Service a nd W arra nty Sale s to ll-free : 1-800-247 -4618
Fax toll-free : 1-800-727-8320
Dell Services for the De af, Hard-of-Hearing, or Spee chImpaired
toll-free: 1-877-Dell™TY
(1-877-335-58 89)
Page 63
9/20/12
Documentation
22/22
support.dell.com/support/edocs/monitors/2007FP/en/ug/appendx. htm#FCC Identification Information
Support Home Page
Large Text
U.S. Virgin Islands
E-mail: la-te chsu ppo rt@de ll.com
Technical Sup port
toll-free: 1-877-702-4360
Venezuela
We bs ite: w ww .de ll.com/ve
E-mail: la-te chsu ppo rt@de ll.com
Technical Sup port toll-free: 0800-100-2513
Back to Contents Page
Shop
Why Buy Dell?
Laptops & Netbooks
Des ktops & Workstations
Servers, Storage & Networki ng
Printers & Ink
Electronics & Accessories
Support
All Support Options
Drivers and Downloads
Order Status
Getting Started
Product Support
Parts & Upgrades
Community
Join the Discus sion
Share Your Ideas
Read our Blog
Ratings & Reviews
Com mu nity Home
Company Information
About Dell
Corporate Respons ibil ity
Careers
Investors
News room
My Account
Sign-in / Register
Order Status
Care Service Request (SR)
Status
Make a Payment
Laptops | Desktops | Business Laptops | Business Desktops | Workstations | Servers | Storage | Services | Monitors | Printers | LCD TVs |
Electronics
© 2012 Dell | A bout Dell | Terms & Conditions | Unresolved Issues | Privacy Statement | A ds and Emails | Dell Recycling | Contact | Site Map | Visit ID |
Feedback
*O ffers s ubjec t to c hang e. T ax es , sh ippi ng, ha ndli ng an d oth er fee s a ppl y. U .S. De ll Smal l B us ine ss new purc has es o nly . LI M IT 5 D IS CO UN T E D O R P RO MO T IO NA L I T E MS P ER C US T O M E R.
LI MI T 5 V O ST RO O R IN SP IR O N UN IT S PE R C U ST OM ER. D el l res erves right t o c anc el orde rs aris ing from p ric ing or oth er er rors .
snE B10
 Loading...