

Page 1

Dell™ PowerVault™ Data Protection
Solution Quick Start Guide
www.dell.com | support.dell.com
Page 2

Notes, Notices, and Cautions
NOTE: A NOTE indicates important information that helps you make better use of
your computer.
NOTICE: A NOTICE indicates either potential damage to hardware or loss of data
and tells you how to avoid the problem.
CAUTION: A CAUTION indicates a potential for property damage, personal injury,
or death.
____________________
Information in this document is subject to change without notice.
© 2007 Dell Inc. All rights reserved.
Reproduction in any manner whatsoever without the written permission of Dell Inc. is strictly
forbidden.
Trademarks used in this text: Dell, the DELL logo, PowerEdge, PowerVault, and Dell OpenManage
are trademarks of Dell Inc.; Intel is a registered trademarks of Intel Corporation; Microsoft, Windows,
SQL Server, and Windows Server are either trademarks or registered trademarks of Microsoft
Corporation in the United States and/or other countries.
Other trademarks and trade names may be used in this document to refer to either the entities claiming
the marks and names or their products. Dell Inc. disclaims any proprietary interest in trademarks and
trade names other than its own.
November 2007 Rev. A00
Page 3

Contents
1 Getting Started . . . . . . . . . . . . . . . . . . . . . 7
Introduction . . . . . . . . . . . . . . . . . . . . . . . . 7
Supported Systems Information
. . . . . . . . . . . . . . 7
Locating the PowerVault System Model
Obtaining Support Documents
and Software Updates
DPM Prerequisites
Rack Installation
. . . . . . . . . . . . . . . . . . . . . 11
Connecting and Powering on the System
. . . . . . . . . . . . . . . . 9
. . . . . . . . . . . . . . . . . . . . 11
. . . . . . . . 12
Configuring Your System Using a Keyboard,
Video Monitor and Mouse
. . . . . . . . . . . . . . . . 12
Entering the Default Administrator Username
and Password
Changing the Administrator Password
Network Configuration
. . . . . . . . . . . . . . . . . . . . . . 13
. . . . . . . . . 13
. . . . . . . . . . . . . . . . . 14
Cabling and Configuring Your Network Connection
Configuring TCP/IP Using DHCP (Default Setting)
Configuring TCP/IP Using a Static IP Address
Changing the Computer Name
. . . . . . . . . . . . . . 16
. . . . . . . 8
14
. 14
. . . 15
Domain Membership
. . . . . . . . . . . . . . . . . . . 17
Localizing Your System Using MUI
. . . . . . . . . . . 19
Contents 3
Page 4

2 Configuring Your System Remotely . . . . 21
Special Administration Console (SAC) . . . . . . . . . 21
Accessing the SAC Command Prompt
Remote Desktop Connection
Remote Web Administration
. . . . . . . . . . . . 23
. . . . . . . . . . . . 24
. . . . . . . 22
Dell Remote Access Controller (DRAC)
Baseboard Management Controller (BMC)
. . . . . . . . . 24
. . . . . . . 25
3 Configuring DPM . . . . . . . . . . . . . . . . . . 27
Running the Configuration Wizard. . . . . . . . . . . . 27
Microsoft Data Protection Manager Mini-Setup
DPM Storage Pool Configuration
Verification
. . . . . . . . . . . . . . . . . . . . . . . . 35
. . . . . . . . . . . . 33
. . . . 32
4 Licensing . . . . . . . . . . . . . . . . . . . . . . . . 37
DPM Licenses . . . . . . . . . . . . . . . . . . . . . . 37
Windows Storage Server 2003 R2 x64 License
. . . . . 38
5 DPM Deployment . . . . . . . . . . . . . . . . . . 39
4 Contents
Installing Protected System Prerequisite Software. . . 39
Deploying Agents
Protecting Servers
Advanced Configuration
. . . . . . . . . . . . . . . . . . . . 39
. . . . . . . . . . . . . . . . . . . . 40
. . . . . . . . . . . . . . . . . 40
Page 5

6 DPM and Tape Devices . . . . . . . . . . . . . . 41
Installing Tape Drives and Tape Libraries. . . . . . . . 41
Using DPM with Tape Drives and Tape Libraries
. . . . 41
7 Installing Dell OpenManage™ Server
Administrator
Overview . . . . . . . . . . . . . . . . . . . . . . . . . 43
Installing Server Administrator
. . . . . . . . . . . . . . . . . . . . . 43
. . . . . . . . . . . . . 43
8 Updating Software . . . . . . . . . . . . . . . . . 45
Updating Your PowerVault System . . . . . . . . . . . 45
Using the Server Update Utility . . . . . . . . . . . . . . . . . .
Using Dell Update Packages
Updating Your Operating System
Updating DPM
. . . . . . . . . . . . . . . . . . . . . . 45
. . . . . . . . . . . . 45
. . . . . . . . . . . . 45
45
9 Getting Help . . . . . . . . . . . . . . . . . . . . . . 47
Dell Support . . . . . . . . . . . . . . . . . . . . . . . 47
Hardware Issues
Software/DPM Issues
. . . . . . . . . . . . . . . . . . . . . 47
. . . . . . . . . . . . . . . . . . 47
Troubleshooting the
PowerVault Data Protection Solution Wizard
Other Documents and Resources You May Need
Microsoft Information
. . . . . . . . . . . . . . . 48
. . . . . 47
. . . . 48
Contents 5
Page 6

Dell Hardware. . . . . . . . . . . . . . . . . . . . 48
Dell Software
. . . . . . . . . . . . . . . . . . . . 49
Index . . . . . . . . . . . . . . . . . . . . . . . . . . . . . . . 51
6 Contents
Page 7

Getting Started
Introduction
Your Dell™ PowerVault™ Data Protection Solution is preconfigured for quick
and simple deployment. Some configuration settings are unique to your IT
environment and must be entered upon initial use. This document provides
the information needed to configure the system for your specific IT
environment.
NOTE: Prior to deploying your system, review the Dell PowerVault Data Protection
Solution Information Update for the latest information.
NOTE: For documents referenced in this guide, see the Dell PowerVault Data
Protection Solution Quick Reference Guide at support.dell.com.
Supported Systems Information
The PowerVault Data Protection Solution is based on Microsoft® System
Center Data Protection Manager (DPM) 2007, which is preconfigured to run
on a Dell PowerVault system. It is important to know your PowerVault system
model when you require support from Dell, install additional hardware, or
reinstall the PowerVault Data Protection Solution software. Dell
OpenManage™ system management applications recognize and report your
system model information.
Table 1-1. PowerVault Data Protection Solutions and System Models
Data Protection Solution System Model
PowerVault DP100 PowerVault 100
PowerVault DP500 PowerVault 500
PowerVault DP600 PowerVault 600
Getting Started 7
Page 8

The PowerVault Data Protection Solution name is located on the front of
your system.
Figure 1-1. PowerVault Data Protection Solution Tower System
Figure 1-2. PowerVault Data Protection Solution Rack System
Locating the PowerVault System Model
The PowerVault system model is available from the following locations:
• BIOS boot and configurations screens
• OpenManage
• OpenManage
• operating system
8 Getting Started
™
Server Administrator
™
IT Assistant
System Properties
window (see Figure 1-3)
Page 9
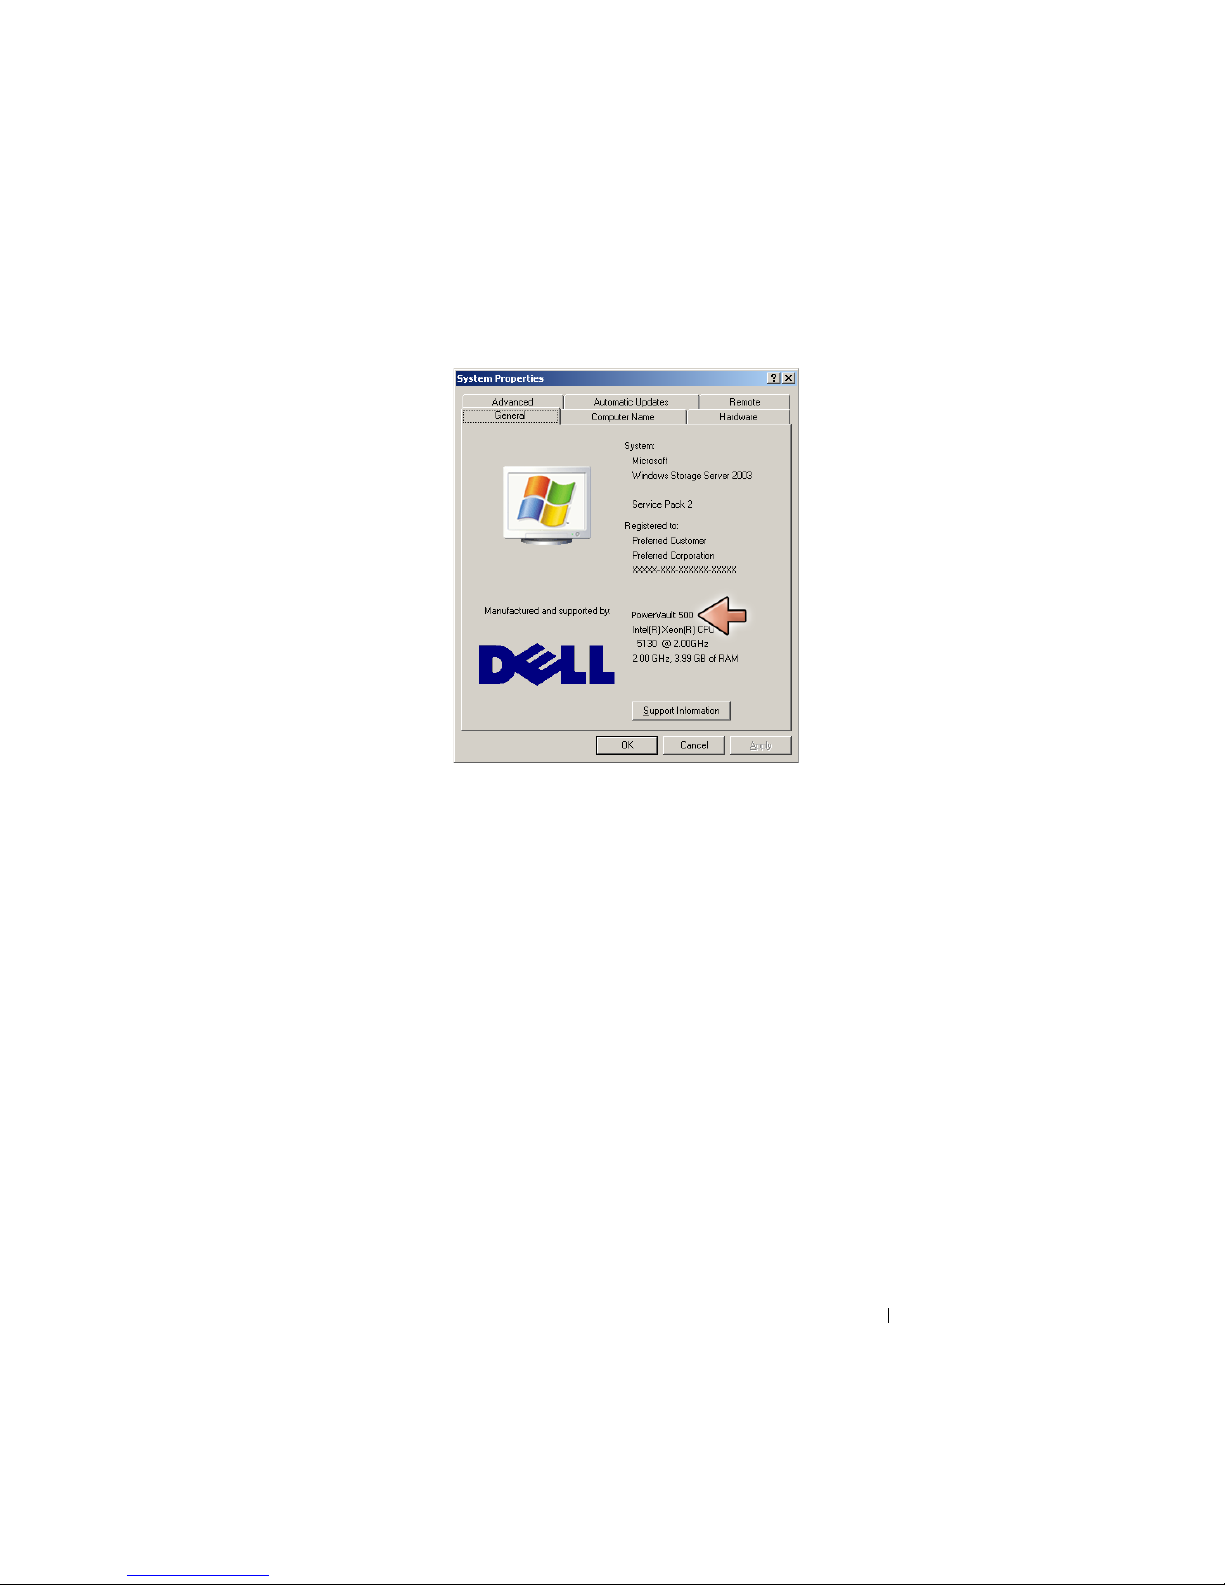
Figure 1-3. PowerVault System Model Identification on the System Properties Window
Obtaining Support Documents and Software Updates
Visit support.dell.com to obtain additional documentation or software
updates for your PowerVault system, including:
• BIOS updates
• firmware updates to the PowerVault system and internal peripherals
• device drivers
Locate the documents and software updates that apply to your system by
selecting your PowerVault system model (for example, PowerVault 500).
Then, choose your system model by either model, service tag, or from your
customized system list.
Getting Started 9
Page 10
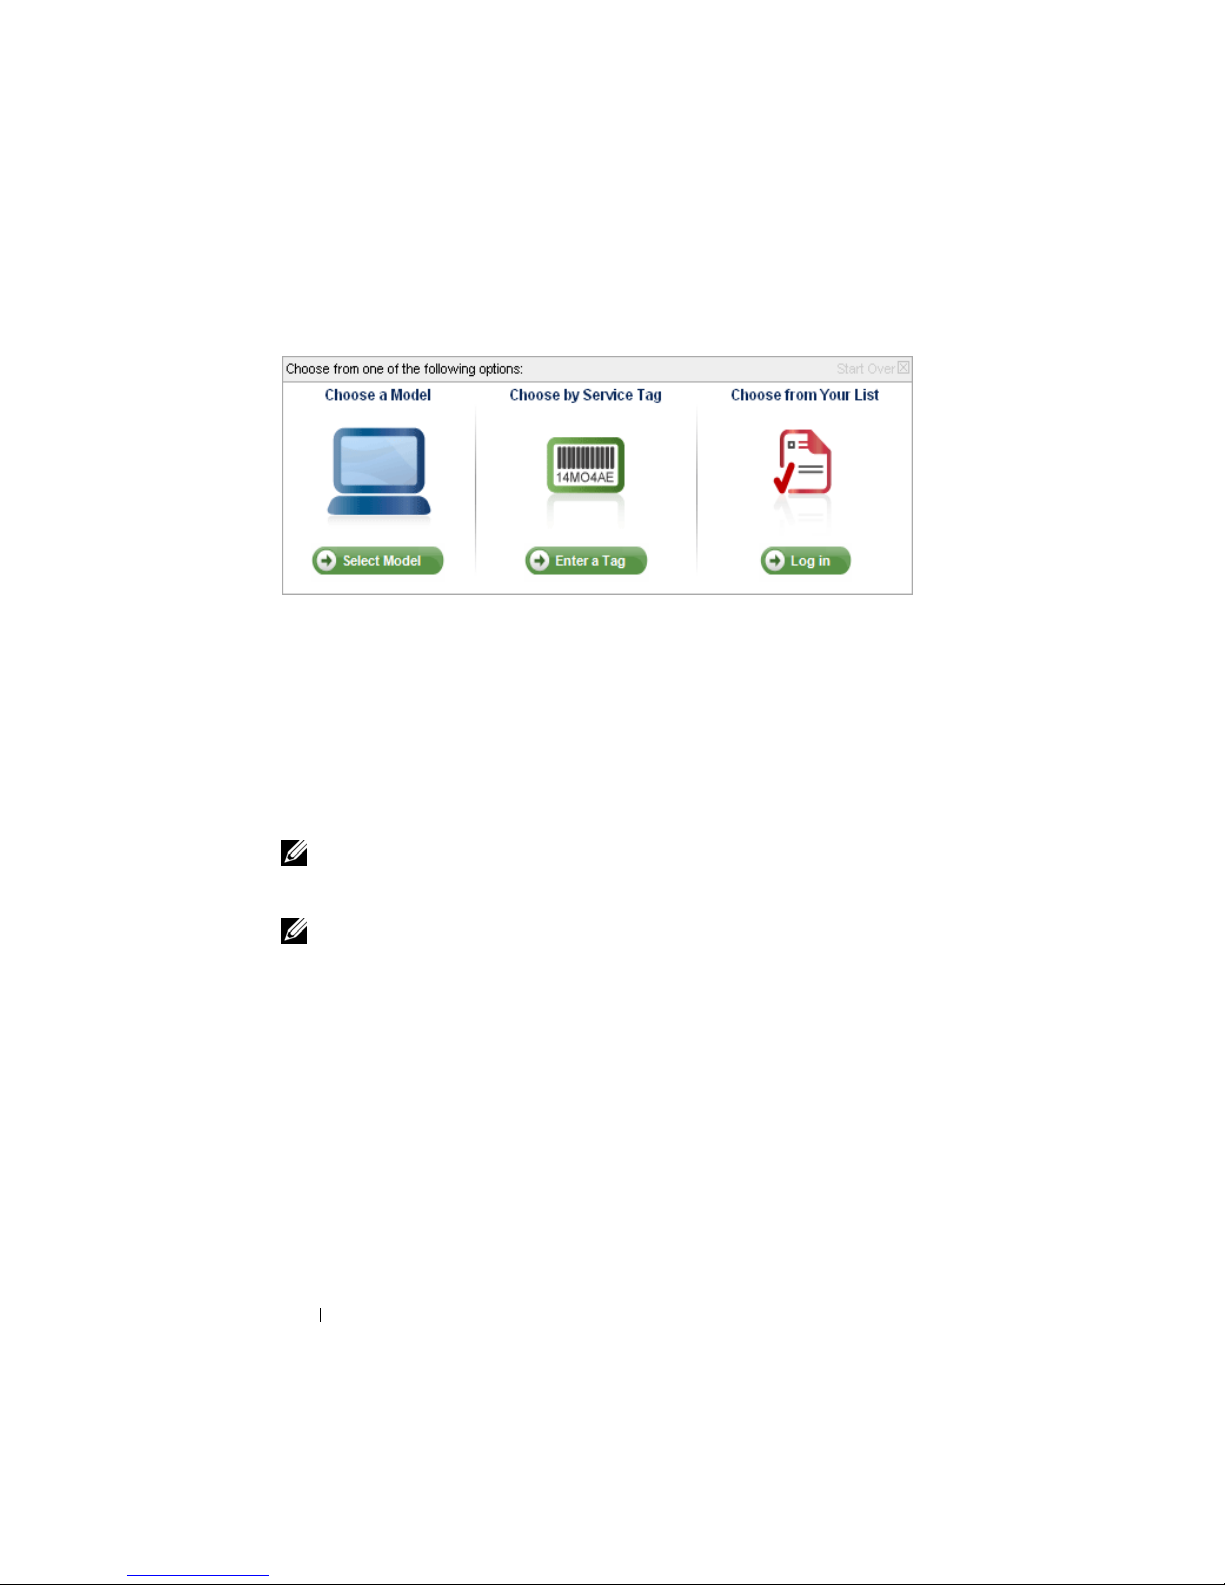
Figure 1-4. Model Selection via support.dell.com
Choose by Model
1
Click on
2
Under
3
Under
4
Choose your system model.
Choose by Service Tag
NOTE: The service tag is a label attached to the side or back of your system that
includes a bar code and alpha numerics. When you enter your system’s service tag,
the system model is determined automatically.
Select Model
Product Family
Product Line
, click on
.
, click
Select Servers, Storage and Networking
PowerVault Storage
.
.
NOTE: Dell recommends using this method when using support.dell.com.
1
Click on
2
Enter your service tag, then click Go.
Choose from Your List
Enter a Tag
.
You can maintain a list of systems you have purchased from Dell using the
Yo u r L i st feature on support.dell.com. Once you have created an account and
entered the service tags for the systems that you own, you can choose your
model from that list.
10 Getting Started
Page 11
DPM Prerequisites
Before you run Microsoft® System Center Data Protection Manager (DPM)
2007 for the first time, these prerequisites apply:
• The system must be on a network and have a valid IP address.
• The system must be a member of a domain.
• The user must be logged on as a domain user, and that domain user must
be a member of the local administrator group.
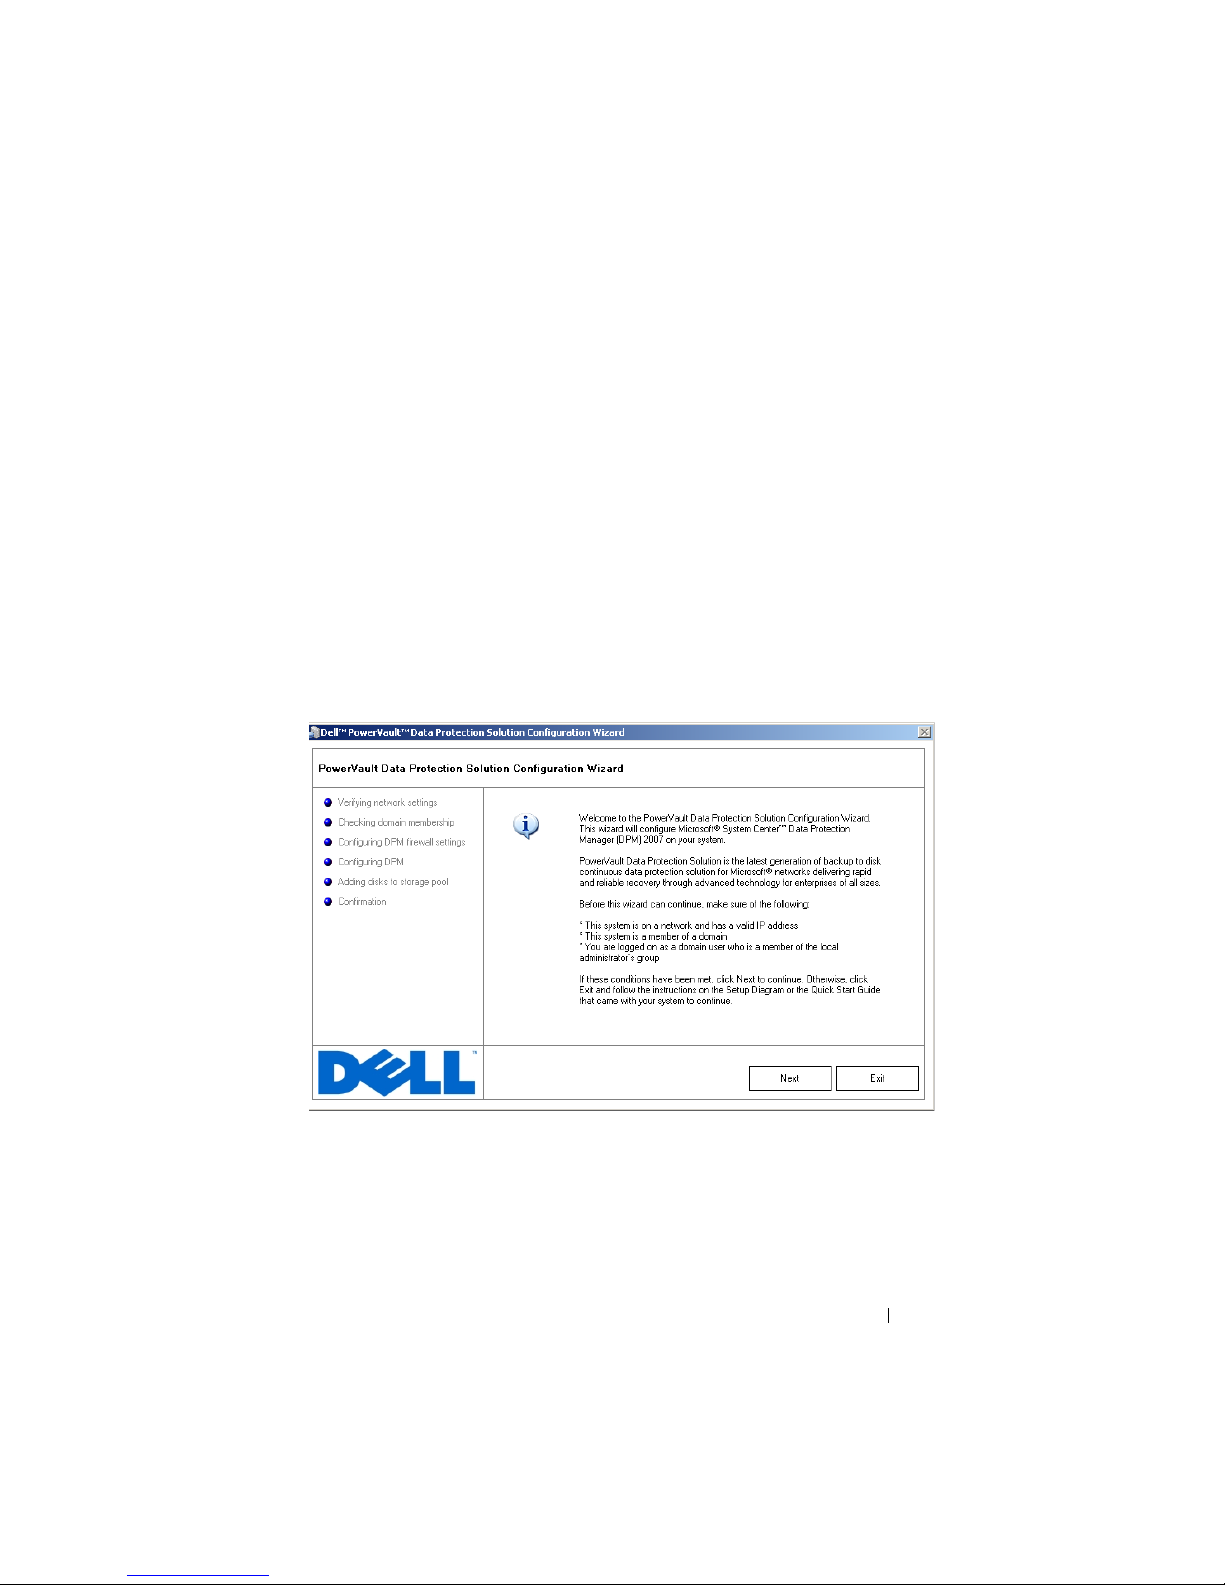
At initial login, the PowerVault Data Protection Solution Configuration
Wizard starts up automatically. Exit the wizard to configure your system to
meet the prerequisites above. The following sections in this document guide
help you complete these tasks.
Figure 1-5. PowerVault Data Protection Solution Configuration Wizard Welcome
Screen
Rack Installation
For rack mountable systems, see the Rack Installation Instructions or Rack
Installation Guide included with your rack solution for information on how to
install your system into a rack.
Getting Started 11
Page 12
Connecting and Powering on the System
NOTE: For maximum reliability and availability of your PowerVault Data Protection
Solution, connect your system to an Uninterrupted Power Supply (UPS).
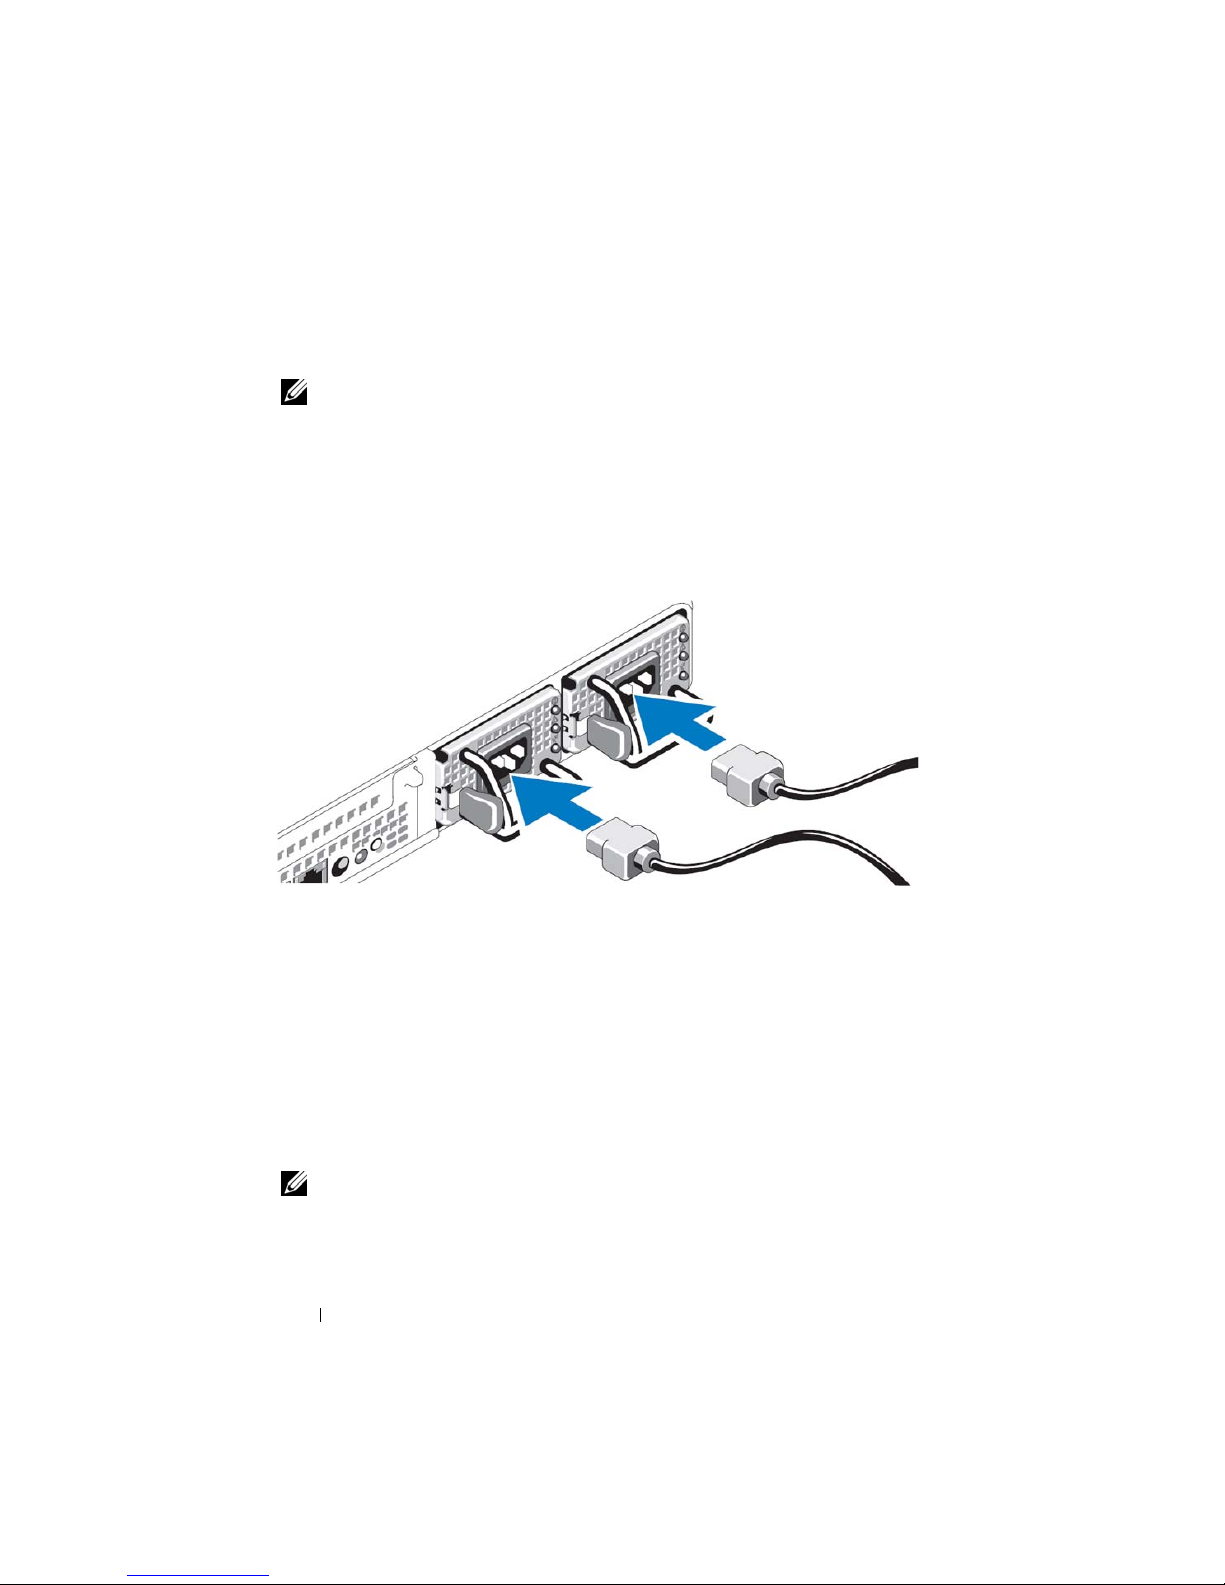
Connect the system’s power cable(s) to the system. Plug the other end of the
cable into a grounded electrical outlet or a separate power source, such as an
uninterrupted power supply (UPS) or a power distribution unit (PDU). For
information about system connectors, see your system’s Hardware Owner’s
Manual.
Figure 1-6. Power Connectors
Configuring Your System Using a Keyboard, Video
Monitor and Mouse
1
Connect your keyboard, video monitor, and mouse to the system.
For information about system connectors, see your system’s
Owner’s Manual.
2
Push the power button to turn on the system.
3
Log on to the system.
NOTE: If you plan to complete the system setup remotely, refer to "Configuring Your
System Remotely" on page 21. Then, return to this section and complete the
following steps.
12 Getting Started
Hardware
Page 13
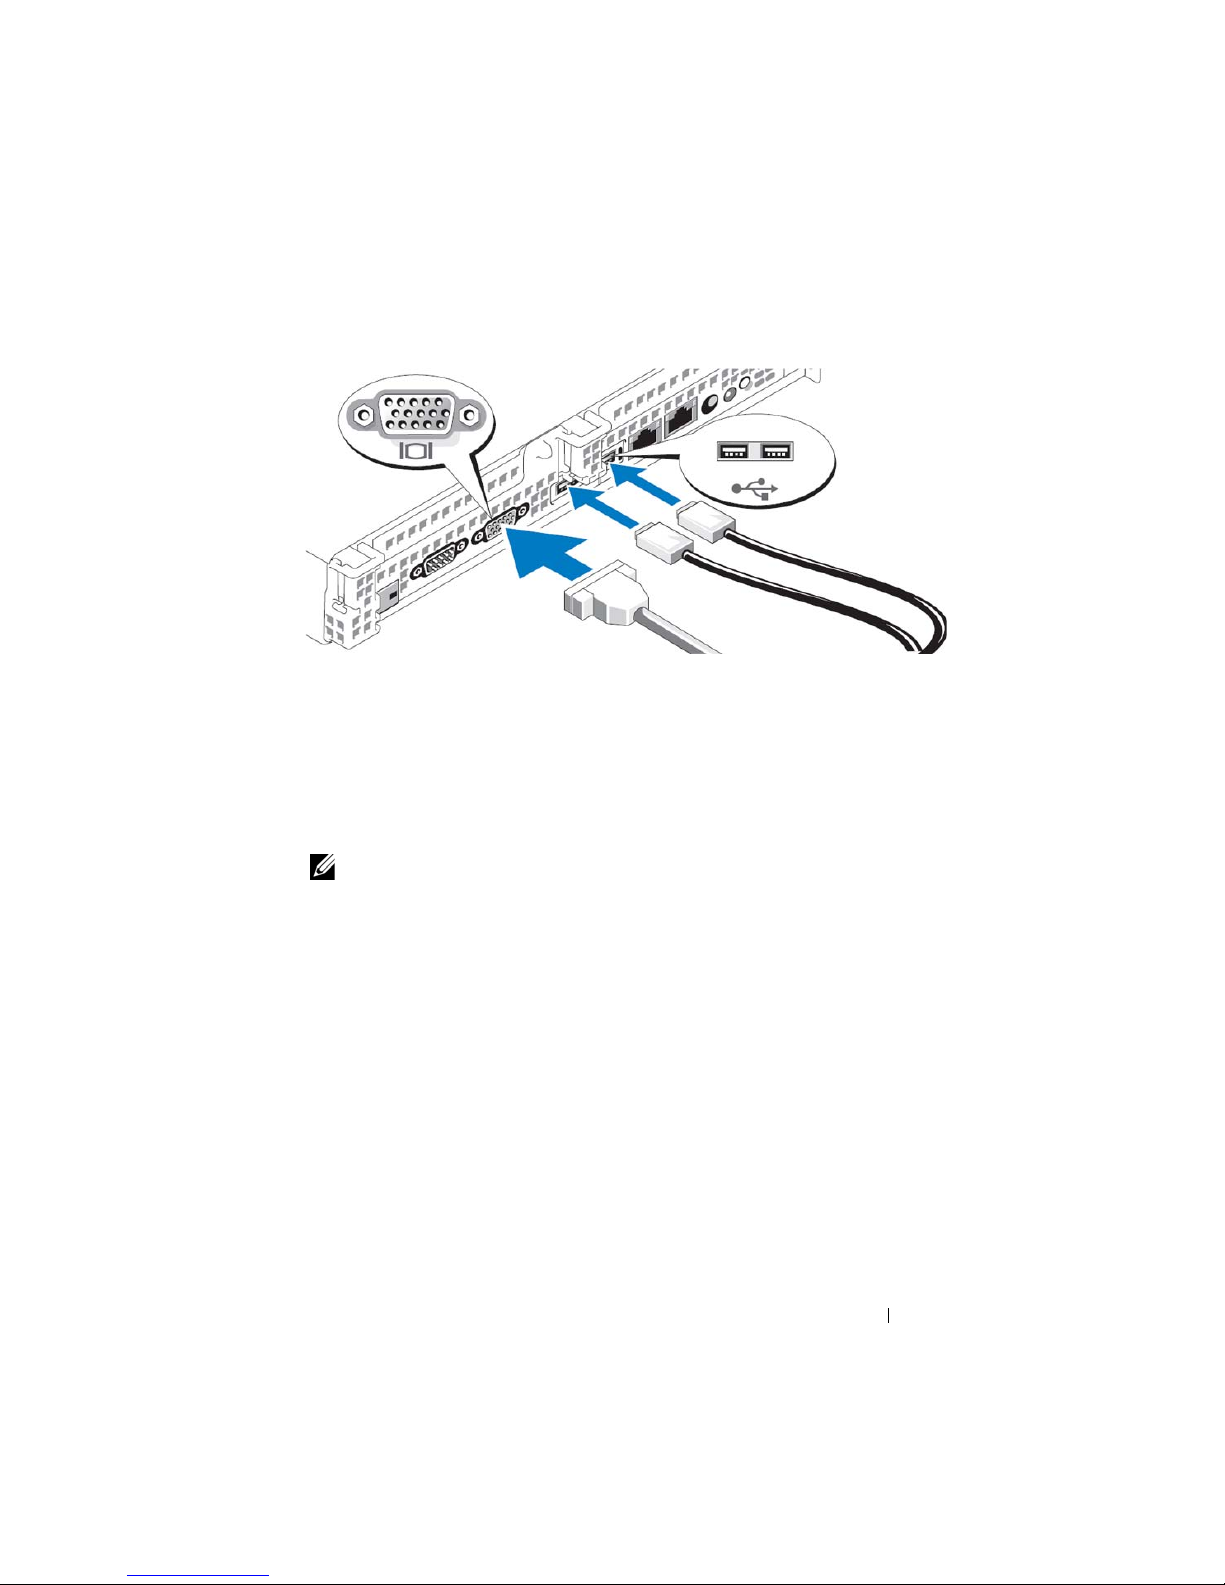
Figure 1-7. Connecting a Keyboard, Video Monitor and Mouse to the System
Entering the Default Administrator Username and
Password
When logging into the system for the first time, you must enter an
administrator user name and password. The default administrator user name
for your system is administrator; the default password is storageserver.
NOTE: Change the default password immediately to keep your system secure.
Changing the Administrator Password
1
Click
Start
and select
2
In the
Computer Management
(Local)
3
In the right window, right-click
4
In the
5
Enter and confirm your password in the appropriate fields, then click OK.
6
Close the
tree, expand
Set Password for Administrator
Computer Management
Administrative Tools → Computer Management
window in the
Local Users and Groups
Administrator
window, click
window.
Computer Management
, then select
and select
Getting Started 13
Users
Set Password
Proceed
.
.
.
.
Page 14
Network Configuration
Cabling and Configuring Your Network Connection
1
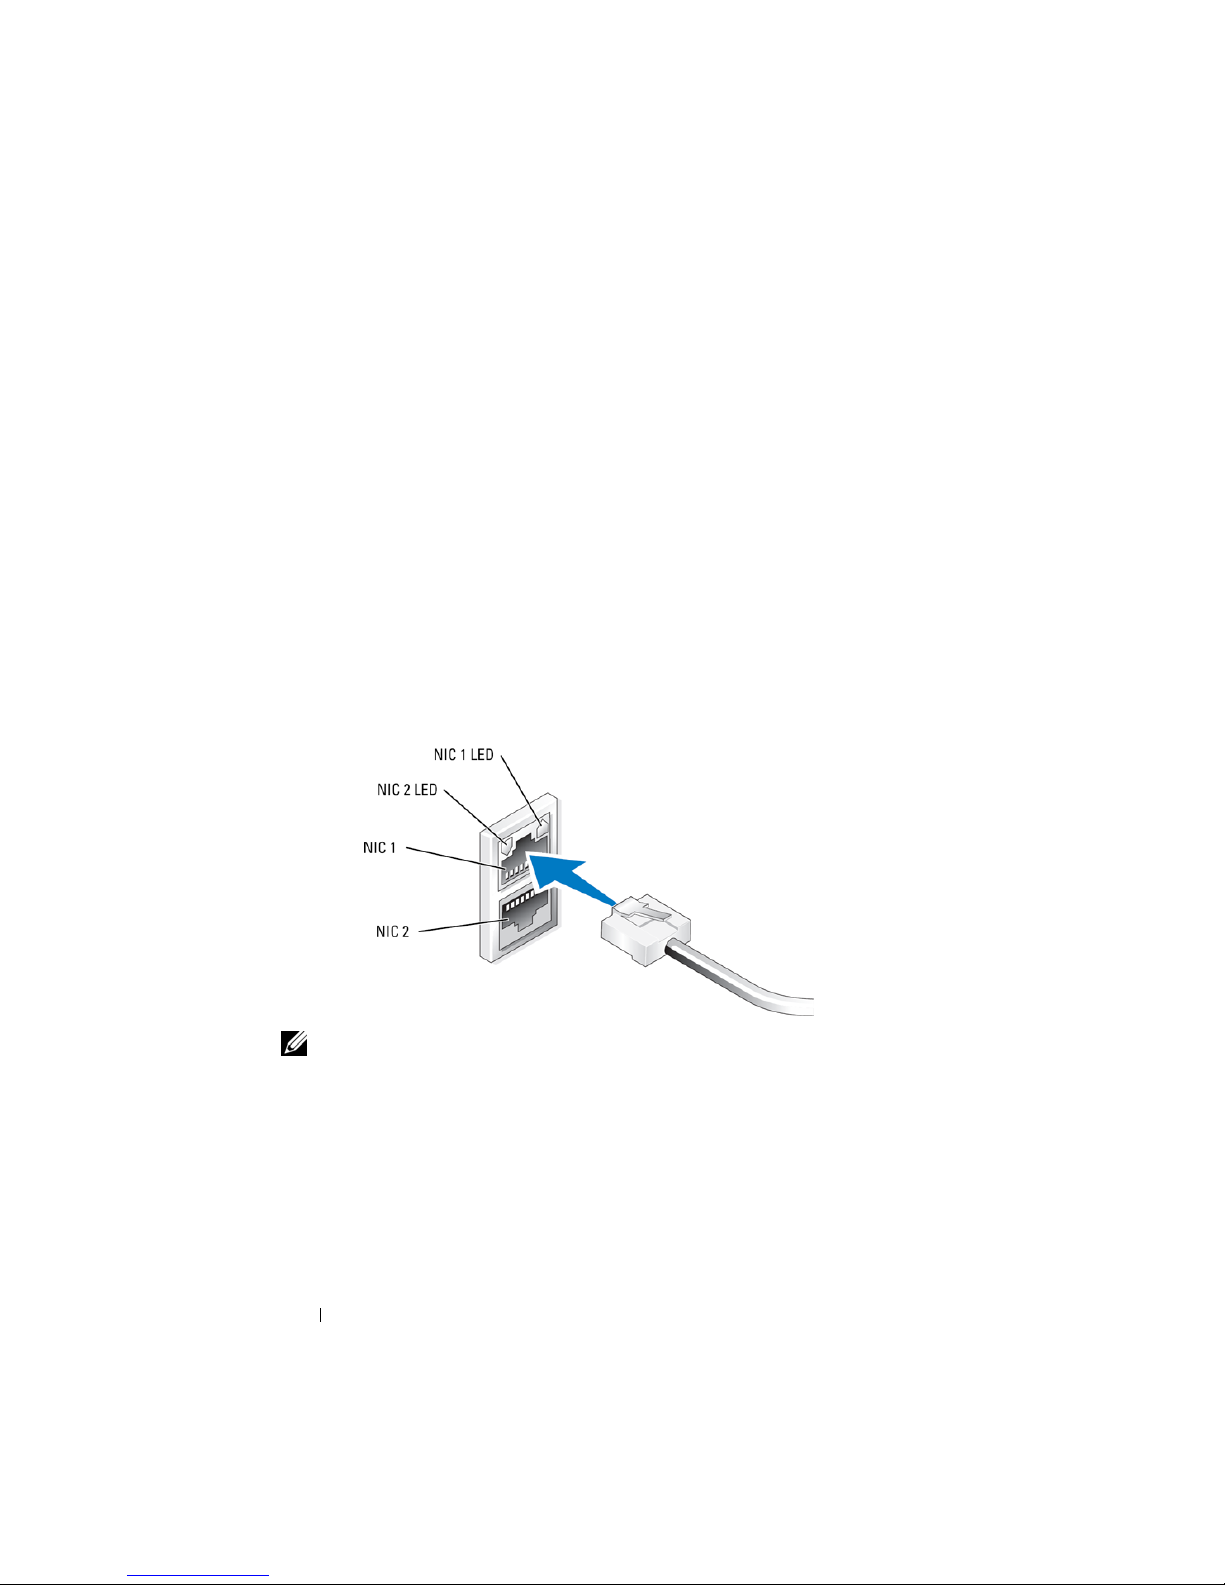
Connect one end of an Ethernet cable into one of the RJ-45 network
interface connectors (NIC) (see Figure 1-8) on the back of your system.
See the
2
Connect the other end of the Ethernet cable to a functioning Ethernet
jack.
3
Verify that the NIC connector LED is lit (see Figure 1-8). If the LED is
steady green, the connection is good. If the LED is flashing amber, data is
successfully being transferred.
4
If the LED is not lit, make sure that each end of the Ethernet cable is
seated properly in the NIC connector and Ethernet jack.
Figure 1-8. NIC Connector
Hardware Owner’s Manual
for the NIC locations.
NOTE: The NIC connector’s physical orientation may vary depending on your
system. See your system’s Hardware Owner’s Manual for more information.
Configuring TCP/IP Using DHCP (Default Setting)
Dynamic Host Configuration Protocol (DHCP) is enabled by default on your
system. If your network is not configured with a DHCP server, proceed to
"Configuring TCP/IP Using a Static IP Address" on page 15 to configure a
static IP address on your system. Use the following procedure to verify your
system’s DHCP configuration.
14 Getting Started
Page 15

NOTE: To perform this procedure, you must be a member of the Administrator
group or the Network Configuration Operator group on the local computer.
1
Click
Start
and select
2
Right-click the network connection you want to configure, then click
Properties
3
On the
.
General
(for all other connections), click
Properties
4
Verify that
.
Obtain an IP address automatically
Settings→ Control Panel→ Network Connections
tab (for a local area connection) or the
Networking
Internet Protocol (TCP/IP)
is selected, then click OK.
. Then, click
Proceed to "Changing the Computer Name" on page 16.
Configuring TCP/IP Using a Static IP Address
The following procedure is required if DHCP is not configured on the
network, or if a static IP address is desired.
NOTE: To perform this procedure, you must be a member of the Administrator
group or the Network Configuration Operator group on the local computer.
1
Click
Start
and select
2
Right-click the network connection that you want to configure, then click
Properties
3
On the
.
General
(for all other connections), click
Properties
4
Click
5
If you are configuring a local area connection, enter the appropriate
.
Use the following IP address
information in the
you are configuring an ad hoc connection, enter the IP address in the
address
field.
6
Click
Use the following DNS server addresses
7
In the
Preferred DNS server
primary and secondary DNS server addresses.
Settings→ Control Panel→ Network Connections
tab (for a local area connection) or the
Networking
Internet Protocol (TCP/IP)
.
IP address, Subnet mask
, and
Default gateway
.
and
Alternate DNS server
fields, type the
. Then, click
.
tab
.
tab
fields. If
IP
Getting Started 15
Page 16

8
Configure additional IP addresses, if required. Otherwise, go to the next
step.
a
Click
Advanced
b
c
On the
Under
IP Settings
TCP/IP Address
appropriate fields, then click
d
Repeat step b and step c for each additional IP address.
9
Configure additional default gateways, if required. Otherwise, go to the
.
tab under
IP addresses
, click
Add
.
, enter an IP address and subnet mask in the
Add
.
next step.
a
b
On the
Under
IP Settings
tab under
Default gateways
TCP/IP Gateway Address
in the
Gateway
, click
Add
.
field, enter the IP
address of the default gateway.
c
To manually configure a default route metric, clear the
metric
check box and enter a metric in the
d
Click
Add
.
e
Repeat step b through step d for each default gateway (if required).
10
Configure a custom metric for this connection, if required. Otherwise, go
Metric
Automatic
field.
to step 11.
11
12
13
Clear the
In the
Click OK.
Automatic metric
Interface metric
check box.
field, type the appropriate metric.
Changing the Computer Name
1
Right-click
dialog box is displayed.
2
On the
Changes
want to assign to your system. Then, click
3
Click OK to close the
4
When prompted, restart your system.
16 Getting Started
Computer Name
dialog box, in the
My Computer
System Properties
, then click
tab, click
Properties
Change
Computer name
. The
System Properties
. On the
Computer Name
field, enter the name you
OK
.
window.
Page 17

Domain Membership
1
Right-click
dialog box is displayed.
2
On the
Changes
text box, and click
3
Provide a domain user name and password (contact your network
administrator to obtain permissions to join the domain).
4
The changes take effect upon system restart. However, defer the restart
until you complete the following steps. If the account used in step 3 has
administrative privileges, proceed directly to step 8. Otherwise, complete
the following steps to add the domain user to the local administrator group
on the system.
5
Click
6
Click
Figure 1-10)
My Computer
Computer Name
dialog box, select
OK (see
Start→ Run
Groups
, then type
, then double-click
.
, then click
tab, click
Domain,
Change
Figure 1-9).
lusrmgr.msc
Administrators
Properties
enter the name of the domain in the
. The
. In the
and click
. Then, click
System Properties
Computer Name
OK
Add
(see
Getting Started 17
Page 18
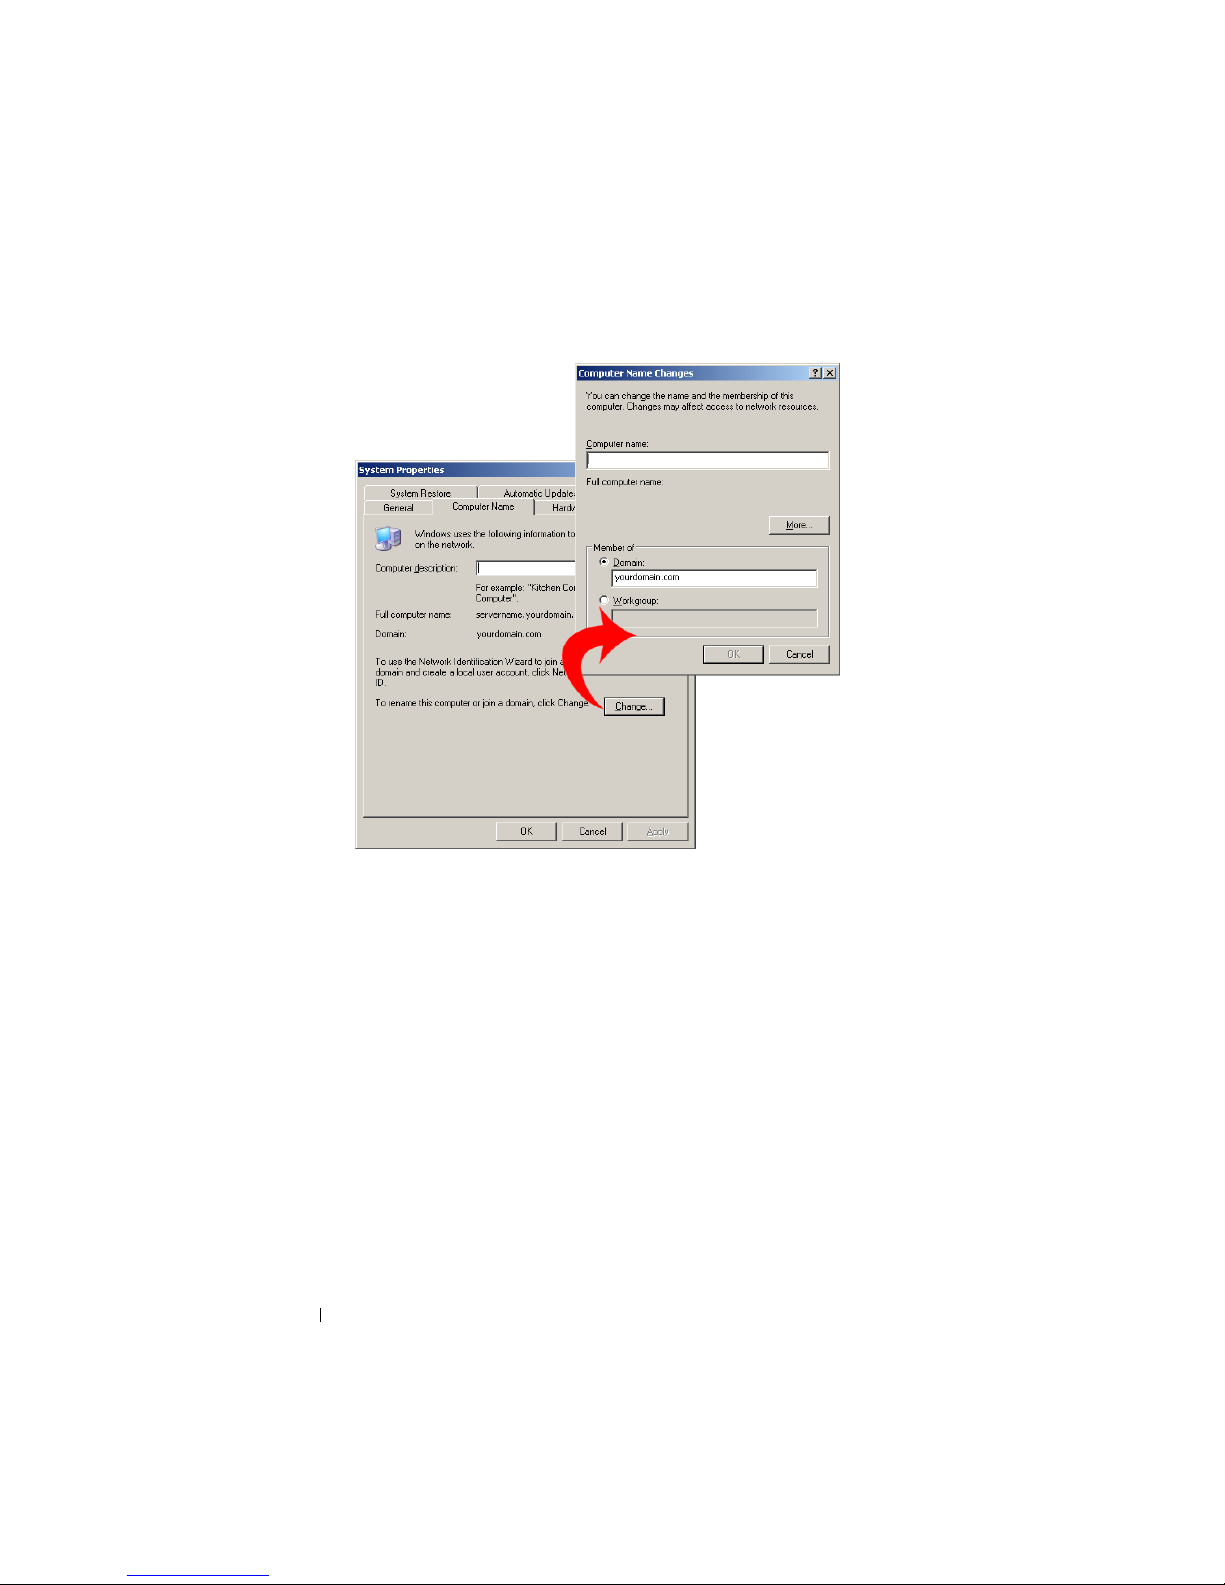
Figure 1-9. Joining a Domain
7
Type the username in
DOMAIN\username
format and follow the
instructions to add the domain user to the Administrators group.
8
Restart your system.
18 Getting Started
Page 19
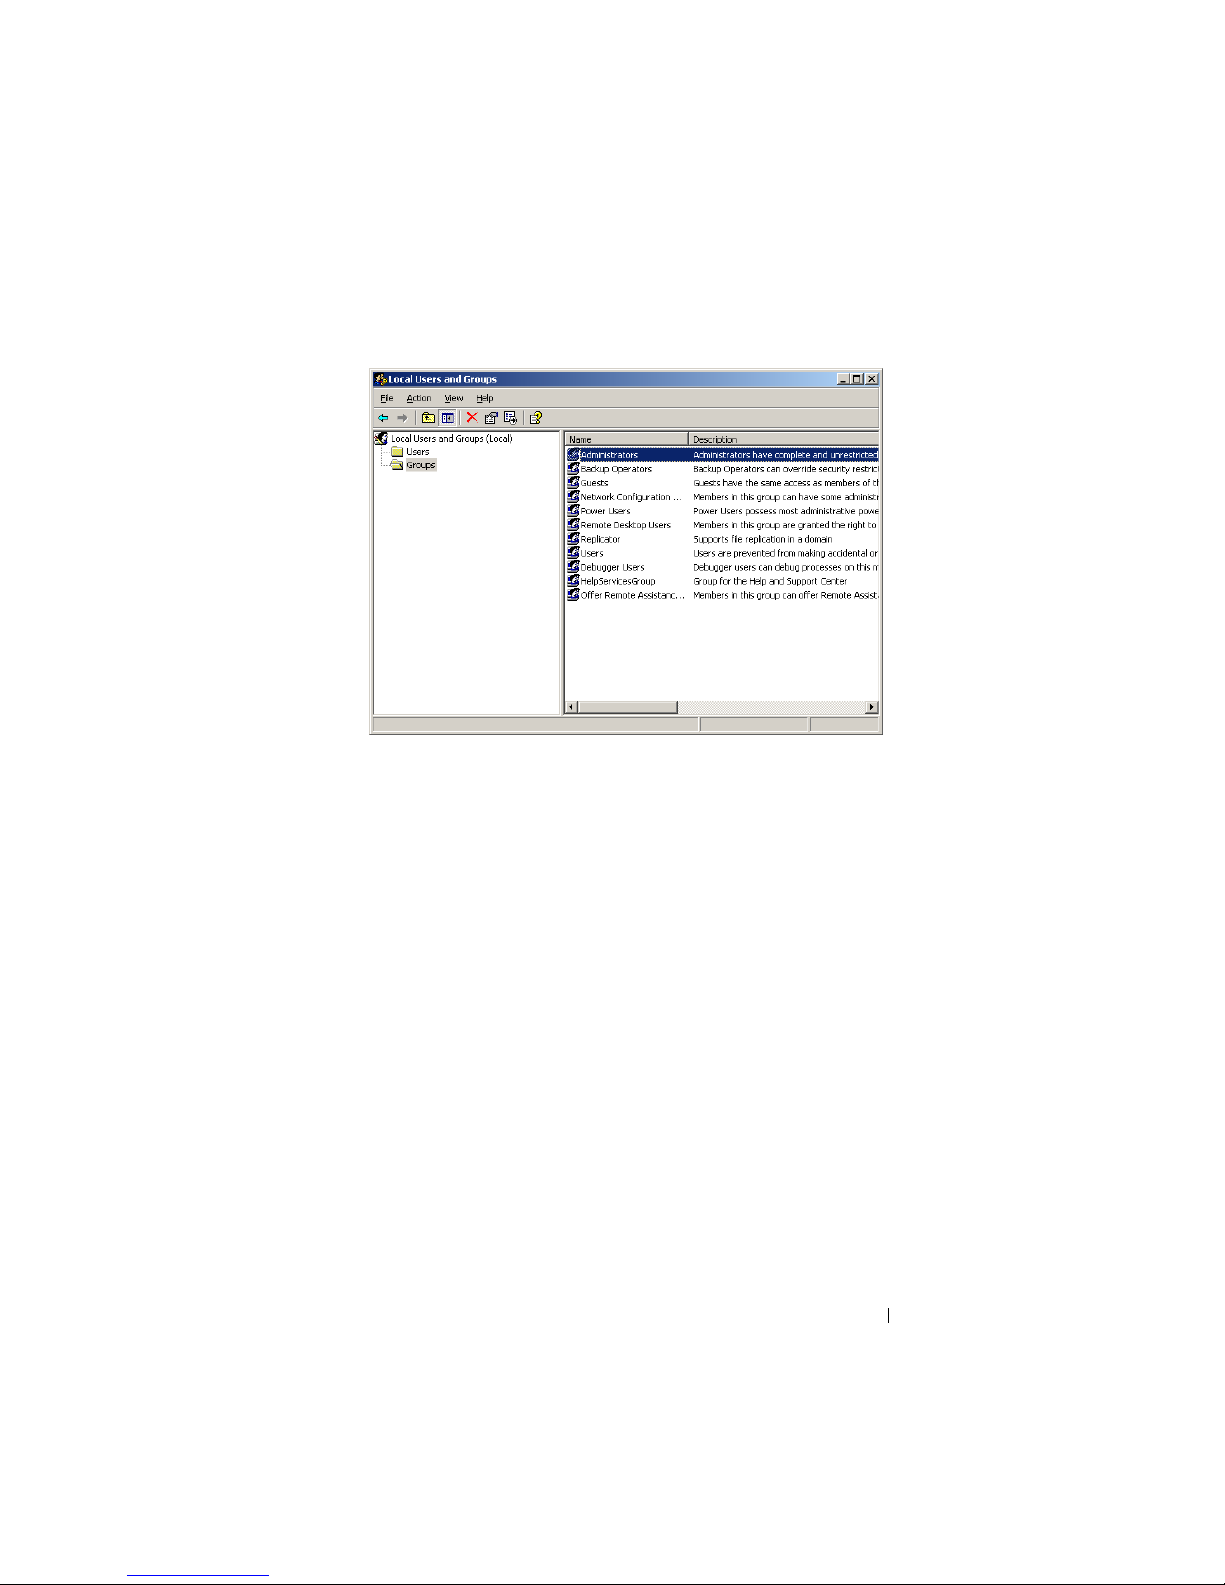
Figure 1-10. Adding a User to the Local Administrator’s Group
Localizing Your System Using MUI
The Multilanguage User Interface (MUI) allows the system to display
operating systems menus, dialogs, and help files in multiple languages.
Your system is preconfigured with Windows Storage Server 2003 R2 x64
Edition with SP2 and the MUI is preconfigured with the language selected at
the time of purchase. No action is required unless you want to configure the
system to use a different language. To change the language to another Dellsupported language, you must install the MUI system files for that language.
Refer to “Localizing the Operating System” in the PowerVault Data Protection
Solution Recovery Guide.
Getting Started 19
Page 20

20 Getting Started
Page 21
Configuring Your System Remotely
Special Administration Console (SAC)
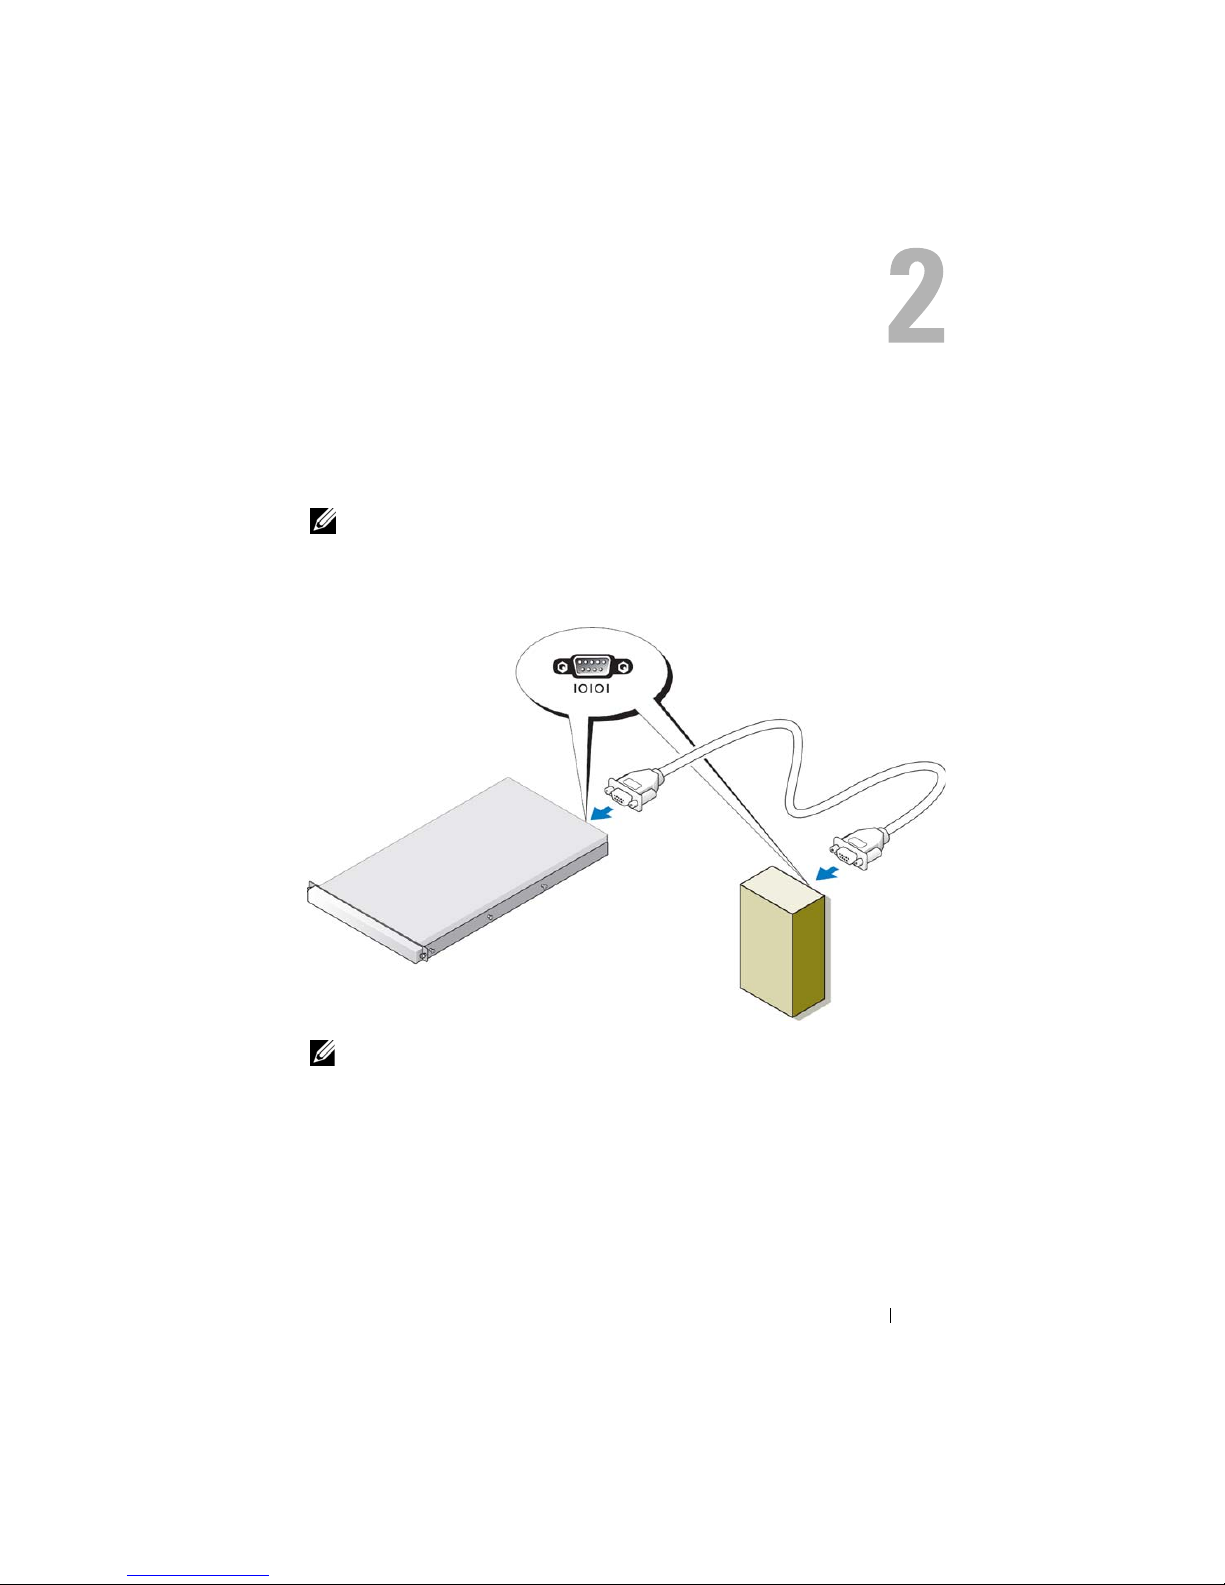
NOTE: Using SAC requires a female-to-female serial console cable to connect
directly from a client system to the PowerVault storage system’s serial port, as
shown in Figure 2-1.
Figure 2-1. Using the Console Cable to Connect to SAC
NOTE: Ensure that the terminal emulation software settings on the client system
are set to 115200 baud, 8 data bits, No parity, and 1 stop bit.
In a non-DHCP environment, use command-line interface (CLI) support in
SAC to connect (through a serial port) to a system running Windows Storage
Server 2003. Then, configure network settings. After you configure the
Configuring Your System Remotely 21
Page 22

network using SAC, you can remotely access the graphical user interface
(GUI) to configure and manage Windows Storage Server using the IP
address. To do this, you need to:
1
Access the SAC command prompt.
2
Configure the system’s IP addresses and the Domain Name System
(DNS).
Accessing the SAC Command Prompt
SAC is the primary emergency management system (EMS) CLI environment
hosted by Windows Storage Server 2003 operating systems. It is separate from
the CLI environment and provides different functionality.
SAC is available immediately after you power on the system. You can use SAC
to manage the server during normal system operation and to configure most
of the Windows Storage Server 2003 operating system components. You can
also use SAC when the system is in Safe Mode or during GUI-mode setup.
When EMS is enabled, SAC remains active as long as the kernel is running.
You can access SAC using a serial cable between the system and a portable
system using a terminal emulation program, such as HyperTerminal.
NOTE: To access EMS remotely, ensure that you are using compatible client
software for terminal emulation. For more information, see "Selecting client terminal
software for Emergency Management Services" on www.microsoft.com
(http://go.microsoft.com/fwlink/?LinkId=66418.)
To Access the SAC Command Prompt:
1
Start the terminal emulation program and connect to the serial port.
2
Power on the system.
3
After EMS starts, from the SAC prompt type
cmd
and press
create a command prompt window.
4
To switch the channel window to view the output of the command
prompt, type
5
Log on as Administrator.
NOTE:
ch -sn cmd0001
and press
The default password for your s
Enter
.
ystem is storageserver.
22 Configuring Your System Remotely
Enter
to
Page 23

For more information about using SAC, see "Using Emergency Management
Services" at www.microsoft.com, or see the Windows Storage Server 2003
Help.
Configuring IP Addresses and DNS
After connecting to the SAC command prompt, you can use netsh to
configure network addresses, default gateways, and DNS for a system. Once
you have configured those settings, you can connect remotely to the server
and use the GUI to complete other initial configuration and management
tasks.
To set the static IP address, you must know the IP address, subnet mask, and
gateway address.
1
Obtain the list of available interfaces:
netsh interface ip show interface
Identify the interface(s) that are displayed as
2
3
Set the IP address for the desired interface by entering the following
Connected
.
command (on a single line):
netsh interface ip set address name=
source=static addr=
gateway=
4
Set the DNS address by entering the following command (on a single line):
gateway_address
IP_address
netsh interface ip set dns name=
source=static addr=
dns_address
interface
mask=
subnet_mask
interface
NOTE: If you are using an interface name that includes spaces, place the text in
quotation marks. For example, "local area connection".
For more information about the netsh command, see "Scripting Tools" on
www.microsoft.com (http://go.microsoft.com/fwlink/?LinkId=66414), or see
the Windows Storage Server 2003 Help.
Remote Desktop Connection
After an IP address has been configured, you can access systems running
Windows Storage Server 2003 from another Windows-based system by using
Remote Desktop Connection.
Configuring Your System Remotely 23
Page 24

To set up access from the management station, create a remote desktop
connection and save it to your desktop using these steps:
1
Click
Start→Run
2
In the
Run
3
In the
Remote Desktop Connection
the IP address of the system, then click
4
In the
Connection Settings
5
In the
Save As
connection. Leave the extension as
6
In the
Save in
For more information about configuring your Remote Desktop Connection,
see "Remote Desktop Connection" on at www.microsoft.com
(http://go.microsoft.com/fwlink/?LinkId=69058), or see the Windows Storage
Server 2003 Help.
.
dialog box, enter
dialog box, enter the file name you would like to use for the
drop-down menu, select
mstsc
window, click
and click OK.
dialog box, enter the system name or
Options
.rdp
.
Desktop
.
Save As
, then
.
Save
.
Remote Web Administration
You can remotely access a server running Windows Storage Server 2003 from
a client system by using a web browser. For systems running a Windows
operating system and Internet Explorer 6 (or later), use the Remote RDP
Client ActiveX control. The ActiveX control is synonymous to the Remote
Desktop Connection, MSTSC.
Dell Remote Access Controller (DRAC)
The Dell Remote Access Controller 5 (DRAC 5) is a systems management
hardware and software solution designed to provide remote management
capabilities, crashed system recovery, and power control functions for Dell
systems. By communicating with the system’s baseboard management
controller (BMC), DRAC 5 (when installed) can be configured to send e-mail
alerts for warnings or errors related to voltages, temperatures, intrusion, and
fan speed. DRAC 5 also logs event data and the most recent crash screen (for
systems running Windows operating system only) to help you diagnose the
cause of a system crash. DRAC 5 contains its own microprocessor and
memory, and is powered by the system in which it is installed. DRAC 5 may
be pre-installed on your system, or available separately in a kit.
24 Configuring Your System Remotely
Page 25

To get started with DRAC 5, refer to "Installing and Setting up the DRAC 5"
in the Dell Remote Access Controller 5 (DRAC 5) User’s Guide.
Baseboard Management Controller (BMC)
The baseboard management controller (BMC) monitors the system for
critical events using various sensors on the system board and sends alerts and
logs events when certain parameters exceed preset thresholds. BMC supports
the industry-standard Intelligent Platform Management Interface (IPMI)
specification, enabling you to configure, monitor, and recover systems
remotely.
For more information, refer to the Baseboard Management Controller Utilities
User's Guide.
Configuring Your System Remotely 25
Page 26

26 Configuring Your System Remotely
Page 27

Configuring DPM
Running the Configuration Wizard
The PowerVault Data Protection Solution (DPS) Configuration Wizard is
used to configure your system to run DPM. It is launched automatically when
you log on to the system. It can also be launched by double-clicking the
PowerVault DPS Wizard icon on your desktop.
The wizard performs the following:
• verifies system, software, and network prerequisites
• verifies user account settings
• configures the system firewall
• launches DPM Mini-Setup
• adds available disks to the DPM storage pool
Log on to the system with the domain user account used in step 3 in "Domain
Membership" on page 17. The wizard will run automatically and display a
welcome screen that lists the prerequisites covered in "DPM Prerequisites" on
page 11.
Configuring DPM 27
Page 28
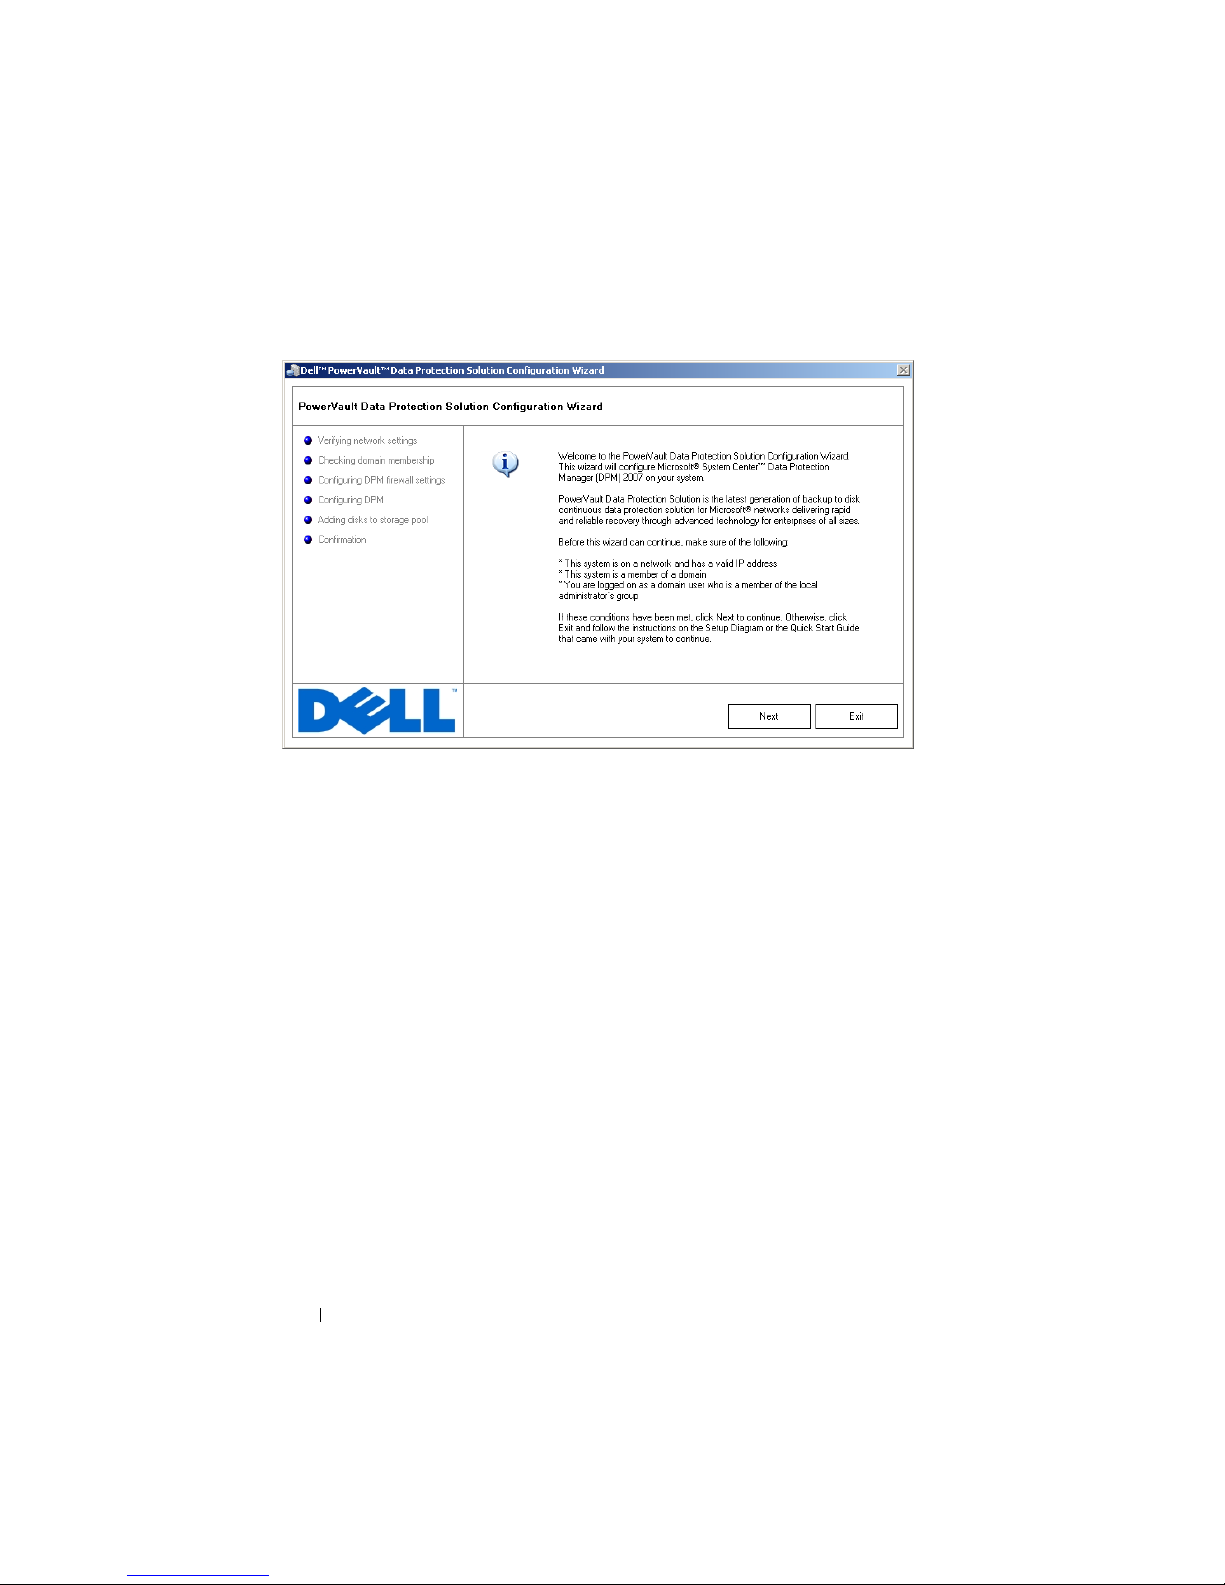
Figure 3-1. PowerVault DPS Configuration Wizard Welcome Screen
After ensuring that the prerequisites have been met, click Next to proceed.
The wizard will then verify the network, domain and user account settings for
DPM.
28 Configuring DPM
Page 29
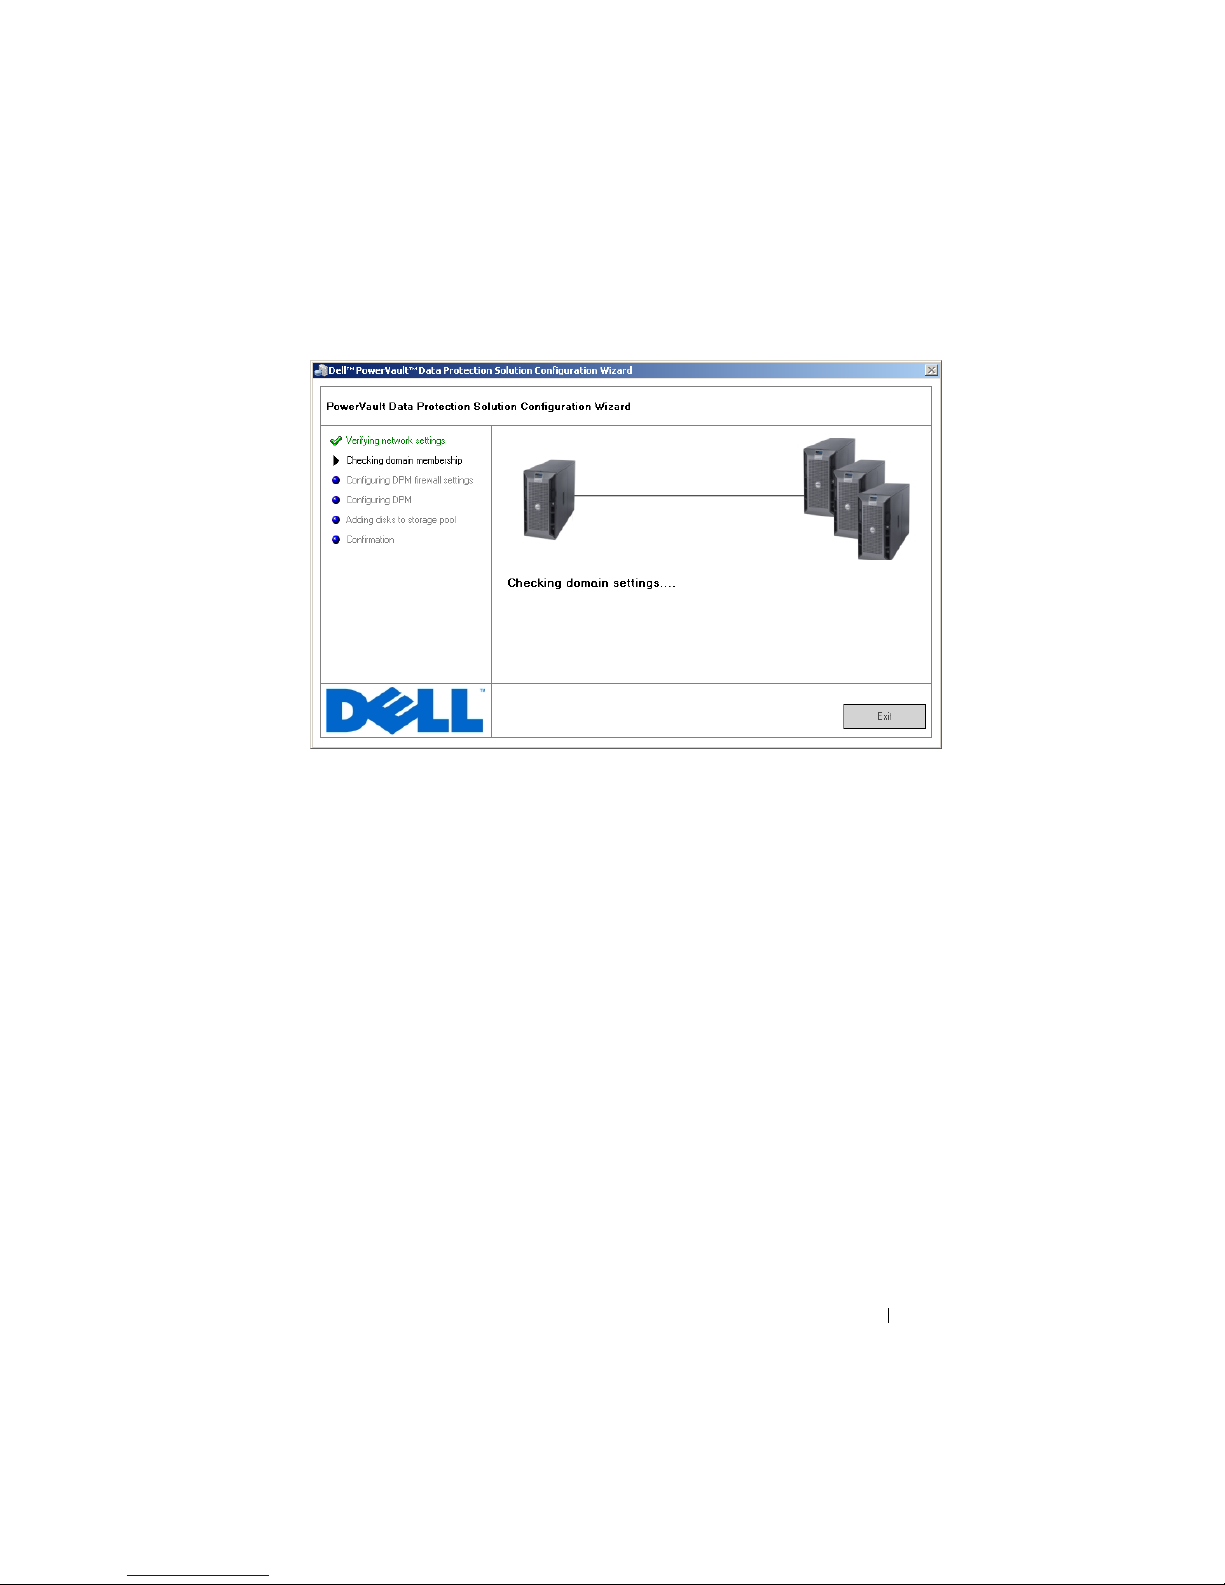
Figure 3-2. Verifying Prerequisites
After the wizard verifies your settings, it configures the Windows firewall for
DPM. In this step, the wizard will create firewall exceptions for the DPM
executables and open the TCP port for Windows Remote Procedure Call
(RPC) and Distributed COM (DCOM) (port 135). If the firewall service is
not running, this step will be skipped.
Configuring DPM 29
Page 30
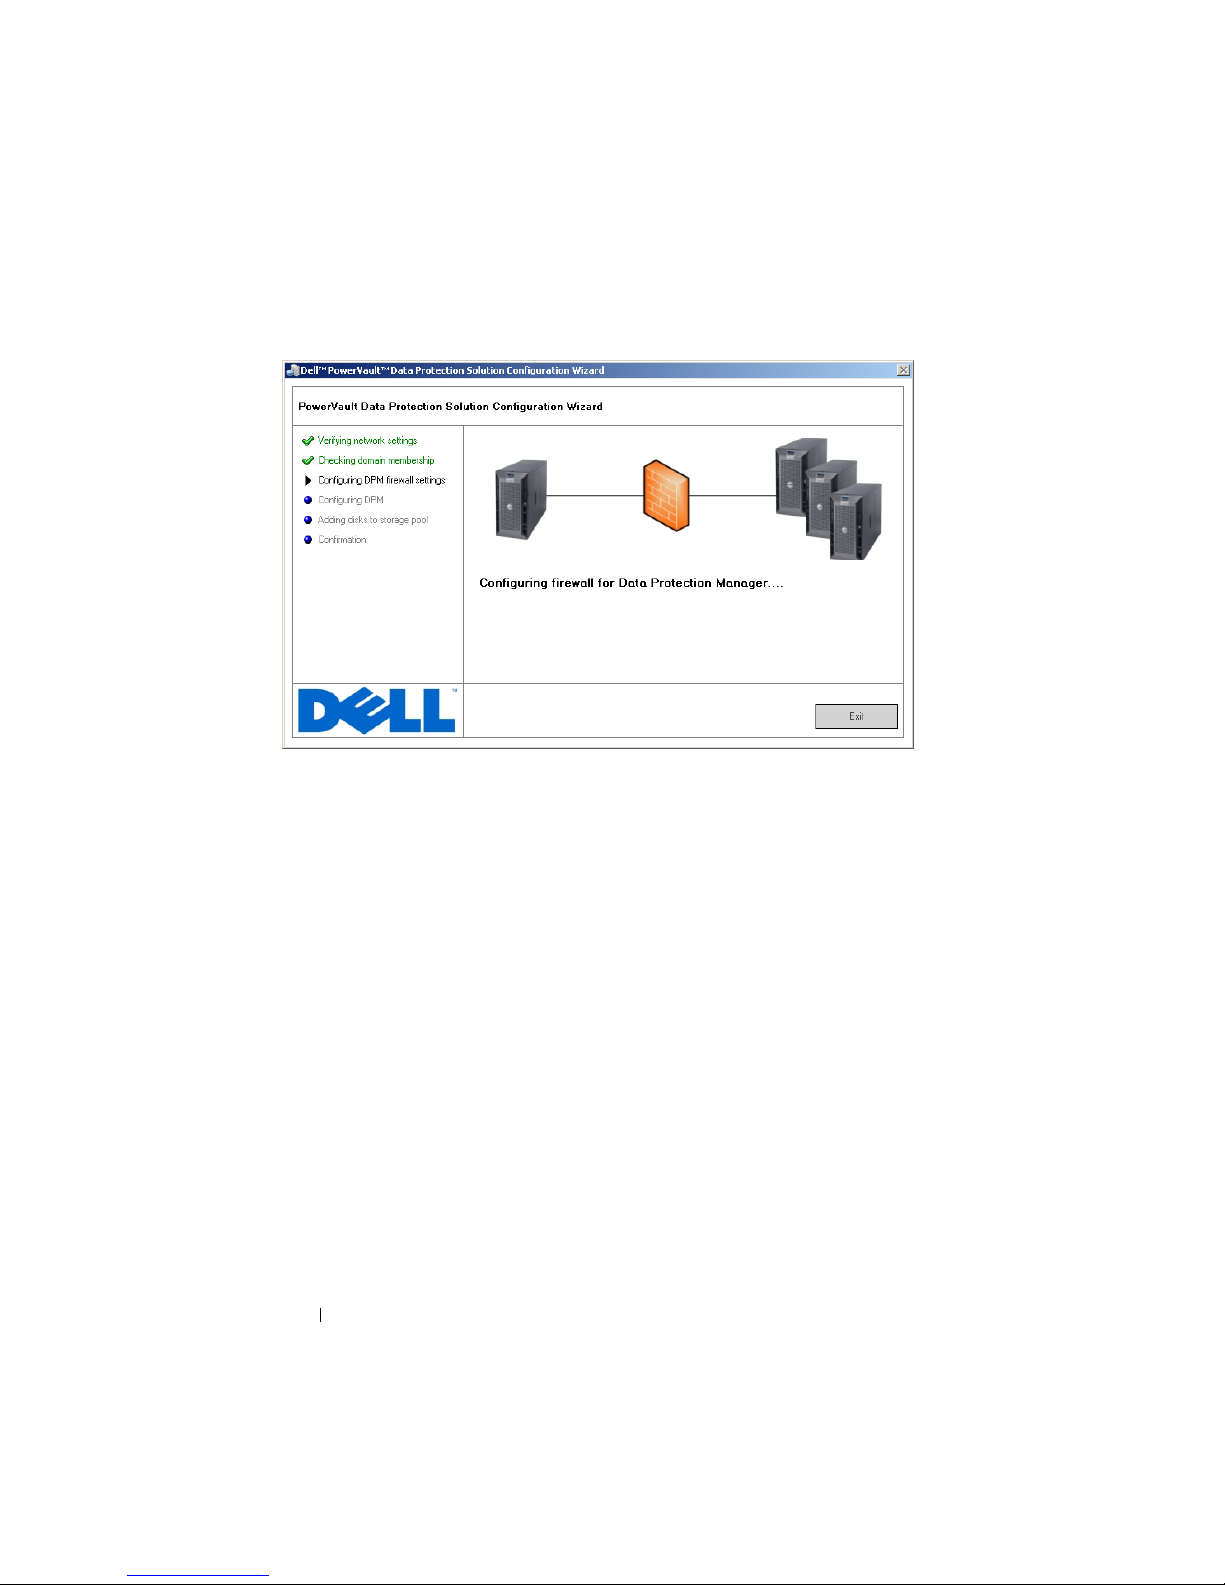
Figure 3-3. Configuring the Windows Firewall
After firewall configuration, the wizard launches the Microsoft Data
Protection Manager Mini-Setup Wizard. This wizard is required to complete
setup of DPM on your system. Click Next to continue. The PowerVault Data
Protection Solution Configuration Wizard will wait in the background until
the DPM Mini-Setup wizard completes.
30 Configuring DPM
Page 31
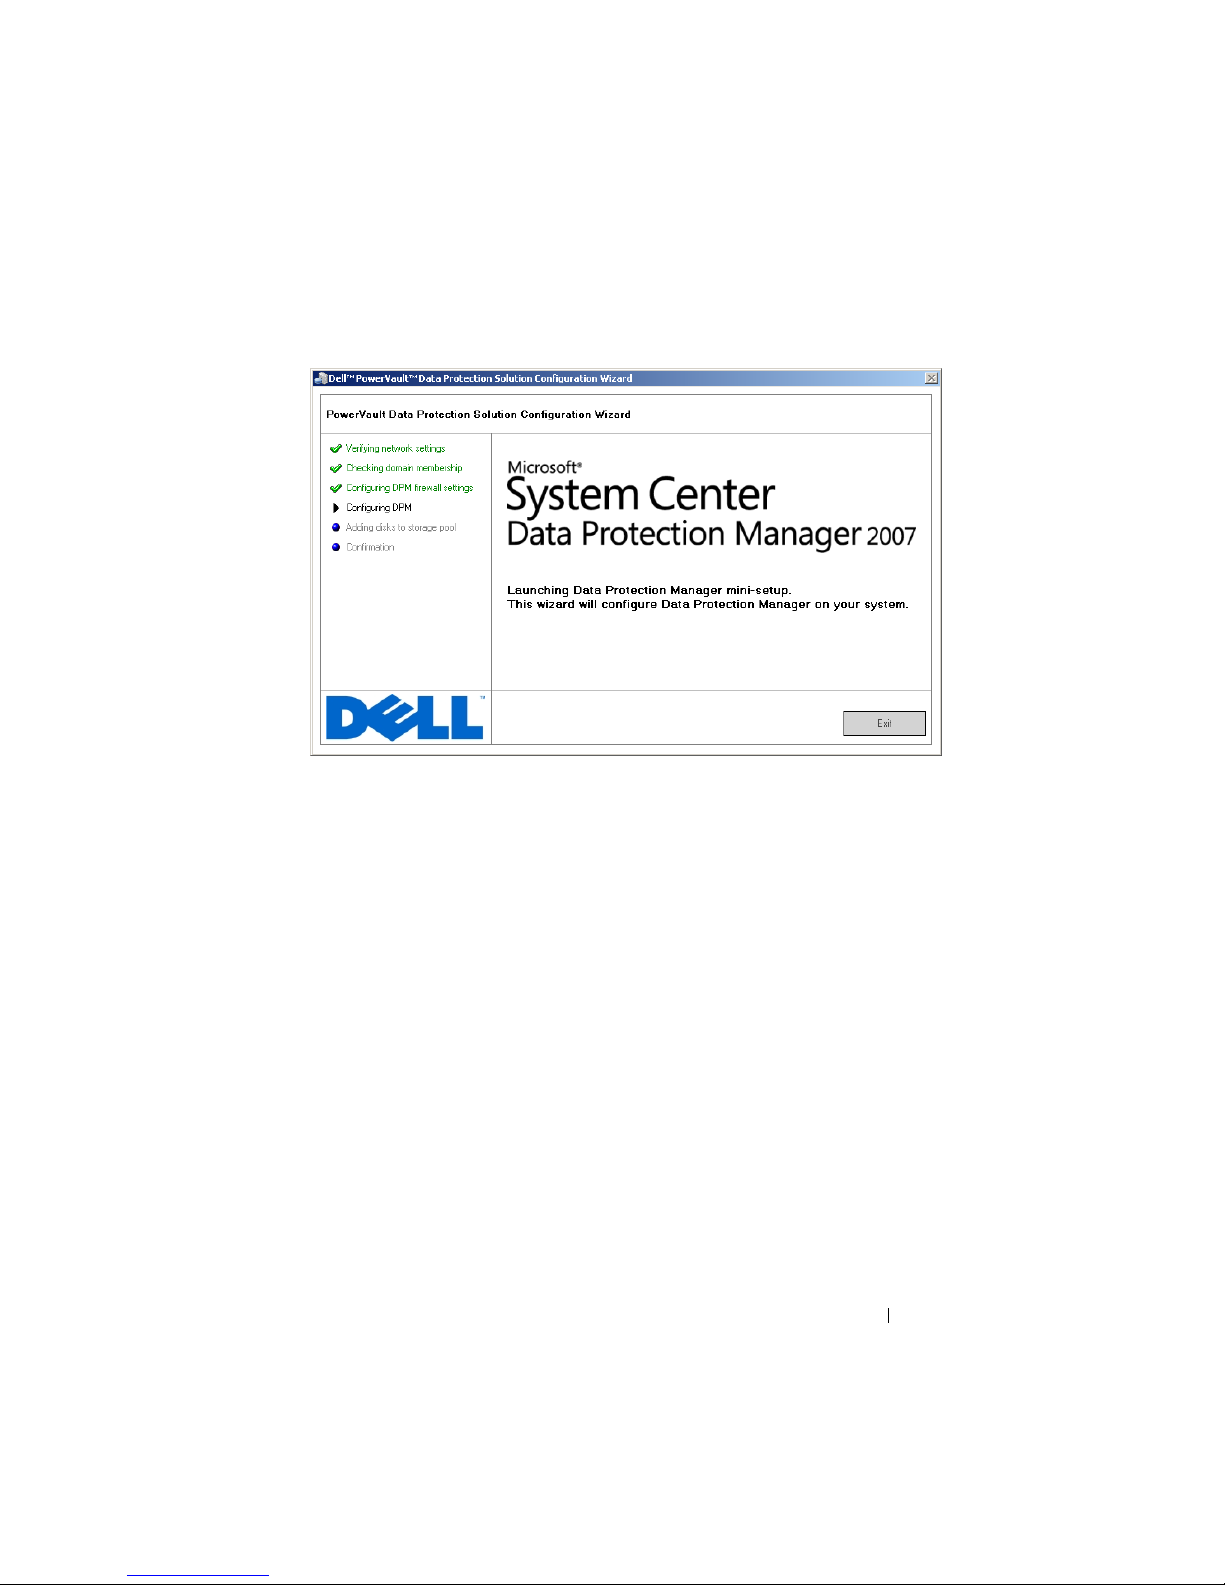
Figure 3-4. Launching Microsoft Data Protection Manager Mini-setup Wizard
Configuring DPM 31
Page 32
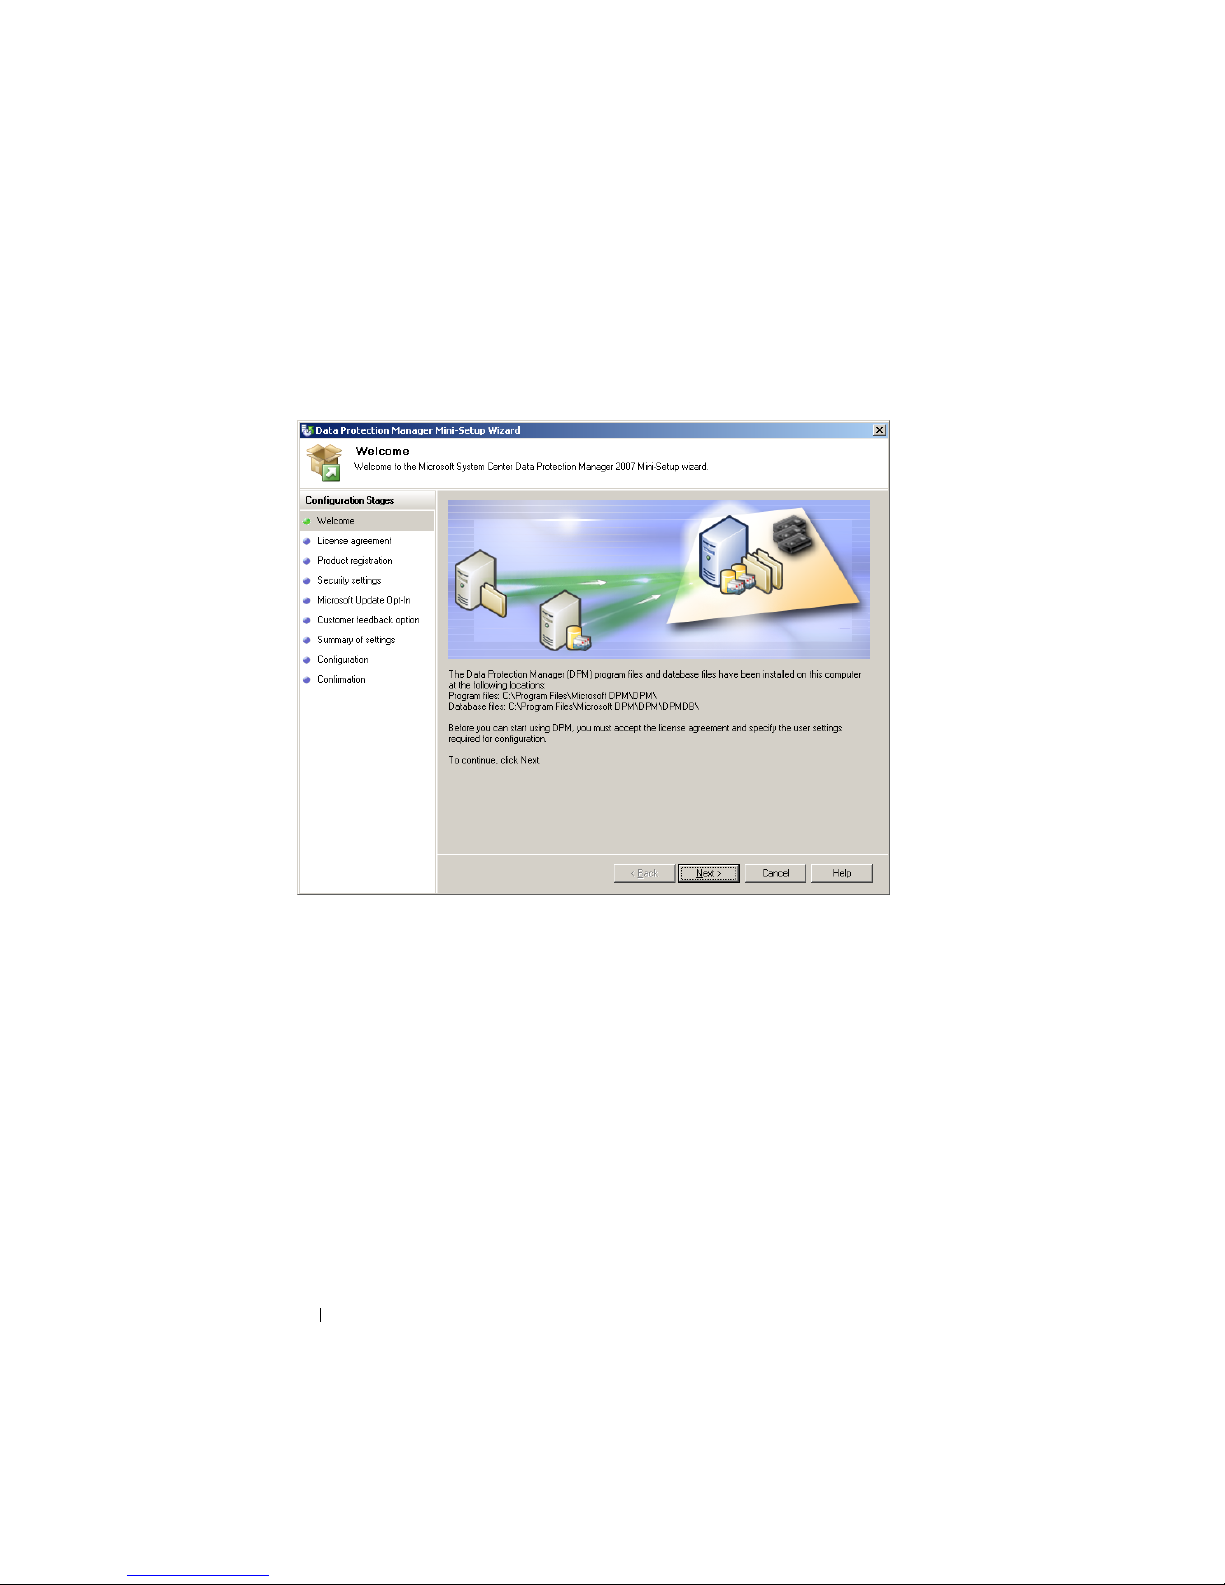
Microsoft Data Protection Manager Mini-Setup
Figure 3-5. Microsoft Data Protection Manager Mini-Setup Wizard
Figure 3-5 shows the DPM Mini-Setup wizard. Click Next to continue. The
wizard guides you through these steps:
•
Welc om e
•
License agreement:
license agreement must be accepted to continue.
•
Product registration:
associated with the DPM installation.
•
Security settings:
accounts.
•
Microsoft update opt in:
for the latest patches, security fixes and updates.
•
Customer feedback option:
the Microsoft Customer Experience Improvement Program.
This step displays the DPM license agreement. The
This step prompts for username and company
This step prompts for a password for the SQL service
Dell recommends enabling automatic updates
This step prompts the user to participate in
32 Configuring DPM
Page 33
•
Summary of settings
•
Configuration:
configuration is performed.
• Confirmation
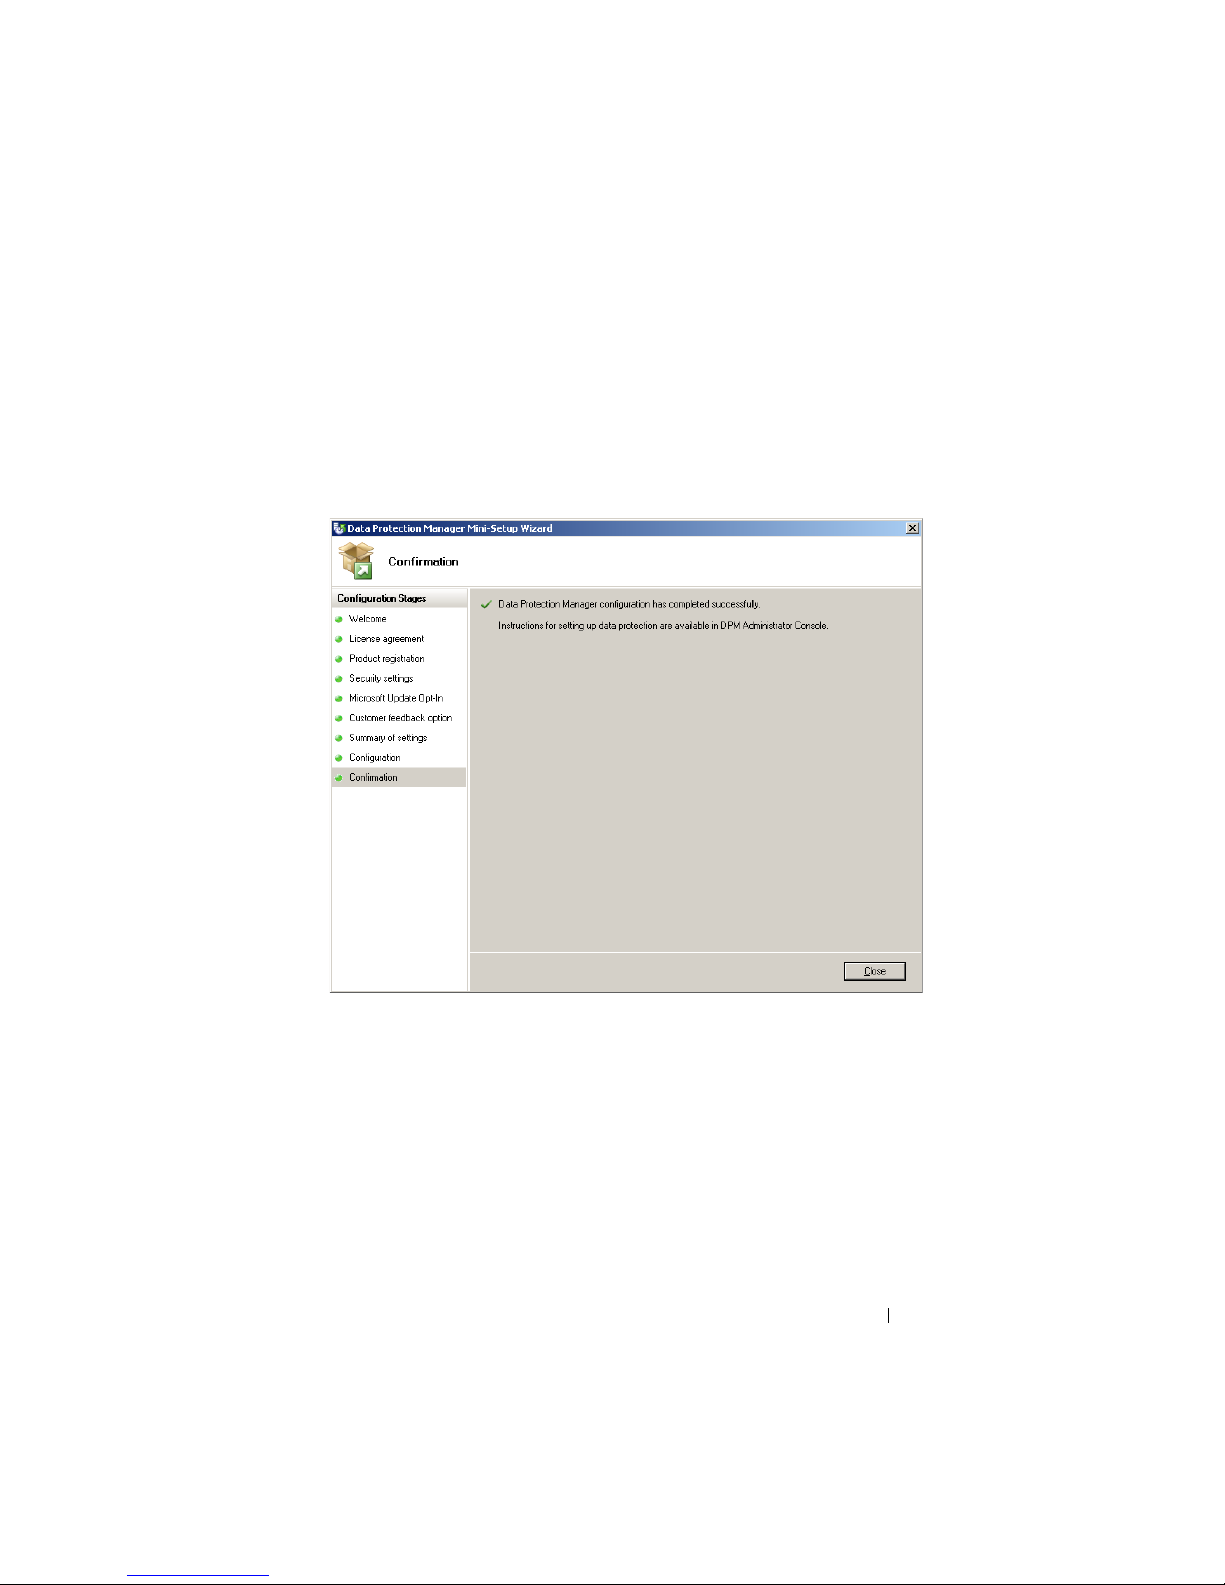
Figure 3-6. Microsoft Data Protection Manager Mini-Setup Wizard Confirmation
Screen
After collecting information from the user, the
After successfully answering all questions and completing the DPM MiniSetup wizard, click Close to return to the PowerVault Data Protection
Solution Configuration Wizard.
DPM Storage Pool Configuration
After the DPM Mini-Setup Wizard has completed successfully, the
PowerVault Data Protection Solution Configuration Wizard resumes and
adds the available storage to the DPM Storage Pool. The DPM Storage Pool is
Configuring DPM 33
Page 34
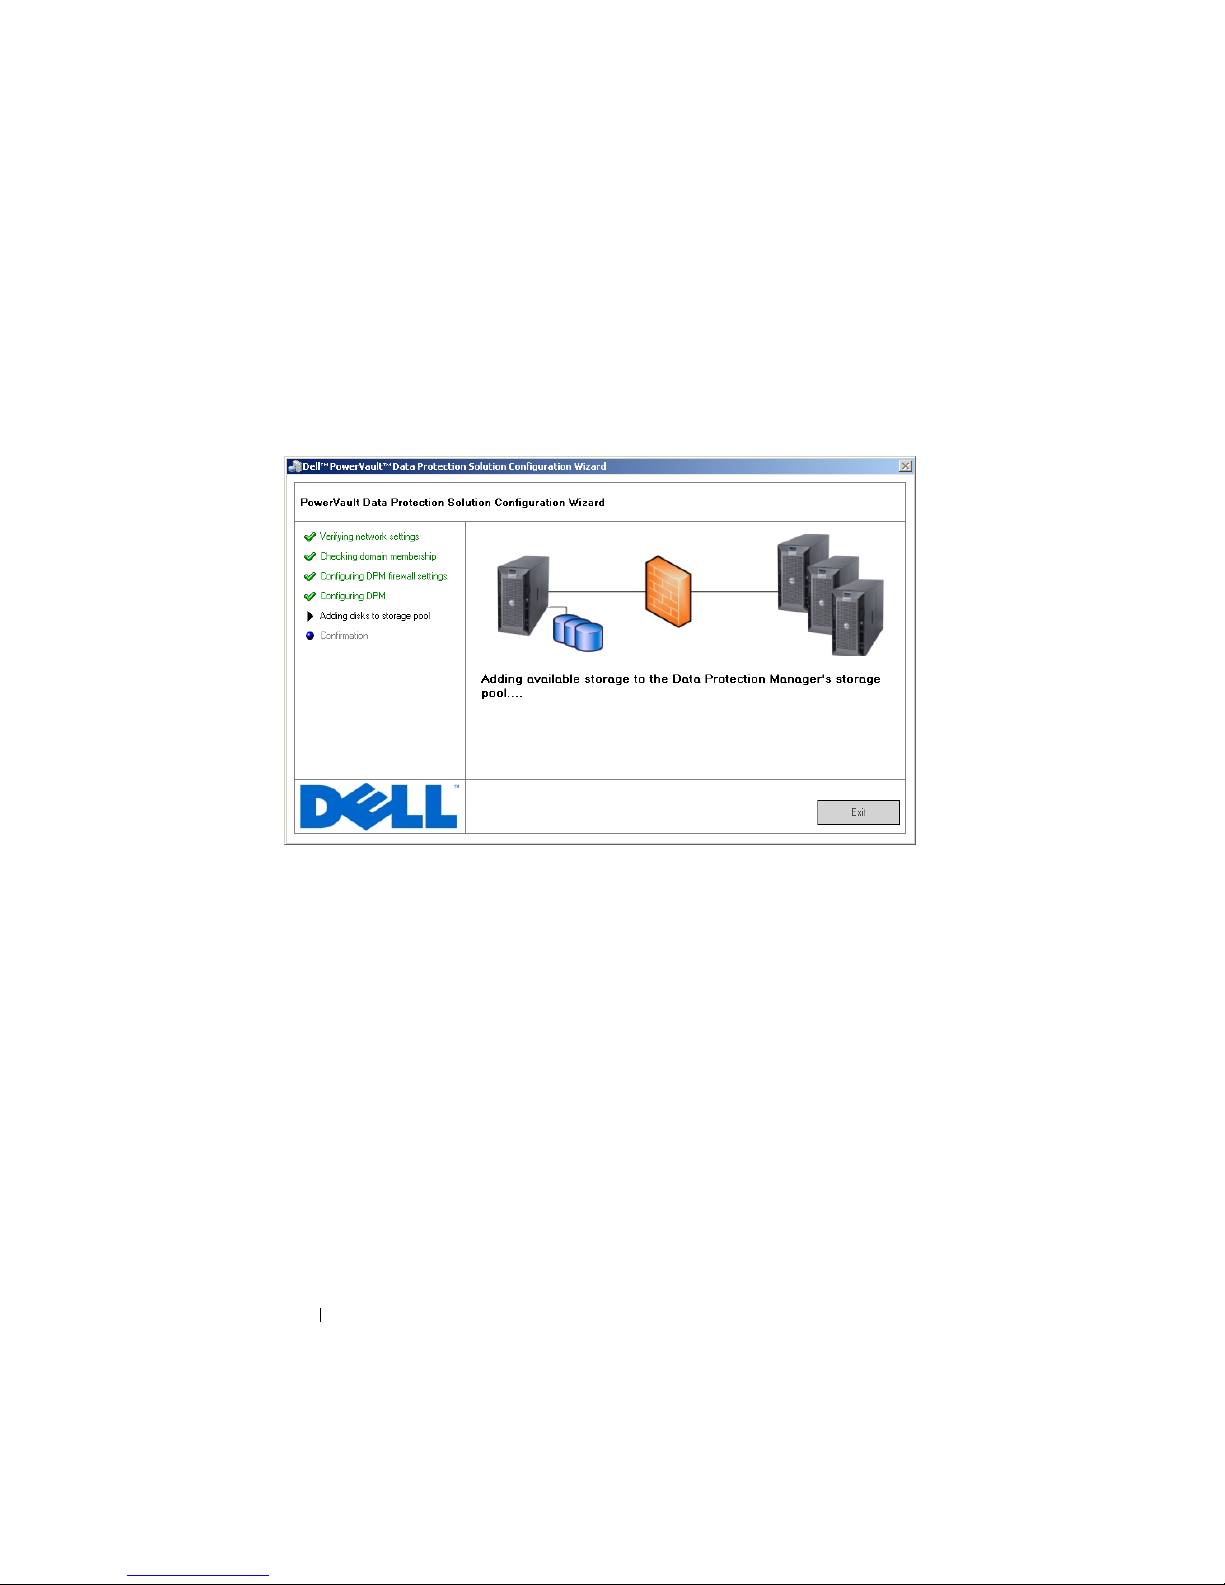
a collection of storage that DPM uses to protect the managed servers in your
network. For more information about storage pool, refer to “Adding Disks to
the Storage Pool” in Deploying System Center Data Protection Manager 2007.
Figure 3-7. Configuring the DPM Storage Pool
After the storage pool is successfully configured, the wizard displays a
message showing the completed steps. When Finish is chosen, the DPM
2007 Administrator Console is launched. Use the DPM Administrator
Console to add servers from your network. Refer to “"DPM Deployment" on
page 39” for more information.
34 Configuring DPM
Page 35
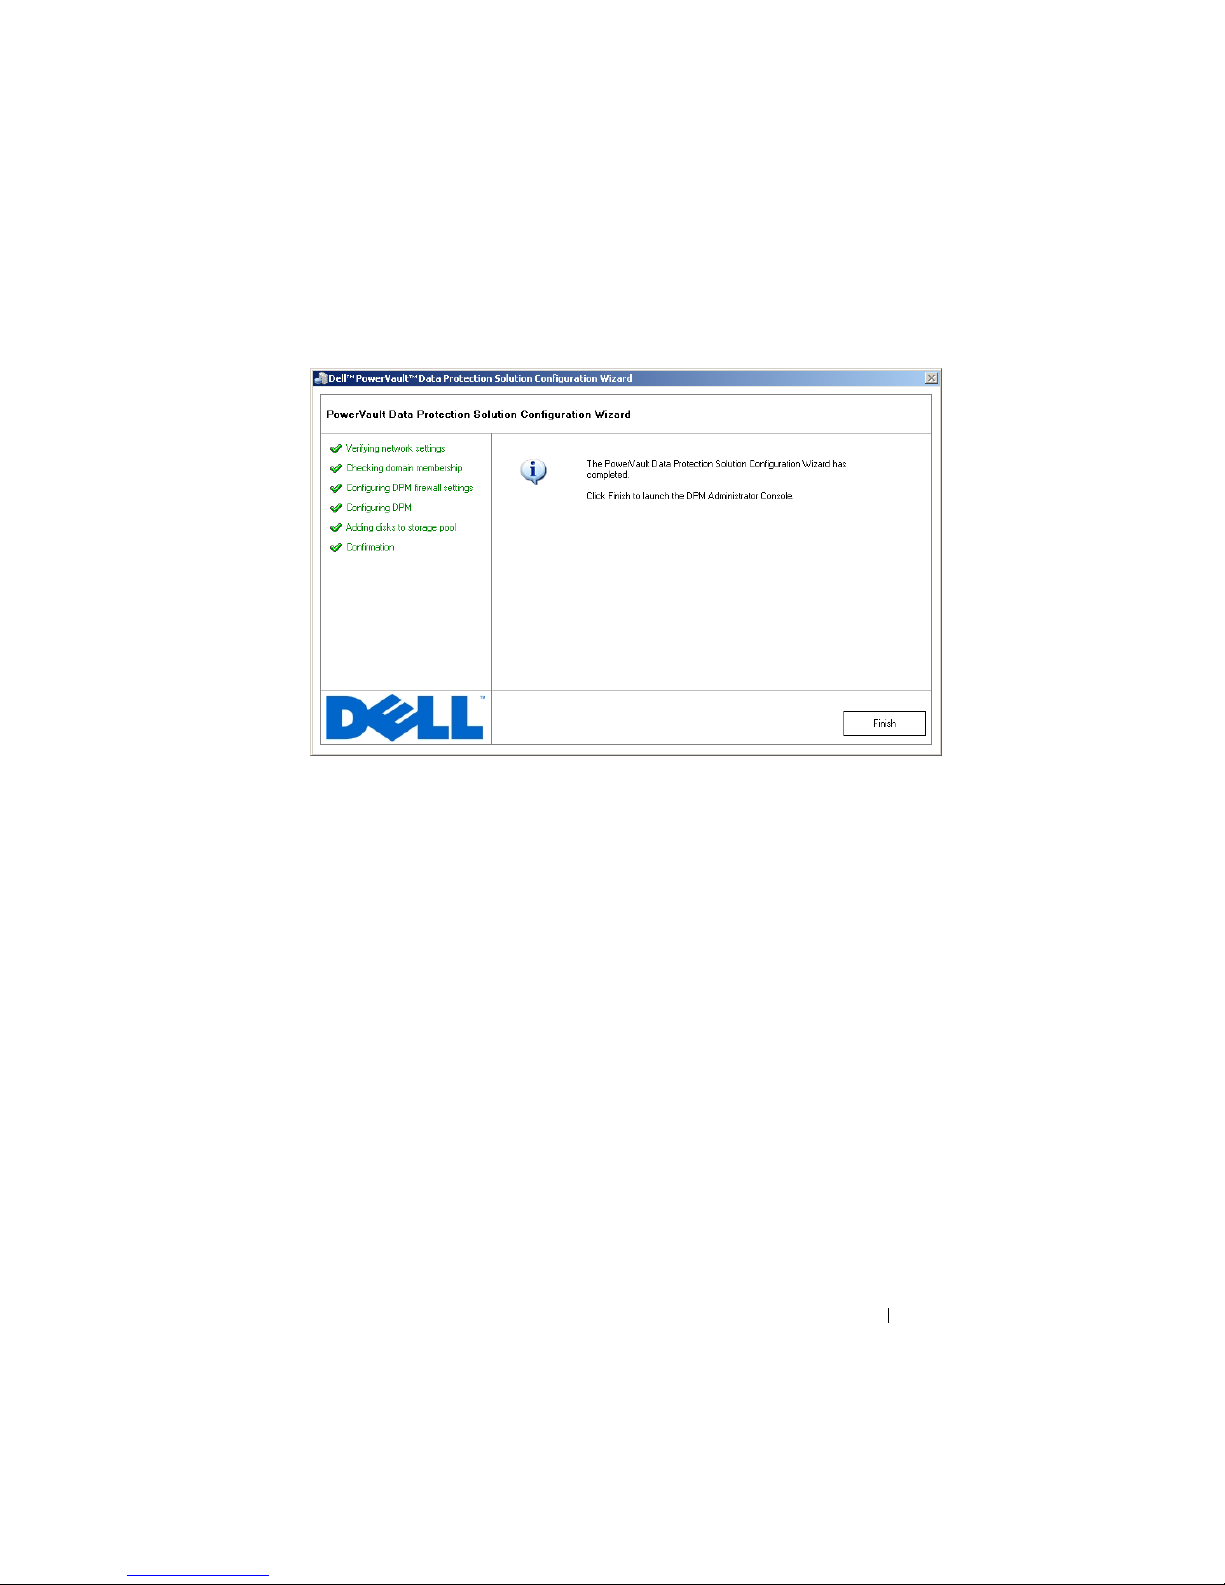
Figure 3-8. Wizard Completion Screen
Verification
To verify that the configuration process has completed successfully, click the
Management tab in the DPM Administrator Console. Then, select the Disks
tab. Depending on the system configuration, the appropriate number of the
disks should be added to the storage pool.
Configuring DPM 35
Page 36
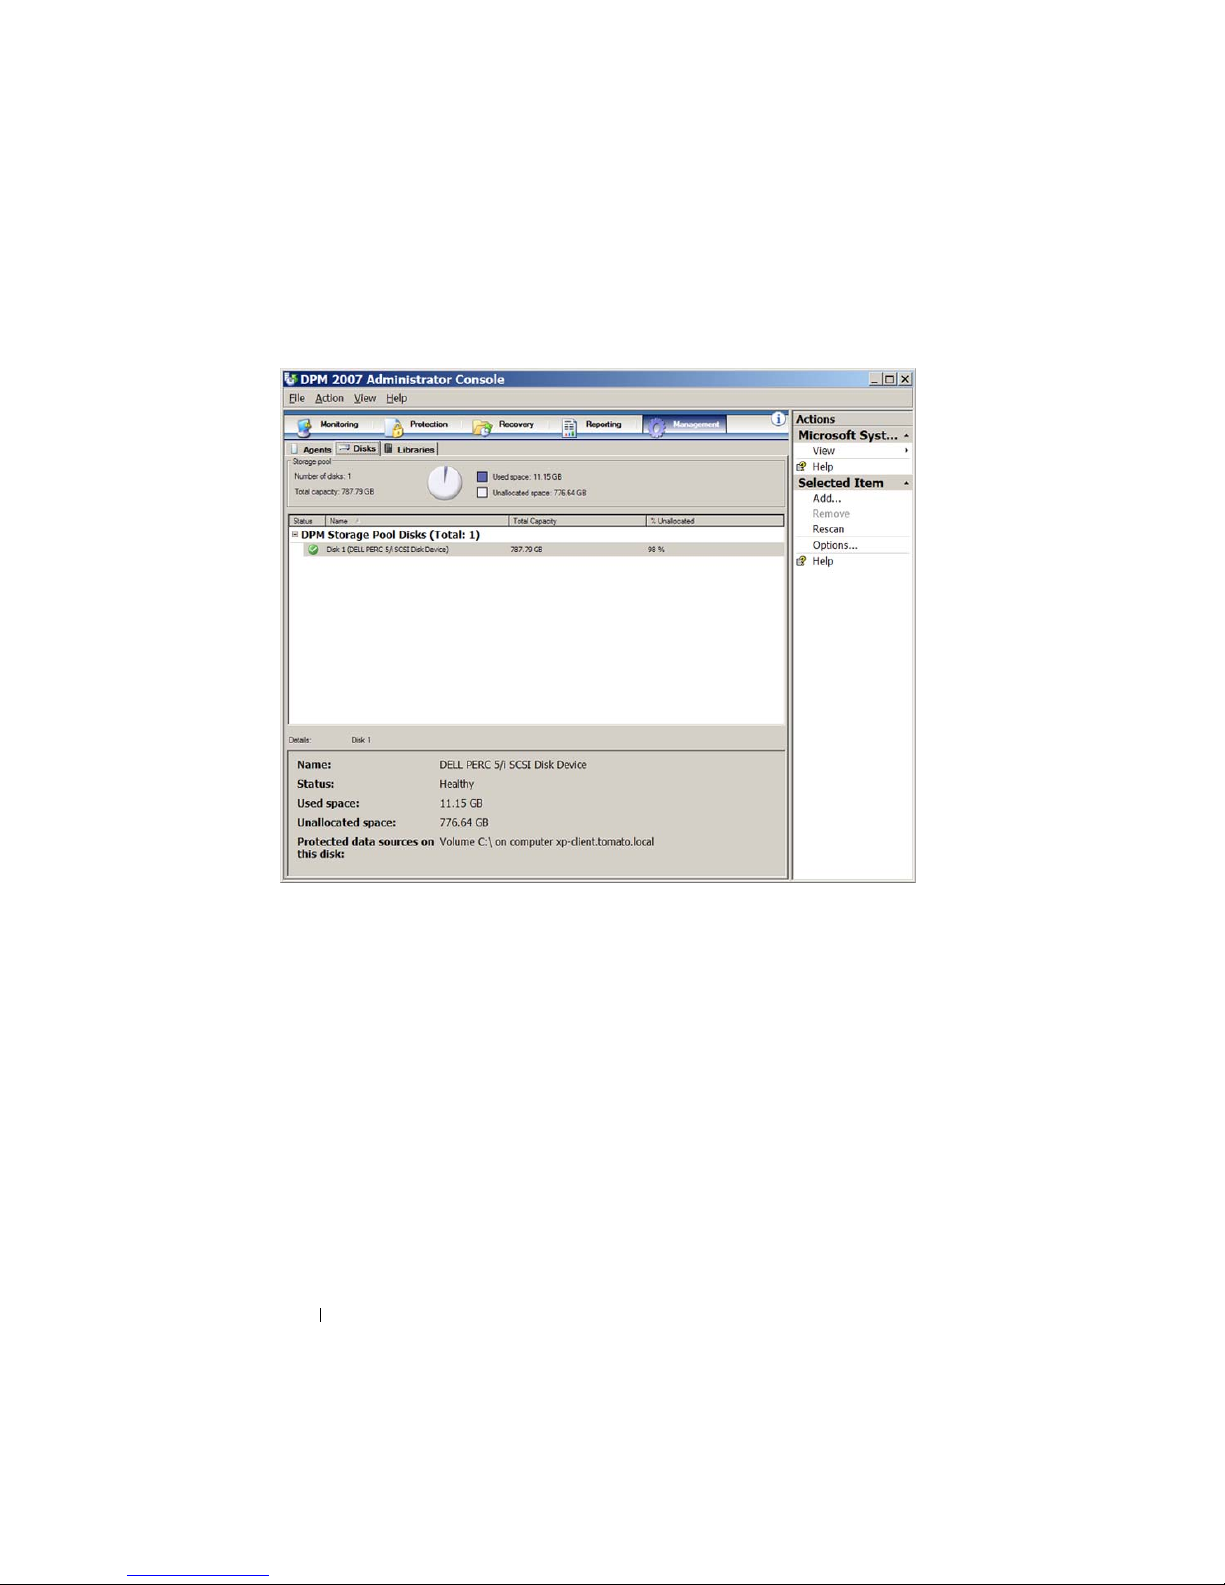
Figure 3-9. DPM 2007 Administrator Console
36 Configuring DPM
Page 37
Licensing
DPM Licenses
Figure 4-1. Certificate of Authenticity (COA) Example
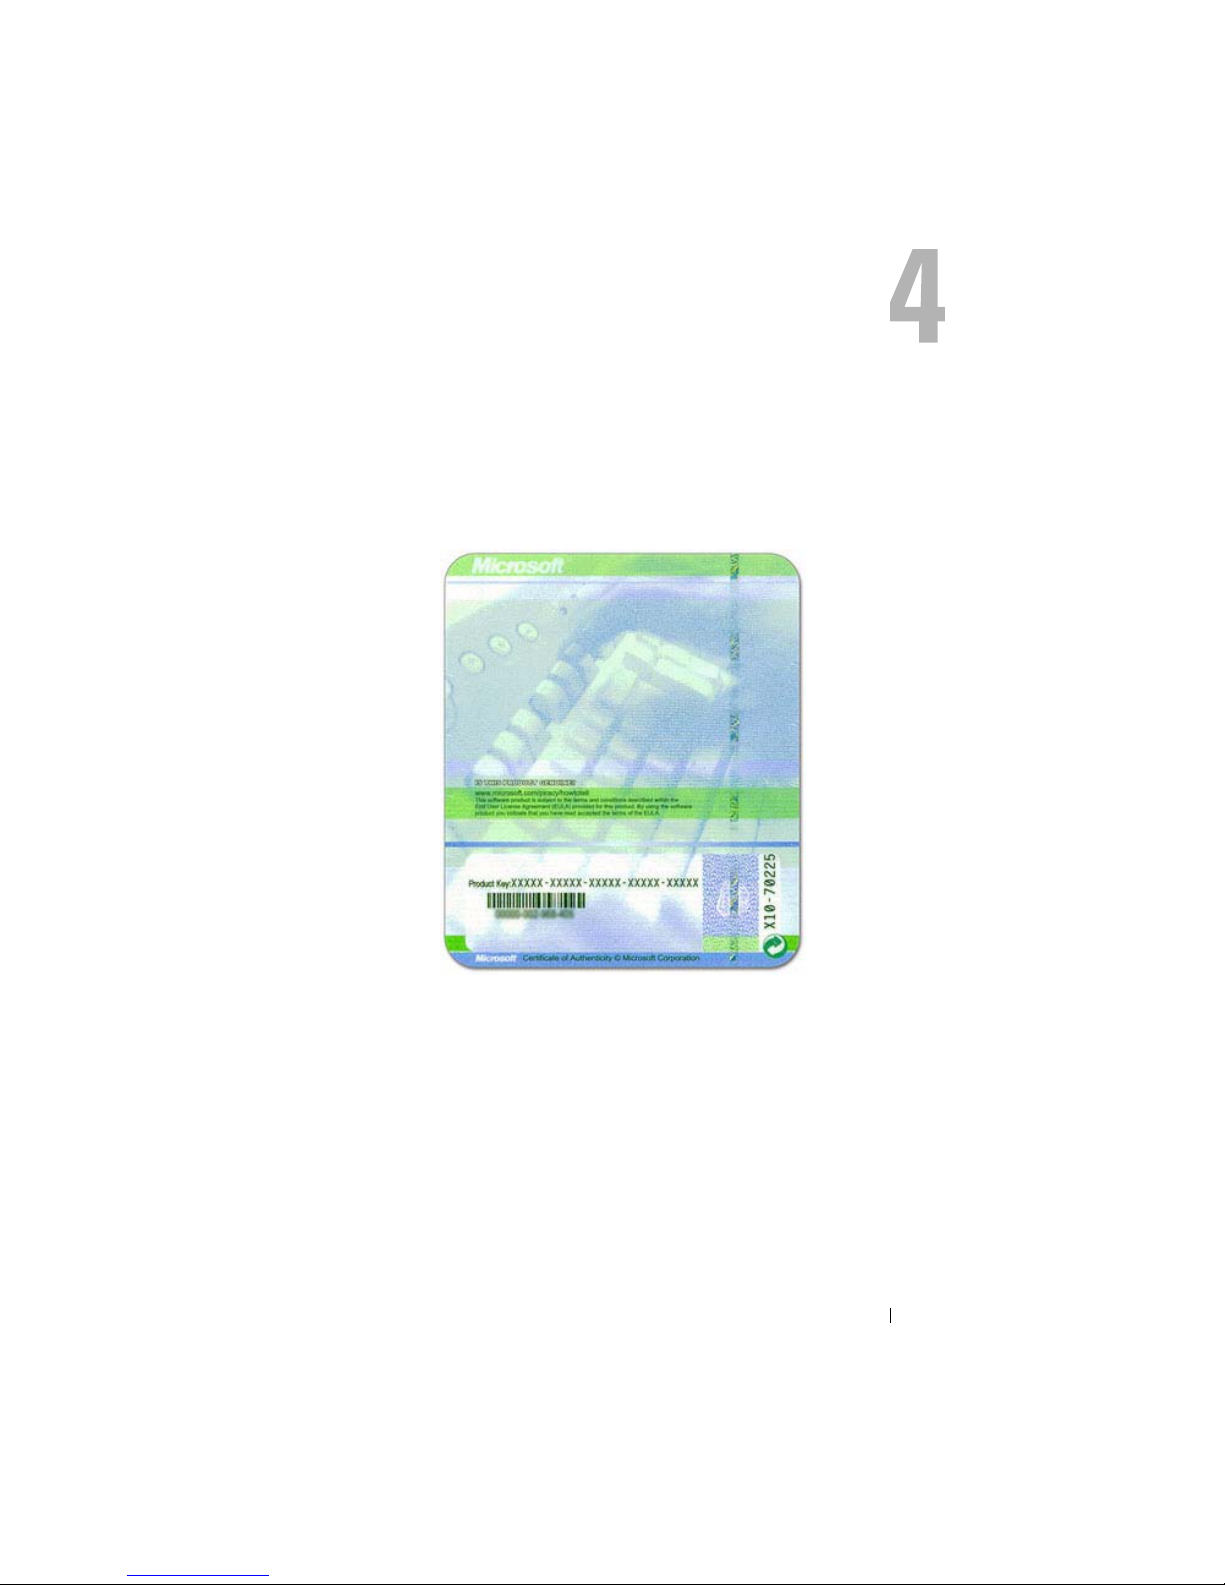
The product key for DPM 2007 is factory-installed on your system. The
product key can be found on the Certificate of Authenticity (COA) included
with the installation media that shipped with your system. The product key
on this COA is required if you ever need to reinstall DPM 2007.
DPM 2007 requires a Data Protection Management License (DPML) for each
protected (managed) server. Two types of DPMLs are available for: Standard
(S-DPML), which offers standard file protection, and Enterprise (E-DPML),
which offers application and file protection on the protected server.
Your system purchase includes one DPML. Contact your Dell sales
representative for additional licenses to protect additional systems in your IT
environment.
Licensing 37
Page 38

For more information on DPM licensing see “DPM Licensing” in Planning a
System Center Data Protection Manager 2007 Deployment.
Windows Storage Server 2003 R2 x64 License
Figure 4-2. Example of the Windows COA Applied to the System
The product key for Windows Storage Server 2003 x64 R2 with SP2 is factoryinstalled on your system. The key is located on a COA applied to the top or
side panel of the system. Record this product key and keep it in a safe place.
You may need the product key should you need to reinstall your operating
system.
38 Licensing
Page 39

DPM Deployment
Before DPM can begin protecting the data and applications on the systems in
your network, you must do the following:
• Install prerequisite software on each server system you want to protect.
• Deploy the DPM Protection Agent to each system you want to protect.
You must own one DPM Agent License for each system you protect using
DPM. Refer to the "DPM Licenses" on page 37.
• Create one or more protection groups to define which systems, data, and
applications on those systems DPM will back up, as well as how often
DPM backs up those systems.
• Set advanced DPM configuration settings (optional).
Installing Protected System Prerequisite
Software
Prior to installing a DPM Protection Agent on a protected server in your
network, install Microsoft Update for Windows Storage Server 2003 x64
Edition KB940349. This update is available on support.microsoft.com. The
update is also on the Microsoft® System Center Data Protection
Manager 2007 reinstallation media that shipped with your system. It is
located in the \prereqs directory. To install the update, double-click on the
KB940349 executable (.exe) from the system administrator account.
Deploying Agents
A protection agent is software installed on a server that tracks changes to
protected data and transfers those changes from the protected server to the
DPM server. Refer to “Installing Protection Agents” in Deploying System
Center Data Protection Manager 2007 for information on deploying the
agents to systems in your network.
DPM Deployment 39
Page 40

Protecting Servers
You must create a protection group to protect one or more servers in your
network. A protection group is a collection of data sources that share the
same protection configuration. Refer to “Creating Protection Groups” in
Deploying System Center Data Protection Manager 2007.
Advanced Configuration
Refer to Deploying System Center Data Protection Manager 2007 and System
Center Data Protection Manager 2007 Operations Guide for advanced
configuration topics, such as managing protection of virtual servers and
enabling end-user recovery.
40 DPM Deployment
Page 41

DPM and Tape Devices
The PowerVault Data Protection Solution supports disk-to-tape backup of the
protected systems and disk-to-disk-to-tape archival for long-term protection.
Refer to “Backup Solutions Combining Disk and Tape” in Planning a System
Center Data Protection Manager 2007 Deployment. To use these features, you
need to attach a supported tape drive or a tape library to your system.
Refer to the PowerVault Data Protection Solution Support Matrix for a list of
supported tape drives, autoloaders and libraries.
Installing Tape Drives and Tape Libraries
Refer to the tape drive or the tape library documentation to install and attach
these components to your system. Install the necessary drivers and update
device firmware, if necessary. Refer to the PowerVault Data Protection Solution
Support Matrix for required driver and firmware versions.
Using DPM with Tape Drives and Tape Libraries
Refer to “Configuring Tape Libraries” in Deploying System Center Data
Protection Manager 2007 to add tape drives and libraries to DPM.
Refer to “Managing Tape Libraries” in System Center Data Protection
Manager 2007 Operations Guide for detailed information on how to manage
tape libraries and stand-alone tape drives attached to the Microsoft System
Center Data Protection Manager 2007 server. This document also contains
information on routine maintenance tasks.
DPM and Tape Devices 41
Page 42

42 DPM and Tape Devices
Page 43

Installing Dell OpenManage™
Server Administrator
Overview
Dell OpenManage™ Server Administrator (OMSA) provides a
comprehensive, one-to-one systems management solution in two forms: (1)
an integrated, browser-based graphical user interface (GUI) and (2) a
command-line interface (CLI) through the operating system. It is designed to
allows system administrators to manage systems both locally and remotely on
a network.
A managed system is a system that has supported instrumentation or agents
installed that allow the system to be discovered and polled for status. A
management station is used to remotely manage one or more managed
systems from a central location.
OMSA provides systems and storage management for your PowerVault Data
Protection Solution. OMSA monitors the system hardware and peripherals for
fault conditions and provides advance warning of potential system failures.
Additionally, OMSA provides a graphical user interface from which the
administrator can configure the storage subsystem, including virtual disks and
RAID.
Installing Server Administrator
You can install Server Administrator using several different methods. The
Dell™ Systems Console and Agent CD included with your system provides a
setup program to install, upgrade, and uninstall Server Administrator and
other managed system software components on both your managed system
and management station.
Refer to the "Setup and Administration" section of the Dell™ OpenManage
Installation and Security User's Guide for detailed information.
NOTE: During installation of OMSA, make sure the Storage Services option is
checked.
Installing Server Administrator 43
Page 44

44 Installing Server Administrator
Page 45

Updating Software
Updating Your PowerVault System
Using the Server Update Utility
Dell™ OpenManage™ Server Update Utility (SUU) is a CD-based
application for identifying and applying updates to your system. SUU
compares the versions of components currently installed on your system with
update components packaged on the server update CDs available on
support.dell.com. SUU then displays a comparison report of the versions and
provides the option of updating the components, such as the BIOS, drivers,
and firmware.
See the Dell™ OpenManage™ Server Update Utility User's Guide for more
information about using SUU.
Using Dell Update Packages
A Dell Update Package (DUP) is a self-contained executable in a standard
package format. Each update package is designed to update a single software
component (such as a specific driver) on your system. DUPs are available on
support.dell.com. Refer to the Dell™ Update Packages for Microsoft Windows
User’s Guide for more information on updating your system using DUPs.
Updating Your Operating System
Visit update.microsoft.com for the latest security patches, fixes, and updates
for Windows Storage Server. All updates to Windows Server™ 2003 R2 x64
SP2 Editions apply to Windows Storage Server 2003 R2 x64 SP2.
Updating DPM
Visit update.microsoft.com for DPM 2007updates.
Updating Software 45
Page 46

46 Updating Software
Page 47

Getting Help
Dell Support
For more information and troubleshooting information for the PowerVault
Data Protection Solution, visit support.dell.com.
Hardware Issues
For help with your hardware, refer to the PowerVault hardware manuals that
shipped with your system. You can also access all hardware documents at
support.dell.com.
Software/DPM Issues
For more DPM information and troubleshooting information, refer to the
System Center Data Protection Manager 2007 Troubleshooting Guide.
Troubleshooting the PowerVault Data Protection
Solution Wizard
If an error occurs while running the PowerVault Data Protection Solution
Configuration Wizard, an error message with appropriate steps needed to
resolve the error will appear. Follow those instructions, then restart the wizard
by double-clicking the wizard icon on the system desktop to continue the
configuration process.
Getting Help 47
Page 48
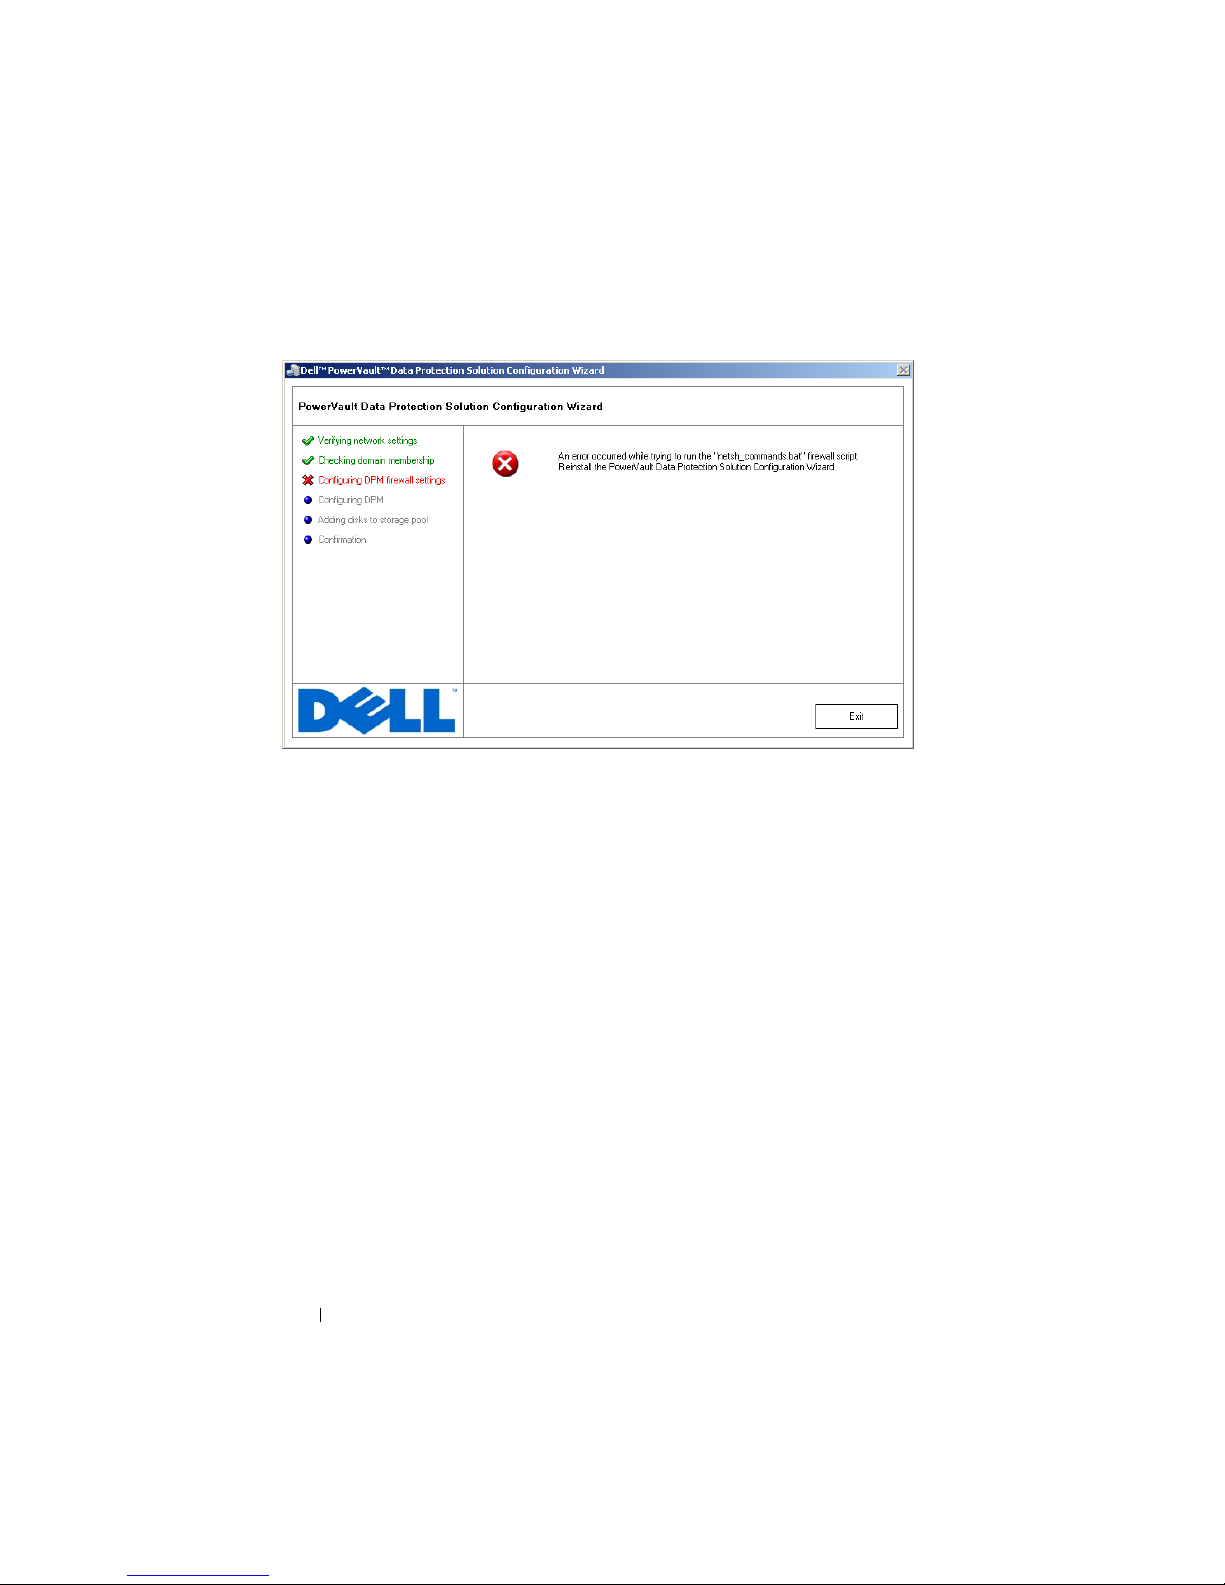
Figure 9-1. PowerVault Data Protection Solution Configuration Wizard Error Screen
Other Documents and Resources You May Need
Refer to the PowerVault Data Protection Solution Quick Reference Guide
available at support.dell.com to locate the following documents and
resources:
Microsoft Information
•
Planning a System Center Data Protection Manager 2007 Deployment
•
Deploying System Center Data Protection Manager 2007
• System Center Data Protection Manager 2007 Operations Guide
Dell Hardware
• Baseboard Management Controller Utilities User's Guide
• Remote Access Controller 5 (DRAC 5) User’s Guide
• PowerVault Systems Hardware Owner’s Manual
• PowerVault Getting Started Guide
48 Getting Help
Page 49

Dell Software
• PowerVault™ Data Protection Solution Support Matrix
• OpenManage Installation and Security User's Guide
• OpenManage™ Server Administrator User’s Guide
• OpenManage™ Server Update Utility User's Guide
• Dell Update Packages for Microsoft Windows User’s Guide
• Dell Systems Console and Agent CD
• Dell Systems Build and Update Utility CD
• Dell Systems Documentation CD
Getting Help 49
Page 50

50 Getting Help
Page 51

Index
A
Administrator Console, 34, 36
Agent, 39
C
Computer Name, 16-17
Changing, 16
D
Data Protection Manager
Mini-Setup Wizard, 32
Data Protection Solution
Configuration Wizard, 27, 47
Troubleshooting, 47
Default Password, 22
Changing, 13
Entering, 13
DHCP, 21
Documents, 9
Domain, 11
F
Firewall, 27, 29-30
H
Help, 19, 47
I
IP Address
Configuring, 14
DHCP, 14
DNS, 23
Static, 15
L
Local Administrator, 17
M
MUI, 19
DPM, 7, 28, 30, 32-33
Licenses, 37
Prerequisites, 11
DRAC, 24
Remote Access, 24
N
Network
Cabling, 14
Configuration, 14
Index 51
Page 52

O
OpenManage Server
Administrator (OMSA)
Installation, 43
Using, 41
Troubleshooting, 47
U
P
Platform, 25
Prerequisites, 11, 27-28
Protected Server, 37, 39
Protection Group, 39-40
R
Remote Access, 24
Remote Desktop
Configuration, 23
S
SAC, 21-22
Static IP, 15, 23
Storage Pool, 33, 35
Configuration, 33
Updating, 45
UPS, 12
W
Wizard, 11, 27, 29-30, 32-33, 47
System Center, 7, 11, 39
T
Tape Devices and Libraries, 41
Tape devices and libraries
Installing, 41
52 Index
 Loading...