How it Works
Log In / Sign Up
Buy Points
How it Works
FAQ
Contact Us
Questions and Suggestions
Users
Delfield
Loading...
D
DELDIS
DIS
4
DIS-1013
3
DIS-1013-ET
3
DIS-1013-QT
4
DIS-1200
3
DIS-1200-ET
3
DIS-1200-QT
3
DIS-1450
3
DIS-1450-ET
3
DIS-1450-QT
3
DIS-500
3
DIS-500-ET
3
DIS-575
3
DIS-575-ET
3
DIS-650
3
DIS-650-ET
3
DIS-725
3
DIS-725-ET
3
DIS-813
3
DIS-813-ET
3
DIS-813-QT
3
DIS-913
3
DIS-913-ET
3
DIS-913-QT
3
DMER
DMER12-G
2
DMER17-G
2
DMER26-G
2
DMER33-SLG
2
DMER3-G
2
DMER45-SLG
2
DMER49-G
2
DMER65-G
2
DMER67-SLG
3
DMER7-G
2
DS4532N
DT-2SS
Dual View 536-SR68
Dual View 536-SRR68
E
E-Chef
E-Chef EHEI36C
2
E-Chef EHEI36L
2
E-Chef EHEI48C
2
E-Chef EHEI48L
2
E-Chef EHEI60C
2
E-Chef EHEI60L
2
E-Chef EHEI74C
2
E-Chef EHEI74L
2
E-Chef ESSW36
E-Chef Series
ECOS24
4
ECOS36
4
ECOS48
4
ECSR24
4
EHEI36C
5
EHEI36L
5
EHEI36L-E
EHEI48C
6
EHEI48C-E
EHEI48L
5
EHEI48L-E
EHEI60C
5
EHEI60C-E
EHEI60L
5
EHEI60L-E
EHEI74C
5
EHEI74C-E
EHEI74L
5
EHEI74L-E
Enodis 4000 Series
Enodis 4500 Series
Enodis 4532N
ENV Series
EODC24
2
EODC27
2
EODC32
2
EODC36
2
EODC36I
3
EODC36S
2
EODC48
2
EODC60
2
EODC64
2
EODC72
2
EODC74
2
EOSM24
2
ESIC36
4
ESOS24
4
ESOS27
4
ESOS32
4
ESOS36
4
ESOS48
4
ESOS60
4
ESOS64
4
ESOS72
4
ESOS74
4
ESSW36
3
F
F13 Series
3
F-6E
F KCFM
Loading...
Loading...
Nothing found
E-Chef Series
Operation Manual
16 pgs
815.06 Kb
0
Table of contents
Loading...
Delfield E-Chef Series Operation Manual
...
Delfield Operation Manual
Download
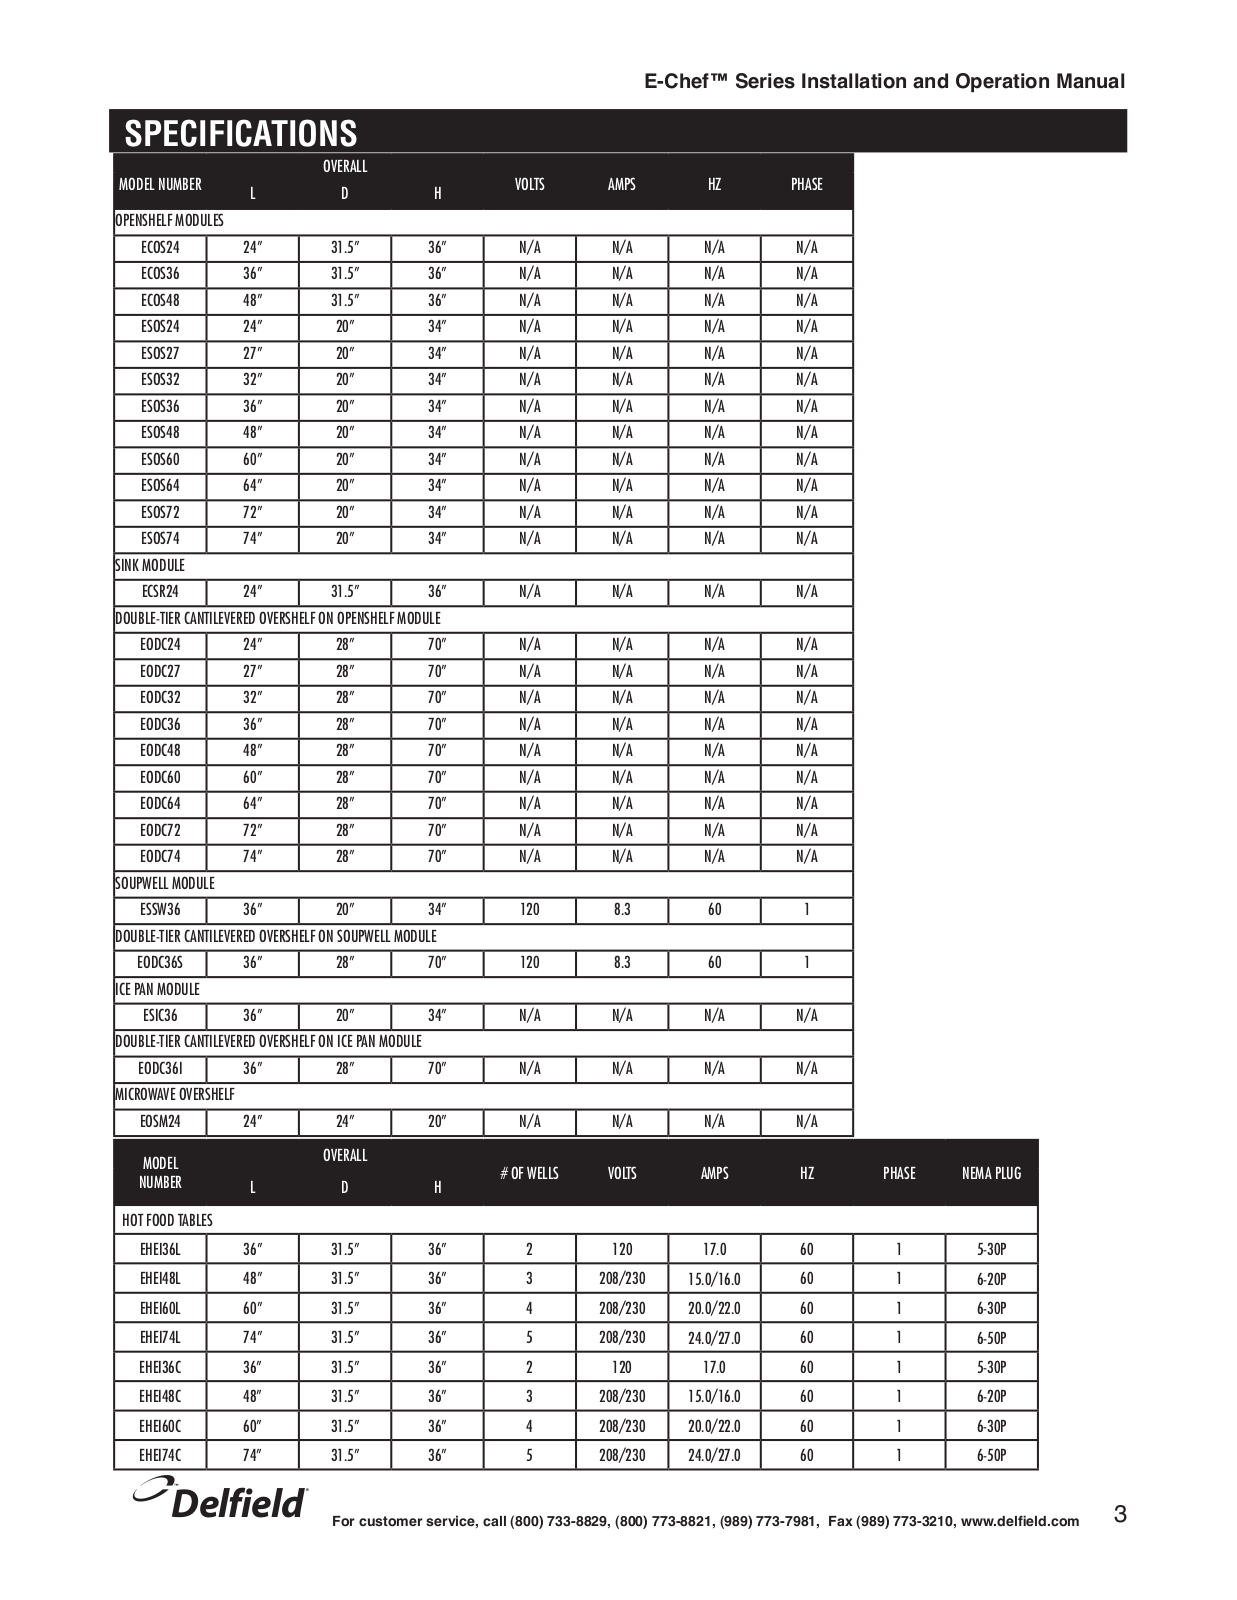
Specifications and Main Features
Frequently Asked Questions
User Manual
Download
Page 1
Page 2
Page 3
Page 4
Page 5
Page 6
Page 7
Page 8
Page 9
Page 10
Page 11
Page 12
Page 13
Page 14
Page 15
Page 16
Loading...
+
hidden pages
Unhide
You need points to download manuals.
1 point = 1 manual.
You can buy points or you can get point for every manual you upload.
Buy points
Upload your manuals