

Page 1
Glass Door Merchandiser
Installation, Use And Care Manual
Please read this manual completely before attempting to install or operate this equipment!
Notify carrier of damage! Inspect all components immediately.
Glass Door Merchandisers
Important Information
• Read Before Use
• Save These Instructions!
April 2013
Page 2
Glass Door Merchandiser Installation, Use And Care Manual
Important Warning And Safety Information
WARNING Read This Manual Thoroughly Before Operating, Installing, Or Performing Maintenance On The Equipment.
WARNING Failure To Follow Instructions In This Manual Can Cause Property Damage, Injury Or Death.
WARNING Do Not Store Or Use Gasoline Or Other Flammable Vapors Or Liquids In The Vicinity Of This Or Any Other
Appliance.
WARNING Unless All Cover And Access Panels Are In Place And Properly Secured, Do Not Operate This Equipment.
WARNING This Appliance Is Not Intended For Use By Persons Who Lack Experience Or Knowledge, Unless They Have
Been Given Supervision Or Instruction Concerning Use Of The Appliance By A Person Responsible For Their
Safety.
WARNING This Appliance Is Not To Be Played With.
WARNING Do Not Clean With Water Jet.
WARNING Do Not Use Electrical Appliances Inside The Food Storage Compartment Of This Appliance.
CAUTION Observe the following:
• Minimum clearances must be maintained from all walls and combustible materials.
• Keep the equipment area free and clear of combustible material.
• Allow adequate clearance for air openings.
• Operate equipment only on the type of electricity indicated on the specification plate.
• Unplug the unit before making any repairs.
• Retain this manual for future reference.
2
For customer service, call (800) 733-8829, (800) 733-8821, Fax (989) 773-3210, www.deleld.com
Page 3

Contents
Receiving & Inspecting .........................................................3
Serial Number Location ........................................................4
Warranty Information ............................................................4
Regulatory Certifications .......................................................4
Specifications ........................................................................5
Installation ............................................................................6
Operation ..............................................................................7
Temperature Control Settings ...............................................7
DMER3-G Temperature Control Settings ..............................8
Top And Bottom Hinged Door Adjustments .................... 9-10
Sliding Door Adjustments ...................................................10
Edge Hinged Door Adjustments ..........................................11
Wall Hanging Instructions...................................................12
Glass Door Merchandiser Installation, Use And Care Manual
Maintenance .................................................................. 13-14
Troubleshooting ..................................................................14
Wiring Diagrams ........................................................... 15-24
Standard Labor Guidelines ..................................................25
Notes ............................................................................ 26-27
Receiving and Inspecting the Equipment
Even though most equipment is shipped crated, care should be
taken during unloading so the equipment is not damaged while
being moved into the building.
1. Visually inspect the exterior of the package and skid or
container. Any damage should be noted and reported to the
delivering carrier immediately.
2. If damaged, open and inspect the contents with the carrier.
3. In the event that the exterior is not damaged, yet upon
opening, there is concealed damage to the equipment notify
the carrier. Notification should be made verbally as well as
in written form.
4. Request an inspection of the concealed equipment. This
should be done within 10 days from receipt of the equipment.
5. Check the lower portion of the unit to be sure legs or casters
are not bent.
6. Also open the compressor compartment housing and
7. Freight carriers can supply the necessary forms upon
8. Retain all crating material until an inspection has been made
Uncrating the Equipment
First cut and remove the banding from around the crate. Remove
the front of the crate material, use of some tools will be required.
If the unit is on legs remove the top of the crate as well and lift
the unit off the skid. If the unit is on casters it can be "rolled" off
the skid.
visually inspect the refrigeration package. Be sure lines are
secure and base is still intact.
request.
or waived.
For customer service, call (800) 733-8829, (800) 733-8821, Fax (989) 773-3210, www.deleld.com
3
Page 4
Glass Door Merchandiser Installation, Use And Care Manual
Serial Number Location
The serial number tag on glass door merchandisers is located
on the interior wall of the cabinet.
Always have the serial number of your unit available when
calling for parts or service. A complete list of authorized
Delfield parts depots is available at www.delfield.com.
©2013 The Deleld Company. All rights reserved. Reproduction without
written permission is prohibited.
Serial #
Model #
Installation Date:
Warranty Information
Visit http://www.delfield.com/minisite/service/warranty_info to:
• Register your product for warranty.
• Verify warranty information.
• View and download a copy of your warranty.
Regulatory Certifications
Models are certified by:
Underwriters Laboratories Environmental and Public
Health Standards complying with ANSI/NSF Standards
Underwriters Laboratories (UL)
Underwriters Laboratories of Canada (ULC)
4
For customer service, call (800) 733-8829, (800) 733-8821, Fax (989) 773-3210, www.deleld.com
Page 5
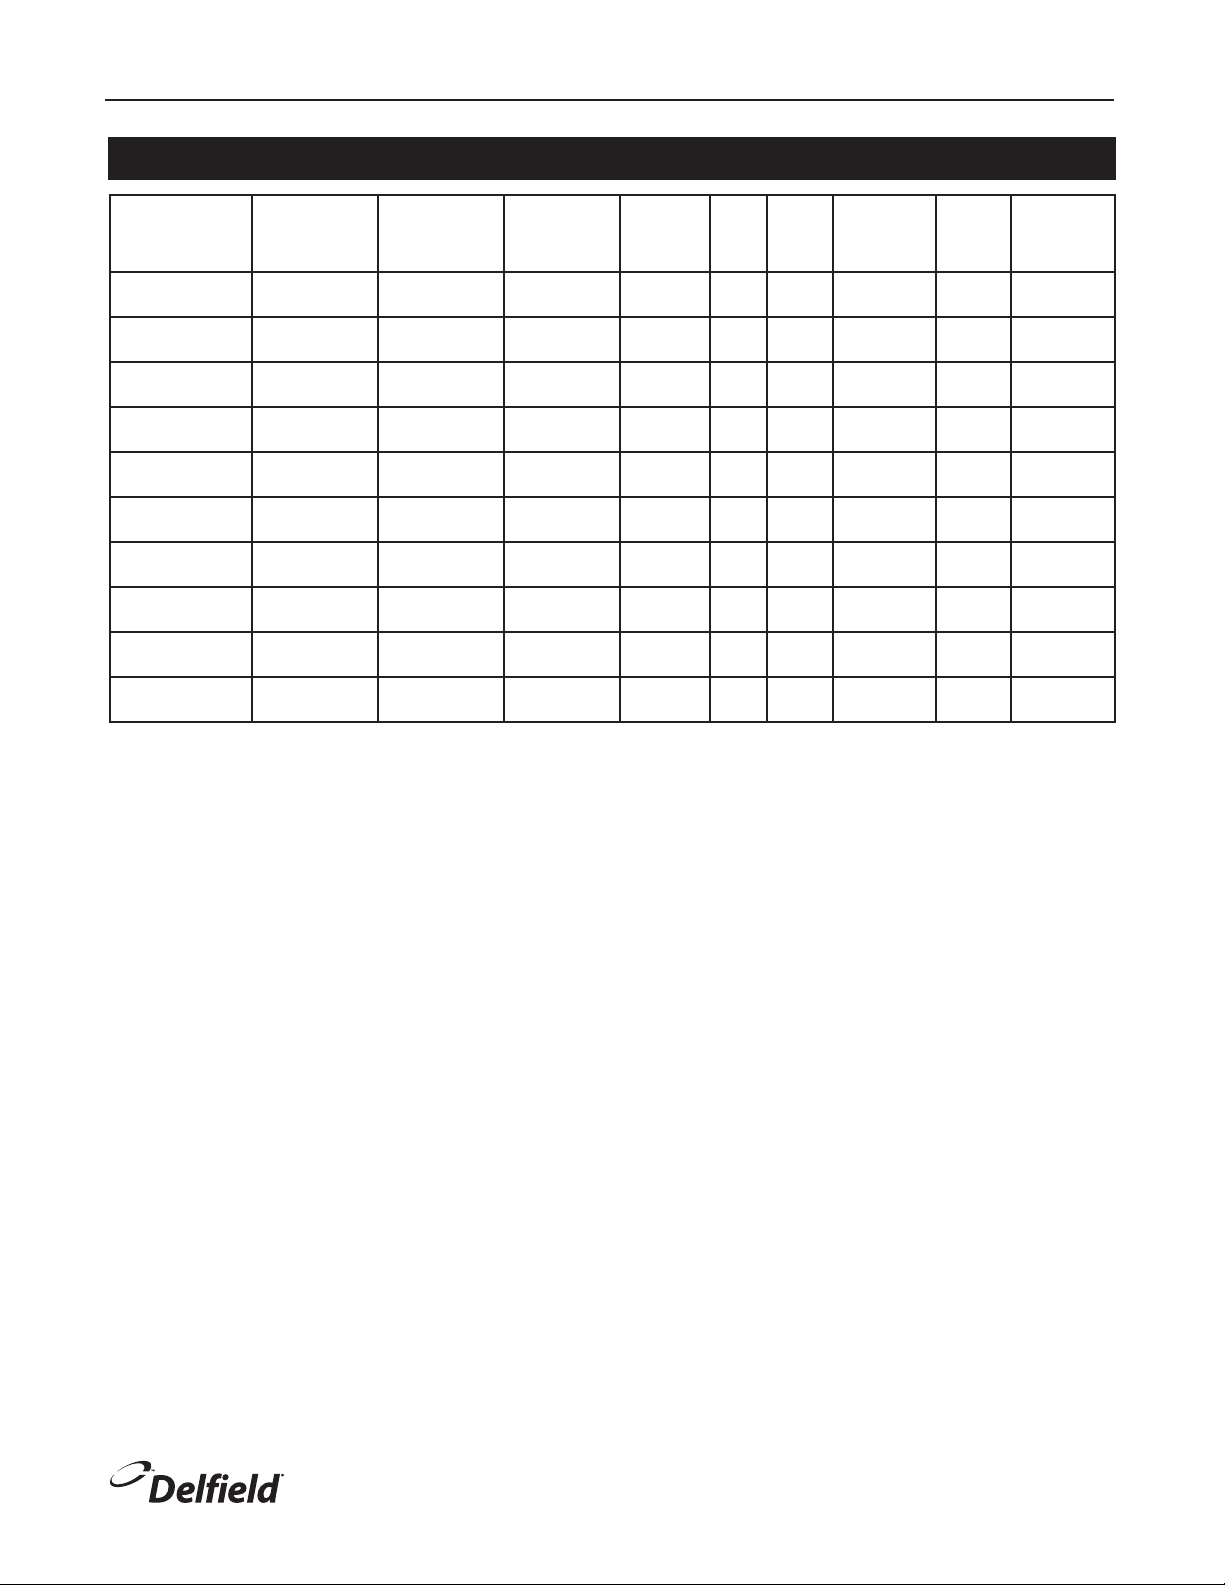
Specifications
Glass Door Merchandiser Installation, Use And Care Manual
Model Height Width Depth Capacity H.P. Amps V/Hz/Ph
DMER3-G
DMER7-G
DMER12-G
DMER17-G
DMER26-G
DMER33-SLG
DMER45-SLG
DMER49-G
DMER65-G
DMER67-SLG
33.75”/86cm 19.00”/48cm 19.13”/49cm 3ft
37.75”/96cm 21.25”/54cm 25.00”/64cm 7ft
62.13”/158cm 25.63”/65cm 22.75”/58cm 12ft
74.00”/188cm 30.00”/76cm 25.75”/65cm 17ft
78.00”/198cm 30.00”/76cm 29.50”/75cm 26ft
78.25”/199cm 39.50 ”/100cm 29.50”/75cm 33ft
78.25”/199cm 51.00”/130cm 29.50”/75cm 45ft
78.00”/198cm 60.00”/152cm 29.50”/75cm 49ft
78.00”/198cm 78.00”/198cm 29.50”/75cm 65ft
78.25”/199cm 73.19”/186cm 29.50”/75cm 67ft
3
1/8
3
1/8
3
1/4
3
1/4
3
1/3
3
1/3
3
1/2
3
1/2
3
3/4
3
3/4
3.0 115/60/1 5-15P 119/302
3.7 115/60/1 5-15P 151/384
3.8 115/60/1 5-15P 215/546
3.6 115/60/1 5-15P 267/678
6.7 115/60/1 5-15P 310/787
7.3 115/60/1 5-15P 425/1080
10.7 115/60/1 5-15P 443/1125
11.5 115/60/1 5-15P 577/1466
14.0 115/60/1 5-20P 720/1829
16.0 115/60/1 5-20P 661/1679
NEMA
Plug
Shipping
Weight
Lbs/Kg
For customer service, call (800) 733-8829, (800) 733-8821, Fax (989) 773-3210, www.deleld.com
5
Page 6
Glass Door Merchandiser Installation, Use And Care Manual
CAUTION
Installation
Location
The cabinet is intended for indoor use only. Be sure the
location chosen has a floor strong enough to support the
total weight of the cabinet and contents. A fully loaded model
may weigh as much as 1,000 pounds! Reinforce the floor as
necessary to provide for maximum loading.
It is very important to allow for proper air flow, both inside
and outside. Allow space for air circulation in the refrigeration
condensing unit compartment.
Avoid hot corners and locations near stoves, ovens and
other pieces of cooking equipment. Ambient temperature
must be between 59°F (15°C) and 86°F (30°C). Low ambient
temperatures below 50°F (10°C) are as harmful as high
ambient temperatures.
Cabinets should never be placed in front of windows or glass
doors where sunlight will be in direct contact with the units.
If a cabinet is located near a window or glass door, provide an
adequate shade to block the sun's rays.
It is recommended that the unit be installed
no closer than 1” from side walls and 8" from
the back wall. Do not install the unit near any
combustible material or object affected by heat
or moisture.
Leg and Caster Installation
Some cabinets may weigh 1000 lbs (450 kg). Use
a lifting device capable of supporting the unit
when removing skid or installing legs or casters.
Leveling
A level cabinet looks better and will perform better because
the drain pan will drain properly, the doors will line up with the
frames properly, and the cabinet will not be subject to undue
strain.
A unit on legs will have an adjustable bullet foot on each
leg, adjust each for a level unit. A unit on casters will not be
adjustable. Be sure the unit is on a level floor, make necessary
changes to the floor for proper level.
Lock all front casters to ensure the stability of the unit.
Plumbing
Models are standard with a condensate evaporator. If, for
some reason a unit does not have a condensate evaporator, or
if the evaporator fails, the unit’s drain must have an outlet to
an appropriate drainage area or container.
Moisture collecting from improper drainage can
create a slippery surface on the floor and a hazard
to employees. It is the owner’s responsibility to
provide a container or outlet for drainage.
Electrical connection
Refer to the amperage data on the specifications page, the
serial tag, your local code or the National Electrical Code to
be sure the unit is connected to the proper power source. A
protected circuit of the correct voltage and amperage must be
run for connection of the line cord, or permanent connection
of the unit.
To install the legs, or casters:
1. Remove unit from skid.
2. Raise unit to access leg/caster mounting holes on bottom
of unit.
3. Attach the casters or legs with the four hex head bolts.
6
For customer service, call (800) 733-8829, (800) 733-8821, Fax (989) 773-3210, www.deleld.com
The unit must be disconnected from the
power source whenever performing service or
maintenance functions.
Never operate the unit without the louvered
panel in place!
Page 7
Operation
Glass Door Merchandiser Installation, Use And Care Manual
After the unit is plugged in, the unit’s compressor will begin
operating. If the condensing unit does not run check to see
that the temperature control is not in the “OFF” position.
Before loading the cabinet, allow the cabinet to operate for at
least two hours to ensure the cabinet has achieved the desired
temperature.
Do not throw items into the storage area. Failure to
heed this recommendation could result in damage
to the interior of the cabinet or to the blower coil.
Overloading the storage area, blocking the cold
air as it exits the evaporator, and continuous
opening and closing of the doors and drawers will
hamper the units ability to maintain operational
temperature.
Continuous opening and closing of the door will hamper the
cabinet’s ability to maintain optimum refrigeration temperature.
Defrosting
Refrigerators defrost automatically with every cycle of the
compressor. The water generated is routed to a pan on the rear
of the cabinet and is evaporated by the heat given off by the
compressor.
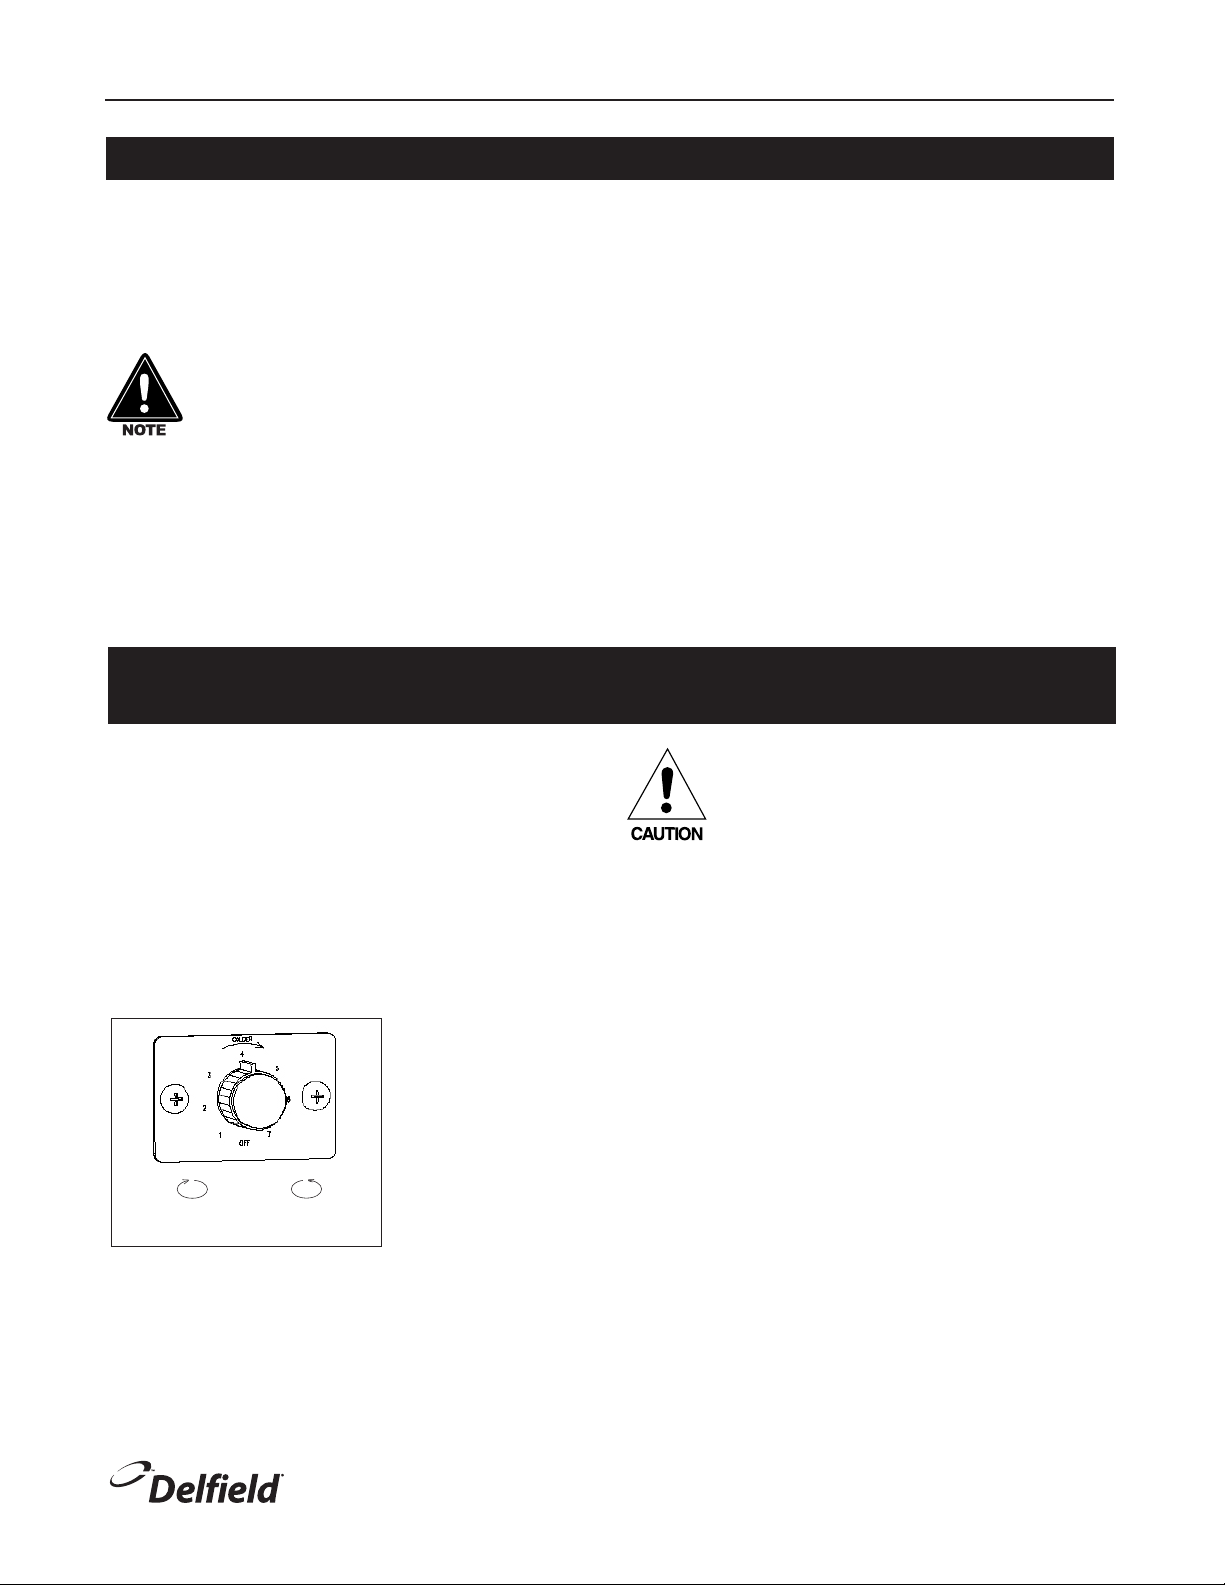
Temperature Control Settings
DMER7-G, DMER12-G, DMER17-G, DMER26-G, DMER33-SLG, DMER45-SLG, DMER49-G, DMER65-G, DMER67-SLG
The refrigeration temperature controls are factory-set to maintain
a temperature range or 35°F to 41°F (2°C to 5°C), with an
average temperature of 38°F (3°C). For a different cabinet
temperature setting, turn the temperature control knob or screw,
located on the evaporator coil/blower housing.
Turn the control knob clockwise to lower the temperature
and counterclockwise to raise it. Adjust the control knob in
increments of 1/4 turn and allow the unit to operate for several
hours before making any further adjustment. Once it is set there
should be no need to change it.
Setting the temperature control to the coldest
setting may cause the coil and/or air ducts to
freeze and ice up. This will eventually result in a
warmer cabinet temperature.
If ice accumulation occurs and the temperature is
lower than the guidelines, turn the control knob to
a warmer setting.
Colder Warmer
For customer service, call (800) 733-8829, (800) 733-8821, Fax (989) 773-3210, www.deleld.com
7
Page 8
Glass Door Merchandiser Installation, Use And Care Manual
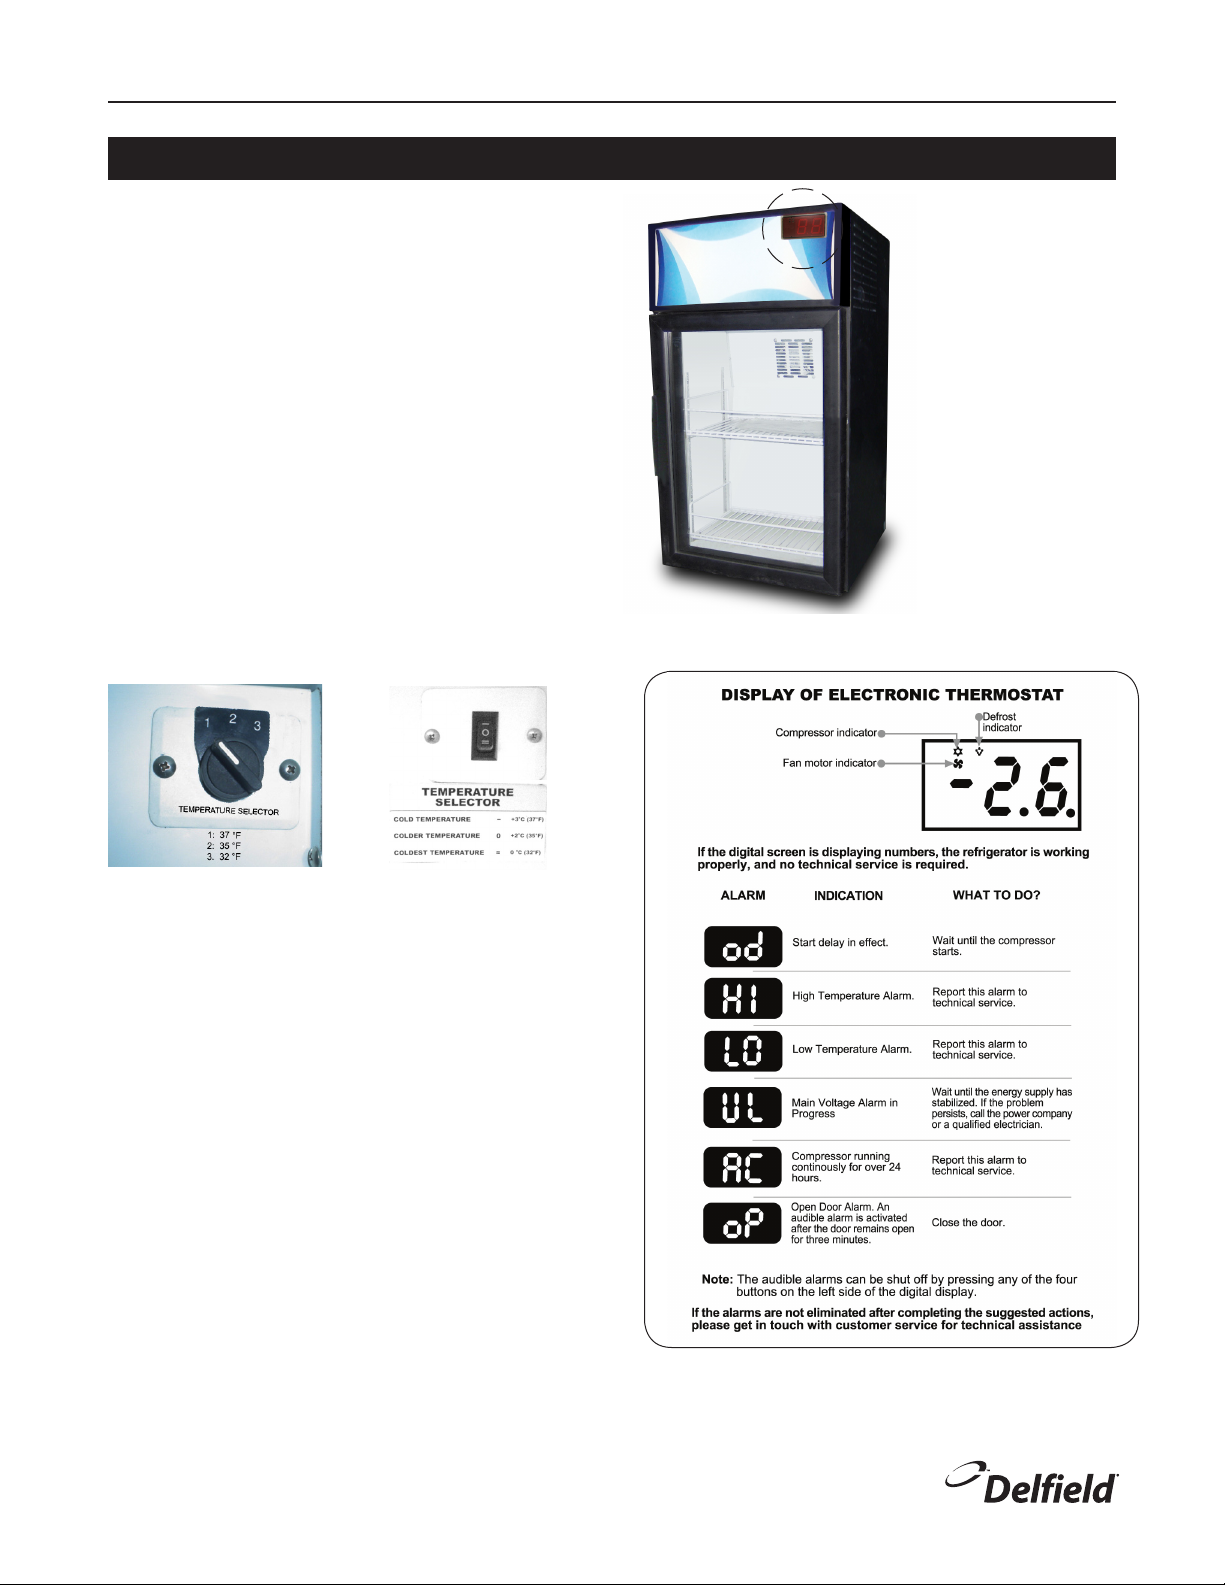
Temperature Control Settings For Model DMER3-G
The DMER3-G model electronic thermostat that is located
at the upper right corner, above the sign of the unit. The
thermostat has a digital thermometer that constantly
shows the temperature of the refrigerator.
The electronic thermostat controls the temperature in
ranges from 32°F to 44°F (0°C to 7°C). This electronic
thermostat allows you to select three temperature ranges
by means of a switch located in the upper front part of the
interior refrigerator cabinet.
Select position 1or - to set the range:
37°F to 44°F (3°C to 7°C)
Select position 2 or O to set the range:
35°F to 43°F (2°C to 6°C)
Select position 3 or = to set the range:
32°F to 39°F (0°C to 4°C)
DMER3-G with digital thermometer display
Electronic thermostat control
8
For customer service, call (800) 733-8829, (800) 733-8821, Fax (989) 773-3210, www.deleld.com
Page 9
Glass Door Merchandiser Installation, Use And Care Manual
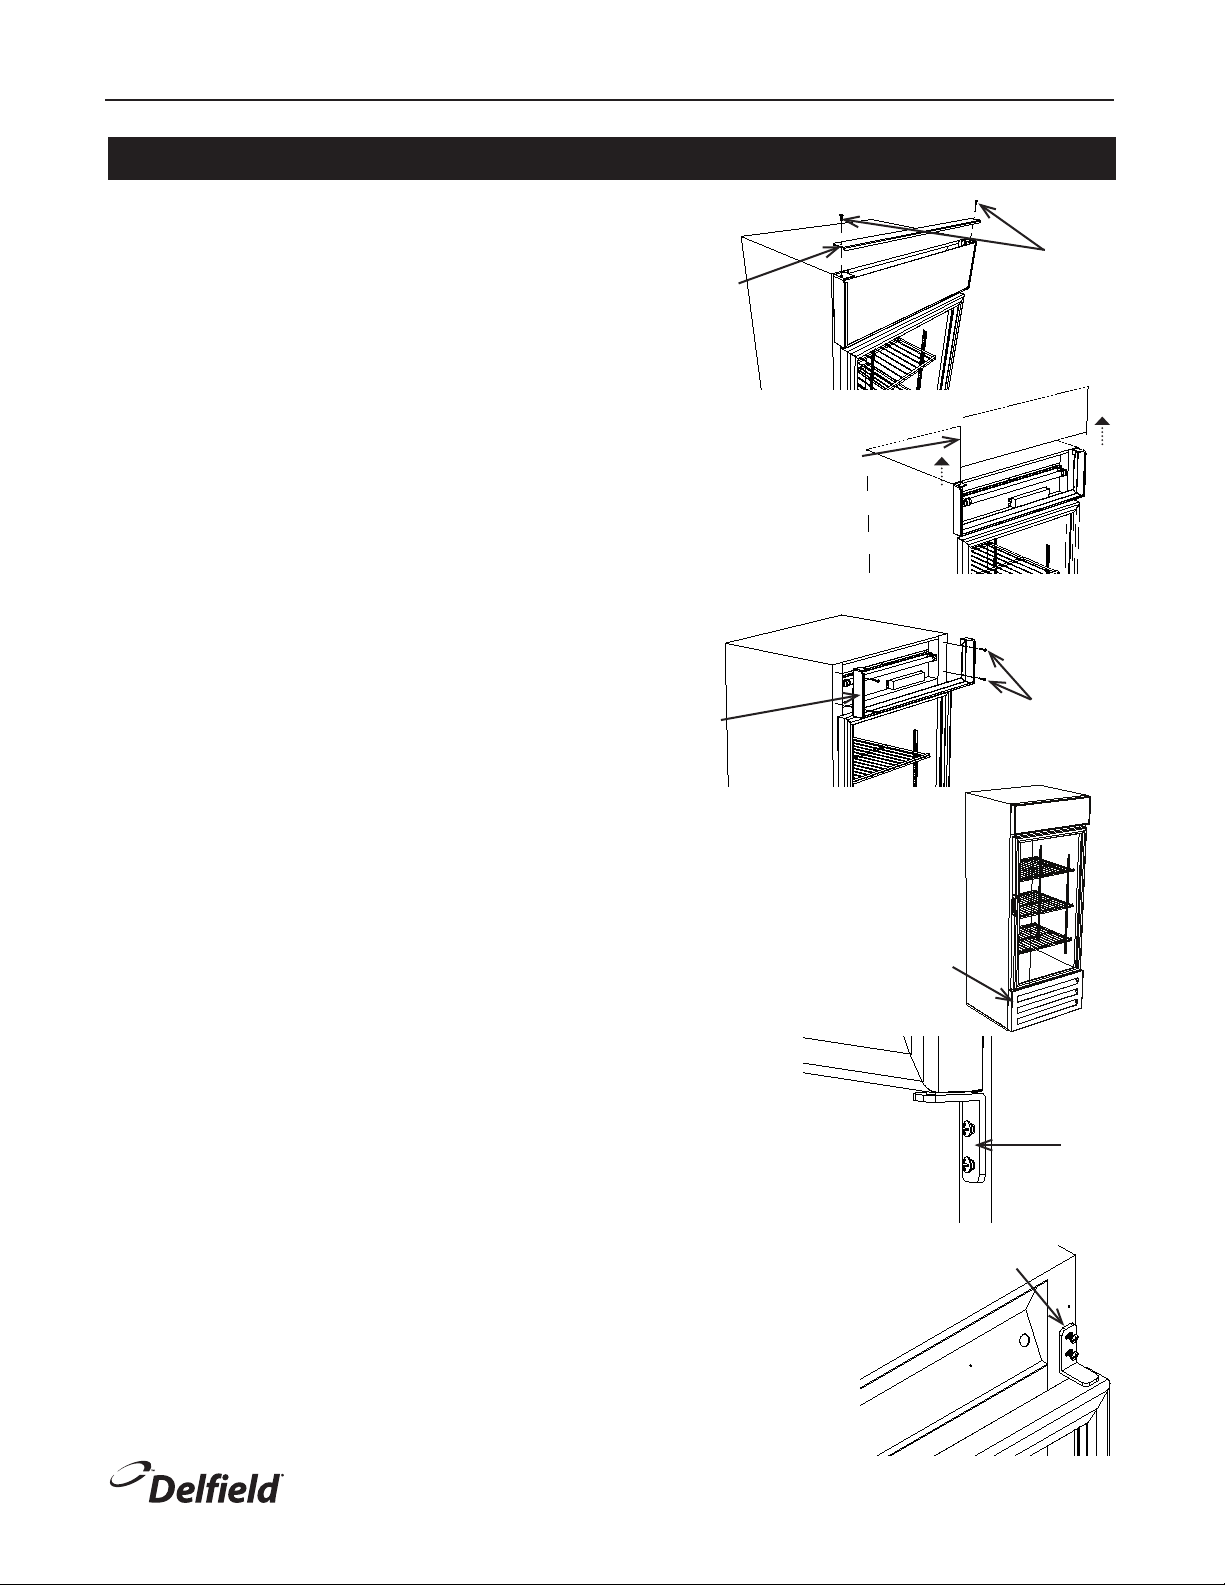
Top And Bottom Hinged Door With Header Sign Adjustments
Removing the Header Sign, Front Grill, Door and Hinges
1. Remove the header sign as follows:
a. Unscrew the sign top on both sides to remove it.
b. Lift and remove the header sign along the guiding
channels.
c. Unscrew the two screws on each side to remove
the sign frame.
2. Unscrew and remove front grill.
3. Unscrew the bottom hinge from the cabinet (bottom hinge
remains attached to the door).
4. Pull the door downward to disassemble the door from
the top hinge.
5. Unscrew and remove top hinge if necessary.
Sign Top
Sign frame
Screws
Header
Sign
Screws
To Re-install The Door
1. Screw the top hinge to the top of the cabinet (if
necessary).
2. Insert the pin of the top hinge by pushing the door
upward.
3. Screw the bottom hinge to the cabinet.
4. Reinstall front grill.
5. Reinstall header sign.
For customer service, call (800) 733-8829, (800) 733-8821, Fax (989) 773-3210, www.deleld.com
Front Grill
Bottom
Hinge
Top hinge
9
Page 10

Glass Door Merchandiser Installation, Use And Care Manual
Top And Bottom Hinged Door Without Header Sign Adjustments
Remove The Door
1. Unscrew and remove front grill.
2. Unscrew the top hinge from the cabinet (top hinge remains
attached to the door).
3. Lift the door off the bottom hinge.
4. Unscrew and remove bottom hinge if necessary.
To Re-install The Door
1. Screw the bottom hinge to the bottom of the cabinet (if it
was removed).
2. Insert the pin of the bottom hinge by pushing the door
downward.
3. Screw the top hinge to the cabinet.
Top
Hinge
4. Reinstall front grill.
Sliding Door Adjustments
Sliding Doors
Sliding doors need to be removed periodically to clean the rollers
and track. Oil the rollers with a light grade oil. Never use any
type of grease as it will accumulate foreign matter and restrict
door movement.
Each door has its own closing spring located at the top and is
positioned for the proper tension. Adjustment may be required.
Either adjust the spring by shortening it or replace it altogether.
Remove The Doors
1. Align the edge of the door with the labels on the aluminum
track, indicating the location of the grooves.
2. Lift the door firmly, pulling the door outward from the
bottom.
Label
Door edge
Lift firmly
Pull outward
10
For customer service, call (800) 733-8829, (800) 733-8821, Fax (989) 773-3210, www.deleld.com
Page 11

Edge Hinged Door Adjustments
Remove Door And Hinges
1. Open the door 90 degrees. Then lift the door off the cabinet
hinge.
2. Remove the hinges using a phillips head screwdriver.
Re-Install Door And Hinges
1. Tighten the cabinet hinge screws slightly and hang the door.
2. Make sure the door is properly aligned.
3. Tighten the hinge screws firmly.
4. Check the door seal by inserting a dollar bill between the
gasket and the cabinet flange. Some resistance should be
felt while withdrawing the bill. Repeat this test at 4” intervals
around the door.
Glass Door Merchandiser Installation, Use And Care Manual
Door hinge
Cabinet
hinge
Achieve Proper Seal
1. Close the door and pop off the door hinge covers with a flat
screwdriver. This exposes the mounting screws for the door.
2. Loosen the screws, move the door side of the hinge to
decrease the gasket-to-cabinet clearance and retighten
the screws.
3. Snap the hinge covers into place.
Hinge cover
For customer service, call (800) 733-8829, (800) 733-8821, Fax (989) 773-3210, www.deleld.com
11
Page 12

Glass Door Merchandiser Installation, Use And Care Manual
Wall Hanging Instructions
1. Drill two holes in the wall 3/8" in diameter at a distance of 18 5/8"
between the two and a depth of 2 1/2".
2. Insert the #10 pins in the drilled holes by tapping them gently with a
hammer.
3. Screw the black bar, which will be used to hang the unit with the
hexagonal head screws. Use a 7/16" hexagon key to adjust the screws
correctly.
4. Hang the refrigeration unit by making sure the hooks on the back of the
unit fall upon the black bar placed on the wall.
5. This is the appearance of the refrigeration unit after hung on the wall.
12
For customer service, call (800) 733-8829, (800) 733-8821, Fax (989) 773-3210, www.deleld.com
Page 13

Maintenance
Glass Door Merchandiser Installation, Use And Care Manual
Door Gasket Maintenance
Door gaskets require regular cleaning to prevent mold and
mildew build up and also to retain the elasticity of the gasket.
Gasket cleaning can be done with the use of warm soapy water.
Avoid full strength cleaning products on gaskets as this can
cause them to become brittle and crack. Never use sharp tools
or knives to scrape or clean the gasket. Gaskets can be easily
replaced and do not require the use of tools or an authorized
service person. The gaskets are “Dart” style and can be pulled
out of the groove in the door and new gaskets can be “pressed”
back into place.
Drain Maintenance - Base
Each unit has a drain located inside the unit that removes
the condensation from the evaporator coil and routes it to an
external condensate evaporator pan. Each drain can become
loose or disconnected during normal use. If you notice water
accumulation on the inside of the unit be sure the drain tube
is connected to the evaporator drain pan. If water is collecting
underneath the unit make sure the end of the drain tube is in
the condensate evaporator in the machine compartment. The
leveling of the unit is important as the units are designed to
drain properly when level. Be sure all drain lines are free of
obstructions.
Caster Maintenance
Wipe casters with a damp cloth monthly to prevent corrosion.
The unit must be disconnected from the power
source whenever performing service, maintenance
functions or cleaning the refrigerated area.
Refrigerators
The interior and exterior can be cleaned using soap and
warm water. If this isn’t sufficient, try ammonia and water or
a nonabrasive liquid cleaner. When cleaning stainless steel,
always rub with the “grain” of the stainless steel to avoid
marring the finish. Do not use an abrasive cleaner because
it will scratch the stainless steel and can damage the breaker
strips and gaskets.
Stainless Steel Care and Cleaning
To prevent discoloration or rust on stainless steel several
important steps need to be taken. First, we need to understand
the properties of stainless steel. Stainless steel contains 7080% iron, which will rust. It also contains 12-30% chromium,
which forms an invisible passive film over the steel’s surface,
which acts as a shield against corrosion. As long as the
protective layer is intact, the metal is still stainless. If the film
is broken or contaminated, outside elements can begin to
breakdown the steel and begin to form discoloration or rust.
Proper cleaning of stainless steel requires soft cloths or plastic
scouring pads.
NEVER USE STEEL PADS, WIRE BRUSHES OR SCRAPERS!
Cleaning solutions need to be alkaline based or non-chloride
cleaners. Any cleaner containing chlorides will damage
the protective film of the stainless steel. Chlorides are also
commonly found in hard water, salts, and household and
industrial cleaners. If cleaners containing chlorides are used be
sure to rinse repeatedly and dry thoroughly. Routine cleaning
of stainless steel can be done with soap and water. Extreme
stains or grease should be cleaned with a non-abrasive cleaner
and plastic scrub pad. Always rub with the grain of the steel.
There are stainless steel cleaners available which can restore
and preserve the finish of the steels protective layer. Early signs
of stainless steel breakdown are small pits and cracks. If this
has begun, clean thoroughly and start to apply stainless steel
cleaners in attempt to restore the passivity of the steel.
Never use an acid based cleaning solution! Many
food products have an acidic content, which can
deteriorate the finish. Be sure to clean the stainless
steel surfaces of ALL food products. Common items
include, tomatoes, peppers and other vegetables.
Cleaning the Condenser Coil
In order to maintain proper refrigeration performance, the
condenser fins must be cleaned of dust, dirt and grease
regularly. It is recommended that this be done at least every
three months. If conditions are such that the condenser is totally
blocked in three months, the frequency of cleaning should be
increased. Clean the condenser with a vacuum cleaner or stiff
brush. If extremely dirty, a commercially available condenser
cleaner may be required.
Failure to maintain a clean condenser coil can initially cause high
temperatures and excessive run times. Continuous operation
with a dirty or clogged condenser coil can result in compressor
failure. Neglecting the condenser coil cleaning procedures will
void any warranties associated with the compressor and cost
to replace the compressor.
Never use a high-pressure water wash for this
cleaning procedure as water can damage the
electrical components located near or at the
condenser coil.
Doors/Hinges
For sliding door cabinets, remove the doors and clean both the
rollers and the track. Oil the rollers with a light grade oil. Never
For customer service, call (800) 733-8829, (800) 733-8821, Fax (989) 773-3210, www.deleld.com
13
Page 14

Glass Door Merchandiser Installation, Use And Care Manual
Maintenance, continued
use any type of grease as it will accumulate foreign matter and
restrict door movement.
Over time and with heavy use doors the hinges may become
loose. If this happens tighten the screws that mount the hinge
brackets to the frame of the unit. Loose or sagging doors can
cause the hinges to pull out of the frame, which may damage
both the doors and the hinges. In some cases this may require
qualified service agents or maintenance personnel to perform
repairs.
Do not throw items into the storage area. Failure to
follow this recommendation could result in damage
to the interior of the cabinet or to the blower coil.
Preventing blower coil corrosion
To help prevent corrosion of the blower coil, store all acidic
items, such as pickles and tomatoes, in sealable containers.
Immediately wipe up all spills.
Continuous opening and closing of the doors will hamper the
unit’s ability to maintain optimum refrigeration temperature.
Overloading the storage area, restricting the
airflow, and continuous opening and closing of
the doors will hamper the units ability to maintain
operational temperature.
Troubleshooting
If a problem arises during operation of your refrigerator, follow the checklist below before calling service. Routine adjustments
and maintenance procedures are not covered by the warranty.
Disconnect electric power before performing any service.
Failure to follow this warning could result in injury or death.
Problem Possible Cause To Correct
Compressor will not start, no
noise
Warm storage temperatures Temperature control not set properly Reset control
Compressor runs continuously,
product too cold
Compressor runs continuously,
product too warm
Power disconnected Check service cord for proper connection
Blown fuse or breaker Replace fuse or reset breaker
Defective or broken wiring Repair or replace
Defective overload Replace
Defective relay Replace
Thermostat dial OFF Turn thermostat dial to 4
Not enough refrigerant Leak check
Change drier, evacuate and recharge
Cabinet location too warm Relocate cabinet
Too much refrigerant Change drier, evacuate and recharge
Low voltage, compressor cycling on
overload
Defective control Replace
Control feeler tube not installed in well Push control feeler tube into well
Not enough refrigerant Leak check
Not enough refrigerant Leak check
Inefficient compressor Replace
Check voltage supply
Change drier, evacuate and recharge
Change drier, evacuate and recharge
14
For customer service, call (800) 733-8829, (800) 733-8821, Fax (989) 773-3210, www.deleld.com
Page 15

Wiring Diagrams, DMER3-G
CONNECTIONS FOR EM-45-HNR COMPRESSOR
DETAIL
TERMINAL
BOX
POWER CORD
WHITE
TO HARNES
GROUND
WHITE
BLACK
HARNES
GREEN
RED
MOTOR FAN
CONDENSING UNIT
BLACK
WHITE
BLACK
N
L2
L1
R
12
C
13
S
10
11
Glass Door Merchandiser Installation, Use And Care Manual
DISPLAY
WIRE
CONECTOR
BLACK 16 AWG
BLACK 16 AWG
BLACK 16 AWG
3
1
POWER SUPPLY
DISPLAY
6
BLUE 16 AWG
RED 16 AWG
YELLOW 16 AWG
5
4
BROWN
BROWN
PERIMETER RESISTANCE
DEFROST ROD
CONDENSING UNIT
EVAPORATOR FAN
(2)
RED
(3)
BLACK
(1)
GREY
DEFROST SWITCH
Pr1 S. TEMP.
WHITE 16 AWG
WHITE 18 AWG
WHITE 16 AWG
WHITE 16 AWG
WHITE 16 AWG
WHITE 16 AWG
Pr2 S. EVAP.
TEMPERATURE
SWITCH
SELECTOR
BLACK 16 AWG
LIGHT
SWITCH
BLACK 16 AWG
YELLOW 18 AWG
YELLOW 18 AWG
BALLAST
INTERIOR LAMP
SING LAMP
CONDENSING UNIT
MOTOR FAN
HARNES
TO HARNES
POWER CORD
DETAIL
WHITE 16 AWG
GROUND
WHITE
BLACK
RED 18 AWG
RED 18 AWG
GREEN
11
10
BLACK
12
WHITE
R
13
S
RED
WHITE
C
N
L1
L2
BLACK
TERMINAL
1
BLACK
BOX
CONNECTIONS FOR EM-45-HNR COMPRESSOR
RELAY
3
CAPACITOR
THERMAL
PROTECTOR
2
For customer service, call (800) 733-8829, (800) 733-8821, Fax (989) 773-3210, www.deleld.com
15
Page 16

Glass Door Merchandiser Installation, Use And Care Manual
Wiring Diagrams, DMER7-G
16
For customer service, call (800) 733-8829, (800) 733-8821, Fax (989) 773-3210, www.deleld.com
Page 17

Wiring Diagrams, DMER12-G
Glass Door Merchandiser Installation, Use And Care Manual
For customer service, call (800) 733-8829, (800) 733-8821, Fax (989) 773-3210, www.deleld.com
17
Page 18

Glass Door Merchandiser Installation, Use And Care Manual
Wiring Diagrams, DMER17-G
18
For customer service, call (800) 733-8829, (800) 733-8821, Fax (989) 773-3210, www.deleld.com
Page 19

Wiring Diagrams, DMER26-G
Glass Door Merchandiser Installation, Use And Care Manual
For customer service, call (800) 733-8829, (800) 733-8821, Fax (989) 773-3210, www.deleld.com
19
Page 20

Glass Door Merchandiser Installation, Use And Care Manual
Wiring Diagrams, DMER33-SLG
20
For customer service, call (800) 733-8829, (800) 733-8821, Fax (989) 773-3210, www.deleld.com
Page 21

Wiring Diagrams, DMER45-SLG
Glass Door Merchandiser Installation, Use And Care Manual
For customer service, call (800) 733-8829, (800) 733-8821, Fax (989) 773-3210, www.deleld.com
21
Page 22

Glass Door Merchandiser Installation, Use And Care Manual
Wiring Diagrams, DMER49-G
22
For customer service, call (800) 733-8829, (800) 733-8821, Fax (989) 773-3210, www.deleld.com
Page 23

Wiring Diagrams, DMER65-G
Glass Door Merchandiser Installation, Use And Care Manual
For customer service, call (800) 733-8829, (800) 733-8821, Fax (989) 773-3210, www.deleld.com
23
Page 24

Glass Door Merchandiser Installation, Use And Care Manual
Wiring Diagrams, DMER67-SLG
24
For customer service, call (800) 733-8829, (800) 733-8821, Fax (989) 773-3210, www.deleld.com
Page 25

Glass Door Merchandiser Installation, Use And Care Manual
Standard Labor Guidelines To Repair Or Replace Parts
Advice and recommendations given by Delfield Service Technicians do not constitute or guarantee any special coverage.
•Amaximumof1-hourisallowedtodiagnose a defective component.
•Amaximumof1-hourisallowedforretrieval of parts not in stock.
•Amaximumtravel distance of 100 miles round trip and 2-hours will be reimbursed.
•Overtime, installation/start-up, normal control adjustments, general maintenance, glass breakage, freight damage, and/or
correcting and end-user installation error will not be reimbursed under warranty unless pre-approved with a Service Work
Authorization from Delfield. You must submit the number with the service claim.
Labor Of 1 Hour Is Allowed To Replace:
•CompressorStartComponentsandOverloadProtector
•DoorHinges,Locks,andGaskets
•Evaporator/CondenserFanMotorandBlade
•SolenoidCoil
•Thermostat
Labor Of 2 Hours To Replace:
•Locate/RepairLeak
•PressureControl
•SolenoidValve
Labor Of 3 Hours To Replace:
•CondenserorEvaporatorCoil
•ExpansionValve
Labor Of 4 Hours To Replace:
•Compressor
This includes recovery of refrigerant and leak check.
$55.00 maximum reimbursement for refrigerant recovery (includes recovery machine, pump, torch, oil, flux, minor fittings,
solder, brazing rod, nitrogen, or similar fees.)
Refrigerants:
•R134AAmaximumof$15.00/lb.or$1.00/oz.willbereimbursed.
For customer service, call (800) 733-8829, (800) 733-8821, Fax (989) 773-3210, www.deleld.com
25
Page 26

Glass Door Merchandiser Installation, Use And Care Manual
Notes
26
For customer service, call (800) 733-8829, (800) 733-8821, Fax (989) 773-3210, www.deleld.com
Page 27

Notes
Glass Door Merchandiser Installation, Use And Care Manual
For customer service, call (800) 733-8829, (800) 733-8821, Fax (989) 773-3210, www.deleld.com
27
Page 28

Mt. Pleasant, MI Covington, TN
Thank you for choosing Delfield!
Help is a phone call away. Help our team of professional, courteous customer
service reps by having your model number and serial number available at the time
of your call (800) 733-8829.
Model: _______________________ S/N: ______________________
Installation Date: _______________
For a list of Delfield’s authorized parts depots,
visit our website at www.delfield.com
Register your Deleld warranty
online. Go to www.deleld.com
under the service tab to complete.
980 S. Isabella Rd., Mt. Pleasant, MI 48858, U.S.A. • (989) 773-7981 or (800) 733-8829 • Fax (989) 773-3210 • www.deleld.com
Deleld reserves the right to make changes in design or specications without prior notice. ©2013 The Deleld Company. All rights reserved. Printed in the U.S.A.
DMDMERG 04/13
9294417
 Loading...