

Page 1
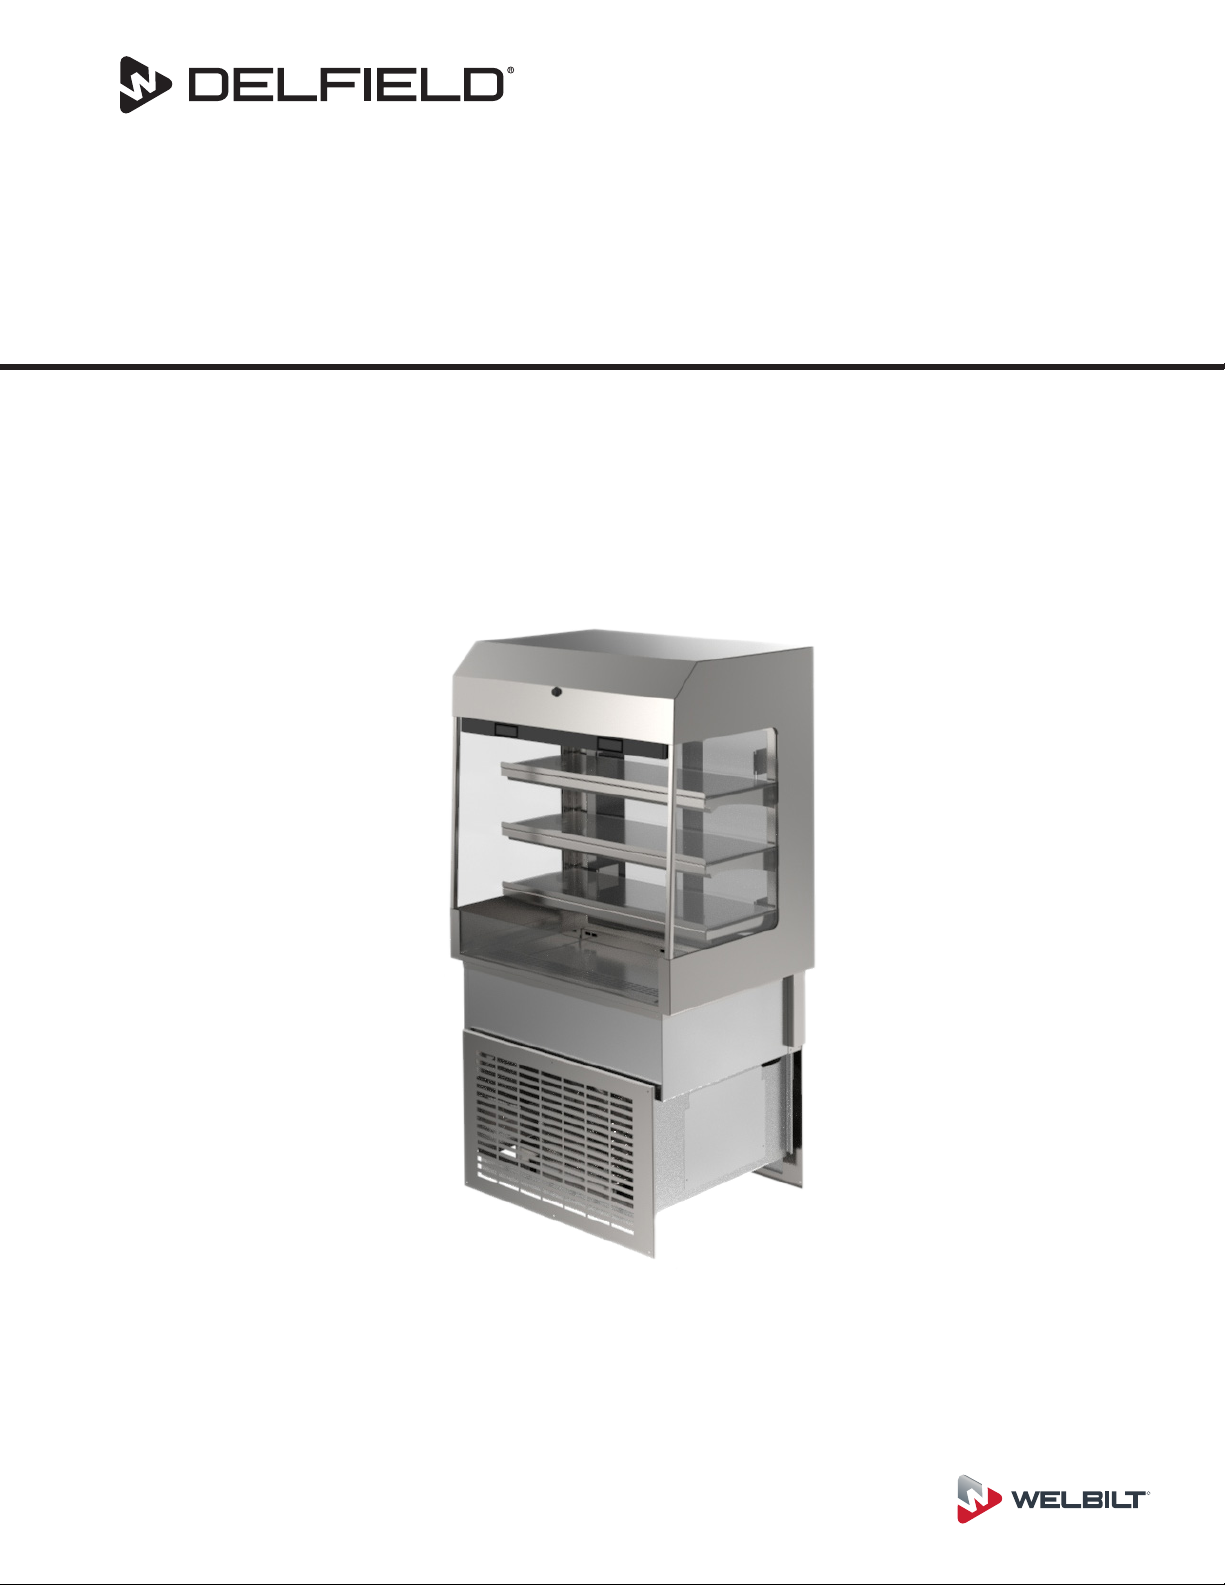
ASM-P Series
A Welbilt Brand
Fresh Soluons, Fit For You
Original Instructions
Installation, Operation and Maintenance Manual
This manual is updated as new information and models are released. Visit our website for the latest manual.
Part Number: 9291463A 11/21
R
Page 2
Safety Notices
Warning
n
Read this manual thoroughly before operating, installing
or performing maintenance on the equipment. Failure
to follow instructions in this manual can cause property
damage, injury or death.
DANGER
Do not lift the condensing unit by the refrigerant tubing
or other components. These features will not support
the condensing unit weight. Injury and unit damage
may occur!
DANGER
Do not install or operate equipment that has been
misused, abused, neglected, damaged, or altered/
modified from that of original manufactured
specifications.
Warning
n
This product contains chemicals known to the State
of California to cause cancer and/or birth defects or
other reproductive harm. Operation, installation, and
servicing of this product could expose you to airborne
particles of glasswool or ceramic fibers, crystalline
silica, and/or carbon monoxide. Inhalation of airborne
particles of glasswool or ceramic fibers is known to the
State of California to cause cancer. Inhalation of carbon
monoxide is known to the State of California to cause
birth defects or other reproductive harm.
Warning
n
Do not use electrical appliances inside the food storage
compartments of the appliance, unless they are of the
type recommended by the manufacturer.
Warning
n
Use caution when handling metal surface edges of all
equipment.
DANGER
All utility connections and fixtures must be maintained
in accordance with Local and national codes.
DANGER
Keep power cord AWAY from HEATED surfaces. DO NOT
immerse power cord or plug in water. DO NOT let power
cord hang over edge of table or counter.
Warning
n
Authorized Service Representatives are obligated to
follow industry standard safety procedures, including,
but not limited to, local/national regulations for
disconnection / lock out / tag out procedures for all
utilities including electric, gas, water and steam.
Warning
n
This appliance is not intended for use by persons
(including children) with reduced physical, sensory
or mental capabilities, or lack of experience and
knowledge, unless they have been given supervision
concerning use of the appliance by a person responsible
for their safety. Do not allow children to play with this
appliance.
Warning
n
Do not store or use gasoline or other flammable vapors
or liquids in the vicinity of this or any other appliance.
Never use flammable oil soaked cloths or combustible
cleaning solutions, for cleaning.
Warning
n
DO NOT touch refrigeration lines inside units; some may
exceed temperatures of 200°F (93.3°C).
Note
Proper installation, care and maintenance are
essential for maximum performance and trouble-free
operation of your equipment. Visit our website www.
wbtkitchencare.com for manual updates, translations,
or contact information for service agents in your area.
Note
These appliances are intended to be used for
commercial applications, for example in kitchens of
restaurants, canteens, hospitals and in commercial
enterprises such as bakeries, butcheries, etc., but not
for continuous mass production of food.
Note
Climatic class 4 is defined as ambient conditions of 30°C
and 55% relative humidity, according to ISO 23953-2.
Note
These appliances will operate within the marked rated
voltage range without adjustment.
Note
This product utilizes Ecomate blowing agent methyl
formate
Page 3

Section 1
General Information
Section 2
Installation
Section 3
Operation
Table of Contents
Model Numbers .................................................................................................................. 4
Serial Number Location ..................................................................................................... 4
Warranty Information ........................................................................................................ 4
Regulatory Certifications ..................................................................................................4
Dimensioned Drawings .....................................................................................................5
Location ..............................................................................................................................6
Weight of Equipment .........................................................................................................7
Clearance Requirements ....................................................................................................7
Dimensions ......................................................................................................................... 7
Electrical Service ................................................................................................................ 8
Voltage .......................................................................................................................................................8
Fuse/Circuit Breaker ..............................................................................................................................8
Ground Fault Circuit Interrupter .......................................................................................................8
Rated Amperages, Horsepower, Voltage & Power Cord Chart ...............................................8
Installation Instructions ....................................................................................................9
Prepare the Cabinet ...............................................................................................................................9
Lower in the ASM ................................................................................................................................10
Construct an Air Duct ........................................................................................................................ 10
Plumbing...........................................................................................................................11
Leveling .............................................................................................................................11
Sliding Door Removal And Reinstall ...............................................................................11
Night & Security Cover Operations .................................................................................11
Shelf Adjustments ...........................................................................................................11
Section 4
Maintenance
Part Number: 9291463A 11/21
Operation ..........................................................................................................................12
Temperature Control Settings .........................................................................................13
Change Set-point Temperature ...................................................................................................... 13
Temperature Alarm .............................................................................................................................13
Cleaning and Sanitizing Procedures ...............................................................................14
General ....................................................................................................................................................14
Interior Cleaning .................................................................................................................................. 14
Exterior Cleaning ................................................................................................................................. 15
Plexiglas, Including Baffles ...............................................................................................................15
Sliding Doors ......................................................................................................................................... 15
Drain .........................................................................................................................................................15
Cleaning the Condenser Coil .......................................................................................................... 15
3
Page 4
Section 1
General Information
Model Numbers
This manual covers standard units only.
NOTE: For custom units, consult Manitowoc KitchenCare at
1-844-724-CARE.
Drop-In Air Screen Merchandisers
ASM-36P
ASM-48P
Serial Number Location
The serial number on all self-contained Drop-In Air Screen
Merchandisers is located on the mechanical section wall.
Always have the serial number of your unit available when
calling for parts or service.
Warranty Information
• Register your product for warranty.
• Verify warranty information.
• View and download a copy of your warranty.
At www.delfield.com/warranty
Regulatory Certifications
All models are certified by:
• National Sanitation Foundation (NSF)
• Underwriters Laboratories (UL)
• Underwriters Laboratories of Canada (cUL)
4
Part Number: 9291463A 11/21
Page 5
Section 1 General Information
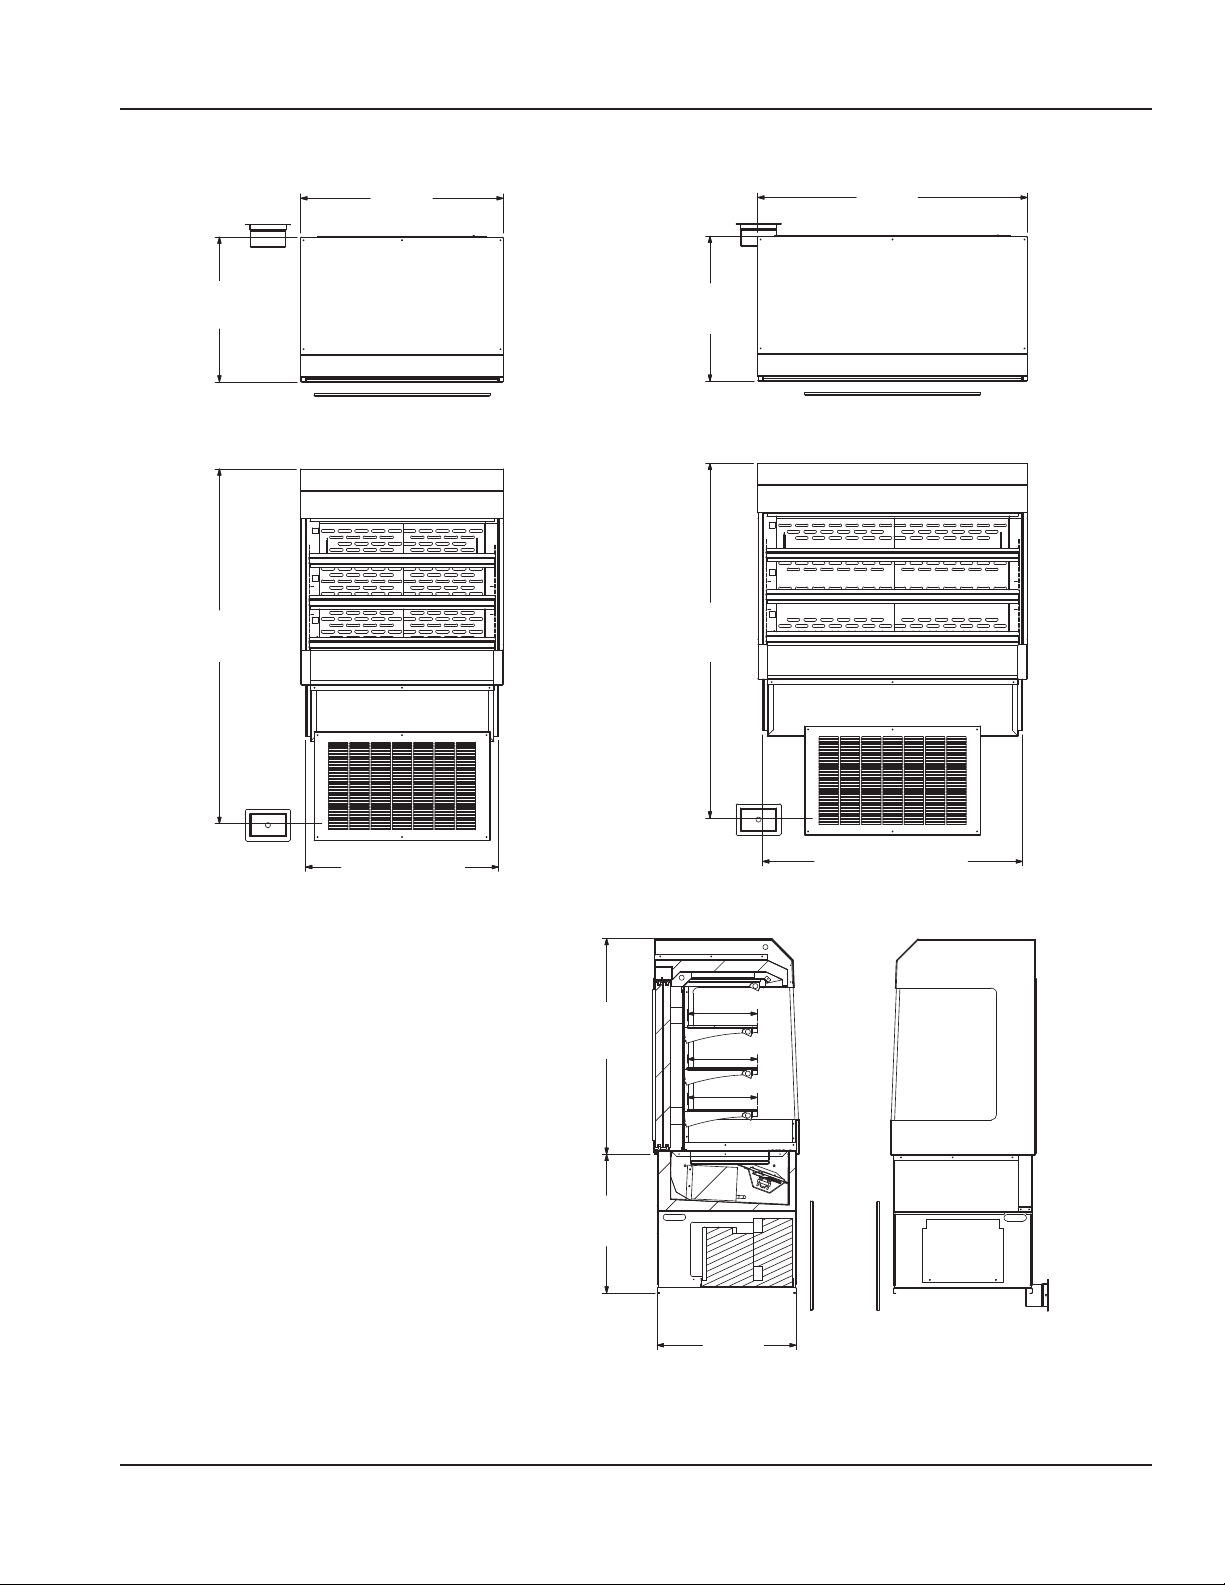
Dimensioned Drawings
25.93”
66cm
63.48”
161cm
36.25”
92cm
48.25”
123cm
25.93”
66cm
Plan View, ASM-36P Plan View, ASM-48P
63.48”
161cm
34.50” 88cm
Elevation View, ASM-36P
12.50”
38.65”
98cm
32cm
12.50”
32cm
12.50”
32cm
24.83”
63cm
Left Section View,
ASM-36P, ASM-48P
46.50” 118cm
Elevation View, ASM-48P
24.87”
63cm
Right Side View,
ASM-36P, ASM-48P
Part Number: 9291463A 11/21
5
Page 6
Section 2
Installation
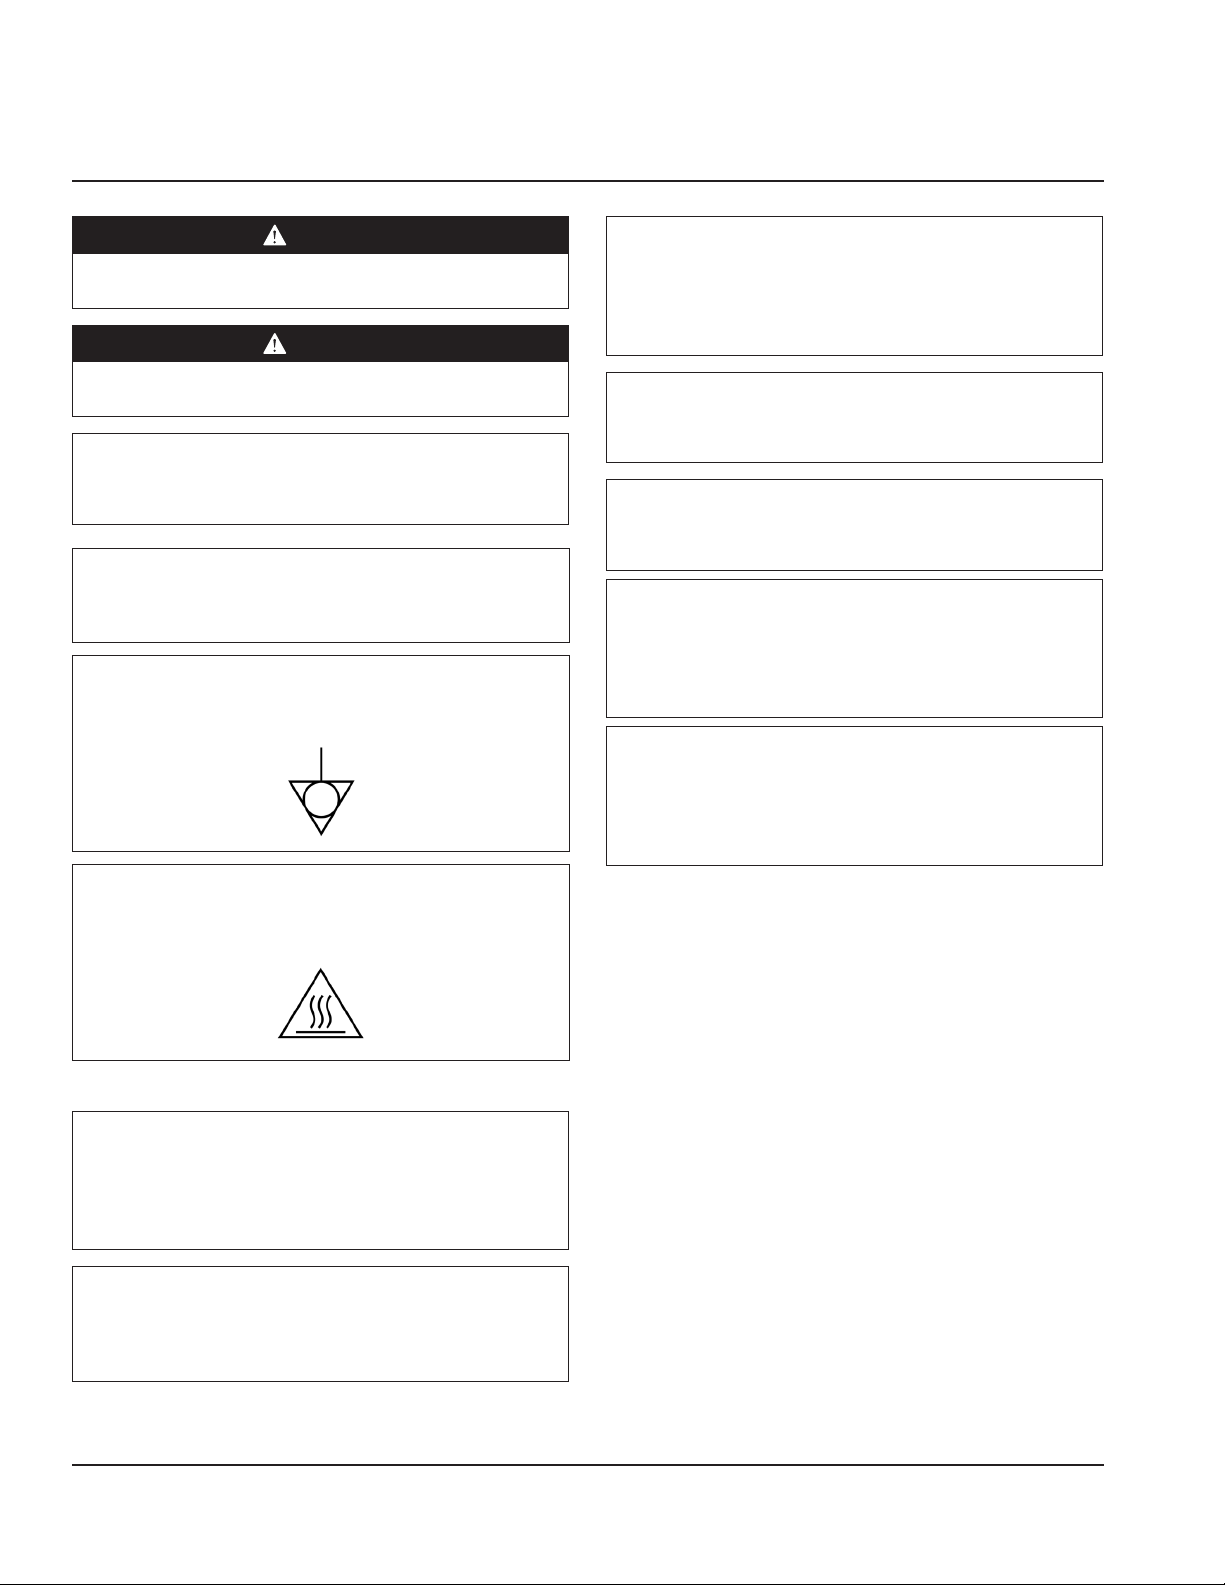
DANGER
Installation must comply with all applicable fire and
health codes in your jurisdiction.
DANGER
Use appropriate safety equipment during installation
and servicing.
Warning
n
Do not damage the refrigeration circuit when installing,
maintaining or servicing the unit.
Caution
,
Do not position the air intake vent near steam or heat
exhaust of another appliance.
NOTE
This symbol indicates the location of the equipotential
bonding conductor connection.
NOTE
This symbol indicates a hot surface that can cause injury
to persons.
Location
Warning
n
This equipment must be positioned so that the plug is
accessible unless other means for disconnection from
the power supply (e.g., circuit breaker or disconnect
switch) is provided.
Warning
n
Adequate means must be provided to limit the
movement of this appliance without depending on or
transmitting stress to the electrical conduit or gas lines.
Warning
n
To avoid instability the installation area must be capable
of supporting the combined weight of the equipment
and product. Additionally the equipment must be level
side to side and front to back.
Warning
n
This equipment is intended for indoor use only. Do not
install or operate this equipment in outdoor areas.
Warning
n
Remove all removable panels before lifting and
installing.
Warning
n
If a refrigerated base does not have a condensate
evaporator supplied, you must connect the condensate
line to a suitable drain. Otherwise, water will collect on
the floor, causing a potentially hazardous situation.
Warning
n
Moisture collecting from improper drainage can create a
slippery surface on the floor and a hazard to employees.
It is the owners reposibility to provide a container or
outlet for drainage.
The location selected for the equipment must meet the
following criteria. If any of these criteria are not met, select
another location.
• Units are intended for indoor use only.
• Unit is designed to maintain 36°F - 40°F at 80°F ambient
room temperature (2°C - 4°C at 27°C) in 55% or lower
relative humidity.
• Unit is NSF listed and designed for storage of prepackage foods.
• The location MUST be level, stable and capable of
supporting the weight of the equipment.
• The location MUST be free from and clear of
combustible materials.
• Equipment MUST be level both front to back and side to
side.
• Position the equipment so it will not tip or slide.
• Proper air supply for ventilation is REQUIRED AND
CRITICAL for safe and efficient operation. Refer to
Clearance Requirements chart on page 7.
• Avoid hot corners and locations near stoves and ovens.
6
Part Number: 9291463A 11/21
Page 7
Section 2 Installation
• Do not obstruct the flow of ventilation air. Make sure the
air vents of the equipment are not blocked.
• Air movement in the room will adversely effect ASM
refrigeration. Do not place the model near doors or air
vents.
• Do not install the equipment directly over a drain.
Steam rising up out of the drain will adversely affect
operation, air circulation, and damage electrical /
electronic components.
Weight of Equipment
Model Weight
ASM-36P
ASM-48P
425lbs (193kg)
500lbs (227kg)
Clearance Requirements
DANGER
Minimum clearance requirements are the same for
noncombustible locations as for combustible locations.
The flooring under the appliance must be made of a
noncombustible material.
Dimensions
Model Length Depth
ASM-36P 36.25”
(92cm)
ASM-48P 48.25”
(123cm)
Model Display Storage
ASM-36P 8.2ft
ASM-48P 11.3ft
25.93”
(66cm)
25.93”
(66cm)
3
3
These units are installed by placing them into the counter
from above. The counter cutout sizes are as follows.
Model Counter Cutout Dimensions
ASM-36P 35.13” x 25.50” (89cm x 65cm)
ASM-48P 47.13” x 25.50” (120cm x 65cm)
Model Louver Cutout Dimensions
ASM-36P 28.00” x 17.00” (71cm x 42cm)
ASM-48P 28.00” x 17.00” (71cm x 42cm)
Height
63.48“
(161cm)
63.48“
(161cm)
DANGER
Risk of fire/shock. All minimum clearances must be
maintained. Do not obstruct vents or openings.
Sides
1” (2.5cm)
• Keep the vents clean and free of obstruction.
Model Control Cutout Dimensions
ASM-36P 6.75” x 4.37” (17cm x 11cm )
ASM-48P 6.75” x 4.37” (17cm x 11cm )
Part Number: 9291463A 11/21
7
Page 8
Installation Section 2
Electrical Service
DANGER
Check all wiring connections, including factory
terminals, before operation. Connections can become
loose during shipment and installation.
Warning
n
This appliance must be grounded and all field wiring
must conform to all applicable local and national
codes. Refer to rating plate for proper voltage. It is the
responsibility of the end user to provide the disconnect
means to satisfy the authority having jurisdiction.
VOLTAGE
All electrical work, including wire routing and grounding,
must conform to local, state and national electrical codes.
The following precautions must be observed:
• The equipment must be grounded.
• A separate fuse/circuit breaker must be provided for
each unit.
• Check all green ground screws, cables and wire
connections to verify they are tight before start-up.
RATED AMPERAGES, HORSEPOWER, VOLTAGE &
POWER CORD CHART
Model
Amps
(with condensate evap. /
without condensate evap)
HP 2 @ 1/3 2 @ 1/2
Voltage, Cycle,
Phase
NEMA Plug 14-20P 14-20P
Cord Length 9ft (2.7m) 9ft (2.7m)
ASM-36P ASM-48P
5.0 / 3.7 11.8 / 7.7
115V, 60Hz, 1Ph 115V, 60Hz, 1Ph
Refrigeration
Model
R-290 Charge 2 @ 5.3oz 2 @ 5.3oz
Cabinet Load
BTU/Hour
System Capacity
BTU/Hour
ASM-36P ASM-48P
4750 6250
5278 6944
FUSE/CIRCUIT BREAKER
A separate fuse/circuit breaker must be provided for each
unit.
GROUND FAULT CIRCUIT INTERRUPTER
Ground Fault Circuit Interrupter (GFCI/GFI) protection is
a system that shuts down the electric circuit (opens it)
when it senses an unexpected loss of power, presumably
to ground. Manitowoc does not recommend the use of
GFCI/GFI circuit protection to energize our equipment.
If code requires the use of a GFCI/GFI then you must
follow the local code. The circuit must be dedicated, sized
properly and there must be a panel GFCI/GFI breaker. We
do not recommend the use of GFCI/GFI outlets to energize
our equipment as they are known for more intermittent
nuisance trips than panel breakers.
8
Part Number: 9291463A 11/21
Page 9
Section 2 Installation
Installation Instructions
Installation Dimensions
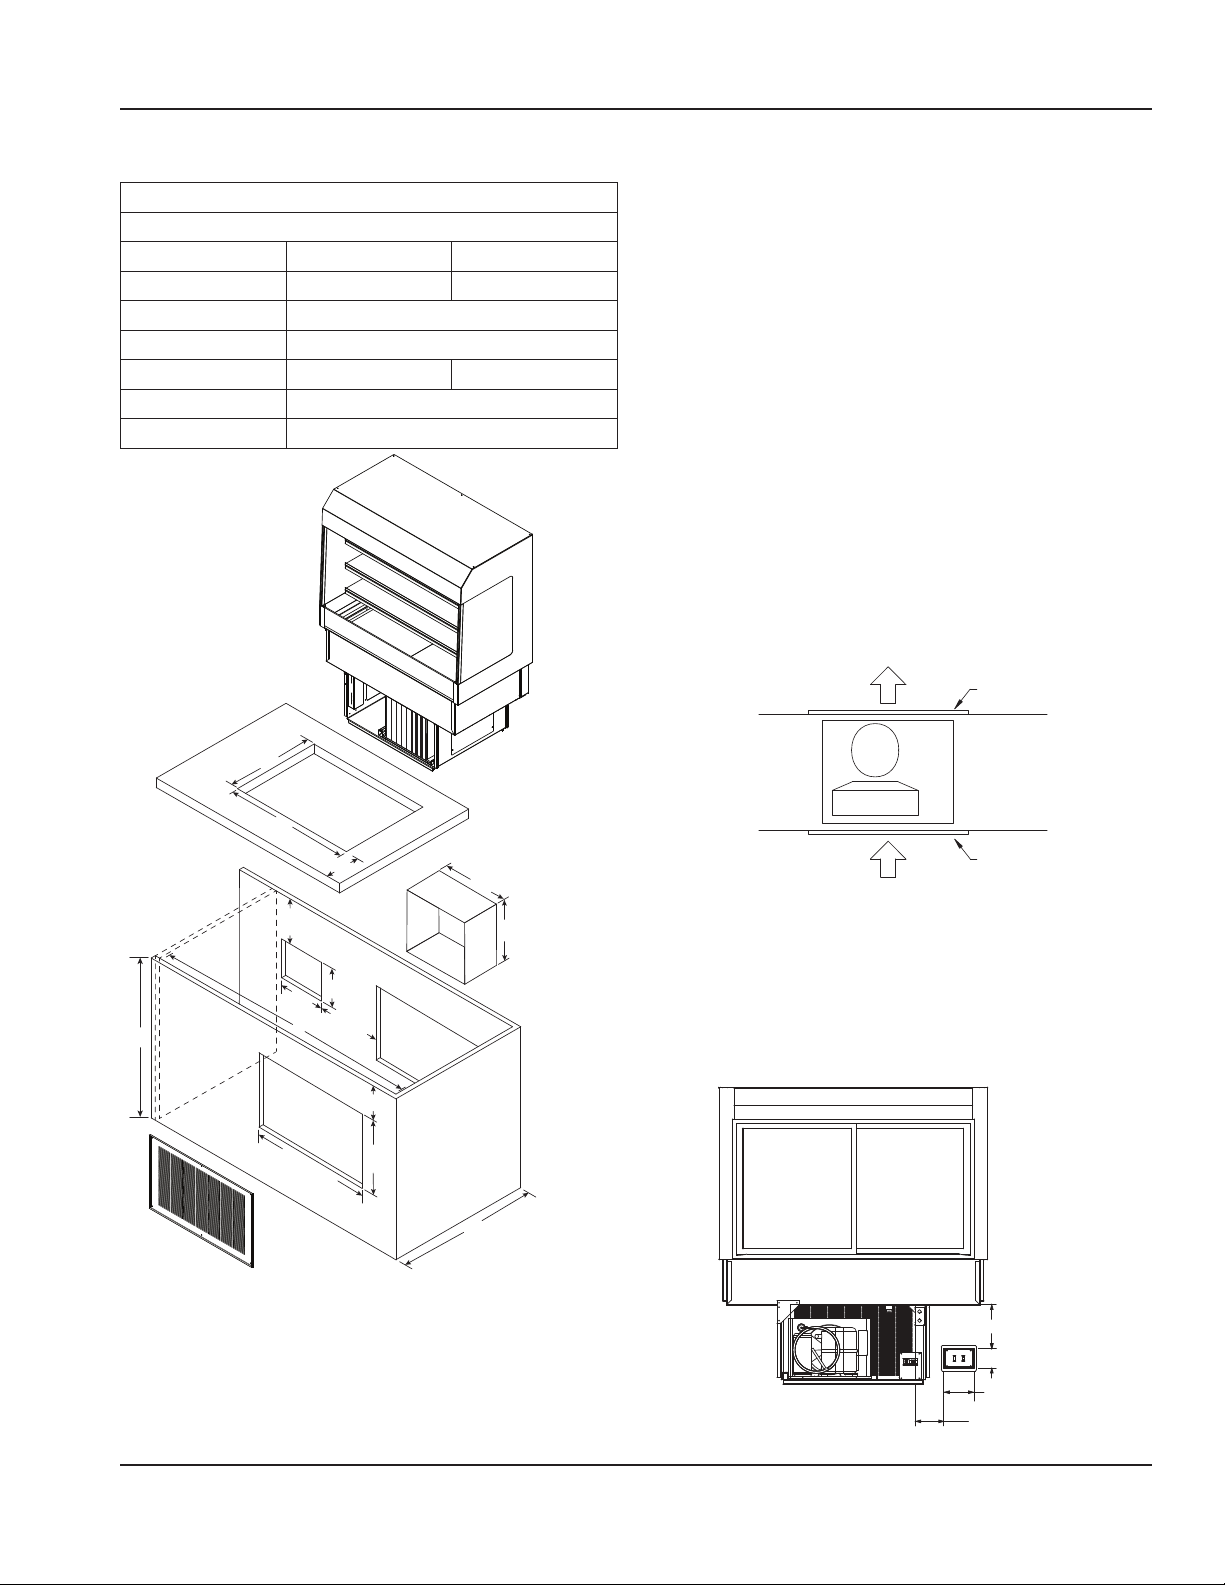
Cabinet Interior Minimum Dimensions
Dimension ASM-36P ASM-48P
A 35.13” (89cm) 47.13” (120cm)
B 27.00” (69cm)
C 28.00” (71cm)
D 35.13” (89cm) 47.13” (120cm)
E 25.50” (65cm)
F Min 0.75” (19cm)
PREPARE THE CABINET
1. Install partitions between the Air Screen Merchandiser
and other electrical appliances if they are located in the
same cabinet. Partitions must fully extend front to back
and top to bottom.
2. Install a GFCI receptacle a minimum of 14” (36cm) up
from the cabinet bottom inside the partitions.
3. The unit requires airflow to the compressor. Two
louvers are provided with each unit.
NOTE: Any restriction to the proper air flow will void the
compressor warranty.
• Louver cut-outs are 28” x 17” (71cm x 42cm) cutouts.
• 143in (923cm) is required at both the intake and
discharge.
• Louver cut-outs must extend to bottom of cabinet
and align with condenser face.
• Install the louvers on the front and back of the
cabinet.
Discharge Air
Louver
E
D
18.0”
(46cm)
Max
F
Air duct dimensions
to match condenser face
(Fig. 1)
A
B
4. Cut a 6.75” x 4.37” (17cm x 11cm ) hole in the base on
Condenser
Fresh Air In On
Customer Side
Louver
the operator side for the control.
4.37”
(11cm)
6.75”
(17cm)
3.5”(9cm) -
A
C
18”(46cm)
• The maximum distance between counter top and
the control cutout is 18” (46cm).
• The distance between the louver and the control
cutout must be between 3.50” (9cm) and 18” (46cm).
10.0”
(25cm)
28.0” (71cm)
17.00”
(42cm)
B
Operator Side
18" (46cm) Max
4.37” (11cm)
6.75” (17cm)
3.50" (9cm) Min
18" (46cm) Max
Part Number: 9291463A 11/21
9
Page 10
Installation Section 2
LOWER IN THE ASM
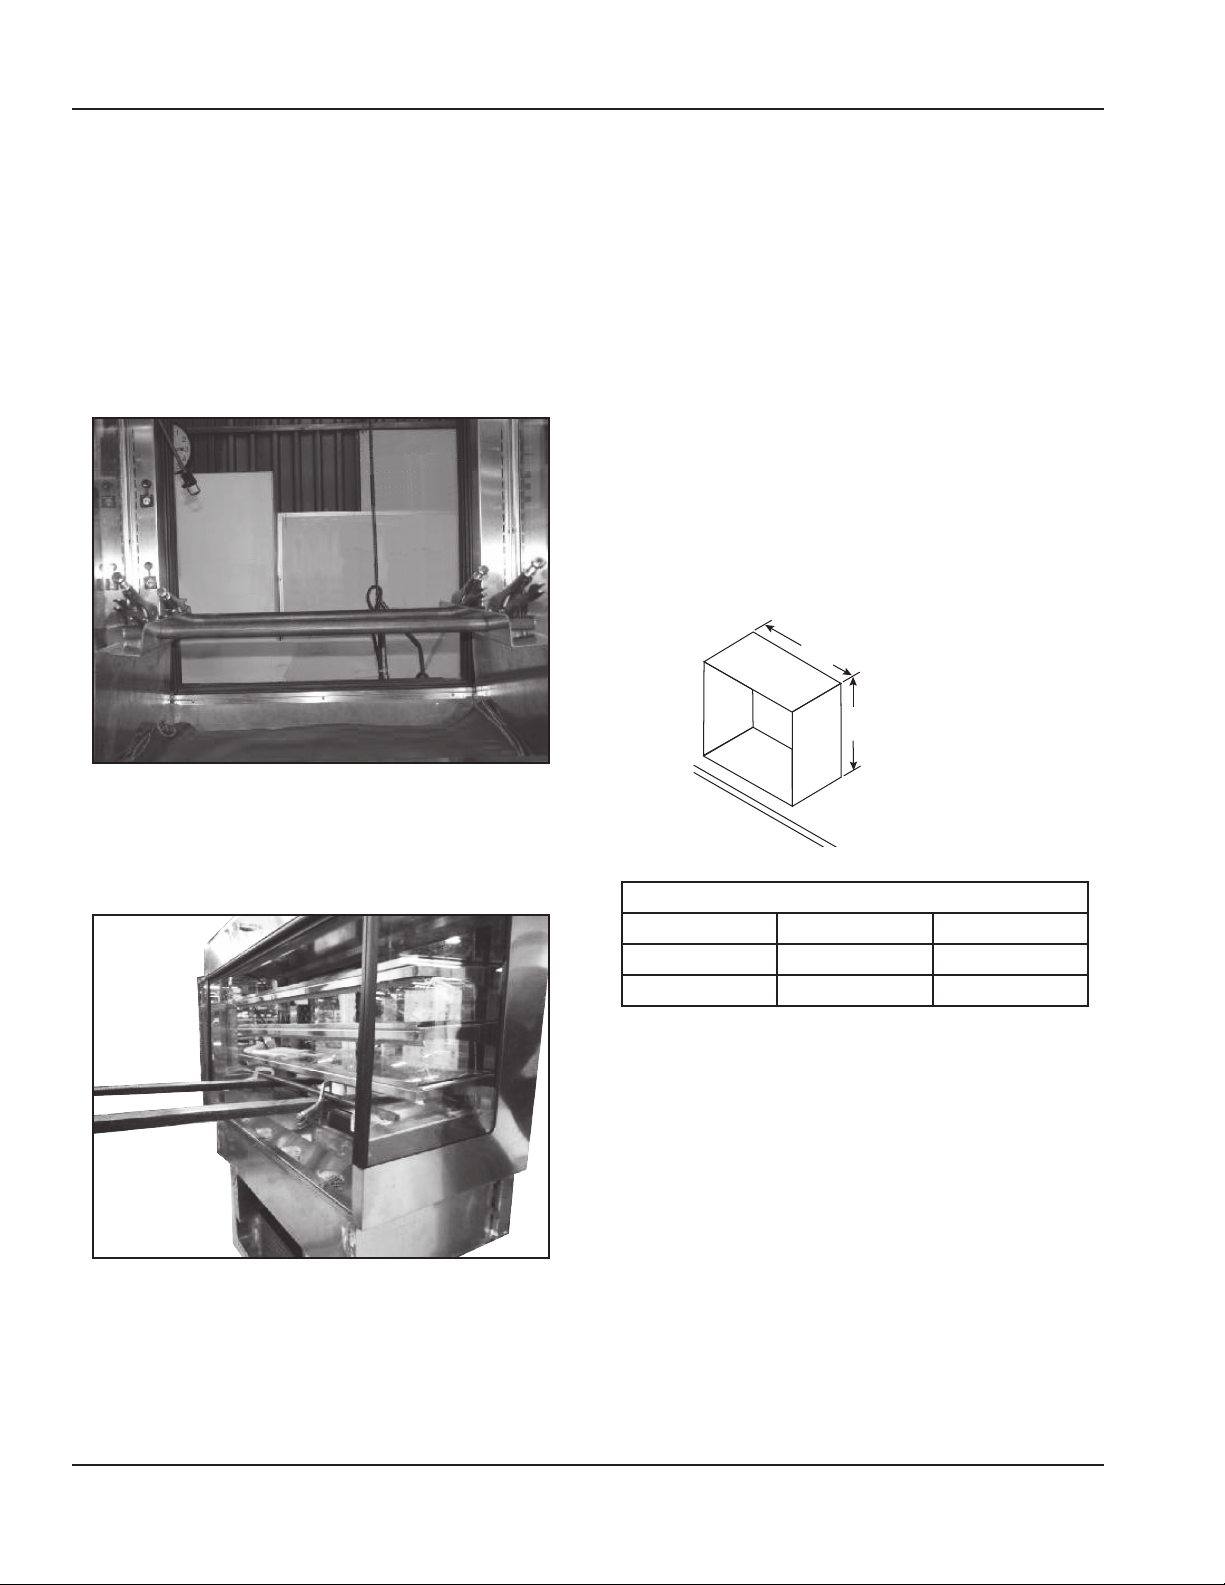
5. Remove the stainless steel pans in the bottom of the
unit.
6. Remove the stainless steel pan clip rail below the door
track.
7. Bolt in the lifting plates using the bolts located inside
the tank that are installed in the lifting braces.
8. Slide two 1” steel pipes into the lifting plate holes. Place
forklift forks under the pipes and clamp the forks and
pipes in position.
10. Remove the bolts and remove the lifting plates. Install
plastic plugs in the bolt holes.
11. Install the stainless steel pan clip rail below the door
track.
12. Install the stainless steel pans in the bottom on the
unit making sure the turn down is engaged in the slot
below the door track.
13. Install the sneeze guard glass in the clips and attach the
end clip with two stainless steel self tapping screws.
14. Use gray silicone to finish the joint between the drop in
unit and the top of the base.
CONSTRUCT AN AIR DUCT
15. Construct an air duct (not provided) connecting
the condenser face to the louver. This will prevent
recirculation of discharge air.
Air duct dimensions
to match condenser face
(Fig. 1)
A
B
Lifting Plates and 1” Steel Pipes
9. Raise the unit high enough with the forklift to roll the
base under the unit into position. Lower the ASM unit
into the base using care to clear all of the flanges and
screw heads.
Lifted ASM
Air Duct Dimensions (Fig. 1)
Dimension ASM-36P ASM-48P
A 10.5” (267mm) 13” (330mm)
B 11” (279mm) 11” (279mm)
10
Part Number: 9291463A 11/21
Page 11
Section 2 Installation
96°
102°
102°
Plumbing
Standard models will have a 1/2” drain which will need
to be run to an appropriate floor drain. The drain will be
stubbed inside the machine compartment.
Warning
n
Moisture collecting from improper drainage can create a
slippery surface on the floor and a hazard to employees.
It is the owner’s responsibility to provide a container or
outlet for drainage.
Leveling
After the cabinet has been placed in the desired location,
cabinets with legs must be leveled. Level units from front to
back and from side to side. Leveling will insure proper door
operation and removal of condensate.
Sliding Door Removal And Reinstall
Sliding Door Removal
Open the door almost completely. Firmly grasp both sides
of the door. Lift the door up and move it until it enters a
notch and can be lifted higher. Tilt the bottom out without
removing the top. Use the top to gently return the spring to
the closed position. Remove the door from the top track.
Sliding Door Reinstall
There is a notch in the top inside corner of the door. Put
the spring in the door’s notch and move the spring to the
open position. Put the top into the track and find the notch
where the door can be lifted higher. Set bottom of the door
into the track.
Shelf Adjustments
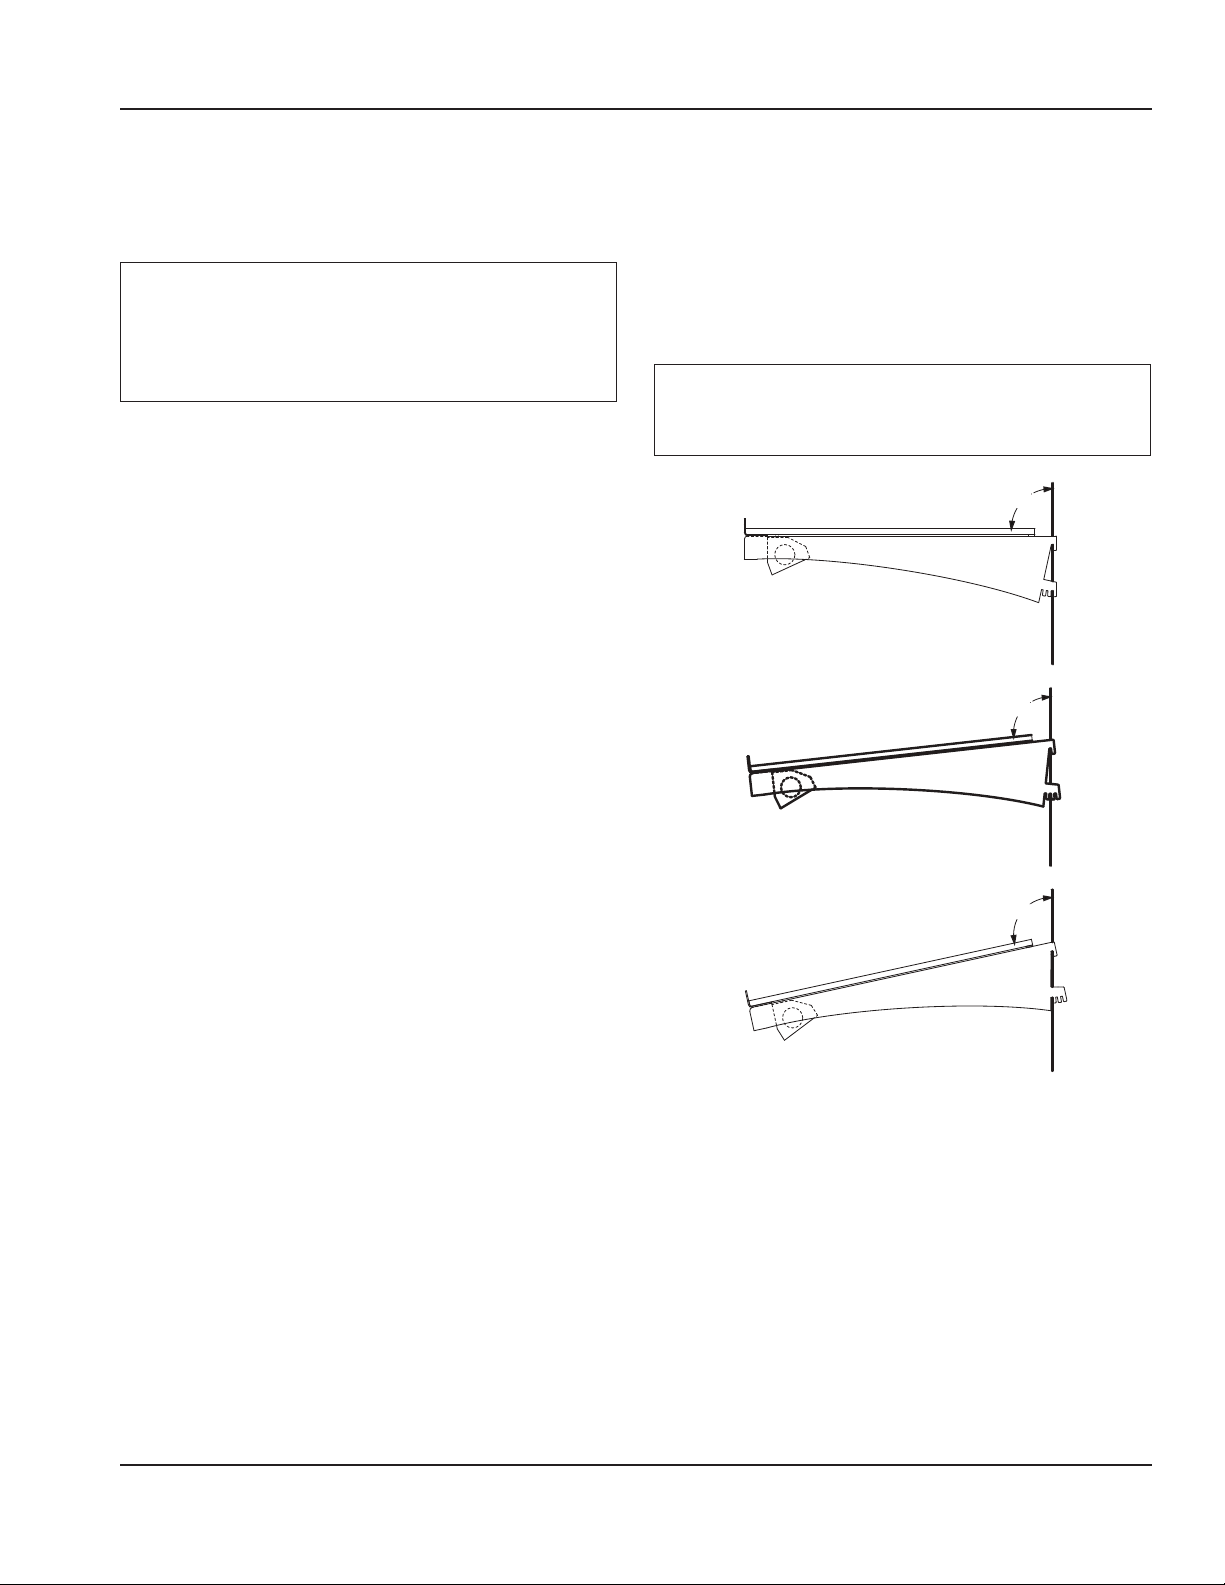
Display cases come with three tempered glass shelves that
are adjustable in 1” increments.
Shelves can be slanted at three different angles. Remove
the glass and unplug the light before adjusting the shelves.
Maximum weight for 36” (91cm) shelves is 25 lbs (11kg).
Maximum weight for 48” (122cm) shelves is 35 lbs (16kg).
Caution
,
Overloading shelves can damage equipment or cause
bodily injury.
90°
96°
102°
Night & Security Cover Operations
At the factory, the keys are taped to the display case. Pull
the cover down, turn the key 90° to lock.
Part Number: 9291463A 11/21
11
Page 12
Section 3
Operation
DANGER
The on-site supervisor is responsible for ensuring that
operators are made aware of the inherent dangers of
operating this equipment.
DANGER
Do not operate any appliance with a damaged cord
or plug. All repairs must be performed by a qualified
service company.
DANGER
Never stand on the unit! They are not designed to
hold the weight of an adult, and may collapse or tip if
misused in this manner.
Warning
n
Do not contact moving parts.
Warning
n
All covers and access panels must be in place and
properly secured, before operating this equipment.
Warning
n
Damp or wet hands may stick to cold surfaces.
Warning
n
Never use sharp objects or tools to remove ice or frost.
Do not use mechanical devices or other means to
accelerate the defrosting process.
Warning
n
The operator of this equipment is solely responsible
for ensuring safe holding temperature levels for all
food items. Failure to do so could result in unsafe food
products for customers.
Warning
n
Do not block the supply and return air grills or the air
space around the air grills. Keep plastic wrappings,
paper, labels, etc. from being airborne and lodging in
the grills. Failure to keep the air grills clear will result in
unsatisfactory operation of the system.
Operation
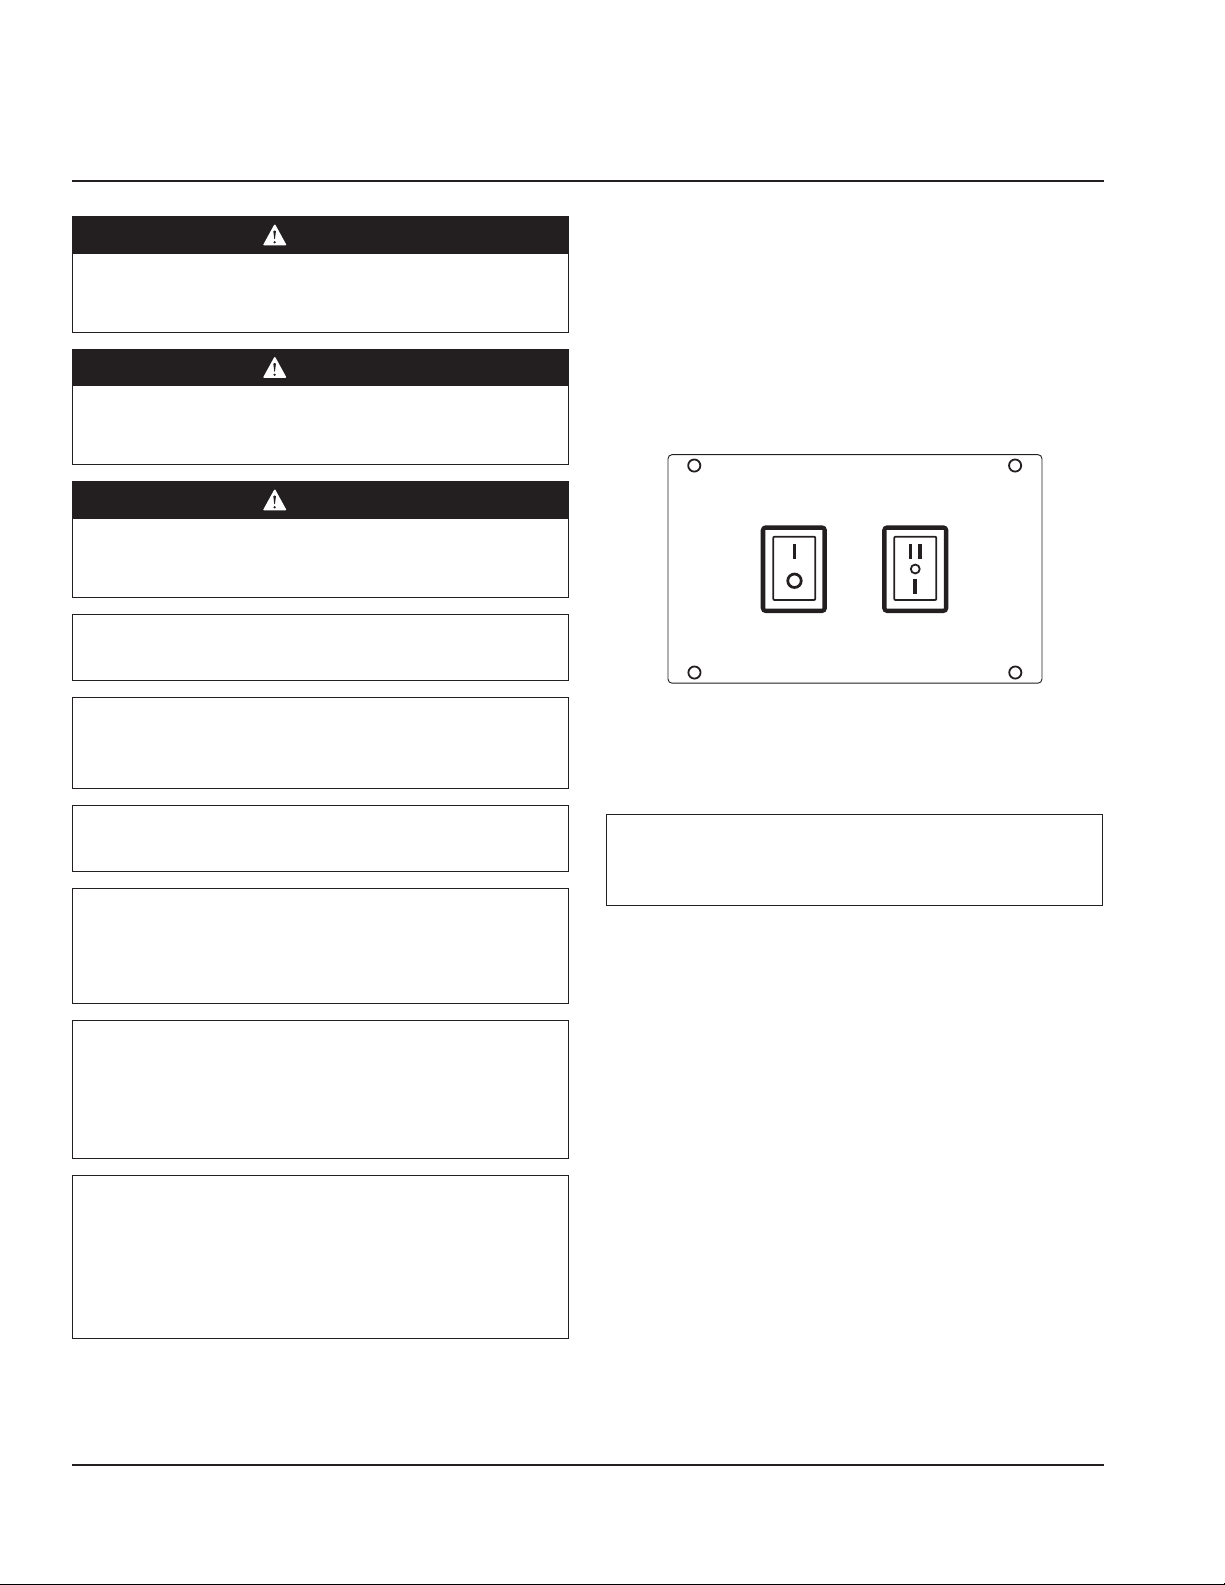
An ON/OFF switch is located on the left side of the remote
control panel. Simply turn the switch to ON to begin
operation. There is a second ON/OFF switch on the right
side of the remote control panel for the lights. The 3-way
rocker switch has a position for On, Off and Eco Mode. Eco
Mode is the factory default setting. Eco Mode toggles the
lights on when the ASM Night Cover is open and off when
the Night Cover is closed.
SYSTEM
ON
OFF
Delfield’s Air Screen Merchandisers are designed to
maintain an operational temperature of 36°F - 40°F at 80°F
ambient room temperature (2°C - 4°C at 27°C) in 55% or
lower relative humidity.
If humidity is above 55%, condensation on the glass will
be present.
Proper airflow is critical to maintaining temperature.
• Overloading the merchandiser, restricting the air flow,
and continuous opening and closing of the doors will
hinder the unit’s ability to maintain operational tem pera tures.
• Do not interfere with the airflow by placing product
over the air return openings.
• The Air Diffuser Pan Assembly must be properly in place
at the bottom of the merchandising case, with the air
return openings on the customer side.
• After cleaning or servicing the Front Deflector Glass,
Honeycomb Diffuser and Airduct Plexiglas Panel must
be replaced properly.
LIGHTS
3-WAY ROCKER
SWITCH
ON
OFF
ECO
Note
12
Part Number: 9291463A 11/21
Page 13
Section 3 Operation
Temperature Control Settings
Note
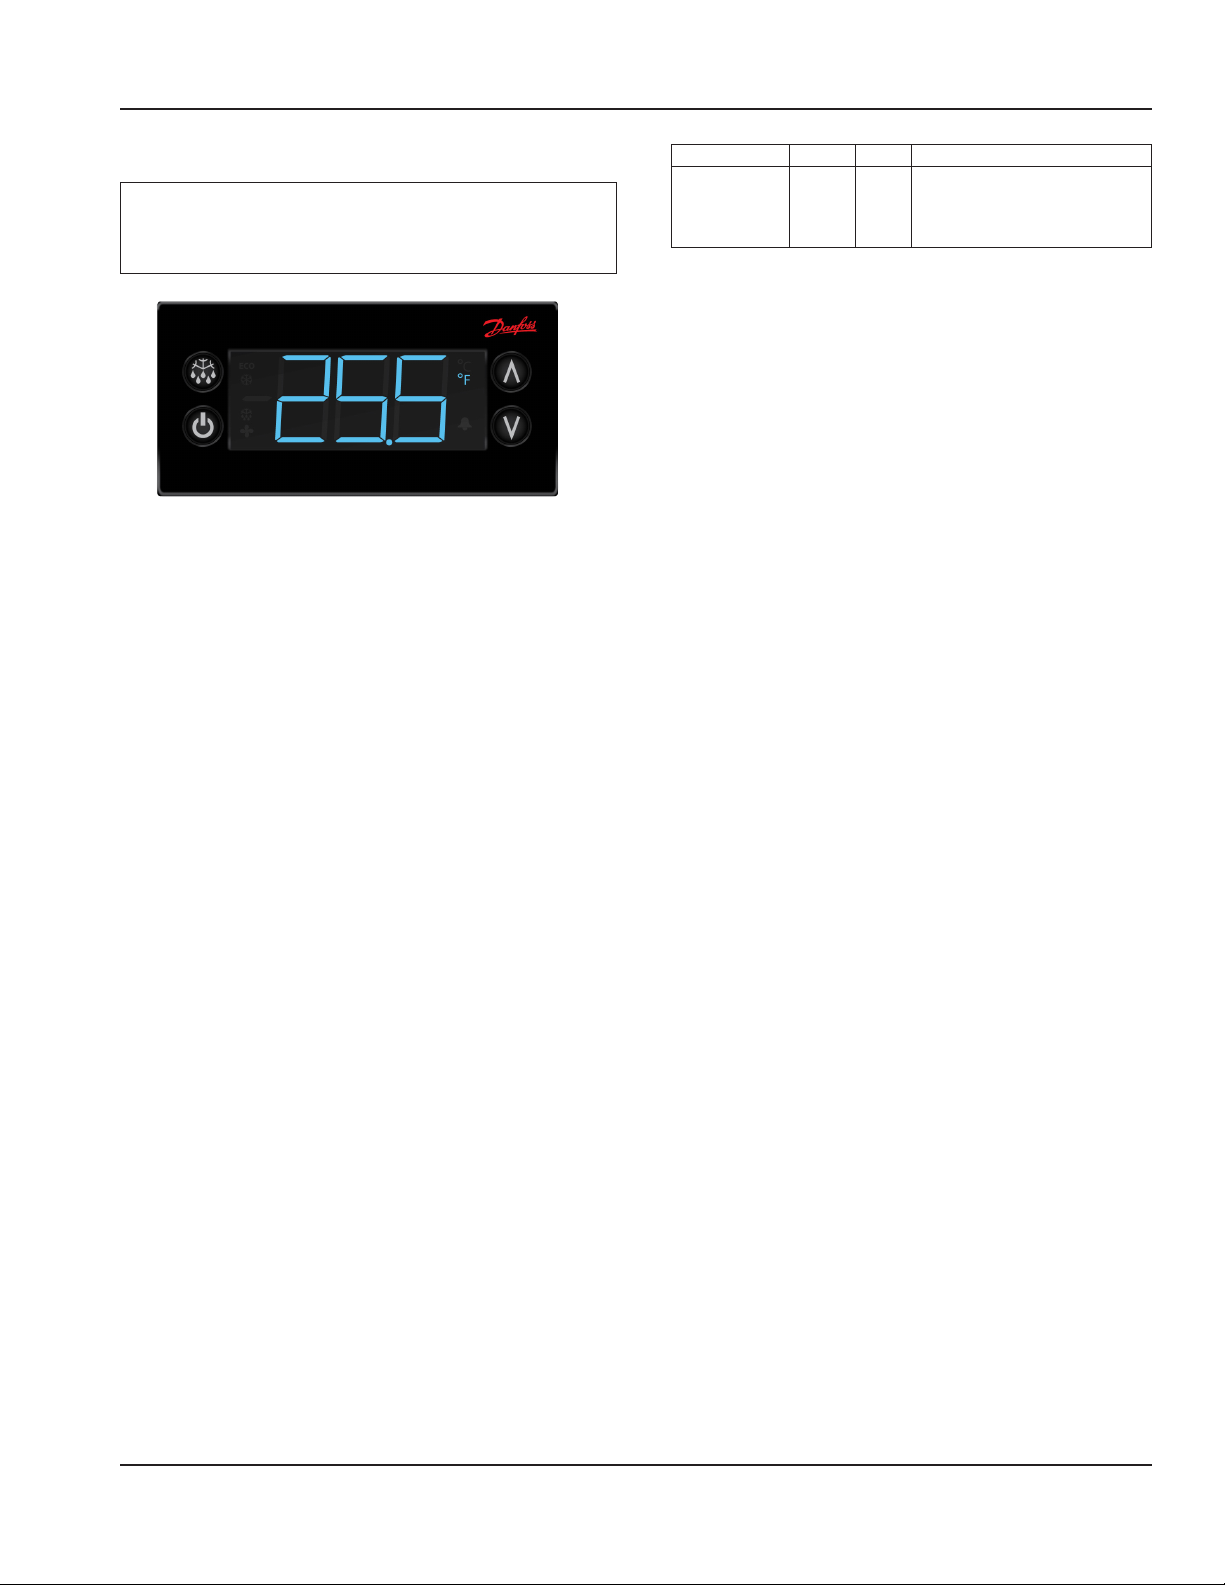
The temp displayed on the control is the air temperature
at the top of the display.
Press upper or lower right button.
• Display show actual set-point (blinking).
• If buttons untouched for 3 seconds returns to
normal.
• Increase set-point by pressing upper button. Max value
depends on parameters in control.
• Decrease set-point by pressing lower button. Min value
depends on parameters in control.
• If buttons untouched for 3 seconds returns to
normal and stores new set-point.
Press upper left button for 5 seconds.
• Start defrost.
Press lower left button for 5 seconds.
• Unit goes into stand-by mode.
• The display will read Off, then a period.
• Press the lower left button again for 5 seconds.
• The display will read On.
• The unit will then start up in the defrost mode,
and display will read dEF.
Temperature Alarm
The alarm will sound and flash HI or LO 90 minutes after the
unit has reached its alarm temperature point or after any
power interruption if the temperature is above or below the
alarm set points. Air Screen Merchandisers are factory set to
cut-out at 25.5°F to maintain 36°F - 40°F.
Parameter 36” 48” Description
Set Point, Air
Temperature
25.5°F 25.5°F Reference point, the
temperature in which the unit
cuts-out cooling.
Part Number: 9291463A 11/21
13
Page 14
Section 4
Maintenance
DANGER
It is the responsibility of the equipment owner to
perform a Personal Protective Equipment Hazard
Assessment to ensure adequate protection during
maintenance procedures.
DANGER
Failure to disconnect the power at the main power
supply disconnect could result in serious injury or death.
The power switch DOES NOT disconnect all incoming
power.
DANGER
Disconnect electric power at the main power disconnect
for all equipment being serviced. Observe correct
polarity of incoming line voltage. Incorrect polarity can
lead to erratic operation.
Warning
n
Never use sharp objects or tools to remove ice or frost.
Do not use mechanical devices or other means to
accelerate the defrosting process.
Cleaning and Sanitizing Procedures
Caution
,
Maintenance and servicing work other than cleaning as
described in this manual must be done by an authorized
service personnel.
GENERAL
Warning
n
When using cleaning fluids or chemicals, rubber gloves
and eye protection (and/or face shield) must be worn.
Owners and operators are responsible for maintaining
the equipment in accordance with the instructions in this
manual. Maintenance procedures are not covered by the
warranty.
Maintenance Daily Weekly Monthly
Interior X X X
Exterior X X X
Drain X X X
Condenser Coil X X X
INTERIOR CLEANING
Notice
When cleaning interior and exterior of unit, care should
be taken to avoid the front power switch and the rear
power cord. Keep water and/or cleaning solutions away
from these parts.
The interior can be cleaned using soap and warm water. If
this isn’t sufficient, try ammonia and water or a nonabrasive
liquid cleaner.
Preventing Blower Coil Corrosion
To help prevent corrosion of the blower coil, store all acidic
items, such as pickles and tomatoes, in seal-able containers.
Immediately wipe up all spills.
After Prolonged
Shutdown
Notice
Never use a high-pressure water jet for cleaning or hose
down or flood interior or exterior of units with water. Do
not use power cleaning equipment, steel wool, scrapers
or wire brushes on stainless steel or painted surfaces.
At Start-Up
14
Part Number: 9291463A 11/21
Page 15
Section 4 Maintenance
EXTERIOR CLEANING
Notice
Never use an acid based cleaning solution on exterior
panels! Many food products have an acidic content,
which can deteriorate the finish. Be sure to clean the
stainless steel surfaces of ALL food products.
Clean the area around the unit as often as necessary to
maintain cleanliness and efficient operation.
Wipe gasket and surfaces with a damp cloth rinsed in water
to remove dust and dirt from the outside of the unit. Always
rub with the “grain” of the stainless steel to avoid marring
the finish. If a greasy residue persists, use a damp cloth
rinsed in a mild dish soap and water solution. Wipe dry with
a clean, soft cloth.
Never use steel wool or abrasive pads for cleaning. Never
use chlorinated, citrus based or abrasive cleaners.
Stainless steel exterior panels have a clear coating that
is stain resistant and easy to clean. Products containing
abrasives will damage the coating and scratch the panels.
Daily cleaning may be followed by an application of
stainless steel cleaner which will eliminate water spotting
and fingerprints. Early signs of stainless steel breakdown
are small pits and cracks. If this has begun, clean thoroughly
and start to apply stainless steel cleaners in attempt to
restore the steel.
PLEXIGLAS, INCLUDING BAFFLES
Wet a clean cloth with lukewarm water and dishwashing
liquid. Apply only light pressure, rinse with clean water
and blot dry with a damp chamois. For excessively dirty
surfaces, rinse surface dirt off before washing. Fine
scratches will disappear when you polish by hand with a
plastic cleaner polish.
DRAIN
Each unit has a drain located inside the unit that removes
the condensation from the evaporator coil and routes it
to an external condensate evaporator pan. Each drain can
become loose or disconnected during normal use. If you
notice water accumulation on the inside of the unit, be sure
the drain tube is connected to the evaporator drain pan.
If water is collecting underneath the unit, make sure the
end of the drain tube is in the condensate evaporator. The
leveling of the unit is important as the units are designed to
drain properly when level. Be sure all drain lines are free of
obstructions.
CLEANING THE CONDENSER COIL
In order to maintain proper refrigeration performance, the
condenser fins must be cleaned of dust, dirt and grease
regularly. It is recommended that this be done monthly. If
conditions are such that the condenser is totally blocked
in a month, the frequency of cleaning should be increased.
Clean the condenser with a vacuum cleaner or stiff brush. If
extremely dirty, a commercially available condenser cleaner
may be required.
Failure to maintain a clean condenser coil can initially cause
high temperatures and excessive run times. Continuous
operation with a dirty or clogged condenser coil can
result in compressor failure. Neglecting the condenser coil
cleaning procedures will void any warranties associated
with the compressor and cost to replace the compressor.
Notice
Never use window sprays, kitchen scouring compounds
or solvents such as acetone, gasoline, benzene, alcohol,
carbon tetrachloride or lacquer thinner to clean
plexiglas.
SLIDING DOORS
Frequent, regular cleaning with a mild soap and water
solution will keep the tracks free of foreign matter and will
insure many years of service. The glass may be cleaned
with one of the many commercial glass cleaners currently
available.
Part Number: 9291463A 11/21
15
Page 16
DELFIELD
980 SOUTH ISABELLA ROAD, MOUNT PLEASANT, MI 48858
800-733-8821
WWW.DELFIELD.COM
©2019 Welbilt Inc. except where explicitly stated otherwise. All rights reserved.
Part Number 9291463A 11/21
 Loading...