

Page 1
®
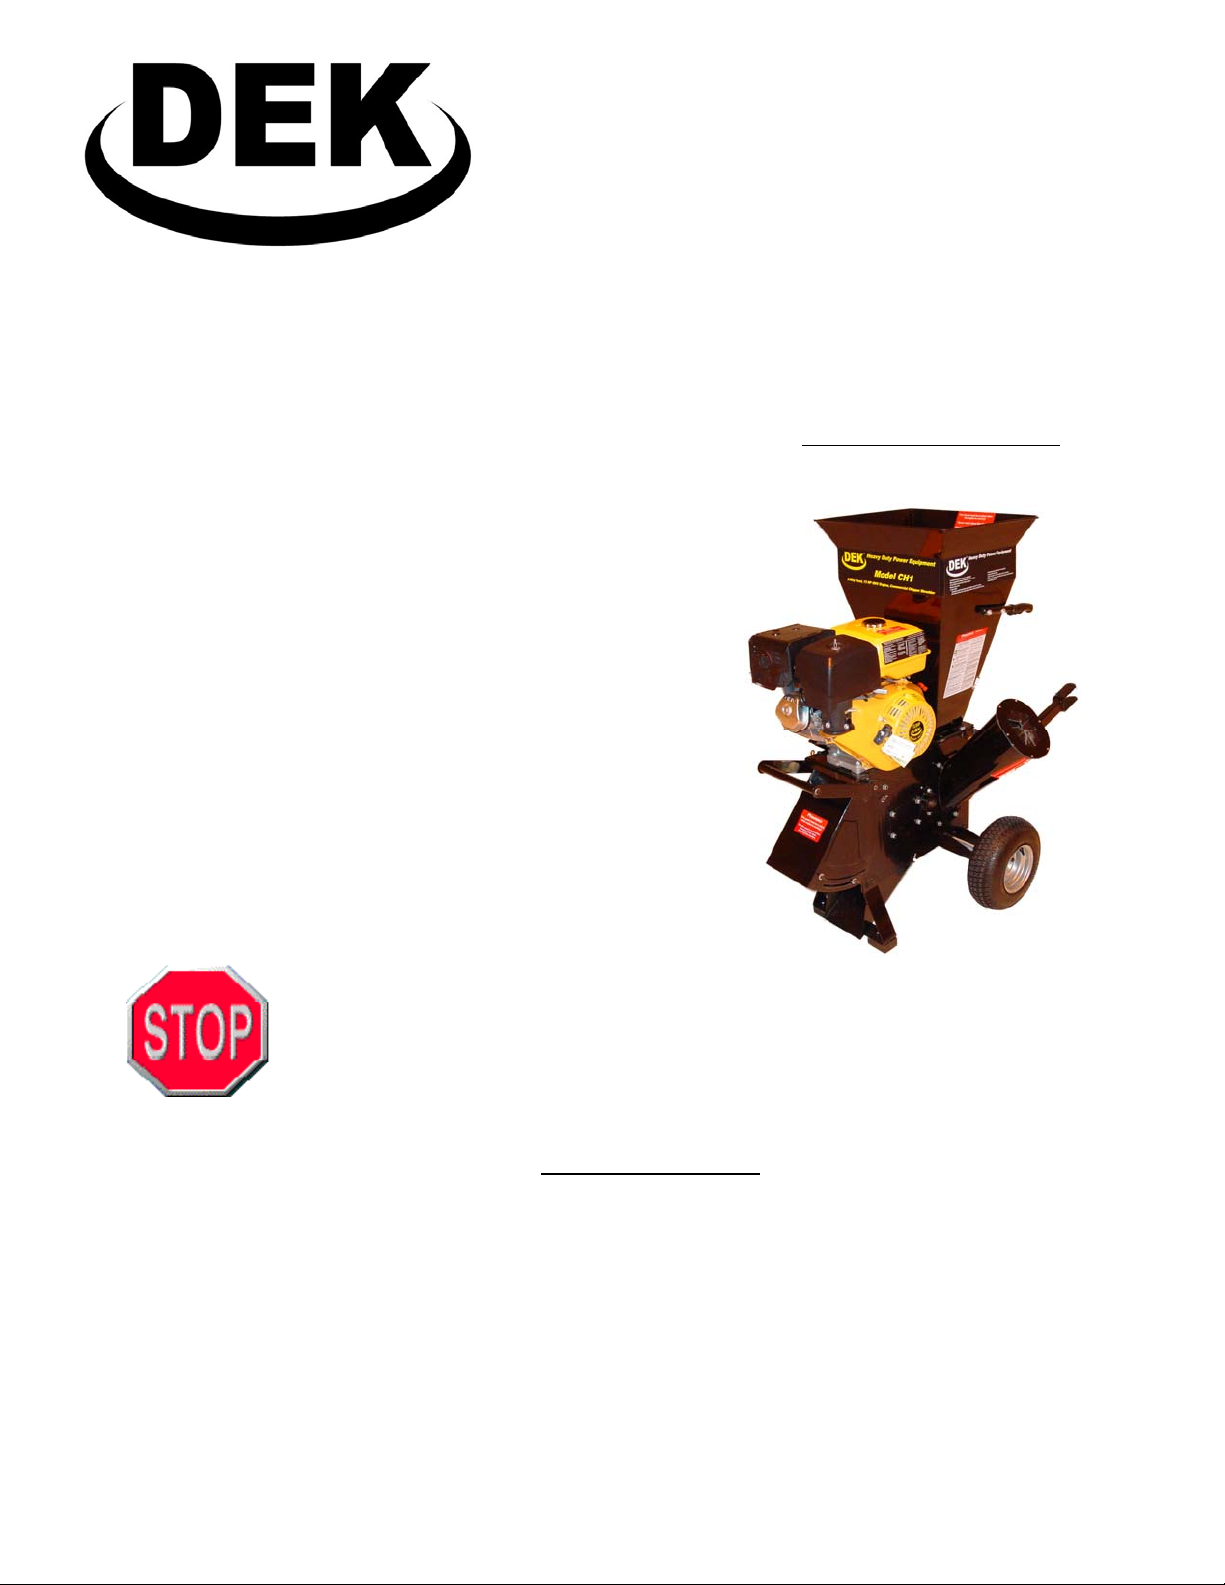
Heavy Duty Power Equipment
2-Way Feed Chipper / Shredder
Owner’s Manual
This manual contains important safety instructions for Chipper/Shredders
READ SAFETY WARNINGS AND OPERATING INSTRUCTIONS CAREFULLY, SAVE THESE INSTRUCTIONS.
Contents:
Warnings & Specifications
Component Identification
Missing Parts Order Form
Assembly
Important Engine Information
Operating Instructions
Maintenance & Storage
Troubleshooting
Warranty & Service
DO NOT RETURN THIS CHIPPER SHREDDER
TO THE STORE!
HAVE QUESTIONS OR NEED HELP?
call 24 hrs / 7-days a week help-line: [1] 919-550-3221
or go to www.DEKPowerUSA.com
Have the following information ready when you call us:
Date of Purchase: _______________________
Location of Purchase: _______________________
Serial #: _______________________
Model #: _______________________
DEK® is registered trademark of GXi Outdoor Power LLC Clayton, NC 27520 USA
No part of this publication can be printed or copied without written permission.
Rev: April 2011
DEK® is exclusively distributed by GXi Outdoor Power LLC
1 of 12
Page 2
Heavy Duty Power Equipment
WARNINGS
This owner’s manual is considered a permanent part of the
chipper shredder and should remain with the chipper shredder if
resold. The information and specifications included in this publication were in effect at the time of approval for printing.
GXi Outdoor Power LLC, exclusive marketer of DEK Heavy
Duty Power Equipment, reserves the right to discontinue or
change specifications or design at any time without notice and
without incurring any obligation what so ever. No part of this
publication may be reproduced without written permission.
WARNINGS
WARNING
WARNING: This symbol points out important safety instructions
which, if not followed, could endanger the personal safety and/
or property of yourself and others. Read and follow all instructions in this manual before attempting to operate this machine.
Failure to comply with these instructions may result in personal
injury. When you see this symbol - heed its warning.
WARNING
WARNING: The Engine Exhaust from this product contains
chemicals known to the State of California to cause cancer,
birth defects or other reproductive harm.
DANGER: This machine was built to be operated according to
the rules for safe operation in this manual. As with any type of
power equipment, carelessness or error on the part of the operator can result in serious injury. This machine is capable of
amputating hands and feet and throwing objects. Failure to
observe the following safety instructions could result in serious
injury or death.
Training
1. Read, understand, and follow all instructions on the machine and in the manual(s) before attempting to assemble
and operate. Keep this manual in a safe place for future
and regular reference and for ordering replacement parts.
2. Be familiar with all controls and their proper operation.
Know how to stop the machine and disengage them
quickly.
3. Never allow children under 16 years old to operate this
machine. Children 16 years old and over should read and
understand the operation instructions and safety rules in
this manual and should be trained and supervised by a
parent.
4. Never allow adults to operate this machine without proper
instruction.
5. Keep bystanders, helpers, pets, and children at least 75
feet from the machine while it is in operation. Stop machine
if anyone enters the area.
6. Never run an engine indoors or in a poorly ventilated area.
Engine exhaust contains carbon monoxide, an odorless
and deadly gas.
7. Do not put hands and feet near rotating parts or in the feeding chambers and discharge opening. Contact with the
rotating impeller can amputate fingers, hands, and feet.
8. Never attempt to unclog either the feed intake or discharge
opening, remove or empty bag, or inspect and repair the
machine while the engine is running. Shut the engine off
and wait until all moving parts have come to a complete
stop. Disconnect the spark plug wire and ground it against
the engine.
WARNING
WARNING: Do not operate this machine unless the
chute deflector has been installed properly.
WARNING
WARNING: Rotating cutting blades. Keep hands and
feet out of opening while machine is running.
WARNING
WARNING
diameter in the chute. Do not deposit branches larger than 1/4
inches into the funnel.
DO NOT force the branches into this machine, allow the machine to automatically feed through.
: Do not deposit branches larger than 4 inch
WARNING
WARNING:
operating this machine or if you are standing within 75 ft. of the
machine.
Safety glasses should be worn while
WARNING
WARNING
least 75 feet from the machine while it is in operation. Stop machine if anyone enters the area.
Never wear loose clothes or long jewelry and keep your lo ng
hair under a headgear when operating machine.
Never use machine on a slope or hard smooth floor.
: Keep bystanders, helpers, pets, and children at
Rev: April 2011
DEK® is exclusively distributed by GXi Outdoor Power LLC
2 of 12
Page 3
Heavy Duty Power Equipment
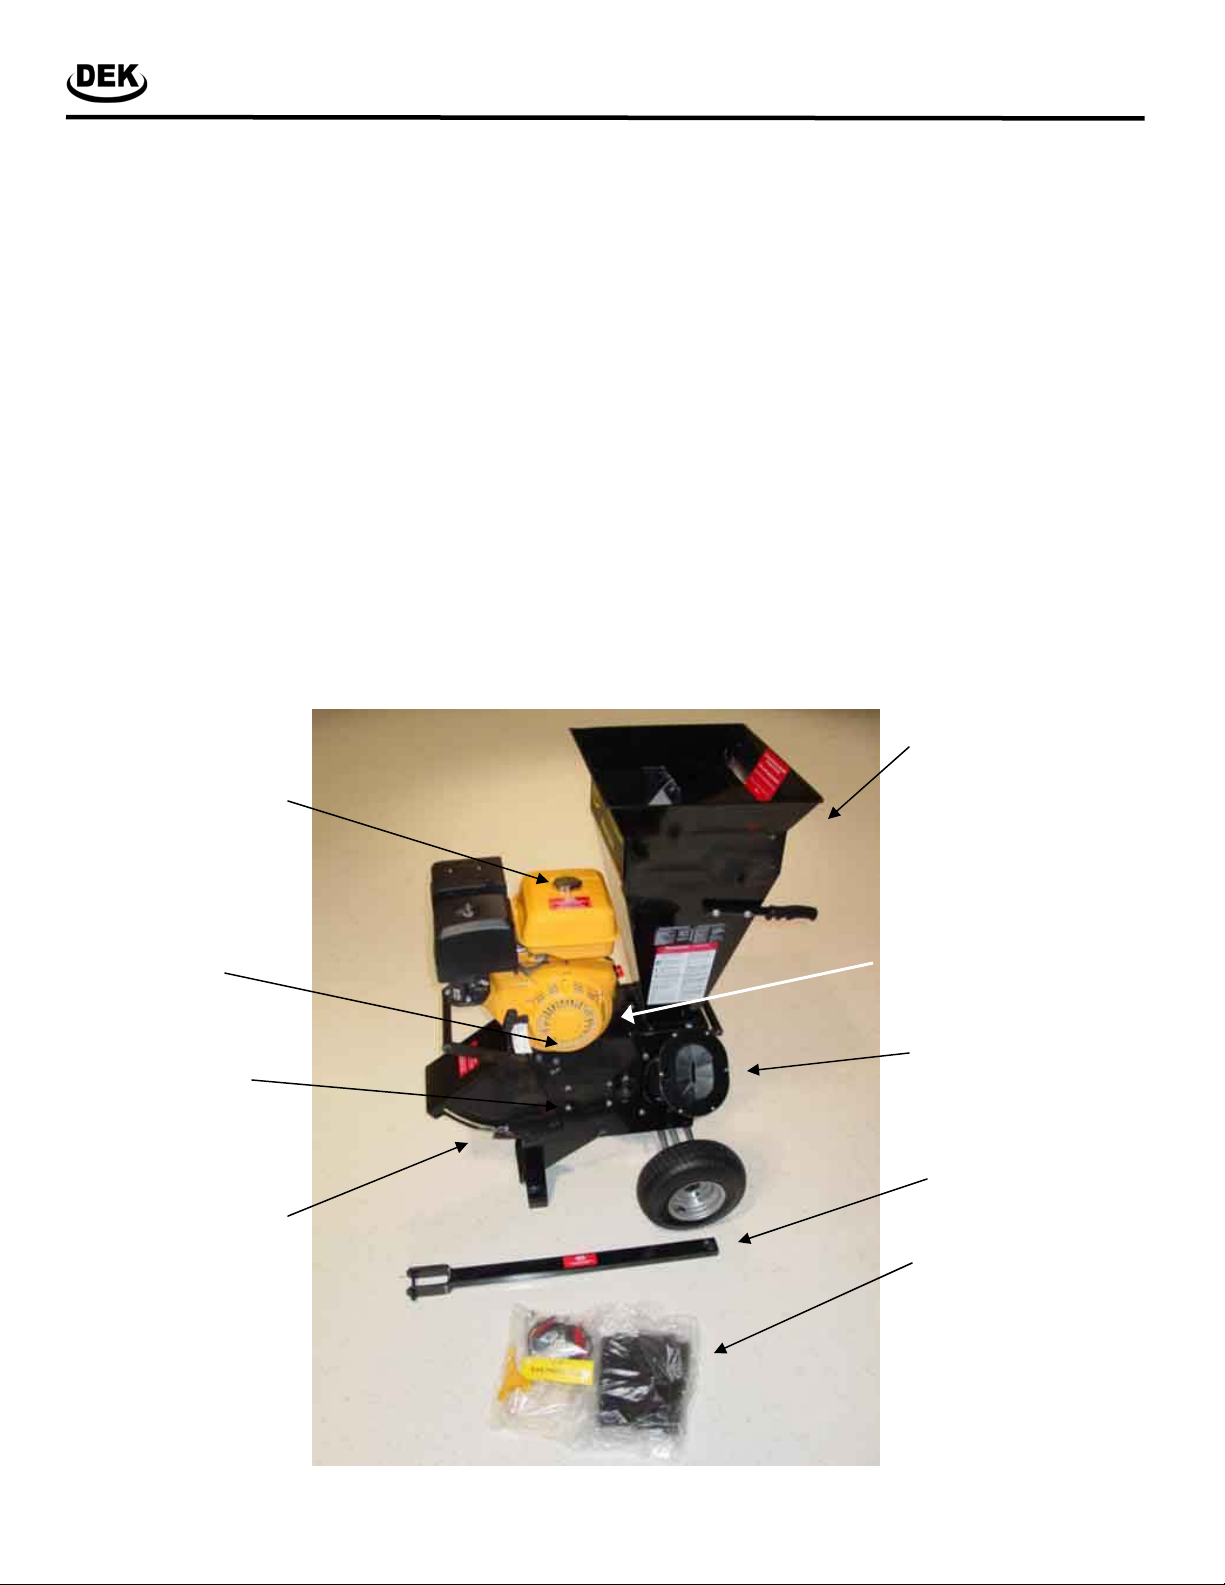
Component Identification
Attaching the Chip Collection Bag
To attach the bag, place the opening of the bag completely
over the discharge chute and hook the metal grommets on
two wire hooks located near the base of the engine.
Tighten the draw string securely.
Recoil Starter
The starter handle is located on the engine. Pull the starter
handle to start engine.
Chipper Chute
Allow twigs and small branches up to 4” in diameter to be fed
into the impeller for chipping. See Figure 6.
Chipper Funnel
Allow leaves and small branches up to 1/4” diameter to be fed
into the funnel for chipping and shredding.
Figure 6
Fuel Tank
Chipper Bag (shown in hardware bag below)
Collects shredded or chipped material fed through the chipper
chute or hopper assembly.
Lawn Tractor or ATV Hitch
To be used for towing by lawn tractors or ATVs at speeds
below 15 mph.
Discharge Chute
Chipped materials are discharged through this opening. It may
be left open or the chip collection bag (Chipper Bag) can be
attached to the chute.
Fuel Tank
Fill tank with regular unleaded fuel. Always leave about 1” of air
gap at the top of the tank for fuel expansion to prevent seepage
or spills.
Chipper Funnel for depositing leaves, grass, plant
debris only. Use the side
chute for branches.
Recoil
Starter
Clean out
and blade
access hatch
Discharge
Chute
Rev: April 2011
Serial #:
Stamped on engine block
between funnel and engine
Chipper Chute for
feeding branches up
to 4” in diameter.
Lawn tractor or ATV
trailer hitch (maximum
tow speed is 15 mph).
Hardware bag, safety devices and chip collection
bag
DEK® is exclusively distributed by GXi Outdoor Power LLC
3 of 12
Page 4
Heavy Duty Power Equipment
Please indicate the part that you are missing:
Missing Parts Request Form
Hardware bag
Wheel Kit
Other
Date of purchase
Model #:
CH1
Serial #:
Comments:
Name
Address
Phone
Email
IMPORTANT: Please include your receipt. Without a receipt, your
order will be delayed. You may also email us at:
customerservice@gxioutdoorpower.com. If emailing, please scan in
your proof of purchase.
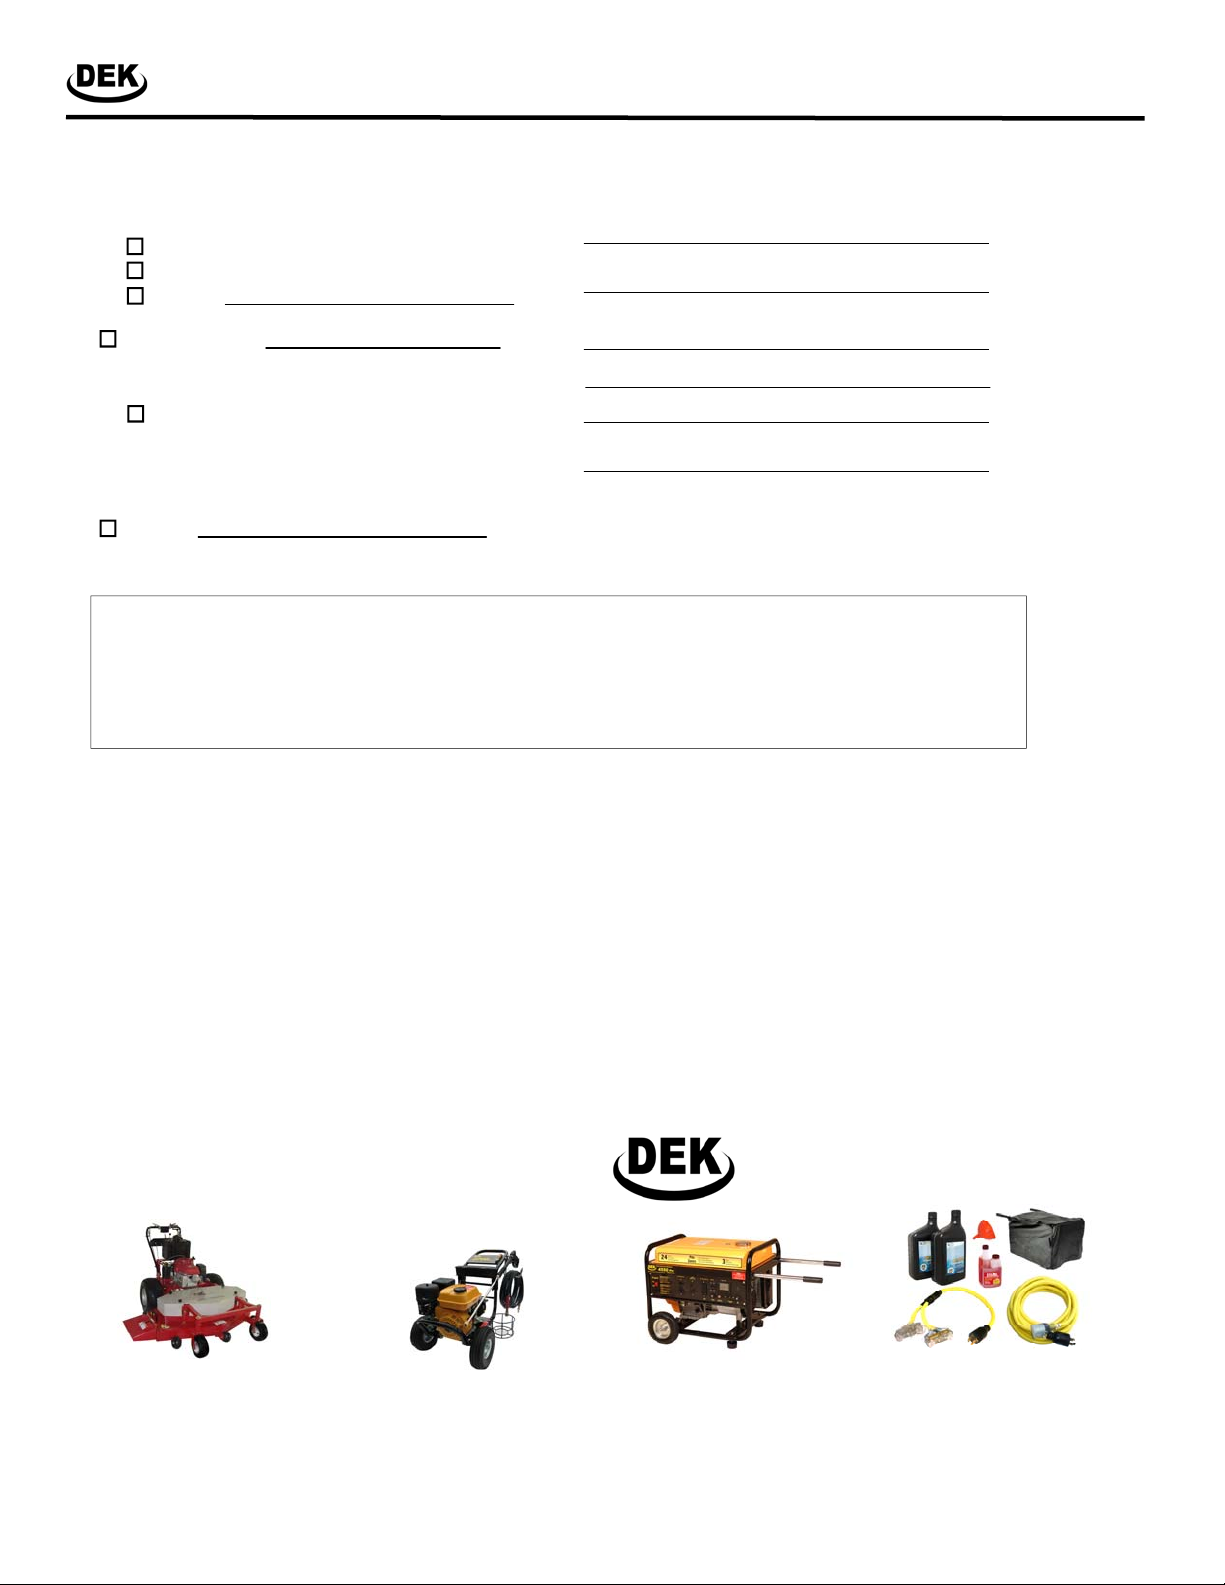
Other fine products offered by
Commercial Lawn Mowers
Rev: April 2011
www.serviceandwarrantyonline.com
Heavy Duty Power Equipment
Heavy Duty Pressure Washers Rental Grade Generators
DEK® is exclusively distributed by GXi Outdoor Power LLC
4 of 12
Generator Accessories
Page 5

Heavy Duty Power Equipment
Assembly
Your Responsibility
Restrict the use of this power machine to persons who read,
understand and follow the warnings and instructions in
this manual and on the machine. Not all safety labels shown
may apply to your chipper shredder.
Preparation
1. Thoroughly inspect the area where the equipment is to be
used. Remove all rocks, bottles, cans, or other foreign objects which could be picked up or thrown and cause personal injury or damage to the machine.
2. Always wear safety glasses or safety goggles during operation or while performing an adjustment or repair, to protect
eyes. Thrown objects which ricochet can cause serious
injury to the eyes.
3. Wear sturdy, rough-soled work shoes and closefitting
slacks and shirts. Loose fitting clothes or Jewelry can be
caught in movable parts. Never operate this machine in
bare feet or sandals. Wear leather work gloves when feeding material in the chipper chute.
4. Before starting, check all bolts and screws for proper tightness to be sure the machine is in safe working condition.
Also, visually inspect machine for any damage at frequent
intervals.
5. Maintain or replace safety and instructions labels, as necessary.
6. To avoid personal injury or property damage use extreme
care in handling gasoline. Gasoline is extremely flammable
and the vapors are explosive. Serious personal injury can
occur when gasoline is spilled on yourself or your clothes
which can ignite. Wash your skin and change clothes immediately.
a. Use only an approved gasoline container.
b. Extinguish all cigarettes, cigars, pipes, and other
sources of ignition.
c. Never fuel machine indoors.
d. Never remove gas cap or add fuel while the en-
gine is hot or running.
e. Allow engine to cool at least two minutes before
refueling.
f. Never over fill fuel tank. Fill tank to no more than
1/2 inch below bottom of filler neck to provide
space for fuel expansion.
g. Replace gasoline cap and tighten securely.
h. If gasoline is spilled, wipe it off the engine and
equipment. Move machine to another area. Wait 5
minutes before starting the engine.
i. Never store the machine or fuel container inside
where there is an open flame, spark, or pilot light
(e.g. furnace, water heater, space heater, clothes
dryer, etc.).
j. To reduce a fire hazard, keep machine free of
grass, leaves, or other debris build-up. Clean up
oil or fuel spillage and remove any fuel soaked
debris.
k. Allow machine to cool at least 5 minutes b efo re
storing.
READ THESE OPERATING GUIDELINES BEFORE YOU
PROCEED ANY FURTHER
Operation
1. Do not put hands and feet near rotating parts or in the feeding chambers and discharge opening. Contact with the
rotating impeller can amputate fingers, hands, and feet.
2. Before starting the machine, make sure the chipper chute,
feed intake, and cutting chamber are empty and free of all
debris.
3. Thoroughly inspect all material to be shredded and remove
any metal, rocks, bottles, cans, or other foreign objects
which could cause personal injury or damage to the machine.
4. If it becomes necessary to push material through the shredder hopper, use a small diameter stick. Do not use your
hands or feet.
5. If the impeller strikes a foreign object or if your machine
should start making an unusual noise or vibration, immediately shut the engine off. Allow the impeller to come to a
complete stop. Disconnect the spark plug wire, ground it
against the engine and perform the following steps:
a. Inspect for damage.
b. Repair or replace any damaged parts.
c. Check for any loose parts and tighten to assure
continued safe operation.
6. Do not allow an accumulation of processed material to
build up in the discharge area. This can prevent proper
discharge and result in kickback of material through the
feed opening.
7. Do not attempt to shred or chip material larger than specified on the machine or in this manual. Personal injury or
machine damage could result.
8. Never attempt to unclog either the feed intake or discharge
opening while the engine is running. Shut the engine off,
wait until all moving parts have stopped, disconnect the
spark plug wire and ground it against the engine before
clearing debris.
9. Never operate without the shredder funnel, chipper chute,
or discharge chute properly attached to the machine. Never
empty or change discharge bag while the engine is running.
10. Keep all guards, deflectors and safety devices in place and
operating properly.
11. Keep your face and body back and to the side of the chipper chute while feeding material into the machine to avoid
accidental kickback injuries.
12. Never operate this machine without good visibility or light.
13. Do not operate this machine on a paved, gravel or nonlevel surface.
14. Do not operate this machine while under the influence of
alcohol or drugs.
15. Muffler and engine become hot and can cause a burn. Do
not touch.
16. Never pick up or carry machine while the engine is running.
Rev: April 2011
DEK® is exclusively distributed by GXi Outdoor Power LLC
5 of 12
Page 6

Heavy Duty Power Equipment
Assembly
IMPORTANT: This unit is shipped without gasoline or oil in the
engine. Be certain to fill the engine with gasoline and oil as
instructed before operating your machine.
Required tools: A Philips head screw driver
Approximate assembly time: 10 minutes
4. Disconnect The Spark Plug Wire
Before setting up your chipper shredder, disconnect the spark
plug wire from the spark plug and ground against the engine to
prevent inadvertent starting of the machine. This step should
be taken as a precaution whenever you are working on this
machine.
1. Remove the chipper from its carton
Remove staples, break glue on top flaps, or cut tape at carton
end and peel along top flap to open carton.
Figure 1
2. Verify all parts in the chipper carton (See Figure 1)
Chipper Funnel
Chipper engine and box assembly (pre-assembled)
Chipper Chute
Hardware Bag
Trailer hitch and funnel handles packaged together
5. Attaching the chipper funnel
The first step is to attach the 2 handles to the sides of the
funnel using the wrench provided and a Phillips head screw
driver (Figure 3). Tighten the nuts securely.
The second step is to place the funnel over the opening on
the chipper box, ensuring the rubber gasket is correctly
aligned. Secure the funnel using the two “swing up bolts”
and the one fixed bolt using the wrench provided. Tighten
the nuts securely (Figure 4).
Figure 3
Figure 4
5. Attaching the Side Chipper Chute
Place the chipper chute
over the four bolts protruding from the side of the
chipper box and secure
the nuts tightly using the
wrench provided (Figure
5).
Figure 2
3. Verify all parts in the hardware bag (See Figure 2)
Hearing protection
Gloves
Goggles (eye protection)
Oil fill funnel
Chip collection bag
Wrench for assembly of the chute and funnel
Hardware bag with a spare blade
Rev: April 2011
DEK® is exclusively distributed by GXi Outdoor Power LLC
6 of 12
Figure 5
6. Attaching the chip collection bag
Place the metal grommets of the bag over the wire loops
located at the base of the engine. Wrap the bag under the
bottom of the discharge chute and pull the draw string
tightly and secure it.
7. Attaching the trailer hitch
Place the trailer hitch into the socket at the base of the
chipper over the axle assembly. Insert the pin and secure
with the locking cotter pin.
8. Re-connect the spark plug wire
Page 7

Heavy Duty Power Equipment
Important Engine Information
This owner’s manual is considered a permanent part of the
power equipment and should remain with the equipment if resold. The information and specifications included in this publication were in effect at the time of approval for printing.
GXi Outdoor Power LLC, exclusive marketer of DEK Heavy
Duty Power Equipment, reserves the right to discontinue or
change specifications or design at any time without notice and
without incurring any obligation whatever. No part of this publication may be reproduced without written permission.
EMISSION CONTROL SYSTEM INFORMATION
The U.S. and California Clean Air Acts
EPA and California regulations require all manufacturers to furnish written instructions describing the operation and maintenance of emission control systems. The following instructions
and procedures must be followed in order to keep the emissions
from your DEK engine within the emission standards. Maintenance, replacement, or repair of the emission control devices
and systems may be performed by any engine repair establishment or individual, using parts that are ‘‘certified’’ to EPA standards.
SAFETY LABEL LOCATIONS
These labels warn you of potential hazards that can cause serious injury. Read them carefully. If a label comes off or becomes
hard to read, contact your DEK dealer for a replacement.
WARNING
Fire and Burn Hazards
The exhaust system gets hot enough to ignite some materials.
Keep the power equipment at least 3 feet (1 meter) away
from buildings and other equipment during operation.
Do not enclose this product in any structure.
Do not smoke when refueling.
Keep flammable materials away.
The muffler becomes very hot during operation and remains
hot for a while after stopping the engine. Be careful not to
touch the muffler while it is hot.
Let the engine cool before storing.
Refuel in a well ventilated area with the engine stopped.
Fuel vapors are extremely flammable and may ignite after
the engine has started. Make sure that any spilled fuel has
been wiped up before starting the generator.
BEFORE PERFORMING ANY SERVICE
Always disconnect the spark plug wire from the spark plug and
ground against the engine to prevent inadvertent starting of the
machine. This step should be taken as a precaution whenever
you are performing service on this machine.
SAFETY INFORMATION
DEK products are designed to give safe and dependable service
if operated according to instructions. Read and understand this
owner’s manual before operating your power equipment.
OPERATOR RESPONSIBILITY
Know how to stop your power equipment quickly in case of
emergency. Understand the use of all controls and connections.
Be sure that anyone who operates this power equipment receives proper instruction. Do not let children operate the power
equipment without parental supervision.
WARNING
CARBON MONOXIDE GAS
Exhaust contains poisonous carbon monoxide, a colorless
and odorless gas. Breathing exhaust can cause loss of consciousness and may lead to death. To keep exhaust gas
from accumulating, use in an area with adequate ventilation. DO NOT use this product in a garage, basement,
crawlspace, enclosed shed, or any other area that does not
have adequate ventilation. DO NOT use this equipment
near ventilation ducts or open windows that may allow exhaust gasses to enter your home or business. ONLY operate this product outdoors.
WARNING
The engine exhaust from this product contains chemicals
known to the State of California to cause cancer, birth defects or other reproductive harm.
WARNING
tenance instructions and precautions can cause serious
injuries or death. Always follow the inspection and maintenance recommendations and schedules in this owner’s
manual.
Safety Precautions:
Make sure the engine is off before you begin any maintenance
or repairs. This will eliminate several potential hazards:
Failure to properly follow main-
Carbon monoxide poisoning from engine exhaust.
Be sure there is adequate ventilation whenever you
operate the engine.
Burns from hot parts.
Let the engine and exhaust system cool before touching.
Injury from moving parts.
Do not run the engine unless instructed to do so.
In the State of California a spark arrestor is required by law.
Other states may have similar laws. Federal laws apply on all
federal lands. If you equip the muffler with a spark arrestor, it
must be maintained in effective working order.
Rapid retraction of the recoil starter cord can pull the
starter cord back faster than you can let go. When starting
the engine, pull the cord slowly until resistance is felt then
pull rapidly to avoid kickback.
Rev: April 2011
DEK® is exclusively distributed by GXi Outdoor Power LLC
7 of 12
Page 8

Heavy Duty Power Equipment
Operating Instructions
WARNING
WARNING: The operation of any chipper shredder can result in foreign objects being thrown into the eyes, which
can damage your eyes severely. Always wear the safety
glasses provided with this unit or eye shields before chipping or shredding and while performing any adjustments or
repairs.
Always use the proper personal safety equipment before
starting this machine:
1. Ear protection
2. Gloves
3. Eye protection
Add Gasoline and Oil
Step 1: Add gasoline
Step 2: Add approximately 1.1 quarts of 10W-30 oil (5W-30 is
recommended for cold weather climate) until the oil is about to
overflow from the oil fill spout. A low oil sensor will prevent the
engine from running unless the oil is COMPLETELY FULL.
Ensure both oil fill plugs on the
engine are secure after filling.
WARNING
WARNING: Never fill fuel tank indoors with engine running
or until the engine has been allowed to cool for at least tw o
minutes after running.
Starting the Engine
Step 3: Attach spark plug wire to spark plug. Make certain the
metal cap on the end of the spark plug is fastened securely over
the metal tip on the spark plug.
Step 4: Move choke lever on engine to CHOKE position. (A
warm engine may not require choking).
Step 5: Turn the fuel valve to the ON position.
Step 6: Grasp starter handle and pull rope out slowly until en-
gine reaches start of compression cycle (rope will
harder at this point). Pull rope with a rapid, continuous, full
arm stroke. Keep a firm grip on starter handle. Let the rope rewind slowly. Repeat the previous steps until engine fires.
Step 7: When engine starts, move choke control gradually to
the RUN position.
pull slightly
Using the Chipper Shredder
Yard waste such as leaves and pine needles can be raked up
and placed in the funnel assembly for shredding. DO NOT PUT
BRANCHES INTO THE TOP FUNNEL. BRANCHES SHOULD
BE FED INTO THE SIDE CHIPPER CHUTE.
If using the side chipper chute to chip branches, it is important to let the chipper feed the branches through automatically. DO NOT attempt to force the branches through.
If the branches do not automatically feed through, gently
push the branch and then allow the chipper to automatically feed the branch through. Forcing branches into the
side chute may wear the belt prematurely.
After the material has been shredded by the flail blades on the
impeller assembly, it will be discharged out of opening or into
chip catcher bag.
Do not attempt to shred or chip any material other than
vegetation found in a normal yard (i.e. branches, leaves, twigs,
etc.) Avoid fibrous plants such as tomato vines until they are
thoroughly dried out. Twigs and small branches up to 4” in
diameter can be fed into the chipper chute.
IMPORTANT: The flail screen is located inside the housing in
the discharge area. If the flail screen becomes clogged, remove
and clean as instructed. For best performance, it is also
important to keep the chipper blade sharp.
To Empty the Chip Bag
Stop the engine.
Release the drawstring and remove the bag from the dis-
charge chute.
Empty bag and reattach to the discharge chute opening.
NOTE: A noise will be heard w hen finding the start of the compression cycle. This noise is caused by the flails and fingers,
which are part of the shredding mechanism, and it should be
expected until the impeller reaches full speed.
Rev: April 2011
DEK® is exclusively distributed by GXi Outdoor Power LLC
8 of 12
Page 9

Heavy Duty Power Equipment
Maintenance & Storage
SECTION 5: MAINTAINING YOUR CHIPPER
SHREDDER
Maintenance Schedule
Item Before
Engine oil (Check) X
Engine Oil (Change) X
Air Cleaner (Check) X
Air Cleaner Wash X
Fuel filter Cup (Clean) X
Spark Plug (Clean) X
Spark Plug (Change) X
Lubricate release bracket X
Lubricate hopper assembly X
Check chipper blade X
Fuel Tank and Filter (Clean) X*
each use
WARNING
WARNING: Always stop engine, disconnect spark plug, and
ground against engine before cleaning, lubricating or doing
any kind of maintenance on your machine.
Maintenance And Storage
1. Never tamper with safety devices. Check their proper operation regularly.
2. Check bolts and screws for proper tightness at frequent
intervals to keep the machine in safe working condition.
Also, visually inspect machine for any damage and repair,
if needed.
3. Before cleaning, repairing, or inspecting, stop the engine
and make certain the impeller and all moving parts have
stopped. Disconnect the spark plug wire and ground it
against the engine to prevent unintended starting.
4. Do not change the engine governor settings or overspeed
the engine. The governor controls the maximum safe operating speed of the engine.
5. Maintain or replace safety and instruction labels, as necessary.
6. Follow this manual for safe loading, unloading, transporting, and storage of this machine.
7. Never store the machine or fuel container inside where
there is an open flame, spark or pilot light such as a water
heater, furnace, clothes dryer, etc.
8. Always refer to the operator’s manual for proper instructions on off-season storage.
9. If the fuel tank has to be drained, do this outdoors.
10. Observe proper disposal laws and regulations for gas, oil,
etc. to protect the environment.
20hrs or
every 3
month
50 hrs or
every 3
months
100 hrs or
every 6
months
300 hrs
or every
1 year
If the Chipper Becomes Clogged:
If the discharge area becomes clogged:
Stop the engine. Disconnect spark plug wire from spark
plug and ground against the engine.
Remove the large funnel and the clean out access hatch on
the side of the box (as necessary).
Reach in and clear the debris causing the blockage.
Reinstall the funnel and the clean out access hatch.
Connect the spark plug wire and restart.
Note: If the blockage is severe, the flail screen within the discharge chute can be removed as well, providing greater access.
To accomplish this, remove the pins and slide the flail screen
out of the discharge chute.
To Change or Tighten the Belt:
Note, the belt is designed to be the weakest link in the mechanical linkage between the engine and the blades. This improves
the safety and durability of the chipper shredder. Occasionally
belt tightening and belt changes will be required.
To change the belt perform the following:
Stop the engine and make certain the chipper shredder has
come to a complete stop. Disconnect the spark plug wire
from spark plug and ground against the engine.
Remove the belt guard.
To change the belt, pry the belt off a pulley using a screw
driver shaft as a wedge as you rotate the pulley. In a similar fashion, a new belt can be placed on the pulleys.
To tighten the tension on the pulleys, follow the above
steps plus:
1. Scribe a mark on the base plate along the edge of
the engine.
2. Remove the belt from the pulleys.
3. Remove the handle, discharge chute and screen.
4. Loosen the 4 bolts securing the engine.
5. Slide the engine about 1/8” further back.
6. Tighten the engine mounting bolts securely.
7. Re-install the belt and verify the tension. If the belt
is still too loose, move the engine back another 1/8”
by repeating the above steps.
8. Reinstall guards, chutes, and screens
Storing Your Chipper Shredder
1. Clean the equipment thoroughly.
2. Wipe equipment with an oiled rag to prevent rust.
3. Refer to engine manual for correct engine storage instructions
4. Store unit in a clean, dry area. Do not store next to corrosive materials such as fertilizer.
Rev: April 2011
DEK® is exclusively distributed by GXi Outdoor Power LLC
9 of 12
Page 10

Heavy Duty Power Equipment
Maintenance & Storage
To Remove, Sharpen or Add
Chipper Blades:
Your chipper was sent with one blade attached and a spare
blade in the hardware bag. The belt life will be extended by
operating the chipper with a sharp blade at a time.
Disconnect the spark plug wire and ground against the
engine.
Remove the blade access hatch and rotate the blade to
align with the access hatch.
Remove the flail screen in the discharge chute by removing
the pins that secure it at the top and bottom of the screen.
Remove the blade using a 3/16” allen wrench on the
outside of the blade and an adjustable wrench on the
impeller assembly (through the discharge chute). A piece
of pipe or wood should be used to block the flails, preventing them from inadvertently turning.
Add, replace or sharpen the blades as desired.
When sharpening the blade, protect hands by using gloves
and follow the original angle of grind. Also, make sure to
remove an equal amount from each blade and torque to
250 - 300 in. lbs.
NOTE: Make certain blades are reassembled with the
sharp edge facing upward.
Rev: April 2011
DEK® is exclusively distributed by GXi Outdoor Power LLC
10 of 12
Page 11

Heavy Duty Power Equipment
Troubleshooting
SECTION 6: TROUBLESHOOTING
Problem Cause Remedy
Engine fails to start 1. Spark plug wire disconnected.
2. Fuel tank empty or stale fuel.
3. Throttle control lever not in correct starting
position. (If Equipped)
4. Choke not in CHOKE position. (If equipped)
5. Engine not primed.
6. Blocked fuel line.
7. Faulty spark plug.
Engine runs erratic 1. Spark plug wire loose.
2. Unit running on CHOKE. (If equipped)
3. Blocked fuel line or stale fuel.
4. Water or dirt in fuel system.
5. Dirty air cleaner.
6. Carburetor out of adjustment.
Too much vibration 1. Loose parts or damaged impeller.
Engine overheats 1. Engine oil level low.
2. Dirty air cleaner.
3. Carburetor not adjusted properly.
Occasional skip (hesitates) 1. Spark plug gap too close. 1. Adjust gap to.030”.
1. Connect wire to spark plug.
2. Fill tank with clean, fresh gasoline.
3. Move throttle lever to FAST position.
4. Move choke to CHOKE position.
5. Prime engine.
6. Clean fuel line.
7. Clean, adjust gap, or replace.
1. Connect and tighten spark plug wire.
2. Move choke lever to OFF position.
3. Clean fuel line; fill tank with clean, fresh gasoline.
4. Drain fuel tank. Refill with fresh fuel.
5. Clean or replace air cleaner.
6. See authorized service dealer.
1. See authorized service dealer.
1. Fill crankcase with proper oil.
2. Clean or replace air cleaner.
3. See authorized service dealer.
Unit does not discharge 1. Discharge chute clogged.
2. Foreign object lodged in impeller.
3. Low engine RPM.
Rate of discharge slows 1. Low engine RPM.
2. Chipper blade dull.
NOTE: For repairs beyond the minor adjustments listed above, contact your nearest authorized service dealer.
1. Stop engine immediately and disconnect
spark plug wire. Clean flail screen and inside
of discharge opening.
2. Stop engine and disconnect spark plug wire.
Remove lodged object.
3. Always run engine at full throttle.
1. Always run engine at full throttle
2. Replace chipper blade or see your authorized
service dealer.
Rev: April 2011
DEK® is exclusively distributed by GXi Outdoor Power LLC
11 of 12
Page 12

Heavy Duty Power Equipment
Limited Warranty & Service
LENGTH OF WARRANTY: 24 MONTHS PARTS AND 12 MONTH LABOR.
*LENGTH OF WARRANTY: Batteries supplied with applicable products as standard, original equipment are covered by this warranty for a period of 3 months
(noncommercial use) or 1 month (commercial/rental use) from the date of original retail product purchase.
Consumable parts such as batteries, oil, spark plugs, blades, belts, air filters, carburetors, gloves, hardware bags are not covered by this warranty.
TO QUALIFY FOR THIS WARRANTY:
The product must be purchased in the United States from a dealer authorized by GXi Outdoor Power LLC to sell those products. This warranty applies to first retail purchaser / owner during the applicable warranty time period. SAVE YOUR PROOF OF PURCHASE RECEIPT. YOU MUST HAVE A RECEIPT TO OBTAIN WARRANTY
SERVICE.
WHAT DEK POWER EQUIPMENT WILL REPAIR OR REPLACE UNDER WARRANTY:
DEK will repair or replace, at its option, any part that is proven to be defective in material or workmanship
subject to the exclusions stated herein. This warranty is void if the owner fails to follow the prescribed maintenance and operating procedures described in this manual.
This specifically refers to ensuring routine oil changes are made, that fuel stabilizer is used for long-term storage, that the generator is not overloaded, and that the generator loads are distributed evenly between the A and B outlets.
DEK has the right to recover warranty administration costs from the owner if the root cause of the malfunction was found to be other than defective material or workmanship. In particular, this warranty does not cover: contaminants in the fuel or oil; damage caused by not following the prescribed warnings and operating practices; failure
to follow proper maintenance and storage procedures; and physical damage due to shipping or handling or storage. Damage to the generat or that occurs as a result of
connecting a DEK generator to household wiring without the use of a UL approved transfer switch device that is connected to the home or business and grounded as per
applicable local electrical codes, is not covered by this warranty.
Warranty repairs will be made without charge for parts and labor for the first year. After the first year, this limited warranty covers the costs of replacement parts only.
Anything replaced under warranty becomes the property of DEK. Parts replaced under warranty will be considered as part of the original product and any warranty on
those parts will expire coincident with the original product warranty.
under normal use during the applicable warranty time period
TO OBTAIN WARRANTY SERVICE:
You must take the DEK Power Equipment product, accessory, replacement part, apparel or the power equipment on which the accessory or replacement part is installed,
and proof of purchase, at your expense, to any DEK Power Equipment service location in the United States, who is authorized to service that product, during the service
location’s normal business hours. If you are unable to obtain warranty service, or are dissatisfied with the warranty service you receive, take the following steps: First,
contact the manager of the service center involved; normally this will resolve the problem. However, if you should require further assistance, write or call the DEK Customer Service.
EXCLUSIONS:
THIS WARRANTY DOES NOT EXTEND TO PARTS AFFECTED OR DAMAGED BY ACCIDENT AND/OR COLLISION, NORMAL WEAR, FUEL CONTAMINATION, USE
IN AN APPLICATION FOR WHICH THE PRODUCT WAS NOT DESIGNED OR ANY OTHER MISUSE, NEGLECT, INCORPORATION OR USE OF UNSUITABLE AT-
DISCLAIMER OF CONSEQUENTIAL DAMAGE AND LIMITATION OF IMPLIED WARRANTIES:
DEK DISCLAIMS ANY RESPONSIBILITY FOR LOSS OF TIME OR USE OF THE PRODUCT, TRANSPORTATION, COMMERCIAL LOSS, OR ANY OTHER INCIDENTAL OR CONSEQUENTIAL DAMAGE. ANY IMPLIED WARRANTIES ARE LIMITED TO THE DURATION OF THIS WRITTEN LIMITED WARRANTY.
This warranty is void if the manufacturing date and the serial number on the equipment has been removed or the equipment has been modified.
EMISSION CONTROL SYSTEM INFORMATION
The U.S. and California Clean Air Acts
EPA and California regulations require all manufacturers to furnish written instructions describing the operation and maintenance of emission control
systems. The following instructions and procedures must be followed in order to keep the emissions from your DEK engine within the emission standards. Maintenance, replacement, or repair of the emission control devices and systems may be performed by any engine repair establishment or
individual, using parts that are ‘‘certified’’ to EPA standards.
The emission control systems on your DEK engine were designed, built, and certified to conform with EPA regulations. We recommend the use of
genuine DEK parts whenever you have maintenance done. These original-design replacement parts are manufactured to the same standards as the
original parts, so you can be confident of their performance. The use of replacement parts that are not of the original design and qualit y may impair
the effectiveness of your emission control system. A manufacturer of an aftermarket part assumes the responsibility that the part will not adversely
affect emission performance. The manufacturer or re-builder of the part must certify that use of the part will not result in a failure of the engine to
comply with emission regulations.
Emission controls are covered by this warranty for all uses for a period of 3 years from original retail purchase date, this coverage extends to subsequent owners of the product with proof of original purchase.
Rev: April 2011
DEK® is exclusively distributed by GXi Outdoor Power LLC
12 of 12
 Loading...