

Page 1
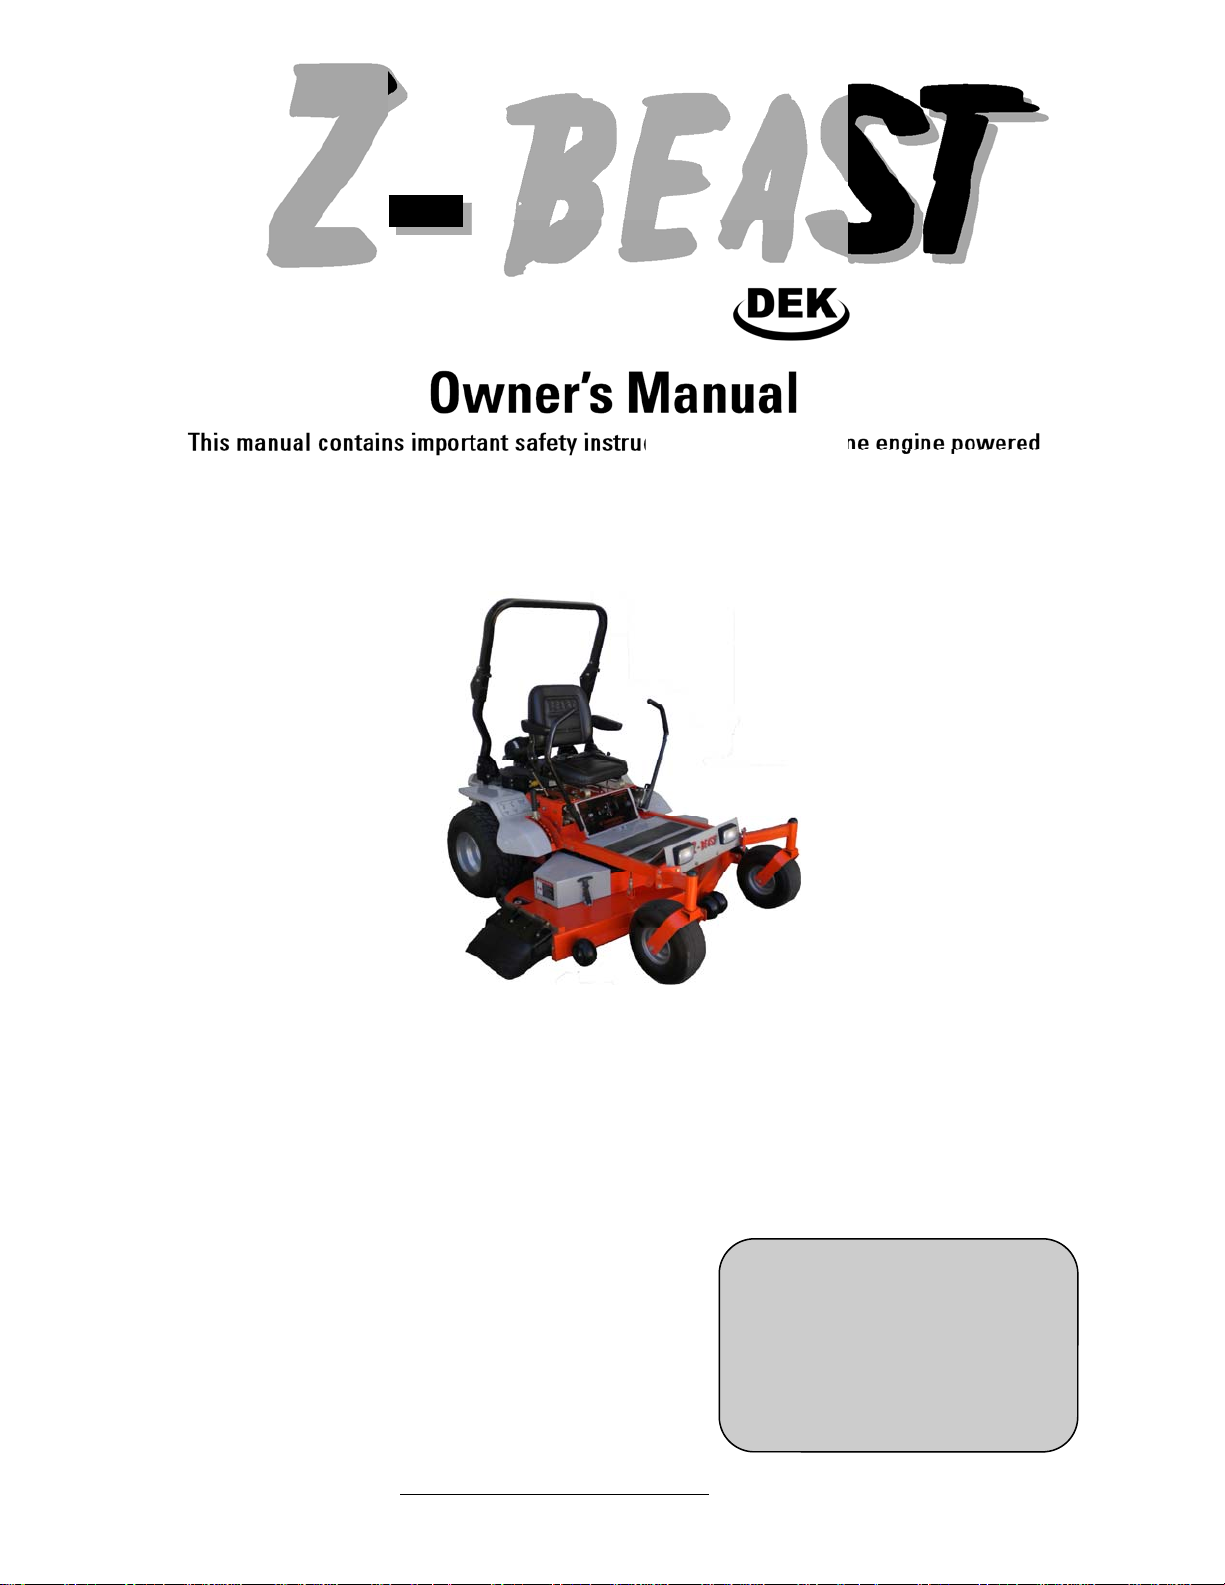
Z BEAST
FINISH MOWER by
Owner’s Manual
This manual contains important safety instructions for the gasoline engine powered
lawnmower models: 54ZB, 62ZB
READ SAFETY WARNINGS AND OPERATING INSTRUCTIONS CAREFULLY.
SAVE THIS MANUAL.
When you call the help-line you will need to have the following information:
Date of Purchase: _______________________
Location of Purchase: _______________________
Serial # - Chassis: _______________________
Serial # - Engine: _______________________
Serial # - Hydro Trans (L) _______________________
Serial # - Hydro Trans (R) _______________________
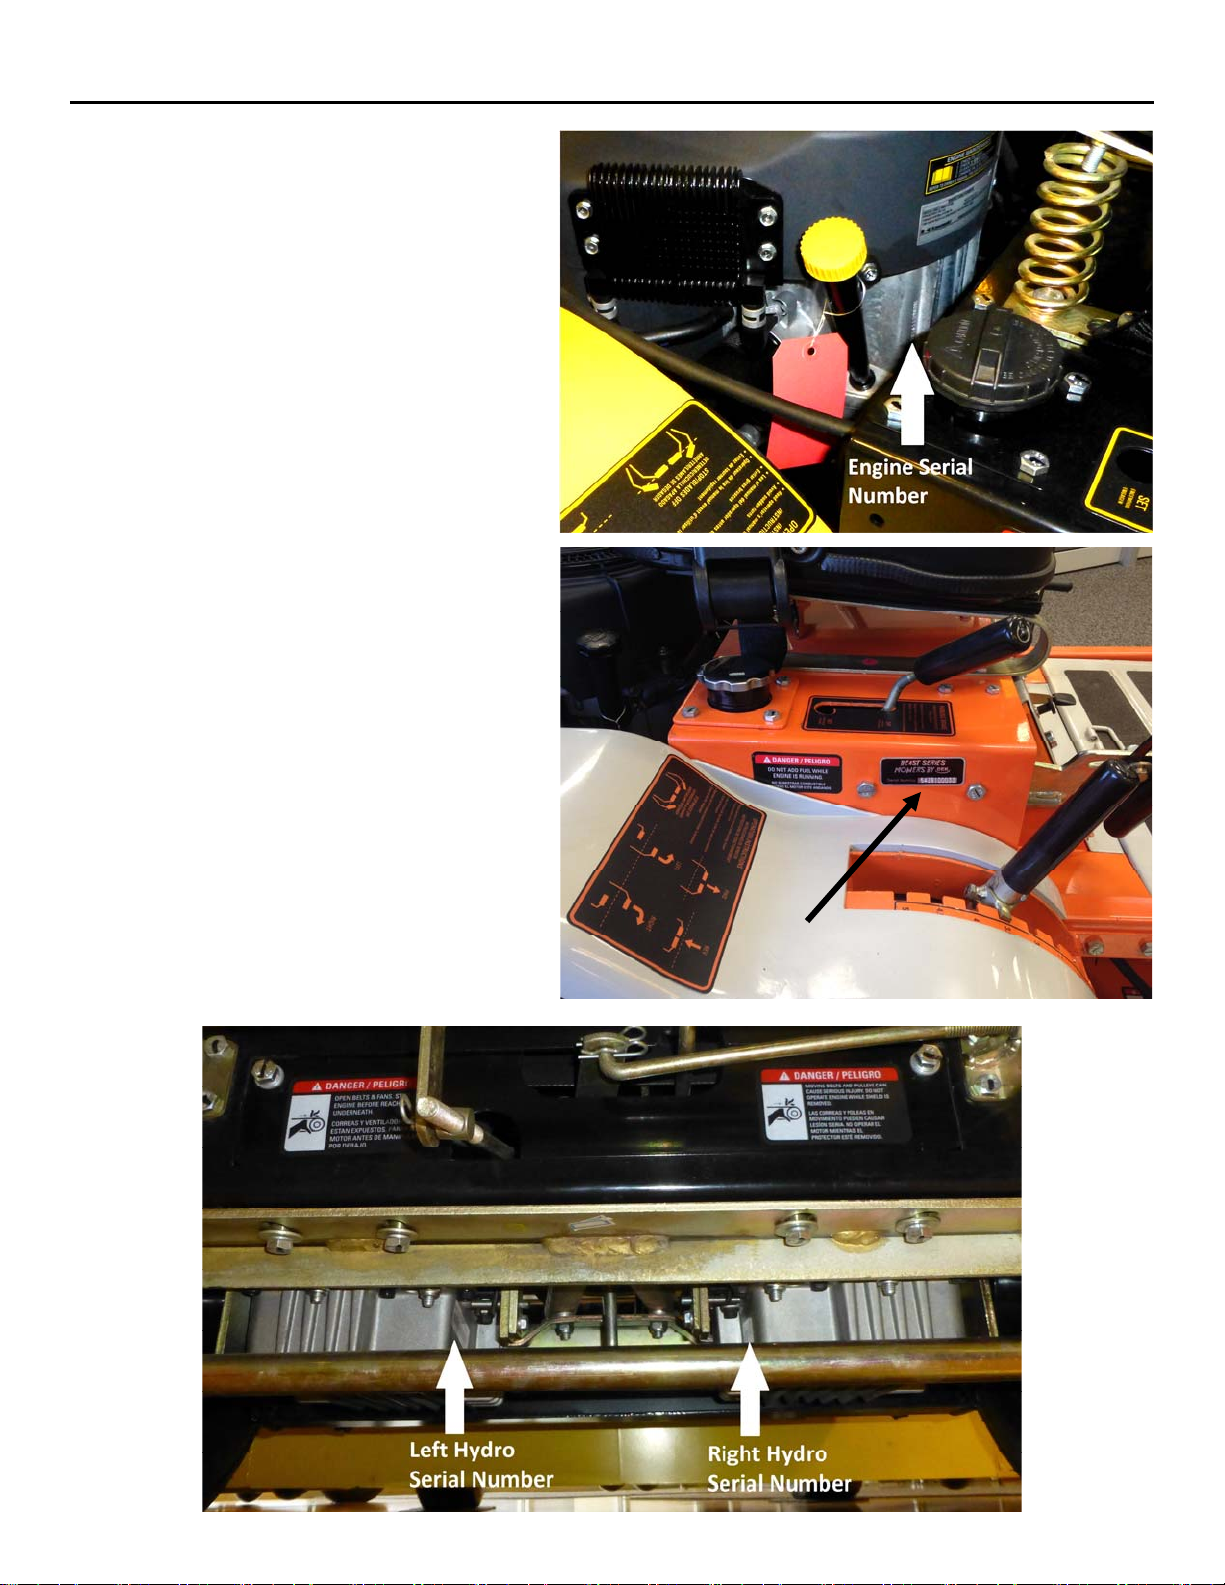
See Page 2 for Serial # Locations
Rev: AUG2014
Need Help?
Parts, Service
and Technical Assistance call:
1-919-550-3221
www.gxioutdoorpower.com
Mower and engine life are
extended greatly by performing
frequent lubrications, oil changes
and regular maintenance. To
protect your investment perform
routine maintenance.
i
Page 2
Z- BEAST
Copyright© 2010 by GXi Outdoor Power, LLC. All rights reserved.
No part of this publication can be reproduced or distributed without prior written permission of GXi Outdoor Power, LLC
Clayton, NC 27520 USA.
DEK is a registered trademark of GXi Outdoor Power, LLC
GXi Outdoor Power, LLC reserves the right to discontinue or change specifications or design at any time without notice
and without incurring any obligation whatsoever.
The information and specifications included in this publication were in effect at the time of approval for printing.
54ZB, 62ZB
WARNING
The engine exhaust from this product
contains chemicals known to the state
of California to cause cancer, birth
defects, or other reproductive harm.
NOTICE OF REQUIREMENT OF SPARK ARRESTER MUFFLER
This equipment may create sparks that can start fires around dry vegetation. California Public Resources
Code Section 4442.6 provides that it is unlawful to use or operate an internal combustion engine on any
forest-covered, brush-covered, or grass-covered land unless the engine is equipped with a spark arrester
maintained in effective working order. A spark arrester is a device constructed of nonflammable materials
specifically for the purpose of removing and retaining carbon and other flammable particles over 0.0232 of
an inch in size from the exhaust flow of an internal combustion engine that uses hydrocarbon fuels or
which is qualified and rated by the United States Forest Service. Other states or federal areas may have
similar laws. The operator should contact local fire agencies for laws or regulations relating to fire
prevention requirements. CONTACT THE ENGINE MANUFACTURER IF YOUR AREA REQUIRES A SPARK
ARRESTER.
This manual contains important safety instructions for Finish Mowers
READ SAFETY WARNINGS AND OPERATING INSTRUCTIONS CAREFULLY
SAVE THESE INSTRUCTIONS.
Rev: AUG2014
This owner’s manual is considered a permanent part of the finish mower and should
remain with the finish mower if resold. Should the owner’s manual become damaged or
illegible, replace immediately.
Z-Beast Finish Mower
ii
Page 3
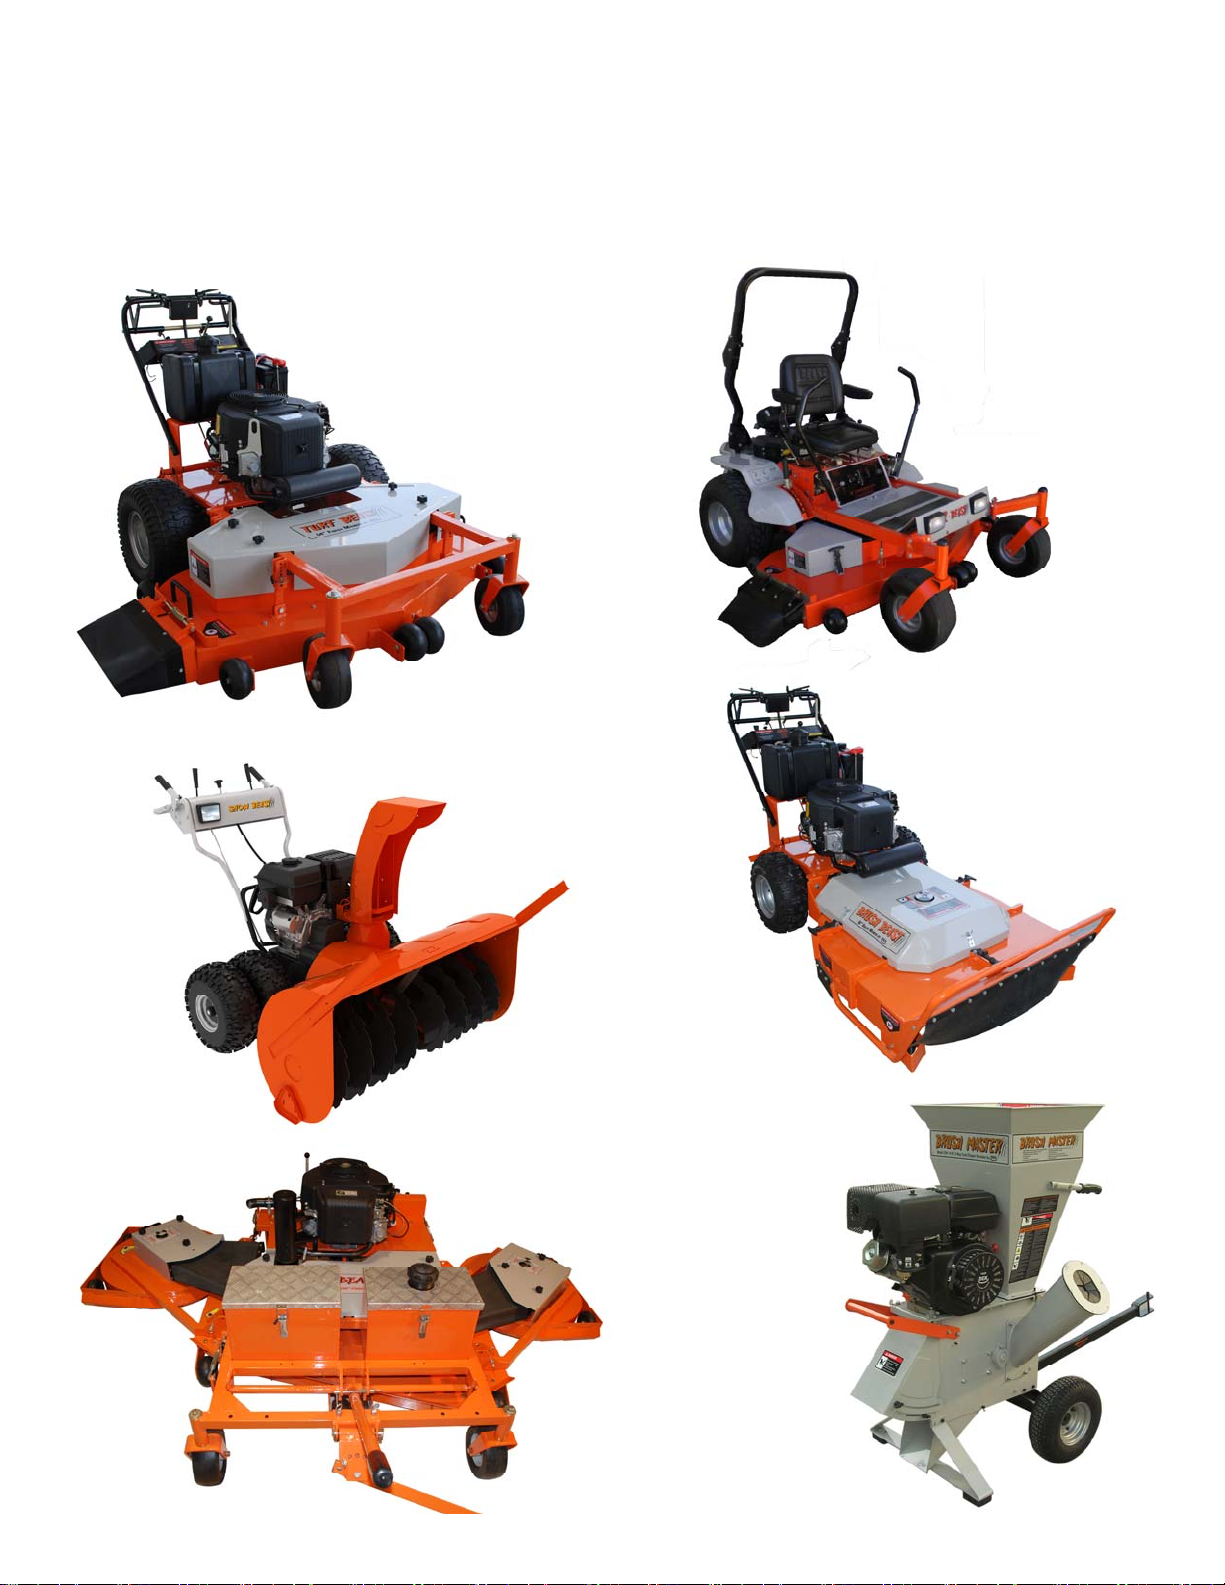
BEAST SERIES
Check out our other great products at www.HomeDepot.com
or visit our website at www.beastpowerequipment.com
Turf Beast
36-inch & 54-inch Walk
Behind Mower
Snow Beast
36-inch & 45-inch Snow
Blower
Z‐Beast
54-inch & 62-inch Zero-Turn
Mower
Brush Beast
36-inch Brush Mower
Rev: AUG2014
Brush Master
Chipper/Shredder
with 2-Way Feed
The Beast
100-inch Tow Behind Mower
iii
Page 4

Z- BEAST
Contents
Safety Information and Warnings ........................................................................ 1
Inspection and Serial Number Locations ........................................................... 2
Preparation Safety Precautions ........................................................................... 3
Operation Safety Precautions ............................................................................ 4,5
Roll Over Protective Structure (ROPS) ................................................................. 6
Slope Diagram .......................................................................................................... 7
Safety Decals .......................................................................................................... 8
Product Specifications .......................................................................................... 9
Control Panel and Lawn Mower Components ................................................. 10
Missing Parts Request Form ................................................................................ 11
Operating Instructions ................................................................. ........................ 12
Starting the Engine ........................................................................................ 12
Operating the Mower .................................................................................... 13
Changing the Cut Height ............................................................................... 14
Disengaging Hydraulic Drive Units .............................................................. 15
General Maintenance .......................................................................................... 16
Maintenance Schedule ....................................................................................... 17
Service Adjustments ............................................................................................ 18
Return to Neutral ........................................................................................... 18
Deck Belt Adjustment ............................................................................... 19-22
Spindle Break Inspection and Replacement ............................................. 23
Removing the Blades ..................................................................................... 23
Engine-to-Hydraulic Drives Belt Adjustment ............................................. 24
Hydraulic Drive System Adjustment ............................................................ 25
Safety System Adjustment ............................................................................ 26
Tracking Adjustment ...................................................................................... 26
Lubrication ...................................................................................................... 27
Battery .............................................................................................................. 27
Storage Instructions ............................................................................................. 28
Troubleshooting ................................................................................................ 29,30
Limited Warranty and Service ............................................................................ 31
54ZB, 62ZB
About the BEAST Mower Manual
Congratulations on the purchase of your new BEAST commercial mower. We at GXi Outdoor Power are confident that
this mower will provide excellent performance, outstanding quality, and great durability when operated and maintained
as directed in this manual.
1. This manual contains assembly, operating, safety, adjustment, maintenance, and troubleshooting instructions.
BEFORE OPERATING YOUR LAWN MOWER, CAREFULLY READ THIS MANUAL IN ITS ENTIRITY.
2. This owner’s manual is considered a permanent part of the mower. It must be available to all operators and/or
persons servicing the mower. Should the mower be resold, this manual must remain with the mower.
3. All information, illustrations, and specifications contained in this manual were in effect at the time of the
publication. GXi Outdoor Power reserves the right to add, delete or modify specifications and/or designs without
notice.
4. If you ever have questions in regards to the operation, maintenance or safety of your mower, please contact the
GXi Parts & Service, LLC at 1-919-550-3221.
Rev: AUG2014
Z-Beast Finish Mower
iv
Page 5
Z- BEAST
Safety Information and Warnings
54ZB, 62ZB
Safety Information
BEAST lawn mowers are designed to provide safe
and dependable service if operated according to
instructions. Read and understand this owner’s
manual before operating your lawn mower.
Emission Control System Information
The U.S. and California Clean Air Acts
EPA and California regulations require all
manufacturers to furnish written instructions
describing the operation and maintenance of
emission control systems. The following
instructions and procedures must be followed in
order to keep the emissions from your engine within
the emission standards.
Safety Label Locations
Safety labels are located on your mower to warn
you of potential hazards. Read them carefully. If a
label comes off or becomes hard to read, contact
GXi Parts and Service, LLC for a replacement.
Operator Responsibility
It is the owner’s responsibility to insure that all
operators and mechanics are trained and have read
this manual before operating the mower as well as
being physically able individuals. They should be
instructed about safe operation and mechanical
procedures. If they can not read or understand
English, it is the owner’s responsibility to explain all
safe operating instructions. The owner or operator
is responsible for accidents or injuries occurring to
themselves, other people, or property. Potential
misfortunate incidents can be prevented by the
owner/user.
Training
1. Read, understand, and follow all instructions on the
machine and manual(s) before attempting to
assemble and operate.
2. Operator must be familiar with all controls, their
operations, and how to stop the engine and
disengage the controls quickly.
3. Never allow children to operate this machine.
4. Never allow adults to operate this machine without
proper instruction.
5. Keep bystanders, helpers, pets and children at a
safe distance from the machine while it is in
operation.
6. Keep area of operation clear of objects that can be
thrown by the machine.
7. Wear eye and ear protection while operating the
machine.
Children
1. Never allow children to operate or ride on the
machine.
2. Always keep children at a safe distance when
operating or servicing the machine.
3. Make sure to always look out for children before
you make turns or reverse.
4. Never let children or untrained people operate or
service the machine. Local regulations may restrict
the age of the operator
WARNING
WARNING
WARNING! Do not use your BEAST lawn mower to
carry passengers. Keep bystanders, helpers, pets and
children at a safe distance from the machine while it is
in operation. Inspect the area where the equipment is
to be used and remove all objects such as rocks, toys,
and wires which can be thrown by the machine causing
serious injury or death.
Rev: AUG2014
Wear appropriate clothing including hard hat, safety
glasses and hearing protection. Long hair, loose
clothing or jewelry may get tangled in moving parts.
Do not operate the mower with defective guards,
shields, or without the safety devices securely in place.
Z-Beast Finish Mower
WARNING
1
Page 6
Z- BEAST
Inspection and Serial Number Locations
Mower Inspection
For your safety, inspect the lawn mower before each
use. Before you begin your inspection, be sure the
following conditions are met: the lawn mower should
be on a level surface, with the ignition switch off, the
key removed, the brake set, and the blades
disengaged. Also, disconnect the spark plug wires
from the spark plugs and ground them against the
engine to prevent inadvertent starting.
1. Walk around the mower and look for any fluid
spills or leaks on or underneath the mower.
Remove any and all excessive debris, dirt, and
fluids.
2. Look for signs of damage or excessive wear.
Check the tightness of all nuts, bolts, pins, and
screws. Tighten any that may be loose and
replace any that are missing.
3. Be sure the safety switches are operating
properly so that the engine cannot be started
unless the blades are disengaged.
4. Check the mower blades for any damage or
abnormal wear. If replacement is required,
replace in sets so that they are balanced.
5. Check the tire pressure of all four tires. Do not
exceed the maximum pressure indicated on the
tire.
6. Check the belts for damage or wear.
7. Check engine oil and air filters as recommended
in the engine manufacturer’s manual.
54ZB, 62ZB
Chassis Serial
Number
Rev: AUG2014
Z-Beast Finish Mower
2
Page 7
Z- BEAST
Preparation Safety Precautions
54ZB, 62ZB
Preparation—Safety Precautions
1. Evaluate the terrain to determine what
accessories and attachments are needed to
properly and safely perform the job. Only use
accessories and attachments approved by
BEAST.
2. Inspect the area where the equipment is to be
used and remove all objects such as rocks,
toys, and trash which can be thrown by the
machine causing serious injury or death.
3. People, pets, and children must not be near
the area being mowed. Do not operate the
mower in their presence.
4. Never operate mower with damaged guards,
shields or covers.
5. All users of the mower must be alert and pay
attention to safety alerts, symbols, and safety
signs.
6. Be sure to inspect mower before each use.
7. Always use roll bar when possible and never
remove or modify the roll bar in any way or
form.
8. Check the controls and shields to make sure
that they are functioning properly before
operating. Do not operate if any are damaged
or missing.
9. Never operate with discharge deflector
raised, removed, or altered, unless a grass
catcher is being used.
10. Install, and maintain in working order, a spark
arrester before using equipment on forestcovered, grass-covered, or brush-covered
unimproved land.
Gasoline and other fuels—Safety Precautions
Use extra care when handling gasoline and other
fuels as they are flammable and vapors can
explode.
1. Only use gasoline approved containers for storage
and keep out of reach of children.
2. Do not fill fuel tank completely full. Overfilling may
result in fuel leakage. Leave a reasonable amount
of space for fuel to expand.
3. If fuel is spilled, do not start the engine. Move the
mower away from the area, wipe up the spill
thoroughly and wait until fuel vapors have
evaporated before starting engine.
4. Do not fill gasoline containers inside a vehicle or
on a truck/trailer bed.
5. Never remove fuel cap or add fuel when engine is
running.
6. Avoid prolonged breathing of gasoline vapors.
7. Never refuel or drain the machine indoors.
8. Keep face away from nozzle and gas tank opening.
9. Keep gas and other fuels away from skin and eyes.
10. Never use the mouth to siphon gas.
11. Never refuel the mower until all moving parts on
the mower have stopped.
12. Never smoke when handling fuels and stay away
from an open flame where fumes can be ignited by
a spark.
13. Always place gasoline containers on the ground
away from your vehicles prior to filling.
14. Gasoline is harmful or fatal if swallowed.
Rev: AUG2014
DANGER
DANGER: GASOLINE IS HIGHLY FLAMMABLE AND EXPLOSIVE. Do not add
fuel while the engine is running or is hot. Keep open flames, sparks, and heat away
from the fuel and store fuel in containers specifically designed for that purpose.
ADD FUEL OUTDOORS ONLY. IF THE FUEL IS SPILLED, DO NOT START THE
ENGINE. Manually push the mower away from the spill and wipe up
immediately.
Z-Beast Finish Mower
3
Page 8

Z- BEAST
Operation Safety Precautions
54ZB, 62ZB
Equipment Operation—Safety Precautions
1. Do not operate the engine in a confined space
where dangerous carbon monoxide fumes can
collect. Carbon monoxide is odorless, tasteless,
and can be fatal.
2. Mow only in daylight or under good lighting
conditions.
3. Make sure the mower is in neutral, parking brake
is engaged, blades are disengaged, seat belt on,
roll bar is raised and the operator is sitting in the
proper position before attempting to start the
engine.
4. Never operate on wet grass.
5. Watch for pedestrian or vehicular traffic when
moving the mower while not in use (e.g., loading,
unloading, or transporting).
6. Never operate the mower with defective guards or
shields, or without the safety devices securely
mounted in place and functioning properly.
7. Be aware of discharge and never direct discharge
of material toward bystanders or allow anyone,
especially children, near the mower during
operation.
8. Do not change the governor settings or over speed
the engine.
9. Always stop the engine when you leave the
mower, even for a moment.
10. To help reduce fire hazard, keep the engine and
the area around the engine free of grass, leaves or
any other type of foreign material.
11. Beware of cutting edges. For safety always wear
gloves when performing blade maintenance
activities. Beware on multiple blade units since the
rotation of one blade may cause the rotation of
another blade.
12. Do not operate the mower with the grass chute
deflector in the raised position. Serious injury
could occur.
13. If lightning is seen or thunder is heard, do not
operate machine. Instead find shelter, as lightning
may cause injury/death.
14. Never raise the mower deck while the blades are
running.
15. Stop on a level ground, disengage drive, engage
parking brake, and shut off engine before leaving
operator’s position for any reason including
clearing grass catcher or unclogging the chute.
16. Stop the mower immediately and inspect blades
after striking objects or if an abnormal vibration
occurs. Discontinue use until repaired.
17. Keep hands and feet away from cutting deck. This
product is capable of amputating hands and feet
and throwing objects.
18. Be alert and slow down when making turns. Also
look left, right, and behind before changing
directions and reversing to be sure there is a clear
path.
19. Disengage blades, slow down, and drive cautiously
when crossing roads and side walks.
20. Never operate mower under the influence of
alcohol or drugs.
21. Use care when loading or unloading the machine
into a trailer or truck.
22. Use care when approaching blind corners, shrubs,
trees, or other objects that may obstruct vision.
23. Always disengage blades when not cutting grass.
24. Never listen to music with headphones/earphones
while operating the mower.
WARNING!
DO NOT OPERATE ON SLOPES EXCEEDING 15 DEGREES! OPERATING ON SLOPES
EXCEEDING 15 DEGREES INCREASES THE RISK OF A ROLLOVER RESULTING IN SERIOUS
INJURY.
OPERATING ON SLOPES EXCEEDING 15 DEGREES ALSO CAUSES PREMATURE WEAR ON
HYDRAULIC DRIVES.
ALWAYS MOW ACROSS SLOPES. DO NOT MOW UP AND DOWN.
Rev: AUG2014
Z-Beast Finish Mower
4
Page 9
Z- BEAST
Operation Safety Precautions
54ZB, 62ZB
Slope Operation—Safety Precautions
1. Do not mow on slopes greater than 15
degrees.
2. Be extremely careful when operating the
mower on a slope. Reduced traction could
cause sliding.
3. Do not stop or start suddenly when going
uphill.
4. Slow down and use caution when making
turns and when changing direction on slopes.
5. Do not operate a riding mower near steep
slopes, ditches, or water. Use a walk behind
mower or a hand trimmer for these areas.
6. Roll bar should be raised and locked with seat
belt bucked before engine is turned on.
7. Should it be necessary to lower the roll bar,
the seat belt should not be used.
8. If tires lose traction, disengage the blades
and drive slowly and cautiously off the slope.
9. Use extreme care with attachments as they
can change the stability of the mower and
cause loss of control.
10. Slow down and drive extra carefully on
hillsides. Be sure to drive in the
recommended direction on hillsides. Turf
conditions can affect the machine’s stability.
11. The parking brake may not hold the mower if
parked on a slope.
IMPORTANT! The mower belts are adjusted to
ensure the blades stop turning within seven (7)
seconds of releasing the blade control lever. If
you are making any belt adjustments whatsoever,
for your safety and the safety of others around
you, you must ensure the belts are re-adjusted to
achieve this design specification.
DANGER: Do not bypass, modify, alter or
disconnect the safety system. Make sure that
the safety interlock system is fully operational
each time before mowing.
Before attempting to use your mower, make
sure you are familiar with all of the
components and have read the manual.
GASOLINE IS HIGHLY FLAMMABLE AND
EXPLOSIVE. FUEL LEAKS, A LOOSE FUEL
TANK, OR A LOOSE FUEL VALVE CAN LEAD
TO SEVERE INJURY OR DEATH. DO NOT
OPERATE THIS MOWER IF ANY COMPONENT
OF THE FUEL SYSTEM IS LOOSE OR LEAKS
GASOLINE!
Rev: AUG2014
Need Help?
Parts, Service
and Technical Assistance call:
1-919-550-3221
www.gxioutdoorpower.com
Before setting up your BEAST mower,
disconnect the spark plug wires from the
spark plugs and ground them against the
engine to prevent inadvertent starting. This
step should be taken as a precaution
whenever you are working on this machine.
Z-Beast Finish Mower
5
Page 10
Z- BEAST
Roll Over Protective Structure (ROPS)
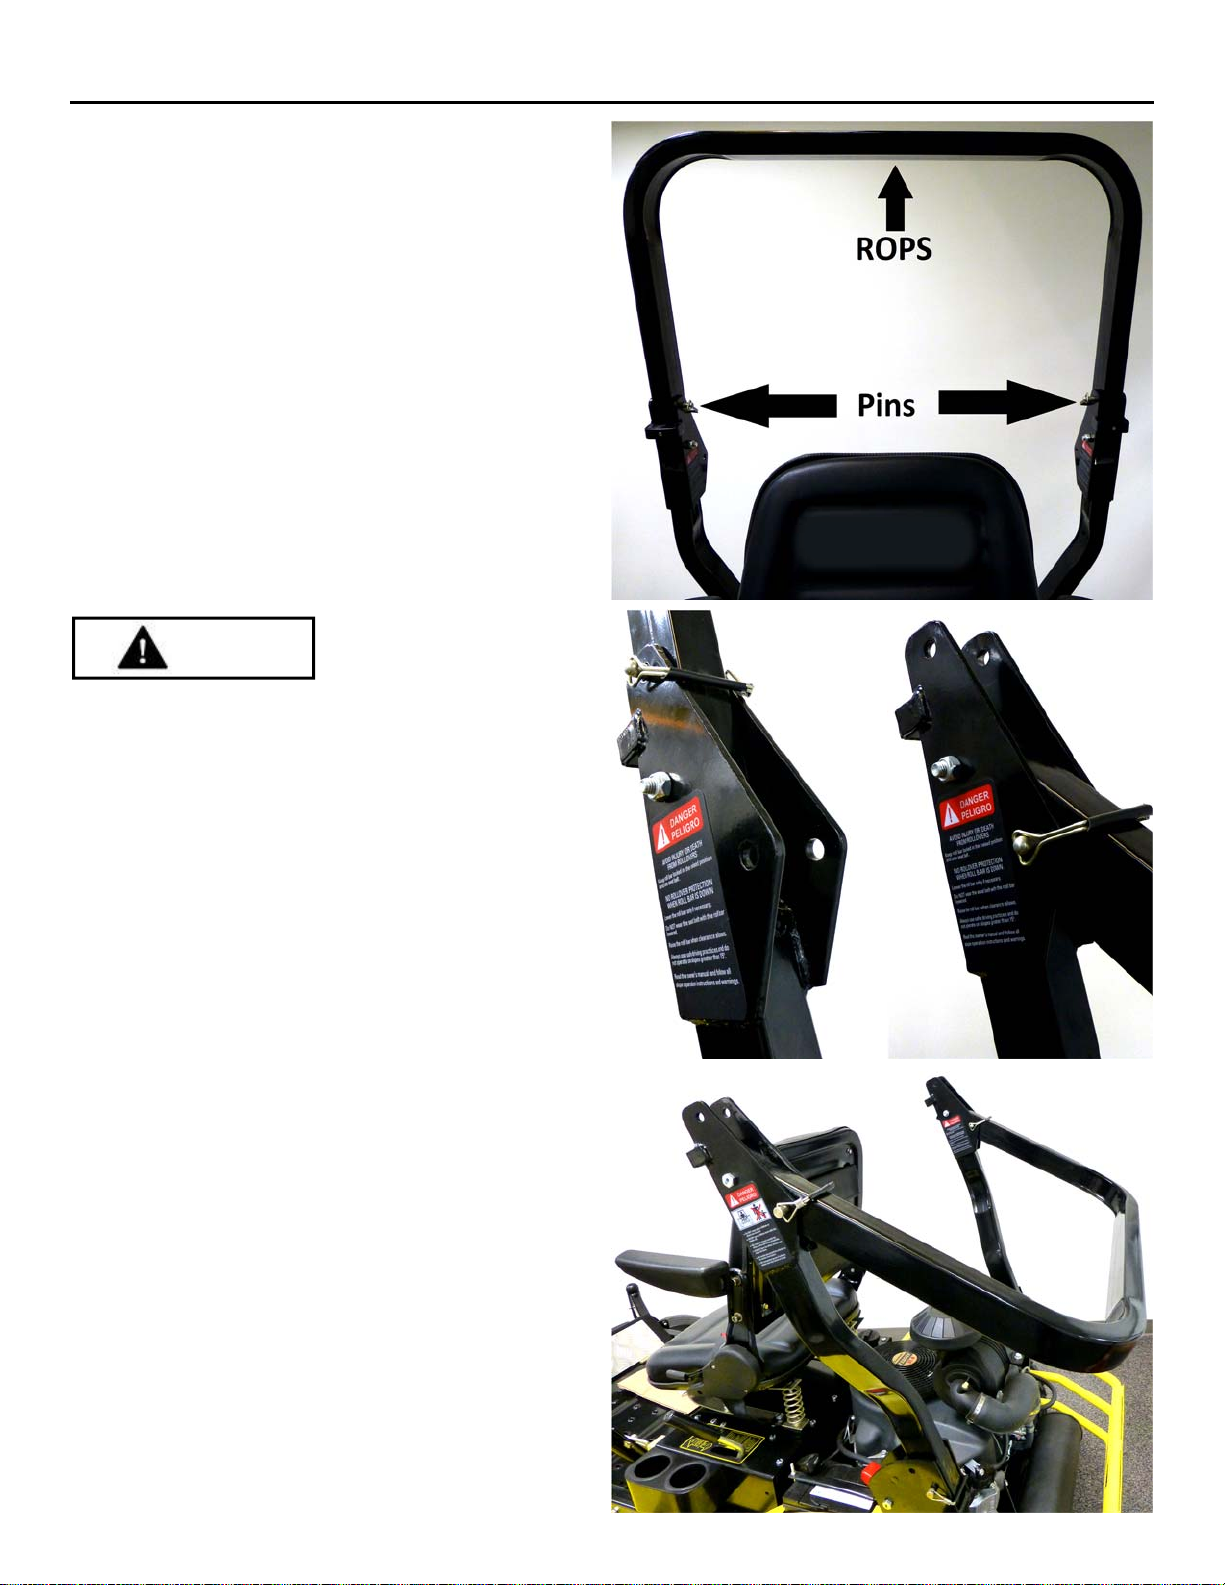
Roll Over Protective Structure (ROPS)
This mower is equipped with a roll over protective
structure (ROPS) and a seat belt. Do not remove the
ROPS or seat belt. ROPS reduces the chance of injury in
the event of a rollover. Overturning the machine without
ROPS can result in serious injury or death. ALWAYS use
the seat belt when the ROPS is in the raised position.
If the ROPS must be lowered for clearance, return ROPS
to raised position when clearance is no longer required.
NEVER use the seat belt when the ROPS is in the lowered
position. If the ROPS is lowered for transportation, return
it to the raised position before operating the machine.
WARNING
54ZB, 62ZB
ALWAYS use the seat belt when the ROPS is in the
raised position. Failure to do so could result in serious
injury or death in the event of a rollover. NEVER use the
seat belt with the ROPS in the lowered position.
Lowering ROPS
If additional clearance is needed the ROPS may be
lowered. Lower the ROPS using the following steps:
1. Remove the two retaining pins.
2. Place the ROPS in the lowered position.
3. Insert the pins into the lowered position holes.
NEVER use the seatbelt when the ROPS is in the lowered
position. Return ROPS to the raised position when
additional clearance is no longer required.
Rev: AUG2014
Z-Beast Finish Mower
6
Page 11
Z- BEAST
Slope Diagram
54ZB, 62ZB
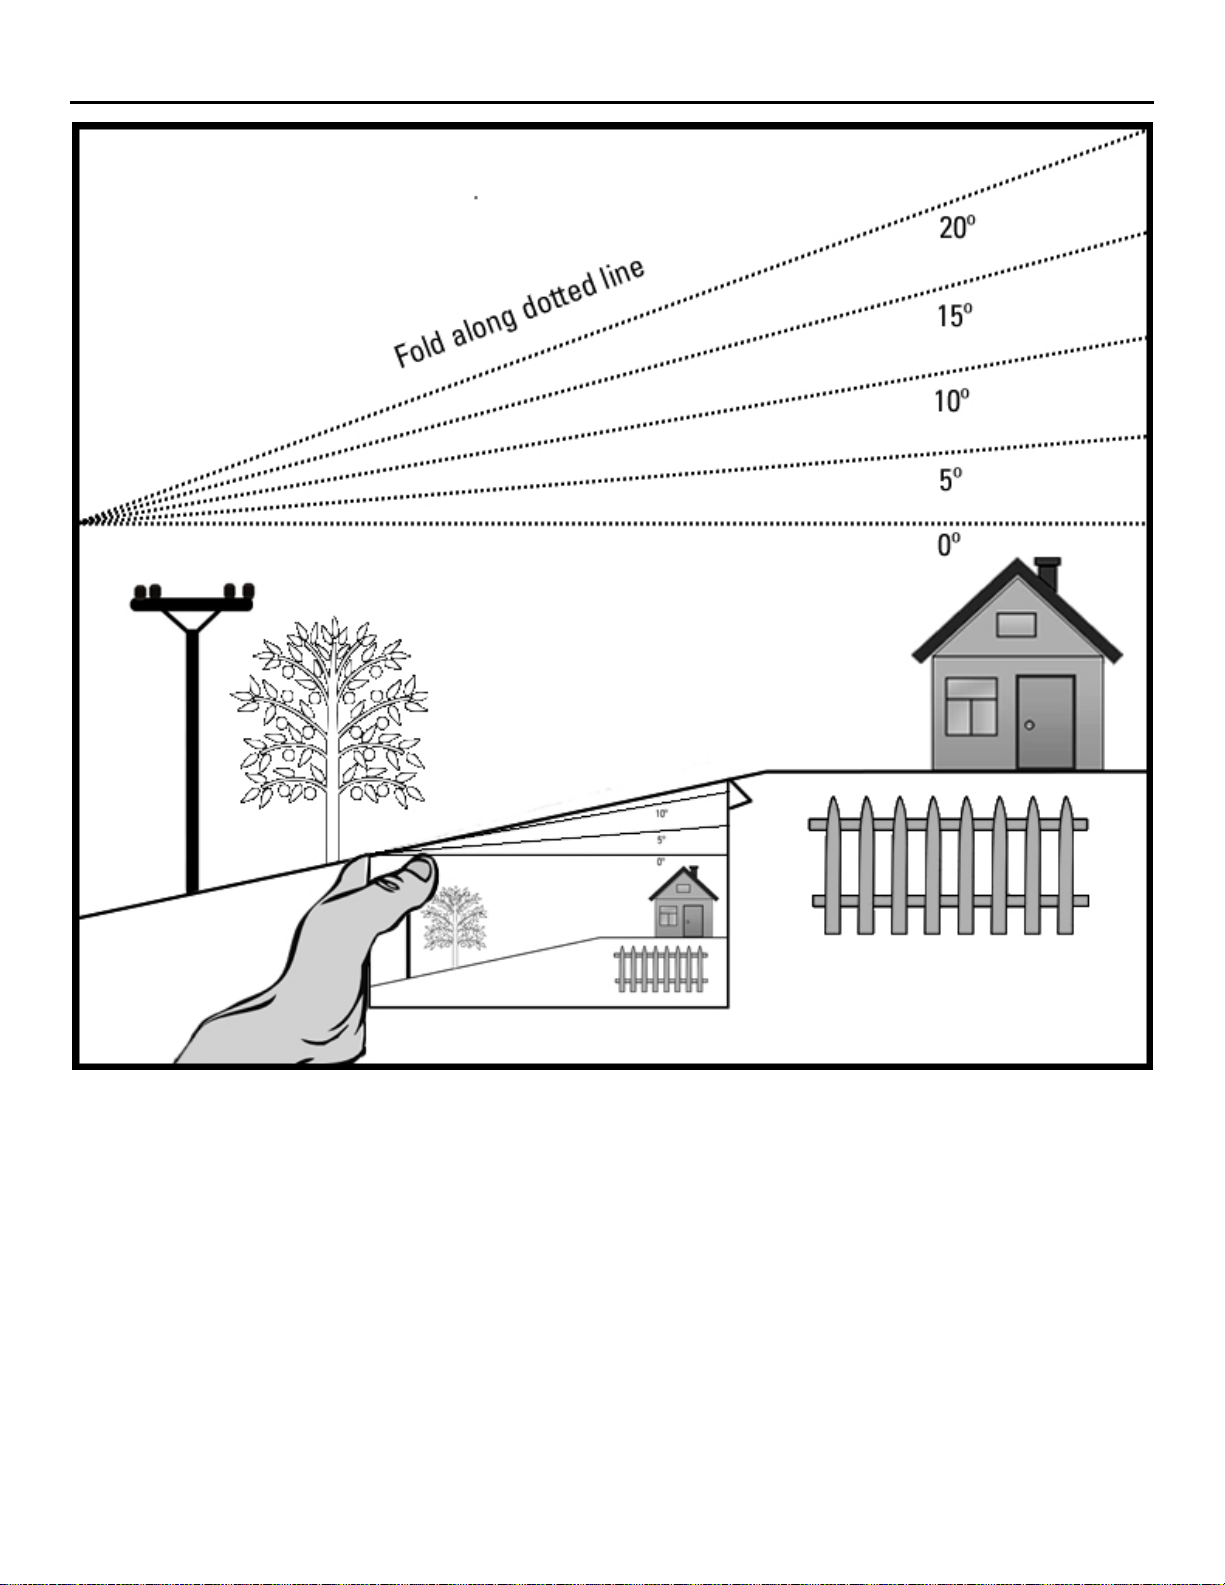
The maximum slope angle you can safely operate your mower on is 15 degrees. Do not exceed 15 degrees with your
mower.
1. Line up the side of this page with a vertical object to gauge the angle of the slope.
2. Fold this sheet along the dotted line and verify the slope is not in excess of 15 degrees.
WARNING!
DO NOT OPERATE ON SLOPES EXCEEDING 15 DEGREES! OPERATING ON SLOPES
EXCEEDING 15 DEGREES INCREASES THE RISK OF A ROLLOVER RESULTING IN SERIOUS
INJURY.
OPERATING ON SLOPES EXCEEDING 15 DEGREES ALSO CAUSES PREMATURE WEAR ON
HYDRAULIC DRIVES.
ALWAYS MOW ACROSS SLOPES. DO NOT MOW UP AND DOWN.
Rev: AUG2014
Z-Beast Finish Mower
7
Page 12
Z- BEAST
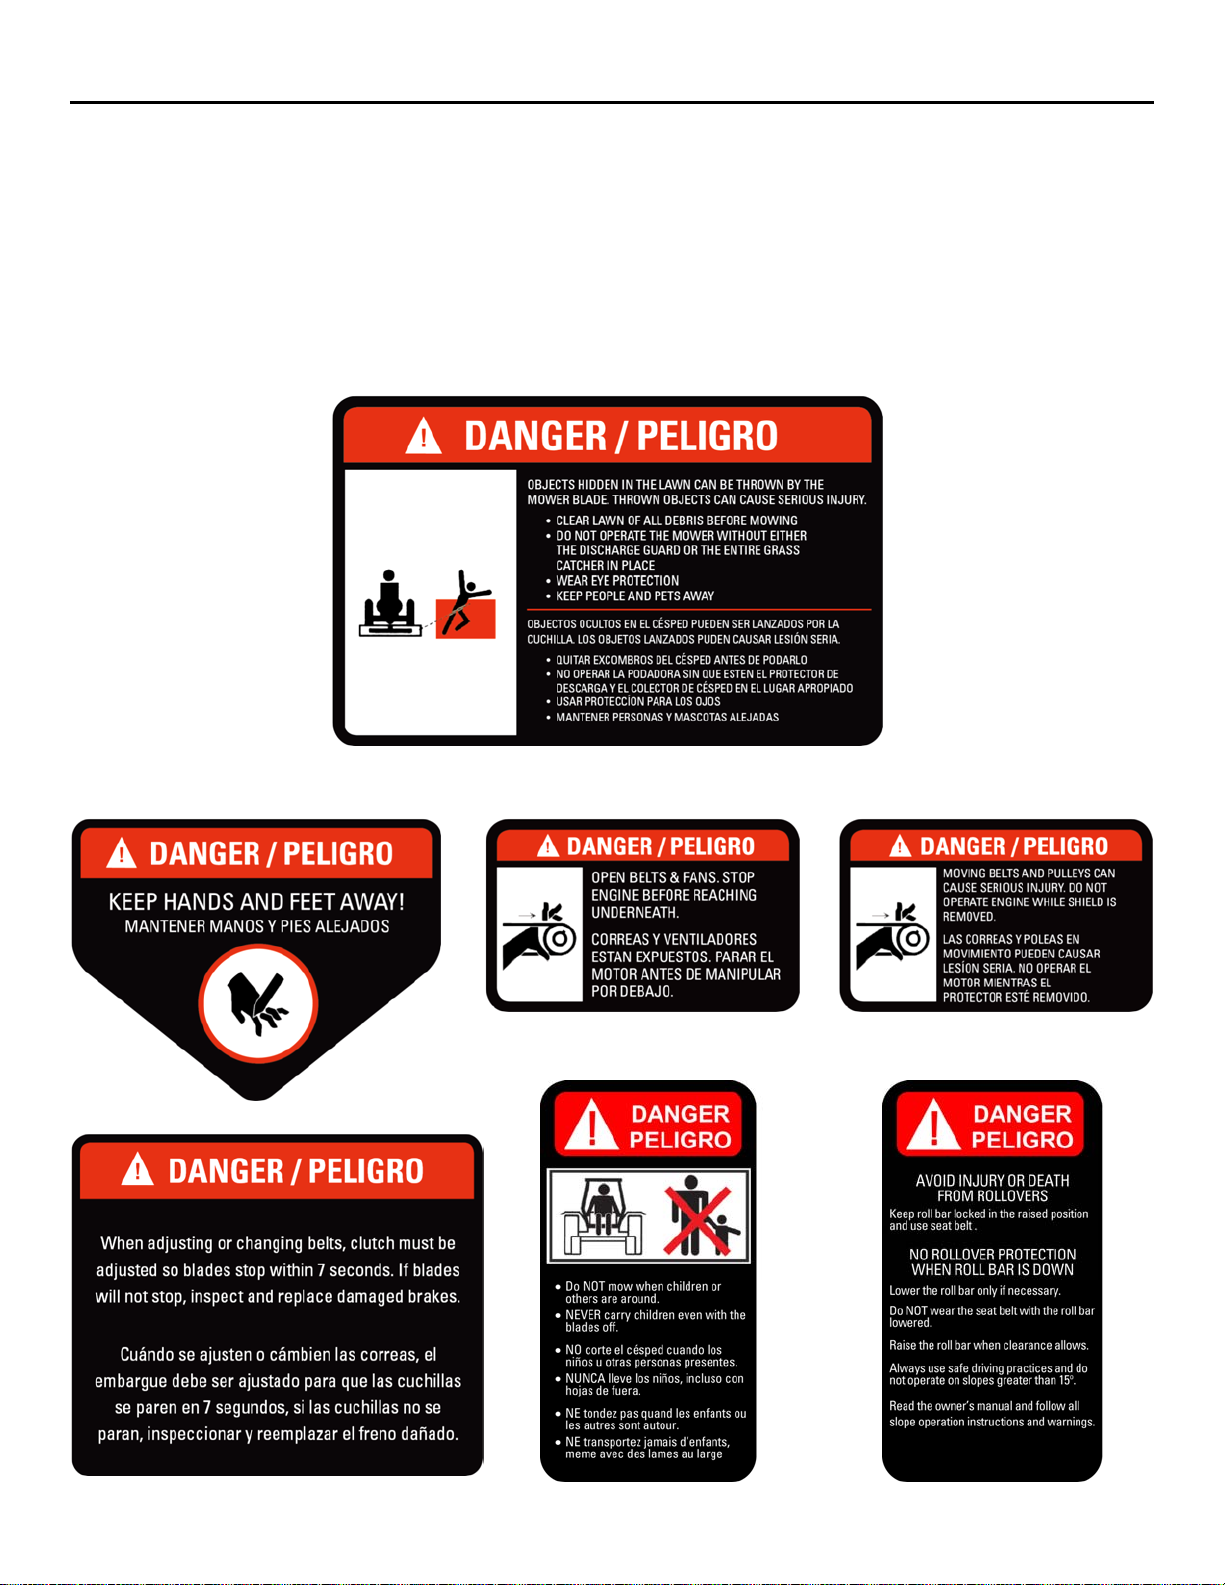
Safety Decal Identification
The labels shown below are located on your mower to warn you of potential hazards and provide you with important
safety information. If these decals become difficult to read or are missing from the mower, please contact GXi Parts &
Service, LLC at 1-919-550-3221or www.gxioutdoorpower.com for a replacement.
Safety Decals
54ZB, 62ZB
Rev: AUG2014
Z-Beast Finish Mower
8
Page 13
Z- BEAST
Product Specifications
54ZB, 62ZB
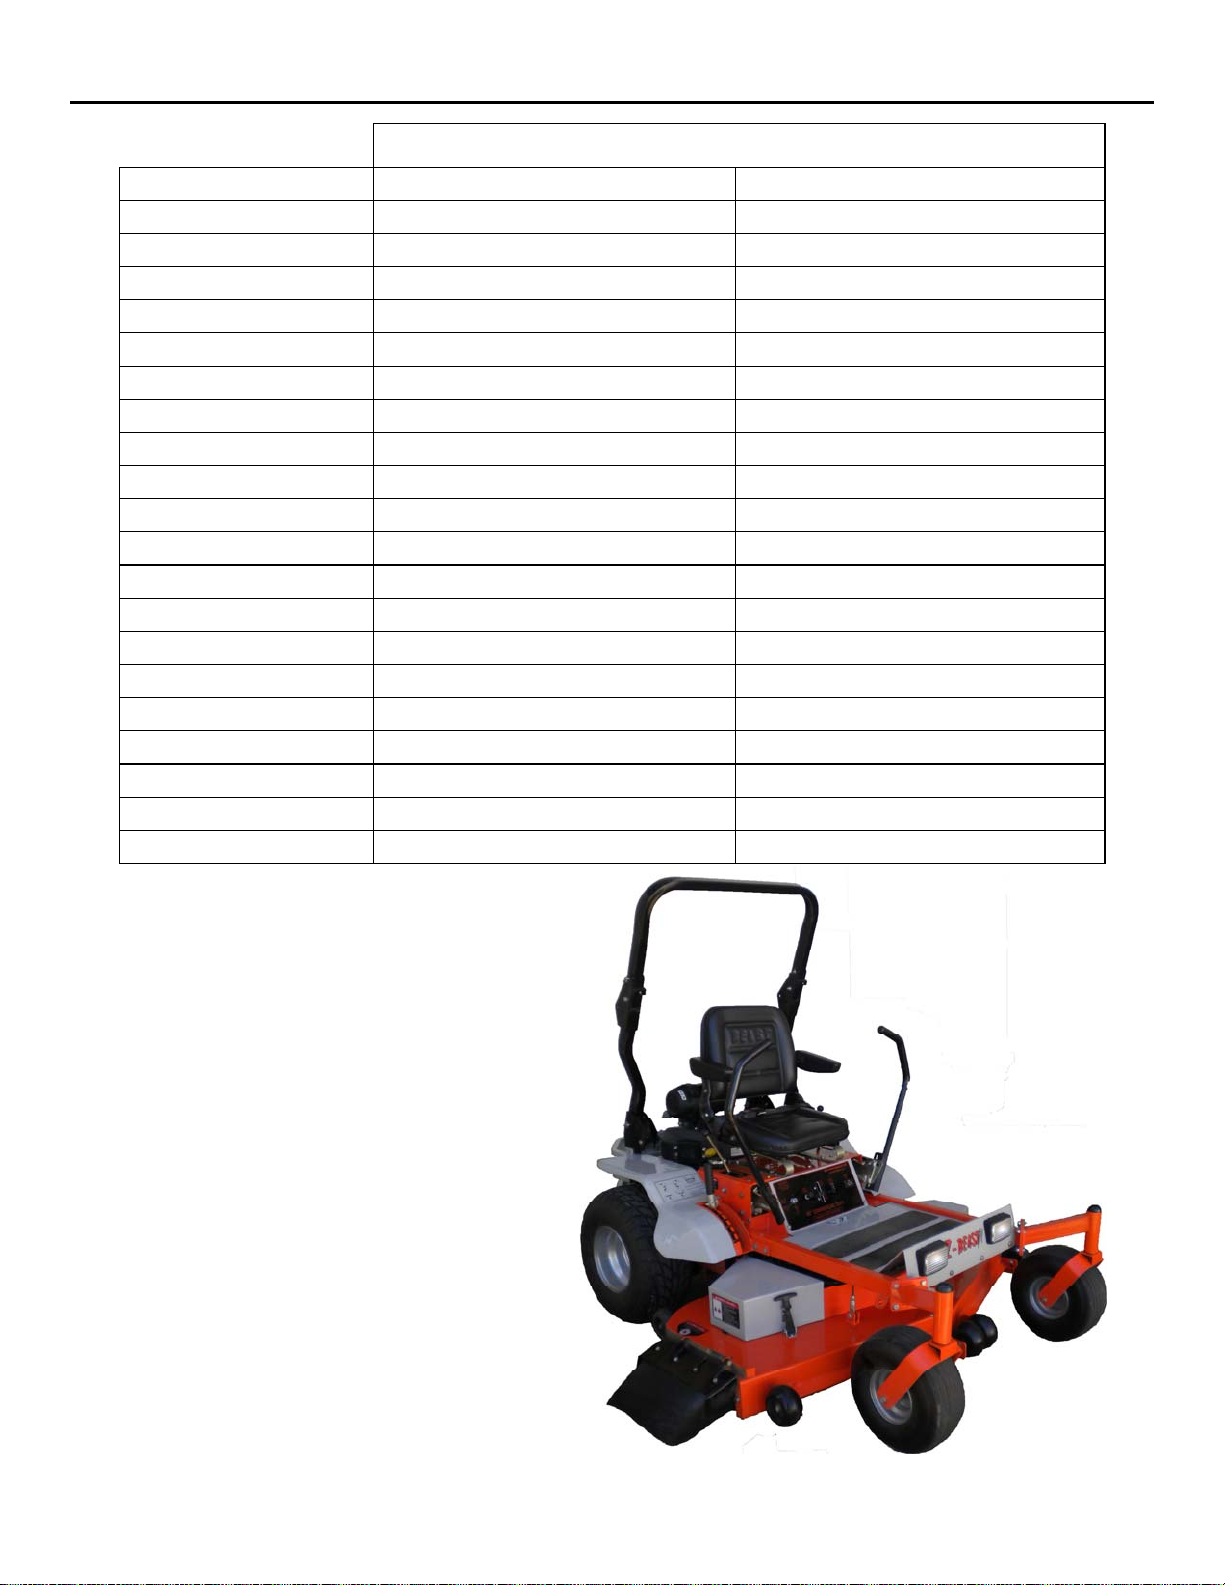
Feature 54ZB 62ZB
Product Type Commercial, 0-turn Commercial, 0-turn
Cutting Width 54-inch 62-inch
Engine See engine manufacturer’s manual See engine manufacturer’s manual
Engine Start Electric Electric
Transmission Type Dual hydraulic Dual hydraulic
Transmission Mfg. GXi GXi
Mower Speeds Infinitely variable Infinitely variable
Deck Type Floating, quick change Floating, quick change
Cutting Height 1.5– 5 inches( ½-inch increments) 1.5– 5 inches( ½-inch increments)
Blade Engagement Manual clutch Manual clutch
Blade Tip Speed 18,750 ft/min 18,750 ft/min
Anti-Scalping Rollers 4 front/2 rear 4 front/2 rear
No. Blades/ Length 3, 18.5-inch blades 3, 21-inch blades
Control System Dual Control Lever Dual Control Lever
Fuel/Capacity Gasoline/7.5 gals. Gasoline/7.5 gals.
Rear Drive Tires 22-inch X 10-inch turf tread 22-inch X 10-inch turf tread
Front Caster Tires 15-inch X 6-inch smooth tread 15-inch X 6-inch smooth tread
Brake System Internal hydraulic and mechanical park Internal hydraulic and mechanical park
Weight 1,200 lbs. 1,200 lbs.
Height/Length 72 inches x 83 inches 72 inches x 83 inches
Models
Transmission Specifications
Hydraulic drives:
Pump Displacement—12.1 cc/rev
Motor Displacement—14.6 cc/rev
Overall drive system:
Output torque—Up to 350 lb-ft
Speed—Up to 10 MPH
Axle diameter—1.2 in. (30 mm)
Note: product specifications may change without notice.
Rev: AUG2014
Z-Beast Finish Mower
9
Page 14
Z- BEAST
Throughout this manual, instructions are given on the operation of your BEAST mower. We recommend that while going
through this manual, you have your mower available for quick and easy access in order to orient yourself with the
controls, maintenance and orientation of different parts. Please read through the manual before operating.
Control Panel and Lawn Mower Components
54ZB, 62ZB
Control Panel
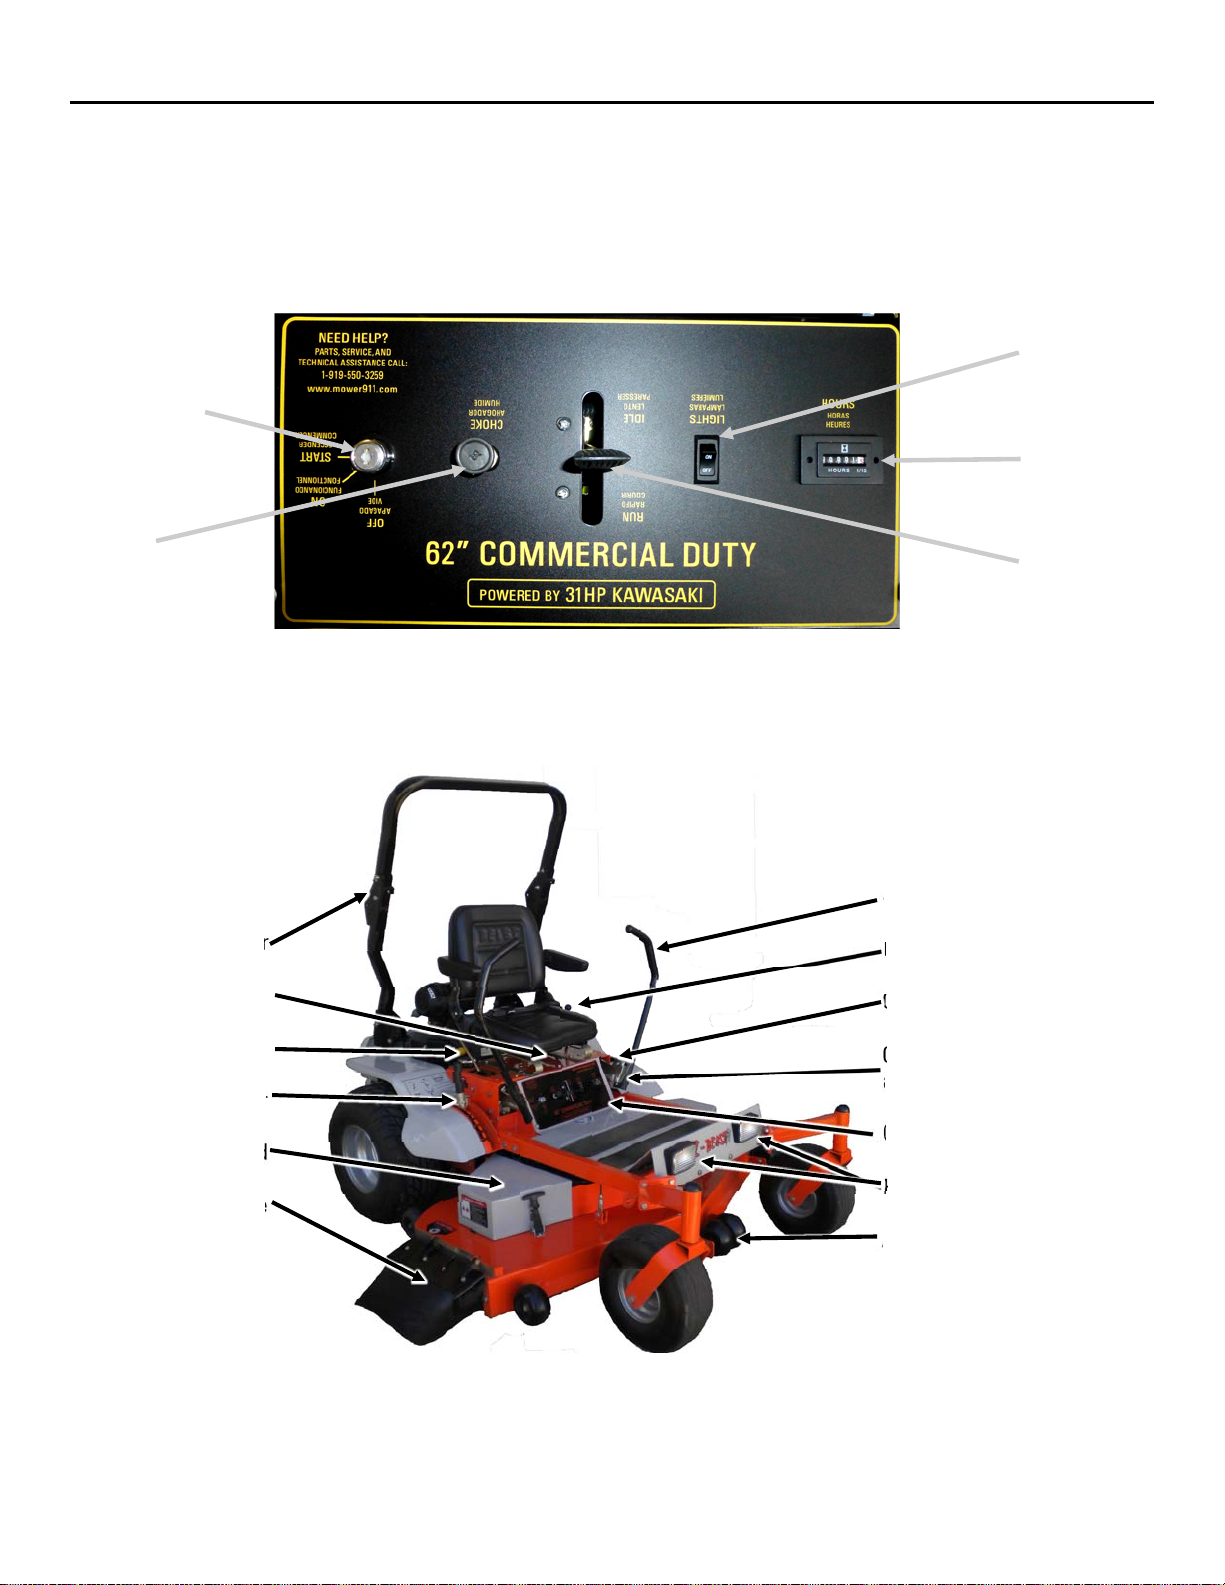
Below, you will find a diagram of the control panel. Please take the time to familiarize yourself with the mower controls.
Key Switch
Choke
Lawn Mower Component Identification
(Some components may appear different than shown, depending on the model.)
Roll Bar and Adjuster
Seat Adjustor
Parking Brake
Deck Height Lever
Pulley guard
Side discharge chute
Lights
Hour meter
Throttle
Steering Control Handle
Blade Control Lever
Cup Holders
Control handle height
adjustment
Control Panel
Headlights
Anti-scalping wheels
Rev: AUG2014
Z-Beast Finish Mower
10
Page 15
Z- BEAST
Missing Parts Request Form
54ZB, 62ZB
Please indicate the part that you are missing:*
Other
Date of purchase
Model #:
Serial #:
Name
Address
Phone
Email
Comments:
IMPORTANT!
Please include your receipt. Without a receipt, your order will be delayed.
You may also email us at:
[email protected]
Fax: 1-919-550-3277
If emailing, please scan your proof of purchase and attach to email.
Rev: AUG2014
Z-Beast Finish Mower
11
Page 16
Z- BEAST
Operating Instructions
Starting the Engine
DANGER
Before attempting to use your mower, make sure you are
familiar with all of the components and have read the manual.
DANGER: Exhaust contains poisonous carbon monoxide, a
colorless and odorless gas. Breathing exhaust can cause loss
of consciousness and may lead to death. Do not operate the
engine in a confined space where dangerous carbon
monoxide fumes can collect.
NOTE: Be sure to add fresh unleaded gasoline and fill the engine
to the proper level with manufacturers recommended motor oil
before starting your mower.
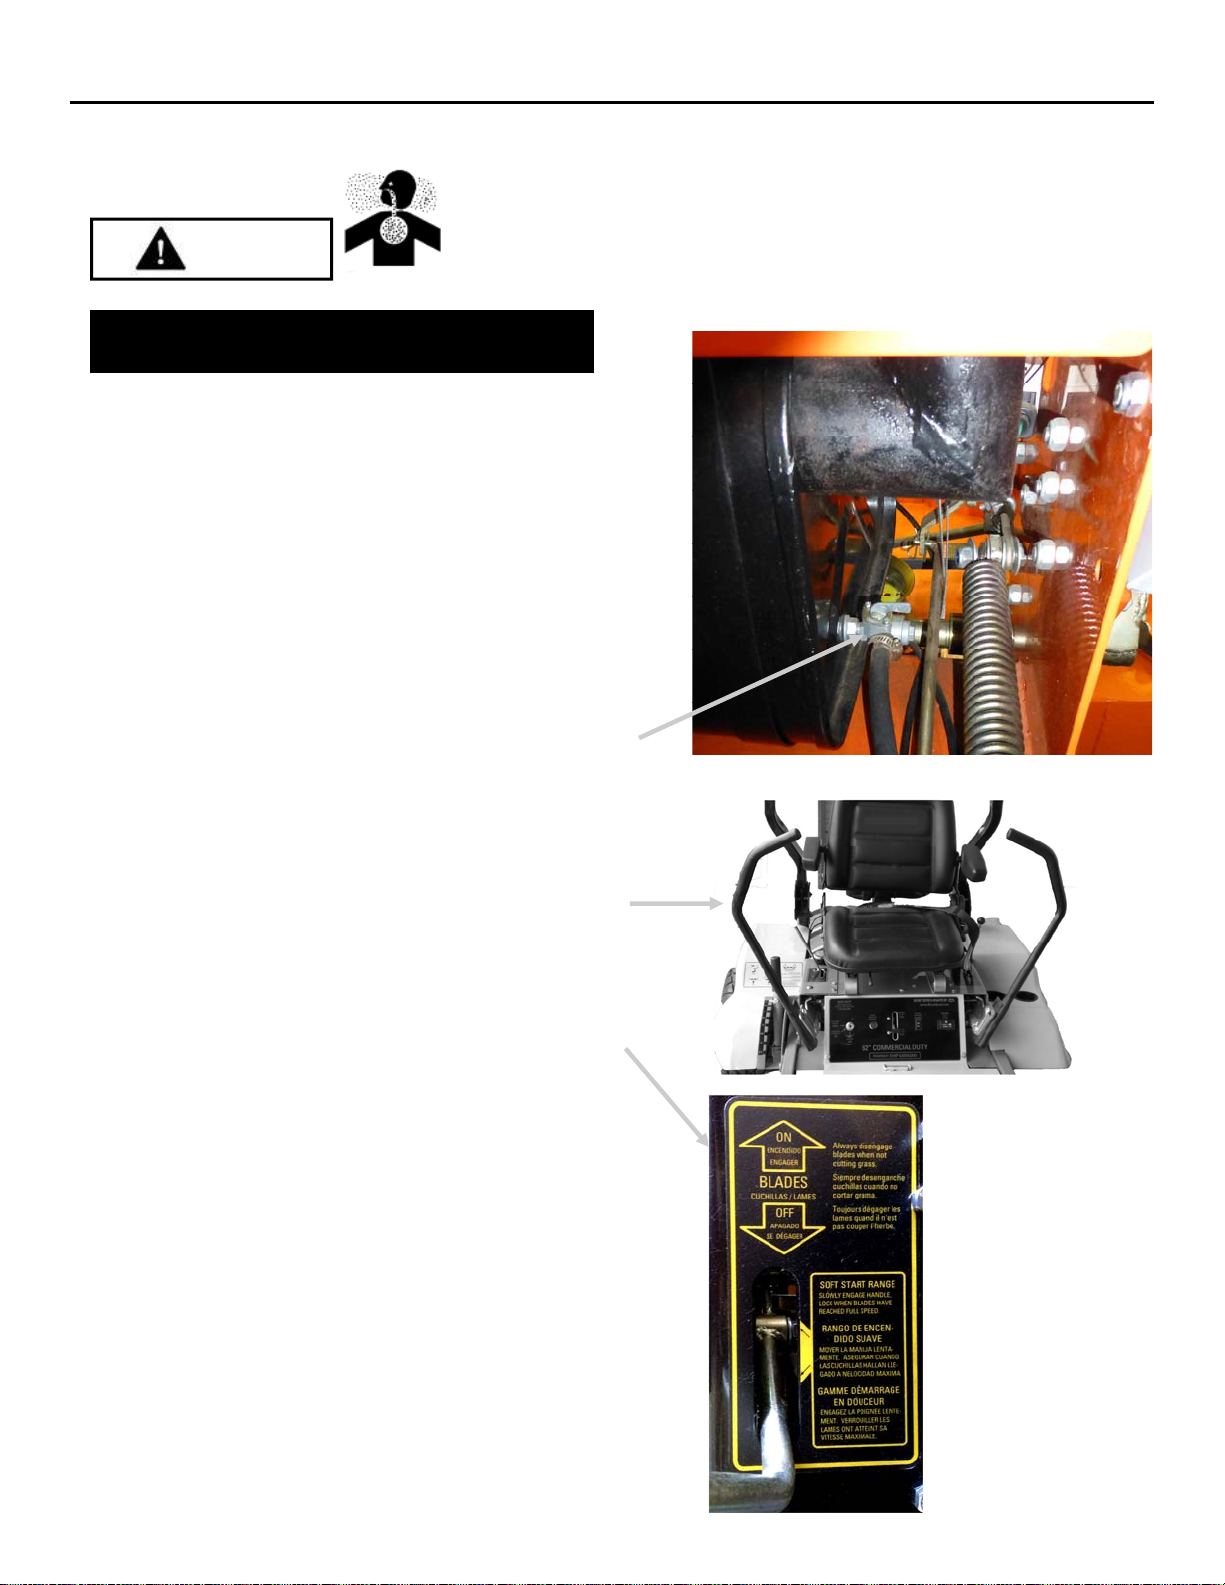
1. Make sure the shut off valve, located at the bottom of the
tank, is in the ON position.
2. Make sure the brake is set and the 2 control handles are
spread open into their neutral position.
3. Make sure the blade control lever is in the OFF position.
4. Pull CHOKE and set the throttle to the RUN position.
5. Turn the key clockwise to the START position and allow it to
return to the ON position when the engine starts.
6. When the engine starts to run and the key returns to the ON
position, push CHOKE off.
54ZB, 62ZB
Rev: AUG2014
Z-Beast Finish Mower
12
Page 17
Z- BEAST
Operating Instructions
54ZB, 62ZB
Operating the Mower
1. Make sure the brake has been moved to the OFF
Position.
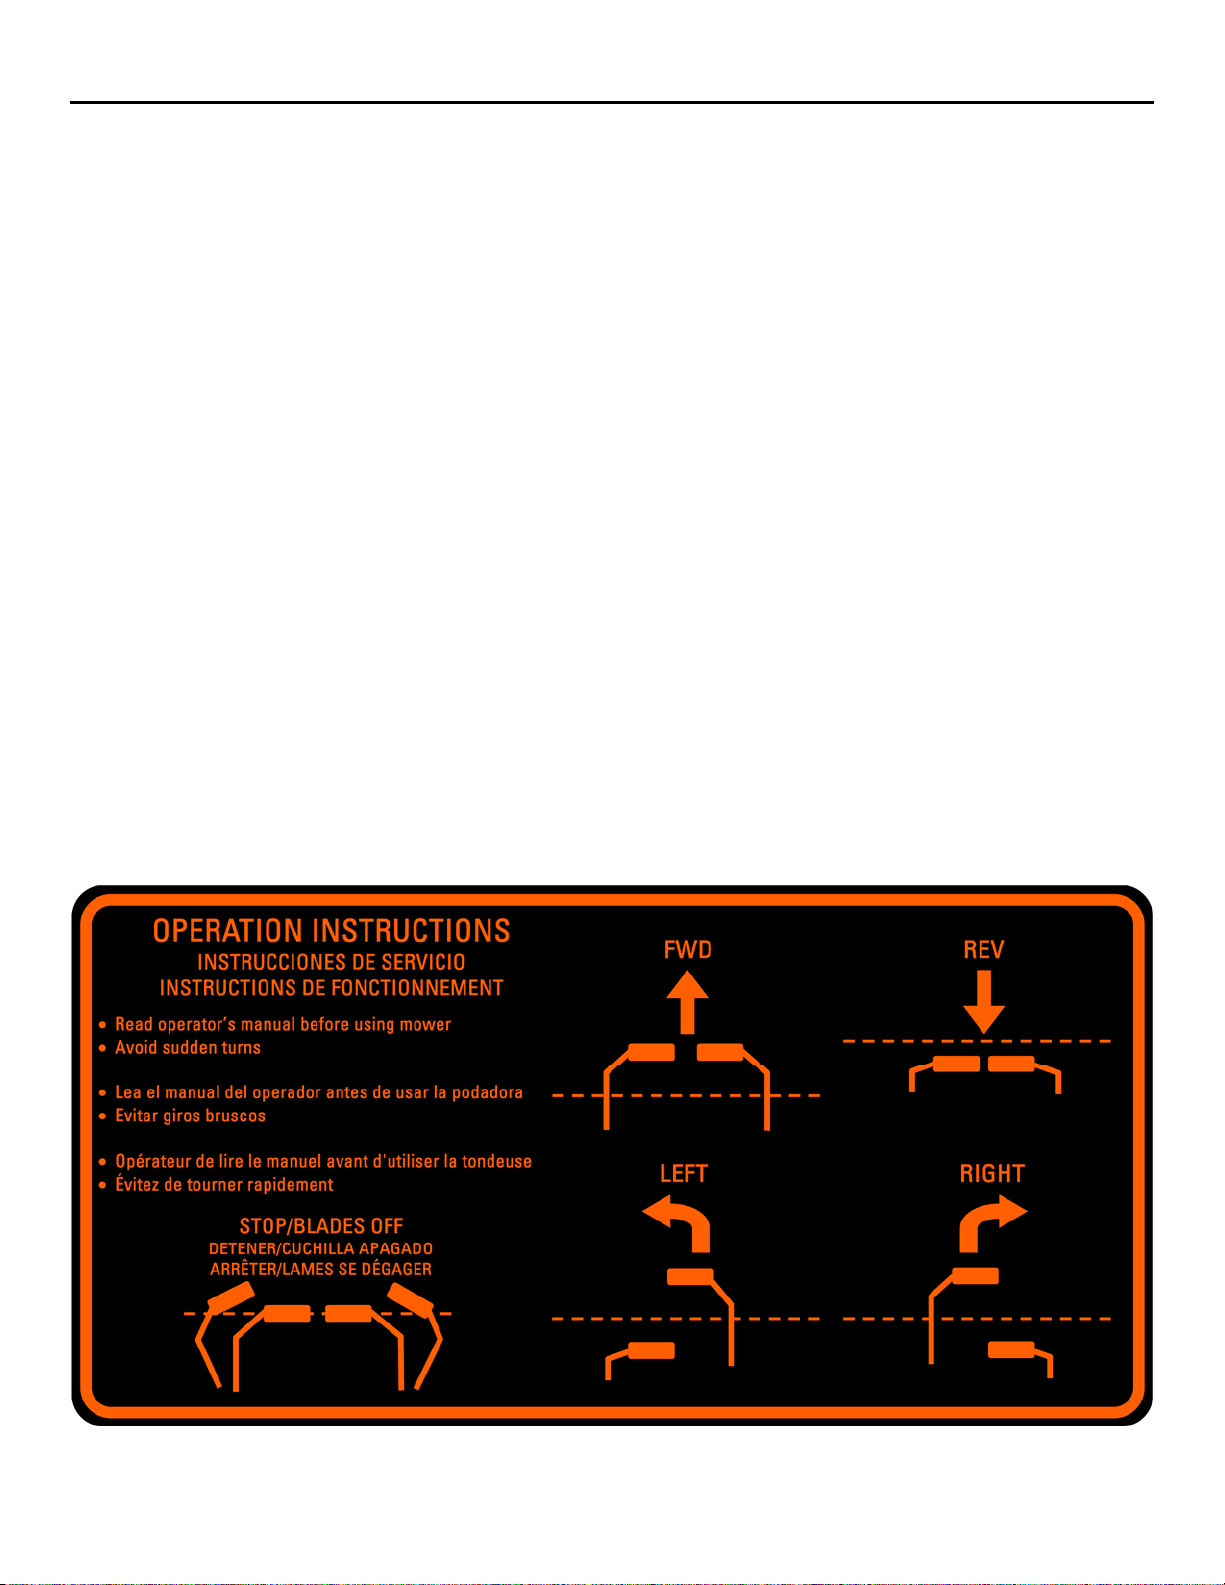
2. Pull both control handles to the center.
3. To drive the mower forward, push both handle bars
forward away from the chest. The forward speed is
directly proportional to the degree these handles are
moved forward.
4. To turn the mower left, push the right handle further
forward than the left handle.
5. To turn the mower right, push the left handle further
forward than the right handle.
6. To stop the forward motion of the mower, move both
the handles to the center/neutral position.
7. To drive the mower backwards, pull both handles
backwards toward the chest.
8. To turn to the left in reverse, pull the right handle
further back than the left handle.
9. To turn right in reverse, pull the left handle further back
than the right handle.
10. To zero turn to the right, push the left handle forwards
and the right handle backwards.
11. To zero turn to the left, push the right handle forwards
and the left handle backwards.
12. When in the neutral position, the hydraulic system
prevents the mower from moving easily. However, on a
grade, the mower can move very slowly (with the
engine off or running). Be sure to set the
manual parking brake any time the mower is left
unattended or is being transported.
13. When the handles are in the middle position they can
be pushed away from each other to lock the mower in
the neutral .
*Note: the hydraulic drive units are shipped with
summer oil. At cooler temperatures the hydraulic drive
units may require 5 to 10 minutes of warm up for optimum performance. This warm up may be longer in cool
weather and shorter in warm weather.
Rev: AUG2014
Z-Beast Finish Mower
13
Page 18
Z- BEAST
Operating Instructions
Changing Cut Height
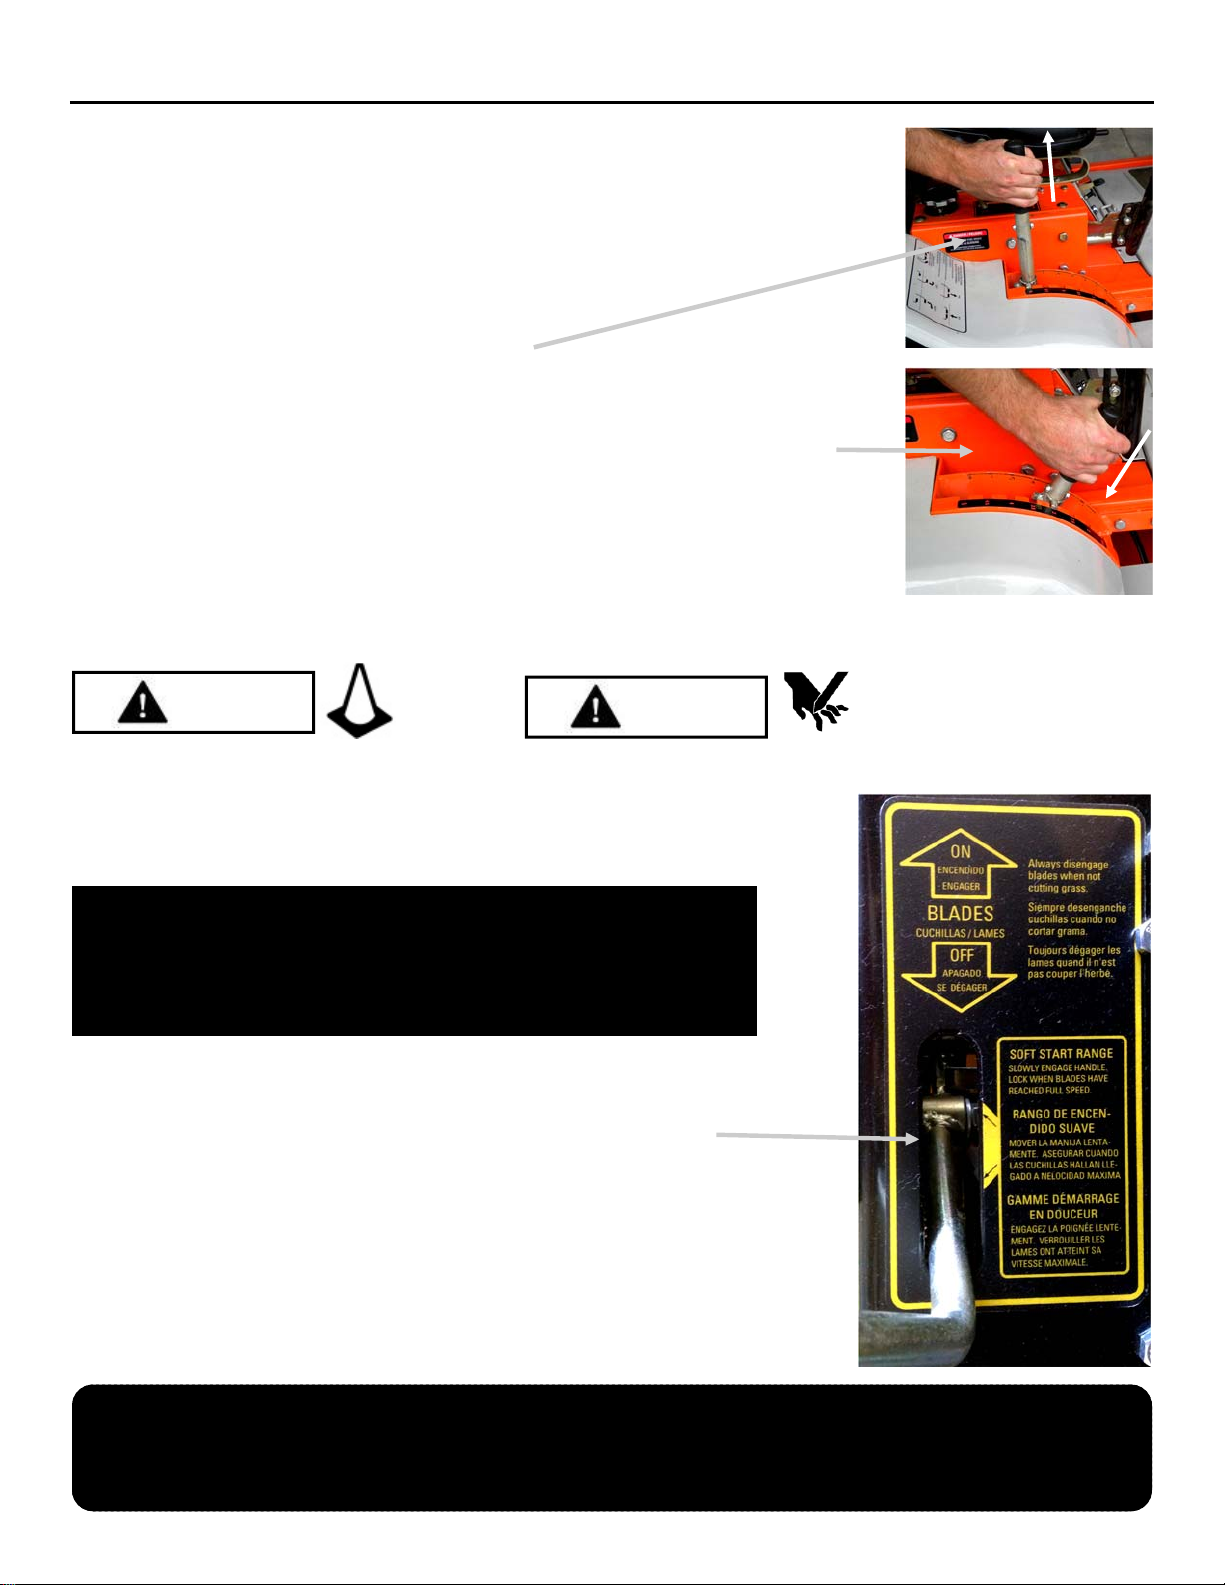
Your mower is equipped with an easily adjustable floating deck, which can be
adjusted for cut heights of 1½ inches to 5 inches in ½-inch increments. The deck height
adjuster is located on the right side of the mower.
How to Change the Cut Height
1. Disengage blades.
2. Extend the deck height handle by pulling it up.
3. Pull the deck height handle to toward the seat and pivot back or forward to shift the
deck up or down to the desired height.
4. Push the deck height handle away from the seat to lock it in the desired position.
5. After deck height is changed the lever should be pushed back down to its
original position.
Note: After mowing, remember to raise the deck to its highest position to avoid
scraping or any other kind of damage to the blades or deck.
Mowing
WARNING
Thoroughly inspect the area where you plan to
use the mower. Look for items such as stones,
sticks , wire, and other foreign objects. If struck
by the mower, these and other objects may
become projectiles that could lead to serious
Do not operate the mower with
defective guards, shields, or
without the safety devices securely
in place.
WARNING
54ZB, 62ZB
This mower is equipped with a Soft Start feature. The Soft Start feature
gradually engages the blades to increase belt, clutch, and engine life.
NEVER “slam” the blade on/off handle from off to on without pausing an
adequate time in the Soft Start range. Doing so will cause excess wear
to the belt, clutch and engine.
1. When the mower is in position on the area to be mowed, move the
throttle to its full speed.
2. SLOWLY push the blade control lever forward into the soft start
range.
3. When the blades have reached full speed push the blade control lever
fully into the on position.
4. Begin mowing as described on the previous page, always using safe/
comfortable speeds.
5. To stop the blades, pull the blade control lever back to the OFF position.
IMPORTANT! The mower belts are adjusted to ensure the blades stop turning within seven (7) seconds of
releasing the blade control lever. If you are making any belt adjustments whatsoever, for your safety and the
safety of others around you, you must ensure the belts are re-adjusted to achieve this design specification.
Rev: AUG2014
Z-Beast Finish Mower
14
Page 19
Z- BEAST
Operating Instructions
54ZB, 62ZB
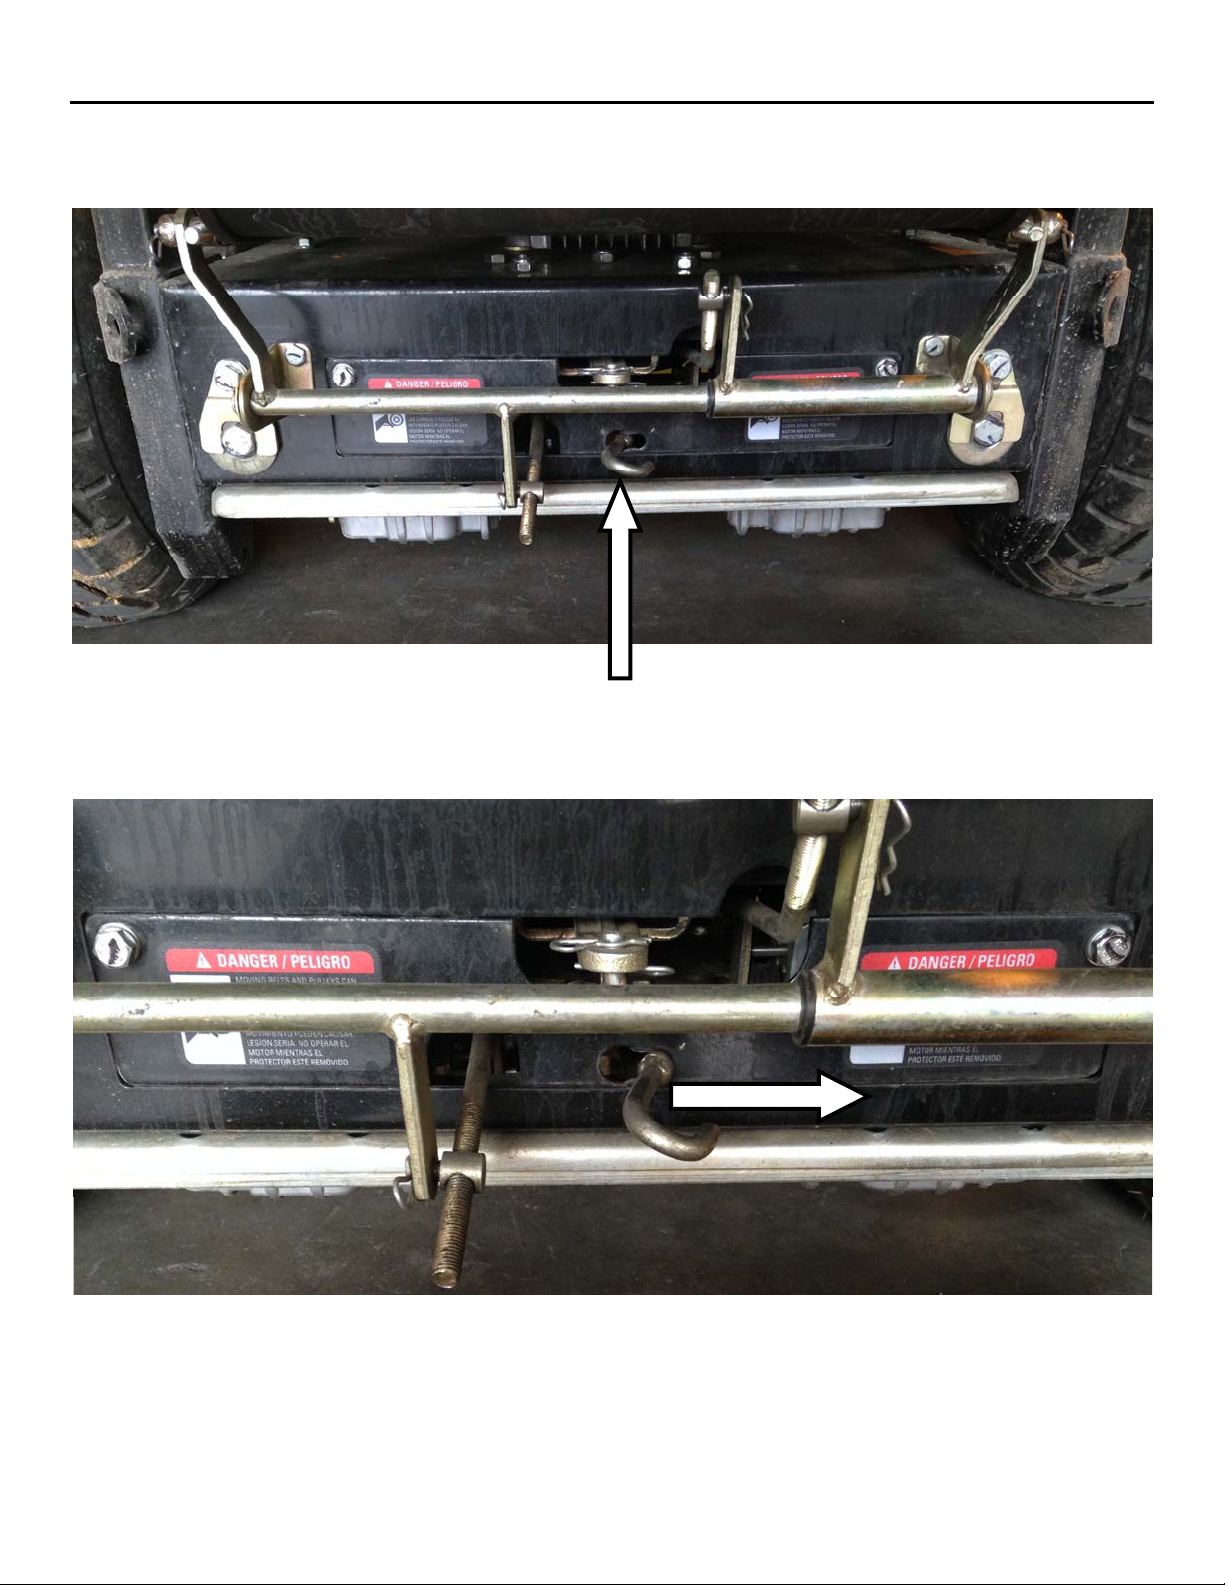
Disengaging Hydraulic Drive Units
Before physically moving the mower when the engine is NOT running, the hydraulic drive units need to be disengaged
into free-wheel mode.
To disengage the hydraulic drive units:
1. Stand at the rear of the mower and locate the hydraulic drive disengagement mechanism.
2. Pull the disengagement mechanism outward toward the rear of the mower until the thickened section of the rod is
outside of the access panel. (Note this may take a large amount of force as the springs inside are very stiff)
Rev: AUG2014
3. Slide the disengagement mechanism to the right so that the thickened section of the rod is captured in the narrow
end of the slot. In the lower picture the disengagement mechanism is shown in the disengaged position.
4. To reengage the hydraulic drive units, pull the disengagement mechanism out, slide it to the left, and release. Make
sure the thickened section of the rod passes back through the wide end of the slot.
Z-Beast Finish Mower
15
Page 20
Z- BEAST
General Maintenance
54ZB, 62ZB
The Importance of Maintenance
Regular maintenance is essential to ensure your
mower continues to deliver safe and high-quality
performance.
To help you properly care for your mower, the following
pages include a recommended maintenance schedule,
routine inspection procedures, and simple
maintenance procedures using basic hand tools.
Maintenance is the responsibility of the owner and
must be performed regularly. More difficult service
tasks or tasks that require special tools are best
handled by a recommended service technician or other
qualified mechanic.
The maintenance schedule described on page 14
applies to mowers used under normal operating
conditions. If you operate your mower under severe
conditions, such as sustained prolonged use or
high-temperature operations, or use it in unusually wet,
dusty or rocky conditions, consult your servicing dealer
for recommendations applicable to your individual
needs and use.
Be sure to use genuine BEAST mower replacement
parts when servicing your mower to assure the best
quality, safety and performance.
Need Help?
For Parts, Service and Technical Assistance call
1-919-550-3221 or visit www.gxioutdoorpower.com
DANGER
Gasoline is highly flammable and explosive. Do not
add fuel while the engine is running or is hot. Keep
open flames, sparks, and heat away from the fuel
and store fuel in containers specifically designed
for that purpose. Add fuel outdoors only and if the
fuel is spilled, do not start the engine. Manually
push the mower away from the spill and wipe up
immediately.
Refer to the Engine Owner’s Manual for the type of fuel
to use.
A fuel shut off valve is located on the bottom of the fuel
tank. It is recommended that the fuel be shut off when
transporting between job sites and when storing the
mower for extended periods of time.
CAUTION
CAUTION! Before making any adjustments to and/or
servicing your BEAST mower, make sure the mower is on a
level surface, with the ignition switch off, the key
removed, the brake set, and the blades disengaged. Also,
disconnect the spark plug wires from the spark plugs and
ground them against the engine to prevent inadvertent
starting.
If you are performing adjustments or maintenance after
operating the mower, allow the unit to cool and always
wear protective clothing.
Tire Pressure
Incorrect tire pressure may cause the mower to pull to one
side and/or result in an uneven cut. Use caution when filling
the tires. NEVER exceed the recommended maximum tire
pressure as stated on the tires.
Air Filter
Refer to the Engine Owner’s Manual for the
recommended maintenance.
Engine Oil
CHECK ENGINE OIL BEFORE EACH USE. Refer to the Engine
Owner’s Manual for the type of oil to use, oil change
intervals, and the proper procedures to check and change
oil.
Blades
Inspect blades on a daily basis for nicks, bends, and
excessive wear. If the blades are worn, cracked, bent, or
damaged, replace them before using the mower. Choose
genuine BEAST mower replacement blades to ensure quality and performance. (See page 23 for blade removal instructions.)
When sharpening the blades, sharpen only the cutting
edges and try to maintain the original angle of the blade. Do
not make the cutting edge razor sharp. Remove the same
amount from each end of the blade so that balance is
maintained.
CAUTION: Always wear work gloves when performing
blade maintenance and beware of the cutting edges. Be
sure the engine is off, the key removed, and the spark
plug wires are disconnected from the spark plugs to
prevent inadvertent starting.
CAUTION
Rev: AUG2014
Z-Beast Finish Mower
16
Page 21
Z- BEAST
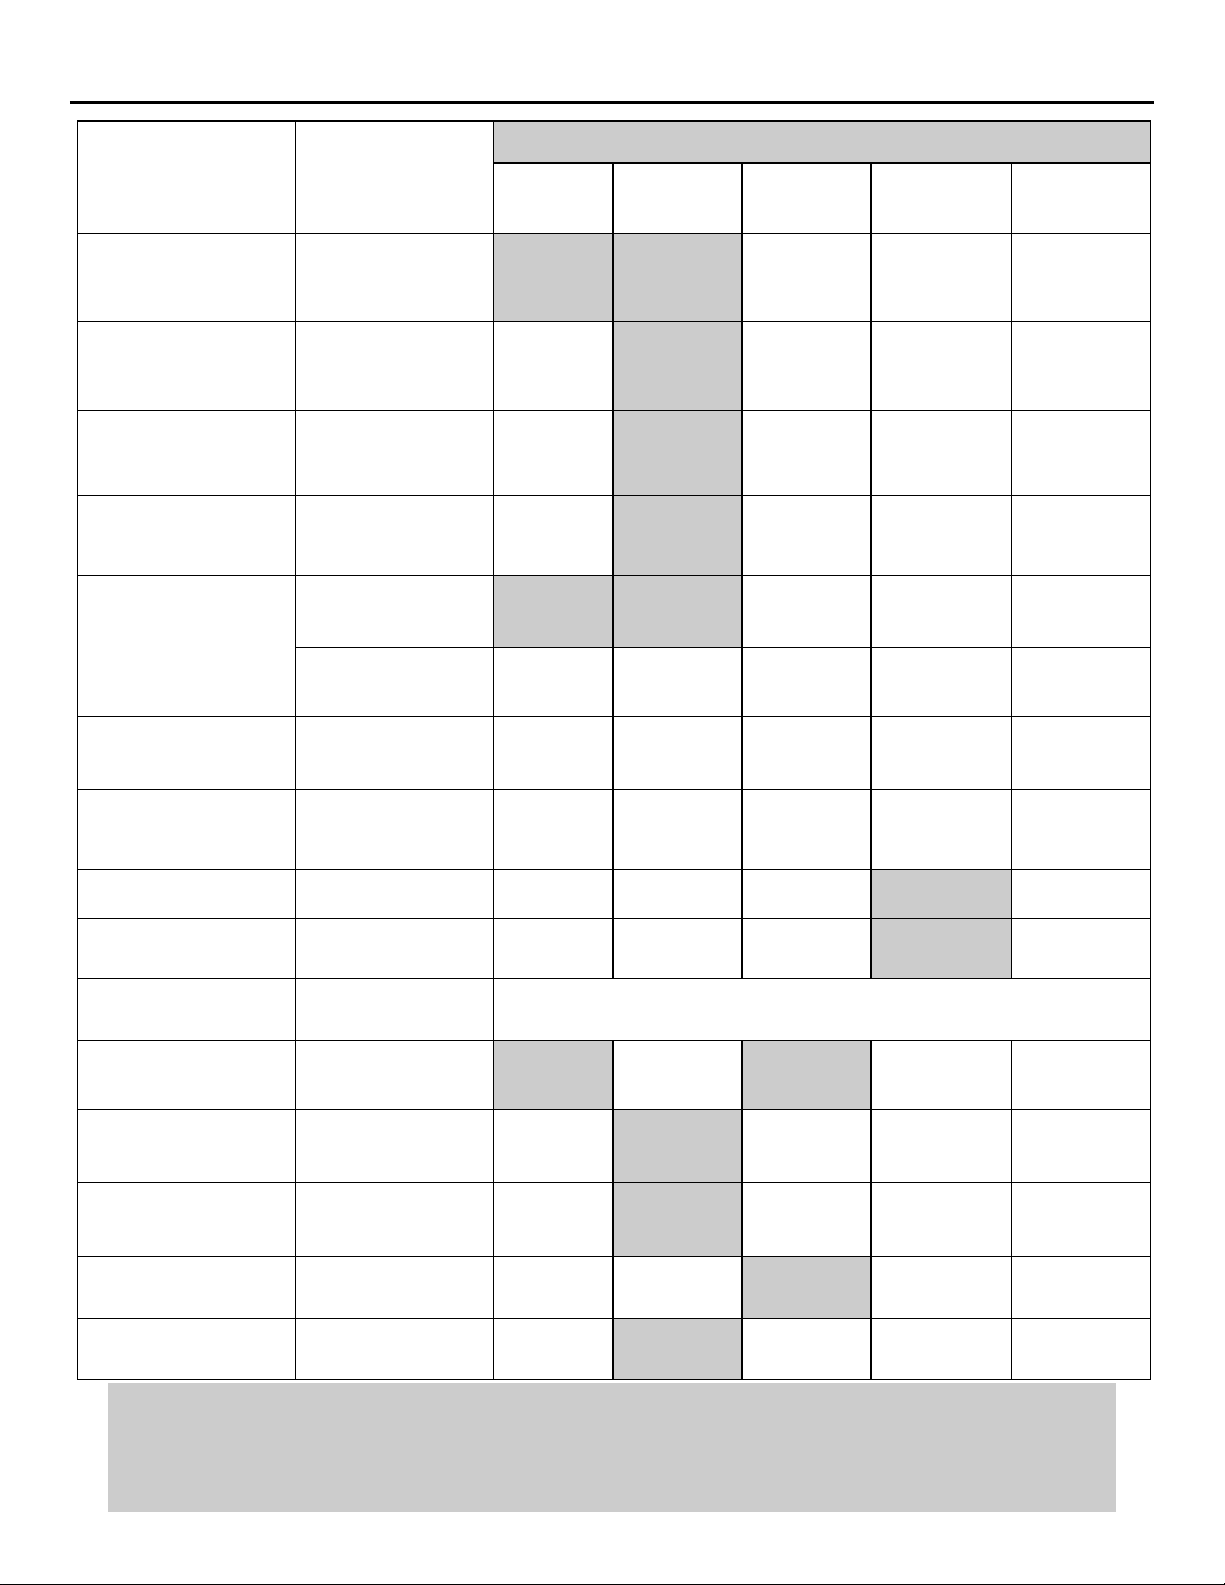
Maintenance Schedule
54ZB, 62ZB
Time Interval
Item Procedure
Belts
Blades
Engine Air Filter
Engine Cooling Areas
Engine Oil
Engine Oil Filter
Inspect (adjust if
needed)
Inspect and/or
Sharpen
Inspect (see Engine
Owner’s Manual)
Clean (see Engine
Owner’s Manual)
Check (see Engine
Owner’s Manual)
Change (see Engine
Owner’s Manual)
Change (see Engine
Owner’s Manual)
Break-in
(first 5 hrs.)
X X
X X
Every 8 hrs.
(daily)
X
X
X
Every 40 hrs.
(weekly)
Every 100 hrs.
(Bi-weekly)
Every 200 hrs.
(monthly)
Engine Spark Plug
Fuel Filter Replace
Fuel Line Check
Grease Fittings Refer to page 19
Hardware
Mower Main Frame
Safety Interlock System
Tires Check Air Pressure
Spindle/Blade Brakes
Inspect (see Engine
Owner’s Manual)
Check for proper
tightness
Remove debris from
under belt cover
Check Operations
and Switches
X X
X
X
X
X
X
X
Rev: AUG2014
Cleaning the Mower
It is recommended that the BEAST lawn mower be cleaned on a daily basis. Excessive accumulation of dirt,
debris, oil, etc. on cutting units, drives, mufflers, and engine may present a potential safety hazard. Also refer to
the engine owners manual for additional cleaning instructions.
Z-Beast Finish Mower
17
Page 22
Z- BEAST
Service Adjustments
Return to Neutral
DANGER
DANGER! Make certain the engine comes to a
complete stop before putting your hands in the
access panel.
If the mower creeps or will not stop as desired when
the handles are in neutral position, adjustments are
necessary.
CAUTION: Be sure the engine is OFF before you
open the hydraulic drive access panel.
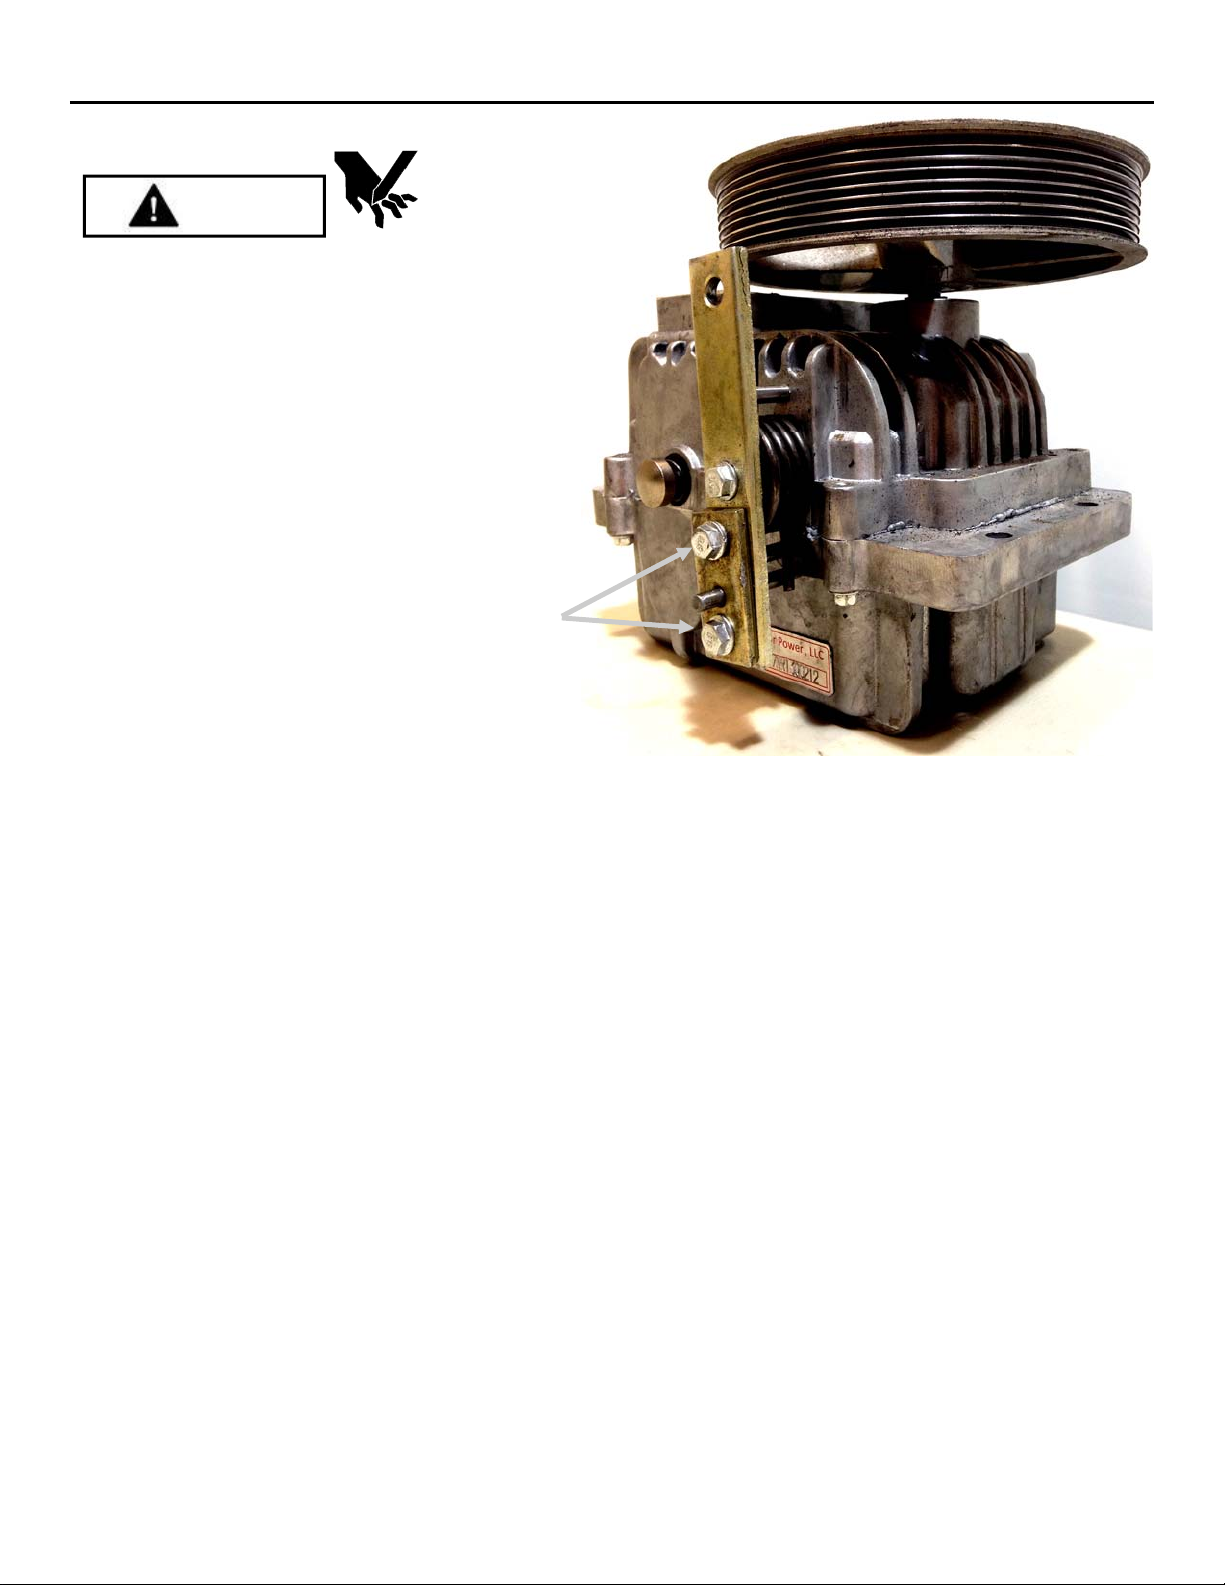
1. Remove the bolts to access hydraulic drive access
panel.
2. Using an 8 mm wrench, reach through the bottom
of the hydraulic drive access panel to the return-toneutral set pin bolts. Loosen bolts on the side that
needs adjusting.
3. Be sure the brake is in the OFF position. In a safe
operator position, start the engine.
4. With the engine running, slowly move the handle
on the side needing adjustment until that side
comes to a complete stop. If the mower creeps
forward, pull handle in reverse, If the mower
creeps backward, pull the handle forward.
5. When the mower stops moving completely, the
hydraulic drive is in the neutral position.
6. Turn off the engine.
7. Slowly tighten the bolts without moving the plate.
8. With the bolts tightened, move to a safe operator
position and start the engine.
9. If the creep has returned, repeat the process.
Multiple iterations may be required.
10. Reinstall hydraulic drive access panel.
54ZB, 62ZB
Rev: AUG2014
Z-Beast Finish Mower
18
Page 23
Z- BEAST
Service Adjustments
Deck Belt Tension
It is recommended to check and adjust the deck belt
tension after the initial 5 hours of use on the hour meter.
The new belt will seat into pulley grooves and may need
adjusting. After the initial break in period, it is
recommended to inspect belt tension every 8 hours and
adjust if necessary. Follow the steps below to inspect belt
tension. Follow ALL safety precautions mentioned in this
manual when doing any maintenance on your mower.
Note: Failure to inspect and adjust the deck belt tension
can result in poor mowing performance and pre-mature
belt wear.
Figure 1
Figure 1
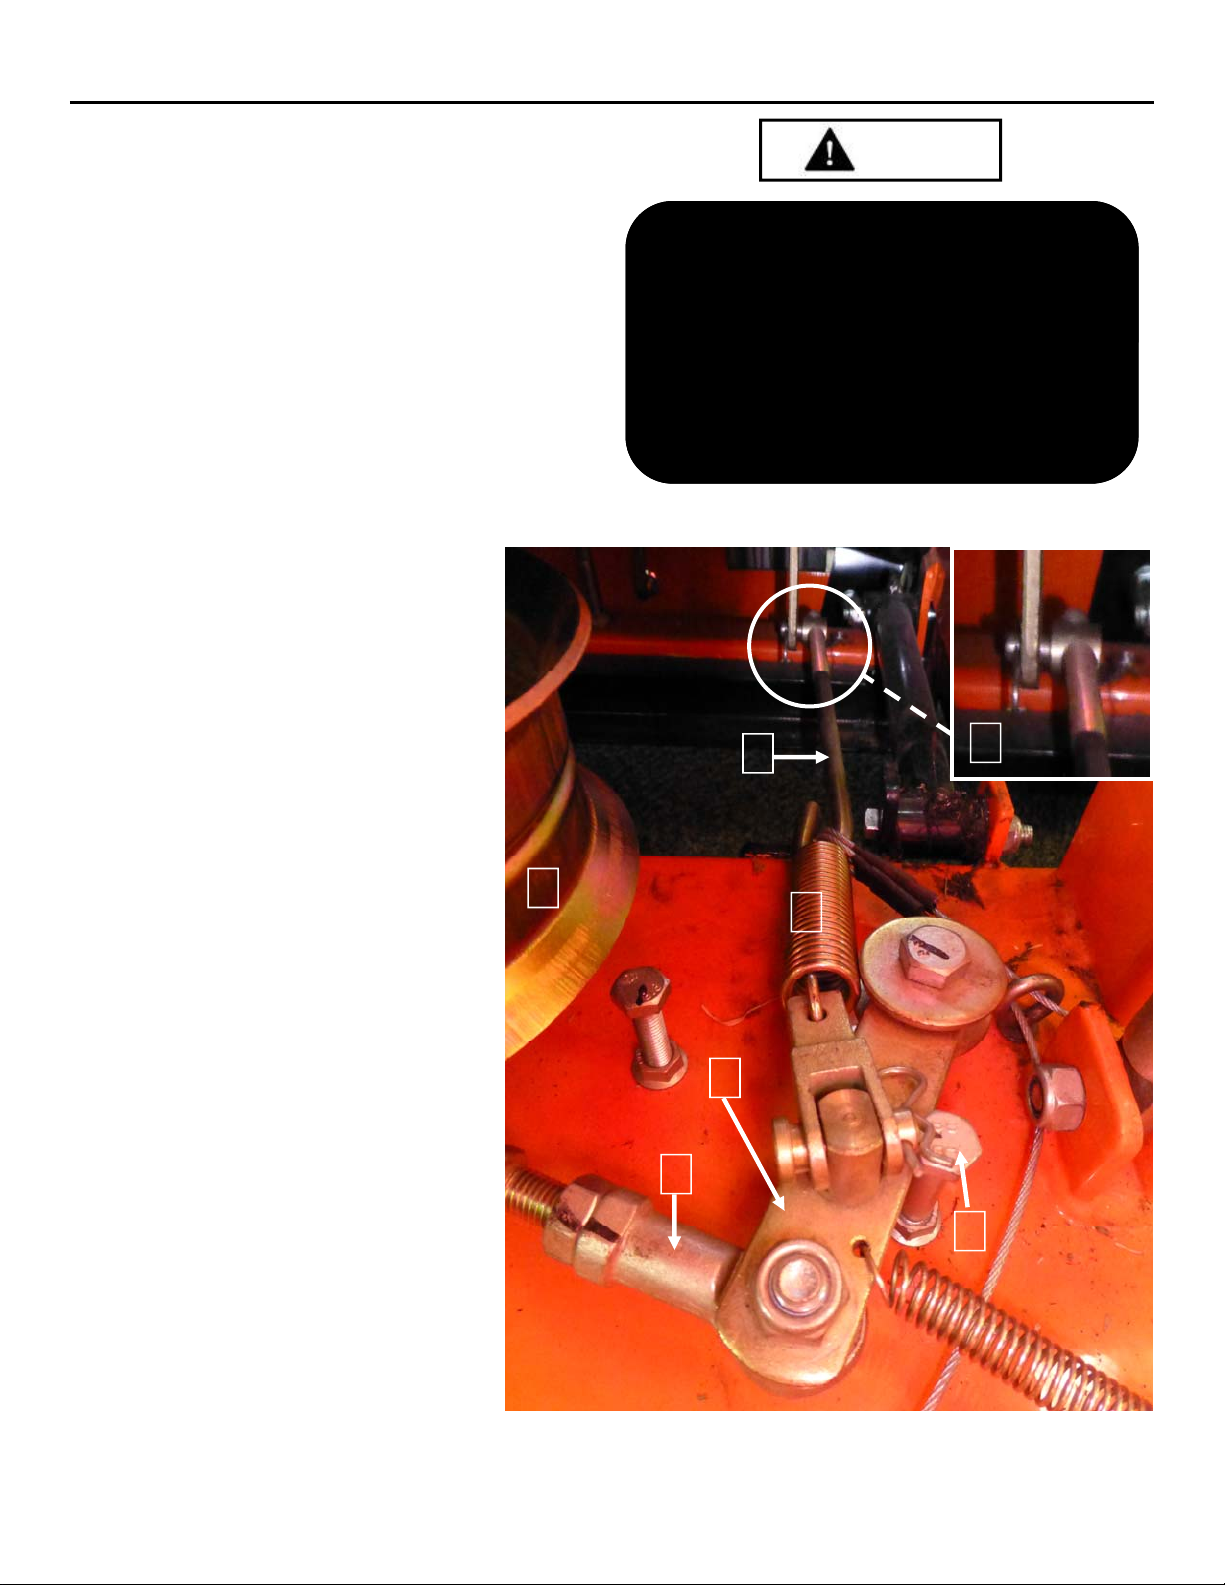
Ensure the blade engagement handle is
in the “OFF” position.
Set your deck height to its LOWEST
setting (1.5 inches)
Open the floorboard and locate the
idle/clutch pulley (1) and turnbuckle (2).
Check the clutch linkage pre-load.
If the threaded rod and spring assem-
bly (3 & 4) is too tight, the clutch will
not contact the return stop bolt (5). The
clutch pivot arm (6) should stop within
a 1/4” of the stop bolt (5).
If the threaded rod and spring assem-
bly (3 & 4) is too loose, the spring will
contact the deck surface.
To adjust the pre-load, remove the
cotter pin from the slack adjuster on
the threaded rod (3) and slide the linkage off the arm (7). Thread the linkage
pivot in or out to set pre-load as stated
above.
1
54ZB, 62ZB
DANGER
DANGER: Before making any adjustments or
servicing your mower, make sure the mower is on
level ground, the blades are disengaged, the brake
set, the key is removed, the engine is off and the
spark plug wires are disconnected from the spark
plugs to prevent inadvertent starting. If maintenance
or adjustments are being performed after operation
of the mower, allow the unit to cool since heat build
up could cause severe burns.
3
7
4
6
2
Rev: AUG2014
Z-Beast Finish Mower
5
19
Page 24
Z- BEAST
Service Adjustments
Deck Belt Tension
It is recommended to check and adjust the deck belt
tension after the initial 5 hours of use on the hour meter.
The new belt will seat into pulley grooves and may need
adjusting. After the initial break in period, it is
recommended to inspect belt tension and adjust if
necessary every 8 hours. Follow the steps below to inspect
belt tension. Follow ALL safety precautions mentioned in
this manual when doing any maintenance on your mower.
Note: Failure to inspect and adjust the deck belt tension
can result in poor mowing performance and pre-mature
belt wear.
Stop Bolt
Figure 2
Figure 2
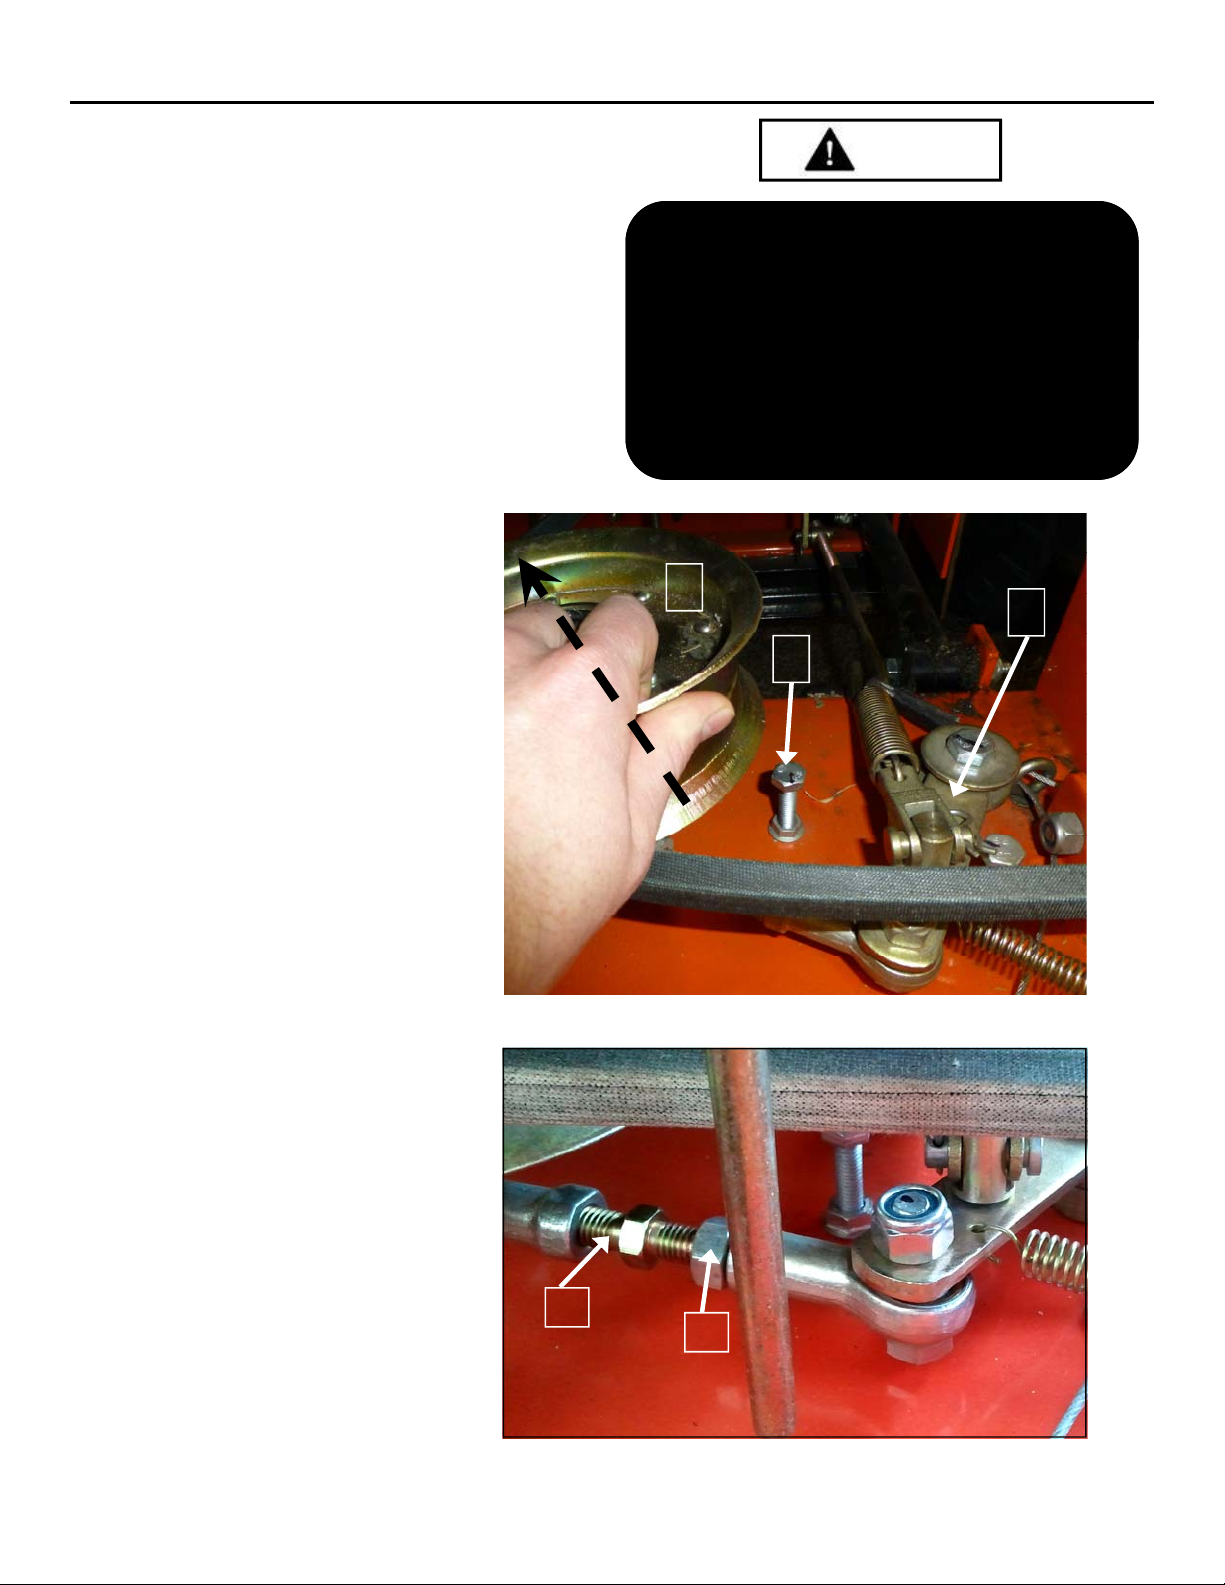
Move the blade engagement handle to
the “ON” position.
Using your hand, press the clutch pulley
(7) in the direction indicated with about
20-25lbs of pressure. Ensure that the
swing arm(8) stops within 1 inch to 1.5
inches from the stop bolt(9).
54ZB, 62ZB
DANGER
DANGER: Before making any adjustments or
servicing your mower, make sure the mower is on
level ground, the blades are disengaged, the brake
set, the key is removed, the engine is off and the
spark plug wires are disconnected from the spark
plugs to prevent inadvertent starting. If maintenance
or adjustments are being performed after operation of
the mower, allow the unit to cool since heat build up
could cause severe burns.
7
8
9
Figure 3
If the swing arm reaches the stop bolt, the
tension is too loose. Move the blade
engagement handle to the “OFF” position.
Loosen the turn-buckle locknut (10). Adjust
the turnbuckle linkage (11), extending the
pulley. Move the blade engagement
handle back to the “ON” position and
repeat test by applying 20-25 lbs of
pressure and check the stop bolt
clearance. The swing arm should be 1” -
1.5” away from the stop bolt.
If the swing arm has a clearance greater
than 1.5” the tension is too tight. This may
result in pre-mature belt wear as well
excess stress on the springs of the clutch.
Adjust the turnbuckle as mentioned above.
Rev: AUG2014
Figure 3
11
10
Z-Beast Finish Mower
20
Page 25
Z- BEAST
Service Adjustments
54ZB, 62ZB
Deck Belt
It is recommended to do a quick visual inspection of the
deck belt retainers at the same interval as inspecting the
deck belt tension. This check should be performed every
8 hours. The engine pulley retainer should be inspected
when replacing the deck belt, or if the belt is slipping off
the engine pulley.
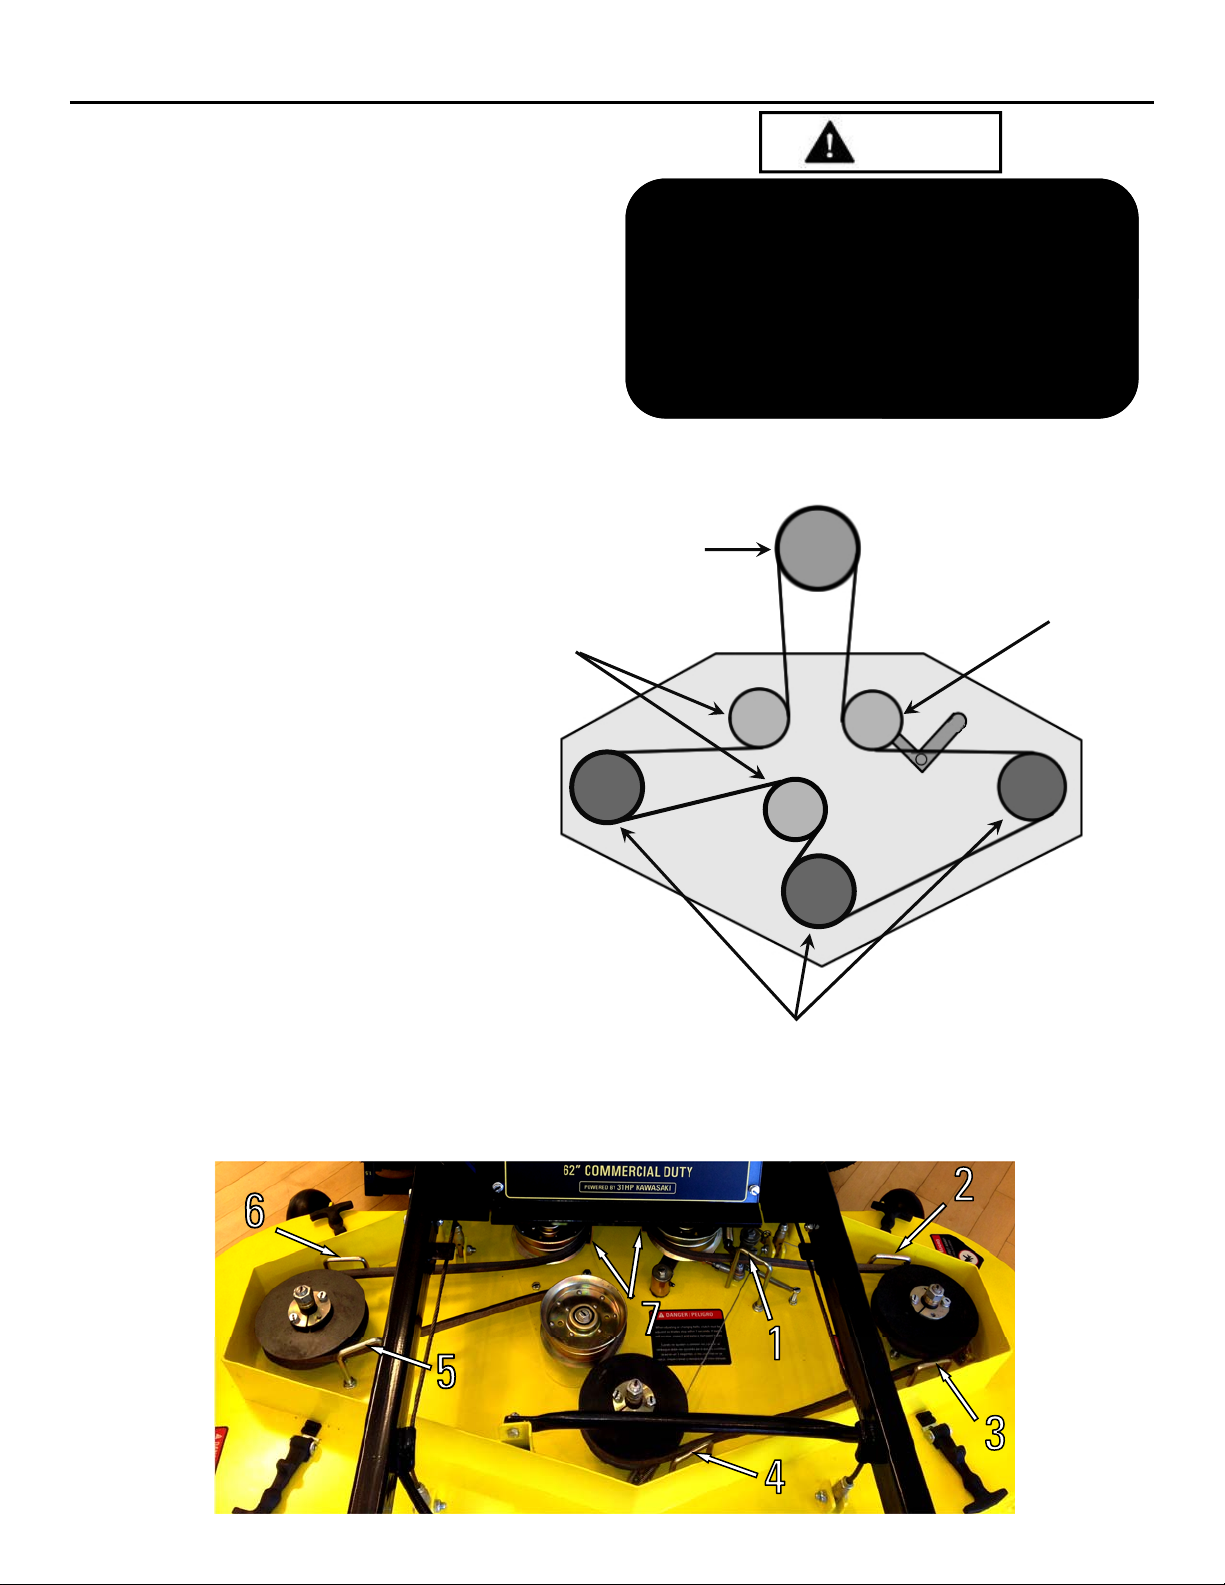
Deck Belt Routing
54ZB
Serial #s beginning with 54ZB10XXX
use a MXV5 1430 V Belt.
All other serial #s use a MXV5 1480
V Belt.
62ZB
Serial #s beginning with 62ZB10XXX
use a MXV5 1630 V Belt.
All other serial #s use a MXV5 1680
V Belt
Idle Pulleys
DANGER
DANGER: Before making any adjustments or servicing
your mower, make sure the mower is on level ground, the
blades are disengaged, the brake set, the key is removed,
the engine is off and the spark plug wires are disconnected
from the spark plugs to prevent inadvertent starting. If
maintenance or adjustments are being performed after
operation of the mower, allow the unit to cool since heat
build up could cause severe burns.
Engine Pulley
Clutch Pulley
Deck Belt Retainers
There are 8 main deck retainers.
6 “J” shaped retainers (1, 2, 3, 4, 5, 6)
2 idle pulley retainers (7)
To adjust the retainers, loosen the top nut slightly and rotate the retainer
into place. After adjusting hold the retainer in place and tighten the nut.
Rev: AUG2014
Z-Beast Finish Mower
Spindle Pulleys
21
Page 26
Z- BEAST
Service Adjustments
Deck Belt
Follow ALL safety precautions mentioned in this manual
when doing any maintenance on your mower.
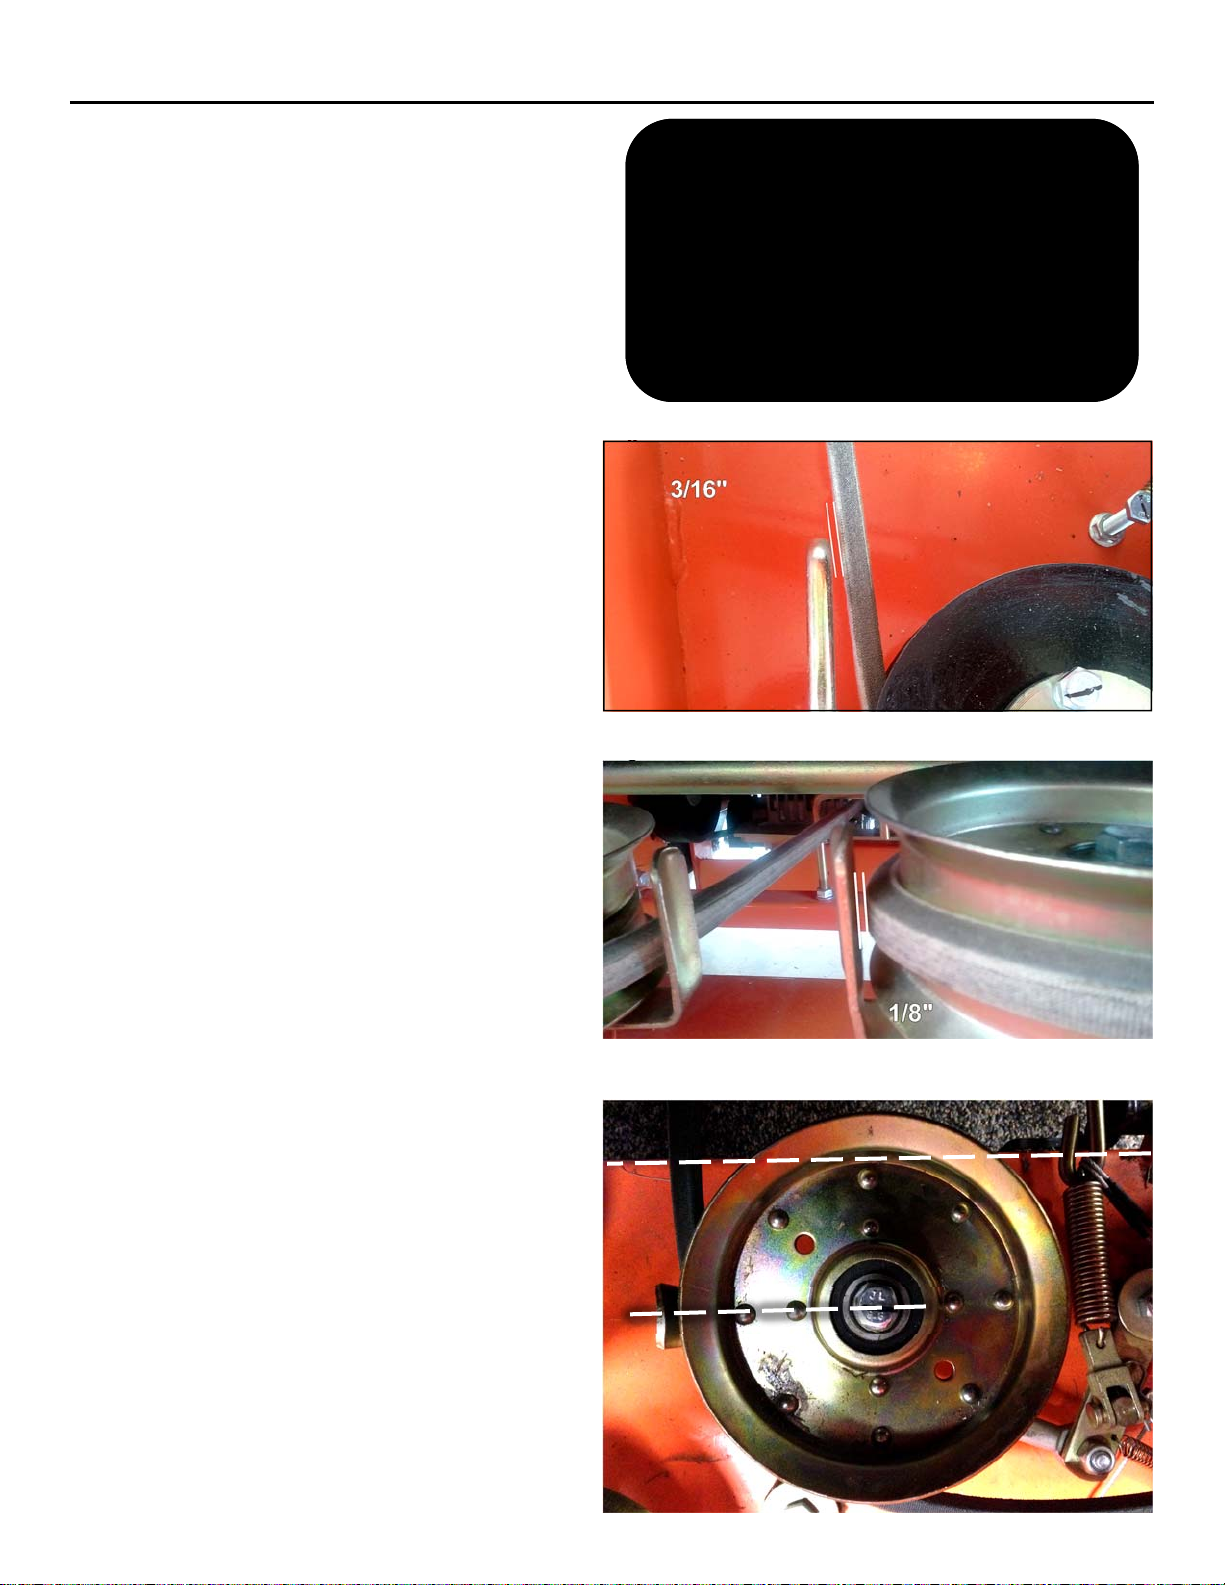
The clearances for the retainers are listed below, and
measured with the blades engaged and engine OFF.
Verifying Deck Belt Retainers
Figure 1:
The clearance for the “J” shaped retainers is 3/16”
To adjust the retainers, loosen the top nut slightly and
rotate into position. Hold the retainer in place while
retightening the nut
Stop Bolt
54ZB, 62ZB
DANGER: Before making any adjustments or
servicing your mower, make sure the mower is on
level ground, the blades are disengaged, the brake
set, the key is removed, the engine is off and the
spark plug wires are disconnected from the spark
plugs to prevent inadvertent starting. If maintenance
or adjustments are being performed after operation
of the mower, allow the unit to cool since heat build
up could cause severe burns.
Figure 1
Figure 2:
The clearance for the idle pulley retainers is 1/8”
To adjust the idle pulley retainers, loosen the nut on
the top of the pulley and bottom slightly. Slide the retainer into place and tighten the nut back.
A line drawn from the center of the deck clutch pulley
to its belt retainer should be parallel to the rear of the
deck when the blades are not engaged.
To adjust the position of the deck clutch pulley belt
retainer, loosen the bolt slightly. Pivot the retainer into
place and retighten the bolt.
Figure 2
Figure 3 Figure 3
Rev: AUG2014
Z-Beast Finish Mower
22
Page 27
Z- BEAST
Service Adjustments
54ZB, 62ZB
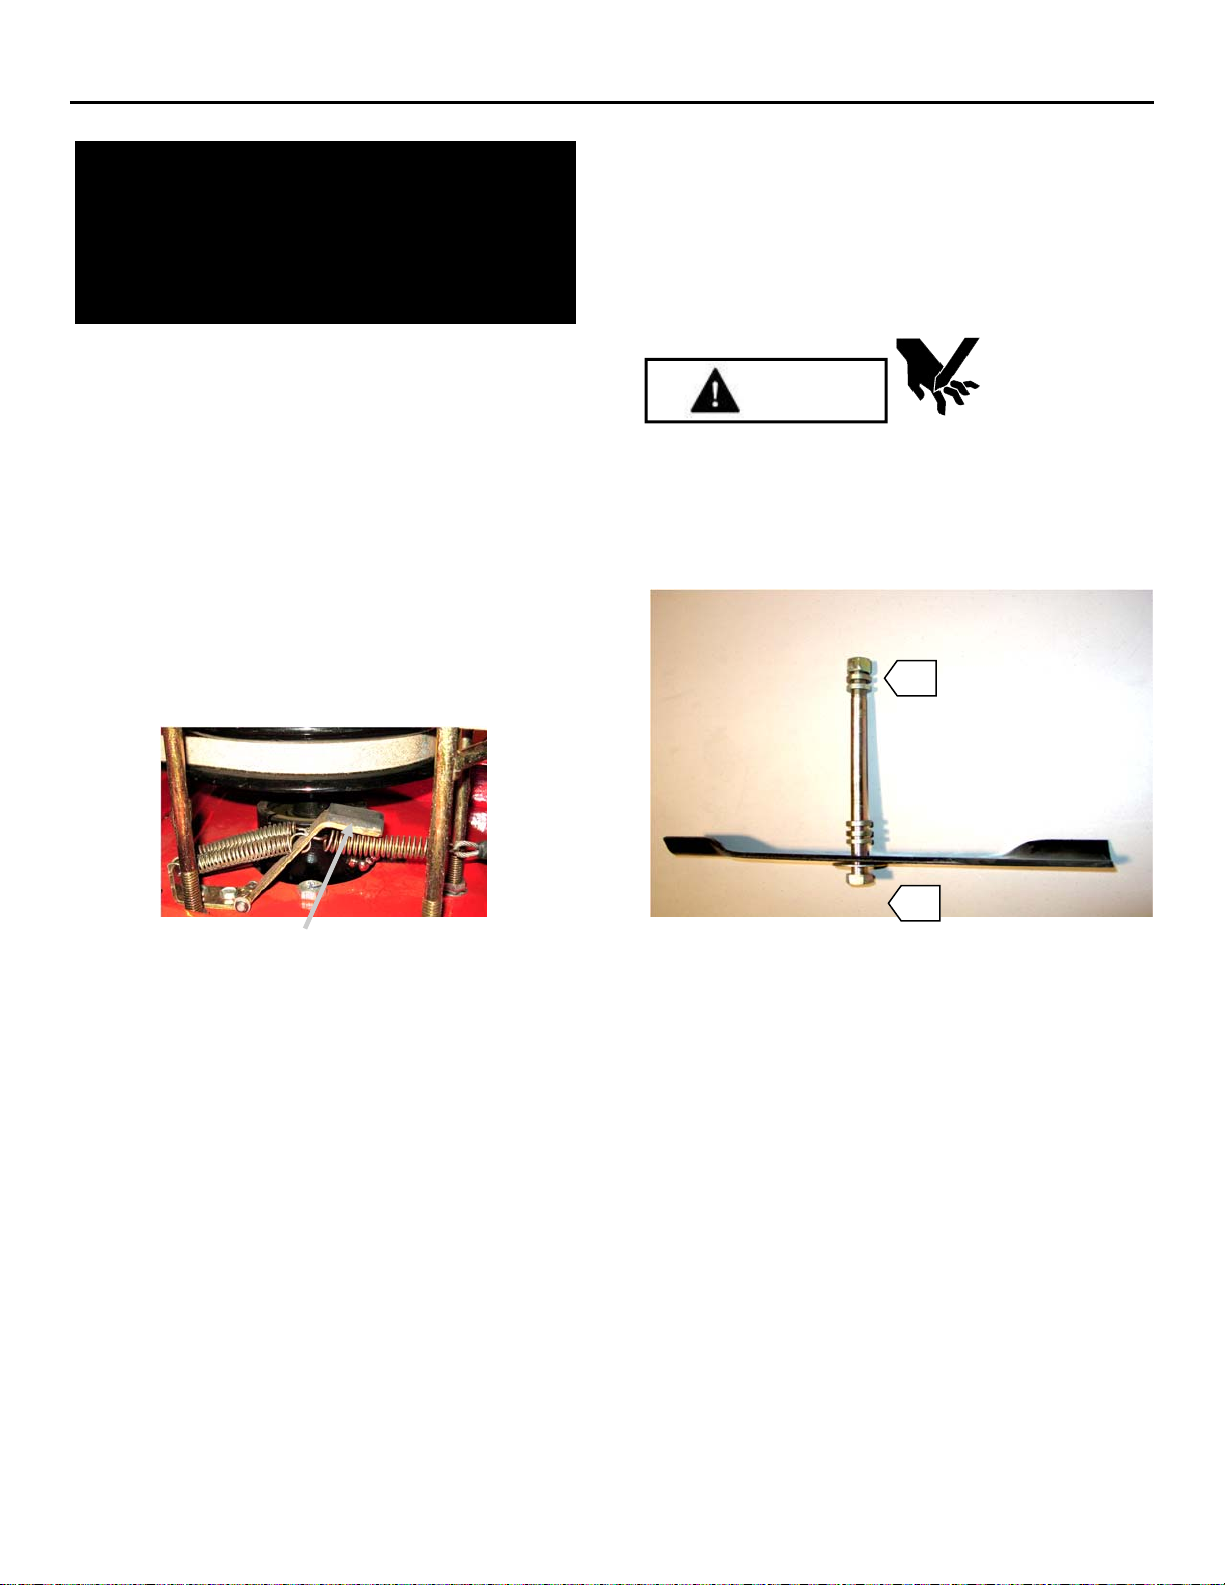
Spindle Brake Inspection and Replacement
IMPORTANT! The mower belts are adjusted to ensure
the blades stop turning within seven (7) seconds of
releasing the blade control lever. If you are making any
belt adjustments whatsoever, for your safety and the
safety of others around you, you must ensure the belts
are re-adjusted to achieve this design specification.
Blade and pulley brake inspections should be
performed every 100 blade on and off cycles.
Before beginning service, park the mower on a level
surface, turn the blades off, turn the engine off, set the
brake, take the key out of the switch, wait an adequate
time to make certain no blades are turning, and remove
spark plug wires from spark plugs.
1. Engage the blade handle (make certain the engine
cannot start) to pull the brakes off of the pulleys.
2. Remove the pulley guards from the deck.
3. Visually inspect the brake pads for wear. Make
certain that no metal is touching the pulleys.
4. The brake pad material should be approximately 1/8inch thick. Replace the brakes if the material is less
than 1/16-inch thick.
Note: Replacing all brake pads is recommended if
replacement of one brake is required.
5. To replace the brake, use a pair of pliers to remove
the springs.
6. Remove the two mounting bolts and
disconnect the spring from the cable.
7. Discard all of these parts. DO NOT reuse springs.
New brakes are equipped with new springs for proper
braking.
8. Install the new brakes by reversing the procedure in
steps 5 and 6.
9. Disengage the blade handle and inspect the brake
contact surface. All of the brake pad contacting
material should be contacting the bottom of the pulley.
Note: Springs may vary from those pictured based on
the particular application.
Removing the Blades
Required tools: Two (2) 15/16” box end wrenches
1. Park the mower on level ground, set the brake and block
the rear wheels to prevent accidental rollback.
2. Raise the front end of the mower and place on a jack
stand.
CAUTION! Beware of the cutting edges on the blades. The rotation
of one blade may cause the other blades to rotate. Always wear
work gloves when handling blades.
3. Use one wrench to loosen nut A while holding bolt B
with the other wrench (see photo).
CAUTION
A
B
4. Slide the blade bolt down through the mower deck and
out.
5. To reinstall, insert the blade bolt through the cutting
deck.
6. Install the blade spacers that were removed back onto
the blade bolt followed by the nut and tighten. (See
figure below.)
IMPORTANT: The number of spacers should always be
the same on each blade bolt. NEVER put the spacers below
the blade and NEVER straighten or weld the blades.
Rev: AUG2014
Z-Beast Finish Mower
23
Page 28
Z- BEAST
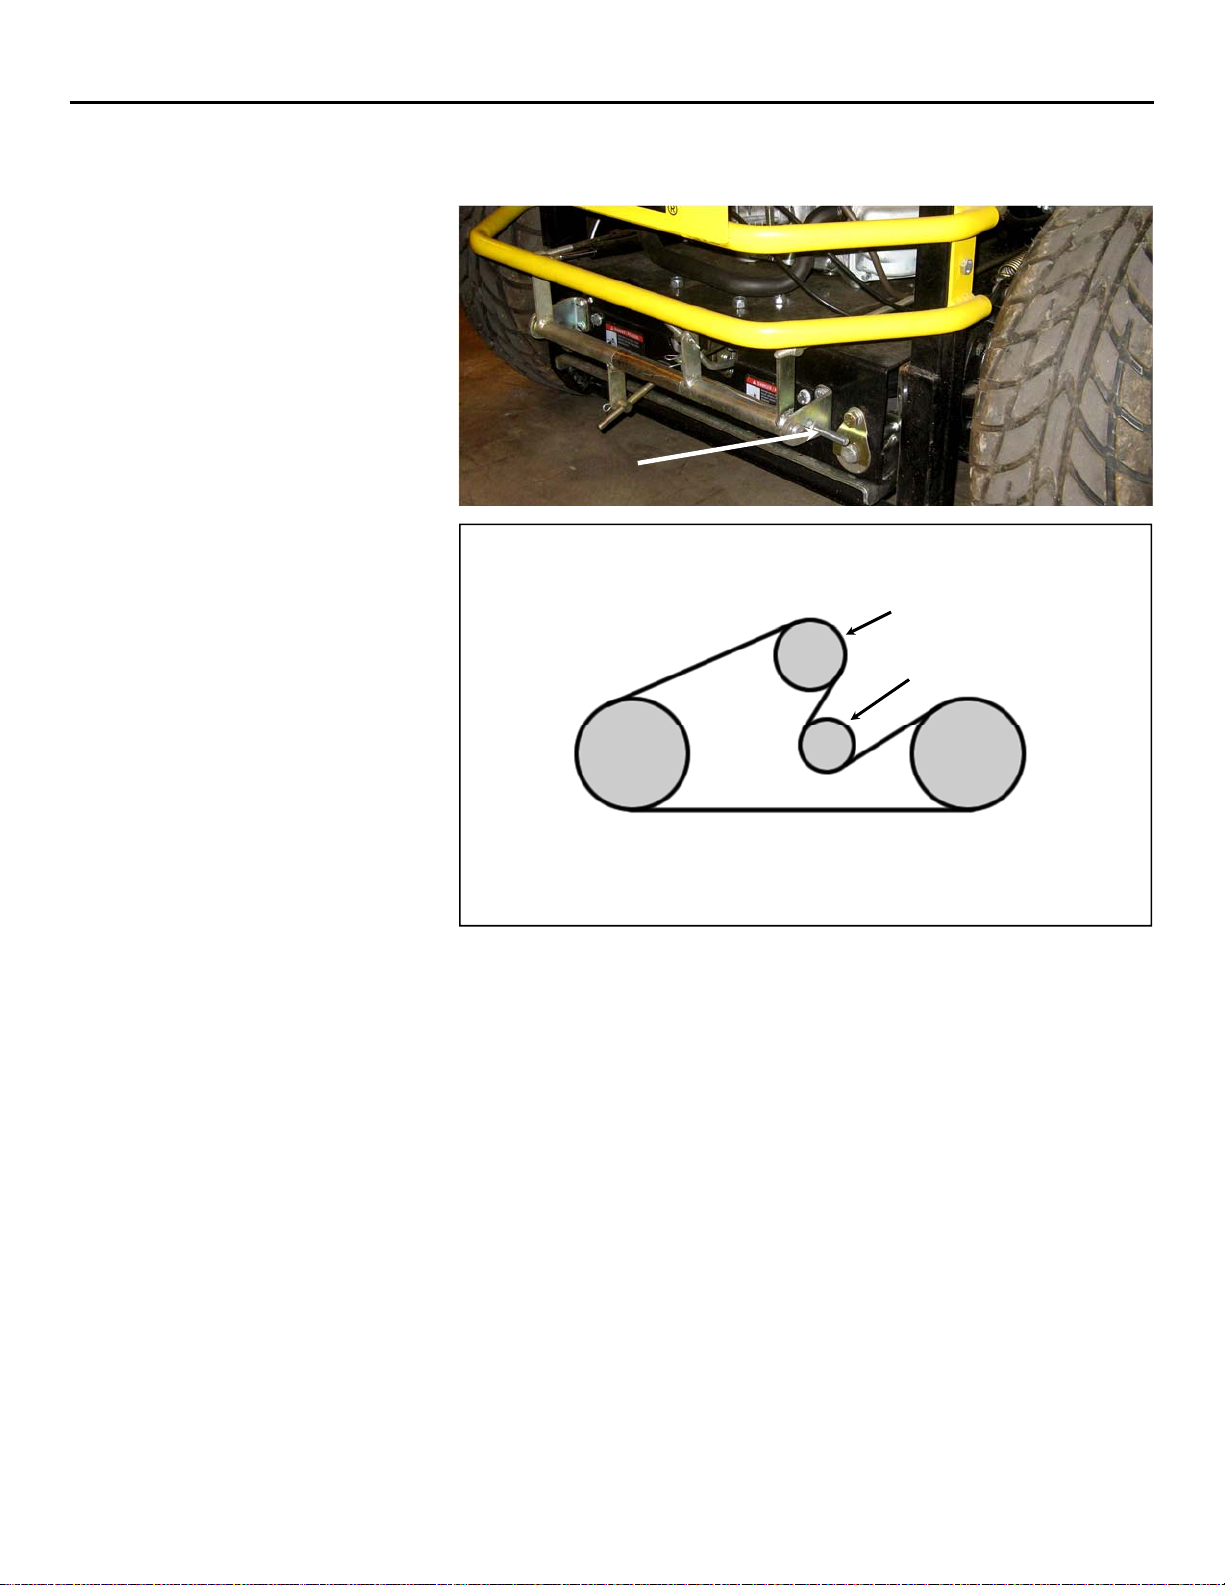
Engine-to-Hydraulic Drives Belt
Adjustment (Hydraulic drive Input
Belt)
The hydraulic drive input belt is
located underneath the chassis at
the rear of the mower. The belt
should move approximately 1/8 to
3/16-inch with three (3) to five (5)
pounds of pressure applied to the
belt midway between the hydraulic
drive pulleys when initially installed.
After approximately 1 hour of
running time, verify that the belt
tension is still correct and tighten if
necessary
Important: Do not over-tighten the
belt.
To adjust the belt, turn the nut on
the threaded tension rod found on
the right, rear corner of the mower.
Do not over-tighten. This could
cause damage to the hydraulic drive
systems.
The hydraulic drive input belt is an
8PK 1690 multi ribbed v belt. GXi part
number M10-000469.
Service Adjustments
Hydraulic drive
input belt tension
adjustment
View from above
Left Hydro
Pulley
Rear of Mower
Hydraulic drive input belt diagram
54ZB, 62ZB
Engine Pulley
Idle Pulley
Right Hydro
Pulley
Rev: AUG2014
Z-Beast Finish Mower
24
Page 29
Z- BEAST
Service Adjustments
54ZB, 62ZB
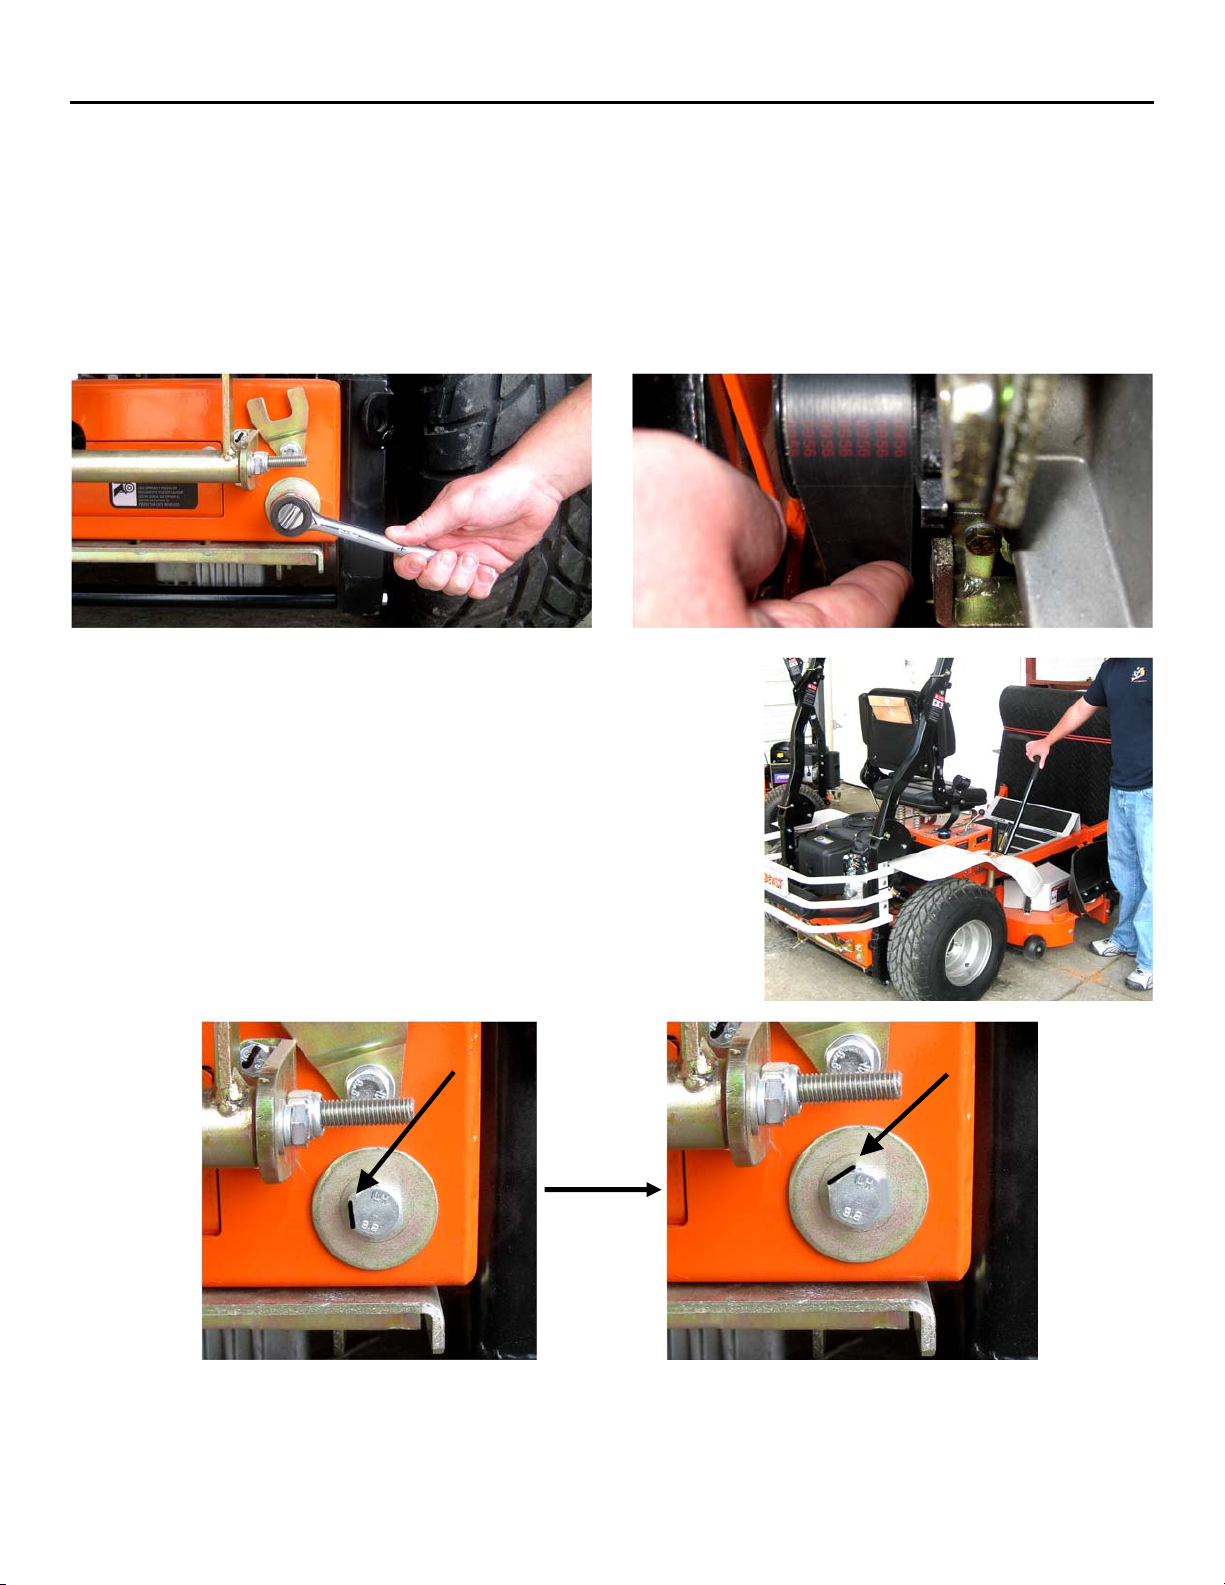
Hydraulic Drive System Adjustment
The hydraulic drives are coupled to the final drives with a multi-v belt. Occasional re-tensioning of the belt may be
necessary. If performance decreases or hydraulic drive control handles are activated and the wheels do not turn,
inspect the multi-v belt. Before beginning the following test, read all warnings in this manual. If you are
uncomfortable with this procedure please contact GXi to be set up for service.
Normal service interval: seasonally or every 100 hrs.
Adjust the hydraulic drive adjustment bolts by tightening the two large 21mm nuts on the rear of the mower. Tighten
the final drive belt so there is approximately 3/4” belt deflection in the center of the belt with about 10lbs of pressure
applied.
The next step is to perform a “wall test.” Drive the mower against a padded
stationary object. For accurate results, a smooth brushed concrete surface
works best. Stand next to the mower with one hand on the seat. Start the
mower with one hand on the seat to engage the safety switch. Engage the
left side handle into the drive position. Quickly move the handle to full
forward position for about half a second. Now perform the same procedure
on the right side. If the belt squeals and the wheel does not spin on either
side, tighten each adjustment bolt one half turn. Always turn both bolts the
same amount whenever adjustment is required. Repeat the test until both
tires will break traction and spin.
Once you have the tension set so each wheel will just barely break traction,
mark the bolt on one side of the hex head as shown. Now tighten the bolt
(turn clockwise) one sixth of a turn. This will set tension so the belt does not
squeal, and provides ample torque for driving and mowing without causing
belt or hydraulic drive damage.
Now drive the mower on a grassy surface. Perform several Zero Turns. Drive the unit aggressively. If the
performance is “sloppy” or you have excessive belt chirping, tighten the bolt 1/6th of a rotation and re-test.
Re-Install the adjustment bolt retainer clips after adjustments.
If the mower is too nimble, or you want to reduce the power output to prevent damage to the turf, loosen the bolt
1/6th of a rotation and re-test. Occasional belt chirping is permitted. If the belt squeals excessively tighten 1/6th of a
rotation and re-test.
Rev: AUG2014
Z-Beast Finish Mower
25
Page 30
Z- BEAST
Service Adjustments
54ZB, 62ZB
Safety System Adjustments
WARNING
WARNING: Do not bypass, modify, alter, or
disconnect the safety system. Make sure that the
safety interlock system is fully operational each time
before mowing. Failure to do so could present danger
to you and others around you.
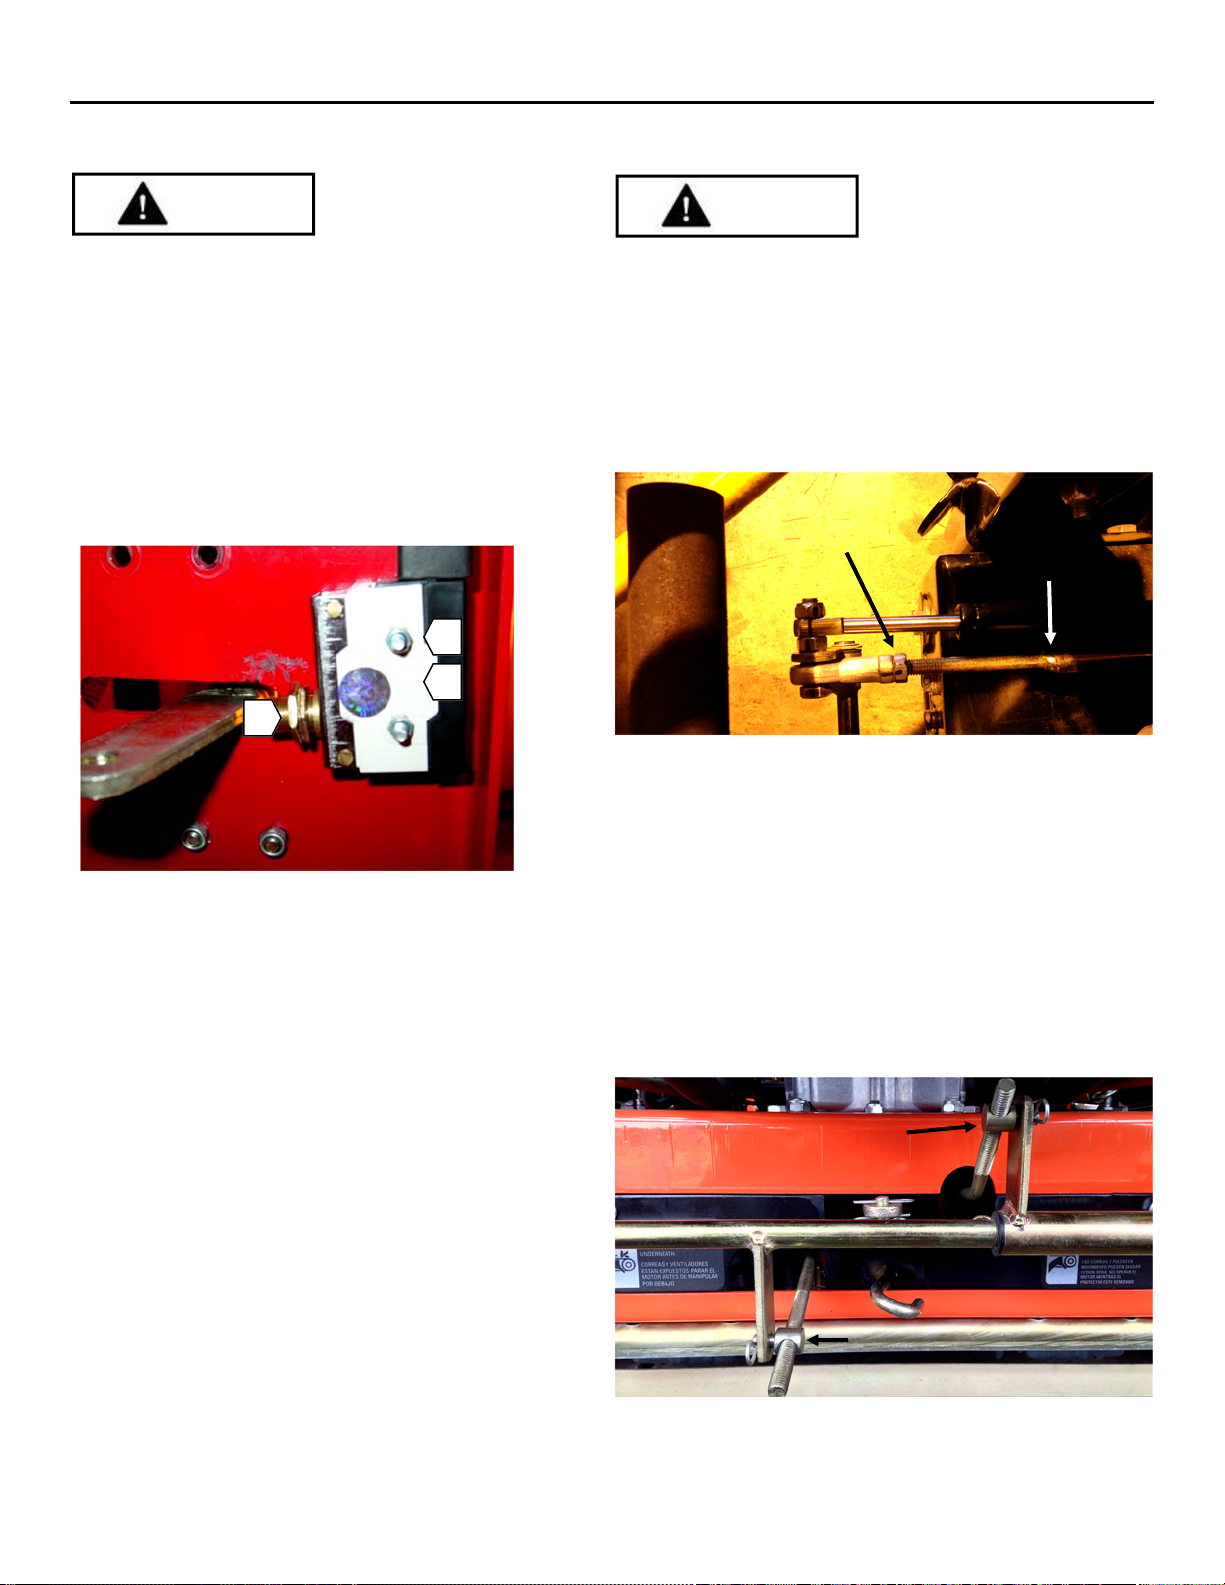
There are generally three (3) ways to adjust the
sensitivity of a safety switch. The most appropriate way
to adjust each switch depends upon the application,
location, and the nature of the problem you are
encountering.
C
A
B
Method 1: Adjust location using the mounting
screws
1. Move the blade control lever to OFF.
2. Loosen screws (A) until safety switch (B) moves
freely.
3. Slide safety switch (B) firmly against blade bell
crank (C).
4. Tighten screws (A) and check that safety switch (B)
does not move.
Method 2: Adjust location using adjustment nuts on
switch body
1. Loosen locking nut (C) on the sensor shaft.
2. Adjust switch location by turning the nuts.
3. Tighten the locking nut when proper adjustment is
achieved.
Tracking Adjustments
WARNING
WARNING! ALLOW THE MUFFLER TO COOL BEFORE
MAKING THIS ADJUSTMENT! This adjustment is made
in close proximity to the muffler. The muffler on can
reach extremely hot temperatures and can burn you
instantly on contact.
For mowers with serial numbers 54ZB13XXXX and
62ZB13XXXX:
Loosen
jam nut
Turn control
rod with fingers
1. Loosen the jam nut on the control rod on the side that is
moving slower.
2. Turn the control rod one turn clockwise while facing
the rear of the mower.
3. Tighten the jam nut.
4. Drive mower in straight line and adjust again if
necessary.
For mowers with all other serial numbers:
Turn clockwise to increase
right side speed
Turn counter clockwise to
increase left side speed
Remove pin and turn adjuster one turn at a time until
mower tracks straight.
Rev: AUG2014
Z-Beast Finish Mower
26
Page 31
Z- BEAST
Service Adjustments
54ZB, 62ZB
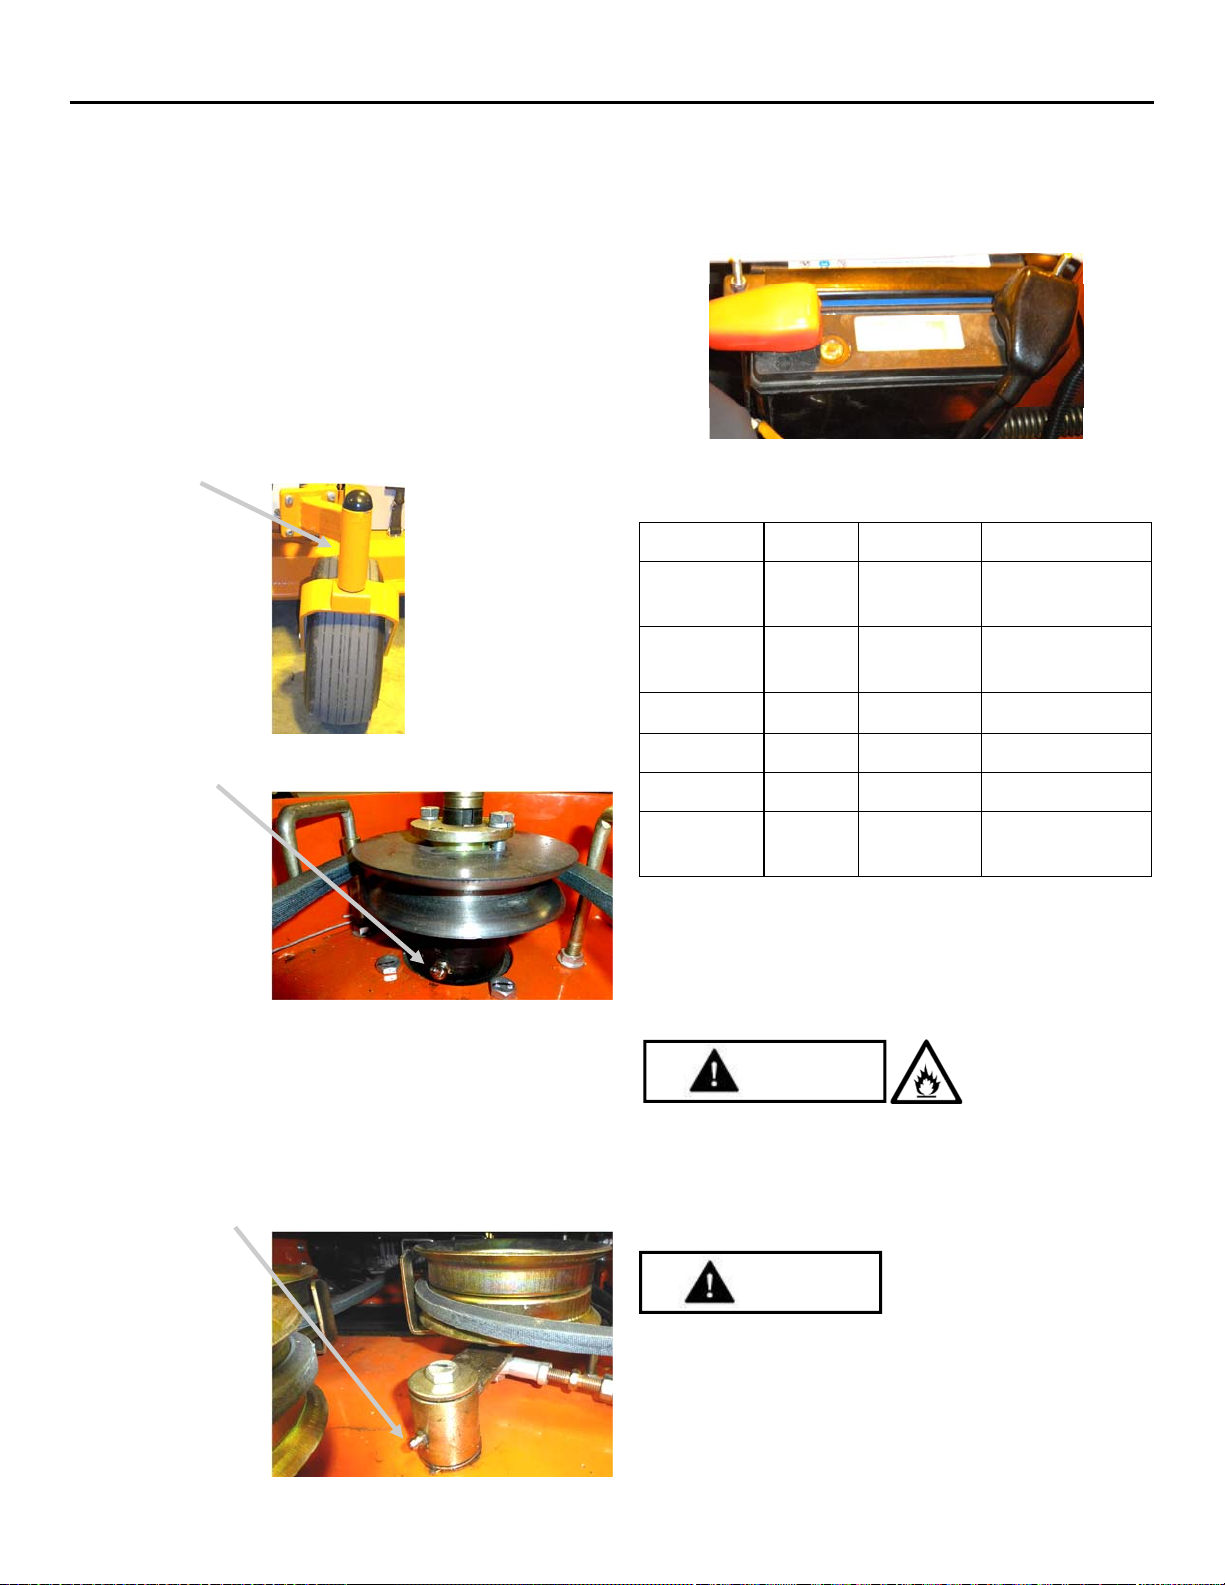
Lubrication
To ensure proper lubrication of moving parts, GXi
recommends that you lubricate the following components
with a high-quality, EP2 high-temperature-based grease or
equivalent. Should the conditions of operation be more
severe than normal, the lubrication interval may need to be
shortened. GTR/OPE grease is the recommended lubricant.
Lubrication Point Locations
54-inch & 62-inch mowers have 10 lubrication points.
Lubricate after every 50 hours of usage
1. Front wheels (2 locations, 1 on each wheel shaft)
2. Spindles (3 locations on 54-inch & 62-inch mower
decks).
Note: The lower spindle bearing is sealed on the bottom
and open on the top. The upper spindle bearing is sealed on
both sides. Failure to frequently replenish grease will cause
premature lower bearing failure. Frequent application of
grease to this bearing is critical to achieving long spindle
life in harsh duty environments.
3. Mower deck clutch pulley pivot.
Changing Battery
When disconnecting the battery make sure to
disconnect the negative terminal first and the positive
last. When reconnecting, connect the positive first and
the negative last.
These batteries are compatible with your mower
Note: some may require that you change terminals
Battery Part # Store Terminal Part #
U1-3 U1-3 Advance
Auto Parts
GT-XHD-MT 4700042 Tractor
Supply
10U1L 543215 Lowe's
BCI#U1 BAT 8229 NAPA NW 728248
U1-3 U1-3 AutoZone 6069
U1LUH U1LUH O'Reilly
Auto Parts
AC171/A1500102
SK7401
Charging Battery
Always charge battery in an open well ventilated area,
away from sparks and flames. Unplug charger before
connecting or disconnecting from battery and always
wear protective clothing and use insulated tools.
DANGER
DANGER: Battery electrolyte has sulfuric acid which
can cause severe burns and is a deadly poison.
Never drink and always avoid contact by wearing
gloves and safety glasses when servicing the
battery.
Rev: AUG2014
WARNING: Do not allow battery terminals to touch
any metal parts of the mower when removing the
battery. Never allow metal tools to short between
the battery terminals and metal parts of the mower
as this may cause sparks. Sparks can also cause the
battery gasses to explode which can result in injury/
death.
Z-Beast Finish Mower
WARNING
27
Page 32

Z- BEAST
Storage Instructions
54ZB, 62ZB
Short Term Storage
Let engine cool before storing and do not store
near flame, high heat, and possible ignitions from
sparks.
Always clean off all flammable material as well as
grime and dirt before storage.
Never use a pressure washer and avoid drenching
the control panel, motor, engine, and hydraulic
drive pumps with water.
Wash with mild detergent and water only.
After washing the machine engage the engine at
high and let the mower run for 5 minutes.
Shut off fuel for storing or transporting.
Carefully release pressure from components with
stored energy.
Store mower only on the ground.
Do not drain fuel indoors or near a flame.
Use jack stands to support components when
required.
Always park machine on level ground and set the
parking brake when storing.
Store the machine in a clean and dry environment.
Always remove the key from the ignition.
Add a petroleum based conditioner in the gas tank
and run for 5 minutes to distribute through mower.
Extended Storage
In addition to the measures taken for short term
storage, the following measures should be taken for
long term storage:
Change air filter.
Make sure all fuel is drained before storing.
To ensure all fuel is drained from the mower, run
the mower until it runs out of gas before storage.
Check the spark plugs condition and pour two
tablespoons of engine oil in the spark plug holes
and leave the spark plugs off.
Cover the machine when in storage.
Remove Battery and clean terminals and cable
connectors. Store battery in a cool dry place.
Rev: AUG2014
Z-Beast Finish Mower
28
Page 33

Z- BEAST
Troubleshooting
Problem Possible Causes Solution
54ZB, 62ZB
Engine will not start 1. Key in the OFF position
2. Insufficient fuel in the tank
3. Air bubble in the fuel line
4. Fuel valve in OFF position
5. Choke not ON
6. Choke linkage out of adjustment
7. Low engine oil
8. Blade control in ON position
9. Loose spark plug wire
10. Fouled spark plug
11. Plugged or dirty air filter
12. Bad gasoline
13. Plugged or dirty fuel filter
14. Safety switches out of
alignment or loose
15. Dead battery (electric start
models)
Engine will not keep
running/quits
1. Water in the fuel
2. Loose safety switch
3. Fuel valve is OFF
4. Dirty fuel filter
5. Dirty air filter
6. Low engine oil
1. Turn key to ON position
2. Add gasoline
3. Prime engine or shake bubble out
4. Turn valve ON
5. Turn choke ON
6. Refer to Engine Owner’s Manual
7. Add engine oil
8. Push lever to OFF position
9. Tighten wire or connections
10. Clean or replace the plug
11. Clean or replace the air filter
12. Drain and replace with fresh gasoline
13. Replace the fuel filter
14. Adjust or tighten switches (p. 26) - read warnings!
15. Recharge or replace battery
1. Drain and replace with fresh fuel
2. Adjust switch (p. 26)
3. Turn fuel valve ON
4. Replace fuel filter
5. Clean or replace air filter
6. Add engine oil
Engine stops when blades
are engaged
Blades do not turn 1. Broken belt
Belts squeal when blades
are engaged
Belts slip when blades are
engaged
1. Loose safety switch
2. Belt tension too high
3. Blades jammed with foreign
material
2. Loose belt
3. Blade activation linkage out of
adjustment.
1. Incorrect belt tension
2. Excessive belt wear
1. Incorrect belt tension
2. Excessive belt wear
1. Adjust switch (p. 26)
2. Adjust belt (p. 20)
3. Remove foreign material
Note: Firmly pushing the blade control lever into
the OFF position to ensure the safety switch is fully
engaged can sometimes resolve this problem.
1. Replace belt
2. Adjust belt (p. 20)
3. Adjust linkage (p. 19)
1. Adjust belt tension
2. Replace belt
1. Adjust belt tension
2. Replace belt
Rev: AUG2014
Z-Beast Finish Mower
29
Page 34

Z- BEAST
Problem Possible Causes Solution
Troubleshooting
54ZB, 62ZB
Mower will not move
forward or reverse
Cannot move mower
when the engine is off
Engine is overheating 1. Dirt in the fuel line
Grass not cut smoothly
or cleanly
1. Brake ON
2. Bypass levers pulled out
3. Hydraulic drive oil has not
reached optimal temperature.
1. Bypass not engaged
2. Dirty air filter
3. Low engine oil
4. Fouled spark plug
5. Misuse of the mower
6. Dull blades
7. Spindle bearing failure
1. Dull blades
2. Mowing too fast for
conditions
3. Grass is wet or bent over
4. Blade is bent
5. Tire pressure not equal
6. Deck is set at uneven heights
7. Blades are set upside down
8. Excessive grass and debris
build up underneath the deck
1. Release brake on control panel
2. Ensure bypass pins are retracted
3. Allow 5 to 10 minutes for hydraulic drive oil to
warm up.
1. Pull bypass rod and set it in the slot in the
chassis (p. 15)
1. Replace fuel filter and flush tank
2. Clean or replace the air filter
3. Add engine oil
4. Replace spark plug
5. Mow slower, wait for grass to dry out
6. Sharpen cutting blades
7. Take in for service
1. Sharpen blades
2. Slow down while cutting
3. Let grass dry to stand up
4. Replace blade
5. Add air pressure to low tires
6. Set deck at equal heights
7. Take blades off and install correctly
8. Clean out debris
Mower always pulls to
one side
Rev: AUG2014
1. Controls out of adjustment
2. Transmission failure
Z-Beast Finish Mower
1. Make tracking adjustment (p. 26)
2. Take in for service
30
Page 35

Z- BEAST
Limited Warranty & Service
54ZB, 62ZB
Length of Warranty: *(from the date of original retail purchase)
Products Covered by
this Warranty
Engine Manufacturer’s warranty Manufacturer’s warranty Manufacturer’s warranty
Transmission Manufacturer’s warranty Manufacturer’s warranty Manufacturer’s warranty
Mower frame Lifetime (original owner only) Lifetime (original owner only) 90 days
Belts, Tires, Battery 90 days 90 days 90 days
Attachments 1 yr limited 1 yr limited 30 day limited
*LENGTH OF WARRANTY: Batteries supplied with applicable products as standard, original equipment are covered by this warranty
for a period of 90 days from the date of original retail product purchase. Consumable parts such as oil, spark plugs, filters, and
blades are not covered by this warranty.
Residential
Commercial Rental
To Qualify for this Warranty
The product must be purchased in the United States from a dealer authorized by GXi Outdoor Power, LLC to sell those products. This
warranty applies to first retail purchaser/owner during the applicable warranty time period. SAVE YOUR PROOF OF PURCHASE
RECEIPT. MUST HAVE PROOF OF PURCHASE TO OBTAIN WARRANTY.
What GXi Outdoor Power Will Repair or Replace under Warranty
GXi will repair or replace, at its option, any part that is proven to be defective in material or workmanship under normal use during
the applicable warranty time period subject to the exclusions stated herein. This warranty is void if the owner fails to follow the
prescribed maintenance and operating procedures described in this manual. This specifically refers to ensuring routine lubrications
and oil changes are made, that fuel stabilizer is used when the product is stored and that the product is not overloaded.
GXi has the right to recover warranty administration costs from the owner if the root cause of the malfunction is found to be other
than defective material or workmanship. In particular, this warranty does not cover: contaminants in the fuel or oil; damage caused
by not following the prescribed warnings and operating practices; failure to follow proper maintenance and storage procedures; and
physical damage due to misuse, shipping, handling or storage.
Warranty repairs will be made without charge for parts and labor for the first year.
Anything replaced under warranty becomes the property of GXi. Parts replaced under warranty will be considered as part of the
original product and any warranty on those parts will expire coincident with the original product warranty.
To Obtain Warranty Service
You must take the BEAST product, accessory, replacement part, apparel or the power equipment on which the accessory or
replacement part is installed, and proof of purchase, at your expense, to any BEAST service location in the United States, who is
authorized to service that product, during the service location’s normal business hours. If you are unable to obtain warranty service,
or are dissatisfied with the warranty service you receive, take the following steps: First, contact the manager of the service center
involved; normally this will resolve the problem. However, if you should require further assistance, write or call the GXi Parts &
Service, LLC 1-919-550-3221. You are responsible for transporting your BEAST product to and from the service center. GXi Parts &
Service can arrange for pickup and delivery if the service center provides this service, at your expense.
Exclusions
This warranty does not cover: normal wear, contaminants in the fuel or oil; damage as a result of use in an application for which the
product was not designed; damage caused by incorporation or use of unsuitable attachments or parts, unauthorized alteration, or
other misuse and neglector; damage caused by failure to follow the prescribed warnings, operating practices, proper maintenance
and storage procedures; parts affected or damaged by accident and/or collision; damage due to shipping, handling, storage or any
causes other than defects in material or workmanship of the product. The customer is responsible for transporting the mower to the
service center. Pick Up & Delivery will depend on if the service center provides this service, and will be made at the owner’s
expense.
Disclaimer of Consequential Damage and Limitation of Implied Warranties
GXi disclaims any responsibility for loss of time or use of the product, transportation, commercial loss, or any other incidental or
consequential damage. Any implied warranties are limited to the duration of this written limited warranty.
THIS WARRANTY IS VOID IF THE MANUFACTURING DATE AND THE SERIAL NUMBER ON THE EQUIPMENT HAS BEEN REMOVED
OR THE EQUIPMENT HAS BEEN MODIFIED.
Rev: AUG2014
Z-Beast Finish Mower
31
 Loading...