

Page 1

Owner’s
Manual
GEMINI & SLIMLINE HOBS
SOLID PLATES &
CERAN
CONTENTS
2 Introduction
2 Unpacking
2 Cupboard Design
3 Installation
3 Electrical Installation
4 Safety Advice
4 The Control Panel Symbols
4 Ringer Timer (Gemini)
5 Solid Plates
6 Ceran Smooth Top
7 Problem Check
7 Owner’s Responsibility
7 Service
www.defy.co.za
Page 2

INTRODUCTION
Congratulations on the purchase of this quality appliance.
We, the manufacturer, trust that you will enjoy many years of trouble free use. Please
read these instructions carefully before using the hob. This book will provide you with
information on how to operate and care for your appliance in order that you gain the
maximum benefit from it.
UNPACKING
• Please ensure that packaging material is disposed of in a responsible manner.
• Plastic bags should be cut up to prevent children playing with them and accidentally
suffocating.
• If the appliance is damaged in any way, do not use it. Report the damage to your
dealer, who will take the necessary corrective action.
CUPBOARD DESIGN
• Cooking appliances generate considerable heat. The layout and materials of the
mounting cabinet should take account of these characteristics.
• Surfaces and surrounding edges immediately adjacent to the hob should be able to
withstand temperatures of up to 100 C without delaminating or discolouring.
• Allow an unrestricted air space of at least 75mm underneath the underside of the hob
for ventilation and cooling purposes.
Page 3
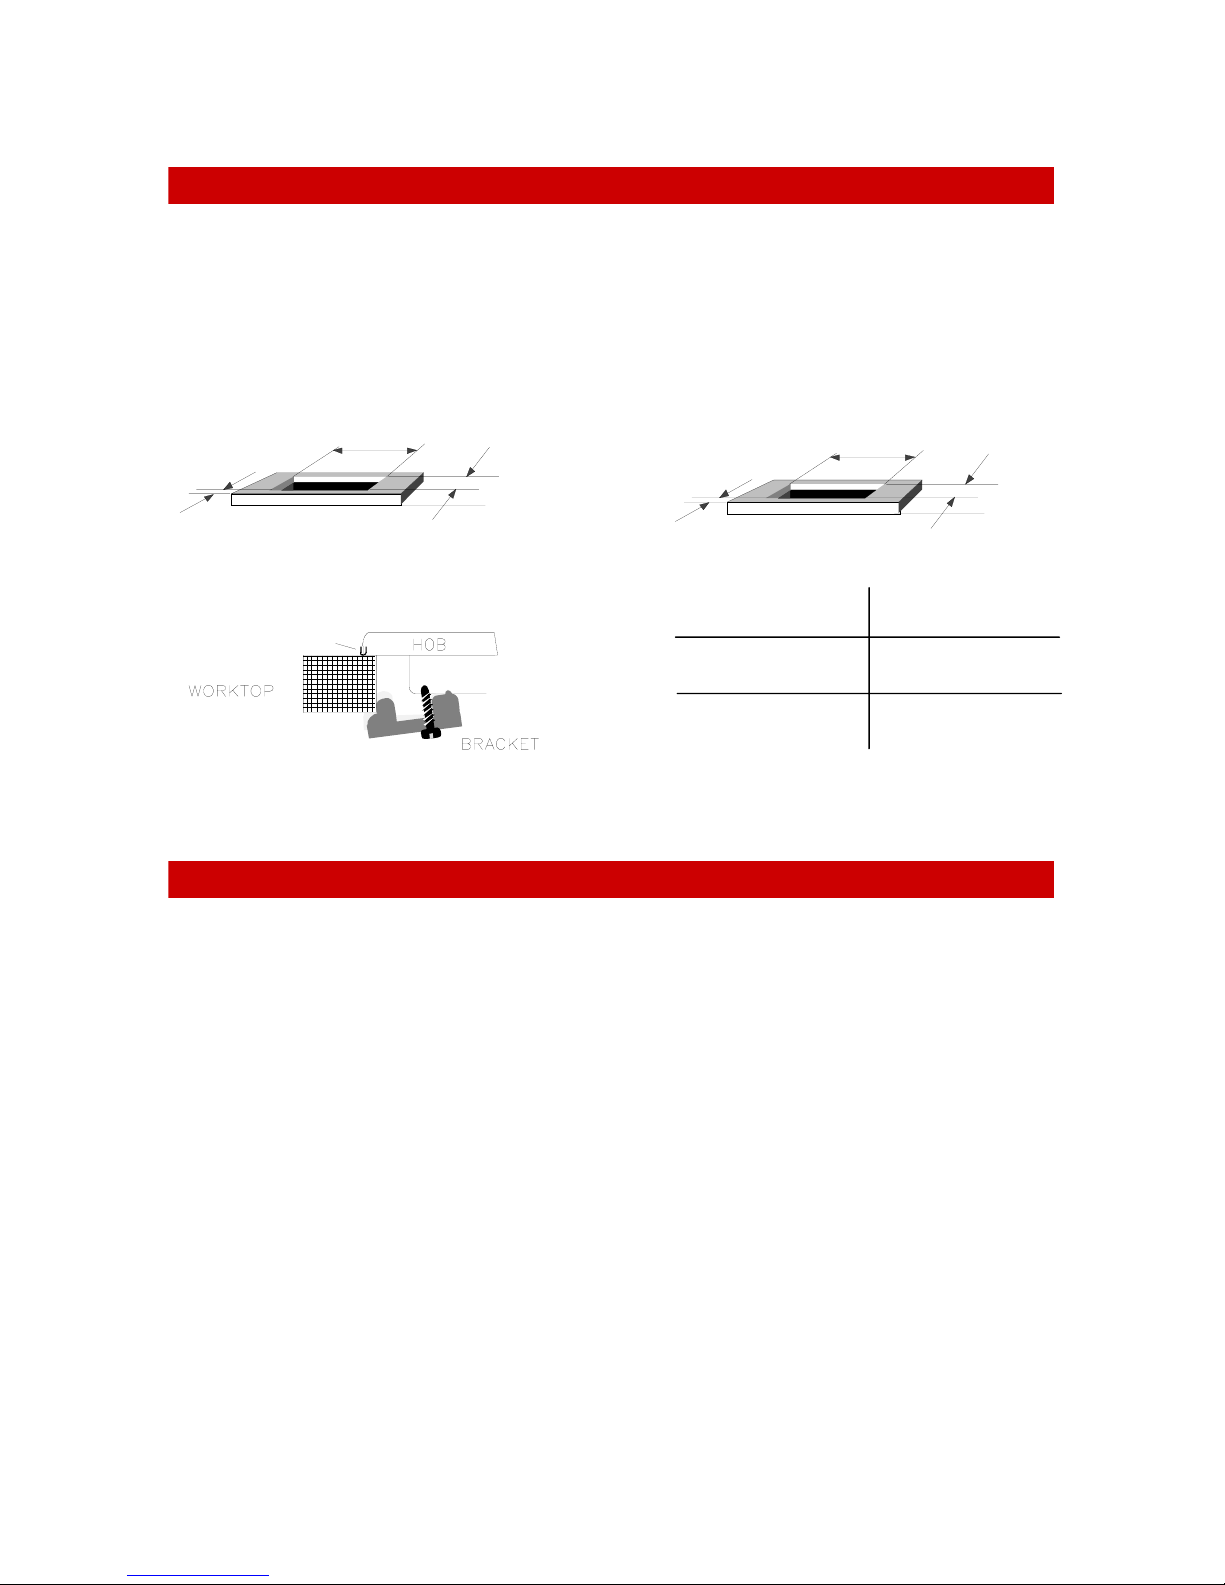
INSTALLATION
• The hob should be installed in a ventilated cupboard fitted with a sturdy worktop and
must be secured using the fixing brackets provided.
• Invert the hob on the worktop adjacent to the aperture before making the electrical
connection. This will ensure sufficient cable length for subsequent servicing.
+ 3
- 0
80
Slimline Aperture
+ 3
570
- 0
480
+ 3
- 0
Gemini Aperture
70
803
+ 3
- 0
470
Hob fixing bracket
Fixing bracket for solid plate hobs
‘U’ SE AL FO R SO LID
PLATE HOB ONLY
Slimline Model Size of ‘X’
Solid Plate 570 mm
+3
- 0
Ceran Smooth top 670 mm
+3
- 0
ELECTRICAL INSTALLATION
“This appliance must be earthed and the manufacturer and the seller do
not accept responsibility for any damage due to incorrect installation or
electrical connection.”
Earth leakage
This appliance should not be connected through an earth leakage system.
Refer to S.A.B.S. 0147.
Connection to the power supply must be carried out by a licensed electrician, who will
ensure that the oven is correctly connected and safely earthed. The rated current is printed
on the serial number label attached to the base cover.
The appliance must be connected to the mains through a double pole isolating switch
which has a minimum clearance between the contacts of 3 mm. in both poles.
A means for disconnection must be provided in the fixed wiring.
Page 4

SAFETY ADVICE
• Only use the appliance for preparing food.
• Always keep children away from the appliance when it is in use.
• Do not leave hot fat or oil unattended. If overheating occurs, these could catch fire.
• Switch off the power at the mains in the event of a fault or when cleaning the
appliance.
THE CONTROL PANEL SYMBOLS
HOT
LEFT FRONT
PLATE
LEFT BACK
PLATE
RIGHT BACK
PLATE
RIGHT
FRONT
PLATE
HOT
SURFACE
INDICATOR
(CERAN)
RINGER
TIMER
(GEMINI)
RINGER TIMER (GEMINI)
• The ringer timer may be used for timing the cooking period.
• It does not switch off the plates but gives a loud ring when the selected time has
elapsed.
• Turn the control knob to 60 minutes to wind up the mechanism.
• Return the knob to the desired time period.
• When the time has elapsed the timer will ring for a few seconds.
Page 5

SOLID PLATES
Red dot plates
• Plates featuring a red dot in the centre are high speed, high
wattage plates for increased performance
• For your safety these plates are fitted with thermal limiters.
Should a plate be accidentally switched on and left unattended,
the limiter will reduce the power output of the plate and
minimise the risk of overheating and the possibility of fire.
Caring for Solid Plates
• Before using the plates for the first time, switch them on for about 4 minutes at the
highest setting. This allows the factory applied protective coating to burn in.
• To prevent blotchy discolouration and corrosion, moisture from spatters and spills
should be cleaned off immediately.
• To clean the plates, wipe them with a damp cloth or nylon pad. A little liquid
detergent may be used. Do not use metal scourers or sharp metal objects to clean the
plates.
• After cleaning, dry the plates by switching them on for a short while.
• To prevent rust, periodically apply some, sewing machine oil or electrical hotplate
polish - available from Defy Service Centres. Extra attention is required in areas of
high humidity or in close proximity to the sea.
NOTE: THE WARRANTY DOES NOT COVER THE REPLACEMENT OR
REPAIR OF RUSTED OR CORRODED PLATES.
Recommendations
• Use only pots with a solid level base. An uneven base can prolong cooking times and
waste energy.
• Use pots with a base diameter slightly larger than the plate. This will ensure even heat
distribution and prevent spillage from dripping onto and staining the hot plate.
• Always cover the pot with a lid. This will conserve energy and minimise spillage.
• Thermal shock could damage the plates. Do not put cold pots on very hot plates.
Plate controls—variable
• Select the heat level by turning the knob to the required
setting.
• You may select any setting, even between numbers.
• 1= low, 4 = medium and 8 = high.
• The illuminated display will glow, when the plate is
switched on.
Page 6

CERAN SMOOTH TOP
WARNING In the unlikely event of sustaining accidental damage and cracking, switch
off the appliance at the mains to avoid electric shock and have the panel replaced before
further use.
Plate controls—variable
• Select the heat level by turning the plate control knob to the required setting. You
may select any setting, even between numbers. 1= low, 4 = medium and 8 = high.
• The illuminated display will glow and shortly thereafter the hot surface indicator light
on the hob will glow. It will remain on for 20 to 30 minutes after switch off. This is a
reminder that the hob surface is still too hot to touch.
Caring for the Ceran hob
• Ceran is a tough, durable material, which provides a beautiful, functional and long
lasting cooking surface. To keep it looking good, it needs to be treated with care and
cleaned regularly.
• Spillage should be wiped off as soon as possible with a damp cloth, preferably while
the hob is still warm.
• Clean the hob with a nylon pad and ‘Smooth top cleaner’. A sample of this cleaner is
supplied with the unit. Replenishment cleaner is available from all Defy Service
Centres.
• If necessary stubborn spills may be removed using the blade scraper provided.
• Do not use metal scourers or coarse abrasive powders as these could scratch the
Ceran.
• Regular cleaning after use will prevent dirt build up and ensure that the hob remains
bright and attractive.
• Wipe the hob surround with a damp hot soapy cloth and dry.
Recommendations (see also the enclosed ‘CERAN’ leaflet)
• Use only pots with a solid level base. An uneven base will prolong cooking time and
waste energy.
• Use pots with a base diameter slightly larger than that of the thermal area. This will
ensure even heat distribution and prevent spillage from dripping onto and staining the
hot zone.
• Always cover the pot with a lid. This will conserve energy and minimize spillage.
• Save energy by switching the plate off 5 to 10 minutes before the end of a lengthy
cooking period. The Ceran hob will retain sufficient residual heat to complete the
cooking process.
• A pot with rough edges could scratch the Ceran if it were dragged across the surface
of the hob.
• Any spillage of sugar solution such as jam, must be removed immediately. If allowed
to cool on the Ceran it could pit and damage the surface.
• Do not cover the Ceran with aluminium foil and do not use poor quality aluminium
pots. These will leave unsightly deposits which in time, could adhere to the Ceran.
Page 7

PROBLEM CHECK
Before calling a service technician to assist with a problem, PLEASE CHECK THE
FOLLOWING
THE MAINS DISTRIBUTION BOARD
THE WALL
SWITCH
Remember that you may be charged for a service call even during the warranty period if
the fault is due to or caused by any of the above.
OWNER’S RESPONSIBILITY
Since the following are not factory faults, they are the owner’s responsibility.
• Damage to exterior finish.
• Breakage of glass and other components.
• Damage through improper use or installation of the appliance.
• Damage caused by moving the appliance.
• Rusted or corroded solid plates.
SERVICE
If you have followed the instructions and still have a problem, contact the nearest Defy
Service Centre. They will be able to advise you on any aspect of the machine or send a
qualified technician to repair it.
Part No. 061 989
The Manufacturer strives for continuous improvements. For this reason, the text and
illustrations in this book are subject to change without notice.
 Loading...