

Page 1

OWNER’S
MANUAL
You ca n rely on Defy
E L E C T R O L O G I C 9 2 0
TOP
LOADING
AUTOMATIC
WASHING
MACHINE
www.defy.co.za
INDEX
2 Features.
2 Accessories.
3 Safety precautions.
4 Installation.
5 Electrical installation.
6 Loading the machine.
7 Functions of the controls.
8 Programme selections.
9 Time delayed start.
9 Customising programmes.
10 Operating procedure.
11 Maintenance.
12 Technical specification.
13 Trouble shooting.
14 Service.
15 Warranty.
Page 1
Page 2
Congratulations
You are now the proud owner of one of the finest and most
modern washing machines that today’s technology can produce. You and your machine are going to make a great team
together. But first it will pay if you really get to know each
other. This book will tell you all you need to know about your
machine, what it will do and how to do it. Please read all the
instructions carefully before operating the machine.
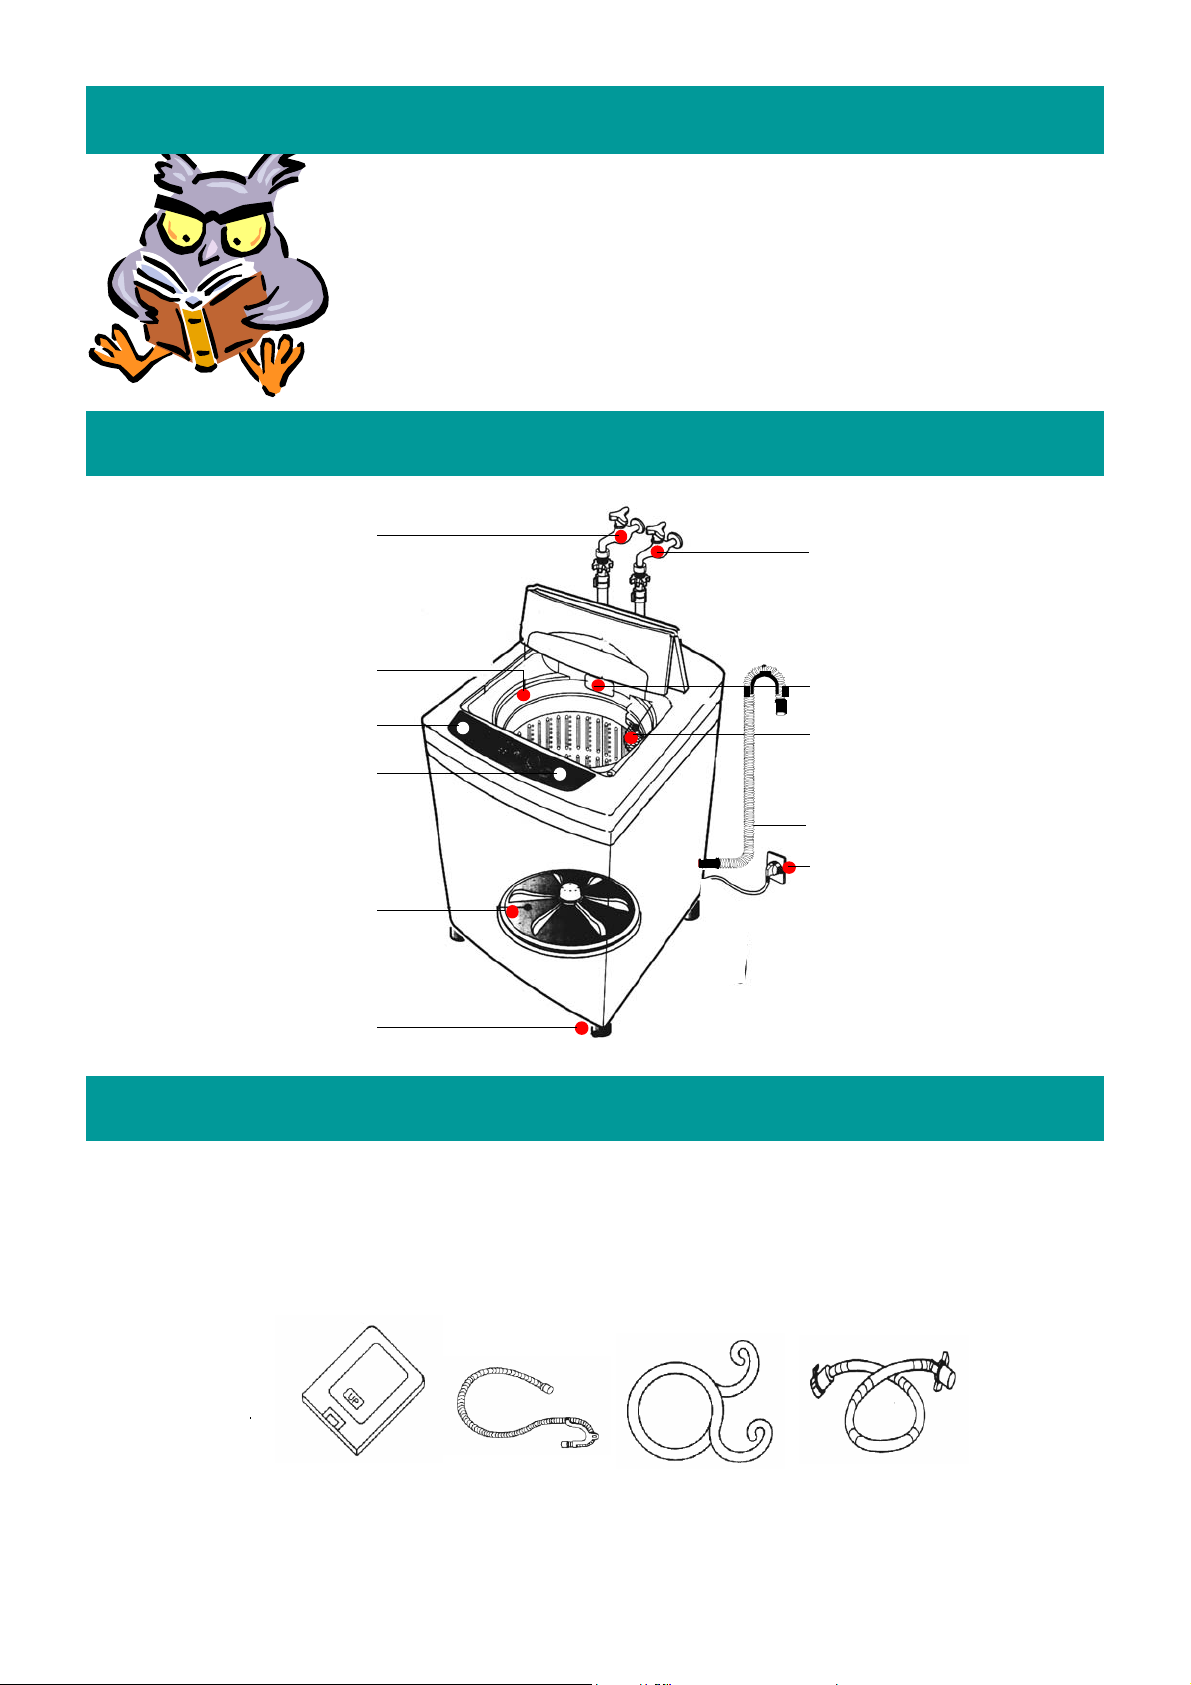
Features
HOT WATER TAP
Close the tap when
the wash cycle has
been completed
SOFTENER INLET.
CONTROL PANEL.
POWER ON / OFF
SWITCH
PULSATOR.
ADJUSTABLE
LEVELLING FOOT
COLD WATER TAP
Close the tap when
the wash cycle has
.
.
.
been completed.
DETERGENT BOX
LINT FILTER
DRAIN HOSE
POWER CORD
AND PLUG
BASE
COVER
Accessories
DRAI N
HOSE
Page 2
DRAIN
HOSE
CLAMP
INLET
HOSE
Page 3

Safety precautions
Do not reach inside the tub while the machine is working.
Wait until all motion stops.
Before washing, check all clothes for loose buttons and tears.
Check pockets for coins , pins or other small articles.
Close zips and fasteners.
Wash small articles inside a pillow slip.
Do not wash clothes soaked in petrol, thinners, vegetable oil or any
other flammable liquids. Nor should any of these liquids be added to
the wash water as they constitute a fire hazard.
Only use the m achine for washing f abrics. Do not attempt to wash
plastic leather or fibreglass. Sort and separate clothes by fabric, colour
and degree of dirt.
Avoid spraying water on to the control panel and back of the machine.
Do not use detergents which are not specifically designed for top loading automatic washing machines.
Do not allow children to play with or crawl inside the machine.
Supervise them closely when the washer is in use.
Always unplug the machine from the wall socket when it requires
cleaning or service. Only permit qualified persons to repair or install
parts in the washer.
Do not use water which is hotter than 65 degrees Celsius as this may
deform plastic parts of the machine.
Page 3
Page 4
Installation
UNPACKING
• Remove all packaging and dispose of it in a re sponsibl e man ner.
• Open the wash-tub li d and remove all the accessor ies st ored i n the drum.
• Do not attempt to op erat e the ma chin e while any of the pack a ging is st ill in p lace.
POSITIONING
• The machine should be installed in a well ventilated
place, away from direct sunlight.
• Hot and cold water taps should be located within 1 metre
of the inlet valves.
• Positioned the machine on a flat and stable uncarpeted
floor capable of supporting the fully loaded washer.
• An adjustable levelling foot is located at the right front
of the machine and may be turned in or out to achieve
stability. An unstable machine will vibrate and generate
excessive noise.
DRAIN HOSE
• Connect the drain hose to the drain outlet at the rear of
the machine and secure it with the hose clamp supplied.
• Hook the outlet end of the drain hose over the lip of a
sink or outlet pipe.
SINK OR LAUNDRY TUB DRAIN
• The top lip of the sink must be at least 860mm (A) above
floor level and not higher than 1300mm.
PIPE DRAIN
• The minimum inside diameter of the pipe drain should be
30mm and the pipe should be able to drain 30 litres per
minute.
• The top lip of the pipe should be at least 860mm (B)
above floor level and not higher than 1300mm.
Drain hose
A
B
Drain
outlet
Hose clamp
Page 4
Page 5
Installation—continued
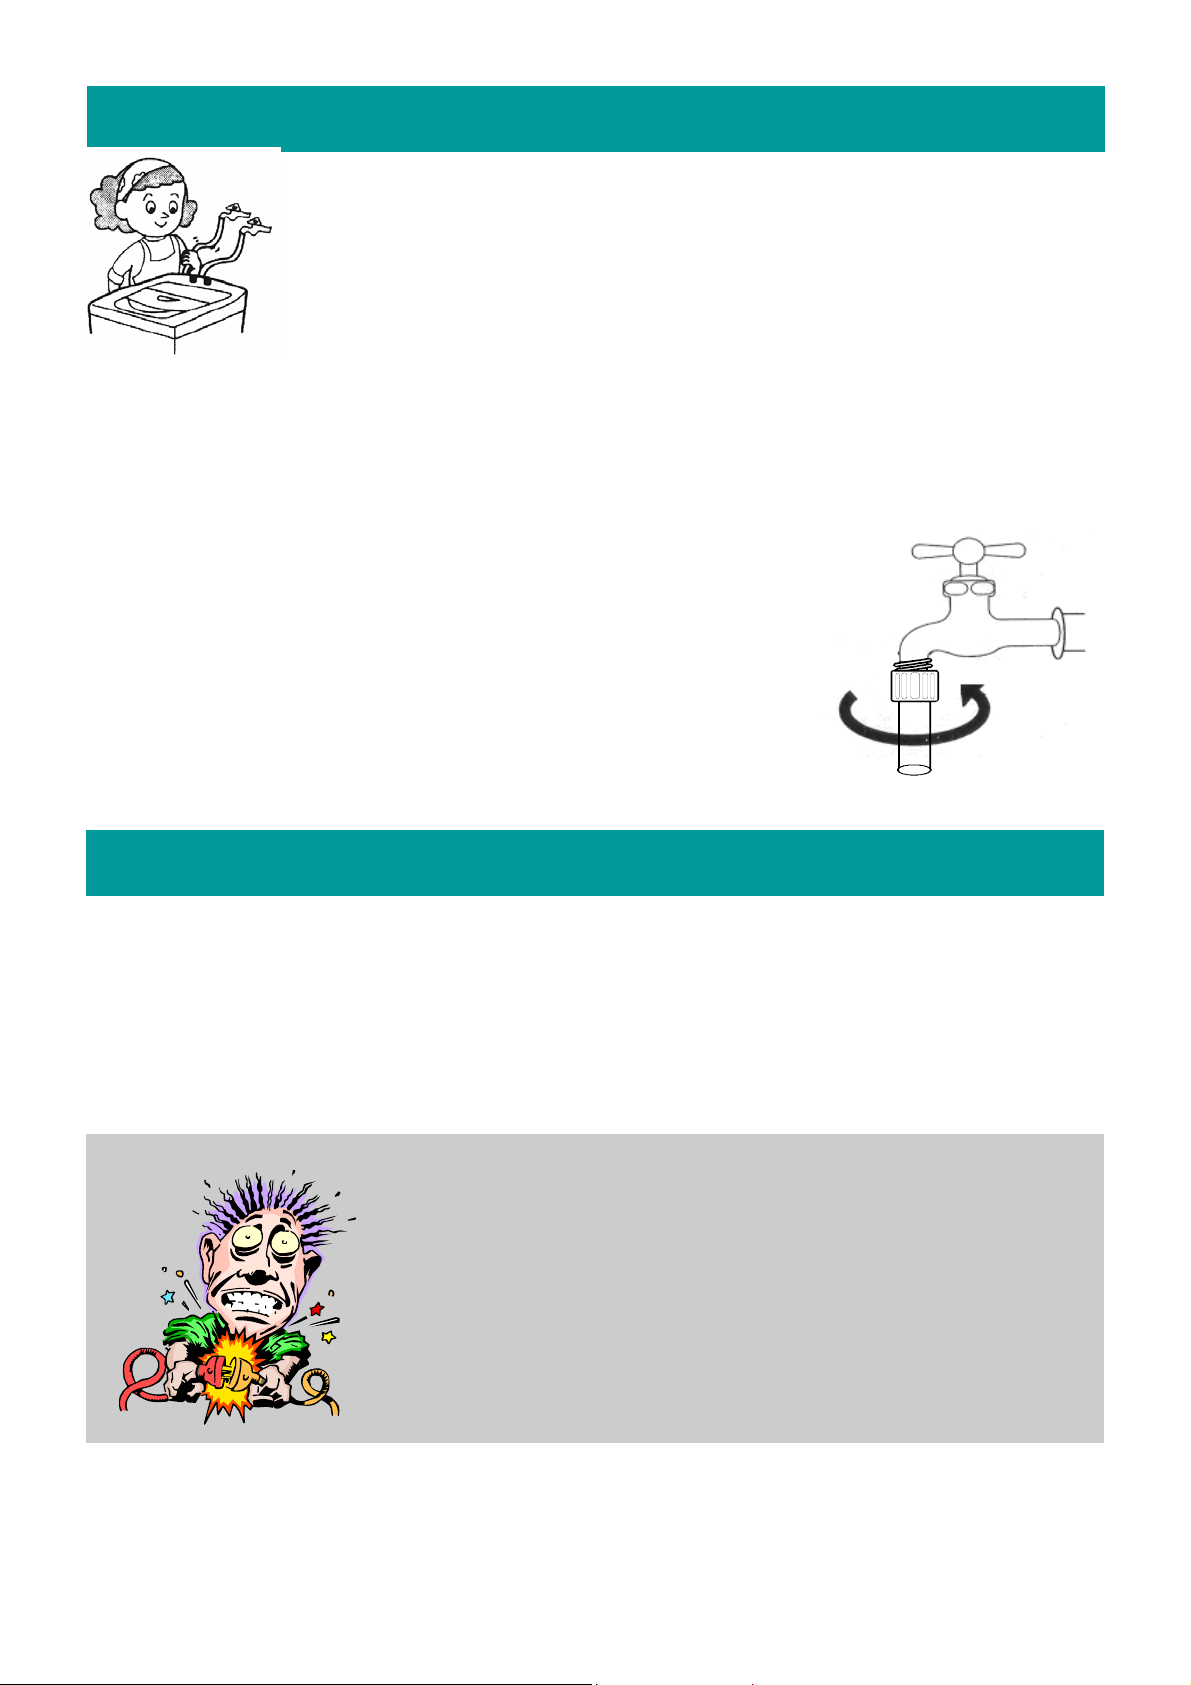
INLET HOSES
• Connect the respective inlet hoses to the hot and cold water taps and to the machine’s inlet
fittings. The hot water inle t is on th e left and the c old water in let on th e right.
CONNECTING THE WATER INLET HOSES
• Connect the inlet hoses to threaded hot and cold water taps and
to the machine’s inlet fittings. Take care not to confuse the hot
and cold water inlets. The hot water inlet is coloured pink and
the cold water inlet is coloured blue.
•
If only one water tap is available, connect the inlet hose to the
blue, cold water coupling.
•
Open the taps and check for leaks. Re-tighten couplings if necessary.
Electrical installation
• The washing machine is designed to operate on a 230 Volt, 50 Hz, 15 Amp, AC power
supply.
• The machine should be connected to an earthed 3 pin wall socket.
• If the power-cord should ever need replacing, use only a genuine cord available from
the nearest Defy Service Centre.
The appliance must be earthed
and the manufacturer and seller
do not accept responsibility for
any damage due to incorrect
electrical connection.
Page 5
Page 6

Loading the machine
PREPARATION
• Close all zippers, snaps and hooks to prevent them from snagging other articles.
• Remove pins, and other hard items to prevent them from scratching the machine.
• Empty all pockets and turn them inside out.
• Turn down cuffs and turn synthetic knits inside out.
• Tie strings and sashes so they will not tangle.
• Treat spots and stains before washing.
SORTING
• Mix large and small items in each load.
• Separate heavily soiled items from lightly soiled ones.
• Separate dark colours from light colours.
• Separate colourfast items from non-colourfast ones.
• Separate robust fabrics from delicate.
• Separate whites from coloured fabrics.
LOADING
• Lift and fold the lid.
•
Arrange the articles to be washed loosely round the perimeter of the tub.
• Load evenly as an off balance load may cause unnecessary vibrations.
• Use a large load programme when washing permanent press garments. These items
need more space to move than heavy items such as jeans and towels.
• Do not overload the machine as this will result in poor cleaning, increased creasing
and excessive lint formation.
Page 6
Page 7

Functions of the controls
WASH
TEMP
WATER
LEVEL
DELAY
POWER
ON / OFF
FUZZY
WASH
TEMP.
HOT
COLD
WASH
TEMP
HIGH
MED.
LOW
SMALL
DETERGENT
WATER
LEVEL
FUZZY
HEAVY
ECONOMY
WOOL
SOAK
CYCLE
WASH
RINSE
CONTROL
SPIN ONLY
REMAIN
MIN.
TIME
DELAY MODE
SPIN
START
HOLD
Press this pad to turn the power on or off.
Press this pad to select the water temperature. Repeated pressing will highlight
COLD COLD + HOT HOT.
Press this pad to select the water level. Repeated pressing will highlight
MEDIUM HIGH SMALL LOW.
Press this pad to engage the time delay function.( 2— 48 hours )
The wash will be completed at the end of the selected time.
POWER
MODE
CONTROL
SPIN ONLY
CYCLE
START
HOLD
Press this pad to select a partial wash cycle or any combination of:
WASH, RINSE, SPIN.
Press this pad to change the WASH TIME, RISE TIME, or SPIN TIME.
The pad is also used for selecting SPIN ONLY.
Press this pad to select the required wash cycle.
FUZZY BLANKET ECONOMY WOOL SOAK.
Press this pad to commence operation. Pressing it a second time will cause the
machine to pause, during which time any settings may be altered. Pressing it
again will cause the machine to resume the wash cycle at the new settings.
NOTE:
Always refer to garment care labels for
the manufacturer's recommendations.
Page 7
Page 8

Programme selection
FUZZY LOGIC PROGRAMME
This machine has Fuzzy Logic sensors. These enable it to evaluate each load placed in
the drum and to select and modify a wash programme to suit the load.
Do not use the FUZZY programme for woollen or delicate garments.
To select Fuzzy, simply press the
POWER On pad and then the START /
POWER
START
HOLD
HOLD pad.
HEAVY PROGRAMME
Use this programme for washing blankets, curtains and small rugs.
CYCLE
Select BLANKET.
Select water level and temp.
START
HOLD
ECONOMY PROGRAMME
This programme saves water and is ideal for washing lightly soiled clothes.
CYCLE
Select ECONOMY.
Select water level and temp.
START
HOLD
WOOL PROGRAMME
Wash 1.5 kg maximum. Do not wash chamois or leather.
CYCLE
START
HOLD
Select WOOL.
After the detergent has dissolved, a buzzer will sound. Put the clothes into the tub
after the buzzer has sounded. Close the lid and push the start / hold pad .
SOAK PROGRAMME
Use this programme for blue jeans, overalls and heavy duty wear.
CYCLE
Select SOAK.
Select water level and temp.
START
HOLD
Page 8
Page 9

Time delayed start
The wash cycle completion time may be delayed by 2 to 48 hours. This feature is particularly useful when you are at work and only want the machine to finish washing just before you arrive home.
To cancel the “time Delayed Start” press the power button. Wait five seconds before
pressing the power button once more to resume.
EXAMPLE: To set a completion time 8 hours from the present, proceed as follows:
MODE
POWER
MODE
CONTROL
SPIN ONLY
MODE
CONTROL
SPIN ONLY
REMAIN
Display
DELAY
Set to 8
REMAIN
8
Display
START
HOLD
Customising programmes
Press the POWER ON pad.
SELECTING THE WASH TIME
Press the Mode pad and the WASH light will illuminate.
Repeatedly press the CONTROL pad to select 14, 18, 0, 6 or 10 minutes.
If you do not want a wash cycle, select the time at 0 minutes.
SELECTING THE NUMBER OF RINSES
Press the Mode pad and the RINSE light will illuminate.
Repeatedly press the CONTROL pad to select 2, 3, 4, 0, or 1 rinse.
If you do not want a rinse cycle, select the time at 0 rinse.
SELECTING THE SPIN TIME
MODE
Press the Mode pad and the SPIN light will illuminate.
Repeatedly press the CONTROL pad to select 5, 7, 9, 0, 1 or 3 minutes.
If you do not want a spin cycle, select the time at 0 .
CONTROL
SPIN ONLY
START
HOLD
Press the START / HOLD pad.
CONVENIENT SPIN ONLY SELECTION
Press the POWER ON pad.
Press the CONTROL pad.
Press the START HOLD pad.
Page 9
CONTROL
SPIN ONLY
START
HOLD
Page 10
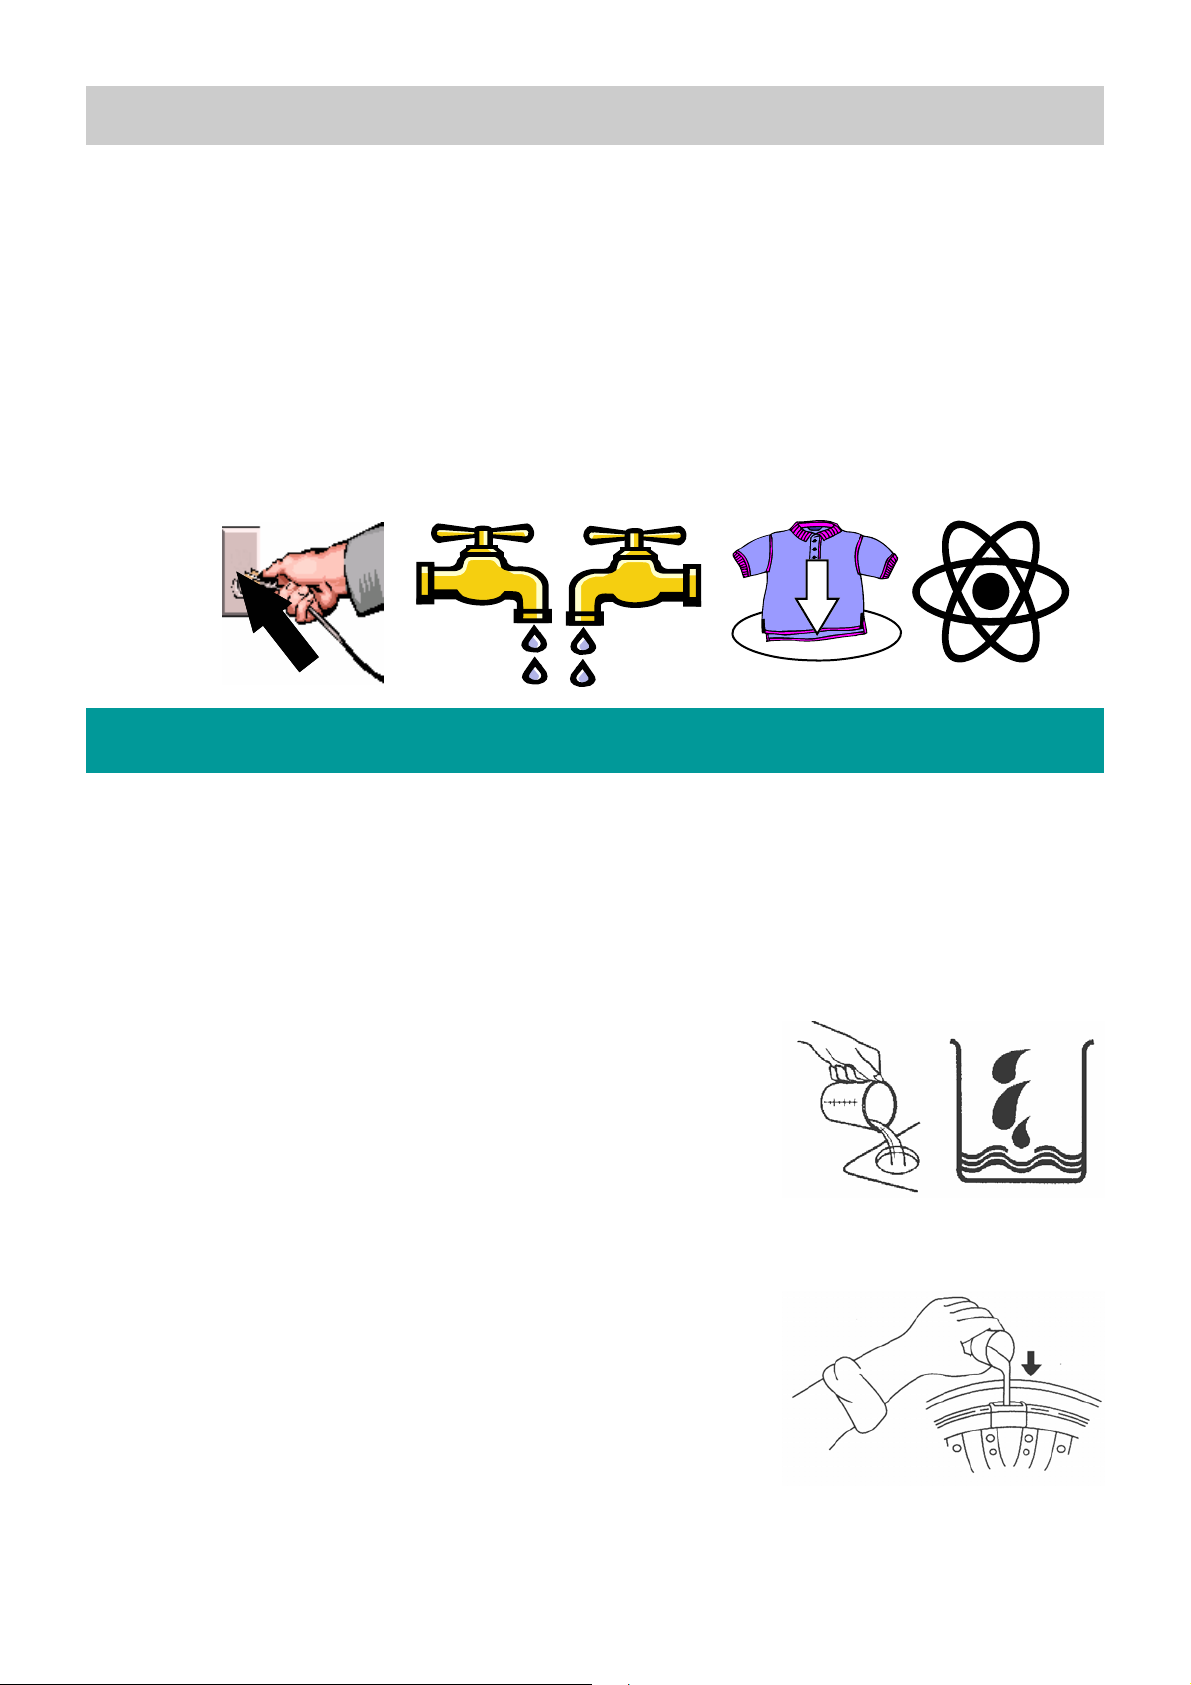
BEFORE ANY OF THE WASH OPTIONS ARE SELECTED YOU MUST FIRST:
• Insert the power plug into an earthed wall socket and switch on.
• Open the hot and cold water taps.
• Load the washing into the machine.( see Loading)
• Add detergent and if necessary softener and bleach.( See Adding detergents)
•
Close the lid.
•
NOTE: DO NOT OPEN THE HOT WATER TAP BY ITSELF.
•
IT IS ESSENTIAL TO OPEN THE COLD WATER TAP FOR ALL PROGRAMMES.
THE MACHINE RINSES IN COLD WATER EVEN WHEN USING A HOT WASH.
COLD
HOT
OPTIONAL
Operation procedure
LOADING DETERGENT
• Only use detergents specifically designed for top loading automatic washing machines.
• Gently pull the detergent drawer open.
• Pour the detergent, the quantity of which is dependent on the wash load, into the deter-
gent drawer and close the drawer.
ADDING BLEACH
• If desired, liquid chlorine bleach may be added to the
bleach inlet as marked on the machine.
• Do not allow bleach to spill onto clothing in the tub as un-
diluted bleach will damage the fabrics.
• The machine will automatically dispense the bleach at the
appropriate time during the wash cycle.
ADDING SOFTENER
• If desired liquid fabric softener may be added to the sof-
tener dispense located on the rim of the tub.
• Pour an amount of softener, as recommended by the
manufacturer, into the dispenser.
• Avoid spilling the softener on fabrics in the wash tub.
• The machine will automatically dispense the softener at
the appropriate time during the final rinse.
Page 10
Page 11

Operation procedure continued
STARTING THE MACHINE
• Close the lid.
• Press the POWER ON pad.
• Select the desired wash cycle ( either fully automatic FUZZY or any of the pre-
programmed washes BLANKET, ECONOMY, WOOL, SOAK or any customised programme).
• Press the START / HOLD pad.
• The machine will complete the selected programme.
Maintenance
CLEANING THE EXTERIOR
• Wipe up any detergent, bleach and other spills as they occur with
a soft damp cloth.
• Periodically clean the cabinet with a damp warm soapy cloth, rinse and dry.
CLEANING THE interior
• Clean the interior with 250ml of chlorine bleach mixed with 500ml of detergent.
• Run the washer through a complete cycle.
• Repeat the process if necessary.
CARE
• Do not put sharp metal objects in the washer.
• Check all pockets for pins, paper clips coins, bolts, screws and such.
• Do not lay these items on top of the washer after emptying the pockets.
HOLIDAY CARE
• If the washer will not be used for an extended period it is advisable to:
• Remove the electric plug from the wall socket.
• Turn off the water supply to the washer.
CLEANING THE LINT FILTER
1
2
Filter
Frame
Pull the filter frame upwards. Turn the filter inside out and
remove any lint and dirt
under running water.
Page 11
3
Re-shape the filter mesh
and fit the filter frame
back in it’s slot.
Page 12
Maintenance continued
CLEANING THE WATER INLET FILTER
• Periodically clean the water inlet filter.
• Remove the power plug from the wall socket.
•
Turn off the water taps.
•
Separate the inlet hose and remove the mesh filter.
•
Clean the filter with an old toothbrush and re-fit.
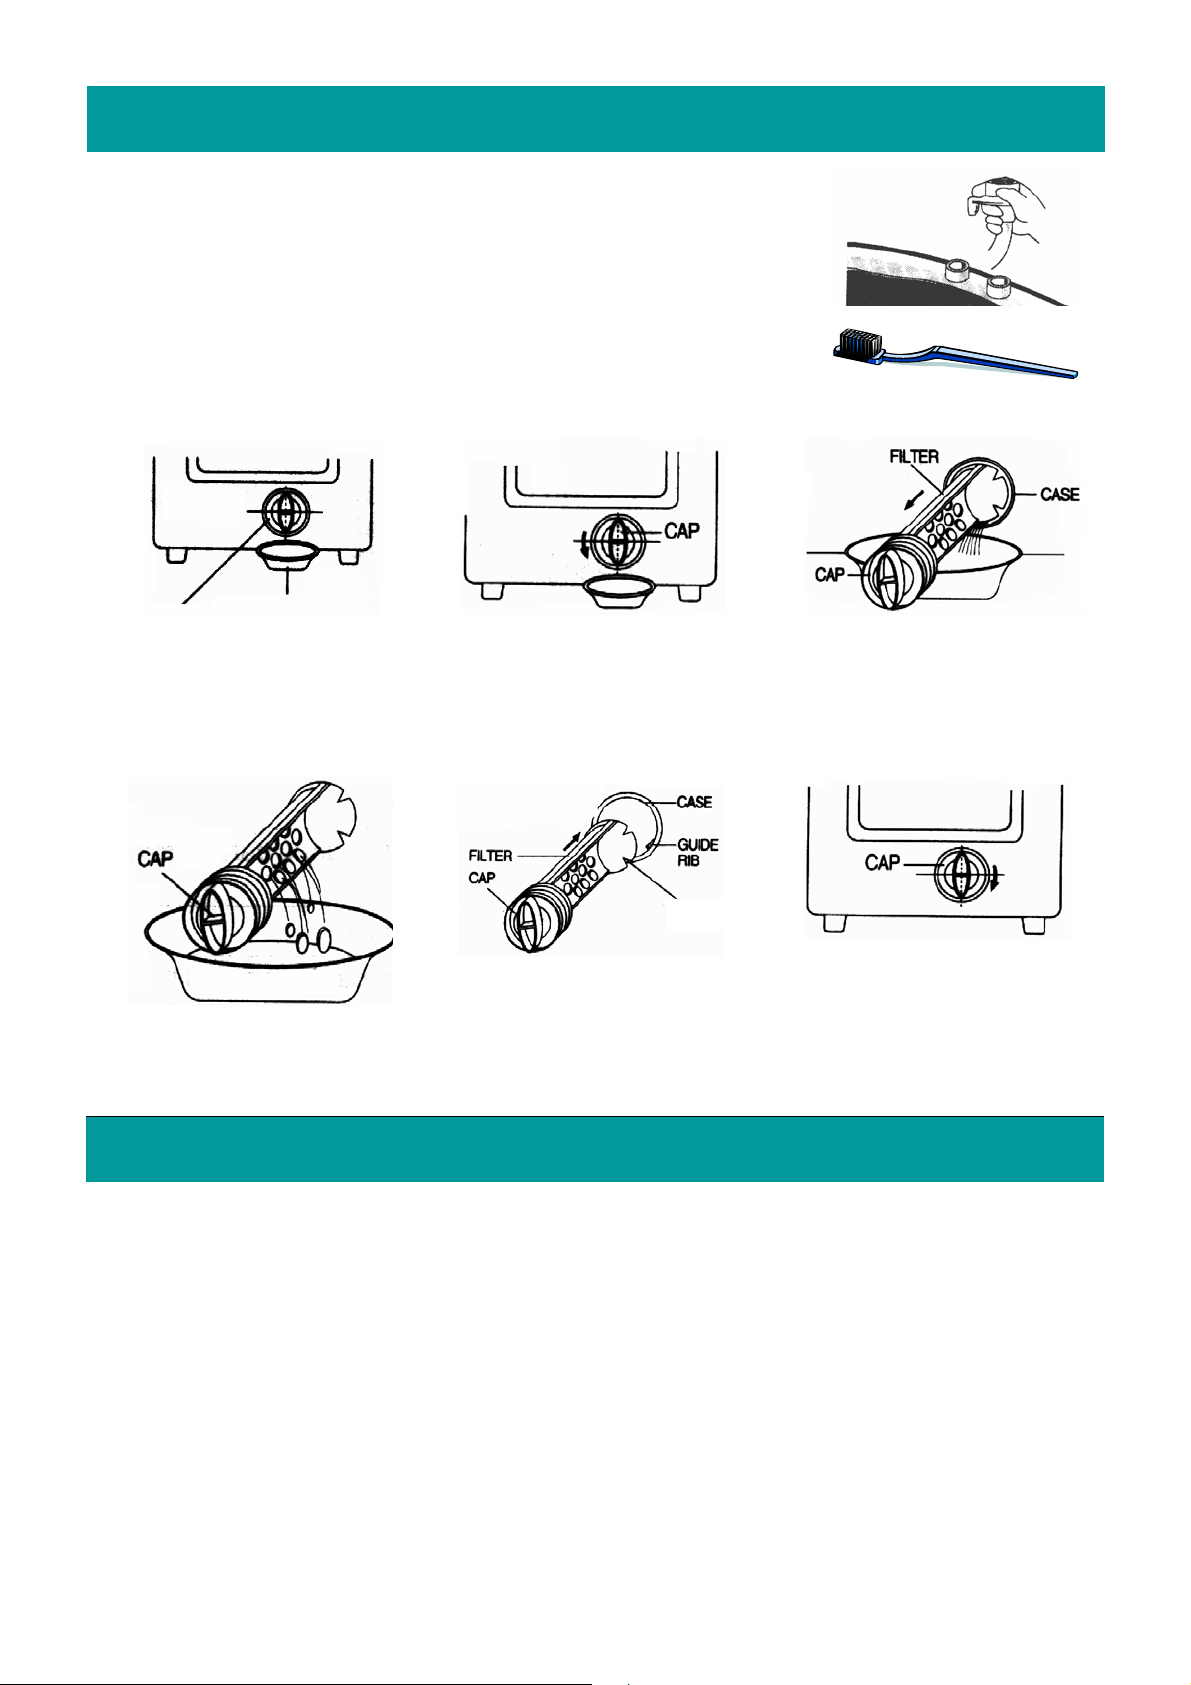
CLEANING THE DRAIN FILTER
Place a shallow con-
tainer under the drain-
filter to collect any
residual water spillage.
Clean the drain filter.
Technical specifications
Turn the filter cap in an
anticlockwise direction.
GROOVE
Re-fit the filter along the
guides ensuring that
the groove in the filter
aligns with the guide rib.
Pull the filter assembly
out.
Tighten the cap by turn-
ing it in a clockwise
direction.
Power source AC 220-240V / 50 Hz
Power consumption 430 W
Dimensions ( W x H x D ) in mm. 598 x 956 x 643
Unit weight 43kg
Standard water consumption 207 litres
Water level for High, Medium, Low, Small 88, 75, 61, 48 litres
Wash mode Double action type Air bubble + Pulsator.
Page 12
Page 13

Trouble shooting
Most problems are easily solved if the cause is known
BEFORE CALLING A SERVICE TECHNICIAN PLEASE CHECK THE FOLLOWING:
PROBLEM
The machine will not operate at all.
There is a restricted or no water supply.
If the water flow has not stopped after 20
minutes the fault code IE will be displayed
and a buzzer will sound to indicate a problem.
The machine will not drain.
If draining is not completed in a specified
time limit the fault code OE will be displayed and a buzzer will sound to indicate
a problem.
The machine will not spin.
If the load is unbalanced the spin cycle
will be interrupted and the machine will
stop. The unbalanced condition may be
corrected by re-filling the tub, rinsing and
then draining. If the unbalanced condition
remains, the fault code UE will be displayed and a buzzer will sound indicating
a problem.
CHECK
Is there a power failure?
Has the power pad been pressed?
Has the start / hold pad been pressed?
Is there water in the tub?
See if the tap is open?
Are the water pipes frozen?
Has the water supply been cut off?
Is the inlet filter blocked?
Is the drain hose blocked or frozen?
Is the drain hose kinked or deformed?
Is the end of the drain hose immersed in
water?
Is there excessive dirt in the drain filter?
Is the wash load located all to one side?
Has the machine been installed on an uneven floor?
Is the lid open? The fault code LE will be
displayed if this is the case.
Page 13
Page 14

Service Centres
If you have followed the instructions and still have a problem, contact the
nearest Defy Service Centre. They will be able to advise you on any aspect
of the product or send a qualified technician to repair it.
BLOEMFONTEIN
CAPE TOWN
EAST LONDON
JOHANNESBURG
DURBAN
POLOKWANE
PORT ELIZABETH
PRETORIA.
P.O.Box 1691 Bloemfontein. 9300.
160 Long Street, Hilton,
Bloemfontein 9301.
Tel. 051 400 3900
P.O.Box 953 Milnerton. 7435
5A Marconi Rd.
Montague Gardens, 7441.
Tel. 021 551 8314
P.O.Box 7006 East London 5200.
16 Bowls Rd. Arcadia,
East London 5201.
Tel. 043 743 7100
P.O.Box 27150 Benrose 2011.
Cnr. Mimetes & Kruger Sts. Denver ext.12
Johannesburg. 2094.
Commercial Head Office, Tel. Sales, Administration,
Distribution, Commercial Head Office, National Groups,
Contracts and Credit.
Tel. 011 621 0200 or 011 621 0300
P.O.Box 12004 Jacobs 4026.
174 Teakwood Rd.
Jacobs 4052.
Tel. 031 460 9712
P.O.Box 1719 Polokwane 0700.
87 Nelson Mandela Drive.
Superbia 0699.
Tel. 0152 92 1166 / 7 / 8 / 9.
P.O.Box 2971 North End 6056.
3 Sidon Str.North End
Port Elizabeth.6001.
Tel. 041 401 6400
P.O.Box 19768 Pretoria West 0117.
Block A1 Old Mutual Industrial Park.
Cnr. D.F.Malan Drive & Moot Str. Hermanstad. 0082.
Tel. 012 377 8300
OTHER AREAS ARE SERVICED BY OVER 200 AUTHORISED SERVICE AGENTS.
PLEASE CONSULT THE NEAREST REGIONAL DEFY SERVICE CENTRE FOR DETAILS
Page 14
Page 15

Warranty
This certificate is issued by DEFY APPLIANCES LIMITED manufacturers of Defy and Ocean
products, hereinafter the Company, to the original purchaser only, of the appliance described on the
certificate and shall constitute the only warranty given in respect of this appliance.
The Company warrants to the original purchaser that for a period of TWO YEARS from date of
purchase the appliance is free from defect under normal domestic use, both in workmanship and material, subject to the following conditions.
1. Repair or replacement of any part of this appliance, found by the Company to be defective, shall
be at the election of the Company. The Company reserves the right to effect such service through
any of its Service Divisions or Authorised Service Dealers. The cost of such service shall be borne
by the Company in full, provided that the appliance is located no further than 50km from a Company Service Centre or an Authorised Service Dealer. Where the appliance is located beyond the
50km radius, the purchaser shall be liable for the standard travelling charges, as determined by the
Company.
CARRY IN SERVICE Microwave ovens, Compact cookers and small appliances are repaired in our
service centres and are not collected from the customers home. Faulty units should be delivered to
the purchasing dealer or to the nearest Company Service Centre for warranty repairs.
2. Vitreous enamelware, fuses and lamps are specifically excluded from these warranties. It is an ex-
press condition of these warranties that the purchaser takes due care and attention in the use and
maintenance of the appliance. Abuse, misuse in conflict with operating instructions, connection to
incorrect voltages and subjection to commercial use shall release the Company from its obligations.
3. This warranty shall become void and cease to operate if the appliance is dismantled by, or any re-
pairs to the appliance are effected by any persons not duly authorised by the Company, or if substitute parts not approved by the Company are used in the appliance, or if the serial number of the appliance is removed.
4. The Company shall not be responsible for damages resulting from fire, flood, civil disturbances or
any Act of God. The Company shall not, in terms of these warranties be responsible nor held liable
for any consequential loss or damage of any kind caused by or due to the failure or malfunction of
the appliance.
5. The Company shall not be responsible for transportation or other costs other than those incurred
within the provisions of Point 1 of this Certificate.
6. These warranties shall not apply to the appliance if it is purchased or used beyond the borders of
the Republic of South Africa, Namibia, Botswana, Swaziland and Lesotho.
7. Where service is requested under warranty and no fault or defect can be found
by the Company, all costs incurred will be for the purchaser's account.
8. This Certificate as well as your invoice will serve as proof of purchase. For the
purpose of warranty, it will be essential to produce this Certificate and invoice.
Failure to do so, will render the purchaser liable for service costs.
KEEP THIS CERTIFICATE AND SALES INVOICE AS
PROOF OF PURCHASE FOR WARRANTY PURPOSES.
Page 15
Page 16

You can rely on Defy
The Manufacturer strives for continuous improvements. For this reason, the text
and illustrations in this book are subject to change without notice.
Part Number 062 959
Page 16
 Loading...