

Page 1

Instruction Manual v. 1.0
Infrared Thermometer
Page 2

Page 3
1
Introduction
Introduction
The PosiTector Infrared Thermometer (IRT) is a hand-held,
electronic instrument that measures surface temperature quickly
and accurately. It consists of a body (Standard or Advanced) and
probe (pg. 2).
This Quick Guide summarizes the basic functions of the Gage.
Download the full instruction manual at:
www.defelsko.com/manuals.
The PosiTector IRT powers-up when the center navigation button
is pressed. Readings are updated automatically each second.
To preserve battery life, the instrument powers down after
approximately 5 minutes of no activity. All settings are retained.
Basic Operation
Basic Operation
1.Remove the protective rubber cap from the probe.
2.Power-up Gage by pressing the center navigation button.
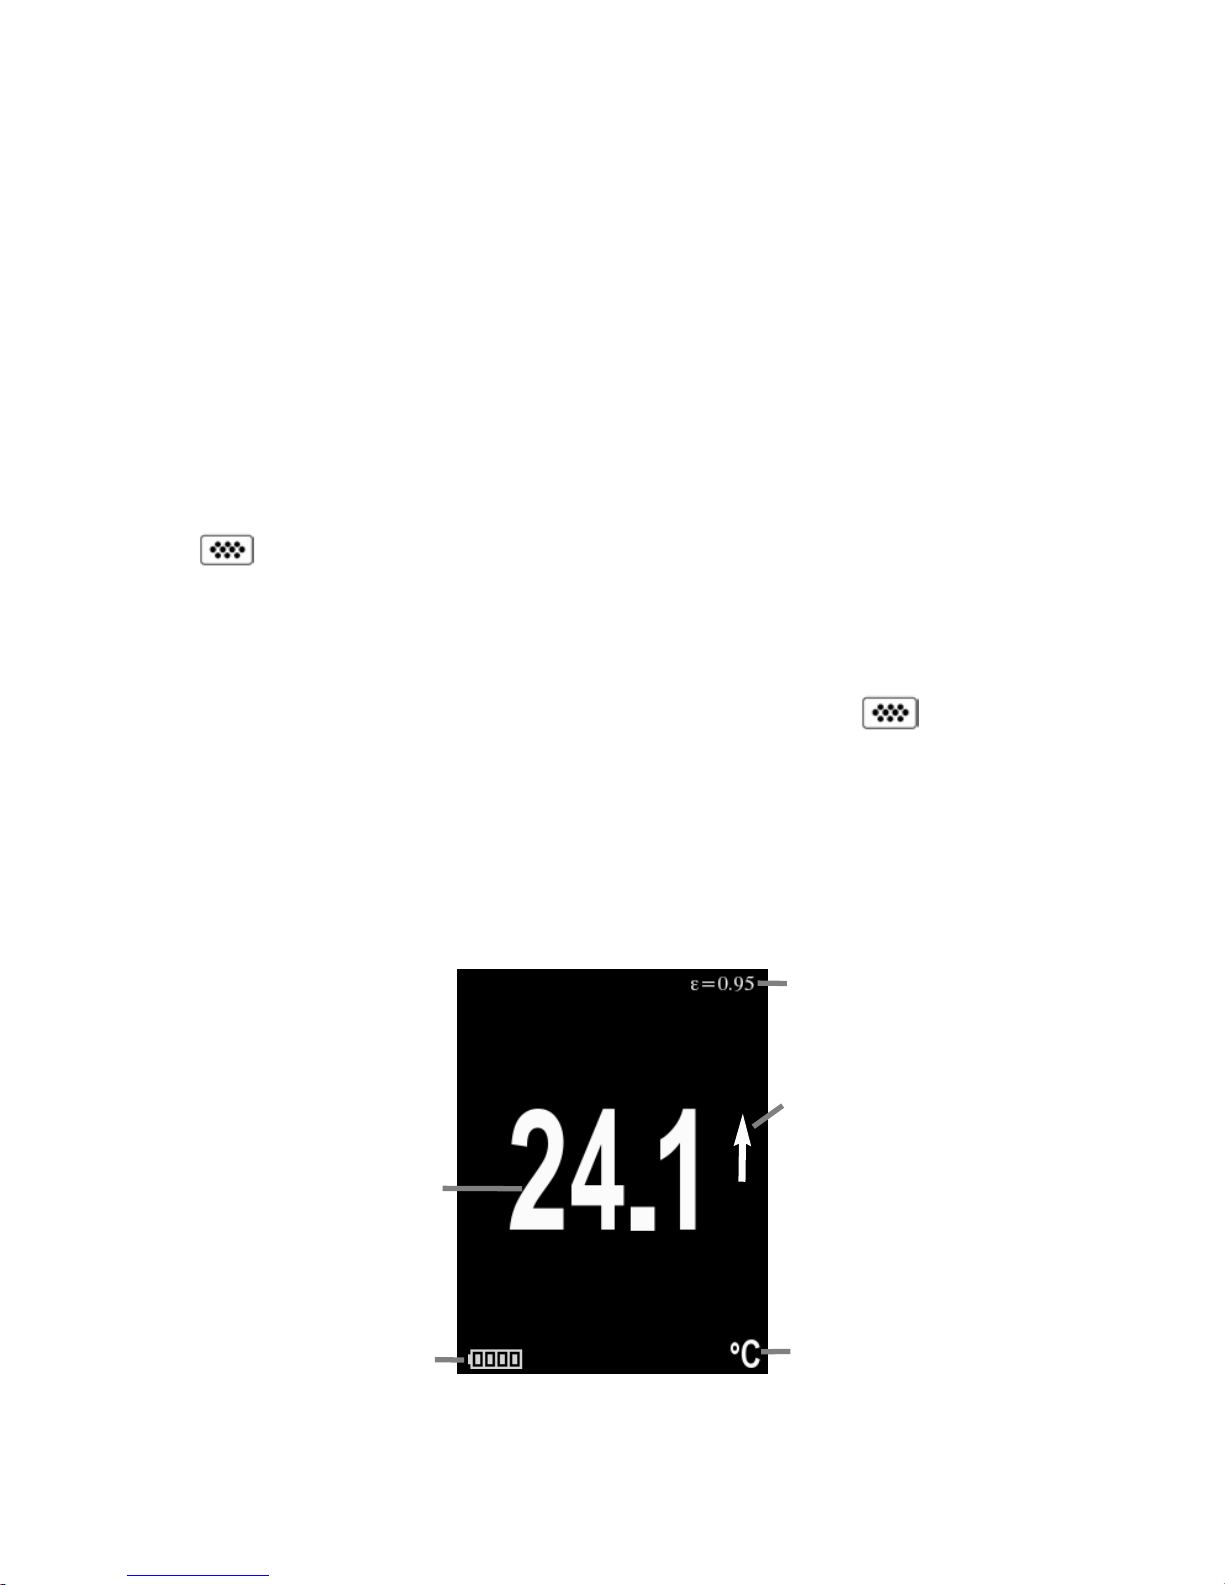
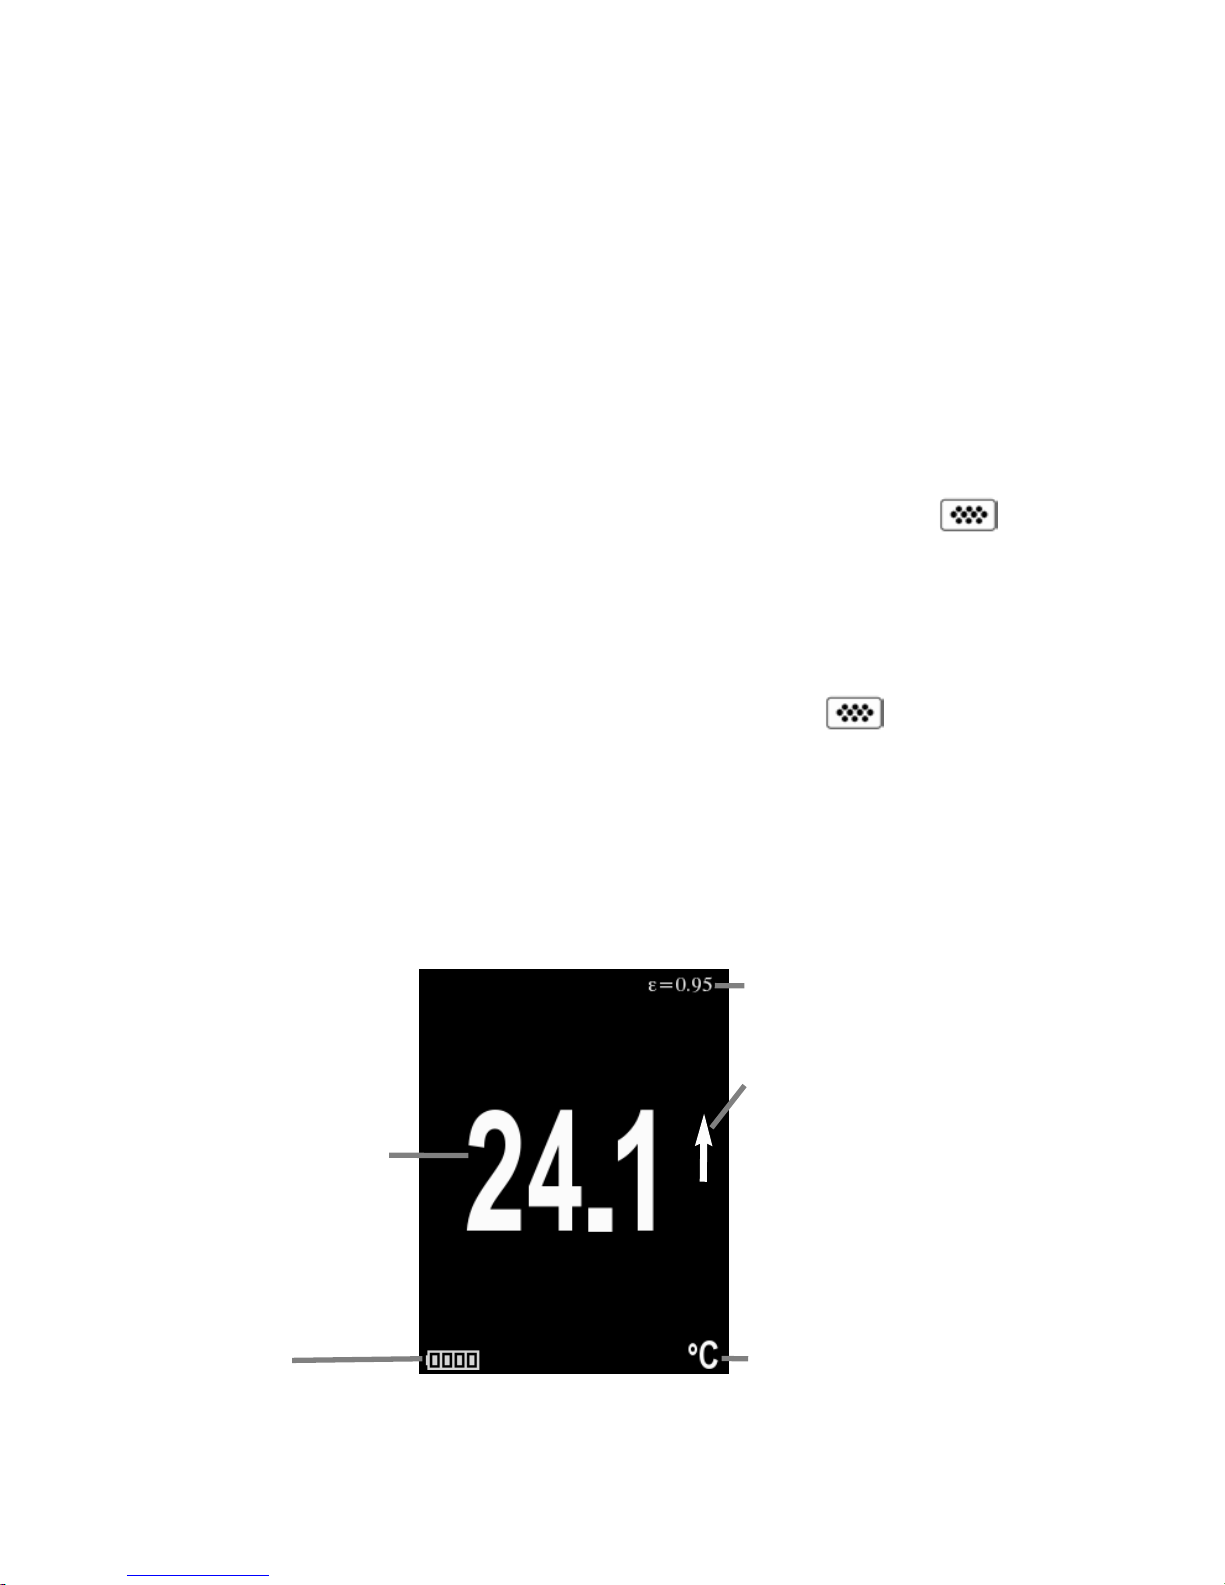
Typical Display
The infrared temperature sensor immediately begins measuring.
Press the (+) button to pause the measurement. Press (+) again to
resume.
SmartTrend Indicator -
Appears when surface
temperature is rising or
falling. Does not appear
when measurement is
stable.
Emissivity (pg.5)
Battery Indicator
Surface
Temperature
Temperature Unit
Page 4
Scroll through
Trend Charts
(Advanced only)
Access the Menu
Pause / Resume
Activate Laser Pointer
(Down Button)
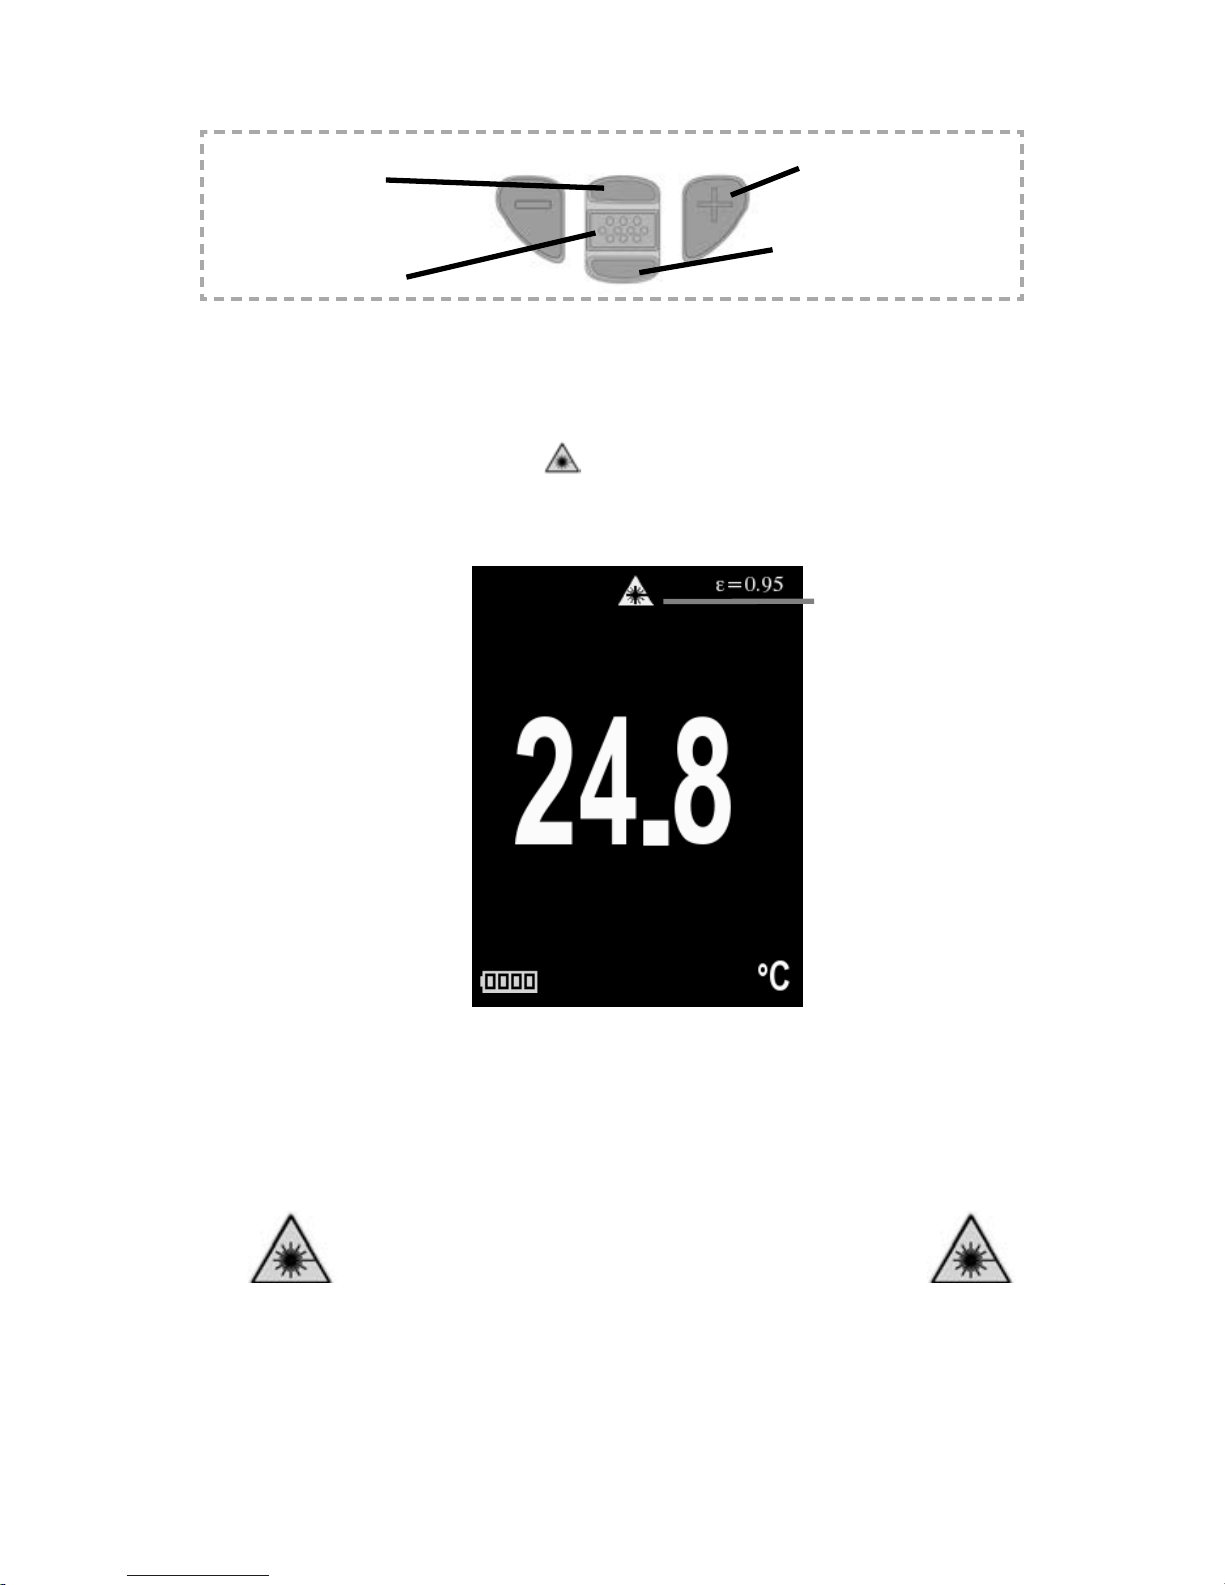
Button Functions — Normal Operation
Laser Pointer
Press and hold the Down button to activate the laser pointer. The
laser helps aim the infrared temperature sensor. Release the button to deactivate laser. The symbol is displayed on the screen
when the laser is active.
2
Laser Active
Laser Radiation. Do not stare into beam. Class 2 laser product.
Laser Parameters:
Wavelength: 652 nm
Laser power for classification: <1.0 mW
Beam diameter: <2mm at aperture
Divergence: 1 mRad
Mode of operation: CW
EN/IEC 60825-1:2014 (2007 USA)
Page 5
3
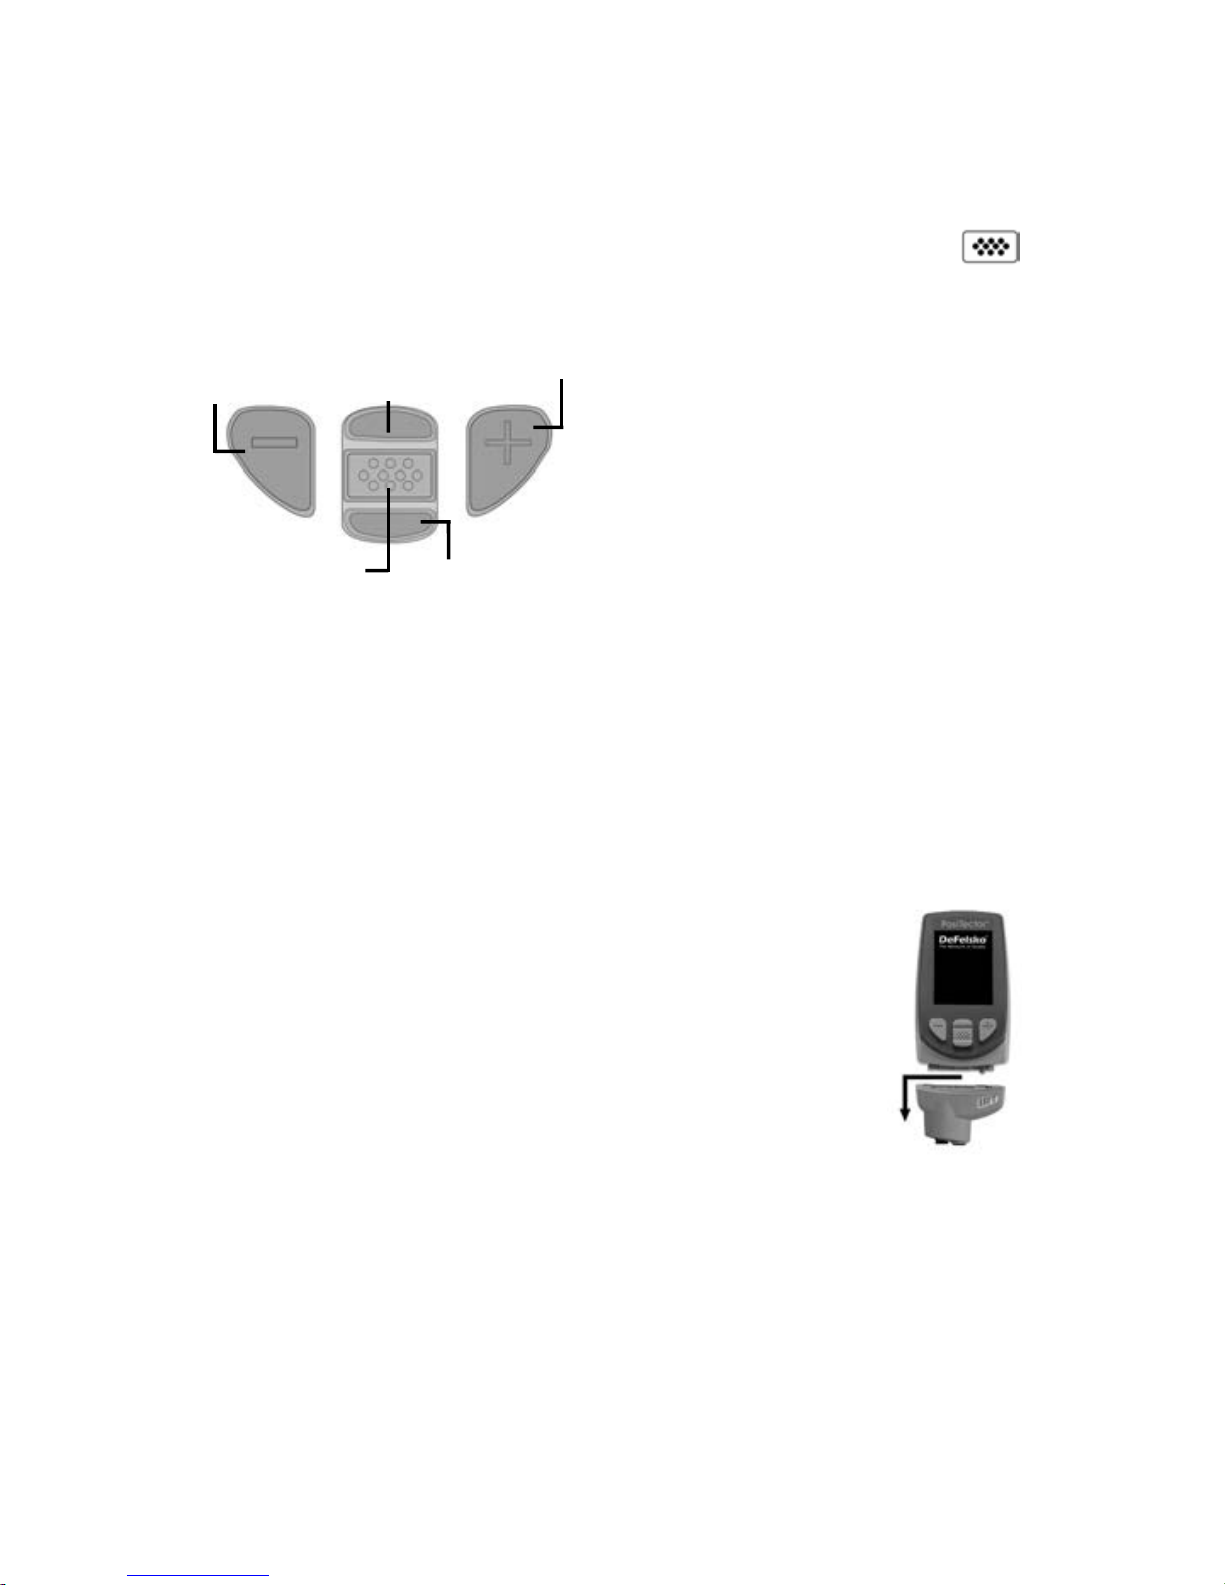
When powered-up, the PosiTector automatically
determines which probe is attached and does a selfcheck.
To disconnect a probe from a body, slide the plastic
probe connector horizontally (in the direction of the
arrow) away from the body. Reverse these steps to
attach a different probe. It is not necessary to powerdown the Gage when switching probes.
The PosiTector gage body accepts a wide variety of probe t
ypes
including magnetic, eddy current and ultrasonic coating thickness,
environmental, surface profile, shore hardness durometer, salt
contamination and ultrasonic wall thickness probes. See
www.defelsko.com/probes
Probes
Probes
Menu Operation
Menu Operation
Gage functions are menu controlled. To access the Menu, power-up
the Gage, then press the center navigation button.
To navigate, use the Up and Down buttons to scroll vertically and
to SELECT.
Press the (
+
) button to switch
pages in a multipage menu.
Press the
(-) button to return to
the previous menu or page.
Select Exit to exit from any menu.
Previous Page
(Exit)
Up
Next Page
Access the Menu
(Center/Select)
Down
Page 6
4
Emissivity refers to a material’s ability to emit infrared energy,
compared to an ideal black surface at the same temperature. The
ratio varies from 0 to 1, and each material has a specific emissivity
associated with it. The PosiTector IRT has built in emissivity
settings for certain materials as well as a user-adjustable
emissivity option (pg. 6).
Most organic and painted surfaces have an emissivity of around
0.95, and are ideal surfaces for accurate infrared temperature
readings. Shiny or reflective surfaces can be difficult to measure
with an infrared thermometer, as they tend to reflect ambient
infrared energy instead of their own. To compensate for this, cover
such surfaces with flat paint or a piece of electrical tape. Allow the
paint or tape to acclimate to the surface’s temperature, and take a
measurement over the paint or tape.
Emissivity
Emissivity
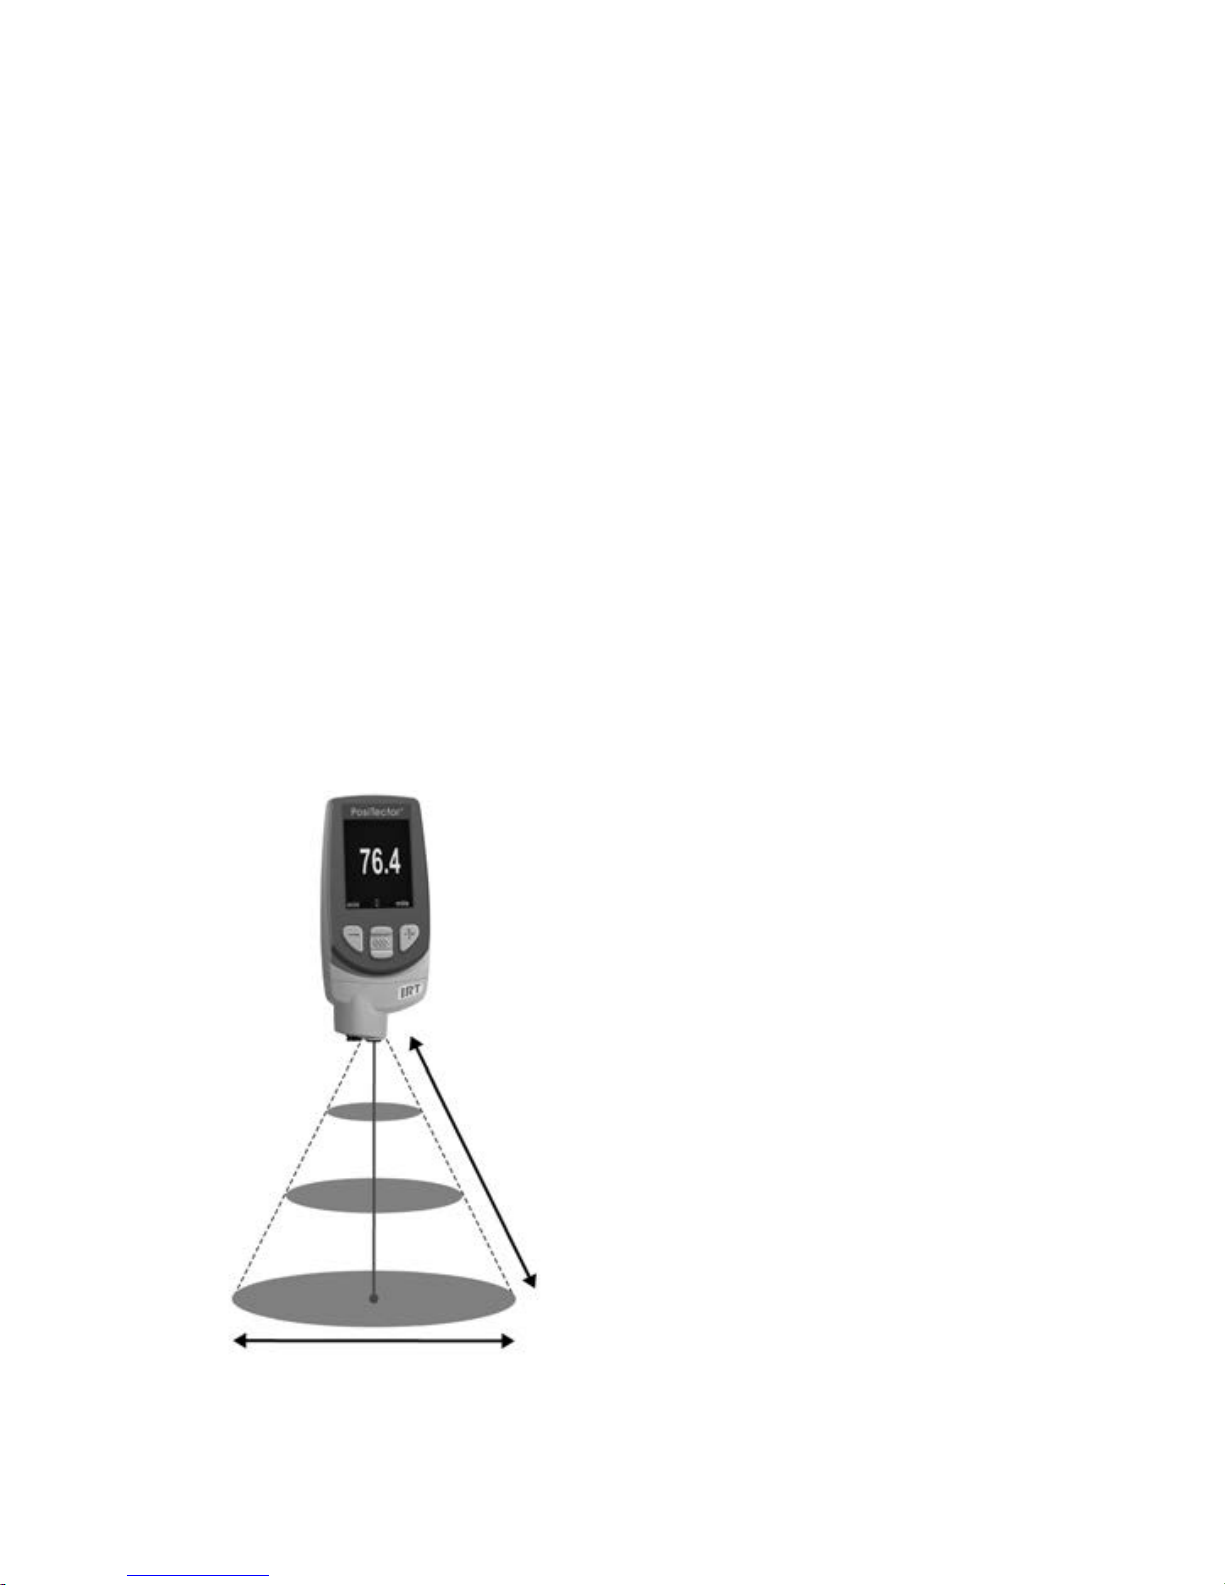
Distance to Spot Ratio (D:S)
Distance to Spot Ratio (D:S)
The distance to spot ratio refers
to the relationship between the
diameter of the area being
measured compared to the
instrument’s distance from the
area. As the distance (D) from
the target increases, the spot
size (S) of the area being
measured by the unit becomes
larger. The D:S ratio of the
PosiTector IRT is 5.7:1. For
example, when the instrument is
100 cm (40 inches) from the
target, the spot size will be about
18 cm (7 inches) in diameter.
Distance
Spot Size
Page 7

5
Setup Menu
Setup Menu
Reset
Reset (menu reset) restores factory settings and returns the Gage
to a known condition. The following occurs:
- All batches and stored readings, batch names and screen
captures are erased.
- Menu settings are returned to the following:
Memory = OFF
Statistics = OFF
HiLo Alarm = OFF
Trend Chart = None
Auto Dim = ON
Bluetooth & Stream = OFF
WiFi & Access Point = OFF
Display = None
Units
Converts the displayed units for temperature. Celsius (°C) or
Fahrenheit (°F)
Perform a more thorough Hard Reset as follows:
1 Power down the Gage and wait 5 seconds.
2 Simultaneously press and hold the (+) and center
buttons until the Reset symbol appears.
This returns the Gage to a known, “out-of-the-box” condition.
It performs the same function as a menu Reset with the addition of:
- Bluetooth pairing info is cleared.
- Alarm settings are set to defaults.
- Menu settings are returned to the following:
NOTE:
Units = Celsius
Flip Lock = OFF
Auto Sync .net = ON
Sound = ON
Language = English
Emissivity = 0.95
Battery Type = Alkaline
Backlight = Normal
Bluetooth Smart = OFF
USB Drive= ON
Date, Time and WiFi settings are not affected by either Reset.
Page 8
6
Emissivity
Select to disable the auto rotate display feature.
Flip Lock
Turns the trend chart on. The trend chart can also be turned on by
pressing the Up navigation button from the main screen.
Trend Chart
Displays information on the gage body and attached probe.
Gage Info
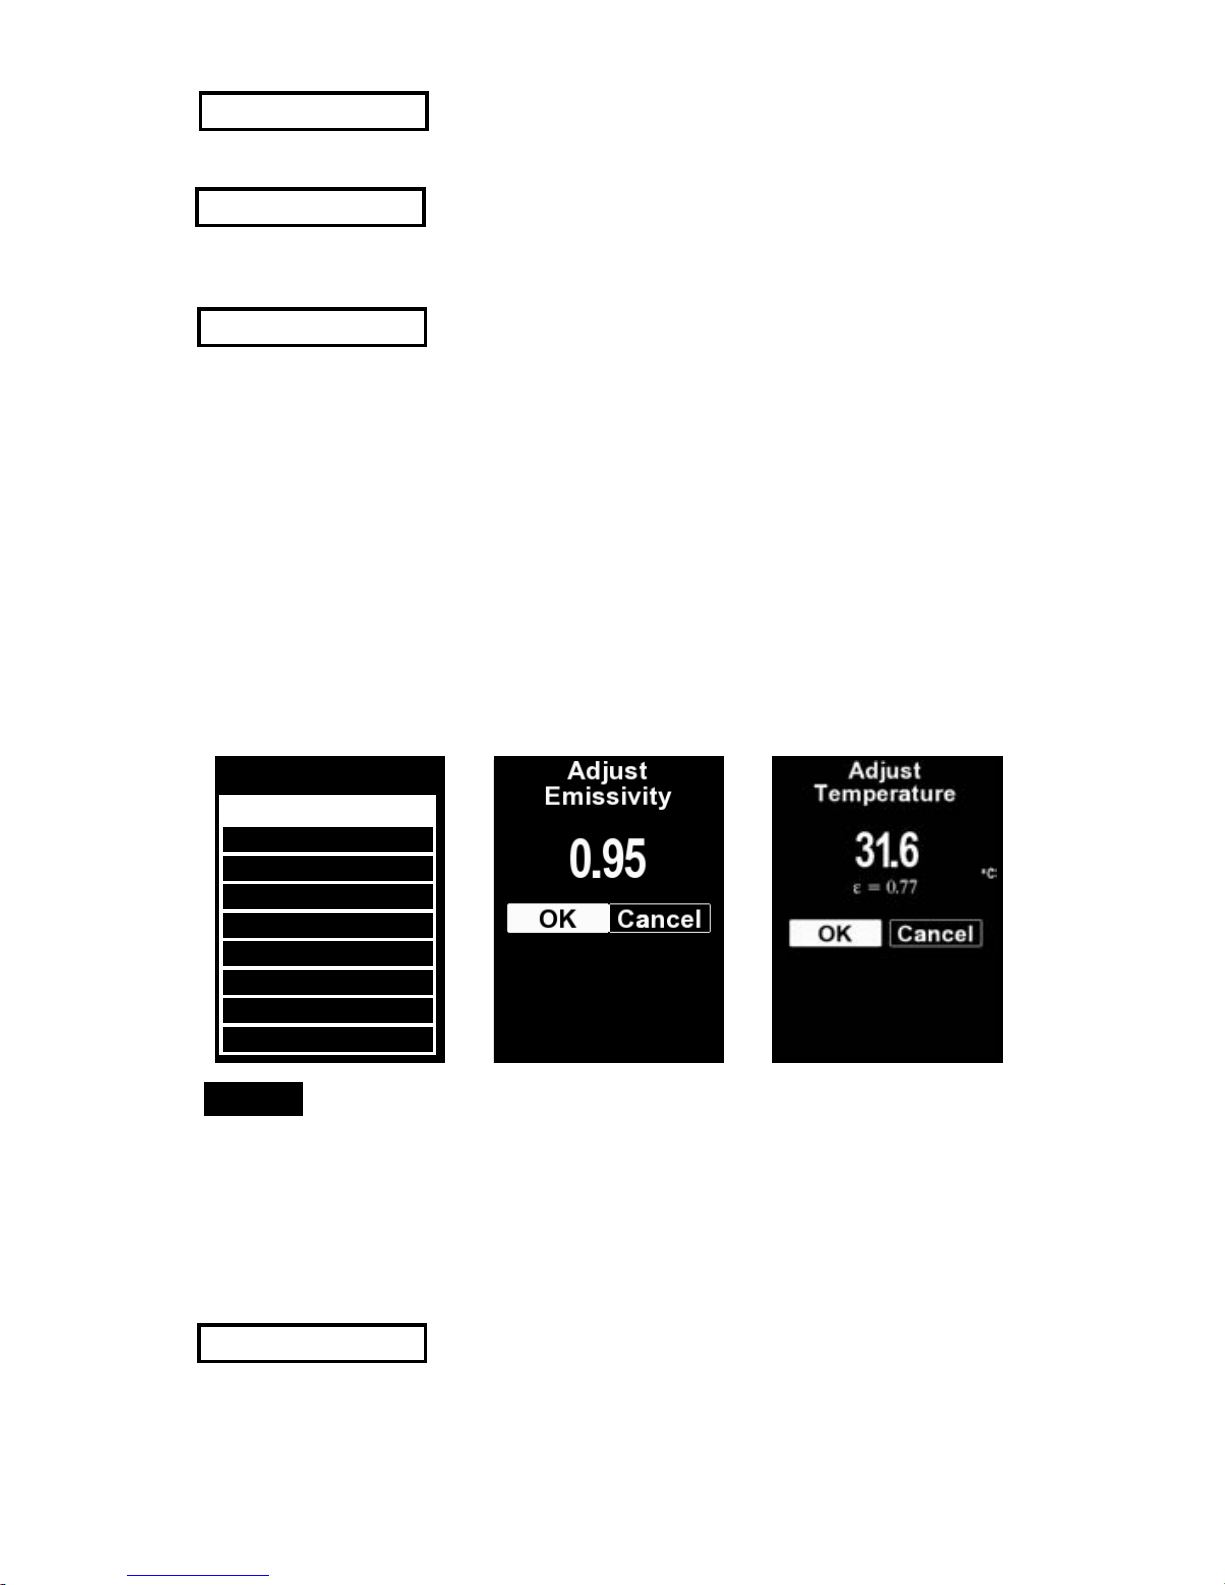
Sets the emissivity ratio for the PosiTector IRT infrared
temperature sensor.
Select Custom to manually adjust the emissivity value or to adjust
to a known temperature. Emissivity is automatically calculated
when adjusting to a temperature.
See
NOTE
below.
Alternatively, use one of the following preset options:
Aluminum (rough) = 0.07 Plastics = 0.94
Zinc (Galvanized) = 0.25 Steel (Oxidized) = 0.95
Concrete = 0.54 Wood = 0.95
Paint = 0.96
NOTE:
Depending on surface treatment, metals such as blasted steel can
have a broad range of emissivity values. Adjusting to a known
temperature (measured by a direct contact surface temperature
probe) on a representative sample will assist in obtaining an
accurate emissivity value.
Zinc Galv. 0.25
Steel Ox. 0.95
Al Rough 0.07
Concrete 0.54
Wood 0.95
Paint 0.96
Plastics 0.94
Custom
Exit
Emissivity
Page 9
7
Memory Management
Memory Management
The PosiTector IRT has internal memory storage for recording
measurement data. Stored readings can be reviewed on-screen or
accessed via computers, tablets and smart phones. Each reading
is date and time-stamped. Press the (+) button to store a
measurement.
The symbol appears when the Gage is set to store readings.
Standard models
store up to 250 readings in one batch.
Selects the type of batteries used in the Gage from a choice of
“Alkaline”, “Lithium” or “NiMH” (Nickel-metal hydride
rechargeable). If NiMH is selected, the gage will trickle charge the
batteries while connected via USB to a PC or optional AC charger.
The battery state indicator icon is calibrated for the selected
battery type. No damage will occur if the wrong battery type is
selected.
Battery Type
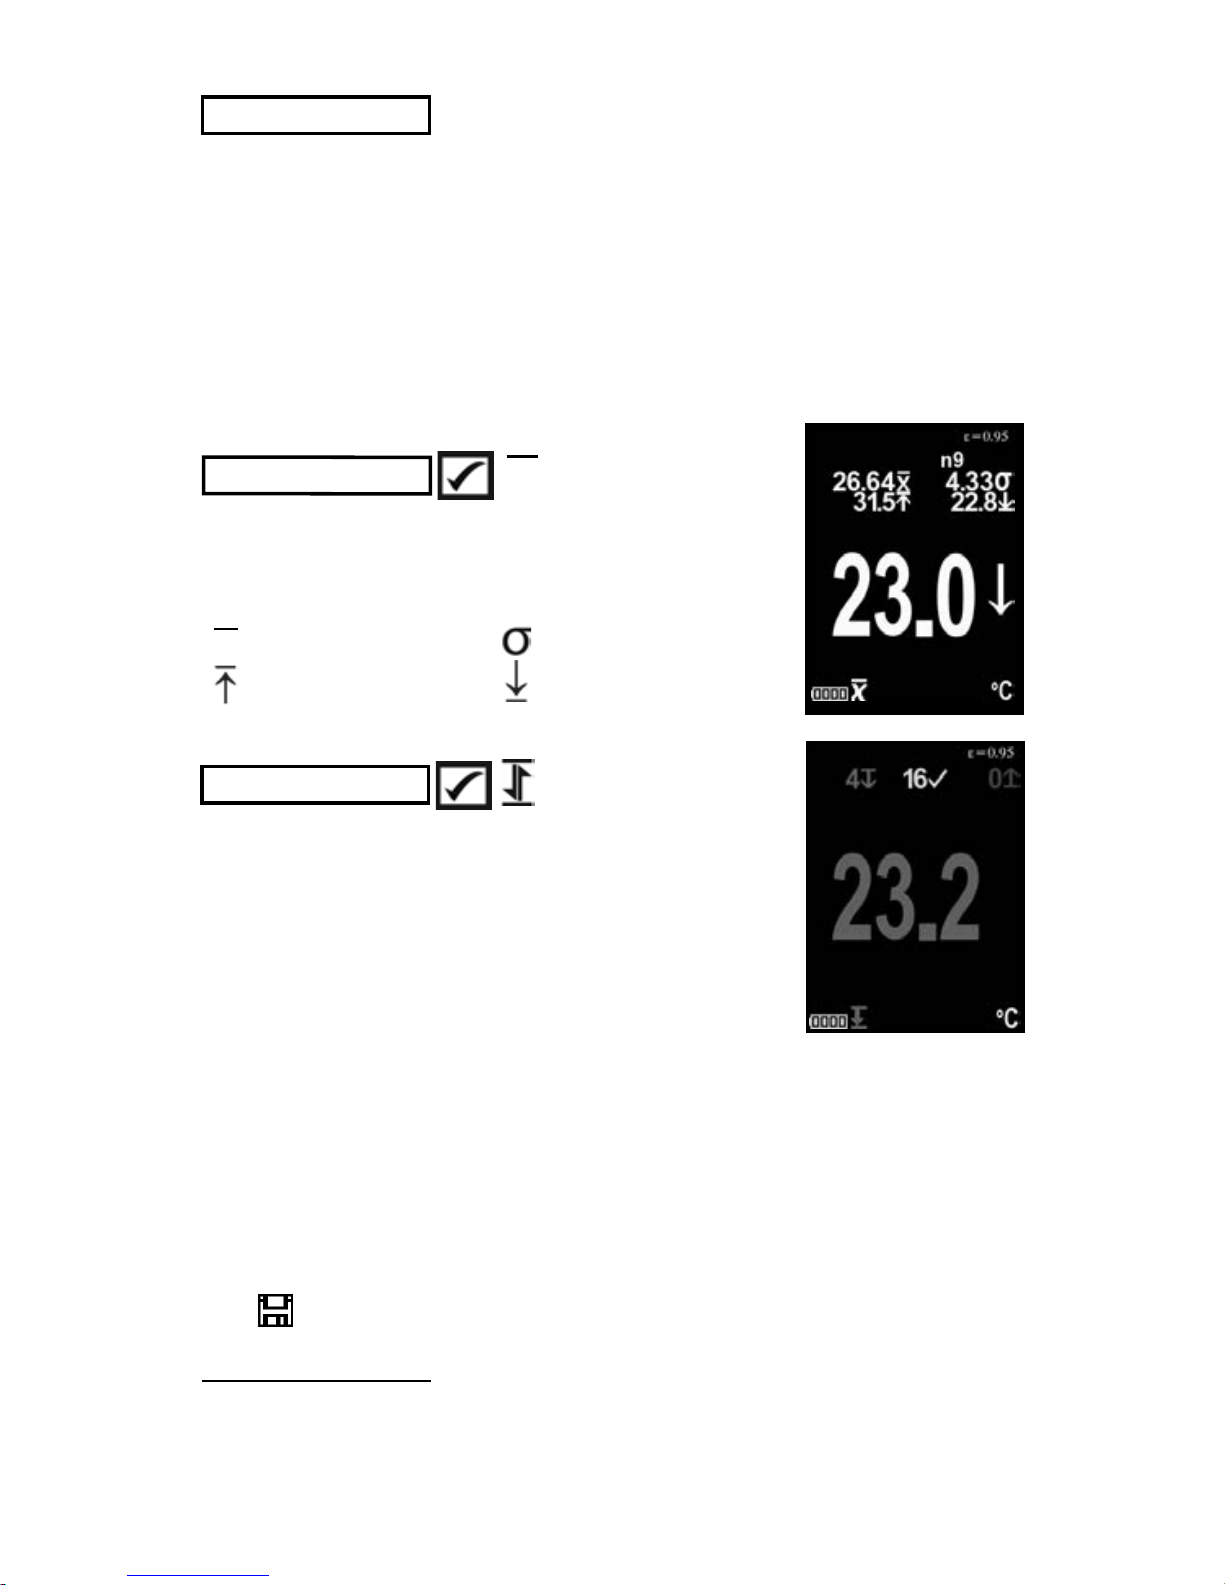
A statistical summary will appear on the
display. Reset Statistics by pressing the
(
-
)
button. Press (
+
)to pause statistics.
Statistics
HiLo Alarm
Allows Gage to visibly and audibly alert the
user when readings exceed user-specified
limits.
– Average
– Maximum Value
– Standard Deviation
– Minimum Value
X
X
Statistics Mode
Statistics Mode
Page 10

8
Accessing Stored Measurements Data
Accessing Stored Measurements Data
DeFelsko offers the following free solutions for viewing, analyzing
and reporting data:
PosiSoft USB Drive - Connect the Gage to a PC/Mac using the
supplied USB cable. View and print readings and graphs using
universal PC/Mac web browsers or file explorers. No software or
internet connection required. USB Drive must be selected in the
Gage’s “Connect > USB” menu (pg. 9).
PosiSoft Desktop - Powerful desktop software (PC/Mac) for
downloading, viewing, printing and storing measurement data.
Includes a customizable, templated PDF Report Generator. No
internet connection required.
PosiSoft.net - Web-based application offering secure, centralized
storage of measurement data. Access your data from any web
connected device.
PosiTector App - (
Advanced models only, s/n 784000+
) App for
compatible iOS and Android smart devices. Permits users to create,
save and share professional PDF reports. Add images and notes
using the smart device’s camera and keyboard.
Advanced models store 100,000 readings in up to 1,000 batches.
“New Batch” closes any open batch and creates a new batch name
using the lowest available number. New batch names are date
stamped when they are created.
Screen Capture
Press both (-)(+) buttons at any time to capture and save an image
copy of the current display. The last 10 screen captures are stored
in memory and can be accessed when connected to a computer
(see PosiSoft USB Drive below).
Scroll through display
modes
(Advanced only)
Delete last reading
Access the Menu
Store a reading in memory
(Advanced only)
Activate Laser Pointer
(pg. 2)
Page 11
9
The above WiFi, USB and Bluetooth menus contain a Sync .net
Now option. When selected, the Gage immediately synchronizes
stored measurement data via its respective communication
method (internet connection required). Alternatively, select Auto
Sync .net from within the USB connect menu to automatically
synchroniz e upon connection to a PC. Additional measurements
added to memory while connected are synchronized only when the
USB cable is disconnected and reconnected, or when the Sync
.net Now option is selected. WiFi connected gages automatically
attempt synchronization upon power-up.
Sync .net Now
Connect Menu
Connect Menu
When USB Drive is checked , the PosiTector gage uses a USB
mass storage device class which provides users with a simple
interface to retrieve stored data in a manner similar to USB flash
drives, digital cameras and digital audio players. USB Drive is also
required to import stored measurements into PosiSoft Desktop
software (pg. 8).
When connected, power is supplied through the USB
cable. The batteries are not used and the body will not
automatically power down. If rechargeable (NiMH) batteries are
installed, the instrument will trickle charge the batteries.
Allows individual readings to be sent to a computer, printer or
compatible device as they are taken using Bluetooth wireless
technology. See www.defelsko.com/bluetooth
Bluetooth
(Advanced models only)
Allows connection to your local wireless network or mobile hot
spot. Ideal for using your network’s internet connection for
synchronizing stored measurements with PosiSoft.net (pg. 8).
See www.defelsko.com/wifi
WiFi
(Advanced models only)
NOTE:
USB
PosiSoft Desktop is required when using a USB
connection to synchronize measurements with PosiSoft.net.
NOTE:
Page 12
10
Sync Batches
Select batches to flag them for synchronization to the
PosiTector App. New batches created while Bluetooth Smart is
enabled are automatically selected.
With Bluetooth Smart enabled, select Sync Batches to transfer
selected batches to the PosiTector App. This is useful when
switching between smart devices, as only datasets and batches
that have yet to be synchronized with any smart device are
synchronized automatically.
The Gage will perform a Hard Reset (pg. 5) after an
update. All stored measurements will be erased from memory.
Updates
Determine if a software update is available for your Gage.
See www.defelsko.com/update
WARNING:
When Enabled , allows communication with a smart device
running the PosiTector App (pg. 8) via auto-pairing Bluetooth
Smart (BLE) wireless technology.
Bluetooth Smart
(Advanced models only, s/n 784000 and greater)
Send Batches
Transfers selected batches to the PosiTector App (useful
when switching between devices).
The Send Batches option is visible in the menu when the Gage
is connected to a smart device running the PosiTector App.
If Bluetooth Smart is disabled, data from batches
selected in the Sync Batches menu are held in a queue until
communication with the PosiTector App is re-established.
NOTE:
Page 13

11
Technical Data
Technical Data
Conforms to: ISO 8502-4, BS7079-B and ASTM D3276
Returning for Service
Returning for Service
Before returning the instrument for service…
1. Install new batteries in the proper alignment as shown within
battery compartment.
2. Examine the surface temperature sensor for dirt or damage.
3. Perform a Hard Reset.(see pg. 5)
4. If issue is not resolved, Updates (pg. 10) your PosiTector
gage body and re-attempt measurements.
IMPORTANT:
If you must return the Gage for service, please fill out and include
the Service Form located at www.defelsko.com/support with the
Gage. Be sure to also include the probe, your company name,
company contact, telephone number and fax number or email
address.
Laser Pointer Class 2 < 1mW
Distance to Spot Ratio (D:S) 5.7:1
Emissivity Adjustable
Response Time <500 µs (95% response)
Spectral Response 2 - 14 µm
Specifications
Range Accuracy Resolution
Temperature
Range
–70˚ to 380˚ C
±
1˚C + 1%
@ 23˚ C ambient
0.1˚ C
–94˚ to 716˚ F 0.1˚ F
Page 14

12
LASER LIGHT DO NOT STARE INTO BEAM
Class 2 laser product
652 nm < 1mW CW
EN/IEC 60825-1-2014 (2007 USA)
serial number
Manufacturer’s Identification
and certification label
Complies with FDA
performance standards for
laser products except for
deviations pursuant
to Laser Notice No. 50,
dated June 24, 2007
DeFelsko Corporation
800 Proctor Avenue
Ogdensburg, New York
13669-2205 USA
Hazard Warning and
Explanatory Label
Aperture
Product Model
Product Labeling
Product Labeling
Page 15

13
Laser Precautions:
Use of controls or adjustments or performance of
procedures other than those specified herein may result in
hazardous radiation exposure.
Do not open or modify the product. There are no user service
components within the product; any service or repair is to be
performed only by DeFelsko Corporation personnel. No scheduled
maintenance is necessary to maintain product in compliance with
laser safety standards.
To prevent eye damage and personal injury:
n
Read all safety information before you use the product.
n
Do not use the product if it operates incorrectly.
n
Do not use the product if the housing appears cracked
or otherwise damaged.
n
Use the product only as specified.
n
Do not look into the laser. Do not point the laser directly
or indirectly (off reflective surfaces) at persons.
CAUTION:
DeFelsko Corporation
800 Proctor Avenue
Ogdensburg, New York 13669-2205 USA
+1-315-393-4450
Page 16

Page 17

Manual de Instrucciones v. 1.0
Termómetro Infrarrojo
Page 18
1
Introducción
Introducción
El termómetro infrarrojo PosiTector Infrared Thermometer (IRT)
es un instrumento electrónico, portátil que mide la temperatura
superficial con precisión y rapidez. Consiste de un cuerpo
(Standard o Advanced) y una sonda (pg. 2).
Esta guia rápida recoge las funciones básicas del dispositivo.
Descargue el manual de instrucciones en:
www.defelsko.com/manuals.
El PosiTector IRT se enciende al pulsar el botón central .
Para conservar las baterías, el Medidor se apaga después de
aproximadamente 5 minutos de inactividad. Se conservarán
todas las configuraciones.
Inicio rápido
1.Retire la goma de la tapa protectora roja de la sonda si la lleva.
2.Encienda el Medidor pulsando el botón central.
Pantalla típica
El sensor de temperatura infrarrojo mide de manera continua
inmediatamente. Presione la tecla (+) para interrumpir la medición
a tiempo real. Presione la tecla (+) nuevamente para continuar
midiendo.
Indicador inteligente
de Tendencia –
Aparece cuando la temperatura superficial esta
incrementando o decrementando. No aparece
cuando la temperatura
es estable.
Emisividad (pg.5)
Indicador de
batería
Temperatura
Superficial
Unidad de Temperatura
Page 19

Desplazamiento
por los gráficos de
tendencia
(sólo
Avanzado)
Acceso al menú
Pausa / Reinicio
Activar Laser
(
Abajo)
Funciones de los botones - Funcionamiento normal
Apuntador Laser
Pulse y mantenga presionado el botón de desplazamiento hacia
abajo para activar el apuntador laser. El laser permite orientar el
sensor de temperatura infrarrojo a una ubicación determinada.
Libere el botón para desactivar el laser. El indicador de (advertencia) laser aparece en la pantalla todo el tiempo que el laser
está activo.
2
Laser Activo
Radiación láser. NO MIRE DIRECTAMENTE. Producto laser Clase 2
Parámetros láser:
Longitud de onda: 652 nm
Potencia láser para clasificación: <1.0 mW
Diámetro del haz: <2mm at aperture
Divergencia : 1 mRad
Modo de operación: CW
EN/IEC 60825-1:2014 (2007 USA)
Page 20

3
Una vez encendido, el PosiTector determinará
automáticamente el tipo de sonda conectado y
realizará una comprobación automática.
Para desconectar una sonda de la base del PosiTector
deslice el conector de la sonda de plástico
horizontalmente (en la dirección de la flecha)
separándola de la base PosiTector. Invierta los pasos
para conectar una sonda diferente. No es necesario
apagar el medidor cuando se cambia la sonda.
La base del medidor PosiTector acepta una amplia variedad de
tipos de sonda incluyendo las necesarias para medir espesor de
recubrimientos tipo magnético, de corrientes de Foucault y de
ultrasonido; sondas para perfiles de superficie, ambiental, dureza
Shore y sondas de espesor de pared por ultrasonidos. Consulte
www.defelsko.com/probes
Sondas
Sondas
Menú Operación
Menú Operación
Las funciones del medidor se controlan con un menú. Para acceder
al menú encienda el medidor y pulse el botón central.
Para desplazarse utilice los botones Arriba y Abajo y para
SELECCIONAR.
Página Anterior
(Salir)
Arriba
Siguiente Página
Acceso al Menú
(Centro/Seleccione)
Abajo
Presione el botón (+) para
cambiar de página en el
menú formado de varias
páginas.
Presione el botón (
-
) para
regresar al menú o página
anterior.
Seleccione Salir para cerrar
el menú del medidor.
Page 21

4
Emisividad es un término que se refiere a la estabilidad de un
material para emitir energía infrarroja comparando dicha emisión
contra la energía emitida por una superficie negra ideal a la misma
temperatura. La proporción varia desde 0 hasta 1, cada material
tiene una emisividad específica asociada a si mismo. El
PosiTector IRT tiene pre-configurados algunos ajustes de
emisividad para ciertos materiales y además cuenta con la opción
de ajuste por el usuario (pg. 6).
La mayoría de las superficies con recubrimientos orgánicos tienen
una emisividad cercana a 0.95 y son superficies ideales para
obtener mediciones precisas. Las superficies reflejantes o muy
brillantes pueden ser difíciles de medir porque tienden a reflejar la
energía infrarroja del ambiente mas que la suya propia. Para
compensar esta interferencia, cubra estas superficies con pintura
mate o con cinta de electricista para aislar. Permita que la
temperatura en la pintura o la cinta se atempere con la
temperatura de la superficie. Tome una lectura sobre la pintura o
la cinta.
Emisividad
Emisividad
La relación de la distancia del
equipo con la dimensión del
objetivo se refiere a la variación
del diámetro del área (en la
superficie del objetivo) y su
relación con la distancia lineal
entre el sensor IR y el objetivo.
Cuando se incrementa la distancia entre el sensor y el objetivo
(D), también aumenta el
diámetro del área al rededor del
punto (S) en la superficie. La
relaciónción D:S en el PosiTector
IRT
es 5.7:1. Por ejemplo, cuando el instrumento se aleja 100
cm (40”) del objetivo, el diámetro
del punto (S) será de 18 cm (7”)
sobre la superficie de prueba.
Distancia
Tamaño de punto
Relación entre la distancia y
Relación entre la distancia y
la dimensión del objetivo (D:S)
la dimensión del objetivo (D:S)
Page 22

5
Menú Establecer
Reinicio
El Reinicio restaura las configuraciones de fábrica y devuelve al
equipo a su condición de fábrica. Es práctico cuando se quiere
empezar de nuevo. Ocurre lo siguiente:
Todas las series y los conjuntos de datos se borrarán.
Las configuraciones del menú serán de nuevo las siguientes:
Memoria =
Apagado
Estadísticas =
Apagado
Alarma Hi Lo = Apagado
Gráfica de tendencia = Ninguna
Auto Dim = ON
Bluetooth y Stream = Apagado
WiFi y Access Point = Apagado
Pantalla = Ninguna
Unidades
Convierte las unidades de temperatura desplegadas en la
pantalla. Temperatura (todos los modelos): Celsius (°C) o
Fahrenheit (°F).
Realice un Reinicio Completo (Hard Reset) de esta manera:
1 Apague el dispositivo y espere 5 segundos.
2 Pulse simultáneamente los botones (+) y el central
hasta que el símbolo de reinicio aparezca.
Esto restablecerá el medidor a su condición conocida de fábrica.
Realiza la misma función que el Reinicio y además:
- La información de conexión Bluetooth se borrará.
- Los valores de alarma regresan a los configurados por el
fabricante.
- Las configuraciones del menú serán de nuevo las siguientes:
Unidades = Celsius
Rotar LCD = OFF
Auto Sync .net = ON
Sonido = ON
Idioma = Inglés
Emisividad = 0.95
Tipo de bateria = Alcalina
Luz de Pantalla = Normal
Bluetooth Smart = OFF
USB Drive = ON
La hora y la fecha y la configuración de WiFi no se verán
afectadas por ningún Reinicio.
NOTA:
Page 23

6
Establece la tasa de emisividad para el sensor de temperatura
infrarrojo del PosiTector IRT.
Seleccione "Custom" (Personalizar) para ajustar manualmente el
valor de emisividad o para ajustarse a una temperatura conocida.
El valor de emisividad se calcula automáticamente cuando se
ajusta el instrumento a una temperatura. Vea la NOTA siguiente:
Selecciona Ajustar para introducir un valor o para seleccionar una
de las siguientes opciones:
Aluminio (áspero) = 0.07 Plásticos = 0.94
Zinc (Galvanizado) = 0.25 Acero(Oxidado) = 0.95
Concreto = 0.54 Madera = 0.95
Pintura = 0.96
Emisividad
Bloquea la pantalla de girar automáticamente cuando el instrumento
es rotado de posición.
Bloqueo de Rotación
Enciende la gráfica de tendencia. La gráfica de tendencia también
puede ser presionando el botón “arriba” desde la pantalla principal.
Gráfica de Tendencia
Despliega información del cuerpo del equipo y del sensor conectado.
Información del Equipo
NOTA:
Dependiendo del tratamiento superficial, los metales como el acero
limpio con chorro abrasivo pueden adquirir un amplio rango de valores
de emisividad. Ajustar el valor en la pantalla contra a una temperatura
conocida (medida previamente con una sonda de temperatura de tipo
de contacto superficial) en una muestra representativa será de ayuda
para obtener con precisión un valor de emisividad apropiado.
Zinc Galv. 0.25
Acero Oxidado 0.95
Al áspero 0.07
Concreto 0.54
Madera 0.95
Pintura 0.96
Plásticos 0.94
Personalizar
Salir
Emisividad
Page 24

El PosiTector IRT dispone de memoria de almacenamiento
interna para registro de datos de mediciones. Podrá revisar las
mediciones almacenadas en pantalla o acceder a ellas mediante
ordenadores, tablets y smartphones. Todas las mediciones
almacenadas incluyen fecha y hora. Presione el botón (+) para
almacenar una medición. Las lecturas pueden ser registradas
manualmente (usando el botón (+), o de manera automática
activando el modo “Auto Log”.
El símbolo aparecerá cuando el medidor esté configurado para
almacenar los datos de medición.
7
Gestión de memoria
Gestión de memoria
Selecciona el tipo de baterías utilizadas en el medidor entre
"Alcalina" "Litio" o "NiMH" (Níquel - metal híbrido recargable). Si se
ha seleccionado NiMH el medidor cargará las baterías poco a
poco si está conectado por USB a un PC o a un cargador de red
(USBCA). El símbolo indicador de estado de batería se calibrará
según el tipo de bateria seleccionado. No se producirá ningún
daño si el tipo de batería del medidor no coincide con el tipo de
batería seleccionado.
Batería
En la pantalla aparecerá un resumen de las
estadísticas. Elimine la última lectura del
resumen presionando el botón (-). Pulse (+)
para borrar las estadísticas.
Estadísticas
Alarma HiLo
El medidor alertará visual y acústicamente al
usuario cuando las mediciones excedan los
límites que haya especificado.
X
Modo Estadísticas
Modo Estadísticas
–
Promedio
–
Valor máximo
–
Desviación estándar
–
Valor mínimo
X
Page 25

8
Acceso a los datos de mediciones almacenados
Acceso a los datos de mediciones almacenados
DeFelsko ofrece las siguientes soluciones gratuitas para la
visualización, análisis y presentación de datos:
PosiSoft USB Drive - Conecta el calibrador a un PC / Mac mediante
el cable USB suministrado. Vea e imprima lecturas y gráficos
utilizando navegadores web o exploradores de archivos para PC /
Mac. No se requiere conexión a internet ni software especializado.
Deberá seleccionar USB Drive en el menú del dispositivo "Connectar
> USB" (pág. 9).
PosiSoft Desktop - Potente software de usuario (PC / Mac) para
descargar, ver, imprimir y almacenar datos de medición. Incluye un
generador de informes PDF personalizable con plantilla. No requiere
conexión a Internet.
PosiSoft.net - Aplicación basada en Web que ofrece un
almacenamiento seguro y centralizado de los datos de medición.
Acceda a sus datos desde cualquier dispositivo conectado a Internet.
PosiTector App -
(Modelos Advanced, números de serie 784000+)
Aplicación para compatible con dispositivos iOS y Android. Permite a
los usuarios crear, guardar y compartir informes profesionales en PDF.
Añade imágenes y notas con la cámara y el teclado del dispositivo.
Modelos Advanced almacenan 100.000 lecturas en hasta 1.000
series. "Lote Nuevo" cierra cualquier serie abierta y crea un nuevo
nombre de serie con el número más bajo disponible. Los nombres de
series nuevas quedarán registrados con la fecha en que se crearon.
Captura de Pantalla
Pulse simultáneamente los botones (-) y (+) en cualquier momento
para copiar y guardar una imagen de la pantalla actual. Las últimas 10 impresiones de pantalla están almacenadas en memoria y
podrá acceder a ellas cuando esté conectado a un ordenador
(consulte PosiSoft USB Drive, pág. 8).
Desplazamiento por los
modos de visualización
(sólo Advanced)
Eliminar última lectura
Acceso al menú
Crear una nueva serie
(sólo Advanced)
Modelos Standard almacenan 250 lecturas en una sola serie.
Laser Activo
(pg. 2)
Page 26

9
Todos los menús antes mencionados - WiFi, USB y Bluetooth contienen la opción “Sync.net Now”. Cuando se selecciona, el
equipo se sincroniza inmediatamente conforme al método de
comunicación seleccionado (requiere conexión a internet).
Alternativamente, selecciona Auto Sync .net desde del menú de
conexión para sincronizar automáticamente cuando se cuente con
una conexión con una PC. Las mediciones adicionales que se
agreguen a la memoria mientras este activa la conexión por cable
USB serán sincronizadas hasta que termine la conexión actual y
se vuelvan a conectar por este medio, o cuando esté seleccionada
la opción “ Sync.net Now”. Los equipos con conexión WiFi, se
sincronizan desde el momento que son encendidos.
Sync .net Now
Se requiere instalar el PosiSoft Desktop a una PC cuando se
usa la conexión por cable USB con el propósito de sincronizar las
mediciones con PosiSoft.net.
NOTA:
Menú Connectar
Cuando USB Drive está activado , el medidor PosiTector
utiliza una clase de dispositivo de almacenamiento masivo USB
que proporciona a los usuarios con una interfaz sencilla para
recuperar los datos almacenados de una manera similar a
unidades flash USB, cámaras digitales y reproductores de audio
digital. El USB Drive también es necesario para importar las
mediciones guardadas con la aplicación PosiSoft Desktop (pág.8).
Cuando está conectado, la alimentación se obtiene a través del
cable USB. Las baterías no estarán en uso y la base no se apagará
automáticamente. Si dispone de baterías recargables (NiMH), el equipo
las cargará poco a poco.
Permite enviar lecturas individuales a un ordenador
o dispositivo compatible con tecnología Bluetooth.
Consulte www.defelsko.com/bluetooth
Bluetooth
(
Sólo modelos Advanced
)
Permite la conexión a su red inalámbrica local o punto de
acceso. Ideal para el uso de su conexión a internet y sincronizar
las mediciones almacenadas con PosiSoft.net (pág. 8).
Consulte www.defelsko.com/WiFi
WiFi
(Sólo modelos Advanced)
NOTA:
USB
Page 27

10
Sinc. Lotes
Seleccione series para marcarlas para su sincronización
con la App PosiTector. Las nuevas series creadas con el
Bluetooth Smart activado se seleccionarán automáticamente.
Con Bluetooth Smart activado, seleccione Sinc. Lotes para
transferir a la App de PosiTector las series seleccionadas.
Es útil al cambiar entre dispositivos smart, ya que sólo se
sincronizarán automáticamente las lecturas y series que aún
tienen que sincronizarse con cualquier dispositivo inteligente.
El medidor puede realizar un Reinicio
completo (pág. 5) tras una actualización. Todas las mediciones
guardadas se borrarán de la memoria.
Actualizar
Determina si hay actualizaciones disponibles de software para su
medidor. Consulte www.defelsko.com/update
ADVERTENCIA:
Si está Activado , comunicará con dispositivos que ejecuten
la App PosiTector (pág.8)
mediante conexión automática
Bluetooth Smart (BLE).
Bluetooth Smart
(sólo modelos Advanced
con número de serie 784000+
Enviar Lotes
Transfiere las series seleccionadas a la App PosiTector
(útil cuando se trabaja con varios dispositivos).
La opción Enviar Lotes podrá verse en el menú cuando el
medidor esté conectado a un dispositivo que tenga installada la
App PosiTector.
Si Bluetooth Smart está desactivado, los datos de las
series seleccionadas en el menú Sinc. Lotes se incluirán en una
cola hasta que la comunicación con la App PosiTector se
restablezca.
NOTA:
(
Updates
)
(
Sincroniza Lotes
)
Page 28

11
Datos Técnicos
Datos Técnicos
Cumple con: ISO 8502-4, BS7079-B and ASTM D3276
Devolución para reparaciones
Devolución para reparaciones
Antes de devolver el instrumento para reparaciones…
1. Utilice baterías alcalinas nuevas verificando que estén
debidamente colocadas en el compartimiento de las baterías.
2. Examine la punta de la sonda por si está sucia o dañada.
3. Realice un Reinicio completo. (Hard Reset, pág. 5)
4. Si el problema no se resuelve, Actualice (Updates, pág. 10)
su base PosiTector y vuelva a intentarlo.
IMPORTANTE:
Si debe devolver el medidor para reparaciones, describa el
problema con detalle e incluya los resultados de medición, si los
tiene. Asegúrese también de incluir la sonda, el nombre de su
empresa, el nombre de la persona de contacto, sus números de
teléfono y de fax o su dirección de correo electrónico.
Website: www.defelsko.com/support.
Puntero Laser Class 2 < 1mW
Relación Distancia - dimensión de
Objetivo (D:S)
5.7:1
Emisividad Ajustable
Tiempo de Respuesta <500 µs (95% respuesta)
Respuesta Espectral 2 - 14 µm
Specifications
Limites Precisión Resolución
Rango de
temperatura
–70˚ to 380˚ C
±
1˚C + 1%
@ 23˚ C ambient
0.1˚ C
–94˚ to 716˚ F 0.1˚ F
Page 29

12
HAZ DE LUZ LASER NO MIRE DIRECTAMENTE
Producto laser Clase 2
652 nm < 1mW CW
EN/IEC 60825-1-2014 (2007 USA)
Número de serie
Etiqueta de identificación y calibración del fabricante.
Cumple con las normas de
desempeño de la FDA para
productos laser excepto por
las desviaciones indicadas
por la “Laser Notice No. 50”
con fecha de Junio 24 de
2007
DeFelsko Corporation
800 Proctor Avenue
Ogdensburg, New York
13669-2205 USA
Advertencia de peligro y
Etiqueta Explicativa
Aperture
Modelo del
Producto
Etiquetado del producto
Etiquetado del producto
Page 30

13
Precauciones con el Laser:
El uso de controle o ajustes o procedimientos de
desempeño diferentes a los especificados puede resultar en
exposición a radiaciones peligrosas.
No abra o modifique el producto. El instrumento no cuenta con
partes internas que requieran servicio por parte del usuario;
cualquier servicio o reparación deberá ser realizado por el
personal de DeFelsko Corporation. No se requieren
mantenimientos programados para mantener el producto en
c
onformidad con las normas de seguridad Laser.
Para prevenir daño en los ojos y daño personal:
n
Lea la información de seguridad antes de usar el producto.
n
No use el producto si este opera de manera incorrecta.
n
No use el producto si la carcaza presenta cuarteaduras
o si esta dañado de alguna otra manera.
n
Use el producto solo como se especifica.
n
No mire directamente en el laser. No apunte el laser directa o
indirectamente (incluyendo a través de superficies reflejantes)
a las personas.
Precaución:
Garantía limitada, solución única y
Garantía limitada, solución única y
obligación limitada
obligación limitada
La garantía única de DeFelsko, la solución, y la obligación son la garantía lim-
itada expresa, la solución y la obligación limitada expuestas en su sitio web:
www.defelsko.com/terms
Este manual está protegido por copyright. Todos los derechos de este manual están reservados y no
podrá ser parcial o totalmente reproducido o transmitido por ningún medio sin el consentimiento previo
por escrito de DeFelsko Corporation.
DeFelsko y PosiTector son marcas comerciales de DeFelsko Corporation registradas en los EE.UU. y
en otros países. Otras marcas o nombres de productos son marcas comerciales o registradas de sus
propietarios respectivos.
Se han tomado todas las precauciones posibles para asegurar la precisión de toda la información contenida en este manual. DeFelsko no aceptará responsabilidad por errores tipográficos o de impresión.
+1-315-393-4450 www.defelsko.com
© DeFelsko Corporation USA 2018
Reservados todos los derechos.
Page 31

Gebrauchsanweisung v. 1.0
Infrarot-Thermometer
Page 32

1
Einleitung
Einleitung
Das PosiTector Infrarot-Thermometer (IRT) ist ein
elektronisches Handgerät, dass schnell und zuverlässig die
Oberflächentemperatur misst. Es besteht aus einem Grundgerät
(Standard oder Advanced) und einer Sonde (siehe S. 2).
Diese Kurzanleitung fasst die Grundfunktionen des Geräts
zusammen. Sie können die vollständige Bedienungsanweisung
unter: www.defelsko.com/manuals herunterladen.
Das PosiTector IRT schaltet sich ein, wenn die mittlere
Navigationstaste gedrückt wird. Um Batterien zu sparen,
schaltet sich das Gerät bei Nichtbenutzung nach etwa 5 Minuten
automatisch ab. Alle Einstellungen bleiben erhalten.
Schnellstart
Schnellstart
1.Entfernen Sie die Schutzkappe aus Gummi (falls vorhanden)
von der Sonde.
2.Schalten Sie das Messgerät ein, indem Sie die mittlere
Navigationstaste drücken
Typische Anzeige im Display
Der Infrarot- Temperatursensor beginnt sofort mit der Messung.
Drücken Sie die (+) Taste, um die automatische Aktualisierung der
Messdaten zu unterbrechen und drücken Sie die (+) Taste noch
einmal, um die Messung fortzusetzen.
SmartTrend Indikator Erscheint nur, wenn sich
die
Oberflächentemperatur
verändert.
Emissionsgrad
(siehe S.5)
Batteriestandsanzeige
Oberflächentemperatur
Temperatureinheit
Page 33

Funktionen der Tasten - Normalbetrieb
Laser-Messfleckmarkierung
Drücken und halten Sie die mittlere Taste unten, um die LaserMessfleckmarkierung einzuschalten. Diese markiert den
Messfleck und hilft so bei der korrekten Ausrichtung des
Temperatursensors. Lassen Sie die Taste los, um den Laser
auszuschalten. Während der Laser eingeschaltet ist, wird ein
Laser-Warnsymbol auf dem Display angezeigt.
2
Laser
eingeschaltet
Ansehen der
Trendgrafiken
(Nur Advanced
Ausführung)
Ins Menü gehen
Pause / Weiter
Laser einschalten
(Ab)
Laserstrahlung. BITTE NICHT IN DEN LASERSTRAHL
BLICKEN. Laserprodukt der Klasse 2
Laserparameter:
Wellenlänge: 652 nm
Laserleistung zur Klassifizierung: <1.0 mW
Durchmesser des Laserstrahls : <2mm at aperture
Abweichung : 1 mRad
Arbeitsweise: CW
EN/IEC 60825-1:2014 (2007 USA)
Page 34

Wenn er eingeschaltet ist, erkennt der PosiTector
automatisch, welche Sonde angeschlossen ist, und führt
einen Selbsttest durch.
Um eine Sonde vom Grundgerät zu entfernen, schieben
Sie die Sondeneinheit in Pfeilrichtung (s. Rückseite) nach
links weg vom Gehäuse. Führen Sie diese Schritte
umgekehrt aus, um eine andere Sonde anzuschließen.
Es ist nicht notwendig, das Messgerät abzuschalten,
wenn die Sonden ausgetauscht werden.
An das PosiTector-Grundgerät kann eine Vielzahl von Sonden
angeschlossen werden, einschließlich magnetischer, Wirbelstromund Ultraschall-Schichtdicken-, Oberflächenprofil-, Umwelt-, ShoreHärte- und Ultraschall-Wanddickensonden.
Siehe www.defelsko.com/probes
3
Menu Operation
Menu Operation
Die Funktionen des Messgeräts sind menügesteuert. Um auf das
Menü zuzugreifen, schalten Sie das Messgerät ein und drücken Sie
dann die zentrale Steuertaste.
Verwenden Sie zur Navigation die Tasten Auf und Ab, um vertikal zu
scrollen und um AUSZUWÄHLEN.
Press the (
+
) button to switch
pages in a multipage menu.
Press the
(-) button to return to
the previous menu or page.
Select Exit to exit from any menu.
Vorherige Seite
(Zurück)
Auf
Folgeseite
Auf das Menü zugreifen
(Mitte/Wählen)
Ab
Sonden
Page 35

Der Emissionsgrad bezeichnet hier die Fähigkeit eines Materials,
Infrarot-Strahlung zu emittieren im Vergleich zu einer idealschwarzen Oberfläche mit derselben Temperatur. Der
Emissionsgrad reicht von 0 bis 1. Jedes Material hat einen
spezifischen Emissionsgrad. Das PosiTector IRT besitzt sowohl
bereits voreingestellte Emissionsgrade bestimmter Materialien als
auch die Möglichkeit, den Emissionsgrad manuell einzustellen.
(siehe S. 6).
Die meisten organischen und beschichteten Oberflächen besitzen
einen Emissionsgrad von ca. 0,95 und sind somit ideal geeignet,
um exakte Messungen mit einem Infrarot-Thermometer zu
erzielen.Bei glänzenden oder reflektierenden Oberflächen kann
eine Messungen mit einem Infrarot-Thermometer schwierig sein,
da diese Oberflächen häufig Infrarot-Strahlung aus der Umgebung
reflektieren. Um dies zu kompensieren, lackieren Sie glänzende
oder reflektierende Oberflächen bitte mit mattem Lack oder
decken Sie diese mit Isolierband ab. Erlauben Sie dem Lack oder
dem Isolierband, sich eine gewisse Zeit an die Temperatur der
Oberfläche anzupassen. Messen Sie dann auf dem Lack oder
dem Isolierband.
Emissionsgrad
Emissionsgrad
Dies bezeichnet das Verhältnis
zwischen dem Durchmesser der
zu messenden Fläche und der
Entfernung des Messgerätes von
dieser Fläche. Sobald die
Entfernung zu der zu messenden
Fläche zunimmt, vergrößert sich
proportional dazu der Messfleck.
Das PosiTector IRT besitzt eine
5.7:1-Optik.
Beispiel: Wenn das PosiTector
IRT 100 cm von der Oberfläche
entfernt ist, hat der Messfleck
einen Durchmesser von 18 cm.
Verhältnis Entfernung
Messfleck
4
Optik: Verhältnis
Optik: Verhältnis
Entfernung - Messfleck (D:S)
Entfernung - Messfleck (D:S)
Page 36

5
Setup-Menü
Setup-Menü
Reset
Menü Zurücksetzen (Reset) stellt die Werkseinstellungen wieder
her und setzt das Instrument auf den werkseitigen Zustand
zurück. Folgendes passiert:
- Alle Blöcke, gespeicherten Messungen und Blocknamen
werden gelöscht.
- Die Menüeinstellungen werden auf Folgendes zurückgesetzt:
Speicher = AUS
Statistik = AUS
Min-Max-Alarm = AUS
TrendChart = AUS
AutoDim = EIN
Bluetooth & Stream = AUS
WiFi & Access Point = AUS
Anzeige = Keine
Maßeinheiten
Einstellung der Temperatur-Maßeinheit auf Celsius (°C) oder
Fahrenheit (°F)
Einheiten = Celsius
LCD drehen = AUS
Auto Sync .net = AN
Ton = AN
Sprache = Englisch
Emissionsgrad = 0.95
Batterie Typ = Alkali
Backlight = Normal
Bluetooth Smart = AUS
USB Drive= AN
Datum, Uhrzeit, WiFi-Einrichtung sind von keinem Reset betroffen.
HINWEISE:
Der Hard Reset unterscheidet sich vom Reset wie folgt:
- Die Bluetooth-Kopplung wird gelöscht.
- Alarm-Einstellungen werden gelöscht.
- Die Menüeinstellungen werden wie folgt zurückgesetzt:
Führen Sie einen vollständigen Hard Reset wie folgt durch:
1. Schalten Sie das Messgerät ab und warten Sie 5 Sekunden.
2. Halten Sie die Taste (+) und die zentrale Taste
gleichzeitig
gedrückt, bis das Rücksetzsymbol erscheint.
Dies setzt das Messgerät auf einen bekannten Originalzustand zurück.
Page 37

6
Emissionsgrad
Verhindert, dass die Display-Anzeige sich dreht, wenn das Gerät auf
dem Kopf stehend benutzt wird.
Rotation der Display-Anzeige sperren
Schaltet TrendChart ein. Die Option TrendChart kann zusätzlich durch
Drücken der „Nach oben“-Taste (mittlere Taste oben) eingeschaltet
werden, während das Hauptmenü angezeigt wird.
TrendChart
Informationen zum Grundgerät und der verwendeten Sonde.
Geräte-Info
Einstellen des Emissionwertes des PosiTector IRT Infrarot-
Temperatursensors.
Wählen Sie den Menüpunkt "custom", um den Emissionwert manuell
anzupassen oder um einen Temperaturwert manuell einzugeben. Bei
manueller Eingabe der Temperatur wird der Emissionwert automatisch
berechnet. Bitte lesen sie hierzu die untenstehende Bemerkung.
Verwenden Sie alternativ eine der folgenden Voreinstellungen:
Aluminum (rau) = 0.07 Kunststoffe = 0.94
Zink (Galvanisert) = 0.25 Stahl (Oxidiert) = 0.95
Beton = 0.54 Holz = 0.95
Farbei = 0.96
Je nach Art der Oberflächenbehandlung können Metalle wie gestrahlter
Stahl eine große Bandbreite an Emissionwerten aufweisen.Eine
Justierung auf einen bekannten Temperaturwert auf einem
repräsentativen Muster (gemessen durch eine berührende
Oberflächentemperatur-Sonde) hilft bei der Ermittlung eines korrekten
Emissionwertes.
BEMERKUNG:
Zink Galv. 0.25
Stahl (Oxidiert) 0.95
Aluminum (rau) 0.07
Beton 0.54
Holz 0.95
Farbei 0.96
Kunststoff 0.94
Benutzerdefiniert
Zurueck
Emissionsgrad
Page 38

Der PosiTector IRT hat einen internen Speicher zur Aufzeichnung
von Messdaten. Gespeicherte Messwerte können am Bildschirm
durchgesehen werden, oder es kann auf diese über Computer,
Tablets und Smartphones zugegriffen werden. Alle gespeicherten
Messwerte werden mit Datum und Uhrzeit versehen. Messdaten
können sowohl automatisch (im AutoLog-Modus) als auch durch
Drücken der (+)Taste manuell abgespeichert werden.
Das Symbol erscheint, wenn die Speicherfunktion eingeschaltet
ist.
7
Standard Modelle speichern 250 Messungen in einem Block.
Menü Statistik
MinMax-Alarm
Das Messgerät warnt den Benutzer sichtbar und
hörbar, wenn die Messwerte die vom Benutzer
angegebenen Grenzwerte überschreiten.
Eine statistische Zusammenfassung erscheint in
der Anzeige. Entfernen Sie die letzte Messung
aus der Zusammenfassung, indem Sie die Taste
(
-
) drücken. Drücken Sie (
+
), um die Statistik zu
löschen.
Statistik
– Mittelwert
– Maximalwert
– Standardabweichung
– Minimalwert
Wählt den im Messgerät verwendeten Batterietyp aus „Alkali“, „Lithium“
oder „NiMH“ (Nickel-Metall-Hydrid, wiederaufladbar). Wenn „NiMH“
gewählt wird, lädt das Messgerät die Batterien sehr langsam, während
es über USB an einen PC oder ein optionales Weschselstrom-Ladegerät
angeschlossen ist (USBAC). Das Anzeigesymbol für den
Batteriezustand wird für den lgewählten Batterietyp kalibriert. Es tritt kein
Schaden ein, wenn der im Messgerät verwendete Batterietyp nicht mit
dem gewählten Batterietyp übereinstimmt.
Batterie Typ
X
X
Speicher-Menü
Speicher-Menü
Page 39

8
Advanced Modelle speichern 100.000 Messungen in bis zu 1000
Blöcken. Die Auswahl „Neuer Block“ schließt einen aktuell geöffneten
Block und erzeugt einen neuen Blocknamen unter Verwendung der
niedrigsten verfügbaren Nummer. Neue Blocknamen werden mit Datum
versehen, wenn sie erstellt werden.
Bildschirmkopie
Drücken Sie beide Tasten (-) und (+) gleichzeitig, um eine
Bildschirmkopie der aktuellen Anzeige zu erfassen und zu speichern.
Die letzten 10 Bildschirmkopien werden im Speicher gespeichert, und
es kann darauf zugegriffen werden, wenn ein Computeranschluss
besteht (siehe PosiSoft-USB-Drive, S. 8).
Neuen Block anlegen
(Nur Advanced Modelle)
Ansehen der Anzeigearten
(Nur Advanced Modelle)
Auf das Menü zugreifen
Löschen der letzte
Messung
Laser einschalten
Zugriff auf gespeicherte Messdaten
DeFelsko bietet folgende kostenlose Lösungen zur Ansicht, Analyse
und Verarbeitung von Daten an:
PosiSoft USB Drive - Schließen Sie das Messgerät mit dem
mitgelieferten USB-Kabel an einen PC/Mac an. Betrachten Sie
Messungen und Graphen mit beliebigen Webbrowsern oder
Dateimanagern und drucken Sie sie aus. Keine Software und kein
Internet-Anschluss erforderlich. USB-Drive muss im Menü
„Verbindung -> USB“ des Messgerätes ausgewählt werden (S.9).
PosiSoft Desktop - Leistungsfähige Desktop-Software (PC/Mac) zum
Herunterladen, Ansehen, Drucken und Speichern von Messdaten.
Enthält einen anpassungsfähigen, mit Vorlagen ausgestatteten PDFBerichtsgenerator. Kein Internet-Anschluss erforderlich.
PosiSoft.net - Webbasierte Anwendung, die eine sichere zentrale
Speicherung von Messdaten bietet. Greifen Sie von jedem mit dem
Web verbundenen Gerät auf Ihre Daten zu.
PosiTector App -
(Nur Advanced Modelle, Seriennummern 784000+) App
für kompatible iOS- und Android-Smart-Geräte. Ermöglicht den
Benutzern, professionelle PDF-Berichte zu erstellen, zu speichern und
mit anderen zu teilen. Fügen Sie mit der Kamera und Tastatur eines
Smartphones/Tablets Bilder und Hinweise hinzu.
Weitere Informationen siehe: www.defelsko.com/posisoft
Page 40

9
Die obigen Menüs „WLAN”, „USB“ und „Bluetooth“ enthalten die
Option Sync .net Now. Durch Auswählen dieser Option wird sofort
eine Synchronisation der gespeicherten Daten über die aktuell aktive
Verbindung gestartet (Internetverbindung vorausgesetzt). Alternativ
können Sie im Untermenü „USB-Verbindung“ die Option „Auto Sync
.net“ auswählen. Dies bewirkt eine automatische Synchronisation,
sobald das Gerät per USB an einen PC oder Mac angeschlossen wird.
Messungen, die vorgenommen werden während das Gerät
angeschlossen ist, werden erst synchronisiert, sobald das USB-Kabel
ausgesteckt und wieder eingesteckt wird oder durch Auswahl der
Option „Sync .net Now“. Über WLAN verbundene Geräte starten die
Synchronisation automatisch beim Einschalten.
Sync .net Now
PosiSoft Desktop wird zwingend benötigt, wenn Sie ihr
Gerät über USB verbunden haben und Messwerte mit PosiSoft.net
synchronisieren möchten.
USB-Drive : Wenn dies ausgewählt ist, fungiert das PosiTectorMessgerät als USB-Massenspeicher, das den Benutzern eine
einfache Schnittstelle bietet, um gespeicherte Daten in ähnlicher
Weise wie bei USB-Flashlaufwerken, Digitalkameras und USB-Sticks
abzurufen. USB-Drive ist auch erforderlich, um gespeicherte
Messwerte in die PosiSoft-Desktop-Software (S. 8) zu importieren.
Beim Anschluss wird der Strom über das USB-Kabel
bereitgestellt. Die Batterien werden nicht verwendet, und das Gerät
schaltet sich nicht automatisch aus. Wenn wiederaufladbare (NiMH)
Batterien verwendet werden, lädt das Instrument die Batterien nur
langsam auf.
Damit können Einzelmesswerte, während der Messung, an einen
Computer oder ein kompatibles Gerät gesendet werden. Siehe:
www.defelsko.com/bluetooth
Bluetooth
(Nur Advanced Modelle)
USB
HINWEIS:
Verbindung-Menü
Ermöglicht einen Anschluss an Ihr lokales WLAN-Netzwerk oder
einen mobilen Hotspot. Ideal für die Verwendung der Internetverbindung
Ihres Netzwerks zur Synchronisierung gespeicherter Messwerte mit
PosiSoft.net (S. 8). Siehe www.defelsko.com/wifi
(Nur Advanced Modelle)
WiFi
HINWEIS:
Page 41

10
Bloecke sync
Wählen Sie Blöcke aus, um sie für die Synchronisation mit der
PosiTector-App zu markieren.Neuer Blöcke, die erstellt werden, während
Bluetooth Smart eingeschaltet ist, werden automatisch ausgewählt.
Wenn Bluetooth Smart eingeschaltet ist, wählen Sie Bloecke sync,
um die ausgewählten Blöcke an die PosiTector-App zu
übertragen. Dies ist nützlich, wenn zwischen Smart-Geräten
gewechselt wird, da nur Messungen und Blöcke, die noch mit einem
Smart-Gerät synchronisiert werden müssen, automatisch
synchronisiert werden.
Das Messgerät führt nach einer Aktualisierung ein
Hard Reset (S. 5) durch. Alle gespeicherten Messwerte werden aus
dem Speicher gelöscht.
Aktualisieren
Ob eine Softwareaktualisierung für Ihr Messgerät vorhanden ist,
erfahren Sie unter: www.defelsko.com/update
WARNUNG:
Wenn dies eingeschaltet ist, ermöglicht es die Kommunikation
über Bluetooth (BLE) mit einem Smartphone/Tablet, das die
PosiTector-App ausführt (S.8).
Bluetooth Smart
(Nur Advanced Modelle mit
Seriennummern 784000 und höher)
Bloecke senden
Überträgt ausgewählte Blöcke an die PosiTector App
(nützlich bei Wechsel zwischen Geräten).
Die Option Bloecke senden ist im Menü sichtbar, wenn das
Messgerät mit einem Smartphone / Tablet verbunden ist, auf dem
die PosiTector App ausgeführt wird.
Wenn Bluetooth Smart ausgeschaltet ist, werden
Daten aus Blöcken, die im Menü Bloecke sync ausgewählt wurden,
in einer Warteschlange gehalten, bis die Kommunikation mit der
PosiTector-App wiederhergestellt ist.
HINWEIS:
(Blöcke synchronisieren)
(
Updates
)
Page 42

Technische Daten
Technische Daten
Hält die Richtlinien: ISO 8502-4, BS7079-B and ASTM D3276
Spezifikationen
Range Richtigkeit Auflösung
Temperaturbereich
–70˚ to 380˚ C
±
1˚C + 1%
@ 23˚ C ambient
0.1˚ C
–94˚ to 716˚ F 0.1˚ F
Einsenden zur Reparatur
Bevor Sie das Messgerät zur Reparatur einsenden…
1.Setzen Sie neue oder neu aufgeladene Batterien in der
richtigen Polung ein, wie im Batteriefach gezeigt.
2.Untersuchen Sie die Spitze des Sensors nach Schmutz oder
Beschädigung. Der Sensor sollte sich frei nach oben und unten
bewegen.
3.Falls der Feuchtigkeitssensor träge reagiert oder falsche
Messwerte liefert, entfernen Sie den Sensor vom Grundgerät und
wickeln Sie ihn über Nacht in ein feuchtes Tuch ein.
4.Führen Sie einen Hard Reset durch. (S. 5)
5. Wenn das Problem nicht gelöst ist, aktualisieren (Updates, S. 10)
Sie die Software Ihres PosiTector-Messgeräts und versuchen
Sie die Messungen erneut.
WICHTIG:
Falls Sie das Gerät zur Reparatur einschicken müssen, beschreiben
Sie das Problem vollständig und fügen Sie Messergebnisse bei, falls
vorhanden. Achten Sie darauf, unbedingt auch die Sonde, den
Namen Ihrer Firma, den Namen der Kontaktperson in Ihrer Firma,
Telefon- und Faxnummer oder E-Mail-Adresse beizufügen.
11
Laser-Messfleckmarkierung Class 2 < 1mW
Optik / Verhältnis Entfernung –
Messfleck (D:S)
5.7:1
Emissionsgrad Regelbar
Reaktionszeit <500 µs (95% reaktion)
Spektralempfindlichkeit 2 - 14 µm
Page 43

12
LASERLICHT. BITTE NICHT IN DEN LASERSTRAHL BLICKEN
Laserprodukt der Klasse 2
652 nm < 1mW CW
IEN/IEC 60825-1-2014 (2007 USA)
Seriennummer
Aufkleber der Zertifizierung
und zur Identifizierung des
Herstellers
Laserprodukt der Klasse 2,
das in Übereinstimmung mit
den US-amerikanischen
FDA-Bestimmungen und
dem Standard IEC 60825-1
klassifiziert wurde.
(24.06.2007)
DeFelsko Corporation
800 Proctor Avenue
Ogdensburg, New York
13669-2205 USA
Gefahrenwarnung und
erklärendes Etikett
Austrittsöffnung
Produktmodell
Étiquetage de produit
Étiquetage de produit
Page 44

13
Vorsichtsmaßnahmen im Umgang mit einem Laser:
Eine missbräuchliche Anwendung des Geräts und
seiner Komponenten kann zu einem Austreten
gesundheitsgefährdender Strahlung führen.
Gerät nicht öffnen oder modifizieren. Das Gerät kann nicht vom
Benutzer gewartet oder repariert werden. Eine Wartung oder
Reparatur darf ausschließlich durch geschulte Techniker der
DeFelsko Corporation durchgeführt werden. Eine regelmäßige
Inspektion ist nicht notwendig.
Um Augenschäden und Verletzungen vorzubeugen, beachten Sie
bitte folgende Punkte:
n
Lesen Sie vor Inbetriebnahme sämtliche Sicherheitshinweise.
n
Benutzen Sie das Gerät nicht, wenn es einen Defekt aufweist.
n
Benutzen Sie das Gerät nicht, falls das Gehäuse beschädigt ist.
n
Benutzen Sie das Gerät ausschließlich in der vorgeschriebenen
Weise.
n
Blicken Sie niemals in den Laserstrahl. Richten Sie den
Laserstrahl nie direkt oder indirekt (durch Richten auf eine
reflektierende Oberfläche) auf Personen.
Achtung:
Begrenzte Garantie, einziges Rechtsmittel
und beschränkte Haftung
Die ausdrücklich begrenzte Garantie, das einzige Rechtsmittel und die beschränkte
Haftung von DeFelsko sind auf der folgenden Website dargelegt:
www.defelsko.com/terms
(in Englisch)
Dieses Handbuch ist urheberrechtlich geschützt, und alle Rechte sind vorbehalten. Es darf ohne
schriftliche Genehmigung der DeFelsko Corporation weder insgesamt noch in Teilen in irgendeiner Weise
vervielfältigt oder weitergegeben werden.
DeFelsko, PosiSoft und PosiTector sind in den USA und anderen Ländern eingetragene Warenzeichen
der DeFelsko Corporation. Alle anderen Marken-oder Produktnamen sind Marken oder eingetragene
Marken der jeweiligen Besitzer.
Die in dieser Betriebsanleitung enthaltenen Informationen wurden nach bestem Wissen und Gewissen
zusammengestellt. Für Druck- oder Bearbeitungsfehler übernimmt DeFelsko keine Verantwortung.
+1-315-393-4450 www.defelsko.com
© 2018 DeFelsko Corporation USA Alle Rechte vorbehalten
Page 45

Notice d'instruction v. 1.0
Thermometer Infrarouge
Page 46

1
Introduction
Introduction
Le thermometer Infrarouge PosiTector IRT est un instrument
électronique portable qui mesure rapidement et précisément la
temperature de surface. Il est composé d’un boitier (standard ou
avancé) et d’une sonde de mesure (page 2)
Ce guide d’utilisation récapitule les fonctions de base de l’appareil.
Téléchargez le mode d’emploi complet à l’adresse :
www.defelsko.com/manuals
Il est possible de mettre le PosiTector IRT sous-tension en
appuyant sur le bouton de navigation du milieu . Pour
économiser la batterie, l’instrument est mis hors tension après
environ 5 minutes d’inactivité. Tous les paramètres sont
conservés.
Démarrage rapide
Démarrage rapide
1.Retirer le capuchon protecteur de la sonde.
2.Activer l'appareil en appuyant sur la touche de navigation
centrale .
Affichage
Le capteur de température à infrarouge commence immédiatement à mesurer. Appuyez sur le bouton (+) pour mettre la mesure
en pause de la mise à jour automatique. Appuyez à nouveau sur
(+) pour reprendre.
Indicateur SmartTrend
- Apparaît lorsque la
température de la
surface augmente ou
diminue. Ne s'affiche pas
lorsque la mesure est
stable.
Émissivité (pg.5)
Indicateur
de batterie
Température
de surface
Unité de température
Page 47

Accès au menu
Pause / Reprise
Activer le laser
(
Bas)
Bouton de fonction - Fonctionnement Normal
Pointeur Laser
Appuyez sur le bouton Bas et maintenez-le enfoncé pour activer
le pointeur laser. Le laser aide à diriger le capteur de température
infrarouge. Relâchez le bouton pour désactiver le laser. Le
symbole s'affiche à l'écran lorsque le laser est actif.
2
Laser Actif
Défilement à travers les
graphes de tendance
(Advancé uniquement)
Paramètres laser:
Longueur d'onde: 652 nm
Puissance laser pour la classification: <1.0 mW
Diamètre du faisceau: <2mm at aperture
Divergence: 1 mRad
Mode de fonctionnement: CW
EN/IEC 60825-1:2014 (2007 USA)
Rayonnement laser. NE PAS REGARDER
DANS LE FAISCEAU. Produit laser de classe 2
Page 48

Une fois sous tension, le PosiTector détermine
automatiquement le type de sonde raccordée puis il
exécute un auto-contrôle.
Pour déconnecter une sonde de l'instrument, faire glisser
le connecteur de sonde en plastique horizontalement (en
direction de la flèche) hors du corps. Inverser ces étapes
pour monter une nouvelle sonde. Il ne faut pas mettre
l'instrument sous tension lors de la commutation des
sondes.
En outre, le PosiTector accepte un grand nombre de
types de sondes différents, y compris des sondes de
mesure d'épaisseur de revêtement à courant de Foucault
et magnétiques, à profil de surface, environnementales,
de mesure de dureté shore ainsi que des sondes de
mesure d'épaisseur de paroi à ultrasons. Consultez le
lien à l'adresse www.defelsko.com/probes
3
Sondes
Pour naviguer, presser les flèches Haut et Bas pour défiler et
sur à pour SÉLECTIONNER.
Utilisation du menu
Les fonctions de l'instrument sont contrôlées via un menu. Pour
accéder à ce menu, mettre l'instrument sous tension, puis presser le
bouton de navigation central.
Appuyer sur le bouton (+) pour
changer de page dans un menu
multipage.
Appuyer sur le bouton (
-
) pour
retourner au menu ou à la page
précédente.
Sélectionner Sortie pour fermer
le menu Instrument.
Page Précédente
(Sortie)
Haut
Page
Suivante
Accéder au menu
(Centre/Sélectionner)
Bas
Page 49

4
L'émissivité se réfère à la capacité d'un matériau à émettre de
l'énergie infrarouge, par rapport à une surface noire idéale à la
même température. Le rapport varie de 0 à 1, et chaque matériau
a un rapport d'émissivité spécifique qui lui est associé. Le
PosiTector IRT intègre des paramètres d'émissivité pour certains
matériaux ainsi qu'une option d'émissivité réglable par l'utilisateur
(page 6).
La plupart des surfaces organiques et peintes ont une émissivité
d'environ 0,95 et sont des surfaces idéales pour des lectures
précises de température infrarouge. Les surfaces brillantes ou
réfléchissantes peuvent être difficiles à mesurer avec un
thermomètre infrarouge, car elles ont tendance à refléter l'énergie
infrarouge ambiante au lieu de la leur. Pour compenser cela,
couvrez ces surfaces avec de la peinture ou un morceau de ruban
adhésif. Laisser la peinture ou le ruban s'acclimater à la
température de la surface et prendre une mesure sur la peinture
ou le ruban adhésif.
Émissivité
Émissivité
Le rapport entre la distance et la
taille de la cible correspond à la
relation entre le diamètre de la
zone mesurée et la distance de
l'instrument par rapport à la zone.
Lorsque la distance (D) à la cible
mesurée augmente, la taille de
de la zone mesurée (S) devient
plus grande. Le rapport D: S du
PosiTector IRT est de 5.7:1. Par
exemple, lorsque l'instrument est
à 100 cm (40 pouces) de la cible,
la taille du point sera de 18 cm (7
pouces) de diamètre.
Distance
Taille du point
Rapport entre la distance et
Rapport entre la distance et
la taille cible (D: S)
la taille cible (D: S)
Page 50

5
Menu Configuration (Config)
Réinit.
La fonction Reset restaure les réglages d’usine et remet
l’instrument dans une condition connue dite “après déballage”.
Elle est pratique lorsque vous souhaitez “tout recommencer”. Cela
entraîne les événements suivants:
- Tous les lots et groupes de données stockées sont effacés.
- Les paramètres du menu sont réinitialisés comme suit::
Mémoire = Désactivé
Statistics = Désactivé
HiLo Alarm = Désactivé
Tendance = Aucun
Auto Dim = Allumé
Bluetooth & Stream = Désactivé
WiFi & Access Point = Désactivé
Display = Aucun
Units
Convertir les unités de température. Température (tous les
modèles): Celsius (° C) ou Fahrenheit (° F).
Exécuter une réinitialisation complète (Hard Reset) comme suit:
1) Mettre l’instrument hors tension et attendre 5 secondes.
2) Appuyer simultanément sur les deux boutons (+) et central
jusqu'à ce que le symbole de réinitialisation apparaisse.
Cela réinitialise l'instrument dans un état connu après déballage. La
même
fonction que la réinitialisation du menu est effectuée avec en
plus:
- Les informations de couplage Bluetooth sont effacées.
- Les paramètres d'alarme sont réglés sur les valeurs par défaut.
- Les réglages du menu sont retournés comme suit:
NOTE:
-
La date et l’heure ne sont pas affectées par la Réinitialisation.
Unités = Celsius
Affichage inversé = Normal
Auto Sync = Désactivé
Alarmes = Désactivé
Langue = Anglais
Émissivité = 095
Type de piles = Alcalines
Rétro-éclairage = Normal
Bluetooth Streaming = Désactivé
USB Drive= Activée
Page 51

6
Émissivité
Verrouille la rotation automatique de l’écran lorsque le boitier est inversé.
Verrouillage Ecran
Active la courbe de tendance. La courbe de tendance peut
également être activée en appuyant sur le bouton HAUT de l'écran
principal.
Courbe de tendance
Affiche les informations sur le boîtier de mesure et la sonde attachée
Information appareil
Définit le taux d'émissivité pour le capteur de température
infrarouge PosiTector IRT.
Sélectionnez Personnalisé pour ajuster manuellement la valeur
d'émissivité ou pour ajuster à une température connue.
L'émissivité est automatiquement calculée lors de l'ajustement à
une température connue. Voir REMARQUE ci-dessous.
Sélectionnez Personnalisé pour entrer une valeur ou utilisez l'une
des options prédéfinies suivantes:
Aluminium brut = 0.07 Plastique = 0.94
Zinc (Galvanisé) = 0.25 Acier oxydé = 0.95
Béton = 0.54 Bois = 0.95
Peinture = 0.96
REMARQUE:
Selon le traitement de surface, les métaux tels que l'acier grenaillé
peuvent avoir une large gamme de valeurs d'émissivité.
L'ajustement à une température connue (mesurée par une sonde
de température de surface à contact direct) sur un échantillon
représentatif aidera à obtenir une valeur d'émissivité précise.
Zinc Galv. 0.25
Acier oxydé 0.95
Aluminium brut
Béton 0.54
Bois 0.95
Peinture 0.96
Plastique 0.94
Personnalisé
Sortie
Émissivité
Page 52

7
X
Sélectionne le type de piles utilisées dans l’instrument parmi « Alcaline
», « Lithium » ou « NiMH » (piles rechargeables de technologie NickelMétal Hydrure). Si l’option « NiMH » est sélectionnée, l'instrument va
même recharger les piles en étant connecté via USB à un PC ou à un
chargeur CA optionnel. L'icône d’indicateur d'état de la batterie est
étalonné selon le type de pile choisie. Aucun dommage ne se produit
si le type de batterie utilisé dans l’instrument ne correspond pas au
type de batterie sélectionné.
Type Batterie
Alarme HiLo
Mode Statistiques
Un résumé statistique apparaît à l'écran.
Supprimer la dernière mesure du récapitulatif en
appuyant sur le bouton (
-
). Appuyez sur (
+
) pour
effacer les statistiques.
Statistiques
Permet à l'instrument d'alerter de manière audible
et visuellel'utilisateur lorsque les mesures
dépassent les limites qu'il aura préalablement
déterminées.
–
Moyenne
–
Valeur maxi
–
Déviation Standard
–
Valeur mini
X
Le PosiTector IRT peut enregistrer mesures dans sa mémoire de
stockage interne. Les valeurs stockées peuvent être examinées à
l'écran ou sont accessibles via des PC, des tablettes PC et des smart
phones. Les mesures enregistrées sont horodatées. Les lectures
peuvent être stockées manuellement (en utilisant le bouton (+)) ou
automatiquement en utilisant le mode Enregistrement automatique.
Modèles standard stockent jusqu'à 250 mesures dans un seullot.
Gestion de la mémoire
Le symbole apparaît lorsque l’instrument est réglé pour stocker
les valeurs de mesure.
Page 53

8
Activer le laser
Modèles avancés stockent 100,000 mesures dans une maximum de
1,000 lots. « Un nouveau lot » ferme tout lot actuellement ouvert et
crée un nom nouveau lot en utilisant le plus petit numéro disponible.
Les nouveaux lots sont horodatés au moment de leur création.
Faites défiler les modes
d’ affichage
(modèle avancé uniquement)
Accéder au menu
Supprimer la
dernière mesure
Créer un nouveau lot
(modèle avancé
uniquement)
Capture d'écran
Appuyez sur les boutons (-) et (+) à tout moment pour capturer et
enregistrer une copie de l'image de l'écran actuel. Les 10 dernières
captures d'écran sont enregistrées dans la mémoire et il est possible
d'y accéder lorsque l'instrument est connecté à un ordinateur
(voir le paragraphe PosiSoft USB Drive, page 8).
Accès aux valeurs de mesure enregistrées
DeFelsko offre les solutions gratuites suivantes pour la visualisation,
l'analyse et la communication des données:
PosiSoft USB Drive – Brancher l’instrument à un PC / Mac à l'aide du
câble USB fourni. Afficher et imprimer des valeurs et des graphiques de
mesure à l'aide des navigateurs Internet ou les explorateurs de fichiers
PC / Mac universels. Aucun logiciel ni aucune connexion Internet n'est
requise. USB Drive doit être sélectionnée dans le menu « Connecter>
USB » de l'instrument (page 9).
PosiSoft Desktop – Logiciel de bureau puissant (PC/MAC) pour le
téléchargement, la visualisation, l'impression et le stockage de vos
données de mesure. Comprend un générateur de rapport PDF
configuré et personnalisable. Aucune connexion Internet n'est requise.
PosiSoft.net – Application Web offrant un stockage sécurisé et
centralisé des valeurs de mesure. Accédez à vos données à partir
d'un périphérique connecté à Internet.
PosiTector App –
App pour périphériques intelligents AndroidetiOS compatibles. Permet
aux utilisateurs de créer, enregistrer et partager des rapports PDF
professionnels. Ajouter des images et des notes en utilisant l'appareil
photo et le clavier du périphérique intelligent.
Pour plus d'informations, consultez le lien à l'adresse
www.defelsko.com/posisoft
(Modèles avancés uniquement, numéros de série 784000+)
Page 54

9
Les menus WiFi, USB et Bluetooth ci-dessus contiennent une option
Sync .net Now. Lorsque cette option est sélectionnée, le boîtier de
mesure synchronise immédiatement les données de mesure stockées
via (connexion Internet requise). Sinon, sélectionnez Auto Sync .net
dans le menu de connexion USB pour synchroniser automatiquement
lors de la connexion à un PC. Les mesures supplémentaires ajoutées
à la mémoire lors de la connexion ne sont synchronisées que lorsque
le câble USB est déconnecté et reconnecté ou lorsque l'option
Synchroniser .net maintenant est sélectionnée. Les boîtiers
connectées au WiFi tentent automatiquement la synchronisation lors
de la mise sous tension.
Synchroniser maintenant
Menu Connexion (Connect)
USB Drive: Lorsque la case est cochée, l’instrument PosiTector
utilise une catégorie de périphérique de stockage de masse USB qui
offre aux utilisateurs une interface simple pour récupérer les données
stockées d'une manière similaire aux lecteurs USB flash, appareils
photo numériques et lecteurs audio numériques. USB Drive est
également requise pour importer les valeurs de mesure enregistrées
dans le logiciel PosiSoft Desktop. (page 8)
Une fois connecté, l'alimentation électrique est fournie
via le câble USB. Les piles ne sont pas utilisées et l’instrument n’est
pas mis automatiquement hors tension. L’instrument se comporte
comme un chargeur de batterie lorsque des piles rechargeables
(NiMH) sont installées.
Cette fonctionnalité permet de transmettre des valeurs de mesure
individuelles vers un ordinateur ou un périphérique compatible grâce
à l’utilisation de la technologie sans fil Bluetooth.
Voir www.defelsko.com/bluetooth
Bluetooth
(Modèle avancé uniquement)
Permet une connexion à votre réseau local sans fil ou à un Hot
Spot mobile. Idéal pour utiliser la connexion Internet de votre réseau
et ainsi synchroniser les valeurs enregistrées avec le PosiSoft.net
(page 8). Voir www.defelsko.com/wifi
WiFi
(Modèles avancés uniquement)
REMARQUE:
USB
PosiSoft Desktop est requis lors de l'utilisation
d'une connexion USB pour synchroniser les mesures avec
PosiSoft.net.
REMARQUE:
Page 55

10
Sync Lots
Sélectionner les lots afin de les signaler pour une synchronisation
avec l'App PosiTector. Les nouveaux lots créés tandis que le
Bluetooth Smart est activé sont automatiquement sélectionnés.
Avec le Bluetooth Smart activé, sélectionner Sync Lots pour
transférer les lots sélectionnés vers l'App PosiTector. Ceci est
utile pour basculer d’un dispositif intelligent à l’autre, car seuls les
mesures et les lots qui doivent encore être synchronisés avec un
dispositif intelligent sont synchronisés automatiquement.
Il est possible de réaliser une réinitialisation
complète (page 5) de l'instrument après une mise à jour. Toutes les
valeurs enregistrées seront effacées de la mémoire.
Mises à jour
Cette option détermine si une mise à jour logicielle est disponible
pour votre instrument.
Consultez le lien à l'adresse www.defelsko.com/update
ATTENTION:
Lorsque Activé , cette fonction permet la communication avec
un dispositif intelligent exécutant l'App PosiTector (page 8) via la
technologique d'auto-appairage sans fil Bluetooth Smart (BLE).
Bluetooth Smart
(Modèles avancés avec numéros de
série 784000 et supérieurs uniquement)
Envoyer Lots
Transferts de lots sélectionnés à l'App PosiTector (utile en cas de
commutation entre dispositifs).
L'option Envoyer Lots est visible dans le menu lorsque l’instrument
est connecté à un dispositif intelligent exécutant l’App PosiTector.
Si la fonction Bluetooth Smart est désactivée, les
données provenant des lots sélectionnés dans le menu Sync Lots
sont maintenus en file d'attente jusqu'à ce que la communication
avec l'App PosiTector soit rétablie.
REMARQUE:
(Updates)
Page 56

11
Données Techniques
Données Techniques
Conforme aux normes: ISO 8502-4, BS7079-B and ASTM D3276
Pointeur LASER Class 2 < 1mW
Ratio distance à la cible (D:S) 5.7:1
Emissivité Ajustable
Temps de réponse <500 µs (95% réponse)
Réponse spectrale 2 - 14 µm
Spécifications
Gamme de mesure Précision Résolution
Gamme de
température
–70˚ to 380˚ C
±
1˚C + 1%
@ 23˚ C ambient
0.1˚ C
–94˚ to 716˚ F 0.1˚ F
Retour pour maintenance
Avant de retourner l’instrument pour maintenance…
1. Installer des piles alcalines neuves dans le compartiment en
respectant la polarité.
2. Examinez la tête de la sonde de température de surface en cas
d’encrassement ou de dommage.
3. Procéder à une Réinitialisation complète (Hard Reset, page 5).
4. Si le problème persiste, mises à jour (Updates, page 10)
instrument PosiTector et recommencer les mesures.
IMPORTANT:
Si l'instrument doit être retourné pour service, décrire complètement
le problème et inclure les résultats de mesure (si possible). Veiller à
inclure l'instrument, à préciser le nom de l'entreprise, du contact au
sein de la société, le numéro de téléphone ainsi que le numéro de
télécopie ou l'adresse de courriel. Site Web:
www.defelsko.com/support
Page 57

12
Lumière LASER NE PAS REGARDER DANS LE FAISCEAU
Produit laser de classe 2
652 nm <1 mW CW
EN / IEC 60825-1-2014 (2007 États-Unis)
numéro de série
Identification du fabricant et
étiquette de certification
Conforme aux normes de
performance de la FDA pour
les produits laser à
l'exception des déviations
conformément à l'Avis Laser
n ° 50 du 24 juin 2007
DeFelsko Corporation
800 Proctor Avenue
Ogdensburg, New York
13669-2205 USA
Avertissement de danger
et Étiquette explicative
l'ouverture
Modèle du produit
Étiquetage de produit
Étiquetage de produit
Page 58

13
L'utilisation de commandes ou de réglages ou
l'exécution de procédures autres que celles spécifiées dans le
présent document peuvent entraîner une exposition à des
radiations dangereuses.
N'ouvrez pas ou ne modifiez pas le produit. Il n'y a aucun
composant de maintenance utilisateur dans le produit; Toute
maintenance ou réparation doit être effectuée uniquement par le
personnel de DeFelsko Corporation ou par LABOMAT ESSOR.
Aucune maintenance programmée n'est nécessaire pour maintenir
le produit en conformité avec les normes de sécurité laser.
Pour prévenir les lésions oculaires et les blessures:
n
Lisez toutes les informations de sécurité avant d'utiliser
le produit.
n
N'utilisez pas le produit s'il ne fonctionne pas correctement.
n
N'utilisez pas le produit si le boîtier semble fissuré ou
endommagé de quelque manière.
n
Utilisez le produit uniquement comme spécifié.
n
Ne regardez pas le faisceau laser. Ne pointez pas le laser
directement ou indirectement (hors des surfaces
réfléchissantes) vers des personnes.
Attention:
+1-315-393-4450 www.defelsko.com
© 2018 DeFelsko Corporation États-Unis Tous droits réservés
Le présent manuel est protégé par des droits de propriété intellectuelle. Tous droits réservés. Toute
reproduction ou transmission intégrale ou partielle, de quelque manière que ce soit sans l'autorisation
écrite de DeFelsko Corporation est interdite.
DeFelsko, PosiSoft et PosiTector sont des marques déposées par DeFelsko Corporation aux États-Unis
et dans d'autres pays. Les autres marques et les autres noms de produits sont des marques, déposées
ou non, qui appartiennent à leurs propriétaires respectifs.
Tous les efforts ont été faits pour que les informations contenues dans le présent manuel soient exactes.
DeFelsko décline toute responsabilité concernant les erreurs d'impression ou les erreurs typographiques.
Garantie limitée, recours unique et
responsabilité limitée
Précautions concernant l’utilisation du laser:
La garantie, les recours et la responsabilité de DeFelsko se limitent aux
dispositions du site Internet de l’entreprise: www.defelsko.com/terms
Page 59

Page 60

Simple. Durable. Accurate.
www.defelsko.com
© DeFelsko Corporation USA 2018
All Rights Reserved
This manual is copyrighted with all rights reserved and may not be
reproduced or transmitted, in whole or part, by any means, without
written permission from DeFelsko Corporation.
DeFelsko, PosiTest, PosiTector and PosiSoft are trademarks of DeFelsko
Corporation registered in the U.S. and in other countries. Other brand
or product names are trademarks or registered trademarks of their
respective holders.
Every effort has been made to ensure that the information in this manual
is accurate. DeFelsko is not responsible for printing or clerical errors.
 Loading...