

Page 1

Powder Checker
Uncured Coating Thickness Gage
Instruction Manual v. 3.0
Find Quality Products Online at: sales@GlobalTestSupply.com
www.GlobalTestSupply.com
Page 2

Introduction
The PosiTest PC Powder Checker is a hand-held, non-contact
coating thickness gage that uses high-frequency ultrasound to
predict the cured thickness of uncured powder coatings.
PosiTest PC Contents
n
PosiTest PC gage
n
Zero Fixture
n
Replacement probe screen
n
4 AAA alkaline batteries
n
Instruction manual
n
Hard shell carrying case
n
USB Cable
n
PosiSoft Desktop reporting software
n
Two (2) year warranty
Quick Start
1. POWER-UP the PosiTest PC by pressing the button.
2. ZERO the gage using the supplied Zero Fixture (pg. 4).
3. MEASURE the applied powder (pg. 4).
4. ADJUST to the specific powder if necessary (pg. 8).
NOTE:
To preserve battery life, the PosiTest PC will power
down after approximately 5 minutes of no activity. All settings are
retained.
Sensor/Screen
Display
Buttons
The USB Port has several functions:
n Gage updates (pg. 10)
n USB Keyboard Mode /
live stream readings (pg. 10)
n Download stored readings to
PosiSoft Desktop (pg. 10)
n Allows the gage to be operated
without batteries when
connected to a suitable
USB Port
USB power supply
1
Find Quality Products Online at: sales@GlobalTestSupply.com
www.GlobalTestSupply.com
Page 3

Menu Navigation
Press the and buttons simultaneously to
enter the gage menu. Navigate between menu
items using the or buttons. Use the to
select the highlighted menu item.
The
following menu items are displayed:
Memory Mode: Turns Memory Mode ON.
The gage will store and maintain a running
average for up to 999 readings. Stored
measurements can be downloaded to PosiSoft
Desktop Software (pg. 10). When Memory Mode
is ON, the following menu options appear:
RESET Memory Mode. All stored readings and the
running average will be cleared from gage memory.
Turns Memory Mode OFF
NOTES:
Memory Mode is unavailable when USB Keyboard
Mode is active
While in Memory Mode, press the button to discard
the last reading
Zero: Zeroes the instrument using the supplied Zero
Fixture (pg. 4)
1-Point Adjustment: Adjusts the gage to a known
thickness of powder (see Adjustment Techniques, pg. 8)
2-Point Adjustment: Adjusts the gage to two known
thicknesses of powder if the 1-Point Adjustment does not
improve accuracy (see , pg. 9)
Display Brightness: Adjusts the gage display
brightness using the and buttons.
2
Find Quality Products Online at: sales@GlobalTestSupply.com
www.GlobalTestSupply.com
Page 4

Units: Toggles the display units between mils and
microns.
Sound: Turns the built-in speaker ON or OFF .
When set to OFF, a red speaker icon will appear in
the gage display.
Scan Mode: In this mode, the gage will continuously
take readings, and only add a reading to memory when
the button is released. Ideal for quickly analyzing
large areas. (See Scan Mode, pg. 6)
USB Keyboard Mode: When enabled and connected to
a computer, the PosiTest PC will be recognized as a
keyboard. Readings are sent to the computer as they
are taken, emulating keystrokes. (pg. 10)
NOTE:
Memory Mode is unavailable when in USB Keyboard Mode.
Gage Reset: Restores the gage to default settings,
clears stored memory and calibration adjustments.
Power Off: Powers down the gage. Alternatively, the
gage will automatically power down after approximately
5 minutes of no activity. All settings are retained.
Exit Menu: Exits the gage menu and returns to the main
measurement screen.
3
Find Quality Products Online at: sales@GlobalTestSupply.com
www.GlobalTestSupply.com
Page 5

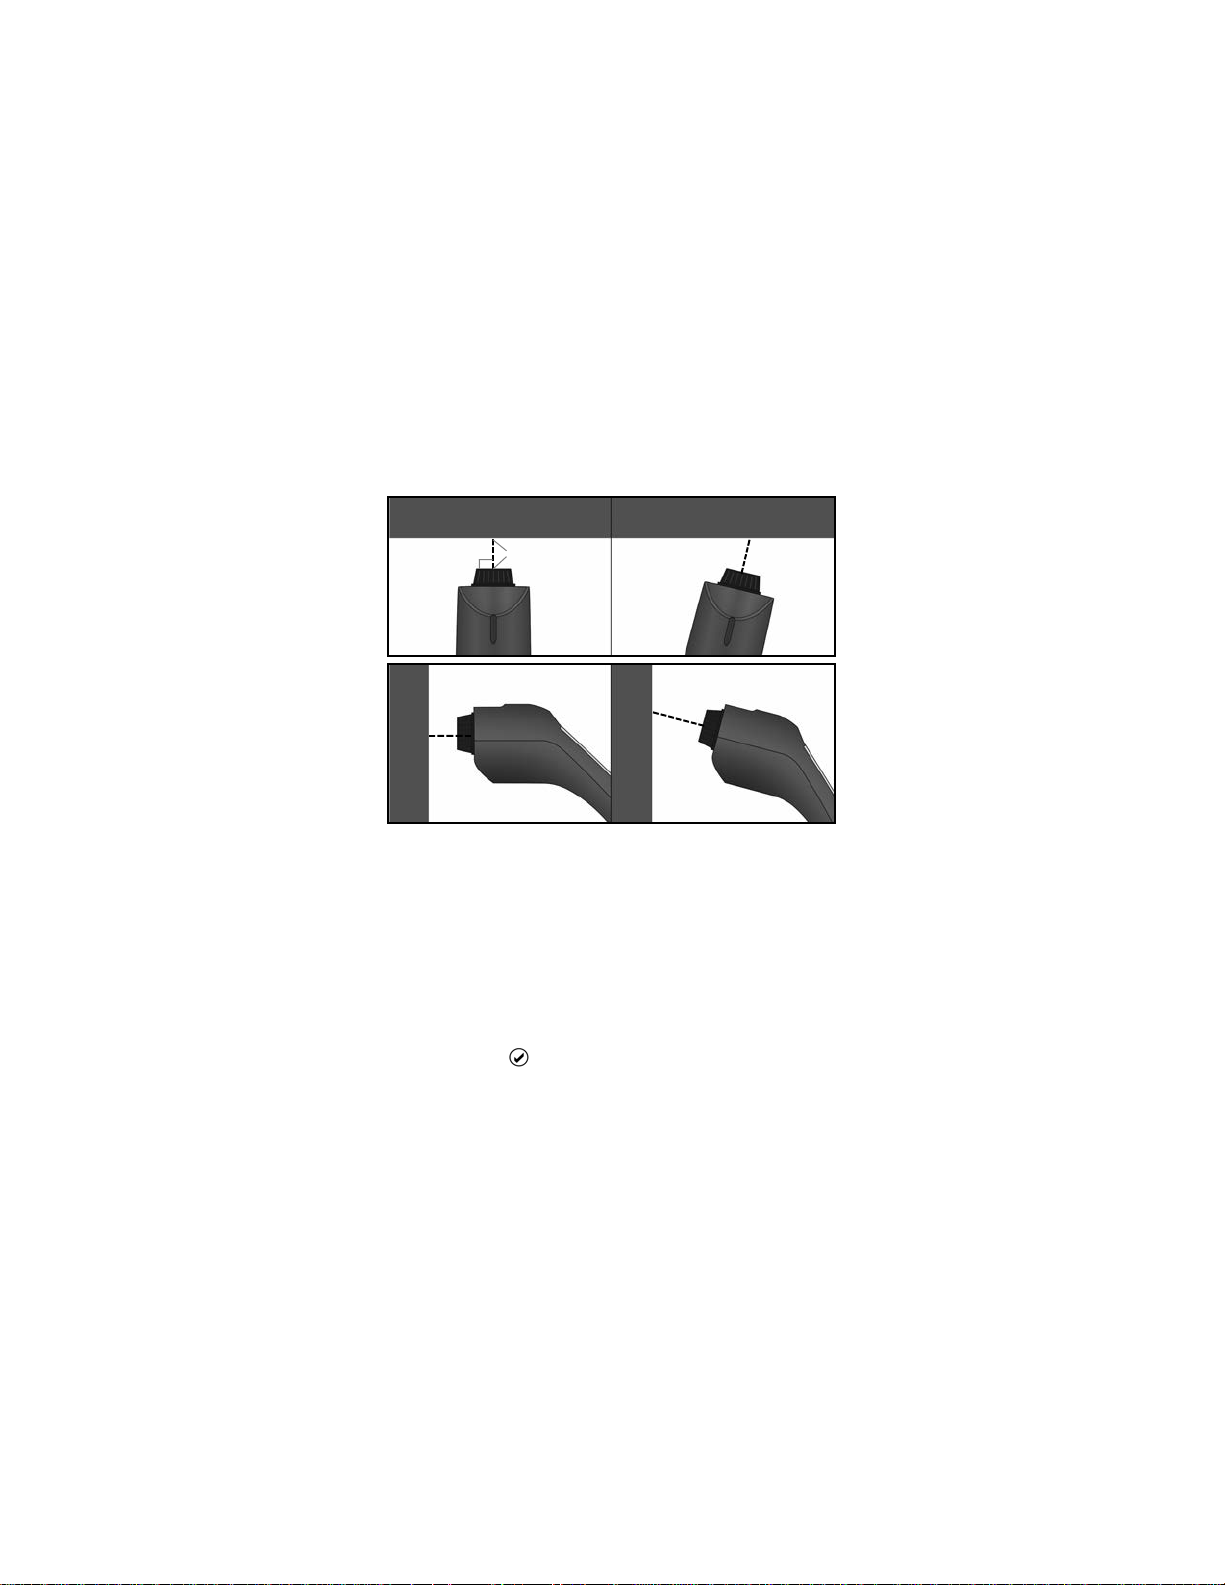
Zeroing
For best accuracy, perform a Zero at the
beginning of every shift to compensate for
temperature and humidity changes. It is also
required after a Gage Reset or whenever the
“Zero Probe” graphic is displayed.
1. Select Zero from the Gage menu.
2. Place the probe tip in the supplied Zero
Fixture.
3. Press the button and hold the Zero Fixture
on the probe until the hourglass icon
disappears and a green check mark is
displayed. If the zero fails, a red X will
display. Repeat the Zero process.
Zero Fixture
NOTE:
The Zero process can take up to 10 seconds
How to Measure
Power-up the PosiTest PC by pressing the button. With the
gage at least 10 cm (4 inches) away from the coated part, press
and hold the button. A target grid will appear on the display:
Distance Paddle
Distance Target Bar
Target Grid
4
Find Quality Products Online at: sales@GlobalTestSupply.com
www.GlobalTestSupply.com
Page 6
While watching the gage display, move the probe tip closer to the
target, aligning the Distance Paddle with the Distance Target
Bar. The optimum distance for measurement is 2 cm (3/4 inch)
between the probe tip and the surface of the applied powder.
Ensure the PosiTest PC is held perpendicular to the surface.
Correct
2 cm (3/4 inch)
90°
Correct
The instrument will take a measurement when:
a. The Distance Paddle is near the Distance Target Bar. This
indicates that the instrument is the correct distance away
from the part.
b. The Distance Paddle is as wide as possible. This indicates
that the instrument is being held perpendicular to the surface.
For best results use Memory Mode (pg. 2) to generate averages.
The average of a series of measurements is often a more
meaningful prediction of cured thickness than a single reading.
If a thickness result does not appear after 5-6 seconds, release
the measurement button and try again.
Small and/or erratically swinging parts may present measurement
challenges. Steady the part whenever possible. If erroneous
readings continually result, change the measurement strategy by
rotating the gage, altering its alignment to the part, or by
Incorrect
Incorrect
5
Find Quality Products Online at: sales@GlobalTestSupply.com
www.GlobalTestSupply.com
Page 7

measuring a different location on the part. If a valid measurement
cannot be calculated, one of the following messages will be
displayed:
0 A good reading, but the predicted cured thickness is
less than the minimum range.
+++ A good reading, but the predicted cured thickness is
greater than the maximum range.
--- An indeterminate or invalid reading.
Single Reading Mode (default)
The gage will automatically display the predicted cured thickness
after analyzing the powder. To take another reading, release the
button, then press and hold the again.
Scan Mode
Press and hold the button. The gage continuously analyzes
the powder and displays the predicted cured thickness until the
button is released. The last valid measurement is added to
memory when the button is released if Memory mode is on.
Maintenance
The probe screen protecting the sensor of the PosiTest PC can
be unscrewed for cleaning. Accumulated powder should be
carefully removed from the screen by no more than 0.2 MPa (20 30 psi) of compressed air.
- Do not blow air directly into the sensor.
- Replacement screens are available for purchase.
6
Find Quality Products Online at: sales@GlobalTestSupply.com
www.GlobalTestSupply.com
Page 8

Calibration and Adjustment
The PosiTest PC probe is factory calibrated and performs an
automatic self-check each time it calculates a measurement. For
most powder measurement applications, no further adjustment is
necessary. Simply Zero the gage (pg. 4) at the beginning of
each shift, then measure.
The PosiTest PC’s factory calibration accurately predicts cured
powder thickness for a wide range of powder coatings. However,
some powder formulations may require a Calibration Adjustment.
Begin by performing a Verification of Accuracy to determine if
there is a need for an adjustment. If the average of several
thickness results is outside the combined tolerances of the two
measuring instruments (PosiTest PC and dry film thickness
instrument) then two adjustment techniques are available to
correct the variance (see Adjustment Techniques).
Verification of Accuracy
Before first use on a new powder and periodically thereafter, an
accuracy check should be performed. This ensures the gage
measures properly by comparing predicted thickness values with
actual cured thickness values.
1. Zero the probe (pg. 4).
2. Spray powder onto a flat, smooth metal sample.
3. Measure the uncured powder with the PosiTest PC.
4. Cure the powder.
5. Measure cured thickness with a magnetic or eddy current
coating thickness gage such as the PosiTest DFT or
PosiTector 6000.
6. Compare results.
A successful verification requires that the average of a series of
measurements by both instruments be within their combined
tolerances. If not, adjust the PosiTest PC using one of the
methods described in Adjustment Techniques (pg 8).
7
Find Quality Products Online at: sales@GlobalTestSupply.com
www.GlobalTestSupply.com
Page 9

Adjustment Techniques
If the average of a series of measurements by both instruments
(PosiTest PC and dry film thickness instrument) is not within
combined tolerances, the PosiTest PC can be adjusted using
one of two methods:
1-Point Adjust – The first and most common choice.
2-Point Adjust – Used only if a 1 Pt Adjust does not
sufficiently improve accuracy.
1-Point Adjust
1. Spray approximately 75 microns (3 mils) of powder onto a
flat, smooth metal sample.
2. Select 1-Pt Adjust from the gage menu.
3. Take at least 3 uncured powder
measurements with the PosiTest PC. Press
the button to discard the last reading if
it should not be included in the average of the
measurements.
4. Select OK to confirm and store the average of the
measurements.
5. Cure the powder. The instrument will power off after 5
minutes of inactivity, but the uncured powder measurements
will be retained.
6. Measure cured thickness with a magnetic or eddy current
dry-film thickness gage. Record the results.
7. Power-up the instrument, and select 1-Pt
Adjust from the gage menu and then
select the option.
NOTE:
8. Adjust the displayed reading lower or
9. Verify accuracy (pg. 7) to ensure the instrument is
This only appears if 1 pt adjustment
readings have been stored
higher to match the cured thickness value.
Select OK to store the adjustment.
measuring within tolerance.
8
Find Quality Products Online at: sales@GlobalTestSupply.com
www.GlobalTestSupply.com
Page 10

2-Point Adjust
1. Spray powder onto two flat, smooth metal samples. Apply
approximately 40 microns (1.5 mils) on the first, and 75
microns (3 mils) on the second.
2. Select 2-Pt Adjust from the gage menu.
3. Take at least 3 uncured powder measurements on the first
(thin) powder sample with the PosiTest PC. Press the
button to discard the last reading if it should not be included
in the average of the measurements.
4. Select OK to confirm and store the average of the
measurements.
5. Take at least 3 uncured powder measurements on the
second (thick) powder sample with the PosiTest PC. Press
the button to discard the last reading if it should not be
included in the average of the measurements.
6. Select OK to confirm and store the average of the
measurements.
7. Cure the powder on both panels. The instrument will power
off after 5 minutes of inactivity, but the uncured powder
measurements will be retained.
8. Measure cured thickness on both panels with a magnetic or
eddy current coating thickness gage. Record the results.
9. Select 2-Pt Adjust from the gage menu and then select
the option.
10. Adjust the displayed reading for the first (thin) sample lower
or higher to match the cured thickness
values. Select OK to store the adjusted
measurement value.
11. Adjust the displayed reading for the second
(thick) sample lower or higher to match
the cured thickness values. Select OK to
store the adjusted measurement value.
12. Verify accuracy (pg. 7) to ensure the
instrument is measuring within tolerance.
9
Find Quality Products Online at: sales@GlobalTestSupply.com
www.GlobalTestSupply.com
Page 11

PosiSoft Desktop
PosiSoft Desktop - Powerful desktop software (PC/Mac) for
downloading, viewing, printing and storing measurement data.
Includes a customizable, templated PDF Report Generator.
Gage Update
The PosiTest PC gage can be updated by the user.
To perform an update, the Gage must be connected with the USB
cable to an internet connected computer running PosiSoft Desktop.
If an update is available, a prompt will appear in PosiSoft for the
user to preform an update.
NOTE:
PosiSoft Desktop before updating the gage.
Ensure that stored measurements are downloaded to
DO NOT unplug the Gage during the update operation.
USB Keyboard Mode / Live Stream Measurements
When enabled, the PosiTest PC will be recognized as a USB
keyboard device when connected to a computer. This mode is
compatible with any software that accepts keystrokes. Readings
are sent to the computer as they are taken, emulating keystrokes.
Can be used in both Single Reading Mode and Scan Mode.
Memory Mode is unavailable when in USB Keyboard Mode.
10
Find Quality Products Online at: sales@GlobalTestSupply.com
www.GlobalTestSupply.com
Page 12

Technical Data
Measuring Range
Accuracy
Resolution
Measurement Time 2-5 seconds
Measurement Distance
to Powder
Measurement Area
Temperature Range
Gage Size
Gage Weight
(without batteries)
Conforms to: ASTM D7378
This device complies with part 15 of the FCC Rules.
Operation is subject to the following two conditions: (1) This
device may not cause harmful interference, and (2) this
device must accept any interference received, including
interference that may cause undesired operation.
20-100 microns
0.8-4.0 mils
+ 5 microns
0.2 mil
+
1 micron
0.1 mil
19 mm
0.75 inch
2 mm
0.08 inch
0 to +50°C
+32° to +120°F
241 x 50 x 50 mm
9.5 x 2.0 x 2.0 in.
140 g
4.9 oz
11
Find Quality Products Online at: sales@GlobalTestSupply.com
www.GlobalTestSupply.com
Page 13

Returning for Service
Before returning the instrument for service…
1. Install new or newly recharged batteries in the proper
alignment as shown within battery compartment.
2. Examine the probe tip screen for dirt or damage.
Replacement screens are available for purchase.
3. Perform a Reset (pg. 3) and Zero (pg. 4).
IMPORTANT:
If you must return the Gage for service, describe the problem fully
and include measurement results, if any. Be sure to also include
the probe, your company name, company contact, telephone
number and fax number or email address.
Find Quality Products Online at: sales@GlobalTestSupply.com
www.GlobalTestSupply.com
 Loading...