

Page 1

Page 1 of 12
DZ 95730 2/18/13
Page 2

Dee Zee Dodge Aluminum Flow Through Tailgate
Installation Instructions
Congratulations on your purchase of a quality Dee Zee product. Dee Zee is
recognized as having the highest quality running boards and accessories on the
market today. We have earned this reputation by offering our customers a
product they can be proud to place on their vehicles. Dee Zee meets all the
criteria of manufacturing a custom-fit product which guarantees it to be the
easiest product to install.
Note: Please take time to read all of the instructions before beginning this installation.
If you should happen to have any questions with this product or you have an installation
question, please feel free to call us at:
1-800-779-8222
If you would like to find out more information on Dee Zee’s products, please feel free to visit
our website at:
WWW.DEEZEE.COM
Page 2 of 12
DZ 95730 2/18/13
Page 3
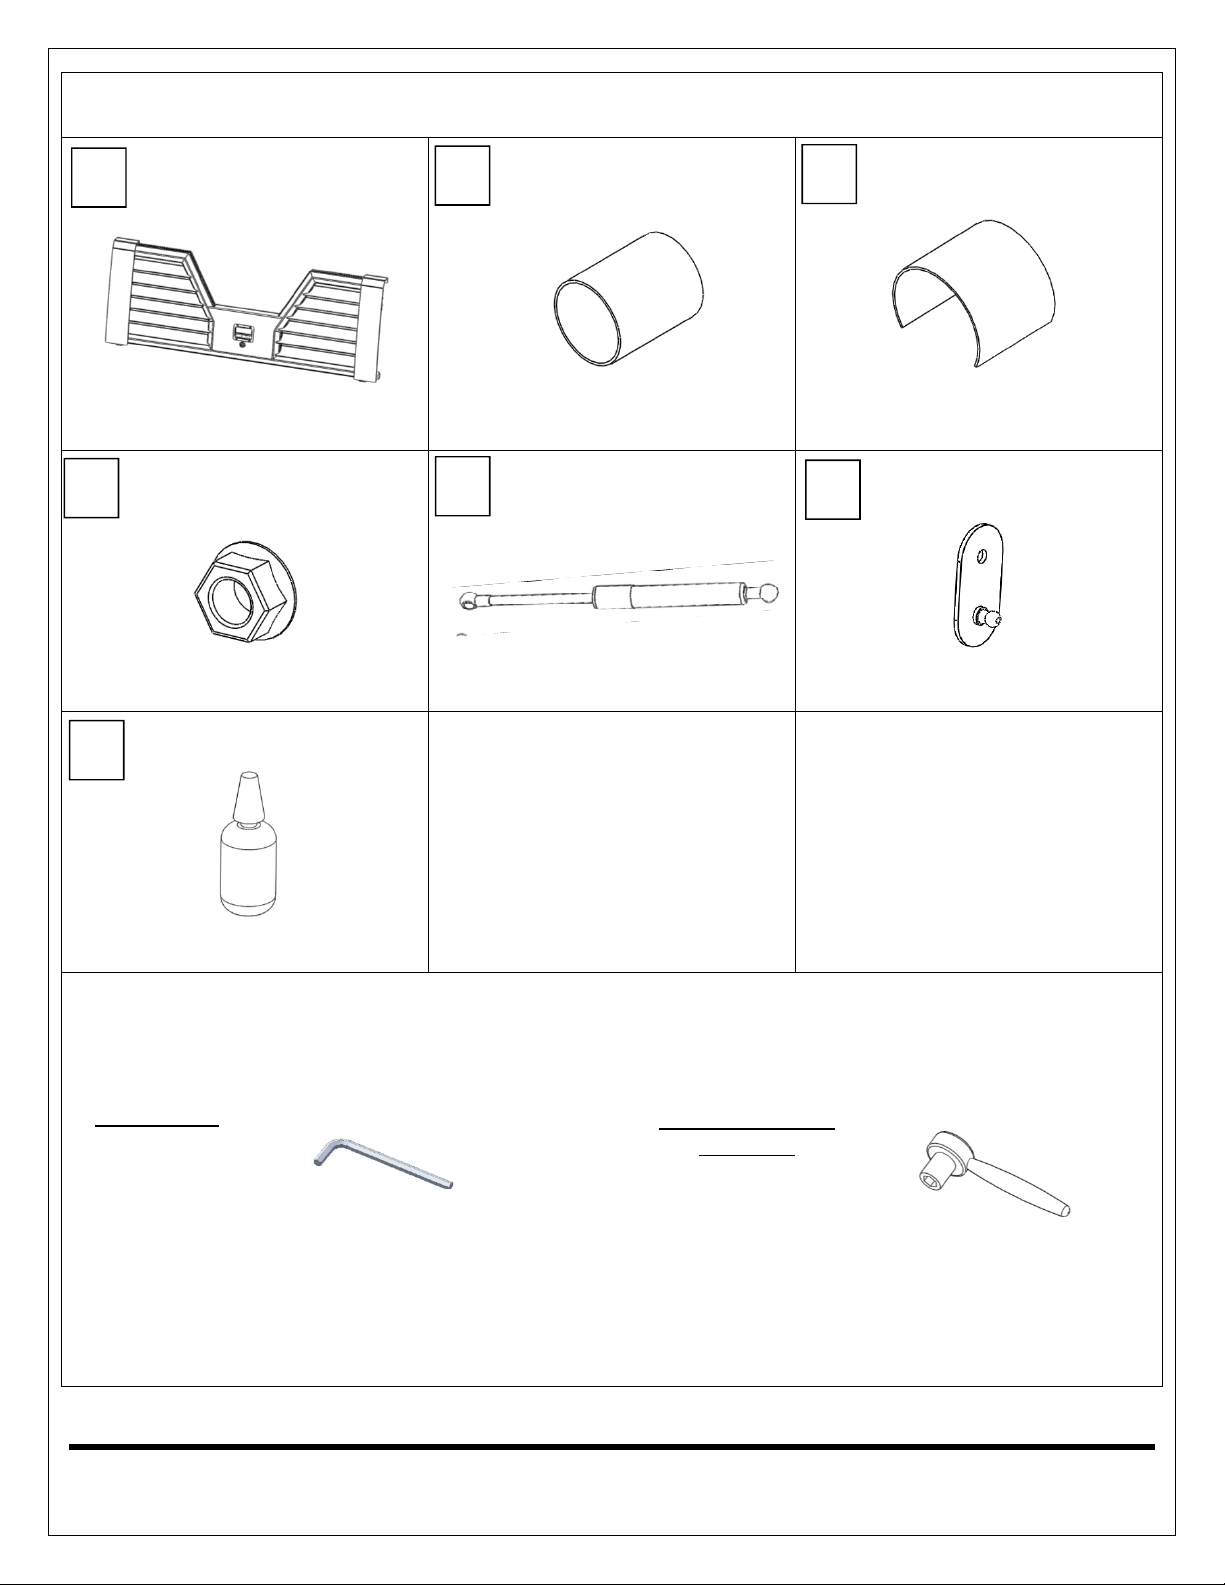
DZ 95730(B) Flow Through Tailgate
F D
Allen Wrench
E
A
FTTG
-
DODGE
-
ASSM
B
C
Ratchet and Socket
G
PN 526
Assembled Tailgate
M8-1.25 Flange Nut
Thread Lock
X1
TGNYLONSLEEVE1
X2
Nylon Hinge Tube Insert
Tailgate Assist Shock
Part of TA43300
X1
X1
Nylon Hinge Tube Insert
TGNLONSLEEVE2C
Shock Mounting Plate
Part of TA43300
X1
X1
Part of TA43300
X1
Tools Required
3/16”
Torx – T50
Torx – T45
Page 3 of 12
DZ 95730 2/18/13
or Wrench
Torx – T50
Torx – T45
13mm
1/2”
Page 4
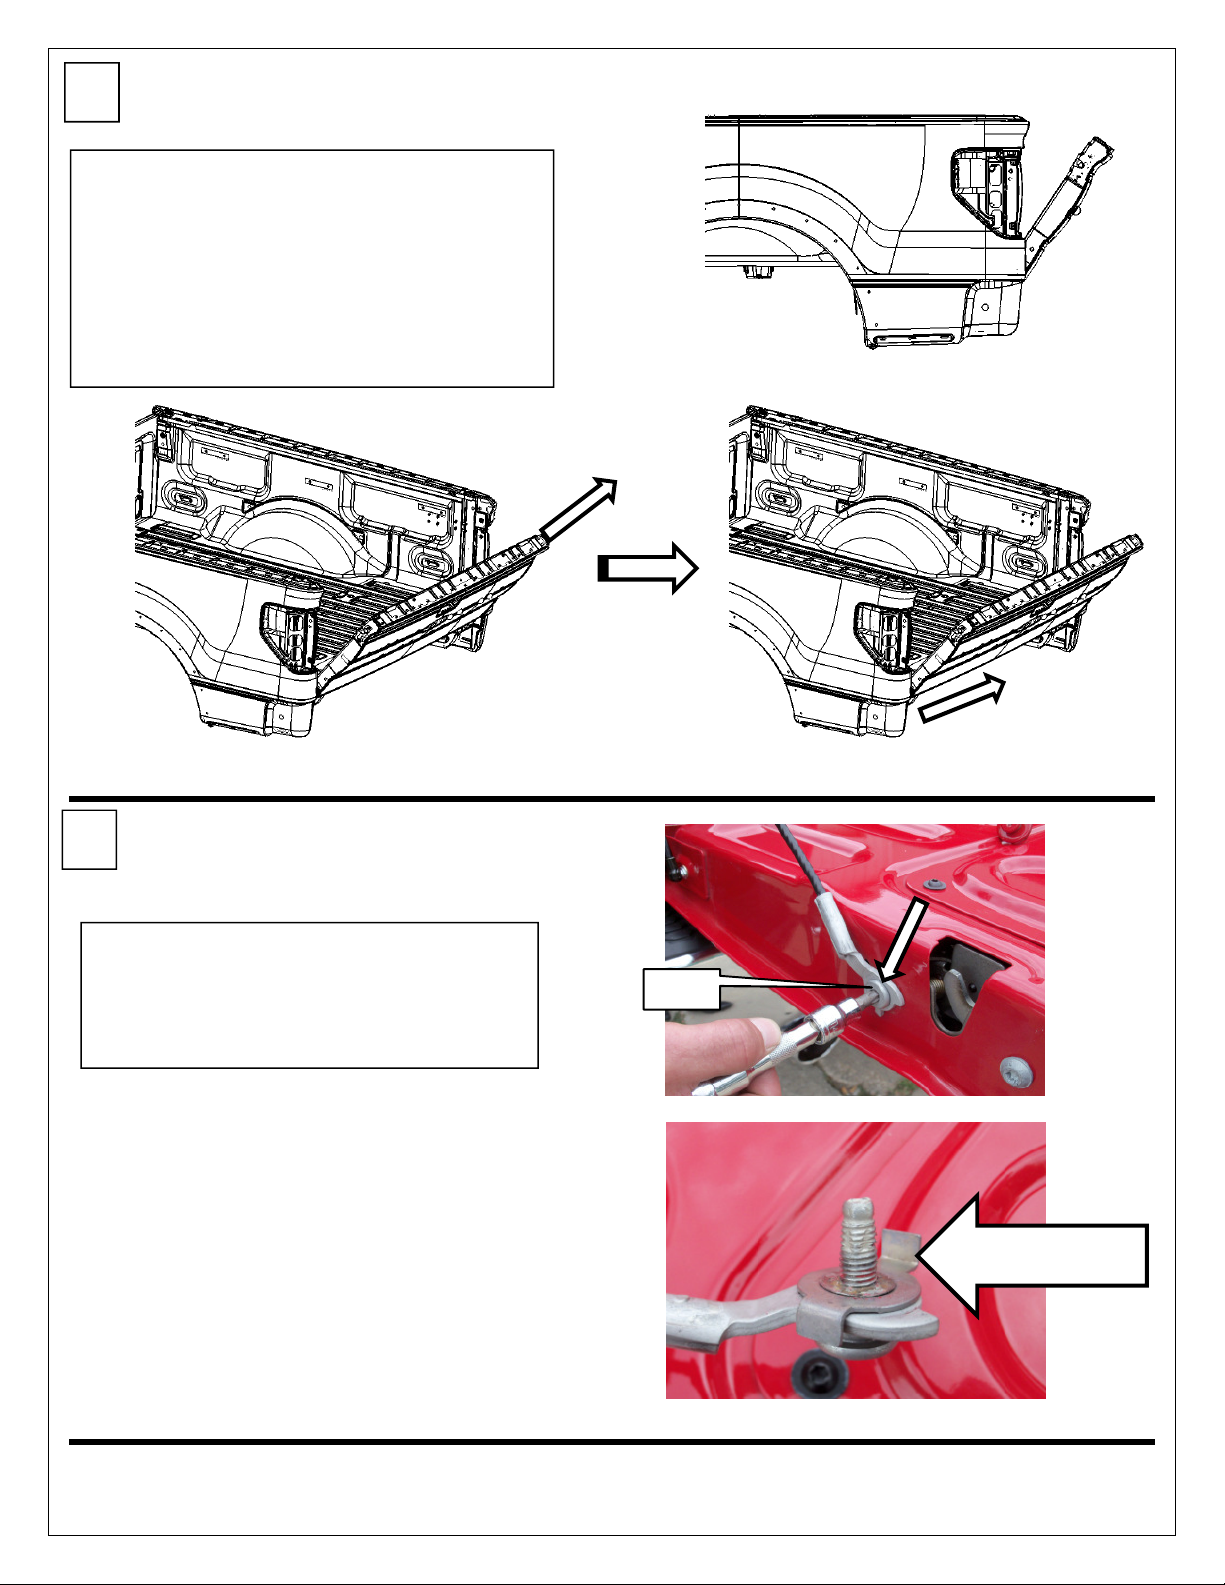
1
2
Open t
ailgate
, remove cable at bed attachment
Remove both cables from factory tailgate by
Limiter
T45
point. Lay back tailgate 30-45 degrees until notch
in passenger side tailgate hinge is parallel with the
mounting pin. Pull up on tailgate parallel to
mounting pin on passenger side. With Passenger
side loose pull sideways to disengage driver side
mounting pin.
Factory Tailgate Removal
removing Torx T45 bolt from tailgate. Remove
motion limiter, flat retaining washer must be
removed to do this.
Cable Removal
Page 4 of 12
DZ 95730 2/18/13
Page 5

3
Install the previously removed bolt and cable
*
Passenger
side follows same steps as in
A
4
A
D
A
C
B
Cable
Insert
(B) TGNYLONSLEEVE1 into the tube hinge bracket
Tailgate Installation-Cable
end in the open hole of the latch bracket below
the latch using the hardware shown. Driver
side shown.
Driver side installation.*
Factory Cable Bolt
on the driver side of the tailgate. Insert (C)
TGNYLONSLEEVE2C into the tube hinge bracket on the
passenger side of the tailgate by pinching open end of
nylon sleeve. Ensure that notches of nylon insert and
steel tube hinge align.
Tailgate Installation-Nylon Insert
Page 5 of 12
DZ 95730 2/18/13
Page 6

6
Tailgate
installation is a reverse process of removing the
Remove Tailgate from vehicle following
A
5
*Due to
variations in the beds and tailgates of the trucks
1/2”
factory tailgate. Slide driver side tube hinge of the tailgate
on to the mounting pin of the bed. Lay back tailgate 30-45
degrees until notch in passenger side tailgate hinge is
parallel with the mounting pin. Slide tailgate hinge on to
mounting pin of the bed. Reattach cables to bed mounting
points. Close Tailgate.
Tailgate Installation
Optional – Latch Bracket Adjustment
tailgate latches may not hit the striker on the truck
correctly. The following is the procedure to adjust the
latch brackets on the tailgates.*
procedure in step 1. Remove hardware shown
to the right. Passenger side shown.
3/16”
A
Page 6 of 12
DZ 95730 2/18/13
Page 7

*
Driver
side follows same steps as in
Move the top of the outer cover
Install tailgate back onto truck
(X6)
Loosen the 6 Allen head bolts
on
to the outside of the tailgate.
Tip the top of the outer cover
away from the tailgate until
bottom flange can be removed
from bottom mounting bolt.
Remove outer cover.
following procedure in step 5.
each side that attach both latch
brackets to the tailgate but do
not remove the hardware.
3/16”
Passenger side Procedure.*
Page 7 of 12
DZ 95730 2/18/13
Page 8

Close Tailgate, adjusting latch brackets
Even g
ap on both sides
Latch
Striker Bolt
on Truck
*
Driver
side follows same steps as in
Striker Bolt
on Truck
into position for latch to close on striker
bolts. Adjust brackets to get an even gap
on both sides of the striker bolt head.
Tighten the 6 Allen head bolts for each
bracket. Repeatedly open and close
tailgate to ensure smooth operation of
the latches.
Page 8 of 12
of Striker Bolt Head
Passenger side Procedure.*
DZ 95730 2/18/13
Page 9

Remove Tailgate from vehicle following
Steel Washer
Nylon Spacer
Outer Cover
Reinstall outer cover
by placing nylon
A
1/2”
Move the top of the outer cover
*
Driver
side follows same steps as in
procedure in step 1.
spacer and steel washer on bolt then
placing slotted flange onto bolt and
rotating the outer cover upwards.
inwards. Reinstall hardware and
tighten in original location.
Ensure that when closing tailgate
for first time that there is a gap
between outside edge of outer
cover and truck bed.
3/16”
A
Passenger side Procedure.*
Page 9 of 12
DZ 95730 2/18/13
Page 10

7
Remove cable from cable bol
t then remove cable
F
Install
(F) shock mounting plate using previously
Reinstall cable onto the cable bolt and the body
Tailgate Assist Installation
bolt using Torx T45 socket or wrench. Tailgate
assist is installed on the driver side only.
removed cable bolt. Apply (G) thread lock to
cable bolt before installing. Tighten using Torx
of the shock onto the ball mount of the shock
mounting plate.
T45
T45
Page 10 of 12
DZ 95730 2/18/13
Page 11

Install narrow end of the shock onto the ball
mount already installed on the driver’s side hinge
bracket.
Page 11 of 12
DZ 95730 2/18/13
Page 12

8
Coding BOLT Lock Cylinder
General Coding Notes:
1. The BOLT cylinder can only be coded one time.
2. If the key is changed, the lock cylinder needs to be replaced.
How to program your cylinder:
Step 1: Remove protective label from cylinder.
Step 2: Remove ignition key from keychain. FULLY insert the key into the lock cylinder before starting to
rotate. Do not pull up/down on key.
Step 3: While maintaining FULL key insertion, rotate key clockwise until it hits a stop point at about ¾ of a turn
or 270 degrees.
Step 4: Rotate key back counter-clockwise about 90 degrees to the key-out position and remove key. Cylinder
is now paired with your key.
Step 5: Cycle coded cylinder from LOCK to UNLOCK position five times to ensure it coded properly. Remove
key between each LOCK-UNLOCK cycle.
Page 12 of 12
DZ 95730 2/18/13
 Loading...