

Page 1
Before returning this product
DZ 2041
to the store of purchase
Contact Dee Zee if you experience the following problems:
•MissingParts
•InstallationProblems/Questions
•WarrantyQuestions
1.800.779.2102
Hoursofoperation:8am-5pmCST,Mon-Friday
Reviewcompletewarrantypolicyandregisteryourproductat:
www.deezee.com
Page 2

Dee Zee Running Board Installation Instructions
Congratulations on your purchase of a quality Dee Zee product. Dee Zee is
recognized as having the highest quality running boards and accessories on
the market today. We have earned this reputation by offering our customers
a product they can be proud to place on their vehicles. Dee Zee meets all
the criteria of manufacturing a custom-fit product which guarantees it to
be the easiest product to install.
Note: Please take time to read all of the instructions before beginning this installation.
Warning! Please check for wiring or other obstructions before drilling any holes into
the vehicle. If it is necessary to drill any holes into the vehicle, Dee Zee recommends
putting a sealant or rust inhibitor around all holes drilled into the body of the vehicle.
Warning! It is the sole responsibility of the vehicle owner to check for tire clearance.
Warning! It is unlawful and dangerous to ride on running boards or side box boards
while the vehicle is in motion.
Cleaning Instructions: To maintain the bright finish of your Dee Zee running boards,
clean with a mild detergent. For our stainless steel products and accessories, the
application of a high grade automotive type wax is recommended.
If you should happen to have any questions with this product or you have an
installation question, please feel free to call us at:
1-800-779-8222
If you would like to find out more information on Dee Zee’s products please
feel free to visit our website at:
WWW.DEEZEE.COM
DZ 2041.PDF 10/30/03
Page 3
Dee Zee Britetread Running Board Installation Instruction
DZ 2041
(2004 - Current) Ford F150 Super Cab Pickup
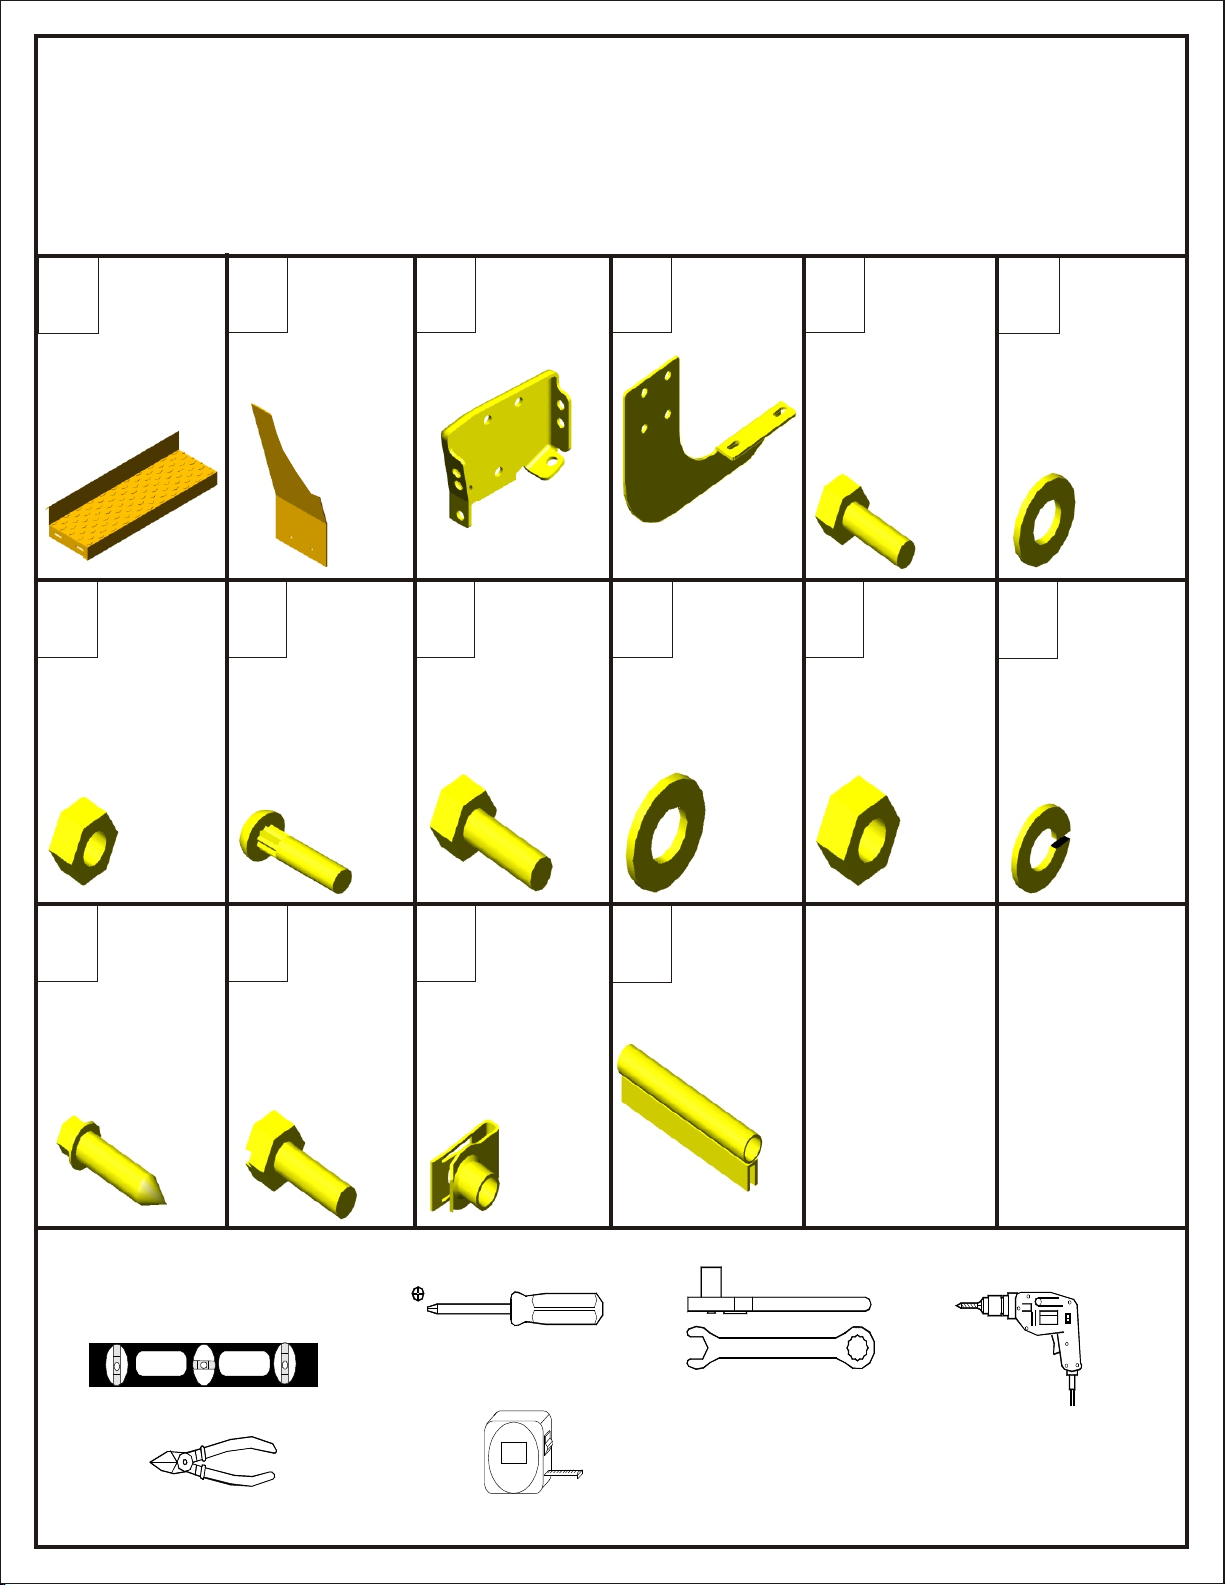
Britetread
Running
A
Board
G
1/4“ Hex Nut
Britetread
Mudflap
B
X2
H
1/4 x 1” Ribneck
Carriage Head
Bolt
Rocker
Panel
C D
Bracket
X2
I
3/8 x 1“ Hex
Head Bolt
Running
Board
Bracket
X6
J
5/16“ Flat Washer
E
X6
K
3/8“ Hex Nut
1/4 x 3/4”
Hex Head
Bolt
X4
1/4“ Flat
Washer
F
L
3/8" Lock
Washer
X20
X16
M
1/4 x 1” Sheet
Metal Screw
To o ls Re qu i r ed :
Outils Nécessaires:
Tin-snips
N
8mm x 25mm
Hex Head Bolt
X4
Level
X12
X12
P
8mm U-Clip
Phillips Head
Screwdriver
Tape Measure
X12
X12
Q
Bulb-Seal
Gasket
Ratchet / Wrench
Sizes: 3/8“
7/16“
13mm
X24
14 ft.
9/16"
X12
Drill
1/4” Drill Bit
3/16” Drill Bit
X12
Page 4
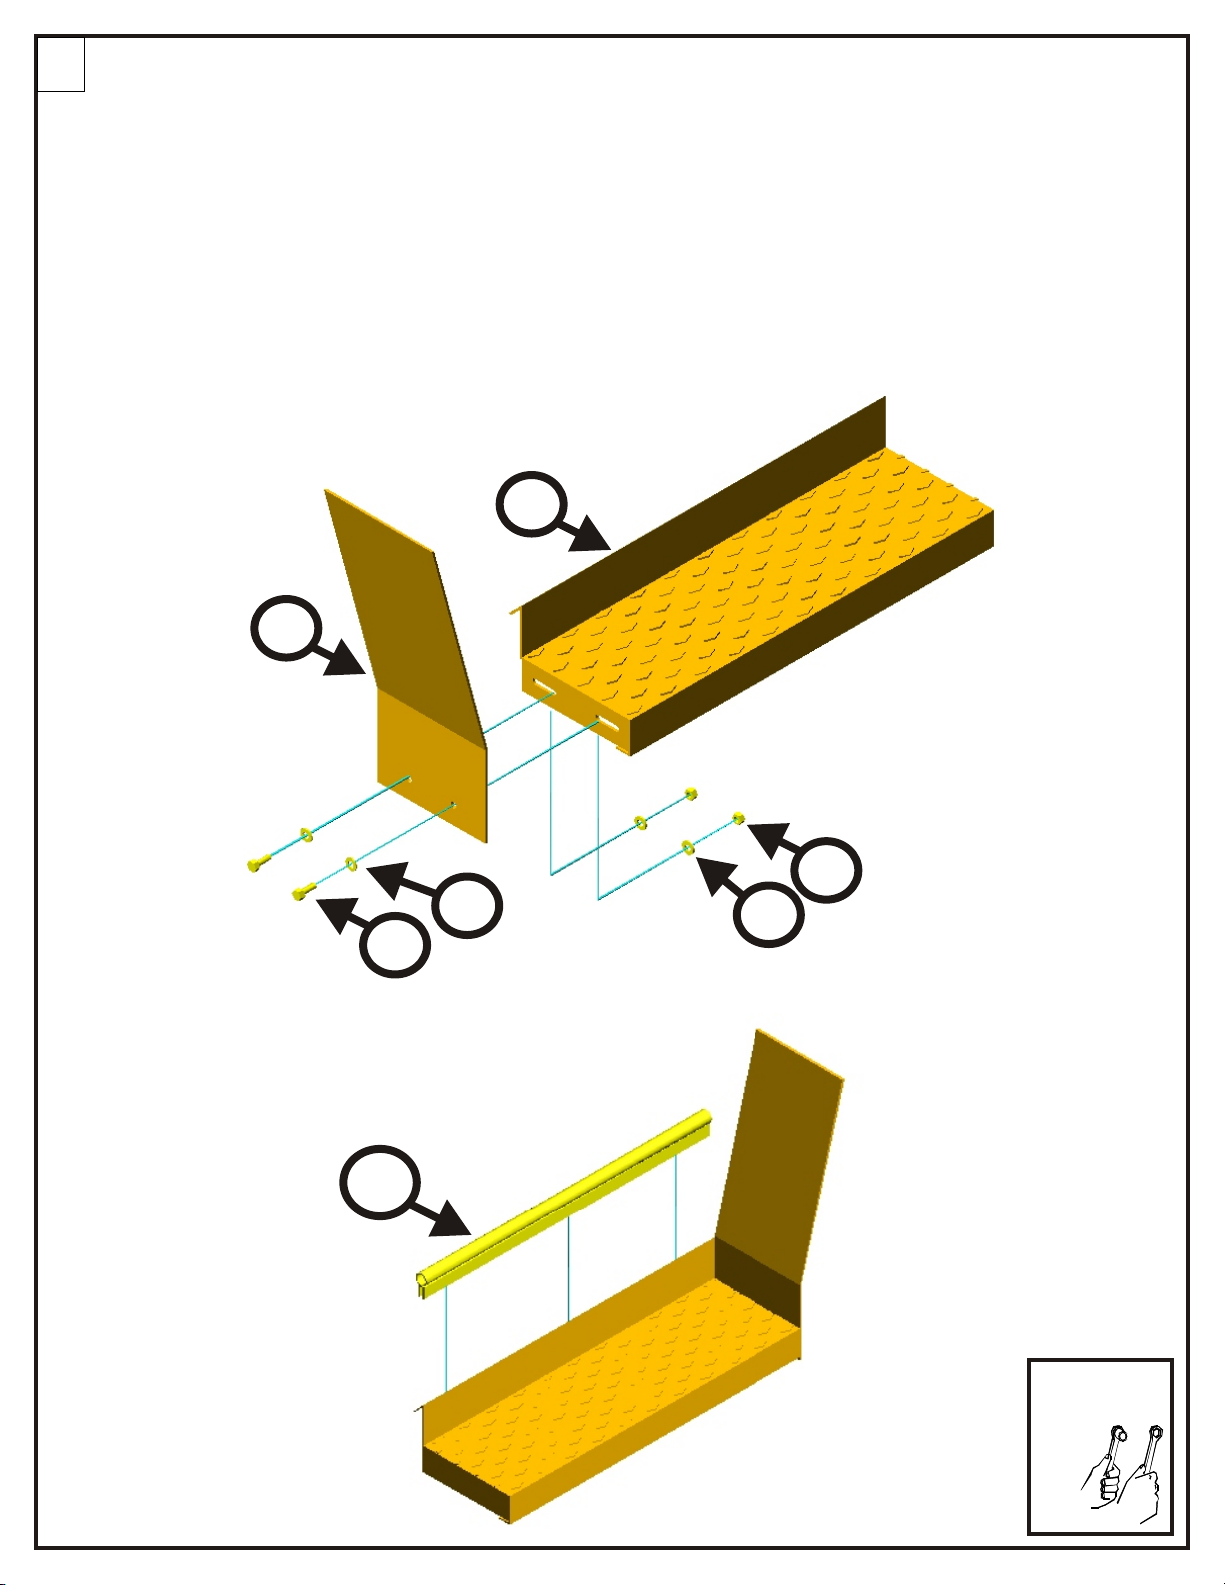
1
Secure britetread mudflap (B) to britetread running board (A) using 1/4 x 3/4” hex head bolts (E),
1/4” flat washers (F), and 1/4” hex nuts (G). Tighten into place using a 7/16” wrench / or socket.
Place bulb-seal gasket (Q) onto the backlip of britetread running board (A) and trim flush with the
britetread mudflap (B) and the end of britetread running board (A).
Fixez le mudflap de britetread (b) au panneau courant de britetread (a) en utilisant les boulons de
tête d'hexa de 1/4 x de 3/4"(e), les rondelles de 1/4" (f), et les écrous 1/4"d'hexa plats (g). Serrez
dans l'endroit à l'aide d'une clé de 7/16"/ou du plot. Placez la garniture d'ampoule-joint (q) sur le
backlip du panneau courant de britetread (a) et équilibrez à affleurement du mudflap de britetread
(b) et de l'extrémité du panneau courant de britetread (a).
A
B
E
Q
F
G
F
Britetread
Running Board
7/16“ Wrench
or Socket
Page 5

2
You will need to remove the black tape from the rocker panel and then place an 8mm u-clip (P) into the hole locations
shown below.
P
Approximate Hole Locations on Vehicle
64 1/4”
36 ½”
19 3/4”
Front of
Rocker
Panel
Existing
Hole
Location
Existing
Hole
Location
Existing
Hole
Location
Page 6

3
Slide 8mm u-clip (P) onto the rocker panel bracket (C) as shown below. Make sure that the hole in 8mm u-clip (O) is
aligned with the hole in rocker panel bracket (C).
Diapositive l'u-agrafe de 8mm (p) sur la parenthèse de panneau de culbuteur (c) comme montré ci-dessous. Assurez-vous
que le trou dans l'u-agrafe de 8mm (o) est aligné avec le trou dans la parenthèse de panneau de culbuteur (c).
C
P
Brace
Assembly
Page 7

4
Front and Rear Brace Installation
Place the rocker panel bracket (C) up to the vehicle rocker panel and u-clip (p) and secure into place
using an 8mm x 30mm flange head bolt (N) as shown below.
Placez la parenthèse de panneau de culbuteur (c) jusqu'au panneau de culbuteur de véhicule et
à l'u-agrafe (p) et la fixez dans l'endroit à l'aide d'un boulon de tête de bride de 8mm x de 30mm (n)
comme montré ci-dessous.
13mm Wrench
or Socket
C
P
N
Brace Assembly
Installed
C
Page 8

5 Front and Rear Brace Installation
Secure the 8mm u-clip in the bottom flange on rocker panel bracket (C) to the rocker panel using 8mm
x 25mm flange head bolt (N).
Asegure el u-clip de 8m m en el reborde inferior en el soporte del panel del eje de balancín (c) al panel
del eje de balancín usando el perno de la cabeza del reborde de 8m m x de 25m m (n).
Vehicle Rocker
Panel
13mm Wrench
or Socket
N
C
Brace Assembly
Installed
C
Page 9

6
Using the drawing below as a guide, place running board bracket (D) up to rocker panel bracket (C). Secure the
rear-top hole in running board bracket (D) to the hole in the rocker panel bracket (C) using 3/8 x 1" hex head bolt (I),
5/16" flat washers (J), 3/8" lock washer (L), and 3/8" hex nut (K). Note: See drawings below for correct hole identification.
I
Vehicle
Rocker
Panel
E
J
D
J
KL
KK
Correct Hole Locations
Correct Hole Locations
Page 10

7
Rotate the running board bracket (D) to the upright position and secure it into place using a 3/8 x 1" hex head bolt (I), 3/8"
lock washer (L), 3/8" flat washers (J), and 3/8" hex nuts (K) as shown below.
Rote el soporte corriente del tablero (d) a la posición vertical y asegúrelo en lugar usando un perno de la cabeza de
la tuerca hexagonal de 3/8 del x 1"(i), la arandela de cerradura del 3/8" (l), las arandelas planas del 3/8"(j), y las tuercas
de tuerca hexagonal del 3/8" (k) según lo demostrado abajo.
I
K
J
C
J
L
D
Rotate
9/16 and 7/16“
Wrench or
Socket
Page 11

8
Place britetread running board (A) up to the running board brackets (D) as shown below. Slide the britetread running
board up to the rocker panel so that it is flush with the vehicle rocker panel.
Placez le panneau courant de britetread (a) jusqu'aux parenthèses de panneau de fonctionnement (d) comme montré
ci-dessous. Glissez le panneau courant de britetread jusqu'au panneau de culbuteur de sorte qu'il soit affleurant du
panneau de culbuteur de véhicule.
Rocker Panel
Bracket
Running Board
Bracket
Britetread Running
Board
Side View of rocker panel bracket
and britetread running board assembly.
Britetread Running
Vehicle
Rocker
Panel
Rocker Panel
Bracket
Board
Running Board
Bracket
Page 12

9
Using the bottom holes in the running board bracket (D) as a guide, drill 1/4” holes through the britetread
running board. Secure the running board bracket (D) to the britetread running board using 1/4 x 1”
ribneck carriage head bolts (H), 1/4” flat washers (F), and 1/4” hex nuts (G). Tighten into place using a
7/16” wrench / or socket.
Drill with a
1/4” drillbit
En utilisant les trous de bas dans le panneau courant encadrez (d) comme guide, forent des trous de
1/4"par le panneau courant de britetread. Fixez la parenthèse courante de panneau (d) au panneau
courant de britetread en utilisant les boulons de tête de chariot de ribneck de 1/4 x de 1"(h), les
rondelles de 1/4" (f), et les écrous 1/4"d'hexa plats (g). Serrez dans l'endroit à l'aide d'une clé de 7/16"/ou
du plot.
Britetread
D
Running
7/16“ Wrench
or Socket
E
Drill with a
1/4” Drillbit
Board
Britetread
Running
Board
D
F
G
Page 13

10
Drill two holes through the britetread mudflap and the sheet metal of the vehicle
wheel well opening. Secure the britetread mudflap to the vehicle wheel well
opening using 1/4 x 1” sheet metal screws (M). Tighten into place using a 3/8”
wrench / or socket.
Drill with a
3/16” drillbit
Forez deux trous par le mudflap de britetread et le métal de feuille de l'ouverture
de soute de train de véhicule. Fixez le mudflap de britetread à l'ouverture de soute
de train de véhicule à l'aide des vis en métal de feuille de 1/4 x de 1"(mj). Serrez dans
l'endroit à l'aide d'une clé de 3/8"/ou du plot.
Britetread
Mudflap
3/8“ Wrench
or Socket
Britetread
Mudflap
M
M
 Loading...