

Page 1
Before returning this product
to the store of purchase
Contact Dee Zee if you experience the following problems:
•MissingParts
•InstallationProblems/Questions
•WarrantyQuestions
1.800.779.2102
Hoursofoperation:8am-5pmCST,Mon-Friday
Reviewcompletewarrantypolicyandregisteryourproductat:
www.deezee.com
Page 2
Dee Zee Running Board Installation Instructions
Congratulations on your purchase of a quality Dee Zee product. Dee Zee is
recognized as having the highest quality running boards and accessories on
the market today. We have earned this reputation by offering our customers
a product they can be proud to place on their vehicles. Dee Zee meets all
the criteria of manufacturing a custom-fit product which guarantees it to
be the easiest product to install.
Note: Please take time to read all of the instructions before beginning this installation.
War ning! Please check for wiring or other obstr uctions before drilling any holes into
the vehicle. If it is necessar y to drill any holes into the vehicle, Dee Zee recommends
putting a sealant or rust inhibitor around all holes drilled into the body of the vehicle.
War ning! It is the sole responsibility of the vehicle owner to check for tire clearance.
War ning! It is unlawful and dangerous to ride on r unning boards or side box boards
while the vehicle is in motion.
Cleaning Instructions: To maintain the bright finish of your Dee Zee running boards,
clean with a mild deter gent. For our stainless steel products and accessories, the
application of a high grade automotive type wax is recommended.
If you should happen to have any questions with this product or you have an
installation question, please feel fr ee to call us at:
1-800-779-8222
If you would like to find out mor e infor mation on Dee Zee’s products please
feel free to visit our website at:
WWW.DEEZEE.COM
Page 3
BD 1360 L/R
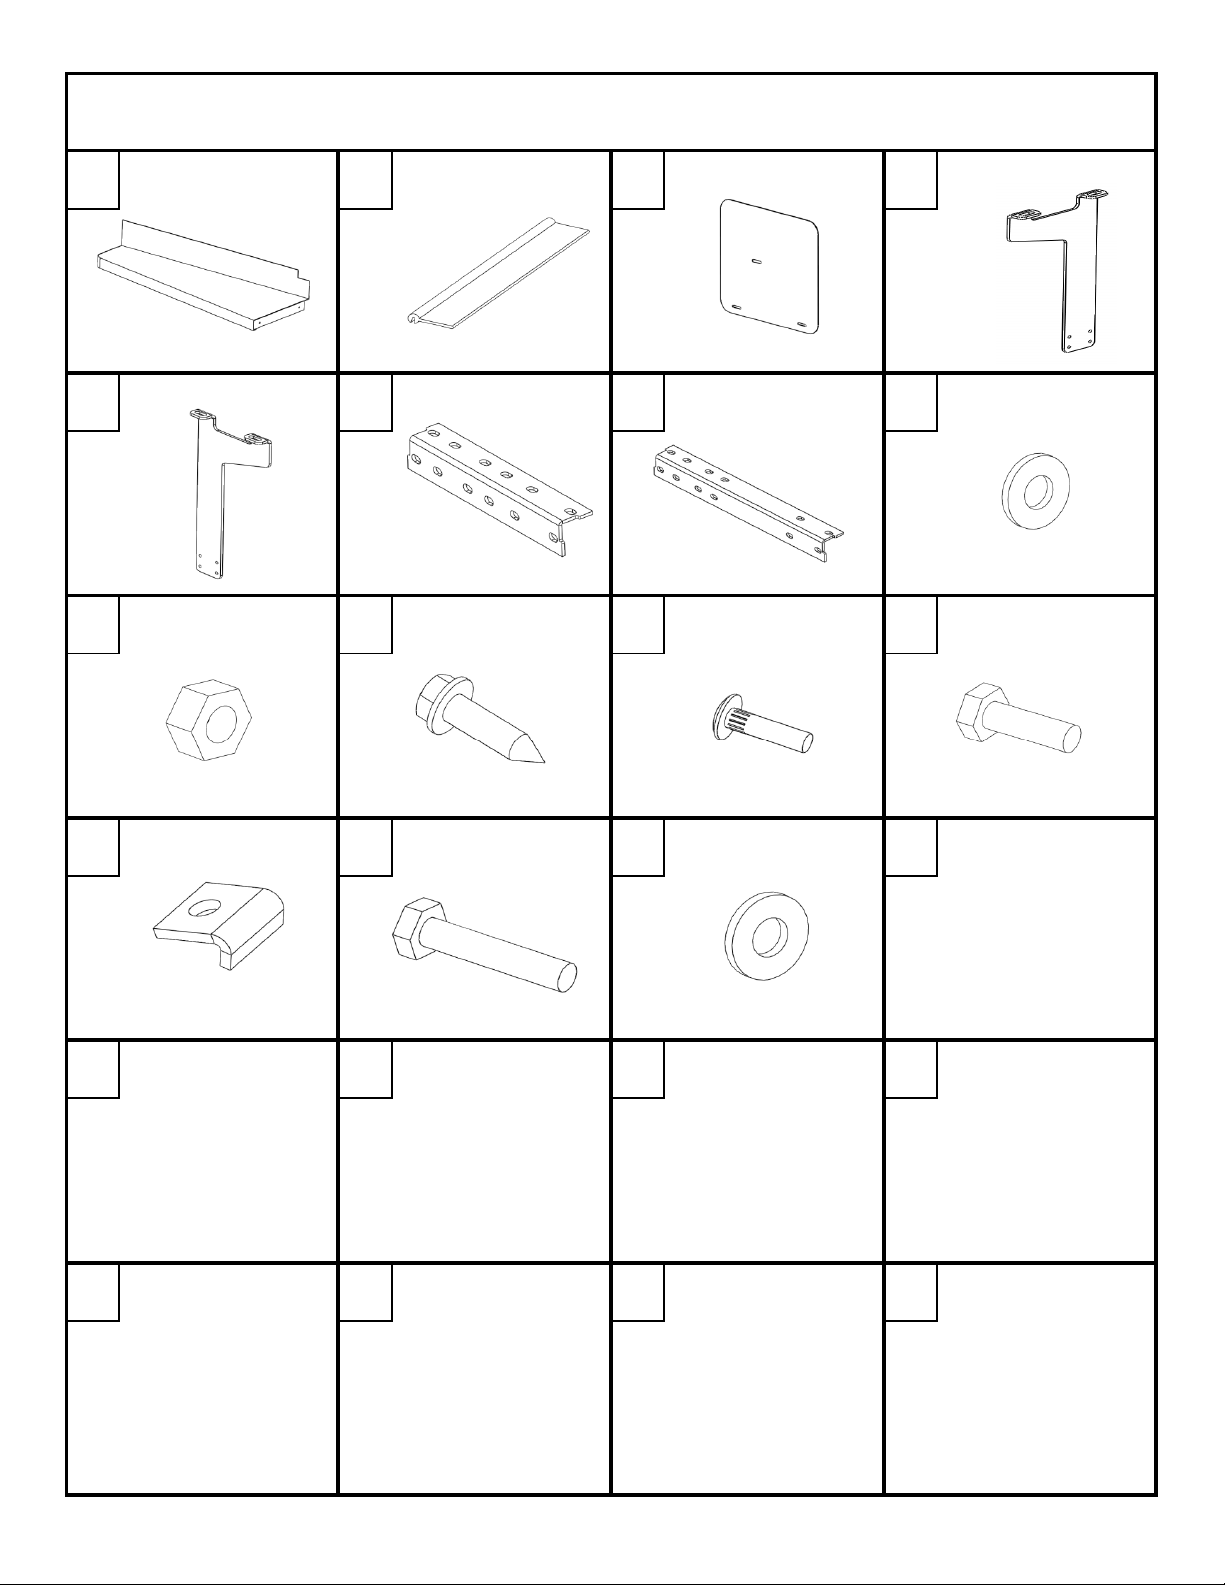
1 LH / 1 RH
GSK-15
6 FT.
MUDFLAP
1 LH / 1 RH
B 1648LP
X2
B 1648RP
X2
B 865
X2
B 885
X2
PN 72
X 36
Dee Zee Brite Tread Side Box Board Installation Instruction
DZ 1361 (2011 - Current) Chevy Dually Pickup
A B C D
PN 71
X20
PN 97
X2
PN 87
X8
PN 96
X12
PHB 196
X2
PN 836
X2
PN 325
X2
SIDE BOX BOARD RUBBER TRIM MUD FLAP RIGHT BRACKET
LEFT BRACKET
9" ANGLE BRACE 13.5" ANGLE BRACE
E F G H
I J K
M
1/4" HEX NUT SHEET
METAL SCREW
BENT SPACER
8mm X 40mm BOLT 8mm WASHER
N O
1/4 X 1" RIBNECK
CARRIAGE BOLT
L
1/4" FLAT WASHER
1/4 X 1" HEX
HEAD BOLT
DZ 1361 1 OF 9 5/23/2011
Page 4
WRENCH/RATCHET
3/8", 7/16",
TAPE
13mm, 18mm
MEASURE
TIN SNIPS
3/16" DRILL BIT
PHILLIPS SCREWDRIVER
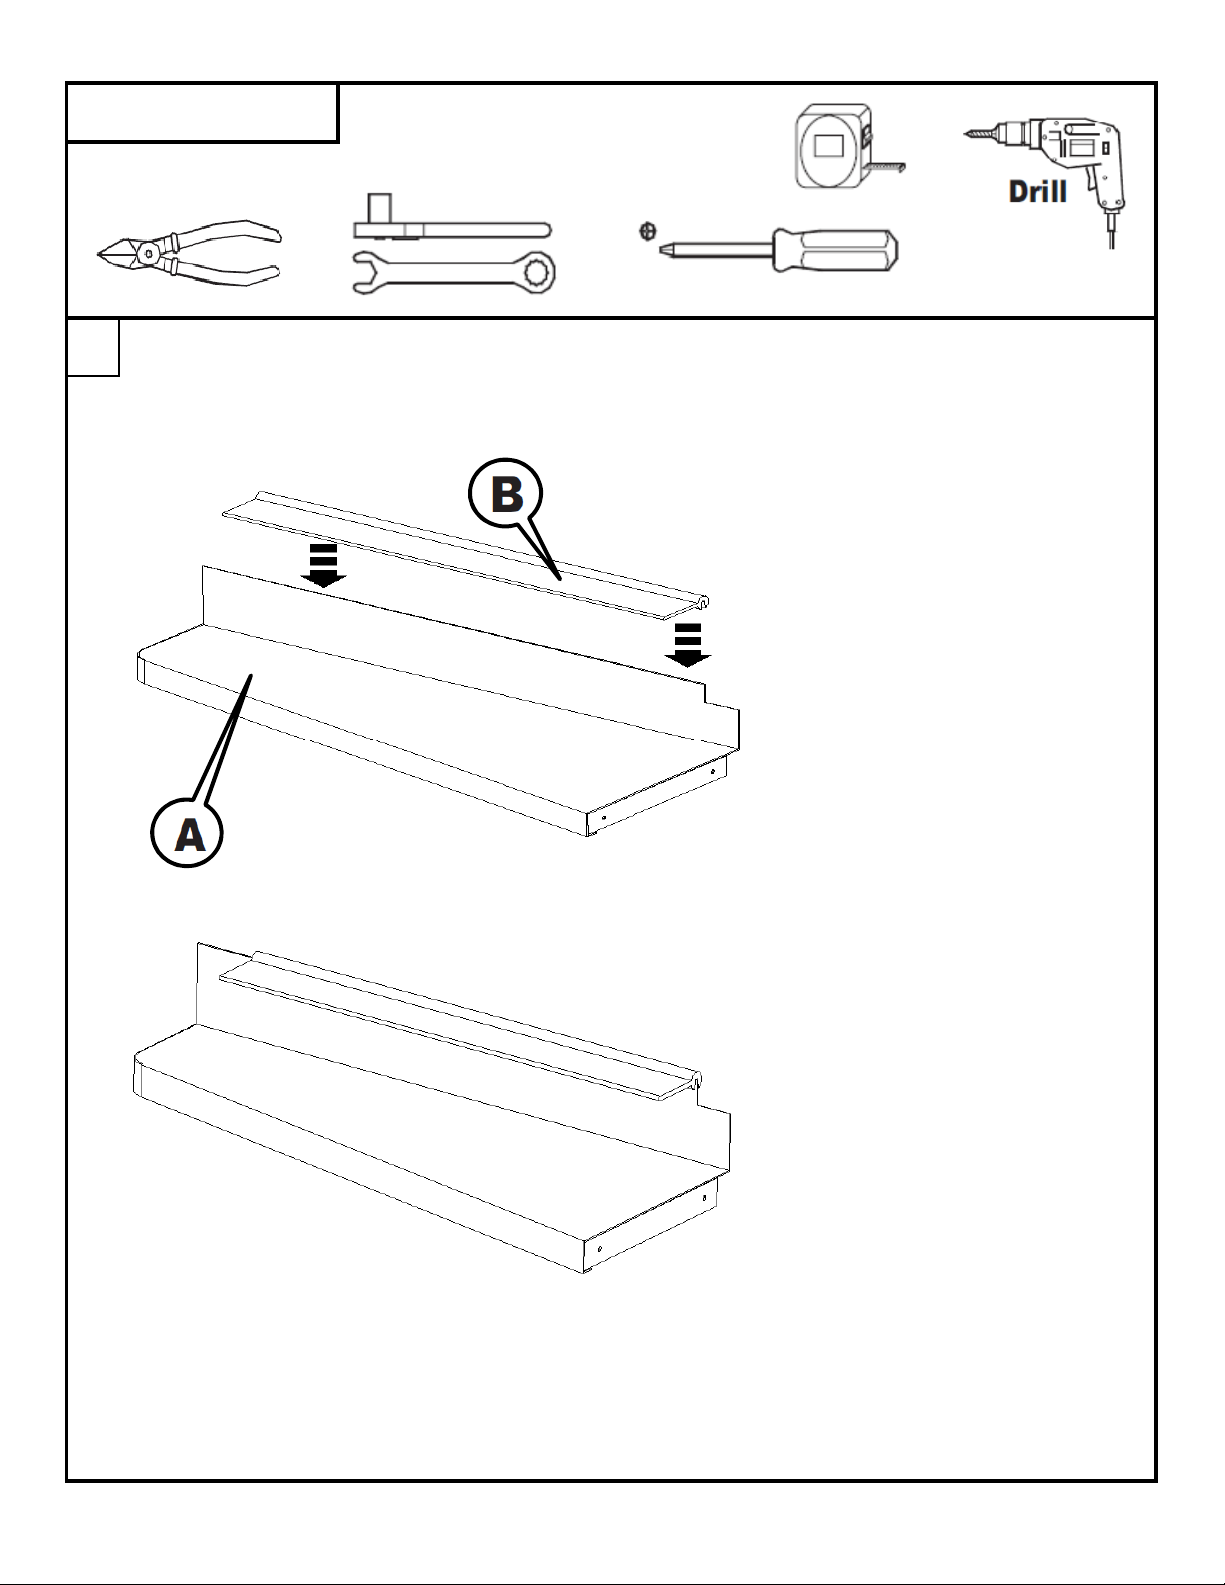
Using tin snips, cut a piece of rubber trim [B] 31" long.
Place the rubber trim onto the back lip of the running board starting at the notch
at the rear of the running board. The gasket will not run the entire length of the board to allow
clearance with the underside of the truck box.
TOOLS REQUIRED
1
DZ 1361 2 OF 9 5/23/2011
Page 5
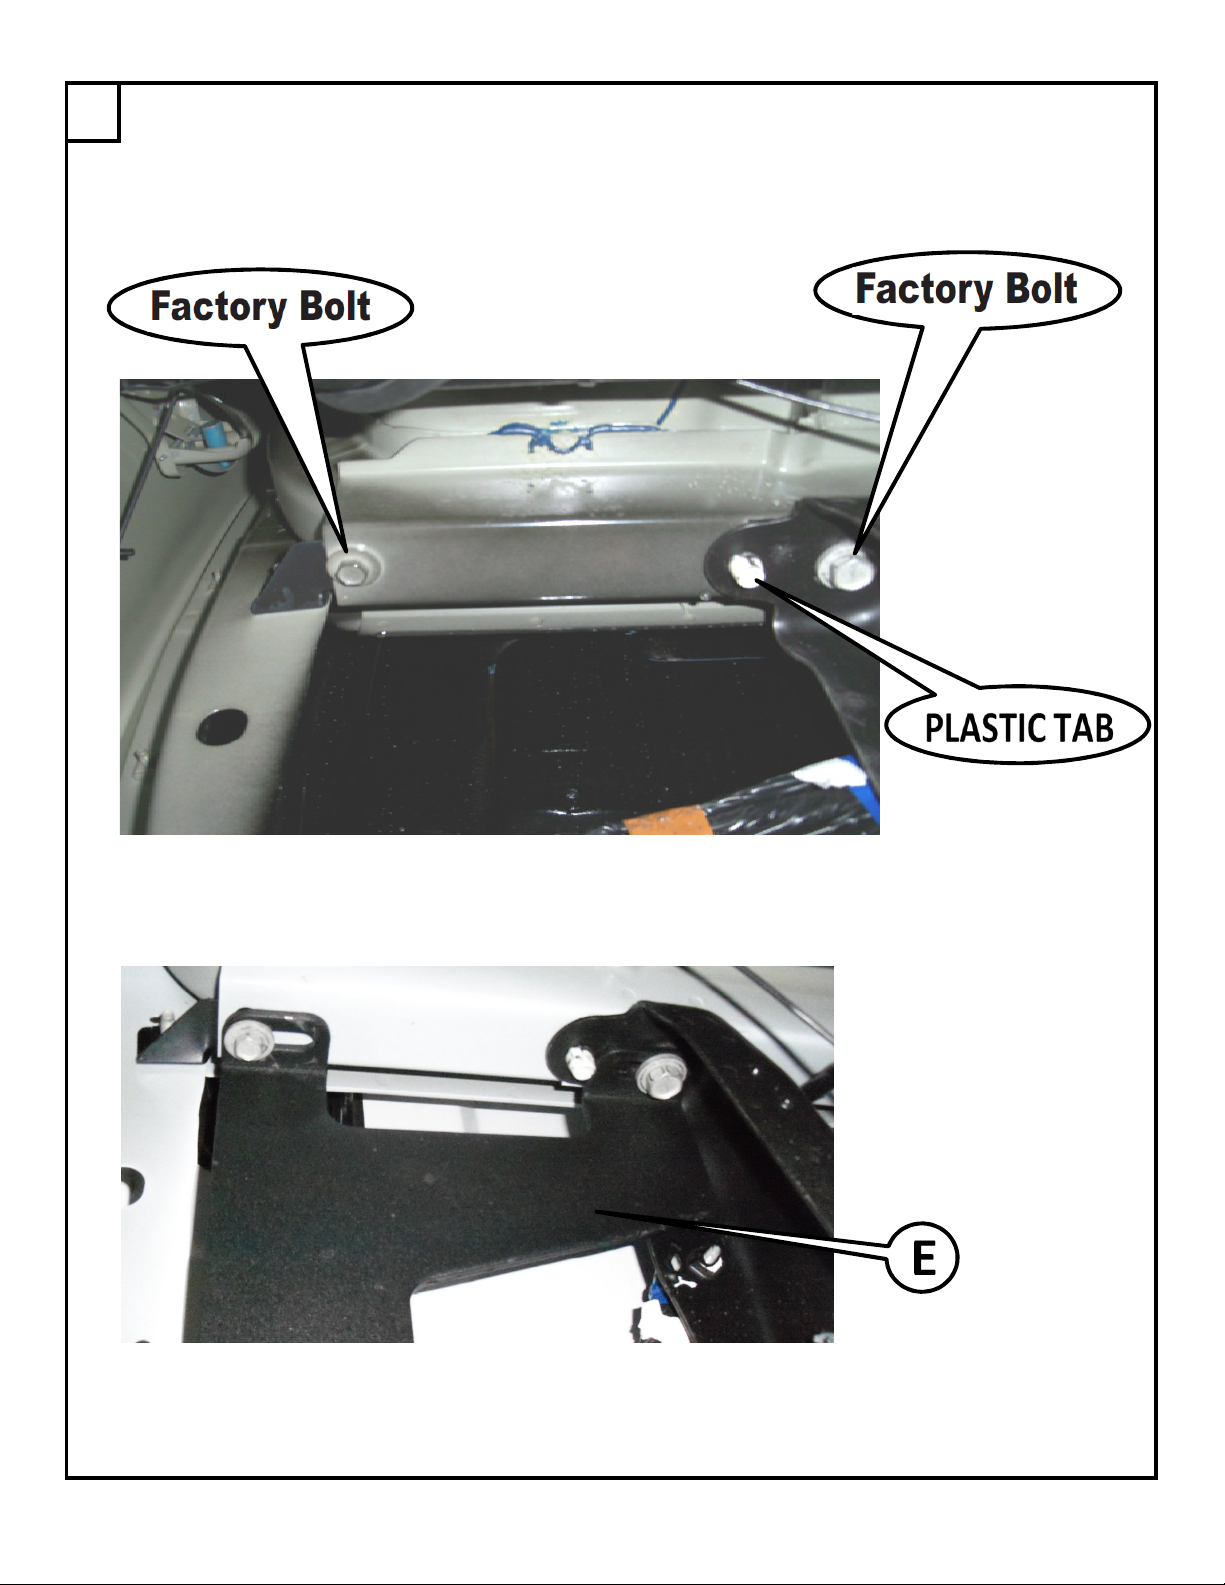
Locate the rear sub-box support as shown below. Remove the factory bolt holding the frame to
the bottom of the sub-box support using an 18mm socket and ratchet.
Remove the bolt at the front of the sub-floor support using a 13mm socket and ratchet.
18mm
13mm
2
Put the left hand mounting bracket [E] up to the sub-box support and attach using the previously
removed factory bolts. If the white plastic tab interferes with the brace, if may be trimmed to allow
the brace to fit.
Tighten the factory bolt using an 18mm socket. Tighten the 8mm bolt using a 13mm wrench or socket.
DZ 1361 3 OF 9 5/23/2011
Page 6

Locate the rear sub-box support as shown below. Remove the factory bolt holding the frame to
the bottom of the sub-box support using an 18mm socket and ratchet.
Using a 13mm socket, remove the bolt from the dually support rod and discard.
Attach mounting bracket [D] using the bolt removed with the 18mm socket, but do not tighten.
Attach the outer mounting location with the 8mm bolt [N], 8mm washer [O], and the bent
spacer [M]. Put the bolt through the slot in the brace and the hole in the dually rod support
and attach it with a 13mm socket where the bolt was previously removed and discarded.
You may have to slide bracket [D] outward to allow the bolt to align with the hole.
Tighten the bolts with a 13mm bolt and 18mm socket.
DZ 1361 4 OF 9 5/23/2011
Page 7
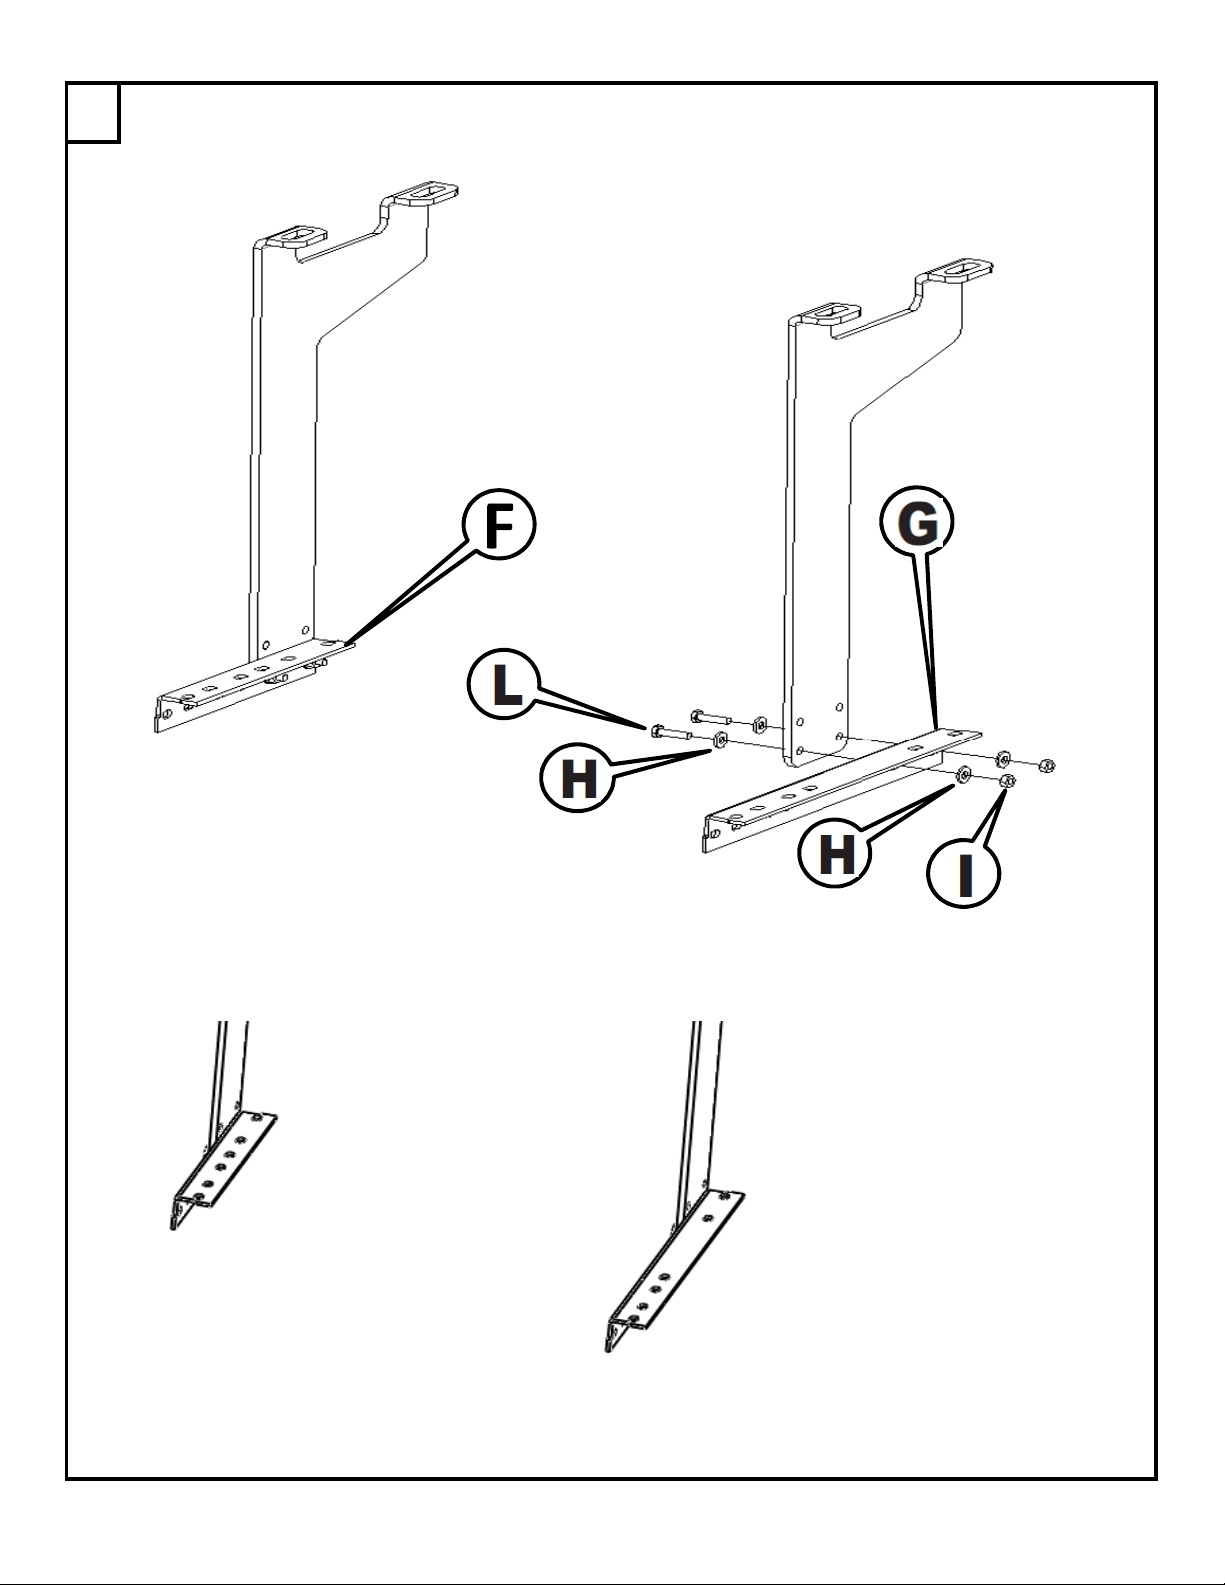
Attach the 9" angle brace [F] to the front brace, and the 13.5" angle brace [G] to the rear brace using
the 1/4" x 1" hex head bolt [L], the 1/4" flat washer [H], and the 1/4" hex nut [I].
3
The angle braces on the front and rear main brace should be pointing towards the rear of the vehicle.
The dirver's side is shown below.
Secure the angle braces in place, but do not tighten completely.
DZ 1361 5 OF 9 5/23/2011
Page 8
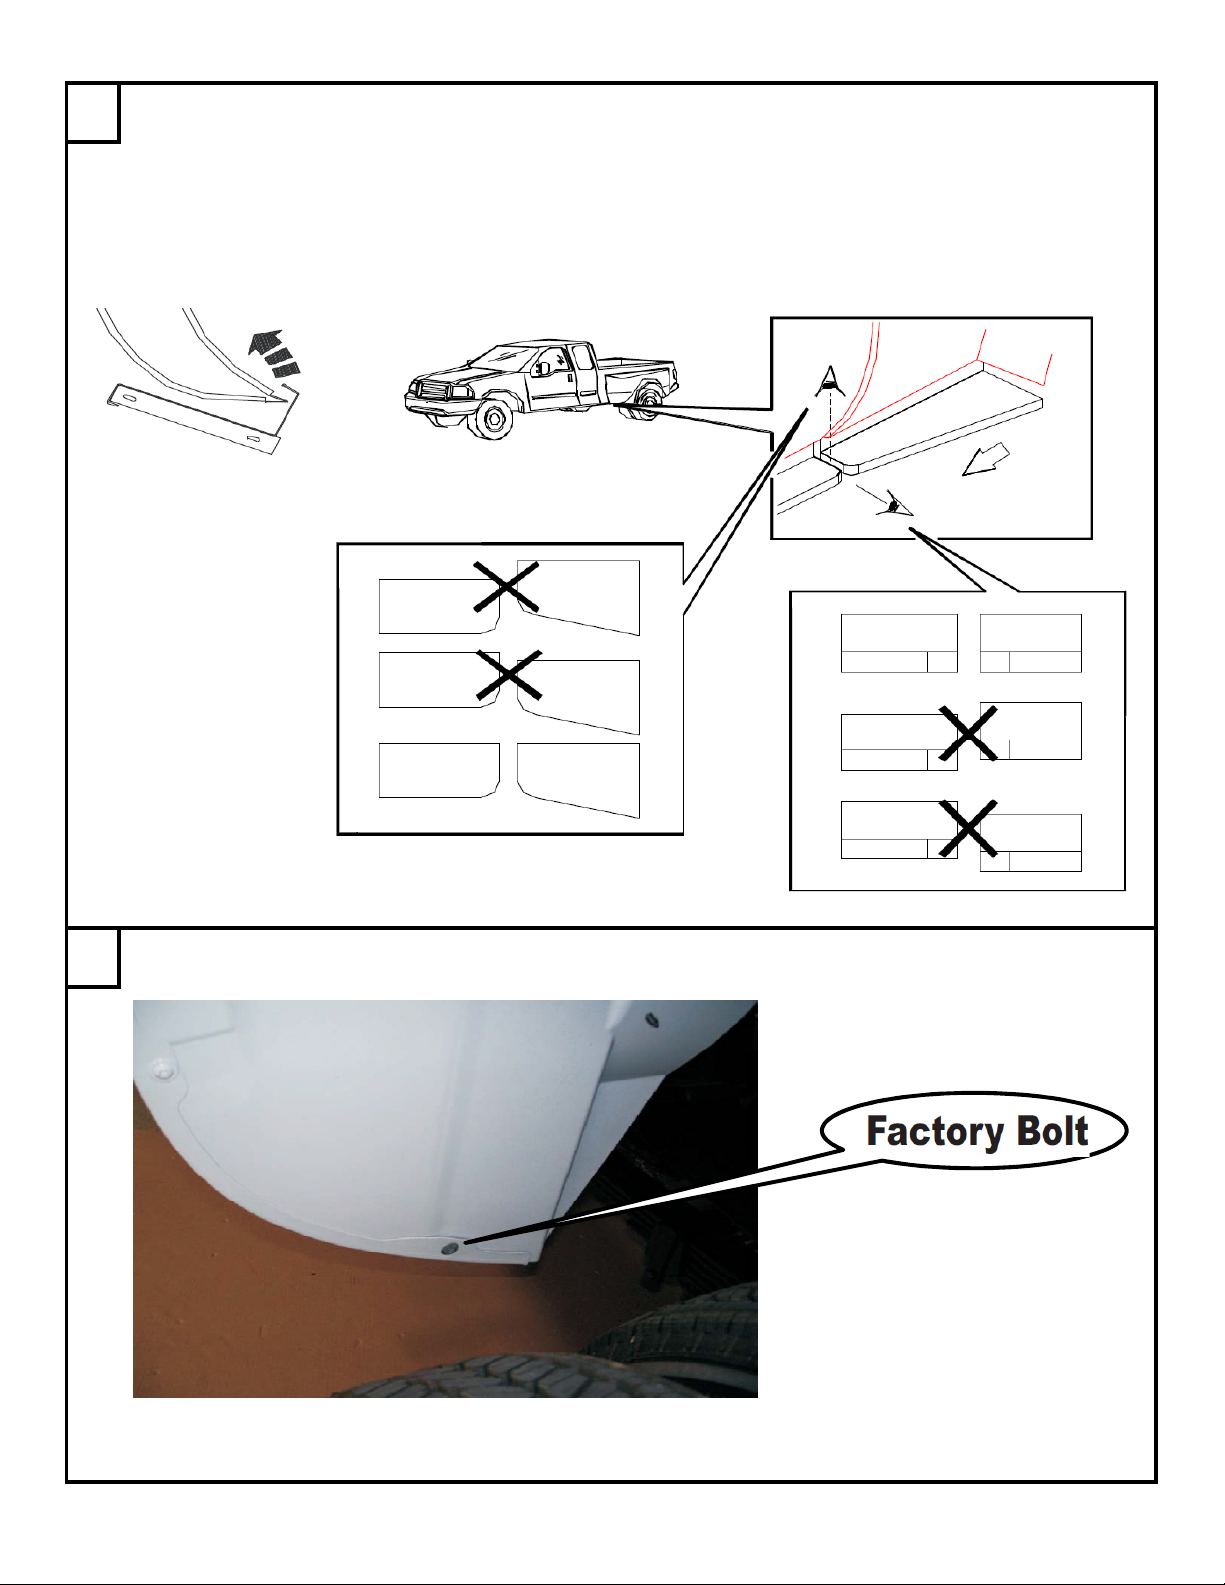
Place the side box board on the angle braces. Align the side box board with the cab board.
The board will need to be rotated into position.
Adjust the angle braces as needed to align the step surface of the side box board with the
step surface of the cab board. Tighten the angle braces in place using a 7/16" wrench and socket.
4
Locate and remove the bolt from the fender well using a torx drive.
DO NOT DISCARD. This bolt will be used again to attach the mud flap.
5
DZ 1361 6 OF 9 5/23/2011
Page 9
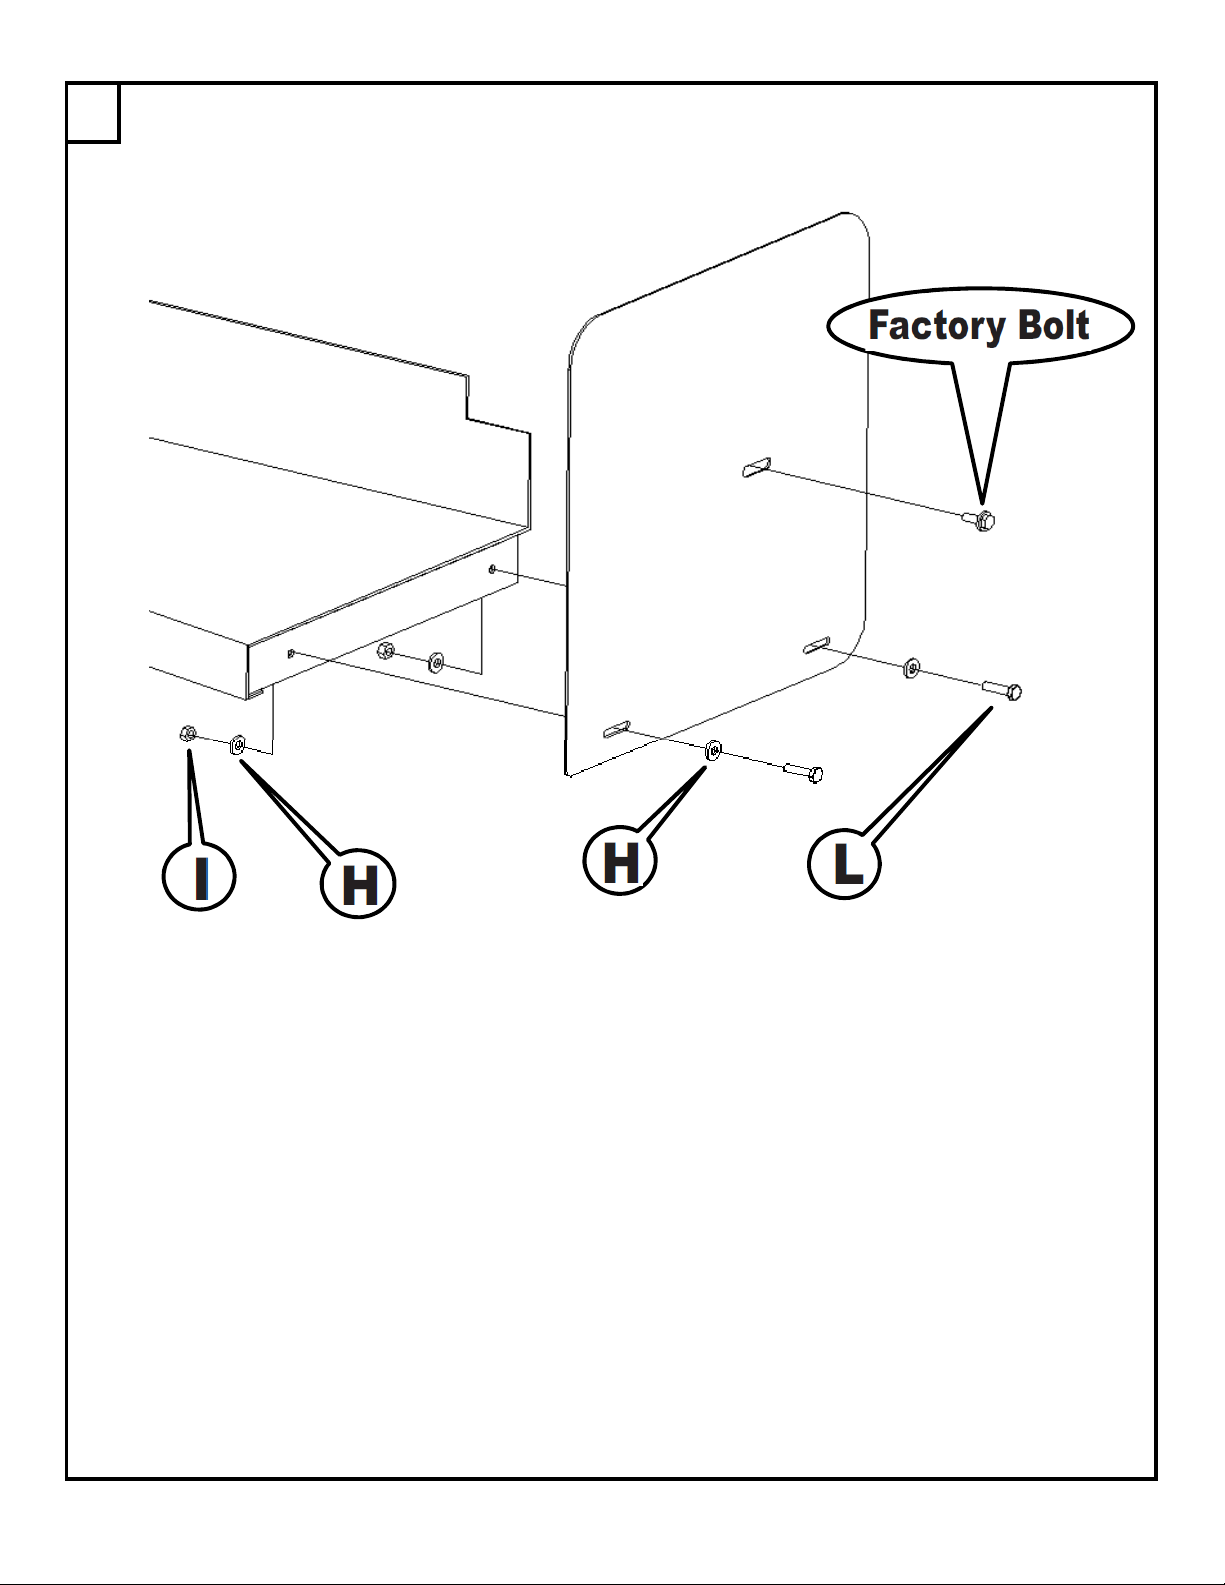
Attach the mud flap to the end of the running board using
the 1/4" x 1" hex head bolt [L], the 1/4" flat washer [H], and the 1/4" hex nut [I].
Attach the flap to the wheel well using the previously removed bolt.
6
Tighten with a 7/16" socket and wrench. Tighten the facory bolt with the tork drive.
DZ 1361 7 OF 9 5/23/2011
Page 10
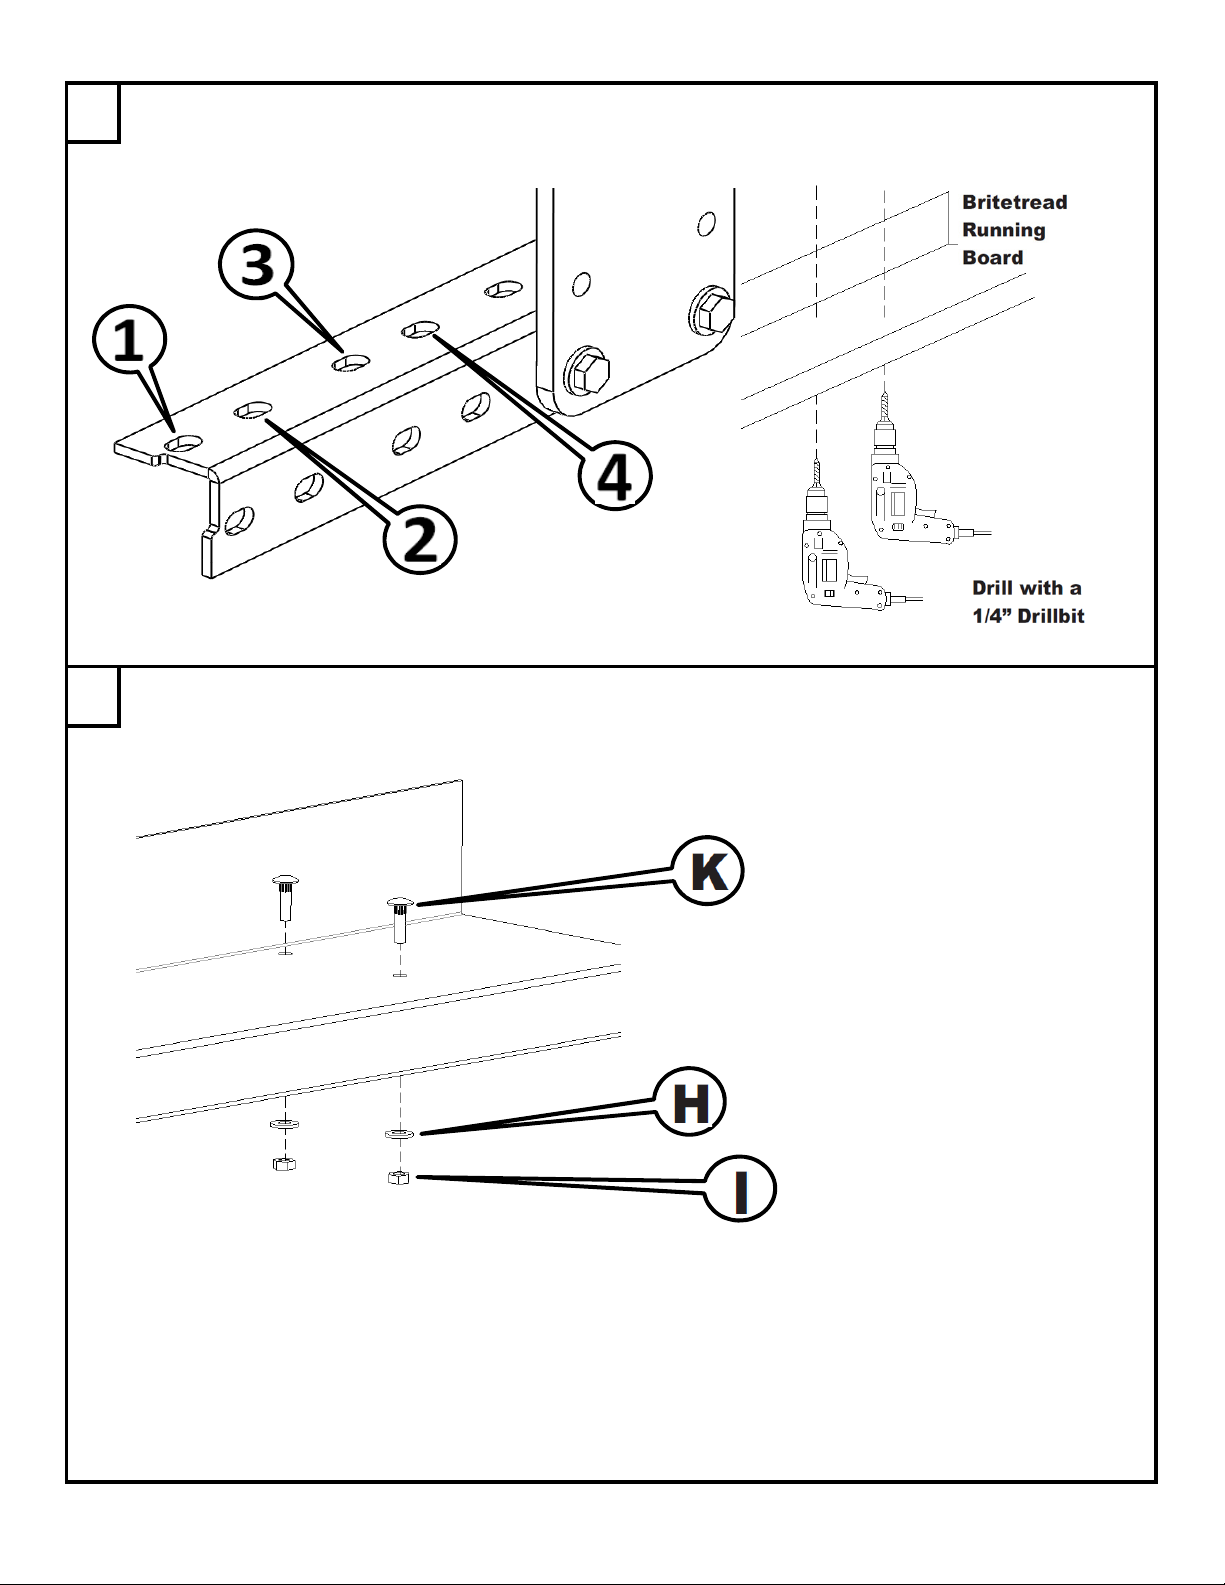
Once the board is straight with the cab board, clamp the board to the angle brace and
drill 1/4" holes up through the board using the 1st and 3rd slots in the braces as location guides.
Attach the running board to the angle brace using the 1/4" x 1" ribneck carriage bolt [G],
1/4" flat washer [H], and 1/4" hex nut [I]. Tighten using a 7/16" wrench or deep well socket.
7
8
DZ 1361 8 OF 9 5/23/2011
Page 11
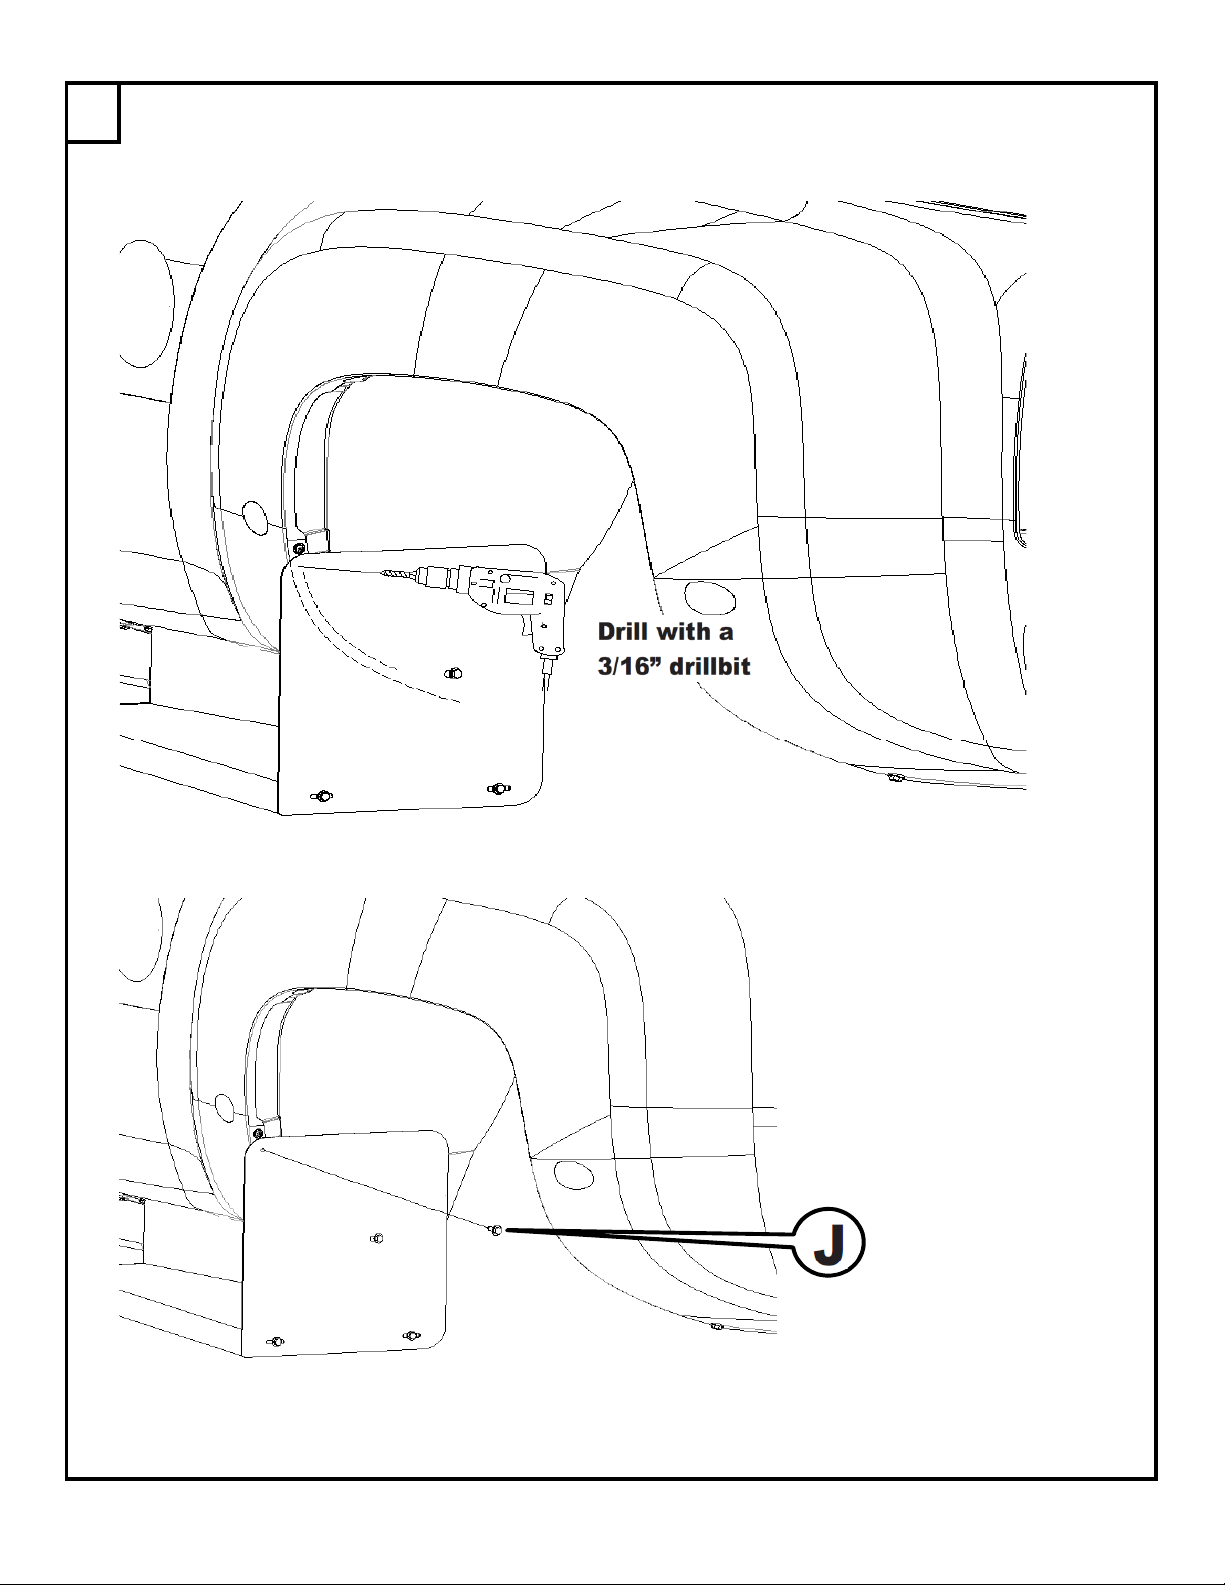
Pressing the flap up against the wheel well opening, drill a 3/16" holes through the mudflap and
the sheet metal of the wheel well. Secure the flap using the sheet metal screw [J] with a 3/8"
socket or wrench.
9
Repeat the assembly steps for the other side of the vehicle.
DZ 1361 9 OF 9 5/23/2011
 Loading...