

Page 1
Before returning this product
DZ 91781
to the store of purchase
Contact Dee Zee if you experience the following problems:
•MissingParts
•InstallationProblems/Questions
•WarrantyQuestions
1.800.779.2102
Hoursofoperation:8am-5pmCST,Mon-Friday
Reviewcompletewarrantypolicyandregisteryourproductat:
www.deezee.com
Page 2
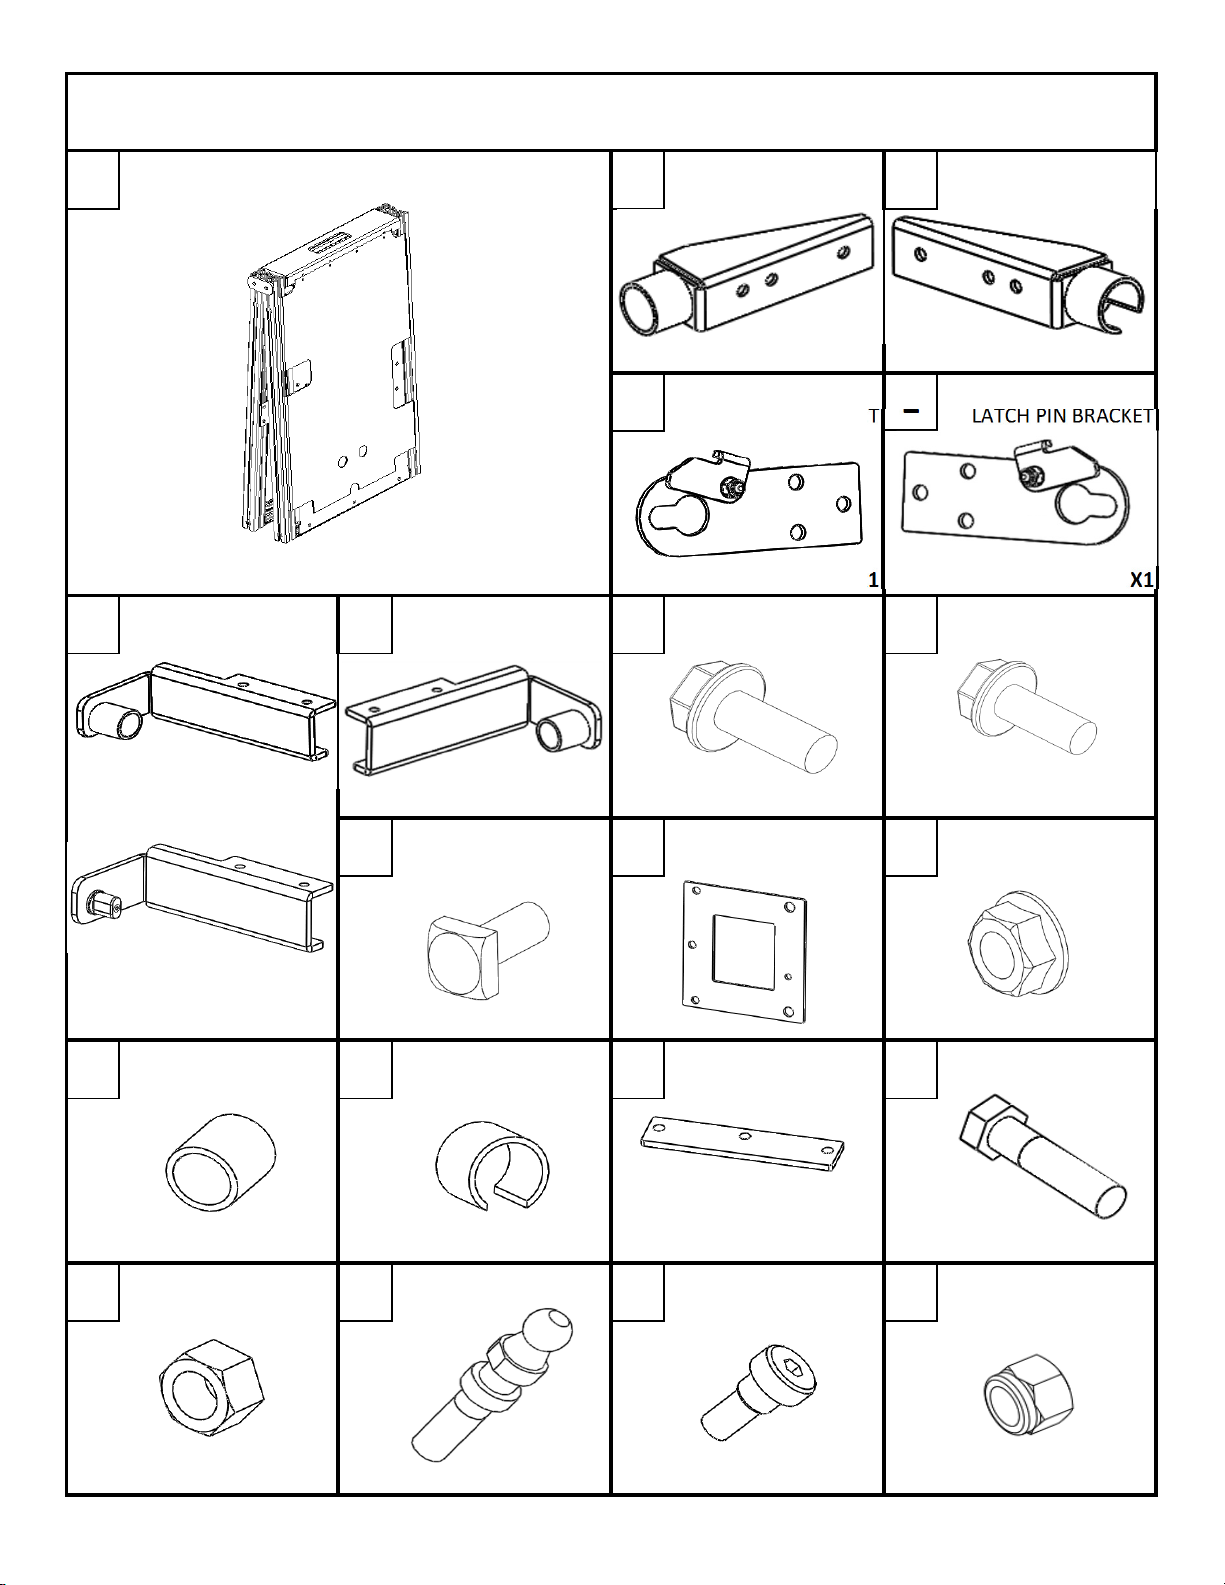
DRIVER SIDE
PASSENGER SIDE
LOWER TRUCK BRACE
LOWER TRUCK BRACE
X1
X1
DRIVER SIDE
PASSENGER SIDE
LATCH PIN BRACKET
X1X1X1
DRIVER SIDE
PASSENGER SIDE
CHEVY
X1X6X6
FORD OR DODGE
X1X8X2
X20
ONLY NEEDED FOR FORD
X1X1X2
X2
X1X1X1
X2
BED EXTENDER
BED EXTENDERBED EXTENDER
BED EXTENDER
DZ 17210, DZ 17220, DZ 17221, DZ 17230
DZ 17210, DZ 17220, DZ 17221, DZ 17230DZ 17210, DZ 17220, DZ 17221, DZ 17230
DZ 17210, DZ 17220, DZ 17221, DZ 17230
A B C
BED EXTENDER
D E
F H
TAILGATE BRACKET
J
TAILGATE BRACKET
HEAD BOLT
K L
LATCH PIN BRACKET
8mm X 25mm 8mm X 20mm
FLANGE HEAD BOLT
CABLE AND PIN 8mm NUT8mm SQUARE
BRACKET
IG
FLANGE HEAD BOLT
M N O
PLASTIC SPACER PLASTIC SPACER
WITH NOTCH
LATCH PIN NUT CHEVY CABLE POST
Q R
METAL SPACER
LATCH PIN BOLT
P
S
1 of 15 5/22/2013
FORD /DODGE
CABLE POST
T
CABLE POST NUT
Page 3
WRENCH/RATCHET
13mm, 9/16, 5/8
Standard screw driver
Needle nose pliers
This instruction shows the assembly for the initial installation of the bed extender. It is recommended
that there are 2 people involved for this.
Use of this bed extender involves pinch points. Be sure to keep fingers clear at all times.
Unfold the bed extender as shown below.
Lift the diamond plate panels and raise the side walls.
TOOLS REQUIRED
1
MAKE SURE EDGES ARE
EVEN AT THE JOINT ON
2 of 15 5/22/2013
Page 4
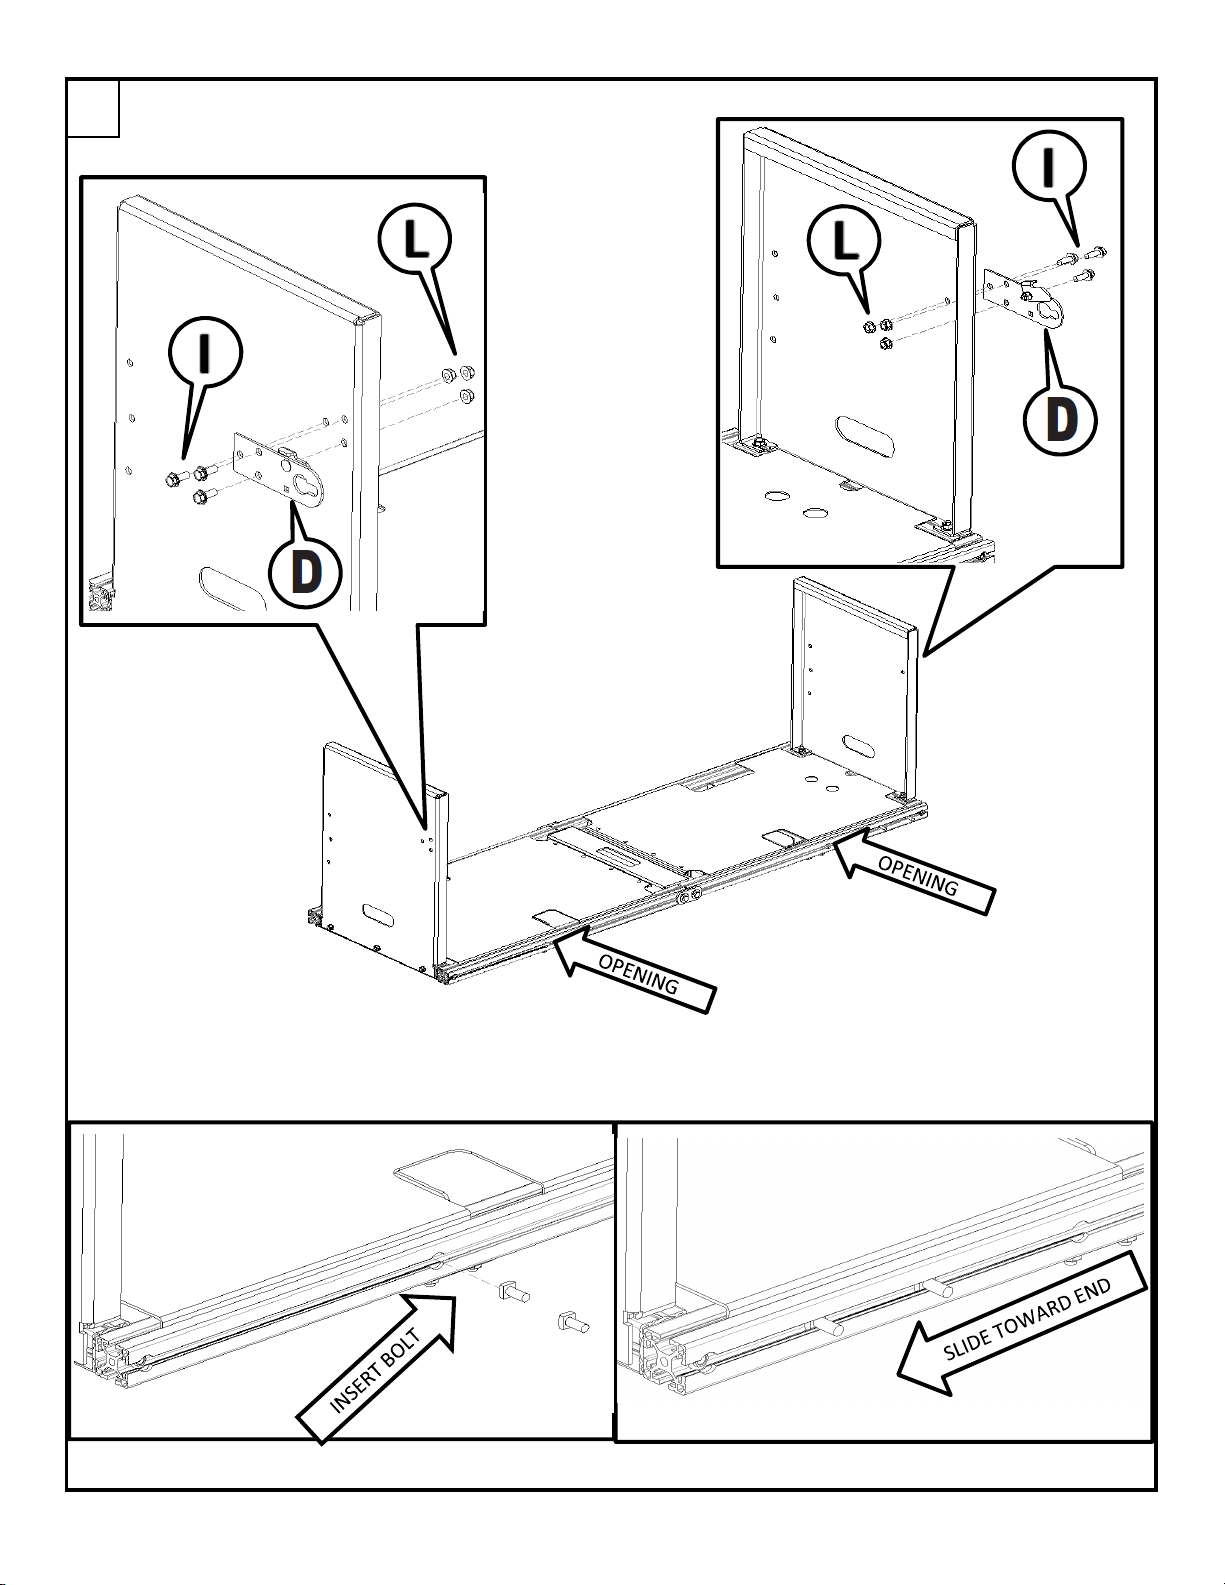
Attach the latch pin braces as shown below. Do NOT completely tighten at this time.
Then slide two of the square head bolts [J] into the
opening on the front edge. Slide the two bolt towards
the outside of the bed extender. Do this on both ends.
2
3 of 15 5/22/2013
Page 5
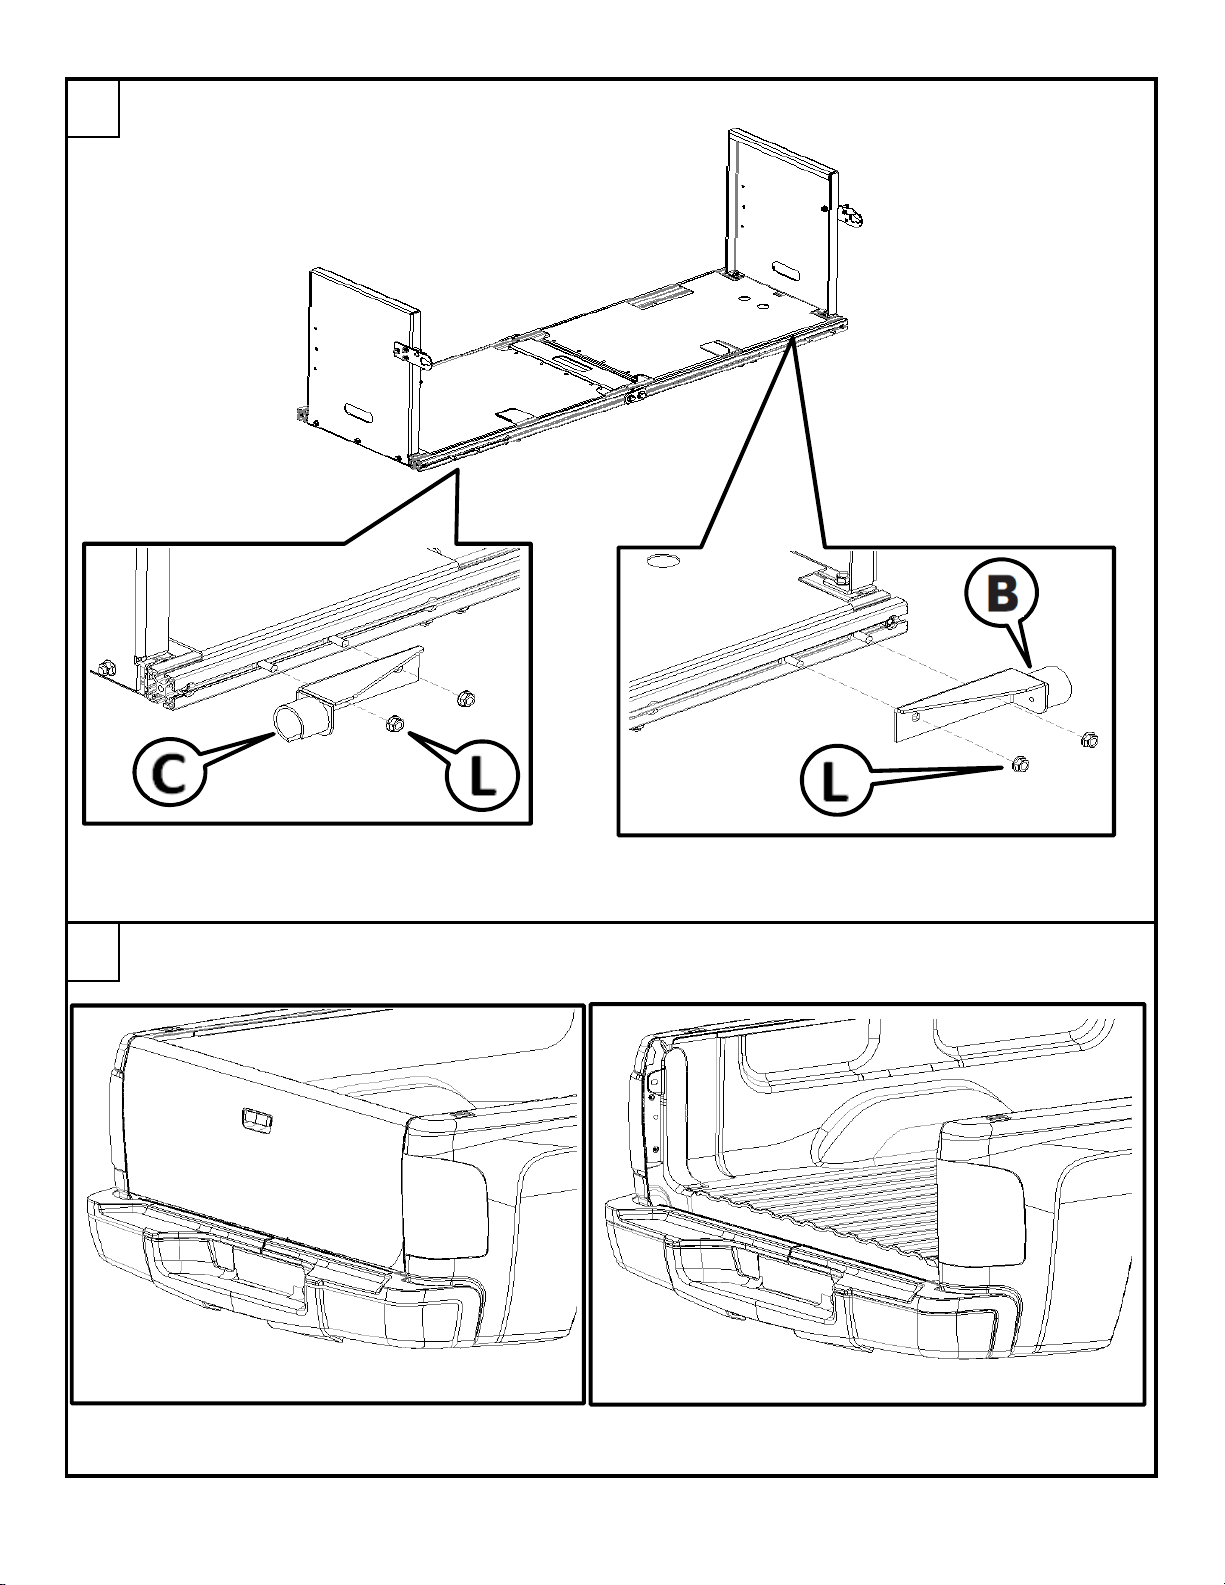
Attach the lower truck braces as shown below. Do not completely tighten at this time.
Remove the tailgate from your vehicle. Refer to your owners manual for instruction.
3
4
4 of 15 5/22/2013
Page 6

Measure the distance across the bed of the truck at the tailgate pivot point.
Subtract 1/4" (6mm) from the measurement taken. Set the lower truck brackets at this dimension.
Make sure that the brackets are at this dimension and centered from left to right on the bed extender.
Tighten the nuts [I] with a 13mm socket.
5
5 of 15 5/22/2013
Page 7

Insert the plastic spacer [M] and plastic spacer with notch [N] into the tubes on the lower truck brackets.
The spacer with the notch goes in the tube with the notch. Align the spacer notch with the notch
in the tube
For some model years of Chevy
trucks, it may be necessary
to use an additional spacer on this side.
This spacer is included in the kit.
Measure the drivers side post shown
in the next step and compare that
measurement to the inside diameter.
If the post will fit in the thicker spacer,
then install both in this step.
6
6 of 15 5/22/2013
Page 8

Put the tube of the drivers side lower bracket over the drivers side post.
Rotate the bed divider down to allow the tube with the notch on the passenger side lower brace
to slide on the tailgate post on the passenger side. This is similar to the process to remove the
tailgate from the vehicle, but this time it is installation instead of removal.
7
7 of 15 5/22/2013
Page 9

Before rotating the bed extender up, push the end panels in slightly to allow the latch pin brackets
to clear the latch pins.
Rotated the entire bed extender up, and put the tailgate latch pin into the large opening in the latch
pin bracket. There is a safety catch on the latch pin bracket that may need to be moved out of the way.
Once the bracket is engaged with the latch pin let the bed extender be supported by the bracket.
Make sure the safety catch is down over the large opening in the bracket.
Do this step on both sides.
8
8 of 15 5/22/2013
Page 10

Hold the bed extender in line with the truck bed and tighten the latch pin bracket bolts using a
13mm wrench/ratchet. Do this step on both sides.
Assemble the hardware to the cable and pin brackets. Assemble each as shown below.
This assembly is different depending on which vehicle you have.
Do not completely tighten the latch pin bolt [P].
Completely tighten the cable post [R] or [S].
Chevy
9
10
9 of 15 5/22/2013
Page 11

F-150 / SUPERDUTY
DODGE
Attach the cable and pin bracket on each side. The head of the bolts attached to this bracket should face
towards the center of the bed extender. There are different cable and pin brackets for each application.
For use on the F-150 and Ford Super duty, a spacer plate will also be used.
Attach the brackets with the long 8mm bolts and nuts, but do not completely tighten at this time.
CHEVY
10
10
10 of 15 5/22/2013
Page 12

F-150 & SUPERDUTY
DODGE
11 of 15 5/22/2013
Page 13

Slide two square head bolts [J] into the bottom channel of the bed extender on each end.
Align the bolts in the channel with the holes in the tailgate brackets. Attach the brackets with the
8mm nut [L]. Do NOT completely tighten at this time.
NOTE:
For Ford and Dodge,
bracket [F] will look like this:
11
12
12 of 15 5/22/2013
Page 14

For the Chevy application remove the plastic inserts from both end of the tailgate with a standard
screwdriver, or needle nose pliers. Keep these pieces so that they may be used with the tailgate
again when the bed extender is not being used.
For the Ford and Dodge applications remove the plastic insert from PASSENGER SIDE end of the tailgate
with a standard screwdriver, or needle nose pliers. Keep this piece so that it may be used with
the tailgate again when the bed extender is not being used.
13
REMOVE
KEEP PART
REMOVE
KEEP REMOVED PART
REMOVE
KEEP REMOVED PART
DO NOT REMOVE
13 of 15 5/22/2013
Page 15

Hold the tailgate between the tailgate brackets. Align the tube/post on the brackets with the
pivot points on the tailgate. Slide the tailgate brackets into the pivot points.
Once the bracket are in the tailgate,
center the tailgate and brackets on the
bed extender so that the tailgate
will sit evenly between the cable
and pin brackets.
When the tailgate is centered,
tighten the nuts attaching the tailgate
brackets using a 13mm socket and ratchet.
14
14 of 15 5/22/2013
Page 16

Attach the tailgate cables to the cable posts.
Close the tailgate and adjust the latch bolts as necessary for tailgate to close.
Tighten the latch pin bolts.
Tighten the cable and pin bracket bolts using a 13mm wrench/socket.
Do this step for both sides.
Check all hardware to insure that it has been tightened.
Review all instructions and warnings posted on the bed extender.
15
16
15 of 15 5/22/2013
 Loading...