

Page 1
Before returning this product
DZ 16252
to the store of purchase
Contact Dee Zee if you experience the following problems:
•MissingParts
•InstallationProblems/Questions
•WarrantyQuestions
1.800.779.2102
Hoursofoperation:8am-5pmCST,Mon-Friday
Reviewcompletewarrantypolicyandregisteryourproductat:
www.deezee.com
Page 2

Dee Zee Running Board Installation Instructions
Congratulations on your purchase of a quality Dee Zee product. Dee Zee is
recognized as having the highest quality running boards and accessories on the
market today. We have earned this reputation by offering our customers a
product they can be proud to place on their vehicles. Dee Zee meets all the
criteria of manufacturing a custom-fit product which guarantees it to be the
easiest product to install.
Note: Please take time to read all of the instructions before beginning this installation.
Warning! Please check for wiring or other obstructions before drilling any holes into the vehicle. If it is
necessary to drill any holes into the vehicle, Dee Zee recommends putting a sealant or rust inhibitor
around all holes drilled into the body of the vehicle.
Warning! It is unlawful and dangerous to ride on running boards or side box boards while vehicle is in
motion.
Cleaning instructions: To maintain the bright finish of your Dee Zee running boards, clean
with a mild detergent and use a high grade automotive type wax. DO NOT USE ABRASIVE
CLEANERS ON THIS PRODUCT!
If you should happen to have any questions with this product or you have an installation
question, please feel free to call us at:
1-800-779-8222
If you would like to find out more information on Dee Zee’s products, please feel free to visit
our website at:
WWW.DEEZEE.COM
Page 2 of 8
DZ 16252 04/15/09
Page 3
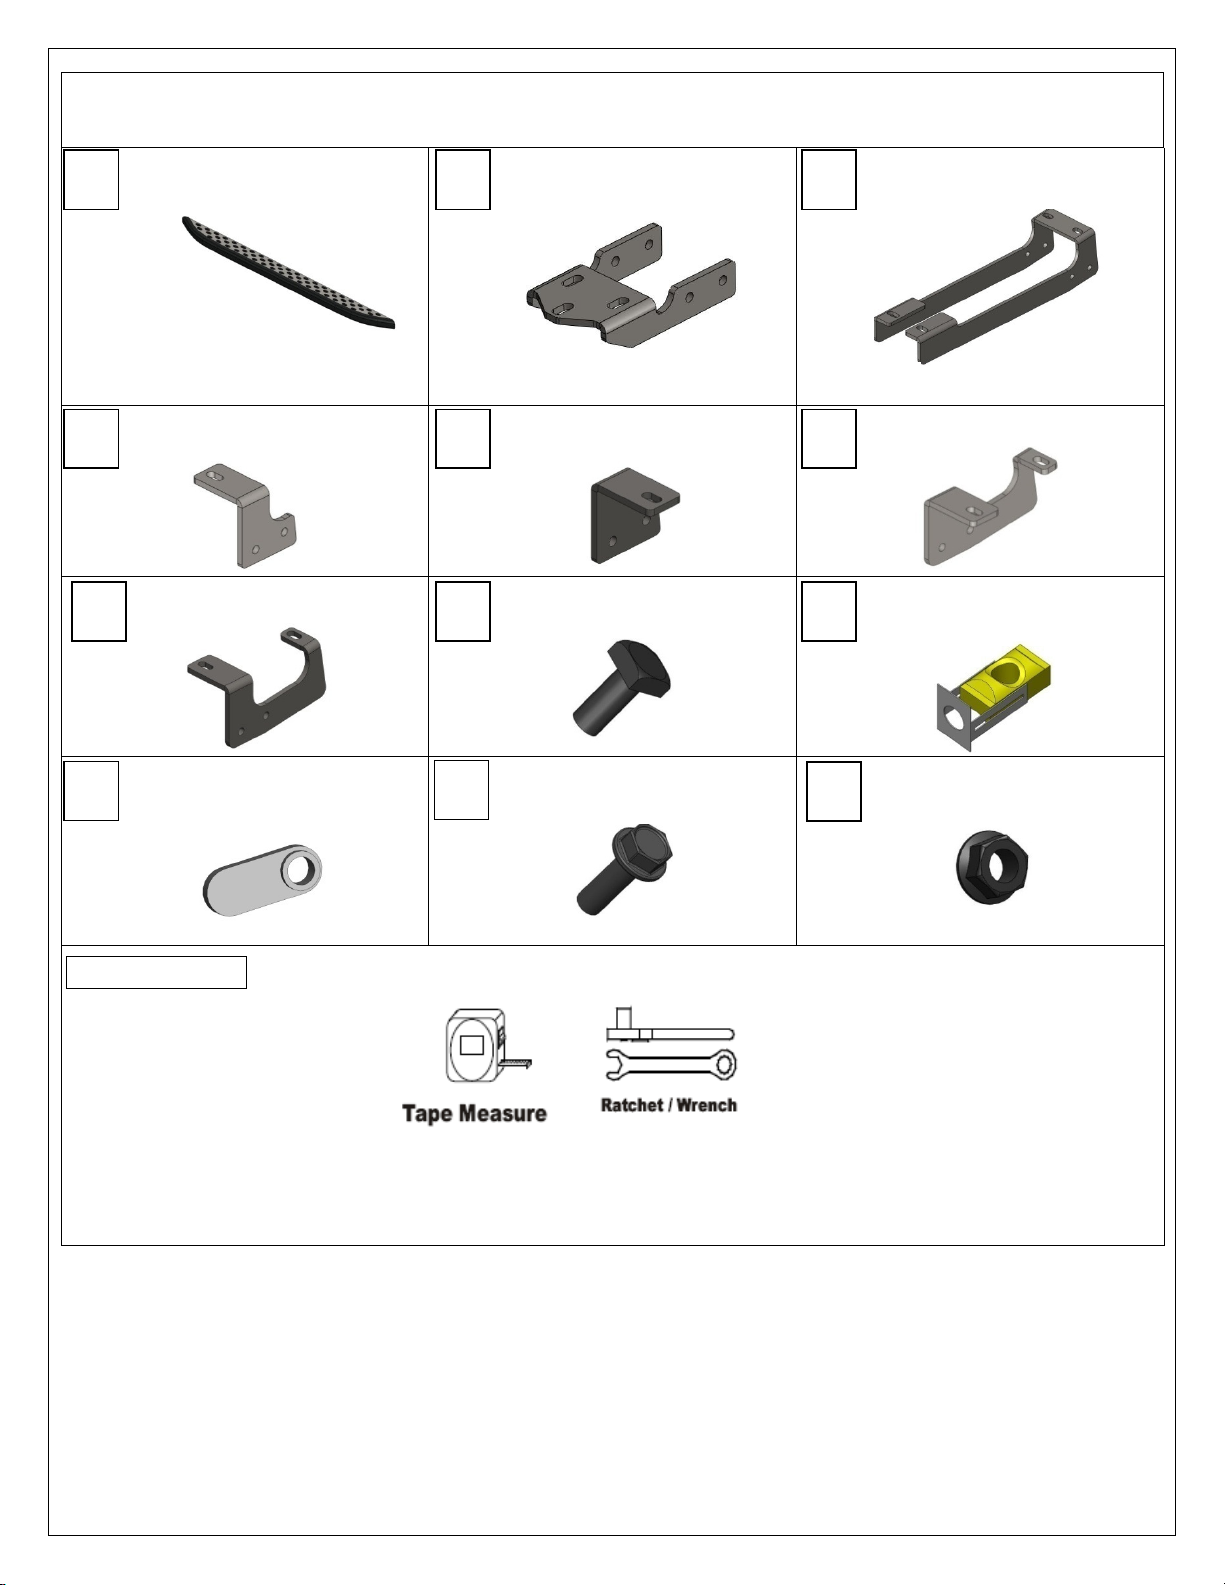
DZ 16252
C B A
DZ
16201
/ DZ
16202
/ DZ
16203
D
RUNNING BOARD BRACKET
E
RUNNING BOARD BRACKET
F
RUNNING BOARD BRACKET
RUNNING BOARD BRACKET
G
M8 X 18 mm
SQUARE HEAD
H
I
RUNNING BOARD BRACKET
RUNNING BOARD BRACKET
BD BRBOARDBB
BD BRBOARDSSB
*
SOLD SEPARATELY FROM THIS KIT
*
J
K
M8 X 25mm HEX HEAD
M8 HEX HEAD FLANGE NUT
L
NISSAN MURANO BRACKET KIT
BD BRBOARDBVM
X2
B 1738P
X4
B 1739P
B 1740LP
B 1741RP PN 524 PN 600
M8 – 1.25 SINGLE TAB
WELD NUT
X1 X1
X1
X8 PN 714
B 1740RP B 1741LP
PN 526
PN 525
BOLT
FLANGE BOLT
X12
X28
X2
X1
M8 – 1.25 2 TERWAI NUT
X4
X28
Tools Required:
Note: Air tools recommended.
Page 3 of 8
DZ 16252 04/15/09
13mm
Page 4

1
H
A
Place the 8mm square head bolts (H) into the two bolt channels of the running board (A) and
slide toward either end of the board. For this application, there should be two bolts in the
front channel on opposite ends of the board, and four bolts in the rear channel grouping two
each to opposite ends of the board.
Page 4 of 8
DZ 16252 04/15/09
Page 5

2
HOLES UTILIZED
HOLES UTILIZED
REMOVE
RUBBER PLUGS
REMOVE
RUBBER PLUGS
Locate the existing hole locations shown below. There will be two sets of hole locations
(Front, Rear).
Front driver
Rear driver
Page 5 of 8
DZ 16252 04/15/09
Page 6

3
L
C
13 mm
B
J
Place bracket (B) between the front sides of bracket (C) and then place an 8mm x 25mm Hex
Head bolt (K) through running board brackets and start the bolt into a M8 hex head flange nut
(L) in the side hole locations shown below. Tighten, but not completely. Next, place an 8mm x
25mm Hex Head bolt (K) through running board bracket (C) and start the bolt into a M8 – 1.25
single tab spot weld nut (J) in the front hole location shown below. Position bracket into front
driver location with thread plates in vehicle openings and tighten, but do not tighten
completely. Then insert the M8 – 1.25 terwai nuts (I) through the bracket and into the rear hole
locations and start bolts (K). Again, do not tighten completely.
Page 6 of 8
DZ 16252 04/15/09
Page 7

4
13 mm
J
K
D
K
K
B
K
J
L
Place bracket (B) between the front sides of brackets (F) and (D) and then place an 8mm x
25mm Hex Head bolt (K) through running board brackets and start the bolt into a M8 hex head
flange nut (L) in the side hole locations shown below. Tighten, but not completely. Next, place
an 8mm x 25mm Hex Head bolt (K) through running board bracket assembly and start the
bolts into a M8 – 1.25 single tab spot weld nut (J) in the hole locations shown below. Position
bracket into rear driver location with thread plate in vehicle opening and tighten, but do not
tighten completely.
Page 7 of 8
DZ 16252 04/15/09
Page 8

5
6
13 mm
Place running board (A) onto the brackets. Align 8mm square head bolts (H) in the bottom of
the running board (A) with holes in the brackets. Completely tighten brackets to vehicle.
Center board on vehicle between wheel well openings or until desired appearance is aquired.
Adjust board in/out on vehicle until desired appearance is met. Secure board into palce using
8mm hex nuts (L).
Repeat steps 1-5 for passenger side using brackets (E) and (G).
Page 8 of 8
DZ 16252 04/15/09
 Loading...