

Page 1

FR GUIDE D’INSTALLATION ET D’UTILISATION
EN GUIDE FOR INSTALLATION AND USE
Table de cuisson
Cooking hob
99643032_A_ML_FR-EN.qxp 21/08/2007 14:18 Page 1
Page 2
27
In this Manual,
displays safety instructions
displays tips and hints
List of contents
Using your hob in complete safety 29
What your hob looks like? 30
What the control board looks like? 31
Installing your hob in all simplicity 32
Fitting recommendations 32-34
Electrical connections 35
Gas connections 36-38
Changing the type of gas supply 39-44
Using your hob in all simplicity 45
Turning on the hob and adjusting the power setting 45
How to use the timer? 46
Which pans are best adapted for use
on the gas burner? 47
How to look after your hob? 48
Minor troubleshooting 49
Gas-cooking guide 51
99643032_A_ML_FR-EN.qxp 21/08/2007 14:19 Page 27
Page 3
28
Dear Customer,
You have just acquired a DE DIETRICH cooking hob and we would
like to thank you.
Our research teams have designed a new generation of appliances
for you which, thanks to their quality, esthetics and technological
advances have resulted in exceptional, products, a testament to our
know-how.
Your new DE DIETRICH hob will blend harmoniously into your
kitchen and perfectly combine cooking performance and ease of
use. Our wish is to offer you a product of excellence.
In the line of
DDEE DDIIEETTRRIICCHH
products, you will also find a wide range
of ovens, microwaves, suction hoods, dishwashers, and
refrigerators, all of which can be integrated and all of which can be
coordinated with your new
DDEE DDIIEETTRRIICCHH
cooking hob.
Of course, in an ongoing effort to better satisfy your demands with
regard to our products, our after-sales service department is at your
disposal and ready to listen in order to respond to all of your
questions and suggestions (contact information at the end of this
booklet).
Log onto our website
wwwwww..ddeeddiieettrriicchh--eelleeccttrroommeennaaggeerr..ccoomm
where
you will find our latest innovations as well as useful and
complementary information.
DE DIETRICH
Setting New Values
As part of our commitment to constantly improving our products, we reserve the right to
make changes to them based on advances to their technical, functional and/or
aesthetic properties.
BBeeffoorree iinnssttaalllliinngg aanndd uussiinngg yyoouurr aapppplliiaannccee,, pplleeaassee rreeaadd tthhiiss IInnssttaallllaattiioonn aanndd UUssaaggee
GGuuiiddee ccaarreeffuullllyy,, wwhhiicchh wwiillll aallllooww yyoouu ttoo qquuiicckkllyy ffaammiilliiaarriizzee yyoouurrsseellff wwiitthh iittss ooppeerraattiioonn..
FR
02
EN
27
99643032_A_ML_FR-EN.qxp 21/08/2007 14:19 Page 28
Page 4
29
Your hob in complete safety
- We have designed this cooking hob for
use by private individuals in their homes.
- As part of our commitment to constantly
improving our products, we reserve the
right to make changes to them based on
technological advances to their technical,
functional and/or esthetic properties.
- These cooking hobs are meant to be
used exclusively for cooking beverages
and foodstuffs and do not contain any
asbestos-based materials.
- All cooking should take place under your
surveillance.
- Consult this guide before installing and
using your appliance.
In the event that a crack becomes
visible in the glass worktop,
immediately unplug the appliance
and contact the After-Sales
Service department.
- Do not store CLEANING products or
FLAMMABLE products (aerosol cans or
containers under pressure, as well as
papers, cookbooks, etc.) in the cabinet
underneath your cooking hob.
- Using a gas cooking appliance results in
the generation of heat and humidity in
the location where it is installed.
Make sure that your kitchen is wellventilated.
- As a safety measure, do not forget to
close the general supply tap for gas
distributed by pipe or the tap of the tank
for butane or propane gas after use.
-The CE mark is affixed to these hobs.
YOUR HOB IS DELIVERED PRE-SET FOR USE WITH NATURAL TOWN GAS.
- This appliance's packing materials are
recyclable. Recycle them and play a role in
protecting the environment by depositing
them in local authority containers provided
for this purpose.
Your appliance also contains
various recyclable materials. It is
therefore marked with this logo
to indicate that, in European
Union countries, used appliances
must not be mixed with other
waste. Appliance recycling organised by
your manufacturer will thus be carried out
in optimum conditions, in accordance with
European directive 2002/96/CE relating to
electrical and electronic equipment waste.
Contact your local council or your retailer
to find out the drop-off points for used
appliances that are nearest to your home.
We thank you for your help in protecting
the environment.
Caring for the environment
- This appliance is not intended to be
used by persons (including children)
with reduced physical, sensory or
mental abilities, or persons lacking
experience or awareness, unless using
it with the help of a person
responsible for their safety, or under
supervision and with prior instruction
in its use.
Please make sure that children do not
play with the appliance.
99643032_A_ML_FR-EN.qxp 21/08/2007 14:19 Page 29
Page 5
The control panel for this hob is equipped with touch sensitive controls.
To use one of the touch controls you should…
30
What your hob looks like?
(*) These power settings are expressed in G20/20mbar.
Semi-fast burner
1,5 kW*
Fast burner
2,3 kW*
Extra-fast burner
3,1 kW*
Auxiliary burner
0,85 kW*
99643032_A_ML_FR-EN.qxp 21/08/2007 14:19 Page 30
Page 6
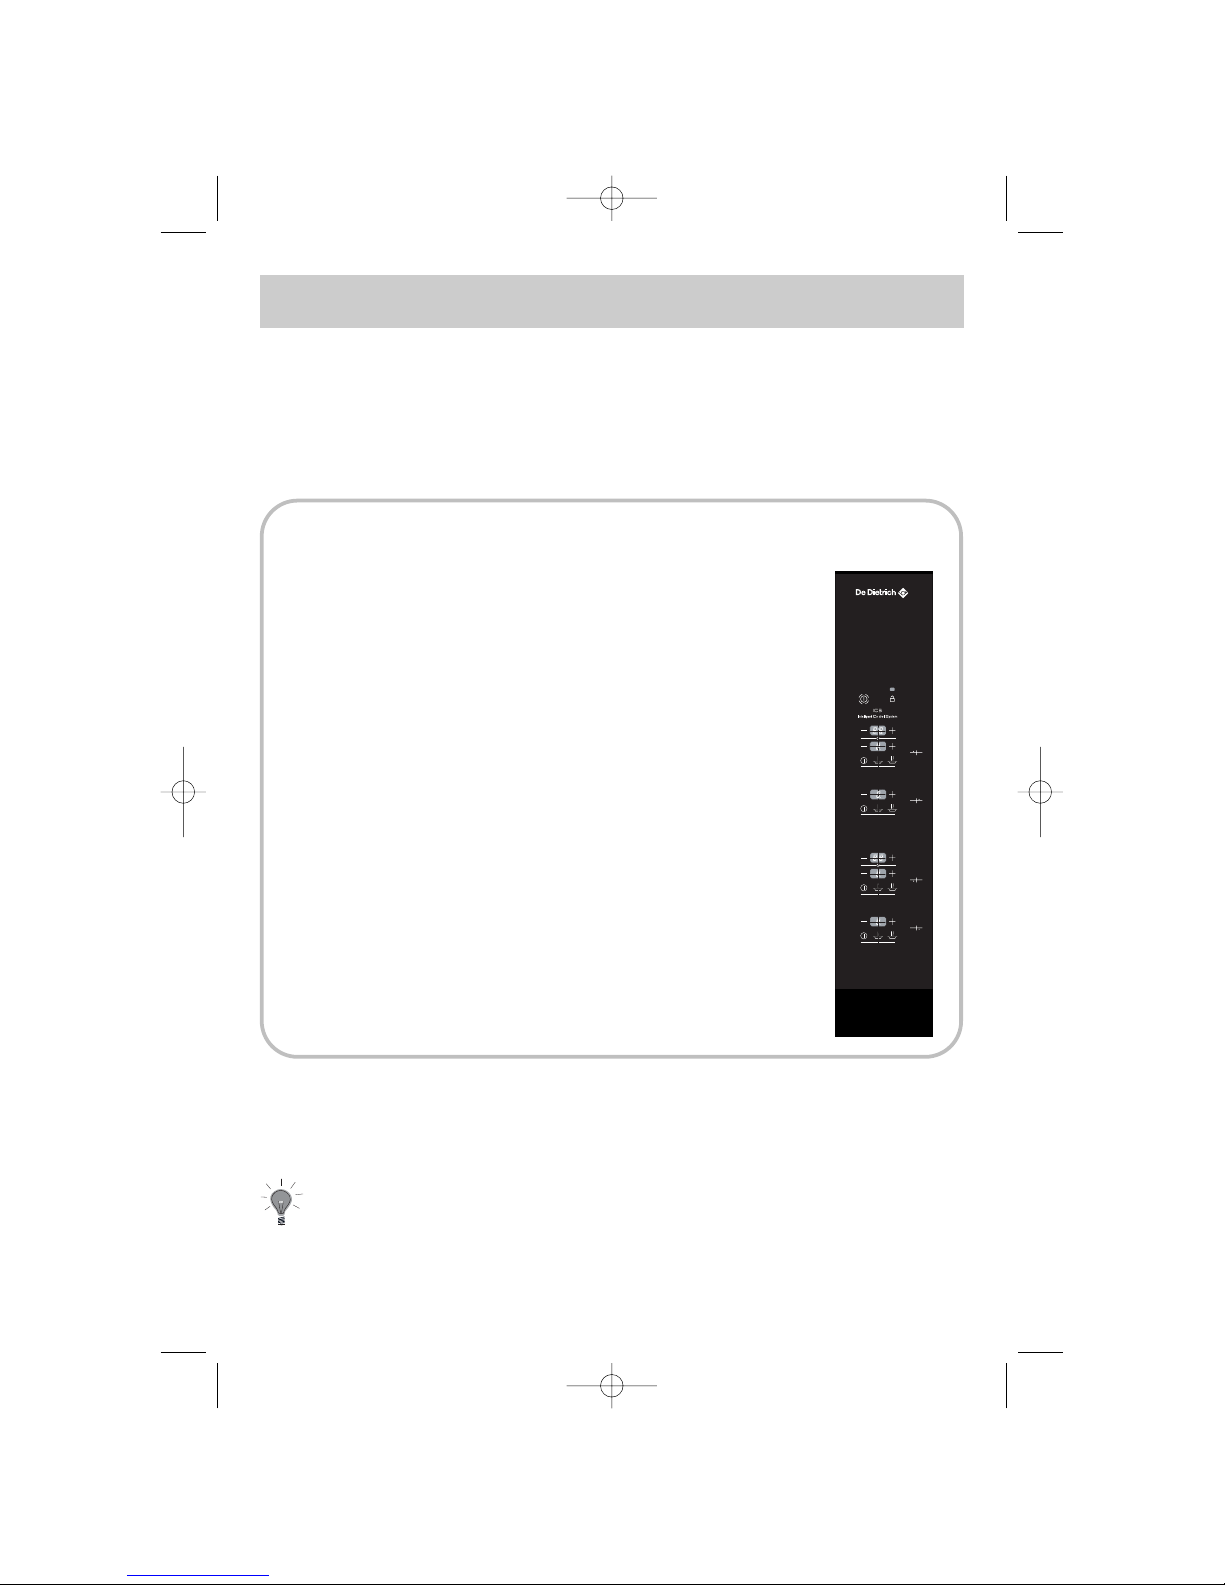
31
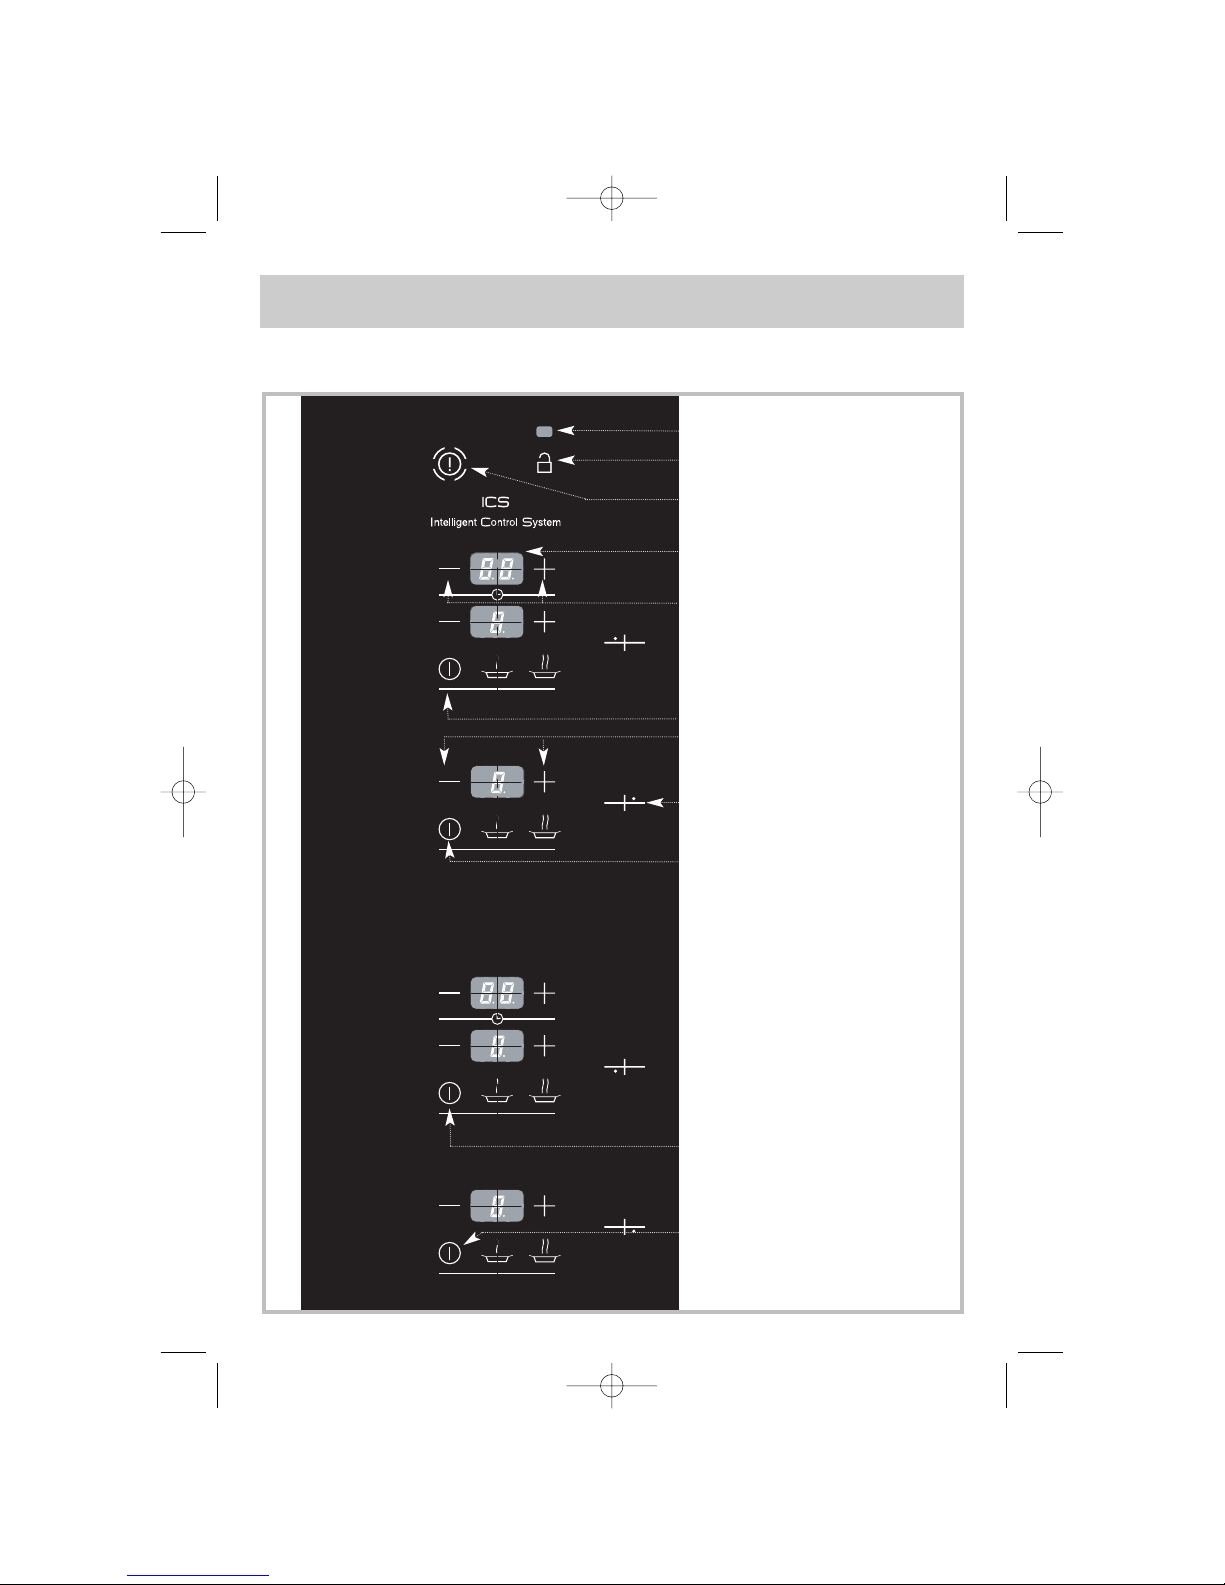
What the control board looks like?
THE "LOCK" INDICATOR
BUTTON FOR LOCKING/UNLOCKING THE
KEYPAD
RING INDICATOR
ON/OFF TOUCH CONTROL
BACK LEFT-HAND RING
ON/OFF TOUCH CONTROL
BACK RIGHT-HAND RING
ON/OFF touch control
F
RONT LEFT-HAND RING
ON/OFF touch control
FRONT RIGHT-HAND RING
BUNER POWER
ADJUSTMENT BUTTONS
MAIN "OFF" SWITCH
TIMER DISPLAY
TIMER SETTING
99643032_A_ML_FR-EN.qxp 21/08/2007 14:19 Page 31
Page 7
32
This appliance should be
installed by a qualified
technician / installer.
Prior to installation, ensure that
the local distribution conditions
(nature of the gas and gas
pressure) and the adjustment
conditions of the appliance are
compatible.
The adjustment conditions are stated
on a label in the wallet and also on
the packaging.
Since this appliance is not connected
to a combustion products evacuation
device, it must be installed in
accordance with current installation
regulations and used in a wellventilated place. Particular attention
should be given to the relevant
requirements regarding ventilation.
Installing your hob in all simplicity
On this subject, combustion can take
place only if oxygen from the air is
present, so this air must be
constantly renewed and the
combustion products must be
evacuated (a minimum air input of 2
m3/hour per kw of gas energy is
required).
E.g. :
Total power :
0,85 + 1,5 + 2,3 + 3,1 = 7,75 kW.
7,75 kW x 2 = 15,5 m3/h minimum
airflow.
These hobs have type X protection
(in accordance with standard EN
60.335.2.6) against overheating of
cupboards and Class 3 for installation
itself (in accordance with standard EN
30.1.1).
Fitting recommendations
Width
Depth
Height
Cut-out
Model
56 cm 49 cm
Depending on
cupboard
Outside
dimensions above
the work surface
65 cm 51,8 cm 5 cm
Outside
dimensions below
the work surface.
55 cm 47 cm 5,1 cm
99643032_A_ML_FR-EN.qxp 21/08/2007 14:19 Page 32
Page 8
33
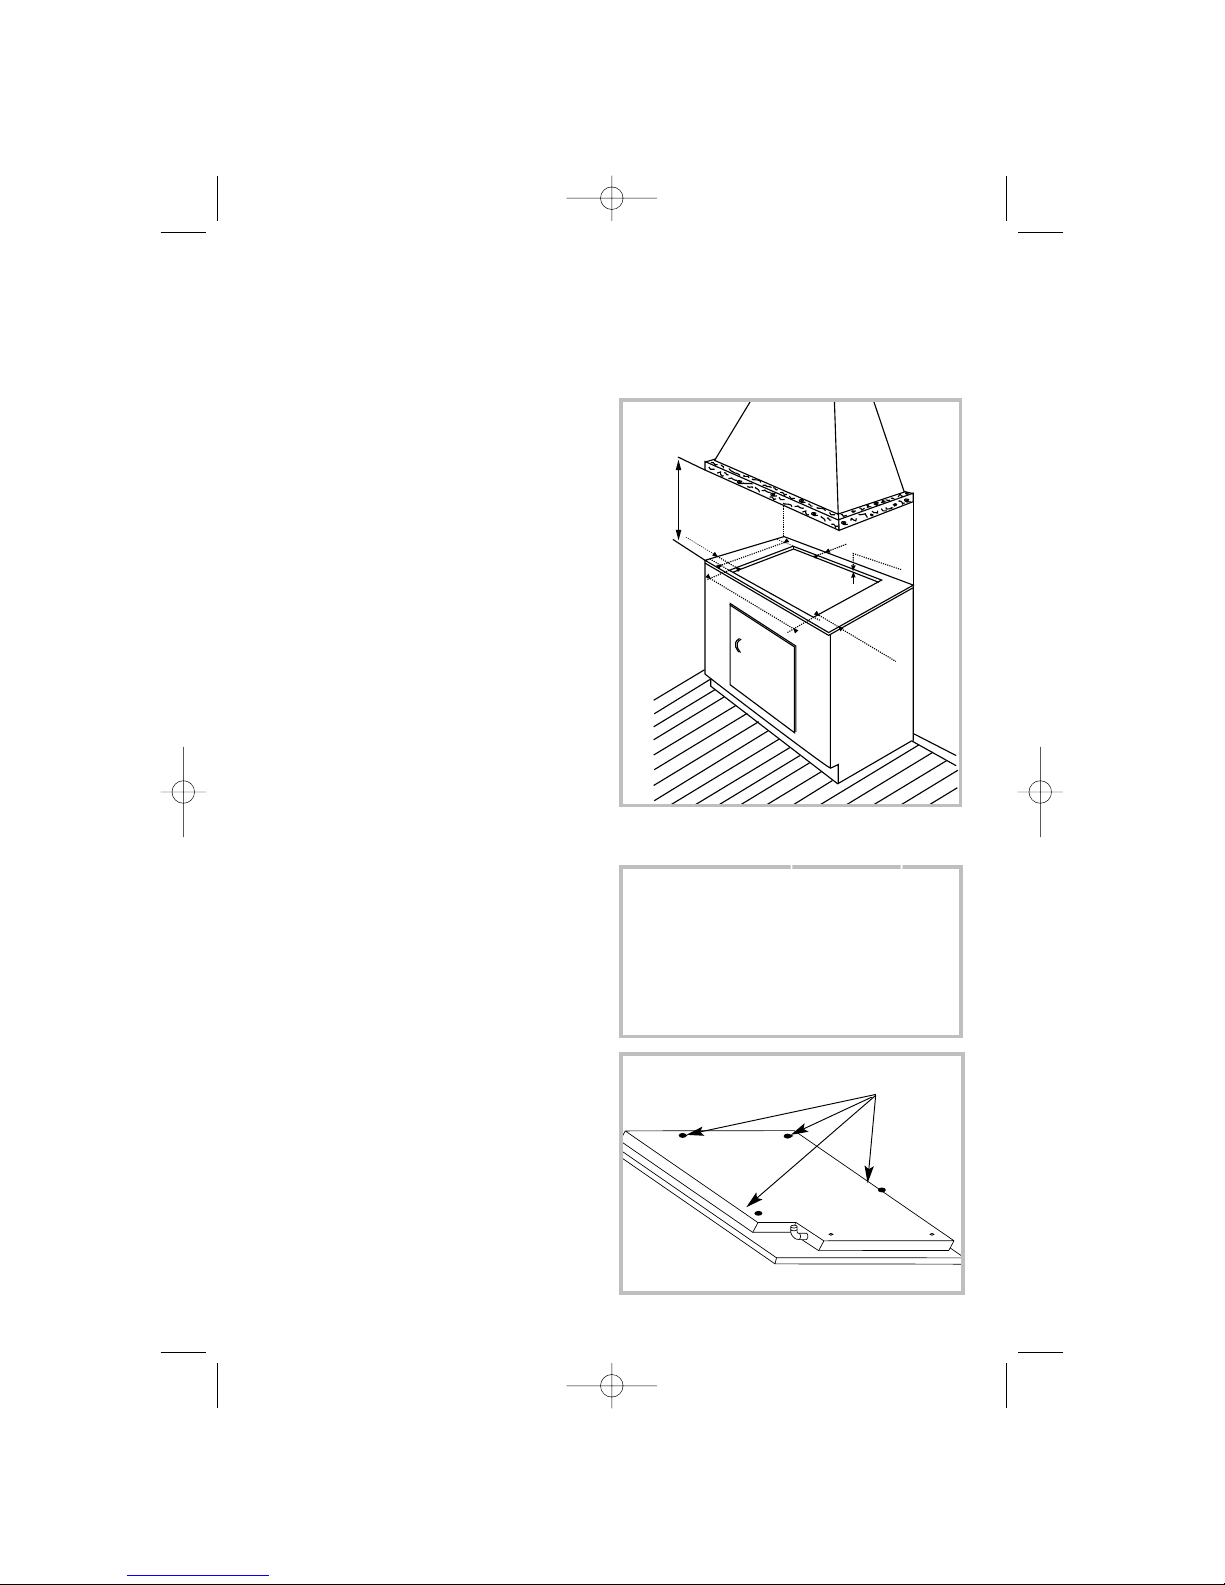
Installing your hob in all simplicity
The hob must be built into the
worktop of a support cupboard. This
worktop must be at least 3 cm thick
and heat-resistant or else coated with
a heat resistant material.
A side-clearance of at least 30 cm
should be left to the right and left of
the hob. A tall cupboard or partition
too close to the hob would hinder free
movement of kitchen utensils.
If a horizontal partition is put under
the hob, it must imperatively be placed between 10 and 15 cm from the
bottom of the worktop. In any case,
do not keep any sprays or pressurized
containers in the compartment which
could be just under the hob.
Place the hob unit into the opening in
the worktop by carefully pulling it towards you.
Put the burners, caps and pan grates
back into position.
Connect the hob power cable to your
kitchen electricity supply (See
"Electrical Connections" for your
hob).
If you want, you can fix the hob in position on its four corners, using the
four lugs and screws provided (See
diagram).
Only use the holes provided.
Stop screwing when the lug
starts to bend.
Do not use a power screwdriver.
Fitting recommendations (cont'd)
Mounting
pad
Worktop
49 cm
3 cm mini
30 cm mini
30 cm mini
56 cm
5,3 cm mini
70 cm mini
Fixing holes
99643032_A_ML_FR-EN.qxp 21/08/2007 14:19 Page 33
Page 9
34
Installing your hob in all simplicity
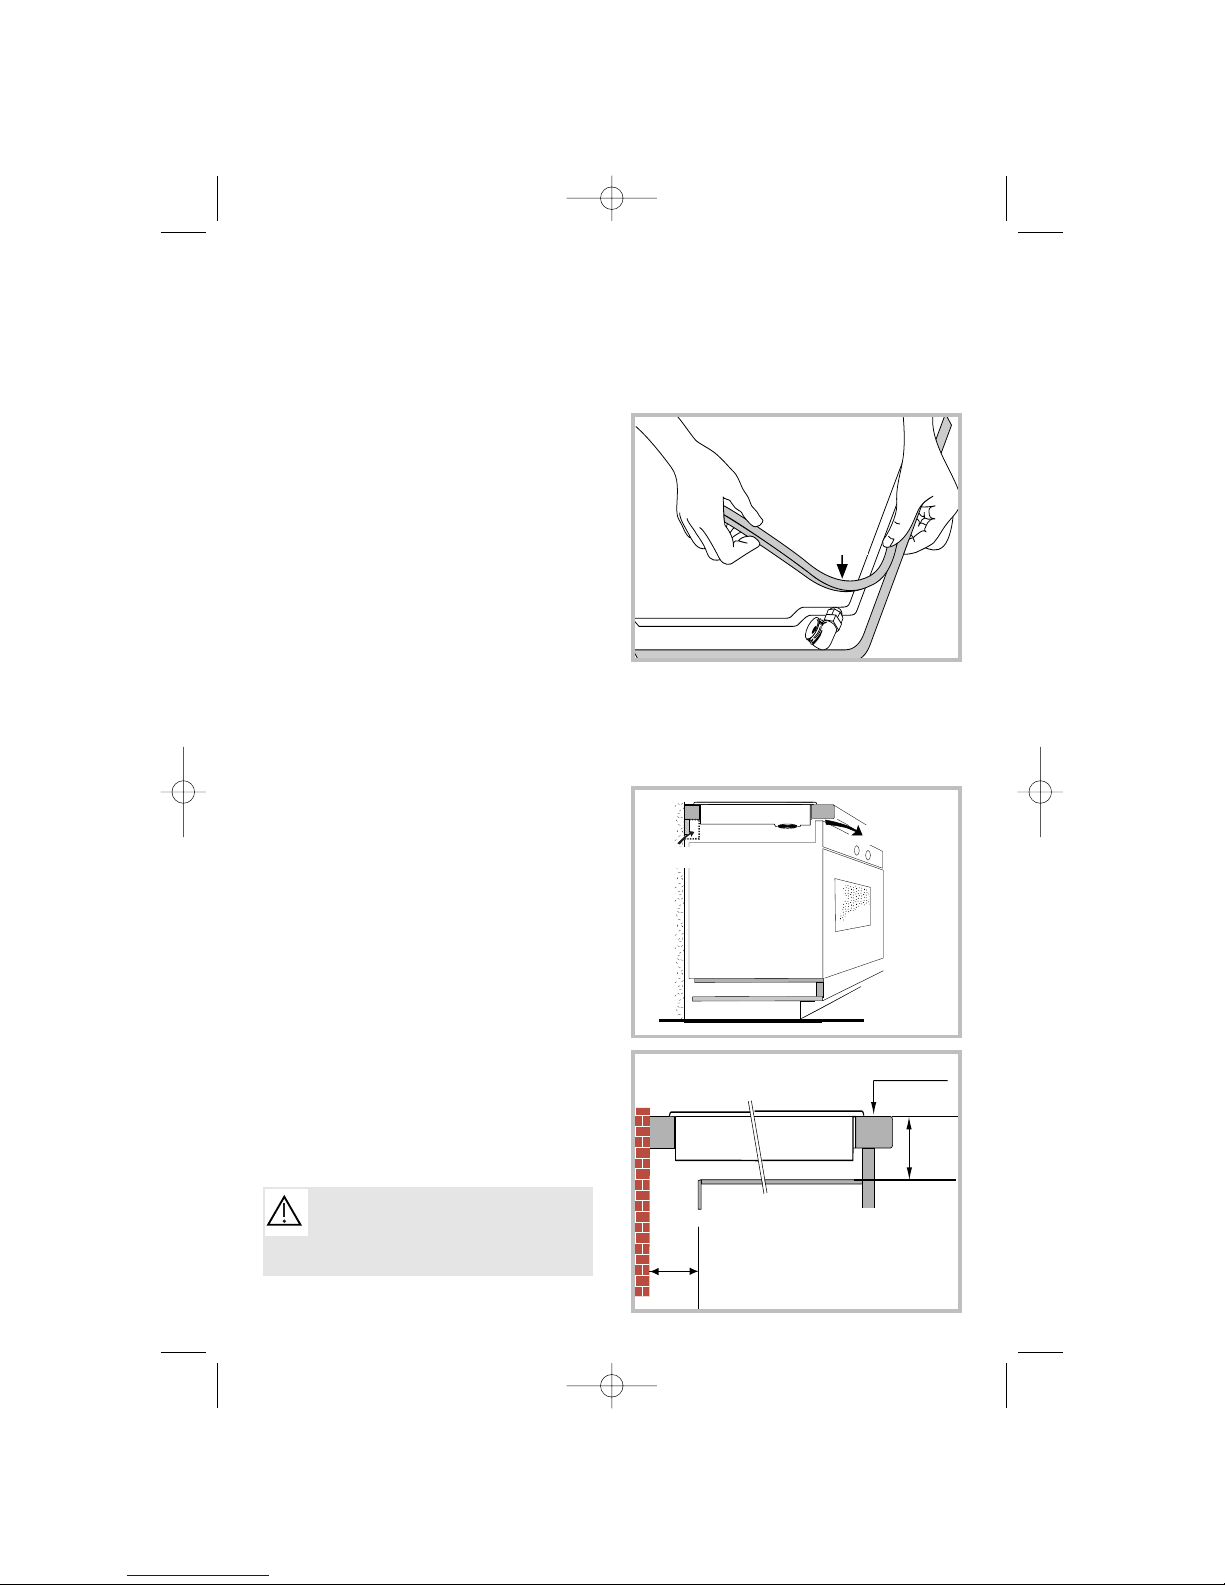
To make sure that nothing can get
between the frame and the worktop,
stick the foam seal around the
outside of the hob.
Affix the joint provided in the folder
before installing the hob :
1- Remove the pan support grates,
the burner caps and heads after
checking their position.
2- Turn the hob over and place it very
carefully over the opening in the unit
taking great care not to damage the
ignition sparkers.
3- Stick the foam seal delivered with
the appliance around the outside of
the hob. This seal prevents anything
getting between the glass and the
worktop.
4- Put the burners, caps and pan
grates back into position.
I
NSTALLATION OVER A UNIT WITH DOORS
OR DRAWERS (please see the diagram
opposite).
The installation of your hob over an
oven requires that this should be in
the low position.
You are advised not to install your hob
over an oven for which ventilation is
not carried out from the front.
You should leave an air inlet of 40 cm2
in the right or left wall of the oven
unit.
Fitting recommendations (cont'd)
Seal
Mini 4mm
Gas hob
100 mm
mini
Worktop
Mini 40 cm
2
The hob's heat-safety features
prevent it being used while it is in
pyrolysis mode.
99643032_A_ML_FR-EN.qxp 21/08/2007 14:19 Page 34
Page 10

35
H05V2V2F - T90
Cross section of
conductors in
mm
2
Fuse
220-240 V~ - 50 Hz
3 conductors of
which 1 is to be
earthed
1
10 A
CROSS SECTION OF THE CABLE TO USE
Installing your hob in all simplicity
This hob must be connected to the
220-240 V~ single phrase mains
network using a 2-pin + earth plug
connector (CEI 60083 standard) or an
all-pole cut-off device with a contact
opening distance of at least 3 mm.
The unit must be installed so that the
mains plug is easily accessible.
Warning :
If the power cable is
damaged, it must be replaced
by a cable or a special kit
available from the
manufacturer or its AfterSales Service Department.
Electrical connections
The protective conductor is connected to the earth connection on the hob
and therefore must also be connected to an external earth connection .
If the power supply cable is damaged, it must be replaced with a cable or a special
unit available from the manufacturer or his After Sales Service.
● Gas Hob
99643032_A_ML_FR-EN.qxp 21/08/2007 14:19 Page 35
Page 11

36
Installing your hob in all simplicity
If the hob is to be installed above an
oven or if other nearby heating
appliances risk heating and damaging
the gas hose then it is essential that a
rigid pipe be installed instead.
If a flexible hose is used (in the case
of butane gas) then it must not be installed in a place where it may be in
contact with a moving part of the kitchen unit or a place likely to get cluttered.
Gas connections
● Preliminary remarks
fig.A fig.B
Reinforced, braided,
flexible gas hose with
threaded connectors
Flexible gas hose with
threaded connectors
Access to the whole length of the connection hose must be possible and the gas
hose must be replaced before its use before date (indicated on the hose).
Whatever means of connections is chosen, make sure that it is gas sound after
installation by using soapy-water.
99643032_A_ML_FR-EN.qxp 21/08/2007 14:19 Page 36
Page 12

37
Installing your hob in all simplicity
Gas connections (Cont'd)
● Possible connections
T
OWN GAS (NATURAL GAS).
One of the 3 following connections
must be used:
-
connection with a rigid pipe
(gas
standard G1/2).
The connection should be made at the end
of the elbow seal on the appliance,
or -
connection with a reinforced,
braided, flexible gas hose with
threaded connectors
(fig. A on the
preceding page).
You may also use a "Gazinox" type,
stainless steel flexible tube available
from your local distributor,
or
- connection with a flexible gas
hose with threaded connectors
(fig. B on the preceding page).
These hoses must not exceed 2
metres in length and their entire
length must be accessible.
NATURAL GAS
Meter
99643032_A_ML_FR-EN.qxp 21/08/2007 14:19 Page 37
Page 13

38
Installing your hob in all simplicity
Gas connections (Cont'd)
● Possible connections
B
OTTLED OR TANKED GAS
(BUTANE/
PROPANE).
For the user's safety, we advise the
connection to be made with a rigid
pipe if this is possible, or with a
reinforced, braided, flexible gas hose
(maximum length 2 metres) (fig. A).
For an existing installation, where
it is not possible to fit a reinforced,
braided, flexible gas hose, the
connection can be made with a
flexible gas hose (maximum length 2
metres), with two jubilee clips: one
on the connector (fig. B), and the
other on the pressure regulator, and a
seal should be fitted
between the connector and the elbow
seal on the hob.
You will find the seal and the adaptor
in the wallet delivered
with the unit.
BUTANE/PROPANE
Pressure regulator compulsory
propane
butanene
propane
Temperatures above 30°C would cause overheating of the gas hose. To
avoid this, check that there are no heat-producing devices nearby.
Screw on the connector with a torque not exceeding 2.5 m/daN (m/kgF).
In France, you must use a hose or a pipe bearing the stamp NF Gaz.
Seal
(not provided)
Jubilee clip
(not provided)
Jubilee clip
(not provided)
fig. A
fig. B
Reinforced,
braided, flexible
gas hose with
threaded
connectors
Flexible hose
connection
propane
99643032_A_ML_FR-EN.qxp 21/08/2007 14:19 Page 38
Page 14

39
Installing your hob in all simplicity
Changing the type of gas supply
● Preliminary remarks
Your hob is delivered regulated
for natural gas.
The injectors for adapting the hob for use
with butane or propane are in the wallet
containing the instructions, together with
the adaptor and the sealing washer. Please
see the corresponding paragraph on
"Gas Connections".
Every time you change your gas
supply, mark the square on the label
in the wallet that corresponds to the
new type of gas (See "Gas Rating" in
this chapter).
99643032_A_ML_FR-EN.qxp 21/08/2007 14:19 Page 39
Page 15

40
Installing your hob in all simplicity
Changing the type of gas supply (cont'd)
When carrying out this operation
BEFORE CONNECTING UP ANYTHING, you
should successively:
➊
Switch over the gas change
switch.
❷
Adapt the gas connection.
❸
Change the injectors.
➍
Electrical connections
➊
SWITCH OVER THE GAS CHANGE
SWITCH.
If your home is supplied by
butane/propane gas, you must switch
over the gas change switch located on
the front right of your hob to the
"butane" position (fig. 1).
❷
ADAPT THE HOB CONNECTION to the
new gas adjustment. Refer to the
paragraph “Gas connections”.
❸
CHANGE THE INJECTORS in the
following way:
•
Remove the supports, and all the
burner caps and heads.
•
Using the spanner supplied,
unscrew the injectors at the bottom of
each dish and remove them (fig 2).
● Changing from natural gas to
butane/propane gas
GAS CHANGE
SWITCH
BUTANE
MAINS GAS
(NATURAL GAS)
Fig. 1
Cover
Head
Dish
Grill
Glass top
Fig. 2
99643032_A_ML_FR-EN.qxp 21/08/2007 14:19 Page 40
Page 16

41
Installing your hob in all simplicity
Changing the type of gas supply (cont'd)
•
Replace these with the injectors
supplied in the wallet, in
accordance with the gas rating
table at the end of the chapter; to
do this:
➪ Screw in the injectors by hand
until they are tight.
➪ Put the spanner well onto the
injector.
➪ With a pencil draw a line on the
hearth plate as indicated (fig. 3).
➪ Turn the spanner clockwise until
the line appears on the other side
(fig. 4). Warning! Do not go
beyond this limit as you are
liable to cause damage.
•
Put all the burners, covers and grills
back in position.
➍
CONNECT lthe electrical cable from
the hob to your single phrase mains
supply (220-240V). Please refer to
the “Electrical connection”
paragraph.
● Changing from natural gas to
butane/propane gas (cont'd).
Spanner
Spanner
Line
Line
Fig. 4
Fig. 3
Y
OUR HOB IS NOW READY TO OPERATE ON BUTANE/PROPANE GAS.
99643032_A_ML_FR-EN.qxp 21/08/2007 14:20 Page 41
Page 17

42
Installing your hob in all simplicity
Changing the type of gas supply (cont'd)
When carrying out this operation
BEFORE CONNECTING UP ANYTHING, you
should successively :
➊
Switch over the gas change
switch.
❷
Adapt the gas connection.
❸
Change the injectors.
➊
SWITCH OVER THE GAS CHANGE
SWITCH.
If your home is supplied by natural
gas, you must switch over the gas
change switch located on the front
right of your hob to the mains gas
(natural gas) position (fig. 1).
❷
ADAPT THE HOB CONNECTION to the
new gas adjustment. Refer to the
paragraph “Gas connections”.
❸
C
HANGE THE INJECTORS
in the
following way:
•
Remove the supports, and all the
burner caps and heads.
•
Using the spanner supplied,
unscrew the injectors at the bottom of
each dish and remove them (fig 2).
● Changing from butane / propane gas
to natural gas
Cover
Head
Dish
Grill
Glass top
GAS CHANGE
SWITCH
BU
TANE
MAINS GAS
(NATURAL GAS)
Fig. 1
Fig. 2
99643032_A_ML_FR-EN.qxp 21/08/2007 14:20 Page 42
Page 18

43
Installing your hob in all simplicity
Changing the type of gas supply (cont'd)
•
Replace these with the injectors
supplied in the wallet, in
accordance with the gas rating
table at the end of the chapter; to
do this:
➪ Screw in the injectors by hand
until they are tight.
➪ Put the spanner well onto the
injector.
➪ With a pencil draw a line on the
hearth plate as indicated (fig. 3).
➪ Turn the spanner clockwise until
the line appears on the other side
(fig. 4). Warning! Do not go
beyond this limit as you are
liable to cause damage.
➪ Put all the burners, covers and grills
back in position.
● Changing from butane / propane gas
to natural gas
Spanner
Spanner
Line
Line
Fig. 4
Fig. 3
Y
OUR HOB IS NOW READY TO OPERATE ON MAINS GAS (NATURAL GAS).
99643032_A_ML_FR-EN.qxp 21/08/2007 14:20 Page 43
Page 19

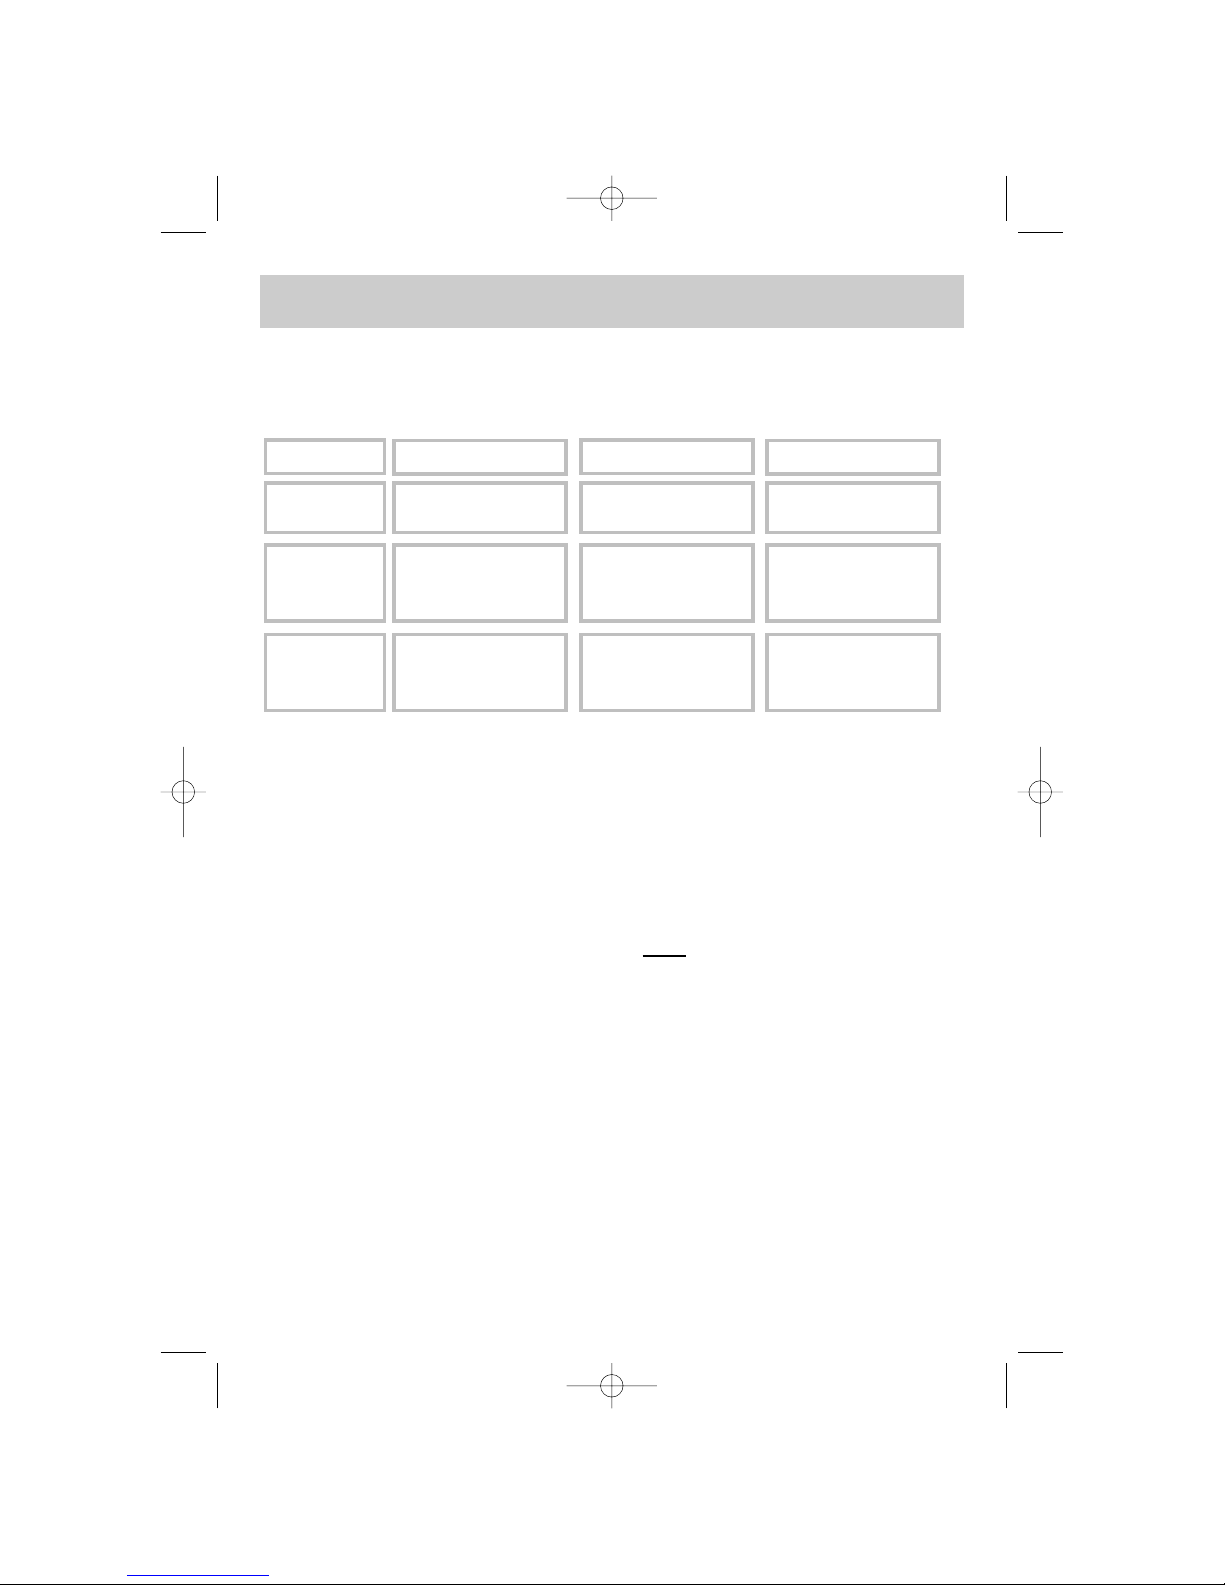
Appliance designed for installation: Butane Propane Natural Natural
FR ....................................Cat : II2E+3+ gas gas
GB - ES - PT .....................Cat : II2H3+
G30 G31 G20 G25
Hourly input -see below: 28-30 mbar 37 mbar 20 mbar 25 mbar
at 15°C at 1,013 mbar
Fast burner
Indicator marked on injector 78 78 121 121
Nominal heat rating (kW) 2,25 2,25 2,30 2,30
Low heat rating (with safety device) (kW) 0,830 0,870
Hourly output (g/h) 164 161
Hourly output (l/h) 219 255
Extra fast burner
Indicator marked on injector 88 88 137 137
Nominal heat rating (kW) 3,10 3,10 3,10 3,10
Low heat rating (with safety device) (kW) 0,830 0,870
Hourly output (g/h) 225 221
Hourly output (l/h) 295 343
Semi-fast burners
Indicator marked on injector 62 62 94 94
Nominal heat rating (kW) 1,45 1,45 1,5 1,5
Low heat rating (with safety device) (kW) 0,620 0,615
Hourly output (g/h) 105 104
Hourly output (l/h) 143 166
Auxiliary burner
Indicator marked on injector 45 45 63 63
Nominal heat rating (kW) 0,750 0,750 0,850 0,850
Low heat rating (with safety device) (kW) 0,300 0,615
Hourly output (g/h) 55 54
Hourly output (l/h) 81 94
65 cm 4 ring gas hob
Total nominal heat rating (kW) 7,55 7,55 7,75 7,75
Maximum output (g/h) 549 540
(l/h) 738 858
44
Installing your hob in all simplicity
Changing the type of gas supply (cont'd)
● Gaz rating
Natural gas
94 121
137 63
62 78
88 45
This table shows the position of the injectors on your hob depending on the type of gas you
use. The number is marked on each injector.
Butane/Propane
gas
ELECTRICITY
MARK ON THE INJECTORS
- Power supply : 220-240 V~ - 50 Hz
- Standby consumption : 2,5 Wh
- Maximum consumption when operating :20 Wh
FR-GB FR-GB FR-GB
FR
ES-PT ES-PT ES-PT
99643032_A_ML_FR-EN.qxp 21/08/2007 14:20 Page 44
Page 20

45
•
Select the burner that you wish to use
by placing your finger squarely on the
corresponding control button
(fig. 1).
➡ The operating indicator for the burner lights up.
➡ The power indicators for this burner will begin flashing.
•
Choose the heater power setting by
selecting and pressing the buttons for
the burner power setting (fig. 2). The
power indicators stop flashing. Your hob
then automatically begins operating.
•
You can adjust the power of the
burner by pressing on the or
buttons.
This power setting is displayed on the power indication indicators.
➡ Pressing on for position 7
(fig 3).
➡ Pressing on for position 5
(fig. 4).
•
Locked : press for approximately
three seconds on the button. The
controls will be locked except for the
On/Off command for the burners
and the main "Off" button for the whole
cooker. After three seconds, the "Lock"
indicator lights up.
•
Unlocked : press for approximately
three seconds on the (fig. 5).
The indicator goes out. All of the controls
can once again be used on the hob.
Using your hob in all simplicity
Turning on the hob and adjusting the power setting
- In the event of accidental extinction (because of draughts for example), your cooker is
equipped with an automatic re-ignition system. This is limited to 2 successive re-ignitions.
- You can immediately turn off all burners by using the main "Off" button for the whole
cooker .
- The flames on the burner are smaller near the grate supports to avoid any damage
being done to the enamel.
After intensive use, the cooking zone
may remain hot for several minutes.
The letter “
H”
H”
is displayed during this
period. Do not touch the zones
concerned.
•
Residual heat indicator
Fig. 3
Fig. 4
Fig. 5
Fig. 2
Fig. 1
99643032_A_ML_FR-EN.qxp 21/08/2007 14:20 Page 45
Page 21

46
•
The front left and back left
burners are equipped with a timer
(maximum duration of 99 min).
However, they can operate without
using this.
•
Ignite the burner as indicated in
the previous page “Turning on the
hob and adjusting the power settings”.
•
Press the touch control on
the timer.
As soon as you press this control,
the timer starts and the cooking time
(in minutes) scrolls down on the
display.
•
Keep your finger on the touch
control until the cooking time you
require is displayed.
When the time is up, the burner will
go out and the timer will blink .
An intermittent beep will sound. To
switch it off, touch any of the timer
controls.
•
To change the cooking time, you
can press the or
controls.
•
To turn off the timer, press on
the button until the display on
the timer goes out. The burner will
stay alight without the timer.
Using your hob in all simplicity
How to use the timer?
- During the last minute, the countdown is shown in seconds.
- When the cooking time is up, the burner automatically turns off (the arrival of gas at
the burner is then cut off).
Fig. 1
99643032_A_ML_FR-EN.qxp 21/08/2007 14:20 Page 46
Page 22

47
Using your hob in all simplicity
Which pans are best adapted for use on the gas burner ?
•
Recommended pan sizes:
Adjust the flames so that they do not
lick up the side of your pan.
Do not use a pan with a convex
or concave bottom.
Do not leave the gas on beneath an
empty pan.
Do not use recipients (saucepans and
pans) which partly cover the keypad.
Do not use heat regulators, toasters,
steel meat grills or stew-pots that touch the glass-top.
RIGHT
WRONG
CONVEX
CONCAVE
Keep all natural air-vents open or have a mechanical ventilation system
installed (a mechanically ventilated hood).
- Prolonged, intensive use of the hob may require extra ventilation; by
a window for example or producing more efficient ventilation by increasing the
power of the existing mechanical ventilation (a minimum air input of 2m3/hour
per kW of gas energy is required).
E.g. this hob :
Total power : 0,85 + 1,5 + 2,3 + 3,1 = 7,75 kW.
7,75 kW x 2 = 15,5 m3/h per hour minimum flow-rate.
- Using a gas-powered hob produces both heat and humidity in the room where it is used.
Make sure your kitchen is well ventilated.
- As a safety measure, after use do not forget to turn off main control valve for the
mains gas supply or the tap/valve on the butane or propane gas bottle.
Big burner
EXTRA FAST
18 to 28 cm
Medium burner
FAST
16 to 22 cm
SEMI-FAST
12 to 20 cm
AUXILIARY
8 to 14 cm
Small burners
99643032_A_ML_FR-EN.qxp 21/08/2007 14:20 Page 47
Page 23

48
➡ If ever the sparkers get
dirty, clean them with a stiff
non-metallic brush.
➡ The gas injectors are in the
centre of each burner in the
form of a "pot". Make sure not
to block them up partially when
cleaning the hob, as this will
considerably reduce the performance of your gas-rings.
- Should a crack appear on the glass-top, disconnect your
appliance immediately and contact your After-Sales Service.
- It is better to wash the parts of your hob by hand rather than in a dishwasher.
- Never use an abrasive sponge for cleaning your hob.
- Do not use a steam cleaner.
thermocouple
Nut
Injector
Sparker
ACCESSORIES TO
BE USED
✓ Small hard-bristled brush.
✓ Non-abrasive cream.
✓ Household sponge.
Keeping your hob in good condition is easy if you clean it before it is completely cold.
Even so, never clean it when it is in use. Put all the control knobs at zero.
HOW TO PROCEED
➤➤
Looking after
sparkers and injectors
➡ Use a non-abrasive cream
for removing any persistent
stains. Then rinse with clean
water. Dry each burner element carefully before
re-lighting your hob.
➤➤
Looking after
the grills and gas
burners
✓ Household sponge.
✓ Special ceramic glass pro-
ducts E.g. Cera-Clen.
➡ Clean it with hot water, then
wipe dry. Use special ceramic
glass cleaning products for any
persistent stains.
➤➤
Looking after
your glass top
How to look after your hob?
99643032_A_ML_FR-EN.qxp 21/08/2007 14:20 Page 48
Page 24

49
You have doubts about whether your hob is working correctly .... ......
this does not
necessarily mean there is a breakdown. Nevertheless, check the following points
IF YOU REALIZE
THAT
WHAT SHOULD
YOU DO?
ERROR
CODES
➡ This is the normal start-up procedure for your hob when the power is turned on.
➡ If you have pressed the main "Off"
button then this is normal.
✓ Wait for a few seconds until the
display goes out.
✓ Your hob is ready to use.
➤ 2 bleeps followed by
the displaying of F1 or F2
or F3 or F...
on the timer , then
showing
A2 or A2 or A…
➡ The current is cut off.
✓ Check that you have an electrical
current.
✓ If you have current and the fault still
continues, call the After Sales Service
department.
➤ You are unable to
control your hob and the
displays are blank.
➡ Your burner is unable to ignite.
✓ Check that the gas is fully open or
that the burners are correctly assembled.
✓ Check that the injectors correspond
to the gas being used (please see the
technical characteristics table).
✓ Check that there are definitely sparks
at the corresponding burner.
✓ After carrying out all of these checks,
try to turn it on again by pressing .
➤ shows E4 and
the hob bleeps. One of
the indicators for the
faulty burner lights up.
➡ You have suffered a power cut or
have pressed the main "Off"
button .
✓ Press to use your hob normally.
➤ displays a fla-
shing time setting. (Time
remaining before the current cuts off).
➡ The burner concerned is unusable.
➡ However, you can still use the other
burners.
✓ Call the After Sales Service dept, and
be sure to tell them which error code is
displayed.
➡ Your hob cannot be used.
✓ Turn off the gas.
✓ Call your After Sales Service dept.
and be sure to tell them which error code is displayed.
➤ displays E6.
Minor troubleshooting
➡ You have a flame or a hot object on
one of the safety features (thermocouple).
✓ Turn off the gas.
✓ Call your After Sales Service dept.
➤ displays E7:
one of the indicators
lights up to show the
faulty burner.
➡ The table has 2 faults.
✓ Call the After Sales Service dept and
tell them which indicators have lit up.
➤ displays EE and
several indicators light up
to show the faulty burners.
- When an error code is displayed, this automatically prevents all use of the timer
.
➤ displays E2 or
E5, one of the indicators
for the faulty burner
flashes and you hear a
bleep.
99643032_A_ML_FR-EN.qxp 21/08/2007 14:20 Page 49
Page 25

50
IF YOU REALIZE THAT
WHAT SHOULD YOU DO?
➡ Lighting the burners:
There are no sparks when pressing the buttons.
✓ Check the electrical connections on the hob.
✓ Check that the sparkers are clean.
✓ Check that the burners are clean and in position.
➡ When lighting a burner, sparks appear at all of the
burners at the same time.
✓ This is normal. The lighter system is centralised, and
all the burners spark at the same time.
➡ Sparking takes place but the burners do not light up.
✓ Check that the gas inlet pipe has not been squashed.
✓ Check that the gas inlet pipe tube is less than 2m
long.
✓ Check that the main gas tap is open.
✓ If you use gas tanks or cylinders check that they are
not empty.
✓ If you have just installed the hob or changed the gas
bottle, you should repeat the ignition procedure several
times until the gas reaches the burners.
✓ Make sure the injector is not blocked up. if this is the
case, clear it with a safety pin.
✓ Light up your gas burner before putting a pan on it.
➡ In the low position the flames go out or are too
high.
✓ Avoid any severe drafts in the room.
✓ Check that the gas you are using corresponds to the
injectors that have been installed (See injector identification in the "Gas Rating" chapter).
Remember that gas hobs are delivered preset for use
with natural gas.
✓ Check that the gas change switch is correctly positioned (please see the chapter on “Changing the type of
gas supply”).
✓ Call the After Sales Service dept for the adjustment of
the burner gas flow reduction.
Minor troubleshooting (cont’d)
➡ Flames are irregular.
✓ Check that the burners and injectors are clean and as-
sembled correctly.
✓ Check you have enough gas in your gas cylinders.
99643032_A_ML_FR-EN.qxp 21/08/2007 14:20 Page 50
Page 26

51
Cooking guide
- To master your cooking times as well as possible, do not hesitate to transfer your
saucepan from one burner to another (e.g. from the extra fast burner to the
semi-fast burner: blanquettes, osso buccos, etc.).
- Choose the extra fast burner for grilling that requires high temperatures.
- Use the semi-fast burner for delicate sauces and heating already-prepared dishes.
DISHES TIME EXTRA- FAST SEMI- AUXILIARY
FAST FAST
SOUPS Broths 8-10 minutes X
Thick soups X
FISH Court-bouillon 8-10 minutes X
Grilled 8-10 minutes X
SAUCES Hollandaise, Bearnaise XX
Bechamel, Aurore 10 minutes XX
VEGETABLES Endives, Spinach X
Peas In Sauce 25-30 minutes XX
Provence Tomatoes 15-20 minutes XX
Fried Potatoes XX
Pasta X
MEAT Steack X
Blanquette, Osso-bucco 90 minutes X
Fried Escalope 10-12 minutes X
Tournedos (gril fonte) 10 minutes X
FRYING Chips X
Fritters X
DESERTS Rice Pudding 25 minutes X
Stewed Fruit XX
Pancakes 3-4 minutes XX
Chocolate 3-4 minutes X
Custard 10 minutes X
99643032_A_ML_FR-EN.qxp 21/08/2007 14:20 Page 51
Page 27

Réf. appareils, Appliance ref: DTG720*/*
Brandt Appliances - société par actions simplifiée au capital de 10.000.000 euros RCS Nanterre 440 302 347.
Service Après-Vente / After Sales Service
Pour en savoir plus sur tous les produits de la marque :
informations, conseils, les points de vente, les spécialistes après-vente.
Pour communiquer :
nous sommes à l’écoute de toutes vos remarques, suggestions, propositions auxquelles nous
vous répondrons personnellement.
Vous pouvez nous écrire :
SERVICE CONSOMMATEURS DE DIETRICH
BP 9526
95069
CERGY PONTOISE CEDEX
ou nous téléphoner au :
*Service fourni par Brandt Customer Services, societe par actions simplifiée au capital de 2.500.000 eu-
ros - 5/7 avenue des Béthunes, 95310 Saint Ouen l’Aumône - RCS Pontoise 440 303 303.
0892 02 88 04 *
*0,34 TTC / min à partir d'un poste fixe
Pour préserver votre appareil, nous vous recommandons d'utiliser les produits d'entretien
Clearit.
Clearit vous propose des produits professionnels et des solutions adaptées pour l'entretien
quotidien de vos appareils électroménagers et de vos cuisines.
Vous les trouverez en vente chez votre revendeur habituel, ainsi que toute une ligne de
produits accessoires et consommables.
LL''eexxppeerrttiissee ddeess pprrooffeessssiioonnnneellss aauu sseerrvviiccee ddeess ppaarrttiiccuulliieerrss
Any maintenance on your equipment should be undertaken by:
-either your dealer,
-or another qualified mechanic who is an authorized agent for the brand appliances.
When making an appointment, state the full reference of your equipment (model, type and se-
rial number). This information appears on the manufacturer's nameplate attached to your
equipment.
Brandt Appliances - simplified shareholder company with a capital 10.000.000 euros RCS Nanterre 440 302 347.
To preserve your appliance, we recommend that you use Clearit cleaning products.
Clearit offers you professional products and solutions designed for the daily care of your
household appliances and kitchens.
They are on sale at your regular retailer, along with a complete line of accessories and
consumables.
PPrrooffeessssiioonnaall eexxppeerrttiissee sseerrvviinngg iinnddiivviidduuaallss..
9964-3032 - 07/07
99643032_A_ML_FR-EN.qxp 21/08/2007 14:20 Page 52
 Loading...