

Page 1
Guide to installing and using your Wine cellar.
EN
99634231C 09/04
99634231_C.qxd 28/09/2004 09:06 Page 1
Page 2
2
Contents
· Safety instructions................................................................................... 3
· Respecting the environment and Saving energy..................................... 4
· Description of your appliance................................................................. 5
1 How to carry out your initial installation
· Fitting the plinth....................................................................................... 6
· Reversing the door opening.................................................................... 6
· Reversing the door handle...................................................................... 7
· Adjusting the door.................................................................................... 7
· Installing your appliance.......................................................................... 8
· Electrical connection............................................................................... 9
2 How to use your wine cellar
· Putting your wine cellar into service ...................................................... 10
· Adjusting the temperature ..................................................................... 11
· Fan-cooled.............................................................................................. 12
· Storing your bottles of wine.................................................................... 12
· Modular layout ....................................................................................... 14
· The Air Pur Pack - anti-odour.................................................................. 15
3 Ongoing maintenance of your appliance
· Cleaning your appliance.......................................................................... 16
· Changing the lightbulb............................................................................ 16
4 Operational anomalies
· Troubleshooting....................................................................................... 17
· Anomalies............................................................................................... 18
· Abnormal operational noise..................................................................... 18
5 Consumer Services
· After-sales service................................................................................... 19
The guide to installation and use of your wine cellar is applicable to several
models. There may be slight differences in the details and features of your appliance and the descriptions presented.
As you read through the guide, you will come across the following symbols, to warn you of:
Safety precautions that must be observed
An electrical danger
Important information and advice
99634231_C.qxd 28/09/2004 09:06 Page 2
Page 3
3
Safety instructions
This appliance is intended for domestic use only. It has been designed for
storage of your bottles of wine.
The following instructions are
for your own safety and should
be observed without fail. We can
neither be held responsible, nor
uphold the guarantee in case of failure to observe these recommendations, which may lead to material or
bodily damage.
Your appliance must be installed and
used in compliance with the instructions in this guide for installation and
use, in order to avoid any damage as
well as any danger due to possible
instability or a faulty installation. You
will only be able to keep your wine in
optimum conditions by following these
instructions carefully.
If the appliance has been delivered
to your home in a horizontal position, stand it vertically and then
wait 2 hours before plugging it in. A
small amount of oil may have run
into the refrigeration circuit, and
you must leave it time to flow back
towards the motor before connecting the appliance. Failure to do so
may damage the appliance.
Carry out an initial cleaning operation
(see "Installation of your appliance"
chapter) before connecting your
appliance to the electrical supply.
Disconnect your appliance prior to
carrying out any maintenance operation. Grasp the plug directly, rather
than pulling on the electric lead.
Do not let children play with the
appliance, and keep your pets well
away from it.
Worn out appliances must be rendered unusable.
Unplug and cut the electric cable flush
with the appliance. Make the door closure device unusable, or, better still,
remove the door. This is in order to
ensure that no child or animal gets
shut inside whilst playing.
If a problem arises that you are unable
to resolve using the advice given (see
"Operational anomalies" section”),
please use an official after-sales
service or a qualified professional.
If the appliance is going to be turned
off for an extended period, leave the
door ajar.
99634231_C.qxd 28/09/2004 09:07 Page 3
Page 4

4
Respecting the environment and
Saving energy
To reduce the electrical consumption
of your appliance:
- Install it in a suitable place see
"Installation of your appliance" sec-
tion)
- Leave the door open as little as possible.
- Periodically check the door seal and
make sure that it still closes firmly.
If it doesn't, please contact our after-
sales service.
Wine cellars contain refrigerant gas
and substances necessitating appropriate scrapping procedures. The
materials used for packaging, as well
as those that make up your appliance
use recyclable materials. Please take
account of this when discarding them.
Your supplier or your local council will
be able to tell you about the possibilities
for disposing of your appliance in a
way that is both suitable and respectful of the environment.
Certain components can be dangerous to the environment.
In compliance with the latest legislation concerning environmental protection, your appliance does not contain
any CFC's.
The exact type of refrigerant used in
your appliance is clearly indicated on
the identification plate situated on the
inside of your appliance, low down on
the left wall.
99634231_C.qxd 28/09/2004 09:07 Page 4
Page 5
5
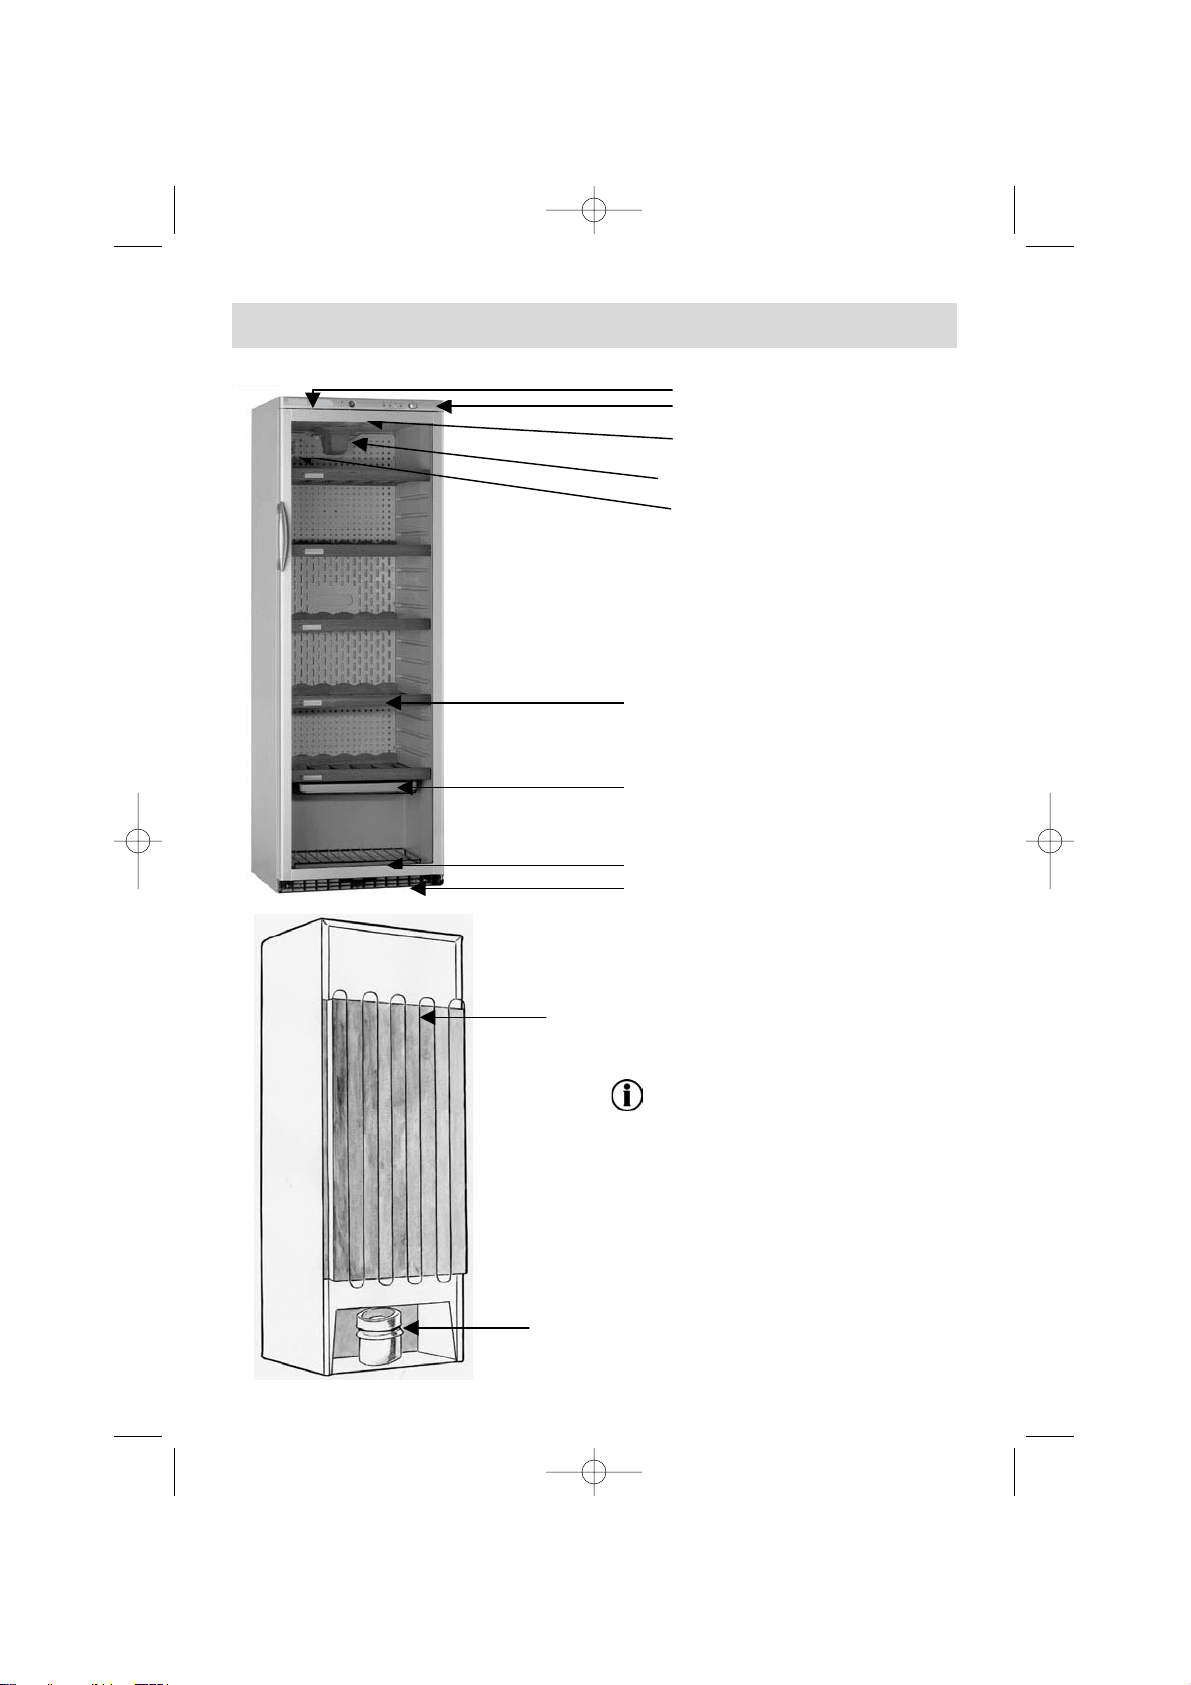
Description of your appliance
Lighting
Control panel
Humidity sensor
Ventilation system
Air Pur Pack
Racks
Hydrating tray
(to position as shown, in contact of
the back for defrost water recovery )
Wire bottle rack
Plinth
Condenser
Motor
The guide to installation and use of
your wine cellar is applicable to
several models. There may be slight
differences in the details and features of your appliance and the descriptions presented.
99634231_C.qxd 28/09/2004 09:07 Page 5
Page 6
6
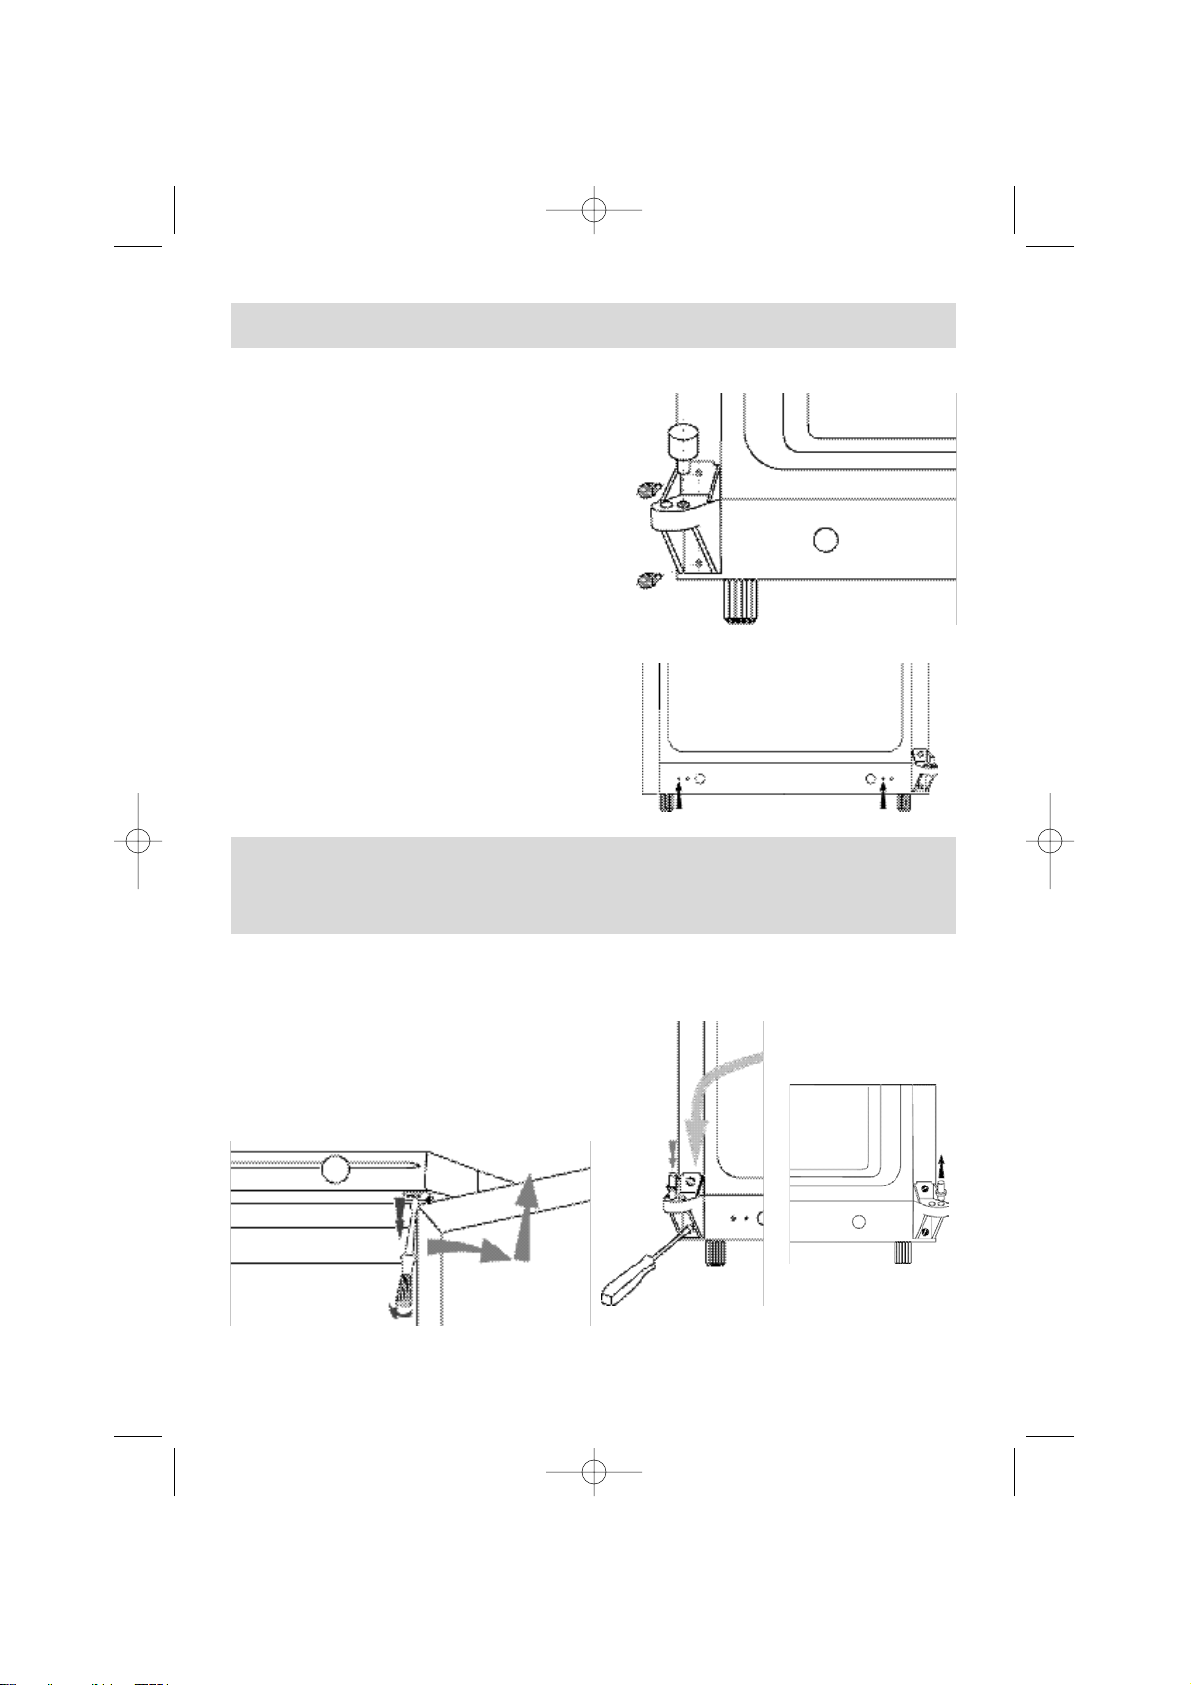
Fitting the plinth
Your appliance is delivered with a
transit brace, and a plinth is supplied.
1- Open the door.
2- Remove the transit bracket from
the door.
3- Unscrew the two screws to remove the transit brace.
4- Replace the two screws and washers. Keep these parts carefully as
they may come in useful if you move
house with your appliance.
5- Use a bradawl or a nail to make
pilot holes for the plinth securing
screws.
6- Fit the plinth end into the space
provided for the hinge bracket.
7- Screw the plinth on.
Your appliance is delivered with the
door opening from left to right (hinges
on right). You can, if you wish, reverse
the door opening:
1- Unscrew the upper hinge, unhinge
and remove the door.
2- Remove the lower right hinge pin
and unscrew its support .
3- Unscrew and remove the plinth, if it
is already mounted.
4- Screw the support to the left side of
the door and replace the hinge pin.
Reversing the door opening
How to carry out your initial installation
2
3
5
1
24
99634231_C.qxd 28/09/2004 09:07 Page 6
Page 7

7
5- Fit the plinth end into the space
provided for the hinge bracket.
6- Screw the plinth on.
7- Reposition the door on the lower
hinge pin, put the upper hinge in
place and screw on.
Reversing the door handle
1 Use a screwdriver to remove the two
screw covers. Remove the screws and
block the holes with the plugs supplied
with these instructions.
2. Identify, and then use the handle
to mark, the positioning of the holes
to be drilled on the door.
3 Using an electric drill, make two
3,4 mm holes.
4 Refit the handle with the two
screws, and replace the screw
covers.
Adjusting the door
If necessary, you can adjust the alignment of the door and the wine cellar
control panel.
Proceed in the following manner:
1- Open the door so that it does not
impede your view.
2- Whilst holding the door, unscrew
the securing screw from the upper
hinge.
3- Remove both hinge and door.
4- Use a sharp tool to cut the stop
from the hinge bracket.
5- Refit the door and the hinge.
6- Screw the hinge securing screw
back into place, fairly tightly.
7- Close the door and align it with the
control panel.
How to carry out your initial installation
7
99634231_C.qxd 28/09/2004 09:07 Page 7
410 mmm
Page 8

8
Your appliance must be instal-
led in compliance with the
instructions given in this "Guide
for Installation and Use" in order
to keep your wine in optimum
conditions and with optimal energy
consumption.
- The appliance should be installed in
a room that is both dry and aired.
- Avoid balconies, verandas, and
patios: the excessive heat in summer
and the cold in winter could prevent
your appliance from functioning properly, or even damage it.
- Avoid placing your appliance near a
heat source such as an oven or
radiator.
- Your appliance has been designed
for optimum functioning at a certain
ambient temperature; it is designed
for a particular "climate class". This
climate class is clearly indicated on
the identification plate
situated on the inside of your appliance, low down on the left wall. Outside
of this temperature range, the performance of your appliance may be
diminished.
Climate class Ambient temperature
SN/ST +10°C to + 38°C
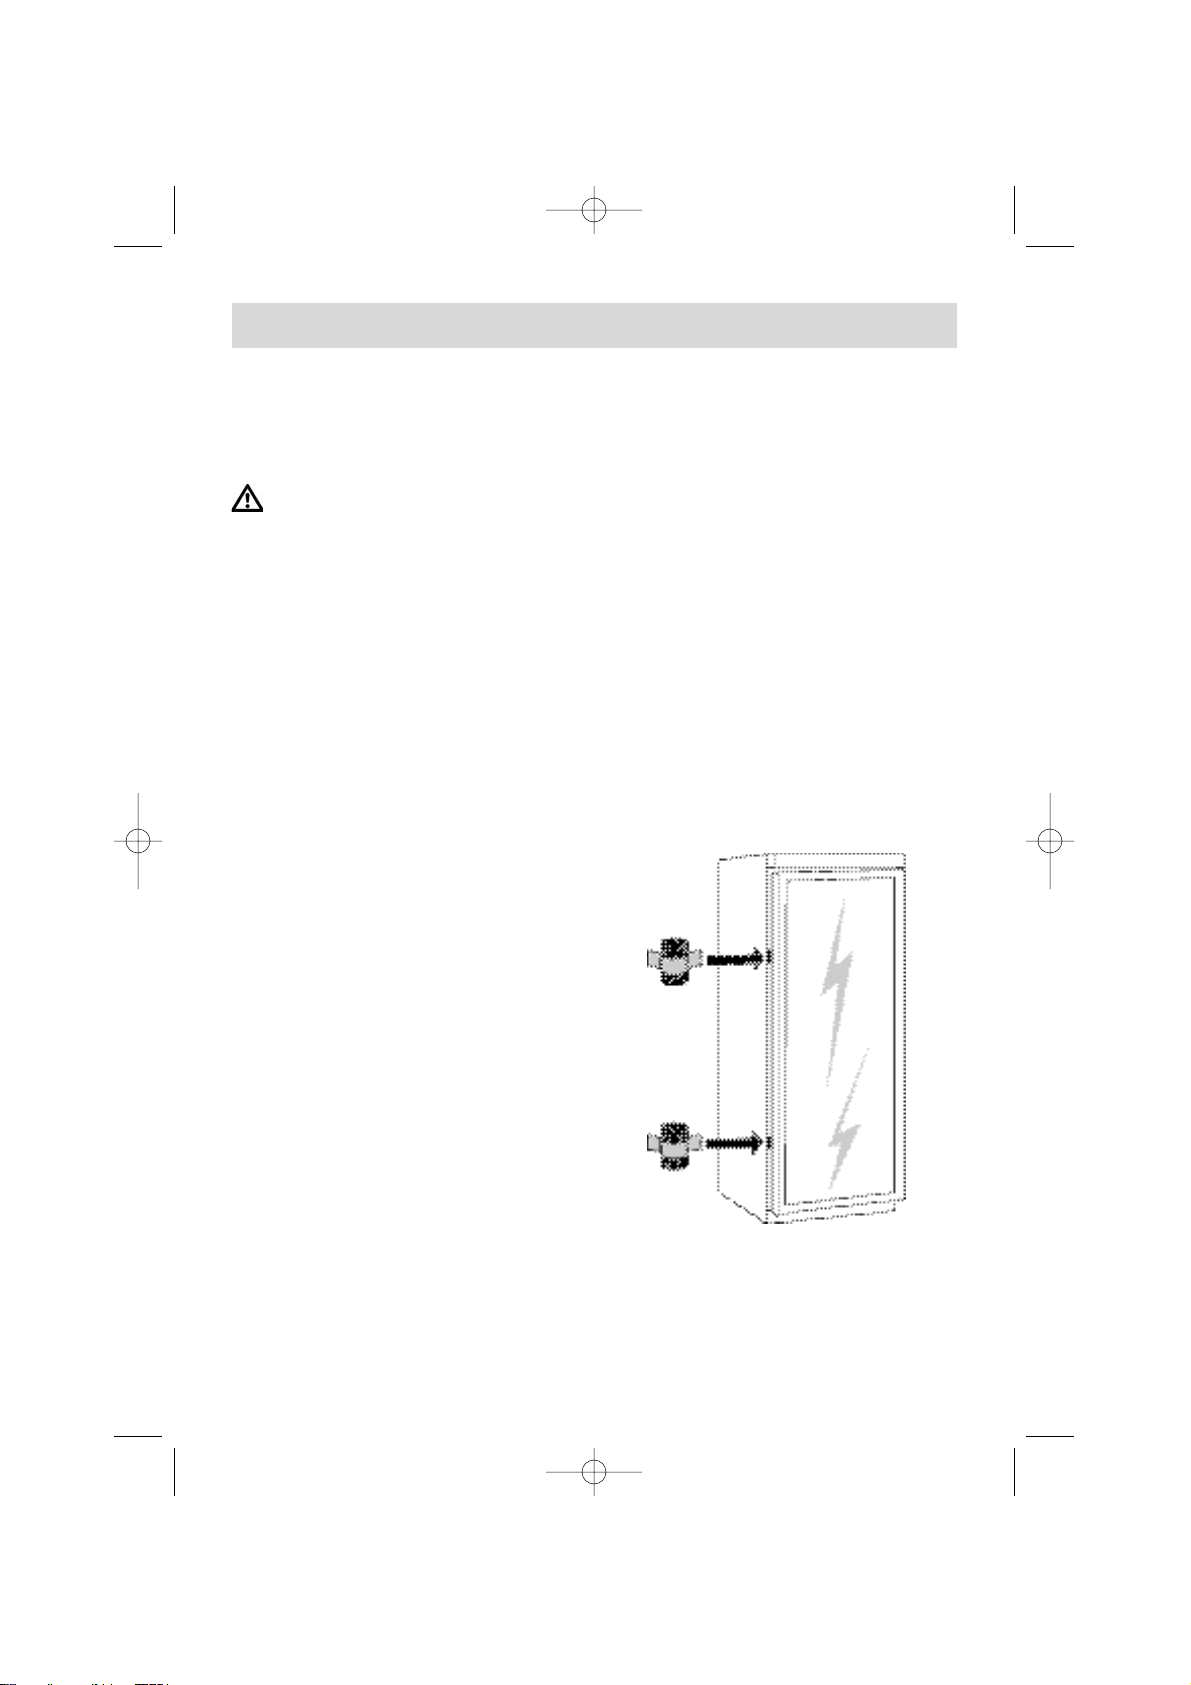
- Leave a minimum distance of 3 to
5 cm at the sides between your wine
cellar and your furniture, and 10 cm
above, to maximise air circulation
around the appliance.
Position the appliance at a suitable
distance from the wall by using the
spacers provided in the accessories
packet. You should mount the
spacers on the back of the appliance.
Once your appliance is installed,
adjust its feet so that it is slightly
leaning forwards, or slightly leaning
backwards:
This will facilitate the efficiency of
door closing.
Before putting any bottles in,
clean the inside and the outside of
your appliance with a bicarbonate
of soda solution (1 dessertspoon
of bicarbonate to 4 litres of water).
Do not use alcohol, scouring powder or detergents, which could
damage the surfaces. See section
on "Cleaning your Appliance".
Installing your appliance
How to carry out your initial installation
99634231_C.qxd 28/09/2004 09:07 Page 8
Page 9

9
Electrical connection
For your own safety, you must
comply with the instructions
given below.
We cannot be held responsible for
any incident caused by a faulty
electrical installation.
Recommendations for the elec-
trical installation of your appliance:
- Do not use extension leads,
adaptors, or socket boards.
- Always make sure your circuit is
earthed.
- If you have to change the supply
lead, we recommend that you
exchange it for a lead of the same
type. You can get this from our
after-sales service
- The socket must always remain
accessible, yet be out of the reach
of children.
If you have any doubts, contact
your installer.
Carry out the initial cleaning
(See section on "Installation of
your appliance ") before connecting your appliance to the electrical supply.
Disconnect your appliance prior to
carrying out any maintenance operation. Grasp the plug directly,
rather than pulling on the electric
lead.
The electrical installation must comply with Standard NF C *15-100, in
particular concerning the earth.
Three-core flex 3x2.5 mm², 230V
connected to:
- a 20A supply 230V-50Hz
- an ELCB and an individual fuse (10
or 16A depending on the model)
- a 16/20A socket with two poles
+ earthed socket
Your appliance is compliant with European Directives
CEE/73/23 (low voltage directive), CEE/89/336 (electromagnetic
compatibility) and CEE/96/57 (energy efficiency) as well as
their modifications.
How to carry out your initial installation
99634231_C.qxd 28/09/2004 09:07 Page 9
Page 10

10
Putting your wine cellar into service
15234
1- Thermostat safety indicator light (Orange light)
2- Low humidity indicator light (Yellow light)
3- Temperature indication lights (Green lights)
4- Temperature control knob
5- Lock
Putting your appliance into service
- Connect to the electricity supply.
- Set the thermostat knob to a
medium position in the ageing zone,
11° to 14° (4)
- The orange safety light (1) should
be on.
- the yellow light (2) may come on if
the humidity rate is insufficient (see
paragraph ...)
- The green light(s) is/are on, or flashing, depending on the interior temperature of the wine cellar (see anomalies table).
Thermostat safety indicator light
(1)
Your wine cellar is fitted with 2
thermostats. One is for regulation of
the temperature, the other being a
security in case the first one fails to
work.
This active security comes on as
soon as electricity is supplied to the
appliance (orange light on).
- The light must stay on. Your wine
cellar is functioning correctly when
the thermostat safety light (1) is on as
well as the regulating lights (3)
- If however only the orange light (1)
comes on, your wine cellar is opera-
ting in safety mode, guaranteeing the
maintenance of your wine at the
conservation temperature. In this
case, please refer to the paragraph
"Operational anomalies"
Humidity alarm indicator light (2)
- This light comes on when the
ambient humidity rate in your wine
cellar is too low.
- To maintain the required level of
humidity, you need to add water to
the
hydrating tray, situated at the bottom
of the unit.
Hydrating tray
- The role of the hydrating tray is to
keep water at a level that will maintain a high enough humidity rate in
the appliance and ensure that your
wine is correctly preserved
-If the humidity alarm light (2) comes
on whilst you are putting the unit into
service or during operation, add
some water to the tray.
Door lock (5)
- The lock fitted to your wine cellar
guarantees the protection of your
wines.
How to use your wine cellar
99634231_C.qxd 28/09/2004 09:07 Page 10
Page 11

11
Adjusting the temperature
Manipulating the thermostat
The appliance is always powered.
To adjust the temperature, set the
thermostat knob to the temperature
zone required (4).
The position on the left corresponds
to the least cold temperature, and turning the knob to the right will select a
colder temperature.
The green lights (3) to the left of the
knob allow you to control the temperature to which your cellar is set.
7° to 10° - Chilling for white wines
11° to 14° - Ideal temperature for
ageing wine
15° to 18° - For bringing wine to room
temperature
Prolonged opening of the door
will cause the internal temperature
to rise.
Adjusting the temperature
- When putting your appliance into
service, set the thermostat to a
medium position (ageing zone) 11°
to 14°
- 4 hours after putting your appliance
into service, or after any change in
the thermostat setting, observe the
temperature light (3) to make sure
that your wine cellar is at the temperature you want.
Adjust the thermostat if necessary.
The internal temperature of
your wine cellar is closely linked to the ambient temperature,
the frequency of opening its door,
and the quantity and the temperature of the bottles you have put in
your wine cellar.
You must therefore check the temperature indicator and adjust the
setting if necessary, as explained
above.
How to use your wine cellar
99634231_C.qxd 28/09/2004 09:07 Page 11
Page 12

12
Fan-cooled
Your appliance is fitted with an air
ventilation system:
- Fan-cooled: fans stir the air around
your wine cellar, creating greater
homogeneity of temperature and
avoiding the formation of condensation between the bottles.
- Apart from these everyday advantages, ventilation optimises the performance of your wine cellar during
extreme weather conditions
(e.g.: a heatwave)
To turn the fan-cooling on:
Press the "on" button.
The ventilator is not continuously
operating; its operation depends on
the internal temperature of the wine
cellar. There is therefore no cause for
concern if at a given moment the fancooling is not operating although the
button is correctly pressed down.
Aspiration d’air
Marche / arrêt
Storing your bottles of wine
The method of filling your wine cellar
depends on the model you have chosen and on the number of racks
used. The quantities given are only a
guide. The bottles used for the tests
are of the Bordeaux type: 290 mm
tall, 76,5 mm in diameter (type: syndical, lightweight, medium, optima).
The maximum load is 50 bottles for
wooden racks
The label located on the top of the
appliance shows the maximum
weight that may be placed on the
shelf.
For optimum filling of your wine
cellar, we recommend that you
stack your bottles starting from the
bottom racks.
The capacity of each rack depends
on the number of racks being used.
We advise the use of small wooden
blocks to hold your bottles securely in
place.
How to use your wine cellar
Air suction
ON/OFF
Distribution of air
99634231_C.qxd 28/09/2004 09:07 Page 12
Page 13

13
Typical storage with 5 racks =
155 bottles
Typical storage with 4 racks =
166 bottles
How to use your wine cellar
50 Bottles
50 Bottles
50 Bottles
50 Bottles
18 Bottles
18 Bottles
37 Bottles
15 Bottles
11 Bottles
11 Bottles
11 Bottles
99634231_C.qxd 28/09/2004 09:07 Page 13
Page 14

14
A maximum configuration of 9 racks
gives a capacity of 121 bottles.
Modular layout
Your wine cellar has been designed to make storing your bottles easy.
You can adjust its layout to suit your requirements.
You can buy extra racks from your dealer or from your after-sales service.
The front panel of each rack is intended to display identifying labels
These labels are delivered with the
instructions and are re-usable.
We advise you to write on them using
a 'B' or 'BB' pencil or a water-soluble
felt tip pen to write on them.
You can also buy more labels form
your dealer or after-sales service.
Wooden rack reference: 41X0550
How to use your wine cellar
8 x11 Bottles
15 Bottles
18 Bottles
99634231_C.qxd 28/09/2004 09:07 Page 14
Page 15

15
The Air Pur Pack - anti-odour
The "Air Pur Pack" uses a special gel
and an active carbon filter. It
enables neutralisation of odours and
purification of your wine cellar.
The cartridge has long-lasting action.
Putting it into service:
- Lift the cartridge to pull it out of its
casing
- Remove the plastic film
- Pull the slip to activate the gel
- Replace the cartridge in its casing in
your wine cellar
When to change the cartridge:
- When you no longer see any blue
gel at the front of the cartridge, you
should change it.
- You can obtain refills with the reference: 42X0087
- from your usual dealer
or from your after-sales service
(contact details are at the end of this
booklet)
How to use your wine cellar
PULL UPWARDS
SELF-ADHESIVE PAD
99634231_C.qxd 28/09/2004 09:07 Page 15
Page 16

16
- Disconnect your appliance
- Unscrew the bulb and replace with
another of the same type
(E14 - 15 W maximum.)
Cleaning your appliance
Disconnect your appliance
prior to carrying out any maintenance operation. Grasp the plug
directly, rather than pulling on the
electric lead.
Clean both the inside and the outside of your appliance with a bicarbonate of soda solution (1 dessertspoon of bicarbonate to 4 litres of
water).
Do not use alcohol, scouring powders or detergent, which could damage the surfaces.
Do not use a high-pressure steam
cleaner. The very hot steam could
damage the surfaces and the electrical circuits;
you would expose yourself to a risk
of electrocution.
Rinse with water, dry with a cloth.
Periodically check the condition of
the hydrating tray and clean it if
necessary.
Don't forget to clean the condenser,
which is at the back of the appliance,
from time to time (see section on
"Description of your appliance").
Use a dry paintbrush to do this,
or better yet, your vacuum cleaner.
Reconnect your appliance, and
adjust
the wine cellar thermostat if necessary, as shown in the section
"Adjusting the temperature".
Changing the lightbulb
Ongoing maintenance of your appliance
99634231_C.qxd 28/09/2004 09:07 Page 16
Page 17

17
Certain problems may appear when you are using your appliance. Before calling
the after-sales service, use this guide to see if you can resolve the problem yourself:
PROBLEM
Unusual noises
The wine cellar is not at
the right temperature
The wine cellar's light is
off
Your appliance is not
working
You have mislaid the key
for the lock
ADVICE
- check the adjustment of the feet of your appliance, and its stability
- check that it is not touching a wall
- check that all the movable parts (trays,
racks, etc...) are securely in place
- check that all the bottles you have placed in your
appliance are properly stacked
- check that the thermostat is correctly set as indica-
ted in the section on "Adjusting the temperature"
- if you have put a large quantity of bottles into
your wine cellar at once, wait
for the appliance temperature to stabilise before
re-adjusting the thermostat
- be careful not to open your appliance's door too
often, and not to leave it open
- check that your appliance is connected to the
electrical supply
- check that the circuit-breaker for your house has
not cut out, that the fuse has not blown or is not
unscrewed
- check that the bulb has not burnt out, and refer to
the section "Changing the lightbulb ".
- The door may have been left open. If the door is left
open (for more than a few minutes), a protection circuit
will automatically turn the light off. Lamp operation will
return to normal several minutes after the door is
closed.
- check that your appliance is connected to the
electrical supply
- check that the circuit-breaker for your house has
not cut out, that the fuse has not blown or is not
unscrewed
-You can obtain a new set of keys from your
dealer or from your after-sales service.
Troubleshooting
Operational anomalies
99634231_C.qxd 28/09/2004 09:07 Page 17
Page 18

18
Orange light on
-alone
-flashing green light on left
-flashing green light on right
-3 green flashing lights
-yellow light on and 1 green light on
Green, orange and yellow lights off
Call after-sales service
Safety Mode
X
X
X
X
X
X
Anomalies
NOISE
Buzzing
Gargling or slight
buzzing
Clicks
Slight background noise
CAUSE
Coming from the motor. This buzzing may briefly
be louder when the motor starts
Coming from circulation of the cooling fluid in the
pipes of your wine cellar
These can always be heard when the thermostat
turns the motor on or off
Your appliance is fitted with a fan, and the air circulating inside the appliance makes a slight background noise.
Abnormal operational noise
Operational anomalies
- The temperature regulation of
your wine cellar is faulty. The
wine cellar is operating in safety
mode, which guarantees maintenance of the temperature.
- The regulation has detected an
anomaly on one of the temperature probes. The wine cellar is operating in safety mode, which guarantees maintenance of the temperature.
- Wait for the temperature to stabilise.
- Check the hydrating tray:
If it contains water, there is not
a problem. This phenomenon
can periodically appear, depending on the prevailing humidity
rate and the ambient temperature.
If there is no water, add some.
- Check the electrical supply to
your appliance.
99634231_C.qxd 28/09/2004 09:07 Page 18
Page 19

19
After-sales service
Any repairs made to your appliance must be carried out by a brand-approved
qualified professional.
When you call, mention the complete references for your appliance (model, type,
and serial number).
This information appears on the identification plate situated on the inside of your
appliance, low down on the left wall.
When you have your appliance repaired, Ask for only CERTIFIED
ORIGINAL PARTS to be used.
Consumer Services
99634231_C.qxd 28/09/2004 09:07 Page 19
 Loading...