

Page 1
INSTRUCTIONS FOR USE
Dishwasher
Page 2

2
Dear Customer,
You have just acquired a
DDEE DDIIEETTRRIICCHH
dishwasher and we would like to thank you.
Our research teams have created this new generation of appliances for you. Their quality, design, features and technological advances make them exceptional products, and
reveal our unique know-how.
Your new
DDEE DDIIEETTRRIICCHH
dishwasher will blend harmoniously into your kitchen and will
perfectly combine washing and drying performance and ease of use. We wanted to offer
you a product of excellence.
In the
DDEE DDIIEETTRRIICCHH
product range, you will also find a wide choice of hobs, ovens,
microwaves, hoods, cookers, fridges, freezers, that you can coordinate with your new
DDEE
DDIIEETTRRIICCHH
dishwasher.
Visit our website
wwwwww..ddeeddiieettrriicchh--eelleeccttrroommeennaaggeerr..ccoomm
, where you will find our latest inno-
vations as well as useful and complementary information.
DDEE DDIIEETTRRIICCHH
Setting New Values
As part of our commitment to constantly improving our products, we reserve the right to
make changes to them based on technical advances to their technical and functional features and appearance.
WWaarrnniinngg ::
BBeeffoorree iinnssttaalllliinngg aanndd uussiinngg yyoouurr aapppplliiaannccee,, pplleeaassee ccaarreeffuullllyy rreeaadd tthhiiss GGuuiiddee
ttoo IInnssttaallllaattiioonn aanndd UUssee,, wwhhiicchh wwiillll aallllooww yyoouu ttoo qquuiicckkllyy ffaammiilliiaarriissee yyoouurrsseellff wwiitthh iittss
ooppeerraattiioonn..
Page 3

3
CONTENTS
1/ FOR THE USER’S ATTENTION
• Safety instructions ______________________________________ 4
• Protection of the environment______________________________ 5
• Economical, environmentally friendly washing ________________ 5
2/ DESCRIPTION OF YOUR APPLIANCE
• General presentation of the dishwasher ____________________ 6
• Presentation of the control panel __________________________ 7
3/ INFORMATION ______________________________________________ 8
4/ WHAT TO DO BEFORE FIRST USING THE MACHINE
• Measure the water hardness and select the type of detergent __ 9
• Hardness table__________________________________________ 9
5/ DETERGENT PRODUCTS AND ADJUSTING THE WATER SOFTENER
• For traditional products __________________________________ 10
•
For multi-purpose products
________________________________ 11
6/ LOADING OF REGENERATING SALT __________________________ 12
7/ LOADING OF RINSING PRODUCT ____________________________ 13
8/ YOUR DISHWASHER’S EQUIPMENT
• The lower basket ________________________________________ 14
• The upper basket ________________________________________ 15
• The cutlery basket ______________________________________ 16
9/ YOUR DISHWASHER’S SAFETY SYSTEMS ______________________ 17
10/ WASHING PROGRAMMES TABLE ____________________________ 18
11/ PROGRAMMING __________________________________________ 20
12/ CLEANING YOUR APPLIANCE
• Cleaning the waste filters ________________________________ 22
13/ IF OPERATING ABNORMALITIES OCCUR______________________ 24
14/
AFTER-SALES SERVICE ____________________________________ 29
INDICATIONS FOR THE TESTING LABORATORIES ______________ 30
EN4EN
Page 4

1/ FOR THE USER’S ATTENTION
Important :
Keep this user’s manual with your appliance. If the appliance is sold or transferred to
someone else, ensure that the manual is with
it. Please take note of these instructions
before installing and using your appliance.
They have been drawn up for your own and
other people’s safety.
• SAFETY INSTRUCTIONS
• Installation
— When you receive your appliance, unpack it
or have it unpacked immediately. Check that it
has not suffered any damage during transport.
Express any reservations in writing on the
delivery note, of which you keep a copy. Never
connect up a damaged machine. If your appliance is damaged, please contact your dealer.
— Before proceeding to connect up your
machine, please refer to the instructions in
your Installation Guide.
— Your dishwasher must be kept disconnected
from the mains supply throughout the whole
of the installation process.
— The electrical connection details on your
appliance’s description plate must comply
with those for the mains supply.
— The socket must still be accessible once
your appliance has been installed.
— Do not alter or attempt to alter the appliance’s characteristics. This could put you at
risk.
— If your installation has to be altered, only
entrust the electrical and plumbing work to a
qualified electrician or plumber respectively.
— Your appliance is designed for normal
domestic use. Do not use it for industrial or
commercial purposes or for any other purpose
than that for which it has been designed.
— The dishwasher’s walls must not be pierced
under any circumstances.
• Children’s safety
— This appliance is not intended for use by
young children or infirm persons unless they
have been adequately supervised by a responsible person to ensure that they can use the
appliance safely.
— This appliance must only be used by adults.
Ensure that children do not touch it and do not
use it as a toy. Ensure that they do not operate
the appliance’s controls.
— Keep young children away from the appliance when it is operating.
— Detergents contain irritant and abrasive substances. These products can have caustic
effects on the eyes, the mouth or the throat.
They can be extremely dangerous if ingested.
Avoid any contact with the skin and the eyes.
Ensure that the appliance’s detergent container is empty at the end of the washing cycle.
— Place detergents out of children’s reach and
do not put any detergent in the machine until
just before you start the washing programme.
— The water in your dishwasher is not drinking
water; this is why children must not go near
the appliance when its door is open.
— Do not let your children play or sit on the
door when it is open.
— Once you have unpacked your appliance,
place the packaging out of children’s reach.
— Keep all the packaging materials (e.g. plastic
bags, polystyrene, etc.) out of children’s reach
because they can be dangerous for children
(ie. risk of suffocation).
• Use
— This appliance is not intended for use by persons (including children) with reduced physical, sensory or mental capabilities, or lack of
experience and knowledge, unless they have
been given supervision or instruction concerning use of the appliance by a person responsible for their safety.
— When machine is running, do not open door.
This may provoke steam leakage or splattering
of water.
Page 5

5
EN
1/ FOR THE USER’S ATTENTION
— Only use products specially designed for your dishwasher (water softening salt, detergent and
rinsing products).
— As far as possible, avoid opening the dishwasher’s door when it is operating, and in particular
during the heating phases, because scalding steam may escape or you may be splashed with hot
water. The machine is fitted
with a safety system that immediately blocks the dishwasher’s operation if the door is opened.
— Never use chemical solvents in your appliance because these could cause an explosion.
— Always close your appliance’s door after loading or removing your items.
— Do not lean or sit on your appliance’s door when it is open.
— You are strongly advised to disconnect the machine after use and turn off the water supply.
— Unplug your machine before carrying out any technical work on it.
— Avoid placing your machine immediately next to a cooking or heating appliance to prevent any
risk of heat damage;
— Do not place any items in your machine, which are not certified as dishwasher safe.
— If you have removed an item before the end of the washing programme, it is important to rinse it
carefully to remove any residual washing products.
— If your appliance breaks down, never attempt to repair it yourself. Any repairs made by non-qualified personnel can cause significant damage or lack of control.
— The machine complies with applicable safety regulations. Any repairs should be carried out by
qualified technicians. Repairs or changes that do not conform may be dangerous for the users. In
case of replacement, only use original parts.
— If the machine malfunctions due to other causes than those mentioned in this booklet, disconnect
the machine (remove the plug) or break the circuit concerned and contact after-sales service.
•
ENVIRONMENTAL PROTECTION
This appliance’s packaging material is recyclable. Help recycle it and protect the environment by
dropping it off in the municipal receptacles provided for this purpose.
Your appliance also contains a great amount of recyclable material. It is marked with this
label to indicate that in countries that are a members of the European Union the used
appliances should not be mixed with other waste. This way, the appliance recycling orga-
nised by your manufacturer will be done under the best possible conditions, in compliance
with European Directive 2002/96/EC on Waste Electrical and Electronic Equipment. Contact your
town hall or your retailer for the used appliance collection points closest to your home.
We thank you doing your part to protect the environment.
• ECONOMICAL, ENVIRONMENTALLY FRIENDLY WASHING
— Remove any food residue from your crockery (bones, pips, etc.)
— Do not pre-wash your items by hand (useless waste of water).
— Utilise your dishwasher’s capabilities to the full for an economical, environmentally friendly wash.
— Always select a washing programme suitable for the crockery type and how dirty they are.
— Avoid overdosing with detergent, regenerating salt and rinsing liquid. Follow the recommendations in this guide (pages 9-10-11 and the instructions on the product packs.
— Ensure that the water softener is correctly set (see pages 10-11).
Page 6
6
EN
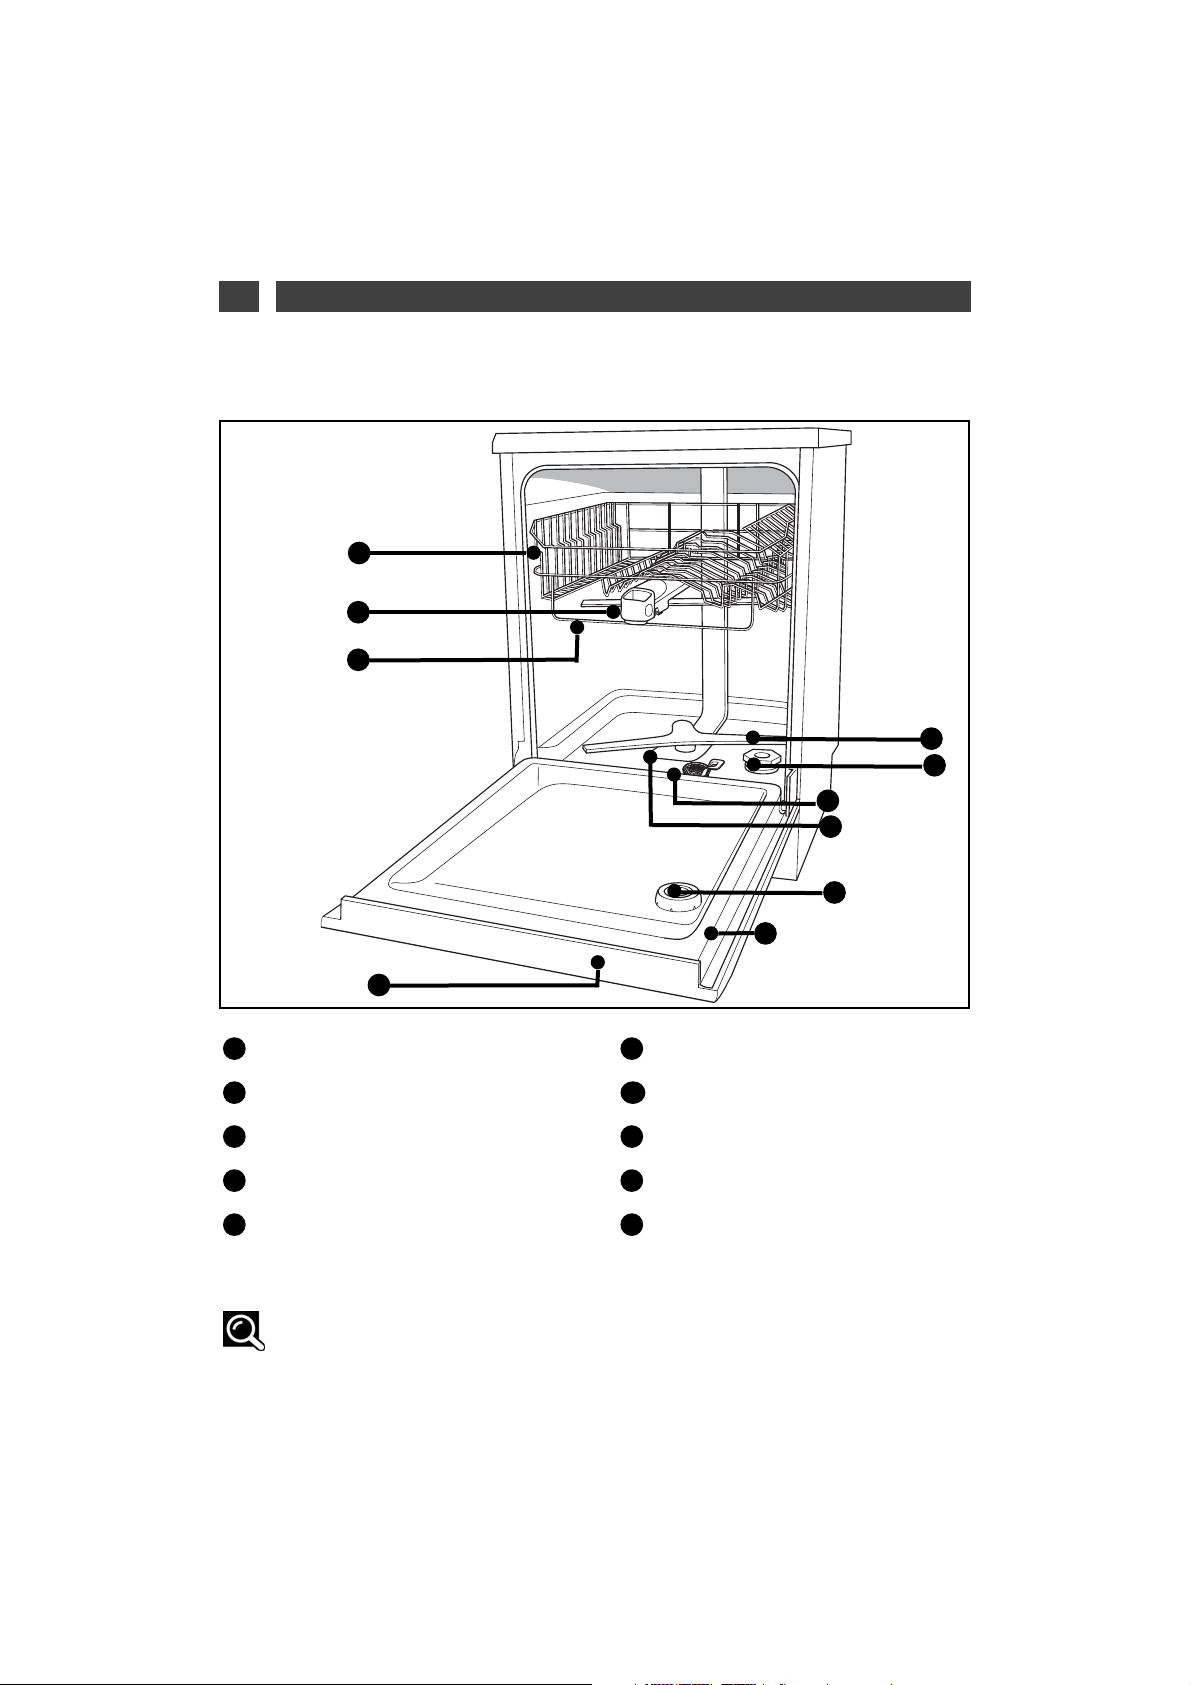
2/ DESCRIPTION OF YOUR APPLIANCE
Control panel
Upper basket
Washing products dispenser
Anti-blocking gauge wire
Lower sprinkler arm
Regenerating salt tank
Waste filter
Main filter
Rinsing product dispenser
Description plate (After-Sales
Ref)
JJ
II
HH
GG
FF
EE
DD
CC
BB
AA
• GENERAL PRESENTATION OF THE DISHWASHER
Advice :
This user’s guide is applicable to several models. There may be some slight differences
in the details and the equipment between your appliance and the descriptions provided here.
Fig. 01
BB
CC
DD
EE
FF
GG
HH
II
JJ
AA
Page 7
7
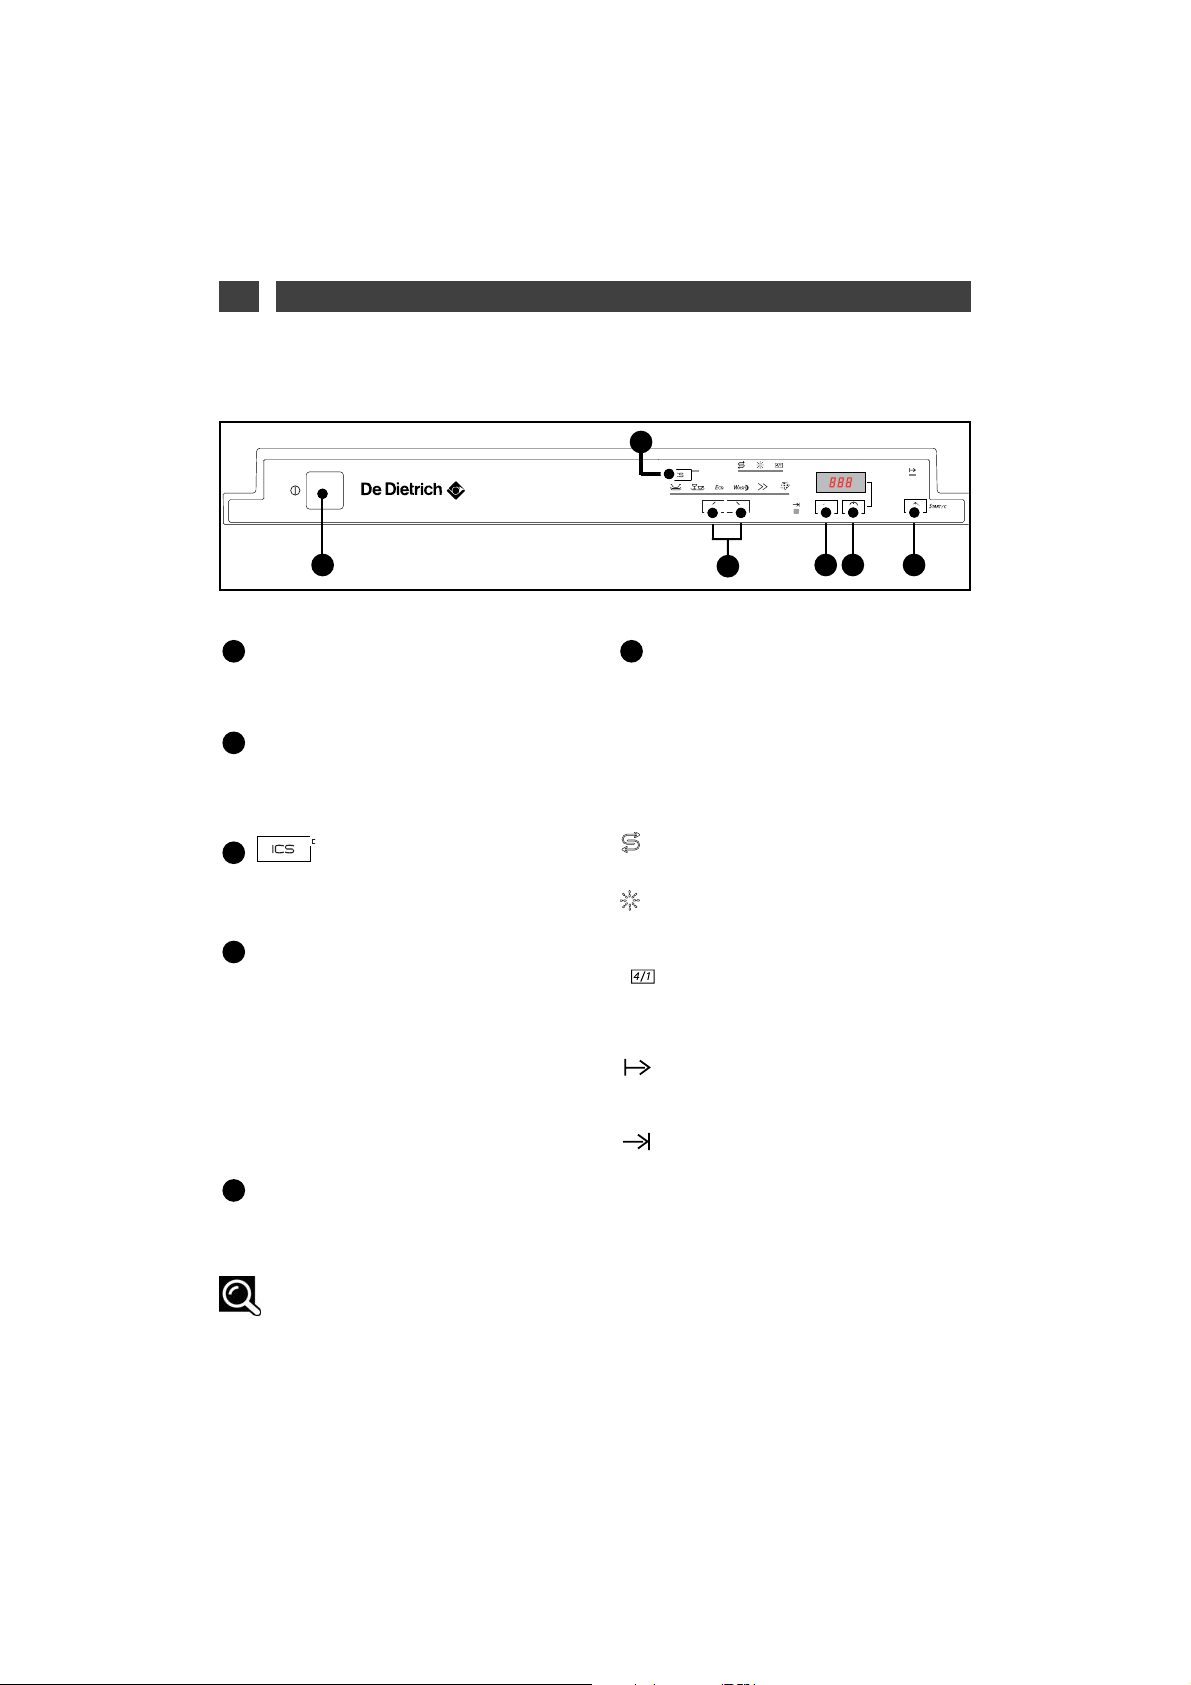
2/ DESCRIPTION OF YOUR APPLIANCE
EN
On/ Off :
Press this button to start your dishwasher :
the screen lights up.
Choosing a programme:
briefly
press one button or the other in succession to
select your programme.
:
IInntteelllliiggeenntt CCoonnttrrooll SSyysstteemm
press this button to select the Automatic programme.
Set :
•
Set the water softerner.
(See 5/ Detergent products and setting the
water softener).
- Activate or deactivate use of “regenerating
salt”, “rinsing product” or “4-in-1” (depending
on the water softener setting on the next page).
•
Setting the audible signal.
(See 11/ Programming).
Delayed programme start
Press this button to delay the programme by 1
to 12 hours.
Start / C :
Briefly press this button to
start your programme.
If you make an error, to cancel a selection or
cancel a programme while it is running, hold
down this button for 3 seconds.
The indicator lights :
SSaalltt
:
lit; indicates lack of regenerating salt.
Rinsing liquid:
lit; indicates lack of rinsing product.
washing product:
lit; indicates that your dishwasher is set to use
“2, 3 4-in-1” pellets.
In progress
lit; indicates that your programme is running.
End :
lit; indicates that your programme has finished
FF
EE
DD
CC
BB
AA
Advice :
A short audible signal (beep) confirm the button’s selection, except for the “On/Off” button.
(See 10/ Washing Programmes).
• PRESENTATION OF THE CONTROL PANEL
Fig. 02
AA DD EE FF
CC
BB
Page 8
8
3/ INFORMATIONS
EN
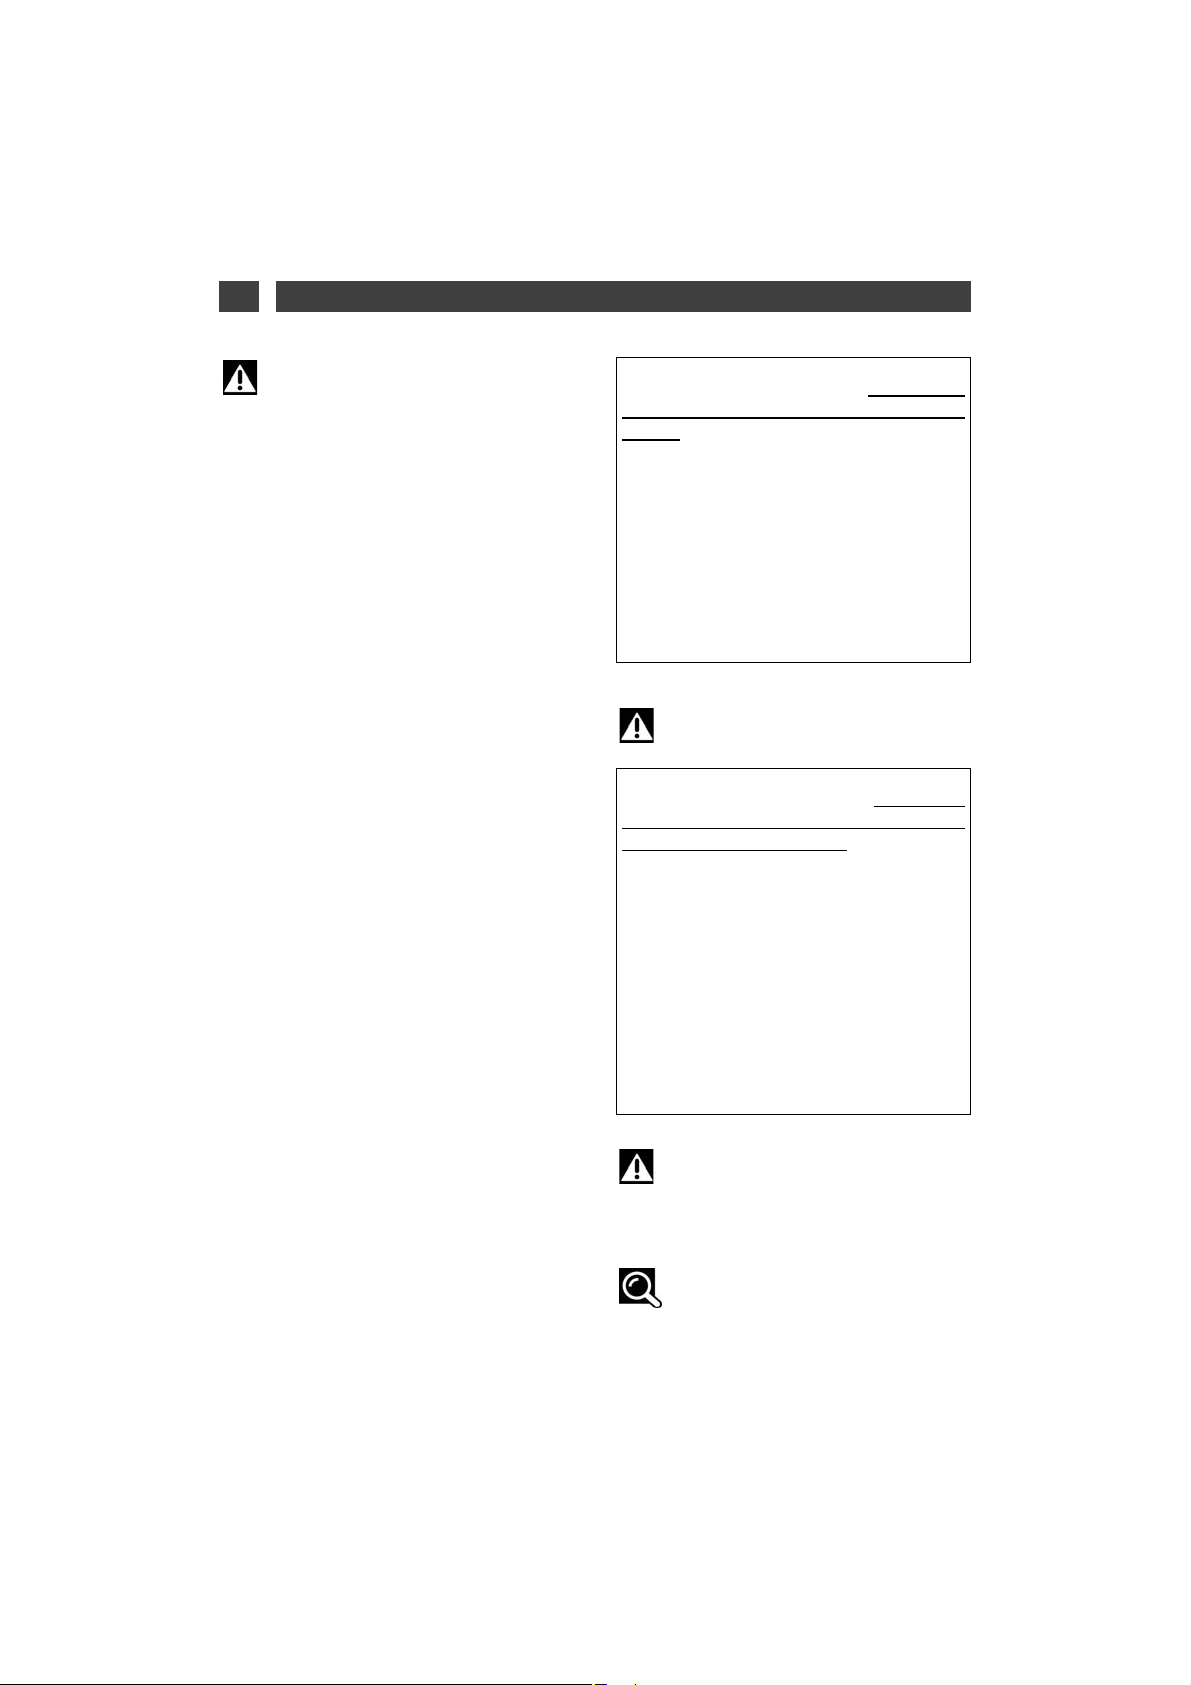
Important:
For your dishwasher to provide impeccable washing and drying results with no
marks, you must set it correctly using the
water softening system, which uses regenerating salt.
•
THE WATER HARDNESS
•
Lime:
rainwater filtering through the
ground picks up mineral salts; some minerals
are found in solid form commonly termed
lime. This reduces the washing detergent’s
performance, furs up the dishwasher and leaves white marks on the crockery.
The more lime there is in the water, the more the
water is called “hard”.
Use the most suitable products for the level of
water hardness in your town.
There are several types of products; how to
choose:
For impeccable results, preferably
use a combination of traditional products:
①①
Washing detergent
to clean the
crockery perfectly (powder, liquid or standard tablets).
②②
Regenerating salt
to enable your dishwasher’s water softener to operate correctly.
③③
Rinsing liquid
to assist drying and to
eliminate marks from water droplets.
Important:
Never use washing-up liquid.
For ease of use and only in certain
water hardness conditions < 25°F,
multi-purpose products
may make the
use of rinsing liquid or salt unnecessary.
• “Two-in-one” products
contain
detergents, rinsing liquid or an agent acting
as the salt.
• “Three-in-one” products
contain
detergents, rinsing liquid and an agent acting
as the salt.
• “Four-in-one” products
also
contain additives that prevent wear on poor
quality glasses and /or prevent the risks of
the stainless steel corroding.
Important:
Follow the instructions for using the
multi-purpose product and the recommendations on the pack.
NB:
If in any doubt, please contact the
detergent manufacturer if the crockery is
very wet at the end of the programme or if
chalky deposits appear.
Page 9
9
4/ ACTIONS BEFORE FIRST USE
EN
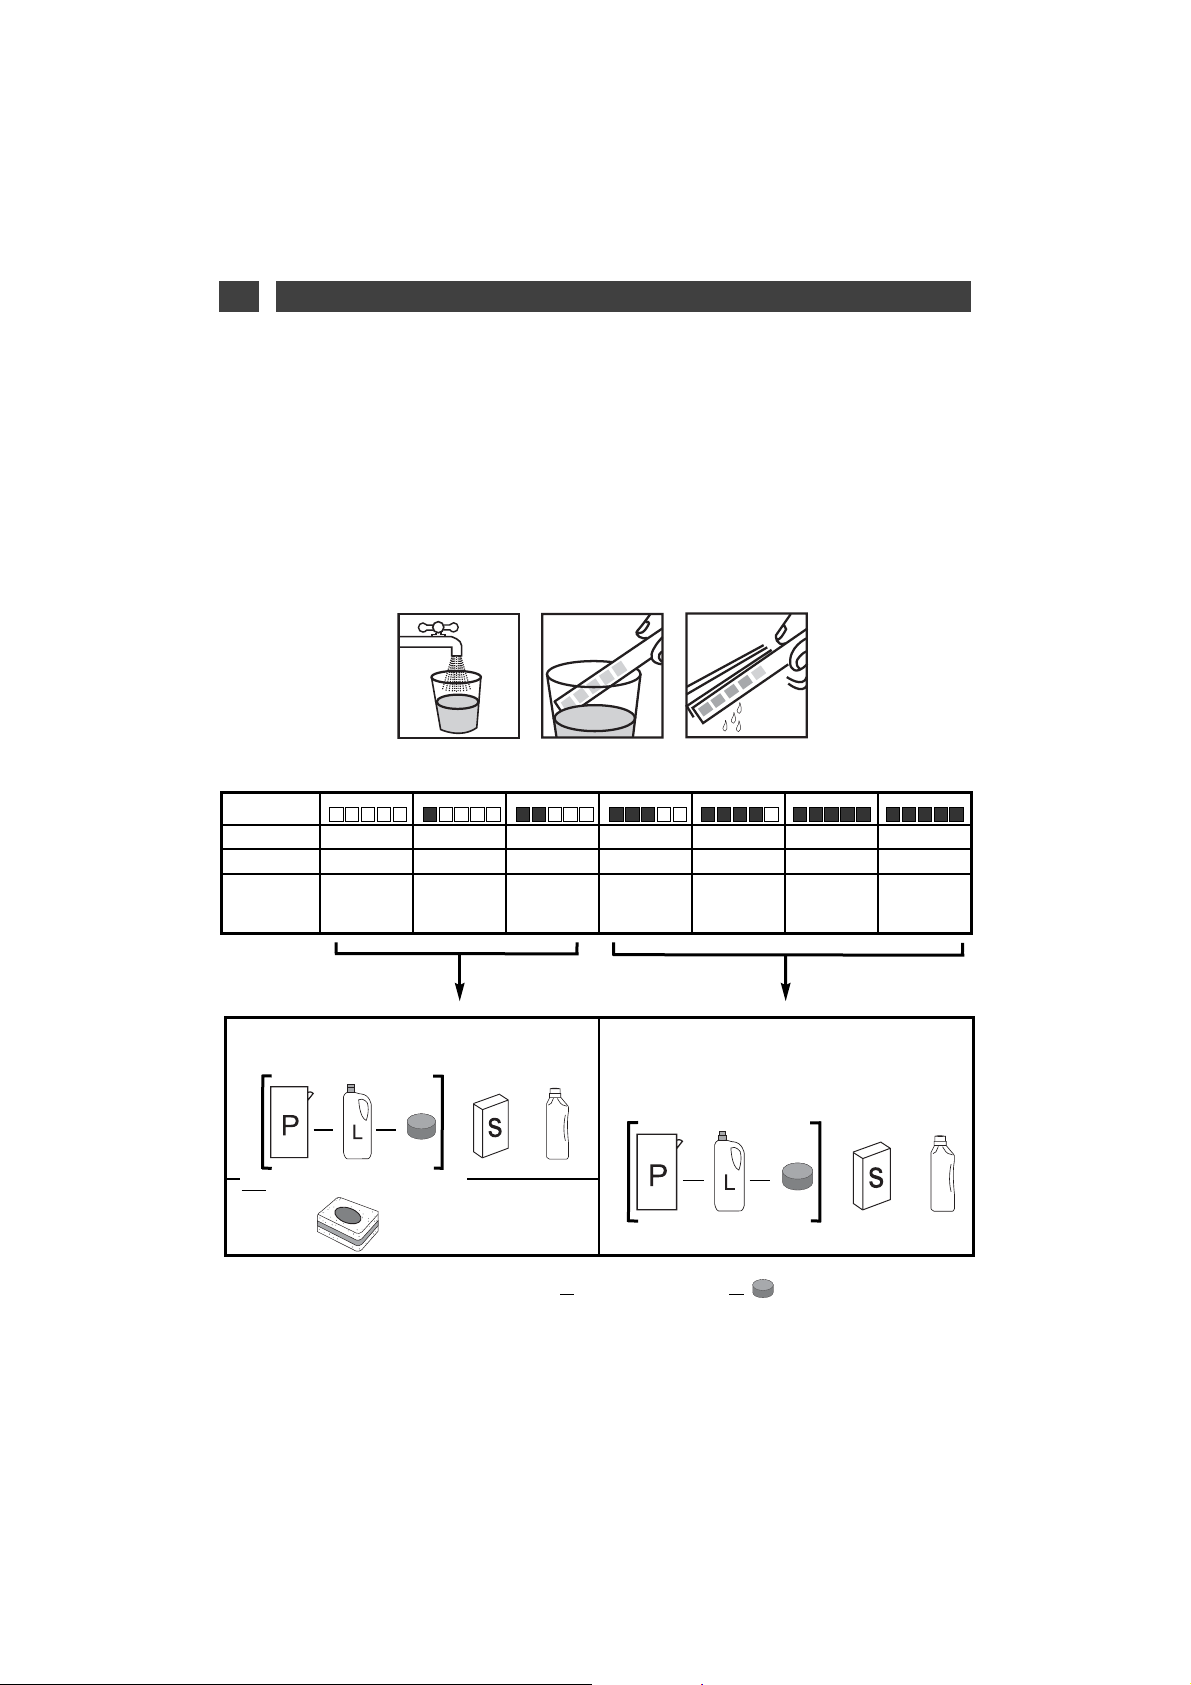
In one simple action, you can test the your water’s lime content using the testing strip supplied with
your dishwasher. Alternatively, contact your local water utility to ascertain your water’s hardness.
— Let the water run from the tap for a few moments.
— Fill a glass with water.
— Take the test strip from its holder and immerse it for 3 seconds.
— Wait 1 minute, shake it and look at the colours to ascertain your water’s hardness.
• MEASURE THE WATER HARDNESS AND SELECT THE TYPE OF DETERGENT: TRADITIONAL OR MULTI-PURPOSE
• HARDNESS TABLE
TTeesstt ssttrriipp
HHaarrddnneessss
0-10°F 10-18°F 18-25°F 25-40°F 40-55°F 55-70°F
> 70°F
WWaatteerr
Soft
Slightly hard Slightly hard
Hard Hard Hard
Very hard
WWaatteerr ssooffttee--
nniinngg aanndd uussee
ooff ssaalltt
Optional
Essential if
using traditional
products
Essential if
using traditional
products
Mandatory Mandatory Mandatory Mandatory
Possible use of
traditional products
➊
Use only of
traditional products
➊
+
oorr oorr
oorr
➋ Multi-purpose
+
➊
TTrraaddiittiioonnaall pprroodduuccttss:: PP: PP
owder detergent orLL: LLiquid detergent or single tablet
+ SS: Regenerating SSalt + RR: RRinsing product
➋
MMuullttii--ppuurrppoossee pprroodduuccttss::
Multi-purpose tablets
R
+
oorr oorr
+
R
Page 10
10
5/ DETERGENT PRODUCTS AND SETTING THE WATER SOFTENER
EN
• FOR TRADITIONAL PRODUCTS
Important:
It is very important to set your water softener correctly.
- If the setting is too low, there is a risk of chalky marks
- If the setting is too high, there is the risk of the glasses becoming cloudy
If you move house, re-adjust the setting on your water softener.
• Traditional tablets
Place tablets that are not multi-purpose in the external compartment (Fig 04)
or, for optimum operation, pull out the distributor’s drawer and lay the tablet there. (Fig 05)
• Powder or liquid in the distributor’s drawer (Fig 03)
Fill at least up to the minimum mark for slightly dirty crockery and up to the maximum mark for dirty
crockery. If the crockery is very dirty or for programmes with pre-wash, we recommend that you
add 5g of detergent (a dessertspoonful) to the tub in accordance with the programmes table.
Important:
Keep these products in a dry place, out of children’s reach.
Only use products specially designed for dishwashers.
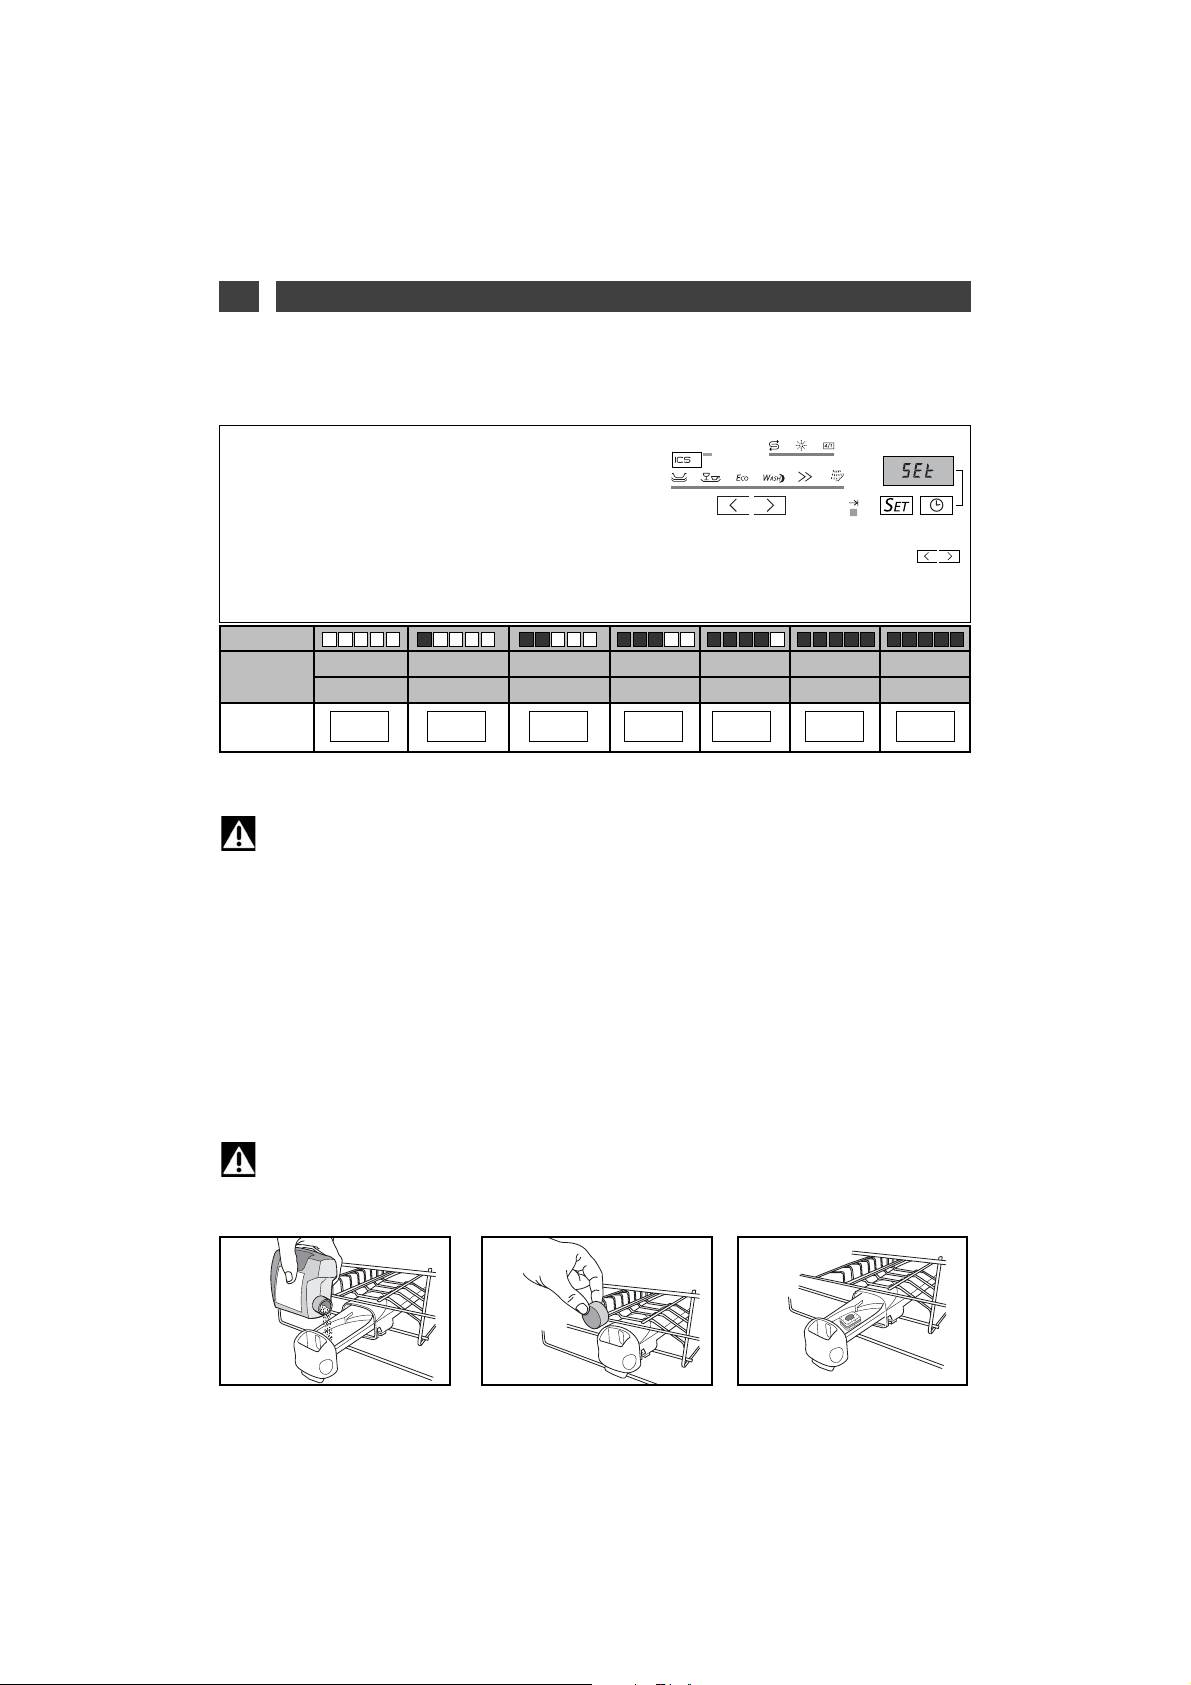
•
Your appliance must be specially set to use traditional products
.
• Proceed as follows to adjust the water softener on the control panel:
— Access setting mode by holding down the “Set ” button
until you hear a double audible signal (long beep).
— The screen displays “SEt” to indicate that you are in
Setting mode.
— To adjust and alter the setting to suit the water hardness, keep on briefly pressing one of the
keys or the other. The screen shows you the setting H0, H1, H2 etc...
— The setting is validated automatically after 10 seconds if the
“Set”
button in not pressed again.
Fig. 04 Fig. 05Fig. 03
Factory setting: H4.
TTeessttiinngg ssttrriipp
HHaarrddnneessss
0-10°F 10-18°F 18-25°F
25-40°F
40-55°F 55-70°F > 70°F
0-1mmol/l 1-1.8 mmol/l
1.8-2.5 mmol/l
2.5-4 mmol/l
4-5.5 mmol/l 5.5-7 mmol/l
> 7
mmol/l
TTrraaddiittiioonnaall
pprroodduucctt
HIH0 H2 H3 H4 H5 H6
Page 11

11
5/ DETERGENT PRODUCTS AND SETTING THE WATER SOFTENER
EN
• FOR MULTI-PURPOSE PRODUCTS: OPTION
• Proceed as follows to adjust the water softener on the control panel:
— Access setting mode by holding down the “Set ” button
until you hear a double audible signal (long beep).
— The screen displays “SEt” to indicate that you are in
Setting mode.
—
TToo uussee mmuullttii--ppuurrppoossee ttaabblleettss,, yyoouu mmuusstt sseelleecctt sseettttiinngg
HH00
oorr
HH II
oorr
HH22
,, ddeeppeennddiinngg oonn tthhee wwaatteerr hhaarrdd--
nneessss..
To do this, keep on briefly pressing one or other of the
keys until you reach the desired
setting.
• Proceed to set the option, if necessary
: (light off) deactivates the "TABS" function.
: (light on) activates the "TABS" function with the setting "
EExxttrraa DDrryy
".
: (flashing light) activates the "TABS" function with the setting "
SSppaarrkklliinngg CClleeaann
". .
— The setting is validated automatically after 10 seconds if the
“Set”
button in not pressed again.
• Your appliance can be specially set to use multi-purpose if the water hardness is < 25°F or < à 2,5 mmo/l.
Advice:
To provide better coverage of the wide range of multi-purpose products available, your
dishwasher’s “4-in-1” option has two possible settings, accessible via the “Set” button.
“Extra Dry”
improves the drying results in the event of reduced performance from the
“2-in-1”, “3-in-1”
or “4-in-1” types of multi-purpose product.
“Sparkling Clean”
enables you to prioritise the sparkle of your crockery whatever the type of
multi-purpose product used.
Important :
The multi-purpose products setting enables you to deactivate the salt warning lights only
on
H
0
and “4-in-1”.
• Loading the multi-purpose tablet dispenser
To assist in loading the detergent, the distributor is situated on the front of the upper basket. It is
compatible with all the products recommended for dishwashers.
• Place the tablet
in the external compartment (Fig 04 on previous page) or, for optimum
results, pull out the distributor’s drawer and lay the tablet inside
(Fig 05 on previous page).
- Close the dispenser.
TTeessttiinngg ssttrriipp
HHaarrddnneessss
0-10°F 10-18°F 18-25°F
00--11 mmmmooll//ll 11--11..88 mmmmooll//ll
11..88--22..55 mmmmooll//ll
FFuunnccttiioonn DDeeaaccttiivvaatteedd
MMuullttii--ppuurrppoossee pprroodduuccttss
““SSppaarrkklliinngg CClleeaann””
MMuullttii--ppuurrppoossee pprroo--
dduuccttss ““
EExxttrraa DDrryy””
H0
H0
H0
H0
H0
H0
H0
H0
H0
Page 12

12
6/
LOADING THE REGENERATING SALT
EN
EAU
SEL
AA
BB
CC
Fig. 06
•
Loading the regenerating salt
(Fig. 06)
Important :
Only use special dishwasher regenerating salt. Do not use table salt or any type
of cooking salt: this could damage your
appliance’s water softener.
Unscrew and remove the stopper on the
salt tank.
Fill the tank with
rreeggeenneerraattiinngg ssaalltt
spe-
cially designed for dishwashers.
Use the funnel supplied with your dishwasher. The first time, top up with water up
to the rim of the tank.
•
Regenerating salt indicator :
This illuminates when salt must be added.
After the tank has been filled with regenerating salt, the indicator light may remain lit until
the salt has dissolved sufficiently, usually after
one cycle (of if the tank has not been filled
completely; for example, when first putting the
machine into service using the sample).
This can be deactivated as indicated in the
paragraph “For multi-purpose products” setting table.
Important :
If the salt overflows when filling the
tank, to avoid oxidization of the tub it is
advisable to remove the salt crystals or to
run a Soaking programme.
CC
BB
AA
Page 13

13
7/
LOADING THE RINSING PRODUCT
EN
Adjustment lever
Fig. 07
AA
BB
CC
• The rinsing product (Fig. 07)
Important:
Use a special dishwasher rinsing product;
this will give you dry, sparkling crockery.
Before switching on the appliance, fill
the rinsing product container until the level is
flush with the top of the setting lever.
Adjust, if necessary; the original setting is 2. If
you experience poor drying or residual marks
after a few cycles, increase the setting by turning
the lever (fig 07 : marking 3 to increase it)
• Checking the level of rinsing liquid
:
This lights when rinsing liquid must be added.
It can be deactivated as shown in the paragraph “For multi-purpose products” setting
table.
Important:
If any rinsing liquid overflows onto the
door when filling the container, sponge away
the excess to avoid foam forming.
CC
BBAA
3
2
1
2
1
3
Page 14

14
8/ YOUR DISHWASHER’S EQUIPMENT
EN
Fig. 09
Very important :
Items not suitable for washing in a dishwasher
- Wooden cutting boards,
- Stainless steel utensils or plastic utensils that are not heat-resistant,
- Copper or pewter items,
- Glued crockery and cutlery,
- Cutlery with wooden, horn or mother-of-pearl handles,
- Antique or hand-painted porcelain.
When purchasing crockery, glasses or cutlery, ensure that it is dishwasher-safe.
• THE LOWER BASKET
Arrange your items so that the water can circulate freely and spray over all the utensils.
Place large diameter dishes and pans at the
sides.
Do not intersperse, jam together or superimpose flat plates and concave dishes (Fig. 08).
The folding spikes make it easier to arrange
your large dishes (Fig. 09) (depending on the
model).
Advice :
When you re-insert the lower basket,
ensure that nothing catches on the upper
basket’s gauge wire to avoid blocking the
rotor.
Unloading your items
First of all empty the lower basket to avoid
drips from the upper basket falling onto the
lower basket.
Fig. 08
Page 15

15
8/ YOUR DISHWASHER’S EQUIPMENT
EN
Fig. 11
Fig. 10
• THE UPPER BASKET
This basket is particularly designed to take:
glasses, cups, ramekins, small salad bowls,
bowls, saucers, etc...
Arrange your items methodically to save on
space (arranging glasses, cups or bowls
together, etc.)
You can also arrange cups, ladles, etc. on the
retractable supports (Fig. 10)
Advice :
Position the cavities of glasses, cups
or bowls facing downwards.
Cutlery basket
• Adjusting the height of the upper
basket
(depending on the model)
For large dishes to be loaded in the lower basket, the upper basket must be set in to high
position. This can be done with the basket
fully loaded (Fig. 11)
①①
Setting in HIGH POSITION :
Gently raise your basket on each side until it
engages.
②②
Setting in LOW POSITION :
Raise your basket completely on both sides to
unlock it and then lower it to the low position.
Important :
Check that the two slides are set to the
same height and the basket is horizontal.
Page 16

16
8/ YOUR DISHWASHER’S EQUIPMENT
EN
Fig. 13
• THE CUTLERY BASKET
The cutlery basket slides to allow for modulable loading.
It can be placed anywhere in the lower basket.
You can therefore make a variety of loads
depending on the items (Fig. 12).
If your cutlery items or your dishes are too
large, alter the height setting for the upper
basket (if it can be adjusted, depending on the
model).
Movable grills are available for if you wish to
load your cutlery in an orderly manner
(Fig.
13).
For optimum washing and drying, use these
separation grills partially or totally.
Point the handles on the cutlery downwards.
Important :
For safety reasons, we recommend
that you place knives with pointed ends with
the point facing downwards in the cutlery
basket (to avoid the risk of an accident).
Long-bladed knives and other sharp kitchen
utensils must be placed flat in the upper basket.
Avoid washing cutlery with horn handles in
your dishwasher.
Separate silverware from other metals using
the separation grill.
Fig. 12
Page 17

17
9/ THE DISHWASHER’S SAFETY SYSTEMS
EN
•
Door not closed properly
The light flashes when the door is open or not closed properly.
•
Anti-overflow system
This system automatically activates the drain pump if the water level in the tub reaches an abnormal height.
•
Anti-leak system
This system interrupts the water supply if a leak is detected under the appliance.
•
Total safety
This supply pipe is fitted with a device to cut off the water supply directly at the tap if there is a leak.
•
If an anomaly occurs
The “End” light flashes rapidly.
The screen shows the anomaly code: please refer to the table on page 24.
Page 18

18
10/ WASHING PROGRAMMES
EN
These values refer:
- to normal usage conditions with separated products (detergents, salt, rinsing product).
- only to multifunction product usage conditions
They may vary depending on the load, the water temperature, the softener setting, the presence of
rinsing product and the supply voltage.
120’
- 140’
14,5
- 16,5 l.
1,7
- 1,8 kWh
90’
- 120’
14,5
- 16,5 l.
1,5
- 1,6 kWh
130’
- 150’
14,5
- 16,5 l.
1,3
- 1,4 kWh
IInntteennssiivv
Drying
Resistant
VVeerryy ddiirrttyy
large dishes and
pans, with baked
on residue, grease,
cooked cheese,
sauce, etc.
TTyyppee ooff iitteemmss::
-- ppoorrcceellaaiinn,, ppaannss,,
ccuuttlleerryy,, ggllaasssseess,,
eettcc..
QQuuaannttiittyy,, ttyyppee aanndd
aammoouunntt ooff ffoooodd
rreessiidduuee..
PPrrooggrraammmmeess
PPrrooggrraammmmee
sseeqquueennccee
AAss aann iinnddiiccaattiioonn
oonnllyy::
DDuurraattiioonn iinn mmiinn..
WWaatteerr ((ll..))
EEnneerrggyy ((kkWWhh))
Hot rinse
Drying
Hot rinse
Mixed
Rinse
Rinse
Washing at 70°C
Washing at 55°C
Hot pre-wash
****
NNoorrmmaallllyy ddiirrttyy
Washing at low
temperature,
economical and
particularly
suitable for
compact –
enzymatic
detergents
NNoorrmmaall
Drying
Mixed
NNoorrmmaallllyy ddiirrttyy,,
i.e. a
normal amount of
sticky and greasy
residue.
Hot rinse
Rinse
Washing at 65°C
Pre-wash
Pre-wash
• PROGRAMMES TABLE
Page 19

19
10/ WASHING PROGRAMMES
EN
100’
- 130’
14,5
- 16,5 l.
1,4
- 1,6 kWh
160’
- 165’
12
- 14 l.
1,05
- 1,30 kWh
30’
11 l.
0,8
kWh
15’
4,5 l.
0,02
kWh
Mixed
Mixed
Drying
NNoorrmmaallllyy ddiirrttyy,,
i.e. a
normal amount of
sticky and greasy
residue. A longer
programme
because it saves on
energy.
Hot rinse
drying
VVeerryy sshhoorrtt 3300--
mmiinnuuttee
wash
specially designed
for a small amount
of daily items with a
limited amount of
non-greasy residue,
not dried on
Hot rinse 60°C
Mixed
SSooaakk
Very short cycle
(with no
detergent) for rins-
ing and
re-dampening the
items while
waiting for a wash
expected the fol-
lowing day or even
the day after
Rinse
Rinse
Washing at 50°C
Washing at 45°C
**
RRaappiidd
Mixed
Drying
Hot rinse
Rinse
Washing at
55/65°C
II
nntteelllliiggeenntt
CC
oonnttrrooll
SS
yysstteemm
AAuuttoommaattiicc
ddeetteeccttiioonn ooff tthhee
aammoouunntt ooff rreessiidduuee..
Optimises the
results and
prioritises
energy savings.
Pre-wash
Pre-wash
Recommended programme:
**
EN50242
****
IEC 436/DIN 44990
Page 20

20
11/ PROGRAMMING
EN
Advice :
Consult the Programmes table on the preceding pages to determine the programme you
need for the type of items, the quantity and the amount of food residue.
Fig. 02
AA DD EE FF
CC
BB
End of programme
Remaining time
Programme length
Waiting for delayed start
•
Immediate programme start
Press “
OOnn
/Off” , to switch on your
appliance and select your programme by
pressing one button or the other or the
Automatic programme by pressing the ICS
button.
— When a programme is selected, the associated light illuminates.
Press “Start/C” , the “In progress”
light illuminates. Close the door and the programme starts.
A short audible signal (beep) confirm the
button’s selection, except for the “On/Off”
button.
•
Delayed programme start
Delay your programme by 1 to 12 hours by
keeping on briefly pressing, or holding down,
the “Delayed Start”
button, as you prefer.
Confirm by pressing “Start/C”..
The screen counts down the hours until the
programme starts.
•
Cancelling a programme
Hold down the “Start/CC” button for a few
seconds.
FF
EE
FF
AA
Page 21

21
11/ PROGRAMMING
EN
•
End of the programme
The light flashes 15 minutes before the end of
the programme and then lights permanents
once the programme has finished.
•
Setting the audible signal
The setting enables you to activate or de-activate the beep at the end of the programme.
— Access the setting by holding down “Set” jun-
til you hear a double audible signal (long beep).
Select your preference by pressing the
“Delayed Start” button
:
- Beep activated : an audible signal is heard
and the “End” light flashes.
- Beep de-activated : no audible signal and
the “End” light is unlit.
The setting is confirmed automatically after
approximately 10 seconds.
•
Stopping the appliance
When the programme has finished, press the
“On/Off” button .
AA
EE
End of programme
Page 22

22
EN
12/ CLEANING YOUR APPLIANCE
Fig. 15
AA
Fig. 14
CC
AA
CC
BB
AA
BB
CC
➀➀
➁➁
③③
④④
⑤⑤
BB
• CLEANING THE WASTE FILTERS
The filtration system consists of several
elements:
--
The waste filter.
--
The large main filter.
--
The micro filter.
The filters are located in the centre of the tub
and must be washed regularly to obtain
ooppttii--
mmuumm wwaasshhiinngg rreessuullttss..
• Actions :
➀➀
Before removing the filters, remove any
waste on the large main filter with a
sponge so that the waste does not block the
sprinkler arms. Orient the
rroottoorr
as shown in
the drawing. (Fig. 14)
➁➁
Loosen the waste filter a quarter of a turn
and then remove it
.
③③
Remove the main filter
.
④④
Remove the micro filter screen
.
⑤⑤
Carefully clean filters
,
and
under running water. (Fig. 15)
Reinstallation:
Proceed in reverse order, inserting filters
and and then .
Important :
Remember to lock the waste filter in
place by pushing it in fully and turning it a
quarter turn.
AA
AABB
CC
CCBBAA
CC
BB
AA
BB
CC
BB
AA
Page 23

23
EN
12/ CLEANING YOUR APPLIANCE
•
Periodically :
Every 3 or 4 months, in order to remove any deposits, run a special maintenance programme, without any items in the machine, using a commercially available special dishwasher cleaning product.
Important :
Keep this product out of children’s reach..
•
Prolonged stoppage
Clean your dishwasher completely and then unplug it from the electricity supply and close the water
tap. Protect your machine from potential frosts
Advice :
Do not use abrasive powders, metal sponges and alcohol-based or thinner-based prod-
ucts. Use a cloth or a sponge.
If you are moving house, run a soaking programme first of all, in order to avoid any water escaping.
Page 24

24
EN
13/ IF OPERATING ANOMALIES OCCUR
• BEFORE CALLING FOR SERVICE
Problem Possible C
auses
What to do?
The door falls heavily when
opened (integratable model)
- Door springs not tensioned
enough to compensate for the
weight of the panel.
- Tighten the two tensioning
screws accessible in the bottom section above the front
feet.
The door does not stay horizontal
when open or returns too
quickly
(integratable model)
- Door springs tensioned too
much.
- No wooden panel.
- Loosen the two tensioning
screws accessible in the bottom section above the front
feet.
- Fit a temporary wooden panel
on the appliance and adjust
the springs.
The door catches when closing - Appliance not stable
- Door not centred on the tub
- Adjust the feet.
- Re-centre by adjusting the
rear feet.
The upper basket does not stay
in the high position
- Poor manipulation (the basket
is being pulled upwards too
quickly)
- Act more progressively (see
instructions), one side and
then the other.
Small leak around or under the
appliance (move the appliance
to locate the leak)
- Leak from the tap.
- Leak from the appliance.
(Cf. table fault d07).
- Check that a seal is fitted and
retighten the nut.
- Close the water tap and call a
technician.
Small leak at the door
- Appliance not stable or not level
- Door not centred on the tub.
- Adjust the feet.
- Re-centre by adjusting the rear
feet.
• SUMMARY OF THE FAULTS
Flashing LED(s) for models without a display
Flashing LED(s)
d01 : water supply fault (tap) d07 : overflow / anti-leak fault
d02 : draining fault
d08 : sprinkling distribution fault
d03 : heating fault d11 : pressure sensor fault
d04 : temperature fault
d12 : filling fault (water inlet
detection system)
d05 : faulty motor d13 : faulty heating
d06 : faulty motor
d14 : installation fault : (incorrect drainage
connection or inadequate flow rate and tap).
Tip:
If one of the above faults occurs and you need to call a repair man, remember to tell him
the message displayed (d01, d02..) as this information will help him.
Page 25

25
EN
13/ IF OPERATING ANOMALIES OCCUR
• THE INDICATOR LIGHTS
Problem Possible Causes What to do ?
The salt light does not go out - No salt or an insufficient quan-
tity of salt in the tank to trigger
the float.
-
Refill the tank and wait for the
cycle to end. If you have soft
water that requires no salt, the
light is constantly lit.
The lights all light up one after
the other
A light flashes and the
programme does not start
- Wrong programme.
-
Programme selector wrongly
positioned (between two notches)
- Cancel the current program-
ming by holding down the Start
button for 3 seconds and then
re-programme.
- Reposition the selector on a
programme.
• RELATING TO PROGRAMMING, DISPLAY
Problem Possible Causes What to do ?
The cycle lasts too long - lThe energy-saving program-
mes last longer because the
agitation and drying times are
longer to compensate for the
lower washing and drying temperatures
- Use these programmes prefe-
rably at night when it is not so
important how long the programme lasts or when it ends.
The appliance trips the circuit
breaker
- Insufficient amperage to supply all the appliances being
operated simultaneously.
- Internal fault in the appliance.
- Check the socket’s amperage
(10A minimum) and the
meter’s capacity.
- Call a technician.
The appliance does not start - No mains power to the socket.
- Tap closed.
(Cf. table fault d01).
- Selection error or programme
lock.
- Start button pressed too long
(>2”).
-
Appliance in Safety mode (antileak).
(Cf. table fault d07).
- Check the socket and the fuse
- Check the tap is open.
- Check the hose line is OK.
- Cancel by holding down Start
for 3” and re-programme.
- Just press Start briefly to start
the programme.
- Call a technician.
Page 26

26
EN
13/ IF OPERATING ANOMALIES OCCUR
Problem Possible C
auses
What to do?
Food traces and deposits in the
glasses
- Items poorly arranged (masked by another larger item or
situated underneath it, items
nested or jammed together).
- Upper spray arm blocked by
cutlery or a dish etc.
- Filter poorly locked and lifting
during washing.
- Micro filter screen clogged.
- One or more holes in the spray
arm blocked.
- Arrange the items properly.
Use the most appropriate
areas and accessories for each
type of item (see instructions).
- Check that the spray arm
rotates freely. Set the basket in
the high position if necessary.
- Check the filter’s facing and that
the filter is locked in place (push
it in fully, turning it to the right)
.
- Remove all the filters and clean
them (in warm water), including
the micro filter’s screen (once
a month).
- Remove the spray arm by turning the lever a quarter of a turn
and clean it under the tap (do
not use any tool that could
damage the holes). Re-install
the spray arm.
Traces of grease - Detergent dose too low; ineffi-
cient detergent; stale product.
- Inappropriate programme
(temperature too low; duration
too short).
-
Increase the dose; try another
detergent.
- Select a programme with a
higher temperature.
• POOR WASHING RESULTS
Problem Possible Causes What to do?
The appliance will not restart - Door opened during a
washing cycle.
- Wait for the time delay to end
(controlled internally by the
appliance).
The appliance does not drain
(Cf. table fault d02).
- The cover has not been removed from the sink’s U-bend.
- Drain hose kinked.
- Filters totally blocked.
- Pump blocked.
- Remove the cover.
- Check the drain hose line
behind the machine is OK.
- Remove and clean the filters
and the drain.
- Initiate a Soaking programme
If the fault persists, call a technician.
The appliance will no longer
function (see table, fault 14).
- installation of non-compliant drainage system: drainage too low
down or pipe pushed too far in.
- siphoning: the appliance is
emptying as the same time as
it is filling up.
- adhere to the drainage tube
installation dimensions.
Page 27

27
EN
13/ IF OPERATING ANOMALIES OCCUR
• POOR WASHING RESULTS...
White marks
(identify what type)
- Chalky film (removable with
vinegar).
- Traces of salt (items have a
salty taste).
- Check that there is salt in the
tank (light unlit = OK).
- Check the water hardness at
the tap and that the water softener is set correctly. Adjust it
to a higher level if necessary.
- Water too hard for using a “4in-1” detergent without the
addition of salt.
- Check that the stopper on the
salt container is closed correctly.
White marks
(identify what type)
- Glass cloudy because water
too soft (cannot be removed).
- Check the water hardness at
the tap and that the water softener is set correctly. Some
detergents in pellet form are
more aggressive to glasses
and decorations (change the
product and use a protective
product if necessary).
Coloured marks (tea, wine, coffee)
- Items poorly arranged
- Detergent dose too low ; inefficient detergent
- Programme temperature too
low.
- If you use a multifunction
product.
- Turn the cavities in the items
towards the jets.
- Increase the dose; try another
detergent.
- Select a more suitable programme with a higher temperature.
- Use the “4-in-1” option.
(depending on the model).
Streaks or dried droplets on
glasses
- Lack or insufficient amount of
rinsing product.
- Rinsing product out-of-date or
inefficient.
- If you use a multifunction
product.
- Check the indicator light and
fill the tank completely. Adjust
the dispensing unit to a higher
position if necessary.
- Use a recent product (a good
product dilutes easily and
foams in cold water).
- Use the “4-in-1” option with a
setting prioritizing drying
(parametering from the menu depending on the model).
Dried-on marks on glasses,
dullness
- If you use a multifunction
product.
- Use the “4-in-1” option with a
setting prioritizing brilliance
(parametering from the menu depending on the model).
Page 28

28
EN
13/ IF OPERATING ANOMALIES OCCUR
• POOR OPERATION
Problem Possible Causes What to do ?
Constant filling
A lot of waste on the large filter
at the end of the cycle.
- (Cf. table fault d12). Drain hole
situated too low for the
appliance.
- The filters and drain outlets are
blocked with too much
residue.
- Drain wand fallen on the floor.
- Remove and clean the filters
and the bottom of the drain
outlets. Remove large residue
from the plates before putting
them in the machine.
Traces of rust on stainless steel - Quality of the stainless steel
not dishwasher-safe (knives in
particular)
- Use “special dishwasher-safe”
cutlery.
- Check that the stopper on the
salt container is closed correctly.
• POOR DRYING RESULTS
Problem Possible Causes What to do?
A lot of droplets on the glasses. - Lack or insufficient amount of
rinsing product.
- The dose has not been distributed.
- Positioning of the items.
- Check the indicator light and
f
ill the t
ank completely.
- If the tank is not empty after
approximately 60 washings,
call a technician.
- To alleviate the phenomenon,
arrange the items to restrict
water retention as much as
possible. Leave the door ajar
for a few minutes, if possible
Droplets on plastic items, Tefal
coatings, etc.
- These insulating items have a
low calorific mass.
- Arrange them preferably in the
upper basket.
Poorer drying on rapid
programmes
-
On rapid programmes, the drying
temperature and drying period are
reduced to cut down the duration
of the cycle as much as possible.
- Select a rapid programme
carefully or leave the door ajar
for a few minutes.
Condensation on the wall of the
inside door or the tub.
-
Condensation may form on the
walls, particularly after the
appliance has cooled down
(sound insulation increases the
phenomenon)
Page 29

29
EN
14/
AFTER-SALES SERVICE
Fig. 16
••
INTERVENTION WORK
Any intervention work on your appliance must
be performed by a qualified professional
approved by the manufacturer. When you call,
please mention the full reference for your
appliance (model, type and serial number).
This information is shown on the description
plate (see Fig. 16)
ORIGINAL PARTS
When maintenance is being carried out, ask
for only certified original spare parts to be
used.
Page 30

30
•
Details common to all models
— Washing capacity - - - - - - - - - - - - - - - - - - - - - - - - - - - - - - - - - - - - 13 standard place settings
— Arrangement of the items - - - - - - - - - - - - - - - - - - - - - - - - - - - - -
Figs. A-B-C; see above and next page
— Loading as per the indications on next page, without side shelves
— Setting for upper basket - - - - - - - - - - - - - - - - - - - - - - - - - - - - - - Low position
— Setting for rinsing product distributor - - - - - - - - - - - - - - - - - - - 3
— Adjusting the water softener - - - - - - - - - - - - - - - - - - - - - - - - - - - 1.8 - 2.5 mmol/l
(See § 5 “detergent products and adjusting the water softener” for details).
For detailed information on the comparison tests regarding the level of soiling, the types of
crockery and cutlery, etc., contact the equipment manufacturer before commencing the tests.
•
Tests to Standard EN 50242
— Recommended programme - - - - - - - - - - - - - - - - - - - - - - - - - - - see Programmes table
— Dosage of detergent - - - - - - - - - - - - - - - - - - - - - - - - - - - - - - - - - 32.5 g of detergent B
•
Tests according to the mixed IEC 436/DIN 44990 method
— Recommended programme - - - - - - - - - - - - - - - - - - - - - - - - - - - see Programmes table
— Dosage of detergent - - - - - - - - - - - - - - - - - - - - - - - - - - - - - - - - - 5 + 27.5 g of detergent C
NB:
When conducting tests using a multi-function tablet: Setting for hardness < 2.5 mmol/l
(See § 5 for details)
— Check that the water softener is correctly set for the water hardness
— Pull out the detergent distribution drawer and place the tablet in the interior compartment.
•
Built in or full built in model: Measuring the noise level in accordance with
Standard EN60704-2-3
— Align the plinth on the housing unit with the door panel.
INDICATIONS FOR THE TESTING LABORATORIES
1 2 3 4 5 6 7 8
B
71
1
1
1
1
1
2
2
2
2
2
333
333333 3
222
NNOOKK NNOOKK OOKK
8
8
8
8
8
8
3
3
3
4
444444
1
22
2888
111
6
8
444
88
11
8
65
22
1
444
Page 31

31
INDICATIONS FOR THE TESTING LABORATORIES
A
C
e
s
m
s
mmmmmmeeeeee e sssss s
e
/
s
e
/
m
e
ee
e: egg/oeuf m: meat/viande s: spinach/épinards
A
e
s
m
Page 32

EN
PPhhoottooggrraapphhiiee ddee ccoouuvveerrttuurree//ffrroonntt ccoovveerr pphhoottooggrraapphhyy:: MMiicchheell GGiibbeerrtt
Any maintenance on your equipment should be undertaken by:
- either your dealer,
- or another qualified mechanic who is an authorized agent
for the brand appliances.
When making an appointment, state the full reference of
your equipment (model, type and serial number). This information appears on the manufacturer's nameplate attached
to your equipment.
Les éventuelles interventions sur votre appareil doivent être
effectuées :
- soit par votre revendeur,
- soit par un autre professionnel qualifié dépositaire de la
marque.
Lors de votre appel, mentionnez la référence complète de
votre appareil (modèle, type et numéro de série). Ces renseignements figurent sur la plaque signalétique fixée sur votre
appareil.
Eingriffe an Ihrem Gerät dürfen nur:
- von Ihrem Händler oder
- von einem sonstigen Fachmann und Vertragshändler der
Marke durchgeführt werden.
Geben Sie bei der Meldung einer Störung die vollständige
Typenbezeichnung Ihres Gerätes an (Modell, Typ,
Seriennummer). Diese Angaben finden Sie auf einem an
Ihrem Gerät angebrachten Schild.
Las intervenciones que requiera la máquina deberán ser
efectuadas:
- por el revendedor,
- o por cualquier profesional cualificado depositario de la marca.
Al llamar, mencione la referencia completa de la máquina
(modelo, tipo y número de serie). Estos datos figuran en la
placa de identificación situada en la máquina.
Qualquer intervenção no seu aparelho deve ser realizada:
- quer pelo seu revendedor,
- quer por outro profissional qualificado autorizado pela marca.
Ao chamá los, indique a referência completa do seu aparelho
(modelo, tipo e número de série). Estas informações figuram
na placa de identificação fixada no aparelho.
Eventuel vedligeholdelse af apparatet skal foretages:
- enten af Deres forhandler,
- eller af en kvalificeret fagmand, som er anerkendt til dette
mærke.
Når De ringer op, skal De angive apparatets fulde reference
(model, type, serienummer). Disse oplysninger står på typeskiltet, der sidder på apparatet.
EN
After Sales Service:
FR
Service après vente :
DE
Kundendienst :
ES
Servicio postventa :
PT
Serviços autorizados :
DA
Kundeservice :
De eventuele ingrepen in de machine moeten worden uitgevoerd :
- of door uw vakhandelaar,
- of door een andere gekwalificeerd technicus van dit merk.
Tijdens het telefoneren, dient u de complete referentie op te
geven van uw machine (model, type, serienummer). Deze
informatie staat op het typeplaatje op de machine.
Wszelkie czynności serwisowe wykonywane na urządzeniu
muszą być wykonane przez:
- sprzedawcę,
- wyspecjalizowany zakład naprawczy posiadający atest producenta.
Aby przyspieszyć i ułatwić obsługę prosimy o podanie
dokładnych danych dotyczących urządzenia (model, typ,
numer seryjny). Wszystkie te dane znajdują się na tabliczce
znamionowej umieszczonej na urządzeniu.
Případné opravy na přístroji může provádět pouze :
- váš prodejce
- nebo záruční opravna, která má smlouvu s výrobcem
Při telefonickém styku uvádějte úplné označení vašeho
přístroje (model, typ a výrobní číslo). Tyto údaje jsou uvedeny na výrobním štítku přístroje.
,
:
- , ;
- ,
.
(, ). !
", .
Οι ενδεχόμενες επεμβάσεις πάνω στη συσκευή σας θα
πρέπει να διενεργούνται:
- είτε από τον προμηθευτή σας,
- είτε από το κατά τόπους εξουσιοδοτημένο σέρβις.
Σε περίπτωση που τηλεφωνήσετε, θα πρέπει να
αναφέρετε όλα τα στοιχεία της συσκευής σας (μοντέλο,
τύπο και αριθμό σειράς).Τα στοιχεία αυτά αναγράφονται
στην ετικέτα των χαρακτηριστικών του κατασκευαστή που
βρίσκεται πάνω στη συσκευή.
NL
Serviceafdeling:
PL
Usługi serwisowe :
CS
Záruční servis:
RU
Cepcoe ocyae:
EL
Tεχνική υποστήριξη:
FagorBrandt SAS, locataire-gérant – SAS au capital social de 20 000 000 euros RCS Nanterre 440 303 196. DW3M00022-00-
12/09-1/2
DVH938JI1
 Loading...