

Page 1

DIETRICH DE DIETRICH DE DIETRICH DE DIETRICH DE DIETRICH DE DIETRICH DE DIETRICH DE DIETRICH DE DIETRICH DE DIETRICH DE DIETRICH DE DIETRICH DE DIETRICH DE DIETRICH DE DIETRICH DE DIETRICH DE DIETRICH DE DIETRICH DE DIETRICH DE DIETRICH DE DIETRICH DE DIETRICH DE DIETRICH DE DIETRICH DE DIETRICH DE DIETRICH DE DIETRICH DE DIETRICH DE DIETRICH DE DIETRICH DE DIETRICH DE DIETRICH DE DIETRICH DE DIETRICH DE DIETRICH DE D
CH DE DIETRICH DE DIETRICH DE DIETRICH DE DIETRICH DE DIETRICH DE DIETRICH DE DIETRICH DE DIETRICH DE DIETRICH DE DIETRICH DE DIETRICH DE DIETRICH DE DIETRICH DE DIETRICH DE DIETRICH DE DIETRICH DE DIETRICH DE DIETRICH DE DIETRICH DE DIETRICH DE DIETRICH DE DIETRICH DE DIETRICH DE DIETRICH DE DIETRICH DE DIETRICH DE DIETRICH DE DIETRICH DE DIETRICH DE DIETRICH DE DIETRICH DE DIETRICH DE DIETRICH DE DIETRICH DE DIETRIC
DIETRICH DE DIETRICH DE DIETRICH DE DIETRICH DE DIETRICH DE DIETRICH DE DIETRICH DE DIETRICH DE DIETRICH DE DIETRICH DE DIETRICH DE DIETRICH DE DIETRICH DE DIETRICH DE DIETRICH DE DIETRICH DE DIETRICH DE DIETRICH DE DIETRICH DE DIETRICH DE DIETRICH DE DI
ETRICH DE DIETRICH DE DIETRICH DE DIETRICH DE DIETRICH DE DIETRICH DE DIETRICH DE DIETRICH DE DIETRICH DE DIETRICH DE DIETRICH DE DIETRICH DE DIETRICH DE DIETRICH DE D
CH DE DIETRICH DE DIETRICH DE DIETRICH DE DIETRICH DE DIETRICH DE DIETRICH DE DIETRICH DE DIETRICH DE DIETRICH DE DIETRICH DE DIETRICH DE DIETRICH DE DIETRICH DE DIETRICH DE DIETRICH DE DIETRICH DE DIETRICH DE DIETRICH DE DIETRICH DE DIETRICH DE DIETRICH DE DIETRICH DE DIETRICH DE DIETRICH DE DIETRICH DE DIETRICH DE DIETRICH DE DIETRICH DE DIETRICH DE DIETRICH DE DIETRICH DE DIETRICH DE DIETRICH DE DIETRICH DE DIETRIC
DIETRICH DE DIETRICH DE DIETRICH DE DIETRICH DE DIETRICH DE DIETRICH DE DIETRICH DE DIETRICH DE DIETRICH DE DIETRICH DE DIETRICH DE DIETRICH DE DIETRICH DE DIETRICH DE DIETRICH DE DIETRICH DE DIETRICH DE DIETRICH DE DIETRICH DE DIETRICH DE DIETRICH DE DIETRICH DE DIETRICH DE DIETRICH DE DIETRICH DE DIETRICH DE DIETRICH DE DIETRICH DE DIETRICH DE DIETRICH DE DIETRICH DE DIETRICH DE DIETRICH DE DIETRICH DE DIETRICH DE D
CH DE DIETRICH DE DIETRICH DE DIETRICH DE DIETRICH DE DIETRICH DE DIETRICH DE DIETRICH DE DIETRICH DE DIETRICH DE DIETRICH DE DIETRICH DE DIETRICH DE DIETRICH DE DIETRICH DE DIETRICH DE DIETRICH DE DIETRICH DE DIETRICH DE DIETRICH DE DIETRICH DE DIETRICH DE DIETRICH DE DIETRICH DE DIETRICH DE DIETRICH DE DIETRICH DE DIETRICH DE DIETRICH DE DIETRICH DE DIETRICH DE DIETRICH DE DIETRICH DE DIETRICH DE DIETRICH DE DIETRIC
DIETRICH DE DIETRICH DE DIETRICH DE DIETRICH DE DIETRICH DE DIETRICH DE DIETRICH DE DIETRICH DE DIETRICH DE DIETRICH DE DIETRICH DE DIETRICH DE DIETRICH DE DIETRICH DE DIETRICH DE DIETRICH DE DIETRICH DE DIETRICH DE DIETRICH DE DIETRICH DE DIETRICH DE DIETRICH DE DIETRICH DE DIETRICH DE DIETRICH DE DIETRICH DE DIETRICH DE DIETRICH DE DIETRICH DE DIETRICH DE DIETRICH DE DIETRICH DE DIETRICH DE DIETRICH DE DIETRICH DE D
Code :A.18562C - 07/04
F
Lave-vaisselle
GB
Dishwasher
DK
Opvaskemaskine
DVF330,DVF440,-
Page 2

Page 3

Sommaire
3
2
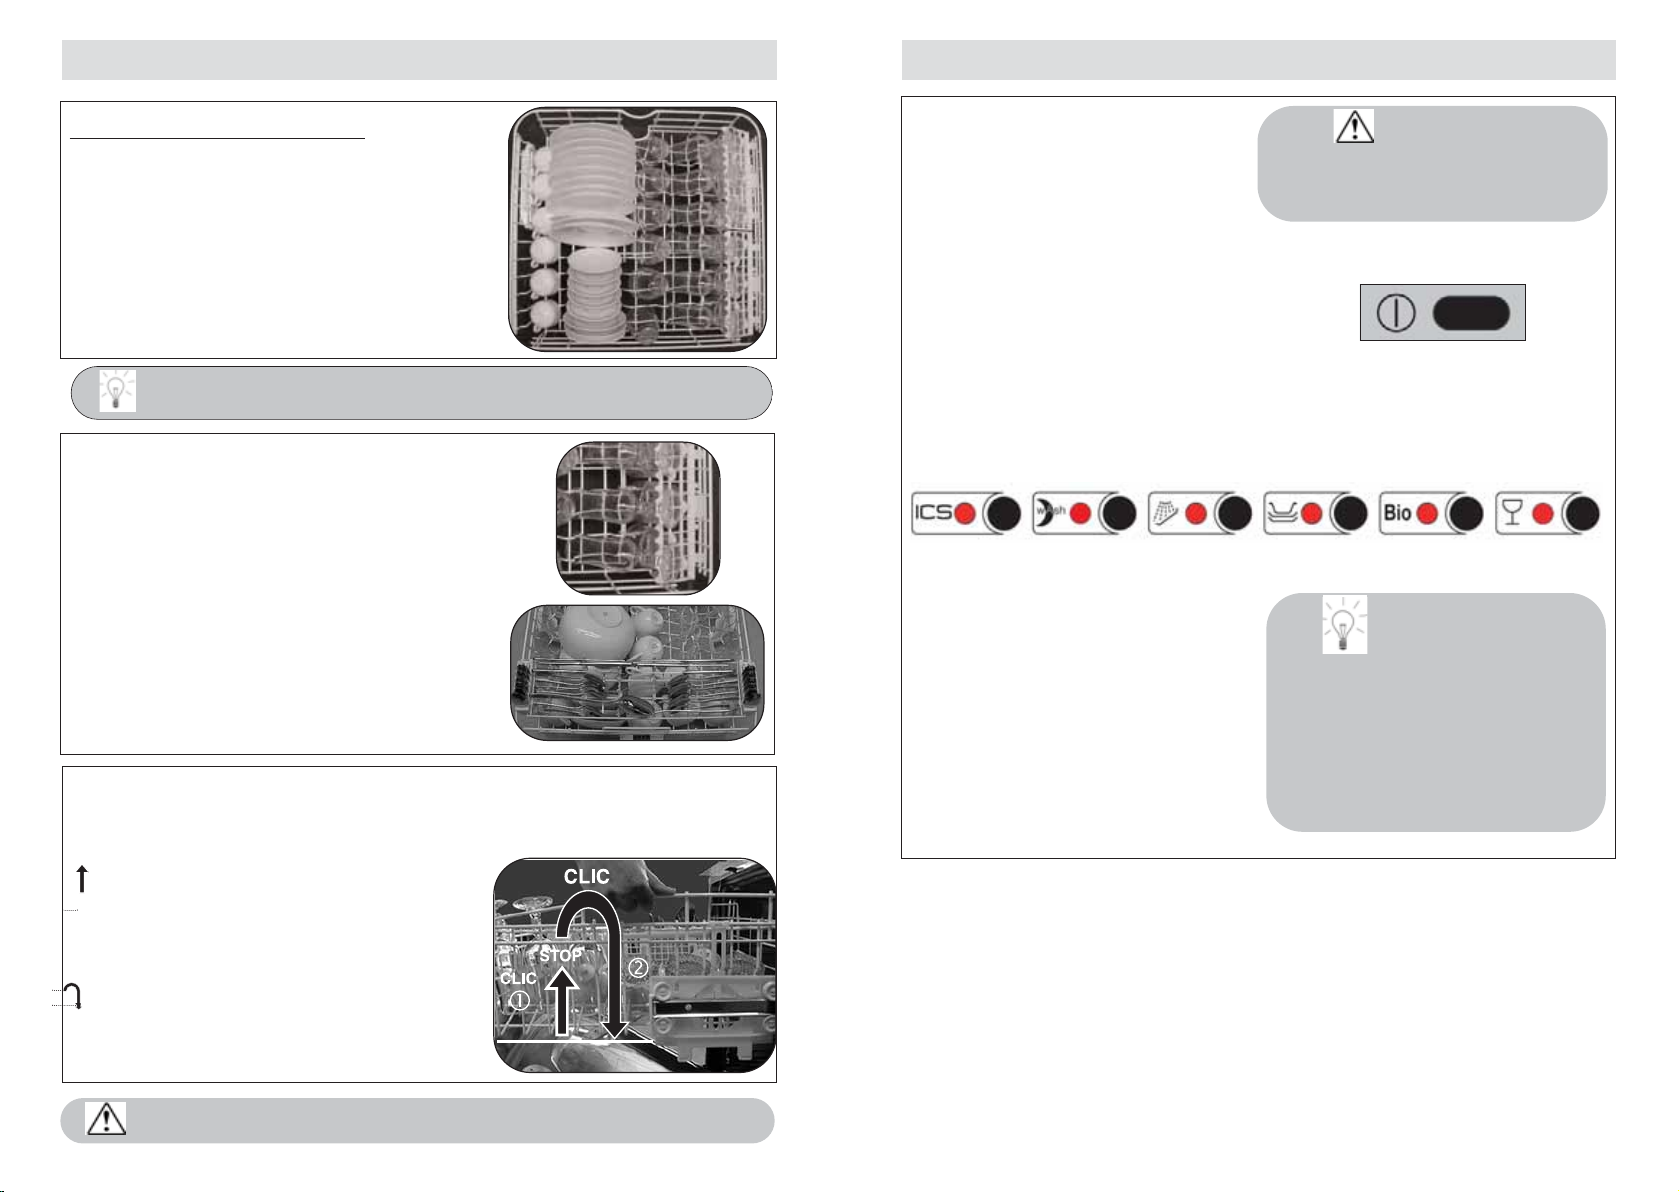
A regarder de près Précautions d’emploi
Protection de l’environnement Conseils, astuces et remarques
Pour que votre appareil vous apporte pleine et
entière satisfaction, lisez attentivement les livrets
d’installation et d’utilisation de votre lave-vaisselle.
Ils vous permettront de découvrir tous les a vanta ges
de cet appareil et d’en tirer le meilleur parti.
Pages
1 - Présentation de votre lave-vaisselle . . . . . . . . .4-5
2 - A faire avant votre 1ère utilisation . . . . . . . . . .6 à 9
Etape 1 : Réglage de l’adoucisseur - Mesure de la dureté de l’eau6
Réglage sur le tableau de commande . . . . . . . . . . . . . . .6
Remplissage du réservoir à sel régénérant . . . . . . . . . . . .7
Etape 2
: Le produit de rinçage - Remplissage - Réglage 8
Etape 3 : Les produits de lavage . . . . . . . . . . . . . . . . . .9
3 - Disposition de votre vaisselle . . . . . . . . . . . . . . .10 à 12
Votre panier inférieur - Les couverts - Votre panier supérieur10 à 12
4 - Sélection d’un programme de lavage . . . . . . . . .13
Les programmes de lavage . . . . . . . . . . . . . . . . .14-15
5 - Départ et déroulement du programme . . . . . . .16-17
Départ immédiat - Départ différé - Fin du programme . . .16
Annulation programme - ICS Auto-programme : avantages17
6 - Entretien courant . . . . . . . . . . . . . . . . . . . . . . . . .18-19
Nettoyage des filtres à déchets . . . . . . . . . . . . . . . . . . . .18
Nettoyage et entretien . . . . . . . . . . . . . . . . . . . . . . . . . .19
7 - Protection de l’environnement . . . . . . . . . . . . . .20
Recyclage de votre emballage . . . . . . . . . . . . . . . . . . . . .20
Recyclage de votre ancien lave-vaisselle . . . . . . . . . . . . .20
Lavage économique et écologique . . . . . . . . . . . . . . . . . .20
8 - Petites pannes et anomalies . . . . . . . . . . . . . . . .21-25
9 - Indications pour laboratoire d’essais . . . . . . . . .26-27
Cher Cliente, Cher Client,
Vous venez d’acquérir un lave vaisselle DE DIETRICH et nous v ous en
remercions.
Nos équipes de recherche ont conçu pour vous une nouvelle génération
d’appareils, qui par leur qualité, leur design et leurs évolutions technologiques en font des produits d’exception et révèle un savoir-faire
unique.
Avec des lignes modernes et raffinées, votre nouveau lave vaisselle DE
DIETRICH s’intègre harmonieusement dans votre cuisine et allie parfaitement la maîtrise technologique, l’efficacité optimale de lavage et de
séchage et la haute fidélité du silence.
Vous trouverez également dans la gamme des produits DE DIETRICH, un
vaste choix de fours, de tables de cuisson, de hottes aspirantes et de
réfrigérateurs intégrables, que vous pourrez coordonner à votre nouveau
lave vaisselle DE DIETRICH.
Bien entendu, dans un souci permanent de satisfaire au mieux vos exigences vis à vis de nos produits, notre service consommateurs est à votre
disposition et à votre écoute pour répondre à toutes vos questions ou
suggestions.
Grâce à ces “nouveaux objets de valeurs” qui nous servent de repère
dans nos vies de tous les jours, DE DIETRICH, référence de l’excellence,
est une véritable invitation à un nouvel art de vivre.
La Marque DE DIETRICH.
Page 4
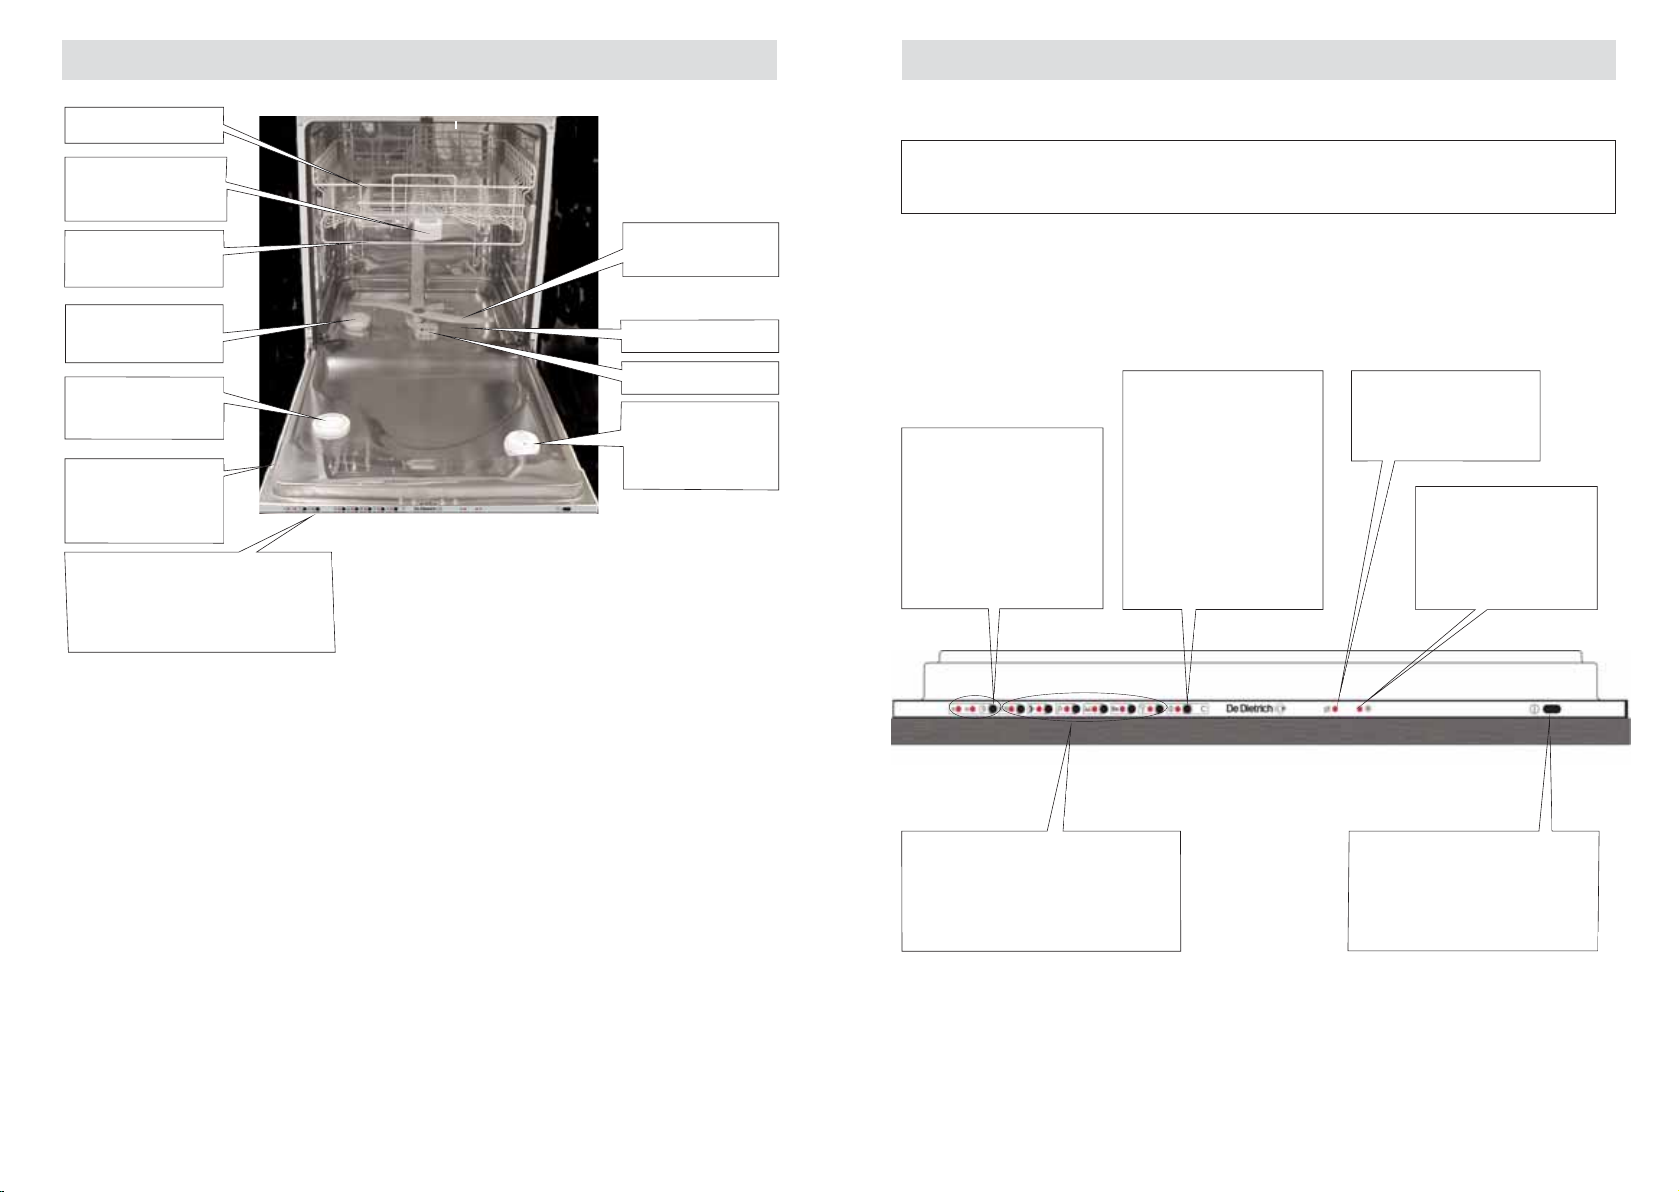
Présentation de votre lave-vaisselle Présentation de votre lave-vaisselle
5
4
La photo ci-dessus, panier inférieur retiré, vous permet de visualiser les
principaux éléments décrits dans cette notice d’utilisation.
Réservoir à sel
régénérant
Filtres à déchets
Distributeur de
produit de lavage
Distributeur
de produit de
rinçage
Bras d’aspersion
inférieur
Plaque signalétique
(Référence
S.A.V.)
Séchage
ventilé (selon
modèle)
Panier supérieur
Filtre principal
Fil-gabarit
anti-blocage
MARCHE/ARRET :
Appuyez sur cette touche
pour mettre votre lavevaisselle sous tension.
DÉPART/ANNULATION :
Appuyez sur cette
touche. Le programme commence.
Maintenez cette touche
appuyée pendant 3
secondes.
Le program-
me s’annule.
DEPART DIFFERÉ :
Appuyez sur cette
touche pour différer
la fin du programme
de 3, ou 6 H.
TOUCHES DE
PROGRAMMES :
Appuyez sur
l’une des touches pour choisir
votre programme.
VOYANT SEL :
vous
indique le manque
de sel régénérant.
VOYANT RINÇAGE :
vous indique le
manque de liquide
de rinçage.
Bandeau de
commande (présentation
page suivante)
Le bandeau de commande situé dans la partie haute
de la porte est visible dès l’ouverture de celle-ci.
Votre lave-vaisselle est équipé de systèmes de sécurités qui vous mettent
à l’abri de toute inondation :
- La SÉCURITÉ ANTI-DÉBORDEMENT. Ce système active automatiquement la pompe de vidange si le niveau d’eau dans la cuve atteint
une hauteur anormale.
- La SÉCURITÉ ANTI-FUITE. Ce système interrompt l’alimentation
d’eau si une fuite est détectée sous l’appareil.
- Le TUYAU ANTI-ÉCLATEMENT. Ce conduit d’alimentation renforcé
est équipé d’un mécanisme qui interrompt l’alimentation d’eau directement au robinet en cas de fuites d’eau.
Page 5
A faire avant la première utilisation A faire avant la première utilisation
7
6
Il est impératif de remplir le réservoir à sel avec de l’eau
lors de la mise en service, même si le réglage choisi pour
l’adoucisseur ne nécessite pas de sel régénérant
En cas de déménagement ajuster de nouveau le réglage de l’adoucisseur.
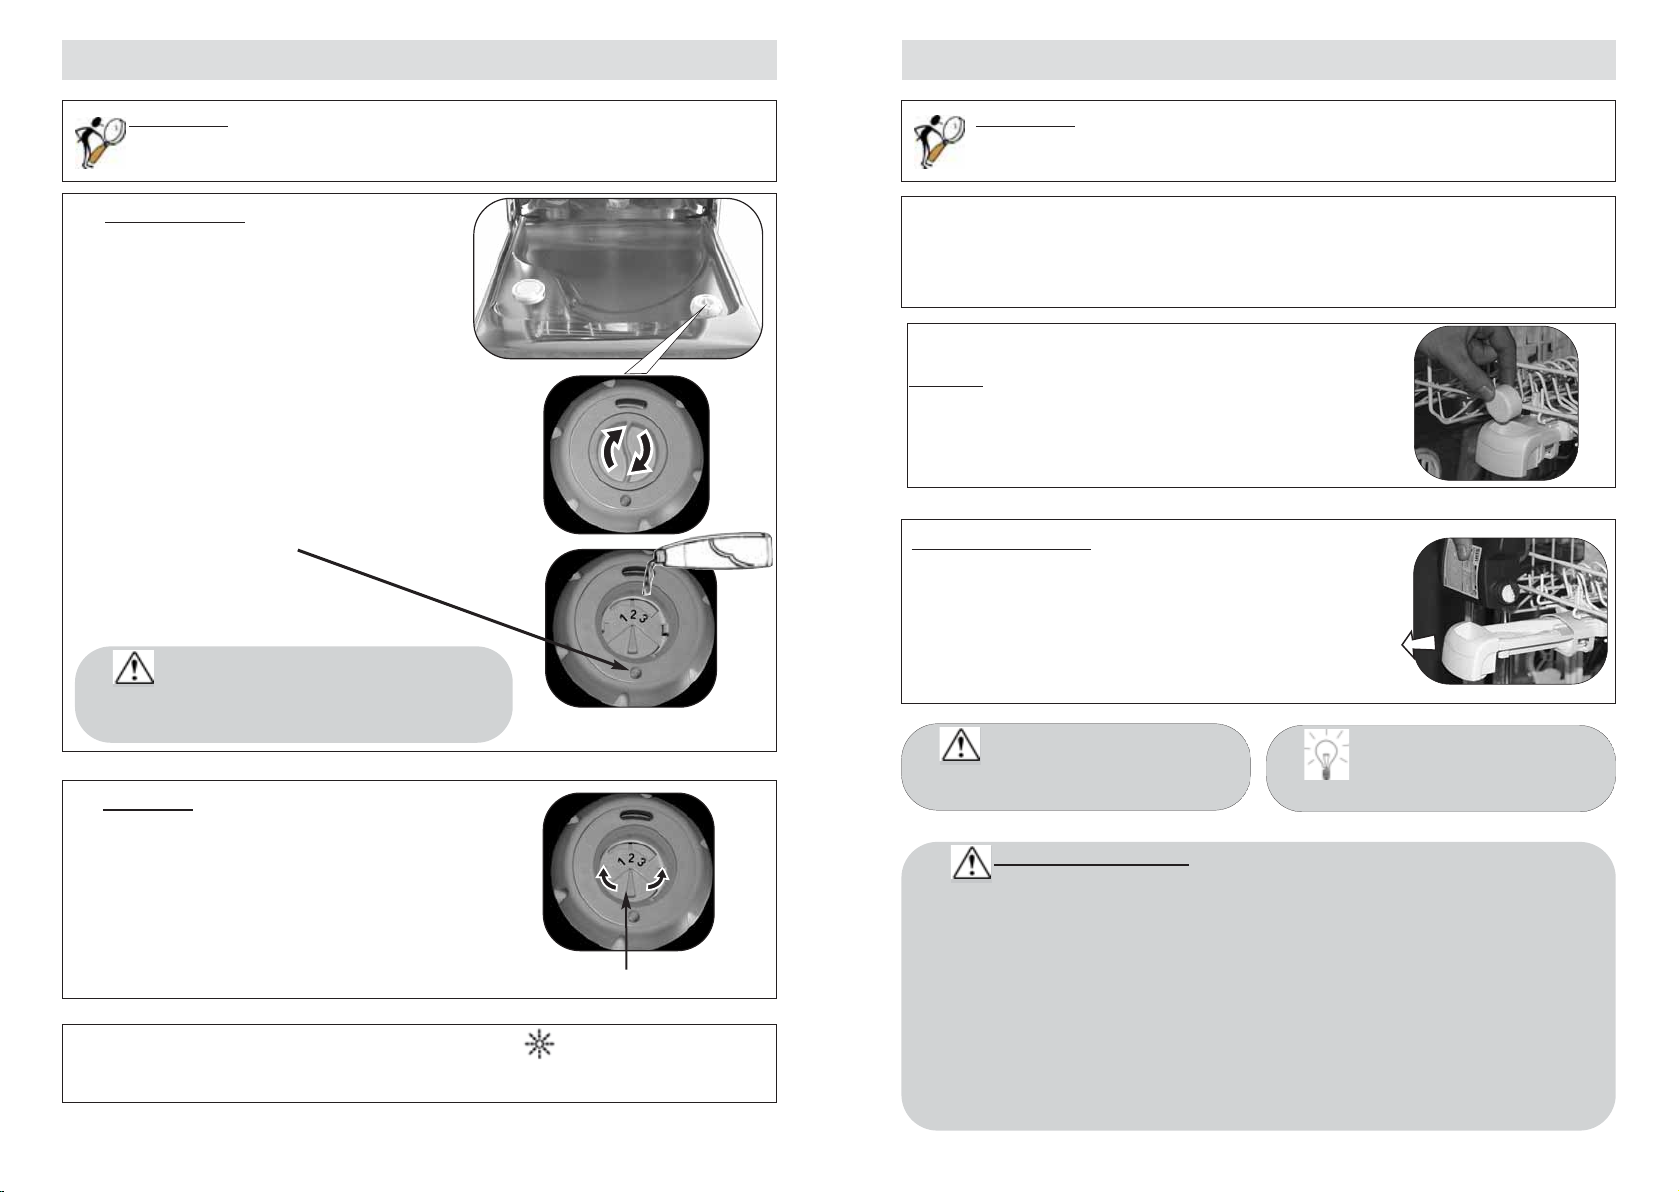
ETAPE 1 :
Réglage de l’adoucisseur
Pour un résultat de lavage et séchage impeccables et
sans traces.
➀➀
-
Mesure de la dureté de l’eau
Pour celà : Renseignez-vous auprès de votre service local de distribution
des eaux pour connaître le degré de dureté d’eau.
OU mesurez la dureté de l’eau au robinet en utilisant la bandelette
“Aqua-test” fournie avec votre lave-vaisselle et reportez vous au tableau
ci-dessous pour connaître le réglage à sélectionner selon la dureté d’eau.
Le réglage de l’adoucisseur doit être effectué correctement pour obtenir
un résultat de lavage et séchage sans traces.
Votre lave- v aisselle est muni d’un dispositif d’adoucissement de l’eau qui
fonctionne grâce à l’utilisation de sel régénérant.
Vous devez le régler en f onction de la dureté de l’eau de votre lieu d’habitation.
Repérage du niveau de
sel régénérant
Le voyant indicateur SEL :
Il s’éclaire lorsqu’il faut ajouter du
sel. Après un remplissage de sel
régénérant, il peut rester allumé
jusqu’à ce que le sel soit suffisamment dissout, en général après un
cycle (ou si le remplissage n’est pas
complet) par exemple lors de la
mise en service avec l’échantillon.
Dans le cas d’une eau par-
ticulièrement douce et ne
nécessitant pas l’utilisation de sel régénérant, le voyant SEL reste éclairé.
➁➁
- Réglage sur le tableau de commande
voyant “Trempage” allumé fixe
voyant “Trempage” allumé fixe
voyant “Intensif” allumé fixe
voyant “Trempage” allumé clignotant
Besoin
de sel
0 - 10°F
10 - 18°F
18 - 25°F
25 - 40°F
40 - 55°F
55 - 70°F
NON
OUI
OUI
OUI
OUI
OUI
Réglage adoucisseur
Dureté
eau
Bandelette
Maintenir la touche “ICS” enf oncée appuyez sur la touche “Départ” :Le
voyant du programme “Trempage” ou “Intensif” s’allume - de façon fixe
ou clignotante - pour vous indiquer le réglage adoucisseur a effectuer suivant la correspondance du tableau ci-dessus.
A la première mise sous tension le réglage est 10°F à 25°F (voyant
“Trempage” allumé fixe).
Pour changer de réglage appuyez, autant de fois que nécessaire, sur la
touche “ICS” jusqu'à obtenir le réglage adoucisseur préconisé par la
bandelette".
voyant “Intensif” allumé clignotant
voyant “Trempage” allumé fixe
> 70°F
OUI
voyant “Intensif” allumé clignotant
③③
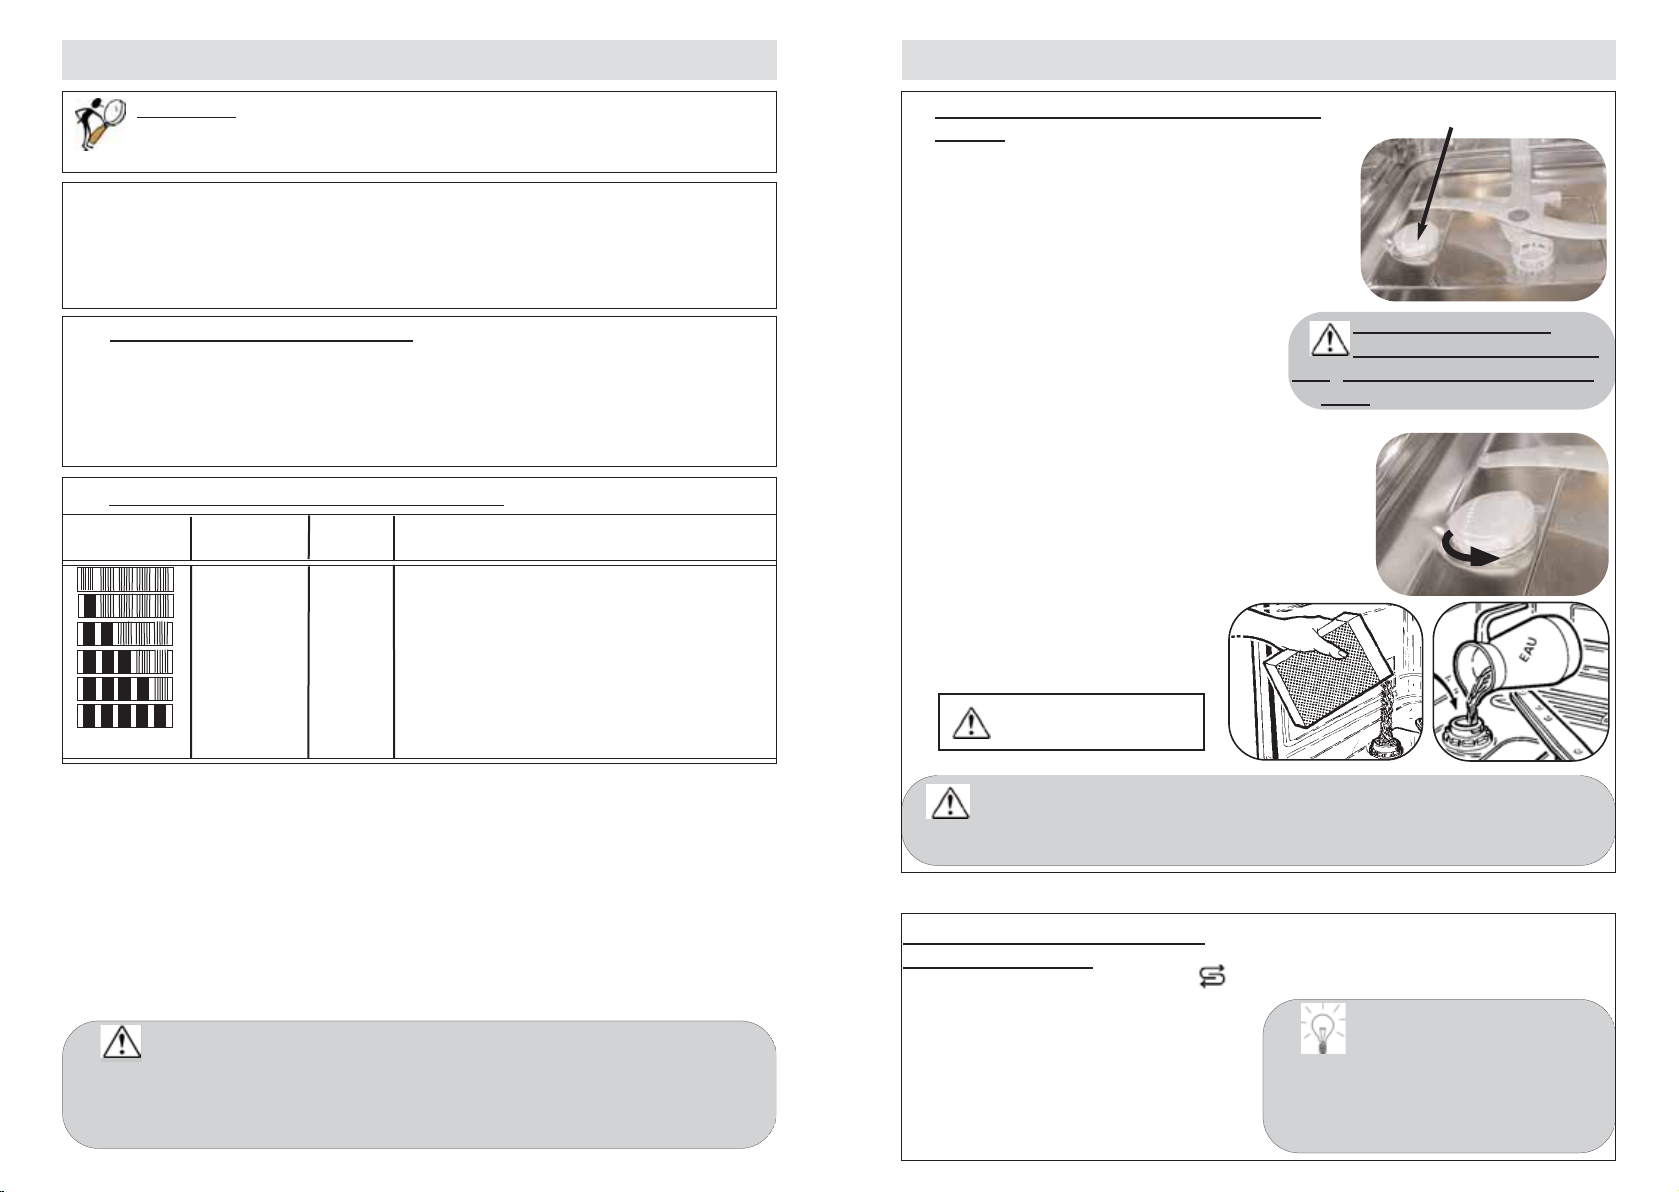
Remplissage du réservoir à sel régé-
nérant
Cette opération de remplissage doit s’effectuer juste avant de lancer le tout premier lavage.
Le remplissage en sel est indispensable pour
bien laver sans traces en régénérant les
résines qui adoucissent l’eau en la débarrassant de son calcaire, sauf si l’eau du
réseau est suffisamment douce (voir
“réglage de l’adoucisseur”).
Réservoir à sel
En cas de débordement du sel régénérant
lors du remplissage, il est recommandé d’enlever les cristaux
de sel pour éviter l’oxydation de la cuve.
Ne jamais verser de
détergent dans ce réser-
voir, vous détruiriez l’adoucis-
seur.
- Dévissez et enlevez le bouchon du réservoir à
sel.
- Remplissez le réservoir avec du sel régéné-
rant spécialement conçu pour lave-vaisselle.
(entonnoir disponible en SAV réf. 31X3964)
- La première fois, complétez avec de l’eau
jusqu’au bord du réservoir.
- Revissez bien à fond le bouchon du réservoir à sel.
Ne pas utiliser de
sel de cuisine.
SEL
Page 6
A faire avant la première utilisation A faire avant la première utilisation
9
8
➁➁
Réglage (si besoin)
Le réglage d’origine est au centre (position
moyenne : repère 2).
Après quelques cycles, en cas de traces ou
de mauvais séchage, vous pouvez ajuster le
réglage au moyen du levier de réglage :
• repère 1 pour diminuer le dosage,
• repère 3 pour l’augmenter.
Contenance : 120 ml (1 verre environ)
En cas de débordement du pro-
duit lors du remplissage, épongez l’excès
pour éviter la formation de mousse.
➀➀
Remplissage
A la mise en service, remplissez jusqu’à affleurer le haut du levier de
réglage.
Versez au minimum la totalité de
l’échantillon de produit de rinçage
fourni.
Refermez bien à fond
Levier de réglage
Le voyant indicateur produit de rinçage :
Il s’éclaire lorsqu’il faut ajouter du produit de rinçage.
Opaque : Reste du produit
Brillant : Réservoir vide
Indicateur visuel :
ETAPE 2 :
Le produit de rinçage
Pour une vaisselle brillante et bien sèche.
Pour faciliter le chargement de la lessive, le distributeur à produits de lavage est situé en face avant du panier supérieur.
La boîte à lessive est compatible avec tous les types de produits recommandés pour lave-vaisselle.
TRES IMPORTANT : Si vous utilisez des produits de
lavage combinés (2 ou 3 en 1), veuillez lire attentivement
les recommandations portées sur l’emballage.
- certains détergents avec produit de rinçage intégré ne produisent pas un effet optimal sur tous les programmes.
- des produits supprimant l’utilisation de sel régénérant ne sont
utilisables qu’à l’intérieur d’une certaine plage de dureté de
l’eau.
- En cas de doute, particulièrement en cas de :
- vaisselle très mouillée à la fin du programme,
- traces de calcaire sur la vaisselle,
adressez-vous au fabricant du produit de lavage.
Pastille
Disposez la pastille dans le compartiment extérieur.
Utilisez des produits
de lavage spécialement
conçus pour lave-vaisselle.
Poudre ou liquide
tirez le distributeur pour approvisionner en lessive
poudre ou liquide.
Remplissez jusqu’au repère min. pour une vaisselle
peu sale
repère max. pour une vaisselle sale
Fermez le distributeur.
Conservez tous ces produits hors de portée des
enfants et à l’abri de l’humidité.
ETAPE 3 : Les produits de lavage
pour une vaisselle propre.
Page 7
Disposition de votre vaisselle Disposition de votre vaisselle
11
10
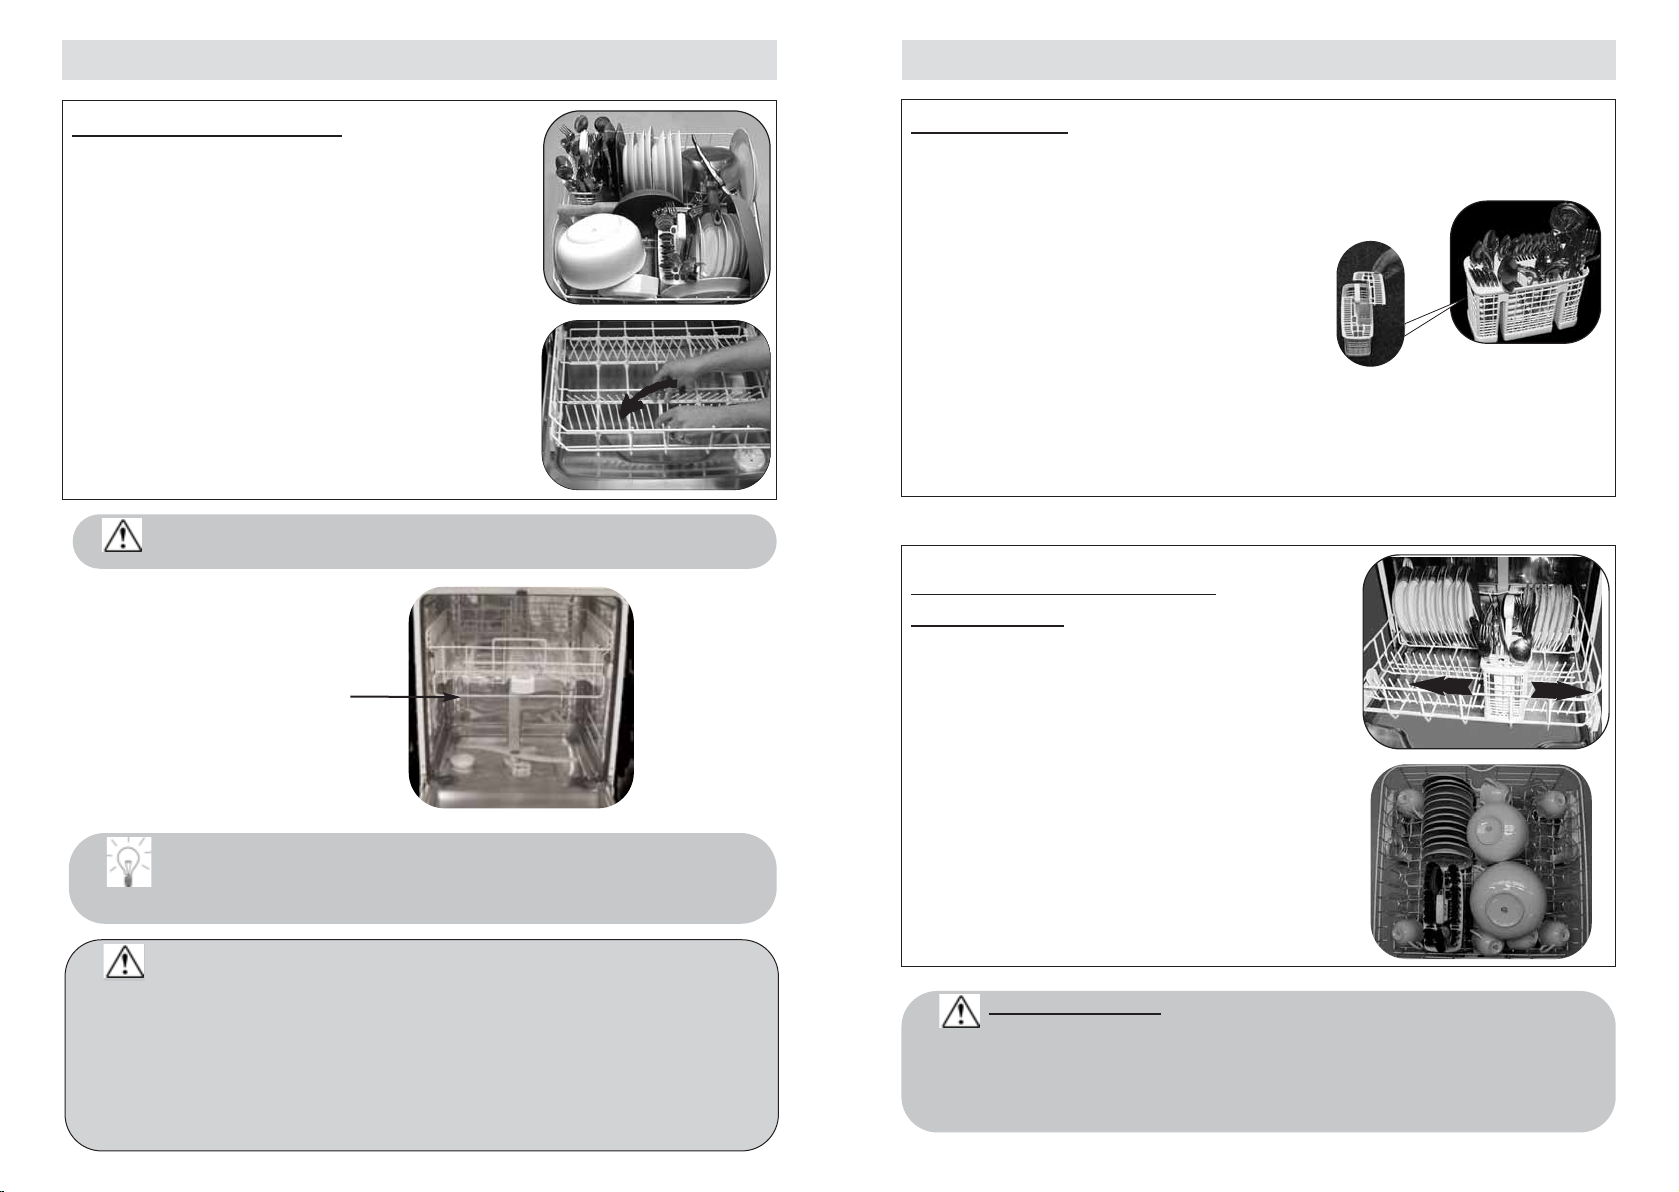
Votre panier inférieur
Disposez votre vaisselle de façon à ce que
l’eau puisse circuler librement et asperger
tous les ustensiles.
Placez les plats, les poêles de grand diamètre sur les côtés.
Evitez d’intercaler, d’accoler et de superposer les assiettes plates et creuses.
Aucun objet ne doit gêner la rotation des bras de lavage
(queue de casserole, couverts).
Les picots rabattables facilitent le rangement de vos grands récipients. (selon
modèle)
Déchargement de la vaisselle
Videz d’abord votre panier inférieur pour éviter de faire tomber
d’éventuelles gouttes d’eau du panier supérieur sur le panier inférieur.
Vaisselle non appropriée pour le lavage en machine
- Les planches à découper en bois,
- Les ustensiles en acier oxydable ou en plastique non résistant à la chaleur,
- Les objets en étain et en cuivre,
- La vaisselle et les couverts collés,
- Les couverts avec manches en bois, en corne ou en nacre,
- Porcelaine antique ou peinte à la main.
Lors d’achat de vaisselle, verres, couverts, faites-vous confirmer qu’ils
sont bien appropriés à un lavage en machine.
Note importante :
Pour des raisons de sécurité nous recommandons de disposer les couteaux à bouts pointus la pointe en bas dans les paniers à
couverts (risque d’accident).
Les couteaux à longue lame et autres ustensiles de cuisine acérés
doivent être placés à plat dans le panier supérieur.
Les couverts
Des grilles amovibles sont à votre disposition si vous souhaitez un chargement des
couverts ordonné.
Pour un lavage et un séchage optimum,
utiliser ces grilles de séparation en totalité
ou partiellement.
• Orientez-les le manche vers le bas.
• Evitez de laver dans votre lave-vaisselle
les couverts dotés d’un manche en
corne.
• Séparez l’argenterie des autres métaux
en utilisant la grille de séparation.
Vos paniers à couverts
coulissants
Ils peuvent être disposés à n’importe quel
endroit du panier inférieur. Ainsi vous pouvez effectuer des chargements divers en
fonction des pièces de vaisselle.
Vous pouvez disposer un panier à couverts
dans le panier supérieur
Si vos couverts ou vos plats sont trop
grands, modifiez le réglage en hauteur du
panier supérieur (si il est réglable).
fil gabarit
Page 8
Disposition de votre vaisselle Sélection d’un programme de lavage
12
13
①①
②②
Réglage en POSITION HAUTE :
Soulevez lentement votre panier jusqu’à entendre le premier clic de
chaque coté.
Réglage en POSITION BASSE :
Soulevez votre panier à fond des deux
cotés (clic) et raccompagnez le ensuite vers le bas.
selon modèle : Le chargement de grands plats dans le panier inférieur
nécessite le réglage du panier supérieur en position haute. Le réglage
peut être effectué panier chargé.
Vérifiez que le réglage des deux glissières est à la même hauteur : panier à l’horizontale
.
Vérifiez que votre
cordon électrique est branché et
votre robinet d’eau ouvert.
La signification des
symboles programmes est rappelée sur l’étiquette adhésive jointe
dans votre pochette documents.
Vous pouvez, si v ous le désirez, la
coller sur votre contre-porte de
votre lave-vaisselle.
Le voyant allumé parmi “ICS
AUTO-PROGRAMME”, “Eco Wash”
“Trempage” “Intensif”, “Bio”
ou “Fragile”, indique le programme sélectionné.
Pour changer cette sélection
appuyez sur une autre touche de
programme.
Appuyez sur la touche “Marche /
Arrêt” pour mettre l’appareil sous
tension.
Consultez le tableau des programmes, pages suivantes, pour
déterminer celui qui correspond le
mieux à la quantité et salissures de
votre vaisselle.
Appuyez sur la touche programme
de votre choix :
Orientez le creux des verres, des tasses, des bols vers le bas.
Votre panier supérieur
Ce panier est destiné plus particulièrement
à recevoir : les verres, les tasses, les
ramequins, les petits saladiers, les bols,
les soucoupes etc...
Rangez votre vaisselle de façon méthodique afin de gagner de la place (rangée
de verres, de tasses, de bols etc...).
Vous pouvez ranger également tasses,
louches etc... sur les supports escamotables ainsi qu’un panier à couverts.
Disposez les verres à pied le long de la
clayette.
La clayette vous permet de ranger les couverts de toutes dimensions, de la disposer
aussi bien dans le panier inférieur ou supérieur en retirant les clayettes supports
tasses.
Page 9

Les programmes de lavage
15
Présentation de votre lave-vaisselle
14
Les programmes de lavage
Mixte
Type de vaisselle :
- porcelaine, casseroles, couverts,
verres, etc...
Quantité, type,
état des résidus
alimentaires.
Programmes
Déroulement du
programme.
à titre indicatif
Durée en mn
eau (L)
énergie (Kwh)
Bio
Séchage par
condensation
Séchage par
condensation
Quantité normale
de résidus dessé-
chés et adhé-
rents : vaisselle
de tous les jours.
rinçage chaud
Mixte
Rapide =
Intensif+Bio
Séchage naturel
Faible quantité
de résidus peu
adhérents, vais-
selle non grasse :
service à café, à
desserts ou vais-
selle de tous les
jours.
rinçage chaud
rinçage
lavage 40°C
rinçage
lavage 50°C
Délicate
Fragile
Faible quantité
de résidus peu
adhérents :
verres ou porce-
laine fragile
sup-
portant mal les
températures éle-
vées.
rinçage chaud
rinçage
lavage 45°C
Intensif
Séchage par
condensation
Résistante
Mixte
Grande quanti-
té de résidus
desséchés et
adhérents,
salissures
cuites, graisse,
friture, gratin,
sauce etc..
rinçage chaud
rinçage
lavage 65°C
prélavage froid
Séchage par
condensation
Auto-Programme
adapté à la
quantité de
vaisselle et
tous les cas
de salissure.
Votre lave-vais-
selle optimise
les consom-
mations et la
durée du pro-
gramme selon
le degré de
salissure de la
vaisselle.
Mixte
Quantité norma-
le de résidus
desséchés et
adhérents :
vaisselle de tous
les jours.
rinçage chaud
rinçage
lavage 55°C
Séchage par
condensation
rinçage chaud
rinçage
lavage 55°C
prélavage froid prélavage froid
Mixte
Trempage
Ce cycle très
court permet de
réhumidifier
votre vaisselle
en attente du
lavage si celui-ci
n’a lieu que le
lendemain ou le
surlendemain.
175
16
1,05
Page 10
Présentation de votre lave-vaisselle
17
Présentation de votre lave-vaisselle
16
Départ et déroulement du programme
Départ immédiat du programme
Après avoir mis votre appareil sous tension et
choisi votre programme, appuyez sur la touche
“Départ”.
Refermez la porte, le programme commence.
Fin d’un programme
La fin du programme vous est signalée
par une sonnerie. Ce signal s’arrête dès
l’ouverture de la porte.
Vous avez la possibilité de supprimer
cette sonnerie en maintenant la touche
“trempage” enfoncée et en appuyant sur
la touche “Départ”
.
Un simple bip sonore valide l’opération.
Si vous désirez rétablir cette fonction
refaites la même opération, elle sera
validée par un double bip sonore.
Départ différé du programme
Après avoir sélectionné votre programme appuyez sur la touche de
“Départ
différé” une ou deux fois selon votre
choix de différer le programme de
3h,ou 6h.
Le voyant correspondant s’allume.
Validez en appuyant sur “Départ”.
Cette sonnerie est
désactivée automatiquement
lors de la sélection d’un départ
différé (option le plus souvent
utilisée la nuit).
Annulation d’un programme
Appuyez sur la touche “Départ
Annulation” pendant 2 secondes.
Le programme s’arrête, vous pouvez
reprogrammer.
Départ et déroulement du programme
auto-programme Avantages :
Selon votre usage ce programme
optimise le fonctionnement pour
obtenir le meilleur résultat de lavage
et séchage tout en réalisant des économies
d’énergie et de temps .
Option séchage renforcé :
Vous pouvez activer cette option :
Maintenez la touche “Intensif” enfoncée et appuyez sur “Départ”.
Le voyant “3 h” est éteint.
- Ré-appuyez sur “Départ” pour
sélectionner l’option de séchage
renforcé ; le voyant 3 h devient clignotant.
- Ré-appuyez sur “Départ” pour supprimer l’option ; le voyant 3 h s’éteint.
Page 11
19
18
Entretien courant
Procédez régulièrement au
nettoyage si nécessaire :
• Du pourtour de la porte, du joint
de porte, avec une éponge humide pour éliminer tout dépôt éventuel.
Tous les ans
Pour garantir durablement le bon
fonctionnement de votre lave-vaisselle, pensez à le nettoyer une ou
deux fois par an en effectuant un
programme intensif à vide avec un
produit de nettoyage spécial lavevaisselle vendu dans le commerce.
Arrêt prolongé
Nettoyez complètement votre lavevaisselle, puis débranchez l’alimentation électrique et fermez le robinet d’arrivée d’eau.
Maintenez votre lave-vaisselle hors
gel.
Pour la carrosserie
et le tableau de commande, utilisez uniquement de
l’eau et du savon.
Ne pas employer les poudres
abrasives, éponges métalliques,
et les produits à base d’alcool,
de diluant.
Utilisez un chiffon ou une éponge.
En cas de déménagement, pour éviter que de
l’eau s’écoule, effectuez auparavant un programme de trem-
page.
Entretien courant
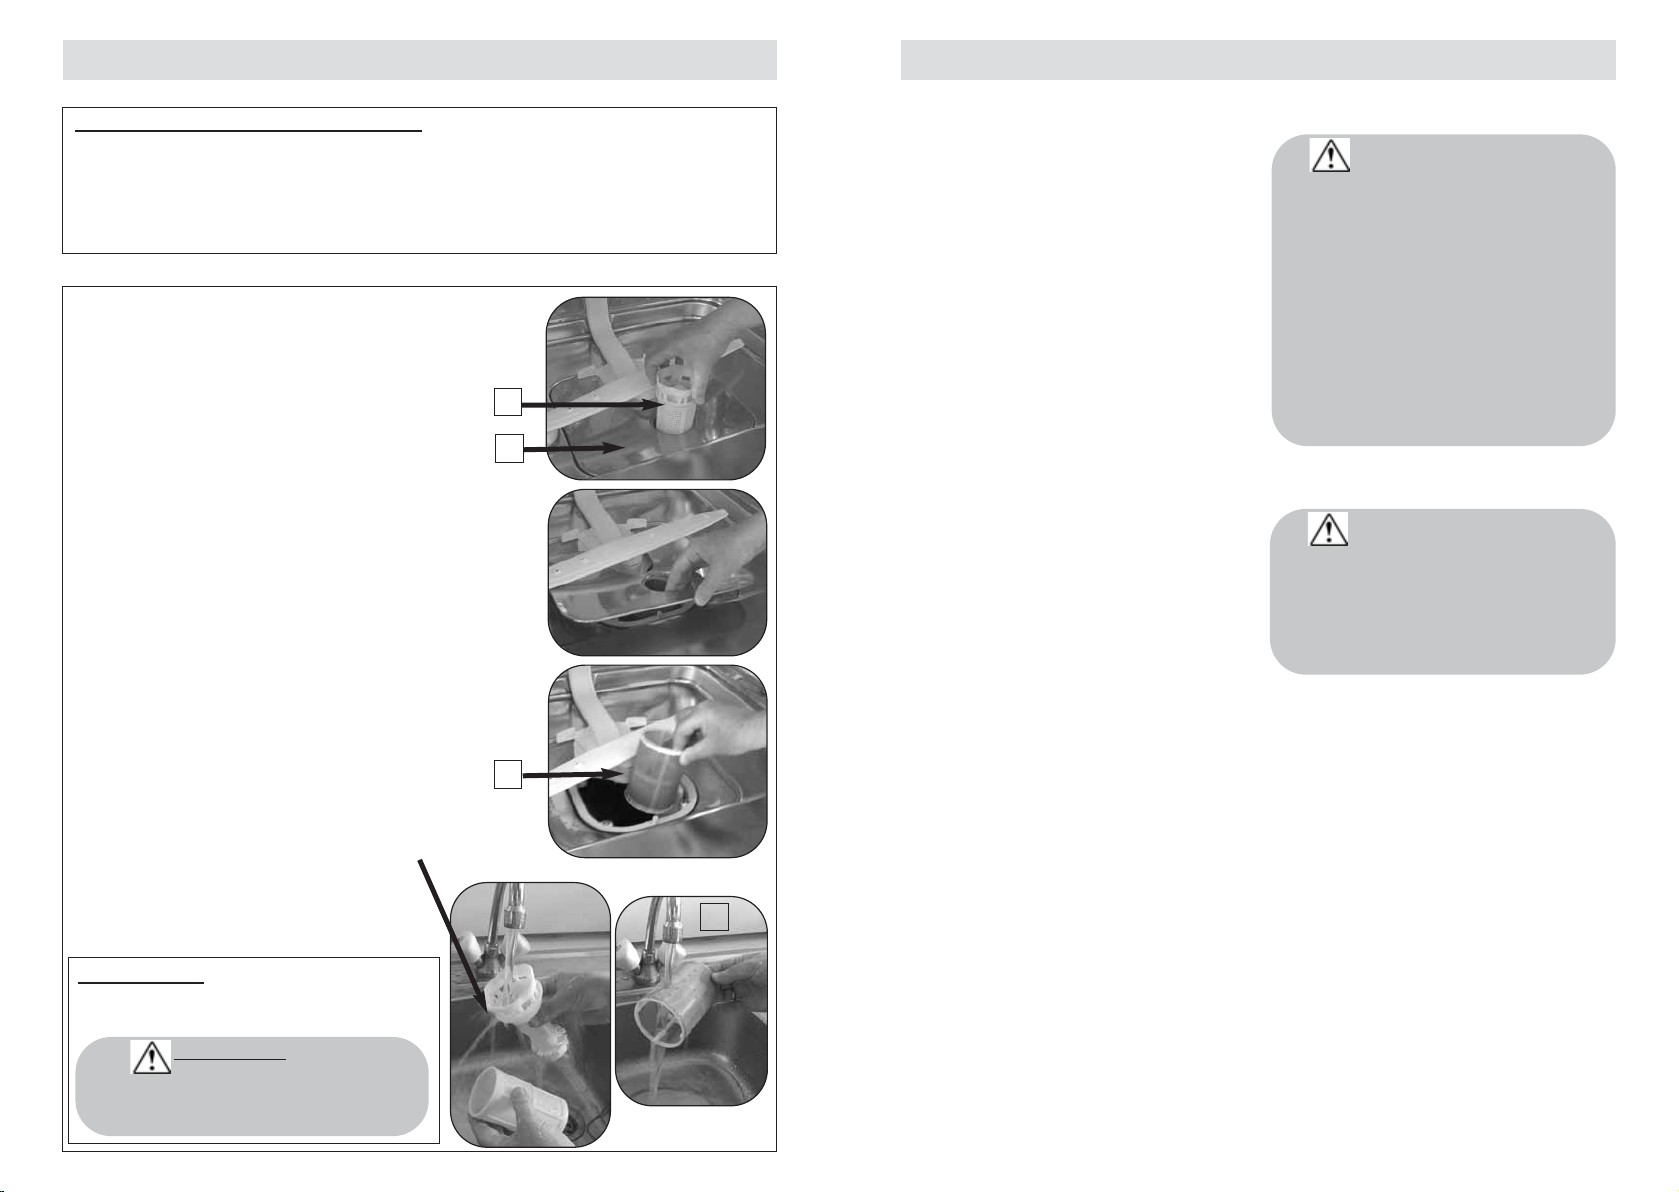
Nettoyage des filtres à déchets
Le système de filtration est composé de
plusieurs éléments :
A - Le filtre à déchets en deux parties.
B - Le grand filtre principal.
C - Le micro-filtre.
A
A - filtres à déchets
en 2 parties
➀➀
Avant le démontage des filtres, retirez les
déchets posés sur le filtre principal à l’aide d’une éponge pour éviter que ces
déchets ne bouchent les bras d’aspersion.
➁➁
Dévissez d’un quart de tour le filtre à
déchets puis le retirer.
③③
Retirez le filtre principal.
④④
Retirez le micro filtre.
Important N’oubliez
pas de verrouiller le
filtre à déchets en le tournant
d’un quart de tour.
B
C
Les filtres sont situés au
centre de la cuve et doivent être nettoyés régulièrement pour garantir
un résultat de lavage
optimal.
⑤⑤
Nettoyez soigneusement tous les
filtres sous l’eau courante.
Remontage :
Procédez dans l’ordre inverse.
C
Page 12

21
20
Protection de l’environnement
Recyclage de votre
emballage
La récupération et le retraitement de
l’emballage permettent d’économiser les matières et de réduire le
volume des déchets.
Remettez votre emballage au centre
de recyclage le plus proche.
Renseignez-vous auprès de la mairie
de votre ville.
Recyclage de votre
ancien lave-vaisselle
Si vous souhaitez vous débarrasser
de votre ancien appareil, rendez-le
totalement inutilisable. Détruisez le
système de fermeture de porte afin
que celle-ci ne ferme plus (des
enfants peuvent s’enfermer en
jouant à l’intérieur de l’appareil risque d’étouffement).
Coupez le câble d’alimentation électrique après avoir enlevé la fiche de
la prise de courant.
Apportez votre lave-vaisselle hors
service au centre de recyclage le
plus proche. Renseignez-vous
auprès de la mairie de votre ville.
Attention : Tenez tous
les matériaux d’emballage hors de
portée des enfants (ex. : sacs en
plastique, polystyrène etc.) car ils
peuvent être dangereux pour les
enfants : Risque d’étouffement.
Lavage économique et
écologique
Ne prélavez pas votre vaisselle à la
main (consommation d’eau inutile).
Exploitez pleinement les capacités
de votre lave-vaisselle. Le lavage
sera économique et écologique.
Choisissez toujours un programme
de lavage adapté au type de vaisselle et en fonction de son degré de
salissures.
Evitez les surdosages de détergents,
de sel régénérant et de liquide de
rinçage. Observez les recommandations inscrites dans cette notice
(pages 6 - 7 - 8) ainsi que les indications mentionnées sur les emballages de produits.
Assurez-vous du bon réglage de
l’adoucisseur d’eau (voir page 6).
- ajuster les pieds
réglables.
- régler les pieds AR
- décoller la lèvre du joint
sur tout le pourtour.
- vérifier présence joint et
resserrer écrou.
- fermer l'arrivée d'eau et
appeler un technicien.
- recentrer en réglant les
pieds AR.
- sortir de 10 cm l'appareil de sa niche, et serrer les 2 vis tendeurs.
- sortir de 10 cm l'appareil
de sa niche, et desserrer
les 2 vis tendeurs.
- équiper l'appareil d'un
panneau bois (panneau
agglo si provisoire), et
régler les ressorts.
- manœuvrer plus progressivement (jusqu'au
CLIC) => voir notice,
un côté puis l’autre.
- utiliser ces programmes
de préférence de nuit,
quand la durée et le
délai de fin ne sont pas
importants.
- appareil bancal, pas de
niveau.
- porte mal centrée par
rapport à la cuve.
- lèvre du joint applatie
pendant stockage.
- fuite au robinet.
- fuite provenant de l'appareil.
- appareil bancal ou porte
mal centrée par rapport
à la cuve.
- ressorts de porte pas assez
tendus pour compenser le
poids du panneau.
- ressorts de porte trop
tendus.
- absence de panneau
bois.
- mauvaise manipulation
(le panier est tiré trop
vite vers le haut).
- les programmes éco-
nomes en énergie durent
plus longtemps, car ils
compensent les T° plus
basses de lavage et
séchage par une durée
plus longue de brassage
et de séchage.
Petite fuite à la porte
Petite fuite autour ou
sous l'appareil
(déplacer l'appareil pour
mieux localiser la fuite)
La porte "accroche" à la
fermeture
La porte retombe lourdement à l'ouverture
(modèles intégrables)
La porte ouverte ne reste
pas à l'horizontale ou
remonte trop rapidement
(appareil intégrable)
Le panier supérieur ne
tient pas en position
haute
Le cycle dure trop longtemps.
Un conseil, une anomalie, que faire ?
Vous avez un doute sur le f onctionnement de votre appareil? Av ant de faire appel
à un professionnel, vérifiez les points suivants (en fonction du symptôme observé).
A la mise en service
Causes possibles
Que faut-il faire ?
lié à programmation, affichage
Causes possibles Que faut-il faire ?
Page 13

23
22
- annuler la programmation en cours en
appuyant 3 sec. sur la
touche départ, puis
refaire une nouvelle
programmation.
- faire le plein du réservoir,
et attendre la fin du cycle.
Dans le cas d'une eau
douce ne nécessitant pas
de sel, le voyant reste
allumé en permanence
.
- vérifier ampérage de la
prise (10A mini) et
capacité du compteur.
- appeler un technicien.
- vérifier prise et fusible
- vérifier ouverture du
robinet.
- vérifier le passage correct du tuyau.
- annuler en appuyant 3" sur
Départ et reprogrammer.
- faire juste une impulsion
sur touche Départ pour
lancer le programme.
- appeler un technicien.
- retirer l'opercule.
- vérifier passage correct du
tuyau derrière l'appareil.
- démonter et nettoyer
les filtres et le puits de
vidange.
- relancer un prog. trempage. Si défaut persiste,
appeler un technicien.
- programmation erronée.
- absence de sel, ou
quantité insuffisante de
sel dans le réservoir
pour déclencher le flotteur.
- ampérage insuffisant
pour alimenter tous les
appareils en service
simultanément.
- défaut interne à l'appareil.
- absence de tension secteur sur la prise.
- robinet fermé.
- tuyau d'alimentation
plié.
- erreur sélection et blocage programme.
- appui trop long (>2")
sur bouton départ.
- appareil en sécurité
(anti-fuite)
- opercule sur siphon
d'évier non retiré.
- tuyau vidange coudé.
- filtre vidange totalement obstrué.
- pompe bloquée.
Les voyants s'allument
tous les uns après les
autres
Le voyant sel ne s'éteint
pas
L'appareil fait disjoncter
L'appareil ne démarre pas
L'appareil ne vidange pas
Un conseil, une anomalie, que faire ?
lié à programmation, affichage
Causes possibles Que faut-il faire ?
Mauvais fonctionnement
Causes possibles Que faut-il faire ?
- démonter et nettoyer les
filtres et le fond du puits
de vidange, oter les plus
gros déchets des assiettes
avant de les mettre dans
le lave-vaisselle.
- phénomène normal
mais peu fréquent (lié à
T° de la pièce, courant
d'air…) seulement en
début de séchage.
- bien ranger la vaisselle,
utiliser les zones et
accessoires les mieux
adaptés à chaque type
de pièces (voir notice).
- vérifier libre rotation du
moulinet (fil gabarit),
régler le panier en position haute si besoin.
- vérifier placage et verrouillage du filtre (le
tourner "à fond" vers la
droite).
- démonter et nettoyer
tous les filtres (à l'eau
tiède), y compris le
tamis.
- augmenter la dose,
essayer une autre lessive.
- choisir programme
Température supérieure.
Beaucoup de déchets sur
le grand filtre en fin de
cycle
Apparition de vapeur 20
min. environ avant la fin
du cycle (modèle avec
séchage ventilé)
Traces alimentaires, redépositions, "grains de
sable" dans les verres
Traces graisseuses
- les filtres et le puits de
vidange sont bouchés
par excès de salissures.
- la vapeur du séchage
s'est trouvé en contact
avec un flux d'air froid.
- vaisselle mal disposée
(masquée par autre
pièce plus grande ou
située au-dessous,
pièces accolées, emboîtées).
- moulinet supérieur bloqué par couvert, plat..
- filtre mal verrouillé se
soulève pendant le lavage.
- tamis microfiltre encrassé.
- dose lessive trop faible,
lessive peu performante, produit éventé.
- programme mal adapté
(trop basse T°, durée
trop courte).
Un conseil, une anomalie, que faire ?
Mauvais fonctionnement
Causes possibles Que faut-il faire ?
Mauvais résultats de lavage
Causes possibles
Que faut-il faire ?
Page 14

25
24
- vérifier présence de sel
dans réservoir (voyant
éteint = OK).
- vérifier dureté de l'eau
au robinet et réglage
correct de l'adoucisseur.
Régler sur une plage
supérieure si besoin.
- eau trop dure pour une
utilisation lessive "3 en
1" sans rajout de sel.
- vérifier la bonne fermeture du bouchon de pot
à sel.
- vérifier dureté de l'eau
au robinet et régler correctement l'adoucisseur.
Certaines lessives en
pastilles sont plus
agressives sur verres et
décors (changer de produit, utiliser si besoin
un produit protecteur).
- orienter les creux vers
les jets.
- augmenter la dose,
essayer une autre lessive.
- cho
isir un programme
mieux adapté avec une
température plus élevée.
- vérifier voyant et remplir complètement le
réservoir, régler le
doseur si nécessaire à
position supérieure.
- remettre produit récent
(un bon produit se dilue
facilement et mousse
dans l'eau froide).
- pellicule calcaire (s'enlève au vinaigre).
- traces de sel (goût salé
sur vaisselle).
- opalisation du verre par
eau trop douce (ne s'efface pas).
- pièces de vaisselle mal
disposées.
- dose lessive insuffisante
ou lessive pas assez
performante.
- programme trop basse
température.
-
manque produit de rinçage ou dose insuffisante.
- produit de rinçage périmé ou inefficace.
Traces blanches
(identifier nature des
traces)
Traces colorées (thé, vin,
café, sang)
Traces de coulures ou
gouttes séchées sur
verres
Un conseil, une anomalie, que faire ?
Mauvais résultats de lavage
Causes possibles Que faut-il faire ?
Traces de rouille sur inox
Nombreuses gouttes sur
les verres
Gouttes sur vaisselle en
plastique, revêtement
téfal…
Moins bon séchage en
programme rapide
Condensation sur parois
de la contre-porte ou de
la cuve
- qualité inox (couteaux
en particulier) non
adaptés au lavage en
machine.
- manque produit de rinçage ou dose insuffisante.
- la dose n'est pas distribuée.
- positionnement de vaisselle.
- ces articles isolants ont
une faible masse calorifique.
- sur les programmes rapide, la T° et la durée de
séchage sont réduites
pour limiter la durée du
cycle au maximum.
- de la condensation peut
se produire sur les
parois, notamment
après refroidissement
(l'isolation phonique
renforce le phénomène).
- utiliser couverts “spécial
lave-vaisselle”.
- vérifier bonne fermeture
du bouchon pot à sel.
- vérifier voyant et remplir complètement le
réservoir.
- si le réservoir n'est pas
vide après environ 60
lavages, appeler un
technicien.
- pour atténuer le phénomène, disposer la vaisselle de façon à limiter le
plus possible les rétentions d'eau, laisser si
possible la porte entrouverte quelques minutes.
- les disposer au mieux
en privilégiant si possible le panier supérieur.
- sélectionner un programme rapide à bon
escient.
Un conseil, une anomalie, que faire ?
Mauvais fonctionnement
Causes possibles Que faut-il faire ?
Mauvais résultats de séchage
Causes possibles Que faut-il faire ?
Page 15

27
26
Indications pour laboratoire d’essais
✔ Capacité de lavage
✔ Dosage du produit de lavage
✔ Réglage du distributeur du produit de rinçage :
✔ Réglage panier supérieur
✔ Chargement effectué selon les indications page
suivante, sans clayettes latérales.
✔ Il est impératif d’effectuer un réglage de l’adou-
cisseur immédiatement supérieur à celui préconisé, en fonction de votre dureté d’eau, pour tenir
compte de l’absence de phosphate dans le détergent normalisé.
✔
Pour obtenir des informations détaillées
par rapport
aux tests comparatifs selon EN 50242 portant sur le
degré de salissure, le type de vaisselle et de couvert
etc..., contactez le fabricant de l’appareil avant le
débuts des
tests.
12 couverts
normalisés
30 g. lessive B
3
position haute
Indications pour laboratoire d’essais
Rangement de la vaisselle figures A - B - C voir page suivante.
selon la norme EN 50242 : Programme
selon la méthode mixte (IEC 436/DIN 44990) :
A
2
1
1 2 3 4 5 6 7 8
3
B
7
8
8
4
2
1
6
6
8
5
1
2
2
8
C
Page 16

29
Please read your dishwasher’s installation
and operating manuals carefully so that your
machine will provide full and complete satisfaction. These will enable you to discover all
the advantages of this machine and put them
to best use.
28
Contents
Please read carefully Precautions when using
Environmental protection Advice, tips and remarks
Page
1 -
Description of your dishwasher . . . . . . . . . . . . . . .30-31
2 - What to do before using the machine for the first time . . . . . .32-35
Step 1: Adjusting the water softener – Measuring the water hardness 32
Setting on the control panel . . . . . . . . . . . . . . . . . . . . . .32
Filling the regenerating salt reservoir . . . . . . . . . . . . . . . .33
Step 2:
Rinse aid – Filling – Setting . . . . . . . . . . . . . . .34
Step 3: Washing products . . . . . . . . . . . . . . . . . . . . . . .35
3 - Loading the dishwasher . . . . . . . . . . . . . . . . . . . . .36-38
Loading the dishwasher . . . . . . . . . . . . . . . . . . . . . . . . .36-38
4 - Selecting a washing programme . . . . . . . . . . . . . .39
The washing programmes . . . . . . . . . . . . . . . . . . .40-41
5 -
Starting the programme, the programmes’ different cycles 42-43
Immediate start – Delayed start – Programme end . . . . . .42
Cancelling a programme - ICS Auto-programme : the advantages 43
6 - Running maintenance . . . . . . . . . . . . . . . . . . . . . .44-45
Cleaning the waste filters . . . . . . . . . . . . . . . . . . . . . . . .44
Cleaning and maintenance . . . . . . . . . . . . . . . . . . . . . . .45
7 - Protecting the environment . . . . . . . . . . . . . . . . . .46
Recycling the packaging . . . . . . . . . . . . . . . . . . . . . . . . .46
Recycling your old dishwasher . . . . . . . . . . . . . . . . . . . .46
Washing ecologically and economically . . . . . . . . . . . . . .46
8 - Troubleshooting, what to do? . . . . . . . . . . . . . . . . .47-51
9 - Instructions for laboratory tests . . . . . . . . . . . . . . .52-53
AFTER SALES SERVICE
In the unlikely event of there being a problem please call the number below quoting the
model number of your appliance – this can be found on its rating plate. Our trained staff
are available to advise or book a service call to one of our authorised service agents.
For any other information on our products
please contact us at:
Brandt UK Ltd
Intec 4
Wade Road
Basingstoke
RG24 8NE
Tel: 01256 308000
SERVICE LINE TEL: 01159 766937
MON - SAT 9 am - 6 pm
SUN - 10 am - 4 pm
Page 17

Description of your dishwasher
31
START/STOP: Press
this button to switch
your dishwasher on.
START/CANCEL:
Pressing this button
starts this programme. Holding
the button pressed
down for 2 seconds
cancels the
Programme.
DELAYED START:
Press this button to
delay the end of
the programme by
3 or 6 hours.
PROGRAMME
BUTTONS: Press one of
these buttons to select your
programme.
SALT LIGHT: This indicates that there is no
regenerating salt.
RINSE AID LIGHT:
This indicates that
there is no rinse
aid.
The control strip in the top of the door can be seen
when you open the door
Description of your dishwasher
30
The above photograph of the machine with the lower basket removed
shows you all the main components described in these operating
instructions.
Regenerating
salt reservoir
Waste filters
Washing product
container
Rinsing agent
container
Lower sprinkling
arm
Information
plate (After-
Sales service
reference)
Drying valve
(depending on
the model)
Upper basket
Main filter
Anti-blocking
size wire
Control strip
(Described on the next
page)
Your dishwasher is fitted with safety systems protecting you from flooding:
The ANTI-OVERFLOW SYSTEM. This system automatically activates
the drain pump if the water in the tub reaches an abnormal level.
The ANTI-LEAK SYSTEM. This system cuts off the water supply if a
leak is detected under the machine.
The ANTI-BURSTING HOSE. This reinforced water supply hose is fitted with a mechanism that cuts off the water supply directly at the tap
if a water leak occurs.
Page 18

Présentation de votre lave-vaisselle
33
What to do before using the machine for the first time
Indication of the level of
regenerating salt
SALT indicator light:
This illuminates showing salt
needs to be added. After you have
refilled the salt reservoir, the light
may still remain lit until the salt
has dissolved sufficiently, generally
after one cycle (or if the reservoir
has not been completely filled, for
instance when putting the
machine into operating using the
sample.
If the water is especially soft and does not require
the use of any regenerating salt, the
SALT light remains lit.
Présentation de votre lave-vaisselle
32
What to do before using the machine for the first time
You must fill the salt reservoir with water before
using the machine, even if the water softener setting
selected does not require any regenerating salt.
If you move house and take the dishwasher with you you will
need to check the water hardness and adjust accordingly.
For good wash results it is very important to set the dishwasher
to the correct level of water hardness and to set the correct
level of rinse aind (see page 34)
STEP 1: Adjusting the water softener
For impeccable washing and drying results with no streaks.
➀➀
-
Measuring the water hardness
To do this: contact your local water supplier to find out the water
hardness level and adjust on the machine as described below.
The water softener must be adjusted correctly to ensure no streaks
after washing and drying.
Your dishwasher is fitted with a water softening system that operates
using regenerating salt.
You must set the water softener according to the hardness of the water
in your area.
➁➁
-
Setting on the control panel
“Soak” light permanently lit
“Soak” light permanently lit
“Intensive” light permanently lit
“Soak” light flashing
Salt
required
0 - 10°F
10 - 18°F
18 - 25°F
25 - 40°F
40 - 55°F
55 - 70°F
NO
YES
YES
YES
YES
YES
Water softener setting
Water
hardness
Testing strip
While holding down the “ICS” button, press the “Start” button: the
“Soak” or “Intensive” programme light will illuminate –and either flash
or be permanently lit – to show the water softener’s setting in accordance with the above table.
When the machine is first switched on, the setting is 10 - 25°F (“Soak”
light permanently lit).
To change the setting, press the “ICS” button repeatedly until you
reach the water softener setting recommended by the testing strip.
“Intensive” light flashing
“Soak” light permanently lit
> 70°F
YES
“Intensive” light flashing
③③
Filling the regenerating salt reservoir
You must fill this, with water just
before starting your first wash then
add the salt:
Filling with salt is essential to obtain a good
wash with no streaks. The salt regener-
ates the resins, which soften the water by
removing its limestone content unless
the water is already sufficiently soft
(see “Adjusting the water softener”).
Salt reservoir
Should any regenerating salt overflow when filling,
we recommend that you remove the loose salt crystals
to avoid oxidising the machine.
Never put detergent in this reservoir: this will ruin
the water softener.
- Unscrew the salt reservoir’s stopper and
remove it.
- Use the funnel to introduce the salt.
(available from the after-sales department
under reference : 31X3964).
- Fill the reservoir with regenerating salt
specially designed for dishwashers.
- On the first time, add
water until it reaches the
edge of the reservoir.
- Screw the salt reservoir’s stop
back in fully.
Do not use kitchen salt.
SALT
Page 19

Présentation de votre lave-vaisselle
35
What to do before using the machine for the first time
For easy loading, the detergent container is located on the front of the
upper basket.
The detergent container is designed to take tablets powder or liquid
recommended for dishwasher use.
VERY IMPORTANT:
- For good wash results it is recommended to use individual
detergent, salt and rinse aid products.
- However “2 in 1” tablets (detergent and rinse aid) can be
used, if so, you may need to adjust the rinse aid dial according
to the wash results (see page 34)
- Good wash results depend on getting the salt + rinse aid
levels set correctly according to use level of water hardness
(see pages 32-35).
Tablets
Place the tablet in the compartment.
underneath the top basket.
Only use the washing
products specially desi-
gned for dishwasher use.
Powder or liquid
Pull the container out to fill it with liquid detergent or powder.
Fill it up to the Minimum mark for lightly soiled
items.
Fill it up to the Maximum mark for dirty items.
Close the container.
Keep all these products out of children’s
reach and away from
any damp environments.
STEP 3: the washing products
for a clean wash
Présentation de votre lave-vaisselle
34
What to do before using the machine for the first time
➁➁
Adjustment (if necessary)
The original setting is in the middle
(Medium position: setting 2).
After a few cycles, if there are streaks or
the drying is poor, you can adjust the setting using the adjustment lever:
- Setting 1 to reduce the dose, (soft water)
- Setting 3 to increase the dose
(hard water)
Contents: 120 ml (approx. one glass)
Should any regenerating salt
overflow when filling, mop up the
excess to avoid foam forming.
➀➀
Filling
When putting the machine into operation, fill the container level with the
top of the adjustment lever.
Put in at least all the contents of the
sample supplied.
Close the container tightly
Adjustment lever
The rinse aid indicator light:
This illuminates showing rinse aid must be added.
Opaque: some product remaining
Brilliant: container empty
Indicator:
STEP 2: Rinse aid
For brilliant and very dry results
Page 20

Présentation de votre lave-vaisselle
37
Loading the dishwasher
Important note:
For safety reasons, we recommend that you arrange any
knives with pointed ends point downwards in the cutlery baskets (to avoid accidents).
Any long-bladed knives and other sharp kitchen utensils should
be placed flat in the upper basket.
Cutlery
Removable lids are available if you wish
to organise the loading of your cutlery.
For optimum washing and drying, use
these separation lids fully or partially.
- Place your cutlery with the handles at
the bottom.
- Avoid washing cutlery with horn handles in your machine.
- Separate silverware from cutlery in
other metals using the separation
grills.
The sliding cutlery baskets
These can be arranged in any position
in the lower basket. You can therefore
arrange different loads according to the
items you wish to wash.
You can place a cutlery basket in the
upper basket.
If your cutlery or your plates are too
large, adjust the height of the upper
basket (it is height-adjustable).
Présentation de votre lave-vaisselle
36
Loading the dishwasher
The lower basket
Lay the items out so that the water can
circulate freely and spray all the utensils.
Place the plates and the wide pots and
pans at the sides.
Do not intersperse or superimpose plates
and dishes or place them side-by-side.
The fold-down spikes help you to
arrange your large items (depending on
the model).
No items should interfere with the rotation of the
washing arms (pot handles, cutlery, etc.)
Unloading the dishwasher
First of all empty the lower basket to avoid any drops of water
falling onto it from the upper basket.
Items unsuitable for dishwasher use
- Wooden cutting boards
- Oxidisable steel or non heat-resistant plastic utensils,
- Pewter or copper items,
- Glued items,
- Cutlery with wooden, horn or mother-of-pearl handles,
- Antique or hand-painted porcelain.
When purchasing crockery, glassware, cutlery, etc., ensure that they
are suitable for use in a dishwasher.
Anti-blocking
size wire
Page 21

Présentation de votre lave-vaisselle
39
Selecting a washing programme
Check that the
power cable is plugged in the soc-
ket and that the water tap is open.
The meaning of the
programme symbols is shown
on the adhesive label included in
your documents pouch. If you
so wish, you can stick this on
the inside of the dishwasher
door.
The following indicator lights light
up :
“ICS
AUTO-PROGRAMME
”,
“Eco
Wash”
“Soak” “Intensive”,
“Bio” or “Fragile”,
shows the
programme selected.
To change the selection, press a
different programme button.
Press the “On / Off” button to
switch the machine on.
Refer to the Programmes table
on the following pages to determine the best programme for the
amount of washing up and how
dirty it is.
Press the button for the programme you have selected
Présentation de votre lave-vaisselle
38
Loading the dishwasher
①①
②②
Adjusting to the HIGH POSITION:
Gently lift the basket until you hear
the first “Click” on both sides.
Adjusting to the LOW POSITION:
Lift the basket at the back on both sides
(“Click”) and then gently lower it.
Depending on the model: when loading large plates into the lower
basket, you may have to adjust the height of the upper basket. This
can be done even when the basket is full.
Check that the slides are both at the same height and that the basket is level.
Place glasses, cups and bowls facing downwards.
The upper basket
This basket is designed in particular to
take: glasses, cups, ramekins, small
salad bowls, bowls, saucers, etc.
Arrange the items methodically to save
space (a row of glasses, cups, bowls,
etc.).
You can also place cups, ladles, etc. on
the foldaway brackets as well as in a
cutlery basket.
Arrange stemmed glasses along the
wire shelf.
The wire shelf enables you to load cutlery of any size, arranging it either in
the lower or upper basket by removing
the cup-holding shelves.
On / Off
Page 22

Présentation de votre lave-vaisselle
41
The washing programmes
Mixed
Bio
Drying by
condensation.
Drying by
condensation.
Normal amount
of dried-on and
adhering
residue: everyday items
Hot rinse
Mixed
Rapid =
Intensive+Eco
Natural drying
Small amount of
easy to remove
residue, nongreasy items:
coffee cups,
dessert bowls or
everyday items.
Hot rinse
Rinse
Wash at 40°C
Rinse
Wash at 50°C
Delicate
Fragile
Small amount of
easy to remove
residue: glass or
fragile porcelain
with poor resistance to high
temperatures.
Hot rinse
Rinse
Wash at 45°C
Intensive
Drying by
condensation.
Resistant
A large amount
of dried-on
and adhering
residue,
baked-on
stains, grease,
residue from
frying, cooked
cheese, sauce,
etc.
Hot rinse
Rinse
Wash at 65°C
Cold pre-wash
Présentation de votre lave-vaisselle
40
The washing programmes
Type of items:
-Porcelain, pans,
cutlery, glasses, etc.
Quantity, type,
amount of food
residue.
Programmes
Programme
cycle.
For information
only
Programme time
Mixed
Drying by
condensation.
100 - 125 mins. 175 mins.
14 mins. 120 mins. 145 mins. 70 mins. 30 mins.
Auto-Programme
adapted to the
amount of items
and all levels of
residue.
Your dishwasher
optimises con-
sumption and
the length of
the programme
depending on
how dirty the
items are.
Hot rinse
Rinse
Wash at 55°C
Mixed
Drying by
condensation.
Normal amount
of dried-on and
adhering
residue: everyday items
Hot rinse
Rinse
Wash at 55°C
Cold pre-wash
Mixed
Soak
This very short
cycle enables
you to rinse
through your
items while
waiting to
wash them
until the following day or
even the day
after.
Cold pre-wash
Page 23

Présentation de votre lave-vaisselle
43
Starting the programme, the programmes’ different cycles
Cancelling a programme
Hold down the “Cancel Start”
button for two seconds.
The programme will stop and you
can then re-programme.
ICS - auto-programme
advantages:
Depending on how you use it, this
programme optimises the machine’s
operation to produce the best washing and
drying results, while saving time and energy.
Extra drying option all
programmes except Rapid:
You can activate this option by
holding down the “Intensive” button and pressing “Start”.
The “3 h” light is unlit.
- Repress “Start” to select the
extra drying option; the 3 h light
starts flashing.
- Repress “Start” to cancel the option; the 3 h light goes out.
Présentation de votre lave-vaisselle
42
Starting the washing programme
immediately
Switch the machine on and select your
programme. Press the “Start” button.
Close the door and the programme will
start.
Programme end
The end of the programme is indicated
by a buzzer. The buzzer stops as soon
as you open the door.
The buzzer can be cancelled by
holding down the “Soak” button and
pressing “Start”.
A single beep confirms the operation.
If you wish to reset the buzzer, repeat
the same operation. This will be confirmed by a double beep.
Delaying the start of the programme
After selecting your programme, press
the “Delayed Start” button once or
twice depending on whether you wish
to delay the programme by 3 or 6
hours.
The corresponding indicator light illuminates.
Confirm by pressing “Start”.
The buzzer is
automatically deactivated
when you select a delayed
start (the option most often
used at night).
Starting the programme, the programmes’ different cycles
Page 24

Présentation de votre lave-vaisselle
45
Running maintenance
Regularly proceed to clean (if
required):
All around the door and the door
seal with a damp sponge to
remove any deposits.
Every year
To ensure your machine’s longterm operation, clean it once or
twice a year by running an
Intensive programme with the
machine empty, using a commercially available special dishwasher
cleaning product.
Prolonged stoppage
Clean your dishwasher completely,
then disconnect the power supply
and close the water tap.
Keep your machine away from the
risk of frost.
Only use soap and
water on the casing
and the control panel.
Do not use abrasive powders,
metal sponges, alcohol-based
products or thinners.
Use a soft cloth or a sponge.
If you are moving,
to avoid any water leaking,
first of all run a soak program-
me.
Présentation de votre lave-vaisselle
44
Running maintenance
Cleaning the waste filters
The filtration system consists
of several components:
A – The two-part waste filter
B – The main filter
C – The micro-filter
The filters are located in the middle of the tub and must be
cleaned regularly to ensure opti-
mum washing results.
A
A - Two-part waste filters.
➀➀
Before removing the filters, remove any
waste from the main filter with a sponge to avoid the waste blocking the
sprinkling arms.
➁➁
Unscrew the waste filter a quarter turn
and remove it.
③③
Remove the main filter
④④
Remove the micro-filter.
Important: Do not
forget to lock the
waste filter by turning it a
quarter turn.
B
C
⑤⑤
Carefully clean all the filters
under running water.
To re-inset the filters
Follow the above instructions in
reverse.
C
Page 25

- The machine is wobbly,
not level
- The door is not correctly centred on the tub
-
The seal’s lip has been
flattened during storage.
- Leak at the tap
- Leak in the machine
- The machine or the
door is not correctly
centred on the tub
- The door springs are
not tensioned enough
to compensate for the
weight of the basket.
- The door springs are
over-tensioned.
- No wooden panel
- Poor handling (the basket has been pulled
upwards too quickly).
- The energy-saving pro-
grammes take longer
because they compensate for the lower washing and drying temperatures by longer agitation
and drying.
- Adjust the adjustable
feet
- Adjust the rear feet
- Take off the door seal
all around the door.
- Check that the seal is pre-
sent and re-tighten the nut
- Close the water tap and
call an engineer.
- Recentre the door by
adjusting the rear feet.
- Contact the installer.
- Pull the machine out
10cm and tighten the 2
tensioning screws.
- Contact the installer.
- Pull the machine out
10cm and tighten the 2
tensioning screws.
- Fit a wooden panel to the
door (a chipboard panel OK
if on a temporary basis)
and adjust the springs.
- Contact the installer.
- Move the basket gradually on one side and
then the other (until
you hear a “Click”) = ->
see the Operating Instructions.
- Use these programmes
preferably at night
when the length and
the finishing time are
not important.
Small door leak
Small leak around or
under the machine (move
the machine to locate the
leak better)
The door “catches” when
you close it
The door falls down
heavily when you open it
(integratable models)
The door is not level
when open or goes back
up too quickly (integratable machine)
The upper basket will not
stay in the high position
The cycle takes too long.
Présentation de votre lave-vaisselle
47
Troubleshooting, what to do?
If you are in any doubt about the operation of your machine, before calling a qualified engineer, check the following points (depending on the symptoms noticed).
When first using the machine
Possible causes
What to do
Programming, display anomalies
Possible causes What to do
Présentation de votre lave-vaisselle
46
Protecting the environment
Recycling the packaging
Recovering and reprocessing
packaging material saves on
material and reduces the amount
of waste.
Take your packaging to the nearest recycling centre. Contact your
town’s local authorities for
details of its location.
Recycling your old
dishwasher
If you wish to dispose of your old
dishwasher, make it completely
unusable. Break the door lock so
that it cannot close (children can
become locked in when playing
inside the machine – risk of suffocation).
Remove the electrical plug and
cut off the power cable.
Take your unusable machine to
the nearest recycling centre.
Contact your town’s local authorities for details of its location.
Warning: Keep all the
packaging materials out of children’s
reach (e.g. plastic bags, polystyrene, etc.): these can be dangerous
for children: risk of suffocation).
Washing economically and
ecologically
DO not wash the items first by
hand (unnecessary waste of
water). Use your dishwasher’s
capacity to the full. You will then
wash economically and ecologically.
Always select a washing programme suitable for the type of
items and how dirty they are.
Do not overdose with detergent,
regenerating salt or rinse aid.
Follow the recommendations in
these instructions (Pages 32 - 33
- 34) and the manufacturer’s
instructions on the pack.
Ensure that the water softener is
set correctly (see Page 32)
Page 26

- Wrongly programmed.
- No salt or too little salt
in the reservoir to trigger the float.
- Insufficient amperage to
supply all the equipment being used at the
same time.
- Internal fault in the
machine
- No power supply to the
socket
- The tap is closed
- The water supply hose
is kinked
- Programme selection
error and programme
blocked
- “Start” button held down
too long (> 2 seconds)
- Safety system (anti-leak)
- Protective cover on the
sink’s U bend not removed
- Drainage hose kinked
- Drain filter totally
blocked
- Pump blocked.
Présentation de votre lave-vaisselle
49
-
Remove the filters and
clean them and the drain
hole. Remove any large
amounts of residue from
the plates before placing
them in the dishwasher.
- A normal but infrequent
occurrence only when
drying starts (connected with the temperature of the room,
draughts, etc.).
- Arrange the items correctly; use the most suitable areas and accessories for each type of
item (see Operating
Instructions).
- Check that the agitator
rotates freely (sizing
wire), set the basket to
the High position if necessary.
- Check the seating and
the tightness of the filter (screw it in fully to
the right).
- Remove and clean all the
filters (with warm water),
including the sieve.
-
Increase the amount of
detergent; try another
detergent.
- Select a programme
with a higher temperature.
A lot of residue left on
the main filter at the end
of the cycle.
Steam appears approx.
20 minutes before the
end of the cycle (model
with ventilated drying).
Traces of food, deposits,
“grains of sand” in the
glasses.
Greasy marks.
- The drain hole and the
filters are blocked by
too much residue.
- The steam from drying
is in contact with a flow
of cold air.
- The washing up has
been badly arranged
(items masked by
another, larger item or
placed under it, items
side by side or nesting
together).
- The upper agitator is
blocked by cutlery,
plates, etc.)
- The filter is not screwed
in tightly and is lifting
during washing
- The micro-filter’s sieve
is clogged.
- Too little detergent,
poor detergent, stale
detergent.
- Unsuitable programme
(temperature too low,
not long enough).
Troubleshooting, what to do?
Poor operation Possible causes What to do
Poor washing results
Possible causes
What to do
Présentation de votre lave-vaisselle
48
- Cancel the current programme by holding
down the “Start” button
for 3 seconds and then
reprogramme.
-
Fill the reservoir and
wait until the cycle
ends. If the water is
soft enough not to
require salt, the Salt
light is permanently lit.
- Check the plug’s ampe-
rage (10A minimum)
and the meter’s capacity
- Call an engineer.
- Check the socket and
the fuse
- Check that the tap is
open
- Check that hose run
- Cancel by pressing
“Start” for 3 seconds
and reprogramme
- Press “Start” only briefly
to start the programme
- Call an engineer.
- Remove the protective
cover
- Check the hose runs cor-
rectly behind the machine
- Remove the filters and
clean them and the
drain hole
- Start a soak programme. If the fault
persists, call an engineer.
The lights light up one
after another
The Salt light does not go
out
The machine cuts off
The machine will not
start
The machine does not
drain.
Troubleshooting, what to do?
Programming, display anomalies
Possible causes What to do
Poor operation Possible causes What to do
Page 27

Présentation de votre lave-vaisselle
51
Traces of rust on stainless
steel
A lot of drops on the
glasses
Drops on plastic glasses,
Tefal coatings, etc.
Drying is less good in
rapid programmes.
Condensation on the
walls of the inner door or
the tub.
- The quality of the stainless steel (in knives in
particular) is unsuitable
for washing in a machine.
- Insufficient or no rinse
aid.
- The dose has not been
distributed.
- Position of the items.
- These insulating items
have a low calorific
mass.
-
In the rapid pro-
grammes, the drying
temperature and the
drying time are reduced
to restrict the length of
the cycle to a minimum
level.
-
Condensation may form
on the walls, particularly after cooling down
(sound insulation
increases its occurrence).
- Use special “dishwasher-safe” cutlery
- Check that the salt pot’s
stopper is firmly closed.
- Check the indicator light
and fill the reservoir
completely.
- If the reservoir is not
empty after approximately 60 washes, call
an engineer.
- To relieve the problem,
arrange the items so as
to restrict as much as
possible any water
retention: if possible,
leave the door ajar for a
few minutes.
- Arrange them optimally,
prioritising the use of
the upper basket if possible.
- Select the most appropriate rapid programme.
Troubleshooting, what to do?
Poor operation
Possible causes What to do
Poor washing results Possible causes What to do
Présentation de votre lave-vaisselle
50
- Check that there is salt
in the reservoir (light
unlit = OK)
- Check the water hardness
at the tap and that the
water softener is set correctly. Set it on a higher
setting if necessary.
- Wate
r too hard for using
a “3 in 1” detergent
(not recommended).
- Check that the salt pot’s
stopper is firmly closed.
- Check the water hardness at the tap and that
the water softener is
set correctly. Some
detergent tablets are
more aggressive to
glasses and decorations
(change the detergent,
use a protective product
if necessary).
- Turn the open ends (of
glasses, bowls, etc.)
towards the jets
- Increase the amount of
detergent
- Select a more suitable
programme, with a
higher temperature.
- Check the indicator light
and fill the reservoir
completely, set the dispenser to the upper
position if necessary.
- Replace with a recent
agent (a good rinse aid
dilutes easily and foams
in cold water).
- Chalky film (can be
removed with vinegar).
- Traces of salt
(item ahs a salty taste)
- Opalisation of the glass
because water too soft
(cannot be removed).
- Items poorly arranged
- Not enough or poor
detergent
- Programme with too
low a temperature.
- Insufficient or no rinse
aid.
- Poor or out-of-date
rinse aid.
White marks
(Identify the nature of
the marks)
Coloured marks (tea,
wine, coffee, blood)
Run marks or dried
droplets on the glasses
Troubleshooting, what to do?
Poor washing results Possible causes What to do
Page 28

Présentation de votre lave-vaisselle
53
Instructions for laboratory testsPrésentation de votre lave-vaisselle
52
✔ Washing capacity
✔ Detergent dose
✔ Detergent dispenser setting
✔ Setting for the upper basket
✔ Loaded in accordance with the instructions on the
following page, with no side shelves.
✔ The water softener MUST be set to a setting
immediately higher than that recommended,
depending on the water hardness, to take into
account the lack of phosphate in standardised
detergents.
✔ For more information on the comparison tests in
accordance with EN 50242 regarding the level of
soiling, the type of items, etc., please contact the
manufacturer of the machine before commencing
testing.
12 standardised
place settings
30g of detergent B
3
High position
Instructions for laboratory tests
Arrange the items as shown in Figures A – B – C (see following page)
in accordance with EN 50242 : standard: Eco Programme
and the Mixed method (IEC 436/DIN 44900) :
A
2
1
1 2 3 4 5 6 7 8
3
B
7
8
8
4
2
1
6
6
8
5
1
2
2
8
C
Page 29

DK
55
54
DK
Læs venligst betjenings- og installationsvejledningen
grundigt igennem, så De kan få glæde af maskinen i
mange år fremover.
Når De læser vejledningen, vil De opdage alle fordelene ved
opvaskemaskinen og hvordan De bedst gør brug af dem.
Indhold
Læses omhyggeligt OBS!
Miljøbeskyttelse
Praktiske råd og tips
Side
1 - Oversigt over opvaskemaskinen . . . . . . . . . . . . .56-57
2 - Iden opvaskemaskinen tages i brug 1. gang . . .58-61
Trin 1: Indstilling af vandblødgøringsanlægget -
Måling af vandets hårdhedsgrad . . . . . . . . . . . . . . . . . . .58
Indstilling på betjeningspanelet . . . . . . . . . . . . . . . . . . . .58
Påfyldning af filtersalt . . . . . . . . . . . . . . . . . . . . . . . . . . .59
Trin 2
: Afspændingsmiddel - påfyldning og indstilling . . .60
Trin 3
: Opvaskemiddel . . . . . . . . . . . . . . . . . . . . . . . . .61
3 - Fyldning/tømning af opvaskemaskinen . . . . . . .62-64
Den nederste kurv - Bestikket - Den øverste kurv . . . . . . . .
62-64
4 - Valg af opvaskeprogram . . . . . . . . . . . . . . . . . . .65
Programmerne . . . . . . . . . . . . . . . . . . . . . . . . . . .66-67
5 - Programstart og -forløb . . . . . . . . . . . . . . . . . . .68-69
Øjeblikkelig start - Forskudt start - Programslut . . . . . . . .68
Annullering af program - ICS AUTO PROGRAM: Fordele . .69
6 - Løbende vedligeholdelse . . . . . . . . . . . . . . . . . . .70-71
Rengøring af siene . . . . . . . . . . . . . . . . . . . . . . . . . . . . .70
Rengøring og vedligeholdelse . . . . . . . . . . . . . . . . . . . . .71
7 - Miljøbeskyttelse . . . . . . . . . . . . . . . . . . . . . . . . . .72
Genbrug af emballagen . . . . . . . . . . . . . . . . . . . . . . . . .72
Genbrug af den gamle opvaskemaskine . . . . . . . . . . . . . .72
Økonomisk og miljøvenlig opvask . . . . . . . . . . . . . . . . . .72
8 - Mindre driftsforstyrrelser . . . . . . . . . . . . . . . . . .73-77
9 - Oplysninger til forsøgslaboratorier . . . . . . . . . .78-79
Page 30

DK
57
56
DK
Oversigt over opvaskemaskinen
TÆND/SLUK: Med
denne knap tændes eller
slukkes opvaskemaskinen.
START /
ANNULLER: Tryk på
denne knap for at
starte programmet.
Ved at trykke på
knappen i 3 sek.
afbrydes programmet.
FORSKUDT START:
Ved tryk på denne
knap forskydes programmets sluttidspunkt med 3 eller 6
timer.
PROGRAMKNAPPER: Tryk
på en af disse knapper for
at vælge opvaskeprogram.
INDIKATOR FOR SALT:
Denne lampe lyser, hvis
der mangler filtersalt i
maskinen.
INDIKATOR FOR
AFSPÆNDING:
Denne lampe lyser,
hvis der mangler
afspændingsmiddel.
Ved åbning af opvaskemaskinens låge kommer be-
tjeningspanelet til syne.
Oversigt over opvaskemaskinen
På ovenstående billede er den nederste kurv taget ud, så det er muligt at
se opvaskemaskinens vigtige dele, som beskrives i denne brugsvejledning.
Filtersaltbeholder
Grovsi
Sæbedispenser
Beholder til
afspændingsmiddel
Nederste
spulearm
Typeskilt (op-
lysning til kundeservice)
Turbotørring
(modelafhængigt)
Øverste kurv
Finsi
Stang til at forhindre en
evt. blokering
Betjeningspanel
(se oversigt næste side)
Opvaskemaskinen er udstyret med sikkerhedssystemer, der beskytter
mod vandskader:
- SIKRING MOD OVERLØB. Dette system aktiverer automatisk afløbspumpen, hvis vandstanden i maskinen skulle blive unormalt høj.
- SIKRING MOD LÆKAGE. Dette system afbryder for vandtilførslen,
hvis der konstateres en utæthed under maskinen.
- Maskinen er udstyret med en EXTREMT STÆRK SLANGE. Denne
tilløbsslange er forsynet med en mekanisme, der afbryder for vandtilførslen ved hanen i tilfælde af lækage.
Page 31

DK
59
58
DK
Før opvaskemaskinen tages i brug 1. gang
③③
Påfyldning af filtersalt
Påfyldningen skal ske kort før den
første opvask.
Det er absolut nødvendigt at fylde salt på
maskinen for at kunne vaske op uden
rande og pletter, medmindre vandet fra
vandhanen er tilstrækkelig blødt (se
“Indstilling af vandblødgøringsanlægget”). Saltet regenererer den
harpiks, der afkalker og blødgør vandet.
Filtersaltbeholder
Hvis der løber salt ud i opvaskemaskinen under
påfyldningen, skal dette fjernes for at forhindre, at
opvaskemaskinens bund oxiderer.
Kom aldrig opvaskemidler i denne beholder. I
så fald vil vandblødgøringsanlæg-
get blive ødelagt..
Niveauindikator for filtersalt:
Indikatoren lyser, når maskinen
mangler filtersalt.
Når der er fyldt salt på, kan det
forekomme, at indikatoren lyser,
indtil saltet er tilstrækkeligt opløst,
eller hvis beholderen ikke er helt
fuld (f.eks. når maskinen startes
med produktprøven). Normalt
slukkes indikatoren efter en enkelt
opvask.
Der må ikke bruges
køkkensalt.
I tilfælde af specielt
blødt vand, hvor der ikke er
behov for filtersalt, lyser
indikatoren for saltmangel konstant.
Før opvaskemaskinen tages i brug 1. gang
Inden
opvaskemaskinen tages i brug, er det vigtigt, at
saltbeholderen fyldes med vand, også selv om den valgte
indstilling ikke kræver påfyldning af filtersalt Efter en flyt-
ning skal vandblødgøringsanlægget indstilles på ny.
TRIN 1: Indstilling af vandblødgørings-
anlægget. For en perfekt opvask og
tørring uden pletter og rande på servicet.
➀➀
-
Måling af vandets hårdhedsgrad
Forhør Dem hos Deres lokale vandværk.
DE KAN OGSÅ VÆLGE at måle vandets hårdhedsgrad ved hjælp af
den vedlagte „Aqua teststrimmel“. Ud fra nedenstående skema kan
De finde den rigtige indstilling i forhold til vandets hårdhedsgrad.
Vandblødgøringsanlægget skal indstilles korrekt for at sikre, at servicet
ikke har pletter eller rande efter opvask og tørring.
Opvaskemaskinen er udstyret med et vandblødgøringsanlæg, som skal
påfyldes filtersalt.
Anlægget skal justeres i overensstemmelse med vandets hårdhedsgrad
der, hvor De bor.
➁➁
-
Indstilling på betjeningspanelet
Indikatoren “Forskyl” lyser
Indikatoren “Forskyl” lyser
Indikatoren “Intensiv” lyser
Indikatoren “Forskyl” blinker
Saltbehov
0 til 6°dH
7 til 14°dH
15 til 20°dH
21 til 25°dH
26 til 39°dH
40 til 60°dH
over 60°dH
NEJ
JA
JA
JA
JA
JA
Indstilling af blødgøringsanlægget
Hårdhedsgrad
Strimmel
Indikatoren “Intensiv” blinker. Hold knappen
„ICS AUTOPROGRAM“
nede
og tryk på Startknappen: Indikatorerne “Forskyl” eller “Intensiv” lyser
eller blinker og viser indstillingen af vandblødgøringsanlægget i
overensstemmelse med ovennævnte skema.
Ved ibrugtagning er maskinen indstillet til en hårdhedsgrad på 0°-20°
dH (indikatoren “Forskyl” lyser).
For at ændre på indstillingen skal De trykke på knappen
„ICS
AUTOPROGRAM“, indtil vandblødgøringsanlægget er indstillet til det, der fremgår
af teststrimlen
.
Indikatoren “Intensiv” blinker
Indikatoren “Forskyl” lyser
JA
Indikatoren “Intensiv” blinker
SEL
VAND
- Skru låget af filtersaltbeholderen.
- Brug tragten til at hælde salt i med.(Kan købes
hos kundeservice, ref. 31X3964)
- Fyld beholderen op med specielt filtersalt
beregnet til opvaskemaskiner.
- Første gang fyldes beholderen op til kan-
ten med vand først.
- Skru låget på filtersaltbeholderen
igen.
Page 32

DK
61
60
DK
Før opvaskemaskinen tages i brug 1. gang
For at gøre det nemmere at fylde opvaskemiddel i, er sæbedispenseren
placeret fortil på den øverste kurv.
Sæbedispenseren kan bruges til alle produkter, der anbefales til
opvaskemaskiner.
MEGET VIGTIGT:
Ved anvendelse af kombinerede midler (2 eller 3 i 1) skal
vejledningen på emballagen læses omhyggeligt. Nogle
opvaskemidler med integreret afspændingsmiddel har
ikke en optimal virkning ved alle programmer.
Produkter, hvor der ikke skal bruges filtersalt, kan kun
anvendes inden for et vist vandhårdhedsinterval.
I tvivlstilfælde og i særdeleshed ved service, der er
meget vådt, når programmet er slut, og ved kalkaflejringer på servicet bedes De henvende Dem til producenten af opvaskemidlet.
Tab
Tab’en lægges i det yderste rum.
Der må kun anvendes
specielle opvaskemidler
beregnet til maskinopvask.
Pulver eller flydende opvaskemiddel
Træk dispenseren ud og kom pulveret eller det
flydende opvaskemiddel i.
Ved kun let snavset service skal rummet fyldes til
Min. og ved meget snavset service fyldes
rumemt til Max.
Skub dispenseren ind på plads igen.
Alle produkter skal
opbevares utilgængeligt
for børn og beskyttet mod fugt.
TRIN 3: Opvaskemiddel er nødvendigt
for et godt opvaskeresultat.
Før opvaskemaskinen tages i brug 1. gang
➁➁
Indstilling (hvis påkrævet)
Fabriksindstillingen er den midterste position
= 2.
Hvis servicet, efter at være blevet vasket op
flere gange, får rande/pletter eller tørrer
dårligt, kan indstillingen ændres ved hjælp af
justeringshåndtaget:
- Position 1 giver en lavere dosering.
- Position 3 giver en højere dosering.
Indhold: 120 ml (ca. 1 glas)
Hvis der under påfyldningen løber
afspændingsmiddel ud i opvaskema-
skinen, skal dette tørres op med en svamp for
at undgå, at der dannes skum.
➀➀
Påfyldning
Inden maskinen tages i brug, skal
beholderen fyldes helt op til kanten
af justeringshåndtaget.
De skal mindst fylde hele den medfølgende prøvepakning med afspændingsmiddel i.
Luk beholderen omhyggeligt
igen.
Justeringshåndtag
Indikator for afspændingsmiddel:
Indikatoren lyser, når maskinen mangler
afspændingsmiddel.
Mørk: Beholderen er fyldt.
Klar: Beholderen er tom.
Visuel indikation:
TRIN 2: Afspændingsmiddel
for skinnende rent og helt tørt service
Afspændings-
middel
Page 33

DK
63
62
DK
Fyldning/tømning af opvaskemaskinen
Vigtig oplysning:
Af sikkerhedsmæssige grunde anbefaler vi, at spidse
knive stilles med spidsen nedad i bestikkurvene, så de ikke kan
forvolde skade.
Lange knive og andet skarpt køkkentøj skal lægges fladt ned i
den øverste kurv.
Bestikket
Hvis De ønsker at placere bestikket, så
de enkelte dele er adskilt fra hinanden,
kan De benytte de aftagelige låg.
De kan bruge disse låg - helt eller
delvist - til at opnå et optimalt resultat,
både med hensyn til opvask og tørring.
- Stil bestikket
- Vermeiden Sie das Spülen von Besteck
mit Horngriffen in der Spülmaschine.
- Trennen Sie Silberbesteck mit dem
Trenngitter von den anderen Metallen.
Flytbare bestikkurve
Bestikkurvene kan placeres hvor som
helst i den nederste kurv, således at
maskinen kan fyldes op på en måde,
der passer til de ting, der skal vaskes
op.
Det er også muligt at placer en
bestikkurv i opvaskemaskinens øverste
kurv.
Hvis fadene eller bestikket er for store,
er det muligt at ændre placeringen af
den øverste kurv (hvis den er justerbar).
Fyldning/tømning af opvaskemaskinen
Den nederste kurv
Når opvaskemaskinen fyldes, skal De
sørge for, at vandet kan cirkulere frit og
nå alle dele i opvaskemaskinen.
Fade og store pander placeres i siderne.
Stil ikke flade og dybe tallerkener
mellem hinanden, lige ved siden af
hinanden eller over hinanden.
De nedfældelige tallerkenholdere gør det
lettere at få store skåle ind i opvaskemaskinen (modelafhængigt).
Der må ikke være noget (håndtag, bestik), der forhindrer spulearmene i at rotere frit.
Tømning af opvaskemaskinen
Tøm først den nederste kurv, for at det ikke skal dryppe ned fra
den øverste kurv.
Service, som ikke er egnet til maskinopvask:
- Skærebrætter af træ
- Genstande af ikke-rustfrit stål eller ikke-varmebestandig plast
- Genstande af tin og kobber
- Limet service og bestik
- Bestik med træ-, horn eller perlemorsskafter
- Antikt eller håndmalet porcelæn
Når De køber service, glas og bestik, skal De altid forvisse Dem
om, at det er egnet til maskinopvask.
Stang, som forhindrer en
eventuel blokering.
Page 34

DK
65
64
DK
Valg af program
Kontroller, om strømforsyningskablet er tilsluttet
og vandhanen er åbnet.
Programsymbolernes
betydning gentages på den
medfølgende selvklæbende
label
. Hvis De ønsker det, kan
De klistre denne label på maskinens trælåge.
De forskellige kontrollamper
„ICS
AUTOPROGRAM“, „Forskyl“,
„Intensiv“, „Öko“ eller „Sart“
viser det valgte program.
For at ændre den foretagne ind-
stilling skal De trykke på en
anden programknap
Tryk på tænd/sluk-knappen for
at tænde for opvaskemaskinen.
Ud fra, hvilken type opvask De
har, hvor meget opvask der er og
snavset den er, kan De ved
hjælp af skemaerne på de følgende sider finde frem til det
bedst egnede program.
Tryk på den ønskede programknap.
Tænd/sluk
Fyldning/tømning af opvaskemaskinen
①①
②②
Længere op:
Løft kurven langsomt, til der høres et
klik i begge sider.
Længere ned:
Løft kurven helt op i begge sider
(klik) og sænk den derefter nedad.
Afhængigt af model: For at kunne placere store fade i den nederste
kurv er det nødvendigt at sætte den øverste kurv højere op. Denne
indstilling kan også foretages, når kurven er fuld.
Sørg for, at de to glideskinner er anbragt i samme højde.
Kurven skal stå vandret.
Vend glas, kopper og skåle med åbningen nedad.
Den øverste kurv
Denne kurv er især beregnet til glas,
kopper, små skåle, små fade, underkopper mm.
Fyld opvaskemaskinen systematisk for at
spare plads (rækker af glas, kopper,
skåle mm.)
De kan også placer kopper, skeer mm.
samt en bestikkurv på hylderne, som kan
klappes op. Langstilkede glas skal sættes
langs med glasholderen.
Ved hjælp af den ekstra hylde kan De
placere alt bestik i opvaskemaskinen
uanset størrelsen. De kan anbringe
hylden i den nederste kurv eller i den
øverste kurv ved at fjerne de specielle
kophylder.
Page 35

DK
67
66
DK
Programmerne
Blandet
Bio
Turbotørring Turbotørring
Normal mængde
indtørrede og
fastklæbende
madrester:
Almindelig
dagligdags
opvask.
Varmt skyl
Blandet
Kort =
Intensiv+Öko
Naturlig tørring
Få og kun let
fastsiddende
rester, ikke
fedtet service,
f.eks. kaffe-,
dessertkuverter
eller dagligt
service.
Varmt skyl
Skyl
Opvask 40°C
Skyl
Opvask 50°C
Sart
Sart
Få og kun let
fastsiddende
madrester: Glas
eller sart
porcelæn der
ikke tåler høje
temperaturer.
Varmt skyl
Skyl
Opvask 45°C
Intensiv
Turbotørring
Solidt
Mange
indtørrede
rester:
Fastsiddende
snavs, fedt,
rester af
friteret og
gratineret
mad, sovs
mm.
Varmt skyl
Skyl
Opvask 65°C
Koldt forskyl
Programmerne
Service:
Porcelæn, gry-
der, bestik, glas
mm.
Omfanget af
madrester,
typen af
madrester og
deres tilstand.
Programmer
Programforløb
Til information
Varighed i min.
Vandforbrug (L)
Energiforbrug (Kwh)
Blandet Blandet
AUTOPROGRAM
Turbotørring
Autoprogram
velegnet til
enhver opvask
uanset
mængde og
til-
smudsningsgrad
Opvaskemaskin
en finder selv
ud af forbrug
og varighed
for opvaskepro-
grammet alt
efter opvaskens
mængdeog
til-
smudsningsgrad.
Normal
mængde
indtørrede og
fastklæbende
madrester:
Almindelig
dagligdags
opvask.
Varmt skyl
Skyl
Opvask ved 55°C
Koldt forskyl
Blandet
Forskyl
Dette meget
korte program
kan bruges til at
skylle indholdet i
maskinen, hvis
den egentlige
opvask skal
vente til i
morgen eller
overmorgen.
Koldt forskyl
Turbotørring
Varmt skyl
Skyl
Opvask ved 55°C
175
16
1,05
Page 36

DK
69
68
DK
Programstart og -forløb
Afbrydelse af et program
Tryk „Start/Annuler“ knappen i
2 sekunder.
Det igangværende program afbrydes. Nu kan De vælge et nyt program .
AUTOPROGRAMMETS FORDELE
Samtidig med, at der spares energi
og tid, optimerer programmet
opvasken alt efter Deres specielle
behov og sikrer det bedste opvaske- og tørringsresultat.
Turbotørring:
Således aktiveres turbotørringen:
Hold Intensiv-knappen nede og
tryk samtidig på startknappen.
Kontrollampen „3 h“ er slukket.
- Tryk igen på Start for at vælge
turbotørring. Kontrollampen „3 h“
blinker.
- Tryk igen på Start for at fravælge turbotørringen. Kontrollampen „3
h“ slukker.
Øjeblikkelig start
Tænd for opvaskemaskinen med
tænd/sluk-knappen og vælg program
med en af programknapperne.l Tryk på
Startknappen.
Luk lågen. Opvaskemaskinen starter.
Programslut
Programslut meddeles ved hjælp af en
ringetone. Ringetonen slukker, når
lågen åbnes.
Ringetonen kan deaktiveres. Hold
knappen „Forskyl“ nede og tryk samtidig på startknappen.
En bip-lyd bekræfter indstillingen.
Hvis ringetonen skal aktiveres igen,
gentages samme fremgangsmåde.
Denne gang bekræftes indstillingen
med en dobbelt biplyd.
Forsinket start
Tænd for maskinen og vælg program.
Tryk derefter 1 eller 2 gange på
„Forsinket Start“, alt efter om starttidspunktet skal forskydes 3 eller 6
timer.
Den tilhørende kontrollampe lyser.
Tryk på Startknappen.
Ringetonen deaktiveres automatisk, når
der indstilles en forsin-
ket start, da denne funktion ofte
anvendes om natten.
Programstart og -forløb
Page 37

DK
71
70
DK
Løbende vedligeholdelse
Ved behov skal følgende dele
rengøres regelmæssigt:
- Lågens kant og tætningslisten
tørres af med en fugtig svamp
for at fjerne eventuelle aflejringer.
Hvert år
For at sikre, at opvaskemaskinen
altid fungerer perfekt, skal den
gøres ren en eller to gange om
året. For at gøre det skal De,
mens opvaskemaskinen er tom,
tænde for et intensivprogram og
anvende et maskinopvaskemiddel,
som fås i handlen.
Ved længere tids stilstand
Giv opvaskemaskinen en grundig
rengøring, træk stikket ud og luk
for vandtilførslen.
Opvaskemaskinen skal beskyttes
mod frost.
Til kabinettet og
betjeningspanelet må
der udelukkende bruges vand
og sæbe.
Brug aldrig slibende
rengøringsmidler, rensesvampe
af metal eller produkter, der er
baseret på alkohol eller opløsningsmidler. Brug en blød klud
eller svamp
.
For at undgå, at der
ved en flytning løber
vand ud af maskinen, skal De
inden da køre et skylleprogram
igennem.
Løbende vedligeholdelse
Rengøring af siene
Opvaskemaskinen er udstyret med
et filtersystem bestående af flere
dele:
A. En todelt grovsi
B. En stor finsi
C. Et mikrofilter
Siene/filtret er placeret midt i
opvaskemaskinens bund og skal
jævnligt renses for at sikre et
optimalt opvaskeresultat.
A
A -
todelt grovsi
➀➀
Før siene/filtret tages ud, skasl finsien
tørres af med en svamp, for at de
madrester, der ligger på sien, ikke skal
tilstoppe spulearmene.
➁➁
Grovsien løsnes en kvart omgang og
tages ud.
③③
✦❉■▲❉❅■ ▼❁❇❅▲ ◆❄
.
④④
Mikrofilteret tages ud.
Vigtigt: Husk at fastlåse
grovsien ved at dreje den
en kvart omgang.
B
C
⑤⑤
Siene og mikrofiltret renses
omhyggeligt under rindende
vand.
Isætning:
Ved isætning bruges den omvendte
rækkefølge.
C
Page 38

DK
73
72
DK
- Juster de justerbare
føder.
- Juster de bagerste fødder.
- Ret tætningslisten ud
hele vejen rundt.
- Kontroller, om der er en
pakning, og spænd
møtrikken.
- Luk for vandtilførslen og
kontakt vor kundeservice.
- Foretag en ny centrering ved at justere de
bagerste fødder.
- Træk maskinen 10 cm
ud af hullet og spænd
de to spændebolte.
-
Træk maskinen 10 cm ud
af hullet og løsn de 2
spændebolte.
- Monter en træfront (eller en
spånplade, hvis det er provisorisk) på maskinen og
juster fjedrene.
- Gør det langsommere
(indtil det siger KLIK)
=> se vejledning.
- Disse programmer bør
fortrinsvis anvendes om
natten, hvor det ikke er
så vigtigt, hvor længe
de varer og hvornår de
slutter.
- Maskinen står ikke vandret.
- Lågen er ikke korrekt
centreret i forhold til
maskinens indre
.
- Tætningslisten er blevet
fladtrykt under lagring.
- Utæthed ved vandha-
nen.
- Utæthed på maskinen.
- Maskinen står ikke vandret eller lågen er er ikke
korrekt centreret i forhold
til maskinen.
- Lågens fjedre er ikke
strammet nok til at
kompensere for frontpladens vægt.
- Fjederen til lågen er strammet for hårdt.
- Der mangler en træfront.
- Forkert håndtering (kurven trækkes for hurtigt
op).
- Spareprogrammerne
varer længere for at
kompensere for de lavere
vaske- og tørretemperaturer ved at bruge længere tid
.
Lille utæthed ved lågen.
Lille utæthed omkring
eller under maskinen (flyt
maskinen for bedre at
kunne se, hvor utætheden er).
Lågen “går imod”, når
den lukkes.
Lågen falder tungt ned,
når den åbnes (indbygningsmodeller).
Den åbne låge forbliver
ikke vandret eller lukker
for hurtigt (indbygningsmodel).
Den øverste kurv vil ikke
blive i den øverste position.
Programmet tager for
lang tid (over 2 timer)
Mindre driftsforstyrrelser
Er De i tvivl om noget vedrørende opvaskemaskinen? Inden De tilkalder vor
kundeservice, kontroller følgende punkter (udfra konstateret symptom).
Ved igangsætning
Mulige årsager
Afhælpning
I forbindelse med valg
af program, display
Mulige årsager
Afhjælpning
Miljøbeskyttelse
Genbrug af emballagen
Ved at genindvinde og genbruge
emballagen er det muligt at spare
råvarer og reducere affaldsmængden.
De kan aflevere emballagen på
nærmeste genbrugsstation. Hvor
den er placeret, kan De få at vide
hos Deres kommune.
Genbrug af den gamle
opvaskemaskine
Hvis De vil skrotte den gamle
opvaskemaskine, skal De først
sørge for, at den er helt uanvendelig. Ødelæg låsesystemet til
lågen, så den ikke kan lukke mere
(ellers er der fare for, at børn
leger i maskinen og bliver lukket
inde med deraf følgende kvælningsrisiko!).
Tag stikket ud og skær kablet
over helt inde ved maskinen.
Når opvaskemaskinen således er
gjort uanvendelig, skal den
afleveres på nærmeste genbrugsstation. Henvend Dem til
kommunen for nærmere
oplysninger.
OBS: Al emballage
(f.eks. plastikposer, flamingo mm.) skal opbevares utilgængeligt for børn, da disse materialer
kan være farlige for børn, f.eks. på
grund af kvælningsrisiko!
Økonomisk og miljøvenlig
opvask
Skyl ikke servicet af, inden det
sættes i opvaskemaskinen
(unødigt vandforbrug).
Udnyt opvaskemaskinens
muligheder fuldt ud. På den måde
bliver opvasken både økonomisk
go miljøvenlig.
Vælg altid et program, som passer
til den type service, der skal
vaskes op, og til hvor snavset det
er.
Undgå at overdosere opvaskemidler, filtersalt og afspændingsmiddel.
Overhold de anbefalinger, der
gives i denne vejledning (på side
58, 59, 60) og anvisningerne på
opvaskemidlets emballage.
Sørg for, at vandblødgøringsanlægget er indstillet korrekt (se
side 58).
Page 39

DK
75
74
DK
Den store si er meget
snavset, når programmet
er slut.
Dampstråle ca. 20 min.
før programslut (model
med turbotørring).
Madrester, aflejringer,
“sandskorn” i glassene.
Fedtmærker
- Afmonter og rens siene og
bunden af det konusformede afløb. Fjern det værste
snavs fra tallerkenerne,
inden de anbringes i
opvaskemaskinen.
- Normal, om end sjælden
foreteelse (i forbindelse
med rumtemperaturen,
træk...) kun i starten af
tørreprocessen.
- Fyld opvaskemaskinen kor-
rekt. Anvend de områder af
opvaskemaskinen og det tilbehør, der er bedst egnet til
det pågældende service (se
vejledning).
- Kontroller, om den øverste
spulearm kan rotere frit (stangen der forhindrer blokering).
Om nødvendigt placeres kurven
i den øverste position.
- Kontroller, om sien er korrekt placeret og låst (sien
skal drejes så langt til højre
som muligt).
- Alle sier og mikrofiltret afmonteres og rengøres (med lunkent
vand)
.
-
Øg doseringen, prøv et
andet opvaskemiddel.
- Vælg et program med
en højere temperatur.
- Siene og det konusformede afløb er blokeret
pga. for kraftig tilsmudsning.
- Tørredampen har været
i kontakt med en kold
luftstrøm.
- Forkert fyldning af opvas-
kemaskinen (noget af
opvasken er tildækket af
større dele eller dele, der
er nedenunder, anbragt
lige ved siden af eller ind
over hinanden.
- Den øverste spulearm kan
ikke rotere frit pga. noget
bestik, et fad el.lign.
- Ikke korrekt låst si, som
går op under opvasken.
- Mikrofiltret er tilsmudset.
- Fedtmærker er tegn på, at
der bruges for lidt opvaskemiddel, et svagt middel
eller et for gammelt middel.
-
Der bruges et forkert
program (for lav temperatur, for kort opvasketid).
Mindre driftsforstyrrelser
Funktionssvigt Mulige årsager Afhjælpning
Dårligt opvaskeresultat
Mulige årsager
Afhjælpning
- Tryk på startknappen i 3
sekunder for at afbryde
det igangværende programvalg og starte forfra.
-
Fyld beholderen og vent
til programmet er slut.
Ved blødt vand, der ikke
kræver salt, lyser indikatoren konstant.
- Kontroller strømstyrken
(min. 10A) og målerens
effekt.
- Tilkald vor kundeservi-
ce.
- Kontroller stik og
sikring.
- Kontroller, om hanen er
åben.
- Kontroller, om slangen
ligger rigtigt.
- Tryk 3 sek. på startknappen for at
annullere valget og
starte forfra.
- For at starte skal der kun
trykkes kort på knappen.
- Tilkald kundeservice.
- Fjern dækslet.
- Kontroller, om slangen
ligger rigtigt bag ved
maskinen.
- Afmonter og rens sier
og filter og det konusformede afløb.
- Start et forskyl. Hvis
fejlen ikke afhjælpes,
tilkald kundeservice.
- Forkert programvalg.
- Der mangler salt eller
der er for lidt salt i
beholderen til at udløse
en indikation.
- Sikringerne er for små
til at kunne klare alle
apparater, der kører på
samme tid.
- Intern fejl i et apparat.
- Ingen spænding på stikdå-
sen.
- Vandhanen er lukket.
- Knæk på tilløbsslangen.
- Der er sket en fejl ved programvalg med deraf følgende blokering af program.
- Der er blevet trykket for
længe (>2 sek.) på startknappen.
- Maskinen er blokeret pga.
lækage
.
- Dækslet til vaskens vandlås er ikke taget af.
- Der er et knæk på
afløbsslangen.
- Afløbsfilteret er tilstoppet.
- Pumpen er blokeret.
Alle indikatorerne tændes
- en efter en.
Indikatoren SALT bliver
ved med at lyse.
Sikringerne springer, når
der tændes for maskinen.
Opvaskemaskinen vil ikke
starte.
Vandet bliver ikke pumpet ud.
Mindre driftsforstyrrelser
Funktionssvigt Mulige årsager Afhjælpning
I forbindelse med valg
af program, display
Mulige årsager
Afhjælpning
Page 40

DK
77
76
DK
Rustpletter på rustfrit
stål.
Mange dråber på
glassene.
Dråber på plastikservice,
tefalbelægning ...
Dårligere tørring ved det
korte program.
Der er kondens på lågens
inderside eller inde i
opvaskemaskinen.
- Den pågældende type
rustfrit stål (i særdeleshed knive) er ikke egnet
til maskinopvask.
- For lidt afspændingsmiddel eller for lav
dosering.
- Dosis afgives ikke.
- Disse isolerende dele
har en ringe varmekapacitet.
- Ved de korte programmer er tørretemperaturen lavere og varigheden
af tørringen kortere for
at gøre opvasketiden så
kort som muligt.
-
Der kan forekomme
kondens på siderne, i
særdeleshed efter afkølingen (lydisoleringen
forstærker denne tendens)..
- Brug bestik, som er
egnet til maskinopvask.
- Kontroller, at saltbe-
holderen er lukket.
- Kontroller indikatoren
og fyld beholderen op.
- Er beholderen ikke tom
efter ca. 60 opvaske, tilkald
kundeservice.
-
For at rette op på dette
problem skal opvaskemaskinen fyldes på en
sådan måde, at det så
vidt muligt undgås, at
der er noget der blokerer
for vandet. Om muligt
skal opvaskemaskinens
låge åbnes en smule
nogle minutter før den
tømmes.
- Disse dele skal placers så
godt som muligt og helst
i den øverste kurv.
- Overvej, om det er hensigtsmæssigt at bruge
et kort program.
Mindre driftsforstyrrelser
Funktionssvigt Mulige årsager Afhjælpning
Dårlig tørring
Mulige årsager
Afhjælpning
- Kontroller, om der er
salt i beholderen (hvis
ikke indikatoren lyser, er
der salt nok.
-
Kontroller vandets hårdhed og om blødgøringsanlægget er korrekt indstillet. Om nødvendigt justeres op til næste interval.
- Vandet er for hårdt til at
bruge et 3 i 1 opvaskemiddel uden at tilføre salt.
- Kontroller, om saltbeholde-
ren er rigtigt lukket.
-
Kontroller vandets hårdhed og juster blødgøringsanlægget i forhold til
dette. Nogle opvaskemidler (tabs) er mere
aggressive end andre
over for glas og dekorationer (skift til et nyt,
måske noget mere skånsomt produkt).
- Åbningerne skal vende
hen mod vandstrålerne.
- Øg doseringen, prøv et
andet opvaskemiddel.
- Vælg et mere velegnet pro-
gram med en højere temperatur.
- Kontroller indikatoren og
fyld beholderen helt op.
Sæt evt. doseringen op til
næste indstilling.
- Fyld nyt afspændingsmiddel på (et godt
produkt opløses nemt i
koldt vand og skummer).
- Kalk (kan fjernes med
eddike).
-
Saltspor (saltsmag på servicet)
- Tågede/mælkede glas
på grund af for blødt
vand (kan ikke fjernes).
- Opvaskemaskinen er
fyldt forkert.
- For lidt eller for svagt
opvaskemiddel.
- Temperaturen ved det
anvendte program er
for lav..
- For lidt afspændingsmiddel eller for lav dosering.
- For gammelt eller virkningsløst afspændingsmiddel.
Hvide pletter (find ud af,
hvad pletterne består af).
Misfarvninger (te, vin,
kaffe, blod)
Mærker af vand eller
indtørrede dråber på
glassene.
Mindre driftsforstyrrelser
Dårligt opvaskeresultat
Mulige årsager Afhjælpning
Page 41

DK
79
78
DK
Oplysninger til forsøgslaboratorier
✔ Kapacitet
✔ Spülmitteldosierung
✔ Justering af afspændingsmiddel
✔ Justering af øverste kurv
✔ Fyldningen sker i henhold til instruktionerne på næste
side uden stativer i siden.
✔ Det er meget vigtigt, at blødgøringsanlægget sættes
op til indstillingen et trin højere end den, der anbefales
ud fra vandets hårdhedsgrad for at tage hensyn til
manglen på fosfat i et almindeligt opvaskemiddel.
✔ For detaljerede oplysninger om de sammenlignende
tester i overensstemmelse med EN 50242 med hensyn
til tilsmudsningsgrad, service- og bestiktype mm. kontaktes producenten af maskinen, inden testen påbegyndes.
12 Standardkuverter
30 g. opvaskemiddel B
3
øverste position
Oplysninger til forsøgslaboratorier
Opvaskemaskinen fyldes i henhold til fig. A - B - C på følgende side.
I overensstemmelse med standarden EN 50242: Öko-program
I overensstemmelse med blandingsmetoden (IEC 436/DIN 44990):
A
UTOPROGRAM
A
2
1
1 2 3 4 5 6 7 8
3
B
7
8
8
4
2
1
6
6
8
5
1
2
2
8
C
 Loading...