

Page 1

FR GUIDE D’INSTALLATION ET D’UTILISATION
EN GUIDE TO INSTALLATION AND USE
PT MANUAL DE INSTALAÇÃO E UTILIZAÇÃO
ES MANUAL DE INSTALACIÓ Y UTILIZACIÓN
Table de cuisson
Cooking Hob
Placa de cozinha
Placa de cocción
99642682_A_ML.qxp 31/05/2007 16:03 Page 1
Page 2
13
Dear Customer,
You have just acquired a DE DIETRICH hob and we would like to thank you.
In order to offer you an excellent product, our research teams have created this new generation of appliances for you. Their quality, appearance,
functions and technological advances make them exceptional products,
showcases of our unique know-how.
In the line of DE DIETRICH products, you will also find a wide range of
ovens, microwaves, ventilation hoods, hoods, dishwashers, and refrigerators, all of which can be integrated and all of which can be coordinated
with your new DE DIETRICH hob.
Of course, in our ongoing desire to ensure our products satisfy your needs
in the best possible way, our customer service department is always at
your disposal at our site.
DE DIETRICH
Setting New Values
We are constantly improving our products; for this reason we reserve the right to make all
modifications to their technical, functional or aesthetic characteristics, originating from technical developments.
Warning
This product is not foreseen for sale in the USA
Before installing and using your appliance please read this installation and use the guide
carefully - it will help you familiarise yourself very rapidly with its operation.
FR
02
EN
13
PT
25
ES
36
99642682_A_ML.qxp 31/05/2007 16:03 Page 13
Page 3

14
EN
CONTENTS
1 /INSTALLING YOUR APPLIANCE
• Choice of location
___________________________________________________
15
• Build-in
_____________________________________________________________
15
• Connection
_________________________________________________________
16
2 / USING YOUR APPLIANCE
• Cookware for vitroceramics
____________________________________________
17
• Description of your top
_______________________________________________
18
• Switching on
________________________________________________________
19
• Cooking zone with extension
___________________________________________
19
• Cooking zone with Boost
______________________________________________
19
• Safety features when operating
________________________________________
20
3 / MAINTAINING YOUR APPLIANCE
• Caring for your appliance
______________________________________________
21
• Maintaining your appliance
____________________________________________
21
4 / SPECIAL MESSAGES, INCIDENTS
• When using for the first time
___________________________________________
22
5 / COOKING CHART
• Cooking chart per dish
________________________________________________
23
99642682_A_ML.qxp 31/05/2007 16:03 Page 14
Page 4
15
EN
1 / INSTALLING YOUR APPLIANCE
Installation
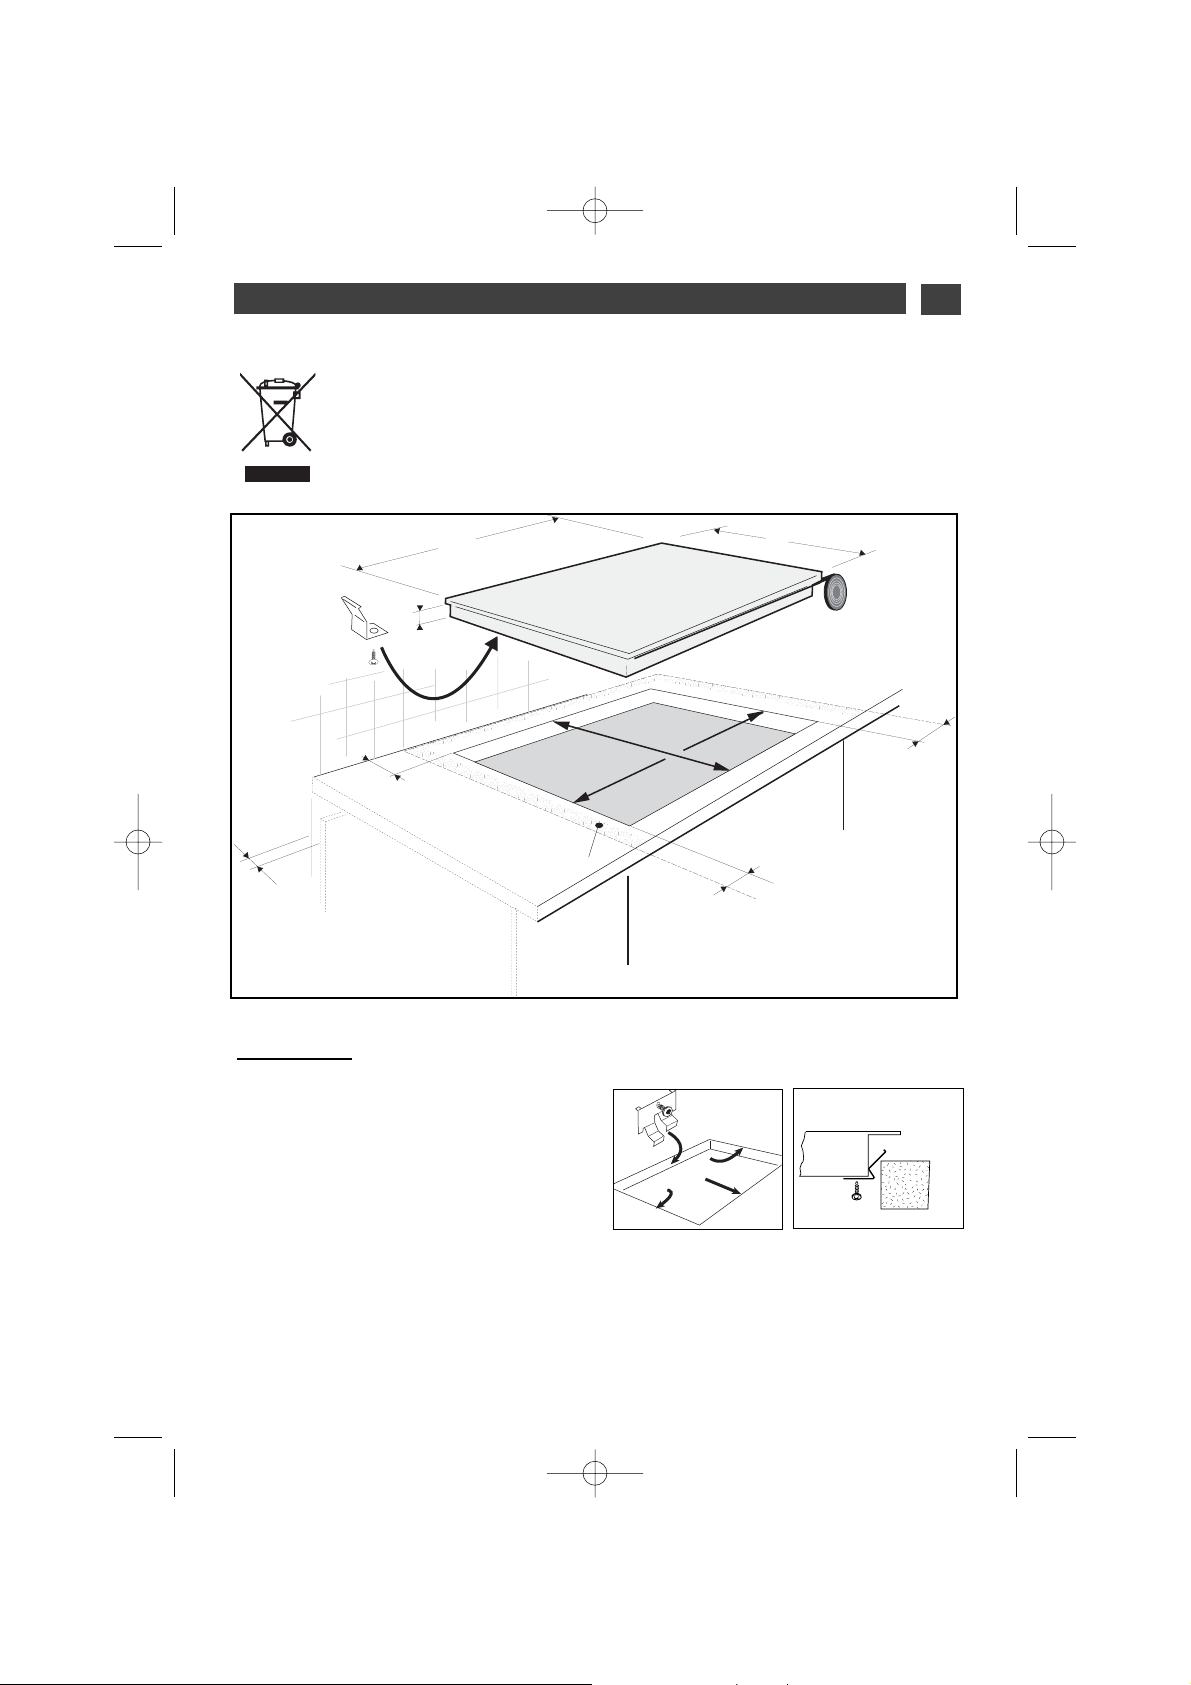
Your appliance should be positioned so that
the mains switch is accessible.
The distance between the edge of your
appliance and the wall or partition must be at
least 4 cm.
Your appliance can be easily integrated above
a cabinet, an oven or a build-in household
appliance. (minimum distance 10mm).
Stick the foam gasket to the bottom of your
appliance. This will allow you to achieve an airtight seal with the worktop.
As shown in this logo, the materials used to package this appliance are recyclable.
Recycle them and play a role in protecting the environment by depositing them in
local authority containers provided for this purpose.
Appliance recycling organised by your manufacturer will thus be undertaken in optimum conditions, in accordance with European directive 2002/96/CE relating to
electrical and electronic equipment waste. Contact your local authority or retailer
for how to have used appliances collected or collection points.
Attach the clips to the hob. (Depending
on the model.)
Dimension selon votre modèle
vide sanitaire
l
LL
66,,44
LL’’
l’
99642682_A_ML.qxp 31/05/2007 16:03 Page 15
4 cm
4 cm
A
4 cm
4 cm
Page 5
16
EN
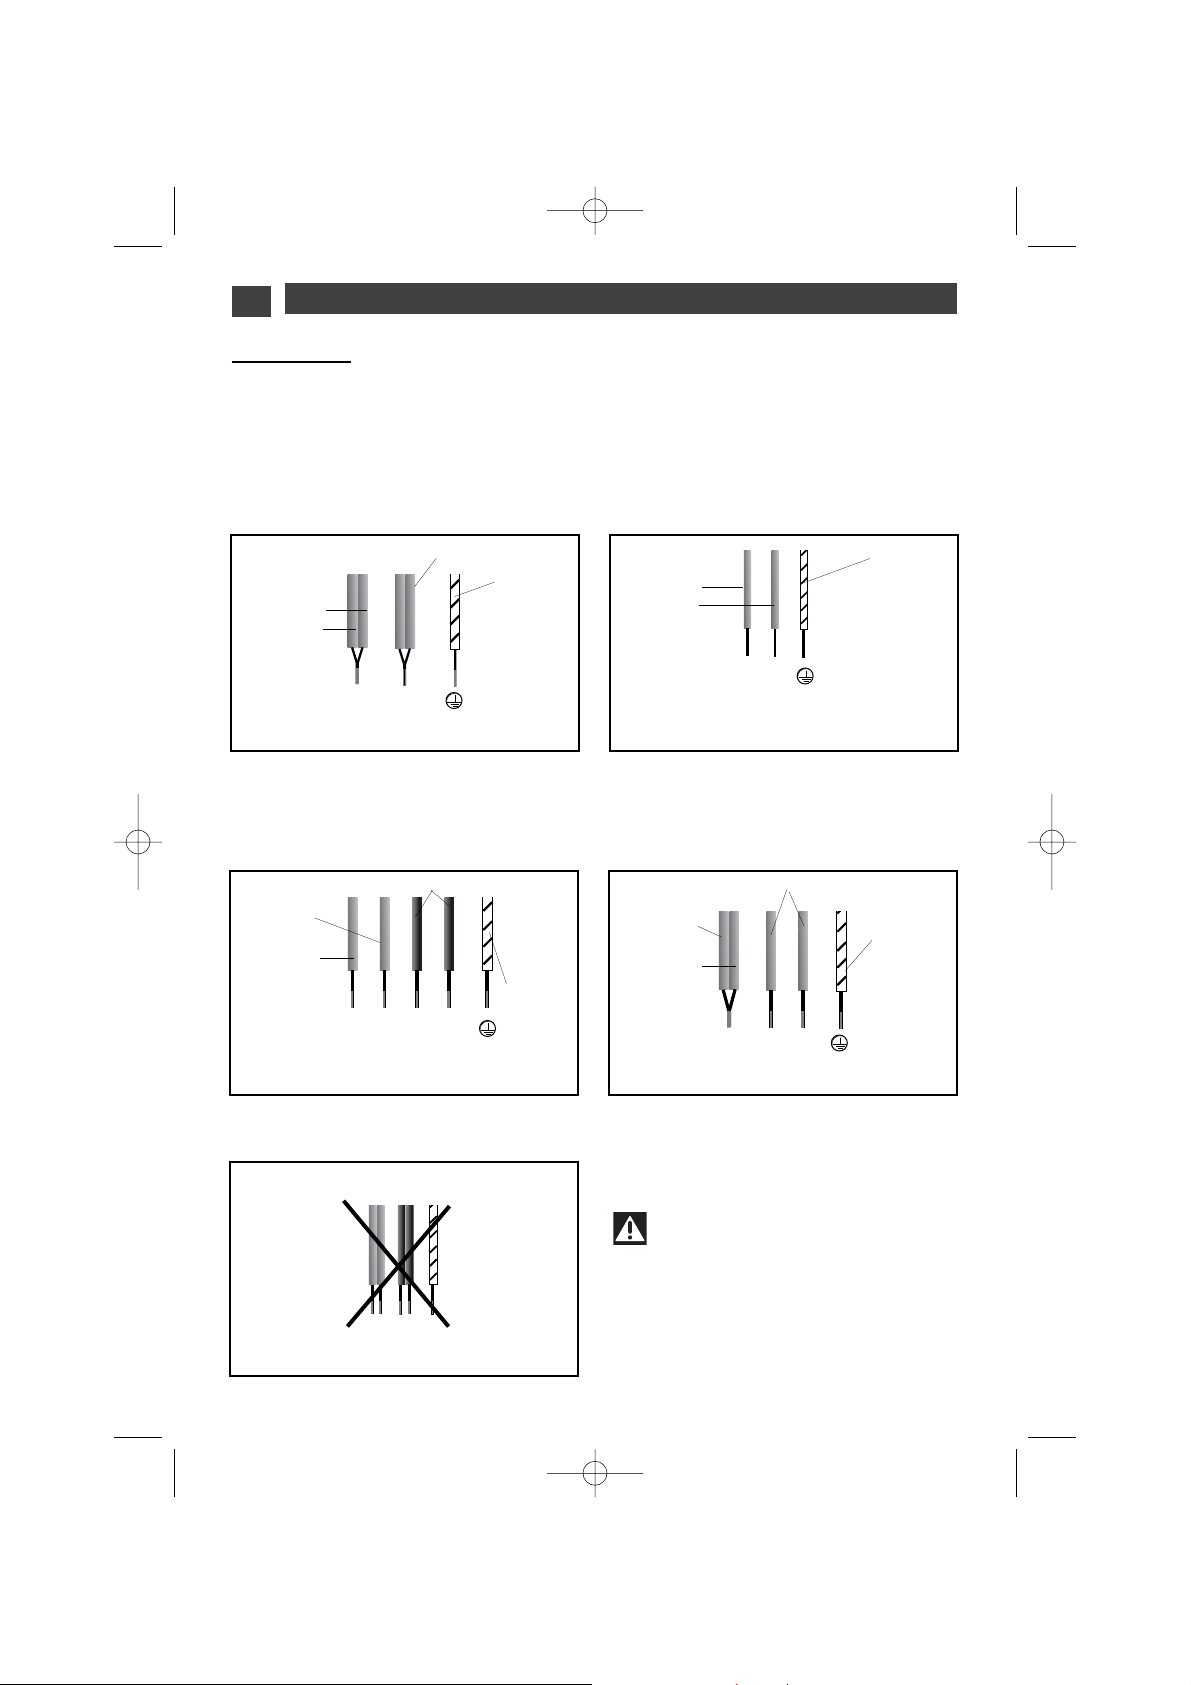
Separate the 2 phase wires (L1 and L2) before
connection.
N
L
Green/yellow
Blue
Black or grey
Brown
Neutral EarthPhase
N
L1
L2
Blue
Green/yellow
Black-grey
Brown
•
Hook-up of 220-240V
~
Warning
If the cable is damaged it must be
replaced by the manufacturer, its aftersales service or a person with a similar
qualification to prevent danger.
With hook-up of 400 V 2N three phase, verify
that the neutral wire is properly connected.
These hobs must be connected to the mains using a socket in compliance with publication CEI
60083 or an all-pole circuit-breaker device in compliance with the installation rules in force.
When power is first supplied to your hob, or after an extended power cut, an indicator light will
appear on the control panel. This information will disappear after 30 seconds.
Connection
N
L
Green/yellow
Blue
Brown
•
Hook-up of 400V 2N
~
-
16A
32A
16A
Separate the wires before connection.
Neutral EarthPhase
N1
L1
L2
Blue
Green/yellow
Black-grey
Brown
•
Hook-up of 2x230V 2L+2N
~
-
16A
N2
•
Hook-up of 400V 3
~
-
16A
Earth
Earth
Neutral
Neutral
Phase
Phase
1 / INSTALLING YOUR APPLIANCE
99642682_A_ML.qxp 31/05/2007 16:03 Page 16
Page 6

17
EN
2 / USING YOUR APPLIANCE
COOKWARE FOR VITROCERAMICS
••
Cookware
It must be designed for electric cooking.
It must have a flat bottom.
Preferably use cookware made of:
- Stainless steel with a thick or “sandwich” three-metal bottom.
- Aluminium with a thick smooth bottom.
- Enamelled steel
••
Use
A higher setting is required if:
- there are large quantities
- the cookware has no lid
- a glass or ceramic pan is used.
A lower setting is required if:
- cooking food which has a tendency to burn easily (start with a lower setting - the setting can
be increased if necessary).
- a spill occurs (remove the lid or remove the pan, then reduce the setting).
••
Energy saving:
To finish the cooking, set at position 0, leaving the cookware in position to use the accumulated
heat (this will save energy).
Use a lid as often as possible to reduce heat loss by evaporation.
••
Automatic regulation of rings
The rings are regulated automatically; they switch on and off to maintain the selected power
level. The temperature thus remains uniform and appropriate for cooking your food.
The regulation frequency varies according to the selected power level.
Tip
Use cookware of an appropriate size.
The diameter of the bottom of the cookware must be the same as or greater than
the printed zone.
Do not leave empty cookware on a cooking zone.
Do not leave cookware containing hot oil
or fat unsupervised on a cooking zone.
We have designed this cooking hob for use by private individuals in their homes.
These cooking hobs are intended exclusively for cooking beverages and foodstuffs and do not
contain any asbestos-based materials.
99642682_A_ML.qxp 31/05/2007 16:03 Page 17
Page 7

2 / USING YOUR APPLIANCEEN
18
694 1
••
DTV701
1166,,55 ccmm
1,2 k W
2211 ccmm
2,2 k W
DTV703
DTV704
1166,,55 ccmm
1,2 k W
2233 ccmm
0,75/2,2 k W
1166,,55 ccmm
1,2 k W
2233 ccmm
2,5 k W
TToottaall ddiimmeennssiioonnss ((LL xx ll)) --
DTV701 X : 31 x 52
RReecceessss ccuutt--oouutt ((LL’’ xx l’’))
DTV701 X : 26.5 x 49
TToottaall ddiimmeennssiioonnss ((LL xx ll)) --
DTV703 B/X/W : 65 x 52
DTV703 J : 63 x 51
RReecceessss ccuutt--oouutt
((LL’’ xx l’’))
DTV703 B/X/W/J : 56 x 49
TToottaall ddiimmeennssiioonnss ((LL xx ll)) --
DTV704 B/X : 65 x 52
RReecceessss ccuutt--oouutt ((LL’’ xx l’’))
DTV704 B/X : 56 x 49
2233 ccmm
2,5 k W
1166,,55 ccmm
1,2 k W
1166,,55 ccmm
1,2 k W
2233 ccmm
2,5 k W
Description of your top
99642682_A_ML.qxp 31/05/2007 16:03 Page 18
Page 8

2 / USING YOUR APPLIANCE EN
19
TURNING IT ON
••
COOKING ZONE
WITH EXTENSION
••
0
11
Turn the lever in a clockwise direction until
it clicks into position
1122
.
22
Now set the power level for your heating
zone.
TToo rreemmoovvee tthhee aaddddiittiioonnaall zzoonneess::
Set the lever to 00, and set the power level for
your heating zone.
0
0
COOKING ZONE WITH BOOST
••
99642682_A_ML.qxp 31/05/2007 16:04 Page 19
Page 9

2 / USING YOUR APPLIANCEEN
20
Safety while using
•Residual heat
As long as a cooking zone being used is hot, the indicator light corresponding to that
zone is on.
Do not put your hand on this zone.
Warning
Do not touch the cooking zones, you will risk getting burned.
Electrical danger
Ensure that the power cable of a connected electrical appliance near the hob is not
in contact with the cooking zones.
If a crack appears in the surface of the
glass disconnect your appliance immediately to prevent a risk of electric shock.
To do this, remove the fuses or use the circuit breaker.
Do not use your hob until you have replaced
the glass worktop
.
Warning
Do not stare at the halogen lamps in
the cooking zones.
99642682_A_ML.qxp 31/05/2007 16:04 Page 20
Page 10

21
EN
3 / MAINTAINING YOUR APPLIANCE
Preserve your appliance
The vitroceramic glass surface is highly
resistant, but not unbreakable. Here are some
recommendations for increasing its lifetime:
- Avoid banging or clattering the cookware.
- Avoid putting heating covers on the hob. A
suction effect may damage the vitroceramic
surface.
- Do not use cookware with bottoms that are
rough or dented.
- Do not use your cooking hob as a work surface.
- Never use aluminium foil or paper or aluminium scrubber to clean it. The aluminium
melts and damages the top.
- Never use a steam cleaner to clean your
hob.
Maintaining your appliance
- Never directly reheat a tin can. It will have a
risk of exploding.
Aesthetic faults, as a result of mistreatment of
your hob and which do not entail a lack of
function, are not covered by our guarantee.
And for the safety of your kitchen, do not
place cleaning items or inflammable objects
or products in the kitchen furniture underneath your cooking hob.
TYPES OF STAINS/SPOTS
Light.
Accumulation of baked-on
stains/dirt.
Sugar spills, melted plastics.
Rings and hard water
residue.
Shiny metal colourings.
Weekly maintenance.
WHAT TO DO?
Thoroughly moisten the zone to be
cleaned with hot water, then wipe off.
Thoroughly moisten the zone to be
cleaned with hot water. Use a scraper for
glass to remove the large bits, follow with
the rough side of a disinfectant sponge,
and then wipe off.
Apply warm white vinegar to the stain, let
stand, then wipe with a soft cloth.
Apply a cleaning agent for vitroceramic
glass (preferable one with silicon for its
protective properties) to the surface.
USE
Cleaning sponges
Cleaning sponges
Scraper for glass.
White vinegar.
Special vitroceramic glass product.
cream
cleaning sponge
special for delicate crockery
abrasive sponge
powder
99642682_A_ML.qxp 31/05/2007 16:04 Page 21
Page 11

22
EN 4 / SPECIAL MESSAGES, DIFFICULTIES
In case of breakage, cracks or even light fissures in the vitroceramic glass, take out
the fuses or turn off the circuit breaker for your hob to avoid the risk of electrical
shock.
Contact the After-Sales Service Department.
POSSIBLE CAUSES:
WHAT SHOULD YOU DO?
A special lamp appears.
Your installation blows a fuse.
Only one side works.
Working normally.
The electrical connection of
your hob is incorrect.
Nothing, the light disappears
after 30 seconds.
Check that it is set up
properly.
See the “Electrical
Connection” section.
•On first use
99642682_A_ML.qxp 31/05/2007 16:04 Page 22
Page 12

23
55
/ COOKING CHART
••
COOKING CHART
BROTHS
THICK SOUPS
COURT BOUILLON
FROZEN FOODS
THICK, FLOUR-BASED
BUTTER-BASED WITH EGGS
(BEARNAISE, HOLLANDAISE)
PREPARED SAUCES
ENDIVES, SPINACH
DRIED BEANS
BOILED POTATOES
GOLDEN BROWN POTATOES
SAUTEED POTATOES
DEFROSTING VEGETABLES
MEAT, NOT TOO THICK
STEAKS
, IN SKILLET
GRILLED MEATS
(CAST IRON GRILL
)
FROZEN FRENCH FRIES
FRESH FRENCH FRIES
PRESSURE COOKER
(ONCE IT STARTS WHISTLING)
COMPOTES
CRÊPES
CRÈME ANGLAISE
MELTED CHOCOLATE
JAMS
MILK
EGGS, FRIED
PASTA
JARS OF BABY FOOD
(DOUBLE BOILER)
MEAT STEW
SPANISH RICE
RICE PUDDING
FFRRYY CCOOOOKK//BBRROOWWNN CCOOOOKK//SSIIMMMMEERR KKEEEEPP
BRING TO RETURN TO BOILING
WWAARRMM
A BOIL BOILING LIGHT BROTHS
SOUPS
FISH
SAUCE
VEGETABLES
MEAT
FRYING
MISCELLA-
NEOUS
EN
1122 1111 1100 77 66 44 33 22 11
1122 1111 1100 77 66 44 33 22 11
1122 1111 1100 77 66 44 33 22 11
99642682_A_ML.qxp 31/05/2007 16:04 Page 23
Page 13

99642682_A_ML.qxp 31/05/2007 16:04 Page 47
Page 14

9964 2682 05/07
99642682_A_ML.qxp 31/05/2007 16:04 Page 48
 Loading...