

Page 1
Réfrigérateur
Refrigerator
Ijkast
Kühlschrank
Frigorifico
Frigorífico
2222680-25
FR GUIDE D’INSTALLATION & D’UTILISATION
EN INSTRUCTIONS FOR USE
NL GEBRUIKSAANWIJZING
DE BEDIENUNGSANLEITUNG
ES MANUAL DE INSTRUCCIONES
PT MANUAL DE INSTRUCOES
Page 2
Ch•re Cliente, Cher Client,
Vous venez d'acquŽrir un congŽlateur DE DIETRICH et nous vous en remercions.
Nos Žquipes de recherche ont con•u pour vous cette nouvelle gŽnŽration d'appareils, qui par leur
qualitŽ, leur esthŽtique, leurs fonctions et leurs Žvolutions technologiques en font des produits
d'exception, rŽvŽlateurs de notre savoir-faire.
Votre nouveau congŽlateur
DE DIETRICH s'int•grera harmonieusement dans votre cuisine et alliera
parfaitement les performances conservation de vos aliments, et la facilitŽ dÕutilisation. Nous avons
voulu vous offrir un produit dÕexcellence.
Vous trouverez Žgalement dans la gamme des produits DE DIETRICH, un vaste choix de fours, de
fours ˆ micro-ondes, de tables de cuisson, de hottes aspirantes, de lave-vaisselle, et de rŽfrigŽrateurs
intŽgrables, que vous pourrez coordonner ˆ votre nouveau congŽlateur DE DIETRICH.
Bien entendu, dans un souci permanent de satisfaire le mieux possible vos exigences vis ˆ vis de nos
produits, notre service consommateurs est ˆ votre disposition et ˆ votre Žcoute pour rŽpondre ˆ
toutes vos questions ou suggestions (coordonnŽes ˆ la fin de ce livret).
Et retrouvez-nous aussi sur notre site www.dedietrich-electromenager.com sur lequel vous
trouverez nos derni•res innovations ainsi que des informations utiles et complŽmentaires.
DE DIETRICH
Les nouveaux objets de valeur
Dans le souci dÕune amŽlioration constante de nos produits, nous nous rŽservons le droit dÕapporter ˆ leurs
caractŽristiques techniques, fonctionnelles ou esthŽtiques toutes modifications liŽes ˆ leur Žvolution.
Important: Avant de mettre votre appareil en route, veuillez lire attentivement
ce guide dÕinstallation et dÕutilisation afin de vous familiariser plus rapidement avec
son fonctionnement.
Page 3
ImprimŽ sur du papier protŽgeant lÕenvironnement 3
Comment lire votre notice dÕemploi
Les symboles ci-dessous vous guideront au long de la lecture de votre notice:
Instructions liées à la sécurité lors de l’utilisation de l’appareil.
Conseils pour une utilisation correcte de l’appareil afin d’obtenir les meilleures performances.
Informations liées à la protection de l’environnement.
F
Avertissements importants
Usage domestique
¥ Les rŽfrigŽrateurs/congŽlateurs domestiques sont
destinŽs uniquement ˆ la conservation et/ou ˆ la
congŽlation des aliments.
¥ Contr™ler, avant dÕinstaller lÕappareil, sÕil nÕest pas
endommagŽ. Dans le cas contraire, sÕadresser au
revendeur.
¥ Cet appareil est lourd. Faites attention lors de son
dŽplacement.
¥ Une Žventuelle modification ˆ lÕinstallation
Žlectrique de votre maison qui devrait •tre
nŽcessaire pour lÕinstallation de lÕappareil ne devra
•tre effectuŽe que par du personnel qualifiŽ.
¥ Assurez-vous que la prise n'est pas ŽcrasŽe ou
endommagŽe par l'arri•re de l'appareil. Une prise
de courant endommagŽe peut s'Žchauffer et
causer un incendie.
¥ Ne placez pas d'objets lourds ou l'appareil sur le
c‰ble d'alimentation (risque de court circuit et
incendie).
¥ Ne dŽbranchez pas l'appareil en tirant sur le c‰ble,
particuli•rement lorsque l'appareil est tirŽ de son
emplacement. Si le c‰ble d'alimentation est
endommagŽ ou ŽcrasŽ peut causer un court
circuit, un incendie et/ou une Žlectrocution.
¥ Ne pas mettre dÕinstruments Žlectriques ˆ
lÕintŽrieur de lÕappareil (sorbeti•re, par exemple).
¥ Ne placez ni bouteilles ni bo”tes de boissons
gazeuses dans le congŽlateur/compartiment ˆ
basse tempŽrature, elles pourraient Žclater.
¥ Ne touchez pas les aliments surgelŽs avec des
mains humides. Les mains pourraient y rester
collŽes.
¥ Ne dŽcollez jamais les bacs ˆ glace avec un
couteau ou tout autre objet tranchant.
¥ Ne jamais essayer de rŽparer lÕappareil vous-
m•me. Les rŽparations effectuŽes par des
incompŽtents peuvent endommager lÕappareil.
SÕadresser au centre de service apr•s-vente le
plus proche et nÕexiger que des pi•ces de
rechange dÕorigine.
SŽcuritŽ enfants
¥ Les ŽlŽments de lÕemballage (par ex. sacs,
pellicules, polystyr•ne) peuvent •tre dangereux
pour les enfants. Ils peuvent sÕŽtouffer!
¥ En cas dÕŽlimination de lÕappareil, couper le c‰ble
dÕalimentation et neutraliser le dispositif de
fermeture de la porte de mani•re ˆ ce que les
enfants ne puissent pas rester enfermŽs ˆ
lÕintŽrieur de lÕappareil.
Ce sont des avertissements de sŽcuritŽ. Nous
vous prions donc de les lire attentivement avant
dÕinstaller et dÕutiliser votre appareil.
Nous recommandons de conserver cette notice afin
de pouvoir la consulter au besoin et de la remettre, le
cas ŽchŽant, au nouveau propriŽtaire de lÕappareil.
Page 4

Sommaire
Avertissements et conseils importants . . . . . . . . . . . . . . . . . . . . . . . . . . . . . . . . . . . . . . . . . . . . . . . . . . . . . .3
Renseignements pour lÕŽlimination des matŽriaux dÕemballage . . . . . . . . . . . . . . . . . . . . . . . . . . . . . . . . . .4
Utilisation . . . . . . . . . . . . . . . . . . . . . . . . . . . . . . . . . . . . . . . . . . . . . . . . . . . . . . . . . . . . . . . . . . . . . . . . . . . . . .5
Nettoyage intŽrieur/Mise en service/RŽglage de la tempŽrature/RŽfrigŽration/CongŽlation/Conservation . . .5
DŽcongŽlation/Fabrication de gla•ons/Tablettes amovibles/Balconnets de la contre-porte . . . . . . . . . . . . . . .6
Explication signalŽtique de la zone froide . . . . . . . . . . . . . . . . . . . . . . . . . . . . . . . . . . . . . . . . . . . . . . . . . . . . .7
Conseils Conseils pour la rŽfrigŽration / Conseils pour la congŽlation . . . . . . . . . . . . . . . . . . . . . . . . . . . . . . .7
Conseils pour la surgŽlation . . . . . . . . . . . . . . . . . . . . . . . . . . . . . . . . . . . . . . . . . . . . . . . . . . . . . . . . . . . . . . . .8
Entretien DŽgivrage . . . . . . . . . . . . . . . . . . . . . . . . . . . . . . . . . . . . . . . . . . . . . . . . . . . . . . . . . . . . . . . . . . . . . .8
Nettoyage / Arr•t prolongŽ / Changement de lÕampoule . . . . . . . . . . . . . . . . . . . . . . . . . . . . . . . . . . . . . . . . . .9
Service apr•s-vente et pi•ces de rechange / CaractŽristiques Techniques . . . . . . . . . . . . . . . . . . . . . . .10
RŽversibilitŽ de la porte . . . . . . . . . . . . . . . . . . . . . . . . . . . . . . . . . . . . . . . . . . . . . . . . . . . . . . . . . . . . . . . . . .11
RŽversibilitŽ de la porte du compartiment congŽlateur . . . . . . . . . . . . . . . . . . . . . . . . . . . . . . . . . . . . . . . . . .12
Installation Emplacement / Branchement Žlectrique . . . . . . . . . . . . . . . . . . . . . . . . . . . . . . . . . . . . . . . . . . . .12
PrŽparation de la grille . . . . . . . . . . . . . . . . . . . . . . . . . . . . . . . . . . . . . . . . . . . . . . . . . . . . . . . . . . . . . . . . . .13
Encastrement sous un plan de travail . . . . . . . . . . . . . . . . . . . . . . . . . . . . . . . . . . . . . . . . . . . . . . . . . . . . . .13
Montage de la plinthe . . . . . . . . . . . . . . . . . . . . . . . . . . . . . . . . . . . . . . . . . . . . . . . . . . . . . . . . . . . . . . . . . . .16
4
Protection de lÕenvironnement
Cet appareil ne contient pas, dans son circuit
rŽfrigŽrant et ses mati•res isolantes, de gaz
rŽfrigŽrants nocifs ˆ la couche d'ozone. Il ne doit pas
•tre mis au rebut avec les ordures urbaines et la
ferraille afin d'Žviter d'endommager le circuit
rŽfrigŽrant, plus particuli•rement ˆ l'arri•re de
l'appareil. Contactez votre mairie afin de vous
renseigner sur la collecte de ce type d'appareils.
Les matŽriaux utilisŽs dans cet appareil et
identifiŽs par ce symbole sont recyclables.
Mise au rebut des anciens appareils
Le symbole sur le produit ou son emballage
indique que ce produit ne peut •tre traitŽ comme
dŽchet mŽnager. Il doit •tre remis au point de
collecte dŽdiŽ ˆ cet effet (collecte et recyclage du
matŽriel Žlectrique et Žlectronique). En procŽdant ˆ
la mise ˆ la casse rŽglementaire de l'appareil, nous
prŽservons l'environnement et notre sŽcuritŽ,
s'assurant ainsi que le dŽchets seront traitŽs dans
des conditions appropriŽes. Pour obtenir plus de
dŽtails sur le recyclage de ce produit, veuillez
prendre contact avec les services de votre commune
ou le magasin o• vous avez effectuŽ lÕachat.
Page 5

Utilisation
5
RŽfrigŽration
Pour obtenir le meilleur rendement du compartiment
rŽfrigŽrateur:
¥ n'introduisez pas d'aliments encore chauds ou de
liquides en Žvaporation dans la cuve;
¥ couvrez les aliments, surtout s'ils sont
aromatiques;
¥ placez les denrŽes de fa•on ˆ ce que l'air puisse
circuler tout autour.
Mise en service
Branchez la prise de courant et ouvrez la porte.
Tournez le bouton du thermostat dans le sens des
aiguilles d'une montre au-delˆ de la position ÇOÈ
(arr•t). L'appareil est ainsi en Žtat de
fonctionnement.
RŽglage de la tempŽrature
La tempŽrature est rŽglŽe automatiquement et peut
•tre augmentŽe (moins froid) en tournant le bouton
vers les numŽros les plus bas ou bien diminuŽe (plus
froid) en le tournant vers les numŽros les plus
ŽlevŽs. En tout cas, I'exacte position doit •tre
repŽrŽe en considŽrant que la tempŽrature interne
dŽpend des facteurs suivants:
¥ tempŽrature ambiante;
¥ frŽquence d'ouverture des portes;
¥ quantitŽ d'aliments conservŽs;
¥ emplacement de l'appareil.
Une position moyenne est la plus indiquŽe.
Pour arr•ter le fonctionnement, placez l'indicateur du
bouton en correspondance du symbole ÇOÈ.
Attention
Si le thermostat est rŽglŽ sur la position de
froid maximum, lorsque la tempŽrature
ambiante est ŽlevŽe et que l'appareil est
plein, il est possible que le compresseur
fonctionne en rŽgime continu.
Dans ce cas, il y a un risque de formation
excessive de givre sur la paroi postŽrieure
ˆ l'intŽrieur de l'appareil.
Pour Žviter cet inconvŽnient, placez le
thermostat sur une position moins ŽlevŽe,
de fa•on ˆ permettre un dŽgivrage
automatique et, par consŽquent, des
Žconomies de courant.
Nettoyage intŽrieur
L'appareil Žtant convenablement installŽ, nous vous
conseillons de le nettoyer soigneusement avec de
l'eau ti•de savonneuse, pour enlever l'odeur
caractŽristique de ÇneufÈ.
N'utilisez pas de produits abrasifs, de
poudre ˆ rŽcurer ni d'Žponge mŽtallique,
qui risquent d'endommager les finitions.
CongŽlation
Le compartiment basse tempŽrature vous le
reconnaissez ˆ son sigle normalisŽ 4 Žtoiles
.
Il vous permet de congeler des denrŽes fra”ches et
de conserver des produits surgelŽs et congelŽs, d'un
mois ˆ un an, suivant la nature du produit.
Pour congeler les aliments frais il n'est pas
nŽcessaire de rŽgler le thermostat sur une position
diffŽrente de celle employŽe en fonctionnement
normal. Toutefois, si vous dŽsirez congeler plus
rapidement vous pouvez rŽgler le thermostat sur une
position plus froide tout en veillant ˆ ce que la
tempŽrature ne descende pas en dessous de 0¡C
dans le compartiment rŽfrigŽrateur. Dans ce cas il
faudra ramener le thermostat sur une position moins
froide.
Conservation des produits
surgelŽs
A la premi•re mise en fonctionnement ou apr•s un
arr•t prolongŽ faites fonctionner l'appareil pendant
deux heures au moins sur la position de froid
maximum.
Ramenez ensuite le thermostat sur la position
dŽsirŽe.
Attention
En cas de coupure de courant abstenezvous dÕouvrir la porte. Si lÕinterruption est
de courte durŽe (jusquÕˆ 12 heures) et si le
congŽlateur est rempli, il nÕy a aucun risque
dÕaltŽration pour les aliments. En cas
contraire vous devrez consommer les
aliments le plus rapidement possible (une
augmentation de la tempŽrature peut
rŽduire remarquablement la durŽe de
conservation des aliments).
Page 6
Fabrication de gla•ons
La fabrication des gla•ons s'effectue dans le
compartiment congŽlateur.
Remplissez d'eau le bac jusqu'aux trois-quarts de sa
hauteur afin de permettre l'expansion de la glace.
Le dŽmoulage des bacs en mati•res plastique
s'obtient par simple torsion.
N'employez pas d'objet mŽtallique pour
dŽcoller les bacs ˆ gla•ons.
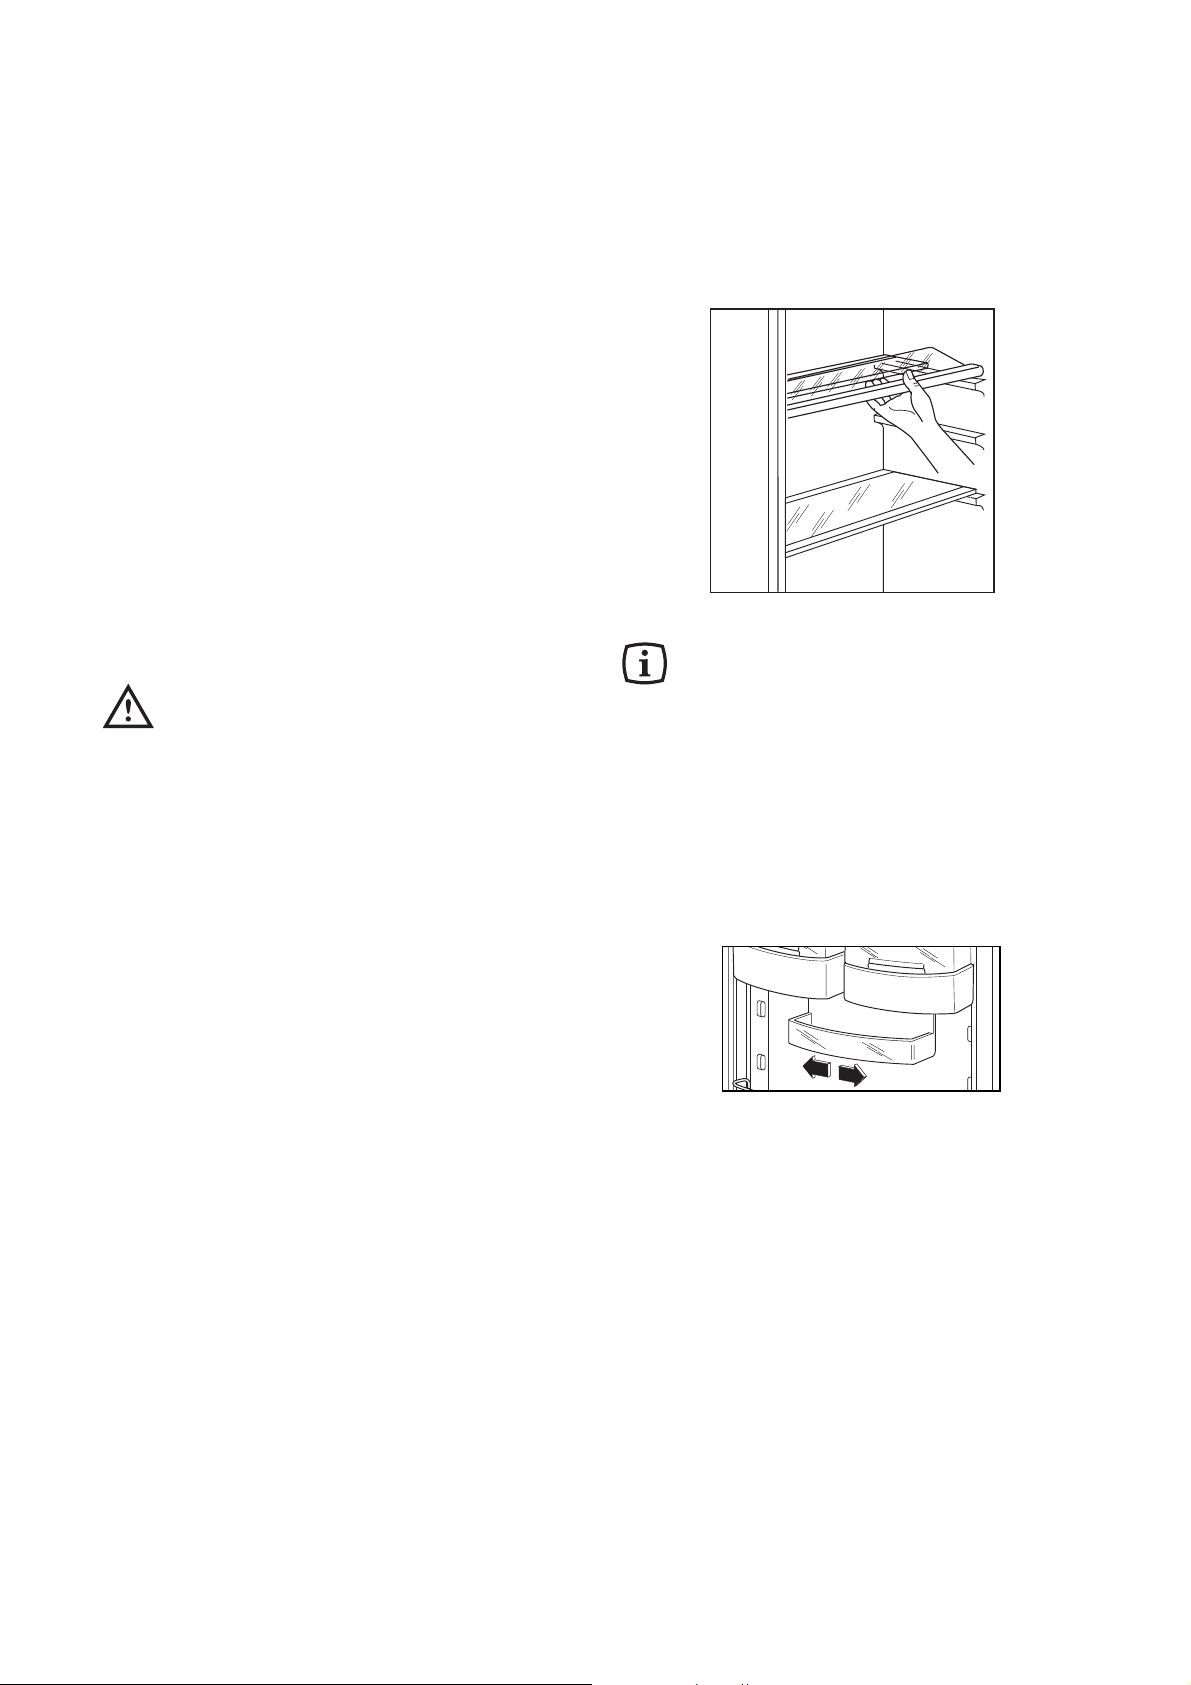
Tablettes amovibles
Les glissi•res se trouvant sur les parois de la cuve
permettent de positionner les tablettes ˆ diffŽrentes
hauteurs, selon vos besoins.
Pour une meilleure utilisation de lÕespace vous
pouvez superposer les demi-tablettes antŽrieures sur
les demi-tablettes postŽrieures.
Pour permettre une bonne circulation de lÕair
nÕenlevez pas la clayette infŽrieure en verre
au-dessus du/des bac/s ˆ lŽgumes et le
balconnet porte-bouteille.
6
DŽcongŽlation
Les aliments congelŽs ou surgelŽs doivent •tre
dŽcongelŽs avant leur utilisation, dans le
compartiment rŽfrigŽrateur (viande, volaille,
poissons, etc.) ou ˆ tempŽrature ambiante (pour les
autres aliments), selon le temps dont on dispose
pour cette opŽration. S'il s'agit de produits minces ou
divisŽs, placez-les directement ˆ cuire: dans ce cas,
le temps de cuisson sera plus long.
La dŽcongŽlation dans un four ˆ micro-ondes est
tr•s rapide et vous permet ainsi d'Žviter une
altŽration des aliments et d'utiliser presque
immŽdiatement les produits congelŽs.
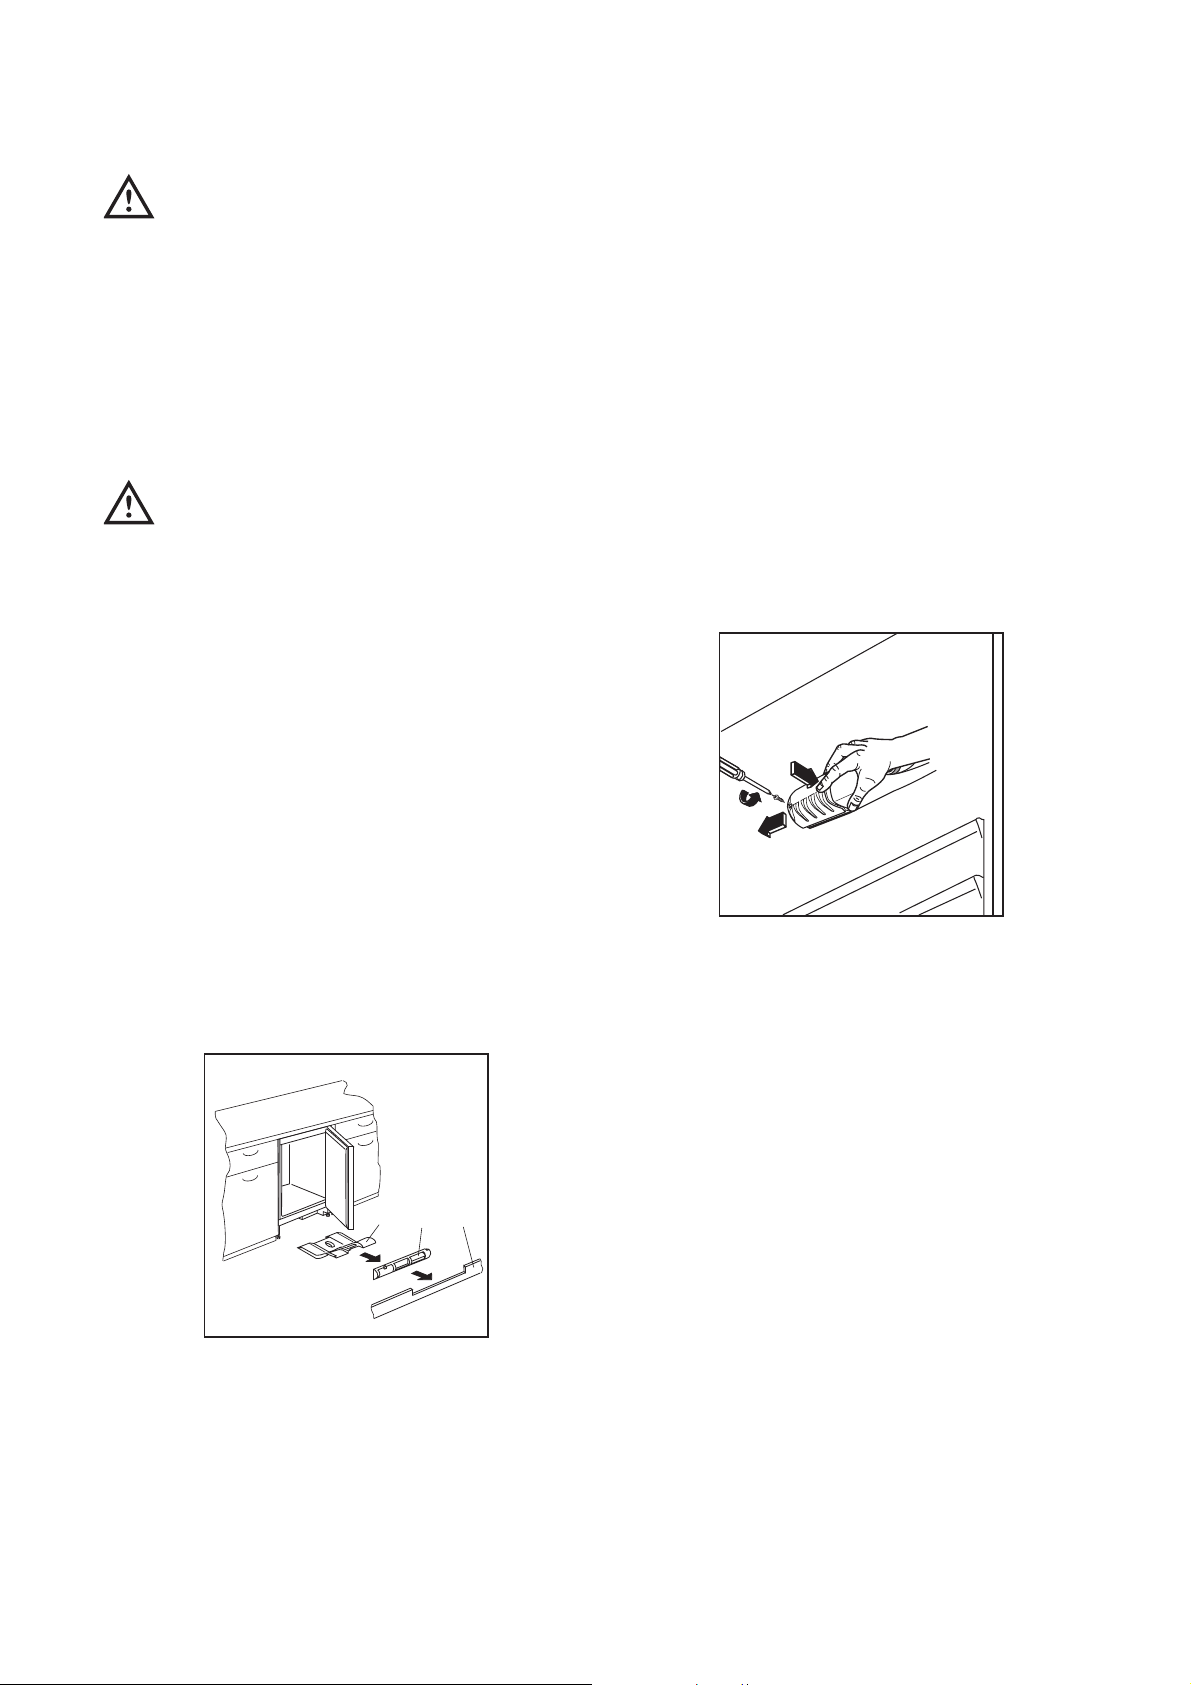
Positionnement des balconnets de
la contre-porte
En fonction des besoins, vous pouvez tirer
latŽralement le compartiment de rangement situŽ
dans la porte.
Pour un nettoyage plus soignŽ, les balconnets
supŽrieur et infŽrieur peuvent •tre aisŽment retirŽs et
replacŽs dans la m•me position.
D338
Page 7

Explication signalŽtique de la zone froide
Le symbole ci-contre indique lÕemplacement de la zone la plus froide de votre rŽfrigŽrateur.
Zone la plus froide: inférieure ou égale à +4° C
Viandes, volailles, poissons, charcuteries, plats prŽparŽs, salades composŽes, prŽparations et p‰tisseries ˆ
base d'Ïufs ou de cr•me, p‰tes fra”ches, p‰te ˆ tarte, pizza/quiches, produits frais et fromages au lait cru,
lŽgumes pr•ts ˆ l'emploi vendus sous sachet plastique et plus gŽnŽralement, tout produit frais dont la date
limite de consommation (DLC) est associŽe ˆ une tempŽrature de conservation infŽrieure ou Žgale ˆ +4¡C.
Indicateur de tempŽrature
Thermostat ˆ rŽgler TempŽrature correcte
L'indicateur de tempŽrature permet de contr™ler le bon fonctionnement de votre rŽfrigŽrateur.
L'indicateur prŽsente la mention "OK" lorsque la zone la plus froide atteint une tempŽrature infŽrieure ou Žgale
ˆ 4¡C.
Si la tempŽrature est supŽrieure ˆ 4¡C, l'indicateur reste noir. L'utilisateur doit alors faire baisser la tempŽrature
de son rŽfrigŽrateur en rŽglant son thermostat.
ATTENTION: Une ouverture prolongŽe de la porte du rŽfrigŽrateur entra”ne une hausse de la tempŽrature
interne. Afin de bien mesurer la tempŽrature, la lecture de l'indicateur doit •tre effectuŽe dans les 30 secondes.
Conseils
Conseils pour la rŽfrigŽration
O• placer les denrŽes?
¥ Viande (de toutes sortes): enveloppez-la dans
des sachets en plastique et placez-la sur la tablette
en verre au-dessus du bac ˆ lŽgumes.
La pŽriode de conservation est de 1 ˆ 2 jours
au maximum.
¥ Aliments cuits, plats froids, etc.: placez-les, bien
couverts, sur une clayette.
¥ Fruits et lŽgumes: bac(s) ˆ lŽgumes (une fois
nettoyŽs).
¥
Beurre et fromage: enveloppez-les
soigneusement dans des feuilles d'aluminium ou
de polyŽthyl•ne et mettez-les dans les casiers
appropriŽs.
¥ Lait en bouteille: ˆ placer dans l'un des
balconnets de la contreporte.
Bananes, pommes de terre, oignon et ail ne
doivent pas •tre placŽs dans le rŽfrigŽrateur, s'ils
ne sont pas conditionnŽs.
Conseils pour la congŽlation
¥ le pouvoir max. de congŽlation par 24 heures
figure sur la plaque signalŽtique.
¥ Ne congelez pas en une seule fois, de denrŽes
fra”ches dŽpassant la valeur indiquŽe sur la plaque
signalŽtique de lÕappareil;
¥ le processus de congŽlation prend 24 heures. Il
vaut mieux ne pas ajouter dÕautres aliments ˆ
congeler pendant ce laps de temps;
¥ les produits destinŽs ˆ la congŽlation doivent •tre
frais, bien nettoyŽs et d'excellente qualitŽ;
¥ les denrŽes ˆ congeler doivent •tre enfermŽes
dans des emballages impermŽables de qualitŽ
alimentaire. Fermez soigneusement les paquets en
Žliminant les poches d'air. Envoleppez les denrŽes
dans du papier dÕaluminium ou de polyth•ne, en
Žliminant les bulles dÕair et en fermant bien les
paquets;
¥ n'ouvrez pas la porte et ne placez pas de
nouveaux produits ˆ congeler pendant la congŽlation;
¥ Žvitez de placer des produits ˆ congeler en contact
avec des denrŽes dŽjˆ entreposŽes, pour Žviter
dÕen Žlever la tempŽrature;
7
OK
Page 8

8
Dans le congélateur, par contre, il faut éliminer le
givre à chaque fois qu'il y a une couche épaisse qui
s'est formée (de 4 mm environ), en se servant d’une
spatule en plastique. Pendant que l'on effectue cette
opération, il n'est pas nécessaire de couper le
courant ou d'enlever les denrées qui se trouvent
dans le compartiment.
Pour effectuer un dégivrage complet procédez de la
manière suivante:
1. tournez le bouton du thermostat sur la position
ÇOÈ ou dŽbranchez lÕappareil;
2. enveloppez les denrŽes dans plusieurs feuilles de
papier journal et conservez-les dans un endroit
frais;
3. maintenez la porte ouverte, placez un rŽcipient sur
la premi•re clayette du rŽfrigŽrateur, ˆ lÕendroit qui
correspond ˆ lÕouverture de vidange, et retirez le
bouchon, comme lÕillustre la figure;
Conseils pour la surgŽlation
Comment utiliser ce compartiment au mieux:
¥ au moment de l'achat, il est vivement recommandŽ
d'Žcourter au minimum le temps qui s'Žcoule entre
le moment ou le produit est achetŽ et le moment
ou il est placŽ dans le compartiment congŽlateur;
¥ ne jamais dŽpasser la date limite d'utilisation
gŽnŽralement marquŽe sur les paquets;
¥ assurez-vous que l'emballage extŽrieur est intact.
Dans le cas contraire le produit surgelŽ peut dŽjˆ
•tre ab”mŽ;
¥ il convient de faire tr•s attention au moment de
l'achat, car les aliments dŽgelŽs, m•me
partiellement, ne peuvent •tre recongelŽs. Dans ce
cas consommez-les dans les 24 heures;
¥ Žvitez d'ouvrir trop souvent la porte et ne la laissez
ouverte que le temps nŽcessaire. Une
augmentation de la tempŽrature peut rŽduire
sensiblement la durŽe de conservation des
aliments.
¥ ne placez ni bouteilles ni bo”tes de boissons
gazeuses dans le congŽlateur, elles pourraient
Žclater;
¥ n'introduisez jamais de liquides ou d'aliments
chauds;
¥ ne remplissez jamais les rŽcipients avec couvercle
jusqu'au bord;
¥ ne consommez pas certains produits tels que les
b‰tonnets glacŽs des leur sortie du congŽlateur. La
tempŽrature tr•s basse ˆ laquelle ils se trouvent
peut provoquer des bržlures;
¥ indiquez sur chaque paquet la date de congŽlation,
afin de pouvoir contr™ler le temps d'entreposage.
Entretien
DŽbranchez lÕappareil avant toute
opŽration.
Attention
Cet appareil contient des hydrocarbures
dans son circuit rŽfrigŽrant; lÕentretien et la
recharge ne doivent donc •tre effectuŽs
que par du personnel autorisŽ.
4. une fois que le dŽgivrage est terminŽ, Žpongez
bien le congŽlateur et remettez le bouchon ˆ sa
place;
DŽgivrage
Le dŽgivrage s'effectue automatiquement, ˆ chaque
arr•t du compresseur. L'eau de dŽgivrage est
ŽvacuŽe dans un bac situŽ ˆ la partie infŽrieure de
l'appareil o• elle s'Žvapore sans intervention.
Nous vous recommandons de nettoyer
pŽriodiquement l'orifice d'Žcoulement de l'eau de
dŽgivrage (F) situŽ derri•re le bac ˆ lŽgumes.
Utilisez ˆ cet effet y b‰tonnet (P) se trouvant
dans l'orifice. On Žvitera ainsi que la niche
contenant le bac ˆ lŽgumes ne se remplisse
dÕeau.
P
S.I.011
F
PR151
Page 9
5. ramenez le bouton du thermostat sur la position
dŽsirŽe ou rebranchez lÕappareil.
Pour cette opŽration nÕutilisez jamais
dÕobjet mŽtallique qui risquerait de
dŽtŽriorer lÕappareil.
NÕutilisez jamais de dispositifs mŽcaniques
ou autres moyens artificiels pour accŽlŽrer
le dŽgivrage, ˆ part ceux prŽconisŽs.
LÕŽlŽvation de tempŽrature des denrŽes
congelŽes peut diminuer leur durŽe de
conservation.
9
Arr•t prolongŽ
Lorsque l'appareil doit rester ˆ l'arr•t pendant un
certain temps, prenez les prŽcautions suivantes:
¥ dŽbranchez la prise de courant;
¥ videz l'appareil;
¥ dŽgivrez-le et nettoyez-le ˆ fond;
¥ laissez les portes entrouvertes pour faire
circuler de l'air, de fa•on ˆ Žviter les
mauvaises odeurs.
Changement de l'ampoule
L'ampoule d'Žclairage dans le compartiment
rŽfrigŽrateur est accessible en effectuant les
opŽrations ci-dessous:
1. dŽvissez la vis de fixation du plafonnier;
2. dŽcrochez la partie mobile en exer•ant une
pression sur celle-ci comme indiquŽ dans la figure.
Lorsque la porte est ouverte, si l'ampoule ne s'allume
pas, il faut contr™ler qu'elle soit bien vissŽe; si cela
n'Žlimine pas le probl•me, mettre une autre ampoule
qui ait la m•me puissance.
La puissance est indiquŽe sur le diffuseur.
Nettoyage
N'utilisez jamais d'objets mŽtalliques pour
nettoyer l'appareil; vous risquez de
l'endommager.
Nettoyez pŽriodiquement l'intŽrieur de votre appareil
avec de l'eau ti•de et du bicarbonate de soude.
Rincez et sŽchez soigneusement.
LÕappareil est ŽquipŽ dÕune grille dÕaŽration; elle
doive toujours •tre nettoyŽe afin de garantir une
bonne ventilation en partie arri•re et un
fonctionnement optimal de lÕappareil.
Nettoyage pŽriodique
La structure de lÕappareil permet dÕeffectuer un
nettoyage de la partie arri•re situŽe pr•s du mur en
utilisant Žgalement un aspirateur.
Pour effectuer cette opŽration, procŽdez comme suit:
1. Enlevez la plinthe (1);
2. dŽmontez la grille dÕaŽration (2);
3. sortez le cache (3) avec prŽcaution en veillant ˆ
ce quÕil nÕy ait pas de traces dÕeau provenant du
dŽgivrage.
D411
S.I.013
3
21
Page 10

CaractŽristiques Techniques
Les donnŽs techniques figurent sur la plaque signalŽtique situŽe sur le c™te droite ˆ lÕintŽrieur de lÕappareil.
Service apres-vente et pieces de rechange
Une fois que tous ces contr™les ont ŽtŽ effectuŽs, si l'anomalie de fonctionnement persiste, adressez-vous au
Service Apr•s-Vente le plus proche.
Pour que l'intervention soit plus rapide, au moment de l'appel, il vaut mieux indiquer le code du mod•le
et le numŽro d'immatriculation, qui se trouvent sur le certificat de garantie ou sur la plaque
d'immatriculation placŽe ˆ l'intŽrieur de l'appareil, ˆ droite et en bas.
DŽrangement
Rem•de
LÕappareil ne fonctionne pas.
LÕappareil refroidit trop fortement.
Les aliments sont trop chauds.
LÕŽclairage intŽrieur ne fonctionne pas.
Formation importante de givre dans lÕappareil,
Žventuellement aussi au joint de porte
Apr•s modification du rŽglage de tempŽrature, le
compresseur ne dŽmarre pas immŽdiatement.
Il y a de lÕeau au fond du compartiment rŽfrigŽrateur ou sur
les surfaces de rangement.
- LÕappareil nÕest pas mis en service; mettre lÕappareil en
service.
- La fiche nÕest pas branchŽe ou ne donne pas de contact;
brancher la fiche secteur.
- Le fusible a dŽclenchŽ ou est dŽfecteux; vŽrifier le fusible,
remplacer le cas ŽchŽant.
- La prise de courant est dŽfectueuse; les dŽrangements du
rŽseau Žlectrique doivent •tre supprimŽs par votre
Žlectricien.
- La tŽmperature est reglŽe trop bas; mettre
temporairement le rŽgulateur de tŽmperature sur une
tŽmperature plus ŽlevŽe.
- La tempŽrature est mal rŽglŽe; veuillez consulter la section
ÒMise en serviceÓ.
- La porte est restŽe ouverte trop longtemps; ne pas ouvrir
la porte plus longtemps que nŽcessaire.
- De trop grandes quantitŽs dÕaliments ont ŽtŽ entreposŽes
au cours des derni•res 24 heures; mettre temporairement
le rŽgulateur de tempŽrature sur un rŽglage plus froid.
- LÕappareil se trouve ˆ c™te dÕune source de chaleur;
veuillez consulter la section ÒEmplacementsÓ
- La lampe est dŽfectueuse; veuillez consulter la section
ÒChangement de lÕampouleÓ.
- Le joint de porte nÕest pas Žtanche (apr•s changement du
sens dÕouverture de la porte); ˆ lÕaide dÕun s•che-cheveux,
rŽchauffer avec prŽcaution le joint de porte aux endroits
des fuites (pas plus chaud quÕenv. 50¡C). Remettre en
m•me temps le joint de porte en forme ˆ la main de
mani•re ˆ ce quÕil soit de nouveau en position correcte.
- Ceci est normal, il ne sÕagit pas dÕun dŽrangement; le
compresseur se met en marche de lui m•me au bout dÕun
certain temps.
- Le trou dÕŽcoulement de lÕeau de dŽgivrage est bouchŽ;
voir section ÒDŽgivrageÓ.
Si l'appareil marche mal, il faut contr™ler:
10
Page 11
11
RŽversibilitŽ de la porte
Pour l'inversion opŽrer comme suit:
Attention!
La rŽversibilitŽ de la porte une fois effectuŽe,
contr™lez ensuite que le joint magnŽtique
adh•re ˆ la carrosserie. Si la tempŽrature ˆ
l'intŽrieur de la pi•ce est trop basse (en hiver,
p.ex.), il se peut que le joint n'adh•re pas
parfaitement. Dans ce cas, si on ne veut pas
attendre que le joint reprenne ses dimensions
naturelles apr•s un certain temps, on pourra
accŽlŽrer ce processus en chauffant la partie
intŽressŽe ˆ l'aide d'un s•che-cheveux.
6
4
1
2
1
6
3
6
7
8
5
2
6
10
13
9
3
11
6
12
Page 12

12
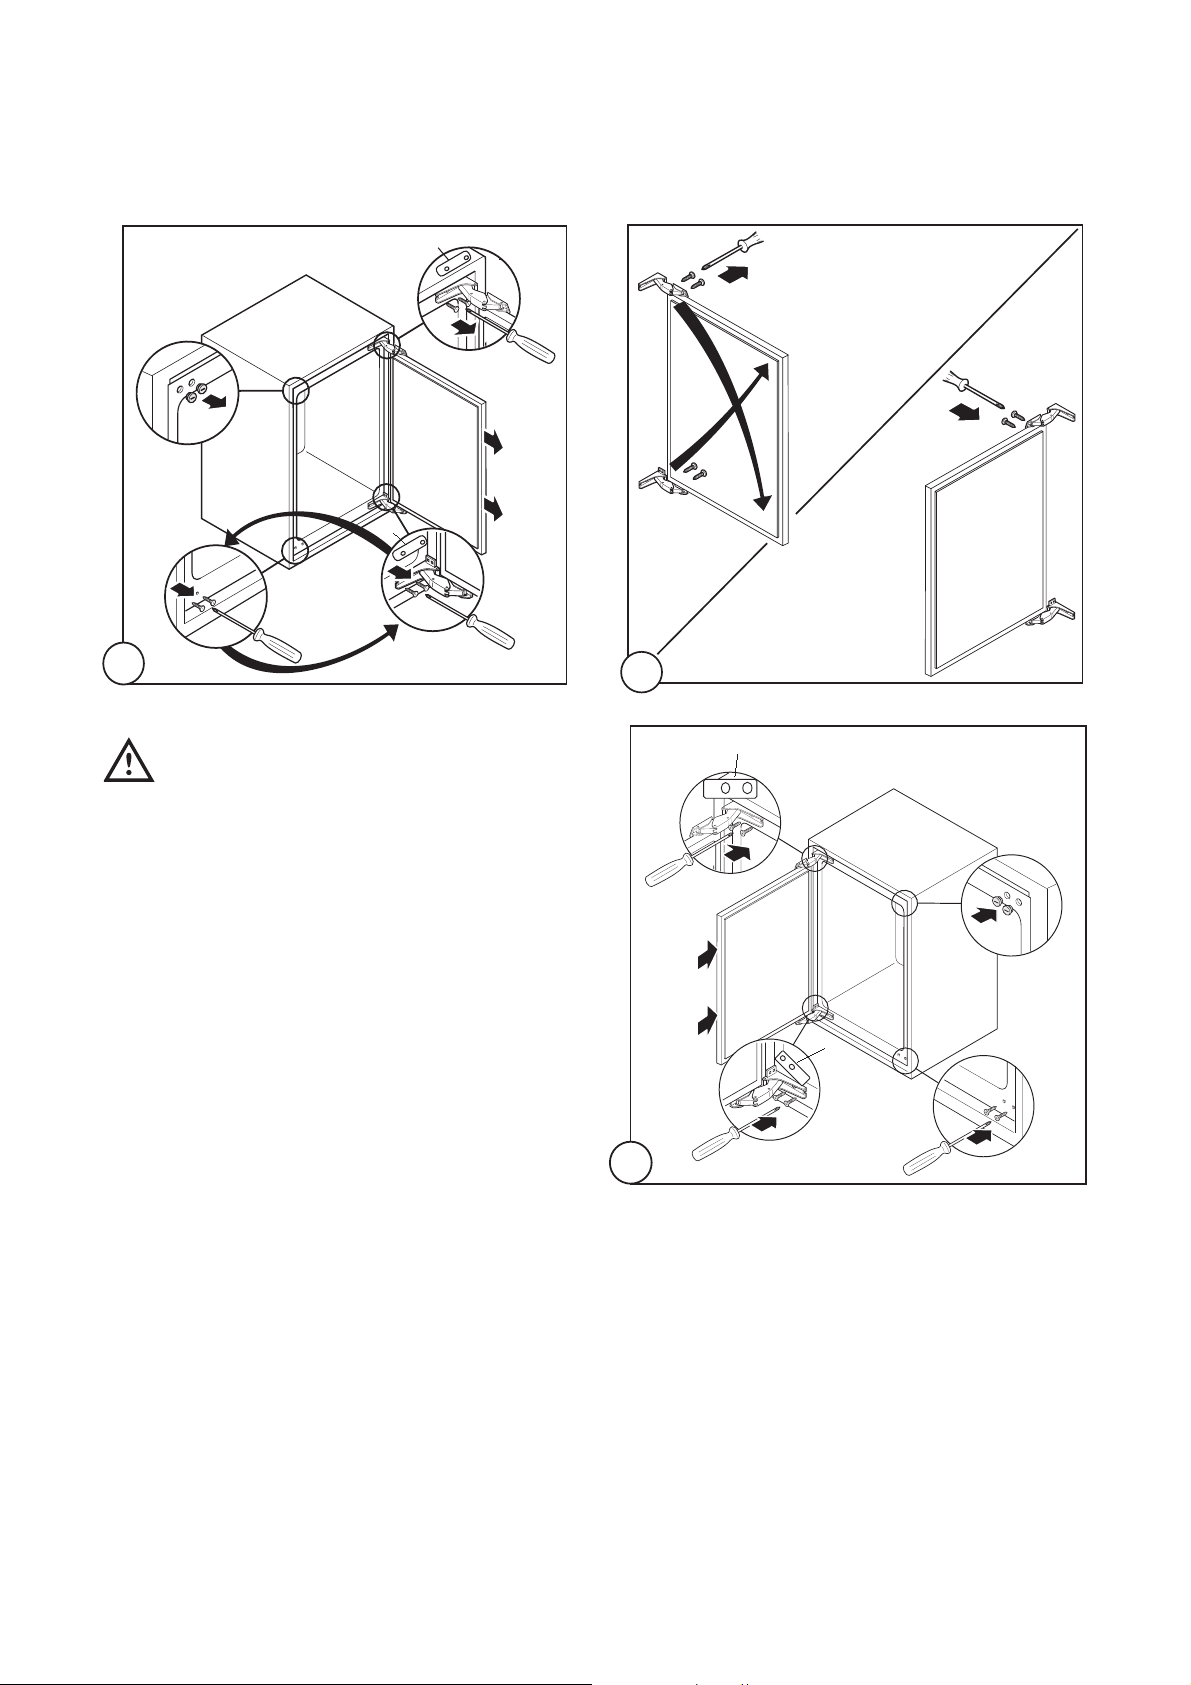
RŽversibilitŽ de la porte du compartiment congŽlateur
Installation
Emplacement
Placez de prŽfŽrence votre appareil loin d'une source
de chaleur (chauffage, cuisson ou rayons solaires
trop intenses).
Pour le bon fonctionnement de votre appareil, la
tempŽrature ambiante du local doit •tre comprise
entre +18¡C et +43¡C (classe T); +18¡C et +38¡C
(classe ST); +16¡C et +32¡C (classe N); +10¡C et
+32¡C (classe SN).
La classe d'appartenance est
indiquŽe sur la plaque signalŽtique.
Pour lÕencastrement et lÕŽventuel changement du
sens dÕouverture de la porte rapportez-vous aux
instructions relatives ci-jointes.
Branchement Žlectrique
Contr™lez, avant de brancher l'appareil, si le voltage
et la frŽquence indiquŽs sur la plaque signalŽtique
correspondent ˆ ceux de votre rŽseau. TolŽrance
admise: ±6%.
Pour l'adaptation de l'appareil ˆ des voltages
diffŽrents, l'adjonction d'un autotransformateur d'une
puissance adŽquate est indispensable.
Important
Il faut absolument brancher lÕappareil ˆ une
prise de terre qui marche.
CÕest pour cela que la prise du c‰ble
dÕalimentation est munie dÕun contact prŽvu
exprŽs. Si la prise de courant de rŽseau
domestique nÕest pas branchŽe ˆ la terre,
branchez lÕappareil ˆ une prise de terre ˆ part,
conformŽment aux normes en vigueur, en
vous adressant ˆ un tŽchnicien spŽcialisŽ.
Important
LÕappareil doit pouvoir •tre dŽbranchŽ du
secteur; il est donc nŽcessaire que la fiche
reste accessible une fois que lÕinstallation est
terminŽe.
Le fabricant dŽcline toute responsabilitŽ
pour tout incident ou accident provoquŽ
par une mise ˆ la terre inexistante ou
dŽfectueuse.
Cet appareil est conforme aux Directives
Communautaires suivantes:
- 73/23 CEE 19/02/73 (Basse Tension) et
modifications successives;
- 87/308 du 2.6.87 concernant la suppression
des interfŽrences radio-Žlectriques.
- 89/336 CEE 03/05/89 (CompatibilitŽ
ElectromagnŽtique) et modifications
successives.
12 3
180°
45
Page 13

PrŽparation de la grille
Ouverture de la porte ˆ gauche:
- enlevez le c™tŽ gauche (A) de la grille en le
coupant de l'arri•re.
Ouverture porte ˆ droite:
- enlevez le c™tŽ droit (B) de la grille en le coupant
de l'arri•re.
ProcŽdez ensuite comme suit pour remettre la grille
sur l'appareil:
- glissez la grille ˆ la base de l'appareil puis appuyer
sur les crochets (a) jusqu'au dŽclic.
Encastrement sous un plan de travail
Dimensions de la niche
Les dimensions de la niche doivent correspondre ˆ
celles indiquŽes dans la figure.
1. Pi•ces de montage fournies avec lÕappareil.
2. Fixez ˆ lÕappareil les Žquerres (D) livrŽes ˆ cet
effet (fig.).
13
Côté gauche Côté droite
2
A
B
DO002/2
DO001
a
a
600
550
min.
600
DO013
1xB
1xA
1xK
2xG
2xL
2xF
2xD
2xC
18xI
2xE
1
Page 14

6. Monter la porte du meuble.
Pour faciliter le glissement de lÕappareil dans la niche
dÕencastrement, appliquez les coussinets (E) fournis
sous les deux pieds postŽrieurs.
Si nŽcessaire, vous pouvez rŽduire les dimensions
des coussinets en les coupant comme lÕindique la
figure.
3. Mettre en place lÕappareil. La prise murale doit se
trouver impŽrativement hors de la niche
dÕencastrement de lÕappareil.
LÕappareil est ŽquipŽ de pieds rŽgables; pour
rŽgler lÕappareil ˆ la hauteur souhaitŽe (870 mm
max.), il est nŽcessaire dÕagir sur les 4 pieds
rŽglables.
4. Appliquez le joint ˆ pression (B) ˆ lÕappareil (fig.).
14
5. Visser l’appareil.
b)
596
555
max
+
3
-
-
+
E
5
I
2
1
10
a
C
4
3
E
II52
1
B
b
6
4
7
Page 15

15
ab
Partie supérieure de la porte
du meuble
1
45°
C
click
3
click
2
8
Möbeltür Innenseite
c
11
a
I
=
1
=
=
c
2
10
=
9
b
12
10
F
I
27,5 cm
27,5 cm
55 cm
13
8 mm
F
G
I
K
Page 16

16
Montage de la plinthe
Attention!
Pour ne pas compromettre le bon
fonctionnement de lÕappareil, il est
nŽcessaire dÕutiliser la grille dÕaŽration
dÕorigine.
¥ Si la niche dÕencastrement de lÕappareil a une
hauteur de A=820 mm et une hauteur de plinthe
a=100 mm, la plinthe peut •tre montŽe sans
modification. Il en est de m•me pour une hauteur
dÕencastrement de B=870 mm et une hauteur de
plinthe b=150 mm.
¥ Si la hauteur de la plinthe est supŽrieure ˆ
a=100 mm, b=150 mm, celle-ci doit •tre dŽcoupŽe
afin dÕobtenir une hauteur de a=100 mm et
b=150 mm et une largeur a=580 mm.
¥ Fixez la plinthe au bloc cuisine.
Important
La plinthe doit •tre positionnŽe ˆ une
distance minimum de 25 mm de la porte.
7. Posez le couvre-joint (A).
14
A
A = 820
B = 870
a = 100
b = 150
15
L
90°
115°
L
580
25 - 80
25
DO008
Page 17

17 Printed on paper manufactured with environmentally sound processes
suffocation! Keep packaging material away from
children!
¥
Remove the plug and ensure that any locks or
catches are removed, to prevent young children
being trapped inside.
Environment Protection
¥ This appliance does not contain any refrigerant gases
harmful to the ozone layer in its refrigeration circuit
and its insulating materials. It must not be scrapped
with the urban rubbish and scrap iron in order to avoid
damaging the refrigeration circuit and in particular the
back of the appliance. Contact your town council for
information on the collection of these types of
appliances.
The materials used in this appliance, which are
identified by this symbol, can be recycled.
Disposal of old appliances
The symbol on the product or on its packaging
indicates that this product may not be treated as
household waste. Instead it shall be handed over to
the applicable collection point for the recycling of
electrical and electronic equipment. By ensuring this
product is disposed of correctly, you will help prevent
potential negative consequences for the environment
and human health, which could otherwise be caused
by inappropriate waste handling of this product. For
more detailed information about recycling of this
product, please contact your local city office, your
household waste disposal service or the shop where
you purchased the product.
Safety Instructions
This information has been provided in the interests of your safety. Please read it before installing or
using the appliance. Please retain the instruction book for future reference. If owner ship is transferred,
please leave the user manual for the new owner.
Domestic Use
¥ The domestic refrigerators and freezers are designed
to be used specifically for the storage of edible
foodstuffs only.
¥ Check the appliance for transport damage. Under no
circumstances should a damaged appliance be
installed. In the event of damage please contact your
retailer.
¥ This appliance is heavy. The edges and projecting
parts of the cabinet may be sharp. Be careful when
moving the cabinet and always use gloves.
¥ Any electrical work required to install this appliance
should be carried out by a qualified electrician or
competent person.
¥ Make sure that the power plug is not squashed or
damaged by the back of the appliance. Make sure
that the cable is not trapped underneath the
appliance, nor touches the motor.
¥ Do not remove the power cord by pulling on its lead,
particularly when the appliance is being pulled out of
its niche. If the power plug socket is loose, do not
insert the power plug. Damage to the cord may cause
a short-circuit, fire and/or electric shock.
¥ Do not use electrical appliances inside the appliance.
¥ Do not keep carbonated drinks or bottles in the freezer
compartment. The glass bottles may break.
¥ Ice lollies can cause Ôfrost/freezer burnsÕ if consumed
straight from the freezer.
¥ It is dangerous to try and alter the specifications or
modify this product in any way.
¥ Under no circumstances should you attempt to repair
the appliance yourself. Refer to your local Service
Centre, and always insist on genuine spare parts.
Child Safety
¥ This appliance is designed to be operated by adults
only. Do not allow the children to tamper with the
controls or play with the products. There is a risk of
Instructions for the use of the instructions booklet
Notes which are important for your safety or for the proper functioning of the appliance
Supplementary information regarding operation and practical applications of the appliance.
Tips and notes concerning economical and environmentally sound use of the appliance
t
Page 18

18
Contents
Important Safety Instructions . . . . . . . . . . . . . . . . . . . . . . . . . . . . . . . . . . . . . . . . . . . . . . . . . . . . . . . . . . . . .17
Use Cleaning the interior / Starting-up / Temperatur control / Fresh food refrigeration . . . . . . . . . . . . . . . . . .19
Freezing fresh food / Storage of frozen food / Thawing . . . . . . . . . . . . . . . . . . . . . . . . . . . . . . . . . . . . . . . . . .19
Ice-cube production / Movable shelves / Positioning the door shelves / Explanation of the cold zone signs .20
Hints Hints for refrigeration / Hints for freezing / Hints for storage of frozen food . . . . . . . . . . . . . . . . . . . . . .21
Maintenance Defrosting . . . . . . . . . . . . . . . . . . . . . . . . . . . . . . . . . . . . . . . . . . . . . . . . . . . . . . . . . . . . . . . . . .21
Periodic cleaning / Periodic of non-operation . . . . . . . . . . . . . . . . . . . . . . . . . . . . . . . . . . . . . . . . . . . . . . . . .22
Interior light . . . . . . . . . . . . . . . . . . . . . . . . . . . . . . . . . . . . . . . . . . . . . . . . . . . . . . . . . . . . . . . . . . . . . . . . . . . .23
Customer service and spare parts . . . . . . . . . . . . . . . . . . . . . . . . . . . . . . . . . . . . . . . . . . . . . . . . . . . . . . . . .23
Technical specifications . . . . . . . . . . . . . . . . . . . . . . . . . . . . . . . . . . . . . . . . . . . . . . . . . . . . . . . . . . . . . . . . .23
Door reversibility . . . . . . . . . . . . . . . . . . . . . . . . . . . . . . . . . . . . . . . . . . . . . . . . . . . . . . . . . . . . . . . . . . . . . . .23
Inner door reversal . . . . . . . . . . . . . . . . . . . . . . . . . . . . . . . . . . . . . . . . . . . . . . . . . . . . . . . . . . . . . . . . . . . . . .24
Installation Positioning / Electrical connection . . . . . . . . . . . . . . . . . . . . . . . . . . . . . . . . . . . . . . . . . . . . . . . .24
Grid preparation . . . . . . . . . . . . . . . . . . . . . . . . . . . . . . . . . . . . . . . . . . . . . . . . . . . . . . . . . . . . . . . . . . . . . . .25
Building in the appliance under a worktop . . . . . . . . . . . . . . . . . . . . . . . . . . . . . . . . . . . . . . . . . . . . . . . . . .25
Fitting the plinth . . . . . . . . . . . . . . . . . . . . . . . . . . . . . . . . . . . . . . . . . . . . . . . . . . . . . . . . . . . . . . . . . . . . . . . .28
Page 19

Use
19
Thawing
Deep-frozen or frozen food, prior to being used, can
be thawed in the refrigerator compartment or at room
temperature, depending on the time available for this
operation.
Small pieces may even be cooked still frozen,
directly from the freezer: in this case, cooking will
take longer.
Starting-up
Insert the plug into the wall socket.
Open the door and turn the thermostat control knob,
to be found on the upper right hand side of the inner
compartment, clockwise beyond position ÇOÈ (OFF)
to start the appliance.
Temperature control
Temperature adjustment is obtained by turning the
thermostat knob clockwise until its pointer coincides
with the required setting.
A medium setting is generally the most suitable.
The minimum setting (least cold) is represented by
the lowest number and the maximum setting
(coldest) by the highest number. In any case, bear in
mind that the temperature can be either increased
(warmer) by turning the thermostat knob
anticlockwise or decreased (colder) by turning it
clockwise.
The thermostat knob setting should be adjusted
depending on the inner temperature of the
refrigerator, which, in turn, depends on a number of
factors, such as:
¥ ambient temperature
¥ number of times the door is opened
¥ quantity of food stored
¥ location of the appliance
Warning
If the ambient temperature is high, the
thermostat knob is on the coldest setting
(higher numbers) and the appliance is fully
loaded, the compressor may run
continuously, causing frost or ice to form
on the evaporator. If this happens, turn the
knob to a warmer setting (lower numbers)
to allow automatic defrosting and so a
saving in electricity consumption.
Fresh food refrigeration
The refrigerator compartment is suitable for cooling
drinks and for normal food storing.
To obtain the best performance:
¥ do not store warm food or evaporating liquids in the
refrigerator
¥ cover or wrap up the food, particularly if it has a
strong smell.
Cleaning the interior
Before using the appliance for the first time, wash the
interior and all internal accessories with lukewarm
water and some neutral soap so as to remove the
typical smell of a brand-new product, then dry
thoroughly.
Do not use detergents or abrasive
powders, as these will damage the finish.
Freezing fresh food
The 4-star compartment ( ) is suitable for
long term storage of commercially frozen food and
for freezing fresh food.
To freeze fresh foods it is not necessary to change
the setting of the thermostat knob.
However, for a quicker freezing operation, turn the
thermostat knob to the coldest setting; but remember
that, in this condition, the refrigerator compartment
temperature might drop below 0¡C. If this occurs
reset thermostat knob to a warmer setting.
Storage of frozen food
When first starting-up or after a period out of use,
before putting the products in the compartment let
the appliance run for at least two hours on the
coldest setting, then turn the thermostat knob to the
normal operating position.
Important
If there is a power failure when food is in
the freezer, do not open the door of the
freezer compartment. The frozen food will
not be affected if the power cut is of short
duration (up to 12 hours) and the freezer
compartment is full, otherwise, it is
recommended that the food should be
used within a short time (a temperature
increase of the frozen food shortens its
safe storage period).
Page 20

Explanation of the cold zone signs
The symbol shown here on the left indicates the coldest point inside your refrigerator.
Coldest area: below or equal to +4¡C
Meat, poultry, fish, cold cuts, ready-to-eat meals, mixed salads, egg or cream based mixes and cakes, fresh
pasta, cake mixes, pizzas/quiches, fresh foods and fresh-milk cheeses, vegetables ready to be used and
packed in plastic bags and all other fresh foods whose expiry date is associated with a preservation
temperature below or equal to +4¡C.
Temperatur indicator
Thermostat must be adjusted Right Temperature
With the temperature indicator you can keep a check that your refrigerator is working properly.
The indicator shows the "OK" symbol when the coldest area reaches a temperature that is below or equal to
4¡C.
If the temperature is higher than 4¡C the indicator is black so you must adjust the thermostat to make the
temperature drop.
ATTENTION: Keeping the refrigerator door open for a long time will cause the internal temperature to rise. To
measure the temperature correctly, it should be read on the indicator within 30 seconds.
20
Ice-cube production
This appliance is equipped with one or more trays for
the production of ice-cubes.
Fill these trays with water, then put them in the
freezer compartment.
Do not use metallic instruments to remove
the trays from the freezer.
Movable shelves
The walls of the refrigerator are equipped with a
series of runners so that the shelves can be
positioned as desired.
For better use of space, the front half-shelves can lie
over the rear ones.
The glass shelf above the vegetable drawers
and the bottle shelf should always remain in
position, to ensure correct air circulation.
Positioning the door shelves
This model is equipped with a variable storage box
which is fitted under a door shelf compartment and
can be slid sideways.
For more thorough cleaning, the top and bottom door
sheves can be easily removed and refitted in
position.
D338
OK
Page 21

Hints
21
Hints for refrigeration
To help you use your refrigerator correctly, here are
some useful hints:
¥ Cooked food, cold cuts, jelly, etc.: these should
be well covered and can be stored on any of the
glass shelves.
¥ Fruit & vegetables: these should be thoroughly
cleaned and placed in the bottom drawer.
¥
Butter & cheese: these should be placed in
special airtight containers or wrapped in aluminium
foil or polythene bags to keep out as much air as
possible.
¥ Milk bottles: these should have a top and should
be stored in the bottle rack on the door.
¥ Raw meat (beef, pork, lamb & poultry): wrap in
polythene bags and place on top of the salad
compartment, this being the coldest spot in the
refrigerator.
Meat can only be stored safely in this way for
one or two days at the most.
Bananas, potatoes, onions and garlic, if not
packed, must not be kept in the refrigerator.
Hints for freezing
To help you make the most of the freezing process,
here are some important hints:
¥ the maximum quantity of food which can be
frozen in 24 hrs. is shown on the rating plate;
¥ the freezing process takes 24 hours. No further
food to be frozen should be added during this
period;
¥ only freeze top quality, fresh and thoroughly
cleaned, foodstuffs;
Unplug the appliance before carrying out
any maintenance operation.
Warning
This appliance contains hydrocarbons in its
cooling unit maintenance and recharging
must therefore only be carried out by
authorised technicians.
Defrosting
Frost is automatically eliminated from the evaporator
of the refrigerator compartment every time the motor
compressor stops, during normal use.
The defrost water drains out through a trough into a
special container at the back of the appliance, over
the motor compressor, where it evaporates.
Hints for storage of frozen food
To obtain the best performance from this appliance,
you should:
¥ make sure that the commercially frozen foodstuffs
were adequately stored by the retailer;
¥ be sure that frozen foodstuffs are transferred from
the foodstore to the freezer in the shortest possible
time;
¥ not open the door frequently or leave it open longer
than absolutely necessary.
¥ Once defrosted, food deteriorates rapidly and
cannot be refrozen.
¥ Do not exceed the storage period indicated by the
food manufacturer.
¥ prepare food in small portions to enable it to be
rapidly and completely frozen and to make it
possible subsequently to thaw only the quantity
required;
¥ wrap up the food in aluminium foil or polythene and
make sure that the packages are airtight;
¥ do not allow fresh, unfrozen food to touch food
which is already frozen, thus avoiding a rise in
temperature of the latter;
¥ lean foods store better and longer than fatty ones;
salt reduces the storage life of food;
¥ water ices, if consumed immediately after removal
from the freezer compartment, can possibly cause
the skin to be freeze burnt;
¥ it is advisable to show the freezing-in date on each
individual pack to enable you to keep tab of the
storage time;
¥
do not put carbonated liquids (fizzy drinks, etc.)
in the freezing compartment as they may burst.
Maintenance
Page 22

22
It is important to periodically clean the defrost
water drain hole (F) situated under the salad
drawers to prevent the water overflowing and
dripping onto the food inside. Use the special
cleaner provided (P), which you will find already
inserted into the drain hole.
4. when defrosting is completed, dry the interior
thoroughly and refit the plug.
5. Turn the thermostat knob back to the required
setting or replace the plug in the power socket.
Important
Never use sharp metal tools to scrape off
frost from the evaporator as you could
damage it.
Do not use a mechanical device or any
artificial means to speed up the thawing
process other than those recommended by
the manufacturer.
A temperature rise of the frozen food
packs, during defrosting, may shorten their
safe storage life.
Periods of non-operation
When the appliance is not in use for long periods,
take the following precautions:
¥ remove the plug from the wall socket;
¥ remove all food:
¥ defrost and clean the interior and all accessories;
¥ leave the door ajar to allow air to circulate to
prevent unpleasant smells.
The freezer compartment, however, will become
progressively covered with frost. This should be
removed with a plastic scraper, whenever the
thickness of the frost exceeds 4 mm. During this
operation it is not necessary to switch off the power
supply or to remove the foodstuffs.
However, when the ice becomes very thick on the
inner liner, complete defrosting should be carried out
as follows:
1. pull out the plug from the wall socket or turn the
thermostat knob to the ÇOÈ setting;
2. remove any stored food, wrap it in several layers
of newspaper and put it in a cool place;
3. leave the door open, place a basin on the top shelf
of the refrigerator compartment, under the drain
hole, remove the plug as shown in the figure;
Periodic cleaning
Never use metal objects for clearing your
appliance as it may get damaged.
Clean the inside with warm water and bicarbonate of
soda. Rinse and dry thoroughly.
The appliance is equipped with a ventilation grid.
Keep clean to guarantee good ventilation and good
working order of the appliance.
An accumulation of dust will affect the performance
of the appliance and cause excessive electricity
consumption.
The structure of the appliance permits cleaning of the
rear zone close to the wall, using a vacuum cleaner.
1. Remove the plinth (1), then the ventilation grid (2);
2. Carefully pull the air deflector out (3), checking
that there is no water left from the defrosting.
P
S.I.011
F
21
3
PR151
S.I.013
Page 23

Interior light
The light bulb inside the refrigerator compartment
can be reached as follows:
1. unscrew the light cover securing screws;
2. unhook the moving part by pressing it as shown in
the figure.
If the door is open and the light does not come on,
check that the bulb is properly screwed in; if it still
does not work, replace the bulb with one of the same
power.
The maximum rating is shown on the light cover.
Customer service and spare parts
If the appliance is not functioning properly, check
that:
¥ the plug is firmly in the wall socket and the mains
power switch is on;
¥ there is an electricity supply (find out by plugging in
another appliance);
¥ the thermostat knob is in the correct position.
¥ If there are water drops on the bottom of the
cabinet, check that the defrost water drain opening
is not obstructed (see "Defrosting" section).
If your appliance is still not working properly after
making the above checks, contact the nearest
service centre.
To obtain fast service, it is essential that when
you apply for it you specify the model and serial
number of your appliance which can be found on
the guarantee certificate or on the rating plate
located inside the appliance, on the bottom right-
hand side.
Technical specifications
The technical data is indicated in the rating plate on the right side inside the appliance.
To reverse the opening direction of the door, proceed as follows:
Door reversibility
23
D411
1
6
6
4
1
7
8
5
2
6
3
2
Page 24

24
Inner door reversal
Electrical connection
Before plugging in, ensure that the voltage and
frequency shown on the serial number plate
correspond to your domestic power supply.
Voltage can vary by ±6% of the rated voltage.
For operation with different voltages, a suitably sized
auto-transformer must be used.
Warning!
If the ambient temperature is cold (i.e. in
Winter), the gasket may not fit perfectly to the
cabinet. In that case, wait for the natural fitting
of the gasket or accelerate this process by
heating up the part involved with a normal
hairdrier.
Installation
Positioning
The appliance should be installed well away from
sources of heat such as radiators, boilers, direct
sunlight etc.
Best performance is obtained with ambient
temperature between +18¡C and +43¡C (class T);
+18¡C and +38¡C (class ST); +16¡C and +32¡C
(class N); +10¡C and +32¡C (class SN).
The class of your appliance is shown on its
rating plate.
For building-in and door reversibility refer to the
relevant instructions.
6
10
13
9
12 3
180°
3
11
6
12
45
Page 25

Important
The appliance must be earthed.
The power supply cable plug is provided with a
contact for this purpose.
If the domestic power supply socket is not
earthed. connect the appliance to a separate
earth in compliance with current regulations,
consulting a specialist technician.
The Manufacturer declines all
responsibility if the above safety
precautions are not observed.
Attention!
It must be possible to disconnect the appliance
from the mains power supply; the plug must
therefore be easily accessible after installation.
This appliance complies with the following E.E.C.
Directives:
- 87/308 EEC of 2/6/87 relative to radio
interference suppression.
- 73/23 EEC of 19.2.73 (Low Voltage
Directive) and subsequent modifications.
- 89/336 EEC of 3.5.89 (Electromagnetic
Compatibility Directive) and subsequent
modifications.
Grid preparation
Left door opening:
Remove the left side (A) of the grid cutting it from the
rear (see figure).
Right door opening:
Remove the right side (B) of the grid cutting it from
the rear (see figure).
To position the grid on the appliance proceed as
follows:
Apply the grid to the base of the appliance by
pushing on to the clasps (a) until they click.
Building in the appliance under a worktop
Dimensions of the recess
The dimensions of the recessed installation area
must correspond with those indicated in the figure.
25
1. Installation kit
A
B
DO002/2
a
DO001
600
550
min.
600
DO013
1xB
1xA
2xG
2xL
2xF
2xD
1
a
2xC
1xK
18xI
2xE
Page 26

3. Push the appliance into place. The plug socket
necessary for connection of the appliance to the
electricity supply should be positioned, so that the
plug is not placed in the recess.
To adjust the height proceed as follows:
- Loosen or tighten the two front feet.
- The rear feet are adjusted by turning the screw in
the front kick plate to the left or right.
2. Two cabinet securing brackets (D) are supplied
with the installation pack. They need to be
assembled onto the cabinet prior to cabinet being
pushed into the Kitchen aperture.
- To fit these brackets remove the two screws at the
top left and right hand front corners of the cabinet.
- Position the two brackets as shown in the figure
and replace the two securing screws.
26
If necessary, pads (E) are supplied for the rear feet to
make sliding the appliance in and out of the recess
easier. To fit the pads, press them onto the rear feet.
4. The joint cover (B) is to be assembled after having
installed the appliance in the recess.
Left hand
bracket
Right hand
bracket
2
II52
E
If required, the dimensions of these pads can be
reduced by breaking them where marked.
5. Screw appliance into place and retain the cabinet
with screws (I) through the securing brackets into
the worktop or adjacent woodwork as necessary.
1
b)
596
555
max
+
3
-
-
+
E
B
4
I
5
Page 27

27
6. To mount the furniture door proceed as shown in
the figures:
Upper part of kitchen
furniture panel
Möbeltür Innenseite
a
I
=
2
1
10
a
=
C
4
c
3
b
b
9
6
I
F
27,5 cm
27,5 cm
10
7
1
45°
ab
3
C
click
55 cm
2
11
click
8
c
Page 28

28
7. Refit the covering strip (A).
Fitting the plinth
Important
For the efficient operation of the appliance, it is
important that the original ventilation grid is
used.
¥ For an opening height dimension A=820 mm and a
plinth height dimension a=100 mm, the plinth may
be fitted without adjustments. The same applies to
an opening height dimension B=870 mm and a
plinth height dimension b=150 mm.
¥ For plinth heights greater than a=100 mm, b=150
mm, a cut should be made in the plinth, 580 mm
wide, in the centre of the appliance position,
leaving a remaining height of a=100 mm, b=150
mm.
¥ Attach plinth to the kitchen units.
Important
The plinth must be positioned at a minimun
distance of 25 mm from the door.
1
L
=
2
10
L
90°
115°
=
12
15
13
8 mm
F
G
I
K
14
A
A = 820
B = 870
a = 100
b = 150
580
25 - 80
DO008
25
Page 29

29 Gedrukt op milieuvriendelijk vervaardigd papier
AFDANKEN. Verwijder de deur(en) of het deksel en
knip het aansluitsnoer af, zodat, in afwachting van
wegbrengen of weghalen, spelende kinderen er zich
niet in op kunnen sluiten of aan een elektrische
schok bloot kunnen staan.
¥ Plaats nooit elektrische apparaten (bijv.
ijsmachines) in de kast.
Onderhoud / Reparatie
¥
Een eventueel noodzakelijke wijziging aan de
elektrische huisinstallatie of het aansluitsnoer, ten
behoeve van de installatie van dit apparaat, mag
uitsluitend door een daartoe bevoegd persoon
uitgevoerd worden. Het betreffende stopcontact
dient, ook na eventuele onder- of inbouw,
gemakkelijk bereikbaar te zijn. Werkzaamheden
die door personen zonder de noodzakelijke kennis
uitgevoerd worden, kunnen schade of letsel tot
gevolg hebben.
¥
Laat inspectie- en/of herstelwerkzaamheden
uitvoeren door onze SERVICE-afdeling en laat
geen andere dan originele onderdelen plaatsen.
¥
Dit apparaat bevat koolwaterstoffen in de
koudekringloop; het onderhoud en het bijvullen
dient daarom uitsluitend door door het bedrijf
aangewezen deskundig personeel uitgevoerd te
worden.
¥
Tracht, in geval van storing of een defect, dit
apparaat niet zelf te repareren. Reparaties die door
niet-deskundige personen uitgevoerd worden,
kunnen tot schade of letsel leiden. Raadpleeg onze
SERVICE-afdeling.
Gebruik
¥ Huishoudelijke koel- en/of vriesapparaten zijn
uitsluitend bedoeld voor het bewaren en/of
invriezen van eet- of drinkbare producten.
¥ Volg de raadgevingen van de fabrikant op met
betrekking tot waar en hoe u spijzen en dranken
bewaart of invriest. Ontdooide diepvriesproducten
Het is uiterst belangrijk dat de bij het apparaat
behorende gebruiksaanwijzing bewaard blijft.
Zou het apparaat door u aan iemand anders
gegeven of verkocht worden, of zou het apparaat
in het huis van waaruit u verhuist achterblijven,
dan dient de nieuwe gebruik(st)er over de
gebruiksaanwijzing en de daarin opgenomen
waarschuwingen te kunnen beschikken.
Indien dit apparaat in de plaats van een oud
model met haak- of veersluiting opgesteld wordt,
dan is het raadzaam de sluiting van het oude
apparaat, dat terzijde gezet wordt, onbruikbaar te
maken.
Deze waarschuwingen zijn bedoeld voor uw en
andermans veiligheid. U wordt geacht ze gelezen
te hebben, alvorens u het apparaat installeert
en/of in gebruik neemt.
Veiligheid
Algemene veiligheid
¥ Dit apparaat is bedoeld en gemaakt voor het
gebruik door volwassenen. Het is gevaarlijk om
kinderen het apparaat te laten bedienen of als
speelgoed te laten gebruiken.
¥ Het is gevaarlijk om, in welke vorm dan ook, dit
apparaat of de eigenschappen daarvan te
veranderen.
¥ Neem v——r u aan ontdooien, schoonmaak-
werkzaamheden of het verwisselen van het,
eventueel aanwezige, verlichtingslampje begint
altijd de stekker uit het stopcontact.
¥ Dit apparaat is zwaar. Delen van randen aan
achter- en onderkant kunnen scherp zijn. Wees
voorzichtig bij het tillen.
¥ Plaats NOOIT explosieve stoffen in het apparaat,
zoals gasvullingen, benzine, ether, aceton
enzovoorts.
¥ Het direct vanuit een vriesvak, vriesgedeelte of
vriezer consumeren van ijslollies en dergelijke, kan
verbranding van de mondhuid tot gevolg hebben;
wacht even.
Aanwijzing voor het gebruik van het instructieboekje
Met de waarschuwingsdriehoek en/of door signaalwoorden wordt de aandacht
gevestigd op aanwijzingen die belangrijk zijn voor uw veiligheid of voor het juist functioneren van het
apparaat.
Na dit symbool wordt uitleg gegeven over de bediening en het praktisch gebruik van het
apparaat.
Tips en aanwijzingen voor een economisch en milieuvriendelijk gebruik van het apparaat.
N
Page 30

mogen, om gezondheidsredenen, niet wederom
ingevroren worden.
¥ De vriezende binnenwanden of -vlakken in het
apparaat bevatten koelmiddel. Plaats geen
scherpe voorwerpen tegen zoÕn wand of vlak en
schraap evenmin met metalen voorwerpen rijp of
ijs af. Lekkage kan het gevolg zijn, hetgeen een
onherstelbare schade aan het apparaat en bederf
van de levensmiddelen veroorzaakt.
¥ Geen voorwerpen of methodes gebruiken om het
ontdooiproces te versnellen die niet door de
fabrikant zijn aangegeven.
¥ Nooit metalen voorwerpen gebruiken om het
apparaat schoon te maken; dit zou het apparaat
kunnen beschadigen.
¥ Plaats geen koolzuurhoudende of mousserende
dranken in het vriesvak, het vriesgedeelte of de
vriezer; de blikjes of flesjes kunnen door bevriezing
van de inhoud exploderen.
Installatie
¥ Zorg ervoor dat de stekker niet wordt platgedrukt of
beschadigd door de achterkant van het
koel/vriesapparaat.
- Een beschadigde stekker kan oververhit raken en
brand veroorzaken.
¥ Plaats geen zware voorwerpen of het
koel/vriesapparaat zelf op het aansluitsnoer.
- Daardoor bestaat kans op kortsluiting en brand.
¥ Trek de stekker niet uit het stopcontact door aan
het snoer te trekken, vooral niet als het
koel/vriesapparaat uit de nis wordt getrokken.
- Schade aan het snoer kan kortsluiting, brand
en/of een elektrische schok veroorzaken.
Inhoud
Waarschuwingen en belangrijke adviezen . . . . . . . . . . . . . . . . . . . . . . . . . . . . . . . . . . . . . . . . . . . . . . . . . . .29
Gebruik Reiniging van de binnenkant/Ingebruikname/Temperatuurinstelling/Koelen van levensmiddelen . .31
Invriezen en bewaren / Ontdooien van ingevroren produkten . . . . . . . . . . . . . . . . . . . . . . . . . . . . . . . . . . . . .31
Ijslaatjes / De indeling van de koeler / Verplaatsen var deurvakken . . . . . . . . . . . . . . . . . . . . . . . . . . . . . . . .32
Uitleg van de symbolische tekens van het koude gebied . . . . . . . . . . . . . . . . . . . . . . . . . . . . . . . . . . . . . . . . .32
Tips Tips het koelen / Tips het invriezen / Tips het diepvriesprodukten . . . . . . . . . . . . . . . . . . . . . . . . . . . . .33
Onderhoud Ontdooien . . . . . . . . . . . . . . . . . . . . . . . . . . . . . . . . . . . . . . . . . . . . . . . . . . . . . . . . . . . . . . . . . .33
Tijdelijk buiten gebruik stellen / Schoonmaken / Vervangen van de lamp . . . . . . . . . . . . . . . . . . . . . . . . . . . .34
Servicedienst en onderdelen . . . . . . . . . . . . . . . . . . . . . . . . . . . . . . . . . . . . . . . . . . . . . . . . . . . . . . . . . . . . . .35
Technische gegevens . . . . . . . . . . . . . . . . . . . . . . . . . . . . . . . . . . . . . . . . . . . . . . . . . . . . . . . . . . . . . . . . . . . .35
Wijzigen van de deurdraairichting . . . . . . . . . . . . . . . . . . . . . . . . . . . . . . . . . . . . . . . . . . . . . . . . . . . . . . . . .35
Omkeren draairichting deurtje . . . . . . . . . . . . . . . . . . . . . . . . . . . . . . . . . . . . . . . . . . . . . . . . . . . . . . . . . . . . . . .36
Installatie Plaats van opstelling / Elektrische aansluiting . . . . . . . . . . . . . . . . . . . . . . . . . . . . . . . . . . . . . . . .36
Voorbereiding van het ventilatierooster . . . . . . . . . . . . . . . . . . . . . . . . . . . . . . . . . . . . . . . . . . . . . . . . . . . . . .37
Inbouw onder een werkblad . . . . . . . . . . . . . . . . . . . . . . . . . . . . . . . . . . . . . . . . . . . . . . . . . . . . . . . . . . . . . . .37
Montage van het sokkelpaneel . . . . . . . . . . . . . . . . . . . . . . . . . . . . . . . . . . . . . . . . . . . . . . . . . . . . . . . . . . . .40
30
¥ Plaats het apparaat met zÕn achterkant zo dicht
mogelijk bij een muur. Hiermee voorkomt u
verbrandingsletsel door aanraking van hete tot
zeer hete delen.
Milieubescherming
¥ Het koelsysteem en het isolatiemateriaal van dit
apparaat bevatten geen koelgassen die schadelijk
zijn voor de ozonlaag. Het apparaat mag niet
worden afgevoerd met het huisvuil of op de
schroothoop om beschadiging van het koelsysteem
te voorkomen met name aan de achterzijde van
het apparaat. Neem contact op met uw
gemeentehuis om te weten te komen op welke
manier u dit soort apparaten kunt afvoeren.
De materialen gebruikt voor dit apparaat en
ge•dentificeerd met dit symbool zijn recycleerbaar.
Weggooien van oude apparaten
Het symbool op het product of op de
verpakking wijst erop dat dit product niet als
huishoudafval mag worden behandeld. Het moet
echter naar een plaats worden gebracht waar
elektrische en elektronische apparatuur wordt
gerecycled. Als u ervoor zorgt dat dit product op de
correcte manier wordt verwijderd, voorkomt u
mogelijk voor mens en milieu negatieve gevolgen die
zich zouden
kunnen voordoen in geval van verkeerde
afvalbehandeling. Voor meer details in verband met
het recyclen van dit product, neemt u het best
contact op met de gemeentelijke instanties, het
bedrijf of de dienst belast met de verwijdering van
huishoudafval of de winkel waar u het product hebt
gekocht.
Page 31

Gebruik
31
Bewaren van diepvriesprodukten
Indien u de koelkast voor het eerst in gebruik neemt
of haar weer gebruikt na een periode van stilstand,
dient u de thermostaatknop op de koudste stand te
draaien. Plaats vervolgens de diepvriesprodukten na
twee uur in de kast en draai de thermostaat terug
naar de gebruikelijke stand.
Belangrijk
Open de vriesvakdeur niet tijdens
stroomuitval. Wij adviseren u om na een
stroomuitval de diepvriesprodukten in korte
tijd te konsumeren (een temperatuurstijging
verkort de houdbaarheidsduur van de
produkten). De normale houdbaarheid
wordt niet aangetast indien de stroomuitval
kort was (minder dan 12 uur) en het
vriesvak vol is.
Temperatuurinstelling
De temperatuur wordt automatisch geregeld en kan
verhoogd worden (minder koud) door de knop naar
een lager cijfer te draaien of verlaagd worden
(kouder) door de knop naar een hoger cijfer te
draaien.
Bij het instellen van de juiste stand dient u er
rekening mee te houden dat de temperatuur in het
apparaat afhankelijk is van:
¥ de kamertemperatuur;
¥ de frequentie waarmee de deuren geopend
worden;
¥ de hoeveelheid levensmiddelen in de kast;
¥ de plaats van het apparaat.
Wij adviseren u de knop aanvankelijk op de
middenstand te draaien.
De werking van de kast kan geheel gestopt worden
door de knop in de stand ÇOÈ te draaien.
Attentie
Het kan voorkomen dat, indien de
thermostaatknop in de koudste stand
gedraaid is, bijvoorbeeld ten gevolge van
zeer warme omgevingstemperatuur of het
snel willen koelen van grote hoeveelheden
dranken, de kompressor kontinu loopt,
waardoor automatische ontdooiing van de
koelverdamper niet plaatsvindt en zich
daarop ijs afzet. Draai, in dat geval, de
thermostaatknop naar een wat minder
koude stand, zodat automatische
ontdooiing kan plaatsvinden; hierdoor
spaart u tevens energie.
Ontdooien van ingevroren
produkten
De diepvriesprodukten moet u v——r gebruik in de
koelkast of bij kamertemperatuur laten ontdooien.
Kleine of in stukken ingevroren produkten kunnen
onmiddellijk gekookt of gebakken worden. De kookof baktijd zal dan natuurlijk iets langer zijn.
Koelen van levensmiddelen
Voor een optimaal gebruik van de koelruimte
adviseren wij u de volgende eenvoudige regels in
acht te nemen:
¥ plaats geen warme of dampende spijzen of
dranken in de koelruimte;
¥ dek vooral sterk geurend voedsel af of verpak het;
¥ plaats de levensmiddelen zo, dat de lucht vrij
eromheen kan circuleren.
Invriezen van verse
levensmiddelen
In het -diepvriesvak kunt u verse
levensmiddelen invriezen en diepvriesprodukten
bewaren.
Voor het invriezen kunt u de thermostaatknop op de
gebruikelijke stand laten staan.
Wilt u sneller invriezen, dan dient u de
thermostaatknop op de koudste stand te draaien. In
deze stand kan de temperatuur in het koelvak echter
beneden 0¡C dalen. In dat geval dient u de knop op
een minder koude stand te draaien.
Reiniging van de binnenkant
Voor u de kast in gebruik neemt, dient u de
binnenkant met lauw water en een neutraal
schoonmaakmiddel te reinigen om de typische geur
van een nieuw apparaat weg te nemen. Droog
vervolgens de wanden goed af.
Gebruik geen schurende
schoonmaakmiddelen, waarmee u de
afwerkingen van het apparaat zou kunnen
beschadigen.
Ingebruikname
Steek de steker in de wandkontaktdoos.
Open de deur en draai de thermostaatknop,
rechtsom uit de stand ÇOÈ (STOP-stand).
De koelkast is nu in werking.
Page 32

Uitleg van de symbolische tekens van het koude gebied
Het symbool hiernaast duidt de plaats aan van het koudste gedeelte van ijskast.
Koudste gebied: lager of gelijk aan +4¡C
Vlees, pluimvee, vis, vleeswaren, kant en klare gerechten, gemengde salades, gerechten en gebak gemaakt
van eieren of slagroom, verse pasta, taartdeeg, pizza/quiche, verse producten en kaas gemaakt van verse
melk, groenten klaar voor gebruik verpakt in plastic zakjes en meer in het algemeen alle verse producten,
waarvan de vervaldatum in verband staat met een conserveringtemperatuur die lager is dan of gelijk aan +4¡C.
Temperatuuraanduiding
Thermostaat die afgesteld moet worden Goede temperatuur
De temperatuuraanduiding maakt het mogelijk de goede werking van uw ijskast te controleren.
Op de aanduiding verschijnt het opschrift "OK", wanneer het koudste gebied een temperatuur bereikt die lager
is dan, of gelijk aan 4¡C.
Indien de temperatuur hoger is dan 4¡C blijft de aanduiding zwart. De gebruiker dient de temperatuur van de
ijskast in dit geval dus te verlagen door de thermostaat af te stellen.
LET OP: Als de deur van de ijskast lang open blijft staan, wordt de interne temperatuur verhoogd. Om de
temperatuur op de juiste manier te meten, dient de aanduiding binnen 30 seconden afgelezen te worden.
De indeling van de koeler
De rekken zijn naar verschillende hoogten
verplaatsbaar. Trek ze daartoe een stukje naar voren
en kantel ze omlaag.
EŽn legvlak zo mogelijk in de onderste
geleiders boven de groente- en fruitbak
schuiven en daar ook laten liggen.
32
IJslaatjes
Bij het apparaat worden 1 of meerdere ijslaatjes voor
het maken van ijsblokjes geleverd. Vul ze met
drinkwater en plaats ze in het vriesvak.
Gebruik geen metalen voorwerpen om de
laatjes los te wrikken.
Verplaatsen van deurvakken
Het toetsel hebbe een variabele box dat naar de
zijkant verschoven kan worden en onder een
deurvak is aangebracht.
Voor een goede schoonmaakbeurt kan het bovenste
deurvakje verwijderd worden door het te schuiven,
waarna het weer op zijn plaats gezet wordt.
D338
OK
Page 33

Tips
Tips voor het koelen
Enkele praktische tips:
¥
Vlees (alle soorten): wordt in plastic zakjes op de
rek boven de groentelade geplaatst.
Bewaar vlees niet langer dan ŽŽn of twee
dagen.
¥ Gekookt voedsel, koude schotels enz.: kunnen,
goed afgedekt, op elk rooster geplaatst worden.
¥ Fruit en groente: worden schoongemaakt in de
groentelade(n) gelegd.
¥ Boter en kaas: worden, om blootstelling aan de
lucht te voorkomen, in speciale koeldozen bewaard
of in plastic- of aluminiumfolie verpakt.
¥ Flessen melk: worden, goed gesloten, in het
flessenrek geplaatst.
Bewaar niet-luchtdicht verpakte bananen,
aardappelen, uien of knoflook niet in de koelkast.
Tips het invriezen
¥ de max. hoeveelheid levensmiddelen die u kunt
invriezen in 24 uur staat aangegeven op het
ÒtypeplaatjeÓ;
¥ het invriezen duurt 24 uur. Voeg gedurende deze
tijd geen andere in te vriezen levensmiddelen toe;
¥ vries uitsluitend verse, goed schoongemaakte en
eerste kwaliteit levensmiddelen in;
¥ verdeel de levensmiddelen in handzame porties .
Deze vriezen sneller in en bij later gebruik hoeft u
slechts de benodigde hoeveelheid te ontdooien;
Tips het diepvriesprodukten
Neem de volgende regels in acht:
¥ kontroleer dat de diepvriesprodukten in de winkel
op de juiste wijze bewaard worden;
¥ breng de diepvriesprodukten na aankoop zo snel
mogelijk over naar het vriesvak; open de deur altijd
zo weinig en zo kort mogelijk.
¥ Wees heel voorzichtig bij aankoop van
diepvriesprodukten, want gedeeltelijk ontdooide
waren mag u niet opnieuw invriezen.
¥ Noteer de fabrikatiedatum en respekteer de
vervaldatum van de fabrikant.
¥ verpak de levensmiddelen in aluminium- of
kunststoffolie. Sluit de pakjes goed en luchtdicht af;
¥ zorg ervoor dat in te vriezen pakjes niet in
aanraking komen met reeds ingevroren produkten;
de temperatuur van deze laatste zou daardoor
kunnen stijgen;
¥ mager voedsel is ingevroren langer houdbaar dan
vet voedsel; ook zout verkort de houdbaarheid;
¥ vermijd rechtstreekse konsumptie van ijslollies uit
het vriesvak; u zou uw mondhuid kunnen
verbranden;
¥ schrijf de invriesdatum op de pakjes zodat u de
houdbaarheidsduur kunt kontroleren;
¥
plaats geen koolzuurhoudende of mousserende
dranken in het vriesvak; de blikjes of flessen
zouden kunnen ontploffen.
Onderhoud
Neem v——r het schoonmaken altijd eerst de
stekker uit het stopcontact.
Belangrijk
Dit apparaat bevat koolwaterstoffen in het
koelcircuit; onderhoud en bijvulling dient
daarom uitsluitend door door de fabrikant
bevoegd personeel uitgevoerd te worden.
Ontdooien
Het ijs dat zich op de achterwand van het
koeldeel vastzet wordt telkens als de
kompressormotor stilstaat automatisch ontdooid. Het
dooiwater wordt via een speciale goot naar een
verzamelbak aan de onderkant van het apparaat
gevoerd, waar het vervolgens uit verdampt.
Wij adviseren u het afvoergaatje (F) dat zich
onder de groentelade bevindt van tijd tot tijd van
het dooiwater te ontdoen. U kunt dit doen door
de groentelade eruit te halen en het speciale
"reinigingsstaafje" (P) dat bij het apparaat
inbegrepen is te gebruiken om het gaatje door te
prikken. Op die manier voorkomt u dat het vak
waar de groentelade inzit volloopt met water.
33
P
S.I.011
F
Page 34

Tijdelijk buiten gebruik stellen
Wij adviseren u v——r de periode dat de koelkast niet
gebruikt wordt de volgende handelingen uit te
voeren:
¥ neem de stekker uit het stopcontact;
¥ verwijder alle spijzen en dranken uit de kast;
¥ laat de kast geheel ontdooien en maak de
binnenwanden, rekken, korven en dergelijke goed
schoon;
¥ laat de deuren open staan, teneinde het ontstaan
van onaangename geur te voorkomen.
Stof belemmert de warmte-afgifte en verhoogt
zodoende het energieverbruik.
1. De sokkel (1) verwijderen;
2. het ventilatierooster (2) demonteren;
3. de verdamperbak (3) voorzichtig verwijderen, let
erop dat daarin druppels dooiwater aanwezig
kunnen zijn.
Schoonmaken
Nooit metalen voorwerpen gebruiken om
het apparaat schoon te maken; dit zou het
apparaat kunnen beschadigen.
Reinig de binnenkant van de kast regelmatig met
lauw sodawater. Lap de wanden na met schoon
water en droog ze zorgvuldig.
Het apparaat is zo gebouwd dat u de achterzijde bij
de muur kunt reinigen, eventueel met een borstel of
stofzuiger met borstel.
Vervangen van de lamp
Het lampje van de koelkast is op de volgende wijze
bereikbaar:
1. Schroef het afschermkapje los;
2. verwijder het losse deel door er lichte druk op uit
te oefenen (zie afbeelding).
Indien met open deur het lampje niet brandt, kijk dan
eerst of het soms los in de fitting zit. Als het lampje
dan nog niet brandt, vervang het dan door een
lampje met hetzelfde vermogen.
Het vermogen is op het afschermkapje aangegeven.
In het vriesvak dient u echter de rijp te verwijderen,
wanneer deze een laag van circa 4 mm vormt.
Gebruik hiervoor de plastic spatel.
Voor het uitvoeren van deze handeling hoeft u het
apparaat niet uit te schakelen of het vriesvak leeg te
maken. Wanneer zich een dikke laag ijs gevormd
heeft, dient u het gehele apparaat te ontdooien.
Ga als volgt te werk:
1. draai de thermostaatknop op ÇOÈ of trek de steker
uit het stopkontakt;
2. omwikkel de levensmiddelen met meerdere
kranten en bewaar ze op een koele plaats;
3. laat de deur openstaan en plaats een teiltje op het
onderste rek van het koelkastvak onder het
afvoergaatje, haal de dop van de afvoer (zie
afbeelding);
4. droog na het ontdooien het vriesvak zorgvuldig en
sluit het gaatje weer af met de dop.
5. Draai de thermostaatknop in de gewenste stand of
steek de steker weer in het stopkontakt.
Belangrijk
Gebruik voor het verwijderen van de rijp
nooit metalen voorwerpen; u zou uw
koelkast kunnen beschadigen.
Geen voorwerpen of methodes gebruiken
om het ontdooiproces te versnellen die niet
door de fabrikant zijn aangegeven.
Temperatuurstijging van
diepvriesprodukten kan hun
houdbaarheidsduur verkorten.
34
21
3
S.I.013
PR151
D411
Page 35

35
Servicedienst en onderdelen
Indien het apparaat niet goed funktioneert, kontroleer
dan:
¥ of de stekker goed in het zit;
¥ of de elektriciteit soms uitgevallen is;
¥ of de thermostaatknop op de juiste stand staat;
¥ en indien er water op de bodem van de koeler ligt,
of het afvoerkanaaltje soms verstopt is (zie
hoofdstuk ÒOntdooienÓ).
Kunt u de storing niet zelf lokaliseren en verhelpen,
raadpleeg dan de dichtsbijzijnde servicedienst.
Geef daarbij altijd het model en het typenummer
van de kast op. Deze gegevens vindt u op het
garantiebewijs of op het typeplaatje dat zich
rechtsonder aan de binnenzijde van het apparaat
bevindt.
Wijzigen van de deurdraairichting
Technische gegevens
Het typeplaatje met de technische gegevens vindt u aan de rechter binnenzijde van het apparaat.
Voor het wijzigen van de deurdraairichting als volgt
te werk gaan:
6
4
1
7
5
2
1
6
3
2
6
8
Page 36

Omkeren draairichting deurtje
Plaats van opstelling
Plaats het apparaat uit de buurt van warmtebronnen:
centrale verwarming, kachels, felle zonnestralen enz.
De beste resultaten worden bereikt met een
ruimtetemperatuur tussen +18¡C en +43¡C (TKlasse); +18¡C en +38¡C (ST-Klasse);
+16¡C en +32¡C (N-Klasse);
+10¡C en +32¡C (SN-Klasse).
De klasse staat op het typeplaatje vermeld.
Zie voor deurdraairichting en inbouw de betreffende
aanwijzingen.
Installatie
Elektrische aansluiting
Overtuig u ervan dat de netspanning en de
netfrequentie, welke op het typeplaatje in de kast
staan aangegeven, overeenkomen met de
netspanning en de netfrequentie in uw woning. Een
afwijking op de netspanning tot plus of minus 6% is
toegestaan.
Bij aansluiting op een andere spanning dient u een
geschikte transformator te gebruiken.
36
Attentie!
Bij een lage omgevingstemperatuur (bijv. in de
winter) kan het voorkomen dat de
deurafdichting niet perfect aan de kast hecht.
De afdichting wordt na een bepaalde tijd
vanzelf in vorm getrokken. Als u dit proces wilt
bespoedigen, is het voldoende om de
afdichting m.b.v. een haardroger te
verwarmen.
6
10
13
9
12 3
180°
3
11
6
12
45
Page 37

Belangrijk
De stekker mag alleen geplaatst worden in
een geaard stopcontact.
De kast is daarom voorzien van een speciaal
drieaderig snoer, geschikt voor een geaard
stopcontact.
Mocht het stopcontact in uw woning niet
geaard zijn, dan dient een erkend installateur
het apparaat volgens de geldende normen te
aarden.
Wij wijzen u er op dat schade of letsel,
veroorzaakt door het niet voldoen aan dit
veiligheidsvoorschrift, niet onder de
verantwoordelijkheid van de fabrikant valt.
Attentie
Het apparaat moet van het elektriciteitsnet
afgehaald kunnen worden; de stekker moet
dus ook na de installatie bereikbaar blijven.
Dit apparaat voldoet aan de volgende EU-richtlijnen:
- 73/23 EG-richtlijn van 19/02/73
(Laagspanning) en opeenvolgende
wijzigingen;
- 87/308 EG-richtlijn van 2.6.87 met betrekking
tot de radio-ontstoring;
- 89/336 EG-richtlijn van 03/05/89
(Elektromagnetische compatibiliteit) en
opeenvolgende wijzigingen.
Voorbereiding van het
ventilatierooster
Neem het rooster uit de onderste verpakkingsschaal.
Deuropening links:
- Het linker paneel (A) van het rooster vanaf de
achterzijde afsnijden.
Deuropening rechts:
- Het rechter paneel (B) van het rooster vanaf de
achterzijde afsnijden.
Om het rooster op het apparaat te plaatsen, drukt u
het op de haken (a) tot het vastklikt.
Het rooster met de montagehaken in de nis
bevestigen, daarna het rooster monteren.
Inbouw onder een werkblad
Nismaten
De afmetingen van de nis moeten overeenkomen
met de afmetingen uit de tekening.
1. Meegeleverde montage-onderdelen
37
A
B
DO002/2
600
a
a
DO001
1xB
1xA
2xC
DO013
550
min.
600
1xK
2xG
2xL
2xF
2xD
18xI
2xE
1
Page 38

Links Rechts
2
38
2. De bijgeleverde hoeken (D) aan de kast
bevestigen (zie afb.).
Het apparaat is voorzien van verstelbare voeten; u
brengt het apparaat op de gewenste hoogte
(max. 870 mm) door de voeten in de vier
onderhoeken te verstellen.
3. Apparaat naar binnen schuiven. Het stopcontact
met randaarde dat het apparaat voor aansluiting
nodig heeft, moet zodanig ge•nstalleerd zijn dat
het niet door het apparaat wordt bedekt.
Om het plaatsen in de nis te vergemakkelijken, zijn
twee glijblokjes (E) meegeleverd die onder de twee
achterste voeten moeten worden aangebracht.
Eventueel kunnen de glijblokjes op maat gemaakt
worden door ze te breken op de daarvoor
aangegeven breeklijn.
4. Voegafdekprofiel (B) op het apparaat plakken (zie
afb.).
5. Apparaat vastschroeven.
II52
E
1
6. Meubeldeur monteren.
b)
596
555
max
+
3
-
-
+
E
B
4
I
5
1
10
b
6
2
a
C
4
3
Page 39

39
Boven
F
I
27,5 cm
27,5 cm
10
7
1
45°
ab
C
click
3
55 cm
2
11
click
8
c
1
Möbeltür Innenseite
a
I
=
=
=
2
10
=
c
12
9
b
Page 40

40
7. Afdekking (A) aanbrengen.
Montage van het sokkelpaneel
Belangrijk
Het originele ventilatie-rooster dient
gebruikt te worden opdat de functionaliteit
van het apparaat niet belemmerd wordt.
¥ Bij een binnenwerkse inbouwhoogte maat A=820
mm en een sokkelpaneelhoogte maat a=100 mm
kan het sokkelpaneel ongewijzigd worden
gemonteerd. Dat is ook zo bij een binnenwerkse
inbouwhoogte maat B=870 mm en een
sokkelpaneelhoogte maat b=150 mm.
¥ Bij sokkelpaneelhoogten boven a=100 mm, b=150
mm, moet het sokkelpaneel centrisch 580 mm
breed op een resterende hoogte van a=100 mm,
b=150 mm worden uitgesneden.
¥ Het sokkelpaneel aan het keukenblok bevestigen.
Belangrijk
Het sokkelpaneel moet op een afstand van
tenminste 25 mm van de deur geplaatst
worden.
8 mm
I
L
F
G
13
14
A
K
90°
115°
L
15
A = 820
B = 870
a = 100
b = 150
580
25 - 80
DO008
25
 Loading...