

Page 1

FR GUIDE D'UTILISATION
EN GUIDE TO INSTALLATION
DE BETRIEBSANLEITUNG
ES MANUAL DE UTILIZACIÓN
IT MANUALE D'USO
NL GEBRUIKSAANWIJZING
PT GUIA DE UTILIZAÇÃO
Hotte décor
Decorative Hood
Dekor-Dunstabzugshaube
Campana extractora decorativa
Cappa arredamento
Designafzuigkap
Exaustor decorativo
99636272_A_ML.QXP 13/01/2006 15:27 Page 1
Page 2

Dear Customer,
You have just acquired a
DDEE DDIIEETTRRIICCHH
hood and we would like to
thank you.
Our research teams have created this new generation of appliances
for you. Their quality, design, features and technological advances
make them exceptional products, and reveal our unique know-how.
Your new
DDEE DDIIEETTRRIICCHH
hood will blend harmoniously into your
kitchen and will perfectly combine cooking performance and ease of
use. We wanted to offer you a product of excellence.
In the
DDEE DDIIEETTRRIICCHH
product line, you will also find a wide range of
hobs, ovens, microwaves, cookers, dishwashers and fridges, that you
can coordinate with your new
DDEE DDIIEETTRRIICCHH
hood
Of course, in an ongoing effort to best satisfy your demands with
regard to our products, our after-sales service department is at your
disposal and ready to listen in order to respond to all of your questions
and suggestions (contact information at the end of this booklet).
Visit our website
wwwwww..ddeeddiieettrriicchh--eelleeccttrroommeennaaggeerr..ccoomm
, where you will
find our latest innovations as well as useful and complementary
information.
DE DIETRICH
Setting New Values
As part of our commitment to constantly improving our products, we reserve the right to make
changes to them based on technical advances to their technical and functional features and
appearance.
Warning:
Before installing and using your appliance, please carefully read this Guide to
Installation and Use, which will allow you to quickly familiarise yourself with its operation.
22
FR
02
EN
22
DE
41
ES
60
IT
80
NL
99
PT
118
99636272_A_ML.QXP 13/01/2006 15:28 Page 22
Page 3

23
TABLE OF CONTENTS
EN
1 / NOTICES TO THE USER
••
Safety recommendations
____________________________________
24
••
Environmental protection
____________________________________
25
••
Description of your appliance
________________________________
26
2 / INSTALLING YOUR APPLIANCE
••
Using the evacuation mode
__________________________________
27
••
Using the recycling mode
___________________________________
27
••
Electrical connections
______________________________________
28
••
Assembling the hood
_______________________________________
29
••
Assembling the ventilation shaft
º Outdoor evacuation
__________________________________
31
º Recycling
___________________________________________
32
3 / USING YOUR APPLIANCE
••
Description of control panel
_________________________________
33
••
Powering on
______________________________________________
34
••
Delayed stop
______________________________________________
34
••
Immediate stop
____________________________________________
34
••
Saturated cartridge
_________________________________________
34
••
Recycling mode
___________________________________________
35
••
Evacuation mode
__________________________________________
35
••
Carbon filter saturation
______________________________________
36
••
Auto stop fan
______________________________________________
36
••
Auto stop lighting
__________________________________________
36
4 / CARING FOR AND CLEANING YOUR APPLIANCE
••
Cleaning the filter cartridges
_________________________________
37
••
Changing the carbon filter
___________________________________
37
••
Cleaning the outer surfaces
__________________________________
38
••
Changing the light bulb
_____________________________________
38
••
Maintaining your appliance
__________________________________
39
5 / TROUBLESHOOTING
__________________________________________
40
6 / AFTER-SALES SERVICE
________________________________________
40
99636272_A_ML.QXP 13/01/2006 15:28 Page 23
Page 4
24
1 / NOTICES TO THE USER
EN
SAFETY RECOMMENDATIONS
——
This oven was designed for use by private
persons in their homes.
——
This appliance is to be used by adults.
Make sure that children do not touch it and that
they do not treat it as a toy. Make sure that they
do not touch the appliance's control panel.
——
When you receive the appliance, unpack or
have it unpacked immediately. Give it an overall
general inspection. Make note of any concerns
or reservations on the delivery slip and make
sure to keep a copy of this form.
——
Your appliance is intended for standard
household use. Do not use it for commercial or
industrial purposes or for any other purpose
than that for which it was designed.
——
Do not modify or attempt to modify any of the
characteristics of this appliance. This would be
dangerous to your safety.
——
Repairs must only be carried out by an
approved specialist.
——
Always unplug the hood before cleaning it or
performing other maintenance acts.
——
Provide adequate ventilation for the room in
the case of simultaneous use of the hood and
other appliances powered by an energy source
other than electricity. This will prevent the hood
from aspirating the combustion gases.
——
You should never "flambé" dishes under the
hood or operate gas rings under the hood
without placing cookware on them (the flames
sucked up into the hood can damage the
appliance).
——
When frying food under the appliance, you
must carefully monitor the preparation at all
times.
Oils and grease brought to very high
temperatures can catch fire.
——
Respect the recommended frequency of
cleanings and filter replacements. The
accumulation of grease deposits may cause a
fire.
——
The hood should never be used over a
combustible fuel burning stove (wood, coal,
etc.).
——
Never use steam or high-pressure devices to
clean your appliance (requirement imposed by
electrical safety).
——
With a view to constantly improving our
products, we reserve the right to modify their
technical, functional or aesthetic
characteristics, making any changes to their
features considered necessary or desirable in
view of technical progress.
——
In order to easily locate the reference
information for your appliance, we recommend
that you note these data on the "After-Sales
Service Department and Customer Relations"
page.
(This page also explains to you where to find
this information on your appliance.)
••
Attention
Keep this user guide with your
appliance. If the appliance is ever sold or
transferred to another person, ensure that
the new owner receives the user guide.
Please become familiar with these
recommendations before installing and
using your oven. They were written for your
safety and the safety of others.
Warning
In the case of a kitchen heated by a
device connected to a chimney (a stove, for
example) the "recycling" version of the
hood should be installed. Do not use the
hood without metal filters.
Suitable ventilation should be provided in
the room when the hood is used at the
same time as appliances operated by gas
or another combustible fuel.
99636272_A_ML.QXP 13/01/2006 15:28 Page 24
Page 5
25
1 / NOTICES TO THE USER
EN
Warning
Installation should only be performed by installers and qualified technicians.
Warning
Remove the protective film from the filter cartridge before use.
ENVIRONMENTAL PROTECTION
••
— This appliance's packaging material is recyclable. Help recycle it and protect the environment
by dropping it off in the municipal receptacles provided for this purpose.
— Your appliance also contains a great amount of recyclable material. It is marked with this label
to indicate the used appliances that should not be mixed with other waste. This way, the
appliance recycling organised by your manufacturer will be done under the best
possible conditions, in compliance with European Directive 2002/96/EC on Waste
Electrical and Electronic Equipment. Contact your town hall or your retailer for the
used appliance collection points closest to your home.
— We thank you doing your part to protect the environment.
99636272_A_ML.QXP 13/01/2006 15:28 Page 25
Page 6

26
1 / NOTICES TO THE USER
EN
••
DESCRIPTION OF YOUR APPLIANCE
Vents
Ventilation shaft
Top surface
Control panel
A
B
C
D
B
C
D
A
99636272_A_ML.QXP 13/01/2006 15:28 Page 26
575 / 1027 mm
75 mm
533 mm
500 mm
274 mm
271 mm
600 / 900 mm
Page 7

27
2 / INSTALLING YOUR APPLIANCE
EN
USING THE EVACUATION MODE
If you possess an outlet to the exterior
(fig. 1)
Your hood can be connected to this outlet
using a flue (minimum diameter Ø mm that is
enamelled, in aluminium, flexible or made of
inflammable material). If your flue is less than
125 mm in diameter,
yyoouu mmuusstt uussee tthhee
rreeccyycclliinngg mmooddee..
••
USING THE RECYCLING MODE
If you do not possess an outlet to the exterior
(fig. 2)
All of our appliances can be used in recycling
mode.
In this case, you should add an active carbon
filter which will keep in odours.
(See Chapter 4: Changing the carbon filter.)
••
- The appliance must be unplugged during installation or when any repairs or maintenance work
is being performed.
- Ensure that the network voltage corresponds to the voltage noted on the identification plate
located inside the hood.
- If the electrical installation at your residence requires any changes in order to hook up your
Appliance, call upon a professional electrician.
- If the hood is being used in evacuation mode, do not connect the appliance to a combustion
gas exhaust duct (boiler, chimney, etc.) or to a CMV (controlled mechanical ventilation) system.
- Under no circumstances should the exhaust duct empty into the attic.
- Install the hood at a safe distance of at least 70 cm from an electric, gas or combined cooking
hob.
125
150
fig. 1
fig. 2
99636272_A_ML.QXP 13/01/2006 15:28 Page 27
125
150
Page 8

28
2 / INSTALLING YOUR APPLIANCE
EN
Warning
This appliance is delivered with a
H 05 VVF power cord that has three-
0.75 mm
2
conductors (neutral, phase and
ground). It must be connected to the main
power supply (which should be a 220-240 V
single phase current) via a CEI 60083
standardised socket that should remain
accessible after installation, in keeping with
installation guidelines.
We cannot be held responsible for any
accident resulting from an inexistent,
defective or incorrect ground lead. The fuse
for your installation must be 10 or 16A. If
the power cable is damaged, call the aftersales service department in order to avoid
danger.
Warning
If the electrical installation at your
residence requires any changes in order to
hook up your appliance, call upon a
professional electrician.
Warning
If the hood displays any malfunctions,
unplug the appliance or remove the fuse
corresponding to the electrical socket
where your appliance is plugged in.
••
ELECTRICAL CONNECTIONS
During installation and maintenance
operations, the appliance must be unplugged
from the electrical grid; fuses must be cut off
or removed.
The electrical connections are made before
the appliance is installed in its housing.
Ensur
e that:
- the electrical installation has sufficient
voltage,
- the electrical wires are in good condition,
- the diameter of the wires complies with the
installation requirements.
99636272_A_ML.QXP 13/01/2006 15:28 Page 28
Page 9

29
2 / INSTALLING YOUR APPLIANCE
EN
Tip
Adjust the level of your hood before
fully tightening up the four D and E screws.
ASSEMBLING THE HOOD
Warning
The hood must be installed in
compliance with all applicable regulations
concerning the ventilation of premises. In
France these regulations are described in
DTU 61.1 from the CSTB. In particular, the
evacuated air should never be conveyed to a
duct used to evacuate smoke from
appliances that use gas or other combustible
fuels. Unused ducts may only be used after
approval from a competent specialist.
The minimum distance between the cooking
surface and the lowest part of the hood must
be 70 cm. If the instructions for the hob
installed under the hood specify a distance of
more than 70 cm, this requirement must be
respected.
— Draw a horizontal line 70 cm minimum from
the cook top (fig. 1).
— Draw a vertical line (B/fig. 1) on the wall that is
centred over the cook top and that extends
from the horizontal line drawn in the previous
step (A) to the ceiling.
— Cut the drilling template by following the
dotted lines to obtain two parts, C1 and C2
(fig. 1).
— Place the C2 template (fig. 1) on the wall,
superimposing the line that represents the
hood's axis over vertical line B (fig. 1) drawn in
a previous step.
— Place the C1 template (fig. 1) against the wall
flush with the ceiling.
— Drill the six holes. Insert the 6 wall plugs.
FFoorr tthhee DDHHDD112200XXEE mmooddeell,, ffoollllooww tthhee aaddddiittiioonnaall
iinnssttrruuccttiioonnss ((ffiigguurree 22)) oonn tthhee ffoolllloowwiinngg ppaaggee..
— Screw in the top two screws for the hood
(D/fig. 1), leaving 5 mm sticking out from the wall.
••
=
=
> 70 cm
5mm
x 2
fig. 1
A
B
E
D
C1
C2
99636272_A_ML.QXP 13/01/2006 15:28 Page 29
Page 10

30
2 / INSTALLING YOUR APPLIANCE
EN
fig. 4
fig. 3
D
E
J
— Remove the filter cartridges (J/fig. 4).
— Screw in the two bottom screws (E/fig. 4).
***********************************
FFoorr tthhee DDHHDD112200XXEE mmooddeell oonnllyy::
— Screw in the two additional bottom screws
(K/fig. 4).
***********************************
fig. 2
F
H
H
***********************************
FFoorr tthhee DDHHDD112200XXEE mmooddeell oonnllyy::
— Draw a horizontal line (F/fig. 2) through the two
previously drilled holes (G).
— Drill the two additional holes (H/fig. 2) located
on the line (F) at a distance of 35 cm from the
initial holes (G).
— Insert the two additional wall plugs.
— Screw in the top two screws for the hood
(D/fig. 1), leaving 5 mm sticking out from the wall.
*****************************************
G
K
K
— Hang the suction hood on the two screws
(fig. 3).
Tip
Before fully tightening the four D and E
screws (or six D, E and K screws depending
on the model), adjust the level of the hood.
99636272_A_ML.QXP 13/01/2006 15:28 Page 30
35 cm
35 cm
Page 11

31
2 / INSTALLING YOUR APPLIANCE
EN
ASSEMBLING THE VENTILATION
SHAFT
••
Outdoor evacuation
— Using the two screws (fig. 1), attach the metal
chimney bracket against the wall, flush with the
ceiling for support.
— Mount the back-flow valve near the motor
outlet (fig. 2). This back-flow valve makes it
possible to block the entry of air from the
outside.
— If a 125 mm flue is being installed, use the
adapter provided (fig. 3).
If the diameter of your exterior flue is less than
125 mm, you must connect your hood in
recycling mode.
— Slide the end of the flue over the motor outlet
(fig. 4).
— Prepare your telescoping ventilation shaft,
taking care not to block the vents (fig. 4).
Fit the ventilation shafts into one another as far
as they will go.
— Attach the upper portion of the chimney (B/fig.
4 on the metal chimney bracket (A/fig. 4) using
the two screws (G/fig. 4).
— Adjust the length of the telescoping chimney
by bringing down the lower part and fitting it into
the top of the hood.
••
A
B
C
D
E
CChhiimmnneeyy bbrraacckkeett
TTeelleessccooppiinngg vveennttiillaattiioonn sshhaafftt
FFlluuee
AAddaapptteerr
BBaacckk--ffllooww vvaallvvee
MMoottoorr oouuttlleett
CChhiimmnneeyy hhoollddiinngg ssccrreeww
F
G
=
=
fig. 1
fig. 4
fig. 2 fig. 3
A
C
D
E
F
G
B
99636272_A_ML.QXP 13/01/2006 15:29 Page 31
Page 12

32
2 / INSTALLING YOUR APPLIANCE
EN
••
Recycling
— Remove the back-flow valve (fig. 1).
— Using the two screws (fig. 2), attach the plastic
smoke deflector against the wall, flush with the
ceiling for support. Be careful to centre the
deflector in relation to the vertical line drawn on
the wall (fig. 2).
— Slide one end of the flue over the deflector and
the other end over the motor outlet (fig. 3).
— Prepare your ventilation shaft, taking care to
face the vents upward so that they are visible
(B/fig. 3).
— Attach the upper portion of the chimney
(C/fig. 3) on the metal smoke deflector (A/fig. 3)
using the two screws (F/fig. 3).
— Adjust the length of the telescoping chimney
by bringing down the lower part and fitting it into
the top of the hood.
Tip
For optimal use of your appliance, we
recommend that you connect the hood to a
150 mm-diameter flue (not delivered with the
appliance). Minimise the number of angles
and bends and the lengths of the flue. In the
event that the hood will be operated using
outdoor evacuation, you should ensure a
sufficient inflow of fresh air to avoid a
pressure deficiency in the room.
A
B
C
D
E
SSmmookkee ddeefflleeccttoorr
VVeennttss
TTeelleessccooppiinngg vveennttiillaattiioonn sshhaafftt
FFlluuee
MMoottoorr bbrraacckkeett
CChhiimmnneeyy hhoollddiinngg ssccrreeww
fig. 1
=
=
fig. 2
F
fig. 3
A
B
D
E
F
C
99636272_A_ML.QXP 13/01/2006 15:29 Page 32
Page 13

33
3 / USING YOUR APPLIANCE
EN
Light
Speeds 1 to 4
••
DESCRIPTION OF CONTROL PANEL
••
Four-speed electronic model
Tip
This Guide to Installation and Use is valid for several models. Minor differences in
details and fittings may emerge between your appliance and the descriptions provided.
A
B
C
D
Delayed stop (10 minutes)
Filter cleaning indicator light
A
B
C
D
99636272_A_ML.QXP 13/01/2006 15:29 Page 33
Page 14

34
3 / USING YOUR APPLIANCE
EN
••
POWERING ON
Press the button corresponding to the
desired speed (1 to 4).
Ex
ample: speed 2.
The 2 indicator lights up.
Press the lit button twice.
The hood stops and the light goes out.
Press the lit button.
The hood automatically stops operating after
10 minutes.
The button flashes until the hood stops.
When the light flashes, this is an
indication that the filter cartridges need to be
cleaned (you can put them in the dishwasher).
••
DELAYED STOP
••
IMMEDIATE STOP
••
SATURATED CARTRIDGE
To deactivate the filter cartridge saturation
function, simultaneously press the 1 and
2 buttons for two seconds.
The light goes out.
99636272_A_ML.QXP 13/01/2006 15:29 Page 34
Page 15
35
3 / USING YOUR APPLIANCE
EN
••
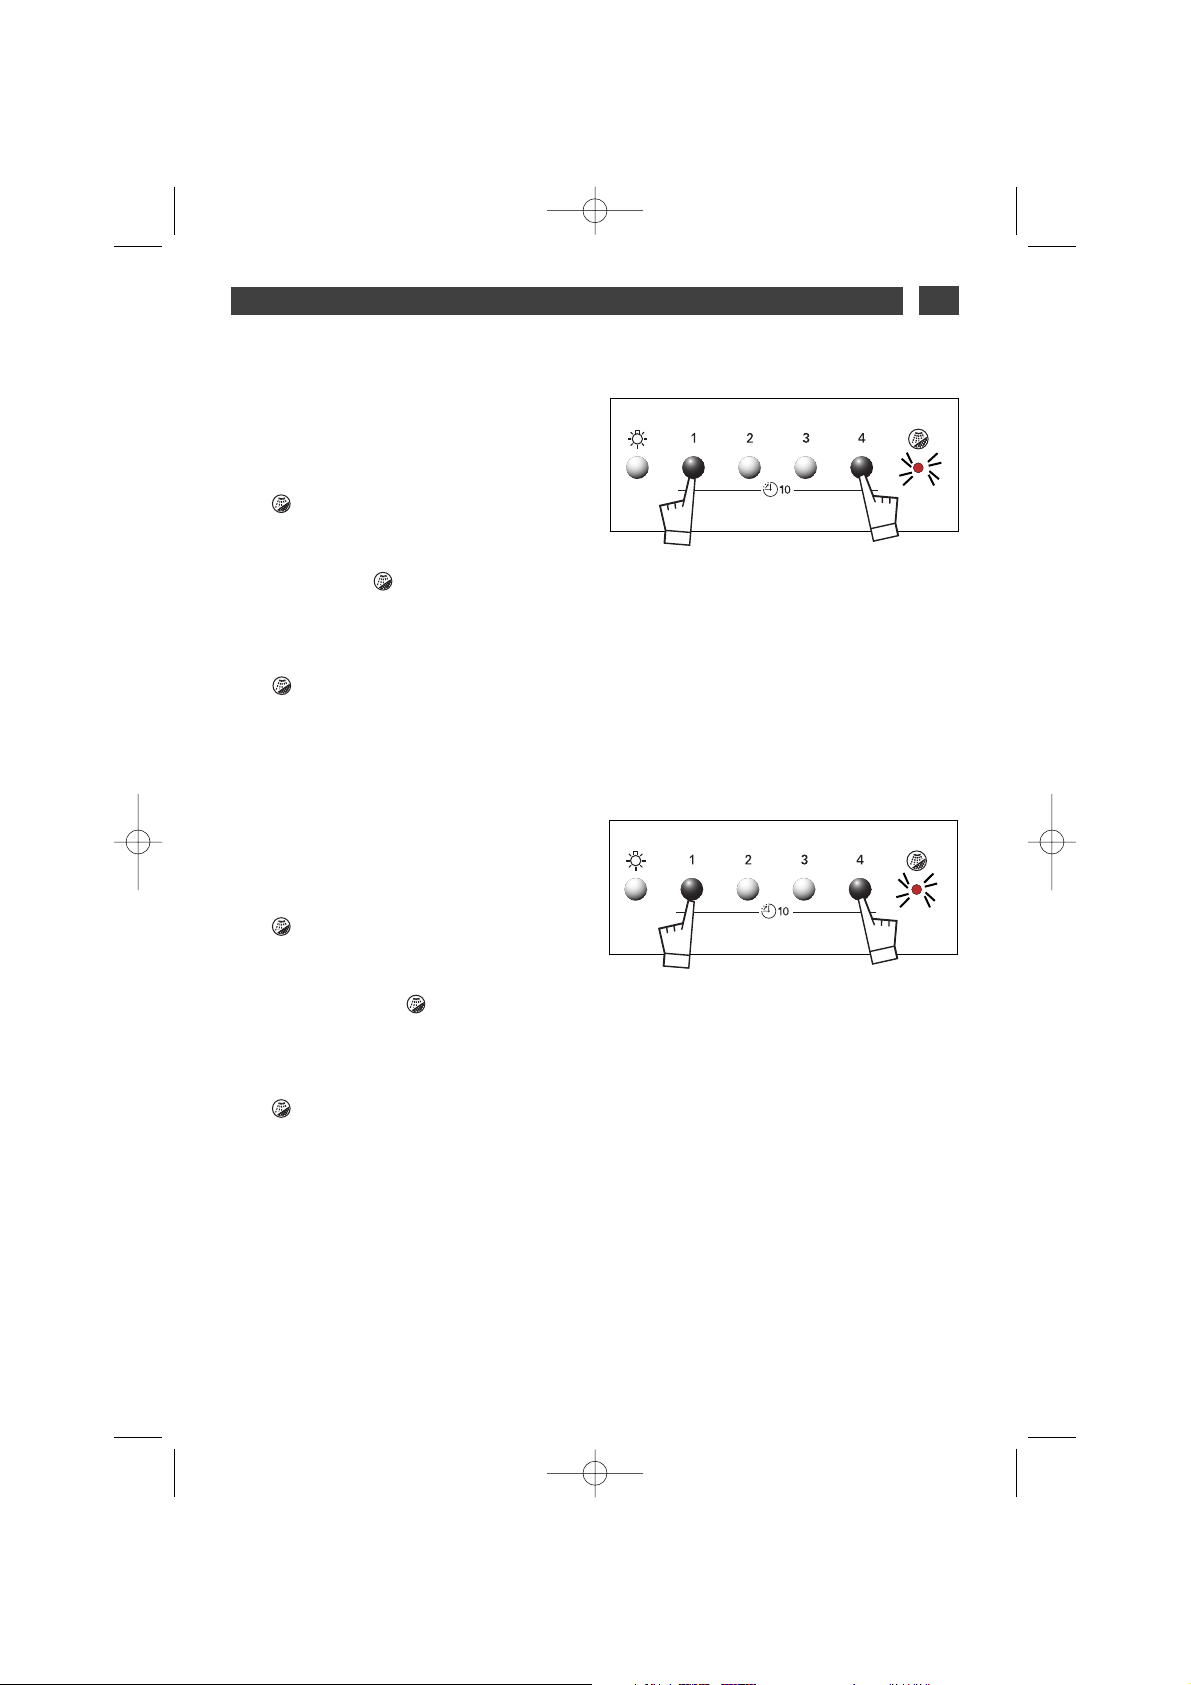
RECYCLING MODE
••
EVACUATION MODE
Your hood will be used in recycling mode,
configure it for recycling mode:
For three seconds, simultaneously press the
1 and 4 buttons, which will light up.
The indicator either lights up or begins
flashing.
To configure for recycling mode, press the
1 button until the indicator lights up (but
does not flash).
Confirm the configuration by pressing the
4 button.
The indicator and the 1 and 4 buttons go
out.
Your hood has an external air outlet,
configure it for evacuation mode:
For three seconds, simultaneously press the
1 and 4 buttons, which will light up.
The indicator either lights up or begins
flashing.
To configure for evacuation mode, press the
1 button until the indicator begins
flashing.
Confirm the configuration by pressing the 4
button.
The indicator and the 1 and 4 buttons go
out.
99636272_A_ML.QXP 13/01/2006 15:29 Page 35
Page 16

36
3 / USING YOUR APPLIANCE
EN
When your hood is in recycling mode.
The indicator lights up, indicating that the
carbon filter must be changed (we
recommend that you replace your filters every
six months).
To turn out the indicator, simultaneously
press the 3 and 4 touch controls.
The light goes out.
If you forget to turn off your hood, it will
automatically turn itself off after nine hours of
operation.
If you forget to turn off the light, it will
automatically turn itself off after nine hours of
operation.
••
CARBON FILTER SATURATION
••
AUTO STOP FAN
••
AUTO STOP LIGHTING
99636272_A_ML.QXP 13/01/2006 15:29 Page 36
Page 17

37
4 / CARING FOR AND CLEANING YOUR APPLIANCE
EN
Warning
Always unplug the hood before cleaning it or performing other maintenance acts.
Regular maintenance of your appliance is a guarantee of proper functioning, good
performance and durability.
Warning
Failure to respect the guidelines for cleaning the appliance and filters may cause fires.
Please carefully adhere to the maintenance recommendations.
CLEANING THE FILTER
CARTRIDGES
They must be cleaned after approximately
30 hours of use or at least once a month.
These filters can be cleaned in a vertical
position in your dishwasher.
Use a brush, hot water and mild detergent.
Rinse and dry them thoroughly before
returning them to the hood.
••
Dismantling the filter cartridge
(fig. 1)
— Turn the built-in filter cartridge handle.
— Tilt the filter cartridge downward.
••
CHANGING THE CARBON
FILTER
Replace it after approximately 120 hours of
use.
— Remove the filter cartridge (fig. 2).
— Place the carbon filter on the filter cartridge
on the inside of the hood.
— Pull the two fastener clips over each side of
the filter cartridge.
— Repeat these steps for all the filter cartridges.
••
fig. 2
99636272_A_ML.QXP 13/01/2006 15:29 Page 37
Page 18
38
4 / CARING FOR AND CLEANING YOUR APPLIANCE
EN
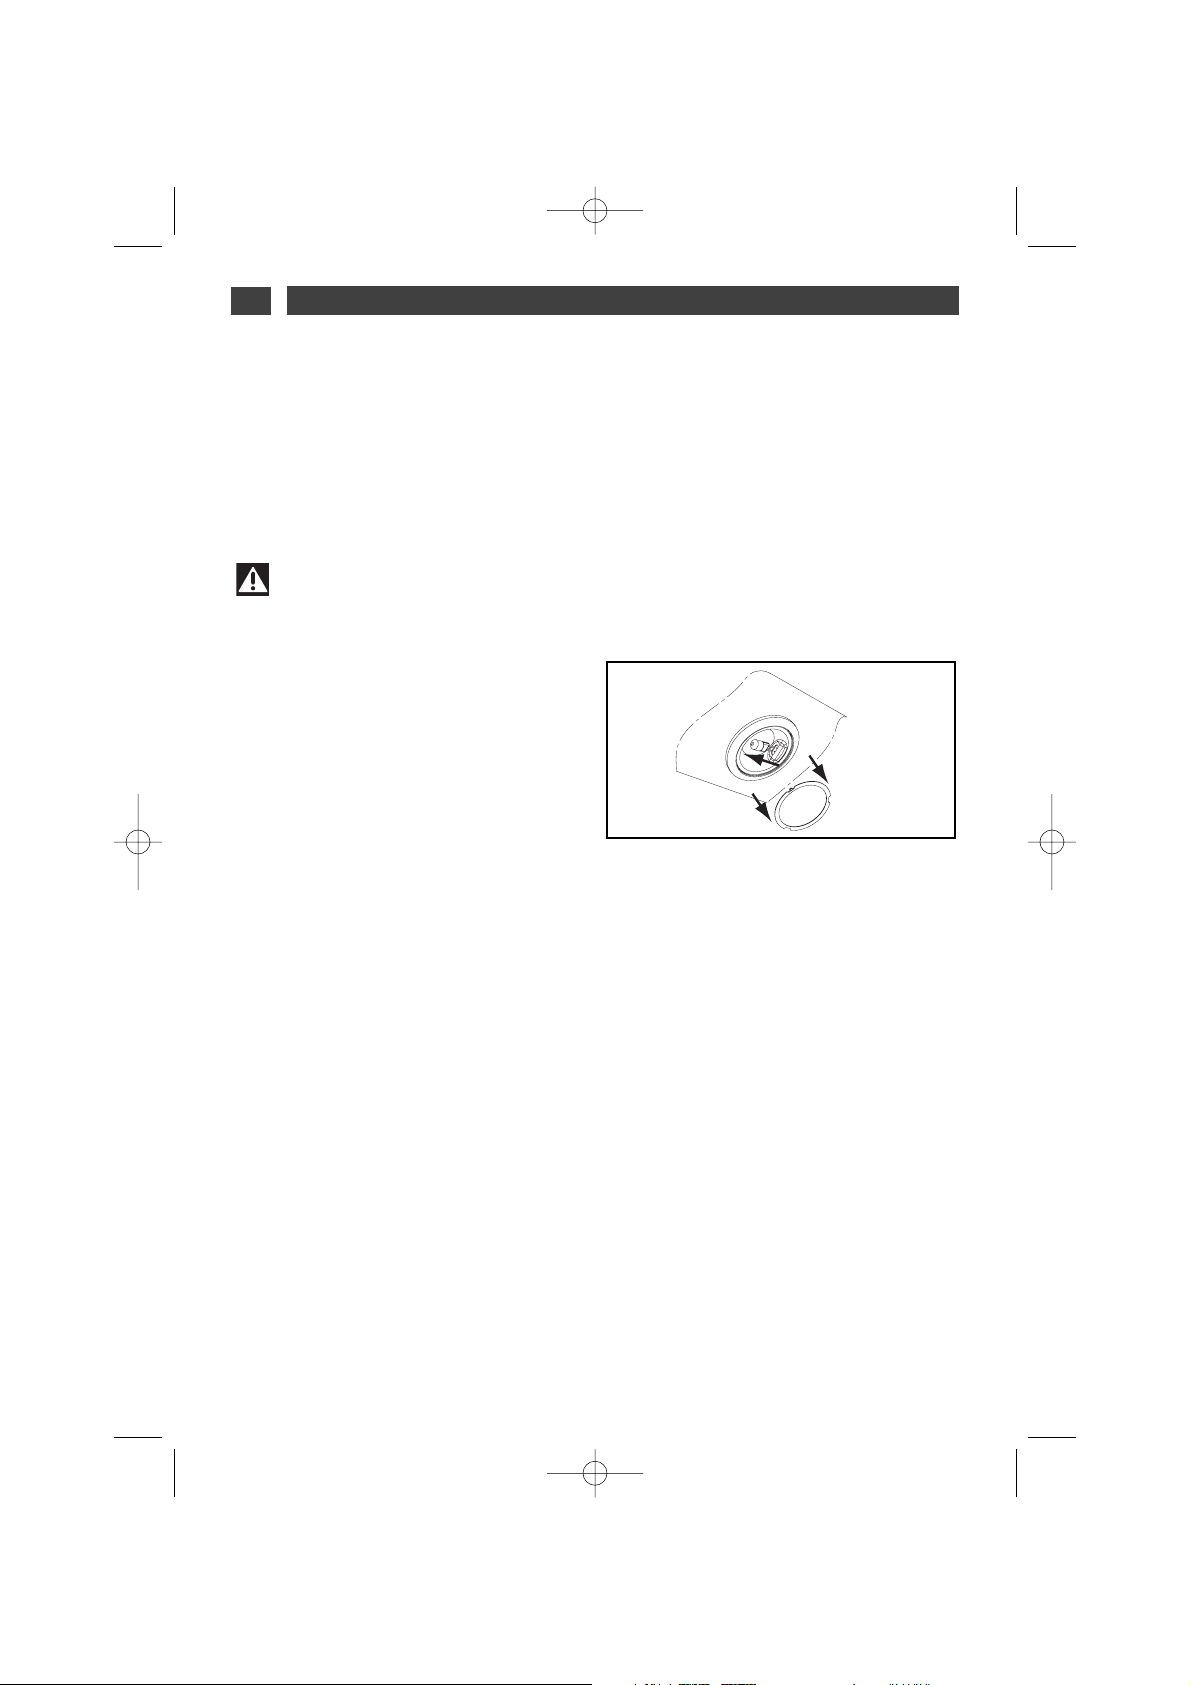
CHANGING THE LIGHT BULB
••
MMooddeell wwiitthh hhaallooggeenn bbuullbb
——
Remove the lighting port (fig. 1).
——
Change the G4-20W-12V halogen bulb.
——
Replace the bulb by repeating these steps
in reverse order.
Warning
Before carrying out any work, the power supply to the hood must be turned off, either
by unplugging it or by using the circuit breaker switch.
fig. 1
CLEANING THE OUTER SURFACES
To clean the outside of your hood, use soapy water, but do not use abrasive creams or
scrubbing sponges.
••
99636272_A_ML.QXP 13/01/2006 15:29 Page 38
Page 19

39
4 / CARING FOR AND CLEANING YOUR APPLIANCE
EN
MAINTAINING YOUR APPLIANCE
••
Warning
Before carrying out any work, the power supply to the hood must be turned off, either
by unplugging it or by using the circuit breaker switch.
PPRROODDUUCCTTSS//AACCCCEESSSSOORRIIEESS
TTOO UUSSEE
MMAAIINNTTEENNAANNCCEE
To preserve your appliance, we recommend that you use Clearit cleaning products.
PPrrooffeessssiioonnaall eexxppeerrttiissee
sseerrvviinngg iinnddiivviidduuaallss
Clearit offers you professional products and solutions designed for the daily care of your
household appliances and kitchens.
They are on sale at your regular retailer, along with a complete line of accessories and
consumable products.
WWHHAATT TTOO DDOO
Top surface and
accessories
Filter cartridge
Activated carbon filter
NNeevveerr uussee mmeettaall ssccoouurriinngg ppaaddss,,
aabbrraassiivvee pprroodduuccttss oorr eexxcceessssiivveellyy
ssttiiffff bbrruusshheess..
This filter traps fatty vapours and
dust. This component plays an
important role in ensuring the
effectiveness of your hood.
In the event of tough stains, use
a non-abrasive cream, then rinse
with clean water.
This filter traps odours and must
be changed at least once a year
depending on your level of use.
You should order these filters
from your dealer (quoting the
reference shown on the
identification plate located inside
the hood) and note the date the
filter was changed.
To clean the body and the
lighting port, you should use only
commercial household cleaning
products diluted in water and
then rinse using clean water,
drying with a soft cloth.
Use a commercial household
cleaning product then rinse
abundantly and dry. These filters
can be cleaned in a vertical
position in your dishwasher.
((DDoo nnoott aallllooww tthheemm ttoo ttoouucchh ddiirrttyy
ddiisshheess oorr ssiillvveerrwwaarree.. ))
99636272_A_ML.QXP 13/01/2006 15:29 Page 39
Page 20

Any maintenance on your equipment should be undertaken by:
- either your dealer,
- or another qualified mechanic who is an authorized agent for the brand appliances.
When making an appointment, state the full reference of your equipment (model, type and serial
number). This information appears on the manufacturer's nameplate attached to your equipment.
6 / AFTER-SALES SERVICE
EN
40
5 / TROUBLESHOOTING
EN
The hood is not operating
effectively...
Ensure that:
• The selected motor speed is sufficient for the
quantity of smoke and vapours to be cleared.
• The kitchen is sufficiently ventilated to allow
for fresh air intake.
• The carbon filter is not worn (hood operating
in recycling mode).
The hood is
not working...
Ensure that:
• The power is not cut off.
• A speed has been selected.
The hood stopped
working
Ensure that:
• The power is not cut off.
• The single-pole cut-off device was not
activated.
SSOOLLUUTTIIOONNSSSSYYMMPPTTOOMMSS
99636272_A_ML.QXP 13/01/2006 15:29 Page 40
Page 21

41
FR
02
EN
22
DE
41
ES
60
IT
80
NL
99
PT
118
Liebe Kundin, lieber Kunde,
Sie haben soeben eine
DDEE DDIIEETTRRIICCHH
Dunstabzugshaube erworben, und
wir danken Ihnen dafür.
Unsere Forschungsteams haben für Sie diese neue Generation von
Geräten entwickelt, die durch Qualität, Ästhetik, ihre Funktionen und technische Fortentwicklung Ausnahmeprodukte sind, die unser Know-how zeigen.
Ihre neue
DDEE DDIIEETTRRIICCHH
Dunstabzugshaube fügt sich harmonisch in Ihre
Küche ein und verbindet perfekte Leistungen beim Kochen und Backen mit
einfacher Benutzung. Wir wollten Ihnen ein exzellentes Produkt anbieten.
In der
DDEE DDIIEETTRRIICCHH
Produktpalette finden Sie auch eine breite Auswahl an
einbaufähigen Backöfen, Mikrowellenherden, Kochfeldern, Küchenherde,
Geschirrspüler die Sie mit Ihrer neuen
DDEE DDIIEETTRRIICCHH
Dunstabzugshaube
abstimmen können.
Mit der ständigen Bemühung um bestmögliche Erfüllung Ihrer Forderungen
an unsere Produkte steht Ihnen natürlich unser Verbraucherservice zur
Verfügung, der auf alle Ihre Fragen und Vorschläge eingeht (Adresse am
Schluß dieses Büchleins).
Sie können uns auch im Internet unter
wwwwww..ddeeddiieettrriicchh--eelleeccttrroommeennaaggeerr..ccoomm
besuchen, wo Sie unsere jüngsten
Innovationen sowie nützliche und ergänzende Informationen finden.
DDEE DDIIEETTRRIICCHH
DDiiee nneeuueenn WWeerrttoobbjjeekkttee
Da wir unsere Produkte ständig verbessern möchten, behalten wir uns das Recht vor, ihre technischen, funktionellen und ästhetischen Merkmale zu verändern, damit sie mit der technischen
Weiterentwicklung Schritt halten.
Wichtig:
Bitte lesen Sie vor der Inbetriebnahme des Gerätes diese Einbau- und
Gebrauchsanleitung aufmerksam durch, damit Sie sich sehr rasch mit seinem Betrieb vertraut
machen können.
99636272_A_ML.QXP 13/01/2006 15:29 Page 41
Page 22

42
INHALT
DE
1 / FÜR DEN BENUTZER
••
Sicherheitshinweise
________________________________________
42
••
Umweltschutz
_____________________________________________
44
••
Gerätebeschreibung
________________________________________
45
2 / INSTALLATION DES GERÄTS
••
Benutzung mit Abluftbetrieb
_________________________________
46
••
Benutzung mit Umluftbetrieb
_________________________________
46
••
Stromanschluss
___________________________________________
47
••
Montage der Dunstabzugshaube
_____________________________
48
••
Montage des Kamins
º Abluft ins Freie
______________________________________
50
º Umluft
_____________________________________________
51
3 / BENUTZUNG DES GERÄTS
••
Beschreibung der Bedienelemente
____________________________
52
••
Einschaltung
______________________________________________
53
••
Zeitverschobene Abschaltung
________________________________
53
••
Sofortige Abschaltung
______________________________________
53
••
Sättigung der Kassette
______________________________________
53
••
Umluftbetrieb
______________________________________________
54
••
Abluftbetrieb
______________________________________________
54
••
Sättigung des Kohlefilters
___________________________________
55
••
Automatische Abschaltung des Ventilators
_____________________
55
••
Automatische Abschaltung der Beleuchtung
___________________
55
4 / PFLEGE UND REINIGUNG DES GERÄTS
••
Reinigung der Filterkassetten
________________________________
56
••
Austausch des Kohlefilters
__________________________________
56
••
Reinigung der Aussenfläche
_________________________________
57
••
Austausch der Lampe
______________________________________
57
••
Pflege des Geräts
__________________________________________
58
5 / FUNKTIONSSTÖRUNGEN
______________________________________
59
6 / KUNDENDIENST
______________________________________________
59
99636272_A_ML.QXP 13/01/2006 15:29 Page 42
Page 23

43
11 //
FÜR DEN BENUTZER
DE
SICHERHEITSHINWEISE
——
Dieses Gerät ist für die Benutzung durch
Privatpersonen in ihrem Haushalt konzipiert
worden.
——
Dieses Gerät muss von Erwachsenen
benutzt werden.
Bitte darauf achten, dass Kinder es nicht
berühren und als Spielzeug benutzen. Sich
vergewissern, dass sie die Bedienelemente
des Geräts nicht berühren.
——
Das Gerät beim Empfang sofort auspacken
oder auspacken lassen. Sein allgemeines
Aussehen prüfen. Eventuelle Vorbehalte
schriftlich auf dem Lieferschein vermerken,
und ein Exemplar davon behalten.
——
Das Gerät ist für den normalen Haushaltsgebrauch bestimmt. Es nicht für kauf-männische oder industrielle oder andere Zwecke als
diejenigen benutzen, für die es konzipiert worden ist.
——
Die Merkmale dieses Geräts nicht verändern
oder versuchen, sie zu verändern. Dies würde
eine ernste Gefahr für alle darstellen.
——
Reparaturen dürfen nur von einem zugelassenen Fachmann durchgeführt werden.
——
Die Dunstabzugshaube vor dem Reinigen
oder der Pflege immer vom Stromnetz trennen.
——
Bei gleichzeitigem Betrieb der Dunstabzugshaube und anderer nicht mit Strom
betriebener Geräte den Raum angemessen
belüften. Dies, damit die Dunstabzugshaube
keine Verbrennungsgase ansaugt.
——
Es ist verboten, unter der Dunstab-zugshaube Gerichte zu flambieren oder die
Gaskochstellen einzuschalten, ohne dass ein
Kochgeschirr darauf steht (die angesaugten
Flammen könnten das Gerät beschädigen).
——
Frittiervorgänge unter der Dunstab-zugshaube müssen ständig überwacht werden.
Die auf sehr hohe Temperaturen aufgeheizten
Öle und Fette können Feuer fangen.
——
Die Häufigkeit der Reinigung und des
Ersatzes der Filter einhalten. Die Ansammlung
von Fettablagerungen kann einen Brand auslösen.
——
Der Betrieb über einer BrennstoffFeuerstelle (Holz, Kohle, usw.) ist nicht zulässig.
——
Niemals Dampf- oder Hochdruckgeräte zur
Reinigung des Geräts benutzen (Forderungen
bezüglich der elektrischen Sicherheit).
——
Bei der Sorge um die ständige
Verbesserung unserer Produkte behalten wir
uns das Recht vor, ihre technischen, funktionellen oder ästhetischen Merkmale im
Zusammenhang mit der technischen
Fortentwicklung zu ändern.
——
Für das spätere leichte Auffinden der
Produktreferenzen des Geräts raten wir, sie
auf der Seite „Kundendienst und
Kundenbeziehungen" zu notieren.
(Auf dieser Seite wird auch erklärt, wo sie sich
auf dem Gerät befinden.)
••
Wichtig
Diese Betriebsanleitung mit dem Gerät
aufbewahren. Sollte das Gerät an eine andere Person verkauft oder veräussert werden,
sichergehen, dass sie auch die
Betriebsanleitung bekommt. Vor der
Installation und Benutzung des Geräts sollten folgende Ratschläge zur Kenntnis
genommen werden. Sie sind für die
Sicherheit des Benutzers und anderer
Personen verfasst worden.
Achtung
In einer Küche, die mit einem an
einen Kamin angeschlossenen Gerät (z.B.:
Ofen) beheizt wird, muss die
Dunstabzugshaube als Umlufthaube installiert werden. Die Dunstabzugshaube darf
nicht ohne die Filterkassetten benutzt werden.
Wenn die Dunstabzugshaube in der Küche
gleichzeitig mit Geräten benutzt wird, die
mit Gas oder einem anderen Brennstoff
betrieben werden, muss eine angemessene
Belüftung des Raums vorgesehen werden.
99636272_A_ML.QXP 13/01/2006 15:29 Page 43
Page 24

44
11 //
FÜR DEN BENUTZER
DE
Achtung
Der Einbau muß von qualifizierten Installateuren und Technikern vorgenommen wer-
den.
Achtung
Vor der ersten Benutzung der Filterkassette die Schutzfolie abziehen.
UMWELTSCHUTZ
••
— Die Verpackungsmaterialien dieses Geräts sind recyclebar. Entsorgen Sie sie in den von den
Gemeinden eigens zur Verfügung gestellten Containern und tragen Sie auf diese Weise zu
Ihrem Recycling und zum Umweltschutz bei.
— Ihr Gerät enthält zahlreiche recyclingfähige Materialien. Es wurde deshalb mit diesem Zeichen
versehen, um Sie darauf hinzuweisen, dass diese Geräte nach ihrem Gebrauch nicht
mit dem übrigen Hausmüll entsorgt werden dürfen. Das von Ihrem Hersteller in die
Wege geleitete Recycling kann somit in Übereinstimmung mit der europäischen
Richtlinie 2002/96/CE über Elektro- und Elektronik-Altgeräte unter optimalen
Bedingungen erfolgen. Ihre Gemeindebehörden oder Ihr Händler informieren Sie
gerne über die zu Ihrem Wohnort am nächsten liegenden Sammelstellen.
— Wir danken Ihnen für Ihren Beitrag zum Umweltschutz.
99636272_A_ML.QXP 13/01/2006 15:29 Page 44
Page 25

45
11 //
FÜR DEN BENUTZER
DE
••
GERÄTEBESCHREIBUNG
Ansaugöffnungen
Kamin
Gehäuse
Bedienelement
A
B
C
D
B
C
D
A
99636272_A_ML.QXP 13/01/2006 15:29 Page 45
575 / 1027 mm
75 mm
533 mm
500 mm
274 mm
271 mm
600 / 900 mm
Page 26

46
22 //
INSTALLATION DES GERÄTS
DE
BENUTZUNG MIT
ABLUFTBETRIEB
Bei vor
handenem Abzug ins Freie
(Abb. 1)
Die Dunstabzugshaube kann daran angeschlossen werden vermittels eines emaillierten, aus Aluminium bestehenden, flexiblen
oder aus unbrennbarem Material bestehenden Abzugsrohrs (Mindest-Ø 125 mm). Wenn
das Rohr weniger als 125 mm Querschnitt hat,
uunnbbeeddiinnggtt iinn ddeenn UUmmlluuffttbbeettrriieebb üübbeerrggeehheenn..
••
BENUTZUNG MIT UMLUFTBETRIEB
W
enn kein Abzug ins Freie vorhanden ist
(Abb. 2)
Alle unsere Geräte können auch im
Umluftbetrieb betrieben werden.
In diesem Fall muss ein Aktivkohlefilter eingesetzt werden, das die Gerüche zurückhält.
(Siehe Kapitel 4: Austausch des Kohlefilters.)
••
- Das Gerät muss während der Installation oder bei einem eventuellen Eingriff vom Stromnetz
getrennt sein.
- Prüfen, dass die Netzspannung dem auf dem Geräteschild in der Dunstabzugshaube angegebenen Spannungswert entspricht.
- Wenn die Stromanlage der Wohnung für den Anschluss des Geräts geändert werden muss,
sich an einen qualifizierten Elektriker wenden.
- Wenn die Dunstabzugshaube im Abluftbetrieb betrieben wird, das Gerät an kein Abzugsrohr
für Verbrennungsrauch (Heizkessel, Kamin, usw. ...) oder an eine kontrollierte mechanische
Belüftung anschliessen.
- Das Abzugsrohr darf wie auch immer nicht in den Dachboden führen.
- Die Dunstabzugshaube zur Sicherheit in mindestens 70 cm Entfernung von einer elektrischen,
Gas- oder gemischten Kochstelle installieren.
125
150
fig. 1
fig. 2
99636272_A_ML.QXP 13/01/2006 15:29 Page 46
125
150
Page 27

47
22 //
INSTALLATION DES GERÄTS
DE
Achtung
Dieses Gerät wird mit einem
Versorgungskabel H 05 VVF mit 3 Leitern
mit 0,75 mm
2
(Nulleiter, Phase und Erdung)
geliefert. Es muss vermittels einer
Normsteckdose IEC 60083 an ein Stromnetz
mit 220 - 240 V einphasig angeschlossen
werden, die auch nach der Installation
gemäss Einbauregeln zugänglich bleiben
muss.
Wir können im Fall eines Unfalls nach einer
nicht vorhandenen oder nicht ordnungsgemässen Erdung nicht haftbar gemacht werden. Die Sicherung der Anlagen muss 10
oder 16 A betragen. Wenn das
Anschlusskabel beschädigt ist, den
Kundendienst rufen, um jegliche Gefahr
auszuschließen.
Achtung
Wenn die Stromanlage der Wohnung
für den Anschluss des Geräts eine Änderung erfordert, einen qualifizierten
Elektriker heranziehen.
Achtung
Wenn die Dunstabzugshaube irgendeine Anomalie aufweist, das Gerät vom Strom
trennen oder die Schmelz-sicherung herausnehmen, die der Anschlussleitung des
Geräts entspricht.
••
STROMANSCHLUSS
Bei der Installation und den Pflegevorgängen
muss das Gerät vom Stromnetz abgetrennt
werden, die Schmelzsicherungen müssen
abgeschaltet oder herausgenommen werden.
Der Stromanschluss wird hergestellt, bevor
das Gerät in das Möbel eingeschoben wird.
Prüf
en, ob:
- die Leistung der Installation ausreicht,
- die Versorgungsleitungen in gutem Zustand
sind,
- der Drähtequerschnitt mit den Installationsregeln übereinstimmt.
99636272_A_ML.QXP 13/01/2006 15:29 Page 47
Page 28

48
22 //
INSTALLATION DES GERÄTS
DE
Ratschlag
Vor dem endgültigen Festziehen der
4 Schrauben D und E das Niveau der
Dunstabzugshaube justieren.
MONTAGE DER
DUNSTABZUGSHAUBE
Achtung
Die Installation muss die geltenden
Bestimmungen für die Belüftung von Räumen
einhalten. In Frankreich werden diese Regeln
in der DTU 61.1 des CSTB angegeben. Insbesondere darf die Abzugsluft nicht in eine
Leitung geschickt werden, die für den Rauchabzug von Geräten benutzt wird, die mit Gas
oder einem anderen Brennstoff betrieben werden. Die Verwendung eines stillgelegten
Abzugsrohrs kann nur mit der Erlaubnis eines
kompetenten Fachmanns erfolgen.
Der Abstand zwischen dem Kochfeld und dem
niedrigsten Teil der Dunstabzugshaube muss
70 cm betragen. Wenn in der Betriebsanleitung
des unter der Dunstabzugshaube installierten
Kochfelds ein größerer Abstand als 70 cm vorgegeben ist, muss dies berücksichtigt werden.
— In mindestens 70 cm Abstand über dem
Kochfeld an der Wand einen waagerechten
Strich ziehen. (A/Abb. 1).
— Einen vertikalen Strich (B/Abb. 1) an der Wand
mittig im Verhältnis zum Kochfeld und von der
Decke bis zur Grenze des vorstehenden waagrechten Strichs (A) ziehen.
— Die Bohrschablone nach der gestrichelten
Linie schneiden, um 2 Teile zu erhalten, C1 und
C2 (Abb. 1).
— Die Schablone C2 (Abb. 1) an der Wand plazieren und den die Achse der Dunstab-zugshaube darstellenden Strich auf den vertikalen
Strich legen (Abb. 1), der vorher gezeichnet
worden war.
— Die Schablone C1 (Abb. 1) gegen die Wand
und im Anschlag gegen die Decke plazieren.
— Die 6 Löcher bohren. Die 6 Dübel einsetzen.
FFüürr MMooddeellll DDHHDD112200XXEE ssiinndd ddiiee zzuussäättzzlliicchheenn
AAnnlleeiittuunnggeenn aauuff ddeerr nnääcchhsstteenn SSeeiittee
((AAbbbbiilldduunngg 22)) zzuu bbeeffoollggeenn..
— Die beiden Schrauben oben an der Dunstab-
zugshaube einschrauben (D/Abb. 1) und sie
5 mm überstehen lassen.
— Die Dunstabzugshaube an den beiden
Schrauben aufhängen. (D/Abb. 2).
— Die Filterkassetten herausnehmen (F/Abb. 3).
— Die beiden Schrauben unten einschrauben
(E/Abb. 3).
••
=
=
> 70 cm
5mm
x 2
Abb. 1
B
C2
E
D
C1
A
99636272_A_ML.QXP 13/01/2006 15:29 Page 48
Page 29

Abb. 4
Abb. 3
D
E
J
— Metallfettfilter herausnehmen (J/Abb. 4).
— Die zwei unteren Schrauben anziehen
(E/Abb. 4).
***********************************
NNuurr ffüürr MMooddeellll DDHHDD112200XXEE
::
— Die zwei unteren zusätzlichen Schrauben
anziehen (K/Abb. 4).
***********************************
Abb. 2
F
H
H
***********************************
NNuurr ffüürr MMooddeellll DDHHDD112200XXEE::
— Waagerechte Linie anzeichnen (F/Abb. 2), die
durch die beiden zuvor gebohrten Löcher verläuft (G)
— Zwei weitere Löcher bohren (H/Abb. 2), die
sich auf der Linie (F) in einem Abstand von 35 cm
von den Löchern (G) befinden.
— Die zwei zusätzlichen Dübel eindrücken.
— Die beiden Schrauben oben an der
Dunstabzugshaube einschrauben (D/Abb. 1)
und sie 5 mm überstehen lassen.
***************************************
G
K
K
— Dunstabzugshaube an den beiden
Schrauben aufhängen (D/Abb. 3).
Ratschlag
Bevor die vier Schrauben D und E (bzw.
6 Schrauben D,E,K, je nach Modell) vollständig angezogen werden, sollte das Niveau
der Dunstabzugshaube angeglichen werden.
22 //
INSTALLATION DES GERÄTS
DE
99636272_A_ML.QXP 13/01/2006 15:29 Page 49
35 cm
35 cm
Page 30

22 //
INSTALLATION DES GERÄTS
DE
50
MONTAGE DES KAMINS
••
Abluft ins Freie
— Die Metallhalterung des Kamins mit den beiden Schrauben an die Wand mit Stoss an der
Decke befestigen (Abb. 1).
— Die Rücklaufklappe auf den Motorausgang
montieren (Abb. 2). Mit dieser Rücklaufklappe
kann der Eintritt der von aussen kommenden
Luft versperrt werden.
— Im Fall eines Rohrs mit 125 mm Querschnitt
den gelieferten Adapter benutzen (Abb. 3).
Wenn das Außenrohr einen Durchmesser von
unter 125 mm aufweist, muss die
Dunstabzugshaube unbedingt im Umluftbetrieb
angeschlossen werden.
— Das Rohrende auf den Motorausgang schieben (Abb. 4).
— Den Teleskopkamin vorbereiten und dabei die
Ansaugöffnungen sorgfältig verstecken
(Abb. 4).
Die Kaminteile so weit wie möglich ineinanderschieben.
— Den oberen Kaminteil (B/Abb. 4) mit den beiden Schrauben (G/Abb. 4) auf der
Metallhalterung des Kamins befestigen.
— Die Länge des Telekopkamins justieren, dabei
den unteren Teil herunterziehen und in den oberen Teil der Dunstabzugshaube einschieben.
••
A
B
C
D
E
KKaammiinnhhaalltteerruunngg
TTeelleesskkooppkkaammiinn
RRoohhrr
AAddaapptteerr
RRüücckkllaauuffvveennttiill
MMoottoorraauussggaanngg
HHaalltteesscchhrraauubbee ddeess KKaammiinnss
F
G
=
=
fig. 1
fig. 4
fig. 2 fig. 3
A
C
D
E
F
G
B
99636272_A_ML.QXP 13/01/2006 15:29 Page 50
Page 31

51
••
Umluft
— Die Rücklaufklappe entfernen (Abb. 1).
— Mit den beiden Schrauben den Kunststoff-rauchablenker an der Wand mit Stoss an der Decke
befestigen (Abb. 2). Darauf achten, den Ablenker
im Verhältnis zum vertikalen Strich an der Wand
zu zentrieren (Abb. 2).
— Ein Ende des Rohres auf den Ablenker und
das andere Ende auf den Motorausgang schieben (Abb. 3).
— Den Kamin vorbereiten und darauf achten,
dass die Ansaugöffnungen nach oben weisen,
damit sie sichtbar sind. (B/Abb. 3).
— Den oberen Teil des Kamins (C/Abb. 3) auf den
Rauchablenker (A/Abb. 3) mit den beiden
Schrauben (F/Abb. 3) befestigen.
— Die Länge des Teleskopkamins anpassen,
indem der untere Teil heruntergezogen und in
den oberen Teil der Dunstabzugshaube eingeschoben wird.
Ratschlag
Wir empfehlen für die optimale Nutzung
des Geräts den Anschluss an ein Rohr mit
150 mm Querschnitt (nicht mitgeliefert).
Möglichst wenig Winkelstücke und ein möglichst kurzes Rohr verwenden. Beim
Abluftbetrieb der Dunstabzugshaube muss für
ausreichende Frischluftzufuhr gesorgt werden,
damit vermieden wird, den Raum unter
Unterdruck zu setzen.
A
B
C
D
E
RRaauucchhaabblleennkkeerr
AAnnssaauuggööffffnnuunnggeenn
TTeelleesskkooppkkaammiinn
RRoohhrr
MMoottoorrttrrääggeerr
HHaalltteesscchhrraauubbee ddeess KKaammiinnss
F
22 //
INSTALLATION DES GERÄTS
DE
fig. 3
fig. 1
fig. 2
A
B
D
E
F
C
99636272_A_ML.QXP 13/01/2006 15:29 Page 51
=
=
Page 32

33 //
BENUTZUNG DES GERÄTS
DE
52
Beleuchtung
Drehzahlen von 1 bis 4
••
BESCHREIBUNG DER BEDIENELEMENTE
••
Elektronisches Modell mit 4 Drehzahlen
Ratschlag
Diese Installationsanleitung gilt für mehrere Modelle. Zwischen diesem Gerät und
den gegebenen Beschreibungen können kleine Unterschiede im Detail und bei der
Ausrüstung zum Vorschein kommen.
A
B
C
D
Zeitverschobene Abschaltung (10 Min.)
Lampe für Filterreinigung
A
B
C
D
99636272_A_ML.QXP 13/01/2006 15:29 Page 52
Page 33

53
••
EINSCHALTUNG
Den Knopf der gewünschten Drehzahl drükken (von 1 bis 4).
Beispiel
: Drehzahl 2.
Der Knopf 2 leuchtet auf.
••
ZEITVERSCHOBENE
ABSCHALTUNG
Den Leuchtknopf drücken.
Die Dunstabzugshaube schaltet automatisch
nach 10 Min. Betriebsdauer ab.
Der Knopf blinkt bis zur Abschaltung der
Dunstabzugshaube.
••
SOFORTIGE ABSCHALTUNG
Den Leuchtknopf zweimal drücken.
Die Dunstabzugshaube schaltet ab, und der
Knopf verlöscht.
••
SÄTTIGUNG DER KASSETTE
Wenn die Lampe blinkt, gibt sie an, dass
die Filterkassetten gereinigt werden müssen
(sie können in den Geschirrspüler gegeben
werden).
Zur Entaktivierung der Funktion Sättigung der
Filterkassette zwei Sekunden lang gleichzeitig die Knöpfe 1 und 2 drücken.
Die Lampe verlöscht.
33 //
BENUTZUNG DES GERÄTS
DE
99636272_A_ML.QXP 13/01/2006 15:30 Page 53
Page 34

33 //
BENUTZUNG DES GERÄTS
DE
54
••
UMLUFTBETRIEB
Die Dunstabzugshaube ist im Umluftbetrieb,
sie im Umluftmodus konfigurieren:
3 Sekunden lang gleichzeitig die Knöpfe 1
und 4 drücken, die aufleuchten.
Die Lampe leuchtet ständig oder blinkt.
Für die Konfiguration im Umluftbetrieb den
Knopf 1 drücken, bis die Lampe leuchtet
(nicht blinkt).
Die Konfiguration mit Drücken des Knopfes 4
bestätigen.
Die Lampe und die Knöpfe 1 und 4 verlöschen.
••
ABLUFTBETRIEB
Die Dunstabzugshaube ist im Abluftbetrieb,
sie im Abluftmodus konfigurieren:
3 Sekunden lang gleichzeitig die Knöpfe 1
und 4 drücken, die aufleuchten.
Die Lampe leuchtet ständig oder blinkt.
Für die Konfiguration im Abluftbetrieb einmal
den Knopf 1 drücken, bis die Lampe
blinkt.
Die Konfiguration mit Drücken des Knopfes 4
bestätigen.
Die Lampe und die Knöpfe 1 und 4 verlöschen.
99636272_A_ML.QXP 13/01/2006 15:30 Page 54
Page 35

55
••
SÄTTIGUNG DES
KOHLEFILTERS
Wenn die Dunstabzugshaube im Umluftbetrieb ist.
Die Lampe leuchtet und gibt an, dass das
Kohlefilter ausgetauscht werden muss (wir
empfehlen, die Filter alle 6 Monate auszu-tauschen).
Zum Abschalten der Lampe die Tasten 3
und 4 einmal lange drücken.
Die Lampe geht aus.
••
AUTOMATISCHE
ABSCHALTUNG DES
VENTILATORS
Wenn vergessen wird, die Dunstabzugshaube
abzuschalten, schaltet sie selbst nach
9 Betriebsstunden ab.
••
AUTOMATISCHE
ABSCHALTUNG DER
BELEUCHTUNG
Wenn vergessen wird, das Licht abzuschalten, schaltet es selbst nach 9
Betriebsstunden ab.
33 //
BENUTZUNG DES GERÄTS
DE
99636272_A_ML.QXP 13/01/2006 15:30 Page 55
Page 36

44 //
PFLEGE UND REINIGUNG DES GERÄTS
DE
56
Achtung
Das Gerät vor der Pflege und Reinigung vom Stromnetz abtrennen. Die regelmässige
Pflege des Geräts ist eine Garantie für richtigen Betrieb, gute Leistung und Dauerhaftigkeit.
Achtung
Wenn die Anweisungen zur Reinigung des Geräts und der Filter nicht eingehalten wer-
den, kann dies zu Bränden führen. Bitte die Pflegeanweisungen streng befolgen.
Abb. 2
REINIGUNG DER FILTERKASSETTEN
Sie müssen ca. alle 30 Betriebsstunden oder
mindestens einmal im Monat gereinigt werden. Sie können im Geschirrspüler in senkrechter Position gereinigt werden.
Eine Bürste, heisses Wasser und ein sanftes
Reinigungsmittel verwenden. Sie abspülen
und sorgfältig abtrocknen, bevor sie wieder
eingesetzt werden.
••
Ausbau der Filterkassette (Abb. 1)
— Den integrierten Griff der Filterkassette drehen.
— Die Filterkassette nach unten kippen.
••
AUSTAUSCH DES KOHLEFILTERS
Ihn ca. alle 120 Betriebsstunden ersetzen.
— Die Filterkassetten entfernen (Abb. 2).
— Das Kohlefilter auf die Filterkassette an der
Innenseite der Dunstabzugshaube plazieren.
— Die 2 Haltespindeln beidseitig der Filter-kassette einschieben.
— Diesen Vorgang bei allen Filterkassetten
wiederholen.
••
99636272_A_ML.QXP 13/01/2006 15:30 Page 56
Page 37

57
AUSTAUSCH DER LAMPE
••
MMooddeellll mmiitt HHaallooggeennllaammppee
——
Die Leuchtblende entfernen (Abb. 1).
——
Die Halogenlampe G4-20W-12 V austauschen.
——
Das Ensemble wieder einsetzen und dafür
die Vorgänge in umgekehrter Reihenfolge
wiederholen.
Achtung
Vor jedem Eingriff muss die Dunstabzugshaube vom Stromnetz getrennt werden, ent-
weder durch Ziehen des Netzsteckers oder durch Betätigen des Überlastschalters.
Abb. 1
REINIGUNG DER AUSSENFLÄCHE
Für die Reinigung der Aussenfläche der Dunstabzugshaube Seifenwasser benutzen, aber keine
Scheuercremes oder Scheuerschwämme.
••
44 //
PFLEGE UND REINIGUNG DES GERÄTS
DE
99636272_A_ML.QXP 13/01/2006 15:30 Page 57
Page 38

58
PFLEGE DES GERÄTS
••
Achtung
Vor jedem Eingriff muss die Dunstabzugshaube vom Stromnetz getrennt werden, ent-
weder durch Ziehen des Netzsteckers oder durch Betätigen des Überlastschalters.
ZZUU VVEERRWWEENNDDEENNDDEE PPRROODDUUKKTTEE//
ZZUUBBEEHHÖÖRR
PPFFLLEEGGEE
Zur Erhaltung des Geräts empfehlen wir die Pflegeprodukte Clearit.
DDiiee EErrffaahhrruunngg ddeerr PPrrooffiiss
iimm DDiieennsstt ddeerr PPrriivvaattppeerrssoonneenn
Clearit bietet professionelle Produkte und geeignete Lösungen für die tägliche Pflege von
Haushaltsgeräten und Küchen an.
Sie sind beim gewohnten Wiederverkäufer zu finden, ebenso wie ein ganzer Fächer von
Produkten, Zubehör und Betriebsmitteln.
WWIIEE VVOORRGGEEHHEENN
Gehäuse
und Zubehör
Filterkassette
Aktivkohlefilter
NNiieemmaallss MMeettaallllkkrraattzzeerr,, SScchheeuueerr--
mmiitttteell ooddeerr zzuu hhaarrttee BBüürrsstteenn
bbeennuuttzzeenn..
Dieses Filter bindet Fettdämpfe
und Staubpartikel. Es ist ein wichtiges Element zur Sicher-stellung
eines wichtigen Teils der
Wirksamkeit der Dunstabzugshaube.
Bei hartnäckigen Flecken eine
nicht scheuernde Creme an-wenden und dann mit klarem Wasser
abspülen.
Dieses Filter bindet die Gerüche
und muss je nach Nutzungsgrad
mindestens einmal jährlich
gewechselt werden.
Diese Filter beim Fachhändler
bestellen (mit der Produkt-referenz auf dem Geräteschild im
Inneren der Dunstabzugshaube),
und das Datum des Austauschs
notieren.
Für die Reinigung von Gehäuse
und Leuchtblende ausschließlich
handelsübliche in Wasser gelöste
Reinigungsmittel, und dann mit
klarem Wasser abspülen und mit
einem weichen Lappen trocknen.
Mit einem handelsüblichen
Haushaltsprodukt, dann reichlich
abspülen und trocknen. Diese
Reinigung kann im Geschirr-spüler in vertikaler Position erfolgen.
((NNiicchhtt mmiitt sscchhmmuuttzziiggeemm GGeesscchhiirrrr
ooddeerr mmiitt SSiillbbeerrbbeesstteecckk iinn
BBeerrüühhrruunngg bbrriinnggeenn))..
44 //
PFLEGE UND REINIGUNG DES GERÄTS
DE
99636272_A_ML.QXP 13/01/2006 15:30 Page 58
Page 39

59
Die Dunstabzugshaube
zeigt ungenügende
Leistung ...
Prüfen, ob:
• die gewählte Motordrehzahl für die abgegebene Rauch- und Dampfmenge ausreicht;
• die Küche ausreichend belüftet ist, damit eine
Luftzufuhr möglich ist;
• das Kohlefilter nicht verbraucht ist
(Dunstabzugshaube im Umluftbetrieb).
Die Dunstabzugshaube
funktioniert nicht ...
Prüfen, ob:
• kein Stromausfall vorliegt;
• wirklich eine Drehzahl gewählt wurde.
Die Dunstabzugshaube
hat während des
Betriebs abgeschaltet.
Prüfen, ob:
• kein Stromausfall vorliegt;
• die omnipolare Abschaltvorrichtung nicht
ausgeschaltet hat.
LLÖÖSSUUNNGGEENNSSYYMMPPTTOOMMEE
66 //
KUNDENDIENST DE
Eingriffe an Ihrem Gerät dürfen nur:
- von Ihrem Händler oder
- von einem sonstigen Fachmann und Vertragshändler der Marke durchgeführt werden.
Geben Sie bei der Meldung einer Störung die vollständige Typenbezeichnung Ihres Gerätes an
(Modell, Typ, Seriennummer). Diese Angaben finden Sie auf einem an Ihrem Gerät angebrachten Schild.
55 //
FUNKTIONSSTÖRUNGEN
DE
99636272_A_ML.QXP 13/01/2006 15:30 Page 59
Page 40

60
Estimado cliente, estimada clienta:
Acaba de comprar una campana extractora
DDEE DDIIEETTRRIICCHH
y queremos
darle las gracias por ello.
Nuestros equipos de investigación han diseñado para usted esta nueva
generación de aparatos que, por su calidad, su estética, sus funciones y su
desarrollo tecnológico, constituyen productos excepcionales, exponentes
de nuestro saber.
Su nueva campana extractora
DDEE DDIIEETTRRIICCHH
se integrará con armonía en
su cocina y combinará los resultados de aspiración y la facilidad de uso.
Hemos querido ofrecerle un producto óptimo.
También encontrará en la gama de productos
DDEE DDIIEETTRRIICCHH
, una amplia
selección de hornos, hornos microondas, lavavajillas y frigoríficos integrables, que podrá coordinar con su nueva campana extractora
DDEE DDIIEETTRRIICCHH
.
Por supuesto, nuestro servicio al consumidor, siempre con el objetivo de
satisfacer lo mejor posible sus exigencias para con nuestros productos,
está a su disposición y a su escucha para responder a todas sus preguntas
o sugerencias (vea la dirección al final del manual).
Le invitamos a visitarnos en nuestra página web
wwwwww..ddeeddiieettrriicchh--eelleeccttrroommeennaaggeerr..ccoomm
, donde encontrará las últimas inno-
vaciones y otras informaciones útiles y adicionales.
DDEE DDIIEETTRRIICCHH
LLooss nnuueevvooss oobbjjeettooss ddee vvaalloorr
Con el objetivo de mejorar constantemente nuestros productos, nos reservamos el derecho de
efectuar modificaciones en sus características técnicas, funcionales o estéticas vinculadas con
los avances técnicos.
Importante:
Antes de poner en marcha su aparato, lea atentamente este manual de instalación y uti-
lización para familiarizarse lo más rápidamente posible con su funcionamiento.
FR
02
EN
22
DE
41
ES
60
IT
80
NL
99
PT
118
99636272_A_ML.QXP 13/01/2006 15:30 Page 60
Page 41

61
ÍNDICE
ES
1 / A LA ATENCIÓN DEL USUARIO
••
Consignas de seguridad
____________________________________
62
••
Conservación del medio ambiente
____________________________
63
••
Descripción del aparato
_____________________________________
64
2 / INSTALACIÓN DEL APARATO
••
Utilización en versión evacuación
_____________________________
65
••
Utilización en versión reciclaje
_______________________________
65
••
Conexión eléctrica
_________________________________________
66
••
Montaje de la campana extractora
____________________________
67
••
Montaje de la chimenea
º Evacuación exterior
__________________________________
69
º Reciclaje
___________________________________________
70
3 / UTILIZACIÓN DEL APARATO
••
Descripción de los mandos
__________________________________
71
••
Puesta en marcha
__________________________________________
72
••
Parada retardada
__________________________________________
72
••
Parada inmediata
__________________________________________
72
••
Saturación módulos
________________________________________
72
••
Modo reciclaje
_____________________________________________
73
••
Modo evacuación
__________________________________________
73
••
Saturación filtro de carbono
_________________________________
74
••
Parada automática del ventilador
_____________________________
74
••
Parada automática de la iluminación
___________________________
74
4 / MANTENIMIENTO Y LIMPIEZA DEL APARATO
••
Limpieza de los filtros modulares
____________________________
75
••
Cambio del filtro de carbono
_________________________________
75
••
Limpieza de la superficie exterior
_____________________________
76
••
Cambio de la bombilla
______________________________________
76
••
Mantenimiento del aparato
__________________________________
77
5 / ANOMALÍAS DE FUNCIONAMIENTO
_____________________________
78
6 / SERVICIO TÉCNICO
___________________________________________
78
99636272_A_ML.QXP 13/01/2006 15:30 Page 61
Page 42

11 //
A LA ATENCIÓN DEL USUARIO
ES
CONSIGNAS DE SEGURIDAD
——
Este aparato ha sido diseñado para ser utili-
zado por particulares en sus domicilios.
——
Este aparato debe ser utilizado por adultos.
Tenga cuidado de que los niños no lo toquen
y lo utilicen como un juguete. Asegúrese de
que no manipulen los mandos del aparato.
——
Cuando reciba el aparato, desembálelo o
hágalo desembalar inmediatamente.
Compruebe su aspecto general. Si tiene reservas que señalar, hágalo por escrito en el albarán de entrega y quédese con un ejemplar.
——
Su aparato está destinado a un uso doméstico normal. No lo utilice con fines comerciales
o industriales o con otros fines que no sean
aquellos para los que ha sido diseñado.
——
No modifique o intente modificar las características del aparato. Podría suponer un peligro par usted.
——
Las reparaciones deben ser realizadas exclusivamente por un especialista autorizado.
——
Desconecte siempre la campana extractora
antes de limpiarla o realizar el mantenimiento.
——
Ventile adecuadamente la habitación si la
campana funciona al mismo tiempo que otros
aparatos alimentados con una fuente de energía que no sea la electricidad. Ello es para que
la campana no aspire los gases de combustión.
——
No se puede flambear alimentos o tener
encendidos los fuegos de gas sin ningún recipiente bajo la campana (las llamas aspiradas
podrían deteriorar el aparato).
——
Cuando esté friendo debajo del aparato,
deberá vigilarlo constantemente. Los aceites y
grasas calentadas hasta una alta temperatura
pueden coger fuego.
——
Respete la frecuencia de limpieza y cambio
de los filtros. La acumulación de depósitos de
grasa podría provocar un incendio.
——
No puede funcionar encima de un fuego a
base de combustible (madera, carbón...).
——
No utilice aparatos de vapor o a alta presión
para limpiar el aparato (exigencias relativas a
la seguridad eléctrica).
——
Con el objetivo de mejorar siempre nuestros
productos, nos reservamos el derecho de aplicar modificaciones a sus características técnicas, funcionales o estéticas, provocadas por
los avances técnicos.
——
Para que pueda encontrar fácilmente las
referencias de su aparato, le aconsejamos
que las anote en la página "Servicio Técnico y
Servicio al Consumidor".
(Esta página también le explica dónde encontrarlas en el aparato).
••
Importante
Conserve este manual con el aparato.
Si debe vender o ceder el aparato a otra
persona, asegúrese de que el manual de
utilización va con él. Por favor, lea estos
consejos antes de instalar y utilizar el aparato. Han sido redactados pensando en su
seguridad y la de los demás.
Atención
Si la cocina calienta con un aparato
conectado a una chimenea (por ejemplo,
una estufa), se debe instalar la campana en
versión reciclaje. No utilice la campana sin
los filtros modulares.
Hay que prever una ventilación adecuada
cuando se utilice una campana extractora
de cocina al mismo tiempo que otros aparatos que funcionen con gas u otro combustible.
62
99636272_A_ML.QXP 13/01/2006 15:30 Page 62
Page 43

Atención
La instalación está reservada a los instaladores y técnicos cualificados.
Atención
Antes de utilizar por primera vez el filtro modular, retire la película protectora.
PROTECCIÓN DEL MEDIO AMBIENTE
••
— Los materiales utilizados para el embalaje de este aparato son reciclables. Participe en su reciclaje y contribuya así a conservar el medio ambiente tirándolos a los contenedores municipales
previstos para ellos.
— Su aparato también contiene materiales reciclables, por lo que está marcado con este logoti-
po que le indica que los aparatos desechados no deben mezclarse con otros residuos. Actuando así, el reciclaje de los aparatos que organiza su fabricante se efectuará en las mejores condiciones posibles, de acuerdo con la directiva europea
2002/96/CE sobre los residuos de equipos eléctricos y electrónicos. Consulte en su
ayuntamiento o a su vendedor para conocer dónde se encuentran los puntos de
recogida de aparatos desechados más cercanos a su domicilio.
— Le damos las gracias por su colaboración en la protección del medio ambiente.
11 //
A LA ATENCIÓN DEL USUARIO
ES
63
99636272_A_ML.QXP 13/01/2006 15:30 Page 63
Page 44

••
DESCRIPCIÓN DEL APARATO
Aberturas
Chimenea
Carcasa
Mandos
A
B
C
D
64
B
C
D
A
11 //
A LA ATENCIÓN DEL USUARIO
ES
99636272_A_ML.QXP 13/01/2006 15:30 Page 64
75 mm
575 / 1027 mm
533 mm
500 mm
274 mm
271 mm
600 / 900 mm
Page 45

65
UTILIZACIÓN EN VERSIÓN
EVACUACIÓN
Si tiene una salida hacia el exterior
(fig. 1)
Su campana se puede conectar a ella mediante un conducto de evacuación (Ø mínimo 125
mm, esmaltado, de aluminio o de material ininflamable). Si el conducto tiene un diámetro
inferior a 125 mm,
ppaassee oobblliiggaattoorriiaammeennttee aall
mmooddoo rreecciiccllaajjee..
••
UTILIZACIÓN EN VERSIÓN RECICLAJE
Si no tiene una salida al exterior
(fig. 2)
Todos nuestros aparatos presentan la posibilidad de funcionar en modo reciclaje.
En ese caso, añada un filtro de carbono activo que retendrá los olores.
(ver Capítulo 4: Cambio del filtro de carbono)
••
- El aparato debe estar desconectado al instalarlo o al realizar cualquier intervención en él.
- Compruebe que la tensión de la red corresponde a la tensión indicada en la placa de características que se encuentra en el interior de la campana.
- Si la instalación eléctrica de su campana obliga a efectuar una modificación para poder conectar el aparato, llame a un electricista cualificado.
- Si la campana se utiliza en versión evacuación, no conecte el aparato a un conducto de evacuación de humos de combustión (caldera, chimenea, etc.) o a una VMC (ventilación mecánica
controlada.
- El conducto de evacuación, sea cual sea, no debe desembocar en los bajos del tejado.
- Instale la campana a una distancia de seguridad de al menos 70cm de la placa de cocción eléctrica, de gas o mixta.
125
150
fig. 1
fig. 2
22 //
INSTALACIÓN DEL APARATO
ES
99636272_A_ML.QXP 13/01/2006 15:30 Page 65
125
150
Page 46

Atención
Este aparato se suministra con un
cable de alimentación H 05 VVF a 3 conductores de 0,75 mm
2
(neutro, fase y tierra) que
se debe conectar a la red de 220 - 240 V monofásica mediante una toma de corriente
normalizada CEI 60083 que deberá estar
accesible una vez efectuada la instalación,
de acuerdo con las normas de instalación.
No asumiremos ninguna responsabilidad en
caso de producirse un accidente debido a
una toma de tierra inexistente o incorrecta.
El fusible de su instalación deberá ser de
10 ó 16 A. Si el cable de alimentación estuviera dañado, llame al servicio posventa
para evitar todo peligro.
Atención
Si necesita modificar la instalación
eléctrica de su habitación para poder
conectar el aparato, llame a un electricista
cualificado.
Atención
Si la campana tiene cualquier anomalía, desconecte el aparato o quite el fusible
correspondiente a la línea de conexión del
aparato.
••
CONEXIÓN ELÉCTRICA
Al efectuar la instalación y las operaciones de
mantenimiento, el aparato deberá estar desconectado de la red eléctrica y los fusibles
estarán cortados y quitados.
La conexión eléctrica se deberá realizar antes
de colocar el aparato en el mueble.
Com
pruebe que:
- la potencia de la instalación es suficiente,
- las líneas de alimentación están en buen
estado,
- el diámetro de los cables es conforme con
las normas de instalación.
66
22 //
INSTALACIÓN DEL APARATO
ES
99636272_A_ML.QXP 13/01/2006 15:30 Page 66
Page 47

22 //
INSTALACIÓN DEL APARATO
ES
67
Consejo
Antes de apretar completamente los
4 tornillos D y E, ajuste el nivel de la campana
MONTAJE DE LA CAMPANA
EXTRACTORA
Atención
La instalación debe ser conforme a las
normativas vigentes para la ventilación
de los locales. En Francia, dichas normativas
vienen indicadas en el DTU 61.1 del CSTB. En
particular, el aire evacuado no debe ser
enviado un conducto utilizado para evacuar
el humo de aparatos que utilicen gas u otro
combustible. Los conductos en desuso sólo
pueden ser utilizados con el acuerdo de un
especialista competente.
La distancia mínima entre la zona de cocción y
la parte más baja de la campana debe ser de
70 cm. Si las instrucciones de la placa instalada
bajo la campana indicaran una distancia mayor
que 70 cm, es ésta la que se deberá tener en
cuenta.
— Trace una marca horizontal a una distancia
mínima de 70 cm de la zona de cocción.
(A/fig.1).
— Trace una raya vertical (B/fig.1) en la pared,
centrada con respecto a la placa de cocción y
que baje desde el techo hasta la marca horizontal precedente (A).
— Corte la plantilla de perforación siguiendo las
marcas indicadas para obtener 2 partes, C1 y
C2 (fig.1).
— Coloque la plantilla C2 (fig.1) contra la pared,
superponiendo la marca que representa el eje
de la campana sobre la raya vertical B (fig.1)
antes trazada.
— Coloque la plantilla C1 (fig.1) contra la pared,
haciendo tope contra el techo.
— Taladre los 6 orificios. Introduzca las
6 clavijas.
— Atornille los dos tornillos de la parte superior
de la campana (D/fig.1) dejando soprepasar
5 mm.
CCoonn eell mmooddeelloo DDHHDD112200XXEE eess pprreecciissoo sseegguuiirr
llaass iinnssttrruucccciioonneess ssuupplleemmeennttaarriiaass ((ffiigguurraa 22))
ddee llaa ppáággiinnaa ssiigguuiieennttee..
— Enganche la campana extractora a los dos
tornillos (D/fig.2).
— Quite los filtros modulares (F/fig.3).
— Atornille los dos tornillos de la parte inferior
(E/fig.3).
••
=
=
> 70 cm
5mm
x 2
fig. 1
B
C2
E
D
C1
A
99636272_A_ML.QXP 13/01/2006 15:30 Page 67
Page 48

2 / INSTALACIÓN DE SU APARATOES
fig. 4
fig. 3
D
E
J
— Retire los filtros casetes (J/fig. 4).
— Atornille los 2 tornillos de la parte inferior
(E/fig. 4).
***********************************
PPaarraa eell mmooddeelloo DDHHDD112200XXEE úúnniiccaammeennttee
::
— Atornille los 2 tornillos suplementarios de la
parte inferior (K/fig. 4).
***********************************
fig. 2
F
H
H
***********************************
PPaarraa eell mmooddeelloo DDHHDD112200XXEE úúnniiccaammeennttee::
— Marque un trazo horizontal (F/fig. 2) que pase
por los 2 orificios taladrados anteriormente (G).
— Taladre 2 orificios suplementarios (H/fig. 2)
situados sobre el trazo (F) a una distancia de
35 cm de los orificios (G).
— Introduzca los 2 tacos suplementarios.
— Atornille los 2 tornillos de la parte superior de
la campana (D/fig. 1) dejando que sobrepasen
5 mm.
*****************************************
G
K
K
— Cuelgue la campana de aspiración de los
dos tornillos (D/fig. 3).
Consejo
Antes del apretar completamente los
4 tornillos D y E (o los 6 tornillos D, E y K,
según el modelo), ajuste el nivel de la campana.
99636272_A_ML.QXP 13/01/2006 15:30 Page 68
35 cm
35 cm
Page 49

MONTAJE DE LA CHIMENEA
••
Evacuación exterior
— Fije contra la pared, con los dos tornillos, el
soporte metálico de la chimenea, apoyándolo
contra el techo (fig.1).
— Coloque la válvula de retención en la salida
del motor (fig.2). La válvula de retención permite obstruir la entrada de aire procedente del
exterior.
— Si el diámetro del conducto tiene 125 mm,
utilice el adaptador que se suministra (fig.3).
Si su conducto tiene menos de 125 mm, es
obligatorio que conecte la campana en modo
reciclaje.
— Encaje el extremo del conducto en la salida
del motor (fig.4).
— Prepare su chimenea telescópica teniendo
cuidado de disimular las aberturas (fig.4).
Encaje las chimeneas una en otra lo máximo
posible.
— Fije la parte superior de la chimenea (B/fig.4)
al soporte metálico de la chimenea (A/fig.4)
con los dos tornillos (G /fig.4).
— Ajuste la longitud de la chimenea telescópica bajando la parte inferior y encajándola en la
parte alta de la campana.
••
A
B
C
D
E
SSooppoorrttee ddee CChhiimmeenneeaa
CChhiimmeenneeaa tteelleessccóóppiiccaa
CCoonndduuccttoo
AAddaappttaaddoorr
VVáállvvuullaa ddee rreetteenncciióónn
SSaalliiddaa mmoottoorr
TToorrnniilllloo ddee ssuujjeecciióónn ddee llaa cchhiimmeenneeaa
F
G
69
22 //
INSTALACIÓN DEL APARATO
ES
=
=
fig. 1
fig. 4
fig. 2 fig. 3
A
C
D
E
F
G
B
99636272_A_ML.QXP 13/01/2006 15:30 Page 69
Page 50

70
22 //
INSTALACIÓN DEL APARATO
ES
••
Reciclaje
— Quite la válvula de retención (fig.1).
— Fije contra la pared, con los dos tornillos
(fig. 2), el deflector de humo de plástico, apoyándolo contra el techo. Tenga cuidado de centrar
el deflector con respecto a la raya vertical trazada en la pared (fig.2).
— Encaje un extremo del conducto en el deflector y el otro extremo en la salida motor (fig 3).
— Prepare la chimenea teniendo cuidado de
colocar las aberturas hacia abajo para que estén
visibles (B/fig.3).
— Fije la parte superior de la chimenea (C/fig.3)
en el deflector de humo (A/fig.3) con los dos tornillos (F/fig.3).
— Ajuste la longitud de la chimenea telescópica
bajando la parte inferior y encajándola en la
parte alta de la campana.
Consejo
Para conseguir una utilización óptima
del aparato, le aconsejamos conectarlo a un
conducto de 150 mm de diámetro (no suministrado). Limitar al máximo el número de codos
y la longitud del conducto. Si la campana funciona en evacuación exterior, es conveniente
asegurarse de que llegue aire suficiente para
que no se cree depresión en la habitación.
A
B
C
D
E
DDeefflleeccttoorr ddee hhuummoo
AAbbeerrttuurraass
CChhiimmeenneeaa tteelleessccóóppiiccaa
CCoonndduuccttoo
SSooppoorrttee mmoottoorr
TToorrnniilllloo ddee ssuujjeecciióónn ddee llaa cchhiimmeenneeaa
F
fig. 3
fig. 1
fig. 2
A
B
D
E
F
C
99636272_A_ML.QXP 13/01/2006 15:30 Page 70
=
=
Page 51

Iluminación
Velocidades de 1 a 4
••
DESCRIPCIÓN DE LOS MANDOS
••
Modelo electrónico 4 velocidades
Consejo
Esta guía de instalación y utilización es válida para varios modelos. Podría haber
ligeras diferencias en detalles y equipamientos entre su aparato y las descripciones que
se presentan.
A
B
C
D
Parada retardada (10 min)
Piloto limpieza filtro
A
B
C
D
71
33 //
UTILIZACIÓN DEL APARATO
ES
99636272_A_ML.QXP 13/01/2006 15:30 Page 71
Page 52

72
33 //
UTILIZACIÓN DEL APARATO
ES
••
PUESTA EN MARCHA
Pulse el mando de la velocidad elegida
(de 1 a 4).
Ejem
plo: velocidad 2.
El mando 2 se ilumina.
Pulse dos veces en el mando luminoso.
La campana se para y el mando se apaga.
Pulse el mando luminoso.
La campana se para automáticamente después de 10 min. de funcionamiento.
El mando parpadea hasta que la campana se
para.
Cuando el piloto parpadea, está indicando que hay que limpiar los módulos (se pueden meter en el lavavajillas).
••
PARADA RETARDADA
••
PARADA INMEDIATA
••
SATURACIÓN MÓDULOS
Para desactivar la función de saturación del
filtro modular, pulse los mandos 1 y 2 al
mismo tiempo durante dos segundos.
El piloto se apaga.
99636272_A_ML.QXP 13/01/2006 15:30 Page 72
Page 53

••
MODO RECICLAJE
••
MODO EVACUACIÓN
Su campana está en reciclaje, configúrela en
modo reciclaje:
Pulse los mandos 1 y 4 al mismo tiempo
durante 3 segundos y se iluminarán.
El piloto puede estar encendido o intermitente.
Para configurar en modo reciclaje, pulse el
mando 1 hasta que el piloto se encienda
(no intermitente).
Valide la configuración pulsando el mando 4.
El piloto y los mandos 1 y 4 se apagan.
Su campana tiene una evacuación exterior,
configúrela en modo evacuación:
Pulse los mandos 1 y 4 al mismo tiempo
durante 3 segundos y se iluminarán.
El piloto está encendido o intermitente.
Para configurar en modo evacuación pulse
una sola vez el mando 1 hasta que el piloto
esté intermitente.
Valide la configuración pulsando el mando 4.
El piloto y los mandos 1 y 4 se apagan.
73
33 //
UTILIZACIÓN DEL APARATO
ES
99636272_A_ML.QXP 13/01/2006 15:30 Page 73
Page 54

74
33 //
UTILIZACIÓN DEL APARATO
ES
Cuando la campana está en modo reciclaje.
El piloto está encendido, indicando que
hay que cambiar el filtro de carbono (le aconsejamos que cambie los filtros cada
6 meses).
Para apagar el piloto efectúe una pulsación prolongada en los mandos 3 y 4 al
mismo tiempo.
El piloto se apaga.
Si se olvida de apagar la campana, ésta se
detendrá al cabo de 9 horas de funcionamiento.
Si se olvida de apagar la luz, ésta se apagará
sola al cabo de 9 horas de funcionamiento.
••
SATURACIÓN FILTRO DE CARBONO
••
PARADA AUTOMÁTICA DEL
VENTILADOR
••
PARADA AUTOMÁTICA DE LA
ILUMINACIÓN
99636272_A_ML.QXP 13/01/2006 15:31 Page 74
Page 55

Atención
Desconecte el aparato antes de proceder al mantenimiento y limpieza del aparato. Un
mantenimiento periódico es una garantía de buen funcionamiento, buen rendimiento y duración.
Atención
No respetar las instrucciones de limpieza del aparato y los filtros puede ocasionar
incendios. Respete estrictamente las instrucciones de mantenimiento.
fig. 2
LIMPIEZA DE LOS FILTROS
MODULARES
Se deben limpiar cada 30 horas de utilización
o aproximadamente una vez al mes como
mínimo. La limpieza se puede hacer en el lavavajillas, en posición vertical.
Utilice un cepillo, agua caliente y un detergente suave. Aclárelos y séquelos con cuidado antes de volverlos a colocar.
••
Desmontaje del filtro modular
(fig. 1)
— Gire el asa integrada del filtro modular.
— Incline el filtro modular hacia abajo.
••
CAMBIO DEL FILTRO DE CARBONO
Cámbielo cada 120 horas de utilización aproximadamente.
— Quite los filtros modulares (fig.2).
— Coloque los filtros de carbono en el módulo
en el lado interior de la campana.
— Encaje las 2 varillas de sujeción a ambos
lados del filtro modular.
— Repita esta operación con todos los filtros
modulares.
••
75
44 //
MANTENIMIENTO Y LIMPIEZA DEL APARATO
ES
99636272_A_ML.QXP 13/01/2006 15:31 Page 75
Page 56

76
44 //
MANTENIMIENTO Y LIMPIEZA DEL APARATO
ES
CAMBIO DE LA BOMBILLA
••
MMooddeelloo ccoonn bboommbbiillllaa hhaallóóggeennaa
——
Quite la tulipa (fig. 1).
——
Cambie la bombilla halógena G4-20W-12V.
——
Vuelva a colocar el conjunto realizando las
operaciones en sentido inverso.
Atención
Antes de realizar cualquier intervención, deberá dejar la campana sin tensión, bien
desenchufándola o bien accionando el disyuntor.
fig. 1
LIMPIEZA DE LA SUPERFICIE EXTERIOR
Para limpiar el exterior de la campana utilice agua con jabón, pero no use cremas para fregar,
ni estropajos.
••
99636272_A_ML.QXP 13/01/2006 15:31 Page 76
Page 57

MANTENIMIENTO DEL APARATO
••
Atención
Antes de realizar cualquier intervención, deberá dejar la campana sin tensión, bien
desenchufándola o bien accionando el disyuntor.
PPRROODDUUCCTTOOSS//AACCCCEESSOORRIIOOSS
AA EEMMPPLLEEAARR
MMAANNTTEENNIIMMIIEENNTTOO
Para mantener el aparato en buen estado, le recomendamos que utilice los productos de mantenimiento Clearit.
LLooss ccoonnoocciimmiieennttooss yy llaa eexxppeerriieenncciiaa ddee llooss pprrooffeessiioonnaalleess
aall sseerrvviicciioo ddee llooss ppaarrttiiccuullaarreess
Clearit le propone productos profesionales y soluciones adecuadas para el mantenimiento cotidiano de sus aparatos electrodomésticos y su cocina.
Los podrá encontrar a la venta en su distribuidor habitual, junto con toda una línea de productos accesorios y consumibles.
QQUUÉÉ DDEEBBEE HHAACCEERR
Carcasa
y accesorios
Filtro modular
Filtro carbono activo
NNoo uuttiilliiccee nnuunnccaa eessttrrooppaajjooss mmeettáállii--
ccooss,, pprroodduuccttooss aabbrraassiivvooss oo cceeppii--
llllooss ddeemmaassiiaaddoo dduurrooss..
Este filtro retiene los vapores grasos y el polvo. Es el elemento que
garantiza una parte impor-tante de
la eficacia de la campana.
Si hubiera manchas persistentes,
utilice una crema no abrasiva y
aclare con agua limpia.
Este filtro retiene los olores y se
debe cambiar al menos una vez al
año, en función de su uso.
Pida estos filtros a su vendedor
(con la referencia indicada en la
placa de características que se
encuentra en el interior de la campana) y anote la fecha del cambio.
Para limpiar el chasis y ojo de buey
de iluminación, utilice exclusivamente productos de limpieza del
comercio diluidos en agua, aclare
después con agua y seque con un
trapo suave.
Límpielo con un producto de limpieza del comercio, aclárela abundantemente y séquela. La limpieza
se puede hacer en el lavavajillas, en
posición vertical
((NNoo ppoonneerr eenn ccoonnttaaccttoo ccoonn llaa vvaajjiillllaa
ssuucciiaa oo ccoonn ccuubbiieerrttooss ddee ppllaattaa))
77
44 //
MANTENIMIENTO Y LIMPIEZA DEL APARATO
ES
99636272_A_ML.QXP 13/01/2006 15:31 Page 77
Page 58

78
55 //
ANOMALÍAS DE FUNCIONAMIENTO
ES
El rendimiento de la campana es insuficiente...
Compruebe que:
• La velocidad del motor que ha seleccionado
es suficiente para la cantidad de humo y el
vapor de agua producido.
• La cocina está suficientemente ventilada para
que pueda entrar aire.
• El filtro de carbono no está gastado (campana en versión reciclaje).
La campana no funciona...
Compruebe que:
• No hay un corte de corriente.
• Se ha seleccionado una velocidad.
La campana se ha parado mientras estaba funcionando.
Compruebe que:
• No hay un corte de corriente.
• No se ha activado el dispositivo de corte
omnipolar.
SSOOLLUUCCIIOONNEESSSSÍÍNNTTOOMMAASS
66 //
SERVICIO TÉCNICO
ES
Las intervenciones que requiera la máquina deberán ser efectuadas:
- por el revendedor,
- o por cualquier profesional cualificado depositario de la marca.
Al llamar, mencione la referencia completa de la máquina (modelo, tipo y número de serie).
Estos datos figuran en la placa de identificación situada en la máquina.
99636272_A_ML.QXP 13/01/2006 15:31 Page 78
 Loading...