

Page 1
Cod. LI3DRA Rev.00 del 15-01-08 (Typ CCS-SL) (Type INC001 MAE)
Il produttore si riserva il diritto d`apportare qualsiasi modifica senza preavviso.
The manufacturer reserves the right to change the features of the product without prior notice.
Der Hersteller behält sich das Recht vor, Änderungen ohne Ankündigung vorzunehmen.
Le producteur se réserve le droit d“apporter toutes modifications sans préavis.
El fabricante se reserva el derecho de modificar el producto sin aviso previo.
O fabricante reserva-se o direito de efectuar qualquer alteração sem aviso prévio.
De fabrikant behoudt zich het recht voor om zonder voorafgaande kennisgeving wijzigingen aan te brengen.
Page 2
Manuale uso e manutenzione
Prima di utilizzare la macchina consultare le presenti istruzioni. Leggere attentamente le norme di sicurezza
Operation and maintenance manual
Before using the machine, please read the attached operating instructions. Carefully read the safety rules
Bedienungsanleitung
Bitte lesen Sie diese Bedienungsanleitung und die Sicherheitsvorschriften vor Verwendung
des Milk Island aufmerksam durch.
Mode d'emploi
Veuillez lire attentivement le mode d'emploi (notamment les consignes de sécurité) avant d'utiliser l'appareil.
Manual de uso y mantenimiento
Consultar las siguientes instrucciones antes de utilizar la máquina. Leer con atención las normas de seguridad.
Manual de uso e manutenção
Antes de utilizar a máquina consulte estas instruções. Leia atentamente as normas de segurança.
Handleiding voor gebruik en onderhoud
Raadpleeg deze aanwijzingen alvorens de machine in gebruik te nemen. Lees aandachtig de veiligheidsvoorschriften.
ItalianoEnglishDeutschFrançaisEspañolPortuguêsNederlands
Page 3

IMPORTANT PRECAUTIONS
When using electrical household appliances, basic safety
precautions should always be followed to reduce the risk of
fire, electric shocks, and/or injury to persons.
1 Read carefully all the instructions and information
enclosed in this manual and in the booklet contained in
the packaging before operating and using the espresso
machine.
2 Do not touch hot surfaces.
3 To protect against fire, electric shock and personal injury
do not immerse power cord, plugs or machine housing
in water or other liquid.
4 Close supervision is necessary when the espresso machine
is used near children.
5 Unplug the machine from the socket when not in use and
before cleaning. Cool down the machine before inserting
or taking off parts, and before cleaning.
6 Do not operate the machine if the power cord or plug
are damaged or in case of failures or damages. Return
the appliance to the nearest service centre for checks or
repairs.
7 The use of accessories not recommended by the
manufacturer may cause damage to people or things.
8 Do not use the espresso machine outdoors
9 Do not let the power cord hang from the table or touch
hot surfaces.
10 Do not place the espresso machine near heat sources.
11 Make sure the espresso machine is “Off”, then insert the
plug into the socket. Turn the switch to “Off” to disconnect
the machine, then remove the plug from the socket.
12 Use the machine for domestic use only.
13 Use extreme caution when using steam.
KEEP THESE INSTRUCTIONS
CAUTION
The espresso machine is for domestic use only. Any servicing
other than cleaning and normal maintenance should be
performed by an authorized service centre. Do not immerse
the machine in water. Any repair should be done only by
authorised service centres.
1 Check if the voltage indicated on the label corresponds
with your voltage.
2 Never fill the water tank with lukewarm or hot water.
Use only cold water.
3 Do not touch hot parts of the machine and the power
cord during operation.
4 Never clean the machine with abrasive detergents or
sharp implements. Simply use a soft cloth dampened
with water.
5 To avoid limescale forming, use natural mineral water.
INSTRUCTIONS FOR THE
POWER CORD
A A short power cord is provided to reduce risks of getting
tangled up or tripping over.
B Type-approved extensions, may be used with care.
C If an extension is used make sure:
1 the voltage of the extension is at least the same as
the voltage of the electric household appliance;
2 it is equipped with a three-pin grounding type
plug (if the power cord of the electric household
appliance is of this type).
3 the power cord does not hang from the table to
avoid the risk of getting caught up in it.
22
Page 4

English
GENERAL INFORMATION
The coffee machine is designed for preparing espresso
coffee using coffee beans and is equipped with a
device to brew steam and hot water.
The elegant machine housing has been designed for
domestic use only and is not suitable for professional,
continuous use.
Warning. No liability is held for damage caused
by:
• Incorrect use not in accordance with the
intended purposes;
• Repairs not carried out by authorized service
centres;
• Tampering with the power cord;
• Tampering with any parts of the machine;
• The use of non-original spare parts and
accessories;
• Failure to descale the machine and storage at
temperatures below 0°C.
In these cases, the warranty will be invalidated.
TO SIMPLIFY MANUAL READING
The warning triangle indicates the instructions that are important for user’s safety.
Please carefully follow these instructions
to avoid serious injury!
HOW TO USE THESE OPERATING INSTRUCTIONS
Keep these operating instructions in a safe place and
make them available to anyone who may use the
coffee machine. For further information or in case of
problems that are not included or not completely explained in these instructions, please contact the authorized
service centres.
TECHNICAL SPECIFICATIONS
• Nominal voltage
See label on the appliance
• Power rating
See label on the appliance
• Power supply
See label on the appliance
• Housing
Metal type
• Size (w x h x d) (mm)
595 x 455 x 350
• Weight (kg)
27.70
• Power cord length (mm)
1.2
• Control panel
Front
• Water tank (l)
1.8 - Removable type
• Pump pressure (bar)
15
• Boiler
Stainless steel type
• Capacity of coffee bean hopper (g)
300 g of coffee beans
• Grinders
Ceramic type
• Ground coffee quantity
8 g
• Coffee grounds drawer capacity
13
• Safety devices
Boiler pressure safety valve
Safety thermostat.
Subject to engineering and manufacturing changes due
to technological improvements.
The machine conforms to the European Directive
89/336/EEC (Italian Legislative Decree 476 dated
04/12/92) concerning electromagnetic compatibility.
23
Page 5

SAFETY REGULATIONS
INTENDED USE OF THE MACHINE
• The coffee machine is intended for domestic use
only.
• Do not make any technical changes or use the
machine for unlawful purposes since this would
create serious hazards!
• The appliance is not for use by persons (included
children) with reduced physical, mental or
sensory abilities or with scarce experience and/
or competences, unless they are supervised by
a person responsible for their safety or they are
instructed by him/her to use the machine.
NEVER USE THE APPLIANCE
For purposes other than those indicated above to
avoid hazards.
• Never place any substances in the containers other
than those specifi ed in the instruction manual.
• When fi lling a container, make sure all nearby
containers are closed.
• Fill the water tank with fresh drinking water only:
hot water and/or other liquids may damage the
machine.
• Do not use carbonated water.
• Do not introduce your fi ngers or any material other
than coffee beans into the coffee grinder.
• Water left in the tank for several days should not
be consumed. Wash the tank and fi ll it with fresh
drinking water.
POWER SUPPLY
• Only connect the coffee machine to a suitable
socket.
• The voltage must correspond to the indication on
machine’s label.
POWER CORD
• Never use the coffee machine if the power cord is
defective.
• Do not pass the power cord around corners, over
sharp edges or over hot objects and keep it away
from oil.
• Do not pull out the plug by the power cord nor touch
it with wet hands or feet.
PROTECTING OTHER PEOPLE
• Prevent children from playing with the appliance.
Children are not aware of the risks linked with
electric household appliances.
• Do not leave the coffee machine packaging within
the reach of children.
DANGER OF BURNS
• Never direct the jet of hot steam and/or hot water
towards yourself or others. Danger of scalding.
Always use the handles or knobs provided.
• Do not introduce objects through the openings of
the appliance.
SUITABLE LOCATION FOR INSTALLATION, USE AND
MAINTENANCE
• Do not obstruct the openings used for ventilation or
heat dissipation.
• Choose a location that is suffi ciently well-lit, clean
and near an easily reachable socket;
• Do not place the machine on hot surfaces and close
to open fl ames to prevent its housing from melting
or being damaged.
• Maintain a distance of 10 cm from walls and
burners.
• Do not keep the machine at temperatures below
0°C. Frost may damage the machine.
• The electric socket must be accessible at all times.
• Do not use the coffee machine outdoors.
CLEANING
• Before cleaning the machine, the power button
must be switched to the “O” position and the plug
must be removed from the socket.
• Wait for the machine to cool down.
• Never immerse the machine in water! Avoid
exposing the appliance to splashes of water.
• It is strictly forbidden to tamper with the internal
parts of the machine.
24
Page 6

English
STORING THE MACHINE
• In case of inactivity of the machine for a quite long
period, turn it off and unplug it from the socket.
Store it in a dry place and out of the reach of
children.
• Keep it protected from dust and dirt.
• Never place heavy objects on the front panel when
open.
SERVICING / MAINTENANCE
• In case of failure, problems or a suspected fault,
immediately remove the plug from the socket.
Never attempt to operate a faulty machine.
• Servicing and repairs may only be carried out by
authorized service centres.
• All liability for damage resulting from repairs
not carried out by authorised service centres is
declined.
FIRE SAFETY PRECAUTIONS
• In case of fi re, use carbon dioxide (CO2)
extinguishers. Do not use water or dry powder
extinguishers.
MACHINE DISPOSAL
In compliance with art. 13 of the Italian Legislative
Decree dated 25 July 2005, no. 151 “Implementation of
the Directives 2002/95/EC, 2002/96/EC and 2003/108/
EC on the restriction of the use of certain hazardous
substances in electrical and electronic equipment, as
well as waste disposal”. The symbol of the crossed-out
wheeled bin on the appliance or its packaging indicates
that the product must be disposed of separately from
other waste at the end of its operational life. The user
must therefore take the appliance to be disposed of to
an appropriate waste collection centre for electronic
and electro-technical equipment or take it to the dealer
when buying a new appliance of the equivalent kind
(one by one). Appropriate differentiated collection for
the dismantled appliance being subsequently sent
out for recycling, treatment and for environmentally
friendly disposal, contributes to the prevention of
possible negative effects on the environment and on
human health, and encourages re-employment and/
or recycling of the materials the appliance is made
of. Specifi c administrative sanctions provided for by
current regulations will be applied for illicit disposal of
the product by the user.
ADDITIONAL INFORMATION FOR THE CORRECT USE OF
THE WATER FILTER
(WHEN PROVIDED)
To correctly use the water fi lter (when provided), please
consider the following instructions:
1. Store the water fi lter in a cool area in which the
room temperature is between +5°C - +40°C. Do not
store it in direct sunlight;
2. Do not use the water fi lter in areas in which the
temperature exceeds +60°C;
3. We recommend washing the water fi lter if the coffee
machine has not been used for 3 days;
4. The water fi lter must be replaced if the coffee
machine has not been used for 20 days;
5. In the event you wish to store an already-opened
water fi lter, close it in an airtight nylon bag and
place it in the refrigerator. Do not store the water
fi lter in the freezer as this shall alter its properties;
6. Let the water fi lter soak in the water tank for 30
minutes;
7. Do not store an open fi lter once it has been
removed from its packaging;
8. The water fi lter must be replaced 90 days after the
packaging was opened and after having treated 60
litres of drinking water.
25
Page 7

THE APPLIANCE / ACCESSORY KIT
CONTROL PANEL
DOUBLE COFFEE
LONG COFFEE
REGULAR COFFEE
ESPRESSO
HOT WATER
STEAM
SELECT/CONFIRM
PAGE UP
PROGRAMMING/EXIT
DESCALING
Display
PAGE DOWN
Control panel
SBS
Steam wand
Dispensing spout
Float
Drip tray
Coffee grounds drawer
26
Page 8
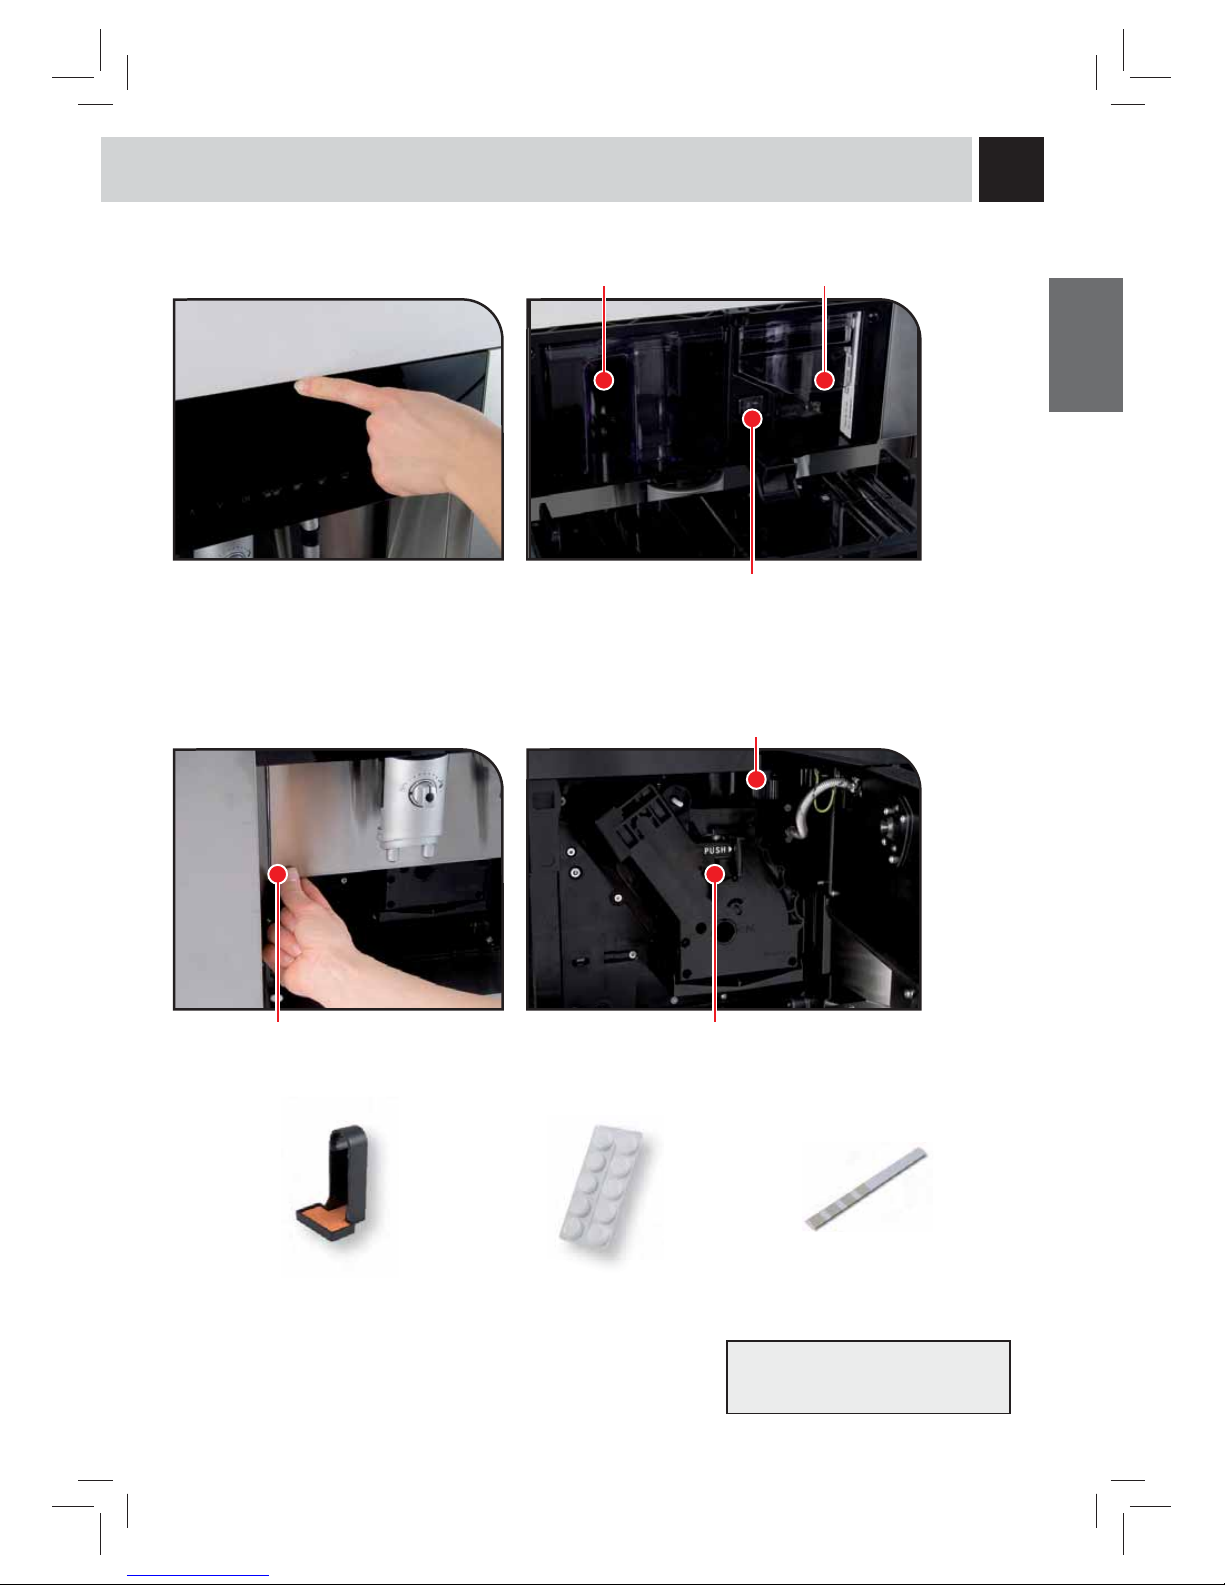
English
Water tank
Coffee bean hopper
ON/OFF button
Open button Front door Brew group
Grinder adjustment knob
Anti-drip device Brew group
detergent tablets
Water hardness
detecting strip
27
The test can be used for one
measurement only.
Page 9

ACCESSORIES ON DEMAND
This fi lter will prolong the life of your
machine, reduce limescale and improve the taste of your coffee.
This soft microfi bre cloth is designed
to keep your machine always shining,
perfect with the Active Cleaner.
This spray is designed for a quick and
complete external cleaning of your coffee machine. Suitable both for plastic
and chromium-plated parts.
This accessory is designed for brewing
a thick, smooth and creamy cappuccino. Your cappuccino bar right at home.
The set is designed for a thorough
cleaning of the brew group and includes: cleaning brush, spare O-ring and
lubricating grease.
Will remove any limescale build-up
from your machine and prolong its life.
AQUA PRIMA
MICROFIBRE CLOTH
BREW GROUP MAINTENANCE KIT
DESCALING SOLUTION
ACTIVE CLEANER
CAPPUCCINATORE KIT
In this page you will fi nd a complete accessory line. High quality accessories designed to achieve maxi-
mum satisfaction from your coffee machine.
28
Page 10

31 2 4
75 6 8
119 10 12
English
INSTALLATION / PRIMING THE WATER CIRCUIT
The messages displayed by the machine during operation are shown on page 40.
Press the panel to open Remove the water tank
from its seat.
We recommend installing
the “Aqua Prima” water
fi lter (see page (see page
31).
Fill the water tank with fresh
drinking water. Do not fi ll the
tank with an excessive quantity
of water. When this operation
is completed, replace the water
tank in its seat.
Note: Before starting the machine after long periods
of inactivity or if the water tank has been completely
emptied, it is advisable to prime the machine water
circuit. Moreover, the water circuit must be primed
every time the message appears on the display.
Remove the coffee bean
hopper.
Fill the hopper with coffee
beans ONLY. When this
operation is completed,
replace the water tank in
its seat.
Insert a container below
the steam wand.
Wait until water fl ows
steadily out from the
nozzle.
14
Select product
Ready for use
A message is displayed
indicating that the machine is
ready for use.
13
Remove the container.
Press
to stop the water
circuit priming.
Press to start the water
circuit priming.
Turn on the machine by
switching the power button
to “I”.
The machine will carries
out a control and then it will
warm up.
Selftest...
Hot water
Dispensing...
Hot water
Dispensing...
Ventilate
29
TO ASSESS WATER HARDNESS, SEE “WATER
HARDNESS MENU” ON PAGE 38.
Page 11

31 2
31
1
2
2
COFFEE GRINDER ADJUSTMENT
Turn the knob to adjust the
grind.
Turn the knob towards
lower values for a Finer
grinding.
The grinder adjustment knob, next to the brew group, must be turned carefully. Do not put ground and/or
freeze-dried coffee into the coffee bean hopper.
Use coffee bean blends for espresso machine. If you do not obtain the desired result, try using different coffee blends.
Keep coffee in a fresh place in a sealed, airtight container.
Y
ou will note a change after brewing 1 -2 coffees.
If you set the grinder on a too fi ne grind, the coffee brewing may result poor or absent.
COFFEE IN CUPS
The set coffee quantity can be selected through the brew buttons , and .
This quantity may be programmed according to personal taste and to the cup dimension.
Place an espresso cup. Place a long coffee cup. Hold the espresso button
pressed. When the desired
quantity of coffee is in the cup, release the button. The
machine is programmed.
ADJUSTABLE DISPENSING SPOUT
Adjust the dispensing spout according to the cup size.
Turn the knob towards
higher values for a Coarser
grinding.
To adjust the grind,
turn the knob one
setting at a time.
Lower the dispensing spout,
when using espresso cups.
Lift the dispensing spout,
when using larger cups.
The programming must be
performed separately for each
button.
The following example shows
how to program an espresso
cof
fee.
SBS
ADJUSTMENTS
1 Espresso
Programm. coffee
30
The machine is equipped with a device that regulates
the intensity of the brewed
coffee: The SBS.
The coffee intensity may be
adjusted or changed even
while brewing.
Turn the knob for the
adjustment.
Turn the knob:
• To the left for a café crème;
• To the central position for an espresso;
• To the right for a strong coffee.
Page 12

31 2
31 2
31 2
English
HOT WATER QUANTITY
Every time the button is pressed the machine dispenses the programmed water quantity.
This quantity may be reprogrammed according to personal taste and to the container dimension.
Place a jug. Place a cup for hot
water.
Keep the
button pressed for hot water dispensing.
When the desired quantity of coffee is in the cup or jug,
release the button. The machine is programmed.
STEAM DISPENSING TIME
Every time the button is pressed the machine dispenses the programmed quantity of steam used for frothing milk or
heating beverages.
This quantity may be reprogrammed according to personal taste and to the container dimension.
Place a jug with a beverage. Place a cup of milk.
Keep the
button pressed for steam dispensing.
When the desired quantity is in the cup or jug, release the
button. The machine is programmed.
“AQUA PRIMA” WATER FILTER - OPTIONAL
The “Aqua Prima” water fi lter allows purifying the water used for coffee brewing.
Thanks to its properties, it eliminates the unpleasant fl avour of chlorine and reduces the water hardness.
The “Aqua Prima” water fi lter can be purchased separately, and can be installed at any moment.
Insert the fi lter in the empty
tank. The reference mark
and the groove must match.
Push fi rmly until it is com-
pletely inserted.
Fill the water tank. Empty the water tank into a container (see Hot water); this
water must not be used. Fill the water tank again. Program
the machine for the operation and reset the counter from
the menu.
The “Aqua Prima”
water fi lter must be
removed before descaling
the machine.
When the “Waterfi lter” function is active an icon is displayed to remind the user that it has been activated.
Waterfilter
On
Steam
Programm. steam
Hot Water
Programm. water
31
Page 13

31 2 4
31 2 4
31 2 4
COFFEE BREWING - HOT WATER DISPENSING
,
or
COFFEE BEANS - 1 COFFEE
,
or
COFFEE BEANS - 2 COFFEES
Warning: Hot water and steam may cause burns! Direct the steam wand towards the drip tray.
HOT WATER
Make sure that the machine
is ready.
Position a hot coffee cup
under the dispensing spout.
Press the , or
button to brew 1 coffee.
The machine stops the
brewing automatically. To
stop the brewing before
press the
, or
button.
When the machine stops
brewing, remove the cup.
Make sure that the machine
is ready.
Position hot coffee cups
under the dispensing spout.
Press the
button to
select 2 coffees.
When the machine stops
brewing, remove the cups.
Press the , or button
to brew 2 coffees.
To stop the brewing before
press the
, or
button. If the 1st coffee is
interrupted, the 2nd will not
be brewed.
Press
button to start the
water dispensing.
Wait.
The machine will
automatically stop the
dispensing; by pressing the
button the dispensing is
stopped manually.
Remove the container.Place a container under
the steam wand.
2 espressos
Prebrewing...
Select product
Double cycle
Hot water
Dispensing...
Select product
Ready for use
1 Espresso
Prebrewing...
1 Espresso
Prebrewing...
32
Page 14

31 2
5
1
4
7 8
9
6
10 11 12
English
CAPPUCCINO / STEAM
Warning: Hot water and steam may cause burns! Direct the steam wand towards the drip tray.
Fill 1/3 of the cup with
cold milk.
Place a container under
the steam wand.
Press the
button to
drain the remaining water.
When steam is ejected
only, press the button to
stop the dispensing.
Press the
button to
dispense steam.
Swirl the cup to warm the
milk evenly.
Position the cup of milk
under the steam wand.
The machine will
automatically stop the
dispensing; to stop it
manually, press the
button.
After frothing the milk
remove the cup.
Swirl the jug to warm the
beverage evenly.
Steam
Dispensing...
Select product
Ready for use
Steam
Dispensing...
Make sure that the
machine is ready.
Position a coffee cup under
the dispensing spout.
Press the , or
button to brew 1 coffee.
When the machine stops
brewing, remove the
cappuccino cup.
Follow the instructions from point 2 to 4 to prepare the machine.
Press
button to start and stop steam dispensing.
Use a jug to warm up a beverage.
STEAM
1 Espresso
Prebrewing...
33
Select product
Ready for use
Page 15

31 2 4
5 6
BA C
7 8
9 10 11
DESCALING
is necessary every 2 months; a more frequent descaling
is recommended when the water hardness degree is very
high. The machine must be on; it automatically controls
the distribution of the descaling solution.
Warning! Never use vinegar as a descaling
solution.
For the descaling cycle use a non-
toxic and/or non-harmful descaling solution for cof
fee
machines, commonly available on the market. Descaling
Press the
button when
indicated by the machine.
Remove the “Aqua Prima”
water fi lter if installed.
Fill the water tank with the
descaling solution.
Place a larger container
under the steam wand.
Press “
”, then “ ”. The descaling cycle starts.
Fill the water tank with fresh
drinking water.
Install the “Aqua Prima” water
fi lter and prime the circuit if
necessary.
Press the
button to
restart the descaling cycle.
Or…
Press the button and
then the
button to
interrupt the descaling
cycle.
The descaling cycle may
be temporarily interrupted
if desired.
Press the
button.
If the descaling cycle is interrupted it must
restarted from the beginning.
After the descaling cycle is completed prime the
machine circuit.
Ready for use
Decalcify
Descaling
Yes
Machine is descaling
When the descaling cycle
is completed, the display
shows:
Rinse machine
Fill watertank
Press the button to start
the rinse cycle.
Rinse machine
Press water key
The machine will start the
rinse cycle.
Machine is rinsing
Press the button to
stop the cycle.
Rinsing finished
Press water key
Machine is descaling
interrupted
Descal. interrupted
Empty watertank
34
Rinse the water tank and refi ll
it with fresh drinking water.
Rinse the water tank and refi ll
it with fresh drinking water;
follow the instructions from
point 9.
Page 16

31 2
4 5 6
21 3
64 5 7
English
CLEANING AND MAINTENANCE
Do not dry the machine and/or its components
using a microwave and/or conventional oven.
Do not immerse the machine in water or place
any of its parts in a dishwasher.
The machine, its
components and the
brew group must be
cleaned at least once a
week.
Do not use spirit, solvents
and/or aggressive chemical
agents.
GENERAL
CLEANING
BREW GROUP
Weekly
Turn off the machine by
switching the power button
to “0”.
Wash the water tank.
Wash the water fi lter
inside the tank.
Remove the drip tray,
empty and wash it.
Remove, empty and wash
the coffee grounds drawer.
Remove and clean the
pannarello.
Remove the dispensing
spout and wash it with
water.
Fit the anti-drip device. Open the front door. Press the PUSH button
to remove the dispensing
spout.
Wash the brew group
under running water.
Carefully wash the upper
fi lter.
Place all the machine
components back in
position. Close the door
Dry the brew group and fi t it
back in the machine.
Do not press the “PUSH”
button.
35
Page 17

21 3
6
10
13
7
11
4
8
12
5
9
14
CLEANING AND MAINTENANCE
BREW GROUP
To clean the machine
internal circuits used for
coffee brewing.
Fit the anti-drip device. Open the front door. Press the PUSH button to
remove the brew group.
Fit a tablet into the brew
group.
Press the “OK” button.
Once the cycle is
completed, remove the
container.
Fill the water tank, if
necessary.
Turn on the machine.Fit it back in the machine.
Do not press the “PUSH”
button.
Press “
”, then “ ”.
Fill the water tank.
Press the “MENU” button.
Select “Rinsing cycle” using
the “
” or “ ” button.
Place a large container
beneath the dispensing
spout.
Wait for the cycle to end.
Empty the container, if
necessary.
To wash the brew group simply use water as
shown on the previous page. This wash
completes the maintenance process of the brew
group. A person shall be present during the cleaning
cycle.
We recommend carrying out this cycle on a
monthly base or every 500 coffees using the
tablets provided, which can be purchased separately
at your local dealer.
Do not brew coffee
when the tablet is
inside the brew group.
36
Rinsing cycle *
Factory settings
Rinsing cycle *
Factory settings
Rinsing cycle
Yes
Rinsing cycle
Dispensing
Page 18

1
1
1
English
PROGRAMMING
The user can change some of the machine operating parameters to suit his/her personal needs.
The MENU button is used for:
- Accessing the programming menu.
- Exiting the menu functions without modifying the highlighted parameter.
The selection buttons “
” and “ ” are used for:
- Displaying the pages inside a menu;
- Changing the selected parameter.
The OK button is used for
- Accessing a menu;
- Confi rming the value change.
The menus used for the machine function programming are listed below.
37
Page 19

21
123 4
PROGRAMMING
Select product
Ready for use
Energy saving *
Rinsing
Rinsing *
Language
Language *
Contrast
Contrast *
Water hardness
Water hardness *
Waterfilter
Waterfilter *
Temperature
Temperature *
Aroma espresso
Aroma espresso *
Aroma coffee
Press the MENU button in the main page to enter the programming pages.
Press the OK button to switch to the ENERGY SAVING mode so as to
reduce the energy costs. Press OK to reactivate the machine.
After the warming phase, the appliance will automatically eliminate the
remaining water in the internal circuits so as to ensure that the coffee is
brewed with fresh water only.
This setting allows choosing the message display language.
This function allows adjusting the display contrast for an easy reading.
The hardness of the water used for beverage dispensing may vary
according to the area. For this reason, set the machine according to the
correct hardness level of the used water.
This function allows a better water fi lter management (when provided) as it
informs the user when the fi lter must be replaced.
The “RESET” command must be performed every time a new cartridge
fi lter is installed.
This function allows obtaining a more or less hot coffee, adjusting the water
temperature (high, medium and low).
This function allows adjusting the coffee quantity to be ground for the
espresso brewing (strong, normal or mild).
38
Immerse the water
hardness tester included
with the machine in water
for one second.
Check the value. Set the water hardness
obtained from the test and save it.
Page 20

English
Aroma coffee *
Aroma large coffee
Aroma large coffee *
Prebrewing
Prebrewing *
Total coffees
This function allows adjusting the coffee quantity to be ground for the
coffee brewing (strong, normal or mild).
This function allows adjusting the coffee quantity to be ground for the long
coffee brewing (strong, normal or mild).
The prebrewing process brings out the full aroma of the coffee which
acquires an excellent taste. This function allows dampening the coffee
before the brewing process.
Total coffees *
Timer
Timer *
Clock
Clock *
Rinsing cycle
Rinsing cycle *
Factory settings
Factory settings *
Exit
Exit *
Energy saving
Automatic On/Off *
Clock time
Clock time *
On/Off time
On/Off time *
Show clock time
Show clock time *
Automatic On/Off
This function enables displaying the number of coffees the appliance has
already brewed.
The function allows activating the energy saving mode when the machine
is not used for a long period.
This factory-set function automatically switches the machine to the
ENERGY SAVING mode after the set time.
This function, activated and deactivated by the user, allows:
- Displaying the current time when the machine is in the “ENERGY
SAVING” or “SELECT PRODUCT” mode.
- Selecting the machine turn on/off time.
Activates the turn on/off time.
Sets the current time.
Sets the turn on /off time.
Sets the time on the display, if desired.
The wash cycle function is used to wash all the coffee brewing parts with
water.
With this function you can restore the machine operating parameters
originally set by the manufacturer.
! Warning. If you restore all the factory settings, all customized
machine settings will be lost.
Exit programming mode.
39
Page 21

CONTROL PANEL WARNINGS
Display Warnings
Through the display panel, the machine guides the user to a correct use.
The alarm messages and /or information that indicate what the user must do for a proper use of the machine are listed
below.
Press the “OK” button.
Descale the machine.
Fill the water tank with fresh drinking water.
! The machine will require fi lling the water tank when the water level is still high.
This happens because the coffee machine tank has been designed to house the
optional ”water fi lter”, which requires a minimum quantity of water for fi ltering.
Refi ll the coffee bean hopper, with coffee beans and restart the coffee brewing cycle.
Open the door, remove the coffee grounds drawer and empty the coffee grounds into
a suitable container.
! Important note. The coffee grounds drawer must be emptied only when the
machine is on. The coffee grounds drawer must be removed for at least 5
seconds. If you empty the coffee grounds drawer when the machine is turned
off, coffee will not be brewed when the machine is turned back on.
Fit the Brew Group properly.
Fit the drip tray and coffee grounds drawer properly.
Close the front door.
Close the upper panel.
Place a cup or a container under the steam spout and press the
button. Wait until
water fl ows out regularly from the steam wand. To stop water dispensing press the
button.
Contact an authorised service centre.
Standby
Ready for use
Decalcify
Fill watertank
Coffee beans empty
Ready for use
Dregdrawer full
Brewunit missing
Dregdrawer missing
Close door
Close control panel
Ventilate
Grinder blocked
Brewunit blocked
40
Page 22

English
PROBLEMS - CAUSES - SOLUTIONS
PROBLEMS CAUSES SOLUTIONS
The machine does not turn on. The machine is not connected to the
power supply.
Check the connection to the power
supply.
The coffee is not hot enough. The cups are cold. Warm up the cups with a little hot
water.
No hot water or steam is dispensed. The steam wand is clogged. Remove the steam wand by pulling it
downwards and wash it.
Coffee is brewed too slowly. The coffee is too fi ne. Change the coffee blend.
Turn the grinder adjustment knob on
a higher value.
The brew group is dirty. Wash the brew group.
The SBS System knob is turned all
to the right.
Turn the knob leftwards and when
the machine is brewing turn it to
rightwards.
Coffee is brewed quickly. The coffee is too coarse. Change the coffee blend.
Turn the grinder adjustment knob on
a lower value.
The SBS System knob is turned all
to the left.
When the machine is brewing, turn
the knob all to the right.
The machine takes a long time to
warm up or the amount of water
dispensed from the spout is too little.
The machine circuit is scaled. Descale the machine.
The brew group does not come out. The brew group is out of place. Turn on the machine. Close the front
door; the brew group will move back
into position and may be removed.
Drip tray inserted. Remove the drip tray.
Coffee leaks out of the dispensing
spout
The dispensing spout is not
positioned correctly.
Place the dispensing spout back in
position.
The dispensing spout is clogged. Remove the dispensing spout and
wash it.
The coffee is not creamy enough. The coffee blend is not suitable or the
coffee is not freshly roasted.
Change the coffee blend.
The coffee is too coarse. Adjust the grind.
The SBS System knob is rotated
towards the left.
Turn the SBS System knob
rightwards.
Water fl ows out from the drip tray. The drip tray is full. Check the fl oat position and empty
the drip tray.
41
Page 23

Page 24

 Loading...