

Page 1
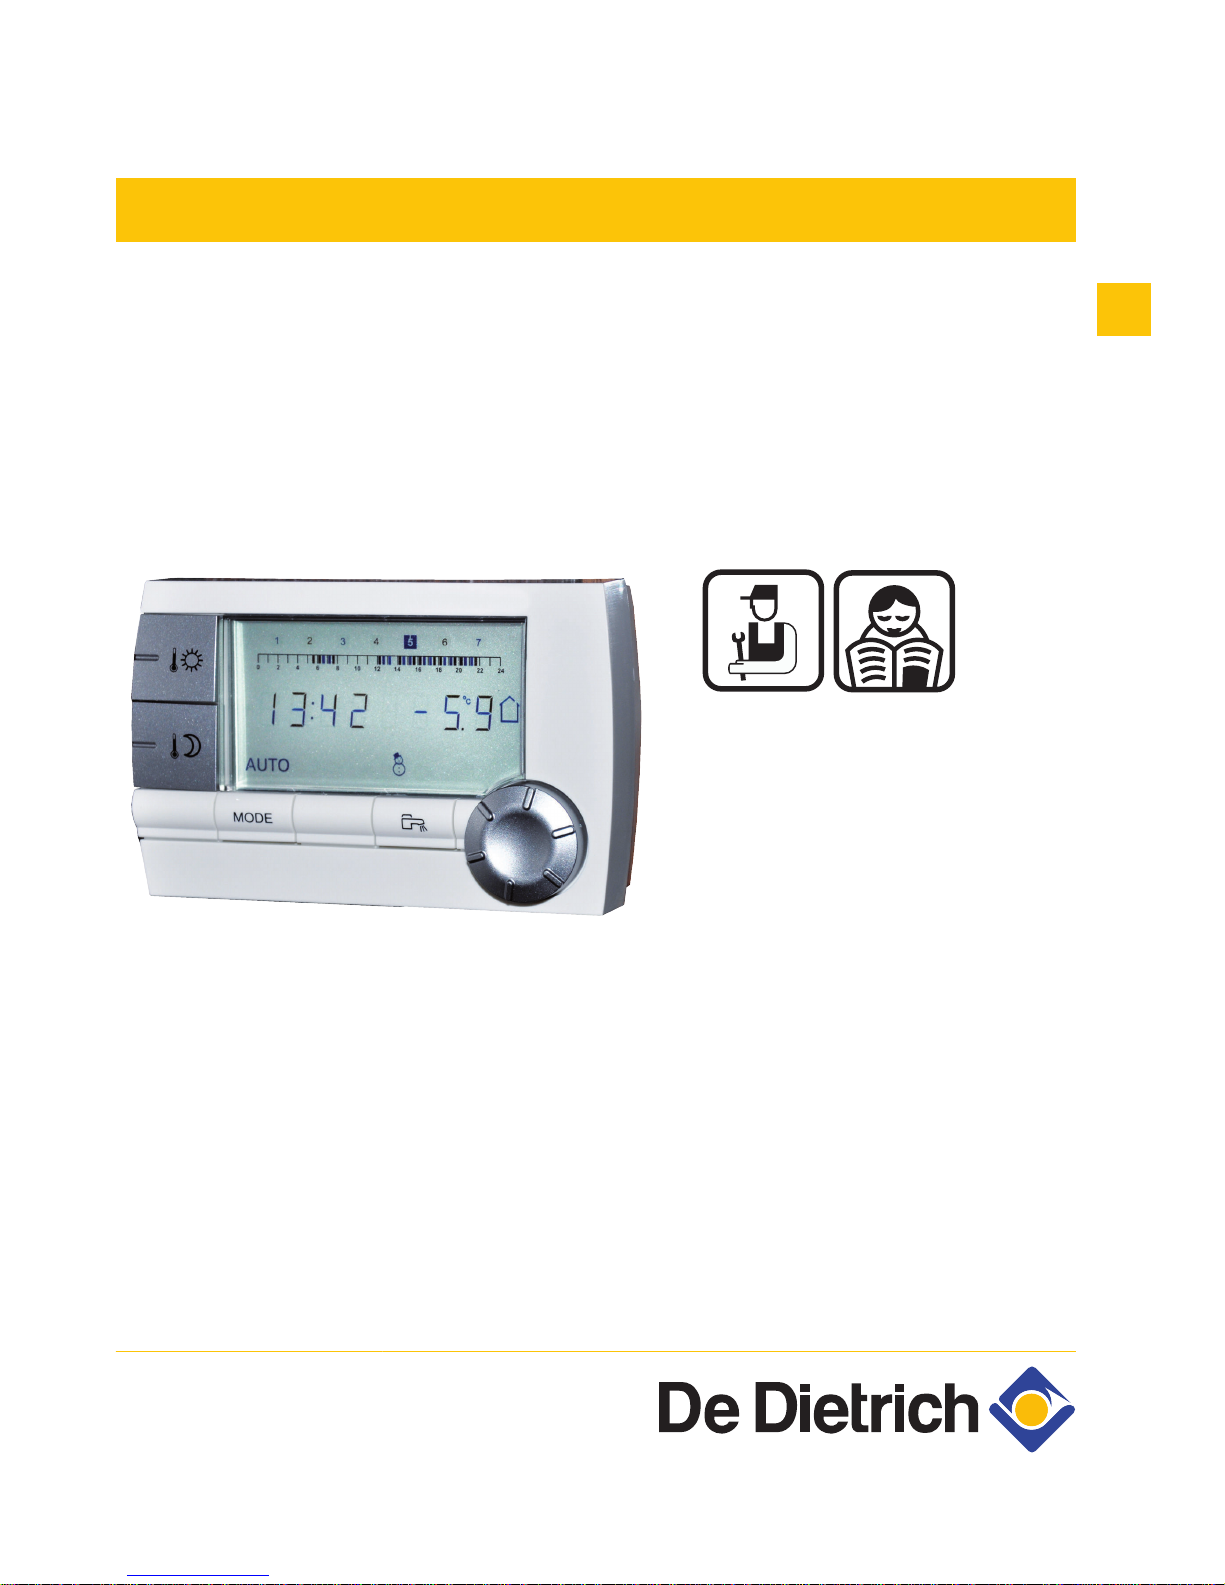
CDI4
Wire remote control
AD254 - AD285
C002331-A
Installation, User
and Service
Manual
300020537-001-02
EN
Page 2

Contents
1 Description ..................................................................................................31
1.1 Description of the keys and the display ..............31
1.2 Energy savings management ...............................32
2 Installation ...................................................................................................33
2.1 Installing the remote control ................................33
2.1.1 Choose a location ....................................................33
2.1.2 Installing the remote control .....................................33
2.2 Electrical connections ..........................................34
3 Operating instructions ...............................................................................35
3.1 Operating the appliance .......................................35
3.1.1 Temporarily adjusting the comfort or reduced
temperature ..............................................................35
3.1.2 Modifying the comfort or reduced temperature ........35
3.1.3
Temporarily activating the comfort mode x ............36
3.1.4
Temporarily activating the reduced mode m ............36
3.1.5
Activating the holiday mode g .................................36
3.1.6 Selecting a timer programme ...................................37
3.1.7 Forcing domestic hot water production ....................37
3.2 Extended use of the appliance .............................37
3.2.1 Setting the time and date .........................................37
3.2.2 Customising a timer programme ..............................38
3.2.3 Calibrating the room sensor .....................................38
3.2.4 Changing the domestic hot water temperature ........39
3.2.5 Selecting the principal display ..................................39
4 Troubleshooting .........................................................................................41
4.1 Display of the faults ..............................................41
4.2 Checking the memory version of the remote
control ....................................................................41
Contents
30
27/06/2012 - 300020537-001-02
EN
Page 3
1 Description
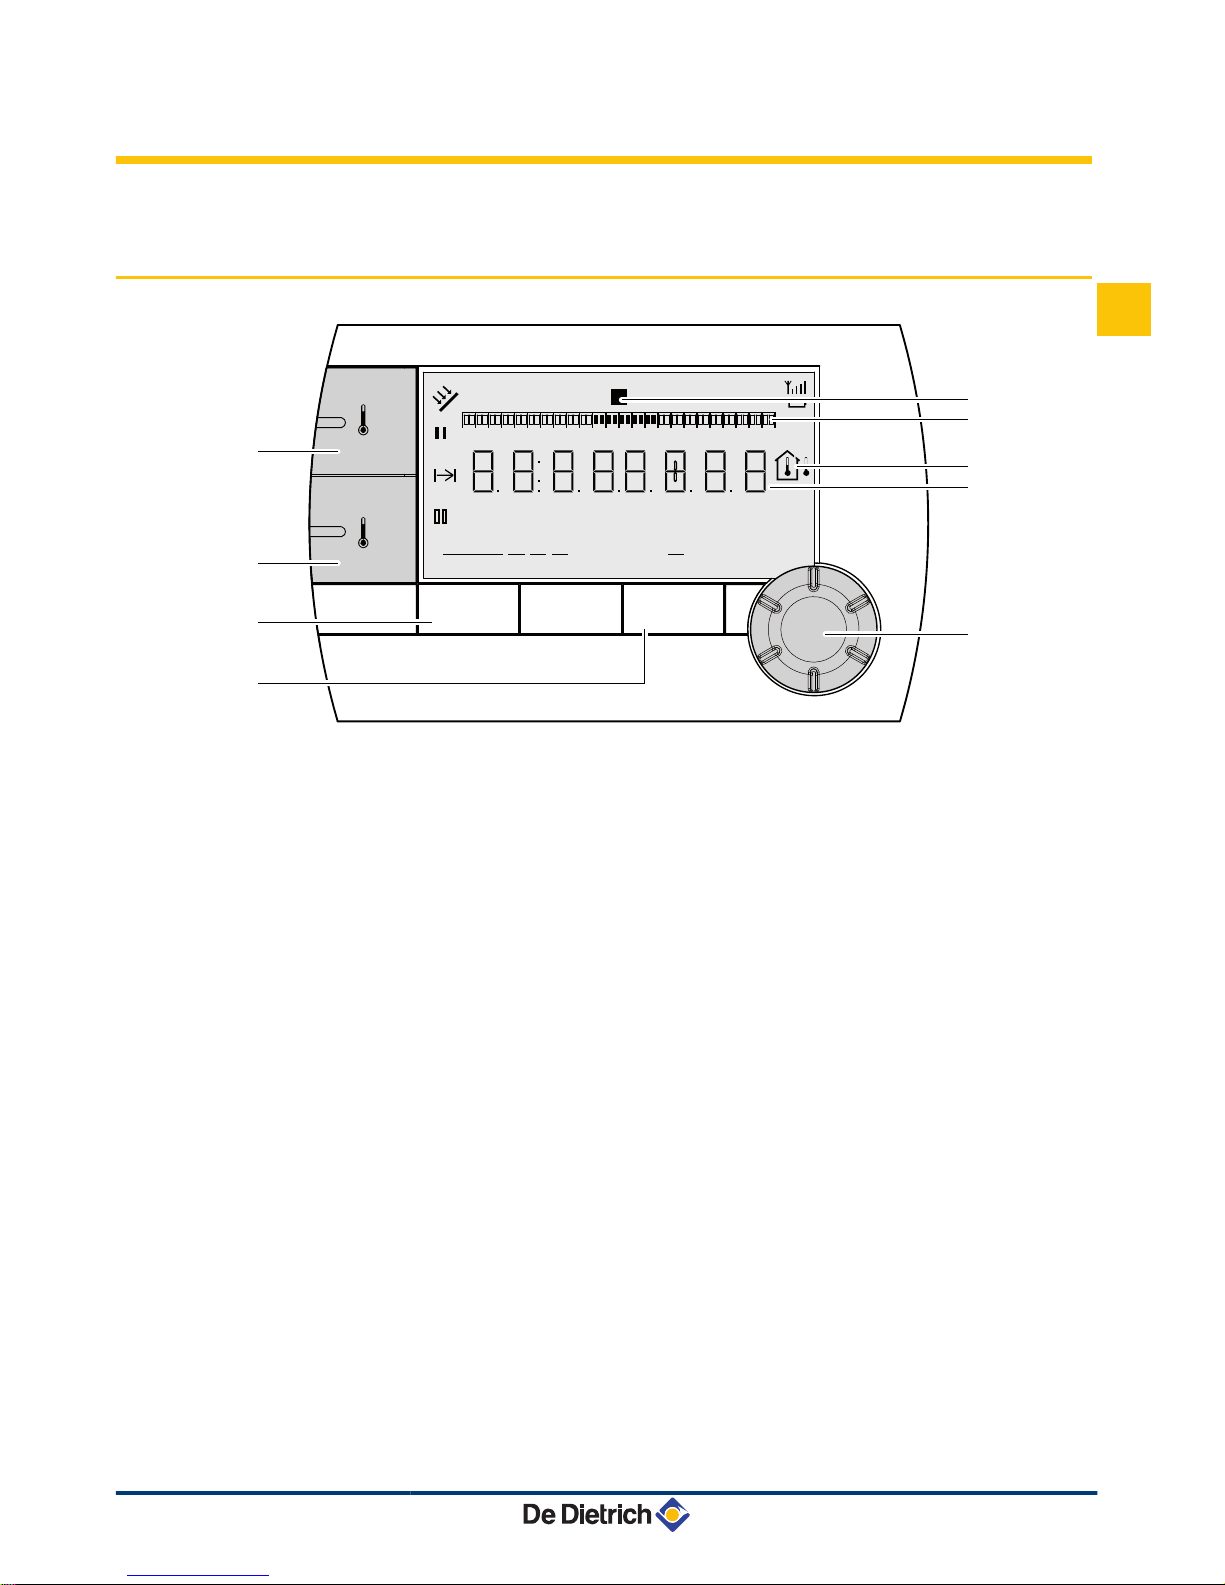
1.1 Description of the keys and the display
C002541-A
MODE
r
r
p
b
w
AUTO
x
c
g
m
x
c
1 2 3 5 6 74
B
C
D
E
G
F
H
I
A
0 2 4 6 8 10 12 14 16 18 22 2420
°F
°C
°F
°C
A
Comfort temperature setting key
B
Reduced temperature setting key
C
Operating mode selection key
D
DHW override key
E
Rotary setting button and push button
F
Timer programmes graphic display bar
4 Dark area b : Heating period in comfort mode or DHW
production enabled
4 Light area v : Heating period in reduced mode or
DHW production not enabled
G
The highlighted figure indicates the current day (1 =
Monday)
H
Temperature display
4 I Outside temperature
4 O Ambient temperature
I
Number display (current time, adjusted values, parameters,
etc.)
b
Selection of the comfort mode period x
4 Steady symbol: Comfort mode selection active
4 Flashing symbol: Comfort mode selection inactive
v Selection of the reduced mode period Vm
4 Steady symbol: Reduced mode selection active
4 Flashing symbol: Reduced mode selection inactive
AD254 - AD285 1. Description
27/06/2012 - 300020537-001-02
31
EN
Page 4

P
Indicator showing the end of override
AUTO
Operation in automatic mode according to the timer
programme
x
Comfort mode: The symbol is displayed when a DAY
override (comfort) is activated
4 Flashing symbol: Temporary override
4 Steady symbol: Permanent override
m
Reduced mode: The symbol is displayed when a NIGHT
override (reduced) is activated
4 Flashing symbol: Temporary override
4 Steady symbol: Permanent override
g
Holiday mode: The symbol is displayed when a HOLIDAY
override (antifreeze) is activated
4 Flashing symbol: Holiday mode programmed
4 Steady symbol: Holiday mode active
w
Cooling mode: The symbol is displayed when a COOLING
override is activated in summer
4 Flashing symbol: Temporary override
4 Steady symbol: Permanent override
p
Summer mode: The heating is off. Domestic hot water
continues to be produced
b
WINTER mode: Heating and domestic hot water working
r
The symbol is displayed when domestic hot water
production is available on the installation
m
Manual mode
1.2 Energy savings management
If no actions are performed for 20 seconds, the remote control goes into
standby (backlight off).
Pressing any key or using the rotary button switches on the backlight.
1. Description AD254 - AD285
32
27/06/2012 - 300020537-001-02
EN
Page 5
2 Installation
2.1 Installing the remote control
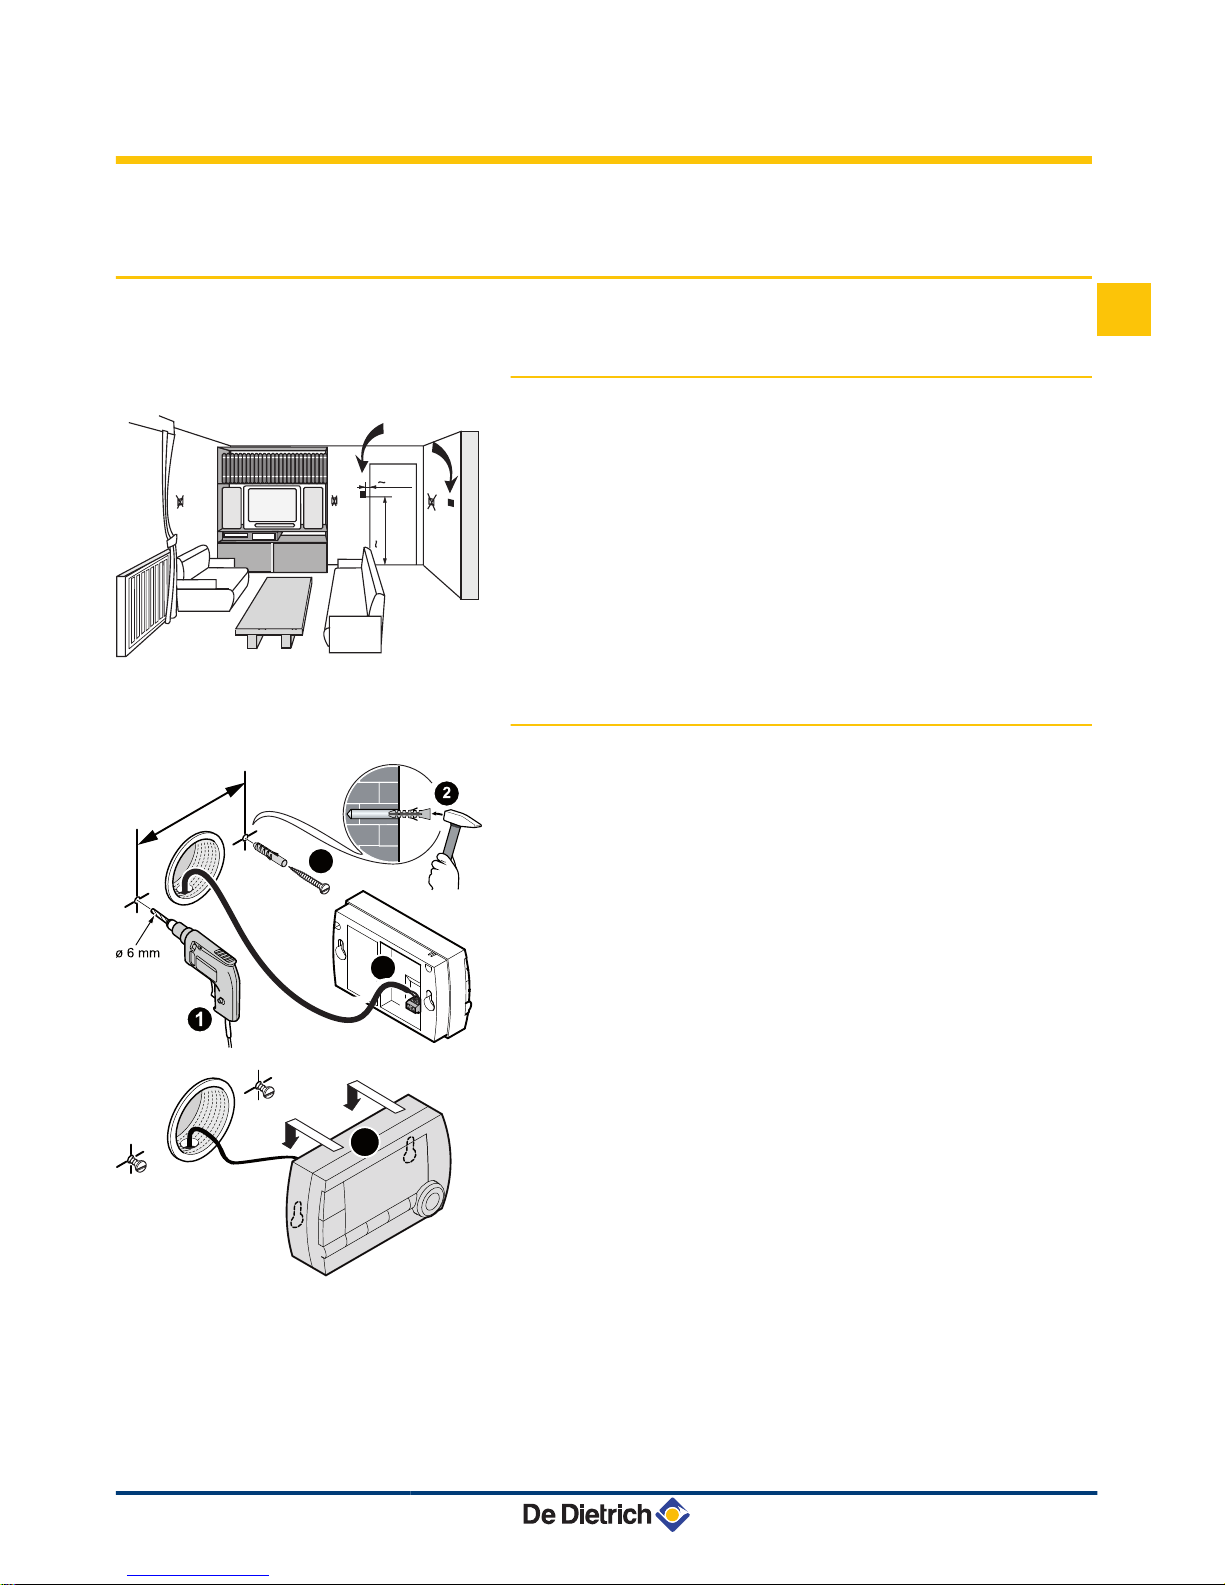
2.1.1. Choose a location
Choose a location in a "reference" room representative of the room
temperature to be taken into account if the remote control is used as a
room sensor.
Locations in the room that are not recommanded:
Enclosed, exposed to solar radiation, heated by a flue duct, exposed to
cold or hot air currents from air ducts, close to an open fireplace, a heat
source (television), behind a curtain.
2.1.2. Installing the remote control
1. Drill 2 holes with a Ø of 6 mm.
2. Put the plugs in place.
3. Tighten the 2 screws.
4. Connect either a 2-wire telephone cable or an electrical cable with
a cross-section of up to 2x1.5 mm² to the 2-pin connector. The wires
can be interchanged.
5. Installing the remote control.
200
1500
8800N036-B
A000850-B
4
3
94
A000854-A
5
AD254 - AD285
2. Installation
27/06/2012 - 300020537-001-02
33
EN
Page 6
2.2 Electrical connections
WARNING
Only qualified professionnals may carry out electrical
connections, always with the power off.
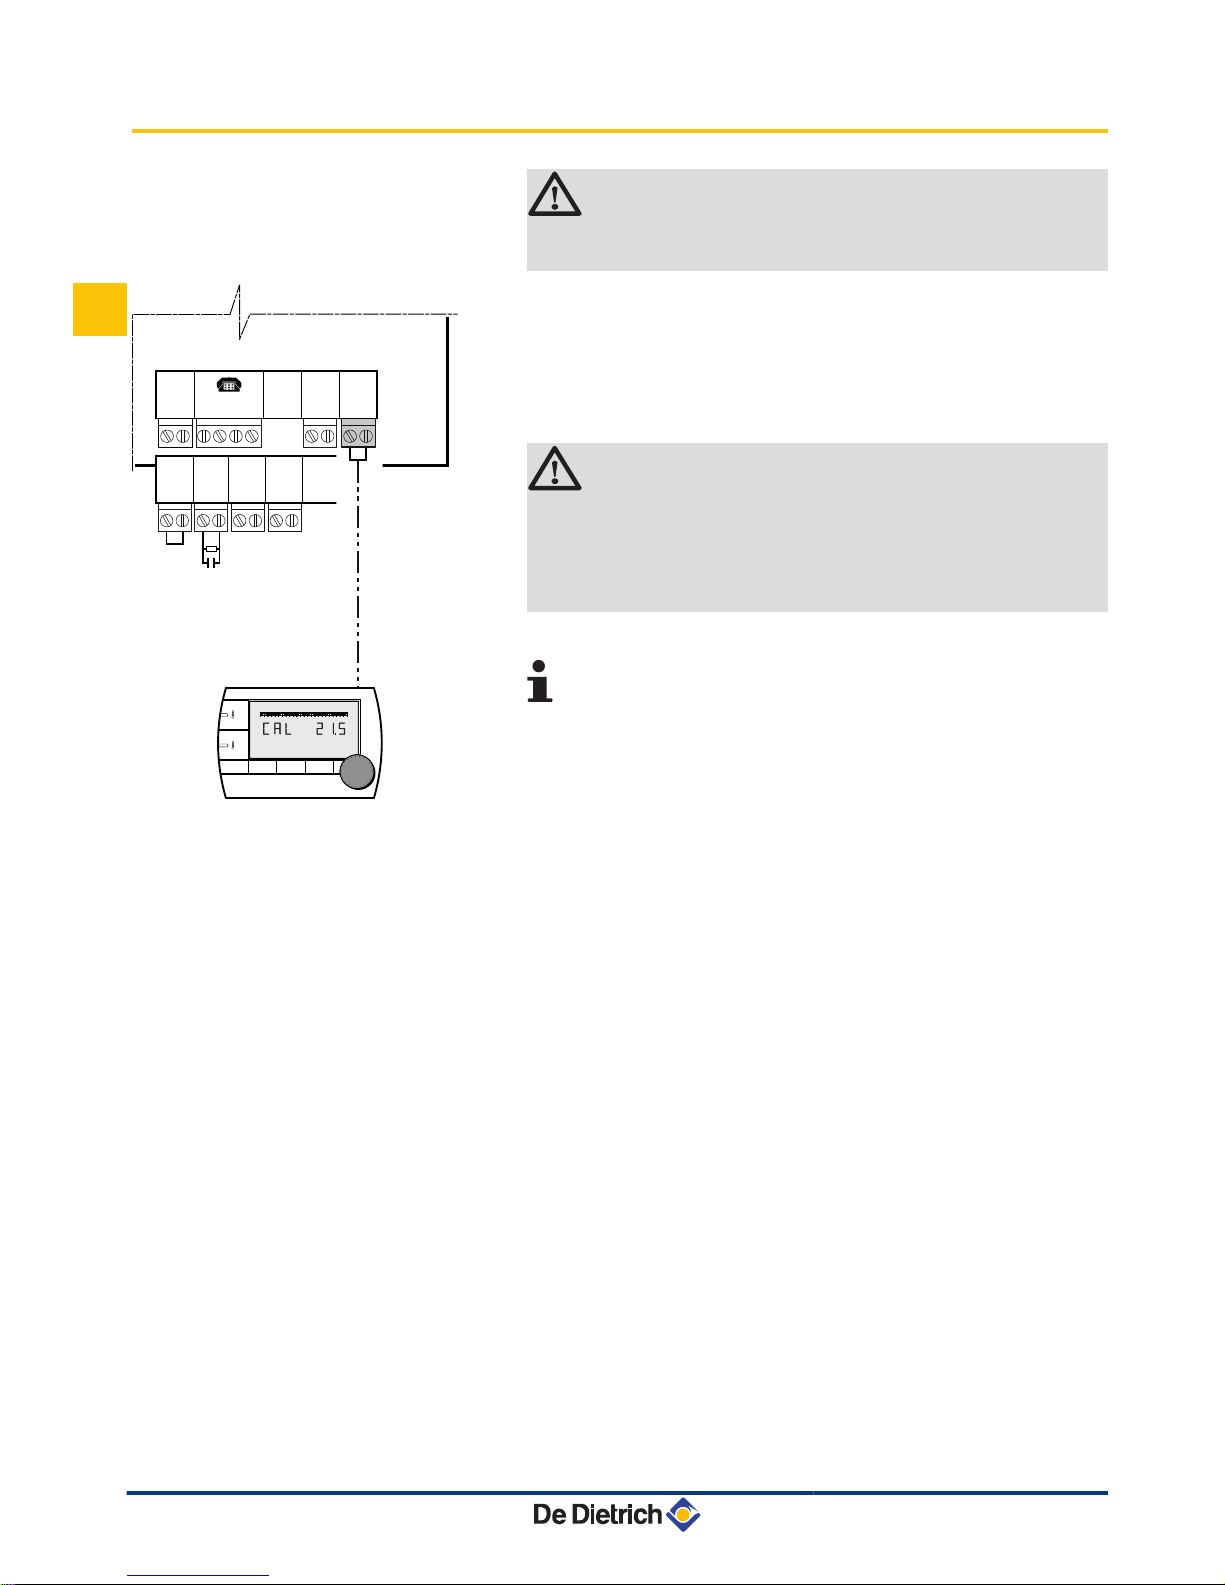
1. Cut the power supply to the boiler.
2. Accessing the boiler PCB SCU.
¼ Refer to the installation and maintenance instructions of the
boiler (Chapter: Electrical connections).
3. Connect the remote control to the terminal block that corresponds
to a circuit's room sensor.
WARNING
Under no circumstances must sensor cables (very low
voltage) be placed in cable ducts or channels carrying
cables supplying 230 V. Furthermore, a minimum distance
of 10 cm should be kept between cables supplying very low
voltage and cables supplying 230 V.
4. Turn the boiler on.
When switched on for the first time, the remote control will
show each segment on the display while it synchronises
itself with the boiler.
A000851-A
0-10V
S AMB C
4 3 2 1 2 1
+ -
S AMB B
2 1
S AMB A
2 1
S SYST + TA -
S ECS S EXT S DEP C
2 12 12 12 1 2 1
S DEP B
2 1
SCU
MODE
r
x
0 2 4 6 8 10 12 14 16 18 22 2420
°C
c
2 x 0,75 mm
2
mini
2. Installation AD254 - AD285
34
27/06/2012 - 300020537-001-02
EN
Page 7
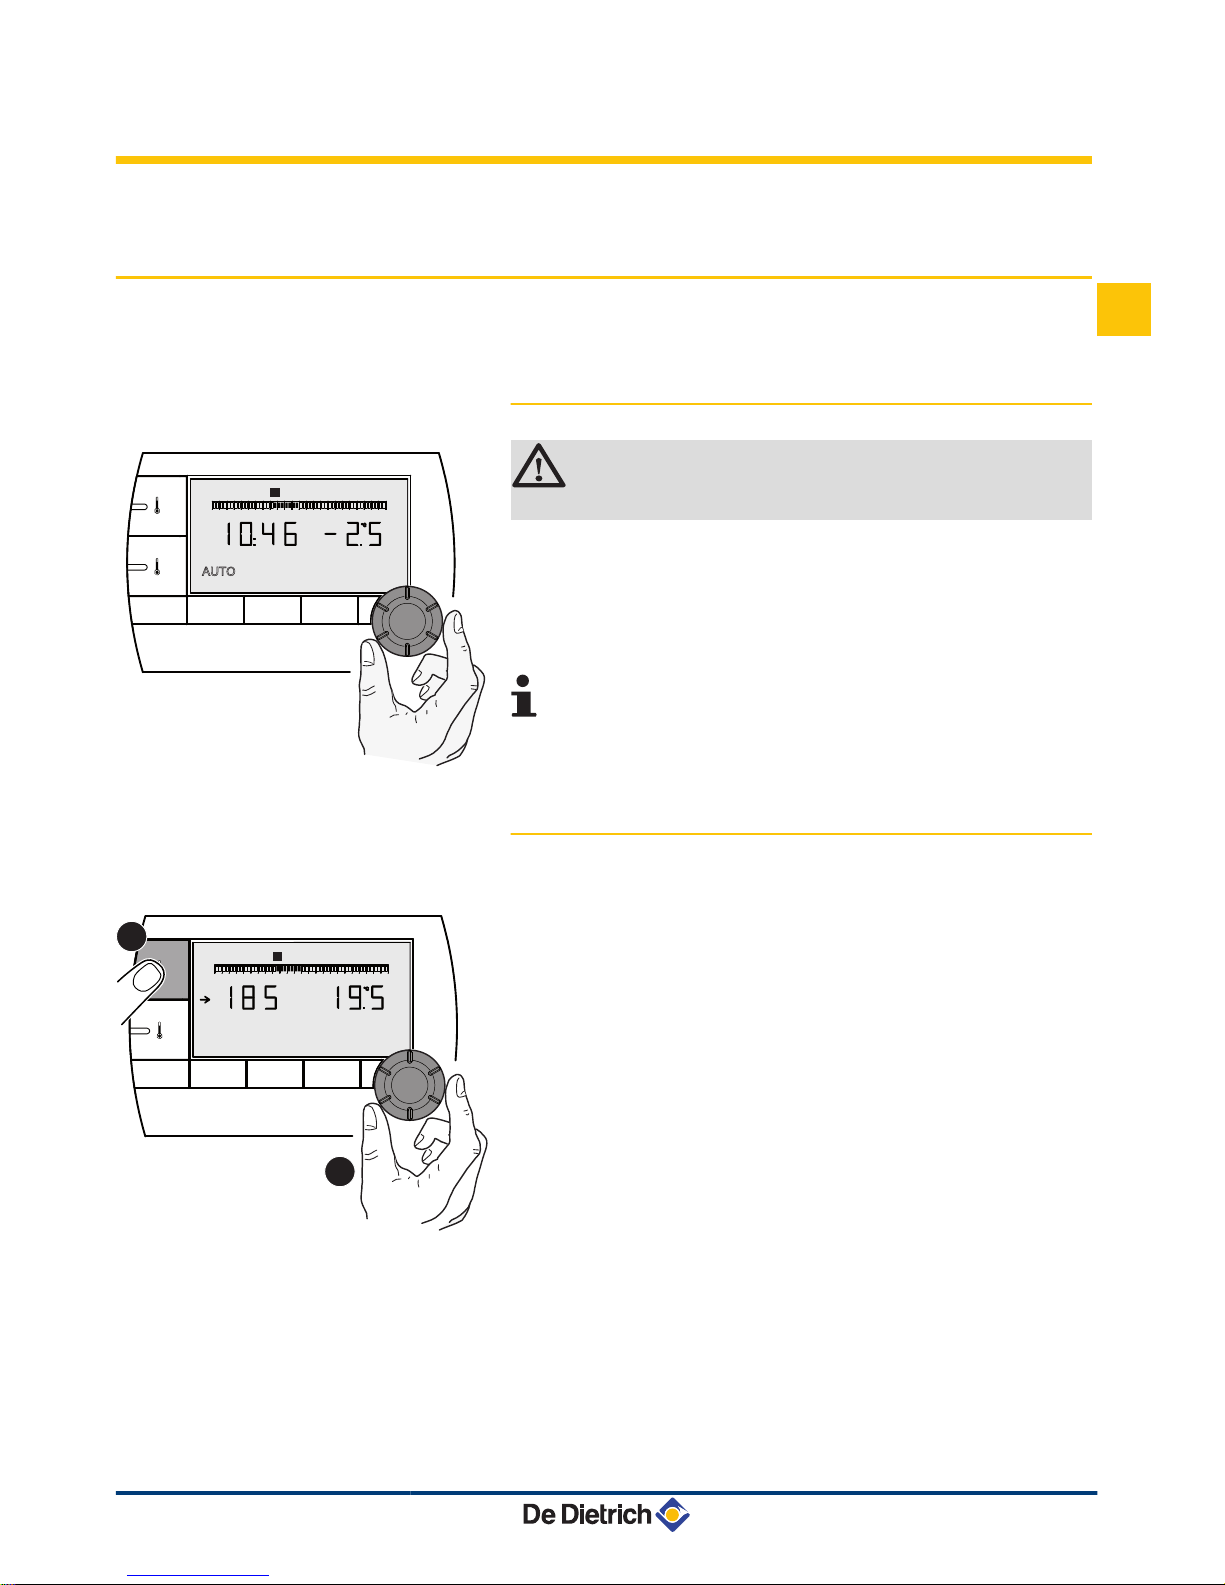
3 Operating instructions
3.1 Operating the appliance
3.1.1. Temporarily adjusting the comfort or
reduced temperature
CAUTION
Function available depending on the model of control panel.
It is possible temporarily to adjust the comfort or reduced temperature
by up to 3 °C compared with the programmed temperature. Starting in
the principal display, turn the rotary button and select the desired
correction.
The display shows the current time and the temperature correction.
Each time the mode is changed (comfort/reduced), the
temperature returns to the programmed value.
3.1.2. Modifying the comfort or reduced
temperature
To modify the comfort temperature, proceed as follows:
1.
Press the Cx key.
2. On the left of the display you can see the comfort temperature and,
on the right, the room temperature measured. The bar graph
displays the heating programme for the current day.
To modify the comfort temperature, turn the rotary button.
3. To confirm, press the rotary button.
Proceed in the same way to modify the reduced temperature by
pressing Cm.
C002405-B
MODE
r
r
b
AUTO
x
1 2 4 5 6 7
0 2 4 6 8 10 12 14 16 18 22 2420
°C
c
3
C002402-C
MODE
r
x
x
1 2 4 5 6 7
0 2 4 6 8 10 12 14 16 18 22 2420
°C°C
c
3
1
2
AD254 - AD285
3. Operating instructions
27/06/2012 - 300020537-001-02
35
EN
Page 8
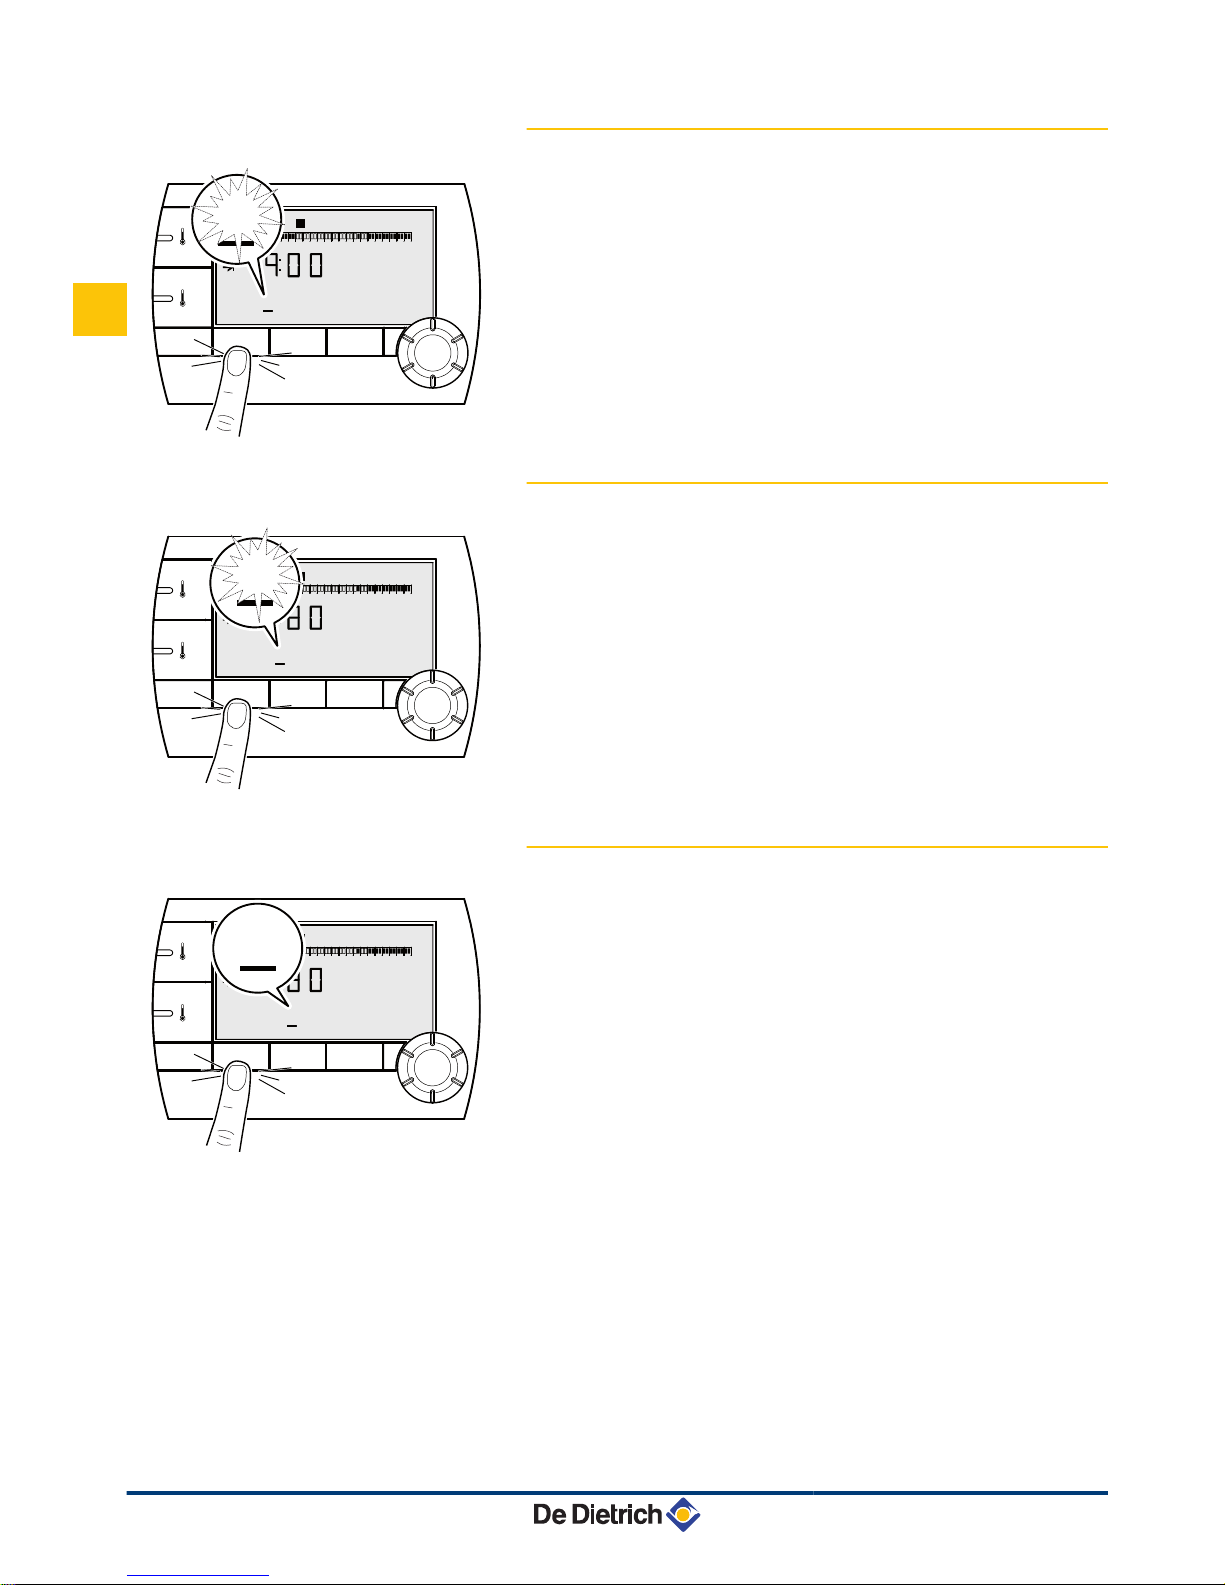
3.1.3.
Temporarily activating the comfort mode x
It is possible temporarily to override the timer programme and force the
comfort mode for a given period. To do this, proceed as follows:
1.
Press the MODE key several times until the symbol x is underlined.
2. Turn the rotary button to the right to modify the end time of the
override.
For a permanent override, select 24:24 by turning the rotary button
to the left.
3. To confirm, press the rotary button.
3.1.4.
Temporarily activating the reduced mode m
It is possible temporarily to override the timer programme and force the
reduced mode for a given period. To do this, proceed as follows:
1.
Press the MODE key several times until the symbol m is underlined.
2. Turn the rotary button to the right to modify the end time of the
override.
For a permanent override, select 24:24 by turning the rotary button
to the left.
3. To confirm, press the rotary button.
3.1.5.
Activating the holiday mode g
To activate the holiday mode and set the dates of your holiday, proceed
as follows:
1.
Press the MODE key several times until the symbol g is underlined.
2. Turn the rotary button to the right to change the date (day:month) or
the number of days (xx) to the end of the override.
For a permanent override, select 7 - 7 by turning the rotary button
to the left.
3. To confirm, press the rotary button.
C002398-D
MODE
r
r
b
AUTO
x
c
g
x
1 2 4 5 6 7
0 2 4 6 8 10 12 14 16 18 22 2420
c
3
x
C002399-D
MODE
r
r
b
AUTO
x
c
g
x
1 2 4 5 6 7
0 2 4 6 8 10 12 14 16 18 22 2420
c
3
c
C002400-D
MODE
r
r
b
AUTO
x
c
g
x
1 2 4 5 6 7
0 2 4 6 8 10 12 14 16 18 22 2420
c
3
g
3. Operating instructions
AD254 - AD285
36
27/06/2012 - 300020537-001-02
EN
Page 9
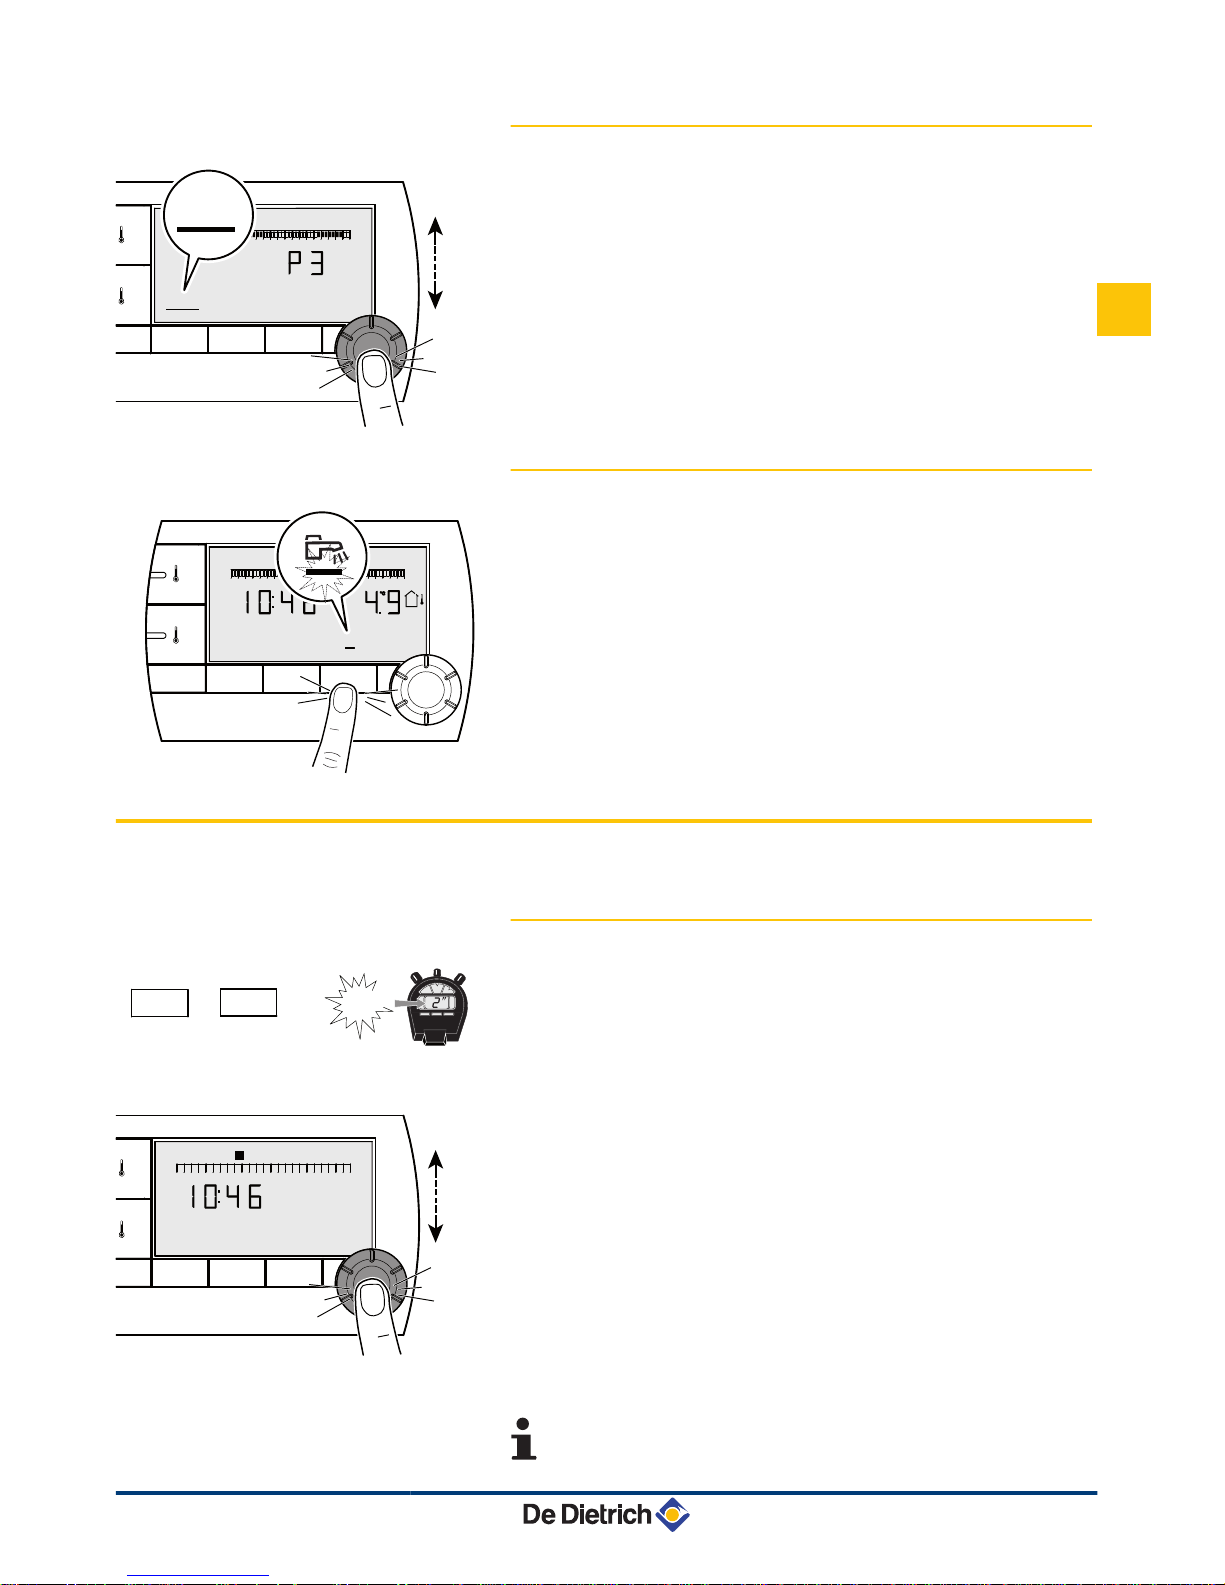
3.1.6. Selecting a timer programme
1. Press the MODE key several times until the symbol AUTO is
underlined.
2. To select the desired timer programme (P1, P2, P3 or P4), turn the
rotary button.
3. To confirm, press the rotary button.
3.1.7. Forcing domestic hot water production
4 For temporary domestic hot water production lasting 1 hour, press
the key r. The line underlining the symbol r flashes.
4 For permanent domestic hot water production, press the key r for
5 seconds. The line underlining the symbol r is steady.
To cancel the override, press the key r. The line underlining the symbol
r is no longer displayed.
3.2 Extended use of the appliance
3.2.1. Setting the time and date
1.
Press the MODE and r keys simultaneously for 2 seconds. The
time is displayed.
2. Press the rotary button.
3.
The minutes flash.
To modify the minutes, turn the rotary button.
To confirm, press the rotary button.
4.
The hours flash.
To modify the hours, turn the rotary button.
To confirm, press the rotary button.
5.
The number of the day flashes.
To modify the day (1 = Monday, 2 = Tuesday, etc.), turn the rotary
button.
To confirm, press the rotary button.
6. To return to the principal display, press the MODE key or wait 20
seconds.
To go back to the previous display, press the key r.
C002392-C
MODE
r
AUTO
x
1 4 5 6 7
0 2 4 6 8 10 12 14 16 18 22 2420
c
2
ÿ
AUTO
3
C002397-E
MODE
r
r
b
AUTO
x
0 2 4 6 8 10 12 14 16 18 22 2420
°C
c
A000858-A
2"
+
MODE
r
A000853-A
MODE
r
x
0 2 4 6 8 10 12 14 16 18 22 2420
c
1x
1 2 3 4 5 6 7
ÿ
AD254 - AD285 3. Operating instructions
27/06/2012 - 300020537-001-02
37
EN
Page 10
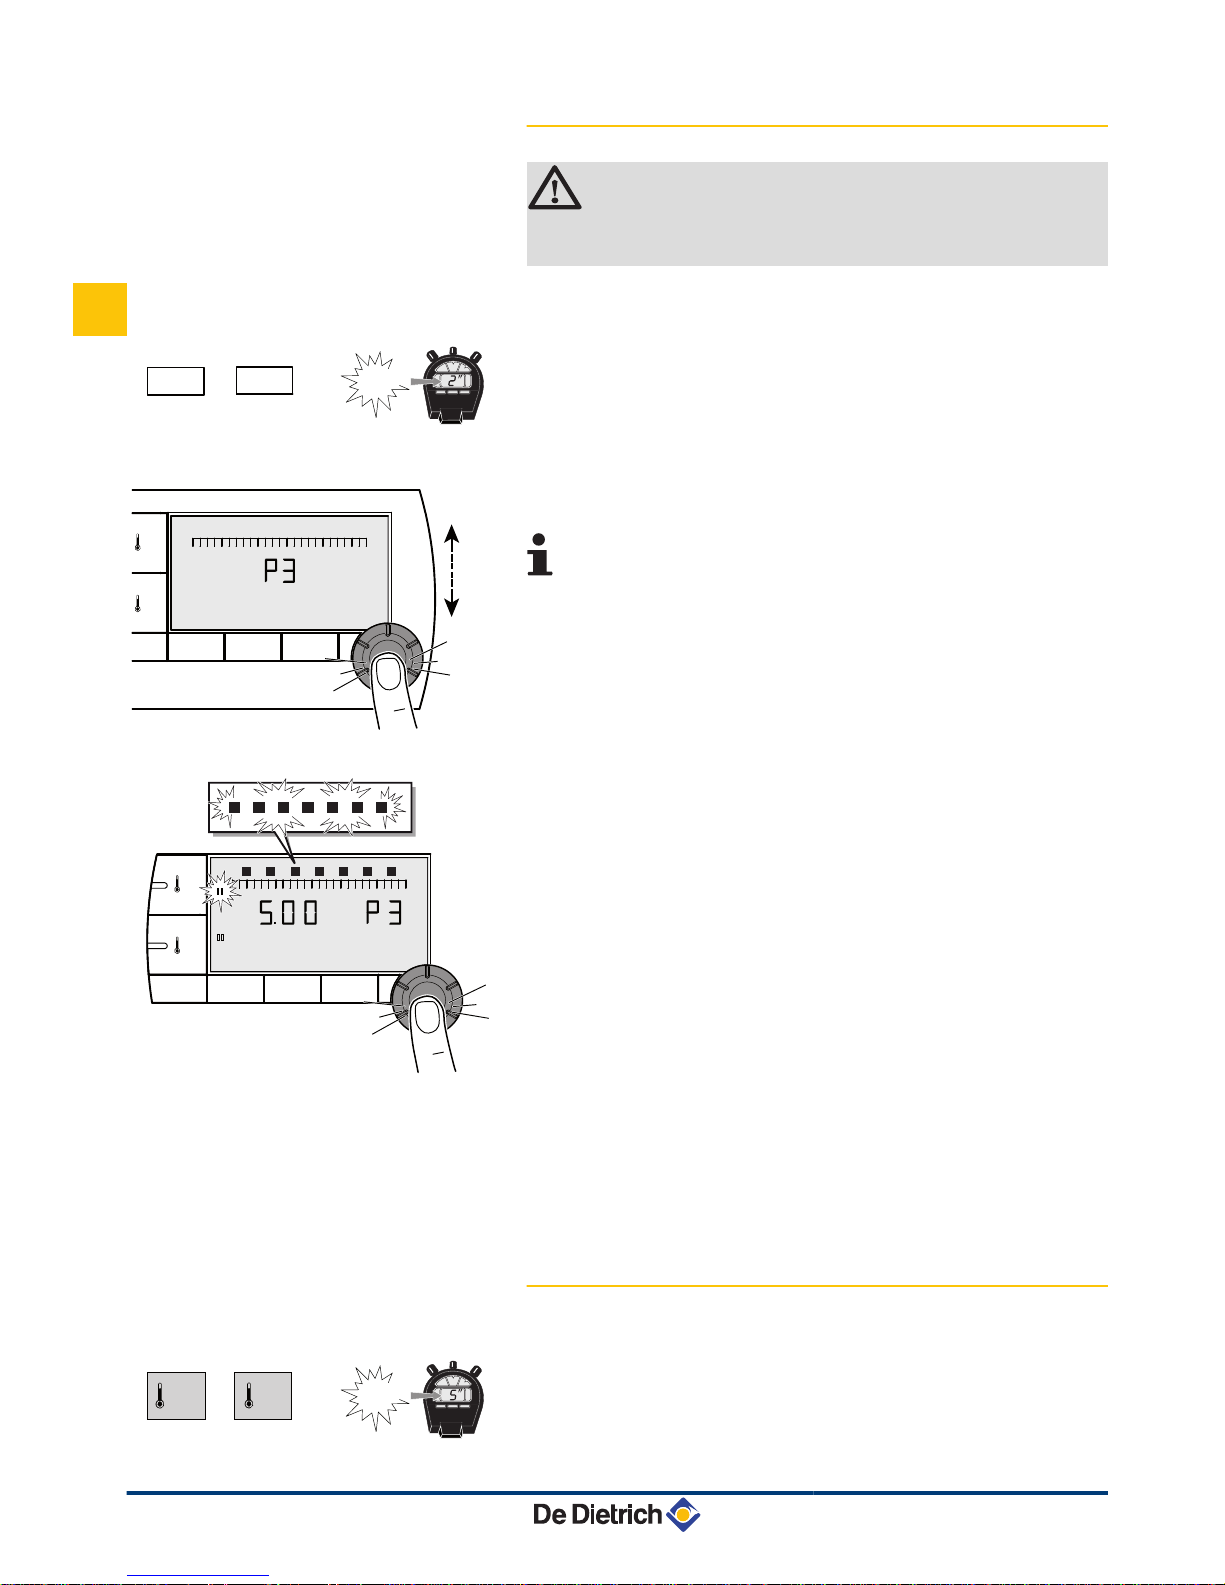
3.2.2. Customising a timer programme
CAUTION
P r : Function available depending on the model of control
panel.
Only the timer programmes P2, P3, P4 and the domestic hot water
programme P r can be modified.
1.
Press the MODE and r keys simultaneously for 2 seconds. The
time is displayed.
2. Turn the rotary button to select the timer programme to be
modified. To confirm, press the rotary button.
To go back to the previous display, press the key r.
3. All of the days flash. The new programme will be active every day
of the week.
To modify the programme for a particular day, press the rotary button
several times until the desired day flashes.
4. Turn the rotary button to the left until 0.00 is displayed. The first
segment of the graphic bar for the timer programme flashes.
5.
b : Comfort mode selection
Press the Cx key. The symbol b is steady, the selection mode for
the comfort time ranges is active.
To select a comfort time range, turn the rotary button to the right.
The zone selected is displayed under b on the graphic bar.
v : Reduced mode selection
Press the Cm key. The symbol v is steady, the selection mode for
the reduced time ranges is active.
To select a reduced time range, turn the rotary button to the right.
The zone selected is displayed under v on the graphic bar.
6. To return to the principal display, press the MODE key or wait 20
seconds.
3.2.3. Calibrating the room sensor
1. Measure the room temperature with a thermometer.
2.
Press key Cx and Vm simultaneously for 5 seconds.
The symbol CAL and the current temperature are displayed.
A000858-A
2"
+
MODE
r
C002393-C
MODE
r
x
0 2 4 6 8 10 12 14 16 18 22 2420
c
ÿ
C002436-A
MODE
r
x
0 2 4 6 8 10 12 14 16 18 22 2420
c
1 2 3 4 5 6 7
3x
2 3 4 5 61 7
C002430-A
5"
x
c
+
3. Operating instructions
AD254 - AD285
38
27/06/2012 - 300020537-001-02
EN
Page 11
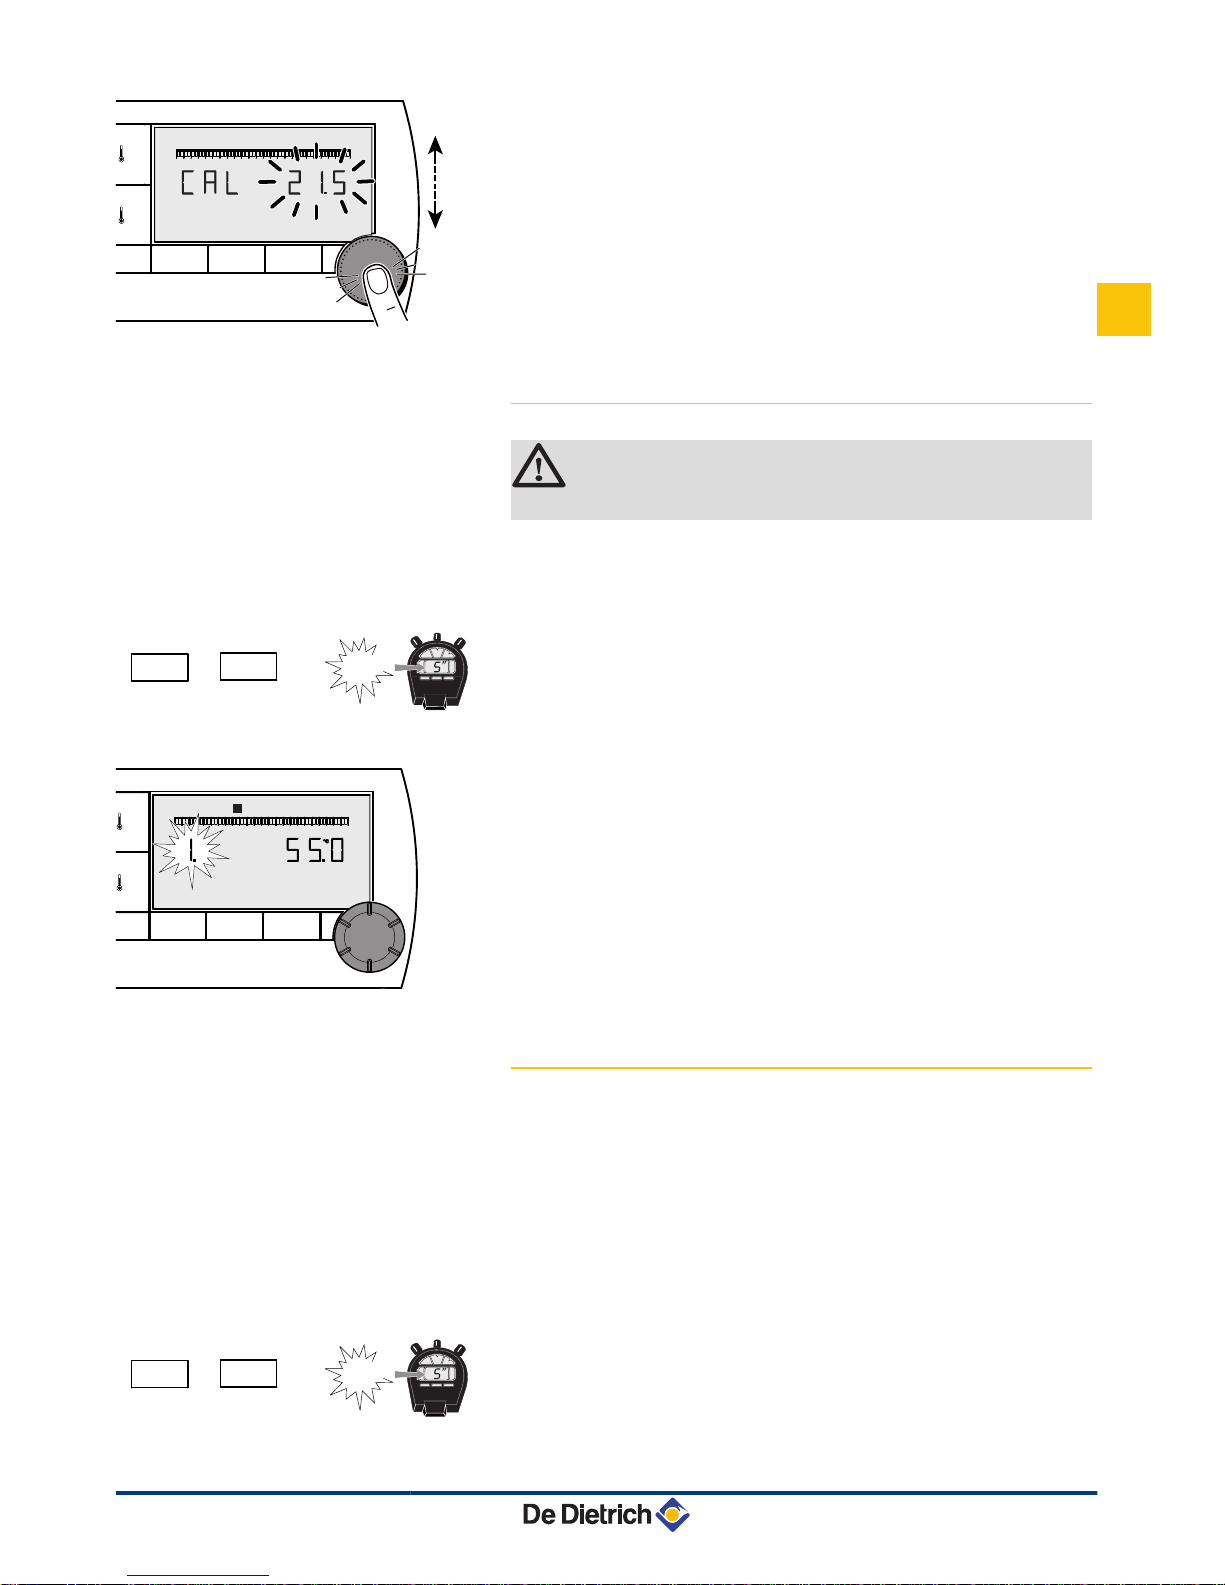
3. Turn the rotary button to set the room temperature.
Setting is done in steps of 0.1°C. The correction range is between
+ and -5 °C compared with the temperature displayed.
4. To confirm, press the rotary button.
3.2.4. Changing the domestic hot water
temperature
CAUTION
Function available depending on the model of control panel.
In the factory, the domestic hot water temperature is set to 55°C. Setting
can be done from 10 to 80°C in steps of 1°C.
To modify the domestic hot water temperature, proceed as follows:
1.
Press the MODE and r keys simultaneously for 5 seconds. The 1
menu is displayed.
2. To modify the setting, turn the rotary button.
3. To return to the principal display, press the MODE key or wait 20
seconds.
3.2.5. Selecting the principal display
In the factory, the principal display is set to show the current time and
the outside temperature.
Other settings available:
4 The current time and the room temperature
4 The current time and alternately, every 5 seconds, the outside
temperature and the room temperature
To modify the principal display, proceed as follows:
1.
Press the MODE and r keys simultaneously for 5 seconds. The 1
menu is displayed.
ÿ
A000852-A
MODE
r
x
0 2 4 6 8 10 12 14 16 18 22 2420
°C
c
A000857-A
5"
+
MODE
r
C002542-B
MODE
r
x
2 4 5 6 7
0 2 4 6 8 10 12 14 16 18 22 2420
c
1 3
A000857-A
5"
+
MODE
r
AD254 - AD285
3. Operating instructions
27/06/2012 - 300020537-001-02
39
EN
Page 12
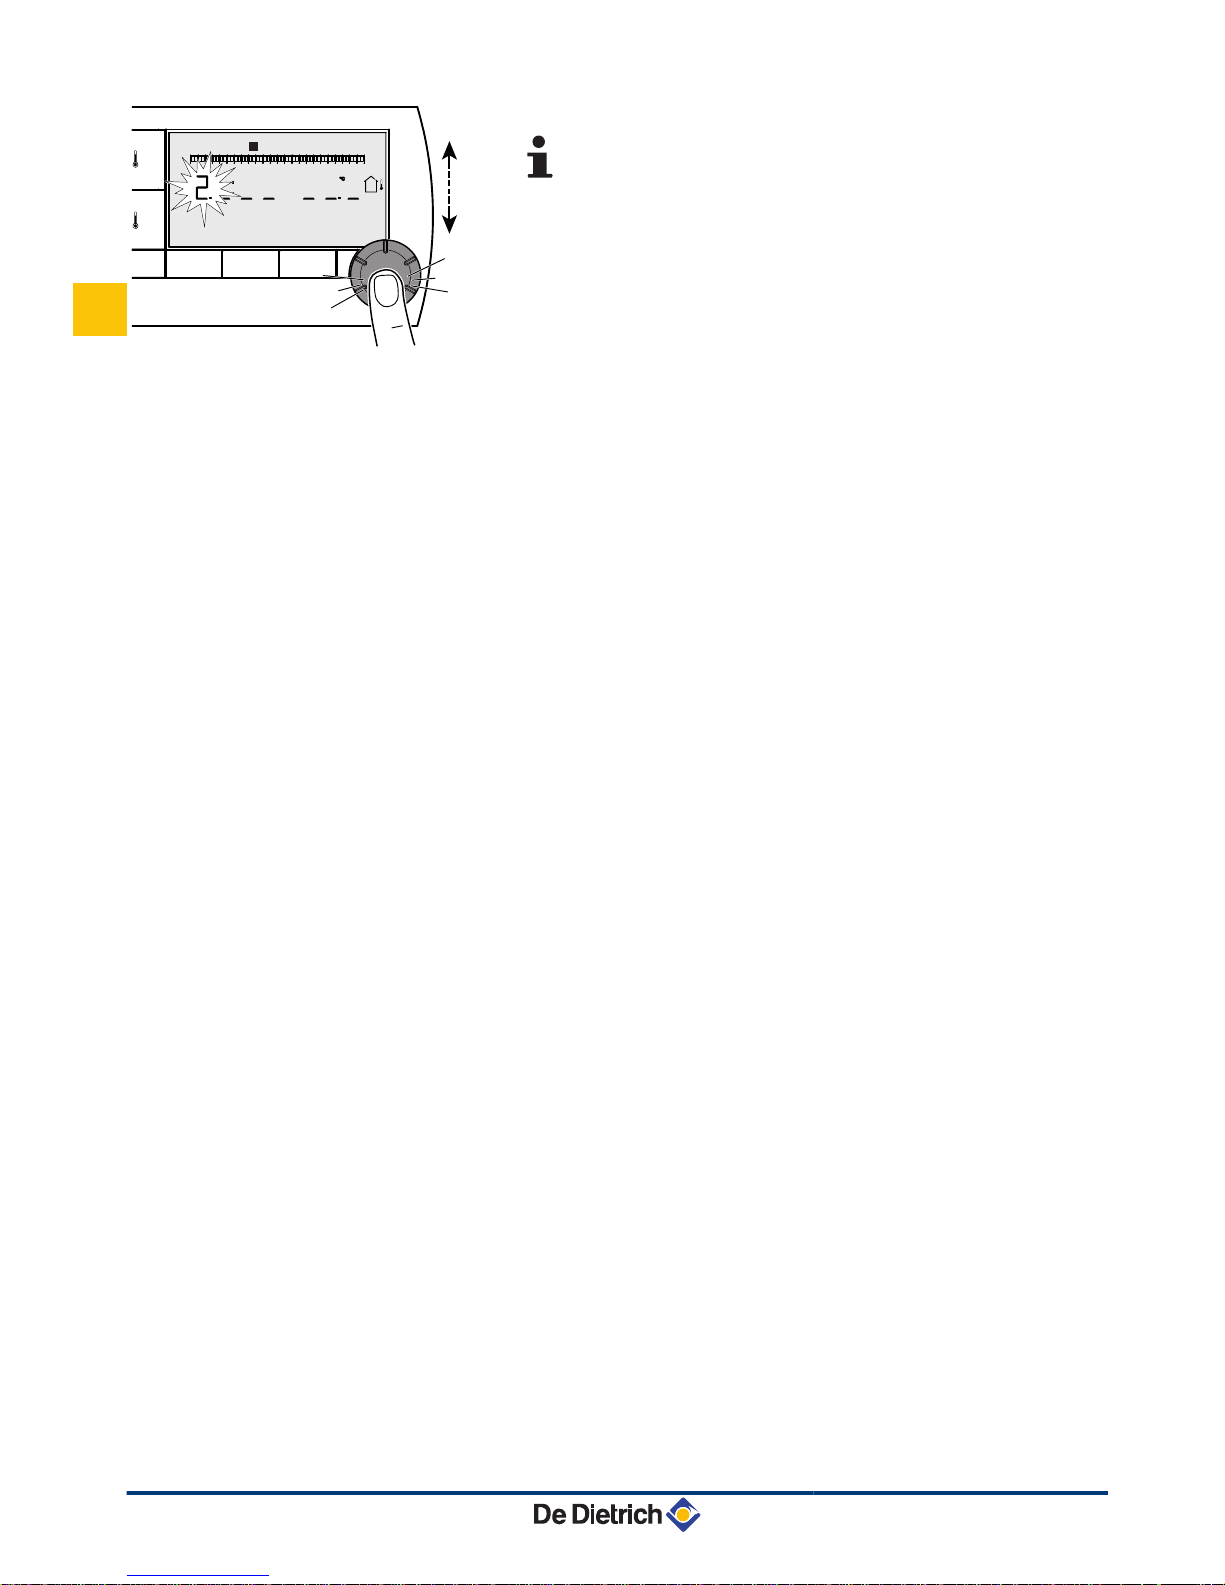
2. Press the rotary button to display the menu 2.
To go back to the previous display, press the key r.
3. To modify the setting, turn the rotary button.
I : Outside temperature
O : Ambient temperature
I then O: Outside temperature alternating with room temperature
4. To return to the principal display, press the MODE key or wait 20
seconds.
C002390-A
MODE
r
x
2 4 5 6 7
0 2 4 6 8 10 12 14 16 18 22 2420
c
1 3
ÿ
3. Operating instructions AD254 - AD285
40
27/06/2012 - 300020537-001-02
EN
Page 13
4 Troubleshooting
4.1 Display of the faults
If there is a malfunction, the remote control displays the message
Error.
The boiler control panel will indicate the corresponding error message.
¼ To consult the cause of error messages, refer to the boiler's
installation and maintenance instructions (Chapter: Troubleshooting).
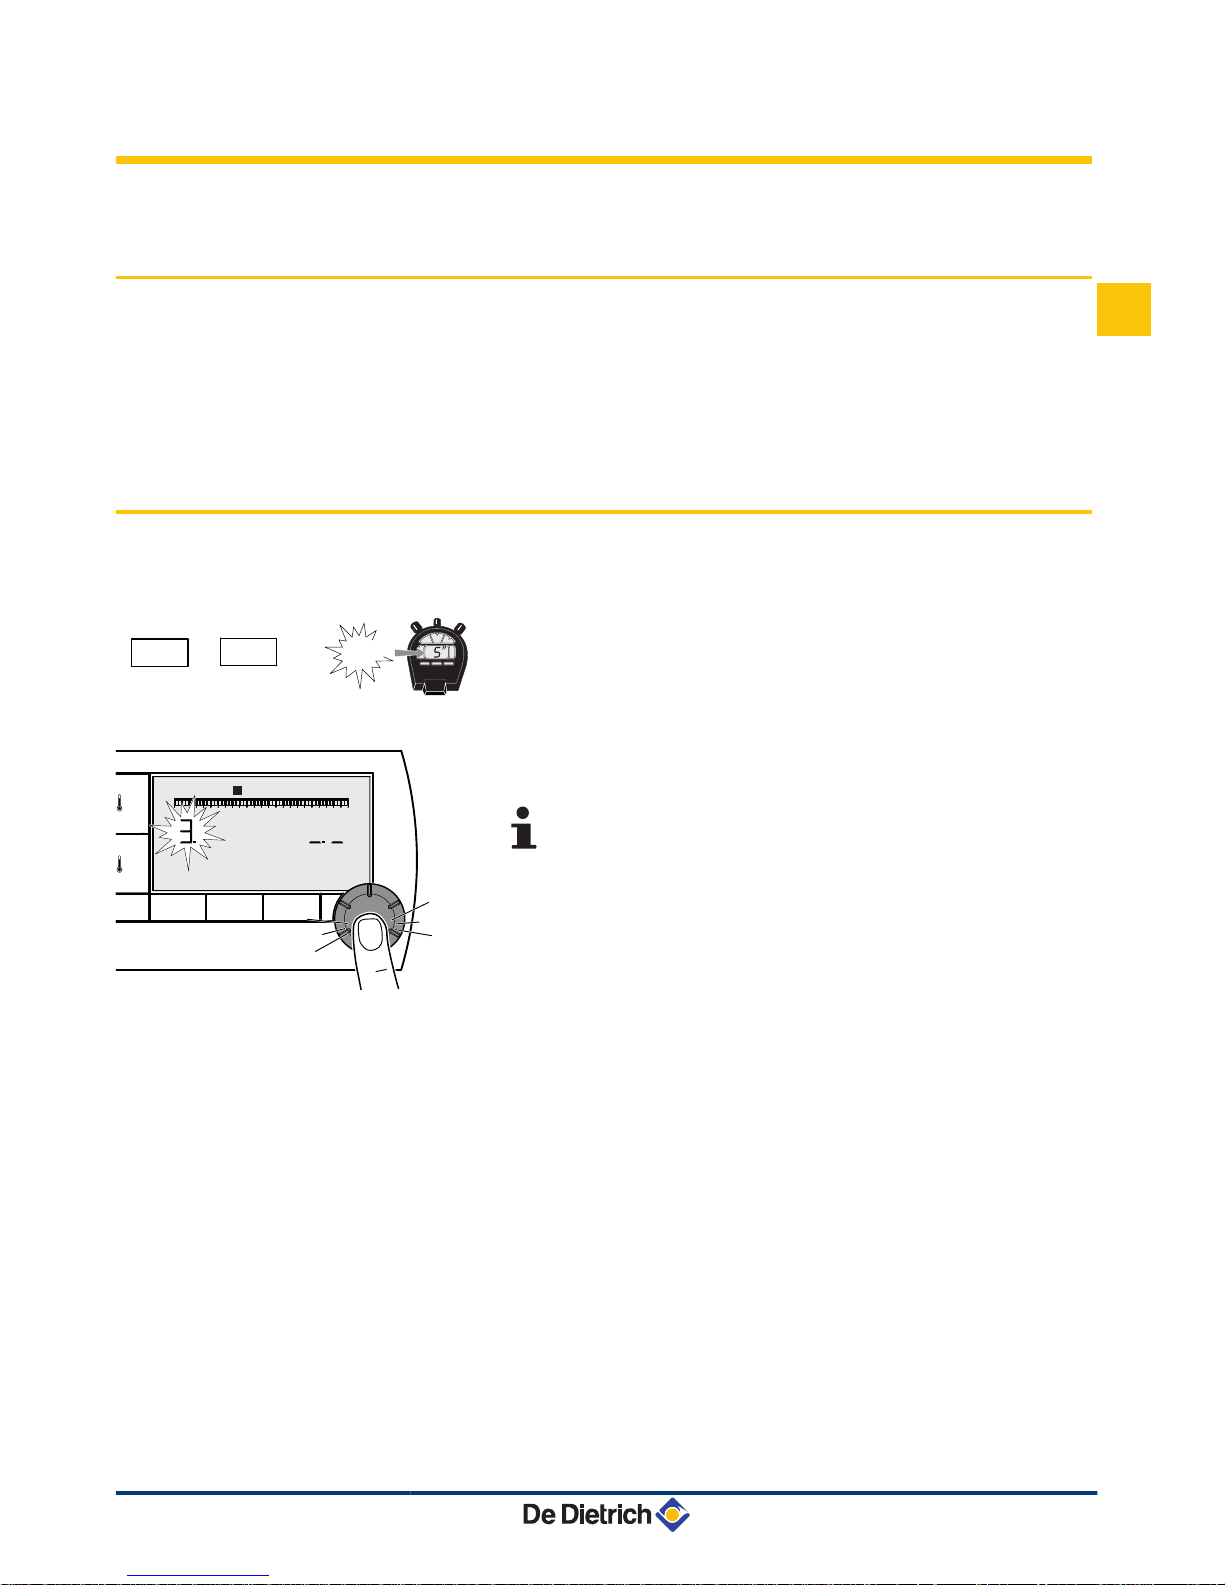
4.2 Checking the memory version of the remote control
Before contacting the installer, make a note of the memory version
installed in the remote control. Proceed as follows:
1.
Press the MODE and r keys simultaneously for 5 seconds.
2. The 1 menu is displayed. Press the rotary button 2 times to display
the menu 3. The memory version is shown to the right of the display.
To go back to the previous display, press the key r.
3. To return to the principal display, press the MODE key or wait 20
seconds.
A000857-A
5"
+
MODE
r
C002543-B
MODE
r
x
2 4 5 6 7
0 2 4 6 8 10 12 14 16 18 22 2420
c
1 3
AD254 - AD285 4. Troubleshooting
27/06/2012 - 300020537-001-02
41
EN
Page 14

4. Troubleshooting AD254 - AD285
42
27/06/2012 - 300020537-001-02
EN
 Loading...