

Decware TORIIMONO, ZEN TORII MONOS Owner's Manual

O W N E R S M A N U A L
MANUAL NO. 01 REV. DATE: 1/2013
The ZEN TORII MONOS
1 Channel 60 watt Vacuum Tube Amplifier
Decware High Fidelity Engineering Co., East Peoria IL, USA www.decware.com
MODEL
TORIIMONO

O W N E R S M A N U A L
QUICK START GUIDE - CHECKLIST
Make sure you have the following items for each channel
Amplifier
•
PowerCord
•
2 of the larger KT88 output tubes (8 pin)
•
2 of the smaller 6N1P or 6922 input tubes (9 pin)
•
1) Install the tubes into the amplifier.
Note: The large 8 pin tubes have a plastic center guide pin that fits into a notched
keyway in the socket. It is important to figure out before installing the tube what the
proper alignment should be. Once you get it to line up properly, the tube can be
gently pushed into the socket until it seats. During both installation and removal it is
important to install and remove the tubes in a straight in-and-out fashion with as little
rocking as possible.
The smaller 9 pin tubes are easier to see how to align and are plugged straight into the
socket and removed by pulling straight out. These too should not be excessively
rocked or tipped as it can damage the pins or even the socket. On 9 pin tubes it is
important to visually inspect the pins to be sure they are straight. Since the pins are
smaller in diameter they are easy to bend and are often slightly bent from handling.
These pins can be carefully straightened by hand or you can purchase a tube pin
straightener from most tube suppliers that makes the task quick and simple. Installing
9 pin tubes with pins that are not straight will damage the socket of the amplifier, an
item not easily replaced since the main circuitry is directly soldered to the socket pins.
Another note about tubes and straight pins is this: Many tubes, being blown glass and
assembled by hand, are not perfectly straight relative to the base of the tube and or
tube pins. It is common for some tubes to be slightly crooked. This has nothing to do
with how straight the pins of the tube are and should be treated as a separate issue
which is purely cosmetic.
The ideal way to clean tube pins is with a pencil eraser, and it’s a good idea to clean
even new tubes prior to plugging them into your amp.
It is acceptable to use FINITE amounts (perhaps 1 drop for all 8 or 9 pins) of “Caig
DeOxit” products to further clean and lubricate the tube sockets. Apply product to
tube pins only. A small amount of this has already been applied at the factory and
should last at least a year.
Decware High Fidelity Engineering Co., East Peoria IL, USA www.decware.com
O W N E R S M A N U A L
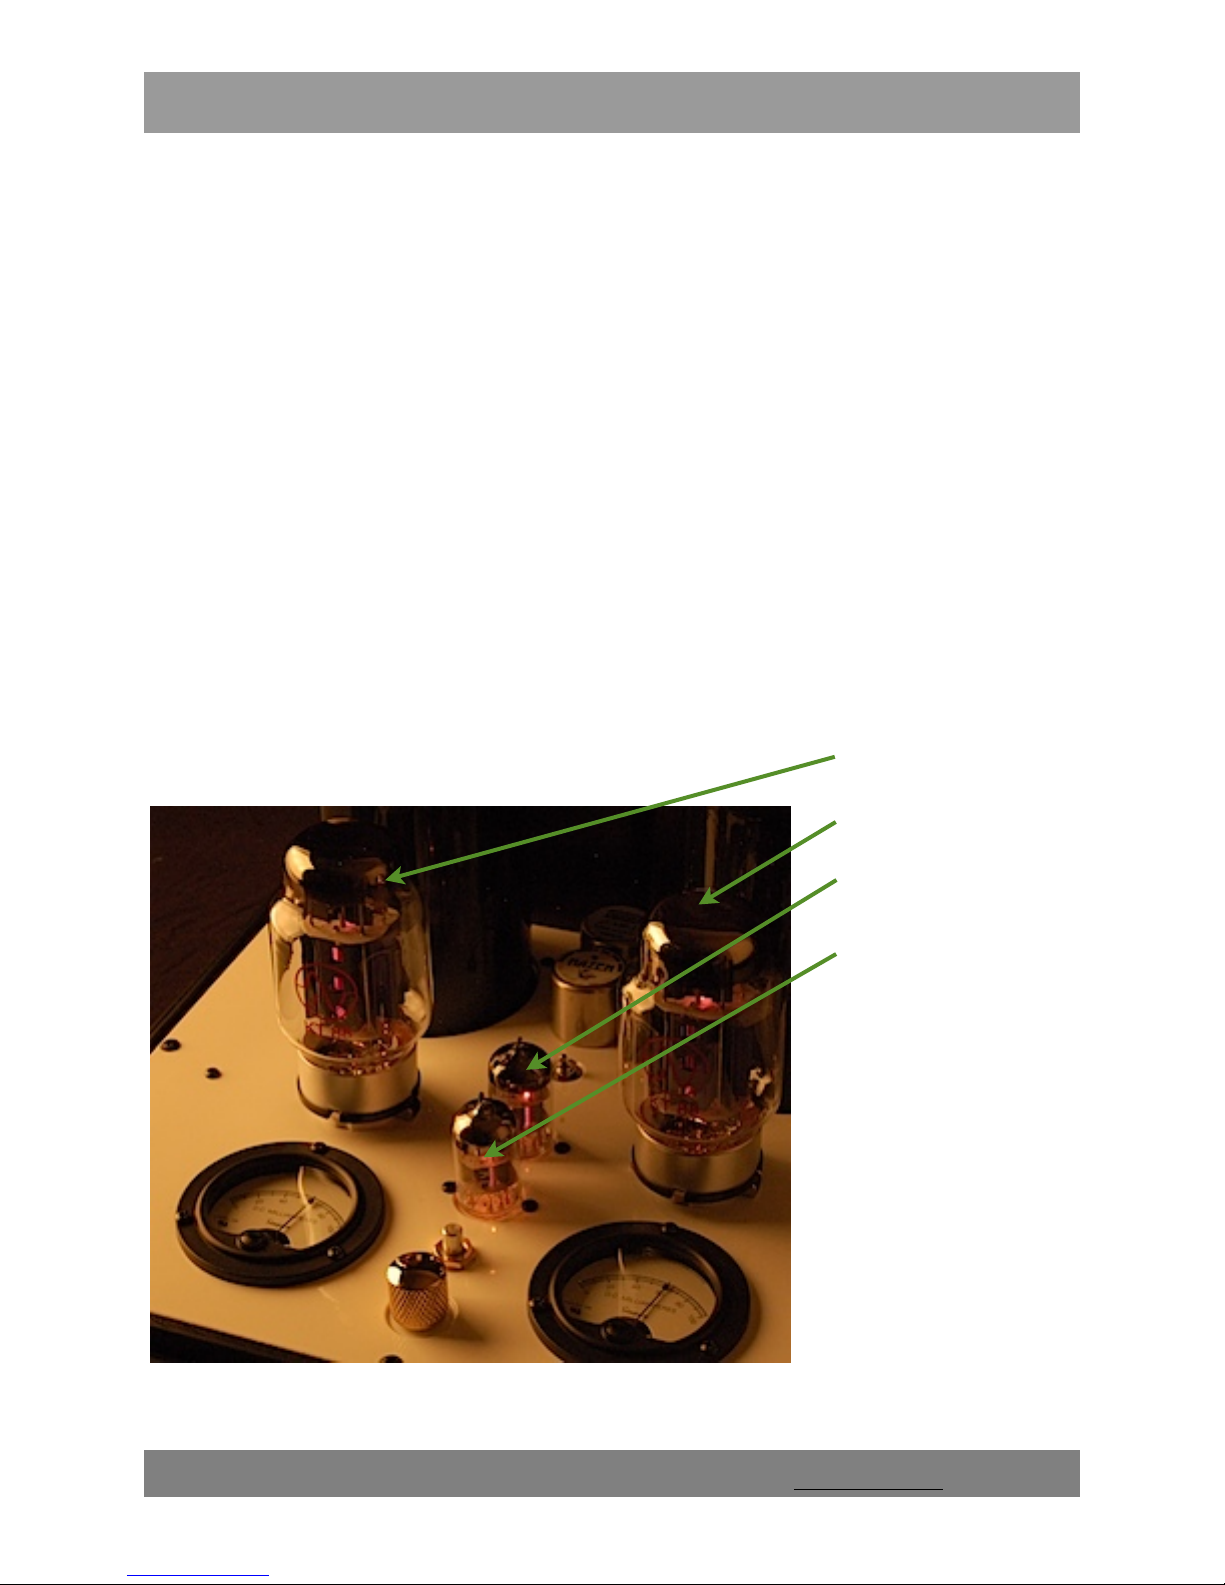
Tube Locations
As you can see in the picture below, the two larger tubes go into the 8 pin sockets.
The tubes should be matched and it makes no difference which one goes on what
side.
The two smaller 9 pin tubes are of the same type. They are either 6N1P or 6922, often
supplied in matched pairs, meaning both tubes are of the same type. If this is the
case, then it makes no difference which tube goes in the front or the back position.
If you plan to get creative and try mixing it up a bit, by installing one of each, the front
tube is likely to have the biggest impact on the sound. The rear tube is what we call a
follower so it adds no gain to the signal, just a lot of torque. Often we see users
placing a 6922 in the front location and a 6N1P in the rear location but reversing it
changes the sound too.
The sound of these interchangeable tubes are as follows:
6N1P - warmest, smoothest, most forgiving
6922 - slightly less warm, more dynamic, tighter focus
KT88
KT88
KT88
6N1P/6922
6N1P/6922
Decware High Fidelity Engineering Co., East Peoria IL, USA www.decware.com

O W N E R S M A N U A L
2) Install Power Cord
Each amplifier has a high quality IEC connector. This is an overlooked item on most
amplifiers and are typically made in China with inferior plastics, metals, and feature
poor electrical connections and earth grounds that change with tension, and
temperature. This includes the gold plated ones being sold to unknowing audiophiles
at an inflated price. Our power cord connector, being quite the opposite, is fully
worthy of an expensive power cord.
Note: Having the power cord go straight up and then curve straight down, relieves
the leverage on the contacts inside the power cord which in turn prevents it from
prematurely wearing out.
Fuse
The IEC connector where the power cord plugs into has a concealed door that can
be pried open to reveal the fuse holder. Inside it there is also a spare fuse. The fuse
should be a 20x5mm with a maximum rating of 5 amps. If you have a 240VAC model
your fuse should be 2.5 amps. Fast Blow types are recommended.
Decware High Fidelity Engineering Co., East Peoria IL, USA www.decware.com

O W N E R S M A N U A L
Neg
Power Draw
Each Zen TORII Mono amplifier will draw between 1.2 and 1.6 amps from the wall
outlet. (150 ~175 watts) The actual amount depends on how high the tubes are
biased, as higher biased tubes draw more current.
4 ohm 8 ohm 16 ohm
3) Speaker Connections
There are 4 gold binding posts located at the rear of each amplifier for hooking up
your speakers. The bottom of these jacks are color coded. The black one should be
connected to the negative speaker wire. There are three red jacks. Use the first one
(next to the black) if your speakers are 4 ohms. Use the second one if your speakers
are 8 ohms or use the third one if your speakers are 16 ohms.
These are industry standard 5 way binding posts that accept bare wire up to 8 AWG,
spade connectors or banana jacks.
MAKE SURE A LOUDSPEAKER IS CONNECTED TO THE AMPLIFIER AT ALL TIMES.
DO NOT OPERATE THE AMPLIFIER WITHOUT A WORKING LOUDSPEAKER
CONNECTED AS DAMAGE MAY RESULT.
Decware High Fidelity Engineering Co., East Peoria IL, USA www.decware.com

O W N E R S M A N U A L
STARTING YOUR AMPLIFIER FOR THE
FIRST TIME
Once you have the tubes installed and the power cord plugged in, the volume control
all the way down (counter-clockwise) you are almost ready to turn it on. BEFORE YOU
DO, we need to familiarize you with the BIAS controls. There are only two and they
are extremely easy to operate. (after the amplifier is turned on and properly
biased, we will connect your source component.)
We’ll start with the most important of the two controls, the one in the front of amplifier
located between the two meters. It is a small 1/4 inch shaft with no knob on it. The
knob is not used because this control is seldom adjusted, and a knob makes it easier
to accidentally bump it out of adjustment. This control is called the BIAS BALANCE
KNOB and it is simply used to make the two meters read the same value.
In the picture above you can see the meter on the left is for the KT88 output tube
directly behind it. Same for the meter on the right. These meters show how many
milliamps of current are going through each output tube. Since this is a push pull
amplifier, the objective is to get both tubes to draw the same amount of current so that
they match. This gives the best performance and the most power.
Decware High Fidelity Engineering Co., East Peoria IL, USA www.decware.com
 Loading...