

Page 1
DECWARE
Select Zen Triode Stereo Amplifier
Model SE84CS
DECWARE / High Fidelity Engineering Co.
1202 N.E. Adams Street Peoria IL 61603 USA
309-671-2428 Fax 309-672-1060 e-mail: [email protected]
www.decware.com (C)2000 All Rights Reserved
Page 2

DECWARE
Owner’s Manual
GETTING STARTED
Save your shipping carton. It has been designed to withstand the abuse of UPS. We tested it by
dropping amps off the roof of our facility onto the parking lot. The fact that your amp is perfect
condition is testimony that shipping carton works. Should you ever need to send your amp back
for warranty repairs, or trade it in on something else, you will NEED the original shipping carton.
TUBES
Your amp comes with premium tubes. The output tubes are from SVETLANA and are made in
St. Petersburg, Russia. These special tubes were originally designed for video applications in
the Russian military. Because of this, they have much wider bandwidth than common audio
tubes. The output tubes that come with your amplifier are factory matched and should last between 4 months and 2 years depending on the sensitivity of your speakers and how often you
clip the amp. The input tube (smallest one) can be either a 6N1P, a 6DJ8, or a 6922. Each effect a different signature so it is nice to collect all three for experimentation. Any 5U4 rectifier will
work (largest tube) and the popular 6BQ5/EL84 output tubes can be used in place of the SV83
output tubes as a direct plug-in replacement.
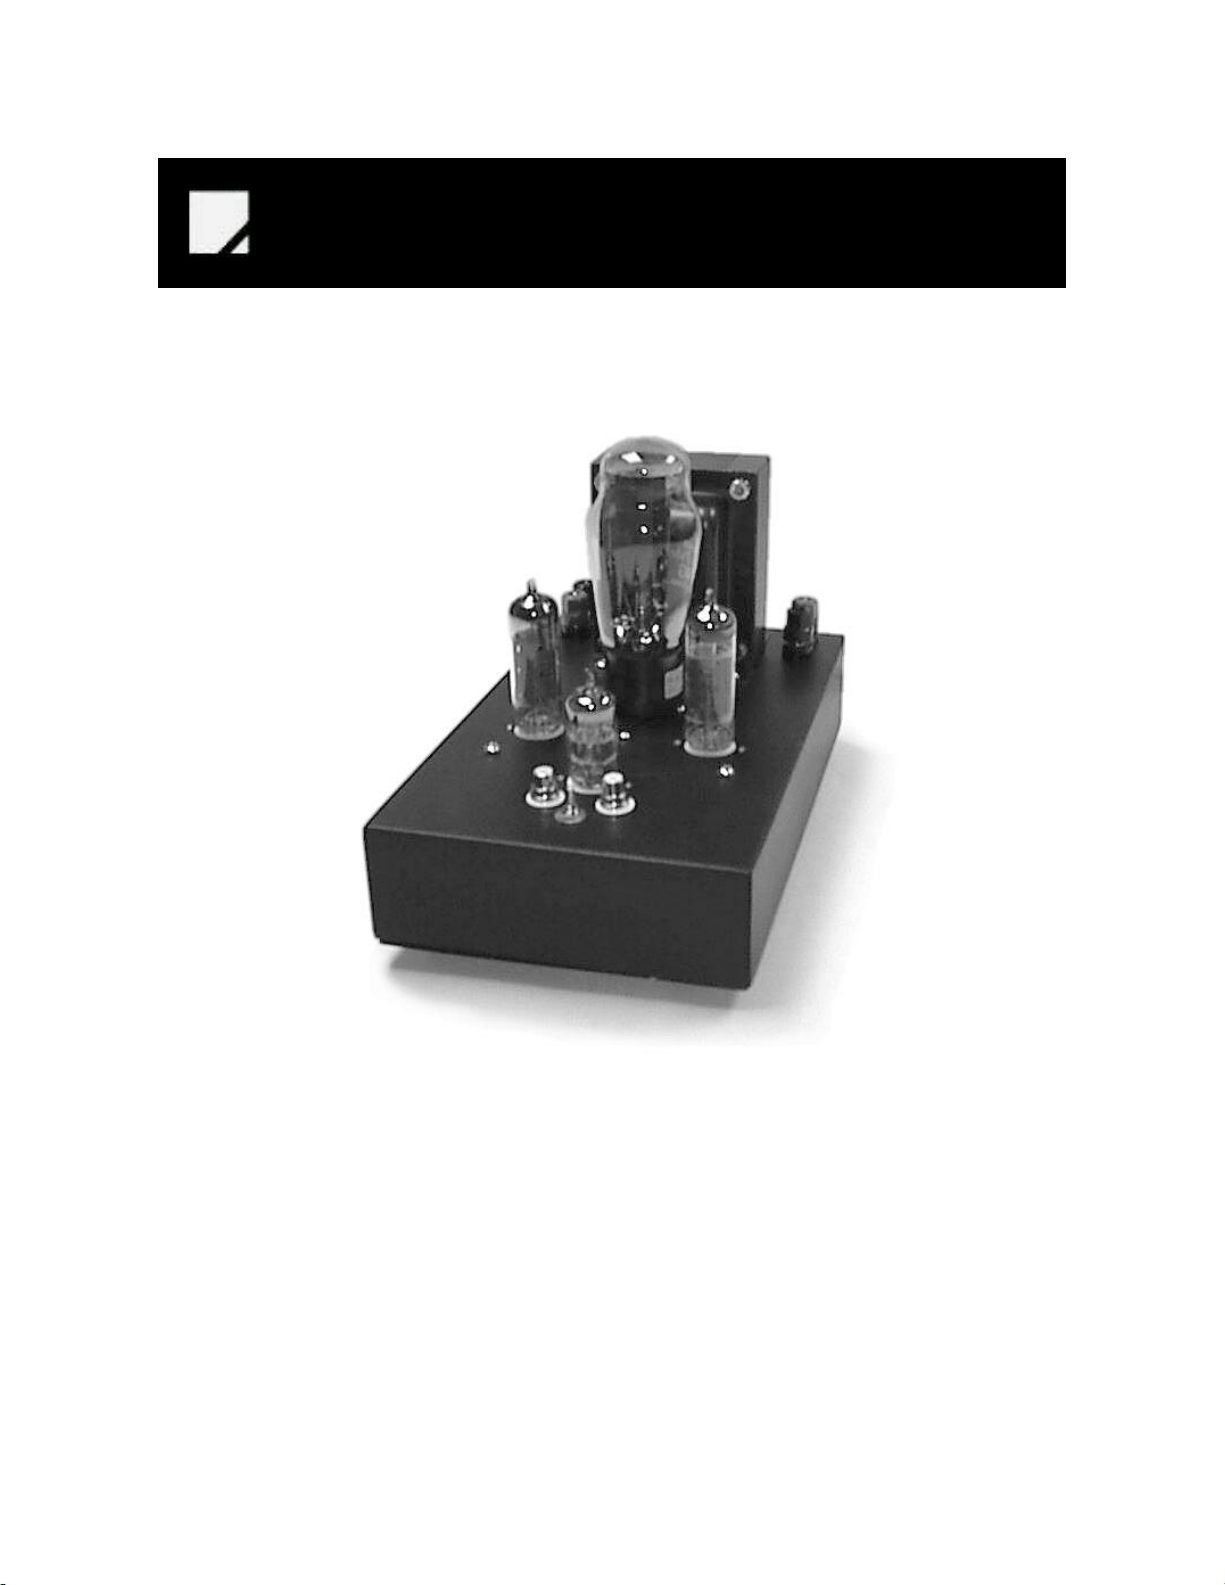
Look at the photo on the front of
this manual to see which tubes go where.
Now that you know which tubes do what, carefully install them into the amplifier. The rectifier
(5U4) should last for many years. If your amplifier was shipped with a Chinese 5U4 you will notice a small flash inside the tube when you first turn on the amp, and you will hear a mechanical
vibration inside the tube as it resonates with 60 cycle ac. This causes no harm to the amplifier
and is no cause for alarm. Most 5U4 tubes (especially new old stock USA made tubes) do not
do this, but of the current manufactured 5U4 tubes available, we feel the Chinese is one of the
better sounding.
BEFORE POWERING UP
Be sure that you always have speakers connected to this or any tube amp before turning
it on. Tube amps are typically the opposite of solid state in that you can short the speaker wires
together and nothing bad will happen.
DECWARE / High Fidelity Engineering Co.
1202 N.E. Adams Street Peoria IL 61603 USA
309-671-2428 Fax 309-672-1060 e-mail: [email protected]
www.decware.com (C)2000 All Rights Reserved
Page 3

DECWARE
Owner’s Manual
With your speakers and line level source connected, you can turn the amplifier on by flipping the
switch on the rear. The switch on the front is not the power switch, but rather a bias adjustment
for the input tube. It may be operated in either position, but should be changed only when the
amplifier is turned off.
After allowing the amplifier to warm up for a few minutes, you can slowly raise the volume (also
located on the rear)to the desired listening level.
DURING OPERATION
After about 30 minutes you will notice the amplifier getting very warm. This is intentional, the
higher temperatures brought on by the pure class A operation push the fidelity higher. Some areas of the chassis may be hotter than others. This is normal. However, proper ventilation is recommended. If you operate the amplifier inside a cabinet, allow a minimum of 4 inches on the
sides, and 10 inches above if possible.
The output tubes have a glass temperature of 200 degrees centigrade by design, and you can
be assured that they will be that hot if you touch them or your cat decides to lick one.
This is important to consider with the rather extremist option of front input jacks. Naturally if you
use these jacks, routing of your interconnects is important. If they touch the output tubes, they
will surely melt, unless of course you have our silver/Teflon cables that will not melt.
The last heat related comment is this - turn your amp off when your not using it. Tube life is directly tied to hours of operation so there is no point wasting it when your not listening.
INITIAL BREAK-IN EXPERIENCE
Unfortunately the esoteric parts in this SELECT amplifier besides being extremely fast, also
need to break-in. The combination of a fast amplifier and fresh parts can be a little rude so we
will explain the process.
Specifically it is the exotic capacitors that actually require the burn-in to sound right. The fastest
way to achieve a burn-in is to play the amplifier for 5 hours and then turn it off and let it rest for at
least 5 hours.
DECWARE / High Fidelity Engineering Co.
1202 N.E. Adams Street Peoria IL 61603 USA
309-671-2428 Fax 309-672-1060 e-mail: [email protected]
www.decware.com (C)2000 All Rights Reserved
Page 4

DECWARE
Owner’s Manual
Once you have repeated this process 5 times your soundstage will bloom and the focus will lock
into a crystal clear image.
If you listen to your amp during the burn-in process this is what you will experience: First the
amp will sound good followed by almost an immediate increase in harshness which after 30 minutes will change to dullness and continue to go back and forth. During this mind bending experience, the imaging and soundstage will be unstable and somewhat restricted.
There will be moments of incredible sound during this process and equally ugly sound. You will
know when the amp is burned-in because out of nowhere some night when your listening the
amp will bloom with a soundstage almost double in size and forever stay that way in all successive listening sessions. As you amplifier ages, it will season like fine wine and continue to do so
for many years.
DESIGN GOAL
The design goal behind this amplifier was simply to take our stock Zen Triode amp and push the
envelope of its design to the limit. It uses all the same parts as found in our Signature Mono
Blocks (model SV83S) and is every bit the equal in fidelity when power is not an issue. Perhaps
the purist amp in the world you will likely never find it to be the weak link in your audio system.
Since you only hear the weakest link in a high end audio system, you will find the quality of your
source and cables as well as your speakers to effect profound changes in the overall fidelity of
your system.
Like the stock Zen amp, this is intended for those who like to get lost in a huge 3-D image and
experience the emotional side of music that only this type of resolution can accurately convey
without grain or ear fatigue. It is not intended for loud playback levels, or parties. Unless of
course you have full range horn speakers around 100dB
efficiency in which case you can have both. We recommend 4 ohm speakers with simple
crossovers that are in excess of 90dB for most listening. This amplifier will run speakers down
to less than 1 ohm, and put out more power as it does so. Therefor you need not be concerned
about dips in your impedance curve when choosing a speaker.
DECWARE / High Fidelity Engineering Co.
1202 N.E. Adams Street Peoria IL 61603 USA
309-671-2428 Fax 309-672-1060 e-mail: [email protected]
www.decware.com (C)2000 All Rights Reserved
Page 5

DECWARE
Owner’s Manual
CIRCUIT DESIGN
The Zen amp is a combination of simple yet unique circuit design, high quality parts selected for
their signature,
intense quality control, and layout.
The small size makes possible the art of hand soldering the entire circuit with only parts leads
and no hook-up wire. The ground buss is silver and so are the cathode leads. The power supply is significantly over sized and breaths naturally with the music while holding steady to less
than a 0.05 millivolt tolerance at full clipping.
There are only 11 solder points between the input and output jacks of this amplifier making it actually simpler than a solid state Op-amp. Output transformers were meticulously designed and
hand built for this amplifier, as is the power transformer.
These features combine to create a unique and magical amplifier that will sound better than anything in its power range.
The small size makes possible the art of hand soldering the entire circuit with only parts leads
and no hook-up wire. The ground buss is silver and so are the cathode leads. The power supply is significantly over sized and breaths naturally with the music while holding steady to less
than a 0.05 millivolt tolerance at full clipping.
There are only 11 solder points between the input and output jacks of this amplifier making it actually simpler than a solid state Op-amp. Output transformers were meticulously designed and
hand built for this amplifier, as is the power transformer.
These features combine to create a unique and magical amplifier that will sound better than anything in its power range.
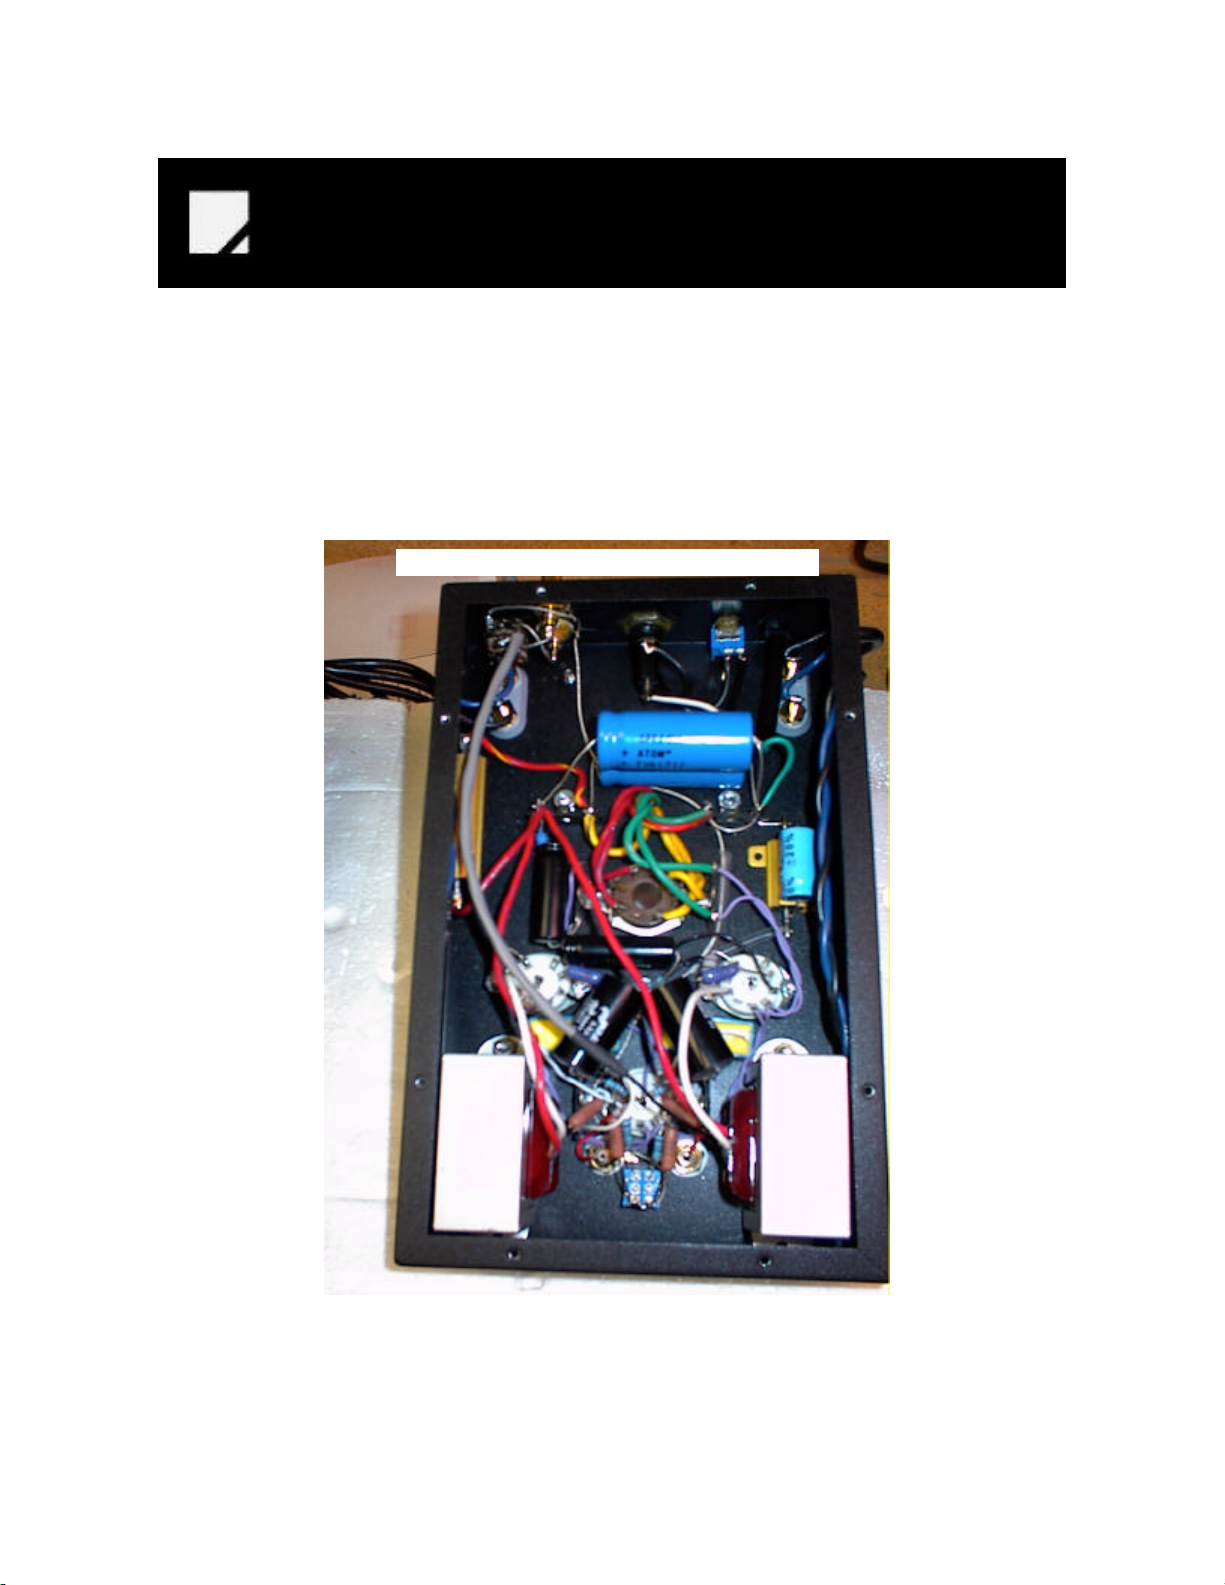
On the follow page is a picture of what your amplifier looks like under the hood (minus the shipping block between the transformers).
There are no user serviceable parts inside.
DECWARE / High Fidelity Engineering Co.
1202 N.E. Adams Street Peoria IL 61603 USA
309-671-2428 Fax 309-672-1060 e-mail: [email protected]
www.decware.com (C)2000 All Rights Reserved
Page 6
DECWARE
Owner’s Manual
There is 400 volts of DC living in here that can linger even after the amplifier is turned off.
The fuse is integrated into the IEC connector where the removable power cord plugs in. Use a 3
amp fuse only.
MODEL SE84CS INSIDE VIEW
DECWARE / High Fidelity Engineering Co.
1202 N.E. Adams Street Peoria IL 61603 USA
309-671-2428 Fax 309-672-1060 e-mail: [email protected]
www.decware.com (C)2000 All Rights Reserved
Page 7

DECWARE
Owner’s Manual
INPUT OPTIONS
This amplifier features input jacks on the rear with a rear mounted ALPs volume control so that
you can use it without a preamp. Using a good pair of interconnects directly from the outputs of
your CD player or DAC will clearly demonstrate how bad most preamps really are.
The front jacks on this amplifier are for the purist who wants the most direct connection possible.
Many people spend hundreds and sometimes thousands of dollars on interconnects only to plug
them into an amp that uses by comparison a far less expensive wire from the input jack to the
first gain stage. Imagine having a $500 cable and soldering a foot or two of 30 cent per foot beldon wire on the end?
Using the front jacks, your cables hook directly to the control grid of the input tube with no resistors in the circuit. In fact the only thing between the input jack and the control grid of the input
tube is a one inch piece of silver/Teflon wire. Using these jacks the volume control on the rear
becomes a partial shunt to ground and is completely removed from the signal path. The volume
control will still act to change the volume with a limited range. You will not be able to turn the volume all the way down in this configuration because the pot is lifted with a 1000 ohm resistor from
ground to prevent shorting the outputs of your source and potentially causing damage.
BIASING
One of the hallmarks of this amplifier like the stock Zen amp, is the bias switch on the front. In
the back position, the input tube is biased harder creating a larger voltage swing. This adds
gain, dynamics, presence. In the forward position, the input tube is biased a little more conservatively yielding a more laid back and neutral presentation. Which one will sound better is purely
subjective and we encourage you to experimented. Even though we do not officially recommend changing this switch without first turning the amp off, we change it “on the fly” while listening here at the factory all the time even though there is a significant “pop” that comes through
your speakers when its changed. Our feeling on this is that the amplifier being only a couple
watts is not enough power to damage the tweeters in 99% of all speakers we know of.
This switch is one reason why the Zen amps can use either of the three input tubes and sound
correct with all three. Fine tuning your amp can be accomplished with the combination of trying
all three types of input tubes, each with the bias switch in both portions. This is six distinct different signatures, and is like having 6 different amplifiers to play with.
DECWARE / High Fidelity Engineering Co.
1202 N.E. Adams Street Peoria IL 61603 USA
309-671-2428 Fax 309-672-1060 e-mail: [email protected]
www.decware.com (C)2000 All Rights Reserved
Page 8

DECWARE
Owner’s Manual
BIASING CONT.
The output tubes are self biasing and self balancing making reliable performance possible even
with un-matched tubes. You will never have to bias your amp, even after tube changes.
LISTENING
There is no doubt you will find the fidelity of this amplifier superior to almost anything within its
power range, however many people do not experience the full potential of its spell casting abilities due to weak links in their set-up. Usually speakers and room. Because of the incredible
resolution of this amplifier, you will find it easier to adjust your speakers properly for best imaging
because there is no time smearing, or filtering common in most amps.
Perhaps the amps strongest weapon is the huge soundstage it casts. To hear music get completely holographic, you need to work on room acoustics and speaker placement. Do not put
your speakers near any walls, especially the front wall. Do not put reflective surfaces (TV SETS)
between your speakers. Pull them out into the room several feet from the front wall and toe
them in to create a triangle with your listening chair.
Take the opportunity to try different speakers whenever possible, you may find that now with a
good amp the differences in speakers will be even more profound. Since you always hear the
weakest link in your system, you will want to pay attention to cables and speaker wires as they
too will make far more difference than you think.
Power conditioners (real ones) are recommended. Clean power is essential. To find out what
clean power sounds like, listen to the amp at 2:00 a.m. when there are no harmful or nasty harmonics in the power line. Once you have your first out of body experience during a late night listening session we have a forum on our web site where you can share your experiences with
other Zen Triode owners and get tips on set-ups that really work well.
USING YOUR AMP AS A MONO BLOCK
You can get another amp and bridge them into mono so that you can use one amplifier per
channel for more power. Because the Zen puts out more power into lower impedance loads,
bridging a pair of these amps will net you 6dB additional power before clipping. This is usually a
cost effective alternative to finding more efficient speakers.
DECWARE / High Fidelity Engineering Co.
1202 N.E. Adams Street Peoria IL 61603 USA
309-671-2428 Fax 309-672-1060 e-mail: [email protected]
www.decware.com (C)2000 All Rights Reserved
Page 9

DECWARE
Owner’s Manual
USING YOUR AMP AS A MONO BLOCK CONT.
To bridge a Zen amp, you simply either parallel or series the outputs of the amplifier. We recommend series, which means take a positive from one channel and connect it to the negative of the
other channel with a short piece of wire. The remaining two unused posts will serve your
speaker.
Remember that the inputs of both channels must see a signal if the amp is bridged. To do this
you can use a Y-Cable. If you decide permanent mono operation is in order we recommend you
send the amp back so we can short the input jacks together, and modify the volume control to
maintain the same 100K input impedance. This eliminates the need for a Y-Cable, and gives the
amp more gain which is handy if you are not using a preamp.
Unlike most stereo amps, bridging a Zen does not kill the fidelity. Most people who have done
so report added weight and smoothness to the presentation without loss of detail or focus. This
is made possible by the floating output transformers and the series connection of the outputs.
WARRANTY
Your new amplifier is built so well that during research and development we took one and
dropped it from a height of 15 feet onto concrete 40 times, followed by putting it into a paint
shaker for 24 hours. Badly beaten, the amp was retubed and played perfectly with ZERO internal damage. This is why we offer you a lifetime warranty on parts and labor to the original
owner. You have purchased a 100% hand made amplifier of the highest build quality in the industry. It was designed to give 30 years of trouble free service. Enjoy.
ADDITIONAL INFORMATION
and design theory can be found at our web site:
www.decware.com
DECWARE / High Fidelity Engineering Co.
1202 N.E. Adams Street Peoria IL 61603 USA
309-671-2428 Fax 309-672-1060 e-mail: [email protected]
www.decware.com (C)2000 All Rights Reserved
Page 10

DECWARE
Owner’s Manual
HELP WITH CHOOSING SPEAKERS
What the Zen amp likes is simple speakers with simple crossovers. Complex speakers with lots of components require complex crossovers that will waist much of the first watt as heat before it gets to the
drivers. Zobel impedance balancing networks also complicate things causing the Zen to clip at the zobel
frequency before anywhere else.
The Zen amp likes 4 ohm speakers better than 8 ohm. 16 ohm speakers are NOT recommended. It is
safe to run your Zen down to 1 ohm. That means that when choosing speakers you need not worry about
dips in the impedance curve of the speaker.
Efficient speakers will allow you to really hear what your Zen is capable of, as the detail and speed will
increase dramatically when going from 90dB to 96dB as an example. You can usually find and get by with
simple speakers that are less sensitive, but for those wanting to hear the ideal, you should consider quality designed horn speakers, and full-range drivers that require no crossovers. While not required to enjoy
this amplifier, these types of high efficiency speakers can not only resolve inner detail better, but also
reach pressures that would have your friends believing you have at least a 100 watt amplifier, and that is
always fun.
BELOW IS A LIST OF SPEAKERS THAT RANGE FROM JUST GETTING BY TO EXCELLENT
Audio Research C3L
Infinity Overture One's
Some AR monitors will work
B&W 602's
ESS AMT Monitors
JBL M5
JBL Control 5
ALL KLIPSCH SPEAKERS
AR TSW Monitors
Altec Voice of the Theater's
RA Labs (Roy Allison) Mini Reference monitors
AR M1's
Harbeth PL-3's
Energy Connaseur C-6 Speakers
Bose 301's / 901's
Jamo M7 mini monitors
Anything made using Lowther drivers
ESS AMT1's
Almost all Pro PA speakers or monitors
Linaeum LFX's
JPO Memorial using the Anniversary Issue Diatone
P610MB
Coincident Speaker Technology Triumph</
Paradigm MiniMonitor's
KEF Coda 7's or 8's
SYNONYME
PSB Alpha Series - All of them KEF
Q15 loudspeakers
JBL L300 Summits, 93db
Coincident Triumph Signatures
MB Quart D-40's
Hammer Dynamics Kits
Reynaud Twins 90dB 4 ohm
The Horns from TheHornShoppe.com
Coincident Triumph Signatures
DECWARE / High Fidelity Engineering Co.
1202 N.E. Adams Street Peoria IL 61603 USA
309-671-2428 Fax 309-672-1060 e-mail: [email protected]
www.decware.com (C)2000 All Rights Reserved
Page 11
YEL
yel/blk
YEL
RED
US transformer shown
RED/YEL
120 VAC
3 amp fuse
NOTE: We recommend wiring the primary for 240 volts even if your
voltage is 220 or 230. Use a 3 amp fuse.
1
WHT
2
3
240 VAC 50/60 cycle
For Japan 100 volt connect 1 to 4 and 2 to 5
Use 1,4 and 2,5 for line connection.
4
WHT/BLK
5
6
BRN
BLK
RED
GRN
GRN/YEL
GRN
YEL
yel/blk
YEL
RED
RED/WHITE
RED
GRN
GRN
ZEN TRIODE STEREO AMPLIFIER
MODEL SE84C-S
DECWARE
High Fidelity Engineering Co.
USA
www.decware.com
to 47K plate
to 47K plate
B+
2 ~ 20 uf 250 volt
10K
3.3uf 400v
Solen poly
1K 5 0 W DALE
B +
2
4
40 uf 450 volt
6.8 K 1 watt
40 uf 450 volt
5U4
6
8
SV83 SV83
6N1P
or 6922
4
545
4,
5
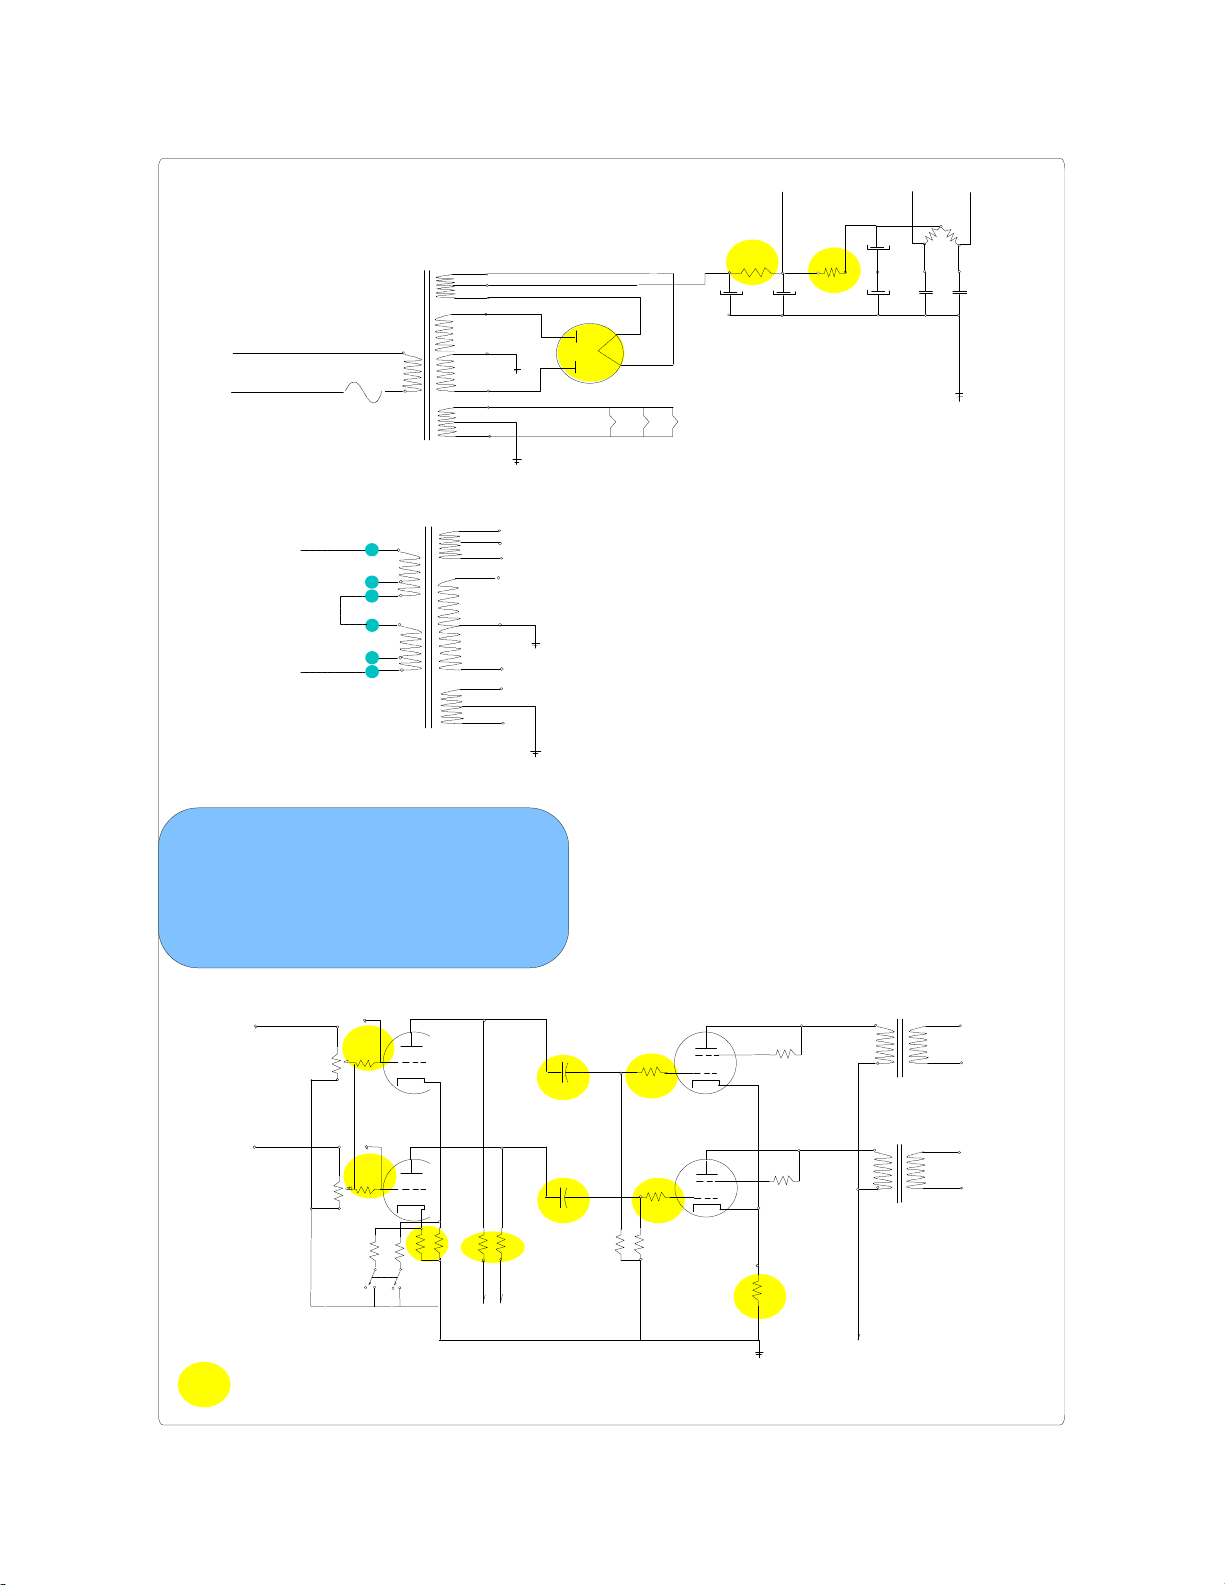
This schematic can be used to construct a Zen Triode Amplifier model SE84CS
or it can be used to upgrade a model SE84C to a model SE84CS. The yellow
areas indicate the upgraded parts that differentiate the two.
To test your amplifier after upgrading or assembly, connect speakers to the
outputs and turn the input volume control all the way down. Install all the tubes
and turn the unit on.
Your B+ voltage should be between 320 ~ 350 vdc. The bias voltage on your
output tubes (pin 3) should be between 9.5 ~ 12 vdc when referenced to ground.
If a 5Y3GT rectifier is used, the output tubes cathode resistor should be changed
from 100 ohms to 150 ohms.
AC ripple can be measured on the outputs and should be less than 2 millivolts.
The silver/teflon wire is used to connect the output tubes cathode (pin 3) to the
cathode resistor (100 ohm 25w ), and should be run in equal lengths from each
tube.
The outputs on this amp float with no reference to ground - do not connect the
negative to ground or the chassis. If you do you won't be able to SERIES the
outputs when bridging the amp for mono use.
This amp is built with a single point ground, located on one of power transformer
mounting bolts. The silver litz wire is used to carry the ground buss for the entire
circuit. Do not use the chassis for ground.
For safety, be sure to use the ground on your power cord, connecting it to the
single ground point as everything else.
10K
3.3uf 400v
Solen poly
UPGRADED
AREAS
6N1P or 6922
REAR INPUT
REAR INPUT
FRONT INPUT
1K
100 K
FRONT INPUT
INPUT GAIN CONTROL
1K
100 K
1 . 5 K
1
2
3
6
7
8
2 . 7 K
2 . 7 K
1 . 5 K
47 K carbon
To power supply
.01 WIMA FKP-1 600V
.01 WIMA FKP-1 600V
47 K carbon
330 K
SV83
2
330 ohm
SV83
2
330 ohm
330 K
7
9
1K 2 W
3
7
9
1K 2 W
3
100 ohm /25 Watt DALE
The areas marked in yellow represent the upgraded parts between a stock SE84C and this SELECT model (SE84C-S)
white
red
white
red
6 ohm
Common
6 ohm
Common
B+
 Loading...