

Page 1
T O R I I J R O W N E R S M A N U A L
Decware High Fidelity Engineering Co., East Peoria IL, USA www.decware.com
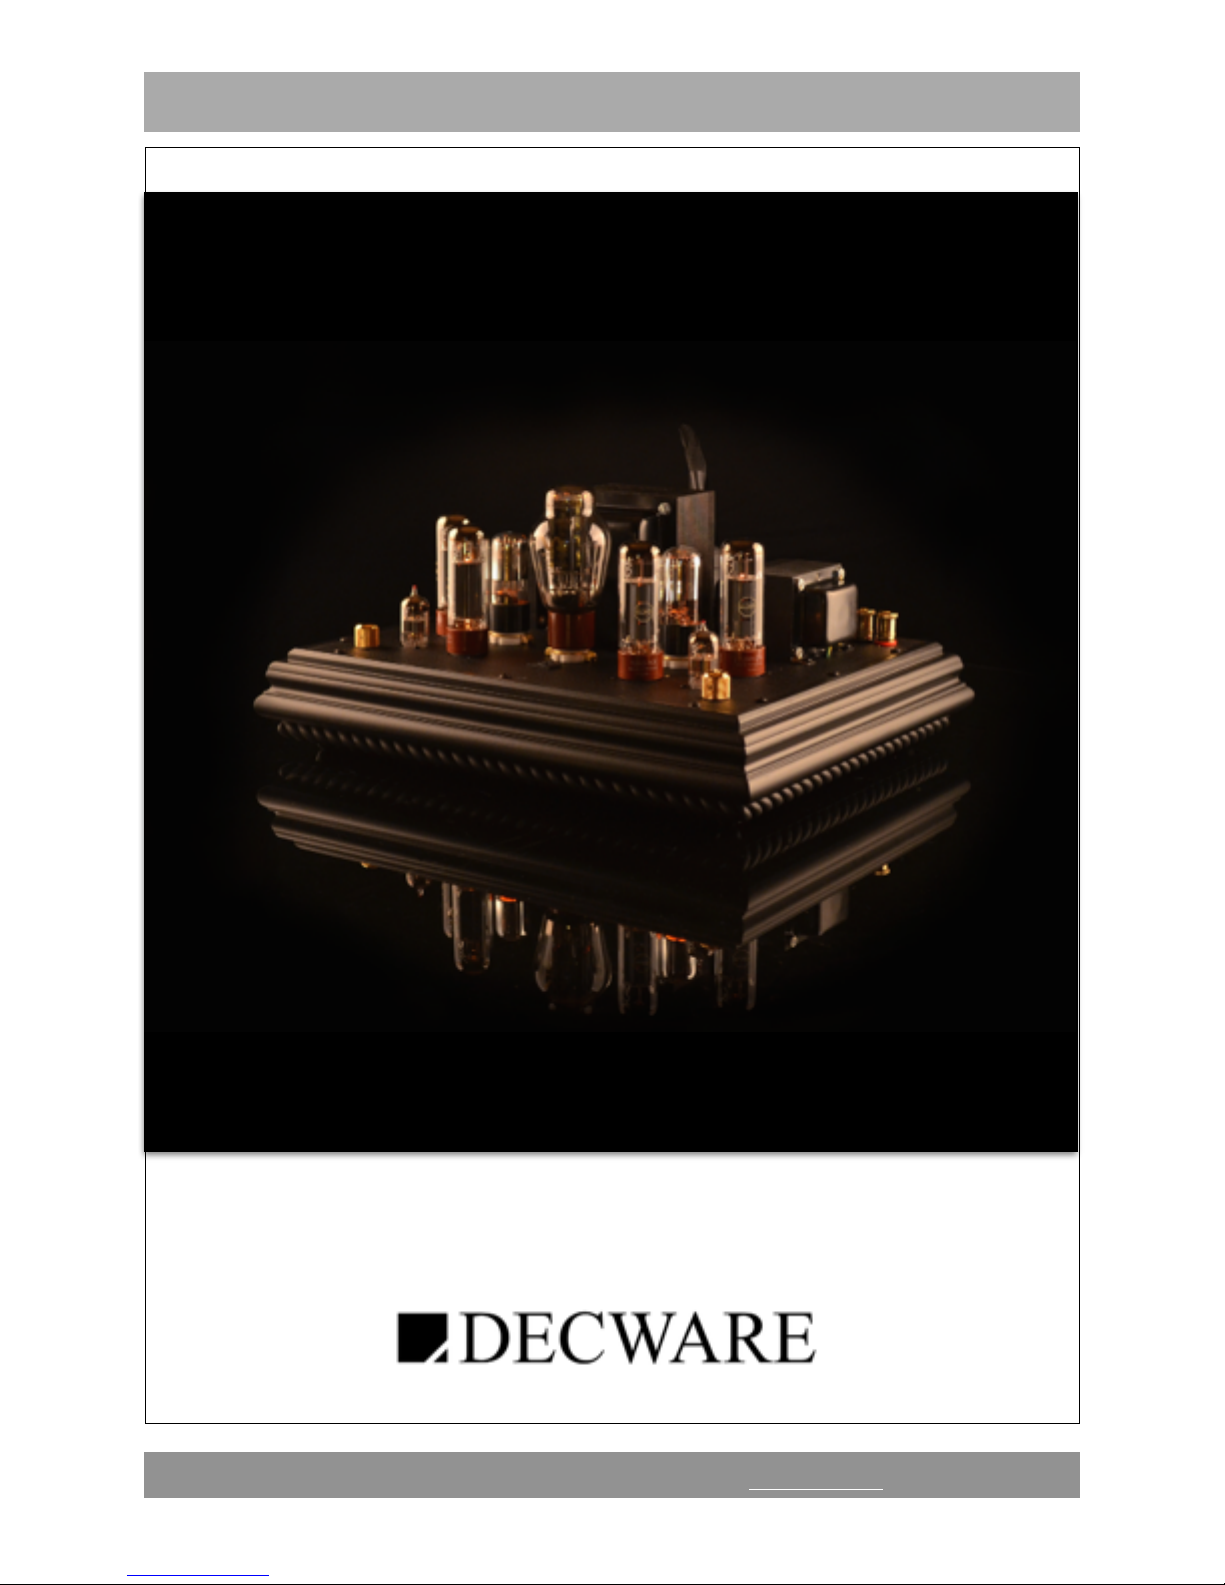
The Zen Torii Jr. Amplifier
MANUAL NO. 02 REV. DATE: 09/2015
MODEL TORIIJR
Page 2

T O R I I J R O W N E R S M A N U A L
!
!
THIS AMPLIFIER IS FACTORY BIASED !
FOR THE SPECIFIC QUAD OF"
EL34 / 6CA7"
OUTPUT TUBES THAT IT SHIPPED WITH."
!
DO NOT USE SUBSTITUTES OR EVEN DIFFERENT
QUADS of EL34’s UNLESS you RE-BIAS."
"
Decware High Fidelity Engineering Co., East Peoria IL, USA www.decware.com
Have no fear, adjusting the bias is super easy in a DECWARE amplifier and will be covered in detail at the end of this manual.
Page 3
T O R I I J R O W N E R S M A N U A L
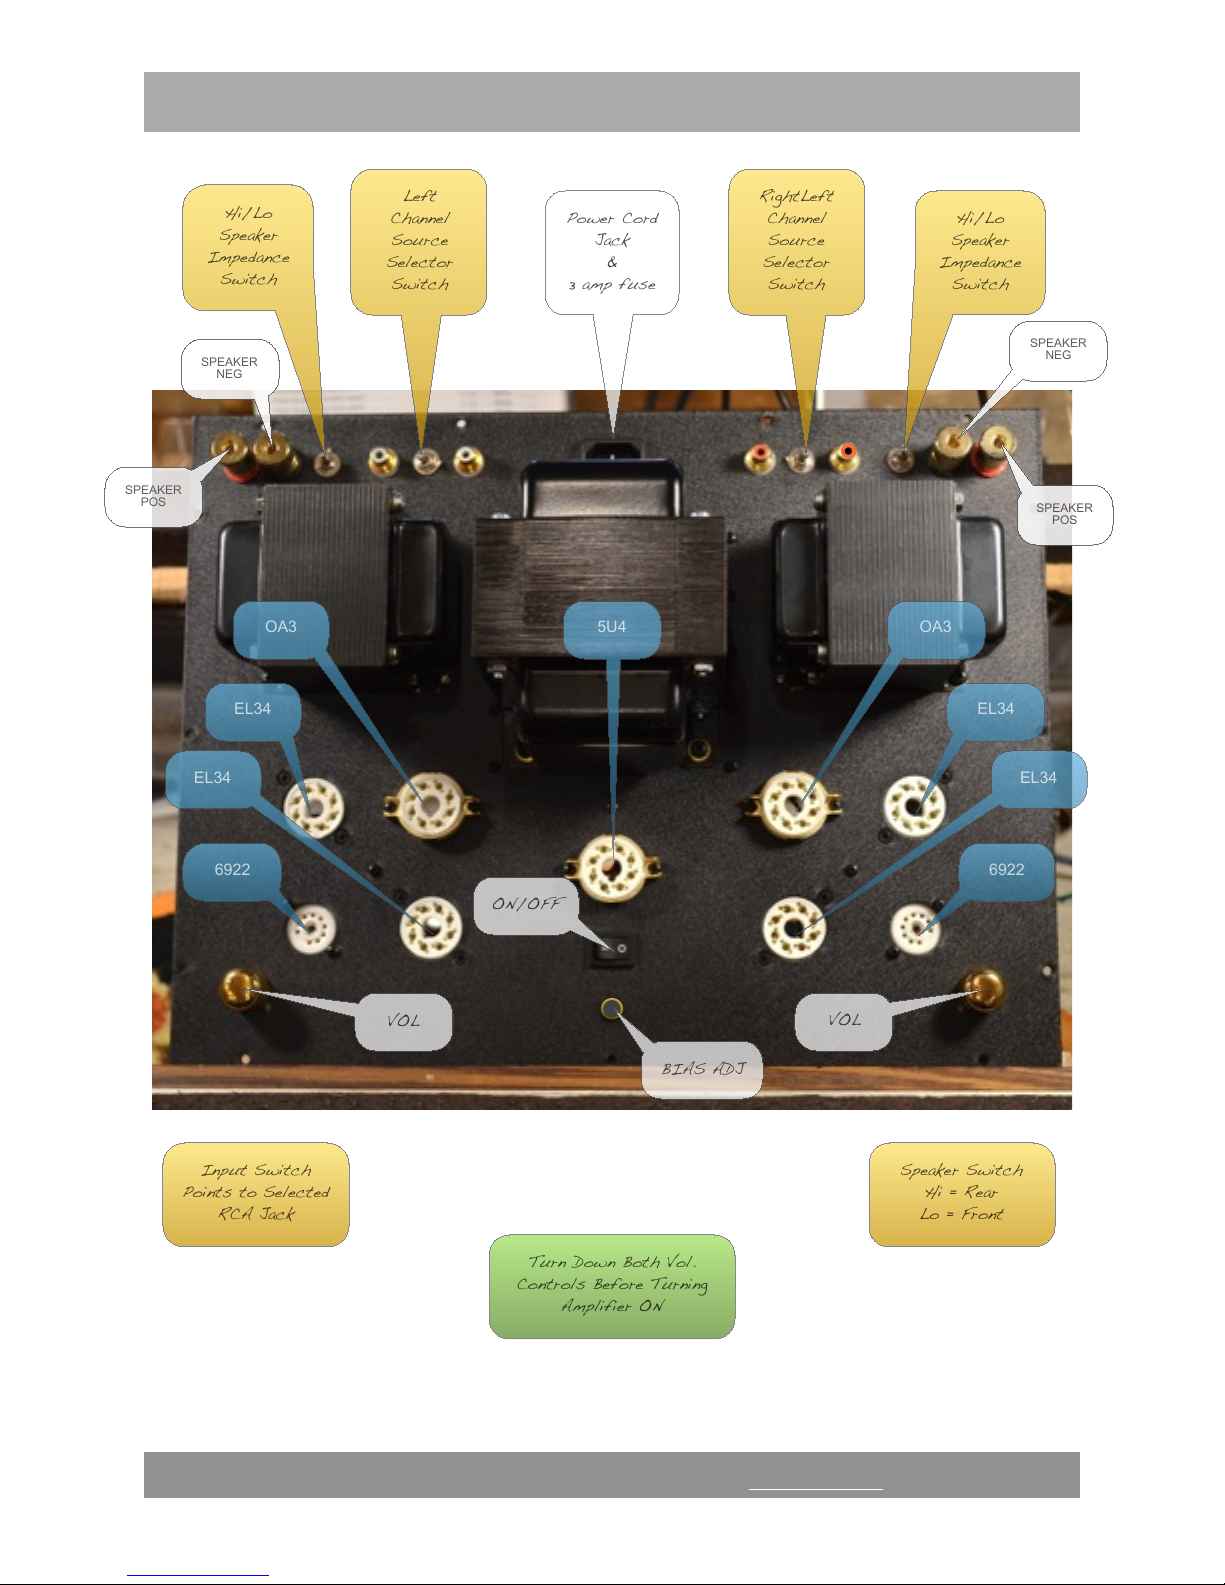
FIG. 1!
!
!
!
Decware High Fidelity Engineering Co., East Peoria IL, USA www.decware.com
Left
Channel
Source
Selector
Switch
RightLeft
Channel
Source
Selector
Switch
Power Cord
Jack
&
3 amp fuse
Hi/Lo
Speaker
Impedance
Switch
OA3
OA3
EL34
EL34
6922
EL34
EL34
6922
5U4
VOL
VOL
ON/OFF
Input Switch
Points to Selected
RCA Jack
Speaker Switch
Hi = Rear
Lo = Front
Hi/Lo
Speaker
Impedance
Switch
SPEAKER
NEG
SPEAKER
NEG
SPEAKER
POS
SPEAKER
POS
Turn Down Both Vol.
Controls Before Turning
Amplifier ON
BIAS ADJ
Page 4

T O R I I J R O W N E R S M A N U A L
!
!
!
INTRODUCTION
!
!
The TORII JR. was designed to offer the sound and performance of our very popular
TORII MK IV amplifier at a more affordable price without compromises in performance
or sound quality. In fact, at the writing of this manual it is still unknown which of the two
amplifiers actually sounds better!
!
The difference between the two is A) Physical Size, B) Adjustability and C) Power.
!
The TORII JR is physically smaller made possible by using a single larger power
transformer to create a stereo amplifier vs. dual mono like it’s bigger brother.
!
The TORII JR is a fixed bias amplifier set up specifically for a single type of output tube
so output tube rolling requires resetting the bias with each change unlike it’s bigger
brother.
!
The TORII JR is a 20 watt amplifier, slightly smaller than it’s bigger brother.
!
These changes while sounding like you’re getting less, may actually be giving you
more. For example, the smaller size makes possible a simpler internal layout with a
more direct signal path. The fixed bias and lack of output tube rolling, makes it
possible to dial the amp in slightly tighter and to a specific tube to maximize
performance.
!
The less power is easy to overlook in side by side testing, as the TORII JR ’s ultra-linear
output stage has a higher level of control with wider bandwidth.
!
The justification then for moving from a TORII JR to a TORII MKIV would be
adjustability. The adjustability can yield a potentially more or less forgiving sound
depending on what the owner wants.
!
That said, we are certain that there is nothing you would want to change about the
sound of the TORII JR, so this isn’t likely to be a problem.
!
Decware High Fidelity Engineering Co., East Peoria IL, USA www.decware.com
Page 5
T O R I I J R O W N E R S M A N U A L
!
!
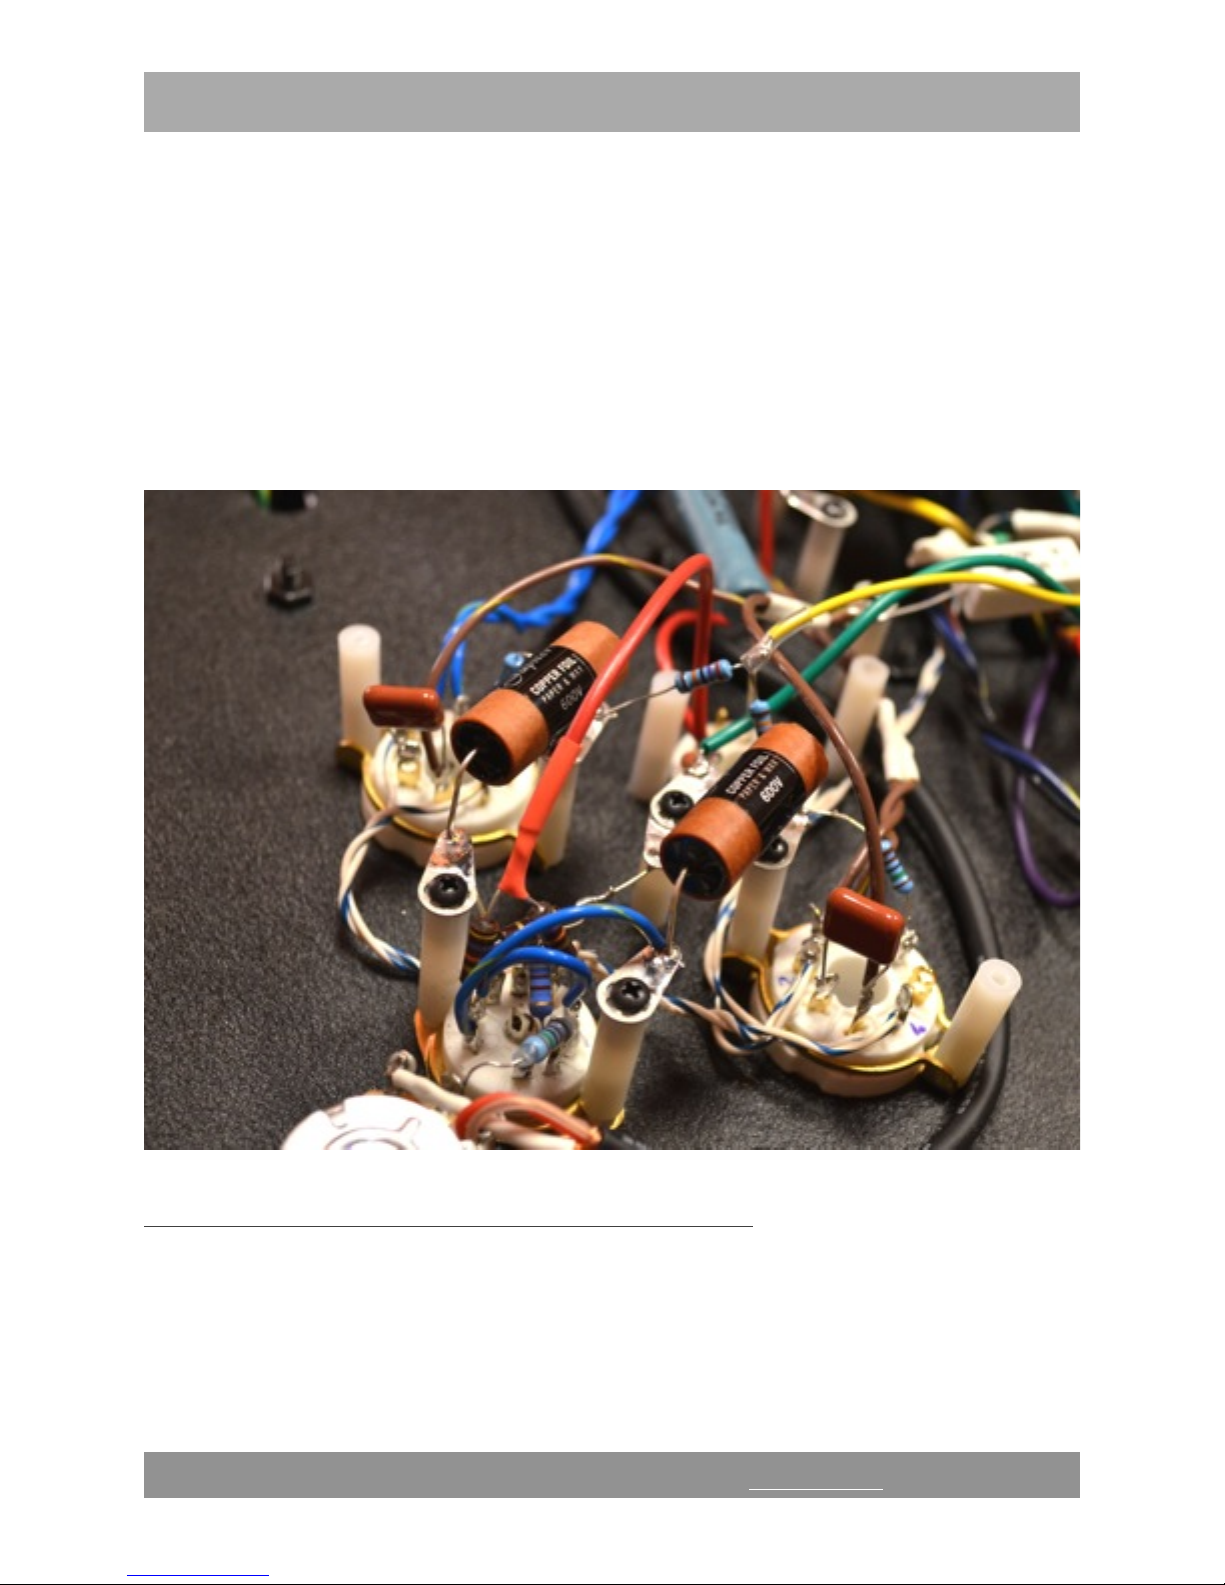
THE DECWARE ZEN LAYOUT
!
All Decware amplifiers employee a Zen Layout, but this particular amp is one of the
best. No circuit boards are used and if you’ll notice, the layout is symmetrical and
done in such a way that the entire audio circuit can be created with only the parts
leads themselves. This reduces solder nodes, wire, dissimilar metals, noise, coloration
and increases sonics and reliability. This is the only way to make an amplifier that
sounds this transparent.
!
You are looking at the entire audio circuit for one channel. Silver wired, silver bearing
solder, nice spacings to avoid magnetic field interaction between the parts, Impact
rated for 90G’s without lead bending during shipping and soldered by the best.
!
You can now see why the amplifier has such breathtaking transparency and speed, …
both things that are diluted by complexity.
!
Decware High Fidelity Engineering Co., East Peoria IL, USA www.decware.com
Page 6

T O R I I J R O W N E R S M A N U A L
!
!
FEATURES
!
Purist Signal Path
!
•
Silver input selector is located between a pair of input jacks on either side so that
only a one inch piece of silver wire is needed to connect the two, which increases
transparency while still allowing for source selection.
!
•
Dual volume controls are used and located 1 inch away from each input tube, again
eliminating large amounts of wire and further increasing transparency.
!
•
To date the best internal layout of the original torii circuit with a 50% reduction in
solder nodes which increases transparency even further.
!
•
Cryo Treated Beeswax caps are used just like the in the MK4, however in the TORII
JR, the value is 75% smaller giving a noticeable increase in speed and detail.
!
•
OA3 Tube regulation is used to regulate and filter the voltage feeding each input
stage which effectively decouples it from the power supply for grain free sound.
!
•
Dual Mono 500V F&T Power supply rails just like it’s big brother, the TORII MK4 give
better stereo separation and enhance headroom.
!
•
UFO Output Transformers with ultra flat response and a bandwidth reaching out to
100 kHz makes it possible to hear the increase in transparency from all the
improvements listed above.
!
•
The TORII JR. works well with or without a preamplifier.
!
•
20 WATTS into 8 ohms with 4 & 8 ohm speaker impedance silver switch.
!
•
Tube Rectification protects amps from large power spikes than can open or short
diodes and brings voicing opportunities to the customer.
!
•
Direct coupled 6922 based input stage, same as in the TORII MK4, gives a world of
opportunities for subtle changes to the voicing by simply trying different brands of
this very popular audiophile input tube.
!
!
!
Decware High Fidelity Engineering Co., East Peoria IL, USA www.decware.com
Page 7

T O R I I J R O W N E R S M A N U A L
!
!
OPERATION
!
Your TORII JR ships with matched quads of EL34 output tubes. If you ordered your
amplifier with stepped attenuators instead of standard volume controls, it is
recommended that you run matched input tubes to maintain perfect channel balance.
All TORII JR’s ship with carefully matched input tubes.
!
As you can see, configuring your amplifier with stepped attenuators can complicate
tube replacement since all the tubes need to be more carefully matched. Again, the
reason for this it to maintain perfect channel balance. The exception would be if you
are running a preamplifier with either dual volume controls or a balance control, in
which case that can be used to match the channels even when the tubes on the left
side of the amp do not perfectly match the tubes on the right side of the amplifier.
!
That said, once it is tubed up the sequence of start up is:
!
1) Turn down left and right volume controls all the way.
2) Make sure loudspeakers are connected to the amplifier on both channels.
3) Turn on the power switch and wait for tubes to warm up.
4) Press Play, or lower the tonearm ; )
5) Slowly raise the volume on each channel to the desired listening levels.
!
!
OA3 REGULATION
!
You will notice that the OA3 regulator tubes will flicker on and off intermittently during
the first 30 seconds of warm up. This is because in order to make an OA3 “fire up” a
certain amount of current must be drawn across it. When you first turn on your
amplifier, the tubes are cold and are not conducting any current. Then as the input
tubes warm up and begin to draw current, electrons begin to flow inside the OA3.
!
Understanding that the amount of current draw determines how the OA3 behaves, you
might also find it informative that the brightness of the glow is determined by the
current draw. Too little current, dim glow or possibly even flickering on and off. To
much current, bright glow and lots of heat created. Just right is a nice yellow/orange
glow with a temperature that you can keep you hand on for as long as you want.
!
You will notice when you turn the amplifier off that the OA3’s may flicker on and off a
few times as well, doing basically the reverse of when you turned the amplifier on. This
is normal.
!
Decware High Fidelity Engineering Co., East Peoria IL, USA www.decware.com
Page 8

T O R I I J R O W N E R S M A N U A L
!
!
Additionally, it should be understood that an OA3 tube takes approximately 20~22
minutes to fully stabilize. During this period it is advised that you keep the amplifier on,
for at least 20 minutes. Following this regimen will ensure your OA3 tube lasts for many
years, if not the life of your amplifier.
!
The OA3 is also known as a VR75. It is a vacuum diode that has a 75 volt drop across
it’s plate and cathode. This could btw., easily be done with a simple resistor, however
using the rare vacuum diode tube we gain 20 times more ripple (hum) reduction and
complete isolation from the power supply so that the power that feeds the input stage
is nearly perfect like a battery. This makes possible the jet black backgrounds you
hear that are essential to underpin the amazing layering that this amp projects.
!
It should be mentioned that the voltage drop across the OA3 determines the DC
voltage that feeds the input stage. With an oA3, the input stage performs well with low
distortion and the maximum amount of clean gain. Occasionally when the full 20 watts
of the amplifier are not required, experimentation with VR90, VR150 tubes have proven
interesting. Since these tubes create a higher voltage drop, they also increase
isolation making them more like a pure battery. The increased voltage drop, lowers the
gain of the tube and increase the distortion of the tube once that gain window is
pushed. This results in a different clipping character and overall different sound to the
amplifier based on the particular input tube that is used. For example, you may drop
the power from 20 watts to 6 or 8 watts but within that zone realize better sound that
consequently better serves a high efficiency horn loaded speaker system.
!
The OA3 is in series between the power supply and the input stage meaning it will also
become a fuse for the input stage should the input tube exhibit a catastrophic failure or
short. In that case, the OA3 will likely flash and go dark killing all power to the input
stage and saving the internal parts in the amplifier from excessive stress. There are no
heat producing parts internally therefor nothing internally in the amplifier fails unless
the fuse was tampered with.
!
It is also worth mentioning that the OA3 tube does not get hot in this amplifier, but it
does get very warm. The other tubes in the amplifier by comparison can NOT be
touched. Temperature of the OA3 reaches around 105 degrees F. The EL34’s are
nearly 300 degrees F. The 5U4 typically runs at 220 degrees F (100 degrees
Centigrade).
!
While we’re talking about temperatures, it should be noted that overall heat was a
careful part of the design, not an after effect of the design. Heat will be discussed in
it’s own section of the manual.
!
!
!
!
Decware High Fidelity Engineering Co., East Peoria IL, USA www.decware.com
Page 9

T O R I I J R O W N E R S M A N U A L
!
!
5U4 TUBE REGULATION
!
The TORII JR uses a 5u4 rectifier to serve both channels of the amplifier. With a
capability of 1 amp, the 280 mA demand of the amplifier are well within the 5U4’s
comfort zone. You will find that different brands of 5U4 and 5U4 compatible rectifiers
will sound different in your amplifier, effecting bass and midrange quality. It’s worth
trying a couple different ones to see which sounds best.
!
We live in a day when it is still possible to acquire new old stock tubes (N.O.S) and it is
not that expensive to own a couple N.O.S. 5U4’s, or 5AR4’s to play with in your amp.
The results are generally promising.
!
It should be noted that some rectifier tubes, particularly those in today’s current
production have more tolerance in the elements inside the tube. This tolerance causes
“chattering” in some rectifier tubes which resonate at 50 or 60 cycles depending on
your country and voltage. If this happens, tapping on the tube firmly with your finger
can make it stop and return to silent operation, albeit usually for a temporary period of
time. We grade our factory tube complements so that tubes that chatter are never
shipped with the amp, but if you buy your own replacements, they might do this or
even our tubes can do this as a result of rough handling during shipping.
!
All tubes supplied in Decware amplifiers are hand picked and meticulously tested and
guaranteed for 90 days which is plenty of time to determine if you have an issue with
one.
!
!
TUBE ISSUES
!
Rectifier - If the rectifier glows, and the OA3 also has fired and is glowing, the rectifier
most likely works. Rare exceptions would be when only one plate is working instead of
two. In this case there is a sharp 60 cycle noise or hum present that goes away when
a new rectifier tube is inserted.
!
Output tubes - If the output tubes both glow and are both equally hot they are likely
working. If one tube is hotter than the other, or you see red hot aka “cherry” plates
inside the tube it means that the tube with the cherry plates that is also much hotter
than the other tube is going bad and should be replaced. Unless you have another
tube that tested with the same values as the one in the amp, it is best to replace all 4
output tubes with a new matched quad.!
Decware High Fidelity Engineering Co., East Peoria IL, USA www.decware.com
Page 10

T O R I I J R O W N E R S M A N U A L
!
!
It is possible for one output tube to fail or start to fail with the other output tube being
perfectly fine. If this happens only one half of the music (sine wave) will be reproduced
and the suspension of your loudspeaker will be the only thing reproducing the other
half. The most noticeable symptom of this is that the channel will drop to about 5 watts
and have high amounts of distortion.
!
Input tubes - the 6922 input tube consists of one half of the tube as the phase splitter
and the other half as a gain stage. The two halves are direct coupled. This means no
capacitor is used resulting in no phase shift so the perceived speed and honesty of the
amplified signal is communicated rather well above the norm. Symptoms of problems
occurring in the input tube could be lower power, increased distortion, drifting
loudness levels in that channel, noise, hum, lower gain, softer dynamics. If you’re not
sure, simply install a new input tube and see if you hear a big change.
!
Clearly, the best way to know if any of the above mentioned tubes are compromised is
to simply have a complete set of new tubes that are verified good. Decware would
obviously be your first choice for getting the best quality tubes for your amplifier.
Anyway, when you have a complete set of replacement tubes, you can fix 95% of any
problems your amp might ever develop over its lifetime.
!
To find out if one of the tubes is compromised in some way, first you must determine
which channel has the issue. One of the things we do when troubleshooting the
sound of an amplifier is to listen to only one channel at a time, and do so by switching
the interconnect cable between channels. This means we would take the left channel
interconnect and switch it manually between the left and right channel of the amplifier
and compare the sound. Doing this will let you hear which channel has the problem.
!
Once the channel with the problem is identified, you simply change either the EL34 or
the 6922 for that channel and see if the problem goes away. In rare cases you may
find the problem persists even after you have replaced both EL34’s and the 6992 in the
problematic channel. At this point to know if the problem is the tubes or the amp, take
all the tubes in the left channel as they are, and swap them with all the tubes in the
right channel. If the problem actually is a tube, the issue should switch sides. If the
problem does not switch sides, then it is either the source, preamp, cables or amplifier.
!
In summary typical tube problems can result in: Lower power, Higher Distortion, Noise,
Hum, Channel imbalances.
!
!
!
!
Decware High Fidelity Engineering Co., East Peoria IL, USA www.decware.com
Page 11

T O R I I J R O W N E R S M A N U A L
!
!
HEAT
!
The TORII JR. has been designed like many Decware amplifiers with a non-ventilated
chassis and a black steel plate to hold and distribute heat evenly throughout the
amplifier. There are two advantages to this technique, 1) Better Sound and 2) The
insides of the amp remain clean and factory new even after 30 years of operation.
!
The temperature of a TORII JR ramps from room temperature (76 degrees F) to max of
around 135 degrees F at a very slow and linear rate. Peak fidelity is reached early at
temperatures as low as 108 degrees.
!
Should the amp be enclosed in a cabinet with no ventilation in a high ambient room
temperature, it is possible for the amplifier transformer temperature to reach 140
degrees F., at which point the sound quality of the amplifier will begin to regress but
otherwise pose no harm to the amplifier.
!
It may be of interest to know that the reason this amplifier’s heat ramp is linear and
gradual over many hours is because the heat is not coming from current draw on the
power supply, but rather from the infra-red radiation of the tubes themselves. This
radiation is absorbed by the black steel chassis and stored as heat.
!
This amplifier runs slightly warmer than the larger TORII MK4 because it has almost the
same amount of tubes oriented into a much smaller area.
!
All this talk about temperature is to let you know the amp is designed to run warm to
optimize the sound.
!
!
INPUT SENSITIVITY
!
The TORII JR uses the same circuit as the all previous TORII amplifiers so it has a
similar input sensitivity of 1.9 Volts. That means on typical CD’s in a typical CD player
you can turn a TORII JR up between 75% & 90% before distortion is heard. If you use
a preamp, then the point at which the volume controls on the TORII JR distort will be
relative to how loud you have the preamp turned up. You can actually use this to your
advantage by turning the volume on the TORII JR down to around 1/2 and then run the
volume on the preamp higher to compensate. The result is often better sound.
!
!
Decware High Fidelity Engineering Co., East Peoria IL, USA www.decware.com
Page 12

T O R I I J R O W N E R S M A N U A L
!
!
SOURCE SELECTION
!
The TORII JR. has a silver contact source selector switch for each channel. It is
located directly in-between the two input RCA input jacks on each channel. The
handle of the switch will point to the jack that is selected. Using a switch for each
channel costs more but locating them in-between the input jacks makes it possible to
replace about 14 inches of shielded cable with a single 1 inch piece of silver wire.
!
!
VOLUME CONTROLS
!
Continuing the theme of eliminating all possible internal cabling, dual volumes were
chosen and located directly in front of each channel’s input tube. This again replaces
about 12 inches of shielded cable with a single 1 inch piece of silver wire. Also, for
amplifiers that are not configured with stepped attenuators, it is possible to make
infinitely fine adjustments to channel balance which in turn makes it possible to shape
your sound-stage around the non-symmetrical properties of your listening space.
!
!
SPEAKER IMPEDANCE SWITCH
!
The TORII JR uses the new DECWARE UFO wide bandwidth output transformers that
feature a dual output impedance to accommodate different loudspeakers that fall
primarily into but not limited only to the typical 4 and 8 ohm speakers. Since
impedance is reflected from the speaker backwards through the output transformer
and ultimately to the plate of the output tube, 4 and 8 ohm taps are only actually 4 and
8 ohms when the amp is designed at the most efficient point of the tubes plate curves.
For an EL34 that is typically around 4 kOhms. The TORII JR’s UFO’s are closer to 6.6
kOhms. This has many advantages, including more realistic air and timbre in the top
end and the ability to handle deep dips in loudspeaker impedance with grace.
!
The reason we listed the speaker impedance switch as HI and LO instead of 4 and 8
ohm, is because that’s exactly what it really is. We expect you to try the switch back
and forth many many times as you get used to your new amplifier until you determine
which of the two setting serves your speakers the best.
!
Remember a typical 8 ohm speaker can have dips below 3 ohms and peaks over 100
ohms. This is the reason why it’s not black and white. Trust you ears and you can
always be sure the switch is in the right position.
!
!
!
Decware High Fidelity Engineering Co., East Peoria IL, USA www.decware.com
Page 13

T O R I I J R O W N E R S M A N U A L
!
!
POWER CORD / VOLTAGES and FUSE
!
The Zen TORII JR can be wired for any country in the world. If you are in one country
and moving to another, just send the amp to Decware and have it rewired and fitted
with the proper power cord for the destination country. The IEC connector on the TORII
JR is the same high quality unit used in all of our amplifiers featuring an integrated fuse
holder with a spare fuse located inside it Costing 8 times more than the ones found in
most amplifiers it is most worthy of a good power cord.
!
The 120V TORII JR uses a 3 AMP 20mm fast blow fuse.
(220/230/240 volt customers use a 1.6 AMP 20mm fast blow fuse.)
!
The power cord itself, supplied with the amplifier is rated for no less than 10 amperes,
is fully shielded and has an earth ground. That said, the standardized IEC connector
used in the TORII JR will support most after market power cords. We recommend if
you want to explore what kinds of differences an “after market” aka “high-end” power
cord can make, you start with ours. We only make one, it’s silver, and comparable to
retail cords costing in excess of the price of your amplifier yet it costs only a couple
hundred bucks.
!
!
JACK ORIENTATION
!
The TORII JR. utilizes a vertical input/output jack orientation. This has two advantages:
!
1) You can remove the amplifier from the hardwood base by simply removing the wood
screws and separating the two. This makes it easy for the owner of the amplifier to
change the wood base his or herself at any time during ownership.
!
2) It greatly relieves stress in the cable connectors by diminishing leverage on the RCA
jacks, the banana jacks for the speaker binding posts, and the power cord itself. With
so many high-end cables being stiff, thick and or heavy, this is the best way to prevent
jack and connector fatigue that typically happens over time.
!
!
UFO OUTPUTS
!
Of interest would be that the TORII JR is the platform for testing Decware’s Ultra-linear
boutique UFO output transformer design.
!
Decware High Fidelity Engineering Co., East Peoria IL, USA www.decware.com
Page 14

T O R I I J R O W N E R S M A N U A L
!
!
!
ADJUSTMENTS / FEEDBACK
!
The TORII JR has ZERO global negative feedback and can therefor cast an
intoxicatingly deep sound stage in a well done room. The 3D imaging capabilities of
this product are benchmark and faithful to the recording.
!
Because this amplifier employes an ultra-linear output stage design combined with a
vacuum tube regulated power supply to handle the phase inverter/input stage, it gives
a very linear response just like the SET amps that inspired it. Due to this inherent
linearity, no treble or bass adjustments are needed nor provided.
!
!
INPUT TUBES
!
The input tube / phase inverter in the TORII JR is a 6922. Possible substitutions are a
6DJ8, 7DJ8, 6N23P. In rare cases, where high efficiency horn speakers are used and
only 5 watts are needed, a 6N1P can be used as it has the warmest signature and can
often times balance the forward nature of super efficient horn speakers.
!
!
ALTERNATE OUTPUT TUBES
!
Alternate quads of output tubes that could be used in this amplifier IF and ONLY IF the
amplifier is re-biased for that specific quad are: 6L6’s, 5881’s, KT77’s, 7027’s, KT66’s,
EL34’s, 6CA7’s.
!
If you desire to have a different sounding output tube, please refer to the end of this
manual on how to bias the amp for the specific matched quad of tubes you intend to
install.
!
!
!
Decware High Fidelity Engineering Co., East Peoria IL, USA www.decware.com
Page 15

T O R I I J R O W N E R S M A N U A L
!
!
OUTPUT TUBE DESIGN CHOICE
!
The TORII JR comes from a long line of TORII amps, which all have been designed
around EL34 output tubes. Although the big brother to this amp, the TORII MK4 can
use your choice of a variety of different output tubes, including KT66, KT77, 6L6
without adjustments, it is important to understand that the TORII JR, can not.
!
Due to the fixed bias design of this amplifier it must be adjusted for each specific quad
of output tubes you put it in it.
!
We chose the EL34 as the default tube in the TORII JR., because we feel due to the
ultra-linear output design the EL34 sounds best in this amp. EL34’s are the only tube
that can take advantage of the the Hazen Grid Mod which has been implemented in
this amplifier!
!
!
TUBE BIASING
!
The TORII JR has an adjustable fixed bias set to 40mA with the EL34 output tubes it
shipped with. Using anything else may increase the milliamps (mA) beyond this very
critical point so different quads and types output tubes MUST NOT BE USED without
re-adjusting the bias. Please see the section at the end of this manual titled “HOW TO
BIAS FOR DIFFERENT TUBES”
!
!
HAZEN GRID MOD
!
Supporting our choice of EL34 output tubes, is what we call the Hazen Grid Mod, aka
Christmas Comes Early Mod, where we couple the suppressor grid and cathode through a film
capacitor increasing clarity by reducing stray electron bounce. This pushes the sonics of this
popular tube up the fidelity later even higher. Other popular tubes like KT66, 6L6, KT77, KT88
etc., have the cathode and suppressor grid internally connected with a piece of wire and can
therefor not benefit from the Hazen Grid Mod.
!
!
!
!
!
!
!
Decware High Fidelity Engineering Co., East Peoria IL, USA www.decware.com
Page 16

T O R I I J R O W N E R S M A N U A L
!
!
!
TUBE ROLLING
!
The TORII JR can enjoy the benefits of tube rolling. Even though you can’t roll different
types of output tubes without re-biasing, you CAN roll different types of input tubes.
!
In addition to different input tubes, you may also try different brands of 5U4 rectifiers.
(The first filter section in the power supply features a 47uf 500V cap. If using 5u4 substitutions, such as
274B, 5AR4, GZ34, etc., make sure the tube can handle 500 mili-amps or more and can handle the
inrush of the largish 47uf cap.)
!
THE BIGGEST change to how your amp sounds will likely be from the input tubes, of
which there is one for each channel. Different brands of the same tube will usually
sound different.
!
You can be assured that the stock tube compliment that shipped with your amp will be
hard to beat, as it was carefully tested in your actual amplifier and evaluated during
several listening tests!
!
!
REPLACEMENT TUBES
!
Replacement tubes are always available from Decware’s website or you can call us
directly. The URL is: http://www.decware.com/newsite/tubesets.htm
!
!
Decware High Fidelity Engineering Co., East Peoria IL, USA www.decware.com
Page 17

T O R I I J R O W N E R S M A N U A L
!
!
SHORTING SPEAKER WIRES
!
When your tube amp is on and you want to unhook your speaker wires without turning
the amplifier off, it is an acceptable practice to SHORT the speaker wires TOGETHER.
!
Yes, it’s true, believe it or not, this actually protects the output transformers from
operating without a load. They can handle a dead short without issue. This is JUST
THE OPPOSITE of many solid state amplifiers, which as you may know, can blow up
instantly if you short the speaker wires together."
!
!
GROUND LOOPS, POWER STRIPS and HUM
!
Whenever we connect more than one audio component together we run the risk of
creating a ground-loop which causes hum.
!
A ground loop happens when the path to ground in one component finds an easier
(less resistive) path through another component via the ground or shield wire in your
interconnects. This is a common problem when components are plugged into different
outlets or a power strip is used, as the resistance varies at the ground point of each
receptacle.
!
Ways to combat the problem are to try and plug everything into the same outlet when
possible, do not use power strips, try to keep the length of the power cords the same.
!
If all else fails, you can try lifting the ground on one or more component until the hum
goes away.
!
How to tell if you have a ground loop causing hum - simply remove all your
interconnects from the input jacks of your amplifier so that the only thing hooked to it is
your loudspeakers. You should hear no hum on all but the most efficient speakers and
even those would sound quiet from the listening chair some 6 or 8 feet back. If you do
hear hum, then it’s likely the amplifier assuming your speaker wires are not wrapped
around a power cord somewhere. The most likely cause if it is the amplifier itself would
of course be tubes. Start by installing a new rectifier tube and see if that corrects it. If
not you can systematically try the remaining tubes in the amplifier.
!
If the amp is acceptably quiet just hooked to your loudspeakers with no input cables
connected to it, then connect your inputs to one component at a time and listen for
hum. If you get hum, then you either have a ground loop between that component and
the amplifier, or that component is bad.
!
!
Decware High Fidelity Engineering Co., East Peoria IL, USA www.decware.com
Page 18

T O R I I J R O W N E R S M A N U A L
!
To prevent ground loops the TORII JR employes a separated audio ground and earth
ground/chassis shield by using a 10ohm resistor across a .68uf 600V poly film cap for
noise and hum free operation even in adverse conditions. It’s a fairly effective ground
loop eliminator/ preventer.
!
!
BREAK-IN aka BURN-IN
!
When your amplifier is new, it will not sound as good as it does when it’s several
months old. The reason for this is the internal parts breaking in. The process typically
involves the amp sounding a little harsh, or a little muddy, or having premature
distortions when run at higher volumes. It can change from one symptom to another in
as little as 15 minutes time. This process usually stops with less than 100 hours of use.
Of course after the initial burn-in process, the amp will continue to season and refine
over several months. That said you can still expect the amp to sound good and be
more than usable right out of the box.
!
!
SEASONING
!
The older your amplifier gets the better it will sound. This helps to explain why used
Decware amps exceeding ten years of age often get their original purchase price on
the used market in the rare event that they get sold.
!
!
SOUND QUALITY
!
The fidelity of the amplifier, it’s frequency balance, pace, transparency, imaging and
sound stage are extraordinary due in part to the small number of parts to get in the way
of the music. That said, you will only ever hear it sound as good as the weakest link in
your system, which could be cables, a preamp, your source component. The only way
to hear how good the amplifier CAN sound would be to hook an analogue master tape
machine with a live two track master tape where the recording was done with top notch
microphones and engineering. Even the worlds most expensive DAC and
TRANSPORT will not sound as good, so obviously a 2500.00 DAC and transport is
going to be a step down, and a 500.00 CD player is going to be another rather large
step down. That means that you WILL handicap your amplifier, the question being
HOW MUCH. Moral of the story is that given the choice to replace this less than two
thousand dollar amp (wholesale price) with one 10 times as expensive will sound NO
WHERE NEAR as good as keeping this amp and spending 10 times as much on a new
source.
!
!
Decware High Fidelity Engineering Co., East Peoria IL, USA www.decware.com
Page 19

T O R I I J R O W N E R S M A N U A L
!
!
SPEAKER PLACEMENT
!
The Zen TORII JR should be able to make even a refrigerator size speaker disappear.
Using the amp to watch movies in two channel mode often fools guests into thinking
you have surround sound due to the amplifiers impressive imaging capabilities. That
said, give yourself a chance to experience exquisite two channel listening by
occasionally pulling your speakers out into the room several feet away from the walls.
Toe them in to create an X just in front of your face and sit anywhere from 5 to 7 feet
back. Close your eyes and we’ll see ya when you return to Earth.
!
!
WARRANTY
!
Your amplifier comes with a lifetime warranty to the original owner. It covers defects in
materials and workmanship. If you decide to sell your amp for any reason, the buyer
can return the amplifier to us for inspection at which point we can offer to transfer the
lifetime warranty to him or her for a reasonable fee.
!
If you think your amp needs to return to the mothership, please call us first or at least email with a description of the problem. Many of the amps sent here for repair without
that call or e-mail have nothing wrong with them. We can often prevent an
unnecessary trip back to Decware by consulting you over the phone and helping you
to troubleshoot the problem. Decware amps are built to outlast you, and are frankly
damn hard to break which we understand is definitely not the norm with many mass
produced tube amplifiers.
!
Returns should be sent to our main office. Please use the Return Form on our web site
for the correct address and required information. Look for it under the “SERVICE” tab
on the menu bar.
!
!
Decware High Fidelity Engineering Co., East Peoria IL, USA www.decware.com
Page 20

T O R I I J R O W N E R S M A N U A L
!
!
HOW TO SET THE BIAS FOR DIFFERENT TUBES
!
We’ve made it possible for you to adjust the output tube bias in the TORII JR any time
you want by following the procedure outlined on this page.
!
You only have to reset the bias when you install new output tubes. Even though you
may purchase more EL34’s like the ones your amplifier came with, it is almost
guaranteed that the new tubes will bias differently than the amplifier’s original tubes
and will therefor require some adjustment to the bias control to restore the original set
point of 40 mA (0.825 volts DC).
!
YOUR AMPLIFIER SHOULD NEVER BE BIASED HIGHER THAN 40mA.
!
To set the bias you will need a digital volt meter, and a small flat blade screwdriver.
!
Below are two examples of digital multimeters from Parts-Express.com that run less
than $15.00
!
!
!
!
!
!
!
!
!
!
!
!
!
!
!
!
!
!
!
!
Decware High Fidelity Engineering Co., East Peoria IL, USA www.decware.com
Part # 390-500
Part # 390-738
Page 21

T O R I I J R O W N E R S M A N U A L
!
!
Plug the RED (+) and BLACK (-) probes into the meter and set the meter to read DC
volts on the 2 volt scale.
!
!
Decware High Fidelity Engineering Co., East Peoria IL, USA www.decware.com
DC
2 VOLT
SCALE
Page 22

T O R I I J R O W N E R S M A N U A L
!
!
Some multimeters are auto-ranging in which case you would only need to set it to DC
voltage.!
Decware High Fidelity Engineering Co., East Peoria IL, USA www.decware.com
DC SCALE
Page 23

T O R I I J R O W N E R S M A N U A L
!
!
Once you have your meter ready, remove both of the input tubes from the TORII JR and
turn the amplifier on.
!
!
!
!
You will see after you remove the 9 pin input
tubes that there is a hole in the center of each
socket. These holes are where you stick the
probes from your meter. Insert the black probe
in the left hand socket, and insert the red probe
in the right hand socket as shown below.!
Decware High Fidelity Engineering Co., East Peoria IL, USA www.decware.com
BIAS ADJ.
Page 24

T O R I I J R O W N E R S M A N U A L
!
!
Once you have your digital multimeter connected to the amplifier and the amplifier is
on, you will see a voltage reading on the meter.
!
Make sure your amplifier has warmed up for several minutes prior to making your final
adjustment.
!
Using a small flat blade screwdriver insert the screwdriver into the bias adj. slot and
turn counter-clockwise to lower the bias voltage on your meter, or clockwise to increase
the bias voltage on your meter.
!
Some EL34 tubes will require the adjustment to be turned fully clockwise as far as it will
go which is normal for some EL34’s.
!
THE VOLTAGE on the meter should read between 600 millivolts (0.600 volts) and 900
millivolts (0.900 volts). If the meter reads 1000 millivolts (1 volt) or higher you should
turn the bias screw counter clockwise until while trying to reach the ideal figure of 825
millivolts (0.825 volts).
!
Below is a chart of what the voltages mean.
!
30mA tube bias = 0.606 VDC (approx. 600 millivolts)
!
40mA tube bias = 0.825 VDC (approx. 825 millivolts)
!
50mA tube bias = 1.040 VDC (approx. 1040 millivolts)
!
ALWAYS BIAS ANY TUBE YOU INSTALL TO 40mA / 0.825 VDC
!
!
YOU MUST SET BIAS EVERY TIME YOU CHANGE THE OUTPUT TUBES. Output tubes
should always be purchased and changed in matched quads ONLY. Do not run
matched pairs in the amplifier, only run matched quads. Alternate tubes may be used
in this amplifier such as 6L6, KT77, KT66, 7027. All of these tubes however will require
considerable adjustment to the bias screw when compared to EL34.
!
Decware High Fidelity Engineering Co., East Peoria IL, USA www.decware.com
Page 25

T O R I I J R O W N E R S M A N U A L
!
!
!
With your tubes biased at 40mA (0.825Volts) combined with TORII JR’s low plate
voltage of 330 VDC, you will find that output tubes last a long time in this amplifier.
Many weekend warriors can expect to get 2 or 3 years from a set of tubes with no
reduction in sound quality. Daily listeners should check the bias every 6 months to see
how far it has drifted and ultimately replace the tubes every year or two.
!
The above applies to output tubes. Input tubes may last up to twice as long. Rectifiers
often even longer.
!
Once you have a steady voltage between 0.800 and 0.890 you can consider the output
stage biased to an acceptable level. Now turn the amplifier off and let it sit for at least
1 minute before you install the input tubes. Once the input tubes are re-installed you
may turn your amplifier on and use it normally.
!
BTW, If you’re new to biasing tube amplifiers, you may not realize that many tube
amplifiers require you to repeat this process for EACH output tube and will have 4 bias
adjustment screws. This might seem cool at first, however once you have the first tube
set to where you want it, it changes as you adjust the second tube at which point you’ll
have to re-adjust the setting for the first tube, and then re-adjust the second tube
again… you get the idea. In the TORII JR, all 4 tubes will bias exactly the same
provided you have a matched quad, so setting the bias typically takes under 1
minute. :)
!
It probably should be mentioned that most Decware amplifiers are self-biasing
meaning there are no adjustments to the bias… not even when changing from one type
of tube to another… everything is naturally balancing. This is true of the TORII MK4,
the big brother to the TORII JR. The advantage of the MK4, is that you can roll different
output tubes in matched pairs without ever needing to adjust anything, or checking
anything with a meter. Naturally this approach would facilitate avid tube rolling and so
it is often said that if you want things to be super simple with no adjustments, and like
to roll tubes, the MK4 is an attractive choice.
!
!
!
Decware High Fidelity Engineering Co., East Peoria IL, USA www.decware.com
Page 26

T O R I I J R O W N E R S M A N U A L
!
!
PERSONAL NOTE
!
We want this to be the best sounding amplifier you’ve ever owned and since
these amps area like our children we have a very vested interest in their
continued success. Please call us any time you have questions or need advise
on how to improve your sound, or room acoustics. We want you to love
this thing as much as we do, and will bend over backwards to make sure you
do with unrivaled customer support.
!
It is also worth noting that your perception of how good this amp sounds
will be ultimately determined by the weakest link in your audio chain. On that
note congratulations for purchasing a hand made point to point silver wired
tube regulated stereo amplifier with bandwidth out to 100KHz, as you can now
be certain that from this point forward your amplifier will never be the weak
link in your audio chain. It will always be cables, source, preamp if you use
one, and speakers or room that determine how good your amp will sound.ol
!
Please reach out any time you want help determining what the weakest link is
in your current audio system… I’ll be more than happy to talk with you and
lead you to an answer that makes sense.
!
!
-Steve Deckert
-Decware High Fidelity Engineering Co.
Decware High Fidelity Engineering Co., East Peoria IL, USA www.decware.com
 Loading...