

Page 1
OPERATION MANUAL
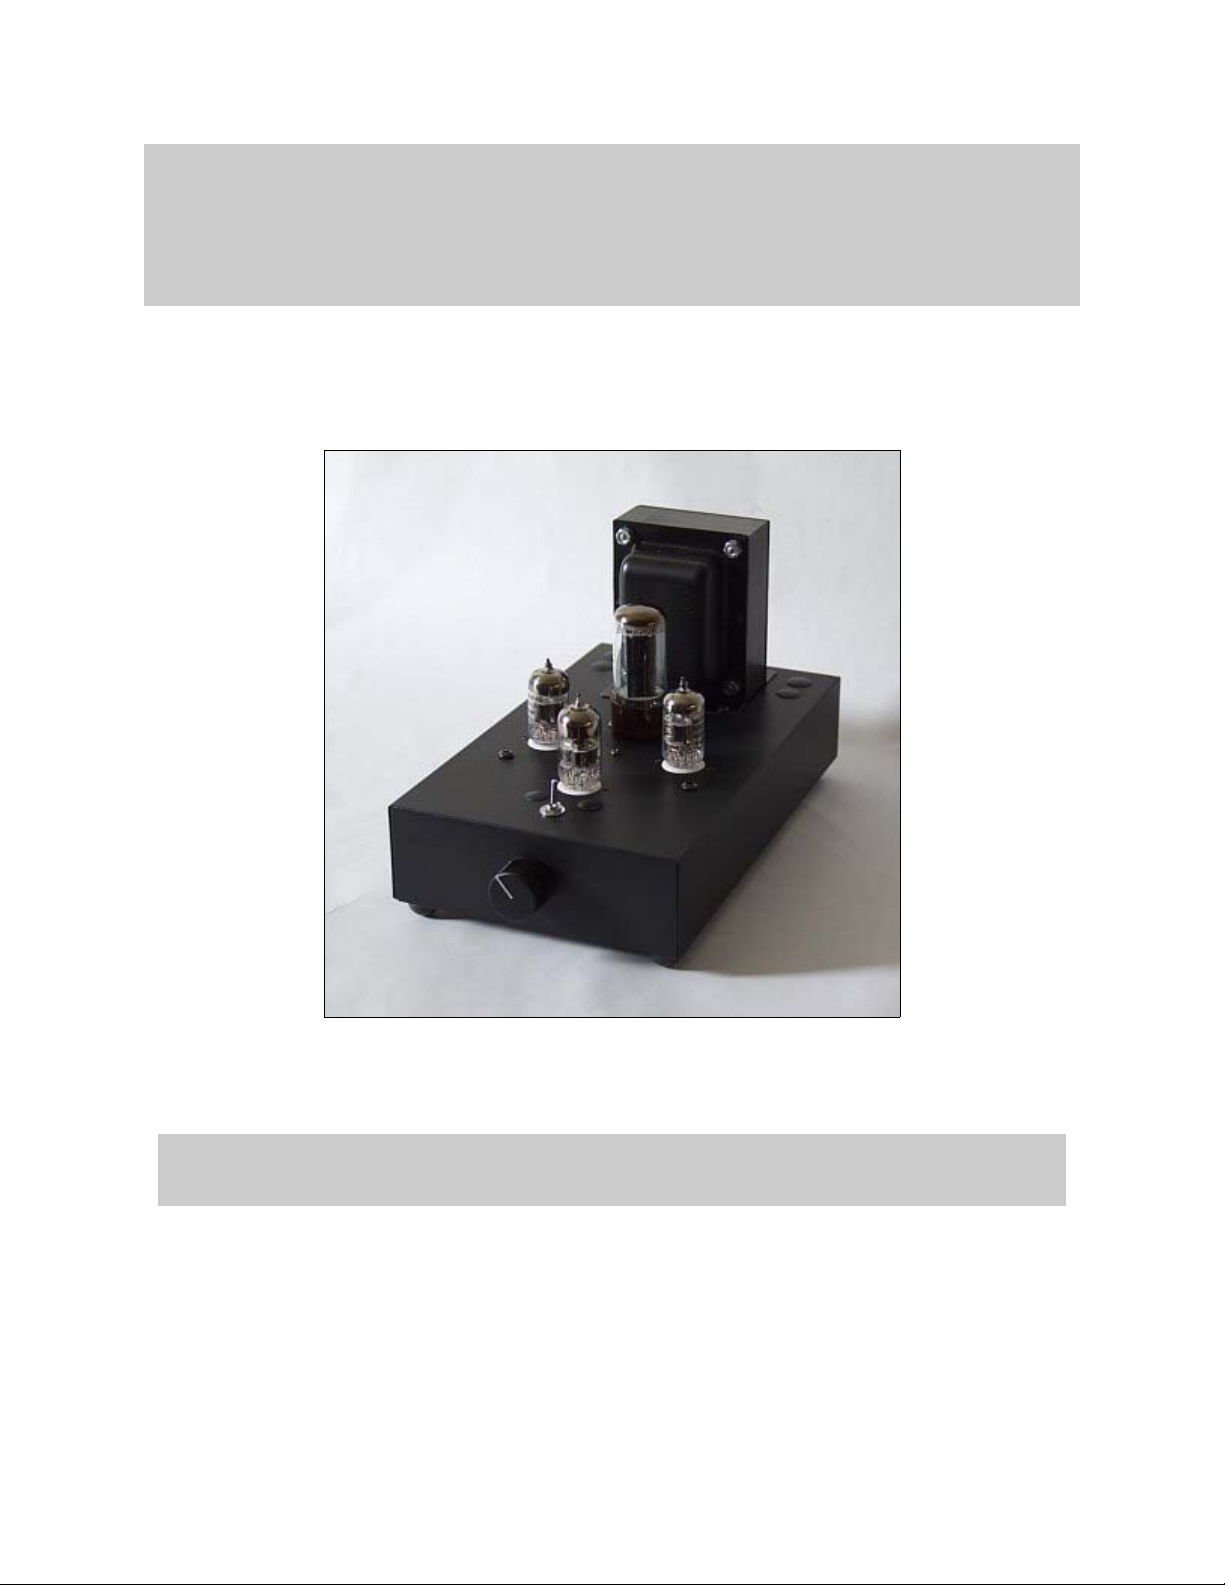
Model SE84CSP
LINE LEVEL STEREO PREAMPLIFIER
MANUFACTURED by DECWARE / High Fidelity Engineering Co.
1202 N.E. Adams Street, Peoria IL 61603
USA
www.decware.com
Page 2

GENERAL DESCRIPTION
The SE84CSP is a line level stereo preamplifier with gain. It is an all tube design
that has been point to point wired and uses no solid state parts or circuit boards.
This ensures top quality sound and extreme reliability.
It features a front mounted volume control that will raise or lower the output level of
both channels evenly. There is no fidelity robbing balance control. Also featured
are two pair of standard RCA type inputs with a front mounted toggle switch to select between source A and source B.
SETUP
The SE84CSP is easy to set up. The tubes are not installed when it ships to prevent breakage. It comes with a total of 4 tubes. The largest one is called a
“rectifier” and locates just in front of the power transformer. It fits into an octal (8
pin) tube socket. This is the only 8 pin socket on the unit so there is no worry of putting the rectifier tube into the wrong location. The rectifier tube shipped with the preamp is typically going to be a 5Y3GT. You can also substitute a 5AR4 or 5U4 type
rectifier in place of the 5Y3GT.
The smaller tubes (9 pin) shipped with this preamp are 6922’s. They go into the
white ceramic 9 pin sockets. Since all three are the same it does not matter which
ones go where, but all three must be installed for the preamp to work.
All of the tubes simply plug into the tube sockets with a firm downward force. It is
important to check the pins on the tubes PRIOR to installing them to be sure they
are not bent. Installing tubes with bent or crooked pins could damage the tube
sockets.
After all tubes are installed in the preamp, install the removable power cord into the
rear located IEC connector, turn the volume control all the way down and turn on
the preamp. The power switch is located on the rear of the preamp. Like all tube
gear it will take up to 30 seconds for the tubes to warm up before the preamp will
begin to work.
Once the preamp is on and warmed up for a few minutes, you can connect your
power amplifier to it using standard RCA type interconnect cables. The output
jacks on the preamp are located on the left hand side next to the power switch.
After you have connected your amplifier to the preamp and the preamp is on and
warmed up, turn on your amplifier. Make sure the preamp and amplifier are plugged
into the same electrical outlet so you don’t develop ground loops which can cause
hum. With the volume control still turned down all the way and the amplifier turned
on, you should hear no hum come from the loudspeakers above the level of hum
your amplifier normally has.
Page 3

Once you have confirmed that there is no additional hum from the amplifier you can
connect your source components to the preamp. If you do hear additional hum from
the amplifier the most likely cause is A) a bad ground in one or both of your interconnect cables. B) a ground loop developing between the amplifier and preamp
from having them plugged into different wall outlets. If either of these causes is not
the case you can go on the web site www.decware.com and read the article in the
articles section on troubleshooting hum problems.
The SE84CSP typically has between 0.4 and 0.9 millivolts of hum and noise. This is
far below the norm for tube gear and is often referred to as “stone quiet”.
The input jacks where you will hook your two sources are located on the rear of the
preamp opposite the output jacks. The toggle switch on the front top of the preamp
is used to select between the two pair of jacks. You can connect any line level
source to these input jacks. A line level source is typically a 2 volt source like a CD
player, tuner, tape deck, vcr, phono stage and so on.
You should now be able turn on your source, raise the level of the volume control
slowly and start enjoying the music!
NOTE: It is not recommended to have more than one source playing at the same
time. For example; if you have two CD players playing CDs at the same time you
may get a small amount of cross-talk or bleed-through from the selector switch. If
this becomes the case, simply turn off one of the CD players, or pause it.
NOTE: This preamp was designed with very low voltages on the tubes compared to
most tube gear. This was done primarily for sound quality but also has the benefit
of extending tube life. You can expect to get 5 to 10,000 hours out of the tubes.
NOTE: Because of the lower tube voltages you can leave your preamp on 24 hours
a day 365 days a year with no worries. Doing so will further increase the tube life
and has the advantage of keeping the preamp fully warmed up and sounding its
best at all times.
NOTE: If you do decided to turn your preamp on and off with each listening session
BE ABSOLUTELY CERTAIN that you turn your power amp on before turning on
your preamp, and when your done, turn your power amp off before turning off your
preamp. This sequence is standard for all preamps and power amps regardless of
type or brand and applies to both tube and solid state models.
NOTE: This preamp is factory set to UNITY gain with the volume control 1/2 way
up. If you require more or less gain there is a trim control inside the unit that can be
easily adjusted clockwise for more gain or counter-clockwise for less gain.
Page 4

TUBE ROLLING
This preamp employees a very stable circuit design that should make it user friendly
when it comes to trying different brand or type tubes in it. If you enjoy the subtle but
noticeable changes in signature that different tubes can make you will find the following tubes can be used in place of the stock 6922’s. 6DJ8’s or 6N1P’s can replace the 6922’s as direct plug-in replacements. The preamp circuit is self biasing
so no internal adjustments are needed.
The two 6922 tubes closest to the rectifier tube are your left and right channel gain
stages. Since 6922’s and the substitutions listed are “dual triodes” you may find it
interesting to note that we wired the left channel to the left half of the tube only and
the right channel to the right half of the tube only. This means that if you swap the
left for right channel tubes you will effectively have just installed a fresh set.
The 6922 located at the front of the preamp by the selector switch is a classic cathode follower where both halves of the tube are used for the left and right channels
respectively. This tube creates a buffer stage between the gain stages and your
amplifier. It’s benefit is to lower the output impedance of the preamp to such a degree that interconnect lengths and capacitance become a non-issue. It also ensures that the preamp will maintain the correct frequency balance and weight with
any amplifier regardless of the amplifiers input impedance, input sensitivity, power
level. That means you will get consistent performance and sound from the preamp
regardless of what it’s driving.
The rectifier tube in this circuit makes a significant difference in the sound of the preamp—more so then most. Since each rectifier listed has a different efficiency
(voltage drop) it effects the voltage feeding the signal tubes. The lush and forgiving
sound of this preamp is because of the lower voltages it was designed around.
Raising the voltages will result in a tighter signature with a more forward sound and
less lushness. The 5Y3GT shipped with your preamp falls in the middle. Changing
to a 5AR4 will typically add to the lushness, while changing to a 5U4 will typically
have the opposite effect. This can be a valuable tool in helping you dial the signature of the preamp in to best compliment the amplifier and speaker combinations
you might through at it.
Remember, with any tube product, it is WISE to have a complete set of spare tubes
on hand. Anytime there is a problem with tube gear it is 9 out of 10 times a tube. If
you have spare tubes you can easily trouble shoot it yourself. While not common,
tubes can go bad for no reason, or get noisy—especially N.O.S. tubes. Be careful
when spending tons of money on N.O.S. tubes that originally only cost a few dollars
when they were new.
Page 5

THERE ARE NO USER SERVICABLE PARTS INSIDE THIS PREAMP.
If you turn the preamp on and the tubes do not light up it can only be a blown fuse
causing it. The fuse is located in the IEC connector where you plug the removable
power cord into. The connector has a well hidden compartment built into it that
houses the fuse as well as a spare. Only use 3 amp fuses in this product.
This preamp comes with a lifetime warranty to the original purchaser and 90 days
on tubes. Always return the unit to DECWARE for authorized service should it ever
need it.
Size 6"W x 11"D x 6.5" H
Weight 13 lbs/120Volt 14lbs/240Volt
Chassis Steel with black powder coat finish
Consumption 70 watts
Input jacks Gold/Teflon RCA - two pair
Output jacks Gold/Teflon RCA - one pair
Input impedance 100,000 ohms
Output Zo Below 300 ohms
Transformer Type DC coupled, no transformers
Frequency Response +/- 1.5dB 10Hz ~ 70kHz
Max output w/ 2 V RMS INPUT 14 V RMS
THD @ 1 V RMS / 1kHz 0.6 %
Hum & Noise Below 0.9 mv - stone quiet.
Operating Voltage USA model 100~125 VAC 50/60 cycles
Operating Voltage World model 220 ~ 250 VAC 50/60 cycles
Warranty Lifetime to original owner
ADDITIONAL FEATURES
• Single Ended CLASS A operation
• 2 channel stereo
• 2 pair of inputs with input selector switch
• ALPS volume control
• Self-biasing for optimum performance and no adjustments - ever.
• Tube rectified power supply
• Point-to-point hand wired with no circuit boards or solid state parts
• High reliability / low maintenance
• Computer grade supply caps.
• Precision metal film resistors.
• Same signature coupling caps used in our more expensive amps.
 Loading...