

Page 1
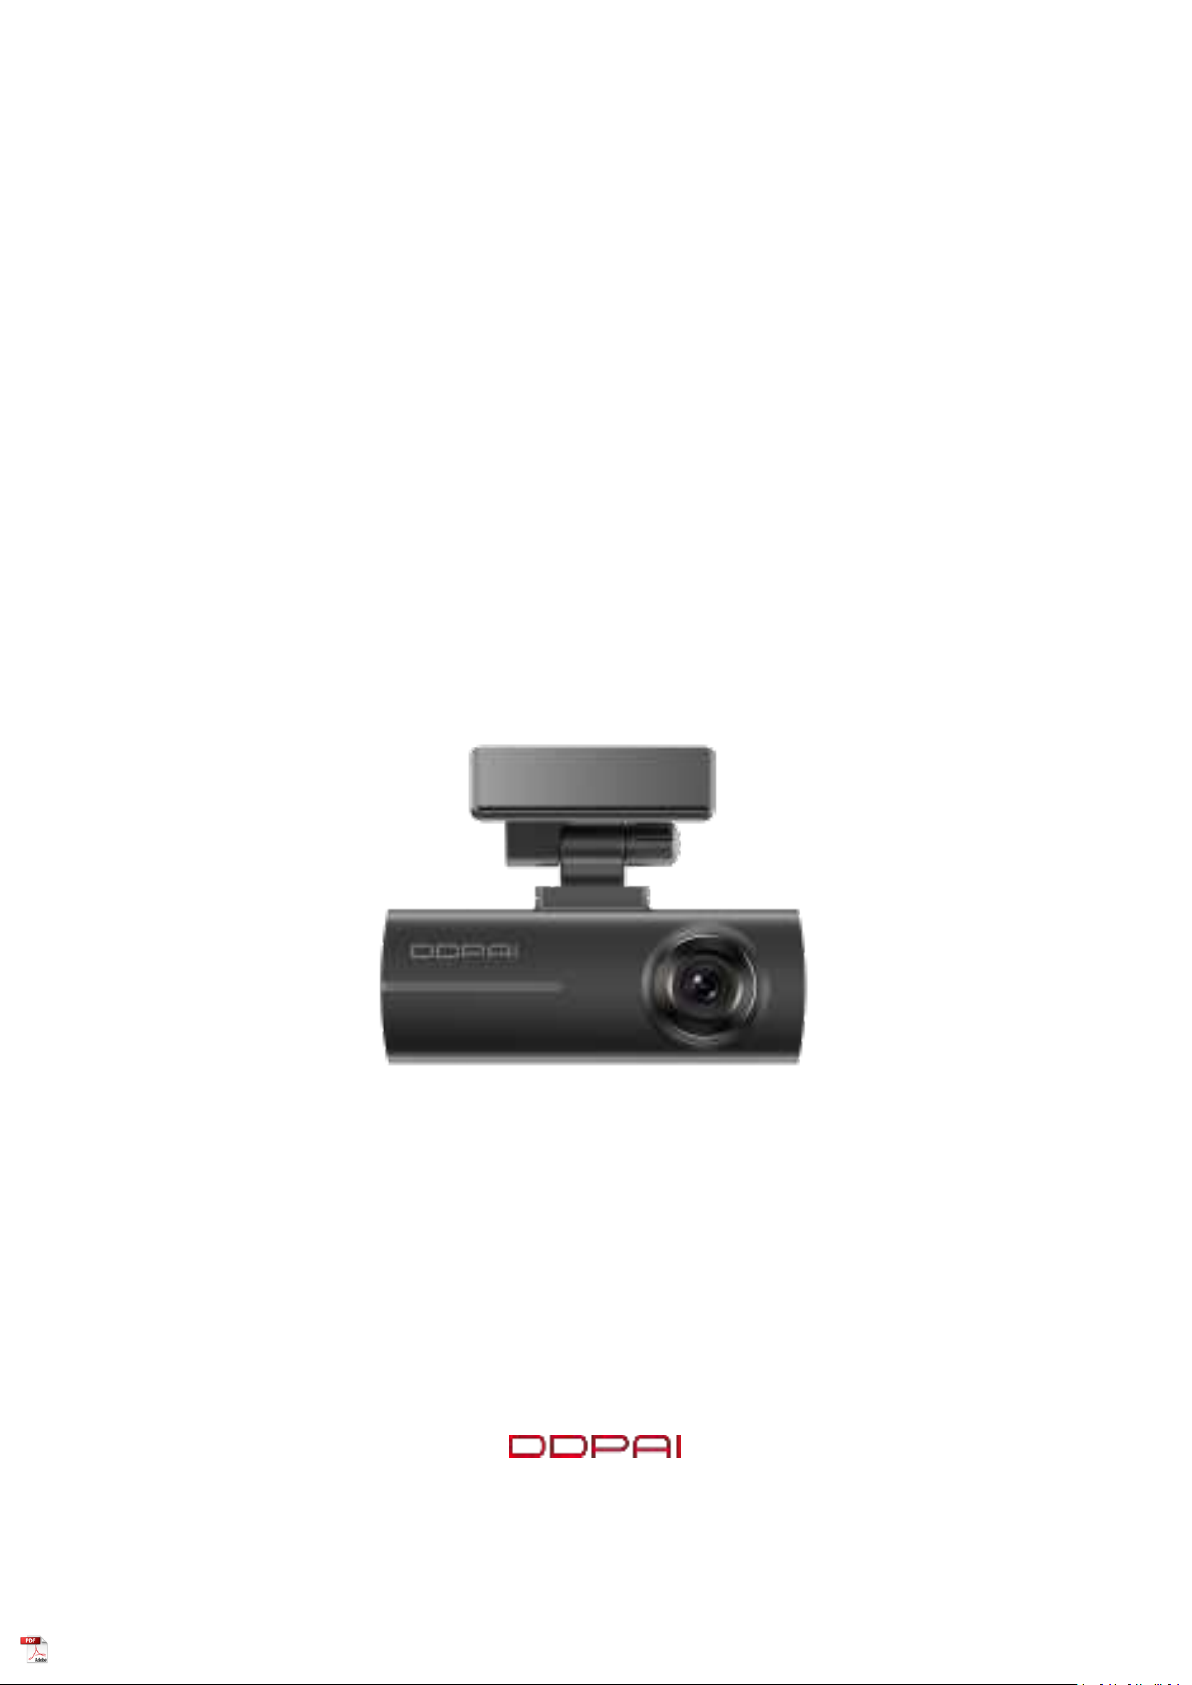
N1 Dual
User Manual
Page 2

Contents
1. Safety Instructions
1.1 Pre-Cautions
1.2 Warnings
1.3 User Agreement
2. Package Contents
3. Appearance
4. Dash Cam Installation
4.1 Installing the TF Card
4.2 Power-On Checking
...........................................................................................................................
..........................................................................................................................
................................................................................................................................
....................................................................................................................
..........................................................................................................................
......................................................................................................................................
......................................................................................................................
.............................................................................................................
...............................................................................................................
4.3 Installing the N1 Dual onto Your Windshield
4.4 Installing the Rear Camera
5. Indicator Guide
6. Loop Recording
..............................................................................................................................
..............................................................................................................................
7. Setting Up the N1 Dual on DDPAI App
7.1 Downloading DDPAI App
..................................................................................................
..........................................................................................
.....................................................................................................
.......................................................................
1
1
2
3
4
5
6
6
7
9
11
13
14
15
15
7.2 Connecting N1 Dual with Smart Phone
8. Video Function
8.1 Preview Real-time Video
8.2 Playback Recorded Video
9. Downloading Video
..............................................................................................................................
.....................................................................................................
....................................................................................................
.......................................................................................................................
9.1 Downloading from the Playback Timeline
9.2 Downloading Emergency Files
10. Taking Photos
..............................................................................................................................
11. Viewing Photos or Videos
...........................................................................................................
............................................................................................
11.1 Viewing Photos or Videos on the Device
11.2 Viewing Photos or Videos from Local Album
12. Sharing/Deleting Photos or Videos
13. 24H Parking Monitoring Mode
14. Collision Detection & Locked Videos
14.1 Setting Camera Sensitivity
.............................................................................................
...................................................................................................
..........................................................................................
................................................................................................
..............................................................................
..........................................................................
..........................................................................
...................................................................
16
19
19
21
22
22
23
24
25
25
25
27
27
29
30
14.2 Set the Duration of Emergency Related Video
15. Browsing File on PC
16. Upgrade Firmware
17. FAQ
..............................................................................................................................................
.....................................................................................................................
......................................................................................................................
.................................................................
32
34
34
35
Page 3

18. Specifications
...............................................................................................................................
37
Appendix: Installing the Hardwire Kit
FCC Statement
...................................................................................................................................
...............................................................................................
38
42
Page 4
Thank you for purchasing the DDPAI N1 Dual ultra-high-definition digital Dash Cam, which offers
high-quality captured images and a high-definition video experience.
The N1 Dual Dash Cam is equipped with front and rear camera, wide-angle cameras of 135° and
125°, IPS power management system, AI.265 encoding technology, 24H parking monitoring and
other functions. With the built-in Wi-Fi, it connects to the DDPAI App, which enables users to
watch and download the captured videos and images in real time.
Caution
Before installing the N1 Dual Dash Cam, please perform power-on checking to ensure the Dash
Cam can be connected to the DDPAI App successfully.
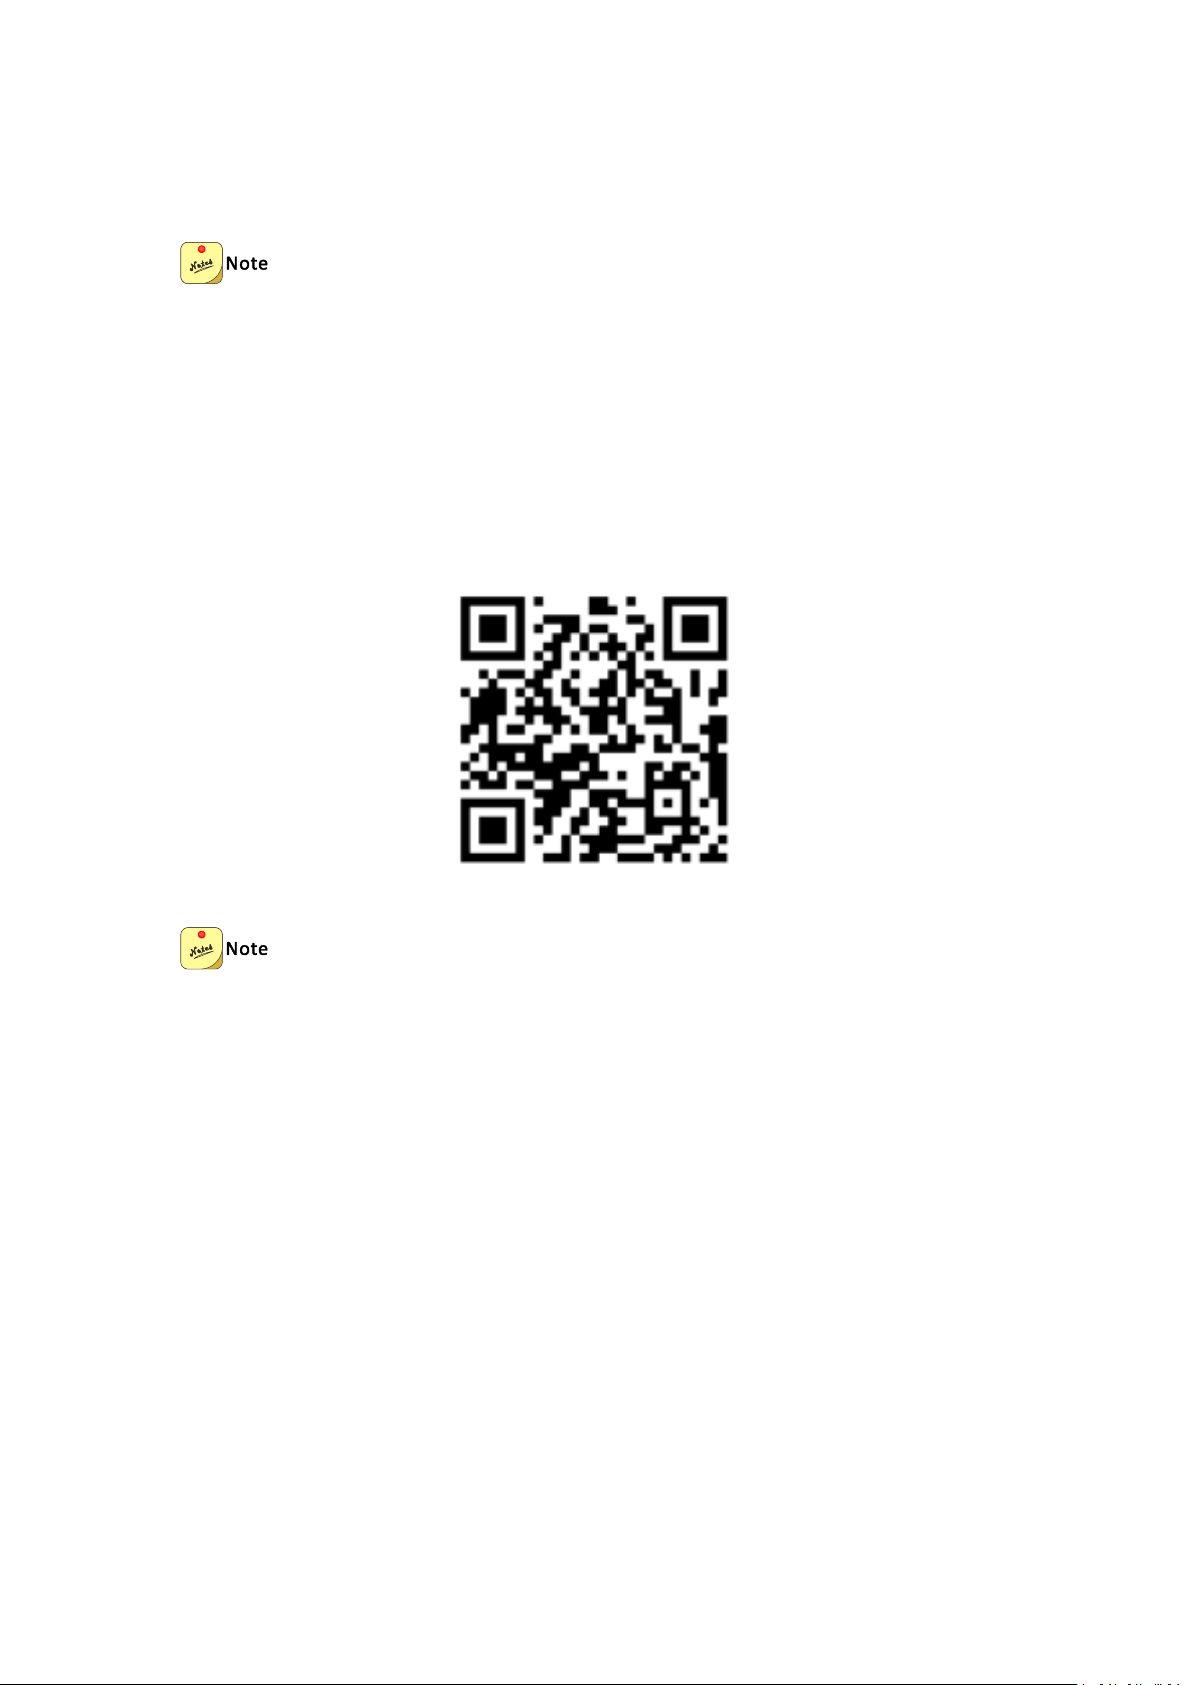
Scan to Download DDPAI App
If there is anything wrong with the connection, or any questions or suggestions, please contact
us without hesitation: [email protected]
Contact Us
Page 5

1
1. Safety Instructions
Please read and understand all instructions before using this product. If any damage is caused by
failure to follow the instructions, the warranty will be voided.
1.1 Pre-Cautions
This Dash Cam is intended to use inside motor vehicles (DC 12V ~ 24V ).
This Dash Cam is ONLY suitable for 12V ~ 24V motor vehicles.
Do not place the Dash Cam in a humid environment, otherwise possible external or internal
damage will be caused.
Do not expose the Dash Cam to rain, moisture or water, otherwise possible external or
internal damage will be caused.
Do not attempt to disassemble or repair without permission. If there are any problems with
the Dash Cam or its accessories, please contact the seller DDPAI Customer Service for help.
Do not expose the Dash Cam to overheating, dust environment, or use any chemicals or
cleaning solvents to clean the device.
Clean the lens with a soft, damp cloth, and clean carefully to avoid scratches that could
affect the quality of the video.
Do not drop, puncture or disassemble this product.
Do not use the Dash Cam in the environment below -4°F (-20°) or above 158°F (70°).
Please remove the camera from the vehicle when not in use for a long period of time to
prevent from damages caused by exposure to overheated environment.
TF Memory Card: Check whether there is any damages or cracks on the surface before
inserting an external memory card. Do not use memory cards that are obviously physically
distorted or covered cracks, for there is a risk of short circuits.
Use the specified USB car charger included in the package, otherwise the Dash Cam may
repeatedly restart due to the mismatch of power supply.
Please make sure the Dash Cam can be connected to the DDPAI App successfully before
installation, please contact us if there is anything wrong: [email protected].
If the App fails to connect to the Dash Cam, check whether the relevant permission of
running this App is given.
In order to function normally, all the permissions required by the App should be granted. For
Page 6

2
specific purposes, please see the App User Agreement. If the failure still exists, please
contact us: [email protected].
1.2 Warnings
Failure to comply with safety warnings and regulations may result in serious injury or death.
Keep gadgets out of reach of children.
Please make sure to use the specified accessories and designated parts. The use of other
non-designated parts may damage the device and lead to fire, electric shock or equipment
failure.
If the Dash Cam is damaged or malfunctioning, please stop using immediately, then consult
the seller. Continued use may cause fires, electric shocks, or vehicle malfunctions.
Do NOT install in areas that may block drivers’ sight, including but not limited to rearview
mirrors or airbag outlets:
1. Do NOT place the Dash Cam on the dashboard or in front of airbags when it is not
secured.
2. Do NOT install the Dash Cam on the windshield when it is not secured, as it may fall and
distract the driver, causing a safety hazard.
Do NOT install or perform any operations while driving. If necessary, pull over properly to
ensure the safety before using.
Please note that the Dash Cam may infringe on privacy and other rights, depending on how
the user uses it. We do not assume any legal responsibility for the above scenarios.
Due to the use of a wide-angle lens, some images may be distorted and differ from the
actual image. This phenomenon is not a malfunction but a characteristic of a wide-angle
lens.
Some countries or states in the United States, drivers are prohibited from installing anything
on the windshield or in specific areas of the windshield. Owners/operators should install or
use this device in compliance with local laws.
Page 7

3
1.3 User Agreement
By purchasing the Dash Cam, you agree to all terms and conditions of the preventive measures,
precautions, warnings, and warranty mentioned in this manual.
If you do not agree to any of the terms mentioned in this manual for any reason, please do not
hesitate to contact us: [email protected].
Page 8
4
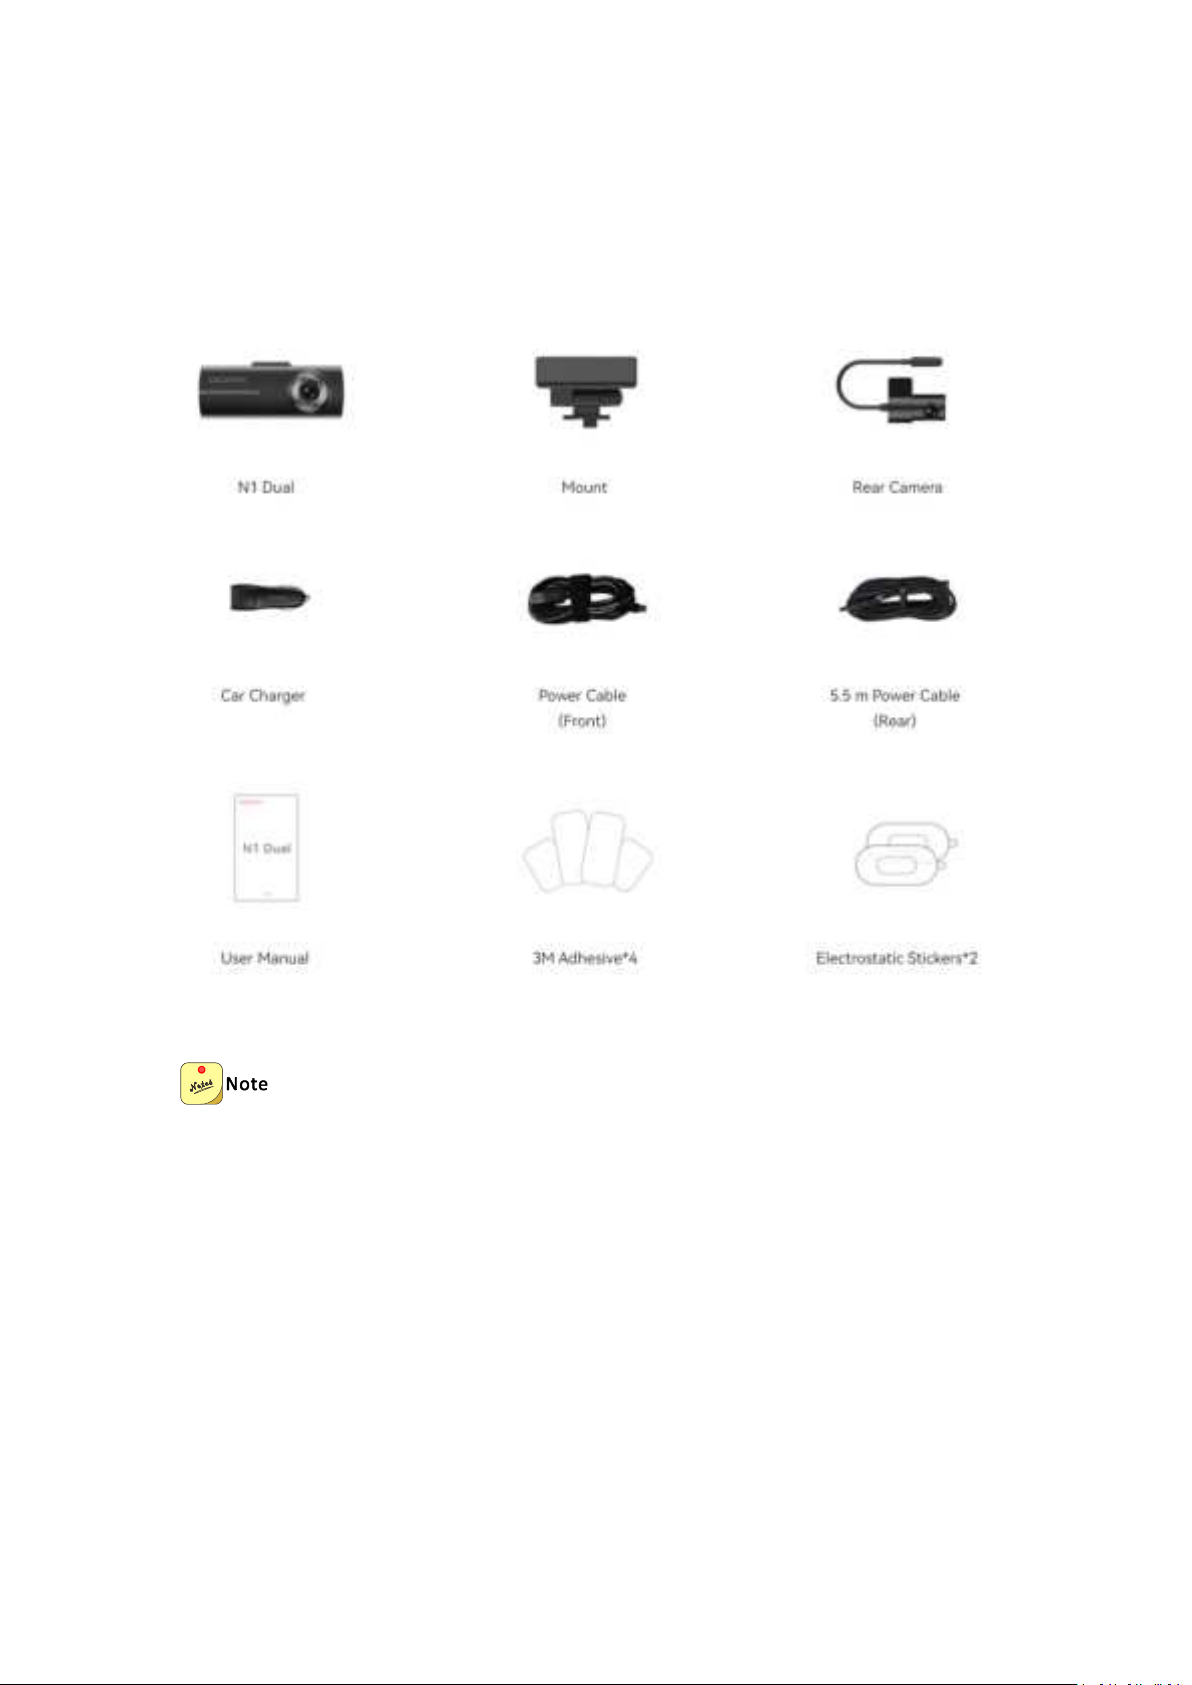
2. Package Contents
If the components are found to be damaged, missing, or waterlogged after unpacking, please do
not hesitate to contact us: [email protected].
Page 9
5
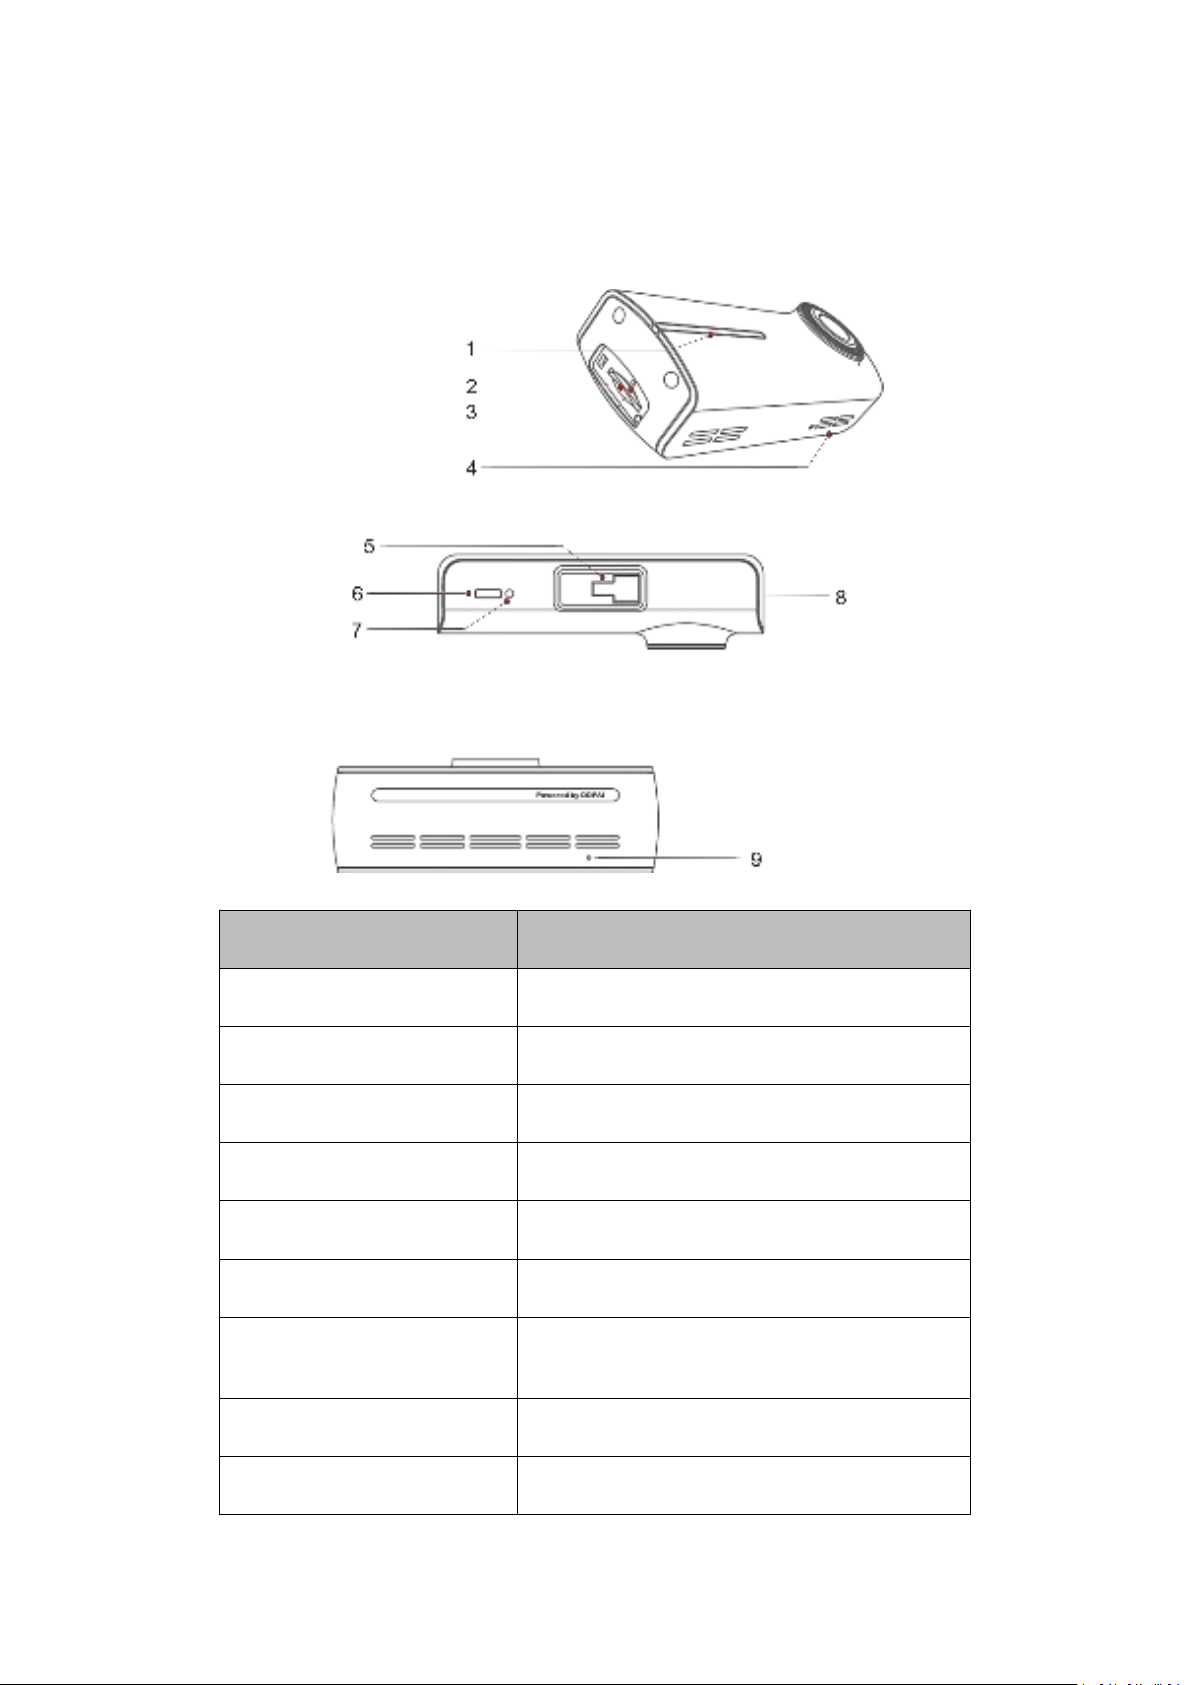
3. Appearance
No.
Components
1
Parking Monitoring Indicator
2
Micro SD Card Slot
3
Reset Hole
4
MIC
5
Bracket Interface
6
Power Interface
7
Rear Camera
Connection Interface
8
Speaker
9
Working Indicator
Page 10
6
4. Dash Cam Installation
4.1 Installing the TF Card
The N1 Dual supports a maximum of 256GB TF memory card and requires a Class 10
high-speed card. Different brands of TF memory cards may affect the storage of
performance, some TF memory cards have the risk of missing records. It is recommended to
use the following brands of TF memory cards: DDPAI, Kingston, Samsung, Toshiba,and Lexar.
Insert or remove the TF card ONLY when the Dash Cam is not connected to the power
supply. Inserting or removing the TF card when the Dash Cam is running may damage the
files within.
Please confirm the orientation of the TF card before installation, if the memory card is
forcibly inserted in the wrong direction, the memory card, card slot or the card data may be
damaged.
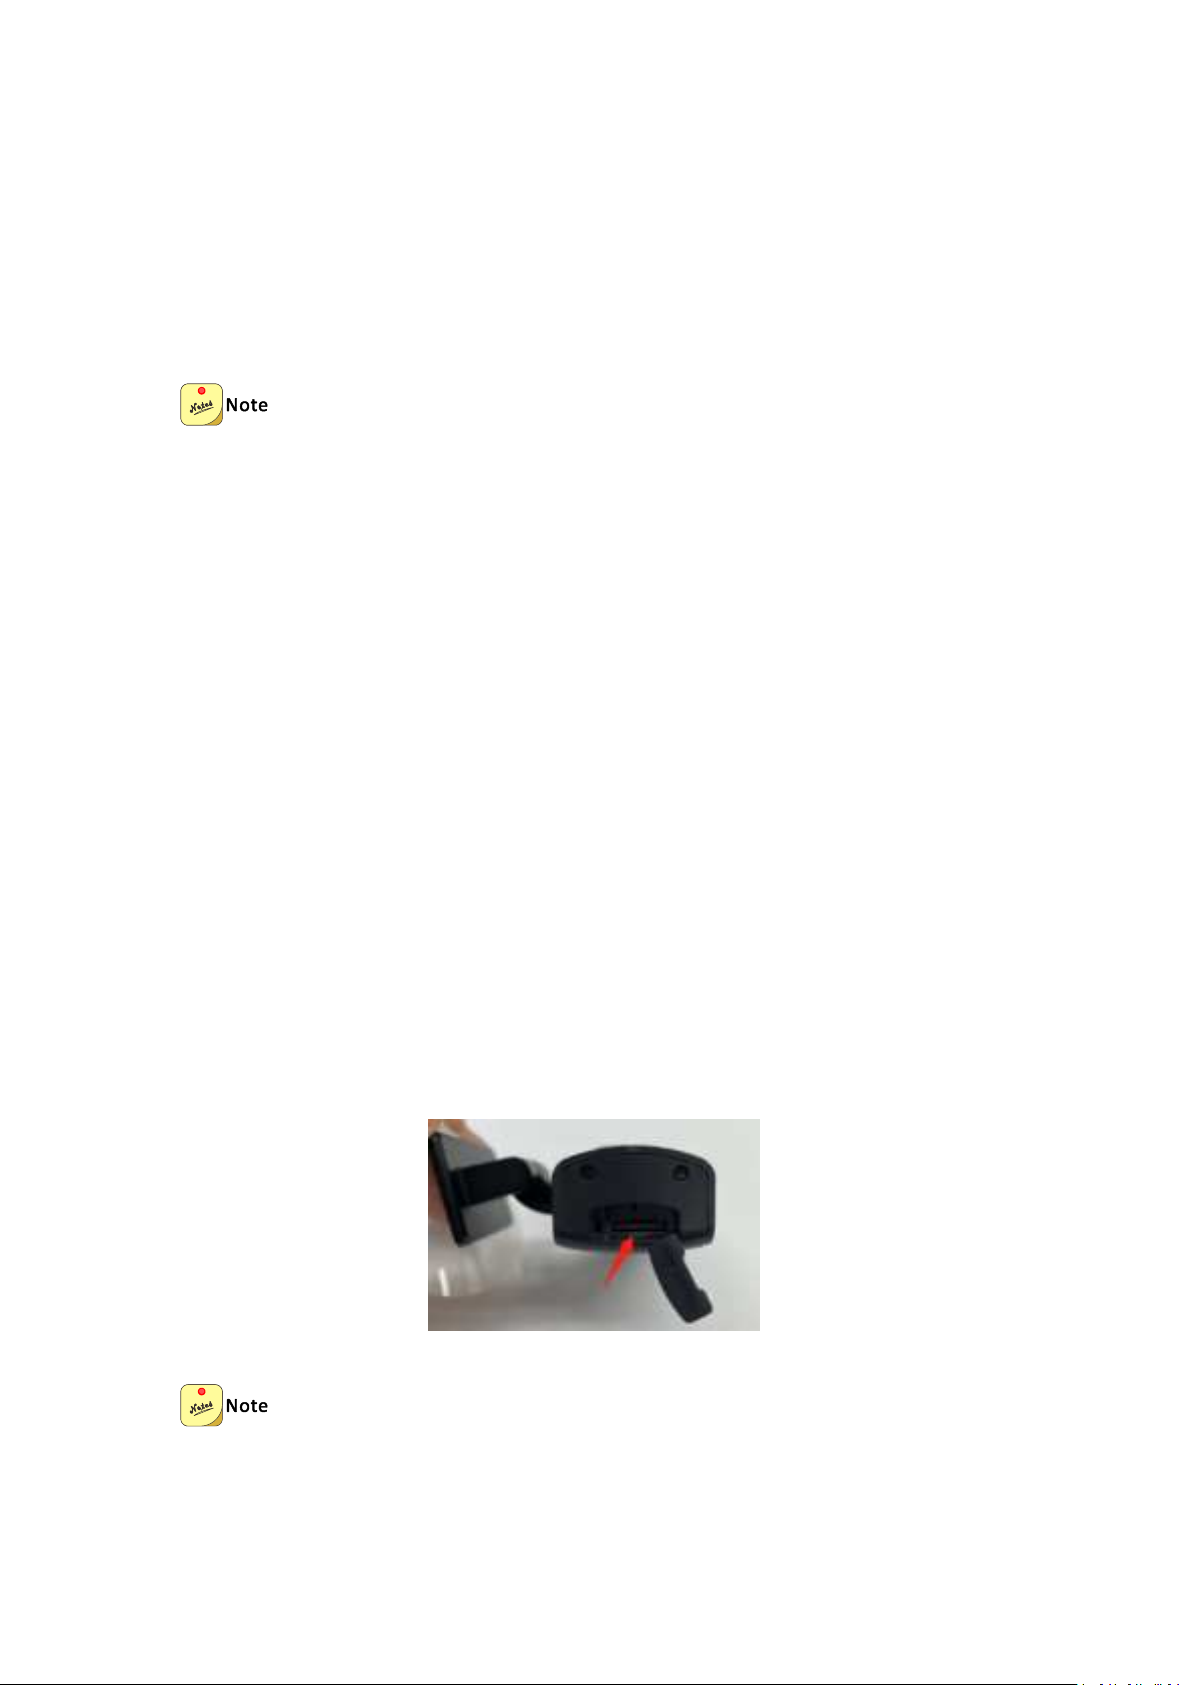
1. Open the TF card slot cover on the left side of the Dash Cam.
2. Please make sure the lens of the Dash Cam is facing up, and the chip of the TF card is facing up,
then insert the TF card into the slot. Please refer to the silkscreen printed pattern beside the TF
card slot to install the TF card.
3. Close the card slot cover.
The Dash Cam will automatically format the TF card at the first time using the TF card.
Page 11
7
4.2 Power-On Checking
Do not perform any operation to set up this product while driving.
Downloading the app will incur your mobile data usage, if you don’t wish so, connect your
phone to the Internet. Before installing the Dash Cam, perform power-on check to confirm
the Dash Cam is connected to the DDPAI App normally.
1. Scan to install the DDPAI App on smartphone.
Please grant the DDPAI App relative application permissions to install, otherwise the connection
may fail.
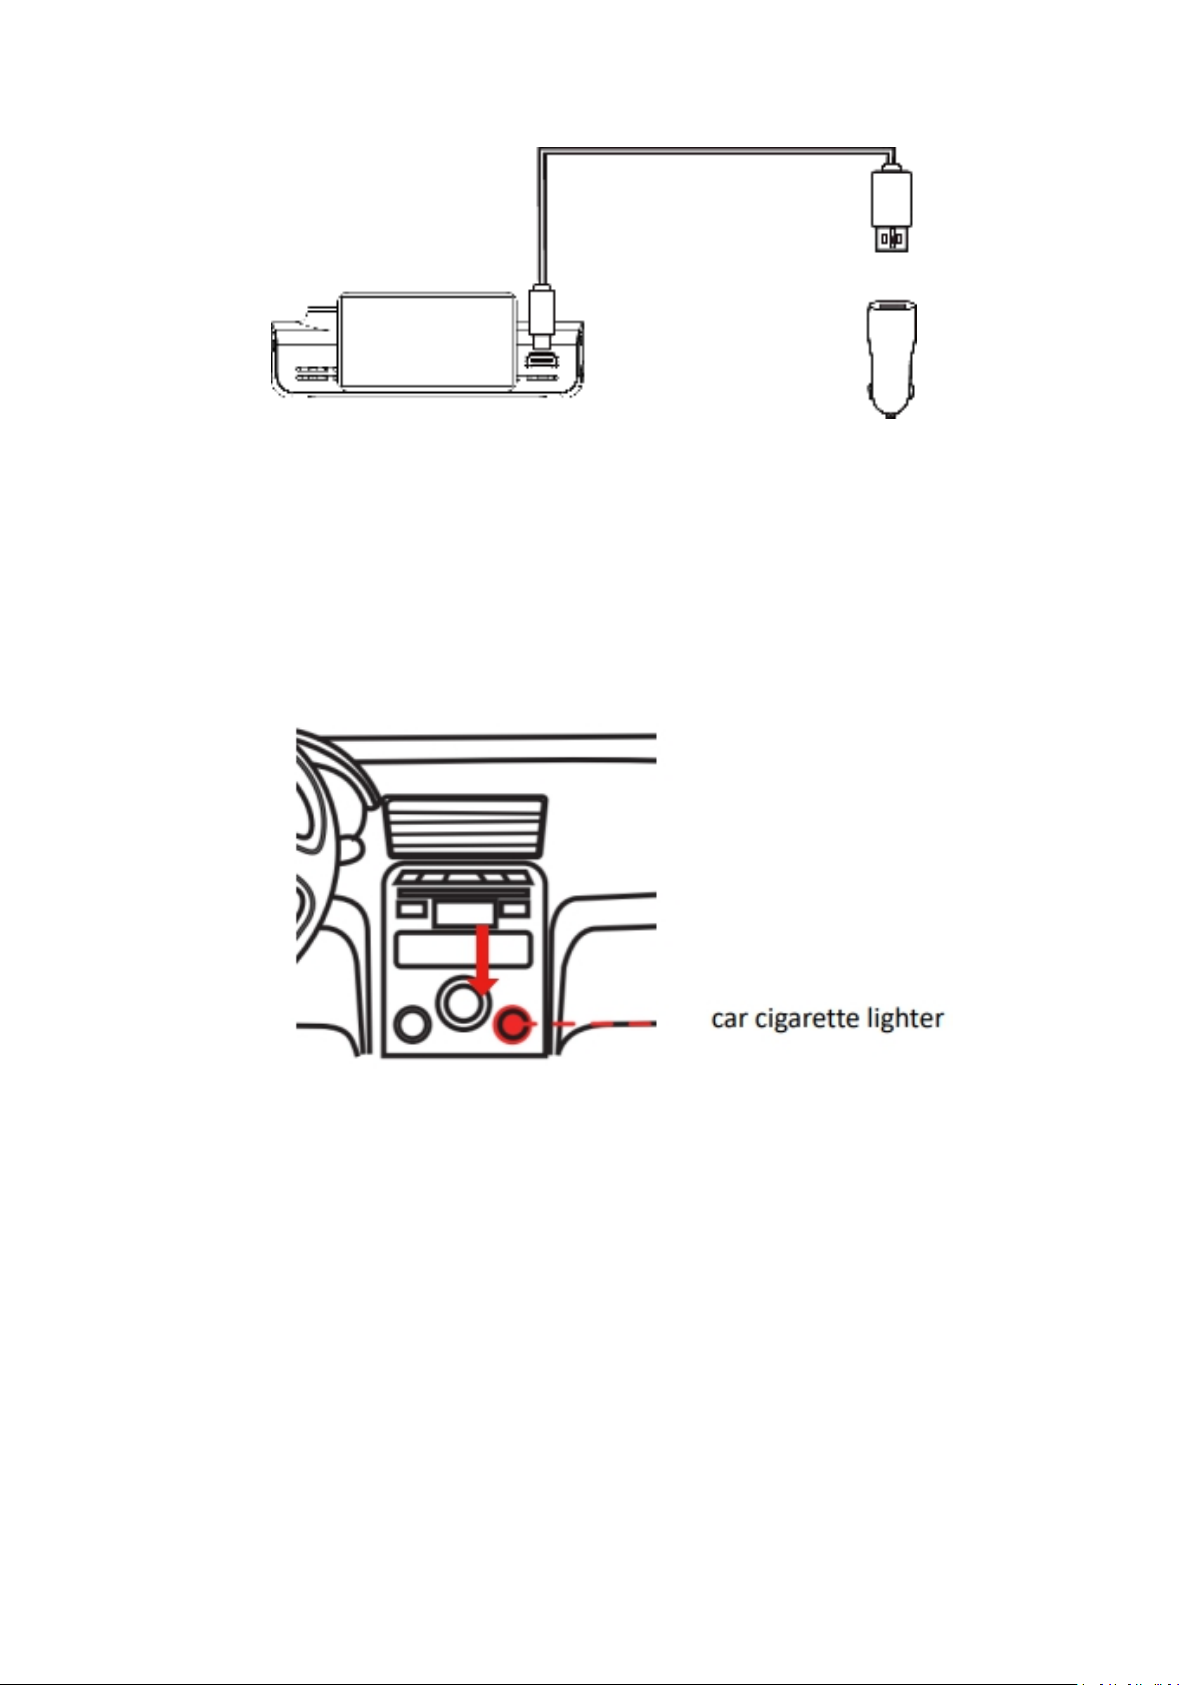
2. Connect the Dash Cam to the vehicle charger:
a. Take out the N1 Dual host, mount, vehicle charger, Type-C power cable.
b. Connect the USB connector of the power cable to the vehicle charger and insert the other end
into the Type-C interface of the Dash Cam, please refer to the figure below.
Page 12
8
c. Insert the vehicle charger into the cigarette lighter socket and start the vehicle. Then the Dash
Cam will automatically power on with the welcome greeting "Hello, DDPAI". When the indicator
is breathing blue, it indicates that the Dash Cam is turned on normally, otherwise, please check
the fault according to the status of the indicator. For a detailed description of the status of the
indicator, please see 5. Indicator Guide.
Page 13
9
4.3 Installing the N1 Dual onto Your Windshield
After performing the power-on checking, please confirm the N1 Dual is connected to the
DDPAI app normally.
Do NOT install this product or perform any other operation to set up this product while
driving.
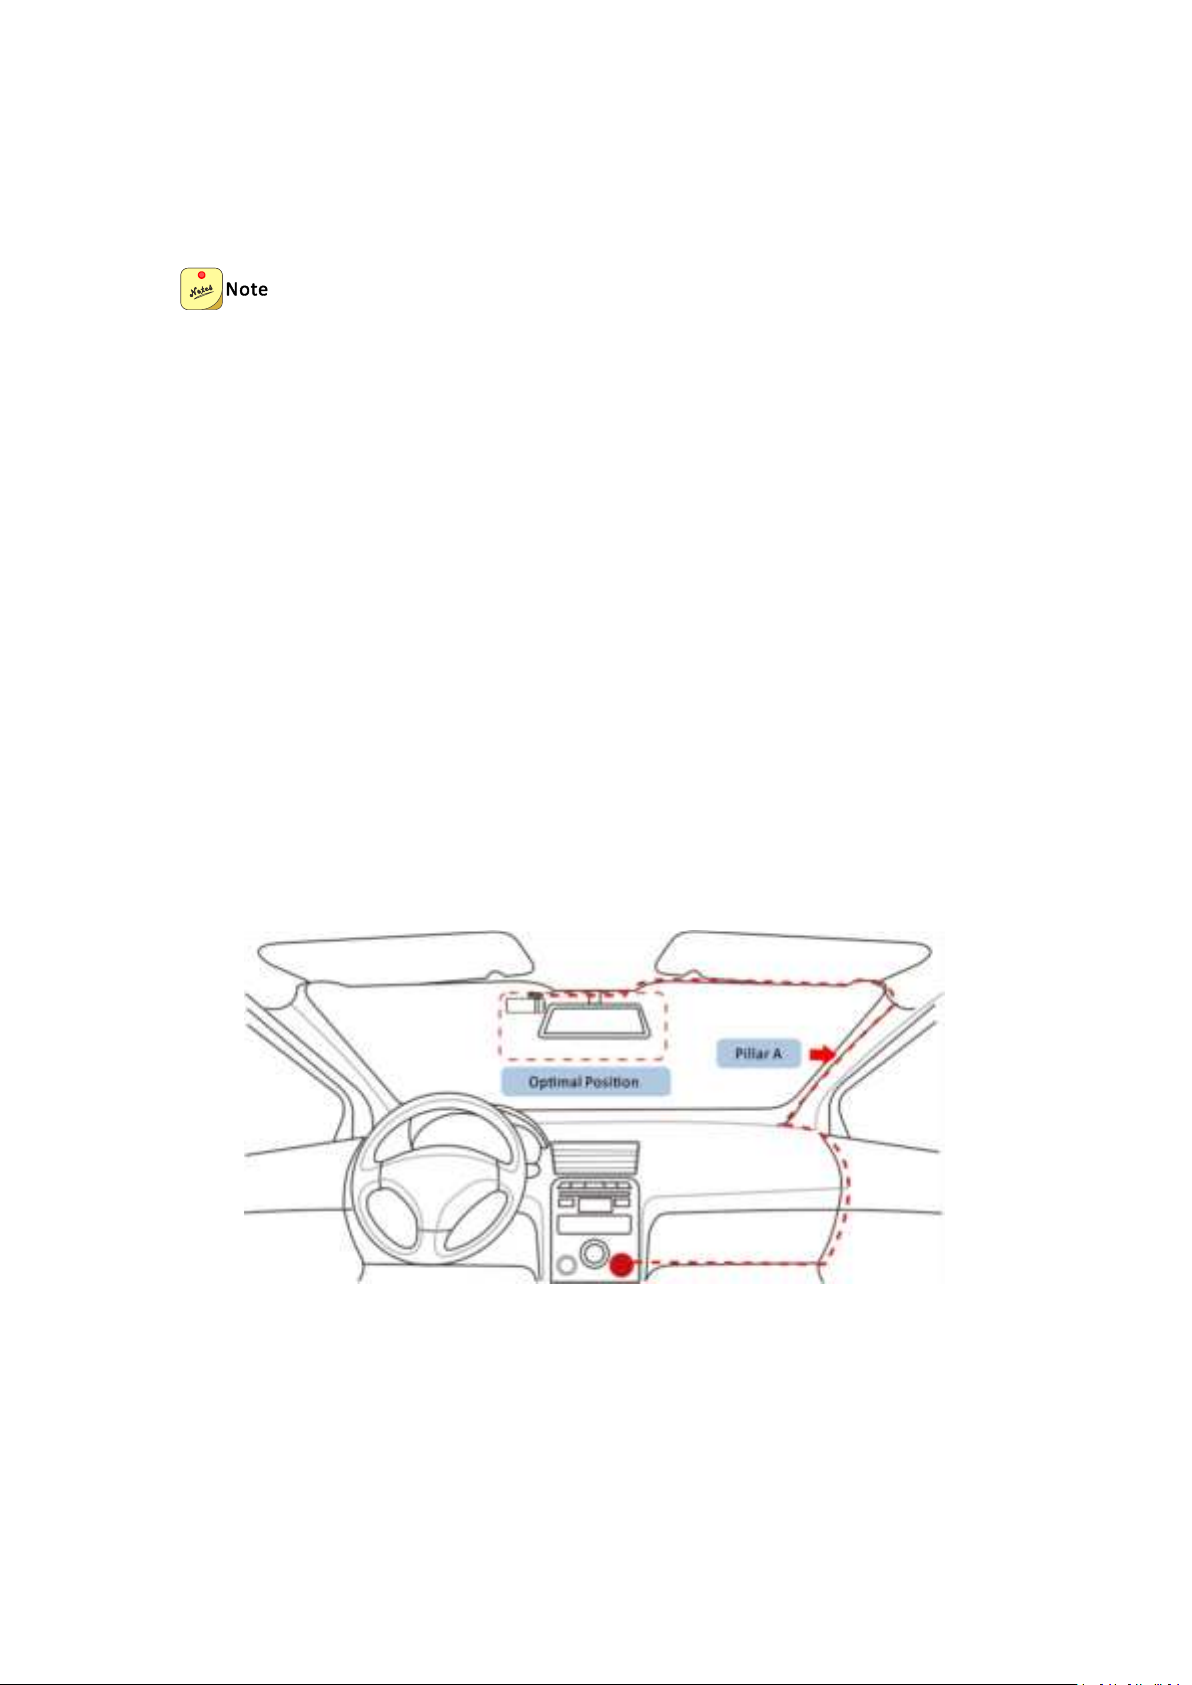
1. Select an appropriate place to locate the N1 Dual and clean this area:
You are recommended in most cases to install the N1 Dual on your front windshield (Next to the
rearview mirror on the driver’s side), as shown in the figure below.
a. Clean the location area on the windshield with a clean and soft cloth from dust, plastic, and
other stuff, to ensure that the N1 Dual can be firmly attached to the front windshield.
b. Use the vehicle wire trim tool to run the power cable along the front windshield and the roof,
and hide the cable on the A-pillar, so as to not block the driver’s sight and cause danger.
Page 14
10
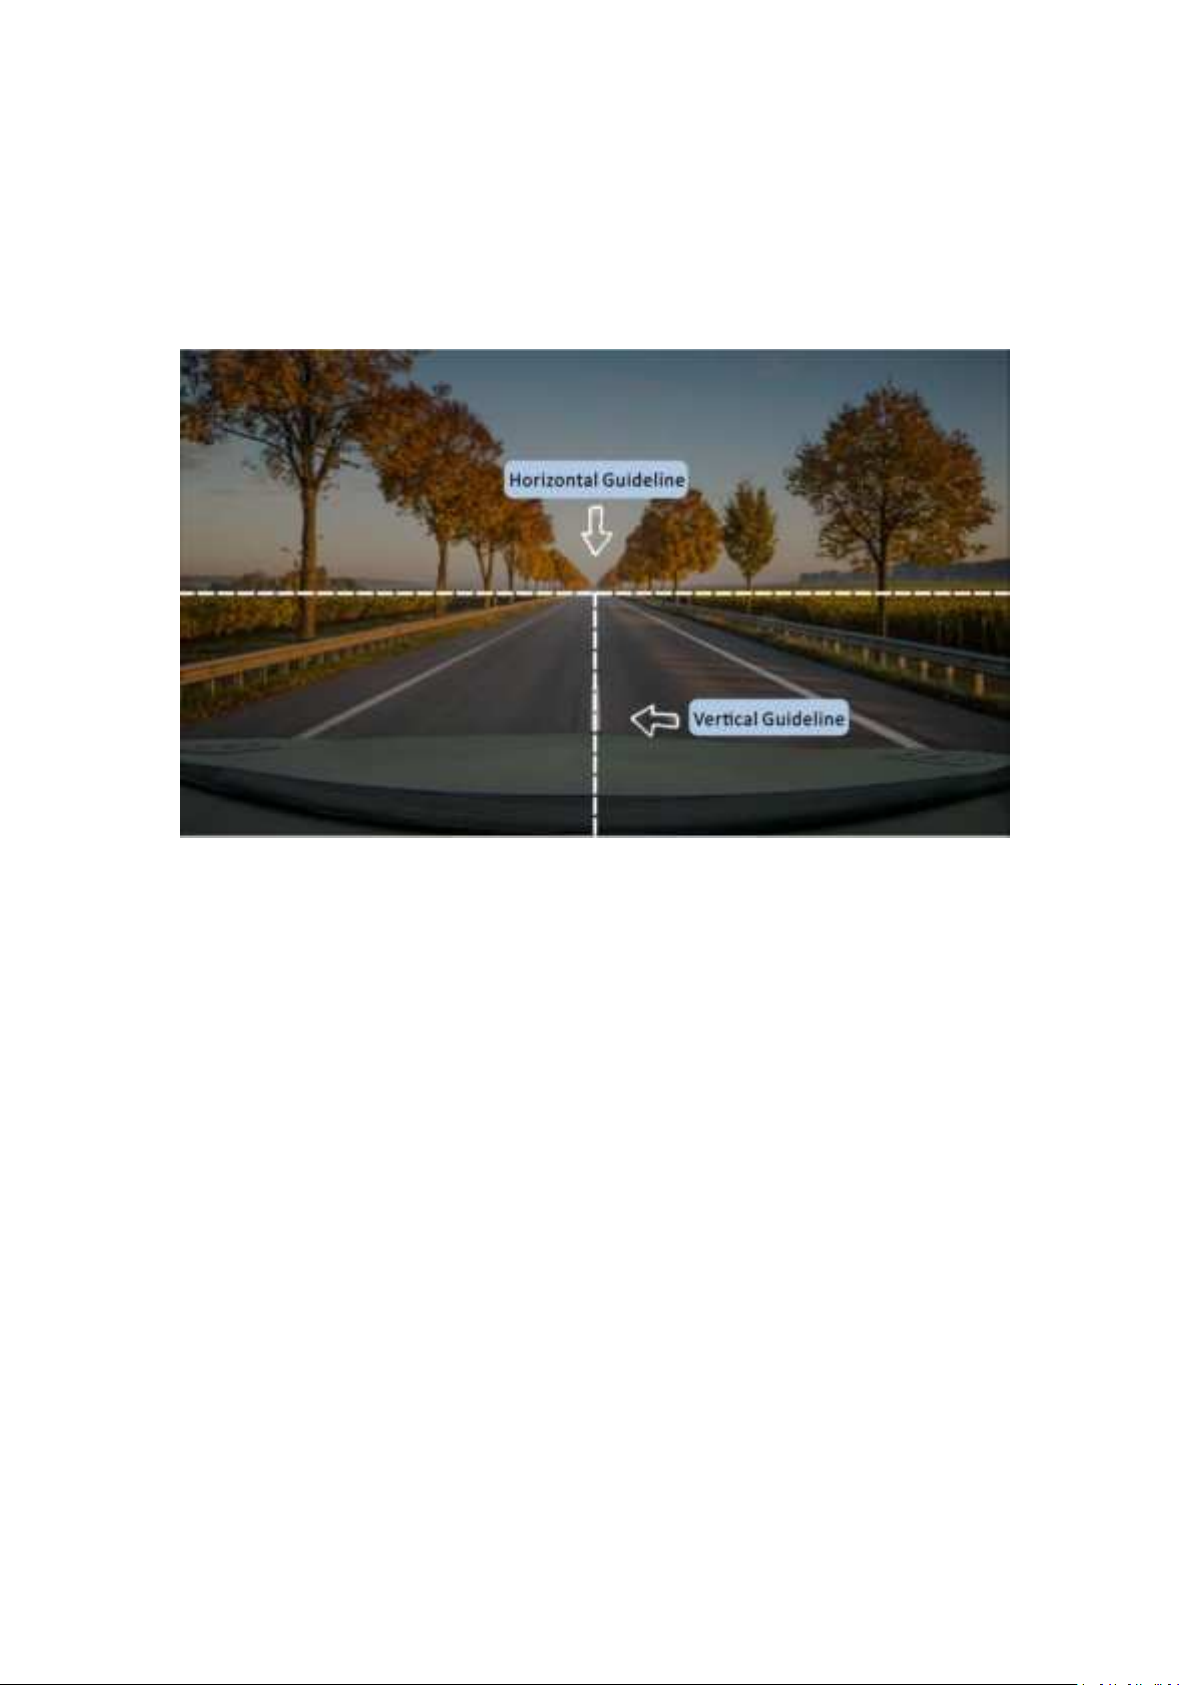
2. Locate the installation position based on the guidelines:
After connecting the N1 Dual to your phone, you will see the horizontal and vertical installation
guidelines on the screen to assist with installation, according which the installation position of
the N1 Dual is located:
Vertically: Moving the N1 Dual side to side with the help of the vertical guideline on the
middle of the screen, keep adjusting until to the middle of the vehicle ’ s front end align to
this vertical guideline.
Horizontally: Rotating the camera up and down with the help of the horizontal guideline on
the middle of the screen, keep adjusting until the ground-level horizon outside vanishes
from the scope of this horizontal guideline.
3. Fix the N1 Dual in place:
After locating the installation position, attach the electrostatic sticker and remove the red
backing film from the 3M adhesive sticker on the bracket of the N1 Dual. Then attach the N1
Dual to the predetermined location, ensuring that the 3M adhesive sticker on the bracket is
firmly attached to the windshield. The camera is facing towards the front of the vehicle.
Page 15
11
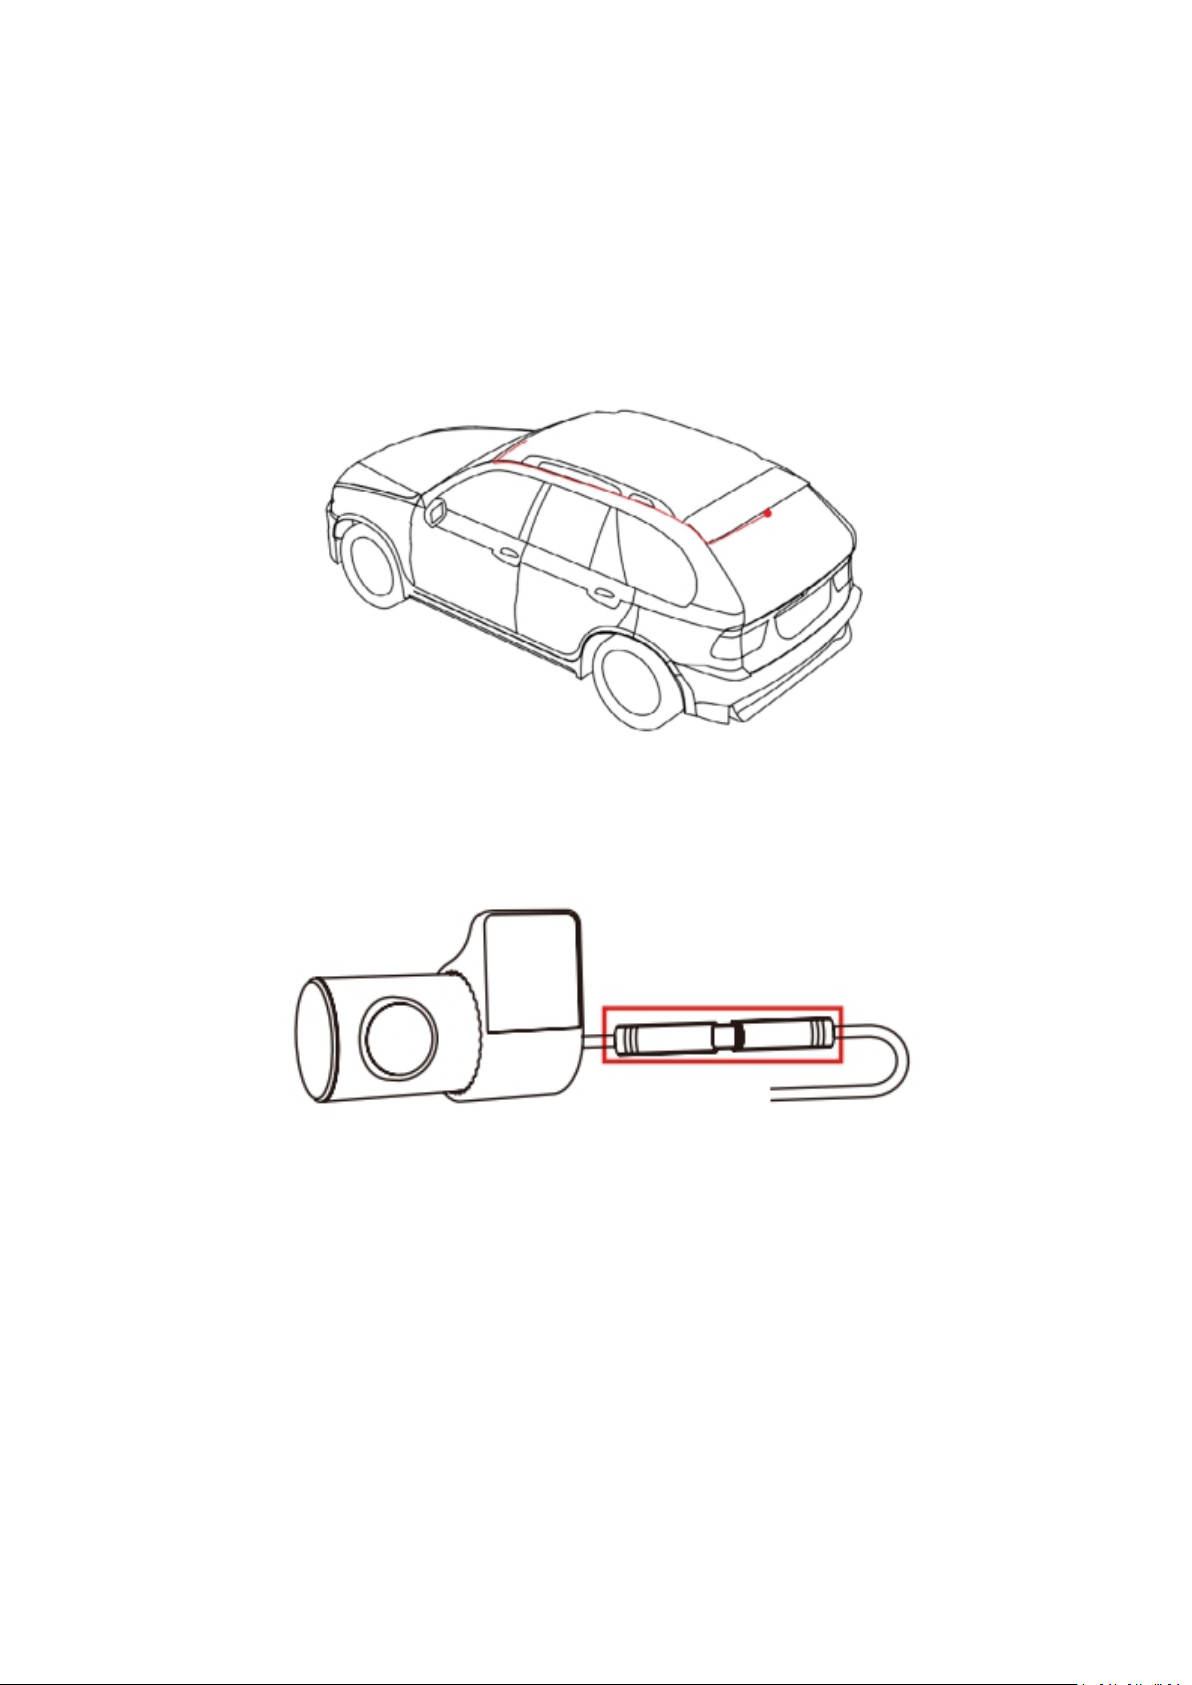
4.4 Installing the Rear Camera
1. Clean the rear windshield (the approximate installation position of the rear camera Is shown in
the figure below).
2.Connect the rear camera to the power cable (rear).
Page 16
12
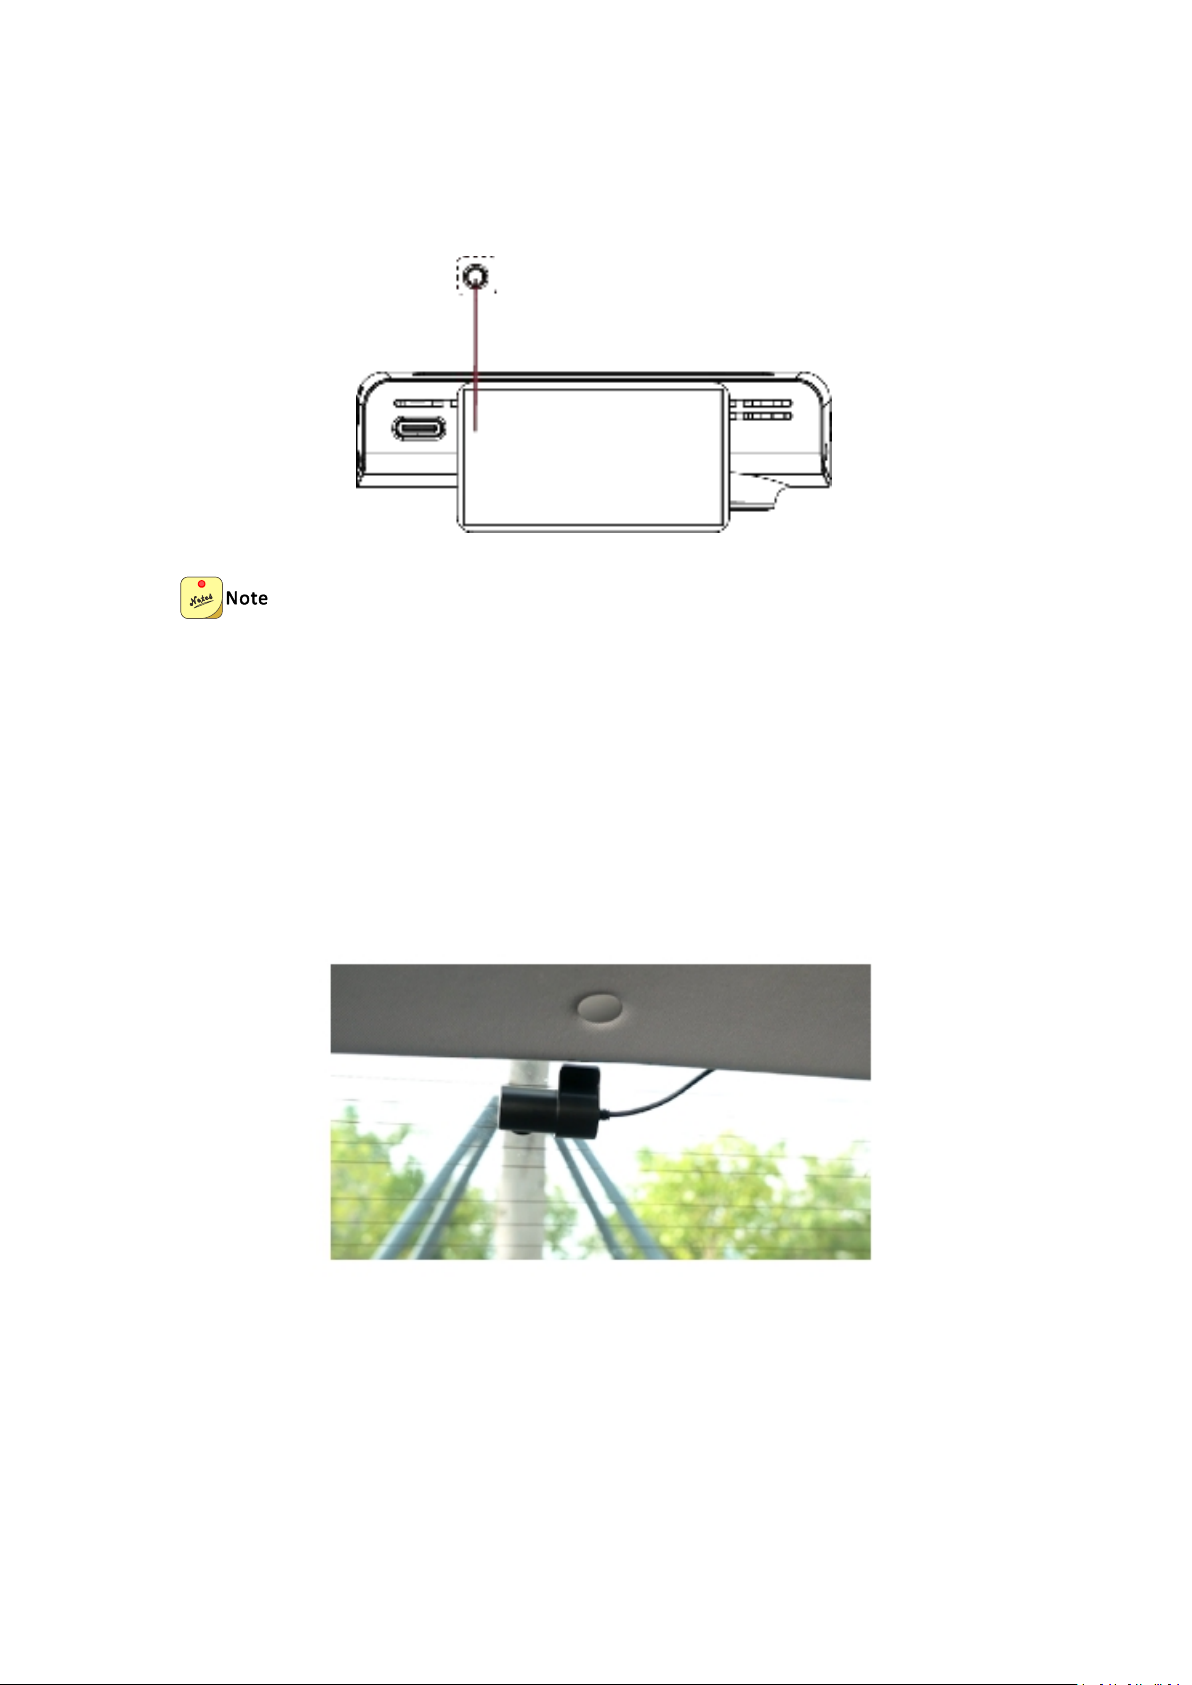
3. Insert the rear power cable fully into the N1 Dual headphone jack.
Please make sure that the power cable is fully plugged into the jack, if not, the rear camera
indicator will not on, and the rear camera will not work.
4. Route the rear power cable from the Dash Cam to the rear camera, cable routing is shown in
the figure above.
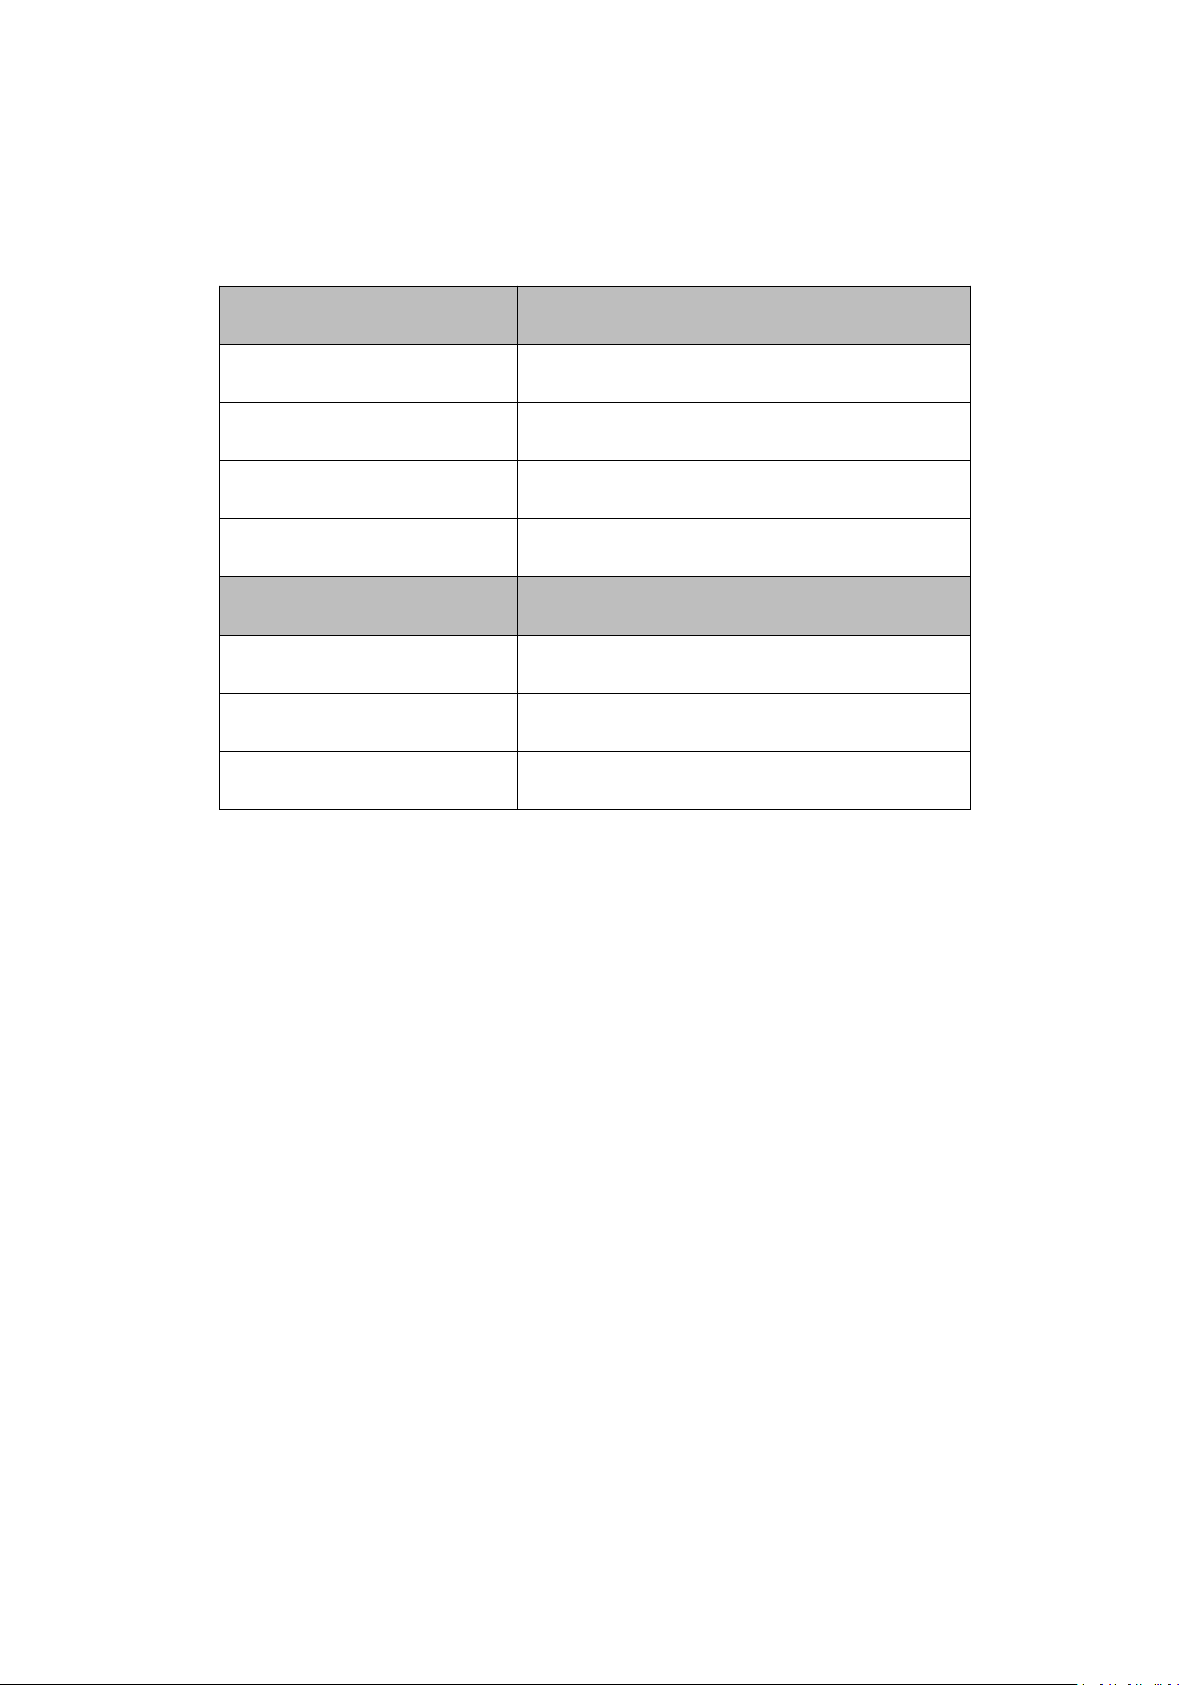
5. Remove the red backing film of the adhesive sticker, and adjust the field of view of the rear
camera, then fix the rear camera to the inner wall of the rear windshield.
Page 17
13
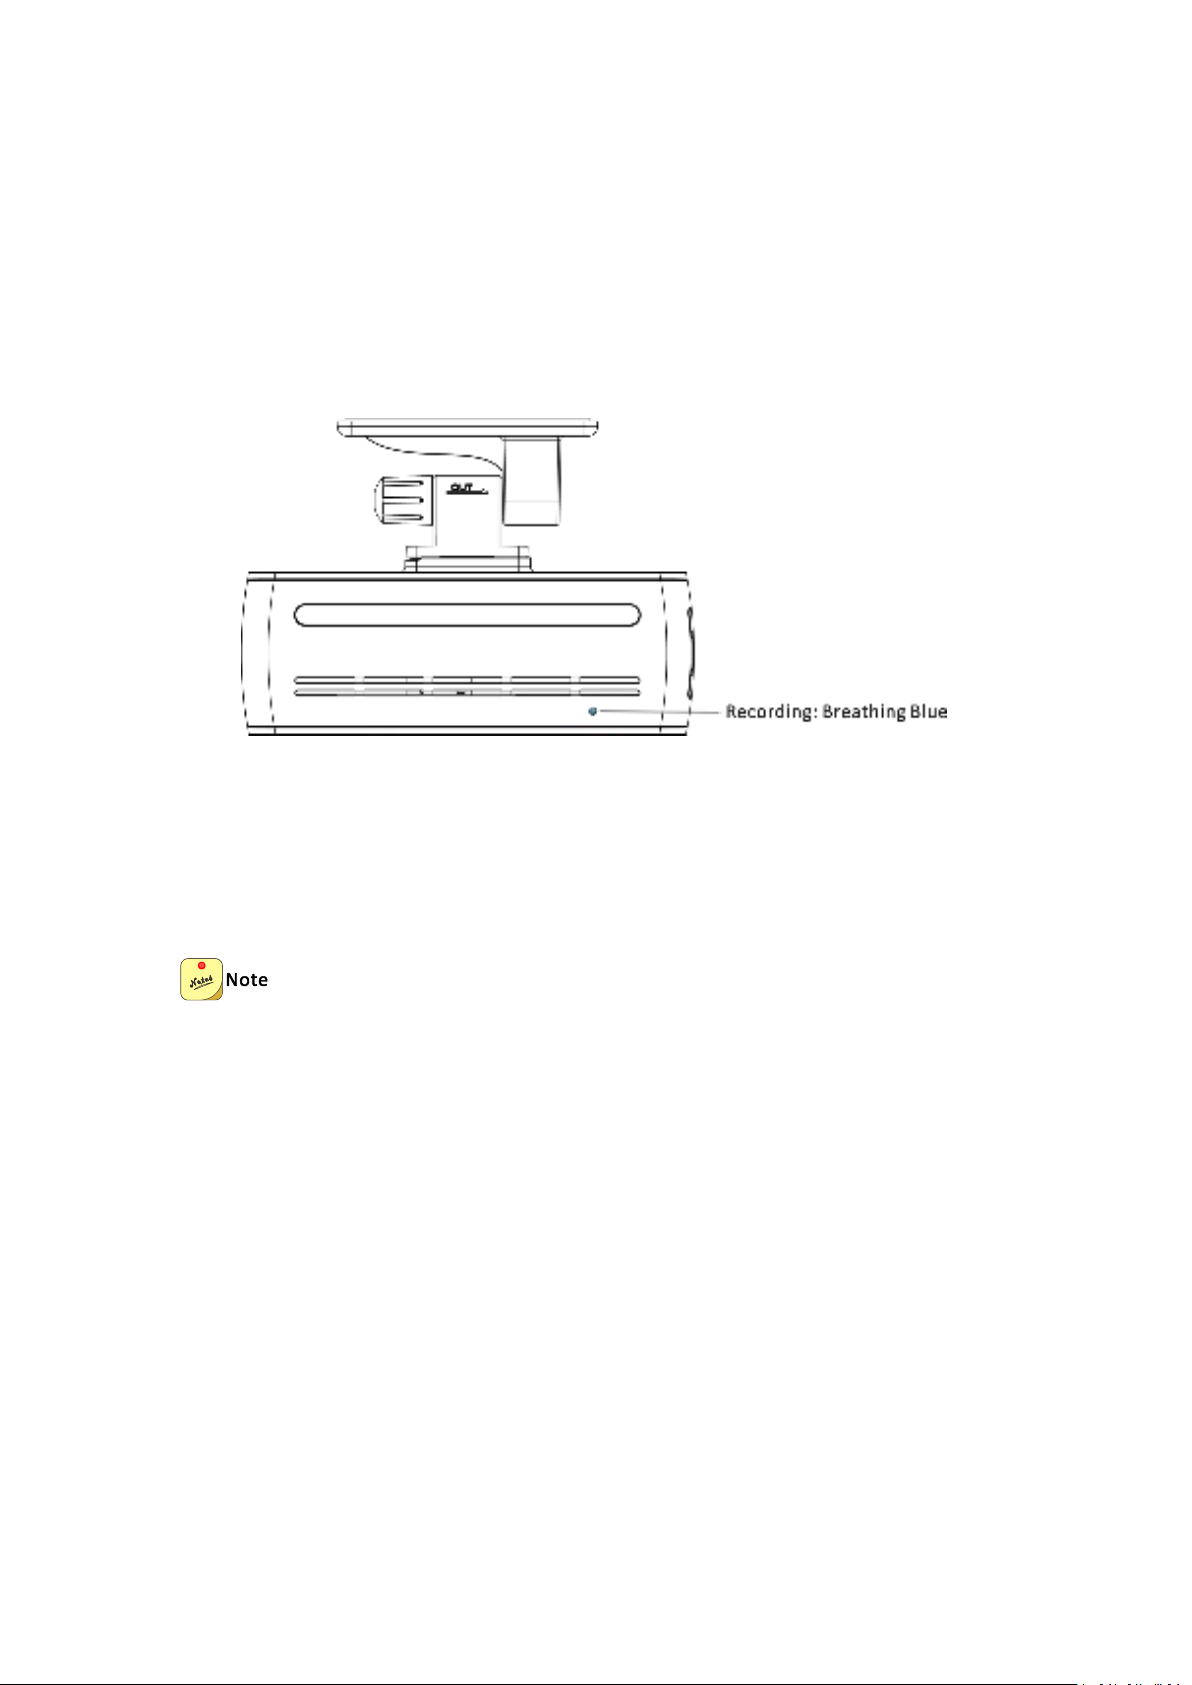
5. Indicator Guide
Working Indicator
System Status
Breathing Blue
Recording
Flashes Blue
Storage Exception/Emergency Recording
Steady Blue
Power-on Moment
Steady Blue
Upgrading
Parking Monitoring Indicator
System Status
Breathing Red
Parking Monitoring
Flashes Red Quickly
Storage Exception/Emergency Recording
Steady Red
Upgrading
Page 18
14
6. Loop Recording
The Device automatically starts recording after powering on without any additional settings
required.
Previous recordings will be overwritten in a loop when storage is full. Emergency events will be
locked and not be overwritten. Previous recordings will be overwritten in a loop when storage is
full. Emergency events will be locked and not be overwritten.
Please download and save emergency files in time. If there are more than 10 emergency files,
they will be overwritten in a loop.
Page 19
15
7. Setting Up the N1 Dual on DDPAI App
The Dash Cam can be connected to the DDPAI App on smartphone via its built-in Wi-Fi without
incurring user's data usage, forming a small Dash Cam-smartphone WLAN. Through this Wi-Fi
network, you can preview, playback, download and share driving recordings and photos in real
time on the DDPAI App on smartphone.
7.1 Downloading DDPAI App
Please scan the QR code below or search for“DDPAI”in Google Play Store (Android) or App
Store (iOS) to download the DDPAI App.
If the authorization prompts appear during installation, please grant full permissions, otherwise
the connection between DDPAI App and N1 Dual may be affected.
Page 20
16
7.2 Connecting N1 Dual with Smart Phone
As the App is constantly upgraded, the actual operation may be slightly different from the
following description. Please connect your device to a phone according to the prompts in the
DDPAI App.
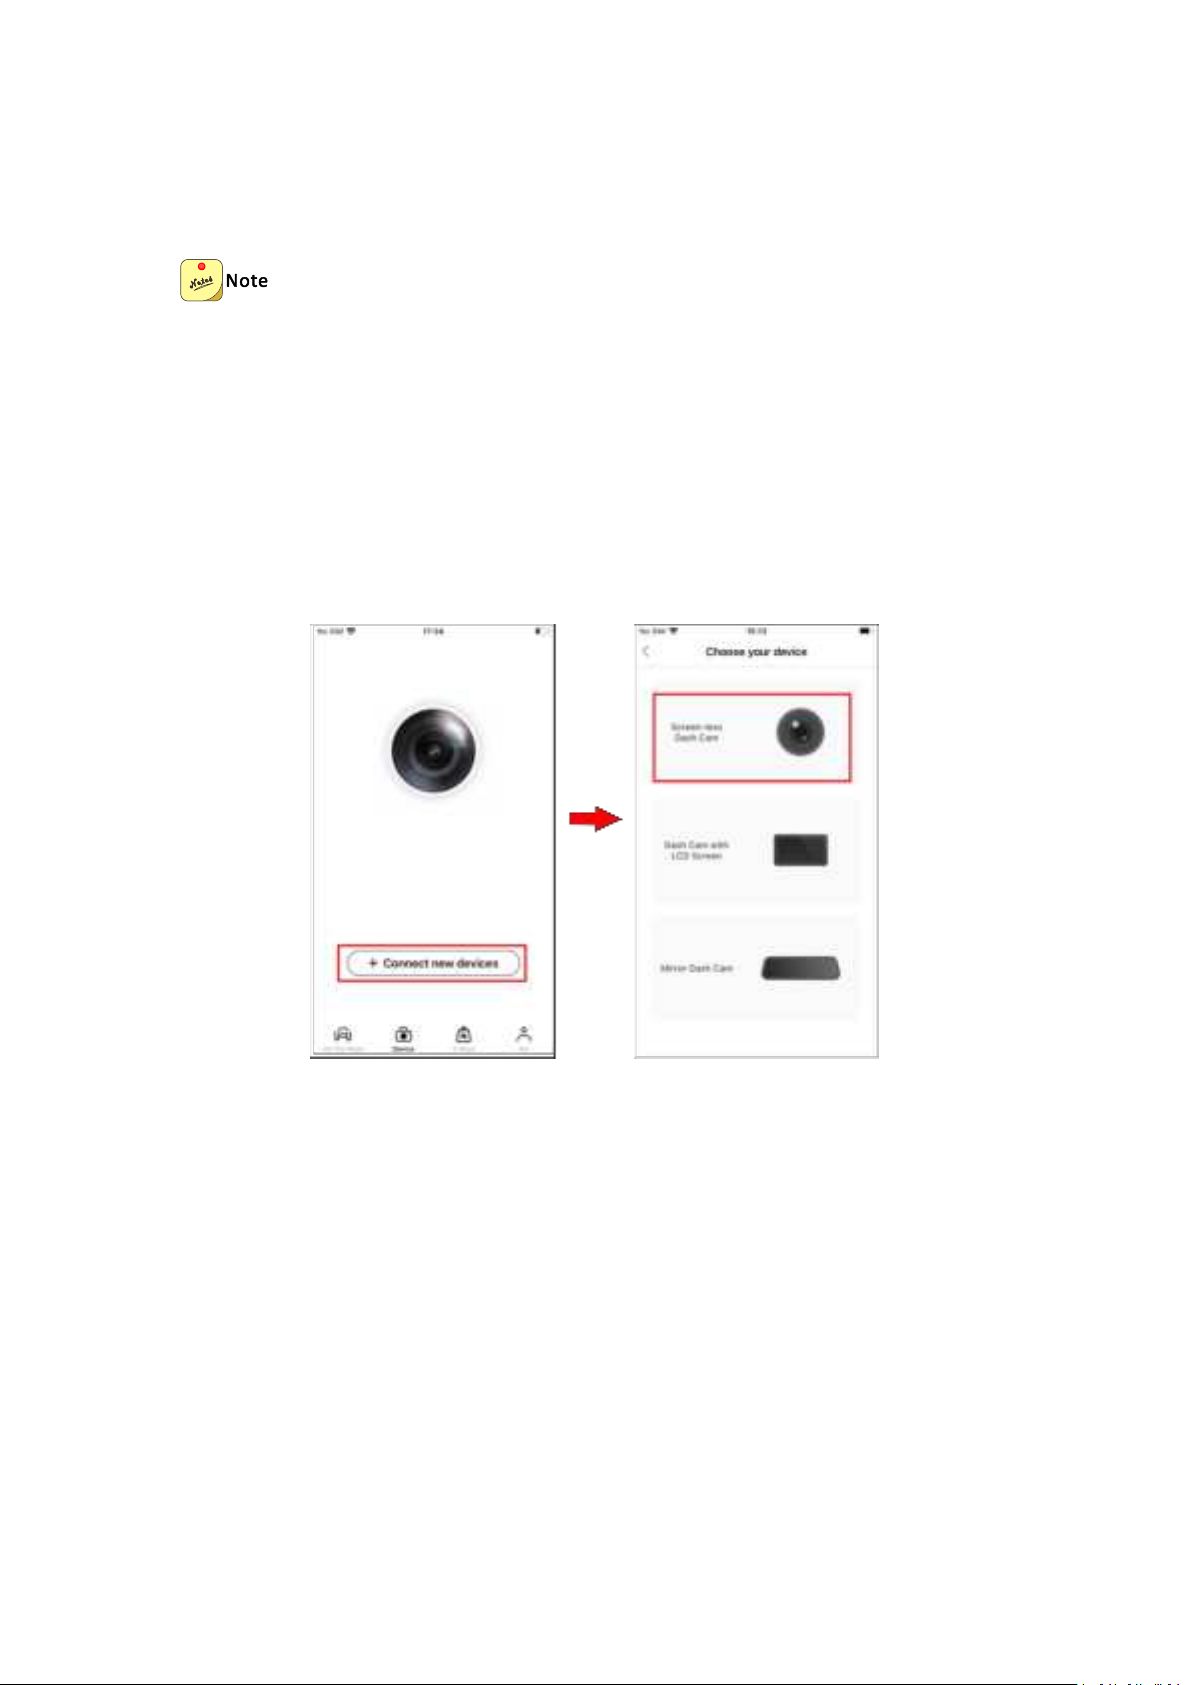
① Open the DDPAI App, enter the "Device" page, tap "+ Connect New Device", enter the
"Choose your device" interface, and then tap "Screen-less Dash Cam".
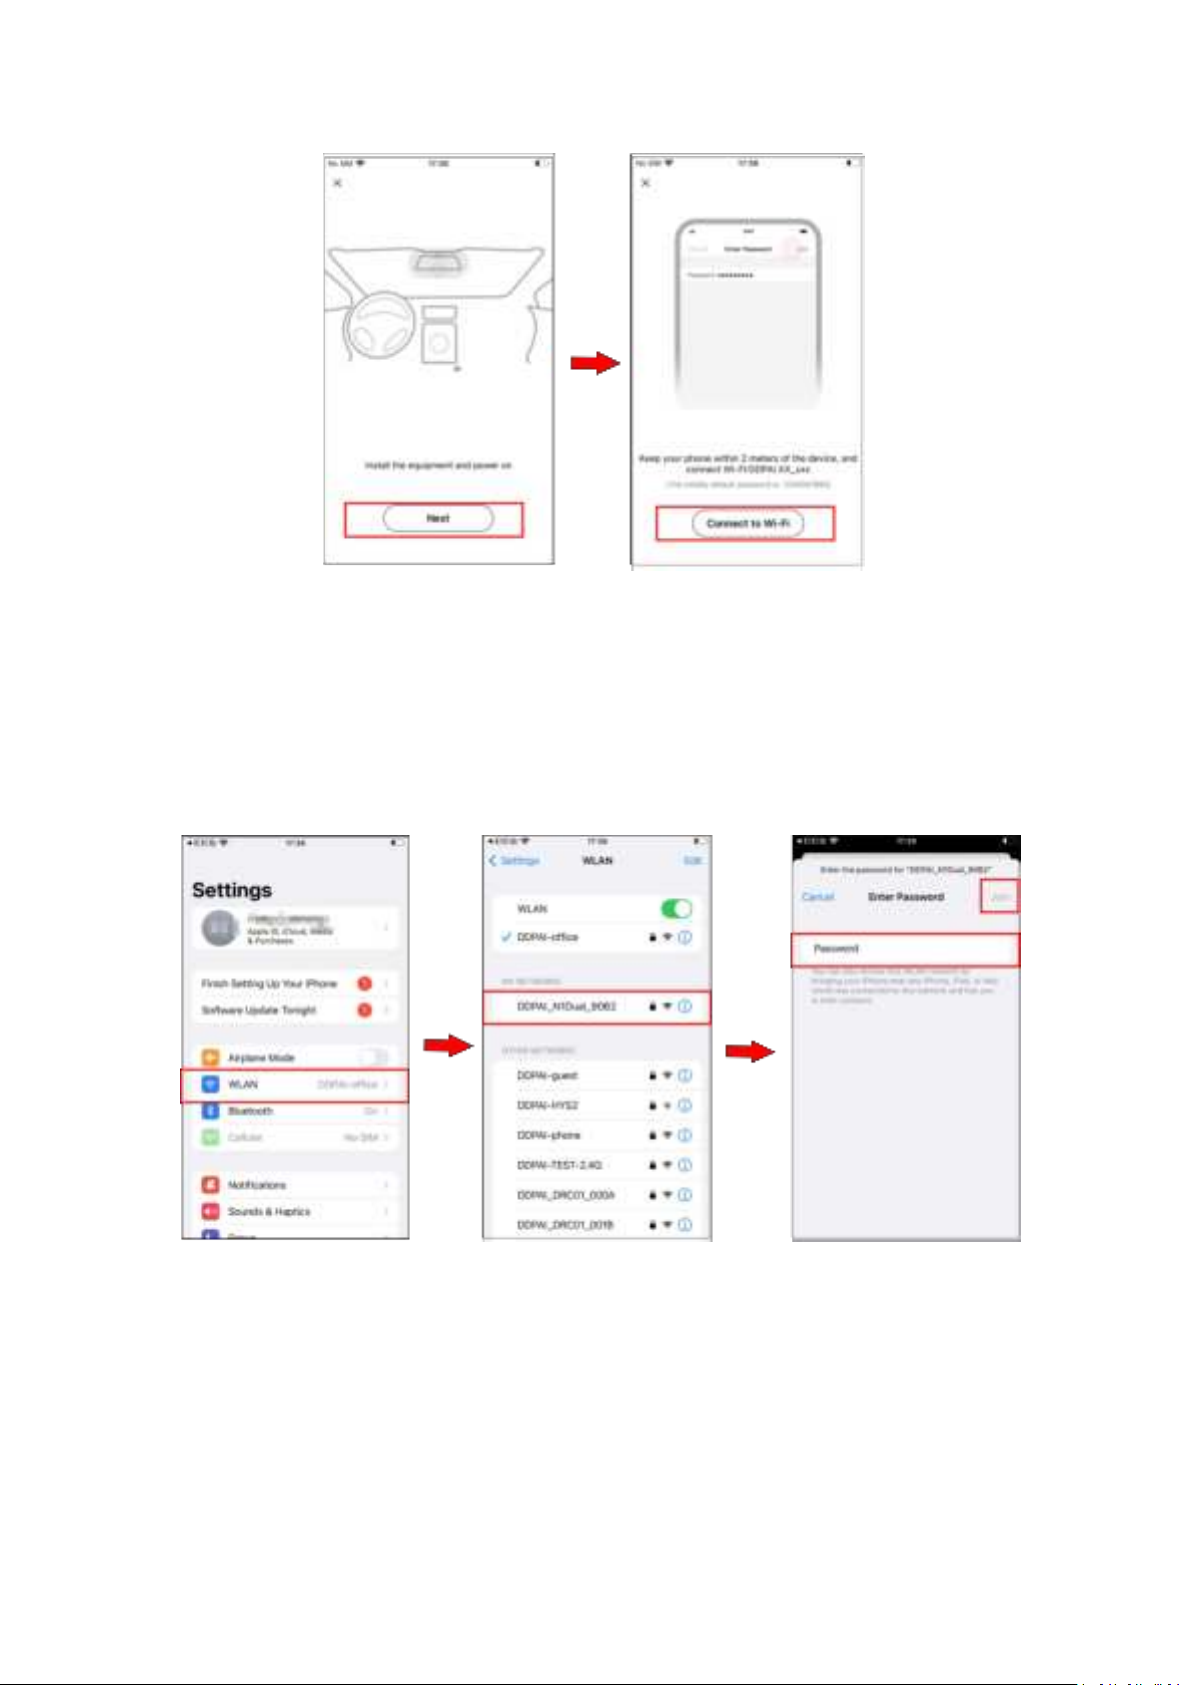
② Tap "Next" > "Connect to Wi-Fi" in turn, and the detected Wi-Fi of the Dash Cam (such as
DDPAI_N1 Dual_XXXX) will be displayed.
Page 21
17
③ Connect your phone to the built-in Wi-Fi "DDPAI_N1 Dual_XXXX" of the Dash Cam, and the
default password is 1234567890.
For iPhone: When you enter the“Settings”interface, select "WLAN" > "DDPAI_N1
Dual_XXXX", enter the initial password (1234567890), and tap Join.
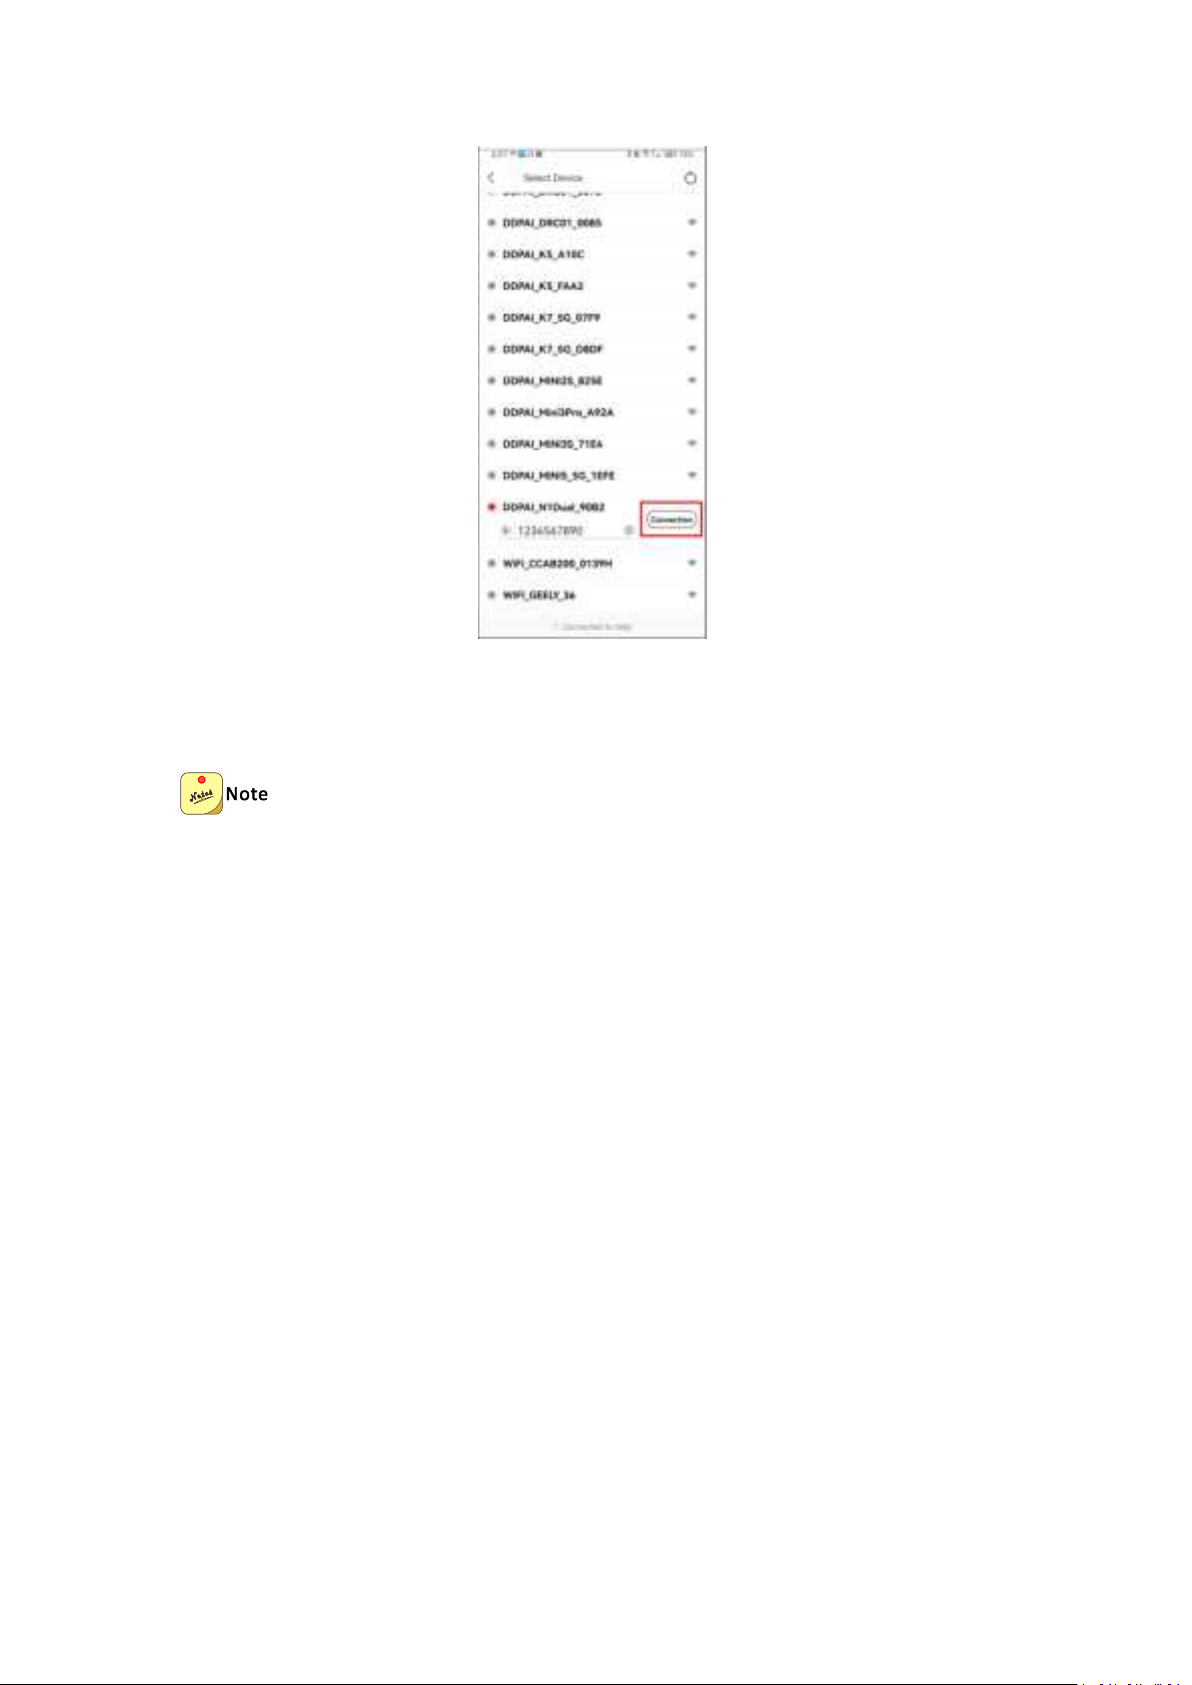
For Android phones: In the Wi-Fi list, select "DDPAI_N1Dual_XXXX", enter the initial
password(1234567890), and tap Connection.
Page 22
18
④ After successful connection, you can directly enter the "Now&back" interface of DDPAI App.
When you connect the Dash Cam for the first time, you will be prompted:
To modify the Wi-Fi password: Please modify it according to your needs, and save the
password properly after modification (if you forget the password, please hold the reset
button on the Dash Cam with a pin for 6 to 8 seconds to restore the factory settings, and
then reconnect the Dash Cam with the initial password).
Whether to enable high compression video encoding: It is recommended to enable. After
enabling, the recorded video quality will be improved, which is clearer than the default
configuration.
Page 23
19
8. Video Function
8.1 Preview Real-time Video
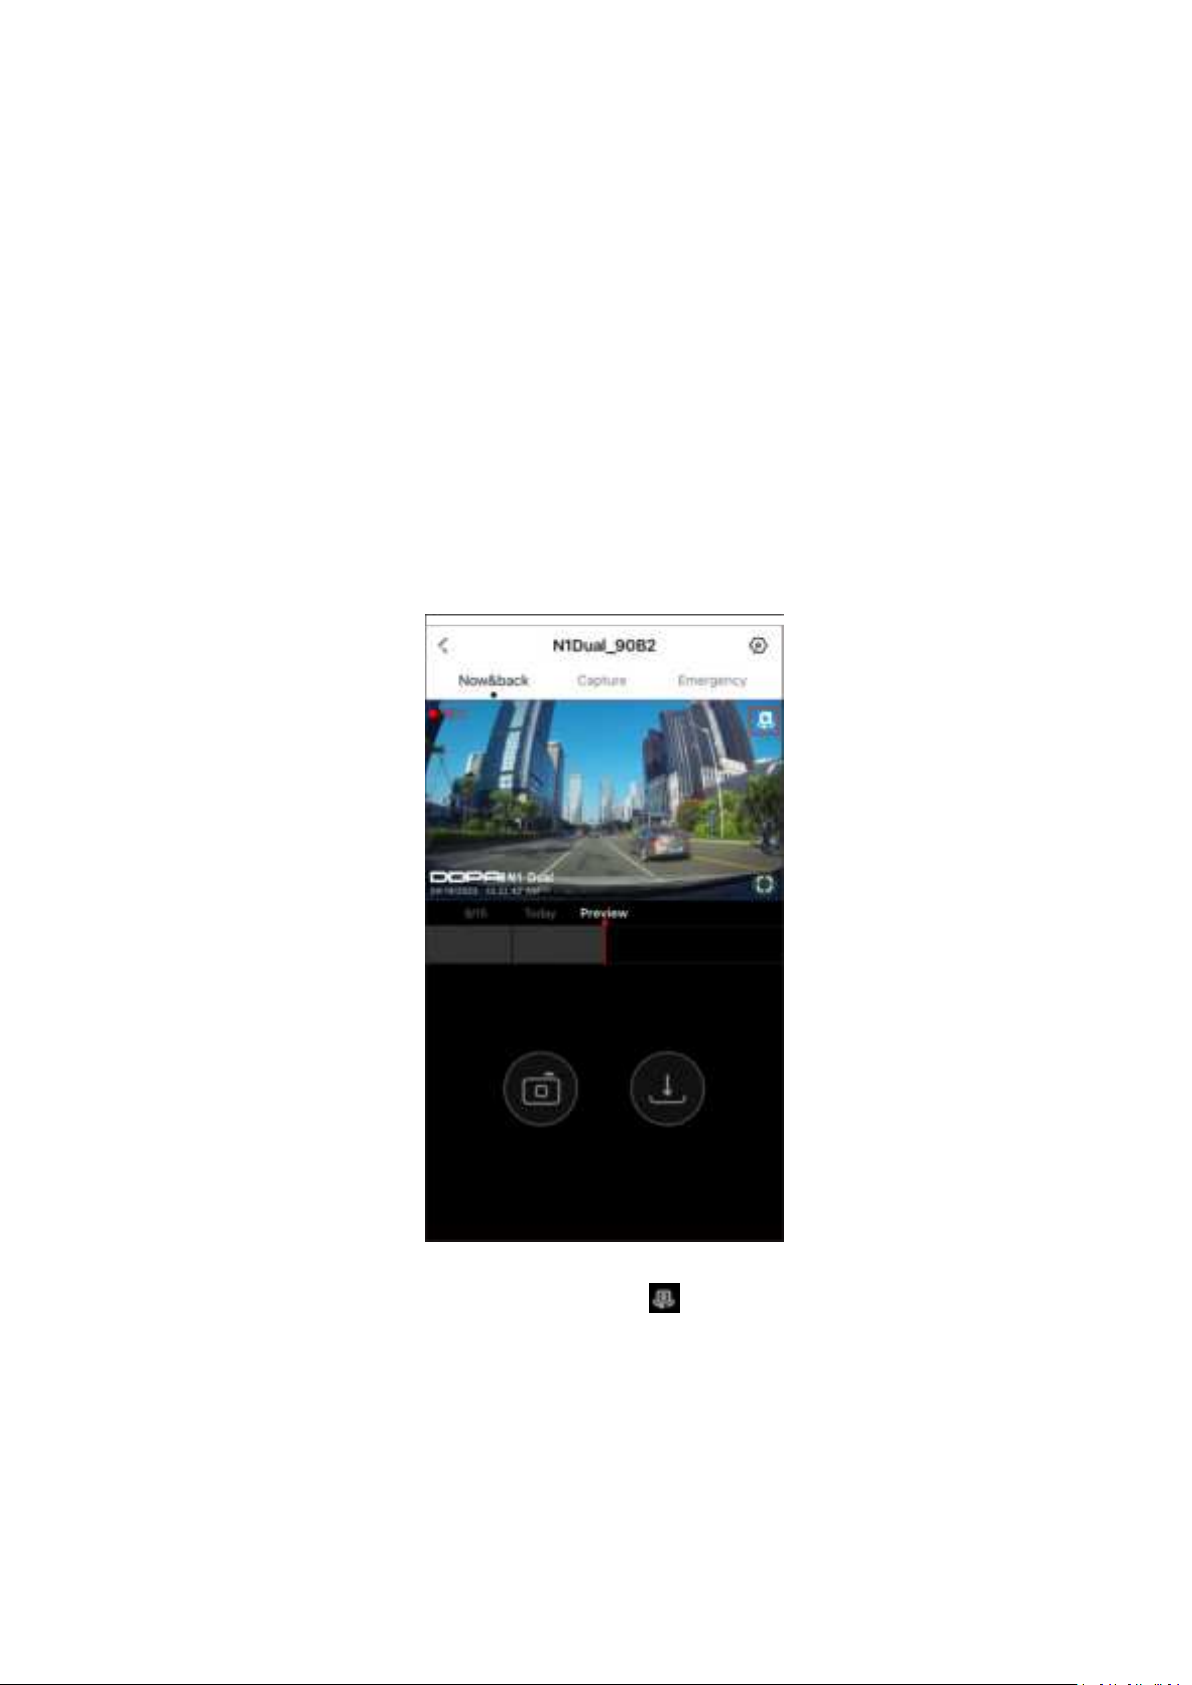
After the App is successfully connected to the Dash Cam, you will enter the real-time preview
interface directly.
1. View real-time footage from the front camera: After connecting the Dash Cam to the App, you
can directly view the front camera footage.
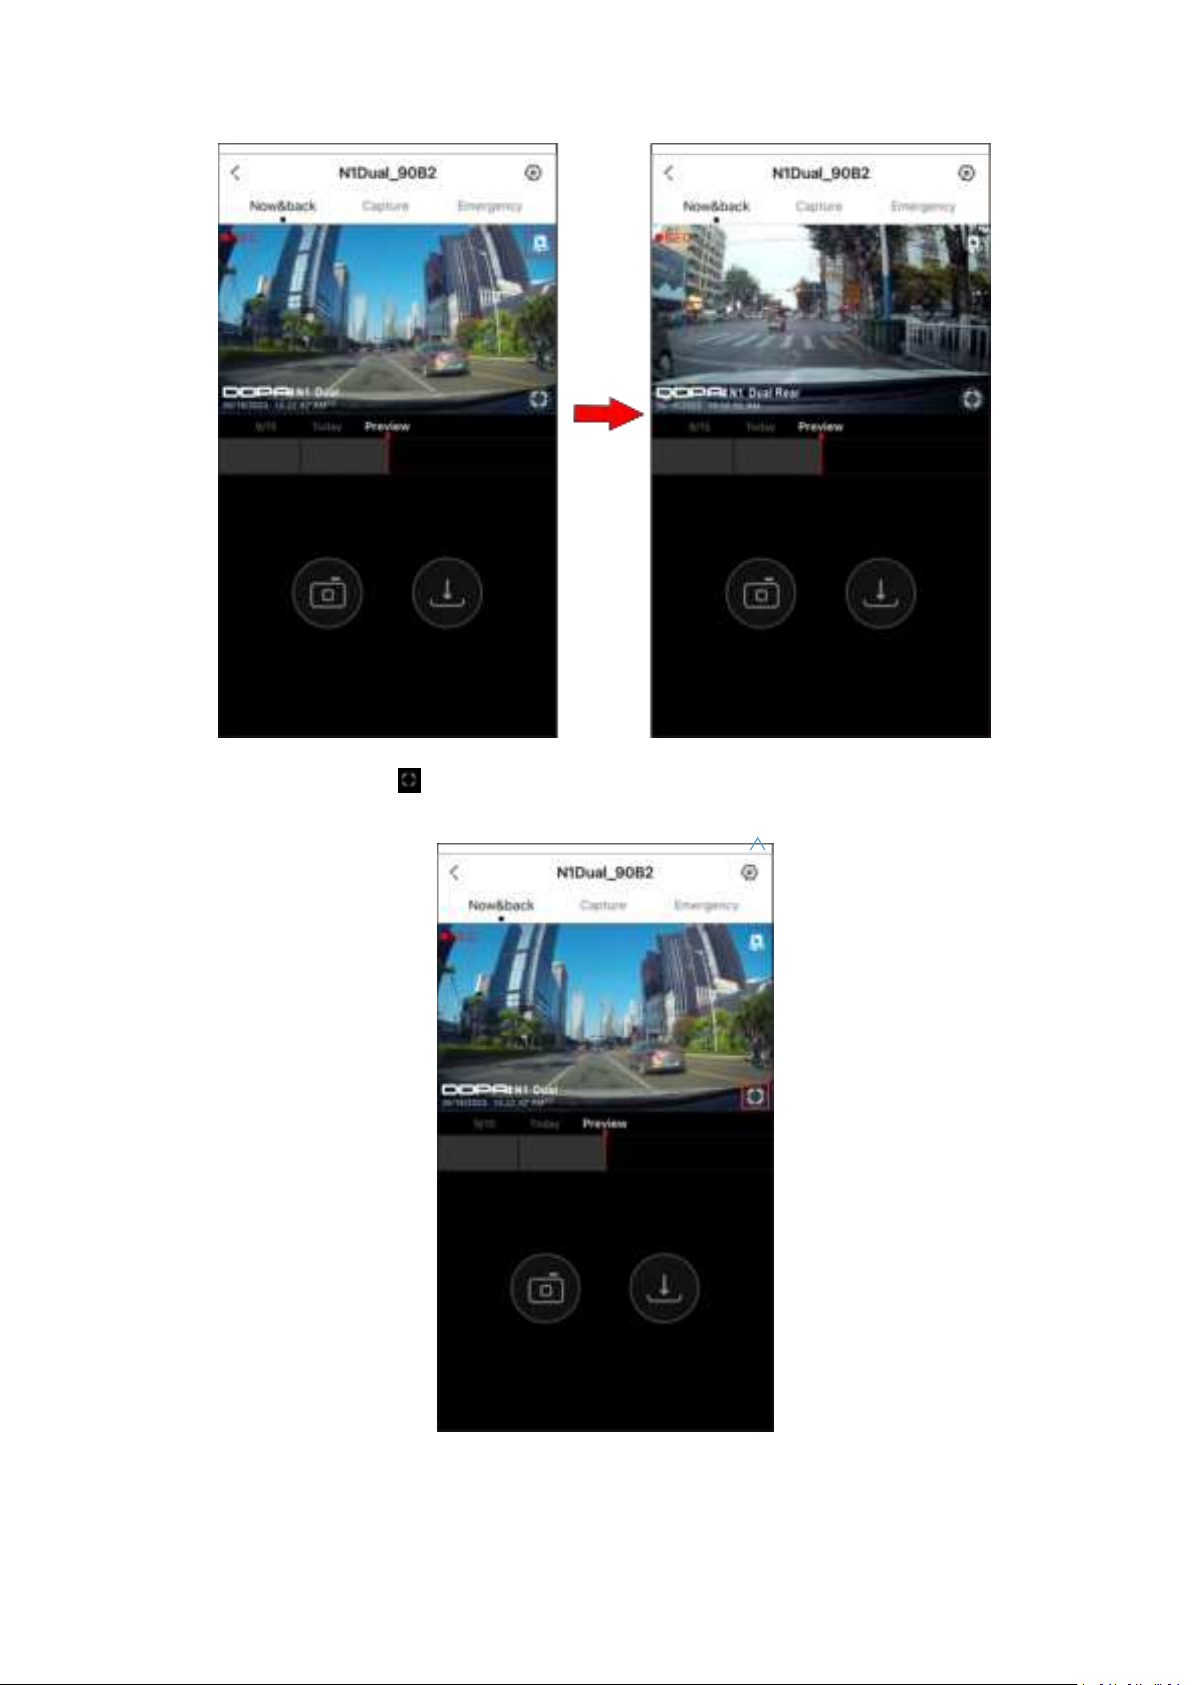
2. View real-time footage from the rear camera: Tap to switch between the front and rear
camera preview screens.
Page 24
20
3. View full screen: Tap or rotate your phone horizontally to switch the real-time screen to
full-screen mode.
Page 25
21
8.2 Playback Recorded Video
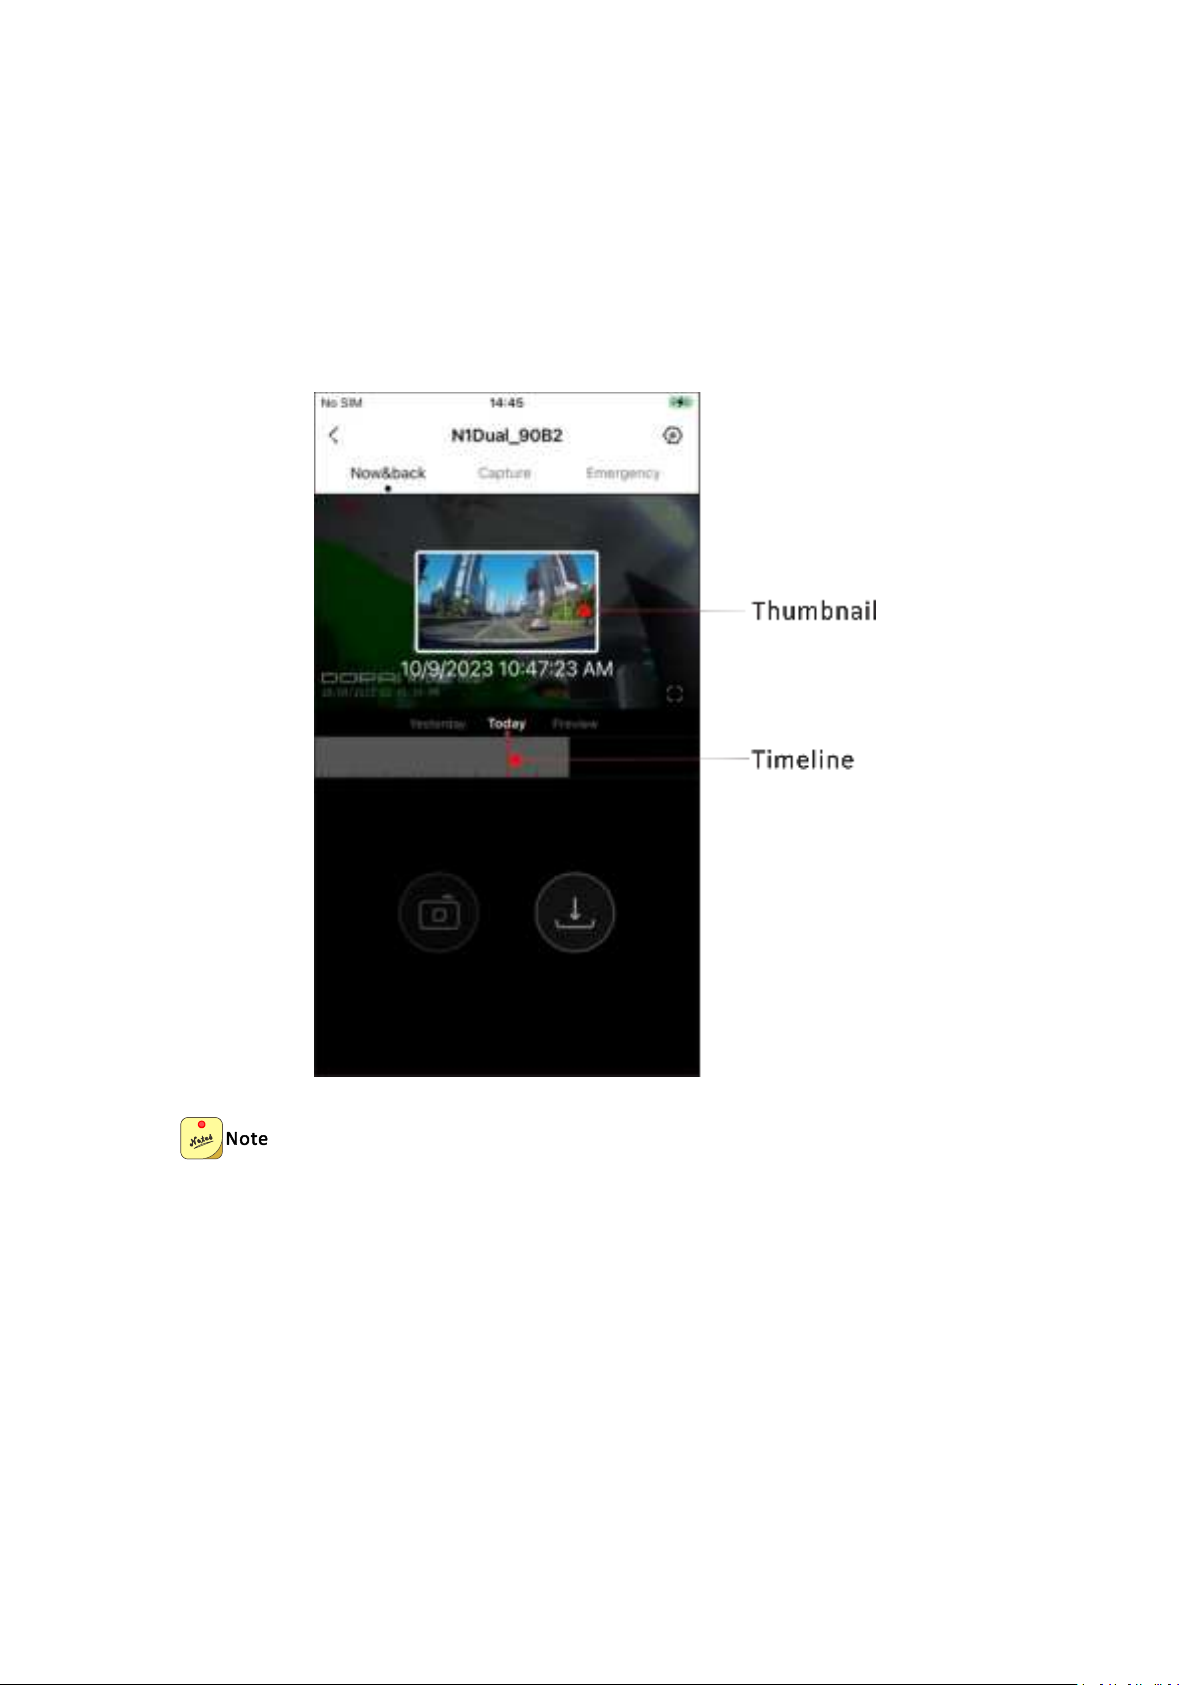
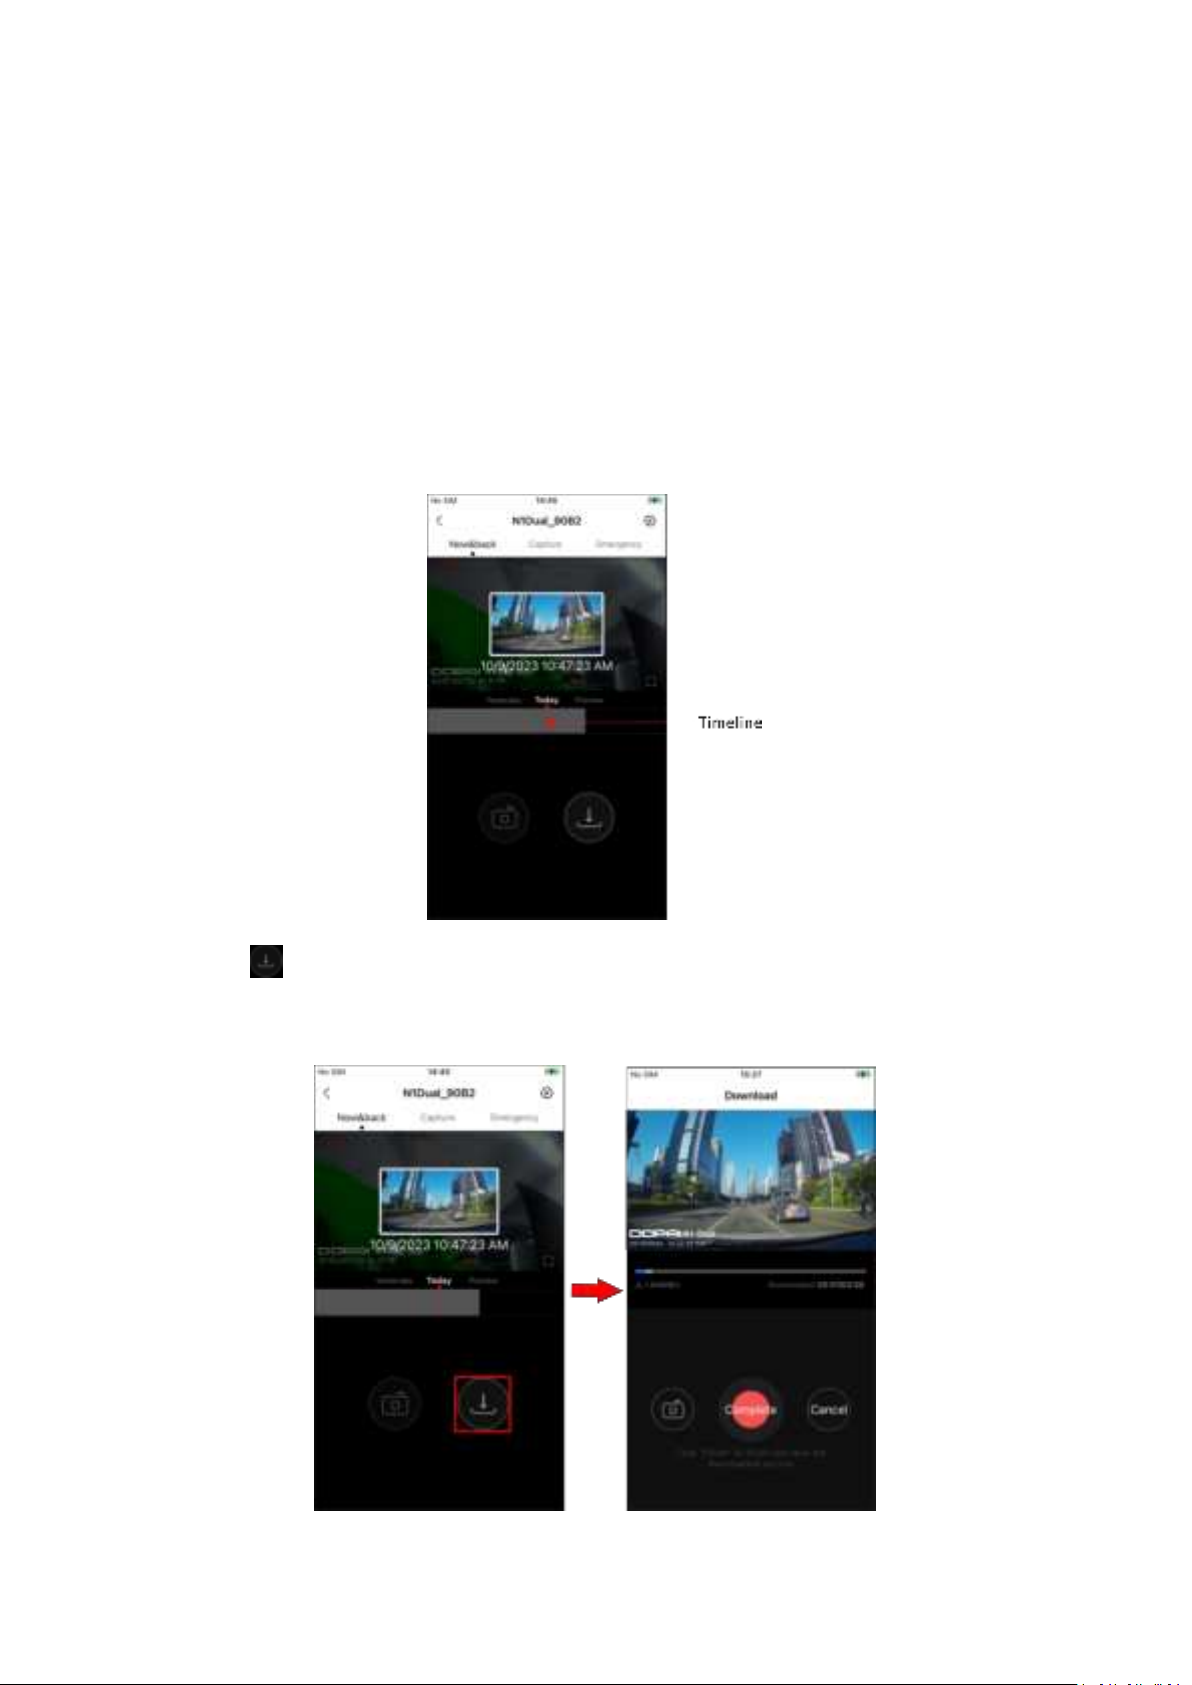
1. Enter the Now&back interface, and tap on the screen will display the progress bar;
2. Drag the progress bar to select the time starting point to view;
3. Tap the thumbnail or wait for 5 seconds to start playing the previously recorded video.
When video playback is performed, the Dash Cam will pause recording.
Page 26
22
9. Downloading Video
9.1 Downloading from the Playback Timeline
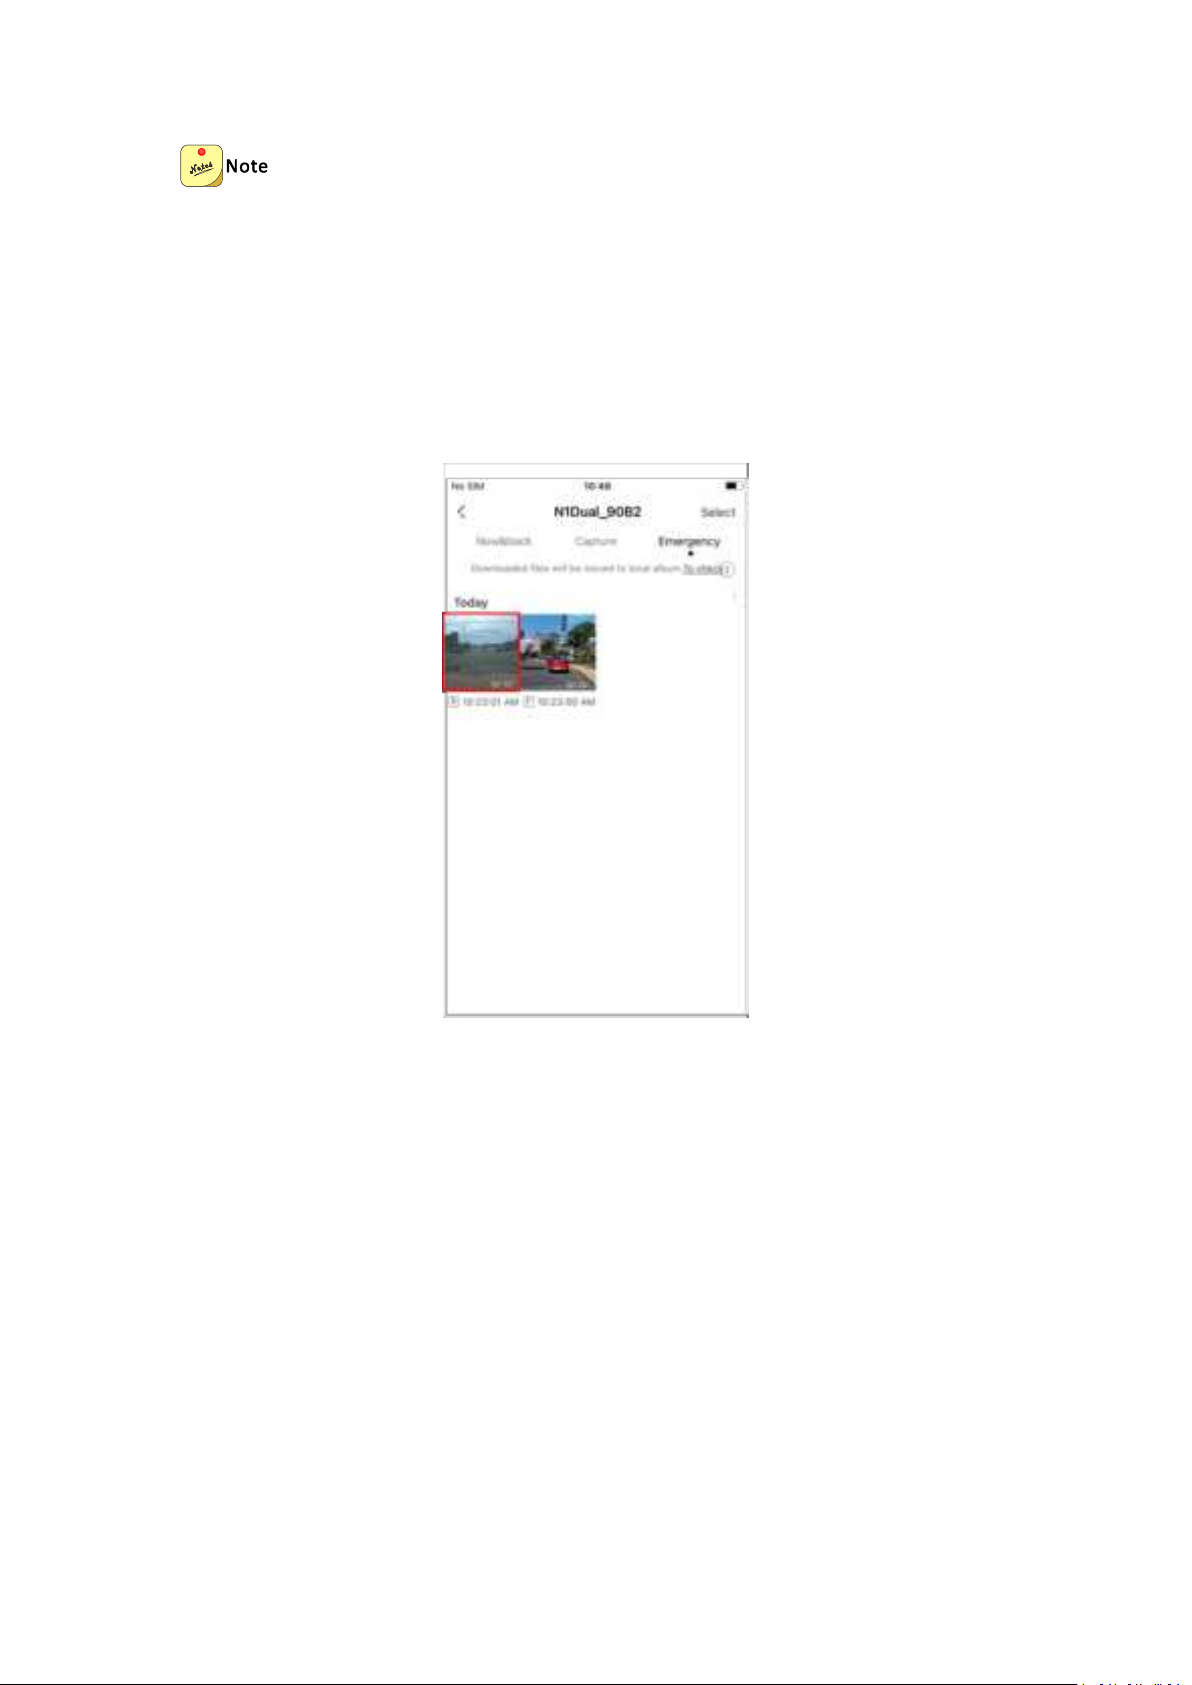
1. Enter the preview interface, and tap on the screen will display the progress bar.
2. Drag the progress bar to select the time starting point to download.
3. Tap (download) to start downloading, and tap Complete to finish downloading. After
downloading, the file is saved to the local photo album, which can be shared and deleted.
Page 27
23
The longest video can be downloaded at one time is 3 minutes and the shortest is 5 seconds.
9.2 Downloading Emergency Files
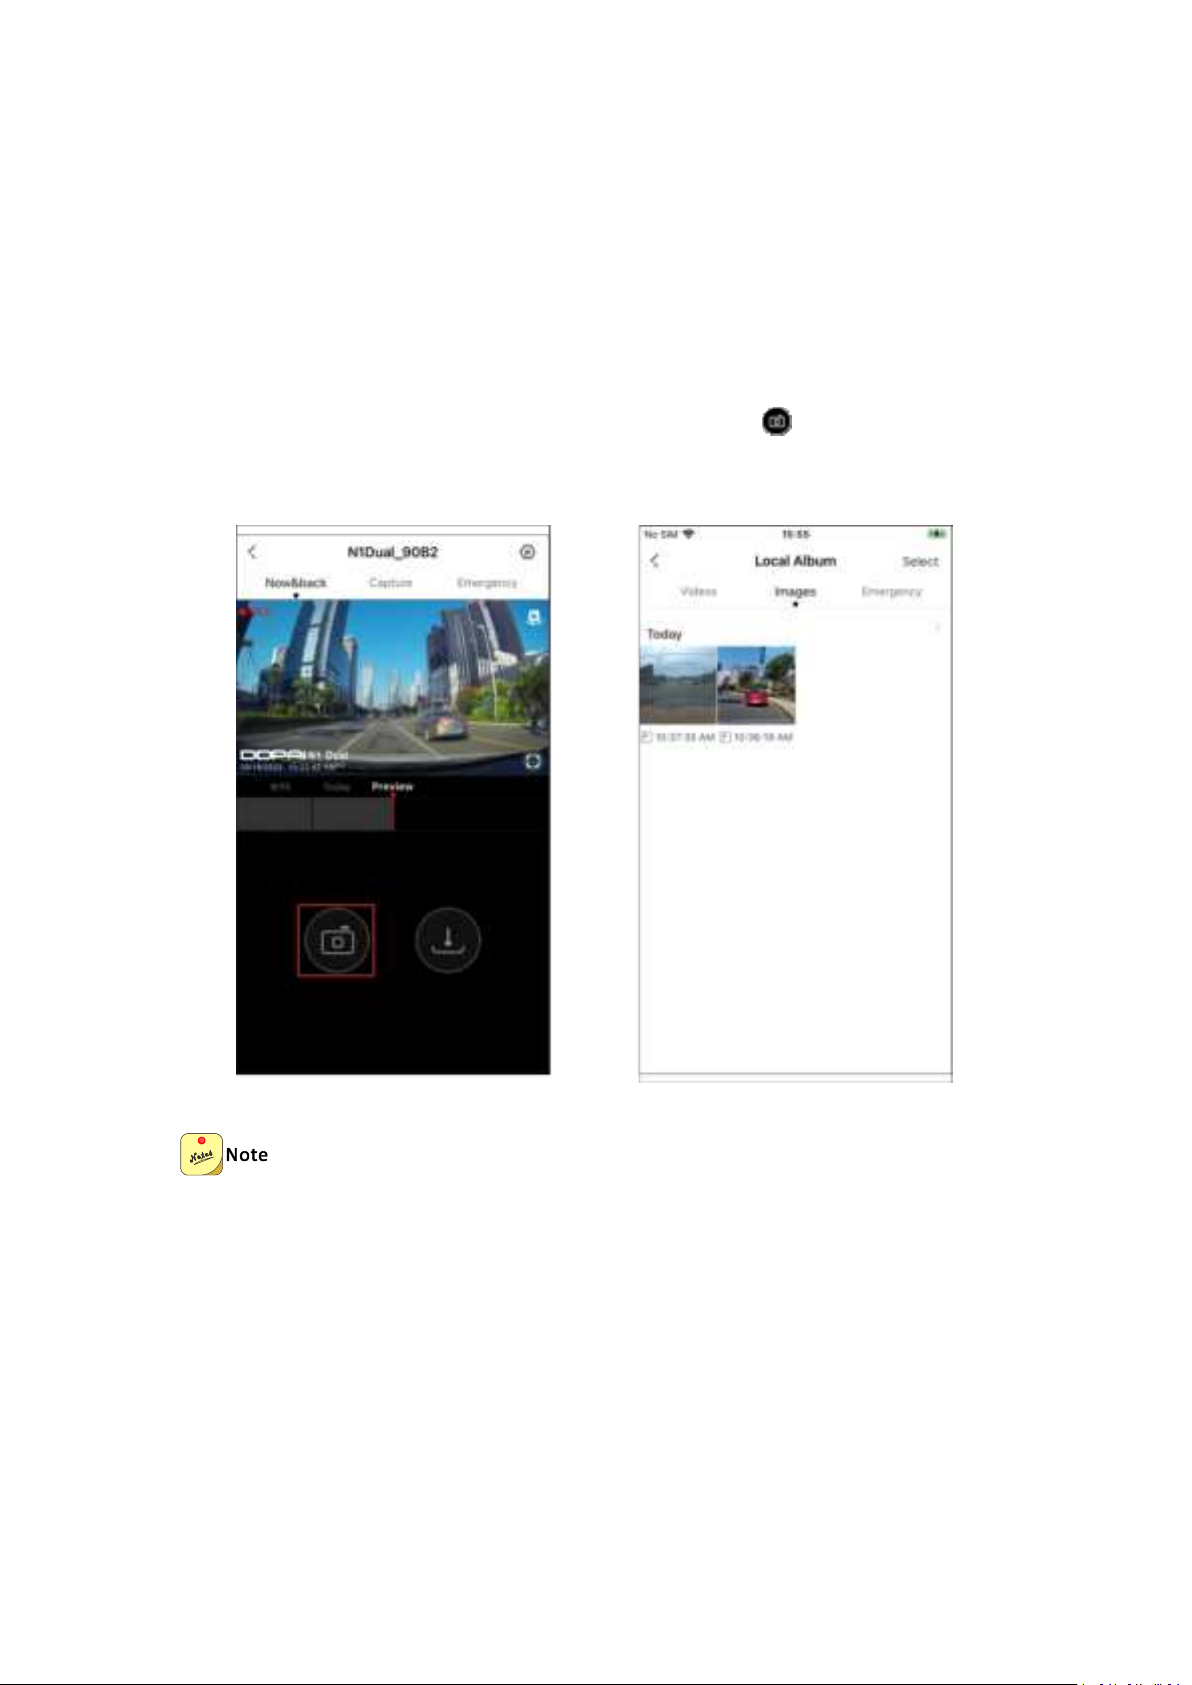
Long-press the file in the list to enter the selection state, and then select files to download.
Page 28
24
10. Taking Photos
This Dash Cam supports the following two photographing modes:
Collision sensing photography: The Dash Cam will automatically take pictures when it senses
the collision or emergency braking of the vehicle.
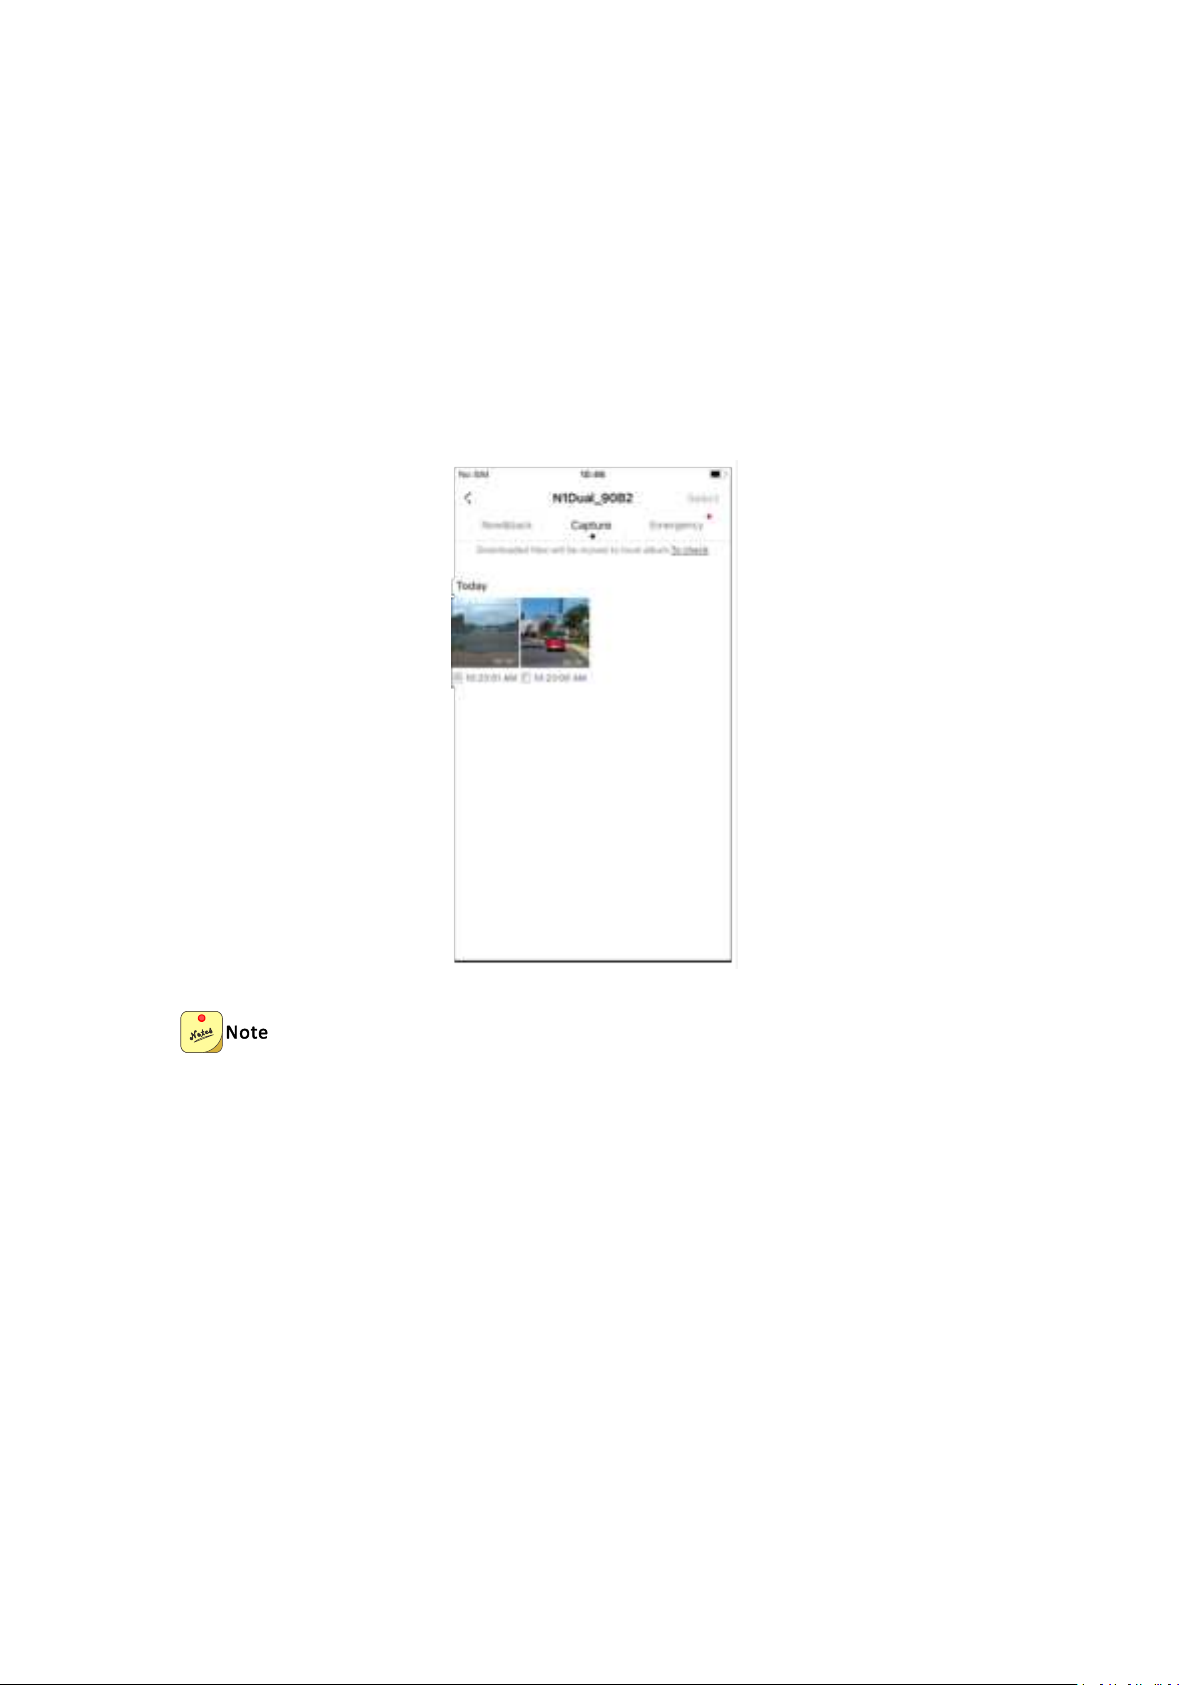
Manual photographing: Enter the "Now&back" interface, Tap to take a photo and you
can view the snapshot photo in your local album.
Collision-sensing photography will generate related videos (lasting 10s) while taking pictures, and
the photos and related videos will be saved in the "Capture" / "Emergency" interface.
Page 29
25
11. Viewing Photos or Videos
11.1 Viewing Photos or Videos on the Device
After connecting the Dash Cam to the mobile phone, open the DDPAI App. In the "Capture"
interface, you can view the captured photos and videos on the Dash Cam.
The captured photos and videos on the Dash Cam are stored in the device's storage memory and
are not downloaded to the mobile phone. You need to connect the mobile phone to the Dash
Cam via the app to view them.
11.2 Viewing Photos or Videos from Local Album
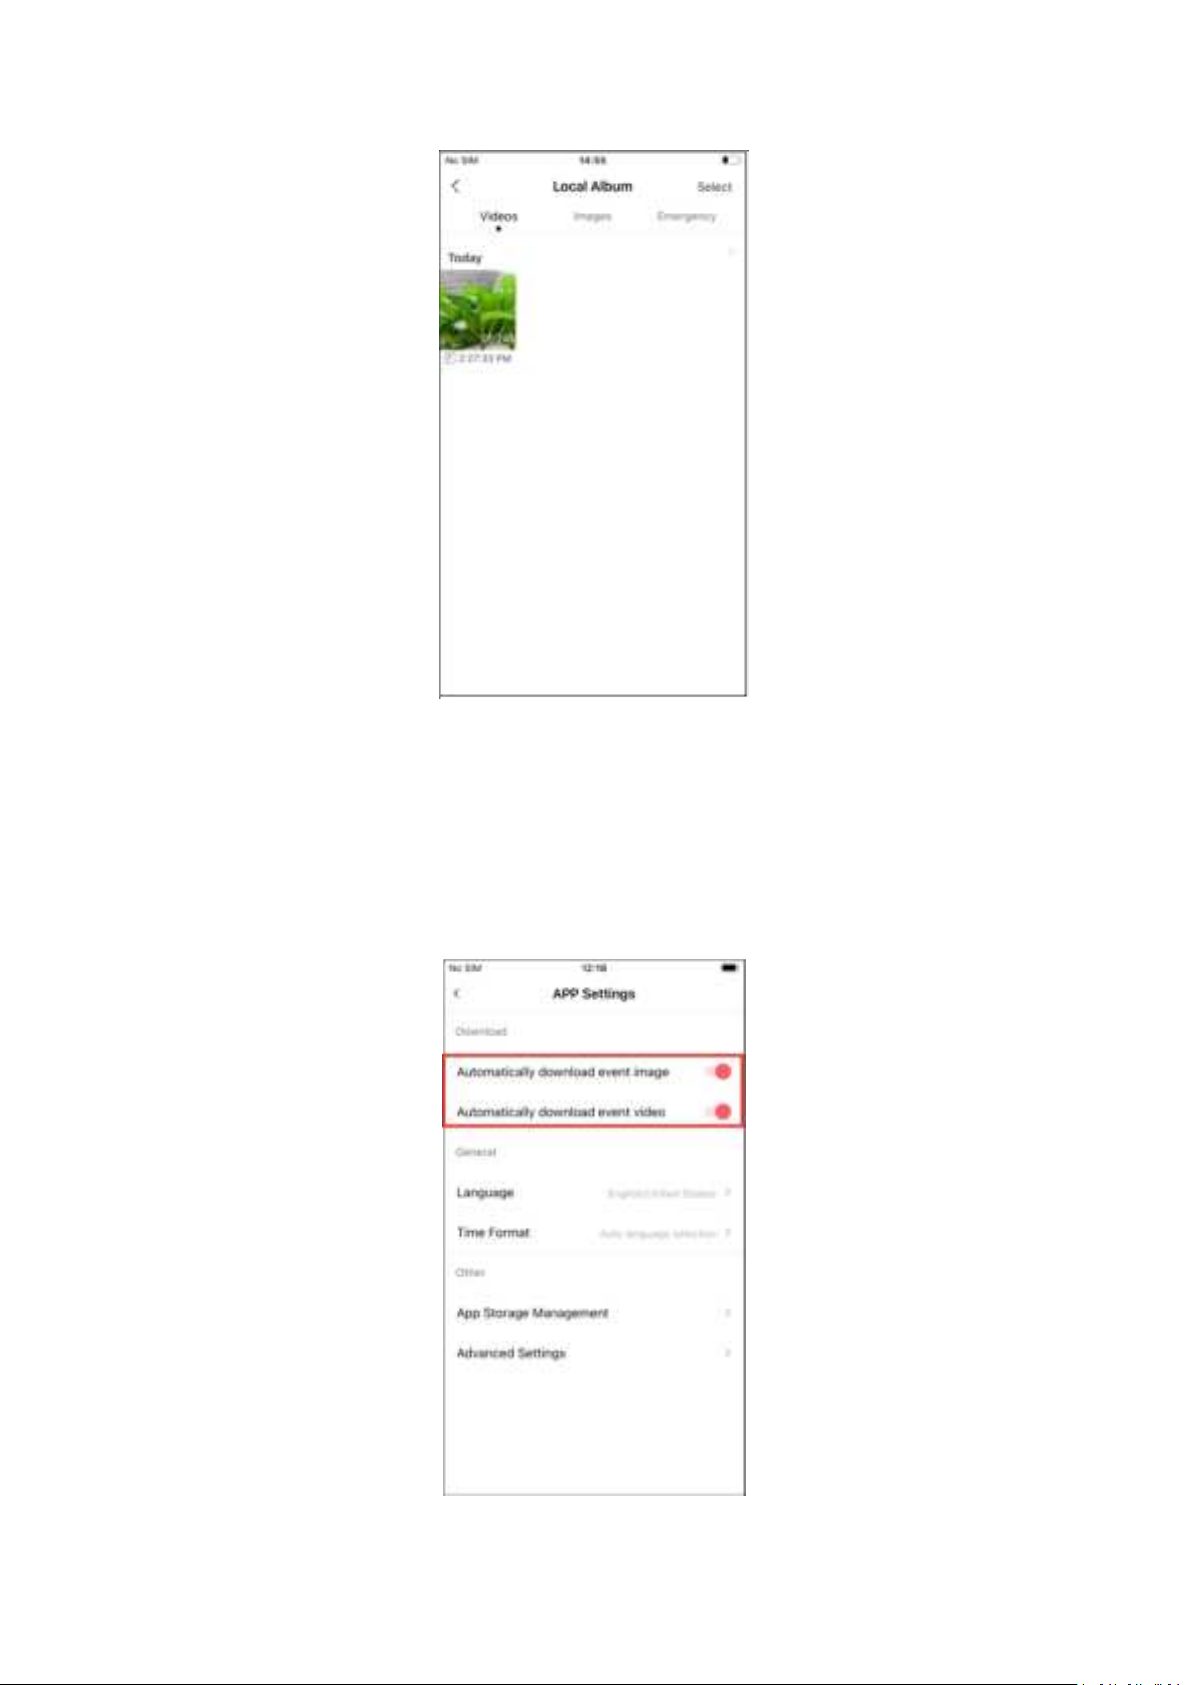
When the captured photos/videos on the device are downloaded to the local album of your
phone, they will be moved to the mobile phone for storage, and can be viewed without
connecting the mobile phone to the Dash Cam. Open the App and enter "Me" interface > tap
"Local Album" to enter the local album interface, and you can view photos or videos
downloaded to your phone.
Page 30
26
Automatically download event photos/videos:
You can choose to automatically download event photos/videos to the local album after
connecting the device. Open the app, enter "Me" interface> tap "APP Settings", enable
"Automatically download event image" / "Automatically download event video" function.
Page 31
27
12. Sharing/Deleting Photos or Videos
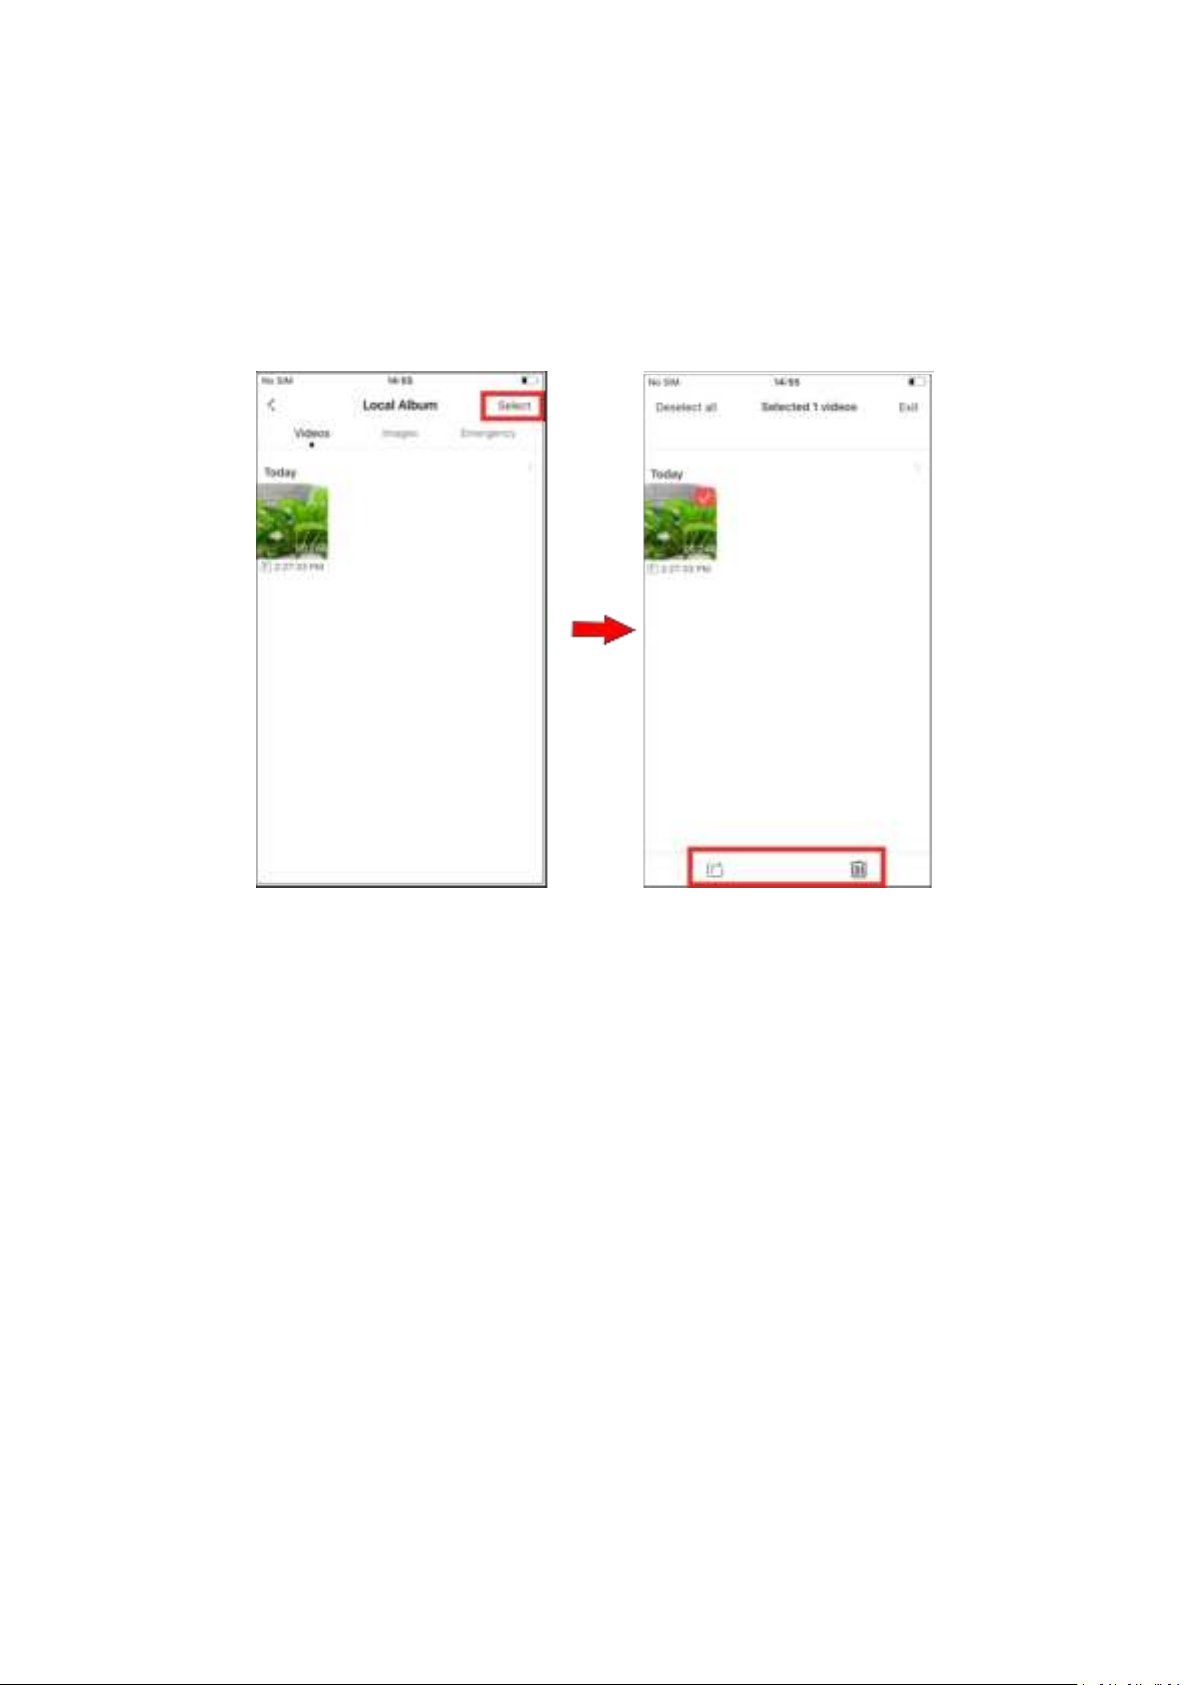
After entering the "Local Album" interface, tap Select to delete videos, pictures, and emergency
files downloaded to your phone or share them to social media accounts.
13. 24H Parking Monitoring Mode
When you select the step-down line to take power, the parking monitoring function can be
realized. After the vehicle is turned off, the Dash Cam will automatically enter the parking
monitoring mode, and will automatically record if there is an abnormal collision. You can set the
parking mode, parking monitoring time and vehicle battery protection voltage value.
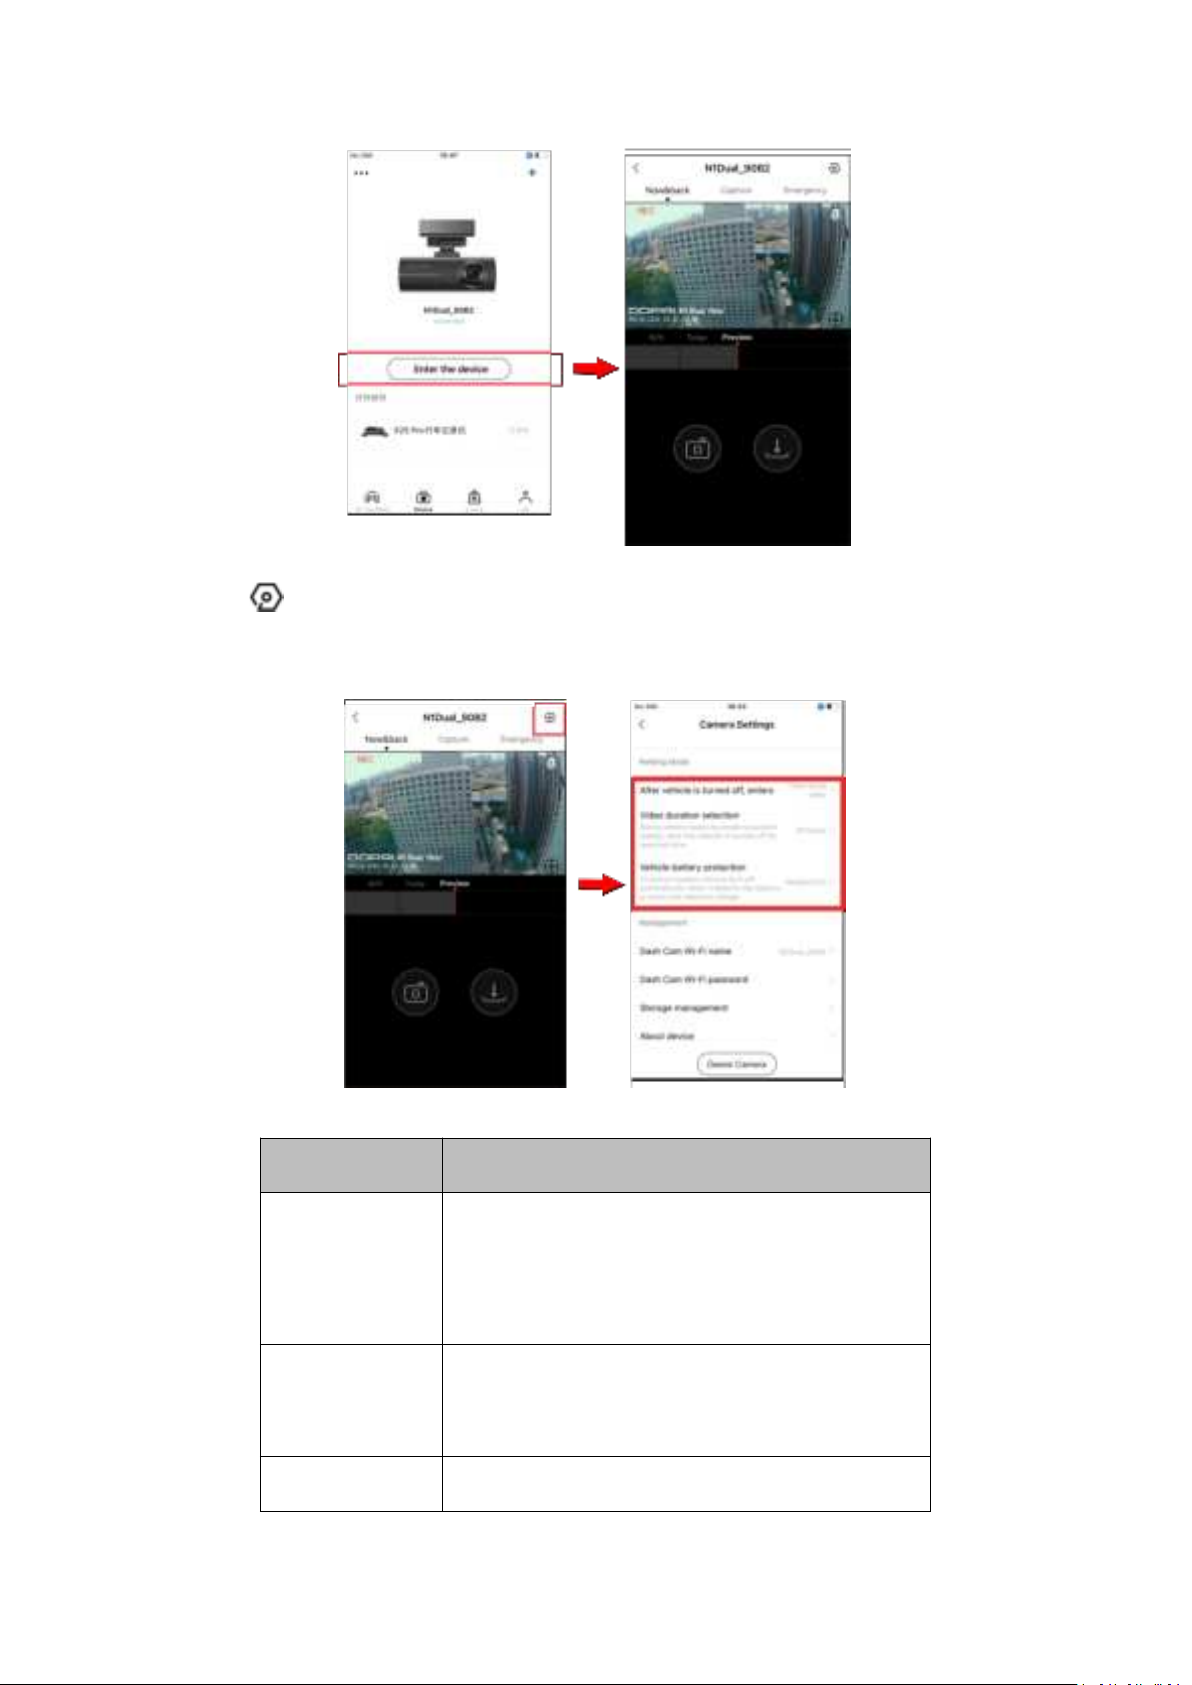
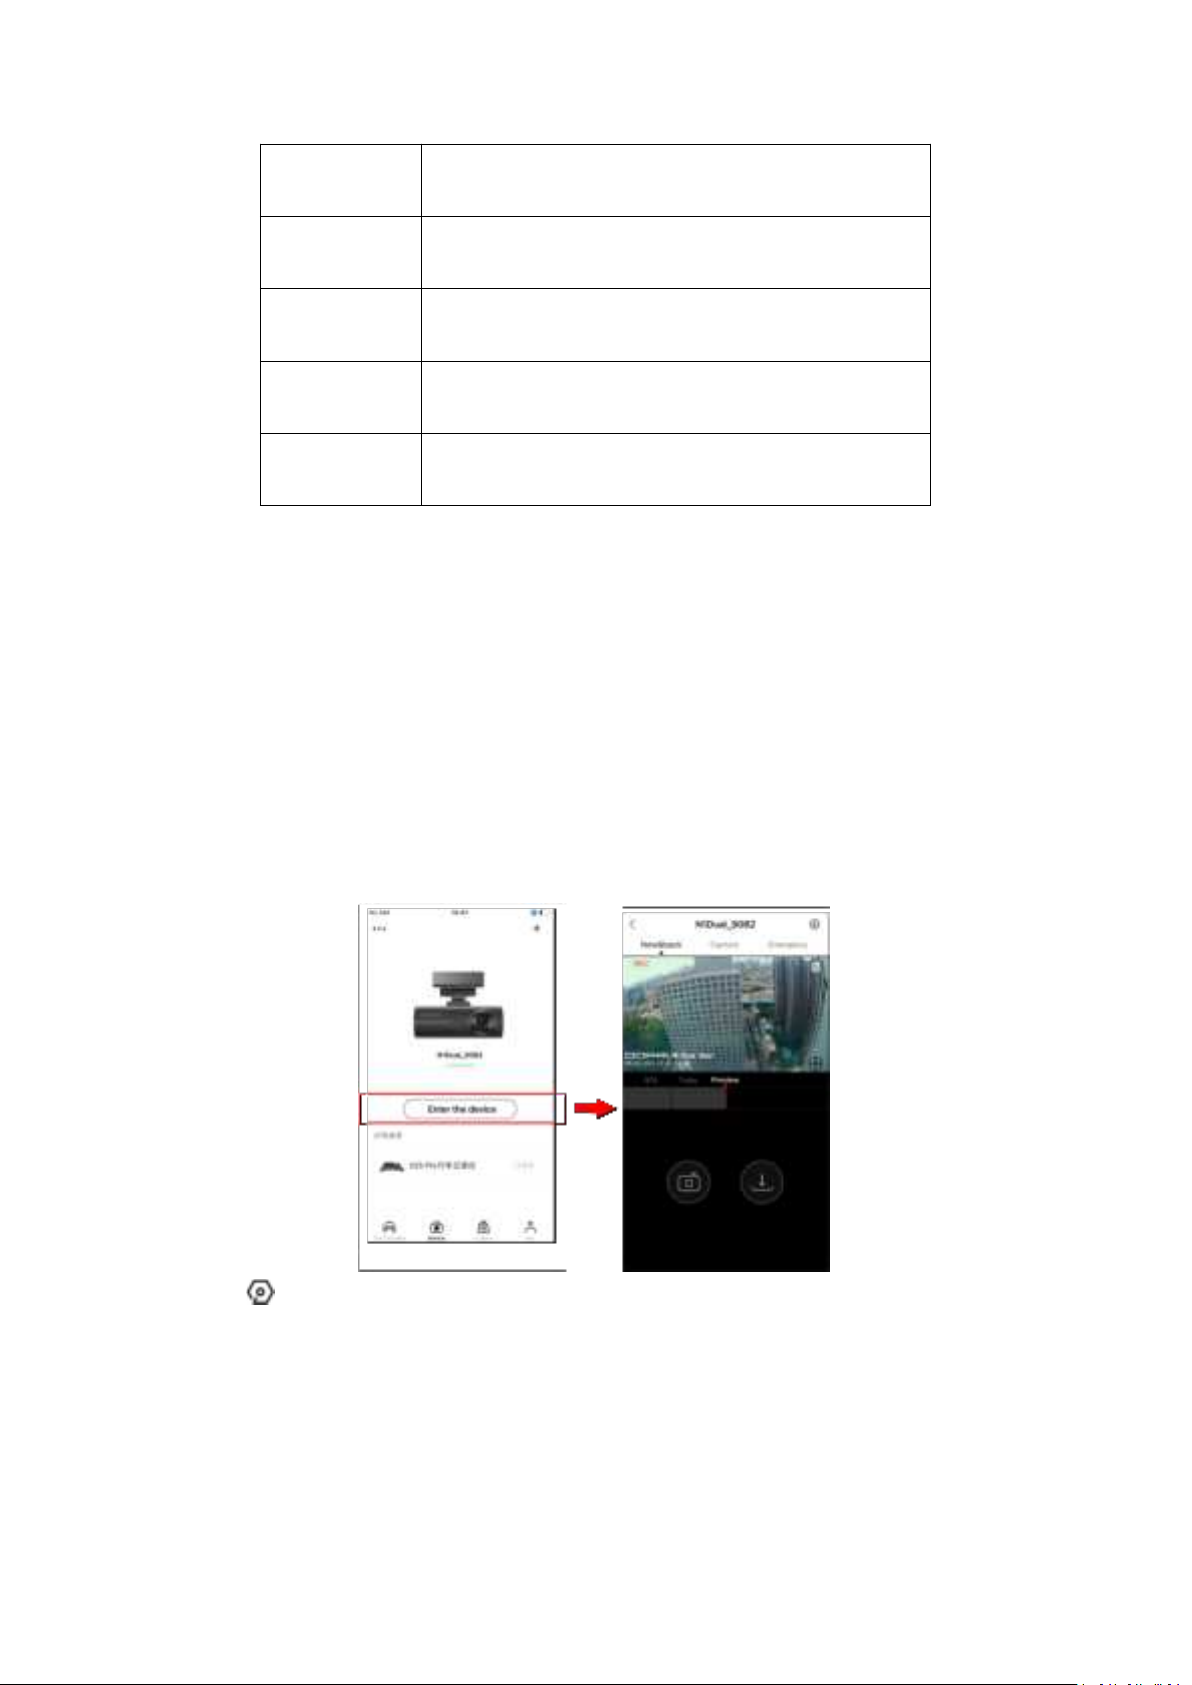
① After the mobile phone is connected to the Dash Cam, open the app, enter the "Device"
interface, tap "Enter the device", and you will enter the "Now&back" interface;
Page 32
28
② Tap on the upper right corner of the interface and enter "Camera Settings" interface >
Settings
Details
Parking mode
After the vehicle is turned off, you can choose to
enter time-lapse video recording/normal video
recording/sleep
Video duration
selection
Set the duration: 12 hours, 24 hours (default), 48
hours
Vehicle battery
Set the battery protection voltage: High (12.4 V),
"Parking mode" / "Parking Monitoring Duration" / "Vehicle Battery Protection".
Page 33

29
protection
middle (12V)(default), low (11.8 V).
When the charge of the vehicle battery is lower than
the selected voltage, the Dash Cam will be turned off
automatically to prevent the battery from losing
power.
Parking Mode: Time-lapse video recording
After the car is turned off, it will enter time-lapse recording. It will shut down after reaching the
set time or detecting low voltage. After shutting down, it can only be awakened by the ignition.
Parking Mode: Normal video recording
Normal recording will be maintained after the car is turned off. It will shut down after reaching
the set time or detecting low voltage. After shutting down, it can only be woken up by the
ignition.
Parking Mode: Sleep
After the car is turned off, it enters the sleep mode. After a collision, it will wake up and work for
2 minutes. It will delay taking the photo for 5 seconds and generate a 10-second video (photo file
name starts with "G" and ends with "L"). In addition, it will remind you the collision event when
waking up next time.
This function needs to be realized by optional step-down line.
14. Collision Detection & Locked Videos
When the Dash Cam is in working mode, when a collision is detected (such as a sudden braking
or collision of a vehicle), it will generate an emergency photo and an emergency-related video,
and store them separately. These files will not get deleted by loop cycle function.
Page 34
30
14.1 Setting Camera Sensitivity
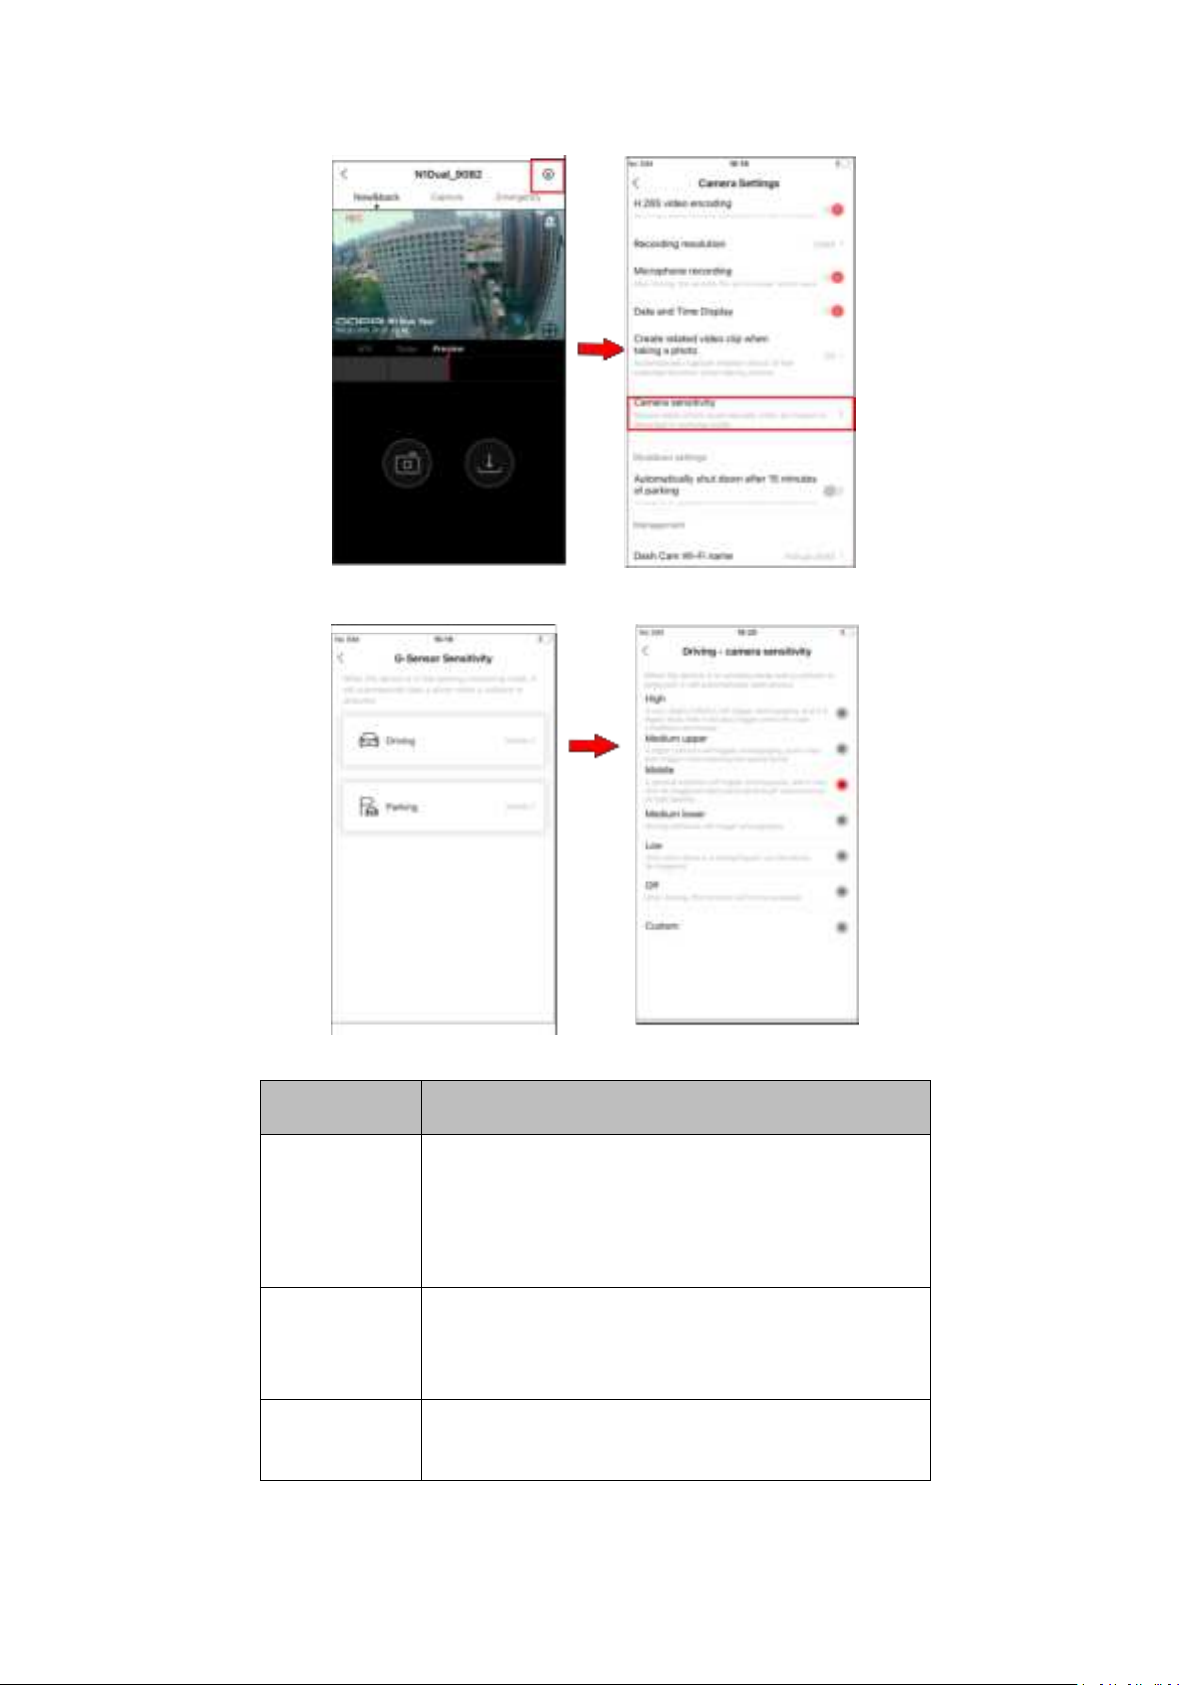
The higher the sensitivity of the Dash Cam, the easier it is to trigger photographing; The lower
the sensitivity of the Dash Cam, the less likely it is to trigger photographing.
The default collision sensitivity of the Dash Cam is "Medium", and it supports the selection of
collision sensitivity in seven levels: "High", "Medium-high", "Medium", "Medium-low", "Low",
"Off" and "Custom".
Select the appropriate collision sensor sensitivity. In emergencies such as vehicle collision or
sudden braking, the Dash Cam will be triggered to take pictures and generate an emergency
photo and video. If you select "Off", in emergency situations such as vehicle collision or sudden
braking, there will be no photos and videos. You can switch the collision sensing sensitivity of the
Dash Cam through the following steps.
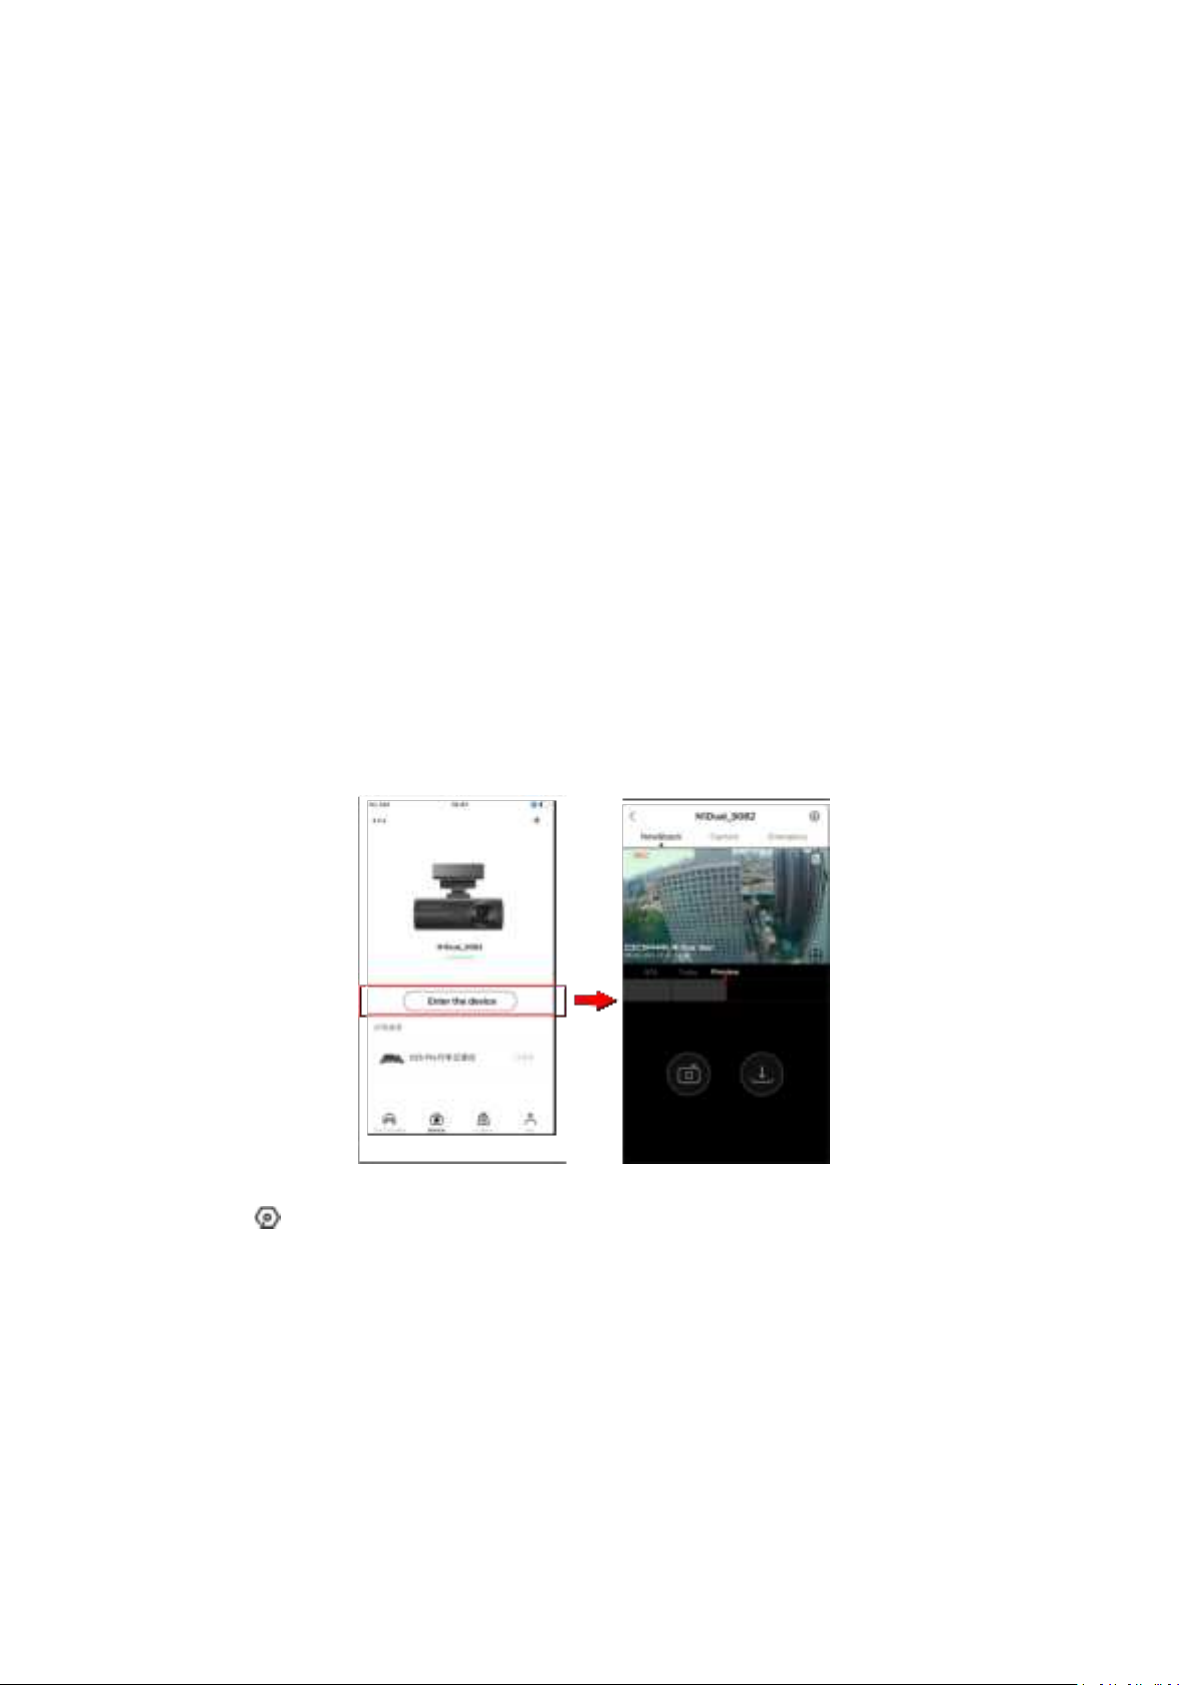
① After the mobile phone is connected to the Dash Cam, open the app, enter the "Device"
interface, tap "Enter the device", and you will enter the "Now&back" interface;
② Tap on the upper right corner of the interface to enter the "Camera Settings" interface >
"Camera sensitivity " > "Driving" / "Parking", set the appropriate sensitivity.
Page 35
31
Settings
Definition
High
A very slight collision will trigger the photo taking, and it
is very likely to be triggered when the road conditions
are bumpy
Medium-high
A slight collision will trigger taking pictures, and it may
also be triggered when passing a speed bump
Medium
A normal collision will trigger photo taking, and it may
also be triggered when passing through the speed bump
Page 36
32
at high speed
Medium-low
A strong collision will trigger photo taking
Low
Photography will only be triggered under strong impact
Shut down
This function will not be available after it is turned off
Customize
Set according to individual needs
14.2 Set the Duration of Emergency Related Video
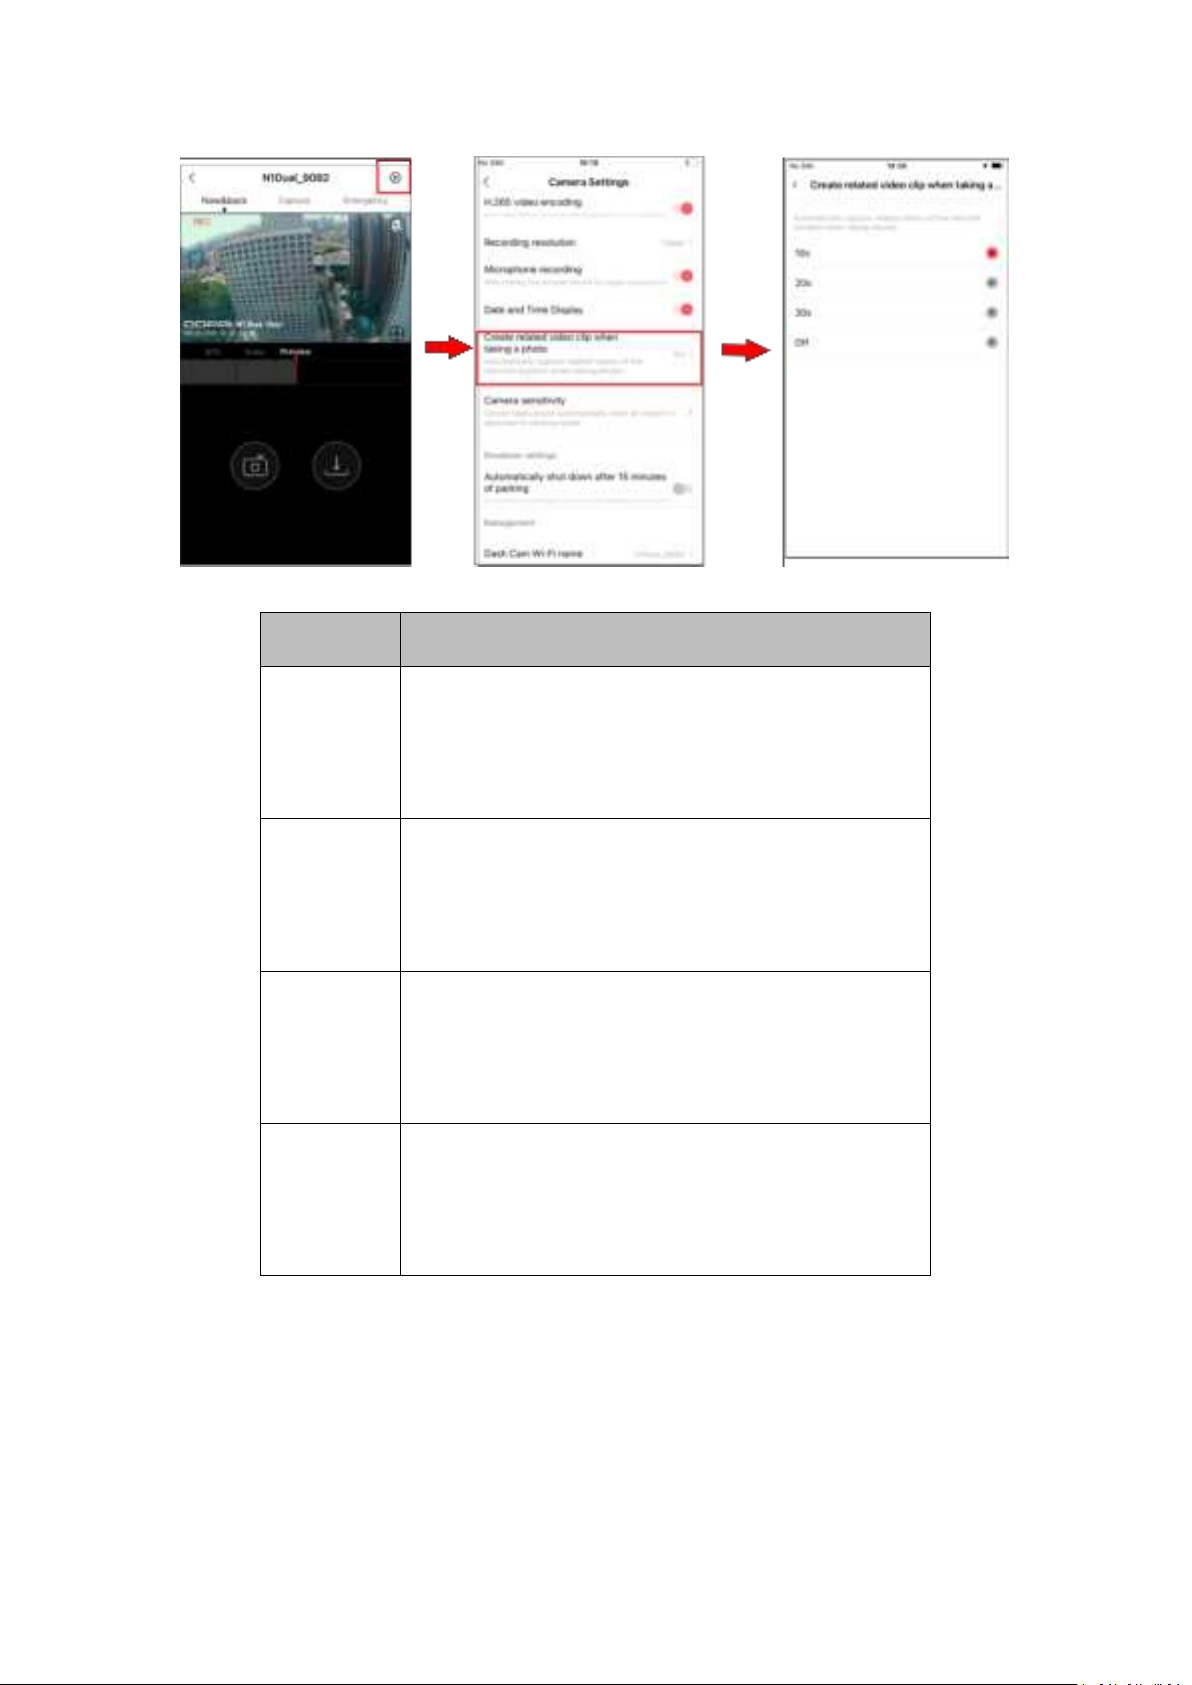
The default emergency related video duration of the Dash Cam is "10s" and supports three
emergency related video duration options: "10s", "20s" and "30s". You can set the duration of
the emergency related video by following these steps.
① After the mobile phone is connected to the Dash Cam, open the app, enter the "Device"
interface, tap "Enter the device", and you will enter the "Now&back" interface;
②Tap in the upper right corner of the interface to enter the "Camera Settings" page, tap
"Create related video clip when taking a photo" to set the photo-related video duration.
Page 37
33
Settings
Definition
10s
After the Dash Cam detects a collision, it will generate an
emergency related video of 5 seconds before and after the
shooting time.
20s
After the Dash Cam detects a collision, it will generate an
emergency related video of 10 seconds before and after
the shooting time.
30s
After the Dash Cam detects a collision, it will generate an
emergency related video of 15 seconds before and after
the shooting time.
Off
After the Dash Cam detects a collision, it will generate an
emergency related video of 5 seconds before and after the
shooting time.
Page 38

34
15. Browsing File on PC
Gently remove the TF card from the card slot of the Dash Cam, insert it into the card reader, then
plug it in the computer, open the “DCIM” folder, and browse or edit the photos or video files
saved in the Dash Cam.
200 video: This folder contains normal recorded videos and time-lapse recorded videos in
parking monitoring mode. The folder name of normal recorded video begins with numbers,
and time-lapse recorded video begins with "S"; Ai.265 encoded recorded video ends with
"H".
201 photo: This folder contains photos generated by collision sensors. Normal photographs
begin with "N"; Collision-sensing pictures begin with "G".
202 thumb: This folder contains thumbnails.
203 gps: This folder is used to store G-sensor data.
16. Upgrade Firmware
Open the DDPAI App, connect the dash cam Wi-Fi, and tap "Me">"About DDPAI">"Detect New
Version" and the app will automatically detect whether the App version and the firmware
version are the latest versions. If there is a new version of the firmware of App or device,
upgrade the version according to the operation displayed on the screen.
During the upgrade process of the dash cam, please do not cut off the power, otherwise the
upgrade will be unsuccessful or the device will be damaged. If a sudden power outage causes the
upgrade to fail, please consult customer service, download the latest upgrade package, and copy
the upgrade package to the “DCIM” folder of the device.
Page 39

35
17. FAQ
Folder Name
Details
200 video
There are two states of files under this folder:
There are two status files in this folder: Normal video files,
such as 20190719161640_0060.mp4, "60" indicates the
duration of the video in seconds. Time-lapse video files start
with "S", such as S_20190719154514_0364_0030.MP4, "30"
indicates the frame rate, that is, 30 frames per second, and
"364" indicates the length of the video in seconds.
201 photo
The photo triggered by the collision begins with "G", for
example, G_20190524113544_035_0005_L.jpg, and "L"
indicates that there is associated video, which will not be
covered by loop.
202 thumb
Used to store thumbnails
203 gps
Used to store G-sensor data
1. How do I format a memory card?
After the mobile phone successfully connects to the device, enter the "Camera Settings"
interface, tap “Storage Management” and select Format to format the card.
2. How to export the driving video in the memory card?
Use the card reader to connect the TF card with the computer, and you can export the driving
video.
3. What do folders in a TF memory card stand for?
There are four folders under “DCIM” folder in TF memory card. See the following table for
details of each folder.
Page 40

36
If the camera sensitivity is turned off in the camera settings, emergency photo and video files will
not be generated in the event of a collision.
4. What is the Wi-Fi password of the dash cam?
The default Wi-Fi password of the device is "1234567890". You can change the password, go to
"Camera Settings" > "Set WIFI Password" after connecting the APP with your mobile phone.
5. Can I change the Wi-Fi password of the dash cam?
It can be modified. The specific modification method is to enter "Camera Settings" interface after
the dash cam is connected to the mobile phone, select "Set Wi-Fi Password" after entering, enter
a new password, confirm it, and save it.
6. How do I reset the dash cam?
In case of abnormal state, press the reset button with a pin and hold for approximately 6 seconds
to reset the device. After successful reset, the device will automatically start up.
7. What if I forget the Wi-Fi password?
Press the reset button with a pin and hold for approximately 6 seconds to reset the device, and
then connect the dash cam again (default password: 1234567890).
8. Why can't I see the image of my rear camera?
Please ensure that the rear camera cable is firmly connected to the front camera, and observe
whether the rear camera indicator light is solid green. Then enter the "Now&back" interface of
the app and tap
to switch to view the image of rear camera.
Page 41

37
18. Specifications
Model
N1 Dual
Rated Input
5V/1A
Storage Capacity
Support TF card (Max. 256GB)
G-Sensor
3-axis G-sensor supports collision detection,
triggers taking pictures in case of collision and
rapid acceleration, and the sensitivity can be
adjusted by the app
Resolution
Optional:
1. 1296P
2. Full HD (1080P)
Video Encoding
H.264/AI.265 (DDPAI encoding technology)
Power Supply
12V intelligent step-down line
Transmission
Type-C interface
Page 42

38
Appendix: Installing the Hardwire Kit
The installation of the hardwire kit requires connection to the vehicle's battery fuse box. To avoid
damage to the vehicle due to incorrect operation, please have the hardwire kit installed at a
professional auto service center. Install the voltage reduction cable with a hidden deployment
method, ensuring a tidy space.
The method of power supply installation through the hardwire kit can achieve parking
monitoring function. The detailed steps for installing the hardwire kit (connecting to the fuse box
for power supply) are as follows:
Please ensure personal safety and turn off the vehicle engine before proceeding with the
installation.
Please ensure the Dash Cam can be successfully connected to the DDPAI App after startup.
For details, please refer to 4.2 Power-on Checking.
Please ensure the Dash Cam has been adjusted for shooting view and has been attached to
the front windshield. For details, please refer to 4.3 Installing the N1 Dual onto Your
Windshield.
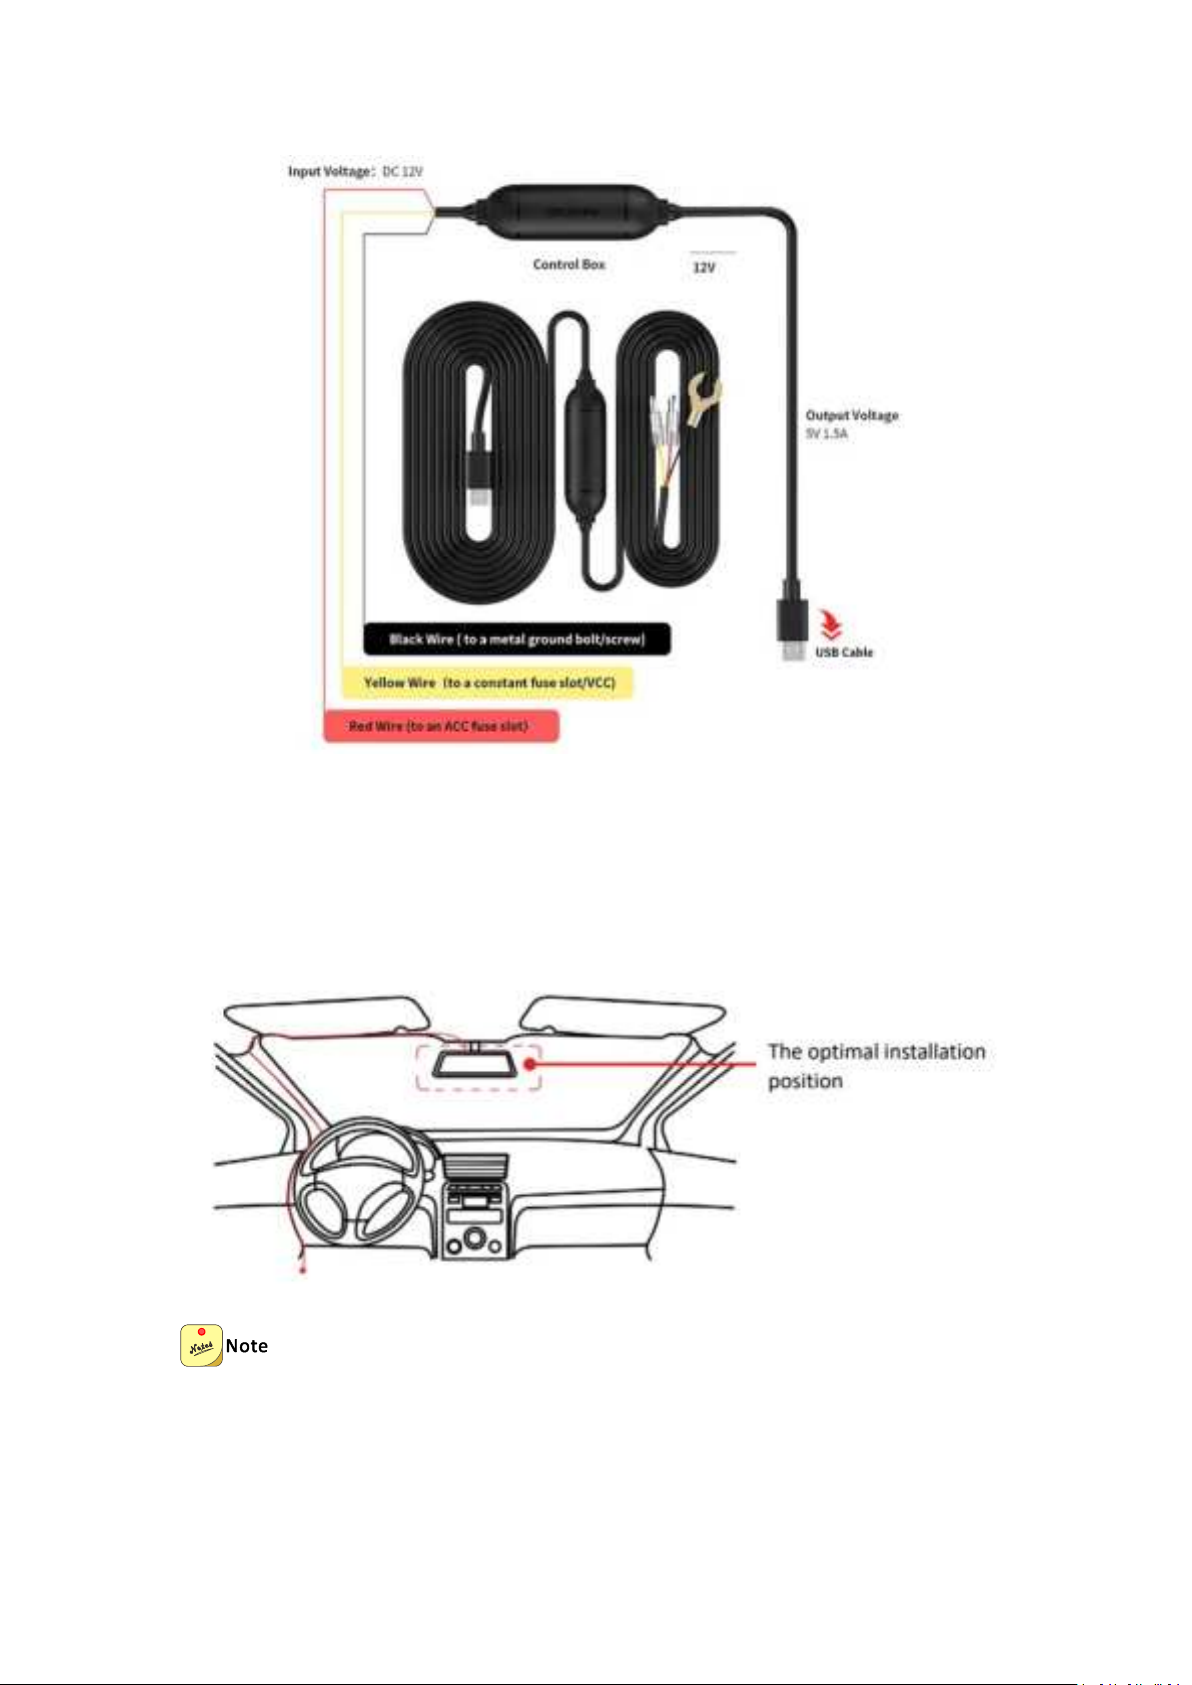
Step 1: Take out the three types of wire terminals and the power connection wire as shown in
the figure below.
The power connector Includes the following terminals:
(1) Red ACC wire terminal
(2) Yellow VCC wire terminal
(3) Black GND wire terminal
(4) The end of the power wire is a Type-C connector
Page 43
39
Step 2: Insert the end of the power wire Type-C interface into the Dash Cam power interface,
and route the power wire along the front windshield, A-pillar, and driver's seat storage
compartment to the fuse box. The power wire routing method is shown in the figure below.
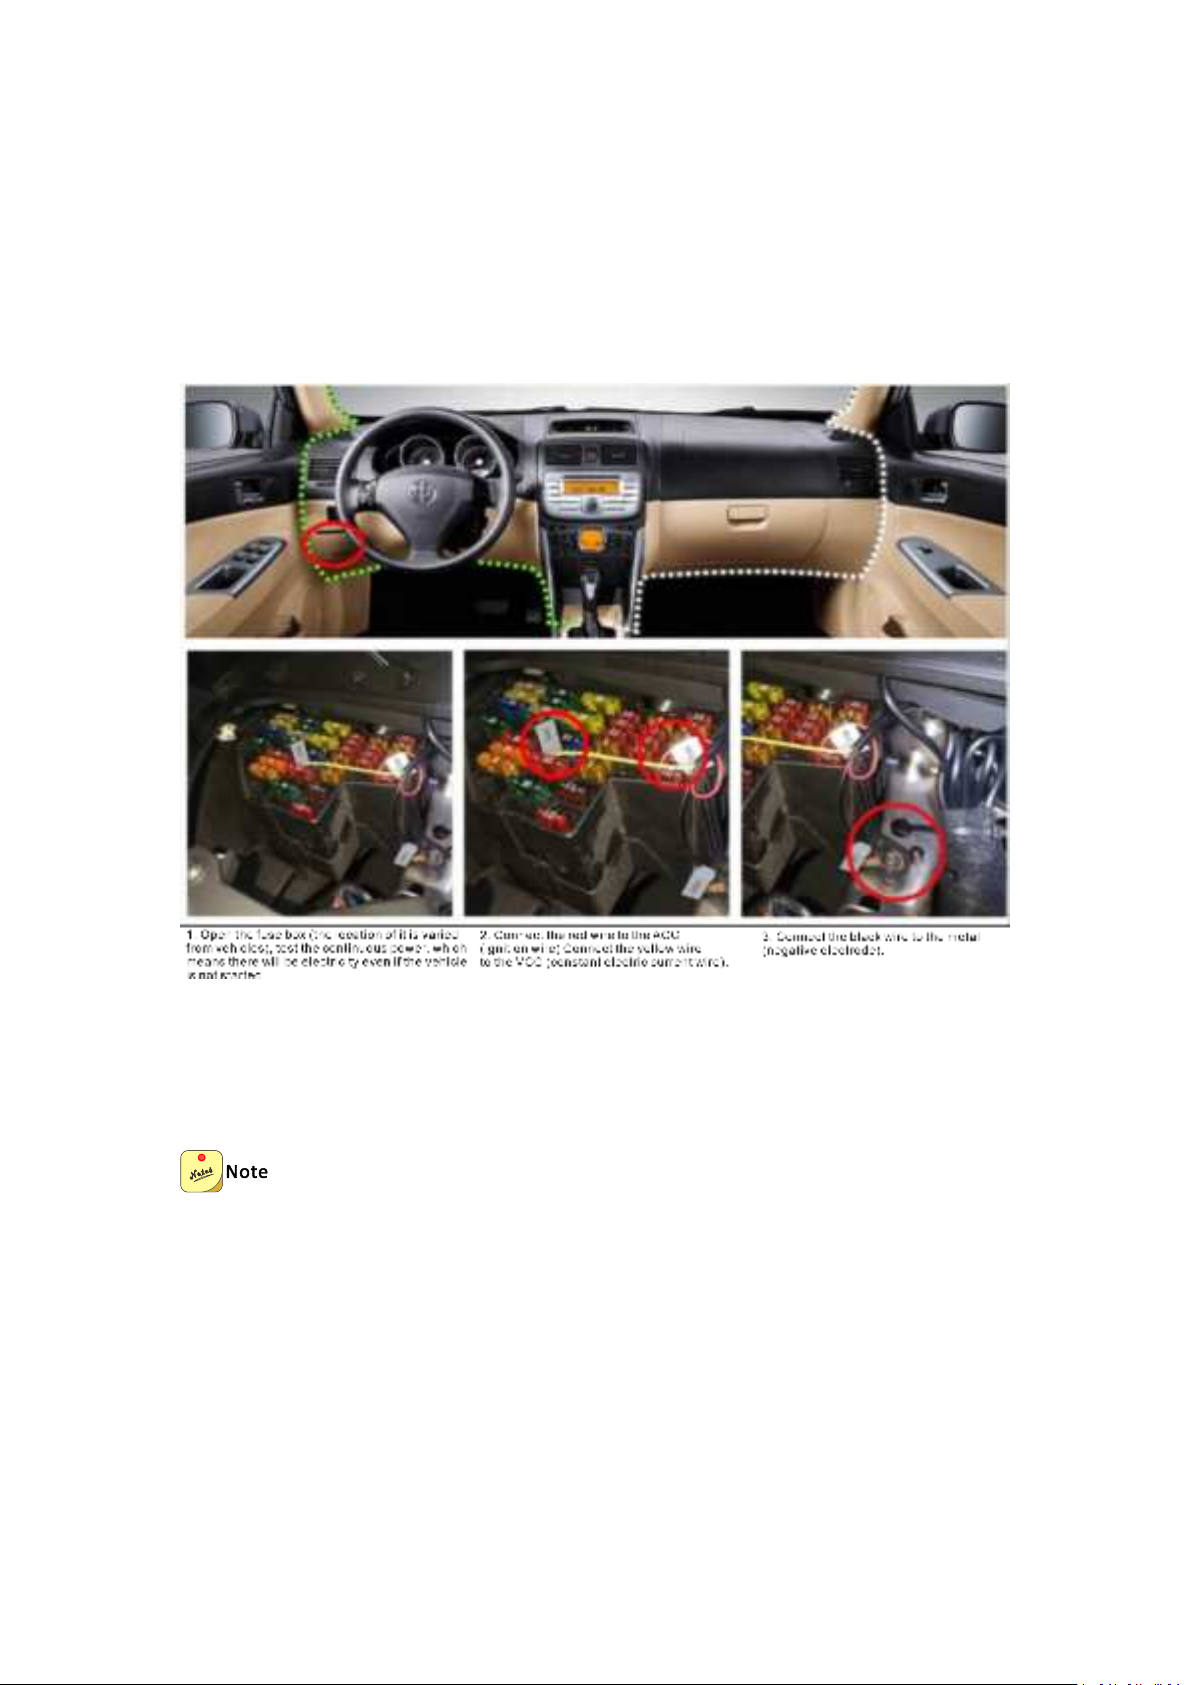
Automotive fuse box: It is usually located on the left side of the driver's seat or near the steering
wheel.
Page 44
40
Step 3: Connect the terminal cables:
a. Connect the black wire (GND) to the ground wire inside the vehicle fuse box,
b. Connect the red wire (ACC) to the +12VDC power supply control of the fuse box,
c. Connect the yellow wire (VCC) to the 12VDC power supply of the fuse box (this power supply is
always on and not controlled by the ignition).
Step 5: Start the vehicle. After the Dash Cam is powered on, it will automatically start up and
emit a start-up prompt tone.
Check if the Dash Cam is working properly. The installation of the hardwire kit requires
professional personnel from an auto service center. Alternatively, scan the QR code below to
watch the hardwire kit installation video.
Page 45

41
Scan the QR code to watch the hardwire kit installation video.
Page 46

42
FCC Statement
This equipment has been tested and found to comply with the limits for a Class B digital device,
pursuant to Part 15 of the FCC Rules. These limits are designed to provide reasonable protection
against harmful interference in a residential installation. This equipment generates uses and can
radiate radio frequency energy and, if not installed and used in accordance with the instructions,
may cause harmful interference to radio communications. However, there is no guarantee that
interference will not occur in a particular installation. If this equipment does cause harmful
interference to radio or television reception, which can be determined by turning the equipment
off and on, the user is encouraged to try to correct the interference by one or more of the
following measures:
-- Reorient or relocate the receiving antenna. -- Increase the separation between the equipment
and receiver.
-- Connect the equipment into an outlet on a circuit different from that to which the receiver is
connected.
-- Consult the dealer or an experienced radio/TV technician for help.
This device complies with part 15 of the FCC Rules. Operation is subject to the following two
conditions:
1. This device may not cause harmful interference.
2. This device must accept any interference received, including interference that may cause
undesired operation. Changes or modifications not expressly Approved by the party responsible
for compliance could void the user's authority to operate the equipment.
 Loading...