


mini
Instructions for use
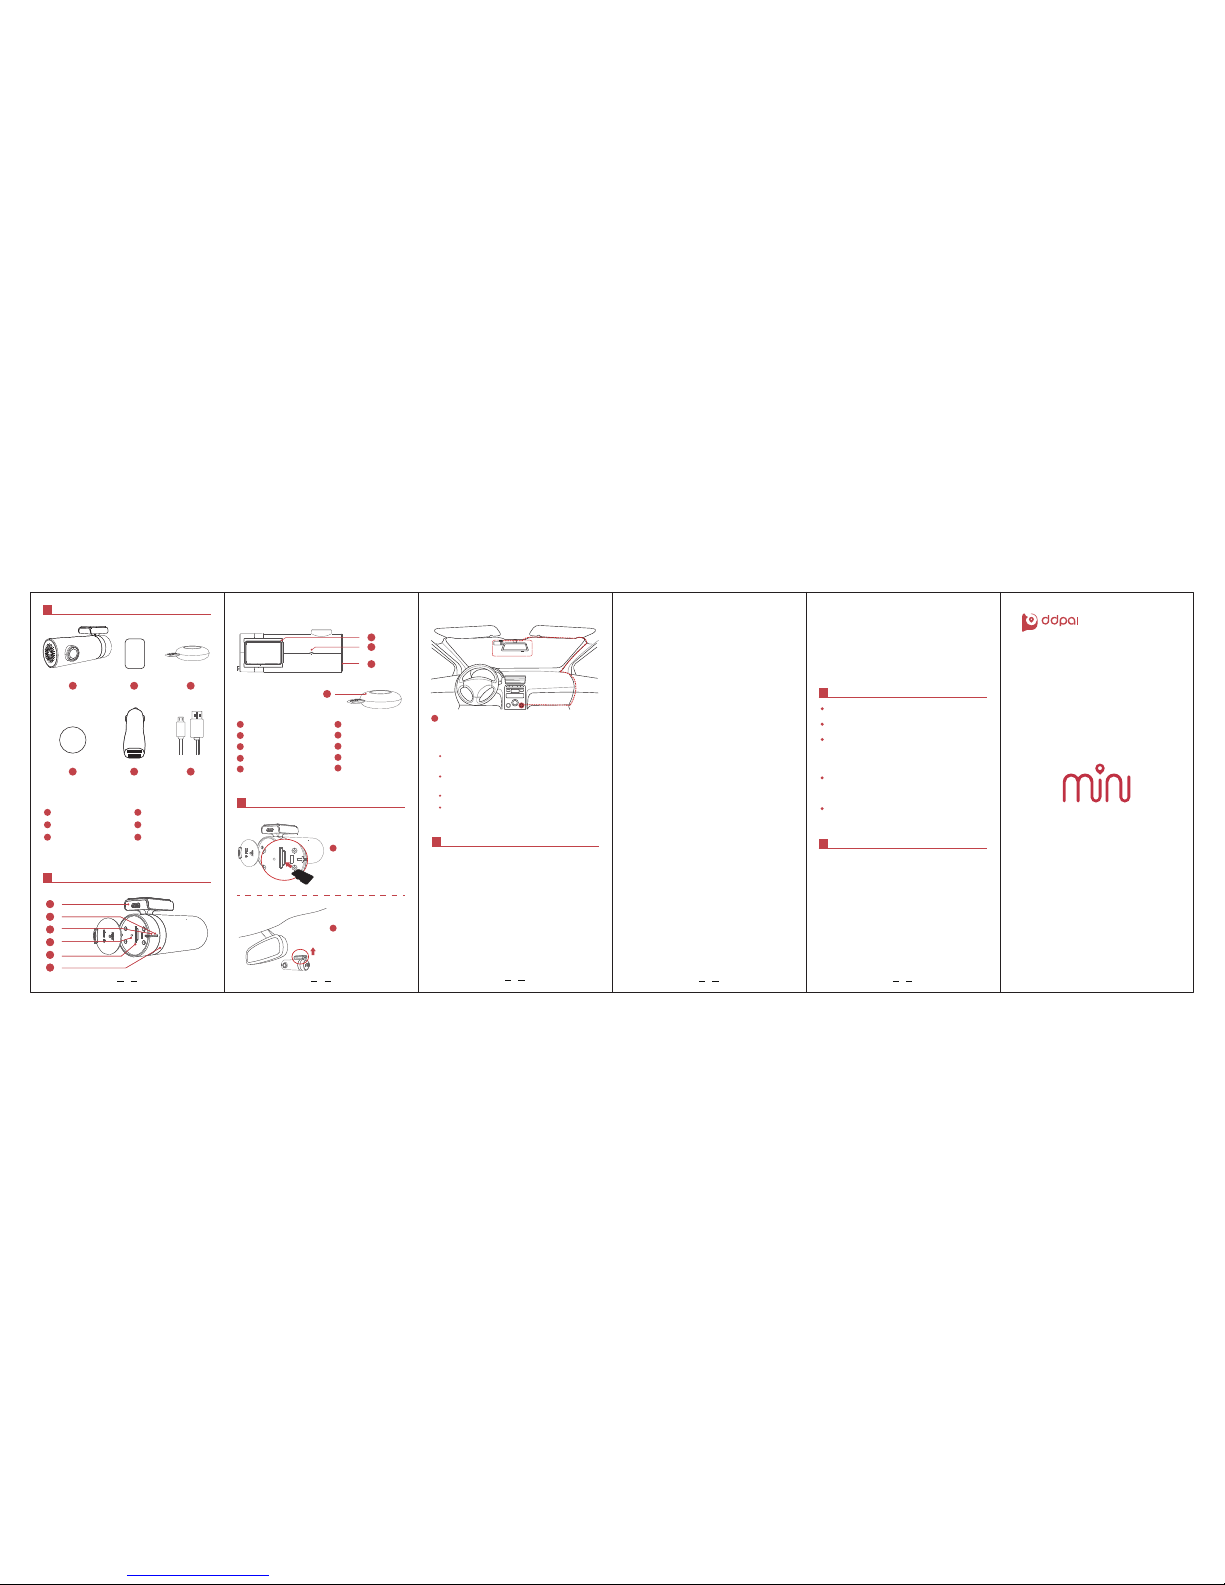
Package Contents
mini Camera at a Glance
Getting Started
mini Camera ×1
3M Sticker ×1
1
3
2
Shaft
Plastic stent
Mic
Speaker
Support up to 32GB TF Card. Class 10 is necessary.
Do not plugthe TF card when the Camera is working.
For Android/IOS Apps, Please search for DDPai in Google
Play or App Store, download and install.
iPhone Settings — WLAN — Select vyou_DDPai_mini —
Enter thePassword 1234567890 to connect the camera
AP— Launch DDpai App and the camera will be displayed
in the camera list.
1. App Download
4. Take a photo or record video
5. Photo Album management and Share the photos
6. Pair the remote button to camera
Enter the setting to modify the general settings. To change
the camera setting, you must connect the camera and enter
the camera settings. You can change the image quality,
mute the mic, adjust the volume etc.
7. Other settings
2. Connect the Camera to mobile phone
3. Live Preview ,playback and video clips download
For iPhone:
Launch DDpai App— Click “+” to Search the camera —
SelectDDpai_mini in the WiFi list — Enter the Password
1234567890 to connect camera.
For Android:
Attention
5
Apps and Camera firmware continuously update.
Store temperature: -20℃~70℃
Stain on the lens would seriously reduce the image
quality. Cleaning tool is very simple: the lens paper with
a cloth or a fine tool, lens brush and cleaning sets. Do not
use cardboard, paper towel or napkin to clean the lens.
In case of some troubles or damage do not attempt
repairing the camera by yourself. The camera must be
repaired or adjusted only by specialists.
When this product reaches its end of life, take it to a
collection point designated by local authorities for the
recycling of electronic equipment.
Please plug the USB cable in the 2.1A output of the car
adapter.
Please do not refit the power supply.
You can stick the remote snap button on the Console,
beside thegear, or on the steering wheel. DO NOT put
it on the position of Airbag.
Note:
User Manual
Download video clips: In playback mode, click the scissors
icon to launch download UI, and drag the progress bar and
find the video clips to download.
1. Main hardware
2. Technical Parameters
Specifications
6
CPU: 1080P@30fps/H.264 encoder
Image Sensor: Sony 1/2.9 inch Exmor CMOS Sensor
Lens: 6-glasses, 140°Wide Angel, F1.8
Wireless: WiFi & 2.4GHz
Storage: Class10 TF Card, up to 32GB
Video Output: Wireless video stream to mobile phone
G-Sensor: three axis acceleration sensor, collision latch,
APP ajusting sensitivity.
Video pixel: 1920x1080@30fps
Camera pixel: 1920x1080
RAM: 128M
1
4
3
6
2
5
8
7
9
1
3
2
4
5
6
1
3
2
4
5
6
Working Indicator ( Red )
Micro USB Power Socket
TF Card Slot
Parking mode ( Blue )
Reset Button
1
2
3
4
5
6
9
Remote Snap Button
10
7
8
10
1
2
Remote Snap ×1
3
Car Power Adapter ×1
4
Removable Sticker ×1
USB Cable ×1
5
6
1 2
2
3
4 5
1
2
3
4
Stick the plastic stent
onto the windshield
( note the position ).
Insert the TF Card into
the Slot
(note the direction).
Connect the USB cable with camera and Car adapter.
When the car starts up, the camera will boot up
automati cally with voice prompt “Hello”.
Note: For Android, do not connect the camare WiFi in
phone settings. If forgotten the password, press the reset
button for a few seconds to restore factory settings. The
initial password is 1234567890.
Preview:When the mobile phone is connected to the
Camera, click play button to preview the Real-time video.
Playback: In full-screen preview mode, drag the progress
bar or slide the touch screen, and find the photo that you
need by thumbnail images and playback.
Click the remote snap button to capture a photo. Switch on
the “10s video” option in the camera setting to record 10
seconds video (5 seconds before and after the click
action). The photos and videos will be specially stored in
the Camera TF Card and wait a few seconds to be
transferred into your mobile phone.
Check all the photos and videos in photo album. You can
choose several photos to add to favorite, or delete, or
share to social network.
If the remote snap doesn’t work,press the button to check
the indicator light.If the indicator light is on, please enter
the Camera Setting-Advance Settings-remote controller
pairing,and take the remote sanp near the camera and
press the button several times to pair.
If the indicator light is not on, the battery may have run
down. Please open the rear cover of the remote snap and
replace a new battery cell.
For frequently asked questions , please enter "Me-Help".
 Loading...