

Page 1
1
US CA
WALL OVEN
FOUR MURAL
User Guide
Guide de l’utilisateur
HORNO DE PARED
Guía del usuario
MODELS:
WOU-130
WOUD-230
Page 2

Page 3

Contents
1
US CA
Safety and warnings
Introduction
Using your oven - before you start
Setting the clock
Using the oven controls
Oven modes
Using your oven
Positioning the shelves
Choosing the right bakeware
Selecting mode and temperature
Preheating your oven
Using the oven modes
Using the meat probe
Automatic cooking
Cooking guidelines
Care and cleaning
User preference settings
Troubleshooting
Service
Limited warranty
40
2
5
6
7
8
10
11
12
12
13
16
18
20
30
34
37
39
Important!
SAVE THESE INSTRUCTIONS
The models shown in this user guide may not be available in all markets
and are subject to change at any time. For current details about model and
specification availability in your country, please go to our website www.
dcsappliances.com or contact your local DCS Customer Care Representative.
Page 4
US CA
2
Safety and warnings
Operation
Your oven has been carefully designed to operate safely during normal cooking procedures.
Please keep the following guidelines in mind when you are using your oven:
WARNING!
Electrical Shock Hazard
Turn the oven off at the wall before replacing fuses or the oven lamp.
Failure to do so may result in death or electrical shock.
WARNING!
Hot Surface Hazard
Accessible parts may become hot when in use.
To avoid burns and scalds, keep children away.
Use oven mitts or other protection when handling hot surfaces such as oven
shelves or dishes.
Use care when opening the oven door.
Let hot air or steam escape before removing or replacing food.
Do not touch heating elements or interior surfaces of the oven. Heating
elements may be hot even though they are dark in color. Interior surfaces of
an oven become hot enough to cause burns. During and after use, do not
touch, or let clothing or other flammable materials contact heating elements
or interior surfaces of the oven until they have had sufficient time to cool.
Other surfaces of the appliance may become hot enough to cause burns among these surfaces are the oven vent, the surface near the oven vent, and
the oven door and window.
Failure to do so could result in burns and scalds.
Page 5

Safety and warnings
Important safety precautions
To reduce the risk of fire, electrical shock, injury to persons, or damage when using the oven,
follow the important safety precautions listed below:
Read all the instructions before using the oven. Use the oven only for its intended purpose as
described in these instructions.
Proper installation: be sure your appliance is properly installed and grounded by a qualified
technician.
Isolating switch: make sure this oven is connected to a circuit which incorporates an isolating
switch providing full disconnection from the power supply.
Never use your appliance for warming or heating the room. Persons could be burned or injured or
a fire could start.
Household appliances are not intended to be played with by children.
Do not leave children alone. Children should not be left alone or unattended in the area where
the appliance is in use. They should never be allowed to sit or stand on any part of the appliance.
Children or persons with a disability which limits their ability to use the appliance, should have a
responsible person to instruct them in its use. The instructor should be satisfied that they can use
the appliance without danger to themselves or their surroundings.
Do not place heavy objects on the oven door.
Wear proper apparel. Do not wear loose fitting or hanging garments when using the appliance.
They could ignite or melt if they touch an element or hot surface and you could be burned.
User servicing: do not repair or replace any part of the appliance unless specifically
recommended in the manual. All other servicing should be referred to a qualified technician.
Storage in or on appliance: flammable materials should not be stored in an oven or near its
surface.
Do not use water on grease fires. Smother the fire or flame or use a dry chemical or foam type
extinguisher.
Use only dry oven mitts or potholders. Moist or damp potholders on hot surfaces could result in
burns from steam. Do not let potholders touch hot areas or heating elements. Do not use a towel
or a bulky cloth for a potholder. It could catch fire.
Do not heat unopened food containers. They can build up pressure that may cause the container
to burst and result in injury.
Safe food handling: leave food in the oven for as short a time as possible before and after
cooking. This is to avoid contamination by organisms which may cause food poisoning. Take
particular care during warm weather.
Always keep oven vents unobstructed.
Caution. Hot air can blow from the vent at the base of the oven as part of the oven’s cooling
system.
Do not place aluminum foil, dishes, trays, water or ice on the oven floor during cooking, as this
will irreversibly damage the porcelain enamel.
3
US CA
Page 6

US CA
4
Safety and warnings
Placement of oven racks (shelves): always position racks (shelves) in the desired location while
the oven is cool (before preheating). If a rack (shelf) must be removed while the oven is hot, do
not let the oven mitts or potholder contact hot heating elements in the oven or the base of the
oven.
Do not clean the door seal or cavity seals (gaskets) or use any oven-cleaning products on them.
They are essential for a good seal, which ensures that the oven operates efficiently. Care should
be taken not to rub, damage or move them.
Do not use oven cleaners, harsh/abrasive cleaning agents, waxes, or polishes. No commercial
oven cleaner, oven liner, or protective coating of any kind should be used in or around any part of
the oven. Do not use harsh/abrasive cleaners, scourers or sharp metal scrapers to clean the oven
door glass since they scratch the surface, which may result in the glass shattering.
Clean only the parts listed in this manual.
Do not use a steam cleaner to clean any part of the oven.
Before starting a self-clean cycle, remove oven shelves/racks, side racks/shelf supports, broiler
pan and all other cookware/utensils, and wipe up large food spills or grease deposits.
During a self-clean cycle, the oven reaches higher temperatures than it does for cooking. Under
such conditions, the surfaces may get hotter than usual and children should be kept away.
Do not store things children might want above the oven. Children could be burned or injured
while climbing on the oven to retrieve items.
Do not install or operate the appliance if it is damaged or not working properly. If you receive a
damaged product, contact your dealer or installer immediately.
Use only bakeware approved for oven use. Follow the bakeware manufacturer’s instructions.
Never cover any slots, holes or passages in the oven bottom or cover an entire rack with materials
such as aluminum foil. Doing so blocks airflow through the oven and may cause carbon
monoxide poisoning. Aluminum foil linings may also trap heat, causing a fire hazard.
The California Safe Drinking Water and Toxic Enforcement Act requires businesses to warn
customers of potential exposure to substances which are known by the State of California to
cause cancer or reproductive harm. Small amounts of harmful chemicals are given off in the
oven’s self-cleaning cycle from insulation and food decomposition. Significant exposure to these
substances can cause cancer and reproductive harm. Venting with a hood or open window, and
wiping out excess food spills prior to self-cleaning the oven reduces exposure.
Page 7

Introduction
5
About your new oven
Thank you for buying a DCS by Fisher & Paykel built-in multifunctional oven. Now that it is
installed and ready to use, you will want to know everything about it to make sure you get
excellent results right from the start. This guide introduces you to all its features, as well as giving
you a set of cooking guidelines. We recommend you read the entire guide before using your new
oven, for both safety and for cooking success.
US CA
1
2
3
4
5
1
Control panel
2
Door handle
3
Oven window
4
Upper oven
5
Lower oven (double models only)
6
Model & serial number
7
Self-clean latch
8
Door seal (gasket)
12
10
15
6
7
8
9
Cavity seal (gasket)
10
Broil element
11
Oven lights
12
Meat probe socket
13
Convection fan & concealed element
14
Lower concealed element
15
Door hinge
16
Oven vent
11
9
13
14
15
16
Page 8
US CA
6
Using your oven - before you start
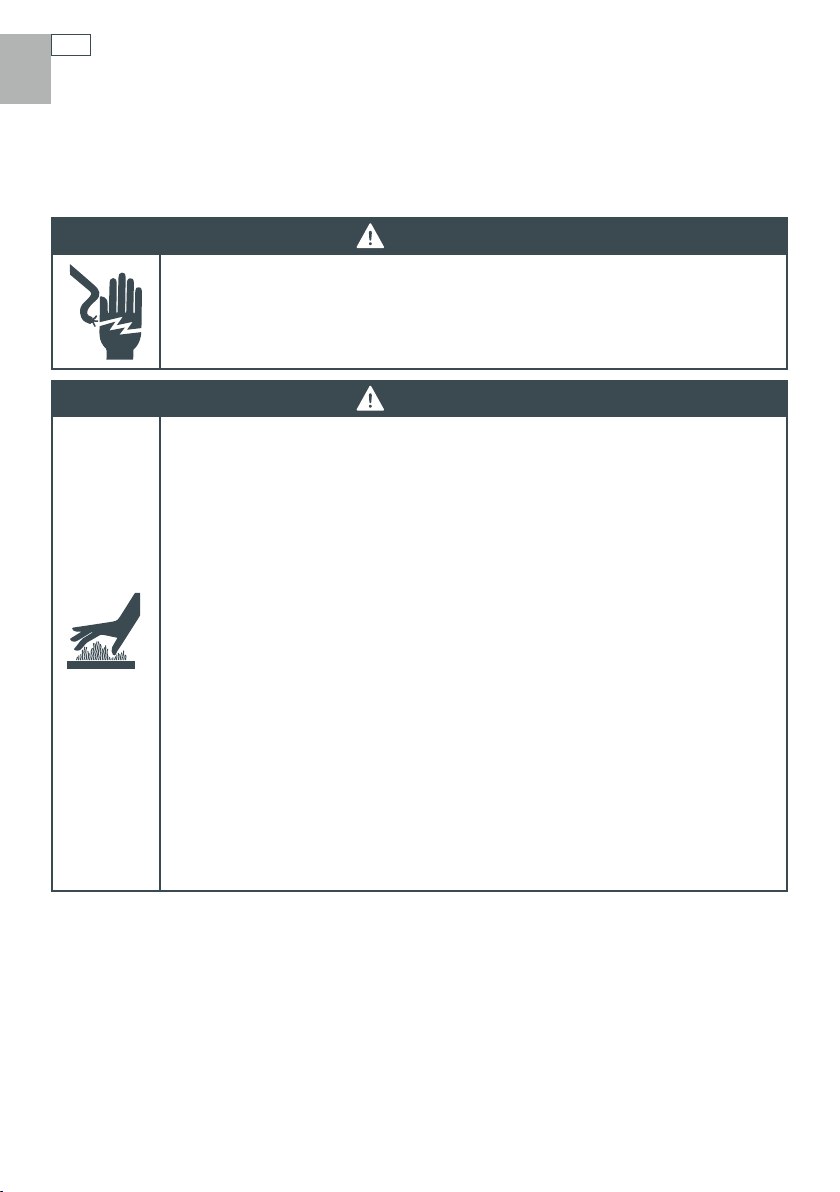
Setting the clock
When your oven is connected to a power supply for the first time, a tone will sound and the
clock display will light up. The clock display will show ‘12:00’ and the colon ( : ) will flash. Next,
set the clock.
Important!
You must set the clock before you can use the oven.
To set the clock
While the colon (:) is flashing, rotate the
1
Press the CLOCK button to set the time, or wait eight seconds and it will set automatically.
2
PUSH TO
CLEAR
button until the correct time is showing.
Refer to ‘User preference settings’ for instructions on how to change between 12-hour and 24-
hour display.
a
a
Clock display
b
CLOCK button
- allows you to set the clock
PUSH TO
c
CLEAR
- turn this button to set the clock, timer,
probe temperature, cook time, stop time
- press this button to clear the display
c
b
Page 9
Using your oven - before you start
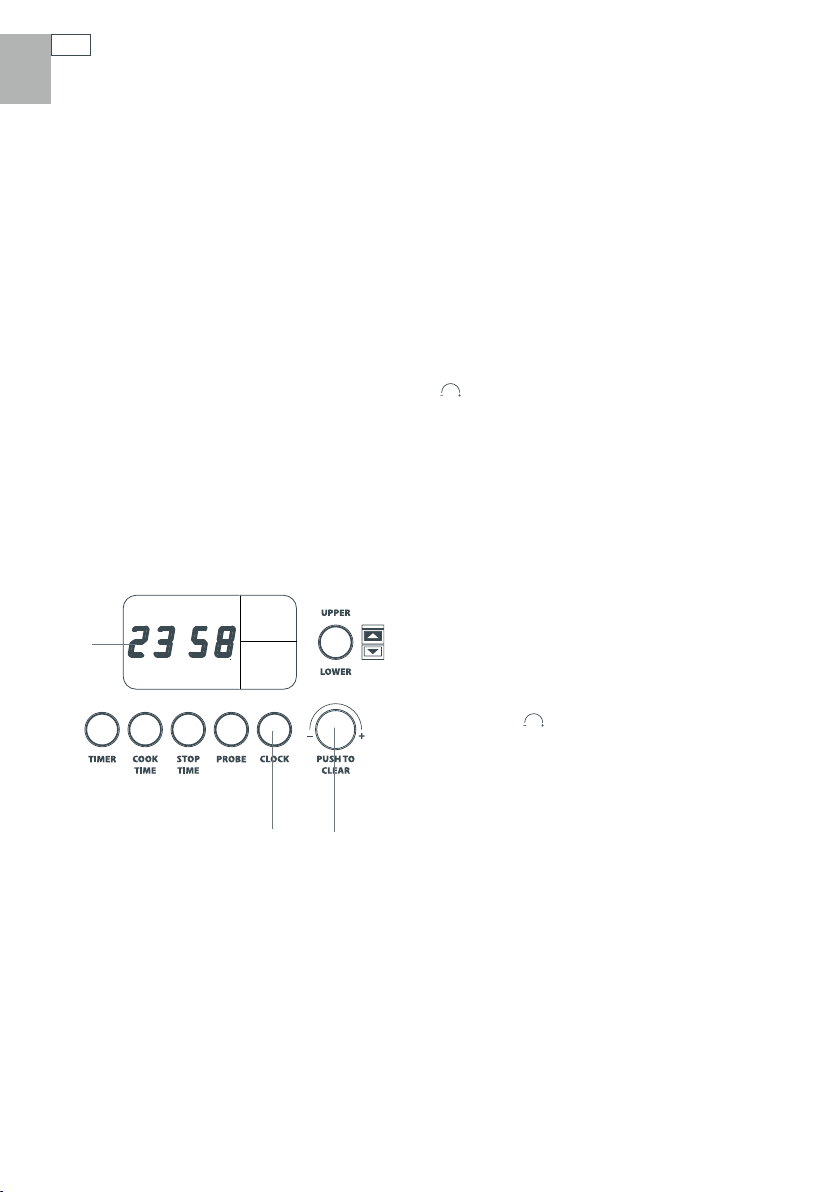
Using the oven controls
In double ovens, knobs on the left are for the upper oven and knobs on the right are for the
lower oven. Pushing the oven cavity selector button lets you toggle between the oven cavities,
for example if you are setting automatic programs.
a
TIMER button
b
COOK TIME button
c
STOP TIME button
d
PROBE button
e
CLOCK button
PUSH TO
f
g
Upper oven cavity display
h
Lower oven cavity display
i
Oven cavity selector button - press this
button (rotate/press)
CLEAR
button to toggle between upper and
lower cavity settings
g, h,
and
i
are on double models only
decba
g
h
f
7
US CA
i
Timer
You can use the timer at any time, even when you are not using the oven.
To set the timer
Press the TIMER button. The TIMER symbol and the colon will flash in the clock display.
1
Rotate the
2
eight seconds for the setting to be adopted and the timer will begin to count down.
To cancel the timer, press the TIMER button then the
3
When the set time finishes, the TIMER symbol and 0:00 will flash and the oven will beep. Press the
4
TIMER or
The timer does not turn the oven off.
PUSH TO
CLEAR
PUSH TO
CLEAR
button until you have the time you need. Press the TIMER button or wait
PUSH TO
CLEAR
button to stop the beeping and clear the timer.
button.
Page 10
US CA
8
Using your oven - before you start
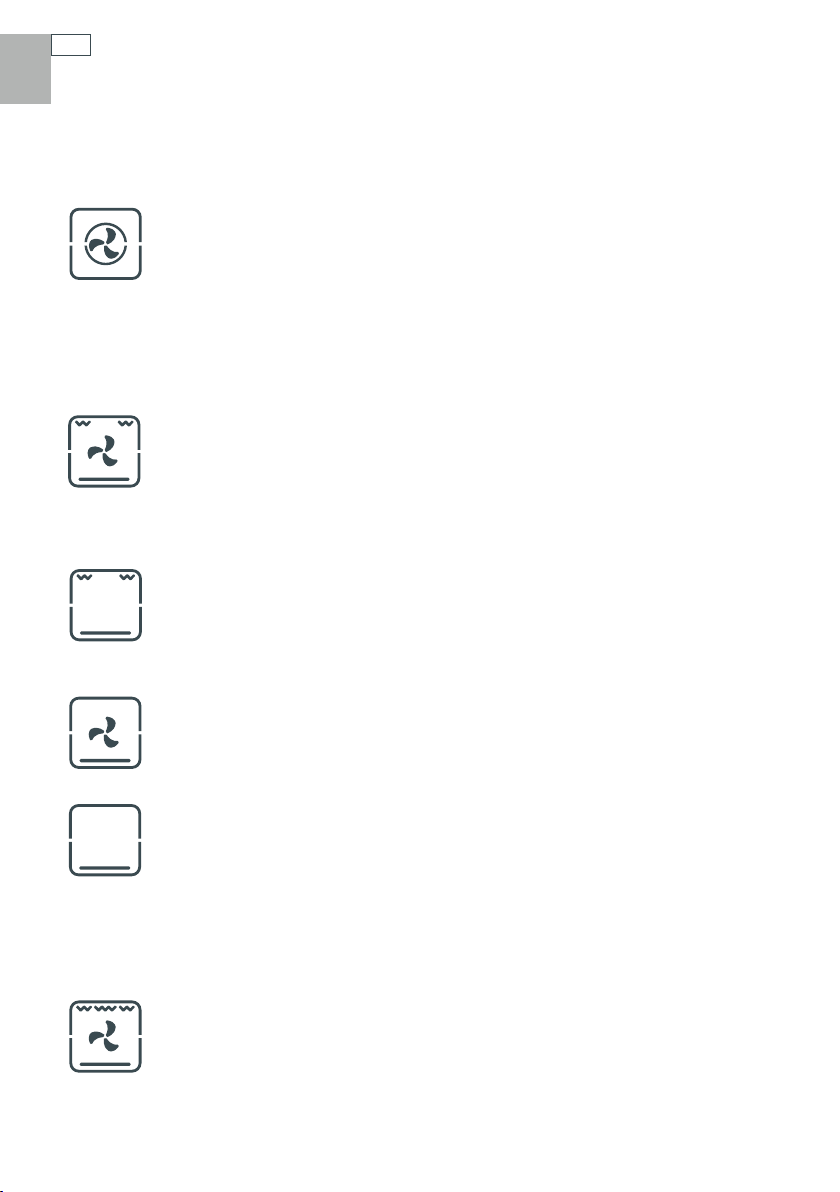
Oven Modes
BAKING
TRUE CONV: fan plus fan element
A concealed heating element surrounding the fan in the rear of the oven heats air,
which is then blown into the cavity. The consistent temperature ensures baking is
well risen and evenly colored. Cookies are crisp on the outside and chewy in the
middle, meat and poultry are deliciously browned and sizzling while remaining
juicy and tender. Casseroles are cooked to perfection and reheating is quick and
efficient (remove lid from casseroles). TRUE CONV is the mode to choose for multishelf cooking and complete oven meals. TRUE CONV is excellent for baking angel
food cake.
CONV BAKE: fan plus upper and lower elements
The oven fan circulates hot air from the top outer and the lower concealed
elements and distributes it around the oven cavity. Food cooked using the CONV
BAKE mode tends to brown more quickly than foods cooked on the traditional
BAKE mode. Use CONV BAKE at a low temperature –125 °F (50°C)– for drying fruit,
vegetables and herbs. When cooking casseroles, remove lid.
BAKE: upper and lower elements
Heat comes from the top outer and lower concealed elements. BAKE is the
traditional baking mode, ideal for cakes. If baking on two shelves, arrange dishes
so no item is directly over another. BAKE is ideal for foods that require baking for a
long time or at low temperatures, like meringues and rich fruitcakes.
CONV PASTRY: fan plus lower element
The fan circulates heat from the lower concealed element throughout the oven.
Excellent for sweet and savory pastry foods, for moist breads and brownies and
cookies that you want extra chewy.
PASTRY BAKE: lower element
Heat comes from the lower element only. This is a traditional baking mode, suitable
for recipes that were developed in older ovens. For best results, bake on only one
shelf at a time. It is perfect for foods that require delicate baking and have a pastry
base, like custard tarts, pies, quiches and cheesecake or anything that does not
require direct heat and browning on the top.
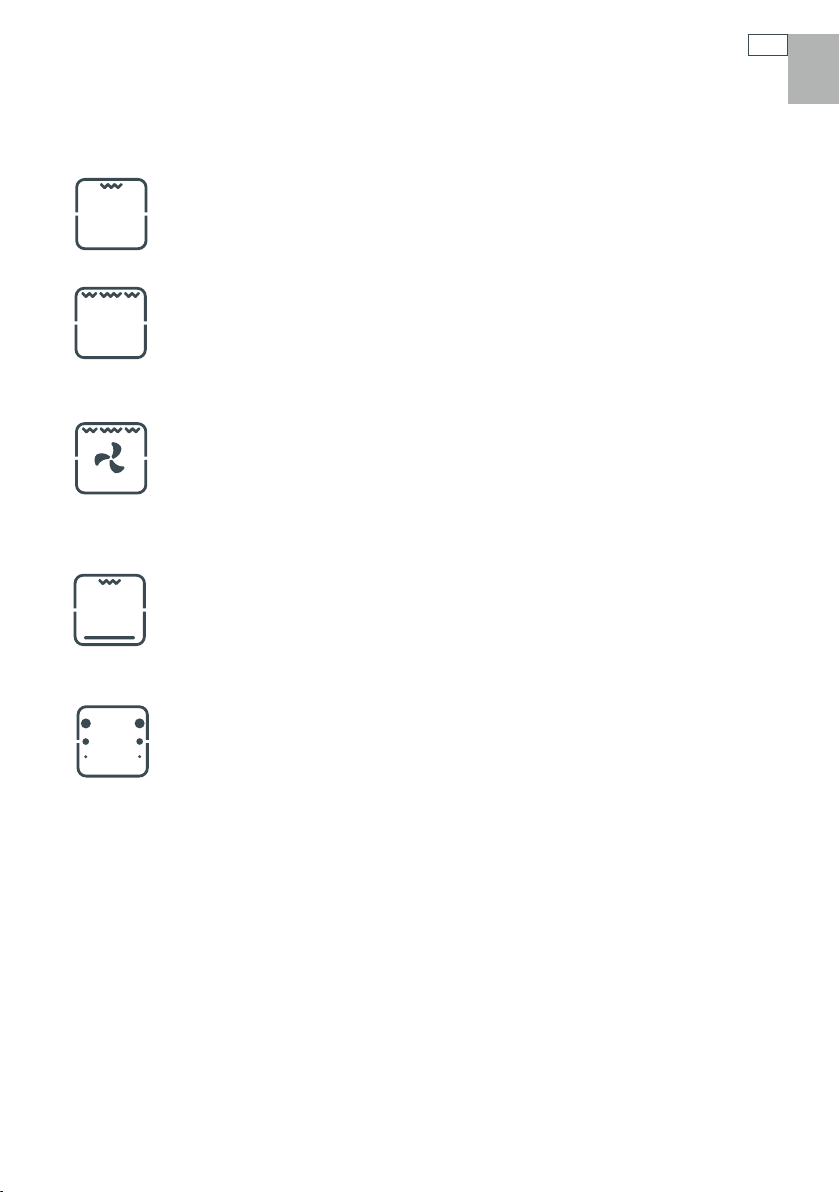
ROASTING
ROAST
This is a two-step program. The oven does not require preheating. An initial 20minute searing stage crisps and browns the roast and caramelizes the juices on the
outside of the meat , then the temperature drops to the level you have preset for
the remainder of the cooking period, producing a tender and juicy roast that is full
of flavor. This mode is also great for cooking vegetables. Little browning takes place
after the initial searing.
Page 11
Using your oven - before you start
BROILING
BROIL: upper inner element
BROIL delivers intense heat from the inner region of the top element. Great when
you need to quickly broil one to two portions of your usual favorites, like crispy
chicken breasts or a steak.
MAXI BROIL: upper inner and outer elements
MAXI BROIL delivers intense heat from the entire top element. It is the most
suitable mode for ‘finishing off’ many meals, for example browning the top of
potato gratin and frittata. Use MAXI BROIL to toast bread or to broil your favorite
chicken, fish and steak.
CONV BROIL: fan plus upper inner and outer elements
CONV BROIL produces food with a finish that is similar to a rotisserie. Meat, poultry
and vegetables cook beautifully; food is crisp and brown on the outside while
the inside remains moist and tender. Try using this mode for whole chicken or
tenderloin of beef.
WARM
WARM is a constant low heat of 165°F (75°C). Use it to keep cooked food hot, or to
warm plates and serving dishes. To reheat food from cold, use TRUE CONV and
change to WARM only when the food is piping hot, as this mode will not bring cold
food up to a temperature high enough to kill any harmful bacteria.
9
US CA
SELF CLEAN
This oven features a pyrolytic self-cleaning cycle that takes care of the mess and
grime that is traditionally associated with oven cleaning. During self-cleaning, the
oven reaches very high temperatures. This burns off and breaks down soil and
grease deposits. A smoke eliminator and active venting system eradicates odor. For
instructions on how to use SELF CLEAN, see the ‘Care and cleaning’ section.
Cooling fan
A cooling fan will come on automatically and blow air out below the oven door during the use
of most oven modes. It may continue to run after the oven is switched off to keep the door and
control panel cool.
Page 12
US CA
10
Using your oven
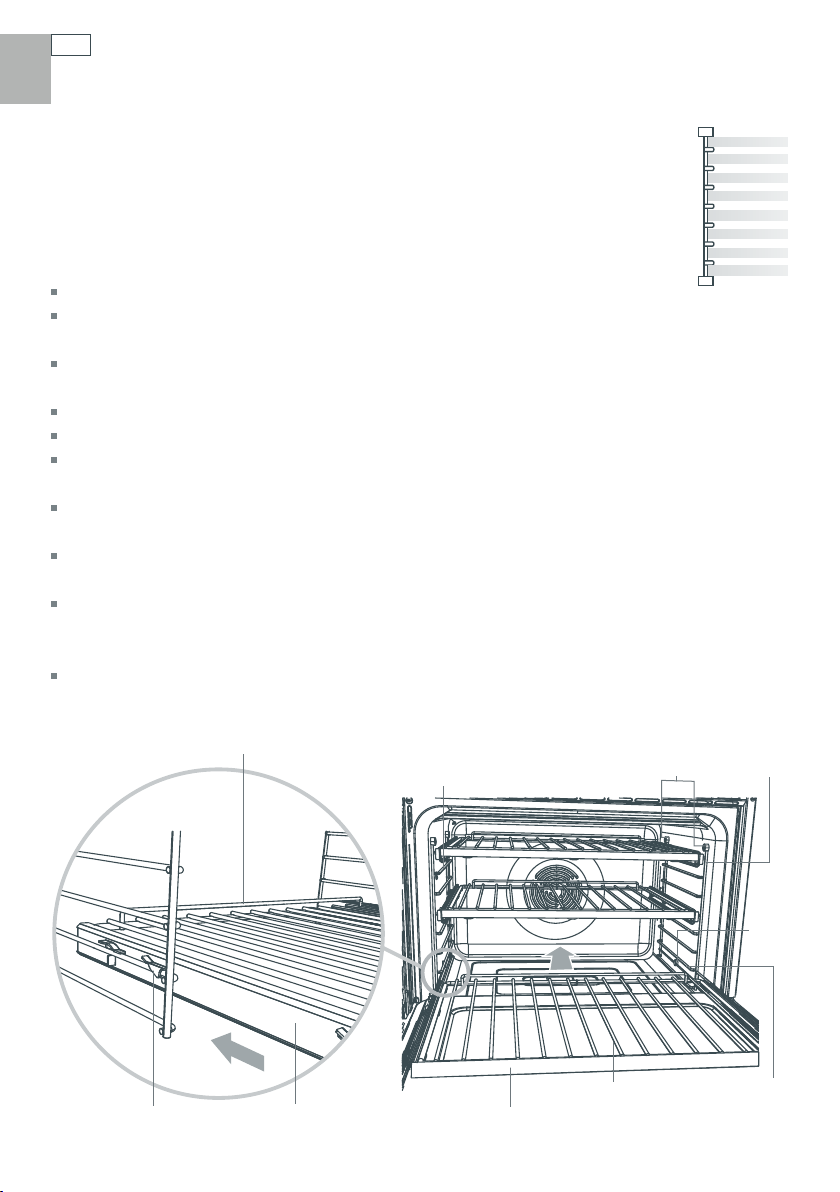
Positioning the shelves
Placing the telescopic sliding shelves on the side racks provides eight cooking
positions to choose from. See the ‘Cooking guidelines’ for suggested shelf positions.
To position the shelves
8
7
6
5
4
3
2
1
Always position oven shelves BEFORE heating the oven.
To remove a sliding shelf, grip it by its two front corners (making sure you are gripping the
wire shelf and the sliding frame together), tilt upwards and pull it out of the oven.
To place a sliding shelf in the oven correctly, position it so that the front bar is toward you, as
shown.
Check that the sliding frame is not extended.
Check the guard rail (as shown) to make sure the shelf is the right way up.
Position the shelf so that it is level and the rear shelf tags on both sides of the sliding frame
rest on the side racks (as shown).
Then push the sliding shelf all the way to the back of the oven, until the front shelf tags drop
into place.
Note: generally, the shelf positions in the top of the oven are suitable for broiling. Those in the
middle or lower region of the oven are suitable for baking, roasting and casseroles.
For your safety, the wire shelves and telescopic sliding frames are built together as one unit
and are not separable. This means that when placed properly on the side rack, the slides will
prevent the wire shelves from tilting when pulled towards you.
To prevent the tags from lifting off the side racks, take care to slide the shelves forward
horizontally.
Shelf tag
Guard rail
Sliding frame
(push fully into place)
Side rack
Front bar
Wire shelf
Mounting
slots
Side rack
Lock
stud
Retaining wire
Page 13

Using your oven
11
Choosing the right bakeware
The size, shape and material of the bakeware will affect the
baking time.
The three-piece broil/roast system provided with your
oven (consisting of the pan, grid and rack) has been
designed to reduce splatter and smoke, and is therefore
ideal for broiling and roasting. We suggest you place meat
on the broil/roast rack (on top of the pan and grid) to
allow hot air to circulate around it. This gives more even
browning and a result similar to a rotisserie.
On occasions, you may want to use only two pieces of the
system. For example, when roasting a large turkey, use
only the pan and grid for greater stability.
Metal bakeware results in the fastest baking time. Dark baking pans or those with a dull finish
absorb heat or brown food, especially on the base, faster than shiny pans.
A shiny finish may work best for some cakes and cookies, as it reflects some heat and gives a less
intensive baking surface.
If using dark baking pans, it may be necessary to reduce the oven temperature by 25°F (10°C). It
may also be necessary to extend the baking time by a couple of minutes.
Insulated cookie sheets or baking pans may increase the length of baking time.
Use glass or ceramic bakeware for foods that do not require a dark brown crust (eg soufflé or
lasagna).
Rack
Grid
Pan
US CA
Page 14
US CA
12
Using your oven
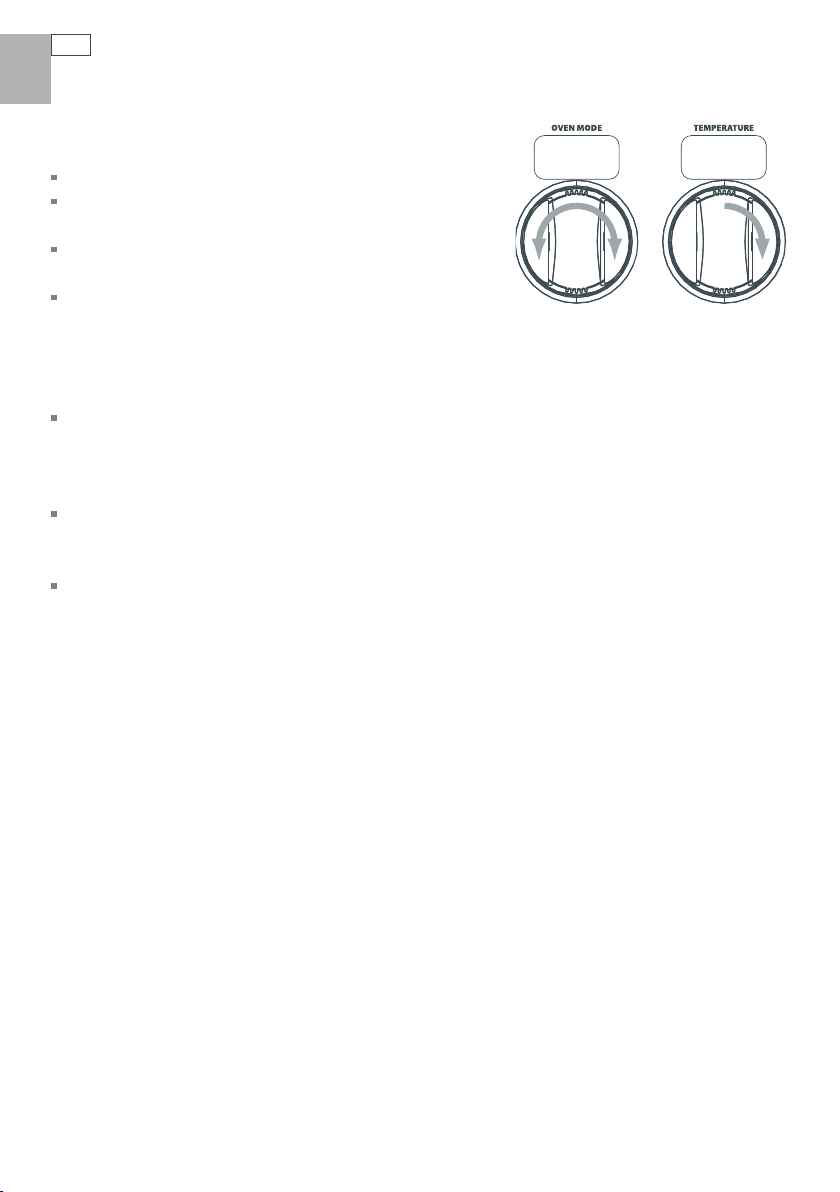
Selecting mode and temperature
To select a mode, turn the oven mode knob.
To select a temperature, turn the temperature knob
clockwise.
For double ovens, knobs on the left are for the upper
oven and knobs on the right are for the lower oven.
See the ‘Cooking guidelines’ section for suggested
modes and temperatures.
Preheating your oven
Preheat your oven when using the following modes for baking: TRUE CONV, CONV BAKE, BAKE,
CONV PASTRY and PASTRY BAKE. These modes are equipped with a fast preheat: the oven will
heat to 350°F (175°C) in approximately 10 minutes and to 425°F (225°C) in approximately 15
minutes.
When your oven is preheating, the selected temperature is displayed alternately with the actual
oven temperature. When the oven reaches the selected temperature, a beep will sound and the
temperature display will change from orange to white.
If you want to increase the oven temperature during cooking, follow these steps to reactivate the
fast preheat:
Turn the oven mode and temperature knobs to OFF.
1
Wait for the display lights to go out.
2
Then select the new settings.
3
Page 15

Using the oven modes
Using your oven
13
US CA
Baking
For best results when baking, always preheat the oven to the temperature recommended in the
recipe.
Make sure cake pans do not touch each other or the sides of the oven by staggering them across
shelves.
If using the BAKE mode and baking on more than one shelf (eg layer cakes), stagger the cake
pans so one is not directly above another.
TRUE CONV is good for multi-shelf baking as the temperature inside the cavity is even.
Do not open the oven door until at least ¾ through the suggested baking time.
When baking double the recipe, especially cookies, it may be necessary to increase the baking
time by a couple of minutes.
The circulating air of convection (CONV) modes heats and browns foods more quickly than using
non-convection modes.
When converting recipes from BAKE to CONV BAKE, the oven temperature can normally be
lowered by 25°F (10°C); the baking time will remain the same. For some recipes, it may work
better to reduce the baking time by several minutes and leave the oven temperature unchanged.
For recipes with longer baketimes (ie over an hour), best results may be achieved by reducing
both slightly.
Food flavors and smells will not transfer between different foods cooked using convection
modes. As a general rule, TRUE CONV is excellent for turkeys and baking foods on multiple
shelves; CONV BAKE browns dishes well and is ideal for dishes cooked in under an hour; BAKE is
generally the mode to choose for delicate foods and those in the oven for longer than an hour.
Important!
Do not place aluminum foil, dishes with reflective qualities or any object on the oven floor as this will cause
a heat build-up which will irreversibly damage the porcelain enamel.
Page 16
US CA
14
Using your oven
Roasting
Using the ROAST mode will give you a tender and juicy roast that is full of flavor.
Place the meat on the broil/roast system on a shelf so that the top of the roast is in the center
of the oven or lower.
Tender cuts should be cooked at a high temperature quickly, while tougher cuts require a
lower temperature for a longer time.
Use the meat probe for perfect results – it takes the guesswork out of telling when your roast
is done. See the instructions on ‘Using the meat probe’.
Thick pieces of meat take longer to cook than thin pieces of the same weight.
Boneless, rolled or stuffed roasts take longer to cook than roasts containing bones.
Poultry should always be well cooked with the juices running clear at an internal temperature
of 170°F (75°C).
Roasting uses dry heat. Don’t add water to your roast as this has a steaming effect.
Vegetables are excellent cooked on ROAST. You can also place them around meat on the broil/
roast system. Do this partway through cooking a large piece of meat which takes longer than
two hours to cook, so that you do not overcook the vegetables. Note that the vegetables will
brown and cook more slowly if they have missed the initial searing stage.
In ROAST mode, the initial searing is too hot for roasting bags. Use TRUE CONV, CONV BAKE or
BAKE if you are using roasting or oven bags and follow the manufacturer’s guidelines.
Broiling
Using the BROIL, MAXI BROIL and CONV BROIL modes gives you a healthier alternative to
frying. It is also a great way to cook vegetables. CONV BROIL is especially suitable for foods
that you might normally pan-fry, barbecue or rotisserie. Always broil with the oven door
completely closed. Note that power levels are expressed as a percentage from LO (50% power)
to HI (100% power) in BROIL and MAXI BROIL modes. Most broiling is carried out on HI, but
you may want to reduce the heat to suit your needs. We recommend that you place food on
the three-piece broil/roast system. In BROIL and MAXI BROIL, best results may be achieved by
preheating the broiler for about five minutes before you begin cooking.
If you use glass or ceramic dishes and pans, be sure that they can withstand the high
temperature of the broiler.
To prevent food sticking, spray the grid with a light coating of non-stick cooking spray.
To avoid piercing the meat and letting juices escape, use tongs or a spatula when you turn the
meat halfway through the cooking time.
Page 17

Using your oven
Tips for dehydrating fruit
To obtain high quality dried fruit, select only unblemished, ripe fruit.
Wash fruit thoroughly and pat dry. Peel if desired. Fruit that is not peeled will take longer to dry.
Remove pits, stems or seeds if necessary. Place fruit on a baking tray on a shelf in the oven.
We recommend using TRUE CONV or CONV BAKE at 125°F (50°C).
Tips for proofing bread
Your oven provides an ideal sealed environment for proofing bread.
Preheat the oven on BAKE at 100°F (30°C). When you are ready to proof the dough, turn the
temperature OFF, leaving the oven mode knob at BAKE, and place the dough in a covered bowl
on a shelf in the warm oven. It will be the perfect temperature to proof dough. The oven is so
well insulated that it will stay warm for several hours.
Note: some recipes recommend putting water or ice in the oven with the bread dough during
baking. The additional moisture improves the bread crust. You must place the water or ice in a
heat resistant dish and on an oven shelf in positions 1 or 2. Do not put it directly onto the oven
floor. Placing water, ice or any dish or tray directly on the oven floor will irreversibly damage the
porcelain enamel.
15
US CA
Page 18

US CA
16
Using your oven
Using the meat probe
Use your meat probe to accurately judge when your meat is perfectly cooked. You can use the
probe on TRUE CONV, CONV BAKE, ROAST, CONV BROIL and BAKE modes.
Select the oven mode and temperature. Preheat the oven
1
if appropriate. Remember ROAST and CONV BROIL do not
require preheating.
Insert the metal probe horizontally into the center of the
2
thickest part of the fully defrosted meat. The thicker the
meat, the longer it will take to cook, so it is important that
the probe is measuring the temperature of the meat at its
thickest point. Make sure the probe does not touch bone (pull
probe away from bone ½ ”(1.5 cm), fat or gristle, as these will
heat up more quickly than the lean meat.
Place the meat on the broil/roast system.
3
When the oven has preheated (if required) to the set
4
temperature, place the broil/roast system in the oven and
insert the plug end of the meat probe into the probe socket,
using an oven mitt if the oven is hot. The probe socket is on
the left hand side of the oven, just under shelf position 7.
Make sure the probe is pushed completely into the socket,
then close the oven door.
Select the upper or lower oven for double models using the
5
cavity selector button.
Press the PROBE button on the control panel. The preset temperature of 150°F (65°C) and PROBE
6
will light up in the display. If you want to select a different internal food temperature from the
PUSH TO
preset temperature, rotate the
button while the PROBE symbol is flashing. For
CLEAR
temperature guidelines, see the ‘Cooking guidelines’ section.
During cooking, the display will show the actual internal temperature of the meat. To look at the
7
set internal temperature, press
The oven will beep and automatically turn off when the meat reaches the set internal
8
PROBE.
temperature. The temperature and oven mode displays will remain on and the oven light will go
out.
Return the oven to manual operation by pressing the
9
PUSH TO
CLEAR
and temperature knobs to OFF.
d
c
a
Metal probe
b
Plug
button. Turn the oven mode
a
c
Handle
d
Cable
b
c
To cancel the probe setting before the set temperature has been reached, press the
and then the
PUSH TO
CLEAR
button.
PROBE button
Page 19

Using your oven
Tips for using the meat probe
You can use the meat probe with automatic cooking functions. If the meat reaches the set
temperature before the stop time is reached, the probe will turn the oven off.
The internal temperature of the meat will continue to rise by 5-15°F (2-8°C) after you have
removed it from the oven, so allow for this in your calculations. Cover with foil and let it rest for
15 to 20 minutes.
17
Important!
Use only the meat probe supplied with your oven, purchased from your DCS dealer or replaced
under warranty by your nearest DCS authorized service agency.
Hold the meat probe at the handle when inserting and removing it from food and the meat probe
socket.
Remember to remove the meat probe from the oven before you start a self-clean cycle.
Do not store the probe in the oven.
Only use the probe with fully defrosted food.
Wash the meat probe in mild soapy water. It is NOT dishwasher safe.
US CA
Page 20

US CA
18
Using your oven
Automatic cooking
Automatic time (delayed start) cooking will turn the oven on and off at times you have set.
To set automatic time cooking
Check that the clock shows the correct time.
1
In double ovens, choose the upper or lower oven. This is important.
2
Select the oven mode and temperature.
3
Decide how long the food will take to cook, allowing time for preheating if necessary.
4
Press the COOK TIME button and rotate the
5
do not need to set a start time.
Press the STOP TIME button, and rotate the
6
want the oven to stop cooking.
Note: you must set this stop time within eight seconds, or the cook time settings will be
automatically adopted. To cancel the cook time settings, turn the oven mode and temperature
knobs to OFF, as described in ‘Canceling automatic cooking’.
When automatic cooking is set
The oven mode and temperature knobs will still function (as during manual operation). You can
alter these before or during cooking, and you can manually turn the oven off before the set cook
time has finished.
Before cooking starts, DELAY, AUTO and the current time will show in the clock display. The oven
mode and temperature displays will dim, and the oven light will be off.
During cooking, AUTO, COOK TIME and the remaining cook time will show in the clock display.
The oven mode and temperature displays will be bright, and the oven light will be on.
PUSH TO
button to select this length of time. You
CLEAR
PUSH TO
button to select the time of day you
CLEAR
When automatic cooking has finished
When cooking has finished, the oven will beep and turn off. The temperature and oven mode
displays will dim, and the oven light will go off. COOK TIME and AUTO will flash in the clock
display.
Turn the oven mode and temperature knobs to OFF. The oven light will stay on for eight seconds,
and then go off when the oven returns to manual operation.
Page 21

Using your oven
Automatic stop cooking
You can set the oven to automatic stop cooking at any time during cooking, or when you turn
the oven on.
To set automatic stop cooking
Check that the clock shows the correct time.
1
In double ovens, choose the upper or lower oven. This is important.
2
Select the oven mode and temperature.
3
Press the STOP TIME button, and rotate the
4
oven to stop cooking.
When automatic stop cooking is set
During cooking, AUTO, COOK TIME and the remaining cook time will show in the clock display.
The oven mode and temperature displays will be bright, and the oven light will be on.
When automatic stop cooking has finished
When the cook time has finished, the oven will beep and turn off. The oven and temperature
displays will dim, and the oven light will go off. COOK TIME and AUTO will flash in the clock
display.
Turn the oven mode and temperature knobs to OFF. The oven light will stay on for eight seconds,
and then go off when the oven returns to manual operation.
PUSH TO
button to select the time you want the
CLEAR
19
US CA
Canceling automatic cooking
To cancel automatic time and automatic stop cooking, turn the oven mode and temperature
knobs to OFF. After eight seconds, the clock display will revert to the time of day, and the oven
will return to manual operation.
Important!
Avoid using foods that will spoil while waiting for the cooking cycle to begin. Typical foods to
avoid include those containing eggs and dairy products, cream soups, cooked and uncooked
meats, poultry and fish.
If cooking will not begin immediately, place only very cold or frozen food in the oven. Most
unfrozen food should never stand in the oven for more than two hours before cooking begins.
Do not allow food to remain in the oven for more than one hour after cooking finished.
Automatic cooking is not suitable for food needing to be cooked in a preheated oven, eg delicate
baked goods.
Page 22
US CA
20
Cooking guidelines
The recommendations in the following charts are guidelines. A lot of factors affect the exact time
and temperature required for baking, roasting and broiling. Follow the instructions in your recipe
or on packaging and be prepared to adjust the oven settings and cooktimes to achieve the best
possible results for you.
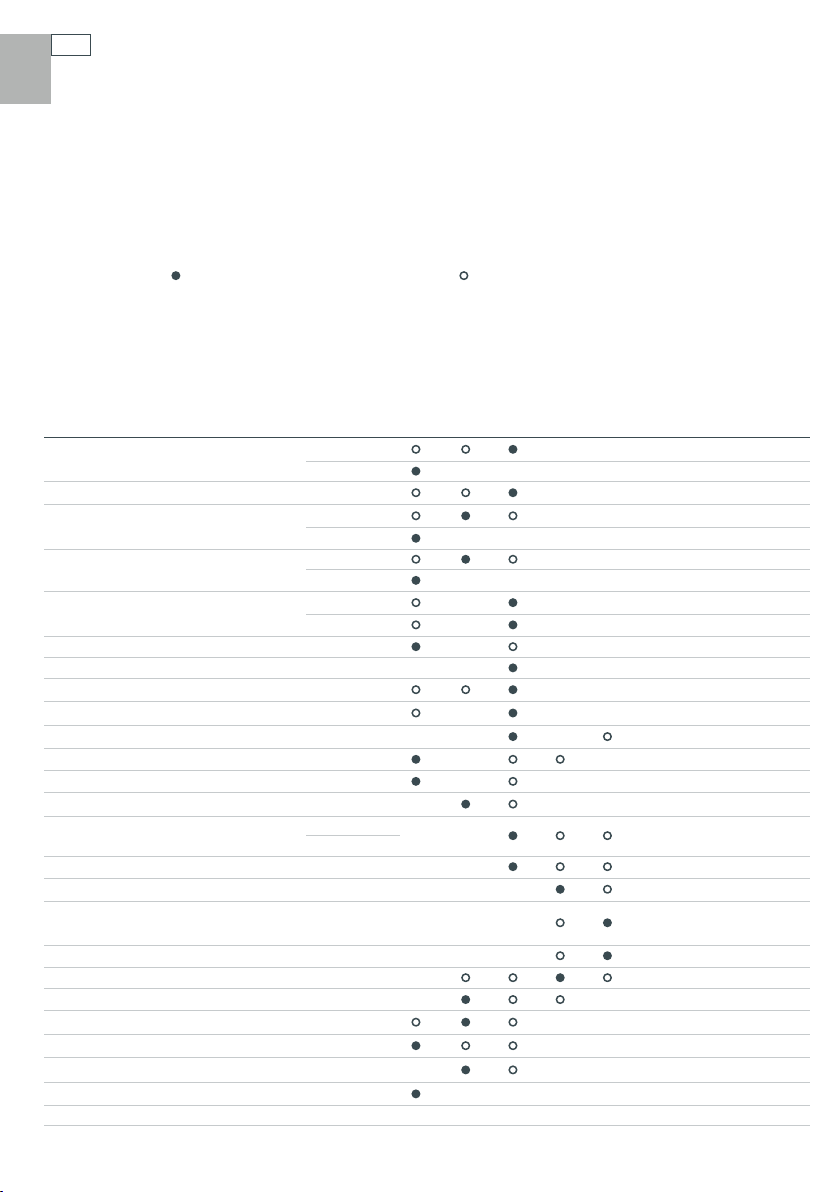
This chart will help you to match your cooking requirements to the most appropriate cooking
mode. Note:
Recommended method Alternative method
TRUE CONV
CONV BAKE
BAKE
CONV
PASTRY
PASTRY BAKE
Baking
Bread (rolls)
one shelf
two shelves
Bread (loaf)
Biscuits/Muffins/Sugar cookies
Cup cakes/Small cakes
Layer cake (8”/20cm or 9” /23cm
round pans)
one shelf
two shelves
one shelf
two shelves
one shelf
two shelves
Angel food cake
Pound cake
Layer cake (9”x13”/23x33cm pan)
Butter or chocolate cake
Rich fruit cake
Brownie (9”x13”/23x33cm pan)
Meringues
Fruit pie (two-crust)
Pumpkin pie
from scratch
frozen
English custard tart
Baked cheesecake
Crème caramel and Crème
brulee (in ‘water bath’)
Pie crust
Quiche
Pizza
Lasagna
Casserole
Vegetables
Complete oven meal
ROAST
BROIL
MAXI BROIL
CONV BROIL
Page 23

Cooking guidelines
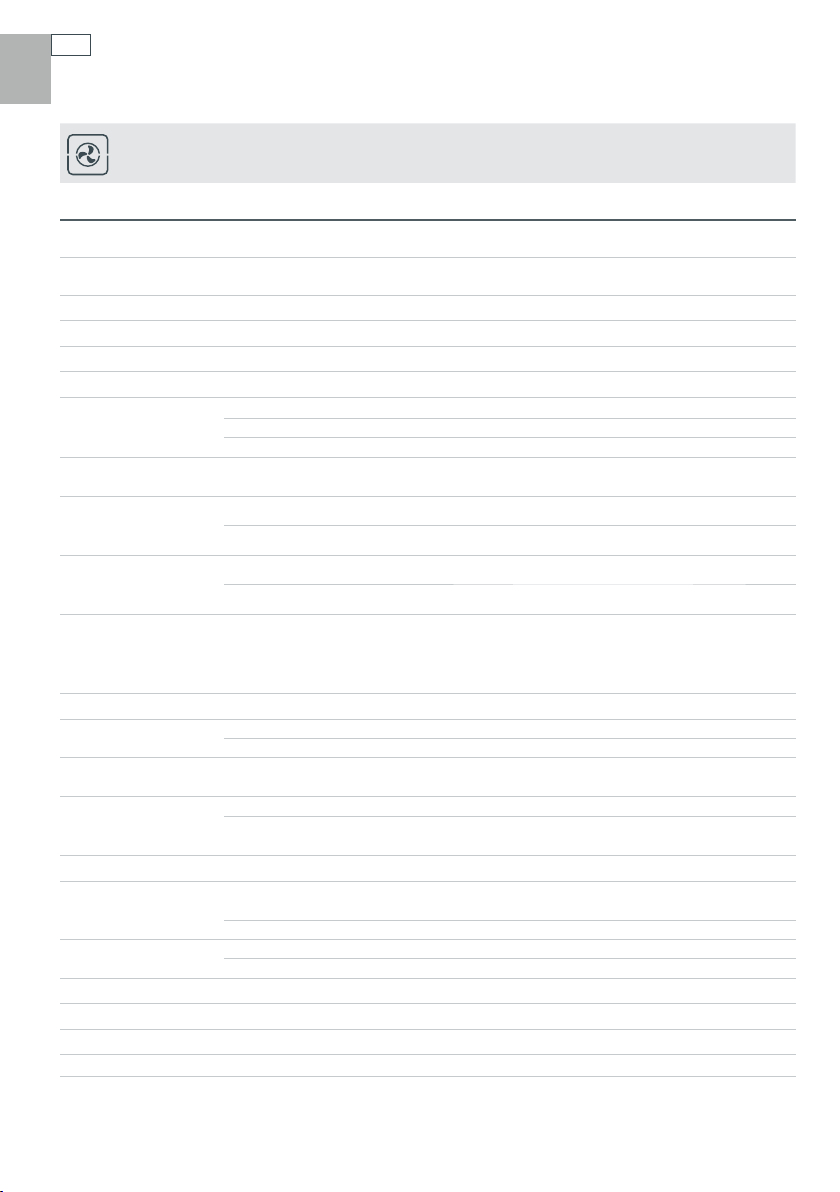
This chart will help you to match your cooking requirements to the most appropriate cooking
mode. Note:
Roasting
Roast beef/pork/lamb
Roast chicken (whole)
Roast chicken (pieces)
Roast turkey
Vegetables
Broiling
Steak/Chops/Cutlets
Fish
Ground meat patties
Vegetables
Toast
Recommended method Alternative method
TRUE CONV
CONV BAKE
BAKE
CONV
PASTRY
PASTRY BAKE
ROAST
BROIL
21
MAXI BROIL
CONV BROIL
US CA
Page 24
US CA
22
Cooking guidelines
Shelf
TRUECONV
(single; multi) Temp °F Temp °C Time (min)
Baking
Bread
Bread
American sandwich loaf 9”x5”/23x13cm loaf pan
wholewheat loaf
- 9”x5”/23x13cm loaf pan
3 350 175 40-50
3 375 190 35-45
Cornbread 4 425 215 22-28
Biscuits 4 425-450 215-230 10-12
Muffins, large 3 375 175 23-30
English scones 4 425-450 215-230 10-12
Sugar cookies
Cup cakes/Small
cakes
Layer cakes, yellow,
white & chocolate
(8”/20cm round pans)
Layer cake, yellow,
white & chocolate
(9”/23cm round pans)
one shelf
two shelves
three shelves
one shelf
two shelves
one shelf
two shelves
4 375 175 6-10
2 & 6 375 175 7-11
2, 4 & 6 375 175 8-12
4 365 185 13-18
4 340-350 170-175 32-38
4 & 6 340-350 170-175 32-38
4 340-350 170-175 27-33
4 & 6 340-350 170-175 27-33
Layer cake, yellow,
white & chocolate
(9”x13”/23x33cm
4 340-350 170-175 32-38
pan)
Fatless sponge cake 4 350 175 30-40
Pound cake
Brownie
(8”x8”/20x20cm pan)
Angel food cake
(10”x4”/25x10cm
tube pan)
from scratch
mix
from scratch
from scratch
mix
2 325 160 70-80
2 350 175 48-58
4 350 175 20-25
1 325-350 160-175 50-60
1 350 175 37-47
Meringues 4 250-270 120-130 60-70
Fruit pie (two-crust)
Pizza
from scratch
frozen
from scratch
frozen
2
425 then
375
2 375 190 45-65
4 425-450 215-230 10-15
4 375 175 18-25
215 then
190
20 then 25
Lasagna 4 350-375 175-190 40-50
Casserole 3 350-360 175-180 60-90
Vegetables 4 350-375 175-190 30-60
Page 25
Cooking guidelines
Shelf
CONV BAKE
Baking
Bread
Bread
Cornbread 4 400-425 210-215 20-25
Biscuits 4 400-425 210-215 8-10
Muffins, large 3 375 175 20-25
English scones 4 400-425 210-215 8-12
Sugar cookies 4 375 175 6-10
Cup cakes/Small
cakes
Layer cakes, yellow,
white & chocolate
(8”/20cm round
pans)
Layer cake, yellow,
white & chocolate
(9”/23cm round
pans)
Layer cake, yellow,
white & chocolate
(9”x13”/23x33cm
pan)
Fatless sponge cake 4 325-350 160-175 30-40
Pound cake
Brownie
(8”x8”/20x20cm
pan)
Meringues 2 250 120 60
Fruit pie (two-crust)
Pizza
Lasagna 4 350-375 175-190 35-40
Casserole 3 350 175 60-90
Vegetables 3 or 4 350-375 175-190 30-50
American sandwich loaf 9”x5”/23x13cm loaf pan
wholewheat loaf
- 9”x5”/23x13cm loaf pan
one shelf
two shelves
one shelf
two shelves
from scratch
mix
from scratch
frozen
from scratch
frozen
(single; multi) Temp °F Temp °C Time (min)
2 325-350 170-175 35-50
2 or 3 350-375 180-190 30-45
4 365 185 13-18
4 340 170 32-38
4 & 6 340 170 32-38
4 340 170 27-33
4 & 6 340 170 27-33
4 340 170 32-38
2 325 160 60-75
2 325-350 160-175 48-58
4 325-350 160-175 20-25
2
400 then
350
200 then
175
20 then 25
2 350 175 45-65
4 425 215 10-12
4 375 175 18-20
23
US CA
Page 26

US CA
24
Cooking guidelines
Shelf
BAKE
(single; multi) Temp °F Temp °C Time (min)
Baking
Bread
Bread
American sandwich loaf 9”x5” /23x13cm loaf pan
wholewheat loaf
- 9”x5” /23x13cm loaf pan
2 or 3 350 175 40-50
2 or 3 375 190 35-45
Cornbread 4 425 215 22-28
Biscuits 4 425-450 215-230 10-12
Muffins, large 3 375 175 23-30
English scones 4 425-450 215-230 10-12
Sugar cookies 4 375 175 6-10
Cup cakes/Small
cakes
Layer cakes, yellow,
white & chocolate
(8”/20cm round
pans)
Layer cake, yellow,
white & chocolate
(9”/23cm round
pans)
one shelf
two shelves
one shelf
two shelves
4 365 185 15-20
4 340-350 170-175 32-38
4 & 6 340-350 170-175 32-38
4 340-350 170-175 27-33
4 & 6 340-350 170-175 27-33
Layer cake, yellow,
white & chocolate
(9”x13”/23x33cm
4 340-350 170-175 32-38
pan)
Fatless sponge cake 4 350 175 30-40
Pound cake
from scratch
mix
2 325 160 70-80
2 350 175 48-58
Rich fruit cake 4 275-300 135-150 3-6 hrs
Brownie
(8”x8”/20x20cm
from scratch
4 350 175 20-25
pan)
Angel food cake
(10”x4”/25x10cm
tube pan)
from scratch
mix
1 325-350 160-175 50-60
1 325-350 160-175 37-47
Meringues 2 250-270 120-130 60-70
Fruit pie (two-crust)
Pizza
from scratch
frozen
from scratch
frozen
2
425 then
375
2 375 190 45-65
4 425-450 215-230 10-15
4 375 175 18-25
215 then
190
20 then 25
Lasagna 3 or 4 350-375 175-190 40-50
Casserole 3 350-360 175-180 60-90
Vegetables 3 or 4 350-375 175-190 30-60
Page 27
Cooking guidelines
25
US CA
CONV PASTRY
Shelf Temp °F Temp °C Time (min)
Baking
Pastry shell
Pumpkin pie
English custard tart
Baked cheesecake
Quiche
Pizza
Crème caramel
Crème brulee
PASTRY BAKE
baked ‘blind’
bake pastry ‘blind’ then
add filling
bake pastry ‘blind’ then
add filling
(in ‘water bath’)
bake pastry ‘blind’ then
add filling
from scratch
frozen
(in ‘water bath’)
(in ‘water bath’)
4 350 175 20-30
4 then 2
4
350 then
375
350 then
275
175 then
190
175 then
135
20-30 then
30-35
20-30 then
25-35
3 300 150 55-60
4 350 175
20-30 then
20-30
4 425 215 10-15
4 350 175 18-25
3 350 175 35-40
3 275 135 40-45
Shelf Temp °F Temp °C Time (min)
Baking
Pie crust
English custard tart
Baked cheesecake
Quiche
Crème caramel
Crème brulee
baked ‘blind’
bake pastry ‘blind’ then
add filling
(in ‘water bath’)
bake pastry ‘blind’ then
add filling
(in ‘water bath’)
(in ‘water bath’)
4 375 190 20-30
4
375 then
300
190 then
150
20-30 then
25-35
3 325 160 55-60
4 375 190
20-30 then
30-35
3 350 175 35-40
3 275 135 40-45
Rich fruit cake 4 275-300 135-150 3-6 hrs
Page 28

US CA
26
Cooking guidelines
Beef
Steaks - rare 7 HI 8-10
Steaks - medium 6 or 7 HI 10-15
Hamburger ground - patties 6 or 7 HI 12-15
Lamb
Chops - medium 7 HI 15-20
Chops - well done 7 HI 20-25
Pork
Chops - well done 7 HI 15-20
Ham steak 6 or 7 HI 15-20
Bacon 7 HI 4-7
Sausages
Sausages 6 or 7 HI 10-15
Fish
Filets 6 or 7 HI 8-12
Whole 6 or 7 HI 15-20
MAXI BROIL & BROIL
Shelf Broil setting Time (min)
Page 29
Cooking guidelines
27
US CA
CONV BROIL
Beef
rare
Boneless roast 1-4
lb/ 450-1800g
Lamb
Chops - medium 6 or 7 400-440 200-225 15-20
Chops - well done 6 or 7 400-440 200-225 20-25
Rack - medium 5 400-410 200-210 20-30
Pork
Chops - well done 6 or 7 375-410 190-210 20-25
Chicken
Whole 3 340-360 170-180
Boneless pieces 5 350-375 175-190 30-50
Bone-in pieces 5 350-375 175-190 30-50
Fish
Filets 6 or 7 400-425 200-220 8-12
Whole 6 or 7 400-425 200-220 15-20
medium
well done
Shelf Temp °F Temp °C Time (min)
4 325 160
4 325 160
4 325 160
18-32 per
lb/450g
25-40 per
lb/450g
30-55 per
lb/450g
30-35 per
lb/450g
Page 30

US CA
28
Cooking guidelines
Time (mins
per lb/
450 g) Best Mode
Probe
Temp °C
Probe
Temp °F
Oven
Temp °C
Oven
Temp °F
3 325 160 170-175 77-79 25-45 ROAST
Boneless - well done
Veal
3 325 160 150-160 65-70 20-43 ROAST
Medium
Well done 3 325 160 170-175 77-79 25-45 ROAST
Chicken
Whole 3 350-375 175-190 170 75 15-20 TRUE CONV
Shelf
Roasting meat
We recommend you use the meat probe to accurately judge when meat is cooked to your preference. ’Time per lb/450g’ is a
rough guide and should only be used to estimate when the meat will be ready. Cooking with ROAST, TRUE CONV, CONV BAKE,
and CONV BROIL will take less time than with BAKE.
Beef
Boneless roast - rare 3 325 160 130-140 54-60 18-32 ROAST
Boneless roast - medium 3 325 160 150-160 65-70 25-40 ROAST
Boneless roast - well done 3 325 160 165-175 74-79 30-55 ROAST
Prime or standing rib roast - rare 3 325 160 130-140 54-60 15-30 ROAST
Prime or standing rib roast - medium 3 325 160 150-160 65-70 20-35 ROAST
Prime or standing rib roast - well done 3 325 160 165-175 74-79 25-40 ROAST
Leg of lamb
With bone - medium 3 325 160 150-160 65-70 18-28 ROAST
With bone - well done 3 325 160 165-175 74-79 20-33 ROAST
Boneless - medium 3 325 160 150-160 65-70 20-35 ROAST
Page 31

Cooking guidelines
29
US CA
Best
Function
Time (mins
per lb/
450 g)
Probe
Temp °C
Probe
Temp °F
Oven
Temp °C
Oven
Temp °F
Shelf
2 325 160 170 75 12-15 TRUE AERO
1 325 160 170 75 10-15 TRUE AERO
TRUE AERO
15-20
AERO BAKE
7½ per
1”/2.5 cm
thickness
AERO BAKE
9 per 1”/2.5
cm thickness
Turkey
8-15 lb/~3.5-7kg - unstuffed
8-15 lb/~3.5-7kg - stuffed 2 325 160 170 75 15-20 TRUE AERO
16-24 lb/~7-10kg - unstuffed
16-24 lb/~7-10kg - stuffed 1 325 160 170 75
Pork
Boneless roast 3 325 160 160-175 71-79 30-45 AERO BAKE
Venison*
Rare 4 425 225 120-130 49-54
Medium rare 4 425 225 130-140 54-60
*Brown in an oiled skillet or frying pan on high heat prior to roasting. The internal temperature of venison rises more on standing due to the
high cooking temperature, therefore the suggested probe settings are lower than other rare or medium rare meats.
Page 32

US CA
30
Care and cleaning
Removing and replacing the sliding shelves and side racks
To remove a sliding shelf, grip it by its two front corners (making sure you are gripping the wire
1
shelf and the sliding frame together), tilt upwards and pull it out of the oven.
To remove the side racks, gently push the retaining wire from underneath the lock stud, then
2
swing the lowest edge of the side rack up and out towards the center of the oven until the rack
is almost horizontal. The prongs at the top will slide out
of the mounting slots.
To replace the side racks, hold them almost horizontally
3
and locate the prongs into the small mounting slots at the
top of the oven cavity. While you are doing this, support
the rack with your hand from underneath, to ensure that
both prongs perfectly locate into the mounting slots.
Lower the side racks carefully and gently place the
4
retaining wire underneath the lock stud.
Important!
Do not lower side racks until the prongs are fully
inserted into the slots so that you do not chip the porcelain enamel.
Retaining wire
Lock stud
Mounting slots
Manual cleaning and maintenance
Important!
Do not use harsh/abrasive cleaning agents, waxes, scourers, sharp metal scrapers, polishes or
commercial oven cleaners to clean your oven, as these will permanently damage the surfaces.
If you choose to use a stainless steel cleaner, please read the label to make sure it does not
contain chlorine compounds. These are corrosive and may damage your oven’s appearance.
Clean the stainless steel surfaces in the same direction as the grain, in a horizontal motion.
Do not clean or use any oven cleaning products on the door seal or cavity seals (gaskets). Do not
rub, damage or move the seals, as they ensure that the oven seals properly and thus operates
efficiently.
Cleaning the control panel and the stainless steel surfaces
It may be useful to lock the oven controls before cleaning - see ‘How to lock the control panel’ in
‘User preference settings’ for details.
Wipe with a clean damp cloth and dry with a lint-free cloth.
To reduce marks like fingerprints, use a stainless steel cleaner regularly.
Do not use scourers or other abrasive cleaners as they will permanently damage the surface.
Cleaning the exterior surface of the glass door
Use a mild solution of detergent and warm water; use a glass cleaner to remove smears and
fingerprints.
Dry with a soft lint-free cloth.
Do not use sharp metal scrapers to clean the oven door glass.
Note: the interior oven door glass will be cleaned during a self-clean cycle.
Page 33

Care and cleaning
Cleaning the porcelain enamel surfaces
The oven interior and inner door liners are porcelain enamel and are cleaned during the self-
clean cycle.
Cleaning the sliding shelves
Important!
Never leave the sliding shelves in the oven during a self-clean cycle. If you do leave them in the oven, the
slides will no longer run smoothly. If you need to relubricate the slides, wipe them with a few drops of
cooking oil on a paper towel.
Apply chrome cleaners with a damp sponge or cloth following manufacturer directions. Wipe
and dry. For hard-to-remove food soil, use a dampened soap-filled non-metal pad, wipe and dry.
Do not wash the sliding shelves in the dishwasher. Do not immerse them in soapy water, or use
oven cleaner on them. Removing the white lubricating grease will reduce the life of the shelf
slides and prevent them from running smoothly.
Cleaning the broil/roast system and side racks
Clean these using a solution of detergent and hot water. They are also dishwasher safe.
Changing the oven light bulbs
The oven is illuminated by three 12 volt/20 watt halogen bulbs. These have a very long life, but if
you should need to replace one, use only a replacement bulb purchased from your nearest DCS
dealer and follow these steps:
Allow the oven to cool completely and then turn it off at the wall.
1
Take out the shelves and side racks (see ‘Removing
2
and replacing sliding shelves and side racks’) and
use a small flat-head screwdriver to twist and lift
the retainer clip at the top of the glass light cover
while holding the glass to prevent it falling. The
clip pivots counterclockwise (see the diagram).
Carefully lift the glass cover out of the lower
3
support and pull out the faulty bulb.
Holding the replacement bulb in a soft cloth or
4
tissue (touching the bulb will reduce its life span),
insert the new bulb.
Reposition the glass cover and twist the top clip
5
back in place. The procedure is the same for the
light in the roof of the oven cavity.
Note: oven bulb replacement is not covered by
your warranty.
Retainer clip
Sockets for
the pins
Plate glass cover
Pins
Replacement bulb
31
US CA
Page 34

US CA
32
Care and cleaning
SELF CLEAN mode
A self-clean cycle normally takes about three hours. This can be reduced to two hours, or
anywhere in between two and three hours.
Only one oven in a double oven can be self-cleaned at a time.
When one oven is in a self-clean cycle, you cannot use the other oven.
Important!
Do not use your oven to clean miscellaneous parts.
Do not use oven cleaners. Do not use any commercial oven cleaner, oven liner or protective
coating of any kind in or around any part of the oven.
During a self-clean cycle, the oven reaches higher temperatures than it does for cooking. Under
such conditions, the surfaces may get hotter than usual and children should be kept away.
Using the SELF CLEAN mode
Remove oven shelves, side racks (see ‘Removing and replacing the sliding shelves and side
1
racks’), and all other bakeware and utensils from the oven before using the SELF CLEAN mode. If
left in the oven, they will permanently discolor. The sliding oven shelves may also become stiff.
Wipe up large food spills or grease deposits. If you don’t, the porcelain enamel will permanently
2
discolor. This, however, will not affect the oven’s performance.
Select the SELF CLEAN mode by turning the oven mode knob.
3
Turn the temperature knob to its maximum position. will appear in the display and this will
4
change to
clock display and the time remaining will count down.
when the cycle begins. The DOOR LOCK and CLEAN symbols will show in the
For your safety, the door lock will automatically activate once you have selected the SELF CLEAN
mode and temperature.
At the end of a self-clean cycle, the door will unlock and the DOOR LOCK symbol will disappear.
5
The CLEAN symbol and 0:00 will flash in the clock display and CLEAN END will show in the oven
mode display until the oven is returned to manual operation – to do this, turn the oven mode
and temperature knobs to OFF.
During SELF CLEAN, the soiling will be reduced to a small amount of gray ash. When the oven is
6
cold, remove the ash with a small brush or dry cloth. Then wipe out the oven with a clean damp
cloth and dry with a clean lint-free cloth.
Replace the side racks and the sliding shelves (see ‘Removing and replacing the sliding shelves
7
and side racks’).
Page 35

Care and cleaning
To cancel the SELF CLEAN mode before it has finished
Turn the oven mode and temperature knobs to OFF. CLEAN COOL will appear in the oven mode
display and the door will remain locked until CLEAN END appears.
Important!
Do not turn off the mains power supply to the oven. The fans are needed to cool the oven.
Once the oven is cool or below the safe temperature, it will return to normal operation and the clock display
will show the time of day.
Short self-clean cycle
You can select a shorter self-clean cycle if the oven is only lightly soiled:
Select the SELF CLEAN mode by turning the oven mode knob.
1
Turn the temperature knob to its maximum position. will appear in the display.
2
While is showing, press the COOK TIME button. The COOK TIME and AUTO symbols and the
3
colon will flash.
Rotate the
4
hours.
Press the COOK TIME button again, or wait eight seconds to adopt the setting and start the self-
5
clean cycle. The clock display will show the time remaining.
PUSH TO
button to reduce the time: this can be anywhere between two and three
CLEAR
33
US CA
Self-clean – delayed start
You can set your oven to start a self-clean cycle at your convenience:
Check that the clock shows the correct time.
1
Select the SELF CLEAN mode by turning the oven mode knob.
2
Turn the temperature knob to its maximum position. will appear in the display.
3
While is showing, press the STOP TIME button. The STOP TIME and AUTO symbols and the
4
colon will flash.
Set the time that you want the oven to finish by rotating the
5
to wait before the self-clean cycle starts, AUTO and DELAY CLEAN will appear in the clock display.
When the self-clean cycle starts, AUTO, DOOR LOCK and CLEAN will appear in the clock display
6
PUSH TO
button. If there is time
CLEAR
and the time remaining will count down.
Page 36

US CA
34
User preference settings
USER SELECT mode
USER SELECT mode allows you to configure some of the settings displayed on your oven control
panel.
How to enter USER SELECT mode
Be sure that the oven mode and temperature knobs are off, that no automatic programs are
1
operating and that the clock is displaying the correct time.
Press the
2
(about two seconds). The oven mode display will show USER SELECT.
How to use SABBATH mode
This mode is designed for religious faiths that observe a ‘no work’ requirement on the Sabbath.
When your oven is in SABBATH mode
Clock, temperature and oven mode displays will be disabled.
No tones will sound.
No error messages or temperature changes will be displayed, however temperature can be
adjusted.
If you set SABBATH mode with the oven door open, the oven lights will stay on while in SABBATH
mode. If you set SABBATH mode with the oven door closed, the oven lights will stay off while in
SABBATH mode.
BAKE is the only oven mode available in SABBATH mode.
TIMER
and the
buttons and hold them down together until the oven beeps
CLOCK
How to set SABBATH mode
Enter the USER SELECT mode and turn the oven mode knob clockwise until SAB MODE appears
1
in its display.
Select the length of time you wish to stay in SAB MODE by rotating the
2
PUSH TO
CLEAR
button. The
maximum is 99 hours, in one hour steps, and is shown in the clock display.
Select a temperature.
3
To start SABBATH mode, press the
4
PUSH TO
button. The oven mode display will show SAB
CLEAR
MODE with no backlight. The temperature display will show --- ; temperatures can be adjusted
but the display will not change.
In double oven models, you can select different temperatures for the upper and lower ovens by
5
using their temperature knobs. In order to activate the lower oven, however, you also need to
turn its oven mode knob one position clockwise (you will see no change in the mode display).
Tips for using SABBATH mode
The oven can be turned off at any time during SABBATH mode by turning the oven mode and
temperature knobs to OFF, but the oven will not revert to regular operation until the set time has
elapsed.
You can exit SABBATH mode at any time by pressing the
PUSH TO
CLEAR
button and holding it
down for five seconds.
Page 37

User preference settings
How to change the temperature scale
Enter the USER SELECT mode and turn the oven mode knob clockwise until TEMP SCALE
1
appears in its display.
Press
2
Press the CLOCK button to activate.
3
Turn the oven mode knob back to OFF.
4
An audible beep will sound five times at the end of automatic cooking functions and when the
The clock display will flash continuously until canceled.
PUSH TO
to select either C or F in the clock display. Selecting C will convert the
CLEAR
numbers shown in the temperature display to degrees Celsius, while selecting F will show the
oven temperatures in degrees Fahrenheit. Remember that BROIL and MAXI BROIL modes will
continue to display percentages rather than temperatures.
How to change SHORT ALERT
By default, SHORT ALERT is off and the audible beep will sound continuously at the end of
automatic cooking functions and when the timer finishes until canceled by pressing the
PUSH TO
button.
CLEAR
When SHORT ALERT is on
timer finishes. After five beeps, the alert will stop, then repeat every five minutes until canceled
by pressing the
PUSH TO
CLEAR
button.
35
US CA
How to activate SHORT ALERT
Enter the USER SELECT mode and turn the oven mode knob clockwise until SHORT ALERT
1
appears in its display.
Press
2
Press the CLOCK button to activate.
3
Turn the oven mode knob back to OFF.
4
PUSH TO
to select either OFF or ON in the clock display.
CLEAR
How to change between 24-hour and 12-hour time display
Enter the USER SELECT mode and turn the oven mode knob clockwise until TIME MODE appears
1
in its display.
Press
2
Press the CLOCK button to activate.
3
Turn the oven mode knob back to OFF.
4
PUSH TO
to select either 24H or 12H in the clock display.
CLEAR
How to hide the time in the clock display
Enter the USER SELECT mode and turn the oven mode knob clockwise until SHOW CLOCK
1
appears in its display.
Press
2
PUSH TO
to select either ON or OFF in the clock display. Selecting ON will show the
CLEAR
time and OFF will hide the time in the clock display. All other functions, such as TIMER, will
continue to be shown as normal in the clock display when the time is hidden.
Press the CLOCK button to activate.
3
Page 38

US CA
36
User preference settings
How to change the language
Your oven is preset to use DCS’s CONV (for ‘convection’) terminology. This is listed in the
languages as LANG DCS. However, you may choose to use an alternative, AERO terminology.
This is listed in the other languages as LANG USA. To select it, refer to the instructions on how to
change the language below. Note that once you have changed terminologies, all references to
CONV in the user guide should be understood as being equivalent to AERO.
Enter the USER SELECT mode and turn the oven mode knob clockwise until LANG DCS appears
1
in its display.
Press
2
PUSH TO
to toggle through the different languages: LANG DCS for CONV terminology,
CLEAR
LANG USA for AERO terminology, LANG UK ENG for UK English, LANGUE FRANCE for Canadian
French or LANG ESPANO for American Spanish.
Press the CLOCK button to activate.
3
Turn the oven mode knob back to OFF.
4
How to reset the oven
This will reset the TEMP (temperature) SCALE, SHORT ALERT, TIME MODE and SHOW CLOCK to
their default settings. SABBATH mode and language settings will remain unaffected.
Enter the USER SELECT mode and turn the oven mode knob clockwise until RESET appears in its
1
display.
Press
2
Press the CLOCK button to exit USER SELECT mode.
3
Turn the oven mode knob back to OFF.
4
PUSH TO
to reset the oven to default settings.
CLEAR
How to lock the control panel
Locking the control panel disables all the buttons and knobs, which can be useful when cleaning
oven surfaces or preventing accidental bumps and unauthorized use. The control panel can only
be locked when the oven mode and temperature are both OFF.
To lock the control panel
Press the
PUSH TO
button and hold down for five seconds. The LOCK symbol will appear in
CLEAR
the clock display. Repeat to unlock.
Page 39

Troubleshooting
Fault codes
If there is a fault, the oven will beep every second, and a fault code will appear in the clock
display as a letter ‘F’ with a number after it.
Important!
Do not turn off the main power supply to the oven if you get a fault code. The fans are needed to cool the
oven.
For safety, this oven is designed to self-cool. Turning off the power while the oven is hot may damage the
oven and its surrounding cabinetry.
If you get a fault code:
Note the fault code.
1
Turn the temperature and oven mode knobs to OFF.
2
Press the
3
enough to clear the fault.
Call your DCS Authorized Service Center with the fault code information.
4
PUSH TO
button. The oven may have already self-corrected, and this will be
CLEAR
37
US CA
Note: if your are unable to immediately clear the fault code or contact your DCS Authorized
Service Center, wait for the oven cooling fans to stop, and then press the
again. It is likely that the oven will now clear the fault. If it does not, then you may turn the oven
off at the wall once the fans have stopped and the oven has completely cooled down.
PUSH TO
CLEAR
button
Troubleshooting
Problem Possible cause What to do
Oven does not
work
Power supply is not
connected.
Clock is not set due to
power cut or failure.
Oven door is open.
Have a service company/electrician
check power connections, wiring and
fuses.
You must set the clock before you can
use the oven. The oven will go into
‘Set Up’ mode when the electricity is
restored after a power cut. The oven
mode and temperature displays will
show OFF. Both displays will be unlit
and unresponsive. The colon (:) in the
clock display will flash. See ‘Setting the
clock’.
The elements are disabled by the door
switch when the door is open. Make
sure the door is properly closed.
Page 40

US CA
38
Troubleshooting
Problem Possible cause What to do
Oven door will not
open
Oven light does
not work
Oven not heating Oven door is not properly
Baked foods too
brown on top or
bottom
Oven door is locked.
Light bulb has blown. Replace the light bulb. Refer to ‘Care
closed or it is opened
too frequently during
operation.
Oven not preheated. Preheat until the illuminated ring
Bakeware too large or too
small for the recipe.
Baking pans/tins not
evenly spaced on shelves.
Baking, eg cookies, not
evenly sized or spaced on
baking trays.
Dark, coated baking pans. Reduce the oven temperature by 25°F
Shelf position too high for
specific function.
Opening the oven door
frequently during baking.
Baking temperature too
high or too low.
Still in SELF CLEAN function. The door
will unlock when the cycle has finished
and the oven has cooled to a safe
temperature.
and cleaning’ for details.
Oven elements and fans turn off while
the door is open so be sure the oven
door is properly closed. Note: BROIL
functions will only operate with the
door closed.
around the temperature knob changes
from red to white.
Use the correct sized bakeware.
Stagger baking pans on the oven
shelves so that there is at least 1⁄”(3
cm) between them and the oven walls.
Make all cookies in a batch the same
size and shape and space them evenly
over the baking tray.
(10°C) and extend the cooking time by a
couple of minutes.
Use shiny baking pans/trays.
Try a lower shelf position.
Do not open the door until at least ¾ of
the baking time has passed.
Adjust temperature.
Baked foods pale
and undercooked
on the base
Baking (eg cookies)
too brown on the
base
Shiny baking trays, tins, or
pans being used.
Dark, coated baking
pans/trays.
Shiny baking trays, tins, and pans reflect
the heat and may result in baked food
that is pale and undercooked on the
base.
Use shiny baking pans/trays.
Page 41

Service
Before you call for service or assistance ...
Check the things you can do yourself. Refer to the installation instructions and your user guide
and check that:
Your product is correctly installed.
1
You are familiar with its normal operation.
2
If the circuit breaker tripped or the fuse blown.
3
If there is a power outage in the area.
4
If after checking these points you still need assistance, please contact your local DCS authorized
service agency or DCS Customer Care Representative for warranty service. Our number is (888)
281-5698. Please have the following information ready before you call:
• Model Number (can be found below the control panel on the left-hand side of the oven frame,
refer to Installation instructions)
• Serial Number (can be found below the control panel on the left-hand side of the oven frame,
refer to Installation instructions)
• Date of installation
• A brief description of the problem
Your satisfaction is of the utmost importance to us. If a problem cannot be resolved to your
satisfaction, please email us at support@dcsappliances.com or write:
39
US CA
Fisher & Paykel Appliances, Inc.
Attention: DCS Customer Care
5900 Skylab Road
Huntington Beach, CA 92647
www.dcsappliances.com
Page 42

US CA
40
Limited warranty
LIMITED WARRANTY
When you purchase a new DCS built-in wall oven you automatically receive a One year Limited
Warranty covering parts and labor for the entire product, and a Ten year Limited (parts only)
Warranty on the porcelain oven cavity and porcelain inner door panel for servicing within the
48 mainland United States, Hawaii, Washington D.C. and Canada. In Alaska the Limited Warranty
is the same except that you must pay to ship the Product to the service shop or the service
technician’s travel to your home. Products for use in Canada must be purchased through the
Canadian distribution channel to ensure regulatory compliance.
FISHER & PAYKEL UNDERTAKES TO:
Repair without cost to the owner either for material or labor any part of the Product, the serial
number of which appears on the Product, which is found to be defective. In Alaska, you must
pay to ship the Product to the service shop or for the service technician’s travel to your home.
If the Product is installed in a motor vehicle, boat or similar mobile facility, you must bring it to
the service shop at your expense or pay for the service technician’s travel to the location of the
Product.
If we are unable to repair a defective part of the Product after a reasonable number of attempts,
at our option we may replace the part or the Product, or we may provide you a full refund of the
purchase price of the Product (not including installation or other charges).
This warranty extends to the original purchaser and any succeeding owner of the Product for
products purchased for ordinary single-family home use. All service under this Limited Warranty
shall be provided by Fisher & Paykel Appliances Inc. or its Authorized Service Agent during
normal business hours.
HOW LONG DOES THIS LIMITED WARRANTY LAST?
Our liability under this Limited Warranty for the entire product expires One year from the date of
purchase of the Product by the first consumer. Our liability under this Limited (parts) Warranty
for the porcelain oven cavity and porcelain inner door panel expires Ten years from the date of
purchase of the Product by the first consumer.
Our liability under any implied warranties, including the implied warranty of merchantability
(an unwritten warranty that the Product is fit for ordinary use) also expires One year (or such
longer period as required by applicable law) from the date of purchase of the Product by the first
consumer. Some states do not allow limitations on how long an implied warranty lasts, so this
limit on implied warranties may not apply to you.
THIS WARRANTY DOES NOT COVER:
A. Service calls that are not related to any defect in the Product. The cost of a service call will be
charged if the problem is not found to be a defect of the Product. For example:
1. Correct faulty installation of the Product.
2. Instruct you how to use the Product.
3. Replace house fuses, reset circuit breakers, correct house wiring or plumbing, or replace
light bulbs.
4. Correct fault(s) caused by the user.
5. Change the set-up of the Product.
6. Unauthorized modifications of the Product.
7. Noise or vibration that is considered normal, for example, drain/fan sounds, regeneration
noises or user warning beeps.
8. Correcting damage caused by pests, for example, rats, cockroaches etc.
Page 43

Limited warranty
B. Defects caused by factors other than:
1. Normal domestic use or
2. Use in accordance with the Product’s Use and Care Guide.
C. Defects to the Product caused by accident, neglect, misuse, fire, flood or Act of God.
D. The cost of repairs carried out by non-authorized repairers or the cost of correcting such
unauthorized repairs.
E. Travel Fees and associated charges incurred when the product is installed in a location with
limited or restricted access. (i.e. airplane flights, ferry charges, isolated geographic areas).
F. Normal recommended maintenance as set forth in the Product’s Use and Care Guide.
G. Damage to cabinets or floor done by a service agent.
If you have an installation problem contact your dealer or installer. You are responsible for
providing adequate electrical, exhausting and other connection facilities.
We are not responsible for consequential or incidental damages (the cost of repairing or
replacing other property damaged if the Product is defective or any of your expenses caused if
the Product is defective). Some states do not allow the exclusion or limitation of incidental or
consequential damages, so the above limitation or exclusion may not apply to you.
HOW TO GET SERVICE
Please read your Use and Care Guide. If you then have any questions about operating the
Product, need the name of your local DCS Authorized Service Agent, or believe the Product is
defective and wish service under this Limited Warranty, please contact your dealer or call us at:
TOLL FREE 1-888-281-5698 or contact us through our web site: www.dcsappliances.com
41
US CA
You may be required to provide reasonable proof of the date of purchase of the Product before
the Product will be serviced under this Limited Warranty.
COMMERCIAL USE
This warranty applies to appliances used in residential applications; it does not cover their use in
commercial situations.
NO OTHER WARRANTIES
This Limited Warranty is the complete and exclusive agreement between you and Fisher & Paykel
Appliances Inc. regarding any defect in the Product. None of our employees (or our Authorized
Service Agents) are authorized to make any addition or modification to this Limited Warranty.
WARRANTOR: FISHER & PAYKEL APPLIANCES, INC.
If you need further help concerning this Limited Warranty, please call us at the above number, or
write to:
Fisher & Paykel Appliances, Inc. - Attention: DCS Customer Care
5900 Skylab Road, Huntington Beach, CA 92647
This Limited Warranty gives you specific legal rights, and you may also have other rights which
vary from state to state.
Fisher & Paykel Appliances Inc. is a leading manufacturer of premium quality cooking and
specialty appliances under the Fisher & Paykel and DCS brands.
Page 44

US CA
FR
42
Page 45

Table des matières
Sécurité et mises en garde 44
Introduction 47
Utilisation du four – avant de commencer
Réglage de l’horloge
Utilisation des commandes du four 49
Modes de four 50
Utilisation du four
Positionnement des grilles
Sélection des plats allant au four adéquats 53
Sélection de mode et de température 54
Préchauffage du four 54
Utilisation des modes du four 55
Utilisation de la sonde thermique 58
Cuisson automatique 60
48
52
43
US CA
FR
Directives de cuisson 62
Entretien et nettoyage 72
Paramètres de préférence de l’utilisateur 76
Dépannage 79
Service 81
Garantie limitée 82
Important !
CONSERVER CES INSTRUCTIONS
Les modèles illustrés dans ce guide de l’utilisateur peuvent ne pas être disponibles
dans tous les marchés et sont susceptibles d’être modifiés à tout moment. Pour
tout détail courant sur la disponibilité de modèles ou des spécifications dans un
certain pays, consulter notre site Web www.dcsappliances.com ou contacter le
représentant local du Service à la clientèle DCS.
Page 46

US CA
FR
44
Sécurité et mises en garde
Fonctionnement
Ce four a été soigneusement conçu pour fonctionner en toute sécurité pendant les procédures
de cuisson normales. Ne pas oublier les directives suivantes lors de l’utilisation du four :
AVERTISSEMENT !
Risque de choc électrique
Éteindre le four au niveau du mur avant de remplacer des fusibles ou la
lampe du four.
Ne pas respecter cette consigne risque de provoquer un choc électrique
voire la mort.
AVERTISSEMENT !
Risque de surface très chaude
Les pièces accessibles peuvent chauffer pendant l’utilisation.
Pour éviter toute brûlure et toute échaudure, tenir les enfants à distance.
Utiliser des gants isolants ou toute autre protection lors de la manipulation
de surfaces très chaudes telles que les grilles de four ou les plats.
Faire preuve de prudence en ouvrant la porte du four.
Laisser l’air chaud ou la vapeur s’échapper avant de retirer ou de replacer les
aliments.
Ne pas toucher les éléments chauffants ni les surfaces intérieures du four.
Les éléments de chauffage risquent d’être très chauds même s’ils sont de
couleur foncée. Les surfaces intérieures d’un four chauffent suffisamment
pour provoquer des brûlures. Pendant et après utilisation, ne pas toucher ni
laisser les vêtements ou toute autre matière inflammable entrer en contact
avec les éléments chauffants ou les surfaces intérieure du four tant qu’ils
ne sont pas refroidis. Les autres surfaces de l’appareil risquent de chauffer
suffisamment pour provoquer des brûlures – notamment, l’évent du four, la
surface près de l’évent du four, ainsi que la porte et le hublot du four.
Le non-respect de cette consigne pourrait provoquer des brûlures et des
échaudures.
Page 47

Sécurité et mises en garde
45
Importantes consignes de sécurité
Pour réduire le risque d’incendie, de choc électrique, de blessures corporelles et de tout dommage
lors de l’utilisation du four, respecter les importantes consignes de sécurité indiquées ci-dessous :
Lire intégralement les instructions avant d’utiliser le four. Utiliser le four uniquement aux fins
prévues comme il l’est décrit dans les présentes instructions.
Installation correcte : s’assurer que l’appareil est correctement installé et mis à terre par un
technicien qualifié.
Sectionneur : vérifier que ce four est connecté à un circuit incorporant un sectionneur fournissant
une déconnexion totale de l’alimentation électrique.
Ne jamais utiliser cet appareil pour chauffer la pièce et ce, pour éviter toute brûlure ou blessure ou
tout risque d’incendie.
Les appareils ménagers ne sont pas prévus à l’usage des enfants.
Ne pas laisser les enfants seuls. Ne pas laisser les enfants seuls ou sans supervision dans la
zone où l’appareil est en utilisation. Ne jamais les laisser s’asseoir ou se mettre debout sur une
partie quelconque de l’appareil. Les enfants ou personnes handicapés ayant une capacité limitée
pour utiliser l’appareil doivent demander à une personne responsable de les informer de son
fonctionnement. L’instructeur doit être convaincu qu’ils sont en mesure d’utiliser l’appareil sans
danger pour eux-mêmes ou leur environnement.
Ne pas placer d’objets lourds sur la porte du four.
Porter des vêtements appropriés. Ne pas porter de vêtements amples ou pendants lors de
l’utilisation de l’appareil. Ils pourraient s’enflammer ou fondre s’ils entrent en contact avec un
élément chauffant ou une surface chaude, et provoquer des brûlures.
Entretien effectué par l’utilisateur : ne pas réparer ni remplacer une pièce quelconque de l’appareil
sauf recommandation spécifique dans le manuel. Tout autre entretien doit être confié à un
technicien qualifié.
Entreposage dans ou sur l’appareil : ne pas entreposer de matières inflammables dans un four ou
près de sa surface.
Ne pas utiliser d’eau sur les incendies de graisse. Étouffer l’incendie ou les flammes ou encore
utiliser un extincteur de type à poudre extinctrice ou à mousse.
Utiliser uniquement des gants isolants ou des maniques. Des maniques moites ou humides sur
les surfaces chaudes pourraient provoquer des brûlures causées par la vapeur. Ne pas laisser les
maniques entrer en contact avec les surfaces très chaudes ou les éléments chauffants. Ne pas
utiliser un linge ou une étoffe épaisse comme gant de cuisine. Ceux-ci pourraient prendre feu.
Ne pas chauffer de conteneurs d’aliments non ouverts. Ils peuvent faire monter la pression
susceptible de faire exploser le conteneur et provoquer des blessures.
Manipulation sans danger des aliments : laisser les aliments dans le four aussi peu que possible
avant et après cuisson. Ceci pour éviter toute contamination par des organismes susceptible de
provoquer une intoxication alimentaire. Faire preuve de prudence par temps chaud.
Ne jamais obstruer les évents de four.
Attention. De l’air chaud peut souffler de l’évent à la base du four comme partie du système de
refroidissement du four.
Ne pas placer de papier alu, de plats, de plateaux, d’eau ou de glace sur la sole pendant la cuisson
et ce, pour éviter d’endommager l’émail vitrifié de manière irréversible.
US CA
FR
Page 48

US CA
46
Sécurité et mises en garde
FR
Placement des grilles de four : toujours positionner les grilles à l’emplacement désiré lorsque le
four est froid (avant le préchauffage). Si une grille doit être retirée pendant que le four est chaud,
ne pas laisser les gants isolants ou les maniques entrer en contact avec les éléments chauffants
chauds dans le four ou la base du four.
Ne pas nettoyer le joint d’étanchéité de porte ni les joints d’étanchéité (joints) des cavités et
ne pas utiliser dessus de produits à nettoyer les fours. Ils sont indispensables pour une bonne
étanchéité qui garantit un fonctionnement efficace du four. Prendre soin de ne pas les frotter, les
endommager ou les déplacer.
Ne pas utiliser de produits à nettoyer les fours, de dégraissants corrosifs/abrasifs, de cire ou
d’encaustique. Ne jamais utiliser de produit à nettoyer les fours commercial, revêtement de
four ou revêtement de protection quelconque, dans et autour les parties du four. Ne pas utiliser
de nettoyants corrosifs/abrasifs, de tampons à récurer ou de raclette en métal coupante pour
nettoyer la vitre de la porte du four car ils peuvent rayer la surface et risquent de provoquer des
bris de verre.
Nettoyer uniquement les pièces indiquées dans ce manuel.
Ne pas utiliser de nettoyeur à vapeur pour nettoyer une partie quelconque du four.
Avant de commencer le cycle d’autonettoyage, retirer les grilles de four, les supports de grilles
latéraux, la lèchefrite et tous les autres plats/ustensiles, et essuyer les déversements d’aliments ou
les dépôts de graisse importants.
Pendant un cycle autonettoyage, le four atteint des températures supérieures aux températures
utilisées pour la cuisson. Dans de telles conditions, les surfaces risquent de devenir plus chaudes
que d’habitude et les enfants doivent être tenus à distance.
Ne pas entreposer d’objets que les enfants risqueraient de vouloir au-dessus du four. Les enfants
pourraient se brûler ou se blesser en montant sur le four pour récupérer les objets.
Ne pas installer ni faire fonctionner l’appareil s’il est endommagé ou ne fonctionne pas
correctement. Si on reçoit un produit endommagé, contacter immédiatement le distributeur ou
l’installateur.
N’utiliser que des plats allant au four. Suivre les instructions du fabricant des plats.
Ne recouvrez jamais les fentes, trous ou passages situés au bas du four et évitez de recouvrir
entièrement une grille avec des matériaux tel que le papier d’aluminium. Cela a pour effet de
bloquer la circulation d’air à l’intérieur du four et peut causer un empoisonnement à l’oxyde de
carbone. Le papier d’aluminium peut également emprisonner la chaleur et causer ainsi un risque
d’incendi.
La « California Safe Drinking Water and Toxic Enforcement Act » requiert des entreprises d’avertir
les clients de l’exposition potentielle à des substances qui sont considérées par l’État de Californie
comme pouvant causer le cancer ou des malformations congénitales. De petites quantités de
produits chimiques nocifs se dégagent pendant le cycle autonettoyage du four de l’isolation et
de la décomposition des aliments. Une exposition considérable à ces substances peut causer
le cancer et des malformations congénitales. Aérer avec une hotte ou une fenêtre ouverte, et
essuyer tout déversement d’aliments excessif avant d’autonettoyer le four réduit l’exposition.
Page 49

Introduction
47
À propos du nouveau four
Merci d’avoir fait l’acquisition d’un four encastré multifonctions DCS by Fisher & Paykel. Maintenant
que celui-ci est installé et prêt à l’emploi, il est important de bien connaître son fonctionnement
a n d’obtenir d’excellents résultats et ce, dès le début. Ce guide présente toutes ses fonctions et
o re toute une série de directives relatives à la cuisson. Il est recommandé de lire le guide dans
son intégralité avant d’utiliser ce nouveau four, tant par mesure de sécurité que pour une cuisine
réussie.
US CA
FR
1
2
3
4
5
1
Tableau de commande
2
Poignée de porte
3
Hublot de four
4
Four supérieur
5 Four inférieur (modèles doubles
uniquement)
6
Numéro de modèle et numéro de
série
7
Loquet autonettoyage
8
Joint d’étanchéité de porte (joint)
6
7
12
10
15
8
9
Joint d’étanchéité de cavité (joint)
10
Élément de grillage
11
Lampes de four
12 Prise de sonde thermique
13
Ventilateur de convection et élément
dissimulé
14
Élément dissimulé inférieur
15
Charnière de porte
16
Évent de four
11
9
13
14
15
16
Page 50

US CA
FR
48
Utilisation du four – avant de commencer
Réglage de l’horloge
Lorsque le four est connecté à une alimentation électrique pour la première fois, une tonalité
retentira et l’affichage d’horloge s’allumera. L’affichage d’horloge indiquera « 12:00 » et les deuxpoints ( : ) clignoteront. Ensuite, mettre l’horloge à l’heure.
Important !
Il faut mettre l’horloge à l’heure avant de pouvoir utiliser le four.
Pour mettre l’horloge à l’heure
Pendant que les deux-points (:) clignotent, faire tourner le bouton
1
PUSH TO
CLEAR
jusqu’à affichage
de l’heure correcte.
Appuyer sur le bouton CLOCK (horloge) pour mettre le four à l’heure ou patienter huit secondes
2
et l’horloge se mettra à l’heure automatiquement.
Se reporter à la section « Paramètres de préférence de l’utilisateur » pour savoir comment passer
de l’affichage 12 heures à l’affichage 24 heures.
a
a
Affichage d’horloge
b
bouton CLOCK (horloge)
- permet de mettre l’horloge à l’heure
PUSH TO
c
CLEAR
- tourner ce bouton pour mettre à l’heure :
l’horloge, le minuteur, la sonde thermique, le
temps de cuisson et l’heure d’arrêt.
c
b
- appuyer sur ce bouton pour effacer
l’affichage
Page 51

Utilisation du four – avant de commencer
Utilisation des commandes du four
Dans les fours doubles, les boutons de gauche contrôlent le four du haut et les boutons de droite
contrôlent le four du bas. Appuyer sur le bouton de sélection de la cavité du four permet de
basculer entre les cavités du four, par exemple, pour configurer les programmes automatiques.
a
bouton TIMER (minuteur)
b
bouton COOK TIME (temps de cuisson)
c
bouton STOP TIME (heure d’arrêt)
d
bouton PROBE (sonde)
e
bouton CLOCK (horloge)
f
bouton
g
Affichage de la cavité supérieure du four
h
Affichage de la cavité inférieure du four
i
Bouton de sélection de la cavité du four
PUSH TO
(tourner/appuyer)
CLEAR
– appuyer sur ce bouton pour basculer
entre les réglages des cavités supérieure
et inférieure
Seuls les modèles doubles disposent des options
g, h, et i
decba
g
i
h
f
49
US CA
FR
Minuteur
Le minuteur peut être utilisé à tout moment, même si le four n’est pas allumé.
Pour régler le minuteur
Appuyer sur le bouton TIMER (minuteur). Le symbole TIMER (minuteur) et les deux-points
1
clignotent dans l’affichage de l’horloge.
Tourner le bouton
2
TIMER (minuteur) ou patienter huit secondes jusqu’à ce que le réglage soit adopté et que le
minuteur commence son compte à rebours.
Pour annuler le minuteur, appuyer sur le bouton TIMER puis sur le bouton
3
Une fois que le temps fixé est écoulé, les symboles TIMER et 0:00 clignoteront et le four émettra
4
un signal sonore. Appuyer sur le bouton
signal sonore et mettre le minuteur à zéro. Le minuteur n’éteint pas le four.
PUSH TO
CLEAR
jusqu’à affichage du temps nécessaire. Appuyer sur le bouton
TIMER ou sur le bouton
PUSH TO
CLEAR
PUSH TO
CLEAR
pour faire cesser le
.
Page 52

US CA
FR
50
Utilisation du four – avant de commencer
Modes de four
CUISSON
AERO PURE : ventilateur et élément chauffant du ventilateur
Un élément chauffant dissimulé entourant le ventilateur au fond du four réchauffe l’air
qui est ensuite ventilé dans la cavité. La température homogène garantit un milieu de
cuisson idéal pour obtenir des gâteaux bien montés et uniformément dorés. Les biscuits
sont croustillant s à l’extérieur et moelleux à l’intérieur, la viande et la volaille sont
délicieusement dorées et grésillantes tout en restant juteuses et tendres. Les ragoûts
sont cuits à la perfection et le réchauffage est rapide et efficace (enlever le couvercle des
cocottes). Le mode AERO PURE est le mode à choisir pour la cuisson sur plusieurs grilles
et la cuisson de plats entièrement cuisinés au four. Le mode AERO PURE est excellent pour
faire cuire un « angel food cake » (gâteau des anges).
CUISSO AERO : ventilateur et éléments chauffants supérieur et inférieur
Le ventilateur du four fait circuler l’air chaud des éléments chauffants dissimulés supérieurs
extérieur et inférieur et le répartir ainsi dans toute la cavité du four. Les aliments cuits
au mode CUISSO AERO ont tendance à dorer plus rapidement que ceux cuits au mode
CUISSO NORMAL traditionnel. Utiliser le mode CUISSO AERO à une basse température, à
savoir de 50 °C (125 °F), pour déshydrater les fruits, légumes et herbes. Lors de la cuisson
en cocotte, retirer le couvercle.
CUISSO NORMAL : éléments chauffants supérieur et inférieur
La chaleur vient des éléments chauffants dissimulés supérieurs extérieur et inférieur.
Le mode CUISSO NORMAL est le mode de cuisson traditionnel, idéal pour les gâteaux.
Pour faire cuire sur deux grilles, arranger les plats de manière à ce qu’ils ne soient pas
directement les uns sur les autres. Le mode CUISSO NORMAL est idéal pour les aliments
qui requièrent une cuisson longue ou à basse température, comme les meringues et les
cakes riches.
AERO GATEAU : ventilateur et élément chauffant inférieur
Le ventilateur fait circuler la chaleur de l’élément chauffant dissimulé inférieur dans tout le
four. Ce mode est excellent pour les pâtisseries douces et salées, pour les pains, brownies
et biscuits que l’on souhaite extra moelleux.
CUISSO GATEAU : élément chauffant inférieur
La chaleur provient uniquement de l’élément chauffant inférieur. Il s’agit là d’un mode de
cuisson traditionnel, convenant aux recettes élaborées dans des fours plus anciens. Pour
obtenir les meilleurs résultats possibles, ne faire cuire que sur une seule grille à la fois. Ce
mode convient parfaitement aux aliments exigeant une cuisson délicate et à base de pâte,
comme les tartes à la crème, les tourtes, les quiches et les cheese-cakes ou tout aliment ne
nécessitant pas d’être exposé à la chaleur directe et d’être doré sur le dessus.
RÔTISSAGE
RÔTIR
Le mode RÔTIR est un programme en deux temps. Il n’est pas nécessaire de faire
préchauffer le four. La première étape de grillage de 20 minutes saisit et dore la viande,
et caramélise les jus sur l’extérieur de la viande ; ensuite, la température s’abaisse à la
température sélectionnée pour le reste de la cuisson, préparant ainsi un rôti moelleux et
juteux ayant énormément de goût. Ce mode est également excellent pour la cuisson de
légumes. Après la saisie initiale, la viande est légèrement dorée.
Page 53

Utilisation du four – avant de commencer
51
GRIL
GRIL : élément chauffant intérieur supérieur
Le mode GRIL fournit une chaleur intense provenant de la zone intérieure de
l’élément chauffant supérieur. Excellent lorsque l’on a besoin de faire griller
rapidement une ou deux portions de ses plats préférés habituels, comme des
blancs de poulet croustillants ou un steak.
MAXI GRIL : éléments chauffants supérieurs intérieur et extérieur
Le mode MAXI GRIL fournit une chaleur intense provenant de tout l’élément
chauffant supérieur. C’est le mode de cuisson le mieux indiqué pour terminer de
nombreux plats, par exemple pour dorer le dessus d’un gratin de pommes de terre
et d’une « frittata ». Utiliser le mode MAXI GRIL pour rôtir du pain ou griller du
poulet, du poisson ou un steak.
AERO GRIL : ventilateur et éléments chauffants supérieurs intérieur et extérieur
Le mode AERO GRIL produit des aliments ayant un fini semblable à celui d’une
rôtisserie. La viande, la volaille et les légumes se cuisent merveilleusement bien ;
les aliments sont croustillants et dorés sur l’extérieur tout en restant moelleux et
tendres au centre. Essayer ce mode de cuisson pour un poulet entier ou un filet de
bœuf.
CHAUD
Le mode CHAUD produit une chaleur faible homogène de 75 °C (165 °F). Utiliser ce
mode pour conserver au chaud les aliments cuits, pour réchauffer les assiettes ou
les plats. Pour réchauffer les aliments froids, utiliser ce mode AÉRO PURE et passer
au mode CHAUD uniquement lorsque les aliments sont extrêmement chauds,
étant donné que ce mode ne réchauffera pas les aliments froids à une température
suffisamment élevée pour tuer toutes les bactéries nocives.
US CA
FR
AUTO NETTOY
Ce four offre un cycle autonettoyant pyrolytique qui élimine la saleté et les
souillures normalement associées au nettoyage du four. Pendant l’autonettoyage,
le four atteint des températures très élevées. Ce qui fait dissiper et décomposer les
dépôts de souillures et de graisse. Un éliminateur de fumée ainsi qu’un système de
ventilation dynamique éliminent les odeurs. Pour savoir comment utiliser le mode
AUTO NETTOY, se reporter à la section « Entretien et nettoyage ».
Ventilateur de refroidissement
Un ventilateur de refroidissement se met automatiquement en marche et fait sortir l’air en
dessous de la porte du four pendant la plupart des modes de four. Le ventilateur peut continuer
à fonctionner après l’extinction du four pour refroidir la porte et le tableau de commande.
Page 54

US CA
FR
52
Utilisation du four
Positionnement des grilles
Placer les grilles coulissantes télescopiques sur les supports-grilles latéraux offre
un choix de huit positions de cuisson. Se reporter à la section « Directives de
cuisson » pour connaître les positions de grilles recommandées.
Positionnement des grilles
8
7
6
5
4
3
2
1
Toujours positionner les grilles du four AVANT de faire chauffer le four.
Pour retirer une grille coulissante, la saisir par ses deux coins avant (en veillant à saisir la grille
métallique et le châssis coulissant ensemble), la soulever et la sortir du four.
Pour remettre une grille coulissante en place dans le four correctement, la positionner de manière à ce
que la barre avant soit dirigée vers soi, comme l’indique le schéma.
Vérifier que le châssis coulissant n’est pas étendu.
Vérifier la butée de sécurité (comme l’indique le schéma) pour s’assurer que la grille se trouve à
l’endroit.
Positionner la grille de manière à ce qu’elle soit nivelée et que les ergots des grilles arrière des deux
côtés du châssis coulissant reposent sur les supports-grilles latéraux (comme l’indique le schéma).
Ensuite, faire glisser la grille coulissante jusqu’au fond du four jusqu’à ce que les ergots des grilles
avant se mettent bien en place.
Remarque : en général, les positions de grilles dans le haut du four sont adaptées pour le grillage.
Celles du milieu ou du bas conviennent pour la pâtisserie, les rôtis et les ragoûts.
Par mesure de sécurité, les grilles métalliques et les châssis coulissants télescopiques sont construits
ensemble comme un tout et ne sont pas séparables. Ce qui signifie que, lorsqu’elles sont correctement
installées sur les supports-grilles latéraux, les coulisses empêcheront les grilles métalliques de basculer
quand on les tire à soi.
Pour empêcher les ergots de basculer des supports latéraux, veiller à faire glisser les grilles vers l’avant
horizontalement.
Butée de sécurité
Support latéral
Fentes de
montage
Support
latéral
Ergot de grille
Châssis coulissant
(pousser complètement en place)
Barre avant
Grille métallique
Goujon de
verrouillage
Fil de retenue
Page 55

Utilisation du four
53
Sélection des plats allant au four adéquats
La taille, la forme et le matériau des plats allant au four
affecteront le temps de cuisson.
Grille
Le système gril/rôtissage à trois éléments fournis avec
ce four (composé d’un plat, d’une grille et d’une grille à
rôtir) est conçu de façon à diminuer les éclaboussures et
la fumée et est, par conséquent, idéal pour faire griller ou
rôtir. Il est recommandé de placer la viande sur la grille de
gril/rôtissage (sur le dessus du plat ou de la grille) pour
permettre à l’air chaud de circuler autour d’elle. Cela lui
donne une couleur dorée uniforme et le même résultat
qu’avec une rôtisserie.
De temps en temps, il est possible de n’utiliser que deux
éléments du système. Par exemple, pour rôtir un grosse
dinde, n’utiliser que le plat et la grille pour une plus
grande stabilité.
Le temps de cuisson est le plus rapide avec des plats métalliques allant au four. Les plats allant
au four de couleur foncée ou ceux ayant un fini mat absorbent la chaleur et dorent les aliments,
particulièrement sur la base, plus rapidement que les plats brillants.
Un fini brillant peut mieux convenir pour certains gâteaux et biscuits étant donné qu’il reflète de
la chaleur et offre une surface de cuisson moins intensive.
Avec des plats allant au four de couleur foncée, il peut être nécessaire de réduire la température
du four de 10 °C (25 °F). Il peut être également nécessaire de rallonger le temps de cuisson de
deux minutes.
Les grilles à biscuits ou plats allant au four à surface isolée risquent d’augmenter la longueur du
temps de cuisson.
Utiliser des plats en verre ou céramique pour les aliments ne nécessitant une croûte dorée
foncée (par ex. soufflé ou lasagnes).
à rôtir
Grille
Plat
US CA
FR
Page 56

FR
54
Utilisation du four
US CA
Sélection de mode et de température
Pour sélectionner un mode, tourner le bouton des modes
du four.
Pour sélectionner une température, tourner le bouton de
température dans le sens des aiguilles d’une montre.
Pour les modèles à deux fours, les boutons sur la gauche
sont pour le four du haut et les boutons sur la droite sont
pour le four du bas.
Se reporter à la section « Directives de cuisson » pour connaître les modes et températures
recommandés.
Préchauffage du four
Préchauffer le four lors de l’utilisation des modes de cuisson suivants : AERO PURE, CUISSO AERO,
CUISSO NORMAL, AERO GATEAU et CUISSO GATEAU. Ces modes sont munis d’un préchauffage
rapide : le four chauffera à 175 °C (350 °F) en 10 minutes environ et à 225 °C (425 °F) en 15
minutes environ.
Lorsque le four est en préchauffage, la température sélectionnée s’affiche en alternance avec la
température réelle du four. Lorsque le four atteint la température sélectionné, un signal sonore
se fera entendre et l’affichage de la température passera d’orange à blanc.
Pour augmenter la température du four pendant la cuisson, suivre les étapes suivantes pour
réactiver le préchauffage rapide :
Mettre les boutons des modes et températures du four en position ARRET/OFF.
1
Attendre que l’éclairage de l’affichage s’éteigne.
2
Sélectionner ensuite les nouveaux réglages.
3
Page 57

Utilisation des modes du four
Utilisation du four
55
US CA
FR
Cuisson
Pour obtenir les meilleurs résultats de cuisson, toujours préchauffer le four à la température
recommandée dans la recette.
S’assurer que les moules à gâteaux ne se touchent pas les uns les autres ni ne touchent les parois
du four en les décalant sur les grilles.
Lors de l’utilisation du mode CUISSO NORMAL et de la cuisson sur plus d’une grille (par ex.
gâteaux fourrés), décaler les moules à gâteaux de manière à ce que l’un ne se trouve pas
directement au-dessus de l’autre.
Le mode AERO PURE convient parfaitement à la cuisson sur plusieurs grilles étant donné que la
température à l’intérieur de la cavité est homogène.
Ne pas ouvrir la porte du four jusqu’aux ¾ au moins du temps de cuisson recommandé.
Pour faire cuire des recettes doubles, particulièrement pour les biscuits, il est peut-être
nécessaire d’augmenter le temps de cuisson de deux minutes.
La circulation de l’air des modes à convection (AERO) chauffe et dore les aliments plus
rapidement que les modes sans convection.
Pour convertir des recettes de CUISSO NORMAL à CUISSO AERO, la température du four peut
normalement être diminuée de 10 °C (25 °F) ; le temps de cuisson sera le même. Pour certaines
recettes, il vaut peut-être mieux diminuer le temps de cuisson de plusieurs minutes et ne pas
changer la température du four. Pour les recettes nécessitant des temps de cuisson plus longs
(plus d’une heure par exemple), les meilleurs résultats possibles d’obtiendront en diminuant
légèrement les deux.
Les saveurs et odeurs des aliments ne se transfèreront pas entre les différents aliments cuits avec
les modes à convection. En règle générale, le mode AERO PURE est excellent pour les dindes
et la cuisson d’aliments sur plusieurs grilles ; le mode CUISSO AERO dore bien les plats et est
idéal pour les plats nécessitant moins d’une heure de cuisson ; le mode CUISSO NORMAL est
généralement le mode à sélectionner pour les aliments délicats et ceux qui nécessitent un temps
de cuisson de plus d’une heure.
Important !
Ne pas placer de papier d’alu, de plats ayant des qualités réfléchissantes ou tout autre objet sur la sole
du four et ce, pour éviter toute accumulation de chaleur qui endommagera l’émail vitrifié de façon
permanente.
Page 58

US CA
56
Utilisation du four
FR
Rôtissage
Le mode RÔTIR produira un rôti moelleux et juteux ayant énormément de goût.
Placer la viande sur le système gril/rôtissage sur une grille de manière à ce que le dessus du rôti se
trouve au centre du four ou plus bas.
Les morceaux tendres doivent être cuits à haute température rapidement, tandis que les morceaux
plus coriaces nécessitent une température inférieur pour un temps de cuisson plus long.
Utiliser la sonde thermique pour obtenir les meilleurs résultats possibles – fini l’estimation au jugé de
la cuisson du rôti. Se reporter aux instructions de la section « Utilisation de la sonde thermique ».
Les morceaux de viande épais prennent plus longtemps à cuire que les morceaux minces du même
poids.
Les rôtis désossés, roulés ou farcis prennent plus longtemps à cuire que les rôtis avec os.
La volaille doit toujours être bien cuite avec les jus coulant clairs à une température interne de 75 °C
(170 °F).
Le rôtissage utilise une chaleur sèche. Ne pas ajouter d’eau au rôti et ce, pour éviter un effet de vapeur.
Les légumes sont excellent lorsqu’ils sont cuits en mode RÔTIR. Il est également possible de les placer
autour de la viande sur le système de gril/rôtissage. Faire ceci au milieu de la cuisson d’un grand
morceau de viande qui prend plus longtemps que deux heures pour cuire de manière à ne pas cuire
les légumes de trop. Noter que les légumes seront dorés et cuiront plus lentement si la phase de saisie
initiale a été omise.
En mode RÔTIR, la saisie initiale est chaude pour les sacs à rôtir. Utiliser le mode AERO PURE, CUISSO
AERO ou CUISSO NORMAL pour utiliser les sacs à rôtir ou les sacs à four et suivre les instructions du
fabricant.
Gril
L’utilisation des modes GRIL, MAXI GRIL et AERO GRIL offre une alternative plus saine à la friture. C’est
également une excellente façon de cuire les légumes. Le mode AERO GRIL convient particulièrement
bien aux aliments que l’on cuirait à la poêle, au barbecue ou à la rôtisserie. Toujours griller avec
la porte du four complètement fermée. Noter que les niveaux de puissance sont exprimés en
pourcentage de LO (50 % de puissance) à HI (100 % de puissance) en modes GRIL et MAXI GRIL. Pour
griller, la température est sur HI mais il est possible de diminuer la chaleur pour convenir aux besoins.
Il est recommandé de placer les aliments sur le système gril/rôtissage à trois pièces. En mode GRIL et
MAXI GRIL, les meilleurs résultats possibles peuvent être obtenus en préchauffant le gril pendant cinq
minutes environ avant de commencer la cuisson.
Avec des plats et moules en verre ou en céramique, s’assurer qu’ils peuvent supporter la forte
température du gril.
Pour empêcher les aliments de coller, vaporiser la grille avec un léger film d’aérosol de cuisine anti-
adhésif.
Pour éviter de percer la viande et laisser les jus s’échapper, utiliser une pince ou une spatule pour
retourner la viande à la moitié du temps de cuisson.
Page 59

Utilisation du four
57
Conseils pour déshydrater les fruits
Pour obtenir des fruits déshydratés de haute qualité, sélectionner que des fruits mûrs sans
taches.
Bien laver les fruits et les sécher en tapotant. Les éplucher le cas échéant. Les fruits non épluchés
prendront plus longtemps à se déshydrater. Retirer les noyaux, les queues ou les pépins le cas
échéant. Placer les fruits sur une grille à pâtisserie sur une grille du four.
Il est recommandé d’utiliser le mode AERO PURE ou CUISSO AERO à 50 °C (125 °F).
Conseils pour l’apprêt du pain
Le four offre un milieu fermé idéal pour apprêter le pain.
Préchauffer le four en mode CUISSO NORMAL à 30 °C (100 °F). Lorsque l’on est prêt à faire lever
la pâte, mettre la température sur OFF, en laissant le bouton de modes de four sur CUISSO
NORMAL, et placer la pâte dans un bol couvert sur une grille du four chaud. Le four sera à la
température parfaite pour faire lever la pâte et il est si bien isolé qu’il restera chaud pendant
plusieurs heures.
Remarque : certaines recettes recommandent de mettre de l’eau ou de la glace dans le four
avec le pain durant la cuisson. L’humidité additionnelle améliore la croûte du pain. Il faut placer
de l’eau ou de la glace dans un plat résistant à la chaleur et sur une grille de four en position
1 ou 2. Ne pas le placer directement sur la sole du four. Placer de l’eau, de la glace ou tout plat
directement sur la sole du four endommagera l’émail vitrifié de manière permanente.
US CA
FR
Page 60

US CA
58
Utilisation du four
FR
Utilisation de la sonde thermique
Utiliser la sonde thermique pour juger avec précision le degré de cuisson de la viande. La
sonde peut être utilisée avec les modes AERO PURE, CUISSO AERO, RÔTIR, AERO GRIL et CUISSO
NORMAL.
c
PUSH TO
CLEAR
d
a
Sonde
métallique
b
Fiche
. Mettre les boutons
Sélectionner le mode et la température du four. Préchauffer
1
le four le cas échéant. Ne pas oublier que les modes RÔTIR et
AERO GRIL ne nécessitent pas de préchauffage.
Insérer la sonde thermique métallique horizontalement au
2
centre de la partie la plus épaisse de la viande entièrement
décongelée. Plus la viande est épaisse, plus la cuisson
sera longue, il est donc important que la sonde mesure la
température de la viande à son point le plus épais. S’assurer
que la sonde ne touche pas d’os (mettre la sonde à une
distance de 1,5 cm de l’os), de graisse ou de cartilage, car
ceux-ci chaufferont plus rapidement que la viande maigre.
Placer la viande sur le système de gril/rôtissage.
3
Lorsque le four a été préchauffé (le cas échéant) à la température
4
de réglage, placer le système de gril/rôtissage dans le four et insérer la fiche de la sonde dans
la prise à cet effet, à l’aide d’un gant isolant si le four est chaud. La prise de sonde se trouve sur
la gauche du four, juste sous la grille en position 7. S’assurer que la sonde est complètement
enfoncée dans la prise, puis fermer la porte du four.
Pour les modèles à deux fours, sélectionner le four du haut ou du bas à l’aide du bouton de
5
sélection des fours.
Appuyer sur le bouton PROBE sur le tableau de commande. La température préréglée de 65 °C
6
(150 °F) et le symbole PROBE s’allumeront dans l’affichage. Pour sélectionner une température de
cuisson interne différente de la température programmée, faire tourner le bouton
pendant que le symbole
PROBE clignote. Pour connaître les directives de température, se reporter
à la section « Directives de cuisson ».
Durant la cuisson, l’affichage indiquera la température interne réelle de la viande. Pour voir la
7
température interne programmée, appuyer sur le bouton
Le four émettra des bips et d’éteindra automatiquement lors la viande atteint la température
8
PROBE.
interne programmée. Les affichages de la température et de modes du four demeureront
allumés et la lampe du four s’éteindra.
Remettre le four en mode manuel en appuyant sur le bouton
9
des modes et températures du four en position ARRET/OFF.
a
PUSH TO
CLEAR
c
Poignée
d
Câble
b
c
Pour annuler le réglage de la sonde avant obtention de la température programmée, appuyer sur
le bouton
PROBE et ensuite sur le bouton
PUSH TO
CLEAR
.
Page 61

Utilisation du four
Conseils quant à l’utilisation de la sonde thermique
La sonde thermique peut être utilisée avec les fonctions de cuisson automatiques. Si la viande
atteint la température programmée avec l’heure d’arrêt, la sonde éteindra le four.
Étant donné que la température interne de la viande continuera à monter de 2 à 8 °C (5 à 15 °F)
après l’avoir retirée du four, il faut donc en tenir compte dans les calculs. La recouvrir de papier
d’alu et la laisser reposer entre 15 et 20 minutes.
Important !
Utiliser uniquement la sonde thermique livrée avec le four. On peut se procurer une sonde
thermique chez un revendeur DCS ou la faire remplacer au titre de la garantie dans un centre de
service autorisé DCS.
Tenir la sonde par la poignée lorsqu’on l’insère dans ou la retire des aliments et de la prise de la
sonde thermique.
Ne pas oublier de retirer la sonde thermique du four avant de commencer un cycle
d’autonettoyage.
Ne pas entreposer la sonde dans le four.
N’utiliser la sonde qu’avec des aliments entièrement décongelés.
Laver la sonde thermique dans une solution d’eau savonneuse. La sonde NE VA PAS au lave-
vaisselle.
59
US CA
FR
Page 62

US CA
60
Utilisation du four
FR
Cuisson automatique
La cuisson à durée automatique (démarrage retardé) allumera et éteindra le four en fonction des
périodes que l’on a programmées.
Pour régler la cuisson à durée automatique
Vérifier que l’horloge affiche la bonne heure.
1
Dans les modèles à deux fours, il est important de sélectionner le four du haut ou le four du bas.
2
Sélectionner le mode et la température du four.
3
Décider de la durée de la cuisson des aliments en prévoyant, le cas échéant, le temps de
4
préchauffage.
Appuyer sur le bouton COOK TIME et faire tourner le bouton
5
période. Il n’est pas nécessaire d’établir une heure de départ.
Appuyer sur le bouton STOP TIME et faire tourner le bouton
6
l’heure à laquelle le four cessera la cuisson.
Remarque : il faut fixer cette heure d’arrêt en moins de huit secondes, à défaut de quoi les
réglages du temps de cuisson seront automatiquement adoptés. Pour annuler les réglages du
temps de cuisson, tourner les boutons de modes et de températures du four en position ARRET/
OFF, tel que décrit dans la section « Annuler la cuisson automatique ».
PUSH TO
pour sélectionner cette
CLEAR
PUSH TO
pour sélectionner
CLEAR
Lorsque la cuisson automatique est programmée
Les boutons de modes et de températures du four fonctionneront toujours (comme pendant
le fonctionnement manuel). Il est possible de les modifier avant ou pendant la cuisson et il est
possible d’éteindre le four manuellement avant que le temps de cuisson programmé ne se soit
écoulé.
Avant le début de la cuisson, l’affichage de l’horloge indiquera DELAY, AUTO et l’heure actuelle.
Les affichages de modes et de températures du four baisseront d’intensité et la lampe du four
s’éteindra.
Pendant la cuisson, l’affichage de l’horloge indiquera AUTO, COOK TIME et le temps de cuisson
restant. Les affichages de modes et de températures du four s’illumineront et la lampe du four
s’allumera.
Lorsque la cuisson automatique est terminée
Lorsque la cuisson est terminée, le four émettra des bips et s’éteindra. Les affichages de modes
et de températures du four baisseront d’intensité et la lampe du four s’éteindra. L’affichage de
l’horloge fera clignoter COOK TIME et AUTO.
Mettre les boutons des modes et températures du four en position ARRET/OFF. La lampe
du four restera allumée pendant huit secondes puis s’éteindra lorsque le four retourne au
fonctionnement manuel.
Page 63

Utilisation du four
Cuisson à arrêt automatique
Il est possible de régler le four à l’option cuisson à arrêt automatique à tout moment pendant la
cuisson ou au moment d’allumer le four.
Pour régler la cuisson à arrêt automatique
Vérifier que l’horloge affiche la bonne heure.
1
Dans les modèles à deux fours, il est important de sélectionner le four du haut ou le four du bas.
2
Sélectionner le mode et la température du four.
3
Appuyer sur le bouton STOP TIME et faire tourner le bouton
4
l’heure à laquelle cessera la cuisson.
Lorsque la cuisson à arrêt automatique est programmée
Pendant la cuisson, l’affichage de l’horloge indiquera AUTO, COOK TIME et le temps de cuisson
restant. Les affichages de modes et de températures du four s’illumineront et la lampe du four
s’allumera.
Lorsque la cuisson à arrêt automatique est terminée
Lorsque le temps de cuisson est terminé, le four émettra des bips et s’éteindra. Les affichages de
modes du four et de température baisseront d’intensité et la lampe du four s’éteindra. L’affichage
de l’horloge fera clignoter COOK TIME et AUTO.
Mettre les boutons des modes et températures du four en position ARRET/OFF. La lampe
du four restera allumée pendant huit secondes puis s’éteindra lorsque le four retourne au
fonctionnement manuel.
PUSH TO
pour sélectionner
CLEAR
61
US CA
FR
Annuler la cuisson automatique
Pour annuler la cuisson à durée automatique et à arrêt automatique, faire tourner les boutons de
modes et de températures du four en position ARRET/OFF. Au bout de huit secondes, l’affichage
d’horloge reviendra à l’heure actuelle et le four reviendra au fonctionnement manuel.
Important!
Éviter des aliments qui s’abîmeront avant que le cycle de cuisson commence. Les aliments
traditionnels à éviter comprennent ceux contenant des œufs et des produits laitiers, les potages
veloutés, les viandes cuites ou crues, la volaille et le poisson.
Si la cuisson ne commence pas immédiatement, ne placer dans le four que des aliments très froids
ou congelés. La plupart des aliments non congelés ne doivent jamais rester plus de deux heures
dans le four avant que la cuisson ne commence.
Ne pas laisser les aliments rester dans le four pendant plus d’une heure après la fin de cuisson.
La cuisson automatique ne convient pas aux aliments nécessitant d’être cuits dans un four
préchauffé (par ex. des produits de boulangerie et de pâtisserie délicats).
Page 64

US CA
62
Directives de cuisson
FR
Les recommandations figurant les tables suivantes ne sont que des directives. Plusieurs facteurs
affectent le temps et la température exacts requis pour cuire au four, rôtir et griller. Suivre les
instructions de la recette ou de l’emballage et être prêt à ajuter les réglages du four et les temps
de cuisson pour obtenir les meilleurs résultats possibles.
Cette table permet de faire correspondre les exigences de cuisson au mode de cuisson le plus
approprié. Remarque :
Méthode recommandée Autre méthode
AERO PURE
CUISSO AERO
CUISSO
NORMAL
AERO GATEAU
Cuisson
Pain (petits pains)
une grille
deux grilles
Pain
Biscuits/Muffins/ biscuits au sucre
Petites génoises individuelles/ petits
gâteaux
Gâteau fourré (moules ronds de
8"/20cm ou 9"/23cm)
Angel food cake (gâteau des anges)
une grille
deux grilles
une grille
deux grilles
une grille
deux grilles
Quatre-quarts
Gâteau fourré (moule de 9” x 13”/23x33cm)
Gâteau au beurre ou au chocolat
Cake riche
Brownie (moule de 9” x 13”/23x33cm)
Meringues
Tarte aux fruits (deux croûtes)
Tarte à la citrouille
à partir de zéro
congelé
Tarte à la crème anglaise
Cheese-cake au four
Crème caramel et crème brûlée (au «
bain-marie »)
Croûte de tarte
Quiche
Pizza
Lasagnes
Ragoût au four
Légumes
Plat entièrement cuit au four
CUISSO GATEAU
RÔTIR
GRIL
MAXI GRIL
AERO GRIL
Page 65

Directives de cuisson
Cette table permet de faire correspondre les exigences de cuisson au mode de cuisson le plus
approprié. Remarque :
Rôtissage
Rôti de bœuf/porc/agneau
Poulet rôti (entier)
Poulet rôti (morceaux)
Dinde rôtie
Légumes
Gril
Steak/Côtelettes/Escalopes
Poisson
Steak haché
Légumes
Toast
Méthode recommandée Autre méthode
AERO PURE
CUISSO AERO
CUISSO
NORMAL
AERO GATEAU
CUISSO GATEAU
RÔTIR
GRIL
63
MAXI GRIL
US CA
FR
AERO GRIL
Page 66

US CA
64
Directives de cuisson
FR
Grille
(simple ;
AERO PURE
multiple) Temp °F Temp °C
Cuisson
Pain
Pain
Pain de mie – moule à
pain de 9”x5” /23x13cm
Pain complet - moule à
pain de 9” x 5”/23x13cm
3 350 175 40-50
3 375 190 35-45
Pain de maïs 4 425 215 22-28
Biscuits 4 425-450 215-230 10-12
Muffins, larges 3 375 175 23-30
Scones 4 425-450 215-230 10-12
Biscuits au sucre
une grille
deux grilles
trois grilles
4 375 175 6-10
2 et 6 375 175 7-11
2, 4 et 6 375 175 8-12
Petites génoises
individuelles/petits
4 365 185 13-18
gâteaux
Gâteaux fourrés,
jaunes, blancs et
chocolat (moules
ronds de 8”/20cm)
Gâteau fourré,
jaune, blanc et
chocolat (moules
ronds de 9”/23cm)
une grille
deux grilles
une grille
deux grilles
4 340-350 170-175 32-38
4 et 6 340-350 170-175 32-38
4 340-350 170-175 27-33
4 et 6 340-350 170-175 27-33
Gâteau fourré,
jaune, blanc et
chocolat (moule de
4 340-350 170-175 32-38
9” x 13"/23x33cm)
Gâteau de Savoie
sans matières
4 350 175 30-40
grasses
Quatre-quarts
Brownie (moule de
8” x 8"/20x20cm)
Angel food
à partir de zéro
préparation pour gâteau
à partir de zéro
à partir de zéro
2 325 160 70-80
2 350 175 48-58
4 350 175 20-25
1 325-350 160-175 50-60
cake (moule à
cheminée de 10” x
préparation pour gâteau
1 350 175 37-47
4”/25x10cm)
Meringues 4 250-270 120-130 60-70
Tarte aux fruits
(deux croûtes)
Pizza
à partir de zéro
congelé
à partir de zéro
congelé
2
425 puis
375
2 375 190 45-65
4 425-450 215-230 10-15
4 375 175 18-25
215 puis
190
Lasagnes 4 350-375 175-190 40-50
Ragoût au four 3 350-360 175-180 60-90
Légumes 4 350-375 175-190 30-60
Temps
(minutes)
20 puis 25
Page 67

Directives de cuisson
Grille
(simple ;
CUISSO AERO
multiple) Temp °F Temp °C
Cuisson
Pain
Pain
Pain de mie – moule à
pain de 9”x5” /23x13cm
Pain complet - moule à
pain de 9”x5” /23x13cm
2 325-350 170-175 35-50
2 ou 3 350-375 180-190 30-45
Pain de maïs 4 400-425 210-215 20-25
Biscuits 4 400-425 210-215 8-10
Muffins, larges 3 375 175 20-25
Scones 4 400-425 210-215 8-12
Biscuits au sucre 4 375 175 6-10
Petites génoises
individuelles/petits
4 365 185 13-18
gâteaux
Gâteaux fourrés,
jaunes, blancs et
chocolat (moules
ronds de 8”/20cm)
Gâteau fourré,
jaune, blanc et
chocolat (moules
ronds de 9”/23cm)
une grille
deux grilles
une grille
deux grilles
4 340 170 32-38
4 et 6 340 170 32-38
4 340 170 27-33
4 et 6 340 170 27-33
Gâteau fourré,
jaune, blanc et
chocolat (moule de
4 340 170 32-38
9” x 13"/23x33cm)
Gâteau de Savoie
sans matières
4 325-350 160-175 30-40
grasses
Quatre-quarts
Brownie (moule de
8” x 8"/20x20cm)
à partir de zéro
préparation pour gâteau
2 325 160 60-75
2 325-350 160-175 48-58
4 325-350 160-175 20-25
Meringues 2 250 120 60
Tarte aux fruits
(deux croûtes)
Pizza
à partir de zéro
congelé
à partir de zéro
congelé
2
400 puis
350
2 350 175 45-65
4 425 215 10-12
4 375 175 18-20
200 puis
175
Lasagnes 4 350-375 175-190 35-40
Ragoût au four 3 350 175 60-90
Légumes 3 ou 4 350-375 175-190 30-50
Temps
(minutes)
20 puis 25
65
US CA
FR
Page 68

US CA
66
Directives de cuisson
FR
Grille
(simple ;
CUISSO NORMAL
multiple) Temp °F Temp °C
Cuisson
Pain
Pain
Pain de mie – moule à
pain de 9” x 5” /23x13cm
Pain complet - moule à
pain de 9” x 5” /23x13cm
2 ou 3 350 175 40-50
2 ou 3 375 190 35-45
Pain de maïs 4 425 215 22-28
Biscuits 4 425-450 215-230 10-12
Muffins, larges 3 375 175 23-30
Scones 4 425-450 215-230 10-12
Biscuits au sucre 4 375 175 6-10
Petites génoises
individuelles/petits
4 365 185 15-20
gâteaux
Gâteaux fourrés,
jaunes, blancs et
chocolat (moules
ronds de 8”/20cm)
Gâteau fourré,
jaune, blanc et
chocolat (moules
ronds de 9”/23cm)
une grille
deux grilles
une grille
deux grilles
4 340-350 170-175 32-38
4 et 6 340-350 170-175 32-38
4 340-350 170-175 27-33
4 et 6 340-350 170-175 27-33
Gâteau fourré,
jaune, blanc et
chocolat (moule de
4 340-350 170-175 32-38
9” x 13"/23x33cm)
Gâteau de Savoie
sans matière grasse
Quatre-quarts
à partir de zéro
préparation pour gâteau
4 350 175 30-40
2 325 160 70-80
2 350 175 48-58
Cake riche 4 275-300 135-150 3-6 hrs
Brownie (moule de
8” x 8"/20x20cm)
Angel food
à partir de zéro
à partir de zéro
4 350 175 20-25
1 325-350 160-175 50-60
cake (moule à
cheminée de 10” x
préparation pour gâteau
1 325-350 160-175 37-47
4”/25x10cm)
Meringues 2 250-270 120-130 60-70
Tarte aux fruits
(deux croûtes)
Pizza
à partir de zéro
congelé
à partir de zéro
congelé
2
425 puis
375
2 375 190 45-65
4 425-450 215-230 10-15
4 375 175 18-25
215 puis
190
Lasagnes 3 ou 4 350-375 175-190 40-50
Ragoût au four 3 350-360 175-180 60-90
Légumes 3 ou 4 350-375 175-190 30-60
Temps
(minutes)
20 puis 25
Page 69

Directives de cuisson
67
US CA
FR
Temps
AERO GATEAU
Grille Temp °F Temp °C
(minutes)
Cuisson
Fond de tarte
Tarte à la citrouille
Tarte à la crème
anglaise
Cheese-cake au four
Quiche
Pizza
Crème caramel
Crème brûlée
cuite « à blanc »
faire cuire le fond de
tarte « à blanc » puis
ajouter la garniture
faire cuire le fond de
tarte « à blanc » puis
ajouter la garniture
(au « bain-marie »)
faire cuire le fond de
tarte « à blanc » puis
ajouter la garniture
à partir de zéro
congelé
(au « bain-marie »)
(au « bain-marie »)
4 350 175 20-30
4 puis 2
4
350 puis
375
350 puis
275
175 puis
190
175 puis
135
20-30 puis
30-35
20-30 puis
25-35
3 300 150 55-60
4 350 175
20-30 puis
20-30
4 425 215 10-15
4 350 175 18-25
3 350 175 35-40
3 275 135 40-45
Temps
CUISSO GATEAU
Grille Temp °F Temp °C
(minutes)
Cuisson
Croûte de tarte
Tarte à la crème
anglaise
Cheese-cake au four
Quiche
Crème caramel
Crème brûlée
cuite « à blanc »
faire cuire le fond de
tarte « à blanc » puis
ajouter la garniture
(au « bain-marie »)
faire cuire le fond de
tarte « à blanc » puis
ajouter la garniture
(au « bain-marie »)
(au « bain-marie »)
4 375 190 20-30
4
375 puis
300
190 puis
150
20-30 puis
25-35
3 325 160 55-60
4 375 190
20-30 puis
30-35
3 350 175 35-40
3 275 135 40-45
Cake riche 4 275-300 135-150 3-6 heures
Page 70

US CA
FR
68
Directives de cuisson
Bœuf
Steaks - saignants 7 HI 8-10
Steaks – à point 6 ou 7 HI 10-15
Hamburgers – steaks hachés 6 ou 7 HI 12-15
Agneau
Côtelettes – à point 7 HI 15-20
Côtelettes – bien cuites 7 HI 20-25
Porc
Côtelettes – bien
cuites
Rouelle de jambon 6 ou 7 HI 15-20
Bacon 7 HI 4-7
Saucisses
Saucisses 6 ou 7 HI 10-15
Poisson
Filets 6 ou 7 HI 8-12
Entiers 6 ou 7 HI 15-20
MAXI GRIL et GRIL
Grille Réglage grill Temps (minutes)
7 HI 15-20
Page 71

Directives de cuisson
69
US CA
FR
AERO GRIL
Bœuf
saignant
Rôti désossé 450 à
1 800 g (1-4 lb)
Agneau
Côtelettes – à point 6 ou 7 400-440 200-225 15-20
Côtelettes – bien
cuites
Carré – à point 5 400-410 200-210 20-30
Porc
Côtelettes – bien
cuites
Poulet
Entier 3 340-360 170-180
Morceaux désossés 5 350-375 175-190 30-50
Morceaux avec os 5 350-375 175-190 30-50
Poisson
Filets 6 ou 7 400-425 200-220 8-12
Entier 6 ou 7 400-425 200-220 15-20
à point
bien cuit
Grille Temp °F Temp °C
4 325 160
4 325 160
4 325 160
6 ou 7 400-440 200-225 20-25
6 ou 7 375-410 190-210 20-25
Temps
(minutes)
18-32 par livre/
450g
25-40 par livre/
450g
30-55 par livre/
450g
30-35 par livre/
450g
Page 72

US CA
FR
70
Directives de cuisson
Meilleur
mode
Temps
(minutes par
lb)(450 g)
Temp °C
de sonde
Temp °F de
sonde
Temp °C
du four
Temp °F
du four
Grille
Rôtissage de viande
Il est recommandé d’utiliser la sonde thermique pour juger de manière exacte la cuisson de viande préférée. Le « temps de
cuisson par lb/450 g » est approximatif et ne doit être utilisé que pour estimer le moment où la viande sera prête. La cuisson
avec les modes RÔTIR, AERO PURE, CUISSO AERO et AERO GRIL prendra moins de temps qu’avec le mode CUISSO NORMAL.
Bœuf
3 325 160 170-175 77-79 25-45 RÔTIR
Rôti désossé - saignant 3 325 160 130-140 54-60 18-32 RÔTIR
Rôti désossé – à point 3 325 160 150-160 65-70 25-40 RÔTIR
Rôti désossé – bien cuit 3 325 160 165-175 74-79 30-55 RÔTIR
Côte de bœuf – saignante 3 325 160 130-140 54-60 15-30 RÔTIR
Côte de bœuf – à point 3 325 160 150-160 65-70 20-35 RÔTIR
Côte de bœuf – bien cuite 3 325 160 165-175 74-79 25-40 RÔTIR
Gigot d'agneau
Avec os – à point 3 325 160 150-160 65-70 18-28 RÔTIR
Avec os – bien cuit 3 325 160 165-175 74-79 20-33 RÔTIR
Désossé – à point 3 325 160 150-160 65-70 20-35 RÔTIR
3 325 160 150-160 65-70 20-43 RÔTIR
Désossé – bien cuit
Veau
À point
Bien cuit 3 325 160 170-175 77-79 25-45 RÔTIR
Poulet
Entier 3 350-375 175-190 170 75 15-20 AERO PURE
Page 73

Directives de cuisson
71
US CA
FR
Meilleur
mode
Temps
(minutes par
lb)(450 g)
Temp °C
de sonde
Temp °F de
sonde
Temp °C
du four
Temp °F
du four
Grille
2 325 160 170 75 12-15 AERO PURE
1 325 160 170 75 10-15 AERO PURE
AERO PURE
15-20
CUISSO AERO
7½ par
1”/2,5 cm
d’épaisseur
9 par 1”/2,5
CUISSO AERO
cm d’épaisseur
Dinde
8-15 lb/~3.5-7 kg – sans farce
8-15 lb/~3.5-7 kg – avec farce 2 325 160 170 75 15-20 AERO PURE
16-24 lb/~7-10 kg – sans farce
16-24 lb/~7-10 kg – avec farce 1 325 160 170 75
Porc
Rôti désossé 3 325 160 160-175 71-79 30-45 CUISSO AERO
Venaison*
Saignante 4 425 225 120-130 49-54
Mi-saignante 4 425 225 130-140 54-60
*Saisir dans une poêle graissée à forte température avant de faire rôtir. La température interne de la venaison grimpe normalement plus haut
vue la haute température de cuisson, par conséquent les réglages de la sonde recommandés sont plus bas que pour les autres viandes de
cuisson saignante ou mi-saignante.
Page 74

US CA
72
Entretien et nettoyage
FR
Pour retirer et remettre en place les grilles coulissantes et les supports latéraux
Pour retirer une grille coulissante, la saisir par ses deux coins avant (en veillant à saisir la grille métallique
1
et le châssis coulissant ensemble), la soulever et la sortir du four.
Pour retirer les supports latéraux, enfoncer délicatement le fil de retenue du dessous du goujon de
2
verrouillage, puis basculer le chant le plus bas du support latéral vers le haut et l’extérieur vers le centre du
four jusqu’à ce que le support soit pratiquement horizontal. Les broches sur le dessus sortiront en glissant
des fentes de montage.
Pour remettre en place les supports latéraux, les tenir
3
pratiquement à l’horizontale et repérer les broches dans les
petites fentes de montage sur le haut de la cavité du four. Ce
faisant, supporter le support de la main par en dessous, pour
s’assurer que les deux broches sont parfaitement installées
dans les fentes de montage.
Abaisser soigneusement les supports latéraux et placer
4
délicatement le fil de retenue sous le goujon de verrouillage.
Fentes de montage
Important !
Ne pas abaisser les supports latéraux jusqu’à ce que les
broches soient complètement
Goujon de
verrouillage
Fil de retenue
insérées dans les fentes de manière à ne pas ébrécher
l’émail vitrifié.
Nettoyage et entretien manuels
Important !
Ne pas utiliser de produits de nettoyage durs/abrasifs, de cires, de tampons à récurer, de racloirs
métalliques coupants, d’encaustique ou de produits à nettoyer les fours commerciaux, pour ne pas
endommager les surfaces de manière permanente.
Si on choisit d’utiliser un nettoyant pour acier inoxydable, lire attentivement l’étiquette afin
de s’assurer qu’il ne contient pas de composés de chlore. Ces derniers sont corrosifs et risquent
d’endommager l’aspect du four. Nettoyer les surfaces en acier inoxydable dans le même sens que le
grain, d’un mouvement horizontal.
Ne pas nettoyer ni utiliser de produits à nettoyer les fours sur le joint d’étanchéité de porte ni les joints
d’étanchéité (joints). Ne pas frotter, endommager ou déplacer les joints car ils sont essentiels au
maintien de l’étanchéité du four et à son bon fonctionnement.
Nettoyage du tableau de commande et des surfaces en acier inoxydable
Il est peut-être utile de verrouiller les commandes du four avant le nettoyage – se reporter à la section «
Verrouillage du tableau de commande » dans la section « Paramètres de préférence de l’utilisateur » pour
de plus amples détails.
Essuyer avec un chiffon humide propre et sécher avec un chiffon non pelucheux.
Afin de diminuer les marques telles que les traces de doigts, utiliser un produit de nettoyage pour acier
inoxydable périodiquement.
Ne pas utiliser de tampons à récurer ou d’autres produits de nettoyage abrasifs et ce, pour éviter
d’endommager la surface de manière permanente.
Nettoyage de la surface extérieure de la porte en verre
Utiliser une solution douce de détergent et d’eau chaude ; utiliser un produit de nettoyage pour vitres afin
d’éliminer les taches et les traces de doigts.
Sécher avec un chiffon doux non pelucheux.
Ne pas utiliser de racloir métallique coupant pour nettoyer le hublot de la porte du four.
Remarque : l’intérieur du hublot de la porte du four sera nettoyé pendant un cycle d’autonettoyage.
Page 75

Entretien et nettoyage
Nettoyage des surfaces en émail vitrifié
Le revêtement de l’intérieur du four et la porte interne sont en émail vitrifié et se nettoient
pendant le cycle d’autonettoyage.
Nettoyage des grilles coulissantes
Important !
Ne jamais laisser les grilles coulissantes dans le four lorsqu’un cycle d’autonettoyage est effectué. Dans ce
cas, le fonctionnement des coulisses pourrait être compromis. S’il est nécessaire de lubrifier les coulisses,
appliquer une mince couche d’huile à cuisson à l’aide d’un essuie-tout.
Appliquer un produit de nettoyage pour chrome à l’aide d’une éponge ou d’un chiffon
humides en suivant le mode d’emploi du fabricant. Essuyer et sécher. Pour les taches d’aliments
incrustées, utiliser un tampon non métallique rempli de savon et humide, essuyer et sécher.
Ne pas laver les grilles coulissantes au lave-vaisselle. Ne pas les immerger dans de l’eau
savonneuse ni utiliser de produits pour nettoyer les fours. Retirer la graisse lubrifiante
blanche réduira la longueur de vie des coulisses de grilles et les empêchera de fonctionner
uniformément.
Nettoyage du système de gril/rôtissage et des supports latéraux
Les nettoyer à l’aide d’une solution de détergent et d’eau très chaude. Ils peuvent également
être lavés au lave-vaisselle.
Remplacement des ampoules de lampes du four
Le four est éclairé par trois ampoules halogènes de 12 V/20 W. Ces dernières ont une très
longue durée de vie; cependant, s’il est nécessaire d’en remplacer une, utiliser uniquement une
ampoule de rechange disponible chez le revendeur DCS de votre région puis observer les étapes
suivantes :
Laisser le four se refroidir complètement, puis
1
l’éteindre au niveau du mur.
Sortir les grilles et les supports latéraux (se
2
reporter à la section « Pour retirer et remettre
en place les grilles coulissantes et les supports
latéraux ») et utiliser un petit tournevis à lame
plate pour tordre et relever le clip de retenue
au-dessus du couvercle en verre de la lampe
tout en le maintenant pour l’empêcher de
tomber. Le clip pivote dans le sens contraire des
aiguilles d’une montre (voir le schéma).
Soulever soigneusement la couvercle en verre
3
pour le sortir de son support inférieur et retirer
l’ampoule défectueuse.
En tenant l’ampoule de remplacement dans un
4
chiffon doux ou un mouchoir en papier (tout
contact de l’ampoule avec les doigts diminuera sa longueur de vie), l’insérer à sa place.
Remettre le couvercle en verre en place et retordre le clip supérieur à sa place. La procédure est
5
la même pour la lampe du haut de la cavité du four.
Remarque: le remplacement des ampoules du four n’est pas couvert par votre garantie.
Clip de retenue
Douilles de
chevilles
Couvercle en verre
poli
Goupilles
Ampoule de
remplacement
73
US CA
FR
Page 76

FR
74
Entretien et nettoyage
US CA
Mode AUTO NETTOY
Un cycle d’autonettoyage prend en général trois heures environ. Ce temps peut être réduit à
deux heures ou même entre deux et trois heures.
Dans un double four, seul un des fours peut être en mode autonettoyant à la fois.
Lorsqu’un des fours est en cycle d’autonettoyage, l’autre four ne peut pas être utilisé.
Important !
Ne pas utiliser le four pour nettoyer d’autres pièces.
Ne pas utiliser de produits à nettoyer les fours. Ne pas utiliser de produit à nettoyer les fours
commercial, revêtement de four ou revêtement de protection quelconque, dans et autour les
parties du four.
Pendant un cycle d’autonettoyage, le four atteint des températures supérieures aux températures
utilisées pour la cuisson. Dans de telles conditions, les surfaces risquent de devenir plus chaudes
que d’habitude et les enfants doivent être tenus à distance.
Utilisation du mode AUTO NETTOY
Retirer du four les grilles, les supports latéraux (se reporter à la section « Pour retirer et remettre
1
en place les grilles coulissantes et les supports latéraux ») ainsi que tous les autres plats et
ustensiles avant le commencer le cycle AUTO NETTOY. S’ils sont laissés dans le four, ils seront
décolorés de manière permanente. Les grilles coulissantes du four risquent également de se
raidir.
Essuyer tout renversement d’aliments ou de dépôts de graisse importants et ce, pour éviter
2
de décolorer de manière permanence l’émail vitrifié. Cela, néanmoins, n’affectera pas la
performance du four.
Sélectionner le mode AUTO NETTOY en tournant le bouton de modes du four.
3
Sélectionner la température maximale à l’aide du bouton de réglage. s’affichera et celui-ci
4
passera à
l’affichage d’horloge et le temps restant commencera un compte à rebours.
lorsque le cycle commence. Les symboles DOOR LOCK et CLEAN apparaîtront sur
Par mesure de sécurité, le verrou de la porte est automatiquement activé dès que le mode AUTO
NETTOY et la température sont sélectionnés.
À la fin du cycle d’autonettoyage, la porte se déverrouillera et le symbole DOOR LOCK
5
disparaîtra. Les symboles CLEAN et 0:00 clignoteront dans l’affichage d’horloge et FIN NETTOY
apparaîtra dans l’affichage de modes du four jusqu’à ce que le four revienne au fonctionnement
manuel – pour ce faire, mettre les boutons de modes du four et de température en position
ARRET/OFF.
Pendant le cycle AUTO NETTOY, les taches seront réduites à une petite quantité de cendres
6
grises. Lorsque le four est froid, retirer les cendres avec une petite brosse ou un chiffon sec.
Ensuite, essuyer le four avec un chiffon humide propre et sécher avec un chiffon non pelucheux.
Remettre les supports latéraux et les grilles coulissantes en place (se reporter à la section « Pour
7
retirer et remettre en place les grilles coulissantes et les supports latéraux »).
Page 77

Entretien et nettoyage
Pour annuler le mode AUTO NETTOY avant le nettoyage soit terminé
Mettre les boutons des modes et températures du four en position ARRET/OFF. La mention
REFROIPOSNET apparaîtra sur l’affichage des modes du four et la porte restera verrouillée jusqu’à
ce que la mention FIN NETTOY s’affiche.
Important !
Ne pas éteindre l’alimentation de secteur du four. Les ventilateurs sont essentiels au refroidissement du
four.
Une fois que le four est refroidi ou en dessous de la température sûre, il reviendra à son fonctionnement
normal et l’affichage de l’horloge indiquera l’heure actuelle.
Cycle d’autonettoyage court
Il est possible de sélectionner un cycle d’autonettoyage plus court si le four n’est que légèrement
encrassé :
Sélectionner le mode AUTO NETTOY en tournant le bouton de modes du four.
1
Tourner le bouton de température à sa position maximale. apparaîtra dans l’affichage.
2
Pendant que est affiché, appuyer sur le bouton COOK TIME. Les symboles COOK TIME et
3
AUTO ainsi que les deux-points clignoteront.
Tourner le bouton
4
Appuyer à nouveau sur le bouton COOK TIME ou attendre huit secondes pour adopter ce réglage
5
et commencer le cycle d’autonettoyage. L’affichage de l’horloge indiquera le temps restant.
PUSH TO
pour réduire le temps, lequel peut être de deux à trois heures.
CLEAR
75
US CA
FR
Autonettoyage – début retardé
Le four peut être réglé pour commencer un cycle d’autonettoyage à une heure qui convient :
Vérifier que l’horloge affiche la bonne heure.
1
Sélectionner le mode AUTO NETTOY en tournant le bouton de modes du four.
2
Tourner le bouton de température à sa position maximale. apparaîtra dans l’affichage.
3
Pendant que est affiché, appuyer sur le bouton STOP TIME . Les symboles STOP TIME et
4
AUTO ainsi que les deux-points clignoteront.
Sélectionner l’heure à laquelle le four cessera de chauffer en faisant tourner le bouton
5
. S’il reste du temps avant le début du cycle d’autonettoyage, les symboles AUTO et DELAY
PUSH TO
CLEAR
CLEAN apparaîtront sur l’affichage de l’horloge.
Au début du cycle d’autonettoyage, les symboles AUTO, DOOR LOCK et CLEAN s’afficheront et le
6
temps restant commencera un compte à rebours.
Page 78

US CA
76
Paramètres de préférence de l’utilisateur
FR
Mode SELECT UTILIS
Le mode SELECT UTILIS permet de configurer certains des paramètres affichés sur le tableau de
commande du four.
Comment passer au mode SELECT UTILIS
S’assurer que les boutons de modes du four et de température sont à l’arrêt, qu’aucun
1
programme automatique ne fonctionne et l’horloge affiche la bonne heure.
Appuyer sur les boutons TIMER et CLOCK et les maintenir tous deux enfoncés jusqu’à ce que four
2
émette des bips (environ deux secondes). L’affichage de modes de four affichera SELECT UTILIS.
Utilisation du mode SABBAT
Ce mode est conçu pour les religions respectant un devoir de « ne pas travailler » le jour du
sabbat.
Lorsque le four est en mode SABBAT
Les affichages d’horloge, de température et de modes de four sont désactivés.
Aucun signal sonore ne sera émis.
Aucun message d’erreur ou changement de température ne s’affichera, cependant la
température peut être ajustée.
Si on règle le mode SABBAT lorsque la porte du four est ouverte, les lampes du four resteront
allumées tandis que le four est en mode SABBAT. Si on règle le mode SABBAT lorsque la porte du
four est fermée, les lampes du four resteront éteintes tandis que le four est en mode SABBAT.
CUISSO NORMAL est le seul mode de four disponible en mode SABBAT.
Comment régler le mode SABBAT
Entrer en mode SELECT UTILIS et tourner le bouton de modes du four dans le sens des aiguilles
1
d’une montre jusqu’à ce que MODE SABBAT s’affiche.
Sélectionner la durée pendant laquelle on souhaite rester en MODE SABBAT en tournant le
2
bouton
PUSH TO
. Le maximum est de 99 heures par tranches d’une heure affichées dans
CLEAR
l’affichage de l’horloge.
Sélectionner une température.
3
Pour lancer le mode SABBAT, appuyer sur le bouton
4
PUSH TO
. L’affichage du mode de
CLEAR
four affichera MODE SABBAT sans rétro-éclairage. L’affichage de température indiquera --- ; les
températures peuvent être ajustées mais l’affichage ne changera pas.
Dans les modèles à double four, il est possible de sélectionner des températures différentes
5
pour le four du haut et le four du bas à l’aide de leurs boutons de température. Pour activer le
four du bas, néanmoins, il faut également tourner son bouton de modes de four d’une position
dans le sens des aiguilles d’une montre (l’affichage de mode ne changera pas).
Conseil quant à l’utilisation du mode SABBAT
Le four peut être éteint à n’importe quel moment pendant le mode SABBAT en tournant les
boutons de modes et de température du four en position ARRET/OFF mais le four ne reviendra
pas au fonctionnement normal tant que la durée programmée ne s’est pas écoulée.
Il est possible de quitter le MODE SABBAT à n’importe quel moment en appuyant sur le bouton
PUSH TO
CLEAR
et en le maintenant enfoncé pendant cinq secondes.
Page 79

Paramètres de préférence de l’utilisateur
Comment changer l’échelle de température
Entrer en mode SELECT UTILIS et tourner le bouton de modes du four dans le sens des aiguilles
1
d’une montre jusqu’à ce que UNITE TEMP s’affiche.
Appuyer sur
2
C convertira les chiffres indiqués dans l’affichage de température en degrés Celsius, tandis
que sélectionner F affichera les températures du four en degrés Fahrenheit. Ne pas oublier
que les modes GRIL et MAXI GRIL continueront à afficher des pourcentages plutôt que des
températures.
Appuyer sur le bouton CLOCK pour activer.
3
Mettre le bouton des modes du four en position ARRET.
4
Comment changer l’ALARME COURTE
L’ALARME COURTE est désactivée par défaut et le bip sonore, à la fin d’une cuisson en mode
automatique et lorsque le minuteur s’arrête, retentira de façon continue jusqu’à ce que l’alarme
soit annulée en appuyant sur le bouton
Lorsque l’ALARME COURTE est activée
À la fin du temps de cuisson en mode automatique et lorsque le minuteur s’arrête, un bip
sonore retentira à cinq reprises. Après les cinq bips, l’alarme s’arrêtera et se répétera toutes les
cinq minutes jusqu’à ce que l’alarme soit annulée en appuyant sur le bouton
L’affichage de l’horloge clignotera continuellement jusqu’à ce que l’alarme soit annulée.
Comment activer l’ALARME COURTE
Entrer en mode SELECT UTILIS et tourner le bouton de modes du four dans le sens des aiguilles
1
d’une montre jusqu’à ce que ALARME COURTE s’affiche.
Appuyer sur
2
Appuyer sur le bouton
3
4 Mettre le bouton des modes du four en position ARRET.
PUSH TO
pour sélectionner C ou F dans l’affichage d’horloge. Sélectionner
CLEAR
PUSH TO
.
CLEAR
PUSH TO
pour sélectionner OFF ou ON dans l’affichage d’horloge.
CLEAR
CLOCK
pour activer.
PUSH TO
CLEAR
.
77
US CA
FR
Comment passer de l’affichage horaire en 24 heures à l’affichage horaire en 12 heures
Entrer en mode SELECT UTILIS et tourner le bouton de modes du four dans le sens des aiguilles
1
d’une montre jusqu’à ce que MODE HORAIR s’affiche.
Appuyer sur
2
3 Appuyer sur le bouton
PUSH TO
pour sélectionner 24 H ou 12 H dans l’affichage d’horloge.
CLEAR
CLOCK
pour activer.
4 Mettre le bouton des modes du four en position ARRET.
Comment dissimuler l’heure dans l’affichage d’horloge
Entrer en mode SELECT UTILIS et tourner le bouton de modes du four dans le sens des aiguilles
1
d’une montre jusqu’à ce que AFFICH HEURE s’affiche.
Appuyer sur
2
PUSH TO
pour sélectionner ON ou OFF dans l’affichage d’horloge. Sélectionner
CLEAR
ON affichera l’heure et OFF dissimulera l’heure dans l’affichage d’horloge. Toutes les autres
fonctions, telles que TIMER, continueront de s’afficher normalement lorsque l’heure est
dissimulée.
Appuyer sur le bouton CLOCK pour activer.
3
Mettre le bouton des modes du four en position ARRET.
4
Page 80

US CA
78
Paramètres de préférence de l’utilisateur
FR
Comment changer la langue
Le four est préréglé pour utiliser la terminologie CONV (convection) de DCS. Celle-ci est indiquée
dans les langues sous LANG DCS. Néanmoins, il est possible d’utiliser une autre terminologie,
AERO. Celle-ci est indiquée dans les autres langues sous LANG USA. Pour la sélectionner, se
reporter aux instructions sur la manière de changer la langue ci-dessous. Noter qu’une fois que
les terminologies sont changées, toutes les références à CONV dans le guide de l’utilisateur
doivent être comprises comme étant équivalentes à AERO.
Entrer en mode SELECT UTILIS et tourner le bouton de modes du four dans le sens des aiguilles
1
d’une montre jusqu’à ce que LANG DCS s’affiche.
Appuyer sur
2
PUSH TO
pour basculer entre les langues différentes : LANG DCS pour
CLEAR
terminologie CONV, LANG USA pour terminologie AERO, LANG UK ENG pour anglais britannique,
LANGUE FRANCE pour français canadien ou LANG ESPANO pour espagnol latino-américain.
Appuyer sur le bouton CLOCK pour activer.
3
Mettre le bouton des modes du four en position ARRET.
4
Comment réinitialiser le four
Ceci réinitialisera les UNITE TEMP (température), ALARME COURTE, MODE HORAIR et AFFICH
HEURE à leurs paramètres par défaut. Les paramètres du mode SABBAT et des langues ne sont
pas affectés.
Entrer en mode SELECT UTILIS et tourner le bouton de modes du four dans le sens des aiguilles
1
d’une montre jusqu’à ce que REINITIALIS s’affiche.
Appuyer sur
2
Appuyer sur le bouton CLOCK pour quitter le mode SELECT UTILIS.
3
PUSH TO
pour remettre le four à ses paramètres par défaut.
CLEAR
4 Mettre le bouton des modes du four en position ARRET.
Verrouillage du tableau de commande
Le verrouillage du tableau de commande désactive tous les boutons et commandes, ce qui est
pratique lors du nettoyage des surfaces du four ou pour prévenir les coups accidentels et une
utilisation non autorisée. Le tableau de commande ne peut être verrouillé que lorsque le mode
et la température du four sont tous deux en position ARRET/OFF.
Pour verrouiller le tableau de commande
Appuyer sur le bouton
PUSH TO
et le maintenir enfoncé pendant cinq secondes. Le symbole
CLEAR
LOCK s’affichera dans l’affichage d’horloge. Refaire de même pour déverrouiller.
Page 81

Dépannage
Codes d’anomalies
En cas d’anomalie, le four émet un bip toutes les secondes et un code d’anomalie, la lettre F
suivie d’un numéro, s’affiche dans l’affichage d’horloge.
Important !
Ne pas éteindre l’alimentation de secteur du four en cas de code d’anomalie. Les ventilateurs sont essentiels
au refroidissement du four.
Par mesure de sécurité, ce four est conçu pour se refroidir automatiquement. Éteindre l’alimentation
pendant que le four est chaud risque d’endommager le four et son habillage.
En cas de code d’anomalie :
Prendre en note le code d’anomalie.
1
Mettre les boutons des modes et températures du four en position ARRET/OFF.
2
Appuyer sur le bouton
3
ainsi l’anomalie.
Appeler le centre de service autorisé DCS en ayant l’information relative au code d’anomalie.
4
Remarque : s’il est impossible d’effacer immédiatement le code d’anomalie ou de contacter le
centre de service autorisé DCS, attendre que les ventilateurs de refroidissement du four s’arrêtent,
puis appuyer de nouveau sur le bouton
effacé l’anomalie. Dans le cas contraire, il est possible de couper l’alimentation du four sur le mur
une fois que les ventilateurs se sont arrêtés et que le four s’est complètement refroidi.
PUSH TO
. Il se peut que le four se soit corrigé lui-même, effaçant
CLEAR
PUSH TO
. Il est probable que le four aura maintenant
CLEAR
79
US CA
FR
Dépannage
Problème Cause possible Que faire ?
Le four ne
fonctionne pas
La source d'alimentation
n'est pas connectée.
L'horloge n'est pas réglée
parce qu'il y a eu une
coupure ou une panne de
courant.
La porte du four est
ouverte.
Demander à une entreprise d’entretien
ou à un électricien de vérifier les
connexions d’alimentation, le câblage
et les fusibles.
Il faut mettre l’horloge à l’heure
avant de pouvoir utiliser le four. Le
four passera en mode « Set Up »
(Configuration) lorsque l’électricité
revient après une coupure de
courant. Les affichages de modes et
de température du four indiqueront
ARRET/OFF. Les deux affichages seront
éteints et ne répondront pas. Les
deux-points (:) de l’affichage d’horloge
clignoteront. Se reporter à la section «
Réglage de l’horloge ».
Les éléments sont désactivés par
l’interrupteur de porte lorsque la porte
est fermée. S’assurer de bien fermer la
porte.
Page 82

US CA
FR
80
Dépannage
Problème Cause possible Que faire ?
La porte du four ne
s'ouvre pas
Le lampe du four ne
fonctionne pas
Le four ne chauffe
pas
Les aliments cuits au
four sont trop dorés
sur le dessus ou sur
le dessous
La porte du four est
verrouillée.
L'ampoule a brûlé. Remplacer l'ampoule. Se reporter à la
La porte du four n'est pas
correctement fermée ou est
ouverte trop fréquemment
pendant la cuisson.
Le four n'a pas été préchauffé. Préchauffer jusqu'à ce que l’anneau
Les plats allant au four sont
trop grands ou trop petits
pour la recette.
Les plats/moules ne sont pas
espacés de façon uniforme
sur les grilles.
Les produits cuits au four
(par ex. des biscuits) ne sont
pas disposés ou espacés de
façon uniforme sur les grilles
à gâteaux.
Plats allant au four de couleur
foncée ou à surface enduite.
Position de grille trop haute
pour la fonction spécifique.
Ouverture trop fréquence de
la porte du four pendant la
cuisson.
La température de cuisson
est trop élevée ou trop basse.
Toujours en fonction AUTO NETTOY. La
porte se déverrouillera une fois que le cycle
est terminé et que le four se refroidit à une
température sûre.
section « Entretien et nettoyage ».
Les éléments chauffants du four et les
ventilateurs s'éteignent lorsque la porte
est ouverte, s'assurer donc de bien fermer
la porte du four. Remarque : Les fonctions
GRIL ne fonctionneront que lorsque la
porte est fermée.
lumineux autour du bouton de
température passe du rouge au blanc.
Utiliser des plats allant au four de la bonne
taille.
Décaler les plats sur les grilles du four de
façon à ce qu'il y ait au moins 3 cm (1⁄”)
entre les plats et les parois du four.
Faire tous les gâteaux d'un lot de la même
taille et de la même forme, et les espacer
uniformément sur la grille à gâteaux.
Diminuer la température du four de 10 °C
(25 °F) et prolonger le temps de cuisson de
deux minutes.
Utiliser des grilles, moules et plats brillants.
Essayer une position de grille inférieure.
Ne pas ouvrir la porte avant que les ¾ du
temps de cuisson au moins se soit écoulé.
Ajuster la température.
Les aliments cuits au
four sont pâles et pas
suffisamment cuits
sur la base.
Les produits cuits
au four (par ex des
biscuits) sont trop
dorés sur la base.
Les grilles, moules ou plats
brillants.
Plats allant au four de couleur
fonc
é
e ou à surface enduite.
Les grilles, moules et plats brillants
réfléchissent la chaleur et peuvent produire
des aliments cuits qui sont pâles et pas
assez cuits à la base.
Utiliser des grilles, moules et plats brillants.
Page 83

Service
81
Avant d’appeler le service technique ou pour toute assistance …
Vérifier ce que l’on peut faire soi-même. Se reporter aux instructions d’installation et au guide
d’utilisation pour vérifier ce qui suit :
Le produit est correctement installé.
1
L’utilisateur en connaît son fonctionnement normal.
2
Le disjoncteur ne s’est pas déclenché ou le fusible n’est pas grillé.
3
Il y a une panne de courant dans la région.
4
Si, après vérification de tous ces points, une assistance est toujours requise, prendre contact avec
le centre de service agréé DCS local ou le représentant du Service à la clientèle DCS pour tout
service sous garantie. Notre numéro de téléphone est le (888) 281-5698. Avant d’appeler, avoir
les informations suivantes à portée de la main :
• Numéro de modèle (se trouve sous le tableau de commande sur le côté gauche du cadre du four,
consulter les Instructions d’installation)
• Numéro de série (se trouve sous le tableau de commande sur le côté gauche du cadre du four,
consulter les Instructions d’installation)
• Date d’installation
• Une brève description du problème
US CA
FR
Votre satisfaction revêt la plus grande importance pour nous. Si un problème ne peut être résolu
à votre entière satisfaction, veuillez nous envoyer un courriel à support@dcsappliances.com ou
un courrier postal à :
Fisher & Paykel Appliances, Inc.
Attention: DCS Customer Care
5900 Skylab Road
Huntington Beach, CA 92647
USA
www.dcsappliances.com
Page 84

US CA
82
Garantie limitée
FR
GARANTIE LIMITÉE
Lors de l’achat d’un four mural encastré neuf DCS pour usage personnel ou non commercial,
vous bénéficiez automatiquement d’une garantie limitée d’un an couvrant les pièces et la main
d’oeuvre pour l’intégralité du produit, et d’une garantie limitée de dix ans (pièces seulement),
sur la cavité de four en porcelaine et le panneau de porte intérieur en porcelaine, valide dans les
48 états continentaux des États-Unis, ainsi que Hawaï, Washington D.C. et le Canada. La garantie
limitée est la même en Alaska sauf que vous devez payer les frais d’expédition du produit à un
centre de service ou les frais de déplacement d’un technicien dans le cas d’une visite à domicile.
Les produits destinés à une utilisation au Canada doivent être achetés auprès d’un distributeur
canadien afin de respecter la réglementation en vigueur.
FISHER & PAYKEL S’ENGAGE À :
entreprendre à ses frais (pièces et main-d’oeuvre) toutes réparations du produit (sur lequel
figure le numéro de série) jugé défectueux. En Alaska, vous devez payer les frais d’expédition
du produit à un centre de service ou les frais de déplacement d’un technicien dans le cas
d’une visite à domicile. Si le produit est installé dans un véhicule ou bateau à moteur, ou une
installation mobile similaire, vous devez l’acheminer à vos frais jusqu’au centre de service ou
payer les frais de déplacement du technicien jusqu’à l’emplacement où se trouve le produit.
Si nous sommes dans l’incapacité de réparer une pièce défectueuse du produit après un nombre
raisonnable de tentatives, nous pourrons, à notre choix, remplacer la pièce ou le produit, ou vous
rembourser entièrement le prix d’achat du produit (à l’exclusion des frais d’installation ou autres
frais.) Cette garantie s’applique à l’acheteur initial et à tous les propriétaires successifs du produit
dans la mesure où il s’agit d’un produit acheté pour une utilisation à domicile normale. Tout
service couvert par cette garantie limitée sera assuré par Fisher & Paykel Appliances Inc. ou son
agent de service agréé durant les heures d’ouverture normales.
QUELLE EST DURÉE DE CETTE GARANTIE LIMITÉE?
Notre responsabilité en vertu de cette garantie limitée concernant l’intégralité du produit expire
UN AN à partir de la table d’achat du produit par le premier acheteur. Notre responsabilité en
vertu de cette garantie limitée concernant la cavité de four en porcelaine et le panneau de porte
intérieur en porcelaine expire DIX ANS à partir de la date d’achat du produit par le premier
acheteur.
Notre responsabilité en vertu de toute garantie implicite, y compris la garantie implicite de
qualité marchande (la garantie tacite selon laque le produit est approprié pour un usage normal)
expire également UN AN (ou une période plus longue si requis par la loi) à partir de la date
d’achat du produit par le premier acheteur. Certaines juridictions ne permettent pas la limitation
de la garantie implicite, il est donc possible que la limitation cidessus sur les garanties implicites
ne s’applique pas à vous.
NE SONT PAS COUVERTS PAR LA GARANTIE :
A. Les appels de service n’ayant aucun rapport avec un défaut éventuel du produit. Le coût de
l’appel de service sera facturé s’il se trouve que le problème n’est pas dû à un défaut du produit.
Par exemple :
1. Corriger une mauvaise installation du produit.
2. Montrer comment utiliser le produit
3. Remplacer des fusibles du domicile, réarmer les disjoncteurs, réparer les fils électriques ou
la plomberie du domicile, ou remplacer des ampoules.
4. Corriger des anomalies causées par l’utilisateur.
5. Changer la configuration du produit.
6. Modifications non autorisées du produit.
7. Bruits ou vibrations considérés comme normaux, par exemple les bruits de drain ou de
ventilateur, les bruits de régénération (vibrations, sifflements) ou les signaux
d’avertissement à l’intention de l’utilisateur.
8. Corriger des dommages causés par des animaux nuisibles, par exemple des rats, des
coquerelles, etc.
Page 85

Garantie limitée
B. Défauts causés par des facteurs autres que :
1. Utilisation domestique normale ou
2. Utilisation conformément aux indications du guide de l’utilisateur.
C. Défauts du produit pour cause d’accident, négligence, mauvaise utilisation, incendie, inondation
ou calamité naturelle.
D. Les coûts des réparations effectuées par des techniciens non autorisés ou le coût de correction
de ces réparations non autorisées.
E. Les frais de voyage et les frais connexes encourus lorsque le produit est installé dans un lieu à
accès illimité ou restreint (déplacement par avion ou par bateau, régions géographiques isolées,
etc.).
F. Entretien normal recommandé par le guide l’utilisateur.
G. Dommages causés aux armoires ou au plancher par un agent de service.
Contactez votre distributeur ou votre installateur en cas de problème d’installation. Il vous
incombe d’assurer une installation électrique, une ventilation et toute autre connexion
appropriées.
Nous ne sommes pas responsables des dommages indirects ou accessoires (coût de réparation
ou de remplacement d’autres biens endommagés parce que le produit était défectueux ou
tout autre coût que vous auriez encouru parce que le produit était défectueux). Certaines
juridictions interdisent l’exclusion ou la restriction de la responsabilité des dommages indirects
ou accessoires; l’exclusion ou la restriction indiquée cidessus peut donc ne pas s’appliquer à
votre cas particulier.
POUR OBTENIR DES RÉPARATIONS
Veuillez consulter le guide de l’utilisateur. Si vous avez des questions concernant l’utilisation du
produit, que vous cherchez le nom de l’agent de service DCS agréé local ou que pensez que le
produit est défectueux et désirez le faire réparer dans le cadre de cette garantie limitée, veuillez
contacter votre distributeur ou nous appeler au numéro suivant :
83
US CA
FR
(NUMÉRO SANS FRAIS) 1-888-281-5698
ou contactez-nous par l’intermédiaire de notre site Web : www.dcsappliances.com
Vous devrez peut-être présenter une preuve raisonnable de la date d’achat du produit avant de
pouvoir bénéficier d’une réparation dans le cadre de cette garantie limitée.
UTILISATION COMMERCIALE
Cette garantie s’applique à des appareils électroménagers utilisés à domicile; elle ne couvre pas
les cas d’utilisation commerciale.
AUCUNE AUTRE GARANTIE
Cette garantie limitée constitue l’accord entier et exclusif entre vous et Fisher & Paykel
Appliances Inc. en ce qui concerne tout défaut du produit. Aucun de nos employés (ou agents
de service agréés) n’est autorisé à apporter des ajouts ou des modifications à cette garantie
limitée.
Page 86

US CA
FR
84
Garantie limitée
GARANT : FISHER & PAYKEL APPLIANCES INC.
Si vous avez besoin d’aide au sujet de cette garantie illimitée, veuillez nous appeler au numéro
ci-dessus ou nous écrire à l’adresse suivante :
Fisher & Paykel Appliances, Inc. Attention : DCS Customer Care
5900 Skylab Road, Huntington Beach, CA 92647
États-Unis
Cette garantie limitée vous donne des droits juridiques spécifiques et vous pouvez bénéficier
d’autres droits qui varient d’une juridiction à l’autre.
Fisher & Paykel Appliances Inc. est un fabricant de pointe d’appareils de cuisson et d’appareils
spécialisés, sous les marques Fisher & Paykel et DCS.
Page 87

Page 88

US CA
US CA
ES
ES
86
Page 89

Contenido
87
US CA
ES
Seguridad y advertencias
Introducción
Uso del horno -antes de comenzar
Puesta en hora del reloj
Uso de los controles del horno
Modos del horno
Uso del horno
Instalación de las rejillas
Selección de utensilios para el horno
Selección del modo y la temperatura
Precalentamiento del horno
Uso de los modos del horno
Uso de la sonda para carne
Cocción automática
Directrices para cocinar
Cuidado y limpieza
Ajuste de las preferencias del usuario
Identificación de fallas
Servicio
Garantía limitada
126
88
91
92
93
94
96
97
98
98
99
102
104
106
116
120
123
125
¡Importante!
GUARDE ESTAS INSTRUCCIONES
Es posible que el modelo mostrado en esta guía del usuario no esté disponible
en todos los mercados y esté sujeto a cambios en cualquier momento.
Para obtener detalles actuales sobre el modelo y la disponibilidad de
especificaciones en su país, visite nuestro sitio Web en www.dcsappliances.com
o comuníquese con su Representante de Cuidado del Cliente local de DCS.
Page 90

US CA
ES
88
Seguridad y advertencias
Operación
Su horno ha sido cuidadosamente diseñado para que funcione de manera segura durante los
procedimientos normales de cocción. Por favor recuerde las directrices siguientes cuando usa
el horno:
¡ADVERTENCIA!
Peligro de descargas eléctricas
Apague el horno en la pared antes de cambiar fusibles o la lámpara del
horno.
No hacerlo podría resultar en muerte o descarga eléctrica.
¡ADVERTENCIA!
Peligro de superficie caliente.
Es posible que piezas accesibles se calienten mientras esté en uso.
Para evitar quemaduras y escaldaduras, mantenga alejados a los niños.
Use mitones u otra protección al manejar superficies calientes como estantes
o platos.
Tenga cuidado al abrir la puerta del horno.
Permita que escape el aire caliente o el vapor antes de sacar o poner comida.
No toque los elementos calefactores ni las superficies interiores del horno.
Es posible que los elementos calefactores estén calientes aún cuando
tengan un color oscuro. Las superficies interiores de un horno se calientan
suficientemente para causar quemaduras. Durante y después del uso, no
toque ni deje que ropa ni otros materiales inflamables hagan contacto
con los elementos calefactores ni las superficies interiores del horno hasta
que hayan tenido tiempo de enfriarse. Es posible que otras superficies del
artefacto se calienten lo suficiente para pausar quemaduras, entre estas
superficies se encuentran la ventilación del horno, la superficie cerca de la
ventilación, y la puerta y la ventana del horno.
No hacerlo podría resultar en quemaduras y escaldaduras.
Page 91

Seguridad y advertencias
89
Medidas de seguridad importantes
Para reducir el riesgo de incendio, descargas eléctricas, lesiones a personas, o daños al usar el
horno, siga las importantes precauciones de seguridad listadas a continuación:
Lea todas las instrucciones antes de usar el horno. Use el horno solo para la finalidad deseada
como se describe en estas instrucciones.
Instalación correcta: Asegúrese de que un técnico calificado instale y conecte a tierra
correctamente su artefacto.
Interruptor de aislamiento: asegúrese de que el horno esté conectado a un circuito que incorpore
un interruptor de aislamiento que proporcione la desconexión completa de la fuente de
alimentación.
Nunca use su artefacto para calentar o calefaccionar el cuarto. Se podría quemar o lesionar
personas o iniciar un incendio.
Los artefactos domésticos no son para que los niños jueguen con ellos.
No deje niños solos. No se debe dejar niños solos o sin atención en un área donde se usa el
artefacto. No se debe permitir que se sienten ni paren en ninguna parte del artefacto. Los niños o
las personas con discapacidades que limiten su capacidad de usar el artefacto deben tener a una
persona responsable para que les enseña a usarlo. El instructor debe estar satisfecho de que ellos
pueden usar el artefacto sin peligro para ellos mismos o el medio ambiente.
No coloque objetos pesados sobre la puerta del horno.
Use la ropa adecuada. No use prendas sueltas o que cuelgan al usar el artefacto. Se podrían
incendiar o derretir si tocan un elemento o una superficie caliente y usted se podría quemar.
Servicio prestado por el usuario: No trate de reparar ni cambiar ninguna pieza de este artefacto
a menos que se lo recomiende específicamente en este manual. Se debe remitir a un técnico
calificado todas las demás tareas de servicio.
Almacenamiento en o arriba del artefacto: No se debe almacenar materiales inflamables en el
horno ni cerca de su superficie.
No use agua para combatir incendios de grasa. Sofoque el fuego o las llamas o use un
extinguidor de polvo químico seco o de tipo de espuma.
Use sólo mitones o tomaollas secos. El uso de tomaollas o mitones húmedos o mojados en
superficies calientes podrían resultar en quemaduras debido al vapor. No permita que los
tomaollas toquen áreas calientes o elementos de calefacción. No use una toalla ni un paño
abultado como tomaollas. Se podría incendiar.
No caliente recipientes de alimentos sin abrir. Podrían acumular presión que podría hacer que
reviente el recipiente y resultar en lesiones.
Manejo seguro de los alimentos: Deje la comida la menor cantidad de tiempo posible en el horno
antes y después de cocinar. Esto es para evitar la contaminación causada por organismos que
pueden causar el envenenamiento de la comida. Tenga mucho cuidado durante tiempo caliente.
Mantenga siempre la ventilación libre de obstrucciones.
Precaución. Es posible que sople aire caliente de la ventilación en la base del horno como parte
del sistema de enfriamiento del horno.
No coloque lámina de aluminio, platos, fuentes, agua ni hielo en el piso del horno mientras
cocina pues esto dañará de manera irreversible el esmalte de porcelana.
US CA
ES
Page 92

US CA
90
Seguridad y advertencias
ES
Instalación de las rejillas del horno (estantes). Coloque siempre las rejillas (estantes) en el lugar
deseado mientras el horno está frío (antes de precalentar). Si se debe sacar una rejilla (estante)
mientras el horno está caliente, no deje los mitones para horno ni el tomaollas en contacto con
los elementos de calefacción del horno ni con la base del horno.
No limpie el sello de la puerta ni el de la cavidad (juntas), ni use productos para la limpieza de
hornos en los sellos. Son esenciales para un buen sellado, lo que asegura que el horno funcione
eficientemente. Se debe tener cuidado para no rasparlos, dañarlos ni moverlos.
No use limpiadores para horno, agentes limpiadores fuertes o abrasivos, ceras ni lustres. No se
debe usar ningún limpiador para hornos, forro para hornos ni revestimiento protector de ningún
tipo en o cerca de cualquier parte del horno. No use limpiadores fuertes o abrasivos, estropajos ni
espátulas afiladas de metal para limpiar el vidrio de la puerta del horno pues rayan la superficie,
lo que podría resultar en la rotura del vidrio.
Limpie sólo con los elementos listados en este manual.
No use un limpiador de vapor para limpiar ninguna parte del horno.
Antes de comenzar un ciclo de limpieza automática, quite los estantes o rejillas, rejillas laterales
o soportes de estantes, bandeja de parrilla y todos los demás artículos o utensilios para cocinar y
limpie derrames grandes de comida o depósitos de grasa.
Durante un ciclo de limpieza automática, el horno alcanza mayores temperaturas que cuando
cocina. Bajo estas condiciones, es posible que las superficies se calientes más de lo normal y se
deben mantener alejados a los niños.
No almacene cosas que los niños puedan querer arriba del horno. Se podrían lesionar los niños si
tratan de trepar en el horno para sacar algo.
No instale ni use el artefacto si está dañado o si no funciona correctamente. Si recibió un
producto dañado, comuníquese inmediatamente con el distribuidor o instalador.
Use sólo utensilios para el horno aprobados para ser usados en el horno. Siga las instrucciones
del fabricante de los utensilios para el horno.
Nunca cubra ninguna rendija, agujero o canal en la parte inferior del horno o cubra la rejilla
completa con materials tales como el papel de aluminio. Esto evita que el aire fluya a través del
horno y puede causar envenenamiento por monóxido de carbono. El papel de aluminio también
puede contener el calor y producir un riesgo de incendio.
La California Safe Drinking Water and Toxic Enforcement Act (Ley Ejecutiva para la seguridad del
agua potable y los tóxicos del estado de California) exige que los comercios avisen a los clientes
sobre la exposición potencial a sustancias que el Estado de California sabe que causan cáncer
o daño a la reproducción. Se emiten pequeñas cantidades de sustancias químicas provenientes
del aislamiento y de la descomposición de alimentos durante el ciclo de limpieza automática
del horno. Una exposición importante a estas sustancias puede causar cáncer y daño al sistema
reproductivo. Ventilar con una campana o con una ventana abierta y limpiar el exceso de
derrames de alimentos antes de la limpieza automática reduce la exposición.
Page 93

Introducción
Sobre su horno nuevo
Gracias por comprar un horno multifuncional empotrado DCS by Fisher & Paykel. Ahora que
está instalado y listo para usar, usted querrá saber todo lo referido al mismo para asegurarse de
que obtenga excelentes resultados directamente desde el comienzo. Esta guía le presenta todas
sus características y también le proporciona un conjunto de directrices para cocinar. Nosotros
recomendamos que lea toda la guía antes de usar su horno nuevo, por su seguridad y para tener
éxito al cocinar.
91
US CA
ES
1
2
3
4
5
1
Tablero de control
2
Manija de la puerta
3
Ventana del horno
4
Horno superior
5
Horno inferior (sólo modelos dobles)
6
Modelo y número de serie
7
Cierre para la limpieza automática
8
Sello de la puerta (junta)
12
10
15
6
7
8
9
Sello de la cavidad (junta)
10
Elementos de asar
11
Luces del horno
12
Receptáculo de la sonda para carne
13
Ventilador de convección y elemento
11
oculto
14
Elemento oculto inferior
15
Bisagra de puerta
16
Ventilación del horno
9
13
14
15
16
Page 94

US CA
ES
92
Uso del horno - antes de comenzar
Puesta en hora del reloj
Cuando conecta su horno a una fuente de alimentación por primera vez, sonará un tono y se
iluminará el reloj. El reloj va a indicar ‘12:00’ y destellarán los dos puntos ( : ). A continuación,
ponga en hora el reloj.
¡Importante!
Tiene que poner en hora el reloj antes de usar el horno.
Para poner en hora el reloj
Mientras destellan los dos puntos (:), haga girar el
1
PUSH TO
CLEAR
botón hasta que se vea la hora
correcta.
Presione el botón CLOCK (RELOJ) para fijar la hora, o espere ocho segundos y se fijará
2
automáticamente.
Consulte “Ajuste de las preferencias del usuario” para obtener instrucciones sobre cómo cambiar
entre la pantalla de 12 horas y la de 24 horas.
a
a
Pantalla del reloj
b
Botón CLOCK (RELOJ)
- le permite poner en hora el reloj
PUSH TO
c
CLEAR
- gire este botón para ajustar el reloj, el
temporizador, la temperatura de la sonda, el
tiempo de cocción, la hora de apagado
c
b
- presione este botón para borrar la pantalla
Page 95

Uso del horno - antes de comenzar
Uso de los controles del horno
En hornos dobles, las perillas de la izquierda son para el horno superior y las perillas de la
derecha son para el horno inferior. Presionar el botón selector de la cavidad le permite conmutar
automáticamente entre las cavidades del horno, por ejemplo si esta ajustando programas
automáticos.
a
Botón TIMER (TEMPORIZADOR)
b
Botón COOK TIME (TIEMPO DE COCCIÓN)
c
Botón STOP TIME (HORA DE APAGADO)
d
Botón PROBE (SONDA)
e
Botón CLOCK (RELOJ)
PUSH TO
f
g
Pantalla de la cavidad del horno superior
h
Pantalla de la cavidad del horno inferior
i
Botón selector de la cavidad del horno,
Botón (gire/presione)
CLEAR
presione este botón para conmutar
entre los ajustes de la cavidad superior e
inferior del horno.
g, h, e i
sólo están en los modelos dobles
decba
g
i
h
f
93
US CA
ES
Temporizador
Usted puede usar el temporizador en cualquier momento aún cuando no esté usando el horno.
Para configurar el temporizador
Oprima el botón TIMER. En la pantalla del reloj destellarán el símbolo TIMER y los dos puntos.
1
Gire el botón
2
espere ocho segundos hasta que se adopte el ajuste y el temporizador comience a descontar.
Para cancelar el temporizador presione el botón TIMER y luego el botón
3
Cuando termina el tiempo establecido, destellará el símbolo TIMER y 0:00 y el horno emitirá
4
un zumbido. Oprima el botón
temporizador.
El temporizador no apaga el horno.
PUSH TO
CLEAR
hasta que tenga el tiempo que necesita. Presione el botón TIMER o
TIMER o
PUSH TO
CLEAR
PUSH TO
CLEAR
para interrumpir el zumbido y despejar el
.
Page 96

US CA
ES
94
Uso del horno - antes de comenzar
Modos del Horno
HORNEADO
AEROPURO: ventilador mas el elemento del ventilador
Un elemento de calefacción oculto que rodea el ventilador en la parte posterior del
horno calienta el aire, que se sopla entonces adentro de la cavidad. La temperatura
consistente asegura que lo que se hornea haya levado y tenga un color uniforme.
Las galletas estarán crocantes por fuera y masticables en el medio, la carne de res
y las aves deliciosamente doradas y crocantes mientras que por dentro estarán
jugosas y tiernas. Los guisados se cocinan a la perfección y se los puede volver a
calentar de manera rápida y eficiente (quite la tapa de los guisados). AEROPURO
es el modo a seleccionar para cocinar en múltiples rejillas y para cocinar comidas
completas al horno. AEROPURO es excelente para hacer pastel de ángel.
AEROHORNEADO: ventilador mas los elementos superior e inferior
El ventilador del horno hace circular el aire caliente desde los elementos superior
externo e inferior ocultos y lo distribuye alrededor de la cavidad del horno.
Los alimentos cocinados con el modo AEROHORNEADO tienden a dorarse más
rápidamente que los alimentos cocinados con el modo HORNEADO tradicional. Use
AEROHORNEADO a baja temperatura –125 °F (50°C) – para secar fruta, verduras y
hierbas. Al cocinar guisados, quíteles la tapa.
HORNEADO: elementos superior e inferior
El calor viene de los elementos ocultos superior exterior e inferior. HORNEADO es
el modo tradicional para hornear, ideal para pasteles. Si está horneando en dos
rejillas, disponga los platillos de manera que ningún elemento esté directamente
sobre el otro. HORNEADO es ideal para comidas que requieren cocción al horno
durante largo tiempo o a bajas temperaturas, como merengues y ricos pasteles de
fruta.
AEROREPOSTER: ventilador mas el elemento inferior
El ventilador hace circular el aire desde el elemento oculto inferior a través del
horno. Excelente para alimentos dulces y sabrosas masas, para panes húmedos y
brownies y galletas que usted quiera que sea extra suaves.
REPOSTER: elemento inferior
El calor proviene sólo del elemento inferior. Este es el modo de cocción tradicional,
adecuado para recetas que se desarrollaron en hornos más antiguos. Para obtener
mejores resultados, hornee en sólo una rejilla por vez. Es perfecto para alimentos
que exigen delicado horneado y que tienen una base de masa, como las tartas de
crema, pasteles, quiches y torta de queso o algo que no exija calor directo y dorado
en la parte superior.
ROSTIZADO
ASAR
Este es un programa de dos pasos. No hace falta precalentar el horno. Una etapa
inicial abrasadora de 20 minutos dora y hace crocante el asado y carameliza los
jugos en la parte exterior de la carne, luego las temperaturas bajan al nivel que
haya predeterminado para el resto del período de cocción, lo que produce un
asado jugoso y tierno, lleno de sabor. Este modo también es muy bueno para
cocinar verduras. Después del abrasado inicial se produce poco dorado.
Page 97

Uso del horno - antes de comenzar
95
ASADO A LA PARRILLA
GRILL: elemento superior interior
GRILL entrega calor intenso desde la región interior del elemento superior. Es muy
bueno cuando necesita asar rápidamente a la parrilla una o dos porciones de sus
favoritos usuales como una pechuga de pollo o un bistec.
MAXI GRILL: elemento superior interior y exterior
MAXI GRILL entrega calor intenso de todo el elemento superior. Es el modo más
adecuado para “terminar” muchas comidas, por ejemplo para dorar la parte
superior de papas gratinadas y huevos revueltos al horno (frittata). Use MAXI GRILL
para tostar pan o para asar a la parrilla su pollo, pescado y bistec favorito.
AEROGRILL: ventilador mas los elementos superiores interior y exterior
AEROGRILL produce comida con un acabado que es similar al de un rosticero.
Se cocina hermosamente carne de res, ave y verduras; la comida está crocante y
dorada del lado de afuera mientras que el interior queda húmedo y tierno. Trate de
usar este modo para todo un pollo o un lomo de res.
CALENTAR
CALENTAR es una temperatura constante baja de 165° F (75° C). Use para mantener
caliente la comida cocinada y para servir platillos. Para volver a calentar comida fría
use AEROPURO y cambie a CALENTAR sólo cuando la comida esté bien caliente,
pues este modo no elevará la temperatura de la comida fría lo suficiente para matar
las bacterias nocivas.
US CA
ES
AUTOLIMPIEZA
Este horno tiene un ciclo de limpieza automático pirolítico que se encarga de
la suciedad relacionada tradicionalmente con la limpieza del horno. Durante
la limpieza automática, el horno alcanza temperaturas muy altas. Esto quema y
descompone la suciedad y los depósitos de grasa. Un eliminador de humo y un
sistema activo de ventilación eliminan el olor. Para ver instrucciones sobre cómo
usar AUTOLIMPIEZA consulte la sección de “Cuidado y limpieza”.
Ventilador de enfriamiento
Se encenderá automáticamente un ventilador de enfriamiento y soplará el aire hacia fuera por
abajo de la puerta del horno durante el uso de la mayoría de los modos del horno. Es posible
que siga funcionando después de que se haya apagado el horno para mantener la puerta y el
panel de control fríos.
Page 98

US CA
ES
96
Uso del horno
Instalación de las rejillas
Colocar las dos rejillas deslizantes telescópicas en los bastidores laterales
proporciona ocho posiciones de cocción de las que puede escoger. Consulte
“Directrices para la cocción” para ver las posiciones sugeridas para las rejillas.
Para instalar las rejillas
8
7
6
5
4
3
2
1
Coloque las rejillas en su sitio siempre ANTES de calentar el horno.
Para quitar una rejilla deslizante, tómela por sus dos esquinas delanteras (asegurándose de que está
tomando la rejilla de alambre y el marco deslizante al mismo tiempo), incline hacia arriba y tire hacia
afuera para sacarla del horno.
Para colocar una rejilla deslizante correctamente en el horno, colóquela de manera que la parte
delantera de la barra esté enfrentándole, como se muestra.
Compruebe que el marco deslizante no esté extendido.
Compruebe el riel protector (como se muestra) para asegurarse de que la rejilla tenga el lado
correcto hacia arriba.
Coloque la rejilla de manera que esté nivelada y que los retenes posteriores de la rejilla del marco
deslizante descansen sobre los bastidores laterales (como se muestra).
Luego, coloque una rejilla deslizante totalmente contra la parte posterior del horno, hasta que los
retenes delanteros caigan en su sitio.
Nota: generalmente, las posiciones de las rejillas en la parte superior del horno son adecuadas para
asar a la parrilla. Las que estén en la región central o inferior del horno son adecuadas para hornear,
rostizar o cocinar guisados.
Para su seguridad, las rejillas de alambre y los marcos telescópicos deslizantes se construyen como
una sola unidad y no se pueden separar. Esto quiere decir que cuando se instalan correctamente en
el bastidor lateral, las correderas evitarán que se inclinen las rejillas cuando las tire hacia usted.
Para evitar que los retenes se levanten y separen de los bastidores laterales, tenga cuidado y deslice
las rejillas horizontalmente hacia adelante.
Barrera de seguridad
Ranuras de montaje
Bastidor
lateral
Ranuras de
montaje
Retén de rejilla
Marco deslizante
(empuje completamente
en lugar)
Barra delantera
Rejilla de alambre
Espárrago
de montaje
Alambre de
retención
Page 99

Uso del horno
Selección de los utensilios correctos para el horno
El tamaño, la forma y el material de los utensilios afectarán el
tiempo de horneado.
El sistema de tres piezas para asar a la parrilla/hornear
proporcionado con su horno (que consiste en la charola,
rejilla de chapa y rejilla de alambre) fue diseñado para
reducir las salpicaduras y el humo, y por lo tanto es ideal
para asar a la parrilla y rostizar. Nosotros sugerimos que
coloque la carne sobre la rejilla para asar a la parrilla/
hornear (en la parte superior de la charola y la rejilla de
chapa) para permitir que el aire caliente circule alrededor
de la misma. Esto permite un dorado más uniforme y un
resultado similar al del rosticero.
En ocasiones, es posible que quiera usar sólo dos piezas
del sistema. Por ejemplo si está haciendo un pavo grande
al horno, use sólo la charola y la rejilla de chapa para
tener mayor estabilidad.
Los utensilios de metal para horno resultan en tiempos de horneado más breves. Las charolas
de asar de color oscuro o que tienen un acabado sin brillo absorben calor o doran los alimentos,
especialmente en la base, más rápido que las charolas brillantes.
Es posible que un acabado brillante sea mejor para ciertos pasteles o galletas, pues refleja algo
del calor y tiene una superficie de cocción menos intensa.
Si está usando charolas oscuras, será necesario reducir la temperatura del horno en 25°F (10°C).
También es posible que sea necesario extender el tiempo de horneado en un par de minutos.
Las charolas aisladas para galletas o para hornear posiblemente aumenten el tiempo de
horneado.
Use utensilios de vidrio o cerámica para horno para los alimentos que no requieran una costra
dorada (por ejemplo suflé o lasagna).
Rejilla de
alambre
Rejilla de
chapa
Charola
97
US CA
ES
Page 100

ES
98
Uso del horno
US CA
Selección del modo y la temperatura
Para seleccionar un modo, gire la perilla de modo del horno.
Para seleccionar una temperatura, gire la perilla de
temperatura en sentido horario.
En hornos dobles, las perillas de la izquierda son para
el horno superior y las perillas de la derecha son para el
horno inferior.
Consulte la sección “Directrices para cocinar” para ver los
modos y las temperaturas sugeridos.
Precalentamiento del horno
Precaliente el horno al usar los siguientes modos para hornear: AEROPURO, AEROHORNEADO,
HORNEADO, AEROREPOSTER y REPOSTER. Estos modos están equipados con un
precalentamiento rápido: el horno se calentará a 350°F (175°C) en aproximadamente 10 minutos
y a 425°F (225°C) en aproximadamente 15 minutos.
Mientras su horno está precalentando, se muestra la temperatura seleccionada alternadamente
con la temperatura actual del horno. Cuando la temperatura del horno alcance la temperatura
seleccionada, se escuchará un zumbido y la pantalla cambiará de naranja a blanco.
Si quiere aumentar la temperatura del horno mientras cocina, siga estos pasos para reactivar el
precalentamiento rápido:
Apague (OFF) las perillas de modo y de temperatura del horno.
1
Espere que se apaguen las luces de la pantalla.
2
Seleccione entonces ajustes nuevos.
3
 Loading...