


Wall oven
WOU130,WOSU30, WOUD230,WODU30 models
Four mural
Modèles WOU130,WOSU30,
WOUD230,WODU30
User guide
Guide d’utilisation
US CA
Contents |
|
1 |
US |
|
|
|
CA |
Safety and warnings |
2 |
|
|
|
|
||
Introduction |
5 |
|
|
Using your oven - before you start |
|
|
|
Setting the clock |
6 |
|
|
Using the oven controls |
7 |
|
|
Oven modes |
8 |
|
|
Using your oven |
|
|
|
Positioning the shelves |
10 |
|
|
Choosing the right bakeware |
11 |
|
|
Selecting mode and temperature |
12 |
|
|
Preheating your oven |
12 |
|
|
Using the oven modes |
13 |
|
|
Using the meat probe |
16 |
|
|
Automatic cooking |
18 |
|
|
Cooking guidelines |
20 |
|
|
Care and cleaning |
30 |
|
|
User preference settings |
34 |
|
|
Troubleshooting |
37 |
|
|
Warranty and service |
39 |
|
|
Important!
SAVE THESE INSTRUCTIONS
The models shown in this user guide may not be available in all markets and are subject to change at any time. For current details about model and specification availability in your country, please go to our website www. dcsappliances.com or contact your local DCS Customer Care Representative.
US CA
2 Safety and warnings
Operation
Your oven has been carefully designed to operate safely during normal cooking procedures. Please keep the following guidelines in mind when you are using your oven:
WARNING!
Electrical Shock Hazard
Turn the oven off at the wall before replacing fuses or the oven lamp.
Failure to do so may result in death or electrical shock.
 WARNING!
Hot Surface Hazard
Accessible parts may become hot when in use.
To avoid burns and scalds, keep children away.
Use oven mitts or other protection when handling hot surfaces such as oven shelves or dishes.
Use care when opening the oven door.
Let hot air or steam escape before removing or replacing food.
Do not touch heating elements or interior surfaces of the oven. Heating elements may be hot even though they are dark in color. Interior surfaces of an oven become hot enough to cause burns. During and after use, do not touch, or let clothing or other flammable materials contact heating elements or interior surfaces of the oven until they have had sufficient time to cool. Other surfaces of the appliance may become hot enough to cause burns - among these surfaces are the oven vent, the surface near the oven vent, and the oven door and window, which could also become hot enough to cause burns.
Failure to follow this advice could result in burns and scalds.

Safety and warnings
Important safety instructions
3US CA
To reduce the risk of fire, electrical shock, injury to persons, or damage when using the oven, follow the important safety precautions listed below:
Read all the instructions before using the oven. Use the oven only for its intended purpose as described in these instructions.
Proper installation: be sure your appliance is properly installed and grounded by a qualified technician.
Isolating switch: make sure this oven is connected to a circuit which incorporates an isolating switch providing full disconnection from the power supply.
Never use your appliance for warming or heating the room. Persons could be burned or injured or a fire could start.
Household appliances are not intended to be played with by children.
Do not leave children alone. Children should not be left alone or unattended in the area where the appliance is in use. They should never be allowed to sit or stand on any part of the appliance. Children or persons with a disability which limits their ability to use the appliance, should have a responsible person to instruct them in its use. The instructor should be satisfied that they can use the appliance without danger to themselves or their surroundings.
Do not place heavy objects on the oven door.
Wear proper apparel. Do not wear loose fitting or hanging garments when using the appliance. They could ignite or melt if they touch an element or hot surface and you could be burned. User servicing: do not repair or replace any part of the appliance unless specifically recommended in the manual. All other servicing should be referred to a qualified technician. Storage in or on appliance: flammable materials should not be stored in an oven or near its surface.
Do not use water on grease fires. Smother the fire or flame or use a dry chemical or foam type extinguisher.
Use only dry oven mitts or potholders. Moist or damp potholders on hot surfaces could result in burns from steam. Do not let potholders touch hot areas or heating elements. Do not use a towel or a bulky cloth for a potholder. It could catch fire.
Do not heat unopened food containers. They can build up pressure that may cause the container to burst and result in injury.
Safe food handling: leave food in the oven for as short a time as possible before and after cooking. This is to avoid contamination by organisms which may cause food poisoning. Take particular care during warm weather.
Always keep oven vents unobstructed.
Caution. Hot air can blow from the vent at the base of the oven as part of the oven’s cooling system.
Do not place aluminum foil, dishes, trays, water or ice on the oven floor during cooking, as this will irreversibly damage the porcelain enamel.

US |
4 |
Safety and warnings |
CA |
|
|
|
Placement of oven racks (shelves): always position racks (shelves) in the desired location while |
|
|
||
|
the oven is cool (before preheating). If a rack (shelf) must be removed while the oven is hot, do |
|
|
not let the oven mitts or potholder contact hot heating elements in the oven or the base of the |
|
|
oven. |
|
|
Do not clean the door seal or cavity seals (gaskets) or use any oven-cleaning products on them. |
|
|
They are essential for a good seal, which ensures that the oven operates efficiently. Care should |
|
|
be taken not to rub, damage or move them. |
|
|
Do not use oven cleaners, harsh/abrasive cleaning agents, waxes, or polishes. No commercial |
|
|
oven cleaner, oven liner, or protective coating of any kind should be used in or around any part of |
|
|
the oven. Do not use harsh/abrasive cleaners, scourers or sharp metal scrapers to clean the oven |
|
|
door glass since they scratch the surface, which may result in the glass shattering. |
|
|
Clean only the parts listed in this manual. |
|
|
Do not use a steam cleaner to clean any part of the oven. |
|
|
Before starting a self-clean cycle, remove oven shelves/racks, side racks/shelf supports, broiler |
|
|
pan and all other cookware/utensils, and wipe up large food spills or grease deposits. |
|
|
During a self-clean cycle, the oven reaches higher temperatures than it does for cooking. Under |
|
|
such conditions, the surfaces may get hotter than usual and children should be kept away. |
|
|
Do not store things children might want above the oven. Children could be burned or injured |
|
|
while climbing on the oven to retrieve items. |
|
|
Do not install or operate the appliance if it is damaged or not working properly. If you receive a |
|
|
damaged product, contact your dealer or installer immediately. |
|
|
Use only bakeware approved for oven use. Follow the bakeware manufacturer’s instructions. |
|
|
Never cover any slots, holes or passages in the oven bottom or cover an entire rack with materials |
|
|
such as aluminum foil. Doing so blocks airflow through the oven and may cause carbon |
|
|
monoxide poisoning. Aluminum foil linings may also trap heat, causing a fire hazard. |
|
|
The California Safe Drinking Water and Toxic Enforcement Act requires businesses to warn |
|
|
customers of potential exposure to substances which are known by the State of California to |
|
|
cause cancer or reproductive harm. Small amounts of harmful chemicals are given off in the |
|
|
oven’s self-cleaning cycle from insulation and food decomposition. Significant exposure to these |
|
|
substances can cause cancer and reproductive harm. Venting with a hood or open window, and |
|
|
wiping out excess food spills prior to self-cleaning the oven reduces exposure. |
|
Introduction |
5 |
US |
|
|
CA |
About your new oven
Thank you for buying a DCS by Fisher & Paykel built-in multifunctional oven. Now that it is installed and ready to use, you will want to know everything about it to make sure you get excellent results right from the start. This guide introduces you to all its features, as well as giving you a set of cooking guidelines. We recommend you read the entire guide before using your new oven, for both safety and for cooking success.
1
2
12
3
10
4 |
15 |
5
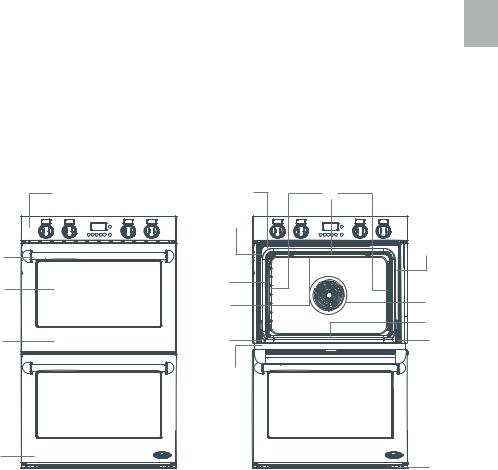
1Control panel
2Door handle (handles may vary)
3Oven window
4Upper oven
5Lower oven (double models only)
6Model & serial number
7Self-clean latch
8Door seal (gasket)
611
7
9
13
14
15
8
16
9Cavity seal (gasket)
10Broil element
11Oven lights
12Meat probe socket
13Convection fan & concealed element
14Lower concealed element
15Door hinge
16Oven vent

US |
6 |
Using your oven - before you start |
CA |
|
|
|
|
|
Setting the clock
When your oven is connected to a power supply for the first time, a tone will sound and the clock display will light up. The clock display will show ‘12:00’ and the colon ( : ) will flash. Next, set the clock.
Important!
You must set the clock before you can use the oven.
To set the clock
1 While the colon (:) is flashing, rotate the |
PUSH TO |
button until the correct time is showing. |
CLEAR |
2Press the CLOCK button to set the time, or wait eight seconds and it will set automatically.
Refer to ‘User preference settings’ for instructions on how to change between 12-hour and 24hour display.
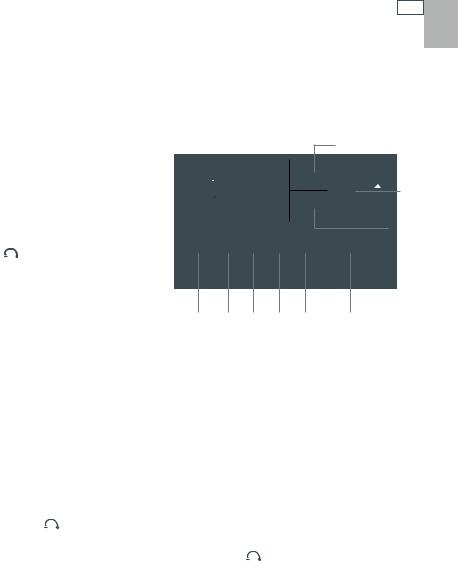
a Clock display
a
b C LO C K button
- allows you to set the clock
c PUSH TO  CLEAR
CLEAR 

- turn this button to set the clock, timer, probe temperature, cook time, stop time
- press this button to clear the display
bc
Using your oven - before you start 7 US
CA
Using the oven controls
In double ovens, knobs on the left are for the upper oven and knobs on the right are for the lower oven. Pushing the oven cavity selector button lets you toggle between the oven cavities, for example if you are setting automatic programs.
a TIMER button |
|
|
|
|
|
|
g |
|
b COOK TIME button |
|
|
|
|
|
|
||
c |
STOP TIME button |
|
|
|
|
|
|
|
d |
PROBE button |
|
|
|
|
|
|
|
e |
CLOCK button |
|
|
|
|
|
|
|
f |
PUSH TO |
button (rotate/press) |
|
|
|
|
|
|
CLEAR |
|
|
|
|
|
|
||
g |
Upper oven cavity display |
|
|
|
|
|
|
|
h |
Lower oven cavity display |
|
|
|
|
|
|
|
i |
Oven cavity selector button - press this |
a |
b |
c |
d |
e |
f |
|
|
button to toggle between upper and |
|
|
|
|
|
|
|
|
lower cavity settings |
|
|
|
|
|
|
|
g, h, and i are on double models only
i
h
Timer
You can use the timer at any time, even when you are not using the oven.
To set the timer
1Press the TIMER button. The TIMER symbol and the colon will flash in the clock display.
2 |
PUSH TO |
button until you have the time you need. Press the TIMER button or wait |
|
Rotate the CLEAR |
|||
|
eight seconds for the setting to be adopted and the timer will begin to count down. |
||
3 |
To cancel the timer, press the TIMER button then the PUSH TO |
button. |
|
|
|
CLEAR |
|
4When the set time finishes, the TIMER symbol and 0:00 will flash and the oven will beep. Press the
TIMER or PUSH TO 
 button to stop the beeping and clear the timer.
CLEAR
The timer does not turn the oven off.

US |
8 |
Using your oven - before you start |
CA |
|
|
|
|
|
Oven Modes
BAKING
TRUE CONV: fan plus fan element
A concealed heating element surrounding the fan in the rear of the oven heats air, which is then blown into the cavity. The consistent temperature ensures baking is well risen and evenly colored. Cookies are crisp on the outside and chewy in the middle, meat and poultry are deliciously browned and sizzling while remaining juicy and tender. Casseroles are cooked to perfection and reheating is quick and efficient (remove lid from casseroles). TRUE CONV is the mode to choose for multishelf cooking and complete oven meals. TRUE CONV is excellent for baking angel food cake.
CONV BAKE: fan plus upper and lower elements
The oven fan circulates hot air from the top outer and the lower concealed elements and distributes it around the oven cavity. Food cooked using the CONV BAKE mode tends to brown more quickly than foods cooked on the traditional BAKE mode. Use CONV BAKE at a low temperature –125 °F (50°C)– for drying fruit, vegetables and herbs. When cooking casseroles, remove lid.
BAKE: upper and lower elements
Heat comes from the top outer and lower concealed elements. BAKE is the traditional baking mode, ideal for cakes. If baking on two shelves, arrange dishes so no item is directly over another. BAKE is ideal for foods that require baking for a long time or at low temperatures, like meringues and rich fruitcakes.
CONV PASTRY: fan plus lower element
The fan circulates heat from the lower concealed element throughout the oven. Excellent for sweet and savory pastry foods, for moist breads and brownies and cookies that you want extra chewy.
PASTRY BAKE: lower element
Heat comes from the lower element only. This is a traditional baking mode, suitable for recipes that were developed in older ovens. For best results, bake on only one shelf at a time. It is perfect for foods that require delicate baking and have a pastry base, like custard tarts, pies, quiches and cheesecake or anything that does not require direct heat and browning on the top.
ROASTING
ROAST
This is a two-step program. The oven does not require preheating. An initial 20minute searing stage crisps and browns the roast and caramelizes the juices on the outside of the meat , then the temperature drops to the level you have preset for the remainder of the cooking period, producing a tender and juicy roast that is full of flavor. This mode is also great for cooking vegetables. Little browning takes place after the initial searing.
Using your oven - before you start 9 US
CA
BROILING
BROIL: upper inner element
BROIL delivers intense heat from the inner region of the top element. Great when you need to quickly broil one to two portions of your usual favorites, like crispy chicken breasts or a steak.
MAXI BROIL: upper inner and outer elements
MAXI BROIL delivers intense heat from the entire top element. It is the most suitable mode for ‘finishing off’ many meals, for example browning the top of potato gratin and frittata. Use MAXI BROIL to toast bread or to broil your favorite chicken, fish and steak.
CONV BROIL: fan plus upper inner and outer elements
CONV BROIL produces food with a finish that is similar to a rotisserie. Meat, poultry and vegetables cook beautifully; food is crisp and brown on the outside while
the inside remains moist and tender. Try using this mode for whole chicken or tenderloin of beef.
WARM
WARM is a constant low heat of 165°F (75°C). Use it to keep cooked food hot, or to warm plates and serving dishes. To reheat food from cold, use TRUE CONV and change to WARM only when the food is piping hot, as this mode will not bring cold food up to a temperature high enough to kill any harmful bacteria.
SELF CLEAN
This oven features a pyrolytic self-cleaning cycle that takes care of the mess and grime that is traditionally associated with oven cleaning. During self-cleaning, the oven reaches very high temperatures. This burns off and breaks down soil and grease deposits. A smoke eliminator and active venting system eradicates odor. For instructions on how to use SELF CLEAN, see the ‘Care and cleaning’ section.
Cooling fan
A cooling fan will come on automatically and blow air out below the oven door during the use of most oven modes. It may continue to run after the oven is switched off to keep the door and control panel cool.

US CA
10 Using your oven
Positioning the shelves |
|
|
8 |
|
|
|
|||
|
|
|
|
|
Placing the telescopic sliding shelves on the side racks provides eight cooking |
|
7 |
||
|
6 |
|||
positions to choose from. See the ‘Cooking guidelines’ for suggested shelf positions. |
|
|||
|
5 |
|||
|
|
|
4 |
|
To position the shelves |
|
3 |
||
|
2 |
|||
|
|
|
||
|
|
|
|
1 |
Always position oven shelves BEFORE heating the oven.
To remove a sliding shelf, grip it by its two front corners (making sure you are gripping the wire shelf and the sliding frame together), tilt upwards and pull it out of the oven.
To place a sliding shelf in the oven correctly, position it so that the front bar is toward you, as shown.
Check that the sliding frame is not extended.
Check the guard rail (as shown) to make sure the shelf is the right way up.
Position the shelf so that it is level and the rear shelf tags on both sides of the sliding frame rest on the side racks (as shown).
Then push the sliding shelf all the way to the back of the oven, until the front shelf tags drop into place.
Note: generally, the shelf positions in the top of the oven are suitable for broiling. Those in the middle or lower region of the oven are suitable for baking, roasting and casseroles.
For your safety, the wire shelves and telescopic sliding frames are built together as one unit and are not separable. This means that when placed properly on the side rack, the slides will prevent the wire shelves from tilting when pulled towards you.
To prevent the tags from lifting off the side racks, take care to slide the shelves forward horizontally.
Guard |
rail |
|
|
Mounting |
Side rack |
||
|
|
Side rack |
slots |
||||
|
|
|
|
|
|
||
|
|
|
|
|
|
|
|
|
|
|
|
|
|
|
|
Lock stud
Wire shelf |
Retaining wire |
Shelf tag |
Sliding frame |
Front bar |
|
(push fully into place) |
|
Using your oven 11 US
CA
Choosing the right bakeware
The size, shape and material of the bakeware will affect the baking time.
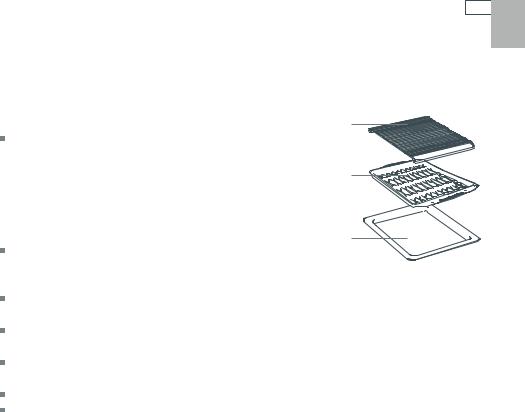
Rack
The three-piece broil/roast system provided with your |
|
|
oven (consisting of the pan, grid and rack) has been |
|
|
designed to reduce splatter and smoke, and is therefore |
Grid |
|
ideal for broiling and roasting. We suggest you place meat |
||
|
||
on the broil/roast rack (on top of the pan and grid) to |
|
|
allow hot air to circulate around it. This gives more even |
|
|
browning and a result similar to a rotisserie. |
Pan |
|
On occasions, you may want to use only two pieces of the |
||
|
||
system. For example, when roasting a large turkey, use |
|
|
only the pan and grid for greater stability. |
|
Metal bakeware results in the fastest baking time. Dark baking pans or those with a dull finish absorb heat or brown food, especially on the base, faster than shiny pans.
A shiny finish may work best for some cakes and cookies, as it reflects some heat and gives a less intensive baking surface.
If using dark baking pans, it may be necessary to reduce the oven temperature by 25°F (10°C). It may also be necessary to extend the baking time by a couple of minutes.
Insulated cookie sheets or baking pans may increase the length of baking time.
Use glass or ceramic bakeware for foods that do not require a dark brown crust (eg soufflé or lasagna).
US CA
12 Using your oven
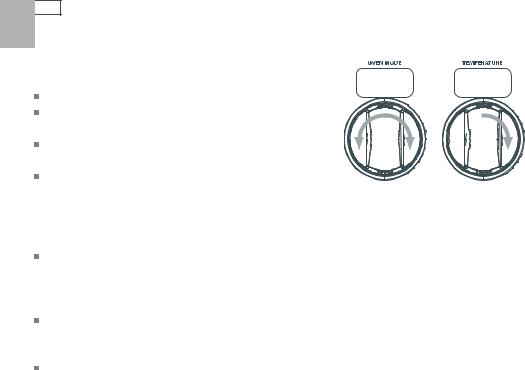
Selecting mode and temperature
To select a mode, turn the oven mode knob.
To select a temperature, turn the temperature knob clockwise. For double ovens, knobs on the left are for the upper oven and knobs on the right are for the lower oven. See the ‘Cooking guidelines’ section for suggested
modes and temperatures.
Knobs may vary
Preheating your oven
Preheat your oven when using the following modes for baking: TRUE CONV, CONV BAKE, BAKE, CONV PASTRY and PASTRY BAKE. These modes are equipped with a fast preheat: the oven will heat to 350°F (175°C) in approximately 10 minutes and to 425°F (225°C) in approximately 15 minutes.
When your oven is preheating, the selected temperature is displayed alternately with the actual oven temperature. When the oven reaches the selected temperature, a beep will sound and the temperature display will change from orange to white.
If you want to increase the oven temperature during cooking, follow these steps to reactivate the fast preheat:
1Turn the oven mode and temperature knobs to OFF.
2Wait for the display lights to go out.
3Then select the new settings.

Using your oven 13 US
CA
Using the oven modes
Baking
For best results when baking, always preheat the oven to the temperature recommended in the recipe.
Make sure cake pans do not touch each other or the sides of the oven by staggering them across shelves.
If using the BAKE mode and baking on more than one shelf (eg layer cakes), stagger the cake pans so one is not directly above another.
TRUE CONV is good for multi-shelf baking as the temperature inside the cavity is even. Do not open the oven door until at least ¾ through the suggested baking time.
When baking double the recipe, especially cookies, it may be necessary to increase the baking time by a couple of minutes.
The circulating air of convection (CONV) modes heats and browns foods more quickly than using non-convection modes.
When converting recipes from BAKE to CONV BAKE, the oven temperature can normally be lowered by 25°F (10°C); the baking time will remain the same. For some recipes, it may work better to reduce the baking time by several minutes and leave the oven temperature unchanged. For recipes with longer baketimes (ie over an hour), best results may be achieved by reducing both slightly.
Food flavors and smells will not transfer between different foods cooked using convection modes. As a general rule, TRUE CONV is excellent for turkeys and baking foods on multiple shelves; CONV BAKE browns dishes well and is ideal for dishes cooked in under an hour; BAKE is generally the mode to choose for delicate foods and those in the oven for longer than an hour.
Important!
Do not place aluminum foil, dishes with reflective qualities or any object on the oven floor as this will cause a heat build-up which will irreversibly damage the porcelain enamel.

US |
14 |
Using your oven |
CA |
|
|
|
|
|
Roasting
Using the ROAST mode will give you a tender and juicy roast that is full of flavor.
Place the meat on the broil/roast system on a shelf so that the top of the roast is in the center of the oven or lower.
Tender cuts should be cooked at a high temperature quickly, while tougher cuts require a lower temperature for a longer time.
Use the meat probe for perfect results – it takes the guesswork out of telling when your roast is done. See the instructions on ‘Using the meat probe’.
Thick pieces of meat take longer to cook than thin pieces of the same weight. Boneless, rolled or stuffed roasts take longer to cook than roasts containing bones.
Poultry should always be well cooked with the juices running clear at an internal temperature of 170°F (75°C).
Roasting uses dry heat. Don’t add water to your roast as this has a steaming effect. Vegetables are excellent cooked on ROAST. You can also place them around meat on the broil/ roast system. Do this partway through cooking a large piece of meat which takes longer than two hours to cook, so that you do not overcook the vegetables. Note that the vegetables will brown and cook more slowly if they have missed the initial searing stage.
In ROAST mode, the initial searing is too hot for roasting bags. Use TRUE CONV, CONV BAKE or BAKE if you are using roasting or oven bags and follow the manufacturer’s guidelines.
Broiling
Using the BROIL, MAXI BROIL and CONV BROIL modes gives you a healthier alternative to frying. It is also a great way to cook vegetables. CONV BROIL is especially suitable for foods that you might normally pan-fry, barbecue or rotisserie. Always broil with the oven door completely closed. Note that power levels are expressed as a percentage from LO (50% power) to HI (100% power) in BROIL and MAXI BROIL modes. Most broiling is carried out on HI, but you may want to reduce the heat to suit your needs. We recommend that you place food on the three-piece broil/roast system. In BROIL and MAXI BROIL, best results may be achieved by preheating the broiler for about five minutes before you begin cooking.
If you use glass or ceramic dishes and pans, be sure that they can withstand the high temperature of the broiler.
To prevent food sticking, spray the grid with a light coating of non-stick cooking spray.
To avoid piercing the meat and letting juices escape, use tongs or a spatula when you turn the meat halfway through the cooking time.

Using your oven 15 US
CA
Tips for dehydrating fruit
To obtain high quality dried fruit, select only unblemished, ripe fruit.
Wash fruit thoroughly and pat dry. Peel if desired. Fruit that is not peeled will take longer to dry. Remove pits, stems or seeds if necessary. Place fruit on a baking tray on a shelf in the oven.
We recommend using TRUE CONV or CONV BAKE at 125°F (50°C).
Tips for proofing bread
Your oven provides an ideal sealed environment for proofing bread.
Preheat the oven on BAKE at 100°F (30°C). When you are ready to proof the dough, turn the temperature OFF, leaving the oven mode knob at BAKE, and place the dough in a covered bowl on a shelf in the warm oven. It will be the perfect temperature to proof dough. The oven is so well insulated that it will stay warm for several hours.
Note: some recipes recommend putting water or ice in the oven with the bread dough during baking. The additional moisture improves the bread crust. You must place the water or ice in a heat resistant dish and on an oven shelf in positions 1 or 2. Do not put it directly onto the oven floor. Placing water, ice or any dish or tray directly on the oven floor will irreversibly damage the porcelain enamel.

US |
16 |
Using your oven |
CA |
|
|
|
Using the meat probe |
|
|
||
|
Use your meat probe to accurately judge when your meat is perfectly cooked. You can use the |
|
|
probe on TRUE CONV, CONV BAKE, ROAST, CONV BROIL and BAKE modes. |
|
1Select the oven mode and temperature. Preheat the oven if appropriate. Remember ROAST and CONV BROIL do not require preheating.
2Insert the metal probe horizontally into the center of the
thickest part of the fully defrosted meat. The thicker the |
c |
|
meat, the longer it will take to cook, so it is important that |
|
|
|
|
|
the probe is measuring the temperature of the meat at its |
|
|
thickest point. Make sure the probe does not touch bone (pull probe away from bone ½”(1.5 cm), fat or gristle, as these will heat up more quickly than the lean meat.
3Place the meat on the broil/roast system.
4When the oven has preheated (if required) to the set temperature, place the broil/roast system in the oven and insert the plug end of the meat probe into the probe socket, using an oven mitt if the oven is hot. The probe socket is on the left hand side of the oven, just under shelf position 7. Make sure the probe is pushed completely into the socket, then close the oven door.
5Select the upper or lower oven for double models using the cavity selector button.
da
b
|
|
|
c |
a |
Metal probe |
c |
Handle |
b |
Plug |
d |
Cable |
6Press the PROBE button on the control panel. The preset temperature of 150°F (65°C) and PROBE will light up in the display. If you want to select a different internal food temperature from the
preset temperature, rotate the |
PUSH TO |
button while the PROBE symbol is flashing. For |
|
CLEAR |
|
temperature guidelines, see the ‘Cooking guidelines’ section.
7During cooking, the display will show the actual internal temperature of the meat. To look at the set internal temperature, press PROBE.
8The oven will beep and automatically turn off when the meat reaches the set internal temperature. The temperature and oven mode displays will remain on and the oven light will go out.
9Return the oven to manual operation by pressing the and temperature knobs to OFF.
PUSH TO |
button. Turn the oven mode |
|
CLEAR |
||
|
To cancel the probe setting before the set temperature has been reached, press the PROBE button
and then the PUSH TO  button.
CLEAR

Using your oven 17 US
CA
Tips for using the meat probe
You can use the meat probe with automatic cooking functions. If the meat reaches the set temperature before the stop time is reached, the probe will turn the oven off.
The internal temperature of the meat will continue to rise by 5-15°F (2-8°C) after you have removed it from the oven, so allow for this in your calculations. Cover with foil and let it rest for 15 to 20 minutes.
Important!
Use only the meat probe supplied with your oven, purchased from your DCS dealer or replaced under warranty by your nearest DCS authorized service agency.
Hold the meat probe at the handle when inserting and removing it from food and the meat probe socket.
Remember to remove the meat probe from the oven before you start a self-clean cycle. Do not store the probe in the oven.
Only use the probe with fully defrosted food.
Wash the meat probe in mild soapy water. It is NOT dishwasher safe.

US |
18 |
Using your oven |
CA |
|
|
|
Automatic cooking |
|
|
||
|
Automatic time (delayed start) cooking will turn the oven on and off at times you have set. |
|
To set automatic time cooking
1Check that the clock shows the correct time.
2In double ovens, choose the upper or lower oven. This is important.
3Select the oven mode and temperature.
4Decide how long the food will take to cook, allowing time for preheating if necessary.
5 |
Press the COOK TIME button and rotate the |
PUSH TO |
button to select this length of time. You |
|
do not need to set a start time. |
CLEAR |
|
|
|
|
|
6 |
Press the STOP TIME button, and rotate the |
PUSH TO |
button to select the time of day you |
|
|
CLEAR |
|
want the oven to stop cooking.
Note: you must set this stop time within eight seconds, or the cook time settings will be automatically adopted. To cancel the cook time settings, turn the oven mode and temperature knobs to OFF, as described in ‘Canceling automatic cooking’.
When automatic cooking is set
The oven mode and temperature knobs will still function (as during manual operation). You can alter these before or during cooking, and you can manually turn the oven off before the set cook time has finished.
Before cooking starts, DELAY, AUTO and the current time will show in the clock display. The oven mode and temperature displays will dim, and the oven light will be off.
During cooking, AUTO, COOK TIME and the remaining cook time will show in the clock display. The oven mode and temperature displays will be bright, and the oven light will be on.
When automatic cooking has finished
When cooking has finished, the oven will beep and turn off. The temperature and oven mode displays will dim, and the oven light will go off. COOK TIME and AUTO will flash in the clock display.
Turn the oven mode and temperature knobs to OFF. The oven light will stay on for eight seconds, and then go off when the oven returns to manual operation.
Using your oven 19 US
CA
Automatic stop cooking
You can set the oven to automatic stop cooking at any time during cooking, or when you turn the oven on.
To set automatic stop cooking
1Check that the clock shows the correct time.
2In double ovens, choose the upper or lower oven. This is important.
3Select the oven mode and temperature.
4 |
Press the STOP TIME button, and rotate the |
PUSH TO |
button to select the time you want the |
|
|
CLEAR |
|
oven to stop cooking.
When automatic stop cooking is set
During cooking, AUTO, COOK TIME and the remaining cook time will show in the clock display. The oven mode and temperature displays will be bright, and the oven light will be on.
When automatic stop cooking has finished
When the cook time has finished, the oven will beep and turn off. The oven and temperature displays will dim, and the oven light will go off. COOK TIME and AUTO will flash in the clock display.
Turn the oven mode and temperature knobs to OFF. The oven light will stay on for eight seconds, and then go off when the oven returns to manual operation.
Canceling automatic cooking
To cancel automatic time and automatic stop cooking, turn the oven mode and temperature knobs to OFF. After eight seconds, the clock display will revert to the time of day, and the oven will return to manual operation.
Important!
Avoid using foods that will spoil while waiting for the cooking cycle to begin. Typical foods to avoid include those containing eggs and dairy products, cream soups, cooked and uncooked meats, poultry and fish.
If cooking will not begin immediately, place only very cold or frozen food in the oven. Most unfrozen food should never stand in the oven for more than two hours before cooking begins. Do not allow food to remain in the oven for more than one hour after cooking finished. Automatic cooking is not suitable for food needing to be cooked in a preheated oven, eg delicate baked goods.
US |
20 |
Cooking guidelines |
CA |
|
|
|
|
|
The recommendations in the following charts are guidelines. A lot of factors affect the exact time and temperature required for baking, roasting and broiling. Follow the instructions in your recipe or on packaging and be prepared to adjust the oven settings and cooktimes to achieve the best possible results for you.
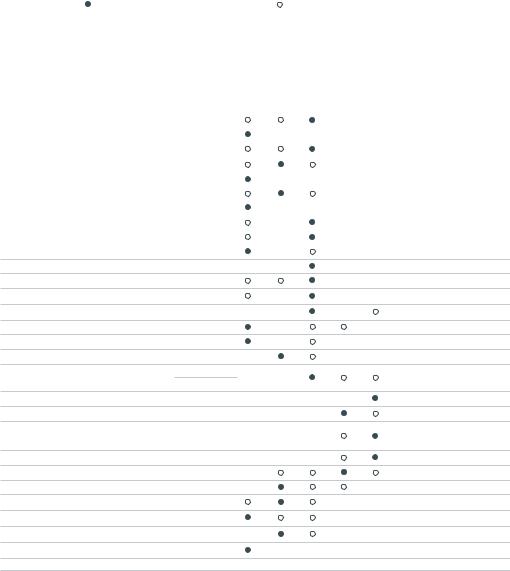
This chart will help you to match your cooking requirements to the most appropriate cooking |
|
|||||||||
mode. Note: |
Recommended method |
|
Alternative method |
|
|
|
|
|||
Baking |
|
TRUE CONV |
CONV BAKE |
BAKE |
CONV PASTRY |
PASTRY BAKE |
ROAST |
BROIL |
MAXI BROIL |
CONV BROIL |
|
|
|
|
|
|
|
|
|
|
|
Bread (rolls) |
|
one shelf |
|
|
|
|
|
|
|
|
|
two shelves |
|
|
|
|
|
|
|
|
|
|
|
|
|
|
|
|
|
|
|
|
Bread (loaf) |
|
|
|
|
|
|
|
|
|
|
Biscuits/Muffins/Sugar cookies |
one shelf |
|
|
|
|
|
|
|
|
|
two shelves |
|
|
|
|
|
|
|
|
||
|
|
|
|
|
|
|
|
|
|
|
Cup cakes/Small cakes |
one shelf |
|
|
|
|
|
|
|
|
|
two shelves |
|
|
|
|
|
|
|
|
||
|
|
|
|
|
|
|
|
|
|
|
Layer cake (8”/20cm or 9” /23cm |
one shelf |
|
|
|
|
|
|
|
|
|
round pans) |
|
two shelves |
|
|
|
|
|
|
|
|
Angel food cake
Pound cake
Layer cake (9”x13”/23x33cm pan)
Butter or chocolate cake
Rich fruit cake
Brownie (9”x13”/23x33cm pan)
Meringues
Fruit pie (two-crust)
Pumpkin pie
from scratch
frozen
English custard tart
Baked cheesecake
Crème caramel and Crème brulee (in ‘water bath’)
Pie crust
Quiche
Pizza
Lasagna
Casserole
Vegetables
Complete oven meal
|
|
|
Cooking guidelines |
21 |
US |
||||
|
|
|
|
|
|
|
|
|
CA |
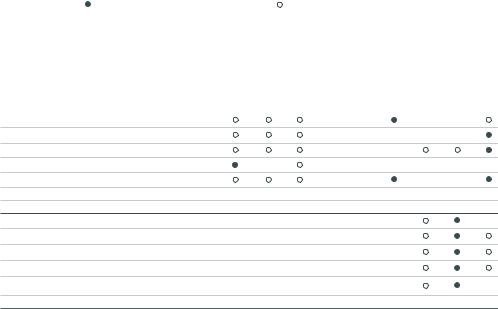
This chart will help you to match your cooking requirements to the most appropriate cooking |
|
|
|||||||
|
|
||||||||
mode. Note: |
Recommended method |
|
Alternative method |
|
|
|
|
|
|
Roasting |
TRUE CONV |
CONV BAKE |
BAKE |
CONV PASTRY PASTRY BAKE |
ROAST |
BROIL |
MAXI BROIL |
CONV BROIL |
|
|
|
|
|
|
|
|
|
|
|
Roast beef/pork/lamb
Roast chicken (whole)
Roast chicken (pieces)
Roast turkey
Vegetables
Broiling
Steak/Chops/Cutlets
Fish
Ground meat patties
Vegetables
Toast

US |
22 |
Cooking guidelines |
CA |
|
|
|
|
|
TRUECONV |
|
Shelf |
|
|
|
|
|
(single; multi) |
Temp °F |
Temp °C |
Time (min) |
||
Baking |
|
|
|
|
|
|
|
|
|
|
|
|
|
Bread |
American sandwich loaf - |
3 |
350 |
175 |
40-50 |
|
|
9”x5”/23x13cm loaf pan |
|
|
|
|
|
Bread |
wholewheat loaf |
3 |
375 |
190 |
35-45 |
|
- 9”x5”/23x13cm loaf pan |
||||||
Cornbread |
|
4 |
425 |
215 |
22-28 |
|
Biscuits |
|
4 |
425-450 |
215-230 |
10-12 |
|
Muffins, large |
|
3 |
375 |
175 |
23-30 |
|
English scones |
|
4 |
425-450 |
215-230 |
10-12 |
|
Sugar cookies |
one shelf |
4 |
375 |
175 |
6-10 |
|
two shelves |
2 & 6 |
375 |
175 |
7-11 |
||
|
three shelves |
2, 4 & 6 |
375 |
175 |
8-12 |
|
Cup cakes/Small |
|
4 |
365 |
185 |
13-18 |
|
cakes |
|
|||||
|
|
|
|
|
||
Layer cakes, yellow, |
one shelf |
4 |
340-350 |
170-175 |
32-38 |
|
white & chocolate |
|
|
|
|
|
|
|
4 & 6 |
340-350 |
170-175 |
32-38 |
||
(8”/20cm round pans) two shelves |
||||||
Layer cake, yellow, |
one shelf |
4 |
340-350 |
170-175 |
27-33 |
|
white & chocolate |
|
|
|
|
|
|
|
4 & 6 |
340-350 |
170-175 |
27-33 |
||
(9”/23cm round pans) two shelves |
||||||
Layer cake, yellow, |
|
|
|
|
|
|
white & chocolate |
|
4 |
340-350 |
170-175 |
32-38 |
|
(9”x13”/23x33cm |
|
|||||
|
|
|
|
|
||
pan) |
|
|
|
|
|
|
Fatless sponge cake |
|
4 |
350 |
175 |
30-40 |
|
Pound cake |
from scratch |
2 |
325 |
160 |
70-80 |
|
mix |
2 |
350 |
175 |
48-58 |
||
|
||||||
Brownie |
from scratch |
4 |
350 |
175 |
20-25 |
|
(8”x8”/20x20cm pan) |
||||||
Angel food cake |
from scratch |
1 |
325-350 |
160-175 |
50-60 |
|
(10”x4”/25x10cm |
mix |
1 |
350 |
175 |
37-47 |
|
tube pan) |
||||||
|
|
|
|
|
||
Meringues |
|
4 |
250-270 |
120-130 |
60-70 |
|
Fruit pie (two-crust) |
from scratch |
2 |
425 then |
215 then |
20 then 25 |
|
375 |
190 |
|||||
|
|
|
||||
|
frozen |
2 |
375 |
190 |
45-65 |
|
Pizza |
from scratch |
4 |
425-450 |
215-230 |
10-15 |
|
frozen |
4 |
375 |
175 |
18-25 |
||
|
||||||
Lasagna |
|
4 |
350-375 |
175-190 |
40-50 |
|
Casserole |
|
3 |
350-360 |
175-180 |
60-90 |
|
Vegetables |
|
4 |
350-375 |
175-190 |
30-60 |
|
|
|
|
|
|
|
|

|
|
Cooking guidelines |
|
23 |
US |
|||
|
|
|
|
|
|
|
|
CA |
CONV BAKE |
Shelf |
|
|
|
|
|
|
|
|
|
|
|
|
|
|||
(single; multi) |
Temp °F |
Temp °C |
Time (min) |
|||||
Baking |
|
|
|
|
|
|
|
|
|
|
|
|
|
|
|
|
|
Bread |
American sandwich loaf - |
2 |
325-350 |
170-175 |
35-50 |
|
|
|
|
9”x5”/23x13cm loaf pan |
|
|
|
|
|
|
|
Bread |
wholewheat loaf |
2 or 3 |
350-375 |
180-190 |
30-45 |
|
|
|
- 9”x5”/23x13cm loaf pan |
|
|
|
|||||
Cornbread |
|
4 |
400-425 |
210-215 |
20-25 |
|
|
|
Biscuits |
|
4 |
400-425 |
210-215 |
8-10 |
|
|
|
Muffins, large |
|
3 |
375 |
175 |
20-25 |
|
|
|
English scones |
|
4 |
400-425 |
210-215 |
8-12 |
|
|
|
Sugar cookies |
|
4 |
375 |
175 |
6-10 |
|
|
|
Cup cakes/Small |
|
4 |
365 |
185 |
13-18 |
|
|
|
cakes |
|
|
|
|
||||
|
|
|
|
|
|
|
|
|
Layer cakes, yellow, |
one shelf |
4 |
340 |
170 |
32-38 |
|
|
|
white & chocolate |
|
|
|
|
|
|
|
|
|
|
|
|
|
|
|
|
|
(8”/20cm round |
two shelves |
4 & 6 |
340 |
170 |
32-38 |
|
|
|
pans) |
|
|
|
|
|
|
|
|
Layer cake, yellow, |
one shelf |
4 |
340 |
170 |
27-33 |
|
|
|
white & chocolate |
|
|
|
|
|
|
|
|
|
|
|
|
|
|
|
|
|
(9”/23cm round |
two shelves |
4 & 6 |
340 |
170 |
27-33 |
|
|
|
pans) |
|
|
|
|
|
|
|
|
Layer cake, yellow, |
|
|
|
|
|
|
|
|
white & chocolate |
|
4 |
340 |
170 |
32-38 |
|
|
|
(9”x13”/23x33cm |
|
|
|
|
||||
|
|
|
|
|
|
|
|
|
pan) |
|
|
|
|
|
|
|
|
Fatless sponge cake |
|
4 |
325-350 |
160-175 |
30-40 |
|
|
|
Pound cake |
from scratch |
2 |
325 |
160 |
60-75 |
|
|
|
mix |
2 |
325-350 |
160-175 |
48-58 |
|
|
|
|
|
|
|
|
|||||
Brownie |
|
|
|
|
|
|
|
|
(8”x8”/20x20cm |
|
4 |
325-350 |
160-175 |
20-25 |
|
|
|
pan) |
|
|
|
|
|
|
|
|
Meringues |
|
2 |
250 |
120 |
60 |
|
|
|
Fruit pie (two-crust) |
from scratch |
2 |
400 then |
200 then |
20 then 25 |
|
|
|
350 |
175 |
|
|
|||||
|
frozen |
2 |
350 |
175 |
45-65 |
|
|
|
Pizza |
from scratch |
4 |
425 |
215 |
10-12 |
|
|
|
frozen |
4 |
375 |
175 |
18-20 |
|
|
|
|
|
|
|
|
|||||
Lasagna |
|
4 |
350-375 |
175-190 |
35-40 |
|
|
|
Casserole |
|
3 |
350 |
175 |
60-90 |
|
|
|
Vegetables |
|
3 or 4 |
350-375 |
175-190 |
30-50 |
|
|
|
|
|
|
|
|
|
|
|
|

US |
24 |
Cooking guidelines |
CA |
|
|
|
|
|
BAKE |
|
Shelf |
|
|
|
|
|
(single; multi) |
Temp °F |
Temp °C |
Time (min) |
||
Baking |
|
|
|
|
|
|
|
|
|
|
|
|
|
Bread |
American sandwich loaf - |
2 or 3 |
350 |
175 |
40-50 |
|
|
9”x5” /23x13cm loaf pan |
|
|
|
|
|
Bread |
wholewheat loaf |
2 or 3 |
375 |
190 |
35-45 |
|
- 9”x5” /23x13cm loaf pan |
||||||
Cornbread |
|
4 |
425 |
215 |
22-28 |
|
Biscuits |
|
4 |
425-450 |
215-230 |
10-12 |
|
Muffins, large |
|
3 |
375 |
175 |
23-30 |
|
English scones |
|
4 |
425-450 |
215-230 |
10-12 |
|
Sugar cookies |
|
4 |
375 |
175 |
6-10 |
|
Cup cakes/Small |
|
4 |
365 |
185 |
15-20 |
|
cakes |
|
|||||
|
|
|
|
|
||
Layer cakes, yellow, |
one shelf |
4 |
340-350 |
170-175 |
32-38 |
|
white & chocolate |
|
|
|
|
|
|
|
|
|
|
|
||
(8”/20cm round |
two shelves |
4 & 6 |
340-350 |
170-175 |
32-38 |
|
pans) |
|
|
|
|
|
|
Layer cake, yellow, |
one shelf |
4 |
340-350 |
170-175 |
27-33 |
|
white & chocolate |
|
|
|
|
|
|
|
|
|
|
|
||
(9”/23cm round |
two shelves |
4 & 6 |
340-350 |
170-175 |
27-33 |
|
pans) |
|
|
|
|
|
|
Layer cake, yellow, |
|
|
|
|
|
|
white & chocolate |
|
4 |
340-350 |
170-175 |
32-38 |
|
(9”x13”/23x33cm |
|
|||||
|
|
|
|
|
||
pan) |
|
|
|
|
|
|
Fatless sponge cake |
|
4 |
350 |
175 |
30-40 |
|
Pound cake |
from scratch |
2 |
325 |
160 |
70-80 |
|
mix |
2 |
350 |
175 |
48-58 |
||
|
||||||
Rich fruit cake |
|
4 |
275-300 |
135-150 |
3-6 hrs |
|
Brownie |
|
|
|
|
|
|
(8”x8”/20x20cm |
from scratch |
4 |
350 |
175 |
20-25 |
|
pan) |
|
|
|
|
|
|
Angel food cake |
from scratch |
1 |
325-350 |
160-175 |
50-60 |
|
(10”x4”/25x10cm |
mix |
1 |
325-350 |
160-175 |
37-47 |
|
tube pan) |
||||||
|
|
|
|
|
||
Meringues |
|
2 |
250-270 |
120-130 |
60-70 |
|
Fruit pie (two-crust) |
from scratch |
2 |
425 then |
215 then |
20 then 25 |
|
375 |
190 |
|||||
|
frozen |
2 |
375 |
190 |
45-65 |
|
Pizza |
from scratch |
4 |
425-450 |
215-230 |
10-15 |
|
frozen |
4 |
375 |
175 |
18-25 |
||
|
||||||
Lasagna |
|
3 or 4 |
350-375 |
175-190 |
40-50 |
|
Casserole |
|
3 |
350-360 |
175-180 |
60-90 |
|
Vegetables |
|
3 or 4 |
350-375 |
175-190 |
30-60 |
|
|
|
|
|
|
|
 Loading...