


1
Warming drawer
WDU/WDV & WDUI/WDVI models
Chau e-plats
Modèles WDU/WDV & WDUI/WDVI
Installation instructions
and User guide
Instructions d’installation
et Guide d’utilisation
US CA

A MESSAGE TO OUR CUSTOMERS
Thank you for selecting this DCS warming drawer. Because of its unique features, we have developed this manual. It contains valuable information on how to properly install, use and maintain your new warming drawer for
years of safe and enjoyable use.
For your convenience, product questions can be answered by a Fisher & Paykel Customer Care Representative
by phone:1-888-936-7872, or email: customer.care@fisherpaykel.com.
NOTE: Please write the model number, code, and serial number on this page for references (located at the front
right hand side of the body of the drawer).
MODEL NUMBER CODE SERIAL NUMBER
NOTE: Inspect the product to verify that there is no shipping damage. If any damage is detected, call the shipper and initiate a damage claim. DCS by Fisher & Paykel is not responsible for shipping damage.
DO NOT discard any packing material (box, pallet, straps) until the unit has been inspected.
1
US
CA
WARNING
The warming drawer is not intended to be used in conjunction with water. DO NOT fill the drawer or warming
cavity with water. Doing so could create a shock hazard, resulting in a possible injury.
WARNING
TO REDUCE THE RISK OF INJURY TO PERSONS IN THE EVENT OF A WARMING DRAWER GREASE FIRE, OBSERVE THE
FOLLOWING: SMOTHER FLAMES with a close-fitting lid, cookie sheet, or metal tray, then turn off the Warming
Drawer. BE CAREFUL TO PREVENT BURNS. If the flames do not go out immediately EVACUATE AND CALL THE FIRE
DEPARTMENT. NEVER PICK UP A FLAMING PAN - You may be burned. DO NOT USE WATER, including wet dishcloths or towels - a violent steam explosion will result. Use an extinguisher ONLY if:
1. You know you have a Class ABC extinguisher, and you already know how to operate it.
2. The fire is small and contained in the area where it started.
3. The fire department is being called.
4. You can fight the fire with your back to an exit.
WARNING
DO NOT use water on grease fires. Turn OFF the warming drawer, then smother the fire with baking soda or use a
dry chemical or foam-type fire extinguisher.
PLEASE RETAIN THIS MANUAL FOR FUTURE REFERENCE.

US
CA
2
TABLE OF CONTENTS
SAFETY PRACTICES AND PRECAUTIONS 3
INSTALLATION INSTRUCTIONS
Specifications 6
Mounting Installation 7
Custom Panel Installation (WDUI/WDVI) 9
Cabinet Installation 10
FEATURES 12
OPERATING INSTRUCTIONS 13
CARE AND MAINTENANCE
Cleaning the warming drawer 14
Removing the drawer 15
Replacing the drawer 16
TEMPERATURE SETTINGS 17
WARRANTY AND SERVICE 18

SAFETY PRACTICES AND PRECAUTIONS
READ AND UNDERSTAND THESE PRECAUTIONS
■ Read these precautions and the entire manual thoroughly before installation or use. This will help to reduce
the risk of fire, electric shock, or injury to persons.
■ Remove all packaging materials from your appliance.
■ Install according to instructions.
■ Be sure to have a qualified service technician install and ground this appliance.
■ Plug into rated outlet: 120 Volts AC, 5 amp min., 15 amp maximum circuit requirement.
PREHEATING
The warming drawer is designed to keep cooked foods warm for extended periods of time. The drawer must
be pre-heated before use on high (see ‘Operating instructions’). If the warming drawer isn’t preheated, the
internal temperature of the food being warmed could fall below the minimum safe level and bacteria could
develop. Always preheat the drawer according to the instructions described in this manual
WARNING:
Do not store items of interest to children in, above or around any appliance. Children could be seriously injured if
they should climb onto the appliance to reach these items.
3
US
CA
■ Children should not be left alone or unattended in an area where appliances are in use. They should never be
allowed to turn knobs, push buttons, sit or stand on any part of an appliance.
■ Children in walkers, or children crawling can be attracted to the door handle and may grab and open the warm-
ing drawer. This can result in injury from the door being pulled open on a child, or severe burns if it is in use
and hot.
Be certain to use only dry pot holders: Moist or damp pot holders on hot surfaces may cause burns from
steam. Do not use a towel or other bulky cloth in place of pot holders.
■ Never store anything in the warming drawer. Flammable materials can catch fire, plastic items may melt or
ignite and other types of items could be ruined.
■ Do not hang articles from any part of the appliance or place anything against the drawer. Some fabrics are
quite flammable and could catch on fire.
■ For safety reasons and to avoid damage to the appliance, never sit, stand, or lean on the warming drawer door.
■ For personal safety, wear proper apparel. Loose fitting garments or hanging sleeves should never be worn
while using this appliance. Some synthetic fabrics are highly flammable and should not be worn while using
this appliance.
■ Do not use aluminum foil to line any part of the warming drawer. Using a foil liner could result in a fire hazard,
or the obstruction of the flow of heat and ventilation air. Foil is an excellent heat insulator and heat will be
trapped underneath it. This trapped heat can upset the perfor mance of the warming drawer parts.
WARNING:
This appliance is designed for warming food. Based on safety considerations, never use the warming drawer to
warm or heat a room.
■ As with any cooking or heating appliance, never leave the warming drawer unattended when warming food,
this could be a fire hazard.
■ Only certain types of glass, heat proof glass-ceramic, ceramic, earthenware or glazes are suitable for use in this
warming drawer. Utensils that are not thermally heat safe may break with sudden temperature changes.

4
SAFETY PRACTICES AND PRECAUTIONS
US
CA
■ Never heat unopened containers, a build up of pressure may cause the container to burst.
■ Grease is flammable, avoid letting grease deposits collect in the warming drawer, clean up spillage.
■ 120 Volts AC, 5 amp min., 15 amp maximum circuit requirement.
■ DO NOT use water on grease fires. Turn OFF the warming drawer, then smother the fire with baking soda or use a
dry chemical or foam-type fire extinguisher.
■ When opening the drawer while keeping sauces (eg tomato sauce) warm, the drawer must be opened slowly to
avoid spillage.
■ Use care when opening a hot warming drawer; to avoid severe burns, open slowly, allow the hot air or steam to
escape before reaching in to remove or replace any foods.
■ Do not repair or replace any part of this appliance unless it is specifically recommended in this manual. All other
servicing should be referred to a qualified Service Technician. Service Technicians must disconnect the power
supply before servicing this appliance.
■ When using the warming drawer: DO NOT TOUCH THE INTERIOR SURFACES or the exterior area immediately sur-
rounding the door until it has had sufficient time to cool to avoid burn injuries.
■ Clean the warming drawer with caution. Avoid steam burns; do not use a wet sponge or cloth to clean the appli-
ance while it is hot. Some cleaners produce noxious fumes if applied to a hot surface. Follow directions provided by the cleaner manufacturer.
■ Be sure all the controls are turned off and the appliance is cool before using any type of aerosol cleaner on or
around the appliance. The chemical that produces the spraying action could, in the presence of heat, ignite or
cause metal parts to corrode.
■ Do not touch the heating element or interior surfaces of the warming drawer, even if they appear dark in color.
They may still be hot enough to cause burn injury. Allow sufficient time to cool.
■ Do not allow flammable materials which may ignite to come in contact with the hot heating element or the inte-
rior surface of the warming drawer until the unit has had sufficient time to cool.

5
US
CA

US
CA
6
INSTALLATION INSTRUCTIONS
SPECIFICATIONS
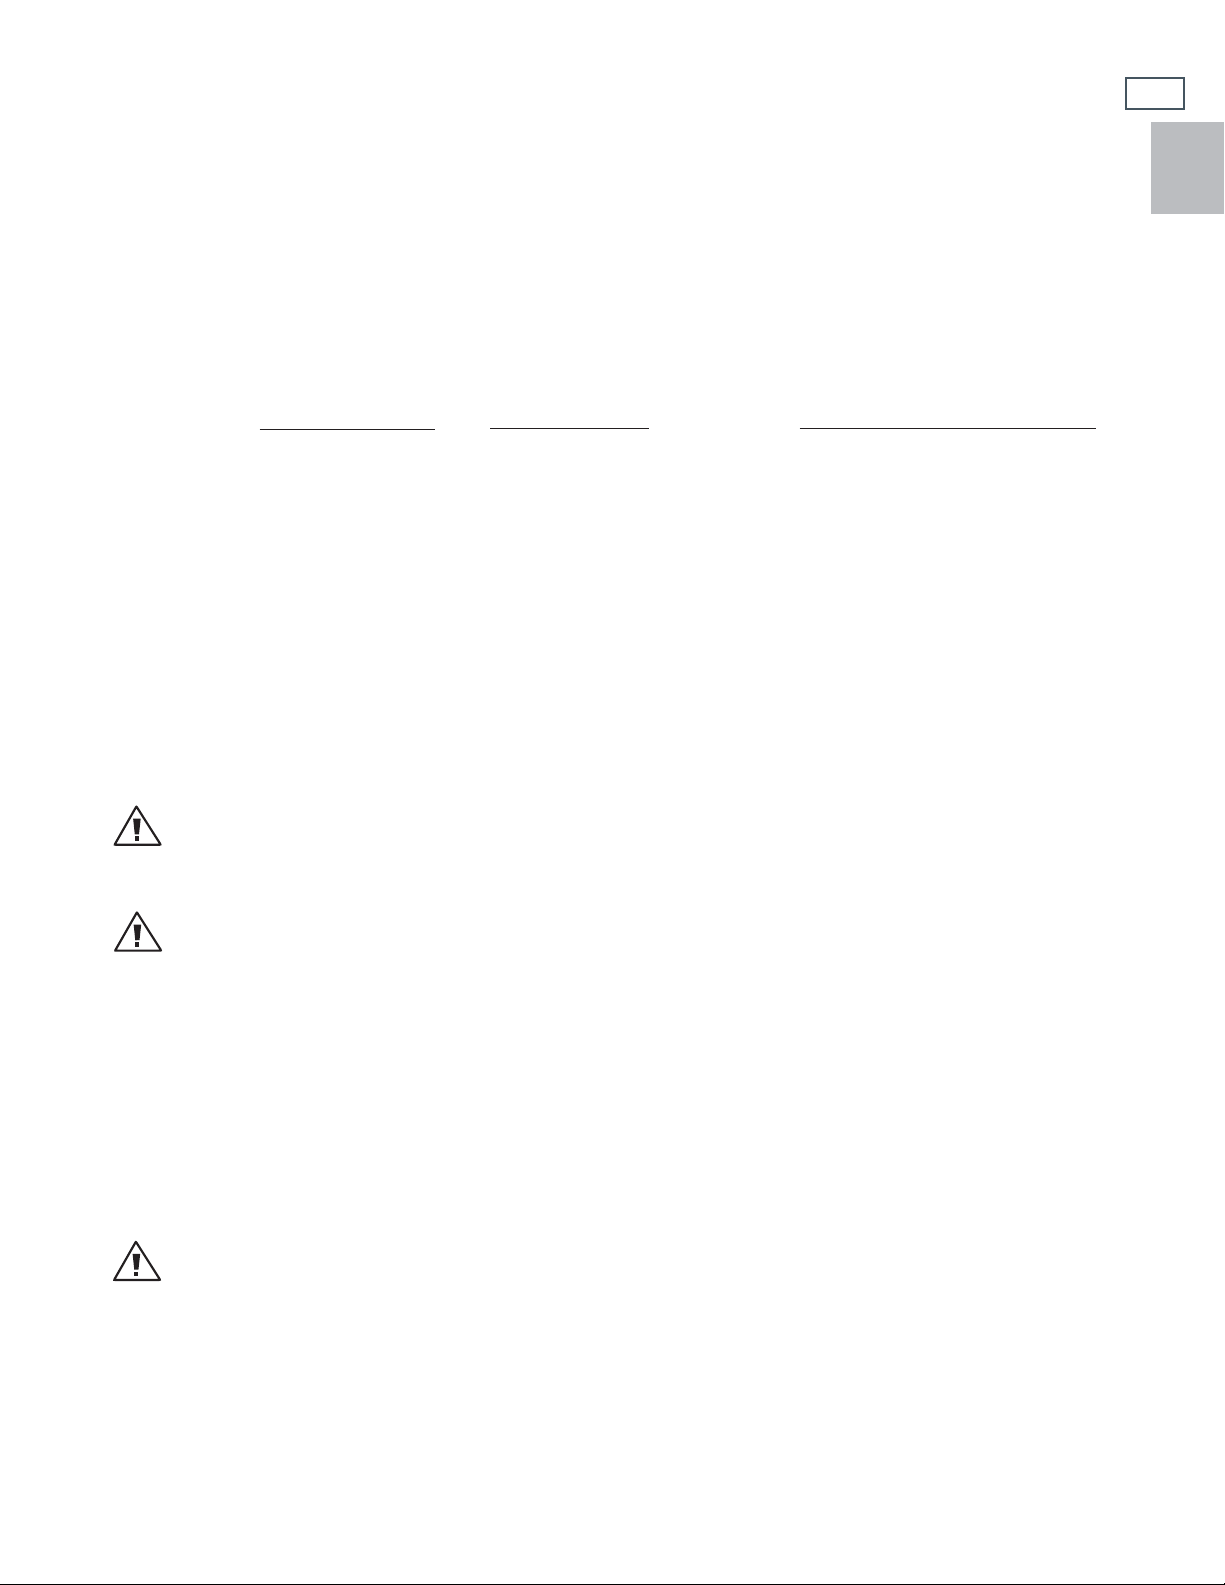
The cabinet depth from the outer edge of the face frame to the inside back of the cabinet or wall should be at
least 24” (see Fig. 1).
The warming drawer should be installed into a base cabinet with minimum outside dimensions of 13-1/4” high by
30” wide by 24” deep.
Power supply required: 120Volts AC; 5 amp min., 15 amp maximum circuit requirement.
+
10 1/16"
–
CUT OUT DIMENSIONS
1-1/2" min.
to bottom
of
countertop
20"
+
25-3/4 1/16"
–
Fig. 1
WDU/WDV-30 DIMENSIONS
(SIDE VIEW)
28-3/16"
25-1/16"
1/2"
23-1/2"
>
24"
–
2x4' beams or
similar support
A 120 volt AC GFI
outlet should be
located below the
warming drawer
POWER
CORD
WARMING DRAWER DIMENSIONS
(FRONT VIEW)
29-11/16"
Fig. 2
WDUI/WDVI
(SIDE VIEW)
24-1/8"
1/2"
23-1/2"
10-1/2"
POWER
CORD
1/4"
Fig. 3
9-3/4"
8-5/16"
9-3/4"
1/4"
Fig. 4
INSTALLATION INSTRUCTIONS
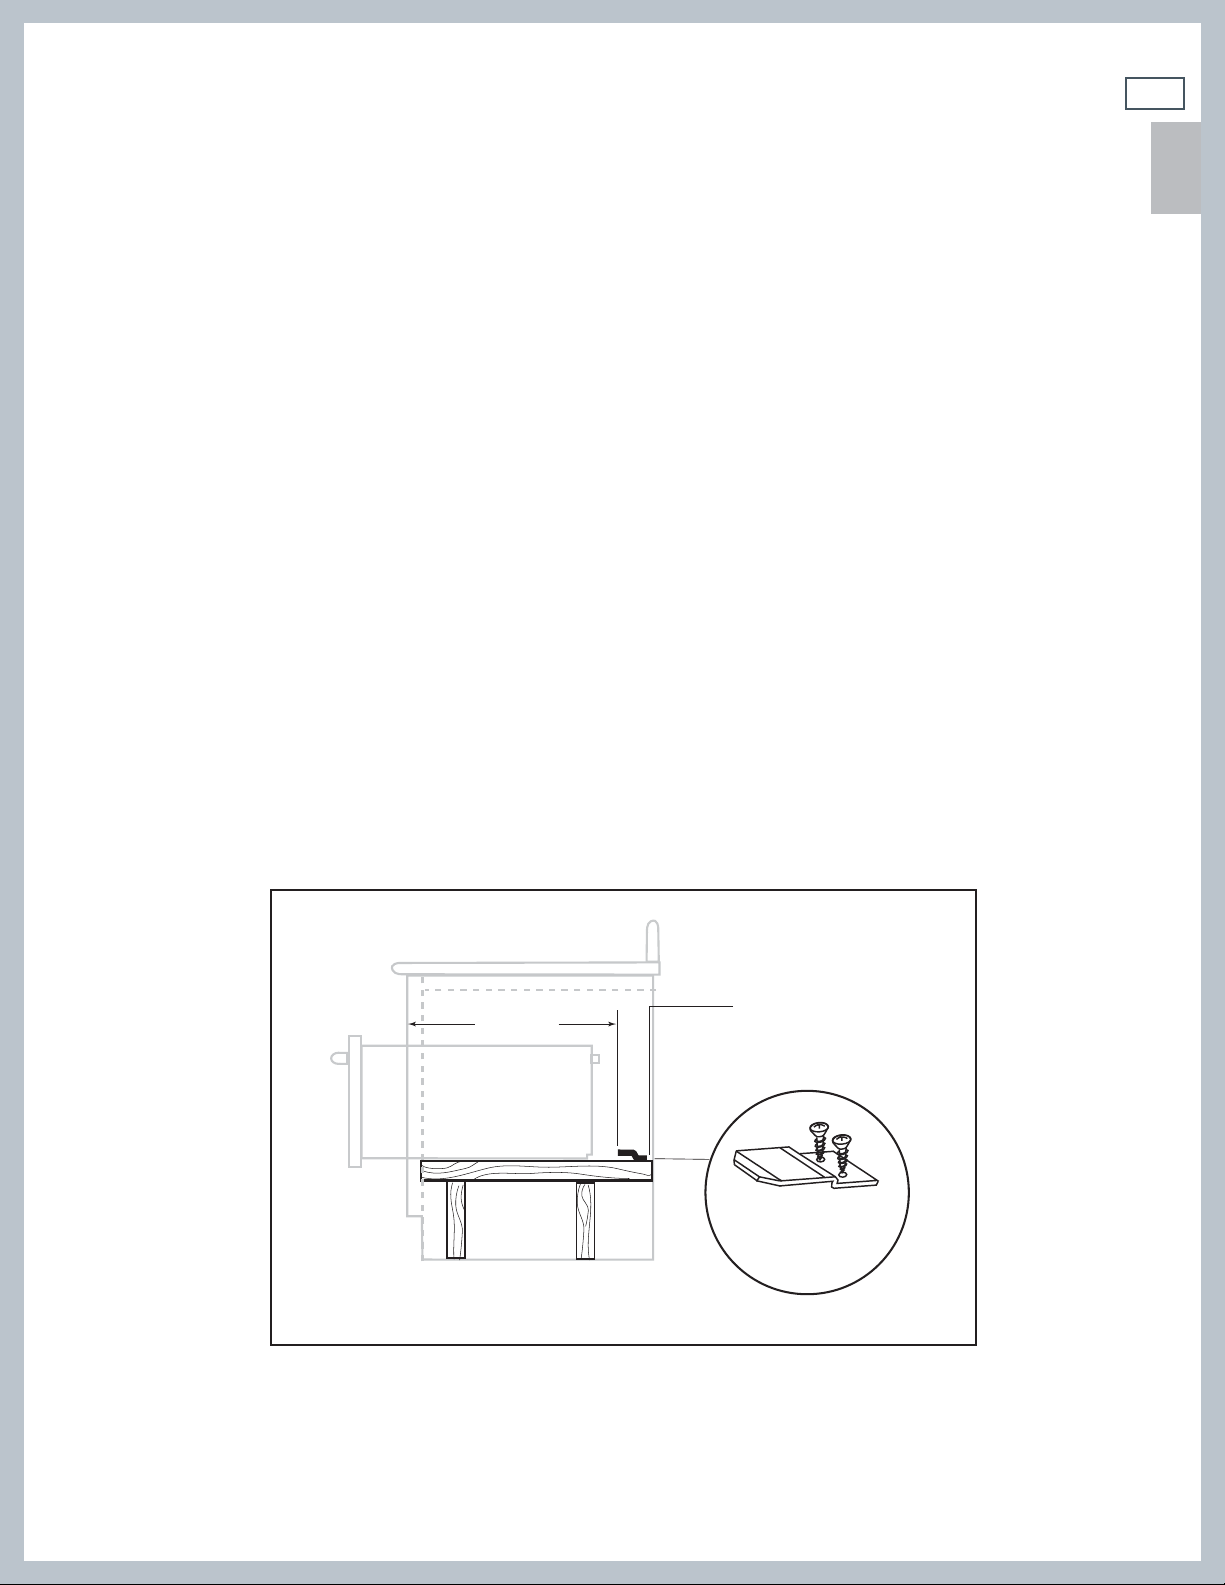
MOUNTING INSTALLATION
The lower rear corners of the cabinet need to provide proper support to the back of the warming drawer and
the anti-tip mounting clips. A 120 volt AC outlet should be located no further than 36 inches from the back
center of the warming drawer.
The bottom rear section of the cabinet should be made of solid plywood or two 2x4 beams. It holds the anti-tip
mounting clips and supports the weight of the warming drawer, which is 90 lbs. (see Figs. 5 and 6). If two 2x4
beams are used, the distance between their centers must be 20” to be able to secure the Warming Drawer.
STEP 1
Use the screws provided and attach the mounting clips. They must be installed for anti-tip safety to the bottom support at the back. See placement dimensions in the figures below (see Figs. 5 and 6).
STEP 2
Plug power cord into AC outlet. Slide the body onto the anti-tip mounting clips (see Fig. 6).
STEP 3
Use the two supplied 1-1/2” long screws through the two embossed holes (see Fig. 7) to secure the front of the
warming drawer.
7
US
CA
21-1/2"
Slide body
on to anti-tip
mounting clips
mounting clips
Fig. 5
US
CA
8
INSTALLATION INSTRUCTIONS
Slot
Slot
Power cord
Fig. 6
20"
Center line
to center line
for mounting clips for
WDU-30
WDUI
Fig. 7
1-1/2”
mounting
screws
INSTALLATION INSTRUCTIONS
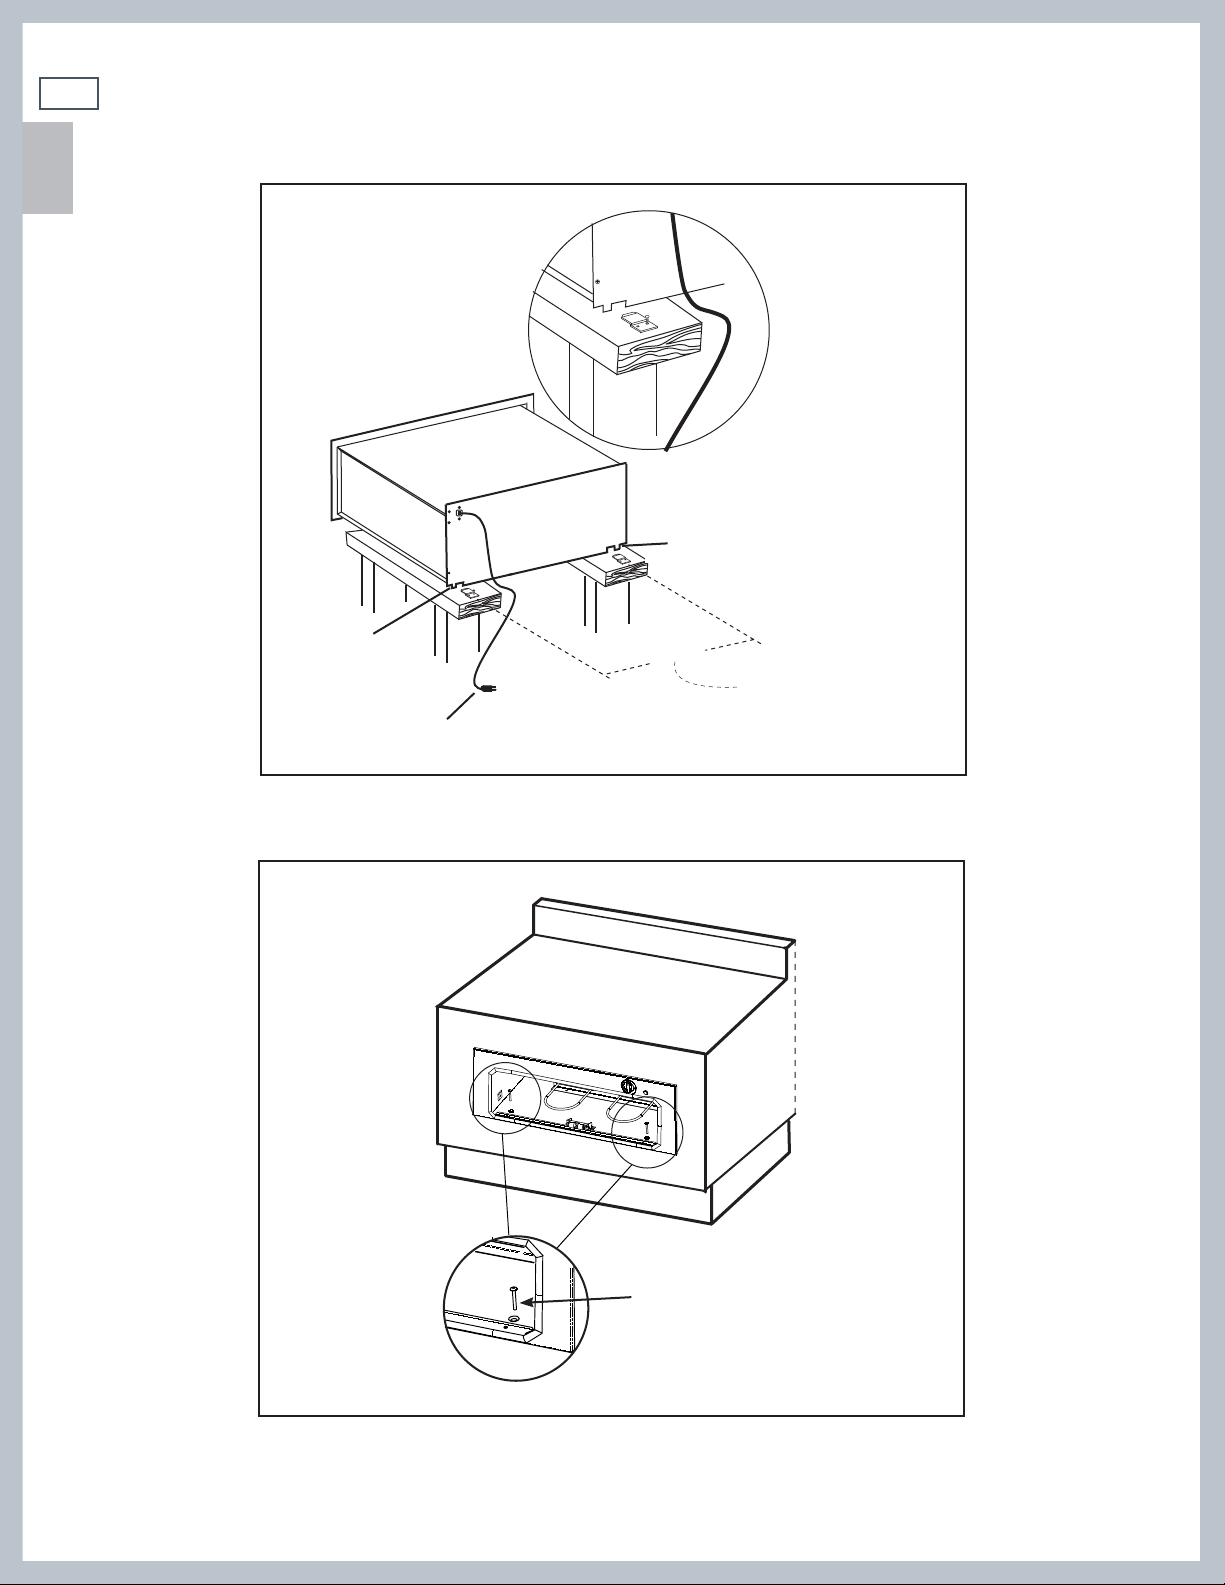
CUSTOM PANEL INSTALLATION OF THE INTEGRATED WARMING DRAWER WDUI/
WDVI
STEP 1
Remove drawer as per instructions (see section ‘Care and maintenance’).
STEP 2
Check the dimensions of the front face (see Fig. 8).
STEP 3
Cut the custom panel to the desired dimensions, knowing that the panel must cover the paper front template
plus 1/8” on all four sides for a good presentation. The thickness of the custom panel must be greater than
9/16” to allow for clearance for the tips of the screws holding the drawer when the custom panel is mounted.
STEP 4
Center the provided paper front template on the back of the custom panel to drill or cut the clearance areas for
the hardware holding the drawer. (Note: the drill sizes and callouts are on the template.)
STEP 5
Fasten the custom panel to the front face with the supplied screws as shown in Fig. 8.
9
US
CA
Screws to hold
custom panel to
warming drawer
Front face
( WDUI/WDVI
only)
ø 1/2” clearance
1/2” deep
Custom panel
11/16” x 2-1/8” clearance
1/8“deep
29-11/16”
25-3/4”
10-1/2”
8-5/16”
Paper front
template
ø 1/4” clearance
5/16” deep
Fig. 8
10
INSTALLATION INSTRUCTIONS
US
CA
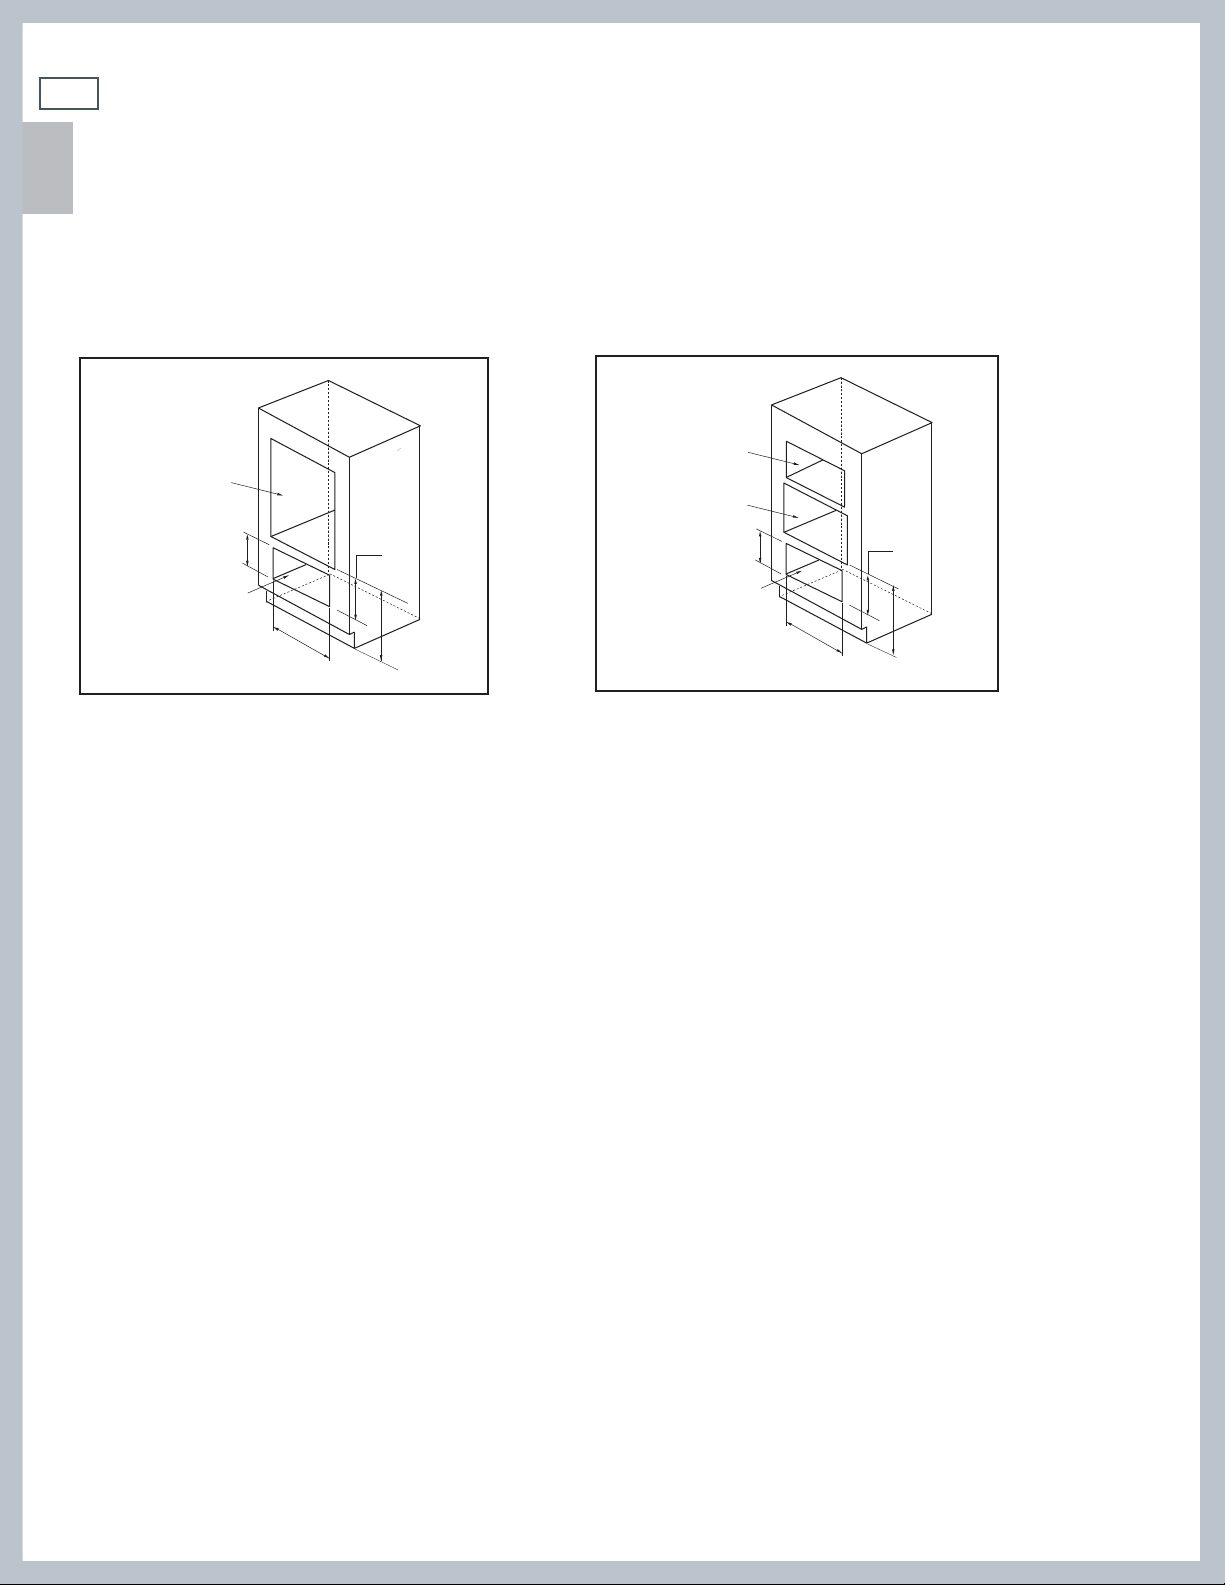
CABINET INSTALLATION
DOUBLE wall oven and warming
drawer Installation
double
wall oven
cutout
+
10 1/16"
–
warming drawer
cutout**
+
25-3/4 1/16"
–
Fig. 9
11-3/16"
15-3/4"
SINGLE wall oven and microwave and
warming drawer Installation
microwave
cut-out
single
wall oven
cutout
+
10 1/16"
–
warming drawer
cutout**
25-3/4 1/16"
+
–
11-3/16"
18-3/4"
Fig. 10
**The floor of the opening should be constructed of plywood strong enough to support the weight of
the oven (or use 2x4 constructions - see Fig. 1)
 Loading...