

Page 1

dCS Verona
Master Clock
User Manual
Software Release 1.0x
September 2004
© 2004 dCS Ltd.
All rights reserv ed. No part of this pub lication may be rep roduced, stored in or
introduced into a retrieva l system, or transm itted in any form , or by any means
(electronic, m echanical, photoco pying, recording or other wise) without the prior
written permission of dCS
relation to this publicat ion may be liabl e to crimina l prosecution an d civil claim s
for damages.
1
. Any person who does any unauthorised act in
Information contained in this manual is subject to change without notice, and
whilst it is checked for accuracy, no liabilities can be accepted for errors.
1
dCS is Data Conversion Systems Ltd. Company registered in England No. 2072115.
Page 2

dCS Verona User Manual Manual for Software Issue 1.0x
dCS Ltd September 2004
Manual filename: Verona Manual v1.0x.doc Page 2 email: more@dcsltd.co.uk
English version web-site: www.dcsltd.co.uk
Page 3

dCS Verona User Manual Manual for Software Issue 1.0x
dCS Ltd September 2004
PRODUCT OVERVIEW
The dCS Verona is a consumer version of the dCS 992 and 995 professional
Master Clocks.
The Verona generates ver y stable clocks at either 44.1 or 48kHz, accurate to
better than 1 part p er m illion. T he usual a pplicat ion is sync hron ising th e units in
SACD / CD systems, where a 44.1kHz Word Clock is used throughout. The
improved synchronisation and stability offered by the Verona enhances the
sound quality, extracting more depth and detail from high quality recordings.
Most customers use the Verona with a set of dCS equipment, however the
Verona m ay be used with any transp ort or other d igital sourc e that will accept a
44.1 or 48kHz reference clock in either Word Clock or SPDIF clock formats.
Verona features an Ex ternal Reference Input, allowing the Master Clock to be
slaved to a even more accurate ref er ence, s uc h as a GP S r ece i ver or an a tomic
clock, if desired. The Verona will convert a variety of audio sample rates or
standard frequencies to either of the two clock frequencies, cleaning the
reference signals in the process.
In common with all dCS converters, the Verona is based o n our flexible digital
audio platform which makes extensive use of software configurable chips –
FPGA’s and DSP’s. This allows the interna l sof tware t o be up dated f rom tim e to
time, either from a dCS CD or from a PC, ad ding extra featur es and facilities to
your system with a minimum of fuss.
Manual filename: Verona Manual v1.0x.doc Page 3 email: more@dcsltd.co.uk
English version web-site: www.dcsltd.co.uk
Page 4

dCS Verona User Manual Manual for Software Issue 1.0x
dCS Ltd September 2004
CONTENTS
Product Overview..............................................................................................3
Contents.............................................................................................................4
About this Manual 6
What does the coloured text mean? 6
About Sample Rates x 6
Step-by-Step Guide ...........................................................................................8
Preliminaries 8
Connecting the System for DSD 9
Connecting the System for Dual AES 9
Typical Applications........................................................................................10
Using a Verona with an upsampling transport 10
Using a Verona with a DSD upsampler 11
Using a Verona with a GPS clock 13
The Software – The Menu...............................................................................14
Using the Menu 14
Opening the Menu 14
Types of Menu Page 14
Closing the Menu 15
Menu Sequence 15
Couple – Setting the format of the Ext Ref Input 15
Bright x - Display Brightness 16
TimeOut – Menu Time Out Setting 16
Test - Display Test 16
Issue – Software Issue State 16
Temp – Unit Internal Temperature 16
Serial – Unit Serial Number 17
Contact - Contact information 17
CDUpdate – Software Update By CD 17
Factory – Restoring Factory Defaults 19
The Hardware – Controls and Connectors ...................................................20
Front Panel 20
Key to Front Panel 20
Power Button x 20
Clock Frequency Button (
Dither Button (
Status Indicator x 21
Remote Control Sensor x 21
Main Display x 21
Mode Indicator x 21
Menu Button (
Step Back)20
Step)21
Select)21
Rear Panel 22
Key to Rear Panel 22
Word Clock Outputs 1 - 5 22
SPDIF Outputs 1 – 3 22
External Reference Input 22
1394 Interface 23
Power Link 23
SUC 23
Power switch 23
IEC Power Inlet 23
Mains Fuse 23
Additional Information 23
Verona Technical Information .........................................................................24
Digital Interface Specifications 24
Output Frequencies 24
Clocking 24
Synchronising to Ext Ref In x 24
Manual filename: Verona Manual v1.0x.doc Page 4 email: more@dcsltd.co.uk
English version web-site: www.dcsltd.co.uk
Page 5

dCS Verona User Manual Manual for Software Issue 1.0x
dCS Ltd September 2004
Power requirements 25
Size and Weight 25
Operating Conditions 25
General Technical Information.......................................................................26
Clock Dither 26
Using your dCS Verona for the first time ........................................................28
What’s in the Box? 28
Safety Notice 28
Mains Voltage Setting 29
Positioning the Unit 29
Options.............................................................................................................30
Mains Supply Voltage 30
Having Your Options Changed 30
Maintenance and Support...............................................................................32
Service & Maintenance 32
Mains Fuse 32
Replacing a Blown Fuse x 32
Updating your Verona 33
Software Updates x 33
Hardware Updates x 33
Safety and Electrical Safety 34
Cleaning the Case 34
Troubleshooting ..............................................................................................36
Fault Indication 36
Power interruption 36
Power up test errors 36
Troubleshooting Guide 37
The unit fails to power up 37
The DAC/DDC suddenly mutes, Verona repeats its’ power-up sequence 37
The system fails to lock to Verona 37
Periodic clicks are heard from the loudspeakers 37
The Display turns on briefly when a control is operated, then turns off 38
Menu Timeout does not work 38
If You Need More Help ....................................................................................39
Other Information 39
Indexes and Software Version Numbers.......................................................40
Software History 40
Definitions and Abbreviations 40
Key to Cable Identification 41
List of Tables 42
List of Figures 42
Keywords and Phrases 43
Manual filename: Verona Manual v1.0x.doc Page 5 email: more@dcsltd.co.uk
English version web-site: www.dcsltd.co.uk
Page 6

dCS Verona User Manual Manual for Software Issue 1.0x
dCS Ltd September 2004
About this Manual
If you have not used a Verona before, please read the s ection “Using your dCS
Verona for the first time” on page 28.
This manual has be en arranged with th e most comm only used s ections placed
first:
• table of contents (page 4)
• step-by-step (page 8) and applications guides (page 10)
• detailed software and hardware infor mation (page 14)
• technical information (page 24)
• information for first time users (page 28)
• options, maintenance and troubleshooting (page 30)
• index section (page 40)
What does the coloured text mean?
If you are reading a colour print or a soft copy of this manual, you will notice that
some types of text are in colour:
• Brown text in bold is a reference to another section or page. Sometimes, if
you are reading a soft copy of the m anual, page numbers are h yperlinks –
click on them and you will go there.
• Blue text is used for controls and connectors, described in the hardware
section.
White text in bold on black is used for alternat ive control functions , such
•
as menu operation.
• Pink text is a menu page or setting.
• Green text in bold shows what appears on the display.
• Purple text in bold is used for indicators.
IMPORTANT! Important information is presented like th is - ignoring this may cause yo u to
damage the unit, or invalidate the warranty.
The manual is designed to be helpful. If there are points you feel we could cover
better, or that we have missed out - please tell us.
About Sample Rates x
All references to sample rates in this manual use the unit kS/s (kilo Samples per
second) rather than the technically incorrect kHz.
Manual filename: Verona Manual v1.0x.doc Page 6 email: more@dcsltd.co.uk
English version web-site: www.dcsltd.co.uk
Page 7

dCS Verona User Manual Manual for Software Issue 1.0x
dCS Ltd September 2004
Manual filename: Verona Manual v1.0x.doc Page 7 email: more@dcsltd.co.uk
English version web-site: www.dcsltd.co.uk
Page 8

dCS Verona User Manual Manual for Software Issue 1.0x
dCS Ltd September 2004
STEP-BY-STEP GUIDE
This section guides you t hroug h s ett ing up the unit for basic o per at io n. You may
find this useful if you have not used the Verona for a while.
Preliminaries
The Control Summary sheet details the menu struc ture and out lines th e use of
the front panel contr ols. For more information, see the Menu section on page
14.
For digital interfaces, use with cables designed for digital audio:
• for Word Clock interfaces, use 75Ω coax cables fitted with BNC plugs.
• for SPDIF RCA interfaces, use 75Ω coax cables fitted with RCA Phono
plugs.
do this: Connect the power cable suppl ied to the Power inlet on the Verona r ear panel,
plug the other end into a convenient power outlet. Set th e power s witch beside
the power inlet to the on position (I).
IMPORTANT! Please do not use an excessively thick power cable as this may damage the
power inlet connector. Such damage is not covered by the warranty.
do this: Press the Power button and wait about 5 seconds while Verona configures
itself.
The display will show in sequence: Verona, Testing and either 44.1kHz or
48kHz.
If the unit is likely to be set in an unfamiliar state, you can reset it as follows:
do this: Press the
shows Factory. Press the
The unit will display Defaults. T he PWR indicator and perh aps the OK indicator
will be lit, the others should be off.
Menu button once, then press the St ep Back button so the disp lay
Select button and wait a second.
Manual filename: Verona Manual v1.0x.doc Page 8 email: more@dcsltd.co.uk
English version web-site: www.dcsltd.co.uk
Page 9

dCS Verona User Manual Manual for Software Issue 1.0x
dCS Ltd September 2004
Connecting the System for DSD
Most owners will use the Verona to clock other dCS equipment at 44.1k Hz.
do this: If necessary, use the Clock Frequency button to set the outputs to 44.1kHz.
do this: Connect one of the Verona‘s Word Clock Outputs to the W ord Clock input of
each unit in the chai n – the transport, the DSD upsam pler and the DAC. The
five outputs are the same.
do this: Connect a 1394 cable f rom the Verdi to the DAC and from the Purcell to the
DAC. Connect an AES cable from the Verdi to the Purcell’s AES input.
IMPORTANT! It is essential to lock the transport to the Verona. If this is not done, the
source will not be synchronised to the rest of the system, causing locking
problems or regular clicks.
A Verdi or La Scala will s lave to the Verona automatically, the WClk indicator wil l
light to confirm this.
do this: For Purcell (v2.00 or later), select the required input then set the WClk menu
page to WClk: In. The WClk indicator will lig ht to confirm that the upsampler is
locked. Set the Output to DSD.
do this: For Elgar Plus or Delius, select the 1394 input then set the MS menu page to
MS: Sync. The SDIF indicator (Elgar) or WClk indicator (Delius) will light to
confirm that the DAC is locked.
See the “Typical Applications” section on page 10 for more details.
Connecting the System for Dual AES
For owners who prefer to use Dual AES it is important to choose compatible
sample rates. The Dual AES sample rate MUST be exactly 2 or 4 times the
source sample rate and clock frequency.
do this: If necessary, use the Clock Frequency button to set the outputs to 44.1kHz.
do this: Connect one of the Verona‘s Word Clock Outputs to the W ord Clock input of
each unit in the chai n – the transport, the DSD upsam pler and the DAC. The
five outputs are the same.
IMPORTANT! It is essential to lock the transport to the Verona. If this is not done, the
source will not be synchronised to the rest of the system,causing locking
problems or regular clicks.
do this: Connect a 1394 cable f rom the Verdi to the DAC. Connect an AE S cable from
the Verdi to the Purcell’s AES input. Connect 2 AE S cables from Purcell’s AES
outputs to the DAC’s AES inputs.
A Verdi or La Scala will s lave to the Verona automatically, the WClk indicator wil l
light to confirm this.
do this: For Purcell (v2.00 or later), select the required input then set the WClk menu
page to WClk: In. The WClk indicator will lig ht to confirm that the upsampler is
locked. Set the Output to 88.2 kS/s Dual AES or 176kS/s Dual AES.
do this: For Elgar Plus (v4.30 or la ter) or Delius (v2.30 or later), select the Dual AES
input then set the MS menu page to MS: Sync. The SDIF indicator (Elgar) or
WClk indicator (Delius) will light to confirm that the DAC is locked.
If the source sam ple rate is 48kS/s or 9 6kS/s and has a W ord Clock input, set
Verona to 48kHz and set Purcell to upsample to 96 or 192kS/s.
Manual filename: Verona Manual v1.0x.doc Page 9 email: more@dcsltd.co.uk
English version web-site: www.dcsltd.co.uk
Page 10
dCS Verona User Manual Manual for Software Issue 1.0x
dCS Ltd September 2004
TYPICAL APPLICATIONS
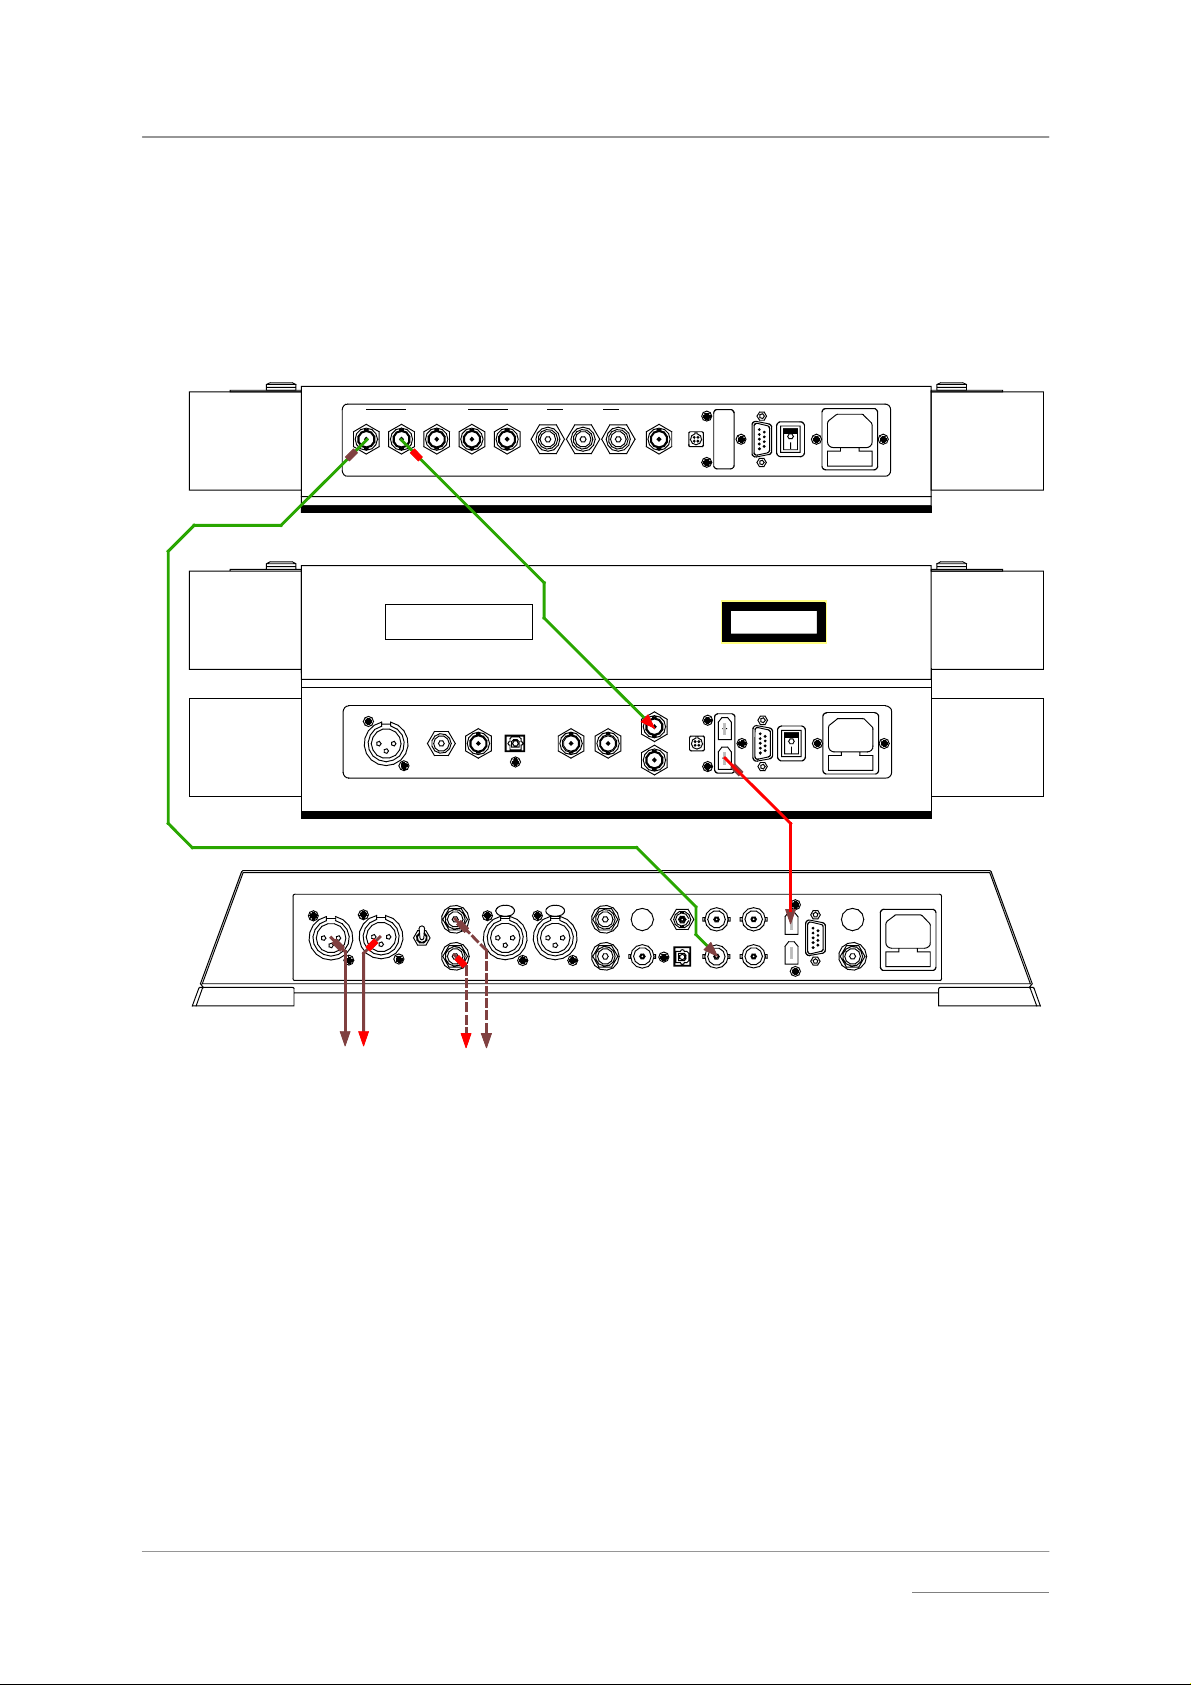
Using a Verona with an upsampling transport
This is the simplest disc-only system using the Verona. The La Scala outputs
DSD data whether you play SACDs or ordinary CDs.
12345 123
44.1kHz Word Clocks
CAUTION: VISIBLE AND INVISIBLE
LASER RADIATION. WHEN OPEN,
DO NOT STARE INTO BEAM.
AES
L R OUTPUT
LEVEL
HIGH
LOW
EXT. RE F. I NSPDIF OUTPUTSWORD CLOCK OUTPUTS
CH2
BNC
LRAES 1 AES 2 RCA1 S T
PUSH PUSH
CH1RCA TOSLINK
IN
SDIF
WORDCLOCK
OUT
A
BNC
POWER
LINK
POWER
LINK
(SACD+CD)
CH1
TOSLINKRCA2
IN - WORDCLOCK - OUT
SUC1394
1
POWER ~
dCS Verdi La Scala
CLASS 1
LASER PRODUCT
SUC1394
1
DSD
SUC
CH2
DSD / SDIF
1394
dCS Verona
SACD Transport
dCS Elgar Plus
B
POWER
REC OUT
Master Clock
DAC
LR
Balanced
Outputs
- or -
RL
Unbalanced
Outputs
To Power Amplifier or Preamplifier
Figure 1 – Using Verona to clock a La Scala and an Elgar Plus
do this: Connect up as shown in Figure 1.
do this: The first time you use th is arrangement, open the menu and run the Factory
routine on all three units. This sets the Verona to 44.1kHz.
do this: If necessary, use the Input b utton on the Elgar Plus to select the 1394 input.
Open the Elgar’s menu and set the MS page to MS:Sync.
It is as simple as that.
Manual filename: Verona Manual v1.0x.doc Page 10 email: more@dcsltd.co.uk
English version web-site: www.dcsltd.co.uk
Page 11
dCS Verona User Manual Manual for Software Issue 1.0x
dCS Ltd September 2004
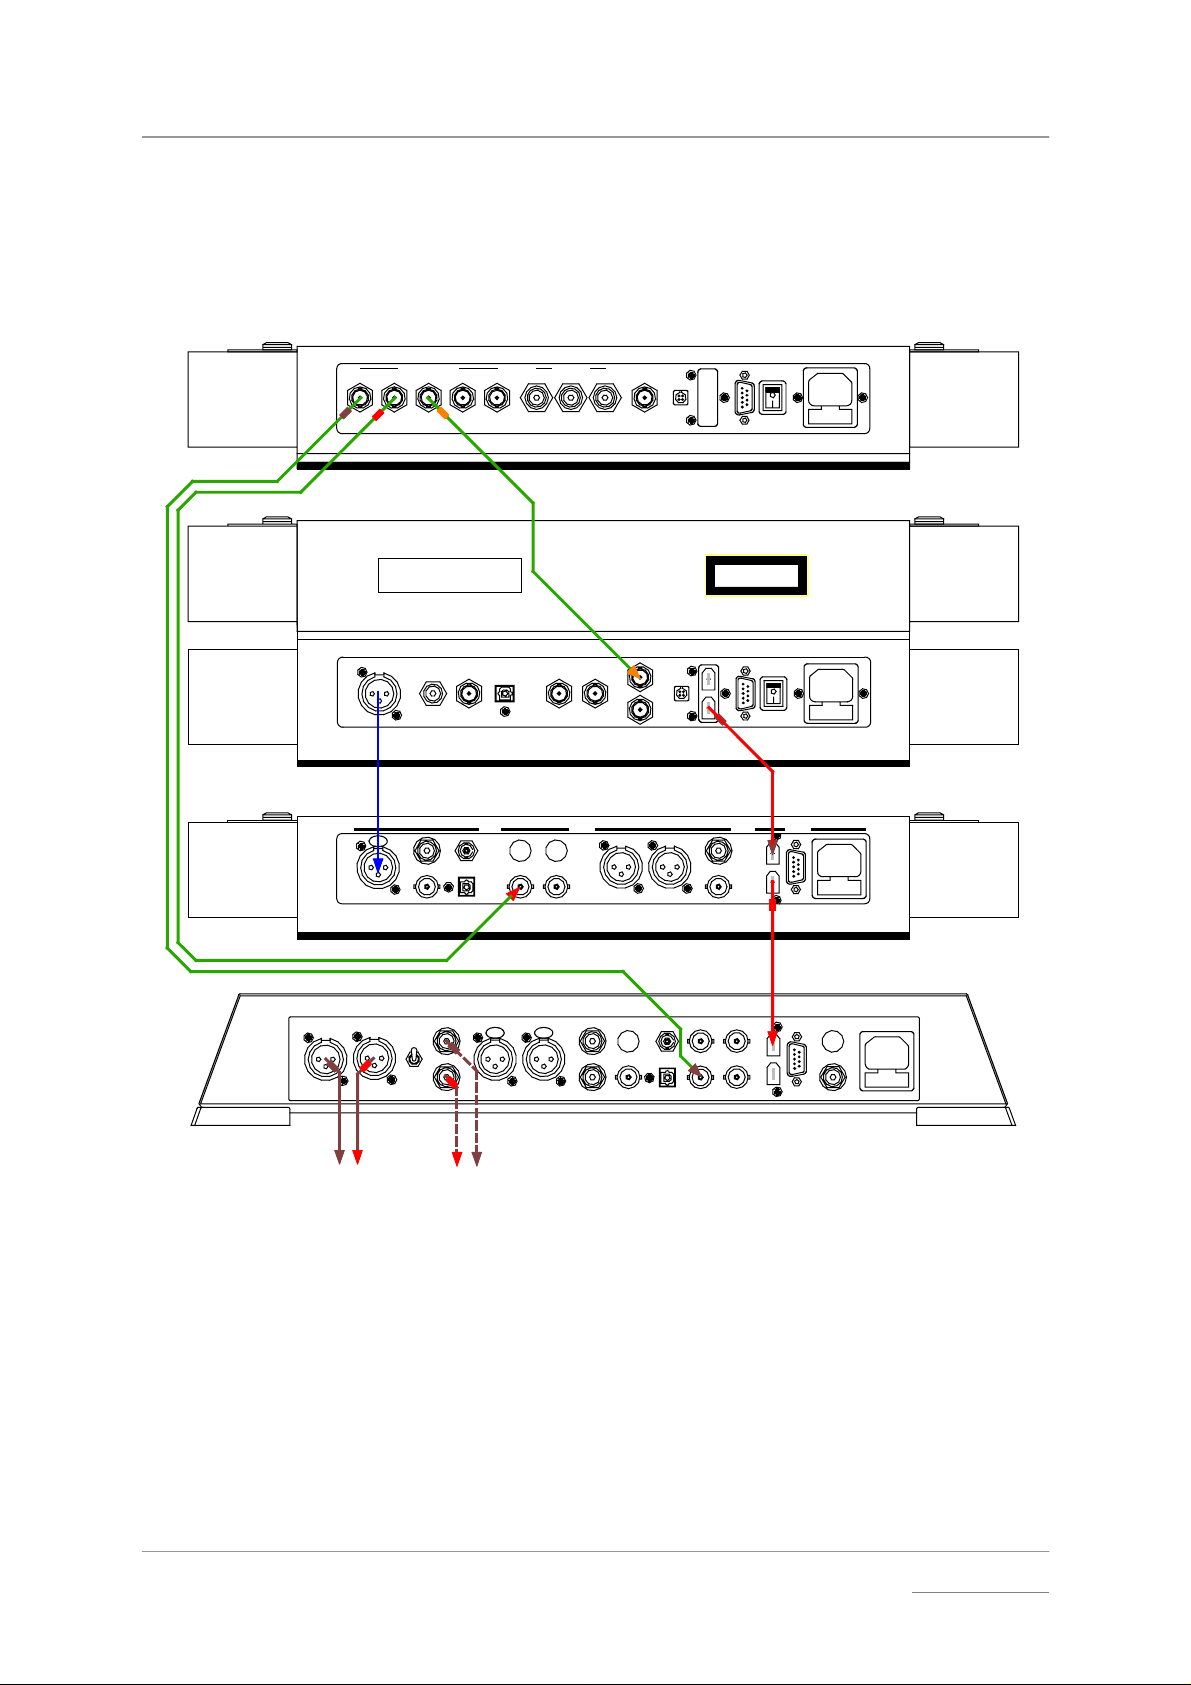
Using a Verona with a DSD upsampler
If you have a Verdi rather than a La Scala, you can still upsample your CDs to
DSD by adding a 1394-equipped Purcell to the system.
EXT. REF. INSPDIF OUTPUTSWORD CLOCK OUTPUTS
12345 123
44.1kHz Word Clocks
CAUTION: VISIBLE AND INVISIBLE
LASER R ADIATION. WHEN OPEN,
DO NOT STARE INT O BEAM.
AES
BNC
CH1RCA TOSLINK
CH2
IN
SDIF
WORDCLOCK
OUT
16 bit / 44.1kS/s
(CD)
DIGITAL INPUTS DIGITAL OUTPUTS POWER
AES RCA
PUSH
ST
RCA
TOSLINK
BNC
WORDCL OCK
AB
OUT
IN
AES1 AES2
POWER
LINK
POWER
LINK
LASER PRODUCT
DSD
(SACD)
BNC
1
CLASS 1
1
dCS Verona
SUC1394
POWER ~
dCS Verdi
SUC1394
dC S Purcell
OPTION
SUC
1394
1
Master Cloc k
SACD Transport
Upsampler
DSD
LROUTPUT
LR
Balanced
Outputs
- or -
LRAES 1 AES 2 R CA1 ST
LEVEL
HIGH
LOW
PUSH PU SH
RL
Unbalanced
Outputs
To Power Amplifier or P reamplifier
(SACD+CD)
SUC
CH2
1394
TOSLINKRCA2
CH1
DSD / SDI F
IN - WORD CL O C K - O U T
A
BNC
dCS Elgar Plus
B
POWER
REC OUT
DAC
Figure 2 - Using Verona to clock a Verdi, a Purcell and an Elgar Plus
do this: Connect up as shown in Figure 2.
do this: The first time you use th is arrangement, open the menu and run the Factory
routine on all four units. This sets the Verona to 44.1kHz.
Manual filename: Verona Manual v1.0x.doc Page 11 email: more@dcsltd.co.uk
English version web-site: www.dcsltd.co.uk
Page 12

dCS Verona User Manual Manual for Software Issue 1.0x
dCS Ltd September 2004
do this: If you prefer, you can connect one of the Purcell’s other inputs to the Verdi
instead of using the AES input. Select that input using the Purcell’s Input
button.
do this: Open the Purcell’s menu and set the WClk page to WClk:In. The Purcell will
lock to the Verona.
do this: If necessary, use the Input b utton on the Elgar Plus to select the 1394 input.
Open the Elgar’s menu and set the MS page to MS:Sync.
Manual filename: Verona Manual v1.0x.doc Page 12 email: more@dcsltd.co.uk
English version web-site: www.dcsltd.co.uk
Page 13
dCS Verona User Manual Manual for Software Issue 1.0x
dCS Ltd September 2004
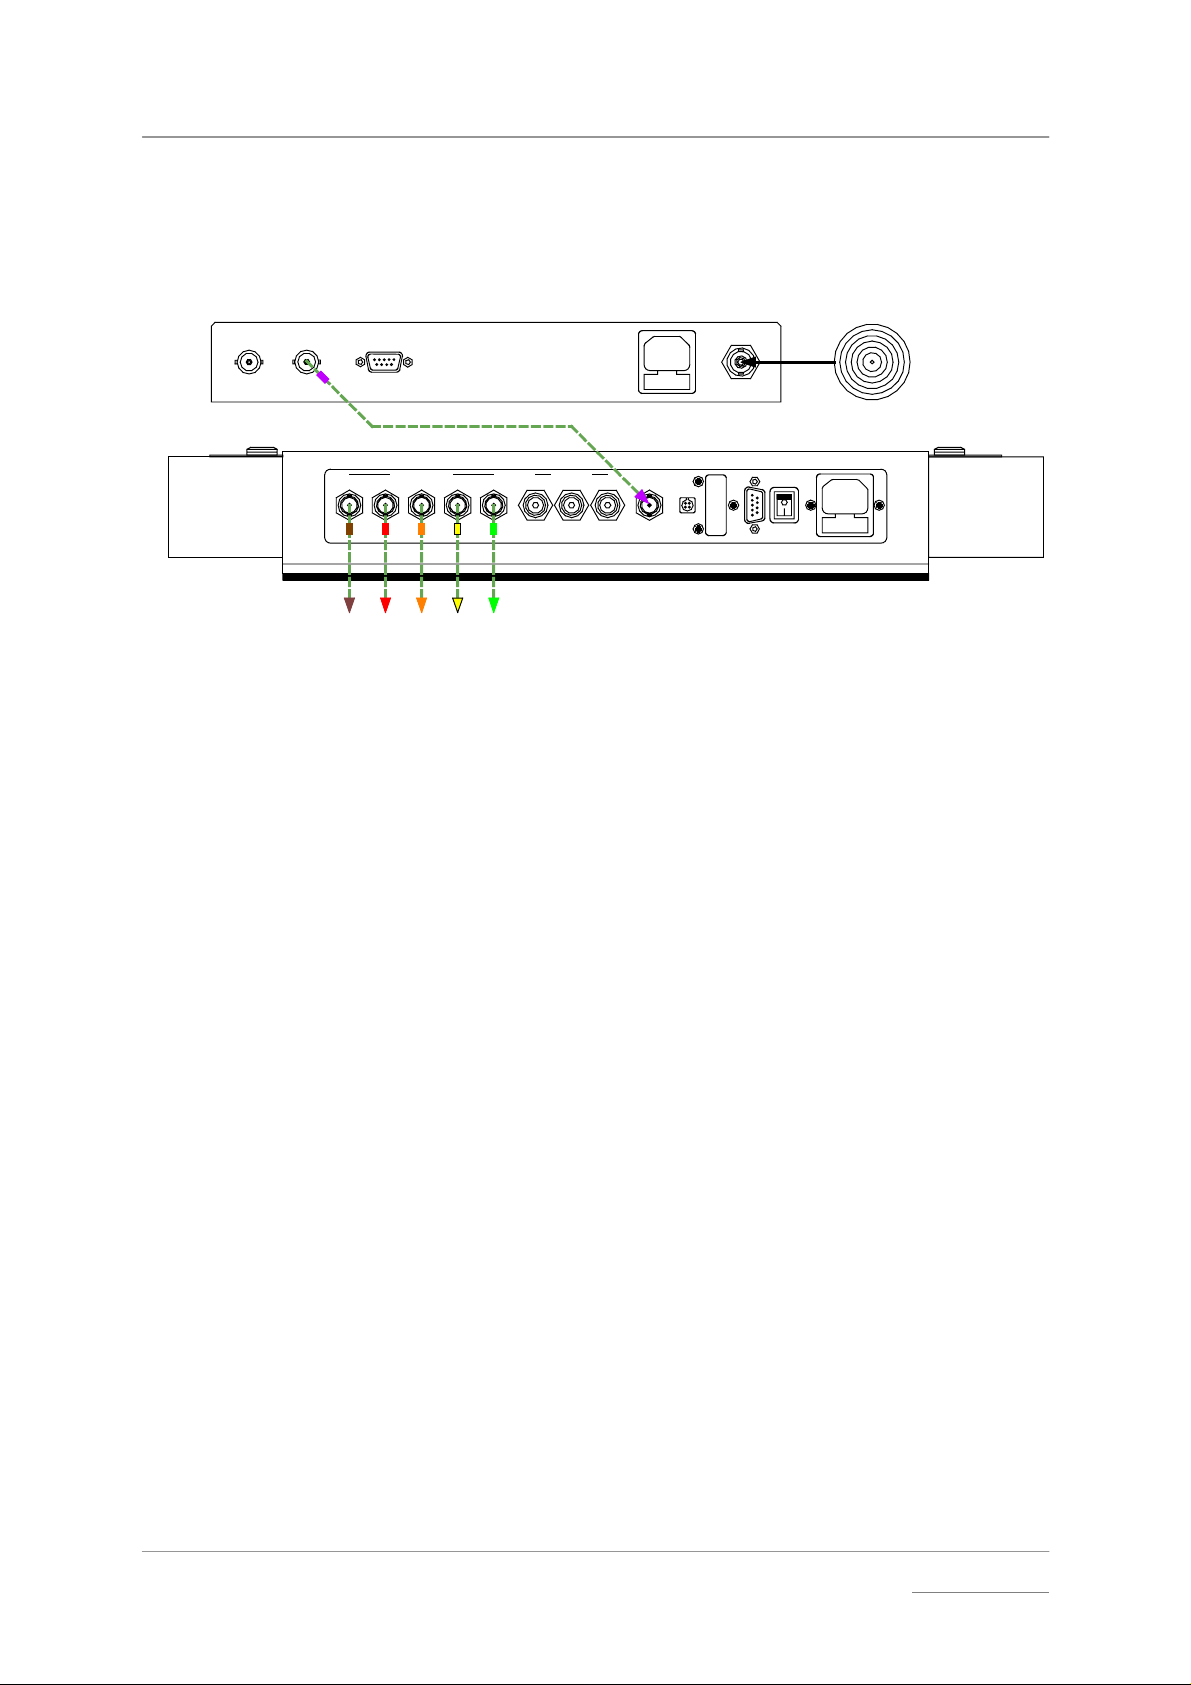
Using a Verona with a GPS clock
If you have a GPS clock or atomic clock, you can slave t he Verona to the clock,
improving the accurac y of the Verona to that of the clock.
GPS clock
1PPS 10MHz RS-232 ANTENNA
The Bang-On
GPS Clock Co.
Roof-mounted
GPS antenna
10MHz +/-1ppb
12345 123
EXT. REF. INSPDIF OUTPUTSWORD CLOCK OUTPUTS
POWER
LINK
SUC1394
1
POWER ~
dCS Verona
Master Clock
Word Clock Outputs
Figure 3 – Slaving the Verona to a GPS clock
do this: Connect up as shown in Figure 3.
do this: The first time you use th is arrangement, open the menu and run the Factory
routine on all four units. This sets the Verona to 44.1kHz.
do this: Open the menu and set the Couple page to Bipolar.
The Verona will lock to the clock. All the outputs will be at 44.1kHz, at the
accuracy of the clock.
do this: If you need 48kHz, press the Clock Frequency button.
do this: Use the Verona‘s outputs to synchronise the audio equipment together.
Note that a GPS clock relies on receiving a sa tellite transmission. Any gaps in
GPS satellite coverage will result in the frequency accuracy of the outputs
reverting to that of the Verona – which is quite adequate for audio use.
Manual filename: Verona Manual v1.0x.doc Page 13 email: more@dcsltd.co.uk
English version web-site: www.dcsltd.co.uk
Page 14
dCS Verona User Manual Manual for Software Issue 1.0x
-
y
dCS Ltd September 2004
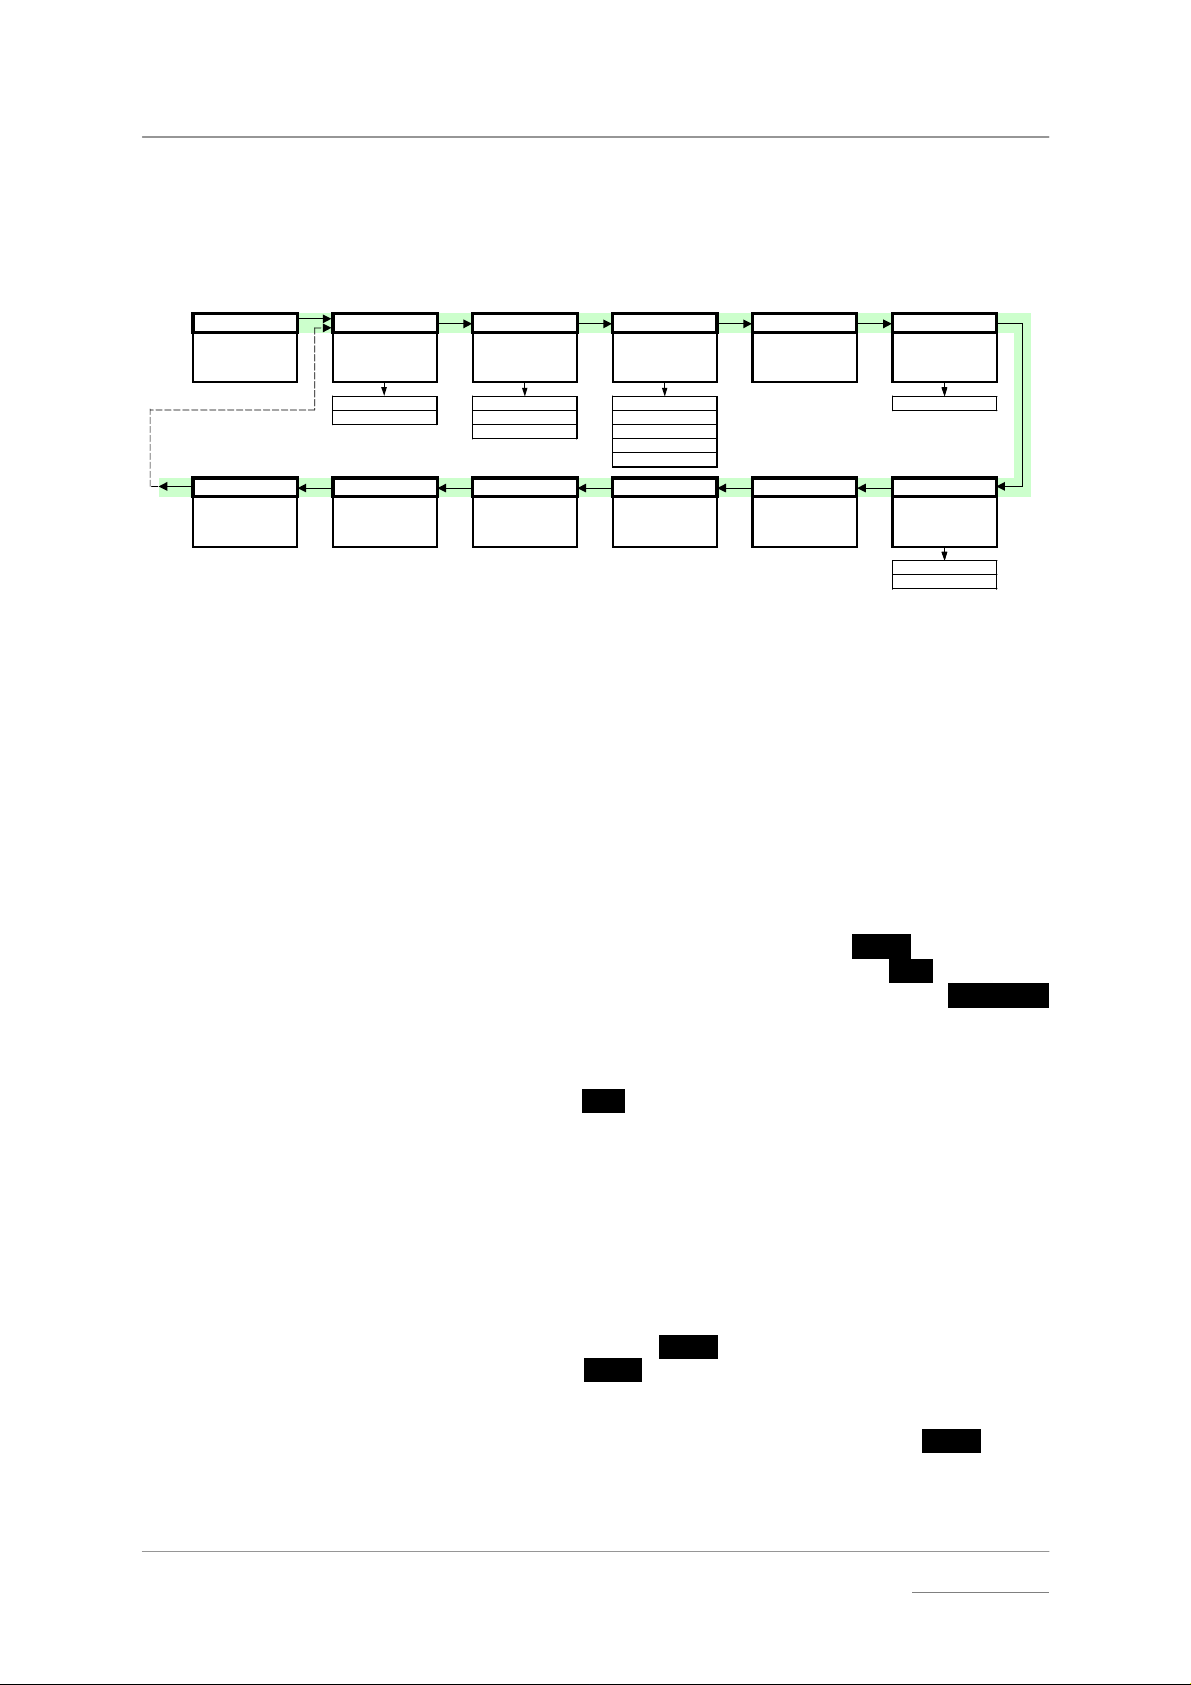
THE SOFTWARE – THE MENU
Press "Step >" to move al ong the M enu, pr ess "< St ep" to m ove back.
Press "Select" to set a menu option or change opt i ons.
Menu Couple Bright x Time Out Test Issue
First page of the
Menu
End CDUpdate Factory Contact Serial Temp
Closes the Function
Menu
Sets the format of
the Ext Ref Input
TTL Bright 7 None 1.0x
Bipolar .... 5 seconds
Starts software
update from a dCS
CD
Sets the display
brightness
Bright 0 15 seconds
Restores standard
factory settings
Sets the Menu time
Displa
out delay
30 seconds
1 min / 3 mins
s dCS email
address
Runs a display test
routine
Displays the unit
full serial num ber
Figure 4 – Menu flow chart
Displays the
software version
number
Displays the
internal
temperature
Celsius
Fahrenheit
Using the Menu
Opening the Menu
Types of Menu Page
The Menu gives the user acces s to a wide range of addit ional features. It also
allows new features and performance enhancements to be added at a later date
by software upgrades.
The Menu is controlled by three buttons:
• the Menu button opens the menu and doubles as the
• the Step →→→→ button pages forward through the Menu – the
• the ←←←← Step button pages backward through the Menu – the
Select button.
Step button.
Step Back
button.
When you first open the Menu, the display will show Menu.
Successive presses of the
Step butto n page through t he Menu. You cann ot go
directly to any particular page, but must enter at the top of the Menu and th en
page through until you reach the page you want.
There are three types of page in the Menu - Parameter Pages, Information
Pages and Test Pages.
Parameter pages allo w the user to check and also change the current settings
of the operating parameters, for example Bright. When a parameter page is
displayed, the first press of the
Subsequent presses of the
Select button change the page setting.
Select button shows the current setting.
Information pages display information about the unit, for example Software
Issue. When an information page is displayed, pressing the
Select button
displays the information held on that page.
Manual filename: Verona Manual v1.0x.doc Page 14 email: more@dcsltd.co.uk
English version web-site: www.dcsltd.co.uk
Page 15

dCS Verona User Manual Manual for Software Issue 1.0x
dCS Ltd September 2004
Test pages allow the user to initiate a number of useful routines, for exam ple
Test. When a Tes t page is displayed, pressing the
Select button starts t he test
routine.
Closing the Menu
There are two ways to close the menu and return to normal operation. The
easiest way is to wait 5 seconds for the unit to time-out and revert to the
standard display. Alternatively, use the
display shows End and then press the
Step button to page forward until the
Select button once.
If the unit times out before the operation in hand has been completed, simply reenter the menu, page forward (or back ward) and continue where you left off . If
you find the 5 second time-out difficult to us e, you can ex ten d i t by changing the
TimeOut setting.
Menu Sequence
Use the flow chart (Figure 4) or the Control Summary sheet to guide you
through the Menu more quickly.
The following explanation deals with the Menu pages in the sequence they
occur in the Menu
2
. The use of each pa ge is sho wn on an individ ual basis , with
the last operation being closi ng the Menu. After you have b ecom e m or e fam iliar
with the Menu, you will find it more convenient to perform all the Menu
operations in one go before finally closing the Menu.
Couple
Couple – Setting the format of the Ext Ref Input
CoupleCouple
When the External Reference Input is in use, the input char acteristics m ust be
set to match the source. There are two options:
TTL The input accepts a DC coupled clock at TTL
levels. This is the usual setting for Word Clock
references.
Bipolar The input accepts a DC or AC coupled clock,
which has an even voltage swing about ground.
This is the usual setting for GPS references.
do this: Open the Menu and step through until the display shows Couple.
do this: Press the
Select button to flip between TTL and Bipolar.
do this: When you have the option you want, wait for the Menu to time-out and the
display to revert to its normal m ode.
IMPORTANT! The Ext Ref Input will not operate if this menu is set to TTL and an AC
coupled cable used.
2
A minor software update may change the order of the menu items or add an option. If this happens, the
Control Summary sheet may be updated before the manual.
Manual filename: Verona Manual v1.0x.doc Page 15 email: more@dcsltd.co.uk
English version web-site: www.dcsltd.co.uk
Page 16

dCS Verona User Manual Manual for Software Issue 1.0x
dCS Ltd September 2004
Bright x
Bright x - Display Brightness
Bright xBright x
This adjusts the brightness of the main display, with settings between 7
(brightest) and 0 (off, unless something is touched).
do this: Open the Menu and step through until the displa y shows Bright x, where x is a
number between 7 and 0.
do this: Press the
Select button repeatedly and the display cycles through Bright 7,
Bright 6, ......., Bright 1, Bright 0 and back to Bright 7.
After time-out, a setting of Bright 0 blanks the display unless the unit is not
locked. Operating an y control or lock ing to a sour ce wh ile in this m ode turns the
display back on momentarily.
TimeOut
TimeOut – Menu Time Out Setting
TimeOutTimeOut
If you find the 5 second time out period for the menu is too shor t, use this option
to change the time out period.
do this: Open the Menu and step through until the display shows Timeout.
do this: Press the
Select button repeatedly and the display will cycle through the
options: None, 5 secs, 15 secs, 30 secs, 1 min, 3 mins.
When set to None, the menu does not close aut omatically. Close it manually by
stepping through to the End page and pressing
do this: Choose the setting you want and press the
Test
Test - Display Test
TestTest
This runs a test routine to ensure the display is working correctly.
do this: Open the Menu and step through until the display shows Test.
do this: Press the
• The main display lights up then fades from bottom to top.
• The indicator LEDs light up briefly in sequence.
• All indicators light up, along with s mall squares on the main d isplay. This
flashes off and on once.
• The display shows Done.
Issue
Issue – Software Issue State
IssueIssue
This displays the is sue num ber of the soft ware fitted to yo ur unit. You will n eed
to check this if you are considering a software upgrade or if your unit
malfunctions.
do this: Open the Menu and step through until the display shows Issue.
do this: Press the
do this: For units fitted with a 1394 interface, pres s the
the 1394 interface software issue.
Select.
Select button again.
Select button once to start the test.
Select button once to display the software issue.
Select button aga in to display
Temp
Temp – Unit Internal Temperature
TempTemp
This displays the temperature inside the unit, close to the crystal oscillators.
do this: Open the Menu and page through until the display shows Temp.
do this: Press the
Press
Manual filename: Verona Manual v1.0x.doc Page 16 email: more@dcsltd.co.uk
English version web-site: www.dcsltd.co.uk
Select button once to dis pla y the temperatur e in degr ees Fahre nheit.
Select again to change to degrees Celsius.
Page 17

dCS Verona User Manual Manual for Software Issue 1.0x
dCS Ltd September 2004
Serial
Serial – Unit Serial Number
SerialSerial
This displays th e full serial num ber, including the h ardware conf iguration cod e.
We will need this information to assemble upgraded software to suit your unit.
do this: Have a pen and paper handy to note down the number. Open the Menu and
step through until the display shows Serial.
do this: Press the
Select button once and the serial number will scroll across the
display.
Contact
Contact - Contact information
ContactContact
This displays dCS’ email address and web-site URL.
do this: Open the Menu and step through until the display shows Contact.
do this: Press the
Select button once and th e contact information will scroll across the
display.
CDUpdate
CDUpdate – Software Update By CD
CDUpdateCDUpdate
Current software for dCS Elgar Plus, Elgar, Delius or Purcell and all Verdi, La
Scala or Verona soft ware features a CD Update menu page. You can update
the software inside any of these products loaded with CD Update software
quickly and easily from a CD supplied by dCS.
IMPORTANT! Please follow the latest update instructions supplied with the CD. The
following is for guidance only.
You will need a standar d CD Transport, a CD player or a dCS Verdi to play the
CD. A few CD players are not suitable because they upsample to 48kS/s or
change some of the data bits in other ways (one example is the ML37). Don’t
worry - the CD Update routin e detects t hes e a nd s to ps, pr e ve nting a n y c han ges
to the internal software.
If you are updating a dCS Upsampler or DAC:
do this: Connect an AES or RC A digital output from the Transport to th e Upsampler or
DAC and select the input you have just connected. Disconnect any 1394
interface cables.
If you are updating a dCS DAC connected to the Transport through another
device:
do this: Connect an AES or RC A digital output from the other device to the DAC and
select the input you have just connected. Set t he other device to b it-f or -bit mode
(Cloning on a dCS Upsampler). Disconnect any 1394 interface cables.
If in doubt, connect the DAC directly to the transport.
If you are updating a dCS Verona:
do this: Disconnect ALL cables f rom the unit, except the po wer cable. Open the Menu
on the unit to be updated and step through until the display shows CDUpdate.
do this: Make sure the transport is in STOP mode.
do this: Press the
do this: When the unit disp lays Cable, connect a BNC cabl e f r om the Ext Ref Input to a
BNC SPDIF digital output on t he transport. The unit will lock to the trans port,
then display Wait.
Select button to start the routine.
If you are updating a dCS Trans port, the Transport plays the CD and updates
itself, missing out some of the early steps. Disconnect any 1394 interface
cables.
Manual filename: Verona Manual v1.0x.doc Page 17 email: more@dcsltd.co.uk
English version web-site: www.dcsltd.co.uk
Page 18

dCS Verona User Manual Manual for Software Issue 1.0x
dCS Ltd September 2004
For all dCS units:
do this: RELAX! The update procedure is easy.
do this: Mute your power amplifier.
do this: Insert a dCS CD (containing soft ware for the unit you want to up date) into the
transport, making sure it is in STOP mode.
do this: Open the Menu on the unit to be updated and step through until the display
shows CDUpdate.
do this: Press the
The unit will display Wait while it prepares the flash memory for the update.
After 3-4 minutes, the unit will scroll P lea se St art CD .
do this: Press PLAY.
Select button to start the routine.
IMPORTANT! Do not press PLAY before the unit to be updated is ready. This can cause
the download to fail. Use only dCS CDs.
The unit will now inspect the CD, and will display Scanning, while it reads
administrative data.
If there is anythi ng wrong wit h the dCS CD that h as been loaded or i t does not
match the product, the unit will displ ay Wrong! or Wrong CD or No Index and
revert to normal operation. Don’t worry – the internal software is unchanged.
Check the CD for dust or scratches.
If it is not a dCS CD at all, the unit will keep repeating Please Start CD, for
about 30 seconds or display Wrong CD and then revert to normal operation.
If the data is correct, the unit will display Track n, where n is a number.
do this: You can move the Transport on to track n, or wait for it t o get there of its o wn
accord.
If the unit has to wait for the right track, it will display Found Track 1, then
Found Track 2, etc, until it finds the right one. Vx.xx will appear on the displa y
(this is the new sof tware issue number). If the unit displays No Track, repeat
the procedure but manually advance the transport to track n.
Next, the update progress is displayed in one of the following formats:
• The display counts up from 0% 0/7 to 99% 0/7, displays Copying, counts
up from 0% 1/7 to 99% 1/7, displays Copying and so on until the last
section is loaded and copied. Some models may use less than 8 sections.
• A moving dot counts down slowly from about 3 to 0.
After about 15 minutes, the update is complete and the unit will reboot itself.
do this: If the CD is still playing, you can stop it now.
do this: If the unit being updated has a 1394 interface, wait until the unit has settled
(about 30 seconds), switch it off for 10 seconds, then on again.
If the unit detects no change in the 139 4 interface code, it will boot up as usua l
and be ready for use.
If the 1394 interface code has been updated, the unit will load the new code into
the flash memory on the 139 4 interface board – thi s takes about 10 minutes.
While this is taking place, th e unit will displa y a progress bar. Nex t the unit will
display in sequence: Done 5, Done 4, …, Done 1 then reboot itself again.
The unit is ready for use.
OOPS! If the CD transport stops or becomes disconnected during an update, don’t
worry! The original software is backed up inside the unit. Proceed as
follows:
Manual filename: Verona Manual v1.0x.doc Page 18 email: more@dcsltd.co.uk
English version web-site: www.dcsltd.co.uk
Page 19

dCS Verona User Manual Manual for Software Issue 1.0x
dCS Ltd September 2004
The checking routine will f ind a sequenci ng error and Non Seq or Bad CD! will
appear on the display.
do this: Turn the power off and on to reboot. This message will scroll across the display:
Bad CheckSum – Press Function button to attempt recovery
or Bad CheckSum – Press Mute button to attempt recovery
or Bad CheckSum – Press Menu button to attempt recovery,
depending on the model.
do this: Press the appropriate button once.
The original software is retrieved from the internal backup while displaying
Wait... . This may take a few minutes. When recovery is complete, the unit
re-boots.
do this: Run the CD Update routine again to load the new software.
Factory
Factory – Restoring Factory Defaults
FactoryFactory
This feature sets m ost of the parameters back to the factory default settings.
This can be useful if the settings are accidentally changed and you need to
reset the unit to a standard configuration, or your children play with it.
do this: Open the Menu and step through until the display shows Factory.
do this: Press the
Select button and leave the menu to time out.
The unit will return to normal operation set up as follows:
• Clock Frequency to 44.1kHz
• Dither to Off
• Couple to TTL
• Display brightness to Bright 4
• Timeout to 15 secs
Manual filename: Verona Manual v1.0x.doc Page 19 email: more@dcsltd.co.uk
English version web-site: www.dcsltd.co.uk
Page 20

dCS Verona User Manual Manual for Software Issue 1.0x
dCS Ltd September 2004
THE HARDWARE – CONTROLS AND CONNECTORS
Front Panel
A BC D E F G H
Clock
Frequency
Step Select
Key to Front Panel
A Power / Standby button
B Clock Frequency button or Menu
C Dither button or Menu
D Status indicator
E Remote Control sensor
F Main Display
G Mode indicator
H Menu or
Power Button x
This button doubles as a power on / off switch and a standby mode switch.
do this: To switch on, press the Power button briefly. If power is available, the PWR
indicator will light and Verona will run through the power up routine.
PWR
Dither
STBY
OK
dCS Verona
Master Cloc k
Figure 5 – dCS Verona Front Panel
button
Select button
DITH
EXT
Step button
MenuPower
Step Back
Note that the Power button will not click when turning power on – this is normal.
do this: When you have finished listening , press the Power button brief ly to set the uni t
to standby mode.
The outputs will mute, all displays will turn off except the PWR and STBY
indicators. In this mode, Verona uses less power. If power is switched off or
fails, Standby mode is cancelled.
do this: To restore normal operation, press the Power button briefly again.
Verona will power up ready for use.
do this: To switch off completely, press the Power button and hold it for a few seco nds
until the Main Display shows Power Dn, then release it.
Clock Frequency Button (
Step Back)
do this: Press this button to set the clock frequenc y to either 44.1kHz (usu ally for CD or
SACD transports) or 48kHz (usually for DVD transports).
The Clock Frequency button doubles as the Me nu
Step Back button, used for
paging backwards through the Menu (see page 14).
Manual filename: Verona Manual v1.0x.doc Page 20 email: more@dcsltd.co.uk
English version web-site: www.dcsltd.co.uk
Page 21

dCS Verona User Manual Manual for Software Issue 1.0x
dCS Ltd September 2004
Dither Button (Step)
do this: Press this button to turn the dither on or off . The DITH indicator lights if dither is
being added.
The Dither button doubles as the Menu
through the Menu (see page 14).
Status Indicator x
This consists of 3 indicators:
• PWR is lit when power is connected and the unit is turned on or is in
standby mode.
• STBY is lit when the unit is in standby mode.
• OK lights about 30 minutes after powering up, to indicate that th e crystal
oscillators have fully settled. The unit is usab le one minute after powering
up.
Remote Control Sensor x
Remote Control operation is not supported in this release.
Main Display x
The main display tells you what Verona is doing.
In normal use, the unit displays either 44.1kHz or 48kHz.
While locking to an external reference the display shows Locking. When
locked, the unit displays either 44.1kHz or 48kHz.
Step button, used for pagin g forwards
When accessing the Menu (see page 14), menu options are displayed here.
If an error occurs during power up or n ormal use, th e details of the fau lt will be
displayed. See “Fault Indication” on page 36.
Mode Indicator x
The DITH indicator lights to show that dither is being added to the outputs.
The EXT indicator lights when the unit is locked to an external reference
connected to the EXT REF IN connector. The external reference over-rides the
internal crystal oscillators.
Menu Button (
Press the Menu button to open the Menu (see page 14) a nd change or
settings in the menu.
Select)
Select
Manual filename: Verona Manual v1.0x.doc Page 21 email: more@dcsltd.co.uk
English version web-site: www.dcsltd.co.uk
Page 22

dCS Verona User Manual Manual for Software Issue 1.0x
dCS Ltd September 2004
Rear Panel
I J K L M N O P Q
12345 123
Designed and Manufactured in England by DCS Ltd. (UK company 2072115), Mull House, Gt. Chesterford Ct., Gt. Chesterf ord, Saffron Walden CB10 1PF U.K.
Warning: Shock Hazard - Do not open. No user se rviceable parts inside. Caution: To avoid risk of fi re replace only with t he same fuse type and rat ing T 500mA L. Caution: This equipment MUST be earthed.
Key to Rear Panel
Word Clock Outputs 1 - 5
There are 5 identical Word Cloc k outputs, all on BNC sockets . They carry the
same Word Clock at either 44.1 or 48kHz.
EXT. REF. INSPDIF OUTPUTSWORD CLOCK OUTPUTS
POWER
LINK
1
Serial No.
SUC1394
POWER ~
Power Supply
50/60Hz, 30W
V
Figure 6 – dCS Verona Rear Panel
I Word Clock Outputs 1 - 5 on BNC connectors
J SPDIF Outputs 1 - 3 on RCA connectors
K External Reference Input on BNC connector
L Power Link connector
M Optional IEEE 1394 interface on two 6-way
connectors
N Software Upgrade Connector, 9-way ‘D’ type
O Power switch
PIEC Power inlet
Q Mains fuse holder
Connect up the BNC sockets with 75Ω co-axial cables design ed f or d igi tal au dio
or RF use. A.C. coupled cables are not suitable.
SPDIF Outputs 1 – 3
There are 3 identical SPDIF outputs, all on RCA phono conn ectors. They carr y
the same SPDIF clock signals but no audio data, sampled at 44.1kS/s or
48kS/s. The format is IEC60958, otherwise known as SPDIF.
Use with 75 ohm co-axial cables designed for digital audio or RF use. Some
types of audio cable are not suitable and m ay cause crackling noises or other
malfunctions.
External Reference Input
The External Reference Input accepts a Word Clock at the main audio
frequencies or var ious reference f requencies (see page 24). It allows Verona to
act as a clock distribution box.
When a suitable external reference is connected, Verona will automaticall y sl ave
to it. The main display will show Locking for several seconds, then the set clock
frequency (either 44.1kHz or 48kHz) and the EXT indicator will light.
Use with 75 ohm co-axial cables designed for digital audio or RF use. A.C.
coupled cables are no t suitable unl ess the Couple menu is s et to Bipolar (see
page 15).
Manual filename: Verona Manual v1.0x.doc Page 22 email: more@dcsltd.co.uk
English version web-site: www.dcsltd.co.uk
Page 23

dCS Verona User Manual Manual for Software Issue 1.0x
dCS Ltd September 2004
1394 Interface
The 1394 interface in not fitted in this release. It is intended for future
enhancements.
Power Link
This can be linked to similar connectors on o ther dCS units using a link cable.
All units linked in th is way m ay be turn ed o n or off or s et to sta ndb y by press ing
a single Power button or sending one Remote Control comm and. Link cables
are available from dCS.
SUC
The Software Up grade Connector is intended to be used by dCS servic e agents
to load new software into Verona.
IMPORTANT! Do not connect any other equipment to the SUC connector as this may
damage both Verona and the equipment so connected. Do not operate
Verona with a PC connected. Fa ilure to observe this warning will void the
unit’s warranty, and may cause unpleasant effects in your system.
Power switch
IEC Power Inlet
Mains Fuse
Additional Information
The Power switch com pletely isol ates the u nit fr om the power s upply. In normal
use, set it to the On positi on (I). Set it to Off (0) during electrical storms , or whil e
you are away for a long period.
Use with a 3 - pin IEC type power cable.
Replace only with a 20 x 5mm 500mA T HRC fuse. Please see page 32 for
replacement details.
The rear panel displays the following information about the unit:
• The manufacturer’s name and address.
• Supply voltage setting, frequency range and rated power.
• Model: dCS Verona
• The short form of the unit serial number.
We will need the serial number (preferably the full serial number from the menu)
to give you support over the phone, or to ship you software updates.
Manual filename: Verona Manual v1.0x.doc Page 23 email: more@dcsltd.co.uk
English version web-site: www.dcsltd.co.uk
Page 24

dCS Verona User Manual Manual for Software Issue 1.0x
dCS Ltd September 2004
VERONA TECHNICAL INFORMATION
Digital Interface Specifications
Output Frequencies
Wordclock Outputs
/ Ext. Ref. Input
Type Single ended,
Impedance 75 25
Level (unloaded) TTL TTL
Connector BNC B NC x 5
Table 1 –Wordclock Output / Ext Ref Input Electrical Characteristics
SPDIF
Type Single ended,
Impedance 75
Level (unloaded) 1.0 V pk-pk
Connector RCA Phono x 3
Table 2 – SPDIF Output Electrical Characteristics
44.1kHz or 48kHz on all Word Clock Outputs.
44.1kS/s or 48kS/s clock on all SPDIF Outputs.
Ext Ref Input Outputs
ground referred
Ω
Outputs
ground referred
Ω
Clocking
The sample clock qualit y significant ly determ ines the output perf ormance of the
system. The highest quality clocks that are available are crystals, so we use
these. Verona uses a pair of pre-aged, specially selected voltage controlled
crystal oscillators (VCXO’s) as clock sources. Each unit is individually calibrated
over a wide temperature range for best accuracy.
When slaving to Ext Ref In, the VCXO is synchronised to the clock signal
extracted from the input by a phase locked loop (P LL). This PLL is of a special
narrow bandwidth type, that provides a significant degree of "clock cleaning”.
The PLL is also very robust, and will lock to very poor signals if necessary.
Accuracy Typically ± 0.1 parts per million when shipped
Synchronising to Ext Ref In x
The unit will slave to the following clock signals on the Ext Ref In connector:
• Word Clocks at 32, 44.1, 48, 88.2 or 96kHz (set the Couple menu to TTL).
• Reference clocks at 10MHz, such as those pro duced by GPS receivers or
atomic clocks (set the Couple menu to Bipolar).
Pull-in range ± 300 parts per million about nominal frequency
Lock-in time < 12 seconds for most situations
Better than ± 1 part per million within 6 months of shipping
Manual filename: Verona Manual v1.0x.doc Page 24 email: more@dcsltd.co.uk
English version web-site: www.dcsltd.co.uk
Page 25

dCS Verona User Manual Manual for Software Issue 1.0x
dCS Ltd September 2004
Power requirements
Units may be set for 100, 115/120, 200, 215/220 or 230/240V (+/-10%),
50/60Hz AC operation.
Size and Weight
Purcell &
Verona
Typical power
consumption
16W 20W
Maximum power
consumption
Delius 21W 25W
Elgar Plus 34W 40W
Verdi &
La Scala
25W 50W
Table 3 – Power consumption for consumer products
Length Depth Height Weight
Purcell &
Verona
Delius
461mm
(18.15”)
461mm
(18.15”)
413mm
(16.18”)
413mm
(16.18”)*
69mm
(2.70”)
69mm
(2.70”)
8.5kg
(18.7lbs)
8.8kg
(19.4lbs)
Operating Conditions
Elgar Plus
Verdi &
La Scala
461mm
(18.15”)
461mm
(18.15”)
406mm
(16.0”)
415mm
(16.34”)**
75mm
(2.94”)
137mm
(5.39”)
12.0kg
(26.4lbs)
17kg
(37.4lbs)
Table 4 – Size and weight for consumer products
• *Delius only: the control knob protrudes out of the front by 20mm (0.79”).
• **Verdi & La Scala only: the control knob protrudes out of the front by 13mm
(0.51”).
• Allow extra depth for cable connectors.
• Ambient temperature range: 0°C (32°F) to 50°C (122°F), non-condensing.
• Do not instal l the unit near hea t sources s uch as ra diators, air duc ts, p ower
amplifiers or direct strong sunlight.
• If in doubt, the easy test is - Verona is happy to work anywhere a human is.
Manual filename: Verona Manual v1.0x.doc Page 25 email: more@dcsltd.co.uk
English version web-site: www.dcsltd.co.uk
Page 26

dCS Verona User Manual Manual for Software Issue 1.0x
dCS Ltd September 2004
GENERAL TECHNICAL INFORMATION
Clock Dither
Phase Locked Loop (PLL) circuits are used in digital audio equipment to
synchronise the local clock to the clock in the incoming data stream. PLL
circuits tend to operate in the centre of a “dead band” when locked. In this band,
the sensitivity of the loop to phase errors is reduced. This is somewhat similar to
the cross-over region in a power amplifier.
The Verona can be set to add dither to the c lock outputs, t o k eep the P LL acti ve
when it is locked. The dither tak es the f orm of a sm all, random tim ing of fs et that
is noise shaped, so that can be easil y filtered out by the PLL. Un like jitter, this
offset is statistically well controlled, so that the effect averages out to zero.
Does a dithered clock make an audible dif ference? Turn it o n and let your ear s
decide.
Manual filename: Verona Manual v1.0x.doc Page 26 email: more@dcsltd.co.uk
English version web-site: www.dcsltd.co.uk
Page 27

dCS Verona User Manual Manual for Software Issue 1.0x
dCS Ltd September 2004
Manual filename: Verona Manual v1.0x.doc Page 27 email: more@dcsltd.co.uk
English version web-site: www.dcsltd.co.uk
Page 28

dCS Verona User Manual Manual for Software Issue 1.0x
dCS Ltd September 2004
USING YOUR dCS VERONA FOR THE FIRST TI ME
Thank you for purchasing this dCS Verona. Before attempting to use your
Verona, please read at least the rest of this section and the “Step-by-Step
Guide” on page 8. This will e nable you to set th e unit up quickly with your hi-fi
system.
What’s in the Box?
The box should contain the following:
• dCS Verona
• User Manual
• Control Summary
• Power Cable
• Spare Fuses (2)
Units supplied with a Remote Control (all models except Verona and Pu rcell)
should also be supplied with the following:
• Remote Control unit
• 3 x AAA batteries
• Pozidriv screwdriver (1 pt)
For safety reasons, the Remote Control is shipped with the batteries packed
separately. For fitting details, see the “Maintenance and Support” section,
starting on page 32.
Units fitted with an IEEE 1394 interface
3
should also be supplied with the
following:
• IEEE 1394 cable assembly
• BNC cable
Check the contents of the inner carton very carefully against the list above.
Notify your dealer as soon as possible if anything is missing or damaged. dCS
suggest that all of the orig inal packaging is retain ed for use when transport ing
any units. Replacement packaging can be ordered from dCS or our distributors.
Safety Notice
Verona contains no user serviceab le parts. Do not att empt to open the case as
there are potentially dangerous voltages pres ent inside. In the event of the uni t
developing a fault, please consult your dealer.
IMPORTANT! This equipment MUST be connected to a safety earth (or ground) via the
power cable.
3
The IEEE 1394 interface is an optional extra with Purcell or Delius units and is not yet available with Verona.
Manual filename: Verona Manual v1.0x.doc Page 28 email: more@dcsltd.co.uk
English version web-site: www.dcsltd.co.uk
Page 29

dCS Verona User Manual Manual for Software Issue 1.0x
dCS Ltd September 2004
Mains Voltage Setting
Before connecting the power cable to your Verona for the first time, please
check that it has bee n set to the correct op erating voltag e for your local mains
supply. 50Hz or 60Hz operation is not important – the unit can use either. The
unit's present volta ge setting is sho wn on the label bene ath the ma ins inlet on
the rear panel. If this does not match your local supply voltage, DO NOT
attempt to use the unit. Co ntact your dealer to arrange to h ave the unit reset.
Using the Verona with the wrong mains s etting for your loc al supply ma y result
in serious dam age to the unit and will inva lidate the warranty. DO NO T attempt
to reset the unit yourself.
IMPORTANT! Please use a sensible power cable, such as the one supplied with the unit.
Some audiophile power cables presently available are excessively heavy,
their weight can damage the power inlet connector. Such damage is not
covered by the warranty.
Positioning the Unit
Place Verona on a firm, vibration free bas e s o as to allow convenient con nec ti on
to your digital source. W e suggest that you avoid siting Verona either directly
above or below preamplifiers or tuners, if either of these will be used in your
system at the same time as Verona.
Manual filename: Verona Manual v1.0x.doc Page 29 email: more@dcsltd.co.uk
English version web-site: www.dcsltd.co.uk
Page 30

dCS Verona User Manual Manual for Software Issue 1.0x
dCS Ltd September 2004
OPTIONS
The following options may be fitted to new units or retrofitted at a later date.
Option code Option
V5 Mains voltage set to 230/240V
V4 Mains voltage set to 215/220V
V3 Mains voltage set to 200V
V2 Mains voltage set to 115/120V
V1 Mains voltage set to 100V
Table 5 – Options available
Mains Supply Voltage
Any unit may be set f or op erati on f r om 230/240V, 215/220 V, 200V, 115/120 V or
100V A.C. Units are shi pped set for the mains s upply voltage accor ding to the
destination. The voltage setting can be updated later by your dealer, if
necessary. Specify the new country of use or the new voltage setting.
Having Your Options Changed
dCS support modifications, updates and opt ion changes to supp lied units . Major
changes are normally carried out at dCS, as we have extensive test facilities
and can verify the changes. Please contact your dealer for details.
IMPORTANT! Please do not attempt the changes yourself. The unit’s performance or
reliability may be impaired and the warra nty will be invalidated.
Manual filename: Verona Manual v1.0x.doc Page 30 email: more@dcsltd.co.uk
English version web-site: www.dcsltd.co.uk
Page 31

dCS Verona User Manual Manual for Software Issue 1.0x
dCS Ltd September 2004
Manual filename: Verona Manual v1.0x.doc Page 31 email: more@dcsltd.co.uk
English version web-site: www.dcsltd.co.uk
Page 32

dCS Verona User Manual Manual for Software Issue 1.0x
dCS Ltd September 2004
MAINTENANCE AND SUPPORT
Service & Maintenance
dCS audio products are desig ned not to need reg ular m aintenance, a nd co ntain
no user serviceable parts apart from the mains fuse.
If your unit is damaged in some way, please contact your dealer or dCS.
Mains Fuse
There is a mains f use below the po wer inlet, ac cessible f rom the outside of the
unit. If the fuse blows, it m ay be changed by the user . The cur rent cons umption
of the unit is very low, so it only blows if po wer surges occur , or there is a f ault
in the unit. Usuall y, power s urges cause no other damage, bu t if the fuse blows
repeatedly on replacement, some other damage will have been done and the
unit must be returned to dCS for repair.
Fuse Type: 20 x 5mm 0.5 amp T HRC fuse
IMPORTANT! If the fuse should fail, it is essential that it be replaced with one of the same
type and rating. Failure to do so could result in damage to the unit, risk of
fire or electric shock and will invalidate the guarantee.
Replacing a Blown Fuse x
Referring to Figure 7, remove the power cable, use a small flat bladed
screwdriver to pr y up the tab on the fus e carrier (A) and pull it out. Push the
blown fuse out of the c lip in the carrier (B) and dispose of it. Fit a new f use in
the clip (C) and push t he carrier back into the unit so that it click s home. Spare
fuses are provided with the unit.
B
A
Figure 7 – Changing the Mains Fuse
IMPORTANT! Disconnect the power cable before changing the fuse.
C
Manual filename: Verona Manual v1.0x.doc Page 32 email: more@dcsltd.co.uk
English version web-site: www.dcsltd.co.uk
Page 33

dCS Verona User Manual Manual for Software Issue 1.0x
dCS Ltd September 2004
Updating your Verona
dCS products make extens ive use of sof tware configurable c hips – F PGAs and
DSPs. This gives us the ability to update our products to add extra features,
update digital interface standards or make performance improvements by
loading new software. Occasionally, a hardware update may be necessary also
to increase the “capaci ty” of the elec tronics, add ex tra connectors or extra f ront
panel controls.
Software Updates x
Please note that not all software upd ates make an earth-shatter ing c han ge. Yo u
should have a clear idea of what you expect to gain before updating to the latest
issue.
If the software loaded in your unit is (for example) version 3.45:
• A change t o versio n 3.46 ind icates a minor upd ate for in ternal dCS use – to
make testing easier, or more thoro ugh, or to c ater for som e minor hard ware
change. Do not update your unit.
• A change to version 3.50 is a more serious update, offering extra
functionality. If you want to use the extra features, update your unit. The
manual will be updated for this (check the web-site).
• A chan ge to vers io n 4.00 is a major update. It wil l re quire updated hard war e
and the manual will be updated
If you have older hardware, some of the f eatures added by new soft ware may
not be available due to (for example) a missing connector. For recent
hardware, this is mentioned in the “Upgrader’s notes” in this manual. If you
need the missing feature, contact your dealer or dCS to arrange a hardware
update.
• If the software currently loaded includes a CD Update page, you can
update the software yourself. Contact dCS for a CD and follow the
instructions in the CD Update section on page 17, or the instructions
supplied with the CD. The update program will check your hardware
configuration and install the latest software compatible with it.
• If you do not have the CD Update feature loaded or have diff icult y with it, a
dCS distributor can download f iles from a PC i nto any unit fitted with a SUC
connector. Contact your dealer for details.
• For older units without a SUC connector, your distributor can install new
firmware in your unit. Firmware updates are low-cost from dCS. Contact your
dealer for details.
Hardware Updates x
You may wish to have your hardware updated from time to time to take
advantage of new featur es in the latest s oftware. dCS offer this service - we will
retest, reset any adjustable it ems to curr ent shipping standards , and install an y
modifications or updates that have occurred since your unit was first shipped.
The price will depend on the hardware changes necessary – please contact
your dealer or dCS for details and pricing. In order to ensure speedy turn
around, please contact us prior to returning the unit to get a Service Return
number.
Manual filename: Verona Manual v1.0x.doc Page 33 email: more@dcsltd.co.uk
English version web-site: www.dcsltd.co.uk
Page 34

dCS Verona User Manual Manual for Software Issue 1.0x
dCS Ltd September 2004
Safety and Electrical Safety
There are no user ser viceable parts inside Verona and so there is no need to
remove the covers. If for some reason you do:
IMPORTANT! Disconnect the power cable before removing any covers or changing the
fuse.
There are no substances hazardous to health inside Verona.
Cleaning the Case
Do not apply any of the following cleaning products to the case as they will
damage or alter the finish:
• Corrosive or abrasive agents
• Spirit or alcohol based cleaners
• Wax polish
do this: To remove dust, wipe with a moist, soft cloth.
do this: To remove deposits from the case, first disconnect the po wer cable then spra y
very lightly with a proprietary glass cleaner containing ammonia and wipe off
gently with a soft cloth, t ak ing care t o avo id scratc hes. D o not spr a y the cleaner
onto the connectors or the rear panel.
Manual filename: Verona Manual v1.0x.doc Page 34 email: more@dcsltd.co.uk
English version web-site: www.dcsltd.co.uk
Page 35

dCS Verona User Manual Manual for Software Issue 1.0x
dCS Ltd September 2004
Manual filename: Verona Manual v1.0x.doc Page 35 email: more@dcsltd.co.uk
English version web-site: www.dcsltd.co.uk
Page 36

dCS Verona User Manual Manual for Software Issue 1.0x
dCS Ltd September 2004
TROUBLESHOOTING
Fault Indication
Verona detects the following fault conditions:
Power interruption
If the AC supply is m om entaril y interrup ted or is m or e than 20% be low it’s rat ed
voltage, the unit disp la ys PowerDn and mutes the audio outputs to prot ect your
loudspeakers from damage. This may be caused by loose AC power wiring,
local power-line overloads or heavy-duty appl iances like air co nditioners. If th is
message appears frequently (other than when switching the unit off), please
consult your dealer.
Power up test errors
If Verona detects a fault during its power up test routine, it will remain muted and
display one of these messages:
• DSPs Not Loaded (#01)
• FPGAs Not loaded (#02)
• Bad Checksum. Press any key to attempt recovery (#03)
• DSP-Err1 (#04)
This can be caused by power line transients occurring during system
configuration. For Bad Checksum, press any button to try to clear the fault.
Otherwise, try switc hing off, wait ing 20 seconds , then s witching on again. If the
fault persists, please consult your dealer.
Manual filename: Verona Manual v1.0x.doc Page 36 email: more@dcsltd.co.uk
English version web-site: www.dcsltd.co.uk
Page 37

dCS Verona User Manual Manual for Software Issue 1.0x
dCS Ltd September 2004
Troubleshooting Guide
If you experience difficulties when using your Verona, the following sugges tions
may help resolve the problem.
IMPORTANT! The GOLDEN RULES for using a Master Clock:
• The source equipment MUST be locked to the Master Clock.
• The Clock Frequency MUST match the sample rate(s) used in the system.
The unit fails to power up
• Ensure there is power available on the mains cable. Connect the power
cable, ensure it is pushed all the way in and press the Power button. If
there is a Power switch on the back panel, ensur e this is set to the On (I)
position.
• Check the rated supply voltage sho wn on the rear of the unit m atches the
local supply voltage.
• Chec k that the fuse has not blown - if so, correct an y obvious cause then
replace the fuse as described on page 32.
The DAC/DDC suddenly mutes, Verona repeats its’ power-up sequence
• This may be caused by short drop-o uts or brown-outs on the AC supply.
When the disturbance has passed, normal operation should be restored.
• Check for loose mains wiring.
The system fails to lock to Verona
• Check that the digital audio cables are of the correct type, correctly
connected and not dam aged. Dam aged cabl es are a VE RY comm on caus e
of malfunctions!
• Check that Verona is switched on and has settled for at least 1 minute.
• Check that Verona is set to the correct Clock Frequency (probably
44.1kHz).
• dCS Verdi and La Scala will only accept a 44.1kHz clock.
• dCS Purcell will only lock if the WClk page is set to WClk:In.
• dCS Elgar Plus and Delius will only lock if the MS page is set to MS:Sync.
• If you are using dCS Elgar Plus or Delius with Verona while upsampling to
176.4 or 192kS/s Dual AES or 88.2 or 96kS/s Single AES, you will need
software v4.30 or later for Elgar Plus or v2.30 or later for Delius.
• If Verona is locked to an External Reference, ensure the reference
frequency is at a su itable frequenc y and the Couple menu is set to m atch
the external reference.
• If Verona is trying to lock to an External Reference but is continuously
displaying Locking, there is som ething wrong with the external reference
generator, the menu s ettings or the cable. The external r eference may be
out of calibration, or at a frequency that the Verona cannot lock to.
• AC coupled cables are not suitable for use with Word Clock signals.
Periodic clicks are heard from the loudspeakers
• T his is often caused by part of the system (usually the so urce equipment)
not being locked to the Verona, while the DAC is locked. Check that the
system is connected correctly, that the menu settings are correct and the
master clock frequency matches the sample rates in use.
Manual filename: Verona Manual v1.0x.doc Page 37 email: more@dcsltd.co.uk
English version web-site: www.dcsltd.co.uk
Page 38

dCS Verona User Manual Manual for Software Issue 1.0x
dCS Ltd September 2004
The Display turns on briefly when a control is operated, then turns off
• This happens when the display brightness is set to Bright 0. Open th e M enu
and change Bright to a different setting.
Menu Timeout does not work
• Page through the m enu to the TimeOut page and chec k the setting. If you
want to set TimeOut to None, you must close the m enu by selecting the
End page.
• Someone has turned the menu tim eout off, using remote sof tware running
on a PC. Open the Menu and run the Factory rout ine to res et ever ything to
ex-factory settings.
Manual filename: Verona Manual v1.0x.doc Page 38 email: more@dcsltd.co.uk
English version web-site: www.dcsltd.co.uk
Page 39

dCS Verona User Manual Manual for Software Issue 1.0x
dCS Ltd September 2004
IF YOU NEED MORE HELP
In the first instance, you should contact your dealer. If they ca nnot resolve the
issue, contact dCS. Our office hours are 8:30 a.m. to 5:00 p.m. Monday to
Friday, UK time (GMT in Winter or GMT + 1hr in Summer). Contact us by phone
or fax on:
Inside the UK Outside the UK
Telephone
Fax
Table 6 – dCS Contact Information
You can write to us at:
dCS Ltd
Mull House
Great Chesterford Court
Great Chesterford
Saffron Walden CB10 1PF
UK
01799 531 999 +44 1799 531 999
01799 531 681 +44 1799 531 681
Other Information
Our email address:
Our web-site is: www.dcsltd.co.uk
The web-site is regu larly updated. You will find f ull details of all dCS products
here, plus the latest dCS news.
dCS produce technical notes from time to time, on issues related to ADCs,
DACs and DDCs. If you are interested in these, please check our web-site.
more@dcsltd.co.uk
Manual filename: Verona Manual v1.0x.doc Page 39 email: more@dcsltd.co.uk
English version web-site: www.dcsltd.co.uk
Page 40

dCS Verona User Manual Manual for Software Issue 1.0x
dCS Ltd September 2004
INDEXES AND SOFTWARE VERSION NUMBERS
Software History
This manual is for Verona software ver s ion 1.0x.
Definitions and Abbreviations
ADC Analogue to Digital Co nverter, sometim es referred
to as an A/D Converter.
AES3 A standard profes sional stereo di gital audio format
consisting of one serial PCM data line. It uses a
balanced cable to extend transmission distance
and includes a comprehensive messaging system.
DAC Digital to Analogue Co nverter, sometim es referred
to as a D/A Converter.
dB A relative signal level or ratio in decibels. The
context may indicate the reference level.
dB0 Level in decibels, referred to a full s cale sine wave
in a sampled system. So, 0dB0 is full scale.
dBu A signal level relative to 0.775V rms, making no
allowance for external loading.
DDC Digital to Digital C onverter, sometimes referred to
as a D/D Converter.
DSD Direct Stream Digital - a single bit digital audio
format, sampled at 2.822MS/s.
kS/s Sample rate in kilo-samples per second. This
replaces kHz, which is technically incorrect when
referring to sample rates.
SDIF-2 Sony Digital InterFace – a stereo digital audio
format consisting of 2 serial PCM or DSD data
lines. Usually used with a Word Clock.
SPDIF Sony / Philips Digital InterFace – a stereo digital
audio format for consumer equipment, consisting
of one serial PCM data lin e. Similar to AES3, but
unbalanced and with different messaging.
Word Clock A synchronisation signal consisting of a square-
wave, the frequency of which is the sample rate.
Usually transmitted through co-axial cable and
BNC connectors.
Manual filename: Verona Manual v1.0x.doc Page 40 email: more@dcsltd.co.uk
English version web-site: www.dcsltd.co.uk
Page 41

dCS Verona User Manual Manual for Software Issue 1.0x
dCS Ltd September 2004
Key to Cable Identification
If you are reading a colour print or a soft copy of this manual, cable types shown
in figures can be identified from Table 7.
Cable Type Colour / Style
XLR Analogue Brown, solid
RCA Phono Analogue Brown, long dash
XLR Digital (AES3) Blue, solid
BNC Digital Pale blue, solid
RCA Phono Digital (SPDIF) Pale blue, short dash
Optical (SPDIF) Dark magenta, solid
IEEE 1394 Red, solid
Sync Link Green, sol id
Wordclock Dark green, solid
AES Reference Dark green, long dash
GPS Reference Dark green, short dash
RS-232 Purple, solid
Table 7 – Cable colours and styles
Where more than one cable of any type is used in a drawing, they can be
identified by a coloured sleeve at the source and a c oloured arrow hea d at the
destination.
Manual filename: Verona Manual v1.0x.doc Page 41 email: more@dcsltd.co.uk
English version web-site: www.dcsltd.co.uk
Page 42

dCS Verona User Manual Manual for Software Issue 1.0x
dCS Ltd September 2004
List of Tables
Table 1 –Wordclock Output / Ext Ref Input Electrical Characteristics .............. 24
Table 2 – SPDIF Output Electrical Characteristics............................................ 24
Table 3 – Power consumption for consumer products...................................... 25
Table 4 – Size and weight for consumer products............................................ 25
Table 5 – Options available............................................................................... 30
Table 6 – dCS Contact Information.................................................................... 39
Table 7 – Cable colours and styles ................................................................... 41
List of Figures
Figure 1 – Using Verona to clock a La Scala and an Elgar Plus......................... 10
Figure 2 - Using Verona to clock a Verdi, a Purcell and an Elgar Plus...............11
Figure 3 – Slaving the Verona to a GPS clock................................................... 13
Figure 4 – Menu flow chart................................................................................ 14
Figure 5 – dCS Verona Front Panel.................................................................... 20
Figure 6 – dCS Verona Rear Panel.................................................................... 22
Figure 7 – Changing the Mains Fuse ................................................................ 32
Manual filename: Verona Manual v1.0x.doc Page 42 email: more@dcsltd.co.uk
English version web-site: www.dcsltd.co.uk
Page 43

dCS Verona User Manual Manual for Software Issue 1.0x
dCS Ltd September 2004
Keywords and Phrases
1
1394 interface................................................23
A
ADC...............................................................40
AES3..............................................................40
applications....................................................10
B
Bad CD! message .........................................19
Bad Checksum message.........................19, 36
blank display............................................16, 38
Bright x menu ................................................16
button, Clock Frequency................................20
button, Dither.................................................21
button, Menu............................................14, 21
button, Menu Select.................................14, 21
button, Menu Step ...................................14, 21
button, Menu Step Back ..........................14, 20
button, Power.................................................20
C
cable identification.........................................41
cables ..................................................8, 22, 37
CD Update is interrupted...............................18
CD Update menu...........................................17
changing options ...........................................30
cleaning the case...........................................34
clicks..............................................................37
clock accuracy...............................................24
clock cleaning................................................24
Clock Frequency button.................................20
clocking..........................................................24
closing the Menu ...........................................15
connecting the outputs ....................................9
connector, Power Link...................................23
contact information ..................................17, 39
Contact menu ................................................17
contents of box ..............................................28
Couple menu .................................................15
crystal oscillator.............................................24
D
DAC...............................................................40
DAC mutes ....................................................37
dB ..................................................................40
dBu ................................................................40
DDC...............................................................40
definitions.......................................................40
digital interface specifications........................24
display blanking............................................. 16
display brightness..........................................16
display test routine.........................................16
display, main..................................................21
DITH indicator................................................21
dither............................................................. 26
Dither button ................................................. 21
dithering the clock......................................... 26
DSD............................................................... 40
DSP-Err1 message....................................... 36
DSPs Not Loaded message ......................... 36
E
earthing......................................................... 28
EXT indicator ..........................................21, 22
Ext Ref input ................................................. 22
F
factory default settings.................................. 19
Factory menu................................................ 19
fault indication............................................... 36
features........................................................... 3
first-time use ................................................. 28
Found Track message .................................. 18
FPGAs Not Loaded message....................... 36
frequencies, output ....................................... 24
front panel..................................................... 20
full scale........................................................ 40
fuse, mains.................................................... 32
fuse, replacing............................................... 32
fuse, spare .................................................... 28
G
golden rules .................................................. 37
GPS clock, using........................................... 13
GPS receiver................................................... 3
grounding...................................................... 28
guide to basic setup........................................ 8
H
hardware updates ......................................... 33
hybrid disc, select layer................................. 15
I
IEEE 1394 interface...................................... 23
indicator, DITH.............................................. 21
indicator, EXT ......................................... 21, 22
indicator, OK ................................................. 21
indicator, PWR.............................................. 21
indicator, status............................................. 21
indicator, STBY............................................. 21
input, Ext Ref ................................................ 22
Issue menu ................................................... 16
issue, software.............................................. 16
J
jitter, low frequency....................................... 24
L
lock-in time.................................................... 24
Manual filename: Verona Manual v1.0x.doc Page 43 email: more@dcsltd.co.uk
English version web-site: www.dcsltd.co.uk
Page 44

dCS Verona User Manual Manual for Software Issue 1.0x
dCS Ltd September 2004
M
main display.............................................16, 21
maintenance..................................................32
master clock ....................................................3
Menu..............................................................14
Menu button.............................................14, 21
menu flow chart .............................................14
Menu Select button........................................14
Menu Step Back button ...........................14, 20
Menu Step button ....................................14, 21
menu time out..........................................15, 16
menu times out too soon...............................16
Menu, closing.................................................15
menu, Couple ................................................15
Menu, opening...............................................14
Menu, using...................................................14
mode, standby...............................................20
N
No Track message ........................................18
Non Seq message.........................................19
O
OK indicator...................................................21
opening the Menu..........................................14
operating conditions ......................................25
option, mains supply voltage.........................30
options...........................................................30
options, changing ..........................................30
output frequencies.........................................24
output, RCA...................................................22
outputs, connecting to .....................................9
outputs, SPDIF ..............................................22
outputs, Word Clock ......................................22
P
packaging, replacement ................................28
phase locked loop....................................24, 26
Please Start CD message.............................18
positioning the unit.........................................29
Power button..................................................20
power inlet .....................................................23
power interruption..........................................36
Power Link connector....................................23
power off........................................................20
power on........................................................20
power requirements.......................................25
power switch..................................................23
power up failure.............................................37
PowerDn message ..................................20, 36
powering up.....................................................8
pull-in range...................................................24
PWR indicator................................................21
R
RCA output....................................................22
rear panel.......................................................22
remote control sensor....................................21
resetting to factory state................................ 19
S
safety............................................................. 28
safety, electrical ............................................ 34
sample clock ................................................. 24
sample rate ......................................... 6, 22, 40
SDIF-2........................................................... 40
Select button........................................... 14, 21
Serial menu................................................... 17
serial number, full.......................................... 17
serial number, short...................................... 23
setting, supply voltage .................................. 29
settings after Factory reset ........................... 19
size................................................................ 25
software issue............................................... 16
software update by CD ................................. 17
software updates........................................... 33
software upgrade connector ......................... 23
software version............................................ 40
SPDIF............................................................ 40
SPDIF outputs............................................... 22
specification .................................................. 24
specification, Ext Ref Input ........................... 24
specification, SPDIF outputs......................... 24
specification, Word Clock outputs................. 24
standby mode ............................................... 20
status indicator.............................................. 21
STBY indicator.............................................. 21
Step button.................................................... 14
step-by-step guide .......................................... 8
SUC connector.............................................. 23
supply voltage option .................................... 30
supply voltage setting ............................. 23, 29
switch, power ................................................ 23
system fails to lock........................................ 37
T
technical notes.............................................. 39
Temp menu................................................... 16
temperature scale ......................................... 16
temperature, internal..................................... 16
temperature, operating.................................. 25
Test menu..................................................... 16
time-out......................................................... 38
time-out fails.................................................. 38
Timeout menu............................................... 16
Track n message .......................................... 18
troubleshooting ....................................... 36, 37
U
updates ................................................... 23, 33
updates, hardware ........................................ 33
updates, software.......................................... 33
updating software by CD............................... 17
updating your Verona.................................... 33
upsamper, using ........................................... 11
upsampling transport, using.......................... 10
using a GPS clock......................................... 13
Manual filename: Verona Manual v1.0x.doc Page 44 email: more@dcsltd.co.uk
English version web-site: www.dcsltd.co.uk
Page 45

dCS Verona User Manual Manual for Software Issue 1.0x
dCS Ltd September 2004
using an upsampler .......................................11
using an upsampling transport ......................10
using for the first time ....................................28
V
VCXO.............................................................24
Vx.xx message ..............................................18
W
weight............................................................ 25
Word Clock ................................................... 40
Word Clock outputs....................................... 22
wordclock, synchronising to.......................... 24
Wrong CD message...................................... 18
Wrong! message........................................... 18
Manual filename: Verona Manual v1.0x.doc Page 45 email: more@dcsltd.co.uk
English version web-site: www.dcsltd.co.uk
 Loading...