

Page 1

S
22
55
88
55
S
11
55
11
88
A.E.B. INDUSTRIALE s.r.l.
Via Brodolini, 8 - 40056 Crespellano (Bo) - ITALIA
Tel. + 39 051 969870 - Fax. + 39 051 969725
Internet: www.dbtechnologies.com
E-mail: info@dbtechnologies-aeb.com
Digital Vertical ArrayDigital Vertical Array
MANUALE d’USO - Sezione 1
USER MANUAL - Section 1
BEDIENUNGSANLEITUNG - Abschnitt 1
CARACTERISTIQUES TECHNIQUES - Section 1
COD. 420120197 Rev 2.0
Made in Italy
Page 2

DESCRIZIONE
DVA S1518N
Il subwoofer attivo DVA S1518N è equipaggiato con un
amplificatore digitale ad alta efficienza DIGIPRO 1500S
della serie DIGIPRO G2, in grado di erogare 1500W
RMS.
ItalianoItalianoItaliano
Manuale d’usoManuale d’uso
Il circuito di alimentazione dell’amplificatore DIGIPRO G2
è stato progettato per lavorare in modalità full-range;
grazie alla tecnologia SMPS (Switched-Mode Power
Supplies) con PFC (Power Factor Correction) viene
garantito il funzionamento a tensioni di alimentazioni da
100 a 240V, garantendo le stesse prestazioni acustiche
anche con linee di alimentazione fluttuanti e non
stabilizzate.
Il preamplificatore digitale con DSP (Digital Signal Processing) gestisce il componente
acustico, la risposta in frequenza ed il limiter.
Il box del subwoofer DVA S1518N è realizzato in legno di betulla, studiato per sonorizzare
ambienti medio grandi; è costruito utilizzando la tipologia “BAND PASS” che permette di
ottenere alte pressione sonore ed un basso profondo.
Il subwoofer ha una forma rettangolare; nella parte superiore è presente un supporto M20
per piantana ed è provvisto di 6 maniglie in metallo (3 per lato).
Sempre nella parte superiore sono previsti due inserti, per vincolare in appoggio
(groundstack) i flybar DRK10 o DRK20, per i diffusori DVA T4 e DVA T12.
Il diffusore può essere utilizzato anche appeso ai flybar DRK10 o DRK20 attraverso il
kit opzionare di staffe SRK-10.
Per facilitarne il trasporto si possono montare 4 ruote diametro 100mm sulla parte
posteriore (SWK-18), oppure utilizzare l’apposito carrello fissato con due PIN ( DVA
S1518N e DVA S2585N dolly).
DVA S2585N
Il subwoofer attivo DVA S2585N è equipaggiato con un
modulo amplificatore DIGIPRO 1500S ed un modulo
amplificatore DIGIPRO 1000S, entrambe della serie
DIGIPRO® G2, per una potenza totale di 2500W RMS
(1000W + 1500W)
Il subwoofer è stato progettato come sistema
supercardioide con 2 camere acustiche separate:
- la sezione frontale in configurazione BAND-PASS, è
equipaggiata con un woofer da 18” (bobina 4” RCF )
pilotato dal modulo amplificatore DIGIPRO 1500S
- la sezione posteriore sempre in BAND-PASS con un
woofer da 15”(bobina 4” RCF) pilotato dal modulo
amplificatore DIGIPRO 1000S.
I circuiti di alimentazione degli amplificatori DIGIPRO G2 sono stati progettati per
lavorare in modalità full-range; grazie alla tecnologia SMPS (Switched-Mode Power
Supply) e PFC (Power Factor Correction) viene garantito il funzionamento a tensioni di
alimentazioni da 100 a 240V, garantendo le stesse prestazioni acustiche anche con linee
di alimentazione fluttuanti e non stabilizzate.
Il preamplificatore digitale con DSP (Digital Signal Processing) gestisce i componenti
acustici, i delay, la risposta in frequenza ed i limiter.
®
Il DVA S2585N prevede fino a tre modalità di utilizzo, (cardiode, supercardioide e
ipercardioide) selezionabili attraverso l'interfaccia RDNET.
Una descrizione dettagliata dell’argomento è riportata in un capitolo dedicato.
Il subwoofer ha una forma rettangolare; nella parte superiore è presente un supporto a
piantana M20 ed è provvisto di 6 maniglie di metallo (3 per lato).
Sempre nella parte superiore sono previsti due inserti,per vincolare in appoggio
®
®
(groundstack) i flybar DRK10 o DRK20, per i diffusori DVA T4 e DVA T12.
Il diffusore può essere utilizzato anche appeso ai flybar DRK10 o DRK20 attraverso il
kit opzionare di staffe SRK-10.
Per facilitarne il trasporto. è previsto l’apposito carrello (DVA S1518N e DVA S2585N
dolly) che viene fissato alla parte posteriore con due perni.
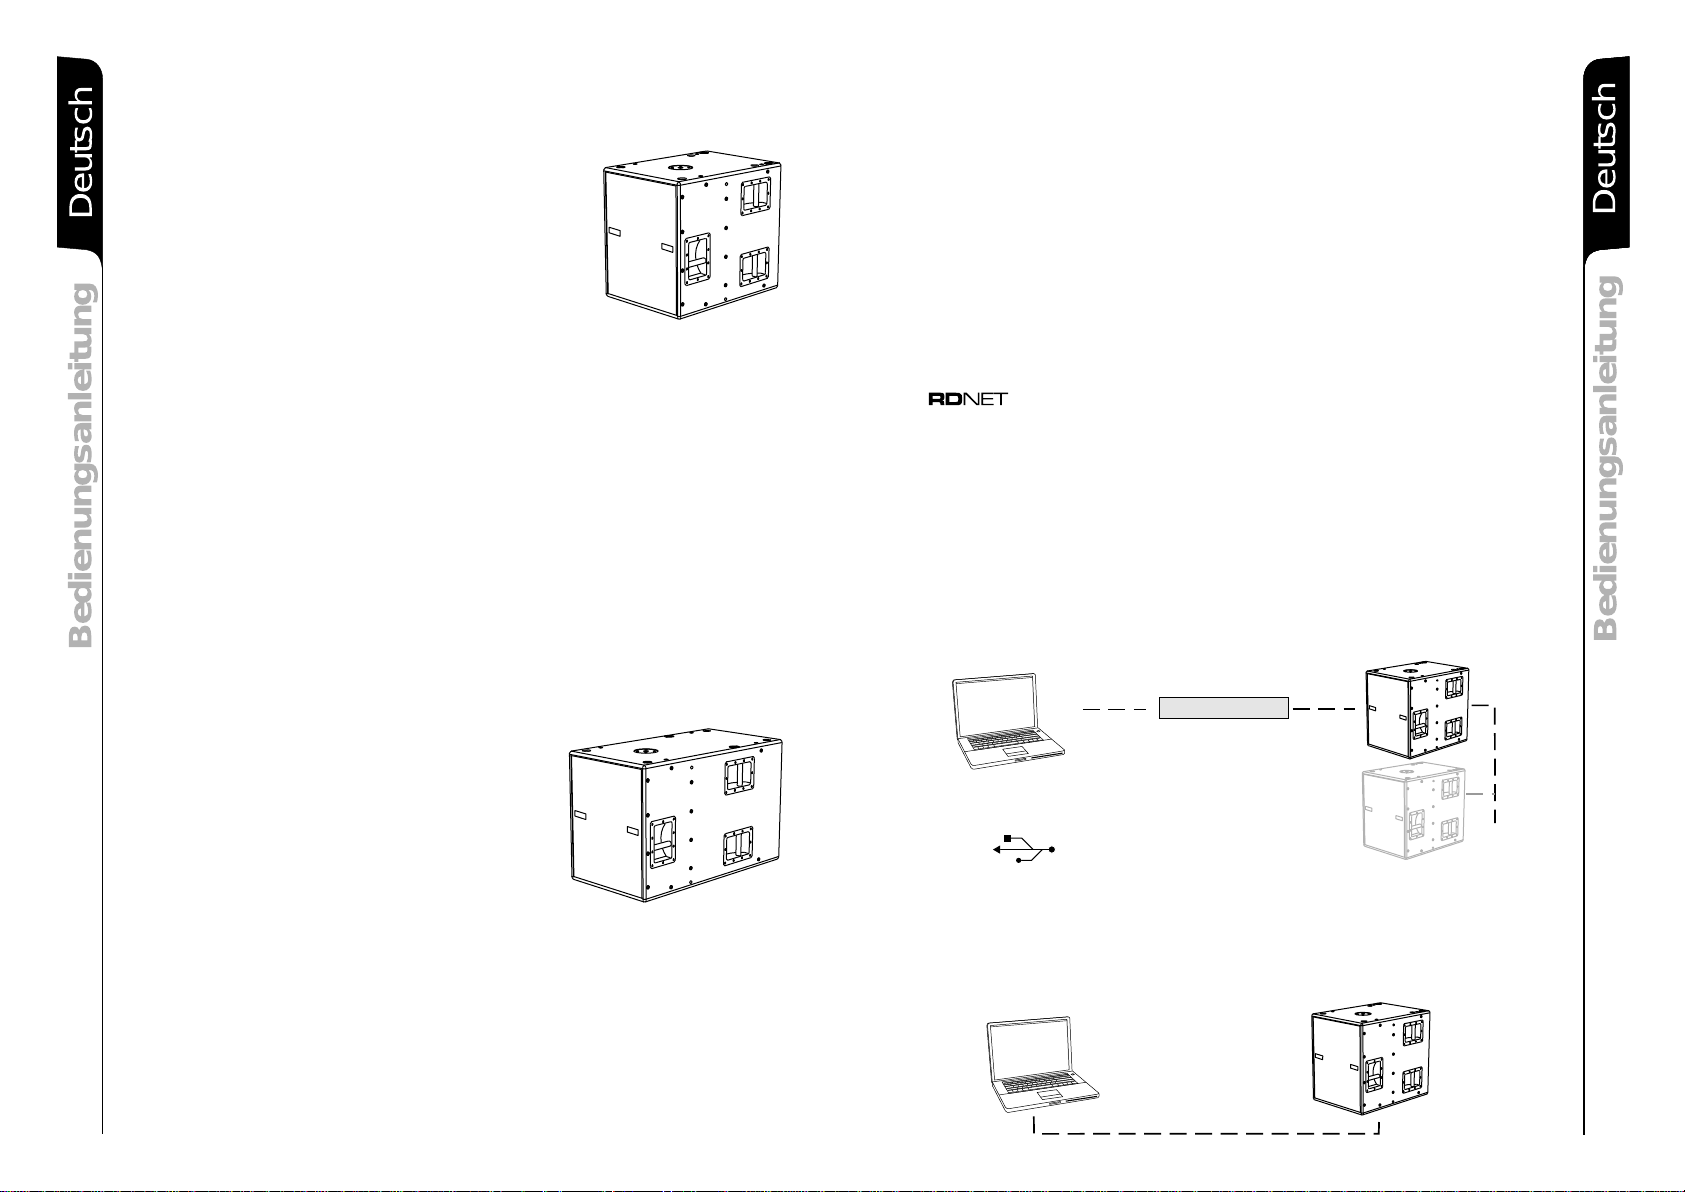
Entrambe i woofer DVA S1518N e DVA S2585N sono equipaggiati con interfaccia di rete
proprietaria, denominata RDNET tramite la quale è possibile interfacciarsi al computer
attraverso una periferica (RDNET hub).
A questo scopo è stato sviluppato un protocollo di comunicazione con il quale è possibile
ricevere e inviare i dati; questo collegamento permette di monitorare in tempo reale i
parametri del diffusore come livello del segnale, stato del limiter, etc...
E’ possibile selezionare diversi valori di crossover, delay, volume ed aggiungere
equalizzazioni, tramite l’apposito plug-in.
Per ulteriori dettagli consultare le informazioni relative al RDNET controller.
PC
USB
Il firmware dei moduli amplificatori possono essere aggiornato tramite porta USB.
Per rendere possibile e facile questo aggiornamento è stato sviluppato un programma
dedicato che deve essere richiesto alla ditta costruttrice e installato su un computer.
L’aggiornamento deve avvenire a modulo amplificatore non alimentato e il potenziometro
rotativo «SUB Phase/Delay» deve essere impostato in posizione 4,5mS.
PC
RDNET hub
ItalianoItalianoItaliano
Manuale d’usoManuale d’uso
Il sistema è studiato per sonorizzare ambienti medio-grandi; il posizionamento del
subwoofer davanti al palco o ai suoi lati, evita che le basse frequenze vengano irradiate
dalla parte posteriore del diffusore stesso, evitando quindi feedback microfonici, rumori
1
meccanici delle strutture portanti e distorsioni sonore dovute al caricamento delle basse
frequenze sotto al palco
2
Page 3

COMANDI E FUNZIONI (FIG. 1)
Sezione “Balanced Audio”
1) CONNETTORE DI INGRESSO " INPUT”
Connettore XLR ingresso bilanciato a livello linea .
2) CONNETTORE DI USCITA "LINK”
ItalianoItalianoItaliano
Manuale d’usoManuale d’uso
3
Il connettore “XLR” connesso in parallelo con l’ingresso (1) può essere utilizzato per
inviare il segnale audio in ingresso ad un altro diffusore amplificato.
Sezione “Status”
3) INDICATORE LUMINOSO “LIMITER”
Questo indicatore s’illumina di colore rosso per indicare l'intervento del circuito
limitatore interno, il quale evita la distorsione dell'amplificatore e protegge gli
altoparlanti contro sovraccarichi.
Evitare di utilizzare il sistema per lunghi periodi di tempo con l’indicatore
!!
luminoso acceso fisso o lampeggiante.
4) INDICATORE LUMINOSO “SIGNAL”
Questo indicatore si illumina di colore verde per indicare la presenza di un segnale
in ingresso di un livello superiore ai -20dBu.
5) INDICATORE LUMINOSO “MUTE/PROT”
Questo indicatore di colore giallo indica lo stato dell’amplificatore. Nel normale
funzionamento il led è spento; nel caso in cui lampeggi o sia sempre acceso fare
riferimento alla tabella della diagnostica per la verifica dello stato dell’amplificatore.
6) INDICATORE LUMINOSO “READY”
Questo indicatore s'illumina di colore verde per indicare che la tensione di
alimentazione di rete è corretta. Nel normale funzionamento il led è acceso; nel caso
in cui lampeggi o sia spento fare riferimento alla tabella della diagnostica per la
verifica dello stato dell’amplificatore.
Sezione “Input control”
7) CONTROLLO SENSIBILITA’ INGRESSO “INPUT SENS”
Questo controllo regola la sensibilità del segnale in ingresso all’amplificatore.
Tale controllo non influisce sul livello dell’uscita “LINK” (2)
Sezione “Xover Out”
8) CONNETTORE DI USCITA
Uscita audio bilanciata del crossover interno, tramite connettore “XLR” . Il segnale
prelevato da questa uscita può essere inviato a qualsiasi diffusore amplificato.
La frequenza di incrocio è selezionabile tramite il selettore “Xover Frequency ” (9).
9) SELETTORE “Xover Frequency selection 24dB/Oct”
Il selettore permette di selezionare la frequenza di incrocio da 75Hz a 120Hz (passo
5Hz) con una pendenza di 24dB/oct.
La scelta del taglio è legata al tipo di riproduzione sonora che si vuole ottenere o
dalla configurazione del sistema.
10) INDICATORE LUMINOSO “Remote Preset Active”
Quando l’amplificatore è controllato da RDNET l’indicatore di colore Giallo è attivo e
vengono esclusi i seguenti comandi:
Volume (7)
Phase (11)
Xover Frequency selection (9)
Delay (12)
Sezione “SUB Phase/Delay”
11) SELETTORE “PHASE”
Il selettore permette la rotazione di 180° del segnale audio riprodotto dal subwoofer.
Tale rotazione di fase facilita l’ottimizzazione della riproduzione delle frequenze
basse anche nelle situazioni di installazioni più difficili. Completata l’installazione,
riprodurre un brano musicale ed agire sul selettore per ottenere la migliore resa
acustica delle basse frequenze. Tale funzione viene utilizzata anche per
configurazioni cardioidi.
12) CONTROLLO “DELAY”
Questo controllo
Questo circuito permette l’allineamento acustico tra line array e sub compensando
le diverse posizioni.
E’ possibile utilizzare questo controllo per la realizzazione di sistemi in
configurazioni cardioidi. La configurazione cardioide permette una notevole
attenuazione delle basse frequenze emesse dalla parte posteriore dei subwoofer,
mantenendo inalterata l'emissione sonora frontale.
Tale configurazione prevede un minimo di 3 subwoofer (due con emissione frontale
e uno con emissione posteriore
Sezione “RDNET”
13) CONNETTORE DI INGRESSO "DATA INPUT”
Connettore RJ45 ’ingresso dati .
14) CONNETTORE DI USCITA "DATA LINK”
Connettore RJ45 ’uscita dati per il collegamento seriale in cascata.
15) INDICATORE LUMINOSO “LINK”
Questo indicatore di colore Verde si accende solo quando l’amplificatore ha
riconosciuto ed è connesso con unità principale RDNET tramite computer.
16) INDICATORE LUMINOSO “ACTIVE”
Questo indicatore di colore Giallo lampeggia quanto è attiva una trasmissione dati
tra RDNET e modulo amplificatore.
Sezione “DSP UP-grade”
17) Connettore “Service Data USB”
Tramite questo connettore USB è possibile aggiornare il firmware del modulo
amplificatore tramite un computer ed un programma dedicato.
18) PRESA DI ALIMENTAZIONE “MAINS INPUT”
Consente la connessione del cavo di alimentazione.
Il connettore utilizzato per il collegamento alla rete è un POWER CON® (blu)
19) PRESA DI ALIMENTAZIONE RILANCIO “MAINS OUTPUT LINK”
(Presente solo nel DVA S1518N)
Consente di rilanciare l’alimentazione di rete. L’uscita è connessa in parallelo con
l’ingresso (18) e può essere utilizzata per alimentare un altro diffusore.
Il connettore utilizzato è un POWER CON® (grigio)
20) GRIGLIE DI RAFFREDDAMENTO
Queste griglie permettono il raffreddamento dell’amplificatore durante il
funzionamento. Non ostruire gli accessi e pulire le griglie quando necessita per
garantire il corretto ricircolo d’aria.
permette di ritardare il segnale audio riprodotto dal subwoofer.
).
ItalianoItalianoItaliano
Manuale d’usoManuale d’uso
4
Page 4

CARATTERISTICHE E PROTEZIONI
Griglie frontali
Visto l’utilizzo professionale di questi diffusori, i componenti sono protetti frontalmente da
una lamiera forata con spessore 1,5mm e foam interno.
Raffreddamento
Il controllo termico è gestito dal microprocessore centrale (main) che interagendo con i
ItalianoItalianoItaliano
Manuale d’usoManuale d’uso
microprocessori locali comunica i dati al DSP per le eventuali correzioni.
In caso di surriscaldamento eccessivo del modulo amplificatore, il volume viene ridotto
gradualmente a step di 0,1dB fino alla stabilizzazione termica del modulo.
Il volume viene ripristinato automaticamente al raggiungimento delle normali temperatura
di esercizio.
Indicazioni di guasto e protezioni
Il microprocessore centrale è in grado di segnalare diversi tipi di guasti tramite diversi
lampeggi dei LED “READY”, “MUTE/PROT” e “LIMIT” come riportato nella tabella della
diagnostica
I tre tipi di guasto possibili sono:
1) ATTENZIONE: viene rilevato una errore o un malfunzionamento autoripristinate non
grave e le prestazioni del diffusore non vengono limitate
2) LIMITAZIONE: viene rilevato un errore e vengono limitate le prestazioni del diffusore
. Il livello sonoro viene ridotto oppure vengono disabilitati uno o più amplificatori.
Questo stato influisce parzialmente sul funzionamento corretto del diffusore.
Se il problema persiste alle successive accensioni del modulo è nessario contattare
il centro assistenza per risolvere il problema.
3) GUASTO: viene rilevato un malfunzionamento grave. Il diffusore viene posto nello
stato di “mute”.
Nel caso di malfunzionamento, prima di contattare il centro di assistenza, provare a
spegnere e riaccendere il modulo per verificare la continuità del problema.
Collegamento alla alimentazione di rete
Il collegamento alla rete avviene tramite un connettore modello Neutrik POWER CON®
(blu) che permette di avere una facile e rapida connessione al diffusore oltre che a un
ottimo sistema di bloccaggio.
Lo stesso connettore serve da interruttore per accendere e spegnare il diffusore.
L’apparecchio dovrà essere collegato ad una rete di alimentazione che possa erogare la
massima potenza richiesta.
Rilancio alimentazione di rete (presente solo nel DVA S1518N)
Sul retro del diffusore è presente un connettore Neutrik POWER CON® (grigio) per il
rilancio di alimentazione di rete.
Questa presa ha lo scopo di rilanciare l’alimentazione ad un altro diffusore riducendo i
collegamenti diretti alla rete. Gli assorbimenti massimi degli amplificatori sono riportati sul
pannello dell’amplificatore.
Il numero massimo dei diffusori collegati insieme varia sia per gli assorbimenti massimi
dei diffusori e sia dalla corrente massima della prima presa di alimentazione.
Inizializzazione del modulo amplificatore
corretta
e rimane attivo con funzionalità limitate
Il modulo ha rilevato una anomalia grave
e rimane in protezione
(limiter attivo) Inizializzazione del modulo completata e
(3 o più lampeggi veloci) (limiter attivo) Il modulo ha rilevato una anomalia parziale
per compensare l’aumento di temperatura
per compensare l’aumento di temperatura
Il volume (INPUT SENS) e il commutatore rotativo (DSP Preset) sono attivi
Il volume (INPUT SENS) e il commutatore rotativo (DSP Preset) sono bypassati
(1 lampeggio lento) (limiter attivo) Il modulo funziona con un volume ridotto (-3dB)
(2 lampeggi veloci) (limiter attivo) Il modulo funziona con un volume ridotto (-6dB)
ItalianoItalianoItaliano
Manuale d’usoManuale d’uso
INSTALLAZIONE DEL DIFFUSORE
ATTENZIONE
!!
Installare il diffusore in modo stabile e sicuro, così da evitare qualsiasi condizione di
pericolo per l’incolumità di persone e strutture.
Per evitare condizioni di pericolo non sovrapporre fra loro più diffusori senza
adeguati sistemi di ancoraggio. Nell’utilizzo all’aperto evitare luoghi esposti alle
intemperie.
Il diffusore viene fornito dalla ditta costruttrice predisposto per l’utilizzo in appoggio
5
ATTENZIONE
!!
Non utilizzare mai la maniglia per appendere il diffusore!
TABELLA DELLA DIAGNOSTICA
STATO LED «READY» LED «MUTE/PROT LED «LIMIT» FUNZIONI MODULO
DEL MODULO
Accensione Spento Acceso per 5 sec. Spento Audio in MUTE
Uso normale Acceso fisso Spento Funzionamento normale Audio ATTIVO
Anomalia parziale Acceso fisso Lampeggio ciclico Funzionamento normale Audio ATTIVO
superiore 70°C Acceso fisso Lampeggio ciclico Funzionamento normale Audio ATTIVO
Anomalia totale Spento Acceso fisso Lampeggio ciclico Audio in MUTE
Temperatura amplificatore
superiore 80°C Acceso fisso Lampeggio ciclico Funzionamento normale Audio ATTIVO
STATO LED «RD NET» FUNZIONI MODULO
DEL MODULO
RDNET non attiva Spento Il modulo funziona normalmente
RDNET collegata Acceso fisso Il modulo amplificatore è controllato in remoto dall’RDNET
6
Equlizzazione «USER EQ» Lampeggio ciclico Il modulo funziona normalmente
(commutatore rotativo Si sta utilizzando l’equalizzazione salvata tramite RDNET
«DSP Preset» in posizione 9)
Page 5

CONFIGURAZIONE CARDIOIDE
I subwoofer standard sono omnidirezionali cioè la
pressione sonora emessa è pressoché uniforme in
qualsiasi direzione (direttività costante nelle tre
dimensioni).
A seguito è riportato come riferimento il diagramma
ItalianoItalianoItaliano
Manuale d’usoManuale d’uso
polare di un subwoofer omnidirezionale. Come si può
notare, la direttività è costante in tutte le direzioni,
ottenendo così un grafico circolare.
La configurazione cardioide nasce con il proposito di direzionare la pressione sonora
verso la parte frontale del diffusore. Spostandosi verso la parte posteriore, invece, tale
pressione viene attenuata.
L'attenuazione può essere inoltre definita in diversi punti dello spazio dietro al sub: ad
esempio può essere impostata esattamente al centro della semisfera posteriore (180°)
oppure in punti diversi. Le scelte di tali configurazioni sono state progettate per tutte
quelle casistiche in cui il sub viene posizionato davanti al palco o ai suoi lati, in modo
da evitare che le basse frequenze risuonino sul palco stesso, evitando quindi feedback
microfonici, rumori meccanici delle strutture portanti e distorsioni sonore dovute al
caricamento delle basse frequenze sotto al palco.
Questa configurazione risulta essere utile anche quando ci si trova a dover
posizionare i subwoofer in vicinanza di strutture compatte quali mura ecc. In questo
caso infatti, le onde posteriori che rimbalzando sul muro creerebbero delle
cancellazioni di fase non esistono, preservando quindi la corretta riproduzione sonora.
Le configurazioni principali sono tre:
- CARDIOIDE (diagramma a forma di cuore): l'attenuazione posteriore è a 180°
(in linea con il frontale).
Questa configurazione è da utilizzarsi qualora il diffusore venga posto davanti al
palco in posizione centrale; in questo caso le basse frequenze vengono
praticamente annullate sul palco.
- IPERCARDIOIDE: l'attenuazione posteriore è 120° rispetto alla parte frontale.
Questa configurazione è consigliata quando i diffusori vengono posti lateralmente
a palchi superiori a 14 metri di larghezza.
STAGE
PALCO
20m
Il subwoofer DVA S2585N nasce già in configurazione supercardioide con una
attenuazione posteriore 135°.
E’ possibile settare le tre diverse configurazioni attraverso l’interfaccia hardware RDNET
CONTROL 2 oppure RDNET CONTROL 8, che permette di collegare il subwoofer ad un
computer per il monitoraggio del funzionamento tramite il software dedicato scaricabile
dal sito dB Technologies, è possibile settare le tre diverse configurazioni.
E’ stata prevista una sezione dedicata “CARDIOD PRESET” dove è possibile trovare tutte
e tre le scelte.
PC
120°
ItalianoItalianoItaliano
Manuale d’usoManuale d’uso
PALCO
STAGE
180°
- SUPERCARDIOIDE: l'attenuazione posteriore è a 135° rispetto alla parte frontale.
Si utilizza questa configurazione quando i diffusori vengono posti lateralmente a
palchi le cui dimensioni rientrano tra i 6 ed i 14 metri di larghezza.
SC = Supercadioide
STAGE
7
12m
135°
C = Cardioide
HC = Ipercardioide
RDNET CONTROL 2
Finestra di monitoraggio DVA S2585N
8
Page 6

Il DVA S1518N, essendo un subwoofer standard, può essere configurato come cardioide
seguendo le indicazione riportate a seguito utilizzando tre subwoofer DVA S1518N in
contemporanea.
ItalianoItalianoItaliano
Ruotare la fase di 180°
Impostare il delay a 3,5msec
Manuale d’usoManuale d’uso
Front
9
0°
180°
Phase
Rear
Input
Audio Balanced Input/Link
S
NEODYMIUM
Delay
0
4.5
4.0
3.5
3.0
2.5
11
55
0.5
1.0
1.5
2.0
Link
Digital Vertical Array
11
88
CERAMIC
mSec
Front
User/120
115
110
Xover Frequency
selection 24dB/oct
Xover Out
DVA S1518N - DATI TECNICI
Sistema Attivo
Tipologia amplificatore Digitale - Classe D (Tecnologia DIGIPRO G2)
Potenza RMS 1500 W
Potenza sonora 3000 W
Risposta in frequenza +/-3dB 39
Crossover
Input Control
Status
Limiter
Signal
Mute/Prot
Ready
Input Sens
0°
75
4.5
80
180°
4.0
85
Hz
3.5
90
3.0
105
95
100
Remote
Phase
Preset
Active
SUB Phase/Delay
Link
Active
+4dB
Data
Input
0dB
mSec
0
0.5
1.0
1.5
2.0
2.5
Delay
TECHNOLOGIESTECHNOLOGIES
dd
BB
Service
Data
USB
Data
Link
DSP Up-grade
Pressione sonora (SPL) 138dB max
Componenti 1 woofer 18” - RCF bobina 4”
Sensibilità ingresso nominale 0 dBu
Impedenza ingresso
Bilanciato 20Kohm
-110Hz
75
- 120Hz (passi 5Hz) selezionabile
ItalianoItalianoItaliano
Sbilanciato 10Kohm
Alimentazione Full range 100Vac -
240Vac, 50-60Hz con PFC
Corrente di accensione 16,1 A
DSP Analog Device 56 bits
Conversione audio 24 bit / 96kHz S/N=116dB
Controllo volume Digitale
Materiale box Multistrato di betulla, verniciato nero bucciato
Forma diffusore Rettangolare
Colore Nero
Maniglia 3 x lato
Rete frontale Lamiera forata 1.5mm con foam interno.
Dimensioni [LxHxP] 515x614x720mm
Peso 44Kg (woofer neodimino)
Manuale d’usoManuale d’uso
47,5Kg (woofer ceramico)
DVA S2585N - DATI TECNICI
Sistema Attivo
Tipologia amplificatore Digitale - Classe D (Tecnologia DIGIPRO G2)
Rear
Potenza RMS 2500 W
Potenza sonora 5000 W
Risposta in frequenza +/-3dB 35
Crossover
-120Hz
75
- 120Hz (passi 5Hz) selezionabile
Pressione sonora (SPL) 140dB max
Componenti 1 woofer 18” - RCF bobina 4” (frontale)
1 woofer 15” - RCF bobina 4” (retro)
Sensibilità ingresso nominale 0 dBu
Impedenza ingresso
Bilanciato 20Kohm
Sbilanciato 10Kohm
Alimentazione Full range 100Vac -240Vac, 50-60Hz con PFC
Corrente di accensione 28,3 A
DSP Analog Device 56 bits
Conversione audio 24 bit / 96kHz S/N=116dB
Controllo volume Digitale
Materiale box Multistrato di betulla, verniciato nero bucciato
Forma diffusore Rettangolare
Colore Nero
Maniglia 3 x lato
Rete frontale Lamiera forata 1.5mm con foam interno.
Dimensioni [LxHxP] 515x640x1000mm
Peso 65Kg
CLASSIFICAZIONE EMI
In accordo alle normative EN 55103, l'apparato è progettato e idoneo all'utilizzo in ambienti
Elettromagnetici E5.
10
Page 7

DESCRIPTION
DVA S1518N
The DVA S1518N is equipped with one high efficiency
amplifiers DIGIPRO 1500S of DIGIPRO® G2 series,
which delivers 1500W RMS.
The power supply circuits of the DIGIPRO® G2
EnglishEnglishEnglish
user manualuser manual
amplifier has been conceived to work in full-range
mode; thanks to the SMPS (Switched-Mode Power
Supplies) technology with PFC (Power Factor
Correction) the operation with supply voltages
between 100 Vac and 240Vac is guaranteed by
ensuring the same sound performances even with
floating and non-stabilized power supply systems.
The digital preamplifier with DSP (Digital Signal Processing) controls the audio crossover
of the acoustic components, the frequency response and the limiter.
The box of the subwoofer DVA S1518N is made from birch wood, designed for medium to
large environments, with a "BAND PASS" solution which allows to obtain high sound
pressure and a low bass.
The subwoofer has a rectangular shape; at the top there is a pedestal support M20 and it is
provided with 6 metal handles (3 for each side).
At the top there are as well two inserts, to fasten (groundstack) the flybars DRK10 or
DRK20, for the speakers DVA T4 and DVA T12.
The speaker can also be hung to the flybars DRK10 or DRK20 through the optional
bracket kit SRK-10.
To facilitate the transport you can fit 4 wheels (diameter 100mm) to the rear, (KIT SWK-18)
or use the appropriate dolly fastened with two PINs (DVA S1518N and DVA S2585N dolly).
DVA S2585N
The active subwoofer DVA S2585N is equipped with
an amplifier module DIGIPRO 1500S and an
amplifier module DIGIPRO 1000S, both of the
DIGIPRO® G2 series, for a total power of 2500W
RMS (1000W + 1500W)
The subwoofer has been designed as supercardioid
system with 2 separated acoustic chambers:
- the front section in BAND-PASS configuration, is
equipped with a 18" woofer (4" RCF coil) powered by
the amplifier module DIGIPRO 1500S
- the rear section, as well in BAND-PASS
configuration, is equipped with a 15" woofer (4" RCF
coil) powered by the amplifier module DIGIPRO
1000S
The power supply circuits of the amplifiers DIGIPRO® G2 are designed to work in fullrange mode; SMPS (Switched-Mode Power Supply) and PFC (Power Factor Correction)
technology enable operation with supply voltages from 100V to 240V, ensuring the same
acoustic performance even with fluctuating, non-stabilized supply lines.
The DVA S2585N provides up to three operating modes, (cardioid, supercardioid and
hypercardioid), selectable through the RDNET interface.
A detailed description of the topic is included in a separate chapter.
The subwoofer has a rectangular shape; at the top there is a pedestal support M20 and it
is provided with 6 metal handles (3 for each side).
At the top there are as well two inserts, to fasten (groundstack) the flybars DRK10 or
DRK20, for the speakers DVA T4 and DVA T12.
The speaker can also be hung to the flybars DRK10 or DRK20 through the optional
bracket kit SRK-10.
A dedicated dolly (DVA S1518N and DVA S2585N dolly), which is attached to the rear with
two PINs, is provided to ease transport.
Both woofers DVA S1518N and DVA S2585N are equipped with proprietary network
interface, called RDNET, for PC interface through a device (RDNET hub).
For this purpose, a communication protocol has been developed for receiving and
sending data; this connection permits real-time monitoring of the diffuser parameters,
such as output power, amplifier temperature, limiter status, etc...
It is also possible to select various equalizations or create new ones, set the desired
volume levels using the specific plug-in.
For more details refer to the information about the RDNET controller.
PC
USB
The firmware of the amplifier module can be updated via the USB port.
To make this update possible and simple, a dedicated program has been developed that
must be requested from the manufacturer and installed on a computer.
The update must be done when the amplifier module is not powered and the «SUB
Phase » rotary potentiometer must be set to 4.5mS.
/Delay
RDNET hub
EnglishEnglishEnglish
user manualuser manual
11
The digital pre-amplifier with DSP (Digital Signal Processing) manages acoustic
components, delays, frequency response and limiters.
The system is designed for medium to large environments; the placement of the
subwoofer in front of the stage or on its sides prevents low frequencies radiation from the
rear of the speaker, thus avoiding microphone feedbacks, mechanical noises of the load
bearing structures and sound distortions due to low frequencies loading below the stage.
PC
12
Page 8

CONTROLS AND FUNCTIONS (FIG. 1)
"Balanced Audio" section
1) " INPUT” INPUT CONNECTOR
Balanced input at line level. It is able to accept “XLR” sockets.
2) "LINK” OUTPUT CONNECTOR
EnglishEnglishEnglish
3) “LIMITER” INDICATOR LIGHT
The “XLR” connector connected in parallel with input (1) can be used to send the
input audio signal to another amplified speaker.
"Status" section
This indicator comes on red to indicate that the internal limiter circuit has tripped.
This prevents amplifier distortion and protects the speakers against overloads.
!!
4) “SIGNAL” INDICATOR LIGHT
This indicator comes on green to indicate the presence of an input signal to a level
higher than-20dBu.
5) “MUTE/PROT” INDICATOR LIGHT
This yellow indicator indicates amplifier status. In normal operating conditions, the
user manualuser manual
13
LED is off; if it flashes or is always on, refer to the diagnostics table to check
amplifier status.
6) “READY” INDICATOR LIGHT
This indicator comes on green to indicate that the main power voltage is correct. In
normal operating conditions, the LED is on; if it flashes or is off, refer to the
diagnostics table to check amplifier status.
"Input control " section
7) “INPUT SENS” INPUT SENSITIVITY CONTROL
This control regulates the sensitivity of the signal amplifier input.
This control does not affect the “LINK” (2) output level.
"Xover Out " section
8) OUTPUT CONNECTOR
Internal crossover audio balanced output, by XLR connector. The signal from this
output can be sent to any other amplified speaker.
The crossover frequency can be selected by means “Xover Frequency” switch (9).
9) "Xover Frequency selection 24dB/Oct” SELECTOR
This selector permits selection of crossover frequency from 75Hz to 120Hz (step
5Hz) with a slope of 24dB/Oct.
The frequency choice depends to the reproduction desired and from system
configuration.
10) “Remote Preset Active” INDICATION LIGHT
When the amplifier is remotely controlled via RDNET, this yellow indicator indicates
the exclusion of the below commands:
Volume (7)
Phase (11)
Xover Frequency selection (9)
Delay (12)
Always avoid operating conditions where the system works for long periods
of time with LED flashes or it is always ON
“PHASE ” SWITCH
11)
This switch permits 180° rotation of the audio signal reproduced by subwoofer.
Rotation makes for easier optimization of low-frequency reproduction even in the
most difficult installation situations. After completing installation, reproduce a track of
music and adjust the switch to obtain the best low-frequency sound.
This function it is used also for cardioid configuration.
12) "DELAY” CONTROL
This control allows to delay the sound signal reproduced by the subwoofer.
circuit allows sound-alignment between line array and sub by balancing the various
positions.
This control can also be used to create cardioid configuration systems. The cardioid
configuration provides a remarkable attenuation of the low frequencies radiated by
the rear side of the subs, without changing the direct radiated signal on the front
side.
This configuration needs at least 3 subwoofers (two with front radiation and one with
rear radiation).
“RDNET " section
13) INPUT CONNECTOR "DATA INPUT”
RJ45 connector 'data input.
14) OUTPUT CONNECTOR "DATA INPUT”
RJ45 connector 'data output for cascading connections.
15) “LINK” INDICATION LIGHT
This green indicator turns on only when the amplifier has recognized and is
connected with the main RDNET unit via the computer.
16) “ACTIVE” INDICATOR LIGHT
This yellow indicator flashes when there is an active data transmission between
RDNET and the amplifier module.
“DSP UP-grade " section
17) “Service Data USB” Connector
Via this USB connector, it is possible to update the firmware of amplifier module
using the computer and a dedicated program.
18) "MAINS INPUT" POWER SOCKET
For connecting the power cable.
The connector used for mains connection is a POWER CON® (blue)
19) “LINK” RELAUNCH POWER SOCKET
(present only DVA S1518N)
For relaunching the mains power. The output is connected in parallel with input (18)
and can be used to power another amplified speaker.
The connector uses a POWER CON® (grey)
20) COOLING GRILLE
These grilles permit cooling the amplifier during operation.
Do not block accesses and clean the grilles whenever necessary to ensure correct
air circulation.
This
EnglishEnglishEnglish
user manualuser manual
14
Page 9

CHARACTERISTICS AND PROTECTION
Front Grille
The speakers’s components in the box are protected by 1.5mm metal steel grille covered
by foam on backside.
Cooling
Thermal control is managed by the main microprocessor that interacts with the local
EnglishEnglishEnglish
user manualuser manual
microprocessors (amplifiers and power supply) and communicates the data to the DSP for
any corrections.
If the amplifier module heats up excessively, the volume is gradually reduced step wise to
0.1dB until the module is thermally stabilised.
The volume is automatically restored when the normal operating temperature is reached.
Failure indications and safeties
The microprocessor is able to signal three different kinds of failure by flashing the
“READY”, “MUTE/PROT” e “LIMIT”
The three types of failure are:
1) WARNING: a non severe error or auto-ripristinate malfunction is detected and the
performance of the speaker is not limited
2) LIMITATION: an error is detected and diffuser performance is limited. The sound
level is reduced or one or more amplifiers are disabled.
This state partially influences the correct functioning of the diffuser.
If the problem persists the next time the module is turned on, contact the support
centre for assistance.
3) FAILURE: a severe malfunction is detected. The speaker switches to “mute”.
If the case of a malfunction, before contacting the support centre, try to turn the
module off and on to check if the problem still exists.
Connecting to the mains supply
Each active speaker features its own power cable. Connection is done by a Neutrik
POWER CON® (blue) model which permits easy and fast connection to the speaker as
well as being an excellent locking system.
The same connector serves as a switch to turn ON and OFF the active loudspeaker by
turning the connector to the left (OFF) or right (ON).
The active speaker must be connected to a power supply able to deliver the maximum
required power.
Main power supply linking (present only DVA S1518N)
On the rear of the speaker, a Neutrik POWER CON® connector (grey) offers linking the
mains power supply.
This socket links the power supply to another speaker, thereby reducing the direct
connections to the mains. Maximum amplifier input power is shown on the amplifier panel.
The maximum number of speakers connected together varies of max input power and of
the maximum allowed current of the first power socket.
MODULE FUNCTIONS
Audio MUTED
Initialization of the amplifier module
Normal operation Audio ACTIVE
(limiter active) Module initialization complete and correct
Cyclic flashing Normal operation Audio ACTIVE
(3 or more quick flashes) (limiter active) The module has detected a partial anomaly
and remains active with limited functions
The module has detected a serious anomaly
and is in protected mode
Cyclic flashing Audio MUTED
to compensate for a temperature increase
to compensate for a temperature increase
Cyclic flashing Normal operation Audio ACTIVE
(1 slow flashes) (limiter active) The module functions with a reduced volume (-3dB)
Cyclic flashing Normal operation
(2 quick flashes) (limiter active) The module functions with a reduced volume (-6dB)
The module is functioning normally.
The volume (INPUT SENS) and the rotary switch (DSP Preset) are active
The amplifier module is remotely controlled by RDNET.
The volume (INPUT SENS) and the rotary switch (DSP Preset) are bypassed
EnglishEnglishEnglish
user manualuser manual
15
LOUDSPEAKER INSTALLATION
WARNING
!!
Make sure that the loudspeaker is securely installed in a stable position to avoid any
injuries or damages to persons or property.
For safety reasons do not place one loudspeaker on top of another without proper
fastening systems.
If you use the loudspeakers outdoors avoid places that are exposed to bad weather.
The loudspeaker is supplied by the manufacturer company for use in support
!!
WARNING
Never use the handle to hang the speaker!
DIAGNOSTICS TABLE
MODULE LED «READY» LED «MUTE/PROT LED «LIMIT»
STATUS
Power ON OFF ON for 5 sec. OFF
Normal use ON OFF
Partial fault ON
Total fault OFF ON
higher 70°C ON
higher 80°C ON Audio ATTIVO
Amplifier temperature
MODULE STATUS LED «RD NET» MODULE FUNCTIONS
RDNET not active OFF
RDNET connect ON
Equalization «USER Eq» Cyclic flashing The module functions normally.
(rotary switch The equalization saved by means of RDNET is being used.
16
«DSP Preset» set to 9)
Page 10

CARDIOID CONFIGURATION
The standard subwoofers are omnidirectional, i.e. the sound
pressure emitted is almost uniform in any direction (constant
directivity in the three dimensions).
The polar diagram of a omnidirectional subwoofer is provided
EnglishEnglishEnglish
as reference. As you can see, the directivity is constant in all
directions, thus obtaining a circular graph.
- HYPERCARDIOID: rear attenuation range is 120° with respect to the front.
This is the recommended configuration when the speakers are arranged laterally to
stages whose width is over 14 meters.
EnglishEnglishEnglish
The cardioid configuration was adopted with the intention of directing sound pressure
toward the front of the speaker. Moving toward the rear, however, this pressure is
attenuated.
Attenuation can also be defined in different points of the space behind the sub: for
example it can be set exactly at the centre of the rear hemisphere (180°) or in different
points. These configurations have been designed for all those cases in which the sub is
positioned in front of the stage or on its sides, so as to avoid low frequencies resounding
on the stage, thus avoiding microphone feedback, mechanical noises of the load bearing
structures and sound distortions due to low frequencies loading below the stage.
This configuration can be very useful also when you have to place the subwoofers near
compact structures such as walls etc.. In this case, in fact, rear waves that would create
phase deletion by bouncing on the wall do not occur, therefore preserving correct sound
reproduction.
user manualuser manual
The main configurations are three:
- CARDIOID (heart shaped diagram): rear attenuation range is 180° (in line with the
front).
This configuration is to be used if the speaker is placed in front of the stage in a central
position; in this case the low frequencies are practically eliminated on stage.
PALCO
STAGE
STAGE
PALCO
20m
The subwoofer DVA S2585N is designed with supercardioid configuration with a 135° rear
attenuation.
It is possible to set the three different configurations via the hardware interface RDNET
CONTROL 2 or RDNET CONTROL 8, that allows you to connect the subwoofer to a
computer for operation monitoring by using the dedicated software downloadable from
the db Technologies site.
A dedicated section "CARDIOD PRESET" where you can find the three choices has been
provided.
PC
120°
user manualuser manual
17
180°
- SUPERCARDIOID: rear attenuation range is 135° with respect to the front.
This configuration is used when the speakers are positioned laterally to stages whose
width is between 6 and 14 metres.
STAGE
12m
135°
RDNET CONTROL 2
Monitoring window DVA S2585N
SC = Supercadioid
C = Cardioid
HC = Hypercardioid
18
Page 11

DVA S1518N, being a standard subwoofer, can be configured as cardioid following the
indications reported below using three subwoofers DVA S1518N at the same time.
EnglishEnglishEnglish
Ruotare la fase di 180°
Rotate 180° phase
Impostare il delay a 3,5msec
Set delay to 3,5msec
user manualuser manual
Front
0°
180°
Phase
Rear
Input
Audio Balanced Input/Link
S
NEODYMIUM
Delay
0
4.5
4.0
3.5
3.0
2.5
11
55
0.5
1.0
1.5
2.0
Link
Digital Vertical Array
11
88
CERAMIC
mSec
Front
User/120
115
110
Xover Frequency
selection 24dB/oct
Xover Out
TECHNICAL SPECIFICATION - DVA S1518N
System Active 2-Amps
Type of amplifier Digital - Class D (DIGIPRO G2 technology)
RMS power 1500W
Musical power 3000W
Frequency response +/-3dB 39 -120Hz
Crossover LF-MF (Low-Mid) 75 - 120Hz (5Hz steps) selectable
Input Control
Status
Limiter
Signal
Mute/Prot
Ready
Input Sens
0°
75
4.5
80
180°
4.0
85
Hz
3.5
90
3.0
105
95
100
Remote
Phase
Preset
Active
SUB Phase/Delay
Link
Active
+4dB
Data
Input
0dB
mSec
0
0.5
1.0
1.5
2.0
2.5
Delay
TECHNOLOGIESTECHNOLOGIES
dd
BB
Service
Data
USB
Data
Link
DSP Up-grade
Sound pressure (SPL) 138dB peak
Component parts 2 woofer 18" RCF - 4" coil
Input sensitivity nominal 0dBu
Input impendence Balanced 20Kohm
Unbalanced 10Kohm
EnglishEnglishEnglish
Power supply Full range 100Vac -240Vac, 50-60Hz con PFC
Inrush Current 16,1 A
DSP Analog Device 56 bits
Audio conversion 24 bit / 96kHz S/N=116dB
Volume control Digital
Box material Birch plywood, black painted orange peel
Housing shape Rectangular
Handle 3 x side
Front grille Performed sheet 1.5mm with internal foam
Dimension WxHxD 515x640x720mm
Weight 44Kg (neodymium woofer)
[ ]
47,5Kg (ceramic woofer)
user manualuser manual
TECHNICAL SPECIFICATION - DVA S2585N
System Active 2-Amps
Type of amplifier Digital - Class D (DIGIPRO G2 technology)
RMS power 2500W
Rear
Musical power 5000W
Frequency response +/-3dB 35 -120Hz
Crossover LF-MF (Low-Mid) 75 - 120Hz (5Hz steps) selectable
Sound pressure (SPL) 140dB peak
Component parts 1 woofer 18" RCF - 4" coil (frontal)
1 woofer 15” RCF - 4” coil (rear)
Input sensitivity nominal 0dBu
Input impendence Balanced 20Kohm
Unbalanced 10Kohm
Power supply Full range 100Vac -240Vac, 50-60Hz con PFC
Inrush Current 28,3A
DSP Analog Device 56 bits
Audio conversion 24 bit / 96kHz S/N=116dB
Volume control Digital
Box material Birch plywood, black painted orange peel
Housing shape Rectangular
Handle 3 x side
Front grille Performed sheet 1.5mm with internal foam
Dimension WxHxD 515x640x1000mm
[ ]
Weight 65Kg
19
EMI CLASSIFICATION
According to the standards EN 55103 this equipment is designed and suitable to operate in E5
Electromagnetic environment.
20
Page 12
BESCHREIBUNG
DVA S1518N
Der DVA S1521N Subwoofer ist mit einem
Hochleistungs-Verstärker DigiPro 1500S der digipro ®
G2-Serie ausgestattet und liefert 1500 W RMS .
Die Versorgungsspannung des Verstärkers DIGIPRO®
DeutschDeutschDeutsch
wurde für den Weitbereich ausgelegt. Dank der SMPSTechnologie (Switched-Mode Power Supplies) mit PFC
(Power Factor Correction) wird der Arbeitsbereich bei
Versorgungsspannungen zwischen 100V AC und 240V
AC g e w ä h rle i s t e t , wo b e i d i e gl e i c h en
Ausgangsleistungen auch bei schwankenden und nicht
stabilisierten Versorgungsleitungen garantiert sind.
Der digitale Vorverstärker verfügt über einen DSP (Digital
Signal Processing) der den Frequenzgang und Pegel
dank Limiter kontrolliert. Das Gehäuse des Subwoofers
DVA S1518N ist aus Birkenholz hergestellt und ist für die
Beschallung mittlerer bis großer Räume ausgelegt. Die
Bandpass-Technik erlaubt hohe Schalldrücke und die
Wiedergabe tiefer Bässe.
Der Subwoofer hat eine rechteckige Form. Im oberen Bereich ist eine M20- Aufnahme für
Ständer angebracht. Außerdem ist er mit 6 Metallgriffen ausgestattet (3 pro Seite).
Ebenfalls an der Oberseite sind zwei Einsätze vorgesehen, die zum Aufsetzen
(Groundstack) der Flybars DRK10 oder DRK20 für Lautsprecher DVA T4 und DVA T12
dienen.
Der Lautsprecher kann anhand des optionalen Flugzubehörs SRK-10 auch an den
Flybars DRK10 oder DRK20 eingehängt werden.
Zur Erleichterung des Transports können 4 Rollen mit 100 mm Durchmesser an der
Rückseite angebracht werden (KIT SWK-18). Als Alternative steht das mit zwei Pins zu
befestigende Rollbrett (DVA S1518N und DVA S2585N dolly) zur Verfügung.
BedienungsanleitungBedienungsanleitung
DVA S2585N
Der aktive Subwoofer DVA S2585N ist mit einem
Verstärkermodul DIGIPRO 1500S und einem
Verstärkermodul DIGIPRO 1000S ausgestattet, die
beide der Serie DIGIPRO® G2 angehören und eine
Gesamtleistung von 2500W RMS (1000W + 1500W)
liefern.
Der Subwoofer wurde als Super-Cardioidsystem mit
2 separaten Kammern ausgelegt:
- Der vordere Teil in Bandpass-Konfiguration ist mit
einem 18“-Woofer (RCF mit 4” Spule )
ausgestattet, das vom Verstärkermodul DIGIPRO
1500S angesteuert wird
- Der hintere Teil, ebenfalls in BandpassKonfiguration, ist mit einem 15“-Woofer (RCF mit
4” Spule) ausgestattet, das vom Verstärkermodul
DIGIPRO 1000S angesteuert wird.
Die Versorgungsspannungen der Verstärker DIGIPRO® G2 wurden für den WeitbereichBetrieb ausgelegt. Dank der Techniken SMPS (Switched-Mode Power Supply) und PFC
(Power Factor Correction) wird die Funktion bei Versorgungsspannungen zwischen 100
und 240 V gewährleistet, wobei gleiche akustische Leistungen auch bei
Spannungsschwankungen und nicht stabilisierter Versorgung gesichert werden.
Der digitale Vorverstärker mit DSP (Digital Signal Processing) steuert den Woofer, Delay,
Frequenzgang und Limiter.
21
Das System ist für die Beschallung von mittleren bis großen Räumen gedacht. Durch
Aufstellung des Subwoofers vor oder seitlich der Bühne wird verhindert, dass tiefe
Frequenzen über die Rückseite des Subwoofers abgestrahlt werden, so dass MikrofonFeedback, störende Geräusche der Tragstrukturen oder Klangverzerrungen durch
Modulation tiefer Frequenzen unter der Bühne vermieden werden.
Der Subwoofer DVA S2585N ist für drei Modalitäten ausgelegt (Cardioid, Supercardioid
und Hypercardioid), die über die Rdnet-Schnittstelle gewählt werden können. Eine
detaillierte Beschreibung finden Sie im entsprechenden Kapitel.
Der Subwoofer hat eine rechteckige Form. Im oberen Bereich ist ein M20-Flansch für
Ständer angebracht. Außerdem ist er mit 6 Metallgriffen ausgestattet (3 pro Seite).
Ebenfalls an der Oberseite sind zwei Einsätze vorgesehen, die zum Aufsetzen
(Groundstack) der Flybars DRK10 oder DRK20 für Lautsprecher DVA T4 und DVA T12
dienen.
Der Lautsprecher kann anhand des optionalen Flugzubehörs SRK-10 auch an den
Flybars DRK10 oder DRK20 eingehängt werden.
Zur Erleichterung des Transports steht das mit zwei Pins zu befestigende Rollbrett (DVA
S1518N und DVA S2585N dolly) zur Verfügung.
Sowohl der Subwoofer DVA S1518N als auch der DVA S2585N sind mit einer eigenen, als
RDNET bezeichneten Netzschnittstelle ausgestattet, dank der sie über ein Interface
(RDNET Controll- Hub) an einen Computer angeschlossen werden können.
Hierzu wurde ein Kommunikationsprotokoll entwickelt, mit dem die Daten empfangen
und gesendet werden. Dank dieser Verbindung können die Lautsprecherparameter, wie
Ausgangsleistung, Verstärkertemperatur, Limiterstatus usw. in Echtzeit kontrolliert
werden.
Außerdem können verschiedene Entzerrungen ausgewählt bzw. neue erstellt werden
oder die gewünschte Lautstärke eingestellt werden.
Sämtliche Daten können entweder auf dem PC oder im DSP selbst «DSP Preset» am
Verstärkermodul gespeichert werden. Die personalisierte Einstellung ist jederzeit
aufrufbar.
Für weitere Erläuterungen siehe die entsprechenden Hinweise zum RDNET controller.
PC
USB
Die Firmware des Verstärkermoduls kann über den USB-Anschluss aktualisiert werden.
Um diesen Vorgang zu ermöglichen und zu vereinfachen, wurde ein dediziertes
Programm entwickelt, das beim Hersteller angefordert und auf einen Computer installiert
werden muss.
Während der Aktualisierung sollte das Verstärkermodul von der Stromversorgung
getrennt sein und der Drehschalter «SUB Phase/Delay» auf Position 4.5mS stehen.
PC
RDNET hub
DeutschDeutschDeutsch
BedienungsanleitungBedienungsanleitung
22
Page 13

BEDIENELEMENTE UND FUNKTIONEN (ABB. 1)
Abschnitt “Balanced Audio”
1) EINGANGSBUCHSE "INPUT”
Symmetrischer XLR Eingang für Line-Pegel.
2) AUSGANGSBUCHSE "LINK”
DeutschDeutschDeutsch
BedienungsanleitungBedienungsanleitung
23
Der parallel zum Eingang (1) angeschlossene XLR-Anschluss kann dazu
verwendet werden, das ankommende Audiosignal an einen anderen verstärkten
Lautsprecher weiter zu leiten.
Abschnitt “Status”
3) LED “LIMITER”
Diese rote LED leuchtet auf, um das Ansprechen der Limiterschaltung zu
signalisieren, die die Verzerrung des Verstärkers verhindert und die Lautsprecher
gegen Überlast schützt.
!!
4) LED “SIGNAL”
Diese LED leuchtet grün, wenn das Audiosignal anliegt mit einem Pegel von größer
-20dBu.
5) LED “MUTE/PROT”
Diese gelbe LED zeigt den Zustand des Verstärkers an. Während des normalen
Betriebs ist die LED ausgeschaltet; wenn sie blinkt oder ständig leuchtet, kann man
der Diagnosetabelle Informationen zur Kontrolle des Zustands des Verstärkers
entnehmen.
6) LED “READY”
Diese LED leuchtet grün, wenn das Gerät an die richtige Netzspannung
angeschlossen ist. Während des normalen Betriebs ist die LED eingeschaltet;
wenn sie blinkt oder ausgeschaltet ist, kann man der Diagnosetabelle
Informationen zur Kontrolle des Zustands des Verstärkers entnehmen.
Abschnitt “Input control”
7) EMPFINDLICHKEITSREGLER EINGANG “INPUT SENS”
Dieser Regler dient zum Einstellen der Eingangs-Empfindlichkeit des Verstärkers .
Diese Regelung beeinflusst nicht den Ausgangspegel “LINK” (2).
Abschnitt “Xover Out”
AUSGANGSBUCHSE
8)
Symmetrischer Ausgang der internen Frequenzweiche. Das Signal dieses
Ausgangs kann auch zu einem beliebigen sonstigen aktiven Lautsprecher
durchgeschleift werden. Die Trennfrequenz kann zwischen 75 und 120Hz mit dem
Schalter X-OVER Frequency” (9) umgeschalltet werden.
WAHLSCHALTER “Xover Frequency selection 24dB ”
9) /Oct.
Die Trennfrequenz kann zwischen 75 und 120Hz mit einer Flankensteilheit von
24dB/Okt umgeschaltet werden (Schritt 5Hz).
Die Wahl der Trennfrequenz hängt von den akustischen Anforderungen ab.
10) LED “Remote Preset Active”
Wenn der Verstärker per Fernzugriff über RDNET kontrolliert wird, leuchtet die
gelbe Anzeige. Folgende Paramater sind dann verändert:
Volume (7)
Phase (11)
Xover Frequenzwahl (9)
Verzögerung (12)
Vermeiden Sie den Dauerhaften Betrieb im Limit
Abschnitt “SUB Phase/Delay”
11) WAHLSCHALTER “PHASE”
Mit diesem Schalter wird die Phase des Sub um 180° gedreht. Durch das
Drehen der Phase kann man die Wiedergabe der Bässe auch bei ungünstigen
akustischen Bedingungen in einfacher Weise optimieren. Nach Abschluss der
Installation ein Musikstück abspielen und ausprobieren, in welcher
Schalterstellung des Phasenschalters der Klang am besten ist.
Diese Funktion wird auch zum Aufbau von kardioiden Bässen benutzt.
12) STEUERUNG “DELAY”
Mit Hilfe dieser Funktion kann der Subwoofer auf die örtlichen Bedingungen
(Time-Alignment) wie Laufzeitunterschiede zum Array angepasst werden.
Man kann diese Funktion auch für die Aufstellung auch von kardiode
Konfigurationen verwenden. Die kardiode Konfiguration ermöglicht eine
erhebliche Dämpfung der tiefen Frequenzen, die über die Rückseite der
Subwoofer abgestrahlt werden. Die vordere akustische Abstrahlung bleibt
dabei unverändert.
Für diese Konfiguration sind mindestens 2 Subwoofer notwendig.
Abschnitt “RDNET”
13) EINGANGSSTECKER "DATA INPUT”
RJ45-Stecker für den Dateneingang.
14) AUSGANGSSTECKER "DATA LINK”
RJ45-Stecker Datenausgang für die Kaskadenschaltung.
15) LED “LINK”
Diese grüne Leuchte schaltet sich nur ein, wenn der Verstärker die Daten
erkannt hat und über den Computer mit dem RDNET Hub verbunden ist.
16) LED “ACTIVE”
Diese gelbe Leuchtet blinkt, wenn eine Datenübertragung zwischen RDNET
und Verstärkermodul im Gange ist.
Abschnitt “DSP Up-grade”
17) STECKER “Service Data USB”
Über diesen USB-Stecker kann die Firmware über einen Computer und ein
eigenes Programm aktualisiert werden.
18) EINBAUSTECKER “MAINS INPUT”
Für den Anschluss des Netzkabels.
Für den Netzanschluss wird ein POWER CON® (blau)Stecker verwendet.
19) EINBAUKUPPLUNG FÜR DIE POWER-WEITERLEITUNG “MAINS OUTPUT
LINK” (präsentieren nur DVA S1518N)
Er dient zum Durchschleifen der Netzspannung. Der Ausgang ist parallel an den
Eingang (18) angeschlossen und kann zum Speisen eines weiteren verstärkten
Lautsprechers verwendet werden. Einbaukupplung POWER CON® (grau).
20) Kühlrippen
Die Kühlrippen erlauben die Kühlung der Endstufe während des Betriebs.
Diese nicht abdecken und die Rippen nötigenfalls säubern, um die
ordnungsgemäße Luftzirkulation zu gewährleisten.
DeutschDeutschDeutsch
BedienungsanleitungBedienungsanleitung
24
Page 14

MERKMALE UND SCHUTZ
Frontverkleidung
Angesichts de s pr ofessionellen Ein satz es dieser Lau tspr echer sind
dieLautsprecherkomponenten durch ein Lochblech mit 1,5 Stärke hinterlegtem
Schaumstoff geschützt.
Kühlung
Die Temperaturkontrolle wird durch einen zentralen Mikroprozessor (main) gesteuert,
DeutschDeutschDeutsch
BedienungsanleitungBedienungsanleitung
der mit den lokalen Mikroprozessoren (Verstärker und Netzteil) interagiert und die
Daten an den DSP weiterleitet, um eventuelle Korrekturen durchzuführen.
Bei einer Überhitzung des Verstärkermoduls wird die Lautstärke schrittweise um
jeweils 0,1dB verringert, bis sich eine Temperaturstabilisierung einstellt.
Nachdem die normale Betriebstemperatur erreicht wurde, wird die Lautstärke
automatisch wiederhergestellt.
Störungsanzeigen und Schutzvorrichtungen
Der Mikroprozessor ist der Lage, drei verschiedene Störmeldungen durch Blinken der
"READY", "MUTE / PROT" und "LIMIT"-Signal anzuzeigen
Bei den drei Störungsarten handelt es sich um:
1) ACHTUNG: Es wurde ein leichter Fehler oder eine leichte Funktionsstörung mit
automatischer Rücksetzung festgestellt und die Leistungen des Verteilers werden
nicht eingeschränkt.
2) BEGRENZUNG: Bei Ermittlung einer Störung werden die Leistungen des
Lautsprechers reduziert. Der Schallpegel wird verringert bzw. einer oder mehr
Verstärker werden deaktiviert. Dieser Zustand kann sich teilweise auf die korrekte
Betriebsweise des Lautsprechers auswirken.
Falls das Problem auch bei einem späteren Gebrauch des Moduls weiterhin
besteht, muss der Kundendienst eingeschaltet werden, um die Störung zu
beheben.
3) DEFEKT: Es wurde eine schwere Funktionsstörung festgestellt. Der Verstärker wird
in den Status “Mute” geschaltet.
Im Störungsfall sollte man vor der Benachrichtigung des Kundendienstes das Modul
zunächst aus- und erneut einschalten, um zu überprüfen, ob das Problem nach wie vor
vorhanden ist.
Netzanschluss
Jeder Aktivlautsprecher hat ein eigenes Netzkabel. Der Anschluss erfolgt mit einem
Netzstecker Neutrik POWER CON® (blau), der den einfachen und schnellen Anschluss
des Lautsprechers erlaubt und eine sichere Verriegelung garantiert. Der Stecker dient
zugleich als Schalter zum Einschalten und Ausschalten der Lautsprecher.
Das Gerät muss an ein Netz angeschlossen werden, dass die verlangte maximale
Leistung abgeben kann.
Power-Weiterführung (präsentieren nur DVA S1518N)
Auf der Rückseite des Lautsprechers befindet sich eine Einbaukupplung Neutrik POWER
CON® (grau) für die Weiterleitung der Netzstromversorgung.
Über diese Steckbuchse kann man einen anderen Lautsprecher anschließen, um die
Anzahl der direkten Netzanschlüsse zu reduzieren.
Initialisierung des Verstärkermoduls
Audio in MUTE
(Limiter ein) Initialisierung des Moduls erfolgreich durchgeführt
Das Modul hat eine schwere Störung ermittelt
und bleibt im Schutzmodus
Zyklisches Blinken Audio in MUTE
(3 oder mehr schnelle (Limiter ein) Das Modul hat eine teilweise Störung ermittelt
Blinkzeichen) und bleibt mit eingeschränkter Betriebsweise aktiviert
Betrieben, um den Temperaturanstieg auszugleichen
betrieben, um den Temperaturanstieg auszugleichen
(Limiter ein) Das Modul wird mit verringerter Lautstärke (-3dB)
Die Lautstärke (INPUT SENS) und der Drehschalter (DSP Preset) sind aktiviert.
(2 schnelle Blinkzeichen) (Limiter ein) Das Modul wird mit verringerter Lautstärke (-6dB)
(1 Langsame Blinkzeichen)
DeutschDeutschDeutsch
BedienungsanleitungBedienungsanleitung
Die Lautstärke (INPUT SENS) und der Drehschalter (DSP Preset) werden
Übersprungen und von der Rdnet Software eingestellt.
25
INSTALLATION DES LAUTSPRECHERS
ACHTUNG
!!
Den Lautsprecher auf eine stabile und sichere Art und Weise installieren, um jede
Gefahr für Personen oder Sachschäden zu vermeiden.
Um gefährliche Situationen zu vermeiden, nie mehrere Lautsprecher ohne angemessene
Abspannsysteme aneinander anschließen.
Bei Verwendung im Freien sollte man darauf achten, das die Lautsprecher vor
witterungseinflüssen wie Sturm, Regen, Hagel, Schnee, usw. geschützt sind.
Aus Sicherheitsgründen, sollten sie beim über einander stellen von Subwoofern darauf
achten, dass diese nicht verrutschen oder umfallen können.
VORSICHT
!!
Hängen Sie den Lautsprecher nie an den Griffen auf!
LED «READY» LED «MUTE/PROT LED «LIMIT»
DIAGNOSETABELLE
ZUSTAND DES MODULFUNKTIONEN
MODULS (Grün) (gelb) (rote)
Einschaltung AUS EIN für 5 sec. AUS
Normalbetrieb EIN AUS Normalbetrieb Audio EIN
Fehler Parzial EIN Zyklisches Blinken Normalbetrieb Audio EIN
zu hoch 70°C EIN Zyklisches Blinken Normalbetrieb Audio EIN
Fehler Gesamtmenge AUS EIN
Verstärkertemperatur :
zu hoch 80°C EIN Zyklisches Blinken Normalbetrieb Audio EIN
ZUSTAND DES LED «RD NET» MODULFUNKTIONEN
MODULS
RDNET nicht akiv AUS Das Modul befindet sich im Normalbetrieb
RDNET verbunden EIN Das Verstärkermodul wird über RDNET ferngesteuert.
Entzerrung «USER Eq» Zyklisches Blinken Das Modul befindet sich im Normalbetrieb.
(Drehschalter «DSP Preset» Es wird eine per RDNET gespeicherte Entzerrung verwendet.
auf Position 9)
26
Page 15

CARDIOID-KONFIGURATION
Standard-Subwoofer sind omnidirektional, d.h. der
Schalldruck ist in allen Richtungen fast gleich
(konstante Richtung in den drei Dimensionen).
Nachstehend ist das Polardiagramm eines solchenSubwoofers dargestellt. Wie daraus ersichtlich ist,
wird der Schalldruck konstant in allen drei
DeutschDeutschDeutsch
Richtungen abgegeben, so dass sich eine kreisrunde
Grafik ergibt.
Die Cardioid-Konfiguration entstand zu dem Zweck, den Schalldruck zur Frontseite des
Lautsprechers zu leiten. Durch Verlagerung nach vorne wird der Pegel dagegen
reduziert. Die Dämpfung kann an verschiedenen Punkten des Raums hinter dem
Subwoofer definiert werden: beispielsweise kann sie genau auf die Mitte des rückseitigen
Halbkreises (180°) konzentriert oder auf verschiedene Punkte verteilt werden. Die Wahl
dieser Konfigurationen wurde für all die Fälle entwickelt, in denen der Subwoofer vor oder
seitlich der Bühne aufgestellt wird, um zu vermeiden, dass tiefe Frequenzen auf der
Bühne Störungen verursachen. Dadurch werden das Feedback an den Mikrofonen,
mechanische Geräusche der Tragstrukturen und Klangverzerrungen durch das
Aufschwingen tiefer Frequenzen unter der Bühne vermieden.
Diese Konfiguration erweist sich auch dann sinnvoll, wenn der Subwoofer in der Nähe von
Strukturen wie beispielsweise Mauern usw. aufgestellt werden muss. In diesem Fall gibt
es keine Wellen, die bei Abstrahlung an der Rückseite des Subwoofers von der Mauer
zurückgeworfen würde. Die korrekte Klangwiedergabe bleibt aufrecht erhalten.
Die wichtigsten Konfigurationen sind dabei:
- CARDIOID (Nierenförmiges Diagramm): die rückseitige Dämpfung erfolgt im
Winkel von 180° (mit der Frontseite gefluchtet).
Diese Konfiguration ist zu verwenden, wenn der Lautsprecher zentral vor der
Bühne aufgestellt wird. In diesem Fall sind die tiefen Frequenzen auf der Bühne
praktisch gleich Null.
BedienungsanleitungBedienungsanleitung
- HYPERCARDIOID: die rückseitige Dämpfung erfolgt im Winkel von 120° in Bezug
auf die Frontseite.
Diese Konfiguration ist zu empfehlen, wenn die Lautsprecher seitlich von Bühnen
aufgestellt werden, die über 14 Meter breit sind.
STAGE
PALCO
20m
Subwoofer DVA S2585N ist bereits auf supercardioide Konfiguration mit einer
rückseitigen Dämpfung von 135° ausgelegt.
Die drei verschiedenen Konfigurationen können anhand der Hardware-Schnittstelle
RDNET CONTROL 2 oder RDNET CONTROL 8 eingestellt werden, dank deren der
Subwoofer an einen Computer angeschlossen werden kann, zur Überwachung mittels
der RDNET Software, die von der Website von dB Technologies heruntergeladen werden
kann und die Einstellung der drei Konfigurationen gestDer attet.
Es wurde eine spezifische Sektion “CARDIOD PRESET” eingerichtet, wo alle drei
Wahlmöglichkeiten zur Verfügung stehen.
PC
120°
DeutschDeutschDeutsch
BedienungsanleitungBedienungsanleitung
27
PALCO
STAGE
180°
- SUPERCARDIOID: die rückseitige Dämpfung erfolgt im Winkel von 135° in Bezug
auf die Frontseite.
Diese Konfiguration wird angewandt, wenn die Lautsprecher seitlich von Bühnen
aufgestellt werden, die zwischen 6 und 14 Meter breit sind.
STAGE
12m
135°
RDNET CONTROL 2
Monitoring-Fenster DVA S2585N
SC = Supercadioid
C = Cardioid
HC = Hypercardioid
28
Page 16

Da der DVA S1518N ein Standard-Subwoofer ist, kann er anhand der nachstehenden
Angaben bei gleichzeitigem Einsatz von 3 Subwoofern DVA S1518N als Cardioid
konfiguriert werden.
Drehen um 180° Phase
DeutschDeutschDeutsch
0°
180°
S
Phase
Delay
4.5
Stellen Verzögerung auf 3,5 ms
BedienungsanleitungBedienungsanleitung
Rear
Front
4.0
3.5
3.0
Input
Audio Balanced Input/Link
11
55
NEODYMIUM
0
0.5
2.0
2.5
Link
Digital Vertical Array
11
88
CERAMIC
mSec
1.0
1.5
Front
User/120
115
110
Xover Frequency
selection 24dB/oct
Xover Out
DVA S1518N TECHNISCHE DATEN
System Active / 2 amps
Verstärker typ Digital - Class D (DIGIPRO G2 technology)
RMS Leistung 1500W
Musikleistung 3000W
Frequenzgang 39 -120Hz
Crossover LF-MF 75 -120Hz (step 5Hz) wählbar
Input Control
Status
Limiter
Signal
Mute/Prot
Ready
Input Sens
0°
75
4.5
80
180°
4.0
85
Hz
3.5
90
3.0
105
95
100
Remote
Phase
Preset
Active
SUB Phase/Delay
Link
Active
+4dB
Data
Input
0dB
mSec
0
0.5
1.0
1.5
2.0
2.5
Delay
TECHNOLOGIESTECHNOLOGIES
dd
BB
Service
Data
USB
Data
Link
DSP Up-grade
Schalldruck (SPL) 138dB max
Lautsprecher 2 woofer 18" - RCF coil 4”
Empfindlich keit Eingang 0dBu
Impedanz Eingang
Symmetrisch 20Kohm
DeutschDeutschDeutsch
Unsymmetrisch 10Kohm
Netzspannung Full range 100Vac -240Vac, 50-60Hz mit PFC
Einschaltstrom 16,1A
DSP Analog Device 56 bits
Sampling 24 bit / 96kHz S/N=116dB
Lautstärke Kontrolle Digital
Gehäuse Multiplex birch plywood, schwarz lackiert
Gehäusetyp Rectangular
Griffe 3x Pro Seite
Frontgitter 1.5mm metall grille (interne Schaum)
Abmessungen BxHxT 515x614x720mm
[ ]
Gewicht 44Kg (neodym kegel)
47,5Kg (keramik kegel)
DVA S2585N TECHNISCHE DATEN
System Active / 2 amps
Verstärker typ Digital - Class D (DIGIPRO G2 technology)
Rear
RMS Leistung 2500W
Musikleistung 5000W
Frequenzgang 35 -120Hz
Crossover LF-MF 75 -120Hz (step 5Hz) wählbar
Schalldruck (SPL) 140dB max
Lautsprecher 1 woofer 18" - RCF coil 4” (frontale Teil)
1 woofer 15" - RCF coil 4” (hintere Teil)
Empfindlich keit Eingang 0dBu
Impedanz Eingang
Symmetrisch 20Kohm
Unsymmetrisch 10Kohm
Netzspannung Full range 100Vac -240Vac, 50-60Hz mit PFC
Einschaltstrom 28.3A
DSP Analog Device 56 bits
Sampling 24 bit / 96kHz S/N=116dB
Lautstärke Kontrolle Digital
Gehäuse Multiplex birch plywood, schwarz lackiert
Gehäusetyp Rectangular
Griffe 3x Pro Seite
Frontgitter 1.5mm metall grille (interne Schaum)
Abmessungen BxHxT 515x614x720mm
[ ]
Gewicht 46Kg
BedienungsanleitungBedienungsanleitung
29
EMV Einstufung
Entsprechend der Norm EN 55103 ist diese Gerät entwickelt um in E5 elektromagnetischen
Umgebungen zu arbeiten
30
Page 17

DESCRIPTION
DVA S1518N
Le diffuseur DVA S1518N est un subwoofer équipé
de l'amplificateur DIGIPRO 1500s des séries
DIGIPRO® G2, qui fournit 1500W RMS.Le circuit
d'alimentation de l'amplificateur DIGIPRO® a été
conçu pour fonctionner en modalité full-range ; grâce
Français
Caracteristiques techniquesCaracteristiques techniques
à la technologie SMPS (Switched-Mode Power
Supplies) avec PFC (Power Factor Correction), le
fonctionnement à tensions d'alimentations de 100Vac
à 240Vac, assurant les mêmes prestations
acoustiques même avec des lignes d'alimentation
fluctuantes et non stabilisées.
Le préamplificateur numérique avec traitement numérique du signal DSP (Digital Signal
Processing) gère le croisement audio des composants acoustiques, la réponse en
fréquence et le limiteur
L'enveloppe du Caisson de Basse DVA S1518N est réalisée en bois de bouleau conçue
pour sonoriser les environnements moyennement grands ; elle est fabriquée en utilisant
la typologie “BAND PASS” qui permet d'obtenir de hautes pressions sonores et des
basses profondes.
Le caisson a une forme rectangulaire ; dans la partie supérieure, figure un support M20
pour piantana et est doté de 6 poignées en métal (3 de chaque côté).
Toujours dans la partie supérieure, deux éléments d'encastrement sont prévus pour
engager en appui (groundstack) les flybar DRK10 ou DRK20, pour les diffuseurs DVA T4
et DVA T12.
Le diffuseur peut aussi être utilisé suspendu aux flybar DRK10 ou DRK20 à l'aide du kit
d'étriers SRK-10 en option.
Pour en faciliter le transport, il est possible de monter 4 roues d'un diamètre de 100 mm
sur la partie postérieure, (KIT SWK-18) ou utiliser le chariot spécial fixé au moyen de deux
PIN ( DVA S1518N et DVA S2585N dolly).
DVA S2585N
Le caisson de basse actif DVA S2585N est équipé
d'un module amplificateur DIGIPRO 1500S et d'un
module amplificateur DIGIPRO 1000S, tous les deux
de la série DIGIPRO® G2, pour une puissance totale
de 2500W RMS (1000W + 1500W)
Le caisson de basse a été conçu comme système
super cardioïde avec 2 chambres acoustiques
séparées :
- la partie frontale en configuration BAND-PASS est
équipée d'un haut-parleur de graves de 18”
(bobine 4” RCF) piloté par le module amplificateur
DIGIPRO 1500S
- la partie postérieure, toujours en BAND-PASS
avec un haut-parleur de graves de 15” (bobine 4”
RCF) piloté par le module amplificateur
DIGIPRO 1000S.
Les circuits d'alimentation des amplificateurs DIGIPRO® G2 ont été conçus pour
travailler en mode full-range ; grâce à la technologie SMPS (Switched-Mode Power
Supply) et PFC (Power Factor Correction), le fonctionnement avec des tensions
d'alimentation de 100 à 240V est assuré, garantissant les mêmes prestations sonores
même avec des lignes d'alimentation fluctuantes et non stabilisées.
Le pré-amplificateur numérique avec DSP (Digital Signal Processing) gère les
composants sonores, les delay, la réponse en fréquence et les limiter.
Le système est étudié pour sonoriser des environnements moyennement grands ; le
positionnement du caisson de basse devant l'estrade ou à ses côtés, évite que les basses
fréquences soient irradiées par la partie postérieure du diffuseur lui-même, évitant donc
des feedbacks microphoniques, bruits mécaniques des structures portantes et
distorsions sonores dues au chargement des basses fréquences sous l'estrade.
Le DVA S2585N prévoit jusqu'à trois modalités d'utilisation, (cardioïde, super cardioïde et
hyper cardioïde) sélectionnables à travers l'interface RDNET. Une description détaillée
de la question est indiquée dans un chapitre dédié.
Le caisson a une forme rectangulaire ; dans la partie supérieure, figure un support M20
pour piantana et est doté de 6 poignées en métal (3 de chaque côté).
Toujours dans la partie supérieure, deux éléments d'encastrement sont prévus pour
engager en appui (groundstack) les flybar DRK10 ou DRK20, pour les diffuseurs DVA T4
et DVA T12.
Le diffuseur peut aussi être utilisé suspendu aux flybar DRK10 ou DRK20 à l'aide du kit
d'étriers en option SRK-10.
Pour en faciliter le transport, un chariot spécial est prévu (DVA S1518N et DVA S2585N
dolly) qui est fixé à la partie postérieure au moyen de deux PIN.
Les deux haut-parleurs DVA S1518N et DVA S2585N sont dotés d'une interface de
réseau propriétaire, dénommée RDNET, au moyen de laquelle il est possible de
s'interfacer à l'ordinateur à travers un périphérique (RDNET hub).
Pour cela, un protocole de communication a été développé, avec lequel il est possible de
recevoir et d'envoyer les données ; ce branchement permet de faire le monitorage en
temps réel des paramètres du diffuseur comme puissance de sortie, température de
l'amplificateur, état du limiteur, etc...
Il est aussi possible de sélectionner différentes égalisations ou d'en créer de nouvelles, et
de régler les niveaux de volume souhaités au moyen d'un plug-in approprié.
Toutes les données peuvent être enregistrées sur PC ou dans la position 9 du «DSP
Preset» du module amplificateur. La courbe personnalisée peut être rappelée à tout
moment.
Pour des détails supplémentaires, consulter les informations relatives au RDNET
controller.
PC
USB
Le micrologiciel du module amplificateur peut être remis à jour par le port USB.
Pour rendre cette mise à jour possible et facile, un programme spécifique a été
développé. Il faut le demander au constructeur et l'installer sur un ordinateur.
La mise à jour doit se faire quand le module amplificateur n'est pas alimenté, et la «SUB
Phase / Delay» potentiomètre rotatif doit être réglé sur 4.5mS.
PC
RDNET hub
Français
Caracteristiques techniquesCaracteristiques techniques
31
32
Page 18

COMMANDES ET FONCTIONS (FIG. 1)
Section “Balanced Audio”
1) CONNECTEUR D'ENTRÉE “INPUT”
Entrée symétrique au niveau ligne . Elle peut accueillir des prises “XLR”.
2) CONNECTEUR DE SORTIE “LINK ”
Le connecteur “XLR” connecté en parallèle avec l'entrée (1) peut être utilisé pour
Français
envoyer le signal audio en entrée d'une autre enceinte amplifiée.
Section “Status”
3) INDICATEUR LUMINEUX “LIMITER”
Cet indicateur s'allume de couleur rouge pour indiquer l'intervention du circuit
limiteur interne qui évite la distorsion de l'amplificateur et protège les haut-parleurs
contre les surcharges
Toujours éviter les conditions d'exploitation où le système fonctionne pendant
!!
de longues périodes de temps avec la LED clignote ou il est toujours ON
4) INDICATEUR LUMINEUX “SIGNAL”
Cet indicateur s'allume de couleur verte pour indiquer la présence du signal audio à
un niveau supérieur de -20dBu.
5) INDICATEUR LUMINEUX “MUTE/PROT”
Cet indicateur de couleur jaune indique l'état de l'amplificateur. Pendant le
fonctionnement normal, la LED est éteinte; si elle clignote ou si elle reste allumée
fixe, se référer au tableau de diagnostic pour contrôler l'état de l'amplificateur..
6) INDICATEUR LUMINEUX “READY”
Cet indicateur s'allume de couleur verte pour indiquer que la tension d'alimentation
de réseau est correcte. Pendant le fonctionnement normal, la LED est allumée; si
elle clignote ou si elle est éteinte, se référer au tableau de diagnostic pour contrôler
l'état de l'amplificateur.
Section “Input control”
Section “SUB Phase/Delay”
11) SÉLECTEUR “PHASE”
Ce sélecteur permet d'obtenir une rotation de 180° du signal audio reproduit par le
caisson de grave.
Cette rotation de phase optimise plus aisément la reproduction des fréquences
basses même lors des installations les plus difficiles. L'installation achevée,
reproduire un morceau de musique et intervenir sur le sélecteur afin d'obtenir la
meilleure performance acoustique des fréquences basses.
Il est également utilisé cette fonction pour la configuration cardioïde.
12) CONTRÔLE
Ce contrôle permet de retarder le signal sonore reproduit par le subwoofer.
Ce circuit permet l'alignement acoustique entre line array et sub en compensant
les diverses positions. Il est possible d'utiliser ce circuit pour la réalisation de
systèmes en configuration cardioïde. La configuration cardioïde permet une
importante atténuation des basses fréquences émises par la partie postérieure du
subwoofer, en maintenant intacte l'émission sonore frontale.
Une telle configuration prévoit un minimum de 3 subwoofers (deux avec émission
frontale et un avec émission postérieure).
Section “RDNET”
13) CONNECTEUR D'ENTRÉE "DATA INPUT”
Connecteur RJ45 d'entrée des données.
14) CONNECTEUR DE SORTIE "DATA LINK”
Connecteur RJ45 de sortie des données par le branchement série en cascade.
15) INDICATEUR LUMINEUX “LINK”
Cet indicateur de couleur verte s'allume uniquement quand l'amplificateur est
reconnu et qu'il est branché à l'unité principale RDNET par l'ordinateur.
16) INDICATEUR LUMINEUX “ACTIVE”
Cet indicateur de couleur jaune clignote quand la transmission des données est
active entre RDNET et module amplificateur.
“DELAY”
Français
7) CONTRÔLE SENSIBILITÉ ENTRÉE “INPUT SENS”
Caracteristiques techniquesCaracteristiques techniques
33
Ce contrôle règle la sensibilité du signal en entrée à l'amplificateur.
Ce contrôle n'influence pas le niveau de la sortie “LINK”
Section “Xover Out”
8) CONNECTEUR D'ENTRÉE
Sortie symétrique du croisement interne. Le signal prélevé de cette sortie peut être
transmis à un diffuseur amplifié quelconque.
La fréquence de coupure peut être sélectionnée à l'aide du sélecteur " X-Over
Freauency" (9).
9) SÉLECTEUR "Xover Freauency selection 24dB “
Le croisement peut être configuré à 75Hz ou à 120Hz (étape 5Hz) avec une pente
de 24dB/oct. Le choix de la coupure dépend du type de reproduction sonore que
l'on souhaite obtenir.
10) INDICATEUR LUMINEUX “Remote Preset Active”
Lorsque l'amplificateur est contrôlé à distance via RDNET, cet indicateur jaune
indique l'exclusion des commandes ci-dessous:
Volume (7)
Phase (11)
Sélection de fréquence Xover (9)
Retard (12)
/Oct.
Section “DSP Up-grade”
17) Connecteur “Service Data USB”
Ce connecteur USB permet de mettre à jour le micrologiciel au moyen d'un
ordinateur et du programme prévu à cet effet.
18) PRISE D'ALIMENTATION “MAINS INPUT”
Elle permet de connecter le cordon d'alimentation fourni.
Le connecteur utilisé pour le branchement au réseau est du type POWER CON®
(bleu)
19) PRISE D'ALIMENTATION RELANCE “LINK”
(seulement présent avec DVA S1518N)
Elle permet de relancer l'alimentation de réseau. La sortie est branchée en parallèle
avec l'entrée (18) et peut être utilisée pour alimenter une autre enceinte amplifiée.
Le connecteur utilisé est du type POWER CON® (gris)
20) FENTES DE REFROIDISSEMENT
Ces fentes assurent le refroidissement de l'amplificateur pendant le fonctionnement.
Ne jamais les boucher et, si cela est nécessaire, les nettoyer afin d'assurer une
ventilation efficace.
Caracteristiques techniquesCaracteristiques techniques
34
Page 19

CARACTERISTIQUES ET PROTECTION
Grilles frontales
Etant donné l'utilisation professionnelle de ces diffuseurs, les composant sont protégés
frontalement par une tôle percée d'une épaisseur de 1,5 mm et mousse interne.
Refroidissement
Le contrôle thermique est géré par le microprocesseur central (main) qui, en interagissant
avec les microprocesseurs locaux (amplificateurs et alimentateur) communique les
Français
Caracteristiques techniquesCaracteristiques techniques
données au DSP pour les corrections éventuelles.
En cas de surchauffe excessive du module amplificateur, le volume est réduit
graduellement par étapes de 0,1dB jusqu'à la stabilisation thermique du module.
Le volume est automatiquement restauré dès que les températures normales de
fonctionnement sont atteintes.
Indications de pannes et protections
Le microprocesseur est en mesure de signaler trois différents types de pannes, au moyen
du clignotement de LED “LIMITER”, “READY””MUTE/PROT”.
Les trois types de panne sont :
1) ATTENTION: quand survient une erreur ou un dysfonctionnement sans gravité, avec
restauration automatique, et quand les prestations du diffuseur ne sont pas limitées.
2) LIMITATION:
niveau sonore est réduit, ou bien un ou plusieurs amplificateurs sont déshabilités.
Cet état influe partiellement sur le fonctionnement correct du diffuseur.
Si le problème persiste aux allumages successifs du module, il est nécessaire de
contacter le centre d'assistance pour résoudre le problème.
3) PANNE : quand survient un dysfonctionnement grave. Le diffuseur est placé en état
de “mute”.
En cas de mauvais fonctionnement, avant de contacter le centre d'assistance, essayer
d'éteindre et de rallumer le module pour vérifier la continuité du problème.
Branchement au réseau d'alimentation
Chaque enceinte active est dotée de son cordon d'alimentation. Le branchement
s'effectue au moyen d'un connecteur modèle Neutrik POWER CON® (bleu) qui rend aisé
et rapide le branchement de l'enceinte et assure un excellent blocage.
Le même connecteur sert de passage à allumer et éteindre le haut-parleur.
L'appareil doit être branché à un réseau d'alimentation en mesure de fournir la puissance
maximum requise.
Relance alimentation de réseau
A l'arrière de l'enceinte, on trouve un connecteur Neutrik POWER CON® (gris) pour la
relance de l'alimentation de réseau.
Cette prise sert pour relancer l'alimentation à une autre enceinte et réduire ainsi les
branchements directs au réseau.
Les absorptions maximums des amplificateurs sont reportées sur la façade de
l'amplificateur.
Le nombre maximum d'enceintes pouvant être reliées varie aussi bien en fonction des
absorptions maximums des enceintes que du courant maximum de la première prise
d'alimentation.
si une erreur est relevée, les prestations du diffuseur sont limitées. Le
(seulement présent avec DVA S1518N)
INSTALLATION DU DIFFUSEUR
ATTENTION
!!
Installer le diffuseur de façon stable et sûre afin d'éviter toute condition de danger
pour l'intégrité des personnes et des structures.
Afin d'éviter les conditions de danger, ne pas superposer entre eux plusieurs diffuseurs sans
systèmes d'ancrage appropriés.
Lors de l'utilisation en espace aérés, éviter les lieux exposés aux intempéries.
Le diffuseur est fourni par l'entreprise qui le fabrique et il est prédisposé pour l'utilisation en
35
ATTENTION
!!
Ne jamais utiliser le poignée pour suspendre l'enceinte!
Initialisation du module amplificateur
LED «READY» LED «MUTE/PROT LED «LIMIT»
ÉTAT FONCTIONS MODULE
DU MODULE
Mise sous tension Éteint Sous tension x 5 s. Éteint Audio en MUTE
(limiteur actif) Initialisation du module terminée et correcte
(limiter attivo)
(3 ou plusieurs Le module a relevé une anomalie partielle et reste
Utilisation normale Sous tension Éteint Fonctionnement normal Audio ACTIVE
Fautepartielle Sous tension Clignotement cyclique Fonctionnement normal Audio ACTIVE
Le module a relevé une anomalie grave et se met
en protection
Clignotements Rapides) actif mais avec des fonctionnalités limitées
Faute franc Éteint Sous tension Clignotement cyclique Audio en MUTE
Température
pour compenser l'augmentation de température.
pour compenser l'augmentation de température.
(1clignotements lents) (limiteur actif) Le module fonctionne avec un volume réduit (-3dB)
(2 clignotements rapides) (limiteur actif) Le module fonctionne avec un volume réduit (-6dB)
LED «RD NET» F
Amplificateur:
trop élevée 70°C Sous tension Clignotement cyclique Fonctionnement normal Audio ACTIVE
Trop élevée 80°C Sous tension Clignotement cyclique Fonctionnement normal Audio ACTIVE
ÉTAT DU MODULE ONCTIONS MODULE
Le volume (INPUT SENS) et le commutateur rotatif (DSP Preset) sont actifs
Le volume (INPUT SENS) et le commutateur rotatif (DSP Preset) sont évités par by-pass
Éteint Le module fonctionne normalement.
Sous tension Le module amplificateur est contrôlé à distance par le RDNET.
Égalisation «USER EQ» Clignotement cyclique Le module fonctionne normalement.
(commutateur rotatif L'égalisation enregistrée par RDNET est utilisée.
RDNET pas actif
RDNET conectes
DSP Preset» en position 9)
Français
Caracteristiques techniquesCaracteristiques techniques
36
Page 20

CONFIGURATION CARDIOÏDE
Les caissons de basse standard sont
omnidirectionnels à savoir que la pression sonore
émise est presque uniforme dans toutes les
directions (directivité constante dans les trois
dimensions).
Ci-après, figure en référence le diagramme polaire
d'un caisson de basse omnidirectionnel. Comme on
Français
peut le noter, la directivité est constante dans toutes
les directions obtenant ainsi un graphique circulaire.
La configuration cardioïde naît dans le but de diriger la pression sonore vers la partie
frontale du diffuseur. Par contre, en se déplaçant vers la partie postérieure, cette pression
est atténuée.
L'atténuation peut de plus être définie à divers endroits de l'espace derrière le caisson :
par exemple, elle peut être configurée exactement au centre de la demi-sphère
postérieure (180°) ou à différents points. Les sélections de ces configurations ont été
étudiées pour tous ces cas où le caisson est positionné devant l'estrade ou à ses côtés de
manière à éviter que les basses fréquences résonnent sur l'estrade évitant ainsi des
feedbacks microphoniques mécaniques des structures portantes et des distorsions
sonores dues au chargement des basses fréquences sous l'estrade.
Cette configuration peut aussi être utile quand il faut positionner les caissons de basse
près des structures compactes comme les murs, etc. En effet, dans ce cas, les ondes
postérieures qui, en se répercutant sur le mur créeraient des annulations, n'existent pas
et préservent donc la bonne reproduction sonore.
Les principales configurations sont trois :
- CARDIOÏDE (diagramme en forme de cœur) : l'atténuation postérieure est à 180°
(en ligne avec la partie frontale).
Cette configuration doit être utilisée dans le cas où le diffuseur est placé devant
l'estrade en position centrale ; dans ce cas, les basses fréquences sont
pratiquement annulées sur l'estrade.
- HYPER-CARDIOÏDE : l'atténuation postérieure est 120° par rapport à la partie
frontale.
Cette configuration est conseillée quand les diffuseurs sont placés latéralement par
rapport à des estrades supérieures à 14 mètres de largeur.
STAGE
PALCO
20m
Le caisson de basse DVA S2585N naît déjà en configuration super-cardioïde avec une
atténuation postérieure de 135°.
IL est possible de régler les trois différentes configurations à travers l'interface hardware
RDNET CONTROL 2 ou RDNET CONTROL 8, qui permet de brancher le caisson de
basse à un ordinateur pour le contrôle du fonctionnement à l'aide du logiciel dédié
téléchargeable du site dB Technologies, il est possible de régler les trois configurations
différentes.
Une section dédiée “CARDIOD PRESET” a été prévue où il est possible de trouver les
trois sélections.
PC
120°
Français
Caracteristiques techniquesCaracteristiques techniques
PALCO
STAGE
- SUPER CARDIOÏDE : l'atténuation postérieure est à 135° par rapport à la partie
frontale.
On utilise cette configuration quand les diffuseurs sont placés latéralement par
rapport aux estrades dont les dimensions entrent dans les 6 et 14 mètres de
largeur.
STAGE
37
12m
180°
135°
RDNET CONTROL 2
SC = Super
C =
Cardioïde
HC = Hyper-
Caracteristiques techniquesCaracteristiques techniques
Suivi fenêtre DVA S2585N
Cardioïde
Cardioïde
38
Page 21

Le DVA S1518N, étant un caisson de basse standard, peut être configuré comme
cardioïde en suivant les indications figurant ci-après par l'utilisation de trois caissons de
basse DVA S1518N en même temps.
Rotation de 180° phase
Français
Régler la temporisation à 3,5 ms
0°
180°
Phase
Input
Audio Balanced Input/Link
S
NEODYMIUM
Delay
0
4.5
4.0
3.5
3.0
2.5
11
55
0.5
1.0
1.5
2.0
Link
Digital Vertical Array
11
88
CERAMIC
mSec
User/120
115
110
Xover Frequency
selection 24dB/oct
Xover Out
75
80
85
Hz
90
105
95
100
Rear
Front
Caracteristiques techniquesCaracteristiques techniques
Front
DVA S1518N - DONNES TECHINIQUES
Système Active - é amps
Typologie amplificateur Digital - Class D (DIGIPRO G2 technologie)
Puissance RMS 1500W
Puissance musicale 3000W
Réponse en fréquence (-6dB) 39-120Hz
Crossover LF-MF (Faible-Mide) 75-120Hz (étape 5Hz) sélectionnable
Input Control
Status
Limiter
Signal
Mute/Prot
Ready
Input Sens
0°
4.5
180°
4.0
3.5
3.0
Remote
Phase
Preset
Active
SUB Phase/Delay
Link
Active
+4dB
Data
Input
0dB
mSec
0
0.5
1.0
1.5
2.0
2.5
Delay
TECHNOLOGIESTECHNOLOGIES
dd
BB
Service
Data
USB
Data
Link
DSP Up-grade
Pression sonore (SPL) 138dB max
Composantes 1 woofer 18" - RCF bobine 4"
Entrée sensibilité 0dBu
Impedance entrée
Symétrique 20Kohm
Français
Asymétrique 10Kohm
Alimentation Full range 100Vac -240Vac, 50-60Hz et PFC
Courant d'appel 16.1A
DSP Analog Device 56 bits
Transformation audio 24 bit / 96kHz
S/N=116dB
Contrôle du volume Digital
Matériel Box Contreplaqué de Bouleau; Peint en noir
Forme enceinte Rectangulaire
Poignée 3 de chaque côté
Grilles frontales 1.5mm et mousse interne
Dimensions WxHxD 515x614x720mm
Poids 44Kg
[ ]
(neodymium woofer)
47,5Kg (ceramic woofer)
DVA S2585N - DONNES TECHINIQUES
Système Active - é amps
Typologie amplificateur Digital - Class D (DIGIPRO G2 technologie)
Puissance RMS 2500W
Rear
Puissance musicale 5000W
Réponse en fréquence (-6dB) 35-120Hz
Crossover LF-MF (Faible-Mide) 75-120Hz (étape 5Hz) sélectionnable
Pression sonore (SPL) 140dB max
Composantes 1 woofer 18" - RCF bobine 4”
1 woofer 15" - RCF bobine 4” érieure
(partie frontale)
(partie post )
Entrée sensibilité 0dBu
Impedance entrée
Symétrique 20Kohm
Asymétrique 10Kohm
Alimentation Full range 100Vac -240Vac, 50-60Hz et PFC
Courant d'appel 28.3A
DSP Analog Device 56 bits
Transformation audio 24 bit / 96kHz
S/N=116dB
Contrôle du volume Digital
Matériel Box Contreplaqué de Bouleau; Peint en noir
Forme enceinte Rectangulaire
Poignée 3 de chaque côté
Grilles frontales 1.5mm et mousse interne
Dimensions WxHxD 515x614x720mm
[ ]
Poids 65Kg
Caracteristiques techniquesCaracteristiques techniques
39
CLASSIFICATION EMI
En accord aux les normes EN 55103, l'équipement est conçu et convenable pour une
utilisation en environnement électromagnétique E5.
40
Page 22

SCHEMA A BLOCCHI BLOCK DIAGRAM
BLOCKSCHALTBILD DIAGRAMA EM BLOQURES
DVA S1518N
DVA S1518N
SCHEMA A BLOCCHI BLOCK DIAGRAM
BLOCKSCHALTBILD DIAGRAMA EM BLOQURES
DVA S2585N
®
Service
Data
1500S
DIGIPRO
USB
Phase
Delay
Remote
Preset
Xover
Freq.
Input
Sens
0°
1.0
0.5
0
4.5
4.0
Active
85
80
75
120
115
+4dB
1.5
3.5
90
110
WOOFER 18”
Class D
180°
2.0
2.5
3.0
95
100
105
0dB
PREAMPLIFIER
Limiter
Signal
DSP
Digital Signal Processor
28/56 bit Audio processor core
I2C
CPU
MODULE
Class D
Mute/Prot
Ready
Converter
Digital Analogic
Converter
Analogic Digital
(MASTER)
DAC
ADC
SMPS
Balanced Audio
®
1500S
DIGIPRO
WOOFER 18”
Class D
Class D
SMPS
Switching Mode
Power Supply
FUSE
MAINS
PFC
Correction
Power Factor
WOOFER 15”
®
PFC
FUSE
MAINS
Power Factor
Correction
1000S
DIGIPRO
Class D
Power Supply
Switching Mode
Limiter
Service
Data
USB
0°
180°
Phase
Delay
Remote
Preset
Xover
Freq.
Input
Sens
0.5
0
4.5
Active
80
75
120
+4dB
1.5
1.0
2.0
2.5
3.0
3.5
4.0
90
85
95
100
105
115
110
0dB
DSP
PREAMPLIFIER
MODULE
SMPS
Class D
Signal
Mute/Prot
Ready
Digital Analogic
Digital Signal Processor
28/56 bit Audio processor core
Analogic Digital
I2C
CPU
(MASTER)
Power Supply
Switching Mode
Converter
ADC
Converter
DAC
FUSE
MAINS
Balanced Audio
PFC
Power Factor
Correction
41
Data
Link
RDNET
RS485
I2C
(serial
communication)
CPU
Link
Data
(SLAVE)
Active
Input
RS485
BALANCED
MAIN INPUT
LINK
X-OVER
OUTPUT
BALANCED
L
FULL RANGE
MAINS INPUT
N
MAINS LINK
Data
Link
RDNET
RS485
I2C
(serial
communication)
CPU
Link
Data
(SLAVE)
Active
Input
RS485
BALANCED
MAIN INPUT
LINK
X-OVER
OUTPUT
BALANCED
L
FULL RANGE
MAINS INPUT
N
42
Page 23

FIG. 1
ABB.1
2
1
Input
Audio Balanced Input/Link
11
S
NEODYMIUM
55
9
Link
Digital Vertical Array
11
88
CERAMIC
COLLEGAMENTI CABLE CONNECTIONS
VERKABELUNG CABLAGE
Balanced Audio
6
4
5
3
10
8
Input Control
Status
Limiter
Signal
Mute/Prot
0dB
Ready
Input Sens
User/120
115
110
105
Xover Frequency
selection 24dB/oct
Xover Out
75
100
0°
0
80
85
90
95
4.5
0.5
180°
4.0
Hz
3.5
2.0
3.0
2.5
Remote
Phase
Preset
Active
SUB Phase/Delay
13
15
7
16
14
20
Link
+4dB
mSec
1.0
1.5
Delay
Active
Data
Input
Data
Link
dd
BB
TECHNOLOGIESTECHNOLOGIES
Service
Data
USB
DSP Up-grade
17
12
11
PUSH
Input
Link
Balanced Audio
PUSH
Input
Link
Balanced Audio
PUSH
Input
Link
DVA T12
DVA T12
DVA T12
43
20
20
2
1
Input
Audio Balanced Input/Link
22
S
NEODYMIUM
55
8
9
Link
Digital Vertical Array
55
88
CERAMIC
FULL RANGE MAINS INPUT
100-240V~ 50-60Hz
10A (100-120V~)
5A (220-240V~)
10
User/120
115
110
105
Xover Frequency
selection 24dB/oct
Xover Out
LINK
O
F
F
O
100-120V~ (10A max) 1150Wmax
220-240V~ (15A max) 3450Wmax
5
Input Control
0dB
Input Sens
0°
0
4.5
0.5
180°
4.0
1.0
1.5
3.5
2.0
3.0
2.5
Delay
FULL RANGE MAINS INPUT
100-240V~ 50-60Hz
15A (100-120V~)
7,5A (220-240V~)
N
18
19
6
13
15
7
Link
+4dB
mSec
Active
Data
Input
Data
Link
dd
16
BB
14
True Cardioid
Subwoofer
TECHNOLOGIESTECHNOLOGIES
Service
Data
USB
DSP Up-grade
20
17
ALLINEAMENTO SEGNALE AUDIO
ALIGNAMENT AUDIO SIGNAL
Input
Audio Balanced Input/Link
MIXER
FULL RANGE
Link
OUTPUT
User/120
115
110
105
Xover Frequency
selection 24dB/oct
Xover Out
75
100
12
11
18
Delay setup = (GAP X 1000) / 344
Delay = ms (espresso in millisecondi)
GAP = m (espresso in metri)
Velocità suono = 344 m/s
80
85
Hz
90
95
DVA S1518N
o
DVA S2585N
GAP
Delay = ms (specify milliseconds)
GAP = m (specify meters)
Sound speed = 344 m/s
0°
0
4.5
180°
4.0
3.5
3.0
2.5
Phase
SUB Phase/Delay
0.5
2.0
mSec
1.0
1.5
Delay
44
O
N
F
F
O
G2G2
ACTIVE P.F.C.
4
3
Status
Limiter
Signal
Mute/Prot
Ready
75
80
85
Hz
90
95
100
Remote
Phase
Preset
Active
SUB Phase/Delay
O
N
F
F
O
G2G2
ACTIVE P.F.C.
Page 24
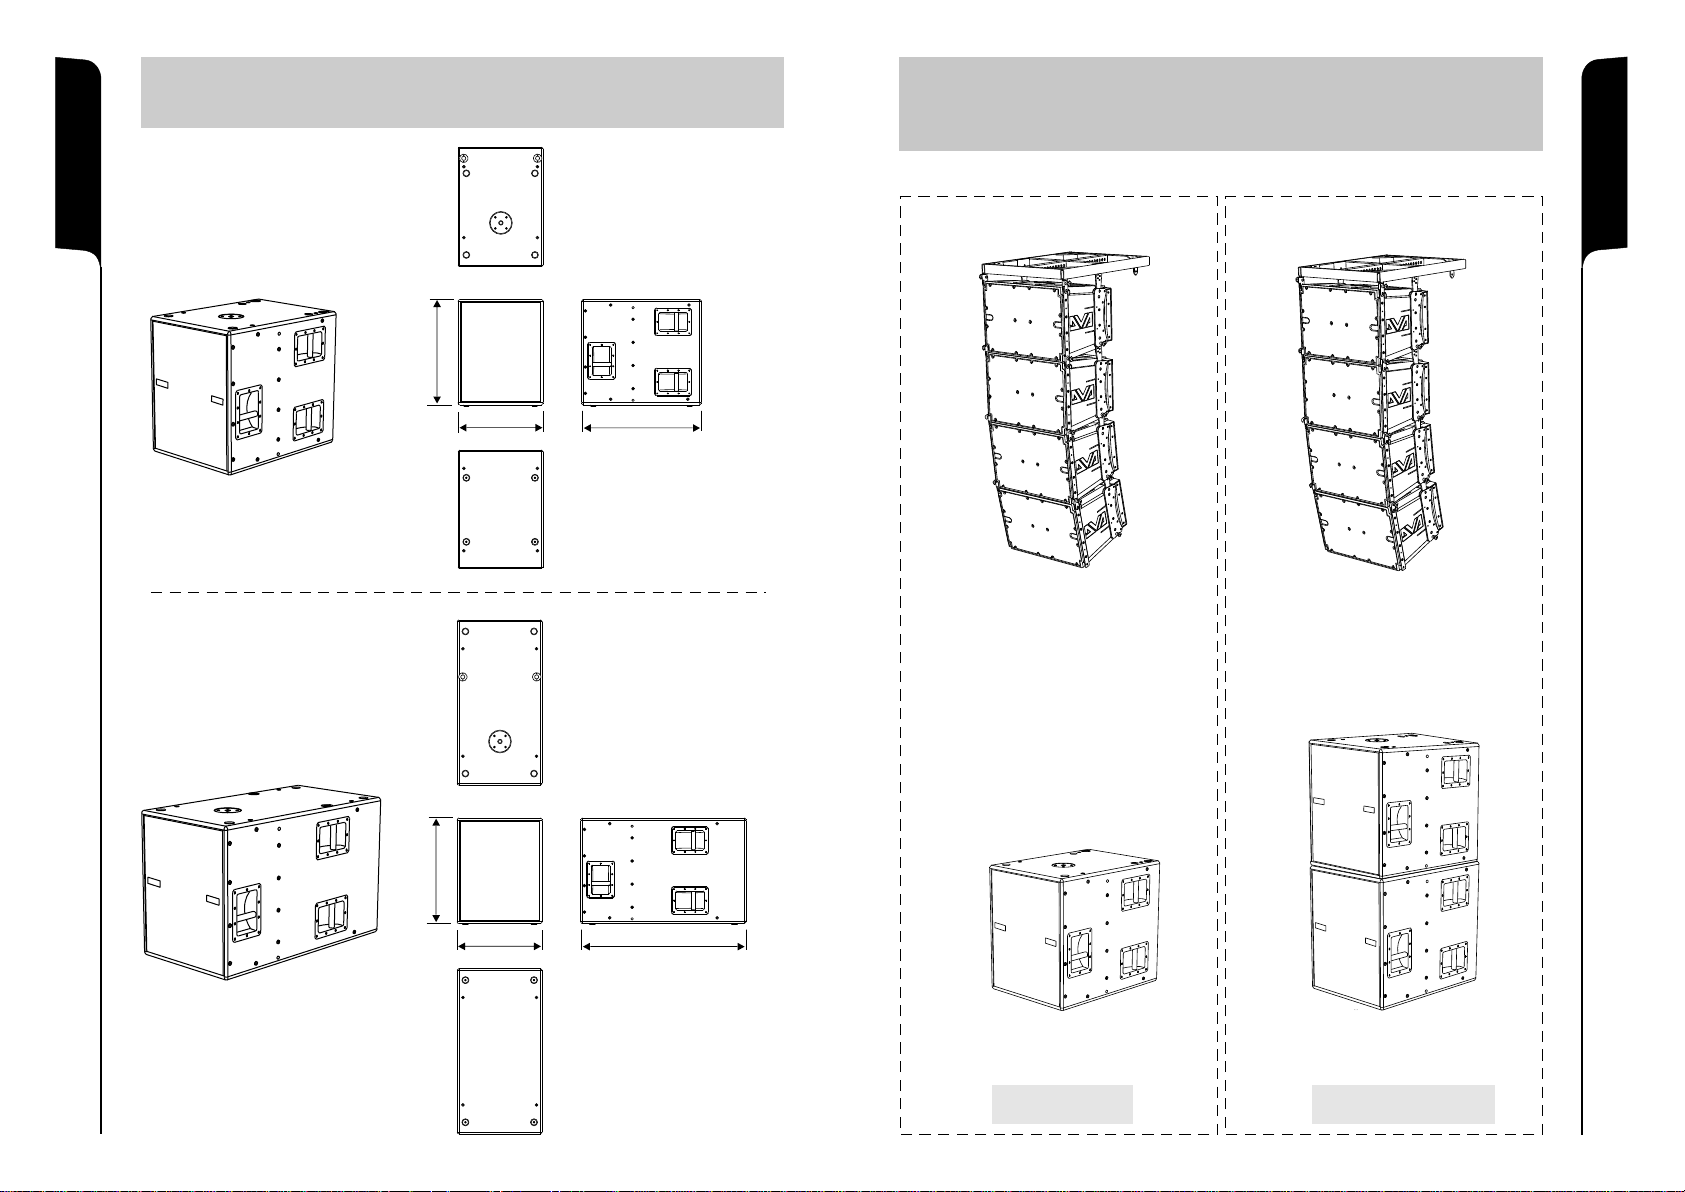
DIMENSIONI DIMENSIONS
ABMESSUNGEN DIMENSIONS
DVA S1518N
INSTALLAZIONE
INSTALLATION
INSTALLATIONEN
INSTALLATIONS
614614
DVA S2585N
640640
515515
515515
720720
10001000
45
In appoggio
Groundstack
In appoggio - impilato
Groundstack - stacked
46
Page 25

DVA S1518N
DVA S2585N
Kit staffe- opzione SRK 10
Kit stirrups - SRK-10 option
47
In appoggio con flybar (opzione DRK 10 oppure DRK 20)
Groundstack with flybar (DRK 10 or DRK 20 option)
In appoggio con kit staffe
Groundstack with kit stirrups
48
Page 26

Il DRK 10 e DRK 20 devono essere utilizzati solo da personale qualificato!
!
The DRK10 and DRK 20 must be used only by qualified persons!
PERICOLO! Rispettare attentamente il carico ammesso il funzione del punto di
fissaggio del gancio di sollevamento. Il non rispetto di tutte le avvertenze può
provocare pericolo di caduta della struttura e del suo contenuto con potenziale
!
danni a persone, cose e animali.
WARNING! Observe with particular attention the maximum load of point of
attachment of the lifting hook. Failure to comply with all warnings may cause
danger of structure and content falling with potential damage to people, things
and animals.
Si raccomanda di scaricare gratuitamente il software DVA_Composer direttamente
dal sito dB Technologies (www.dbtechnologies.com) nella sezione dedicata
«downloads», per informazioni più dettagliate sull'uso e le configurazioni del sistema .
DOWNLOAD
It is recommended to download DVA_Composer free software directly from
dB Technologies (www.dbtechnologies.com) in the special section «download» for more
information about use and configuration of the system.
Appeso con: - kit staffe (opzione SRK-10) e flybar (opzione DRK-10)
- kit staffe (opzione SRK-10) e flybar (opzione DRK-20)
49
Hang with - stirrups kit (SRK-10 option) and flybar (DRK-10 option)
- stirrups kit (SRK-10 option) and flybar (DRK-20 option)
In appoggio e su supporto asta
Groundstack with stand adaptor
50
Page 27

Carrello DVA S1518N e DVA S2585N
DVA S1518N e DVA S2585N dolly
Set di 4 ruote - opzione DWK 20
Set of 4 wheels - DWK 20 option
Solo per DVA S1518N
Only for DVA S1518N
51
ISTRUZIONI DI SICUREZZA PER ACCESSORI /
ZUBEHÖR NSTRUCTIONS DE SÉCURITÉ
!
SICHERHEITSHINWEISE / I POUR LES ACCESSOIRES
Contattare dB Technologies per gli accessori da utilizzare a corredo.
Si declina ogni responsabilità da un utilizzo inappropriato degli accessori o di dispositivi
aggiuntivi non idonei allo scopo.
Contact dB Technologies for accessories to be used with speakers.
Will not accept any responsibilty when inappropriate accessories or not suitable
additional devices are used.
Kontaktieren sie dBTechnologies für passendes Lautsprecherzubehör.
Falls unpassendes Zubehör verwendet wird, wird jegliche Haftung ausgeschlossen.
Contact dBTechnologies pour les accessoires à utiliser avec la machine.
N'accepterons pas toutes les responsabilités lorsque des accessoires inappropriés ou
ne conviennent pas à des dispositifs supplémentaires sont utilisés.
SAFETY INSTRUCTIONS FOR ACCESSORIES
52
 Loading...