

Page 1

MOZART SERIES –FM Exciters/Transmitters - U
SER’S MANUAL
1 /87
MOZART Series
FM Exciters/Transmitters
User’s Manual
Release 1.0.3
- DB ELETTRONICA TELECOMUNICAZIONI S.p.A. -
- Riviera Maestri del Lavoro, 20/1 - 35127 Z.I. SUD PADOVA ITALY -- Ph. (049) 870-0588 - Fax. (049) 870-0747 -
- http://www.dbbroadcast.com -
Page 2

MOZART SERIES –FM Exciters/Transmitters - U
SER’S MANUAL
2 /87
The constructor reserves the right to modify the information in this manual at any time
without advising update.
Document History
Rev. Date Name Details
1.0 September 2013 IC
1.0.1 October 2013 IC Integration and correction of the
menu and technical parameters
1.0.2 October 2013 IC Complete Series user manual
1.0.3 February 2014 AB+DS Updated the menu description chapter
Issued: February 2014 – Version 1.0.3
© 2013. Copyright by:
DB Elettronica Telecomunicazioni SpA
Riviera Maestri del Lavoro, 20/1
35127 Z.I. SUD PADOVA ITALY
All rights reserved.
All specifications, characteristics and circuit descriptions indicated in this manual are subject to
change without notice.
Page 3

MOZART SERIES –FM Exciters/Transmitters - U
SER’S MANUAL
3 /87
INDEX
1 GENERAL INFORMATION ................................................................................................................................ 8
1.1 SAFETY NOTICES ............................................................................................................................................. 8
1.2 FIRST AID IN CASE OF ELECTROCUTION .................................................................................................... 9
1.3 WASTE ELECTRICAL AND ELECTRONIC EQUIPMENT (WEEE) ............................................................ 10
1.4 MANUFACTURE LABELS .............................................................................................................................. 10
1.5 IC RSS-GEN, S
EC
7.1.2 W
ARNING STATEMENT- (REQUIRED FOR TRANSMITTERS
) ........................................... 11
1.6 IC RSS-102, S
EC
2.6 W
ARNING STATEMENTS
.................................................................................................... 11
2 FM EXCITER GENERAL DESCRIPTION ...................................................................................................... 12
3 TECHNICAL SPECIFICATIONS ...................................................................................................................... 18
4 INSTALLATION AND ACTIVATION .............................................................................................................. 21
4.1 INITIAL CHECK ............................................................................................................................................... 21
4.2 CONNECTIONS ................................................................................................................................................ 22
5 MENU DESCRIPTION ........................................................................................................................................ 23
5.1 VISUALIZATION ............................................................................................................................................. 23
5.1.1 START PAGE ............................................................................................................................................ 23
5.1.2 Main menu ................................................................................................................................................ 23
5.2
V
METERS AND INFO MENU .......................................................................................................................... 24
5.2.1 Output Modulation .................................................................................................................................... 25
5.2.2 Left and Right channels level .................................................................................................................... 25
5.2.3 AES-EBU Left and Right channels level ................................................................................................... 25
5.2.4 Auxiliary channels level ............................................................................................................................ 26
5.2.5 Voltages and current ................................................................................................................................. 26
5.2.6 Heatsink temperature ................................................................................................................................ 27
5.2.7 Device information ................................................................................................................................... 27
5.3 SETTINGS MENU............................................................................................................................................. 28
5.3.1 Frequency Set menu .................................................................................................................................. 29
5.3.2 Power Set menu ........................................................................................................................................ 29
5.3.3 Operative Mode menu ............................................................................................................................... 30
5.3.4 Audio Selection menu ................................................................................................................................ 32
5.3.5 Sensitivity menu ........................................................................................................................................ 35
5.3.6 Presetting menu ........................................................................................................................................ 36
5.3.7 Alarms menu ............................................................................................................................................. 43
5.3.8 Memory menu ........................................................................................................................................... 49
5.3.9 History menu ............................................................................................................................................. 53
5.3.10
Generals menu ..................................................................................................................................... 55
6 FRONT PANEL .................................................................................................................................................... 59
6.1 FRONT PANEL KEYS ...................................................................................................................................... 59
6.2 FRONT PANEL LEDS ...................................................................................................................................... 61
6.2.1 Status leds ................................................................................................................................................. 61
6.2.2 Audio leds ................................................................................................................................................. 62
6.2.3 Control leds............................................................................................................................................... 63
6.2.4 Command leds........................................................................................................................................... 64
7 REMOTE I/O (OPTIONAL) ............................................................................................................................... 65
8 WEB SERVER (OPTIONAL) ............................................................................................................................. 66
8.1 WEB PAGES ...................................................................................................................................................... 67
8.1.1 Main page ................................................................................................................................................. 67
8.1.2 Login page ................................................................................................................................................ 68
8.1.3 Settings page ............................................................................................................................................. 69
8.1.4 Presettings page ........................................................................................................................................ 70
8.1.5 Log page ................................................................................................................................................... 71
Page 4

MOZART SERIES –FM Exciters/Transmitters - U
SER’S MANUAL
4 /87
8.1.6 Administration page .................................................................................................................................. 72
8.1.7 Modulator Upgrade page ......................................................................................................................... 74
8.1.8 Webserver Upgrade page ......................................................................................................................... 75
8.2 UPGRADING PROCEDURES .......................................................................................................................... 76
8.2.1 Upgrading the modulator firmware .......................................................................................................... 76
8.2.2 Upgrading the webserver board firmware ................................................................................................ 80
8.3 SNMP PROTOCOL ........................................................................................................................................... 84
8.3.1 Management Information Base MIB ......................................................................................................... 84
8.3.2 Message trap and inform .......................................................................................................................... 86
8.3.3 Commands and State................................................................................................................................. 87
Page 5

MOZART SERIES –FM Exciters/Transmitters - U
SER’S MANUAL
5 /87
F
IGURES INDEX
FIG. 1.1 - U
NITS LABEL
..................................................................................................................................................... 10
FIG. 2.1 - MOZART 30 FRONT VIEW ......................................................................................................................... 14
FIG. 2.2 - MOZART 30 REAR VIEW ............................................................................................................................ 15
FIG. 2.3 – MOZART 50/120/300/500/1000 FRONT VIEW .......................................................................................... 16
FIG. 2.4 – MOZART 50/120/300/500/1000 REAR VIEW ............................................................................................. 17
FIG. 5.1 – S
TART PAGE
....................................................................................................................................................... 23
FIG. 5.2 – M
AIN MENU
....................................................................................................................................................... 23
FIG. 5.3 – V
METERS AND INFO MENUS FLOW GRAPH
......................................................................................................... 24
FIG. 5.4 – O
UTPUT TOTAL MODULATION PAGE
................................................................................................................. 25
FIG. 5.5 – A
NALOGIC LEFT AND RIGHT INPUT LEVELS
....................................................................................................... 25
FIG. 5.6 – AES-EBU L
EFT AND RIGHT INPUT LEVELS
....................................................................................................... 25
FIG. 5.7 – A
UXILIARY CHANNELS 1 INPUT LEVELS
............................................................................................................. 26
FIG. 5.8 – A
UXILIARY CHANNELS 2 INPUT LEVELS
............................................................................................................. 26
FIG. 5.9 – V
OLTAGES AND CURRENT PAGE
........................................................................................................................ 26
FIG. 5.10 – H
EATSINK TEMPERATURE PAGE
....................................................................................................................... 27
FIG. 5.11 – D
EVICE INFORMATION PAGE
............................................................................................................................ 27
FIG. 5.12 – S
ETTING MENU FLOW GRAPH
........................................................................................................................... 28
FIG. 5.13 – S
ET FREQUENCY MENU
.................................................................................................................................... 29
FIG. 5.14 – S
ET POWER MENU
............................................................................................................................................ 29
FIG. 5.15 – O
PERATIVE MODE
MONO .............................................................................................................................. 30
FIG. 5.16 – O
PERATIVE MODE
MONO
CHANNEL SELECTION
............................................................................................ 30
FIG. 5.17 – O
PERATIVE MODE
STEREO
OPTIONS
............................................................................................................. 31
FIG. 5.18 – O
PERATIVE MODE
STEREO MPX .................................................................................................................. 31
FIG. 5.19 – A
UXILIARY CHANNELS OPTIONS
...................................................................................................................... 32
FIG. 5.20 – A
UDIO SELECTION MENU OPTIONS
................................................................................................................... 32
FIG. 5.21 – I
NPUT IMPEDANCE MENU
................................................................................................................................. 33
FIG. 5.22 – PRE-
EMPHASIS MENU
....................................................................................................................................... 33
FIG. 5.23 – E
NABLE LIMITER MENU
................................................................................................................................... 34
FIG. 5.24 – L
IMITER VALUE MENU
..................................................................................................................................... 34
FIG. 5.25 – C
HANNELS SENSITIVITY
.................................................................................................................................. 35
FIG. 5.26 – P
RESETTING MODE
........................................................................................................................................... 36
FIG. 5.27 – P
RESETTING
MONO
MODE MENU
.................................................................................................................... 37
FIG. 5.28 – P
RESETTING
STEREO MPX I
NT MODE MENU
................................................................................................. 38
FIG. 5.29 – P
RESETTING TOTAL DEVIATION ADJUSTMENT
.................................................................................................. 39
FIG. 5.30 – P
RESETTING AUXILIARY CHANNELS DEVIATION ADJUSTMENT
......................................................................... 39
FIG. 5.31 – P
RESETTING
19KHZ/MPX O
UT MENU
............................................................................................................. 40
FIG. 5.32 – P
ILOT TONE DEVIATION ADJUSTMENT
.............................................................................................................. 40
FIG. 5.33 – P
ILOT TONE PHASE ADJUSTMENT
..................................................................................................................... 41
FIG. 5.34 – AES-EBU
INTERFACE ENABLE MENU
.............................................................................................................. 41
FIG. 5.35 – AES-EBU R
ATIO MENU
.................................................................................................................................. 42
FIG. 5.36 – A
LARMS/WARNINGS MENU FLOW GRAPH
........................................................................................................ 43
FIG. 5.37 – F
OLDBACK REFLECTED MENU
......................................................................................................................... 44
FIG. 5.38 – W
ARNING REFLECTED MENU
........................................................................................................................... 44
FIG. 5.39 – W
ARNING POWER LOW MENU
.......................................................................................................................... 45
FIG. 5.40 – A
LARM POWER LOW MENU
.............................................................................................................................. 46
FIG. 5.41 – A
UDIO LOW LEVEL MENU
............................................................................................................................... 46
FIG. 5.42 – A
UDIO LOW TIMEOUT MENUS
.......................................................................................................................... 47
FIG. 5.43 – A
UDIO OVER LEVEL MENU
.............................................................................................................................. 47
FIG. 5.44 – A
UDIO OVER TIMEOUT MENUS
........................................................................................................................ 48
FIG. 5.45 – A
UDIO EVENTS TYPE MENU
.............................................................................................................................. 48
FIG. 5.46 – M
EMORY MENU FLOW GRAPH
.......................................................................................................................... 49
FIG. 5.47 – A
CTIVE MEMORY MENU
.................................................................................................................................. 50
FIG. 5.48 – E
DIT MEMORY MENUS
..................................................................................................................................... 50
FIG. 5.49 – E
NABLE MEMORY EDITING PAGE
..................................................................................................................... 51
FIG. 5.50 – E
NDING EDITING MEMORY PAGE
.................................................................................................................... 51
FIG. 5.51 - M
EMORY MENU DURING EDITING
..................................................................................................................... 51
FIG. 5.52 – C
ONFIRMATION EDITING MEMORY PAGE
......................................................................................................... 51
Page 6

MOZART SERIES –FM Exciters/Transmitters - U
SER’S MANUAL
6 /87
FIG. 5.53 – C
LEAR ALL MEMORY MENU
............................................................................................................................ 52
FIG. 5.54 – C
LEAR ALL MEMORY CONFIRMATION PAGE
.................................................................................................... 52
FIG. 5.55 – H
ISTORY MENU
................................................................................................................................................ 53
FIG. 5.56 – H
ISTORY MENU EVENT DETAIL PAGE
............................................................................................................... 53
FIG. 5.57 – G
ENERALS MENU FLOW GRAPH
........................................................................................................................ 55
FIG. 5.58 – S
ET HOUR PAGE
............................................................................................................................................... 56
FIG. 5.59 – S
ET MINUTE PAGE
............................................................................................................................................ 56
FIG. 5.60 – S
ET SECOND PAGE
............................................................................................................................................ 56
FIG. 5.61 – S
ET DAY PAGE
................................................................................................................................................. 57
FIG. 5.62 – S
ET MONTH PAGE
............................................................................................................................................. 57
FIG. 5.63 – S
ET YEAR PAGE
................................................................................................................................................ 57
FIG. 5.64 – S
ET
RS-485
ADDRESS PAGE
............................................................................................................................. 58
FIG. 5.65 – U
NIT IP ADDRESS PAGE
................................................................................................................................... 58
FIG. 5.66 – U
NIT NETMASK PAGE
....................................................................................................................................... 58
FIG. 8.1 – W
EBSERVER MAIN PAGE
.................................................................................................................................... 67
FIG. 8.2 – W
EBSERVER LOGIN PAGE
.................................................................................................................................. 68
FIG. 8.3 – W
EBSERVER SETTING PAGE
............................................................................................................................... 69
FIG. 8.4 – W
EBSERVER PRESETTING PAGE
......................................................................................................................... 70
FIG. 8.5 – W
EBSERVER LOG PAGE
..................................................................................................................................... 71
FIG. 8.6 – W
EBSERVER ADMINISTRATION PAGE
................................................................................................................ 72
FIG. 8.7 – W
EBSERVER MODULATOR UPGRADE PAGE
....................................................................................................... 74
FIG. 8.8 – W
EBSERVER UPGRADE PAGE
............................................................................................................................. 75
FIG. 8.9 – S
TART IN BOOTLOADER MODE
........................................................................................................................... 76
FIG. 8.10 – M
ODULATOR UPGRADE PAGE
.......................................................................................................................... 76
FIG. 8.11 – N
EW FIRMWARE SELECTION
............................................................................................................................ 77
FIG. 8.12 – U
PLOAD THE NEW FIRMWARE
.......................................................................................................................... 77
FIG. 8.13 – C
ONFIRM THE UPLOAD
..................................................................................................................................... 77
FIG. 8.14 – U
PGRADE TO THE NEW FIRMWARE
................................................................................................................... 78
FIG. 8.15 – E
RASE THE FLASH BEFORE THE UPGRADE
........................................................................................................ 78
FIG. 8.16 – U
PGRADE IN WORKING
.................................................................................................................................... 78
FIG. 8.17 – U
PGRADE COMPLETE
....................................................................................................................................... 79
FIG. 8.18 – W
EBSERVER UPGRADE PAGE
........................................................................................................................... 80
FIG. 8.19 – S
ELECT THE NEW WEBSERVER BOARD FIRMWARE
........................................................................................... 80
FIG. 8.20 – U
PLOAD THE FIRMWARE TO WEBSERVER
......................................................................................................... 81
FIG. 8.21 – C
ONFIRM THE UPLOADING
............................................................................................................................... 81
FIG. 8.22 – B
USY STATE DURING UPLOAD PROCEDURE
...................................................................................................... 81
FIG. 8.23 – N
EW FIRMWARE READY TO UPGRADE
.............................................................................................................. 82
FIG. 8.24 – C
ONFIRMATIONS TO UPGRADE
......................................................................................................................... 82
FIG. 8.25 – U
PGRADE IN WORKING
.................................................................................................................................... 82
FIG. 8.26 – R
EBOOT THE WEBSERVER
................................................................................................................................ 83
FIG. 8.27 – C
ONFIRM THE REBOOT
..................................................................................................................................... 83
FIG. 8.28 – W
AIT UNTIL THE REBOOT IS COMPLETED
......................................................................................................... 83
FIG. 8.29 – L
IST OF FILE OF
MIB
PACKET
.......................................................................................................................... 84
FIG. 8.30 – FM S
INGLE TRANSMITTER
MIB ...................................................................................................................... 85
FIG. 8.31 - T
RAPS AND INFORMS CONFIGURATION
............................................................................................................. 86
Page 7

MOZART SERIES –FM Exciters/Transmitters - U
SER’S MANUAL
7 /87
T
ABLES INDEX
T
ABLE
5.1 – F
REQUENCY PERMITTED VALUES
................................................................................................................... 29
T
ABLE
5.2 – S
ETTING POWER SPECIFICS
............................................................................................................................ 30
T
ABLE
5.3 – I
MPEDANCE PERMITTED VALUES
................................................................................................................... 33
T
ABLE
5.4 – PRE-
EMPHASIS PERMITTED VALUES
............................................................................................................... 33
T
ABLE
5.5 – L
IMITER PERMITTED VALUES
......................................................................................................................... 34
T
ABLE
5.6 – S
ENSITIVITY PERMITTED VALUES
.................................................................................................................. 35
T
ABLE
5.7 - P
RESETTING
STEREO MPX E
XT MODE MENU
.............................................................................................. 38
T
ABLE
5.8 – T
OTAL DEVIATION ADJUSTMENT PERMITTED VALUES
................................................................................... 39
T
ABLE
5.9 – A
UXILIARY CHANNELS DEVIATION ADJUSTMENT PERMITTED VALUE
............................................................ 39
T
ABLE
5.10 – P
ILOT TONE DEVIATION ADJUSTMENT PERMITTED VALUES
.......................................................................... 40
T
ABLE
5.11 – P
ILOT TONE PHASE ADJUSTMENT PERMITTED VALUES
................................................................................. 41
T
ABLE
5.12 – AES-EBU R
ATIO PERMITTED VALUES
........................................................................................................ 42
T
ABLE
5.13 – F
OLDBACK REFLECTED PERMITTED VALUES
............................................................................................... 44
T
ABLE
5.14 – W
ARNING REFLECTED PERMITTED VALUES
................................................................................................. 45
T
ABLE
5.15 – W
ARNING POWER LOW PERMITTED VALUES
................................................................................................ 45
T
ABLE
5.16 – A
LARM POWER LOW PERMITTED VALUES
.................................................................................................... 46
T
ABLE
5.17 – A
UDIO LOW LEVEL PERMITTED VALUES
..................................................................................................... 47
T
ABLE
5.18 – A
UDIO LOW TIMEOUTS PERMITTED VALUES
................................................................................................ 47
T
ABLE
5.19 – A
UDIO OVER LEVEL PERMITTED VALUES
.................................................................................................... 48
T
ABLE
5.20 – A
UDIO OVER TIMEOUTS PERMITTED VALUES
.............................................................................................. 48
T
ABLE
5.21 – A
UDIO EVENTS PERMITTED TYPES
............................................................................................................... 49
T
ABLE
5.22 – M
EMORY AVAILABLE
.................................................................................................................................. 50
T
ABLE
5.23 – E
VENTS LIST
................................................................................................................................................ 54
T
ABLE
7.1 – R
EMOTE
I/O
PINOUT
...................................................................................................................................... 65
T
ABLE
8.1 – T
RAPS AND INFORMS AVAILABLE
.................................................................................................................. 86
Page 8

MOZART SERIES –FM Exciters/Transmitters - U
SER’S MANUAL
8 /87
1 GENERAL INFORMATION
1.1 SAFETY NOTICES
To avoid risks of electrical shocks or fire, only qualified personnel should execute the procedures
specified in this manual.
When the protective covers of any device or component connected to a 110 / 240 VAC source by a
power cord are removed, voltages and currents dangerous to life may be exposed.
Contact with 110 / 240 Volts of alternating current and associated direct current and voltages can be
fatal.
CAUTION
To reduce the risks of electrical shock, do not remove the cover (or the back). Refer, for servicing,
to qualified service personnel. This installation should be done by a qualified person and should
comply with to all local applicable laws.
Beryllium Oxide
It is dangerous component if inhaled, eaten or put into direct contact with skin, especially if the skin
is cut or wounded.
Special care is required in handling beryllium material in order to NOT produce any dust, particles,
fumes etc. etc. Whenever beryllium material is broken it is extremely important to collect all parts
in a carefully sealed and marked container for discharging in a specific way through controlled
channels. All above operations have to be affected using gloves and tongs, with special care taken
not to produce dust.
After handling beryllium components it is essential to wash hands carefully.
Beryllium compounds are used in RF Connectors.
Page 9

MOZART SERIES –FM Exciters/Transmitters - U
SER’S MANUAL
9 /87
1.2 FIRST AID IN CASE OF ELECTROCUTION
Do not touch the victim until the electrical circuit has been interrupted to make sure the person is
isolated. If this is not possible, move the victim away from the conductor by using insulated
material.
If respiration is interrupted, artificial respiration must be applied (mouth-to-mouth respiration). Lay
the patient on his back, feet elevated above the level of the head, chin up and head back.
Call a doctor urgently
In case of a mouth wound it may be necessary to apply mouth-to-nose respiration, blocking the
patient’s mouth.
In case of face wounds the need for manual artificial respiration may arise.
Push down on the chest of the prostrate patient whilst moving the patient’s arms up and out.
If the victim has also suffered burns then, without obstructing breathing, proceed as follows:
• Do not remove clothing from burn wounds.
• If possible gently pour cold water over wounds to relieve pain.
• Do not use any medication.
• Call for urgent medical assistance.
Page 10
MOZART SERIES –FM Exciters/Transmitters - U
SER’S MANUAL
10 /87
1.3 WASTE ELECTRICAL AND ELECTRONIC EQUIPMENT
(WEEE)
The purpose of the DIRECTIVE 2002/96/EC OF THE EUROPEAN PARLIAMENT AND
OF THE COUNCIL of 27 January 2003 on waste electrical and electronic equipment
(WEEE) is, as first priority, the prevention of waste electrical and electronic equipment
and, in addition, the reuse, recycling and other forms of recovery of such wastes so as to
reduce the disposal of waste.
To do this, remember to collect separately all the electronic material.
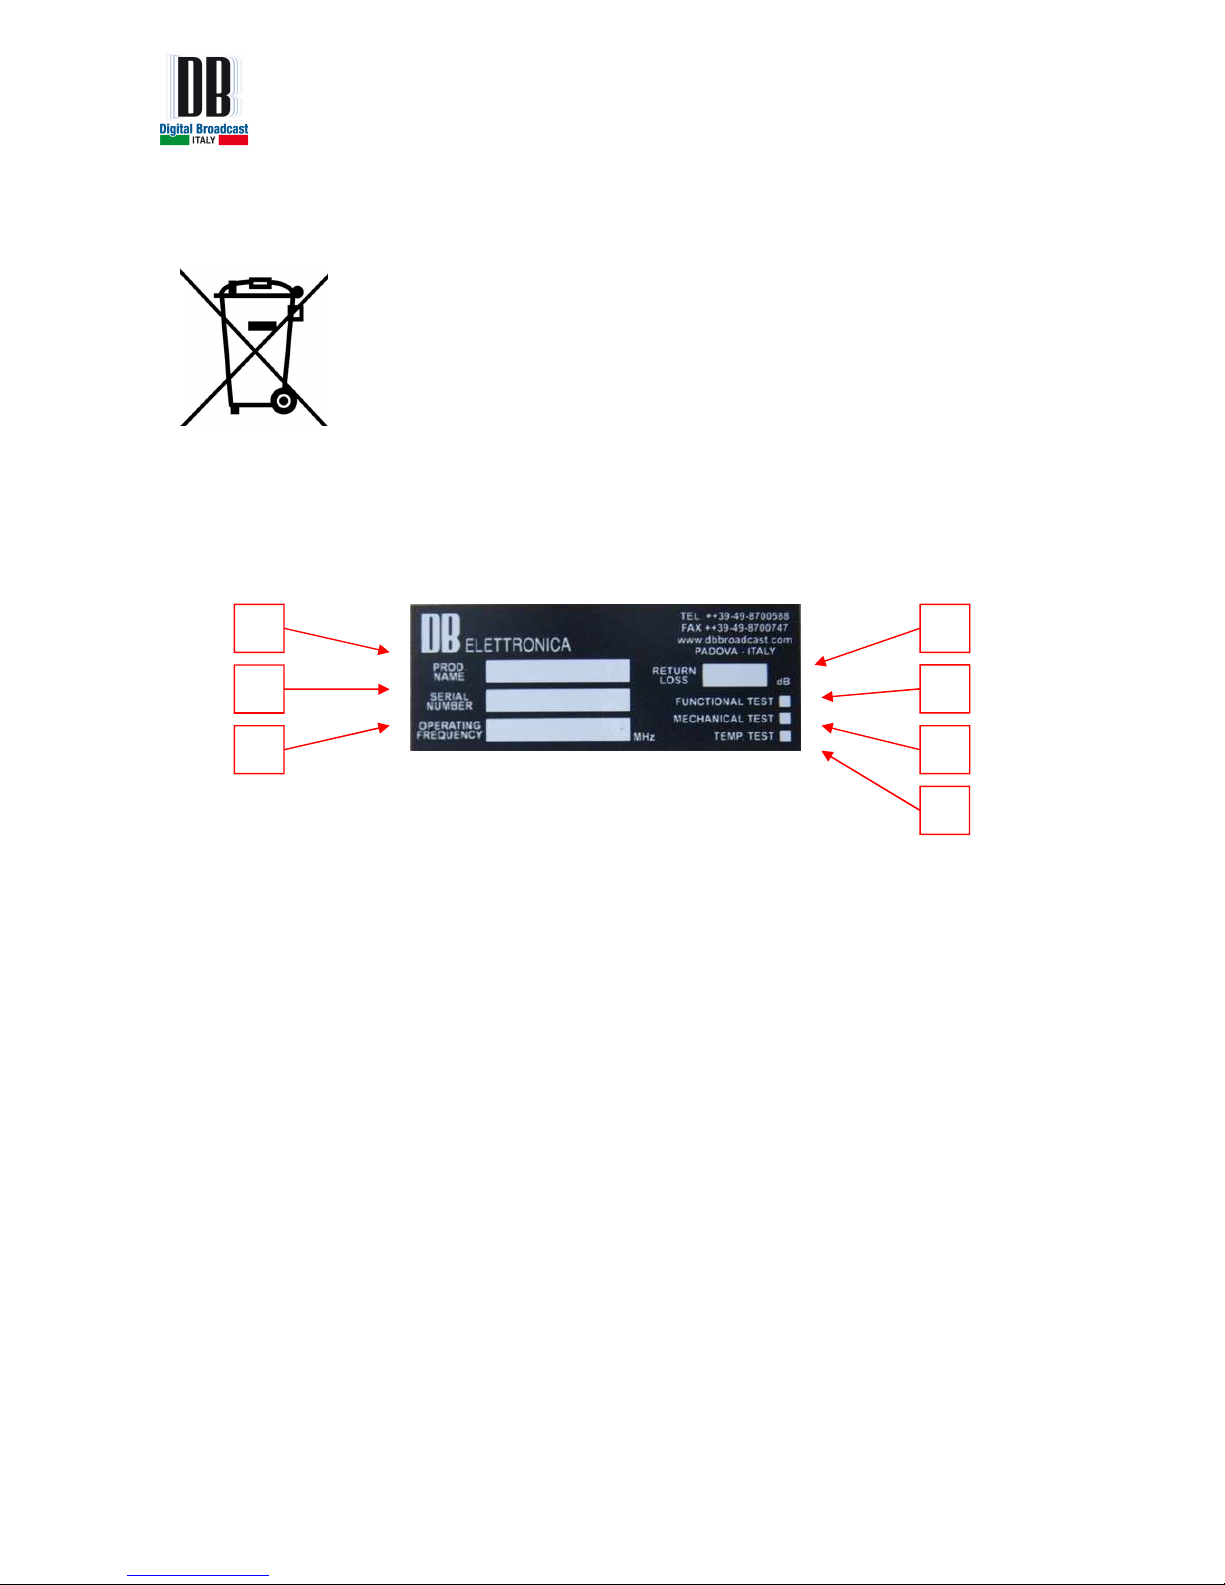
1.4 MANUFACTURE LABELS
All the units are identified by a black silver label:
Fig. 1.1 - Units Label
Label fields:
1. Product name
This field contains the model of the unit (part name).
2. Serial number
This field contains the serial number of the module or equipment (made by 8 digits).
3. Operating Frequency
This field contains the operating frequency (for FM units) or the channel and standard (for
TV units) set by the factory. In case no indication is present, the unit is considered as
broadband in its operating band.
4. Return Loss
FACTORY USE ONLY
1
2
3
4
5
6
7
Page 11

MOZART SERIES –FM Exciters/Transmitters - U
SER’S MANUAL
11 /87
5. Functional Test
A cross on this field indicates that the functional test of the unit has been done by the
technician.
6. Mechanical Test
A cross on this field indicates that the functional test of the unit has been done by the
technician.
7. Temp. Test
A cross on this field indicates that the functional test of the unit has been done by the
technician.
1.5 5)(;32685(6TAT
EMENT6
$QWHQQDVIRUEURDGFDVWWUDQVPLWWHUVVKRXOGEHPRXQWHGRQRXWGRRUSHUPDQHQWVWUXFWXUHV
7KH)&&DVVHVVHV5)H[SRVXUHLVVXHVDWWKHWLPHRIOLFHQVLQJRI\RXUVWDWLRQZLWKWKHUHTXLUHG
)&&%XUHDXVDQGWKLVZLOOLQFOXGHDQWHQQDFRORFDWLRQLVVXHVDVUHTXLUHGLQE
6LPLODUO\&DQDGDZLOODOVRDVVHVV5)H[SRVXUHDWWKHWLPHWKHVWDWLRQLVOLFHQVHG
Page 12

MOZART SERIES –FM Exciters/Transmitters - U
SER’S MANUAL
12 /87
2 FM EXCITER GENERAL DESCRIPTION
The MOZART FM exciter/transmitter is the result of the development of the MSE (Magnetic
Sound Enhancer) technology together with the improvements in the FM modulation and using
high performances PFC filters for the AC/DC conversion. This unit is ideal as stand alone unit
for low power transmissions or suitable as high performance exciter in modular transmitters.
This unit has been developed with the Green RF technology which increases the efficiency of
the amplification part reducing the dimensions and power consumption without modifying the
quality of the transmission.
The main advantages of this technology are:
- High RF efficiency
- Lower heating (lower necessity of air conditioning in the installation room)
- Higher devices safety
- Higher total reliability
- Lower AC power consumption
An user friendly interface with the combination of leds and LCD display offers a very easy
method to control the MOZART main parameters with a metering accuracy that helps the user
to install the unit and check its status even in case he doesn’t have expensive test equipments.
In case of fault of the unit or antenna system, the protection system lowers automatically the
output power, in order to bring back the operating conditions to a safe area without causing a
system shut down, and it indicates on the front panel display the alarm message.
The protection system reduces or stops the output power in case of:
- V.S.W.R. too high.
- Heatsink temperature too high or cooling stop (OVER HEAT).
- Missing Enable command (in case of combination with external units like control
logic units)
Page 13

MOZART SERIES –FM Exciters/Transmitters - U
SER’S MANUAL
13 /87
The switch-mode power supply is largely oversized and guarantees a regular operation even in the
presence of wide main voltage fluctuations.
The systems cooling grants a safe operation even in hard climatic conditions.
Page 14
14 /87
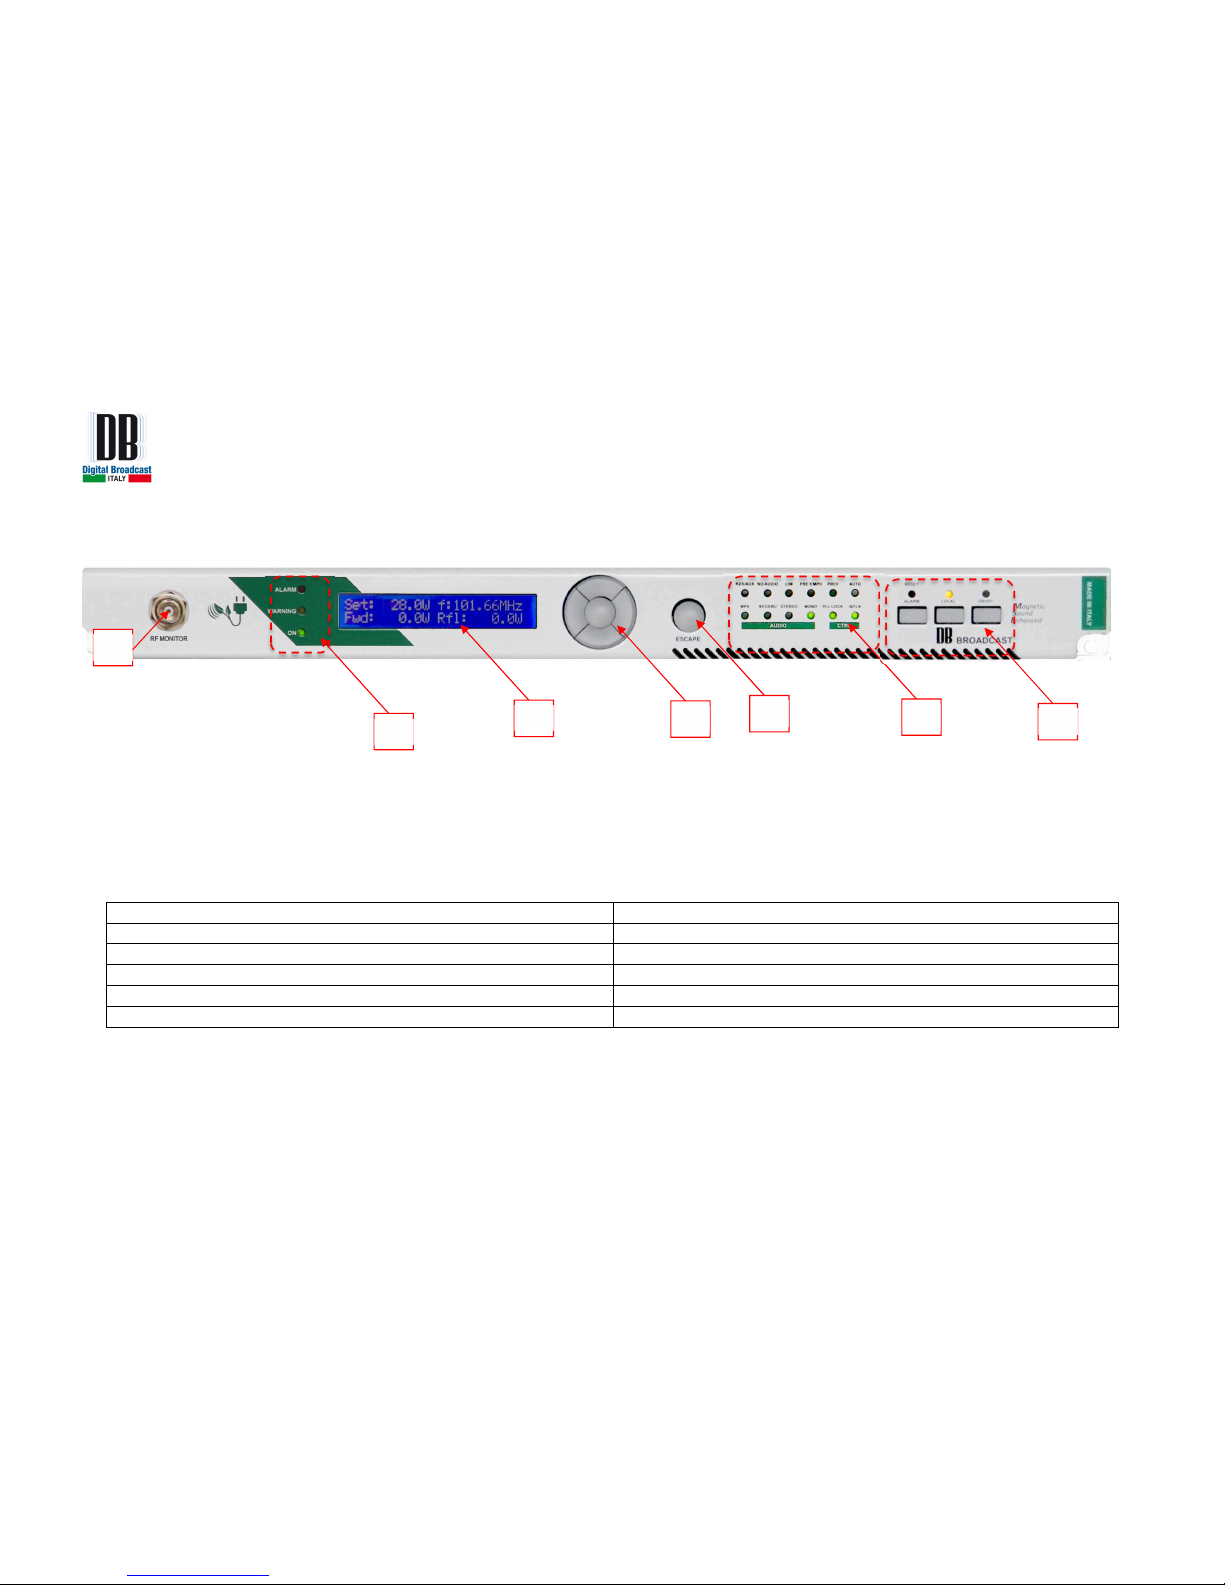
Fig. 2.1 - MOZART 30 FRONT VIEW
1. RF Monitor connector
2. Status leds
a. ALARM: in case of a temporary alarm (it returns automatically to the normal status at next attempt of the unit) – RED led
b. WARNING: in case of a warning is present - YELLOW led
c. ON: in case the unit is connected to the mains and switched on – GREEN led
3. LCD Display
4. Navigation keys (UP /DOWN / RIGHT / LEFT / OK)
5. Escape key
6. AUDIO and CONTROL leds
a. RDS/AUX: it is ON in case the RDS/SCA/AUX are on b. MPX: it is ON in case the MPX EXT mode is selected
c. NO AUDIO: it is ON in case of alarm/warning on audio signal d. AES-EBU: it is ON in case the AES-EBU is on
e. LIM: it is ON in case the limiter is set to on f. STEREO: it is ON in case the MPX INT mode is selected
g. PRE EMPH: it is ON in case the pre-emphasis is on h. MONO: it is ON in case the MONO mode is selected
i. PREF: no actually available j. PLL LOCK: it is ON in case the PLL is correctly locked
k. AUTO: no actually available l. INTLK: it is ON in case the ENABLE is closed
7. Command keys (Reset Alarms, Local/Remote, ON/OFF) and leds (Fault, Local, RF ON)
4
1
2
3
6
7
5
Page 15

15 /87
Fig. 2.2 - MOZART 30 REAR VIEW
1. AC input
2. LAN port
3. Cooling FAN
4. RF output connector (N)
5. Left XLR connector
6. Right XLR connector
7. AES/EBU XLR connector
8. 19kHz / MPX OUT BNC connector
9. AUX BNC connector
10. MOD OUT BNC connector
11. SCA BNC connector
12. MPX BNC connector
13. RDS BNC connector
14. ENABLE connector
15. RS 485 MASTER connector
16. RS 485 SLAVE connector
17. REMOTE connector
1 2 3 4 5 6 7 9
11 13 14
8 10 12 15 16
17
Page 16
16 /87
Fig. 2.3 – MOZART 50/120/300/500/1000 FRONT VIEW
1. RF Monitor connector
2. Status leds
a. ALARM: in case of a temporary alarm (it returns automatically to the normal status at next attempt of the unit) – RED led
b. WARNING: in case of a warning is present - YELLOW led
c. ON: in case the unit is connected to the mains and switched on – GREEN led
3. LCD Display
4. Navigation keys (UP / DOWN / RIGHT / LEFT / OK)
5. ESCAPE key
6. AUDIO and CONTROL leds
a. RDS/AUX: it is ON in case the RDS/SCA/AUX are on b. MPX: it is ON in case the MPX EXT mode is selected
c. NO AUDIO: it is ON in case of alarm/warning on audio signal d. AES-EBU: it is ON in case the AES-EBU is on
e. LIM: it is ON in case the limiter is set to on f. STEREO: it is ON in case the MPX INT mode is selected
g. PRE EMPH: it is ON in case the pre-emphasis is on h. MONO: it is ON in case the MONO mode is selected
i. PREF: no actually available j. PLL LOCK: it is ON in case the PLL is correctly locked
k. AUTO: no actually available l. INTLK: it is ON in case the ENABLE is closed
7. Command keys (Reset Alarms, Local/Remote, ON/OFF) and leds (Fault, Local, RF ON)
4
2
3
6
7
5
1
Page 17
17 /87
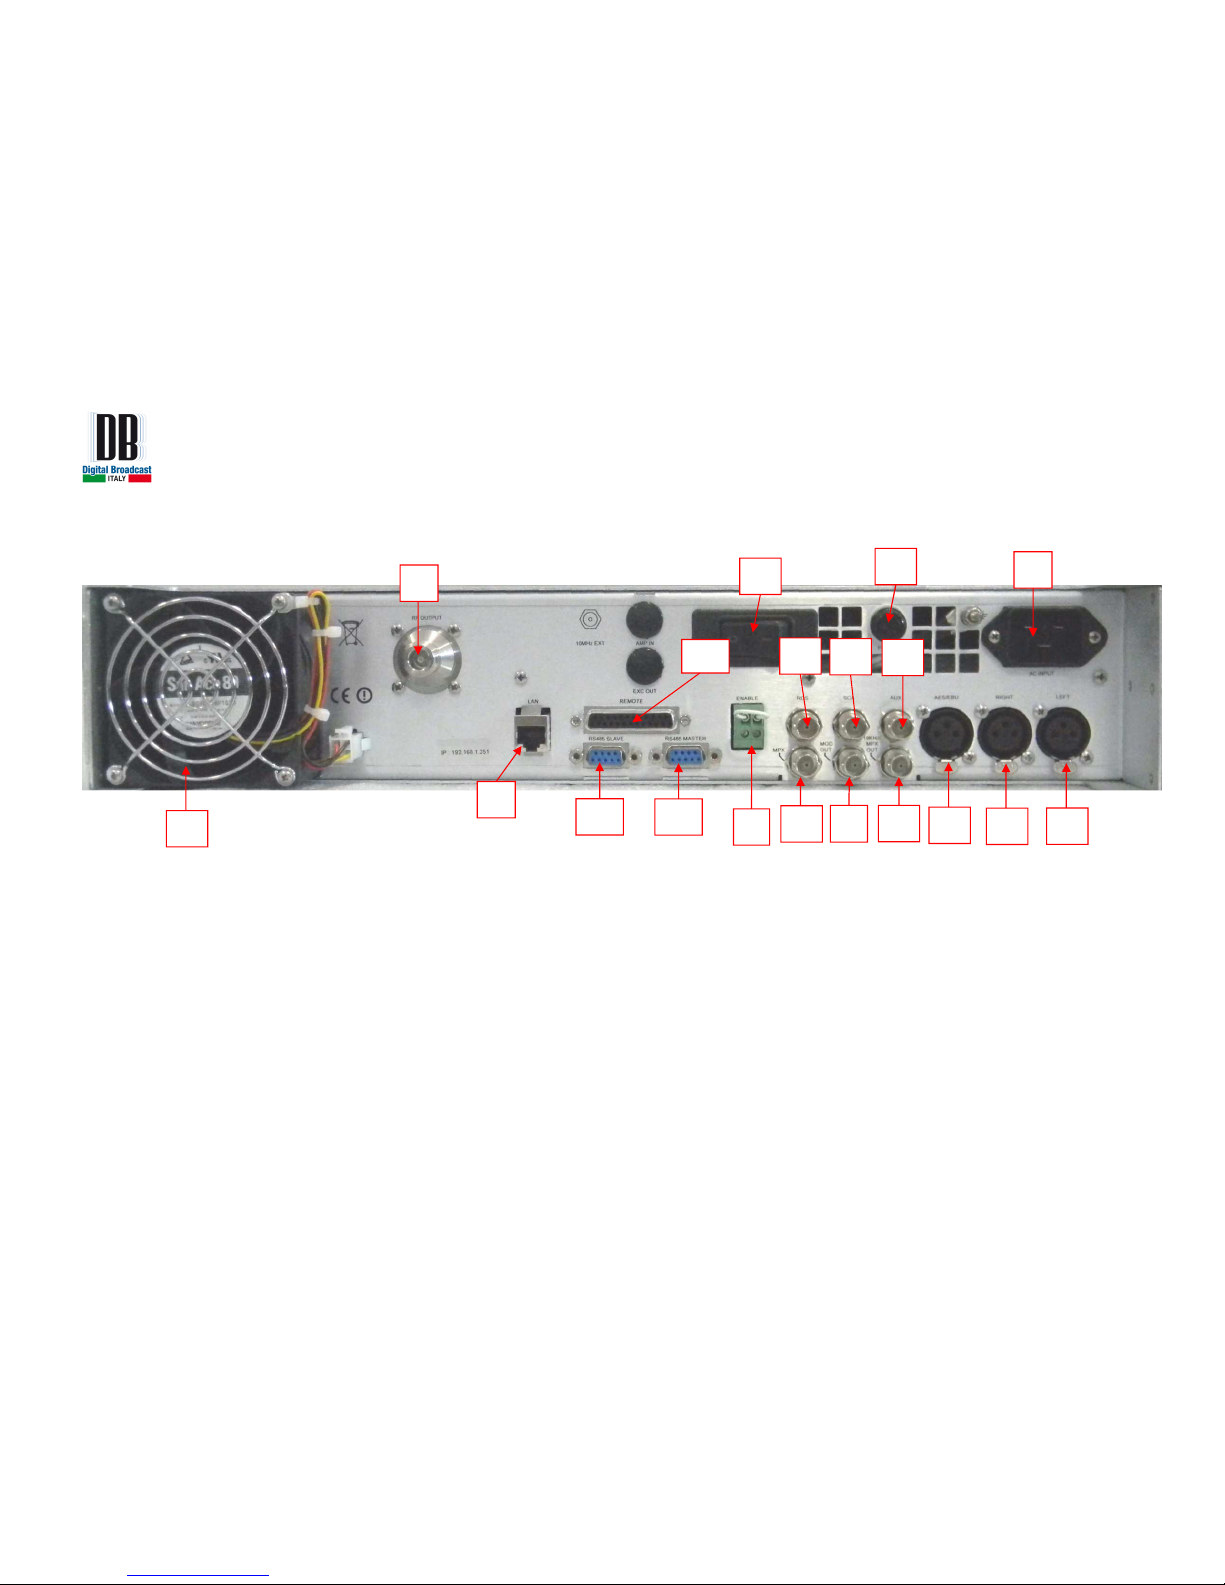
Fig. 2.4 – MOZART 50/120/300/500/1000 REAR VIEW
1. AC input
2. LAN port
3. Cooling FAN
4. RF output connector (N)
5. Left XLR connector
6. Right XLR connector
7. AES/EBU XLR connector
8. 19kHz / MPX OUT BNC connector
9. AUX BNC connector
10. MOD OUT BNC connector
11. SCA BNC connector
12. MPX BNC connector
13. RDS BNC connector
14. ENABLE connector
15. RS 485 MASTER connector
16. RS 485 SLAVE connector
17. REMOTE connector
18. Fuse
19. Switching on button
2
1
5
3
4
6
7
15
16
17
12
9
11
13
8
18
19
Page 18

18 /87
3 TECHNICAL SPECIFICATIONS
RF FEATURES
RF Output impedance
50Ω unbalanced
Frequency range
87.5 to 108 MHz
Frequency control
Synthesizer µprocessor controlled
Off-lock attenuation
> 75 dBc (typical -80 dB)
Type of modulation
F3E / F8E direct FM at the carrier frequency
Modulation mode
Mono, Stereo, Multiplex, SCA, RDS, AUX (input selected by front
panel)
Frequency deviation
±75 kHz =100 %, ±150 kHz capability (others on request)
Reference
VCTCXO 10 MHz ± 1ppm or 10 MHz external (Optional)
Constancy of freq. dev.
±1 % over six months
Variation of freq.
± 1ppm/year
Short term stability
± 1 ppm from -5 to +45 °C
Instantaneous BW
>20 MHz
RF harmonics
Exceeds EBU/CCIR/FCC requirements > -75dBc
RF spurious
Exceeds EBU/CCIR/FCC requirements < -100 dBc @ ± 1 MHz min.
out of carrier (typical -110dB)
Pre-emphasis
Flat/50/75µs selectable via front panel
Pre-emphasis precision
Nominal 1% (typical 0.4% )
Stereo operation
CCIR 450/S2 "pilot tone system"
STEREO OPERATION
1. Audio response
±
0.3 dB da 20 Hz to 15 kHz
2. Audio filter attenuation
>
55 dB @ 19 kHz, >45dB 19 to 100kHz
3. Common mode rejection 20 Hz to 15 kHz > 45 dB
4. Stereo Separation
30-80Hz >53dB (typ. 56), 80Hz-15kHz >60 dB (typ.70)
5. Crosstalk attenuation (M / S)
>
40 dB 30 Hz to 15 kHz (typ. 52dB / 400Hz to 5kHz)
6. Spurious products
>
53 kHz > 50 dB
7. 38 kHz suppression
>
70 dB (Typ -85dB)
8. Subcarrier frequency 38 kHz ± 2 Hz
9. Subcarrier generation
Internal crystal
10. Pilot frequency 19 kHz ± 1 Hz
11. THD+N on encoded channels
<
0.03 % 30 Hz TO 15 kHz ( typ -75dB)
12. Nominal pilot deviation
±
7 kHz
MONO OPERATION
Audio response
±
0.3 dB 20 Hz to 15 kHz (+0/-2%)
THD+N on encoded channels
30 Hz to 15 kHz < 0.06% ( typ. 0.03 % ) typ. -78dB
Page 19
19 /87
MPX OPERATION (External coder)
Audio response
30Hz - 100kHz ± 0.15 dB
THD+N on encoded channels
30 Hz to 15 kHz < 0.03% ( typ. 0.02% , < -75dB)
AUDIO INPUTS
Function
Input level /
Adjustment range
BW
Impedance Type
Conn.
N°
Composite
-0 ÷ +15 dBu
±0.15 dB
30 Hz÷100kHz
>5 kΩ
Unbal. BNC 1
SCA/RDS/AUX
-16 ÷ 0 dBu
±0.15 dB
40kHz÷100kHz
~2 kΩ
(other on
request)
Unbal. BNC 2
AES/EBU
-3 dBFS for ± 75 kHz
15 dBu (12.33 Vpp)
-15 … 0 dBFS
0 to 15 dBu
(2.19 Vpp to 12.3 Vpp)
0.15 dB
40kHz÷100kHz
110 Ω
Unbal
XLR
3
L
-0 ÷ +15 dBu
±0.15 dB
30Hz÷15kHz
10 kΩ
600 Ω
Unbal.
Bal.
XLR
4
R
-0 ÷ +15 dBu
±0.15 dB
30Hz÷15kHz
10 kΩ
600 Ω
Unbal.
Bal.
XLR
5
AUDIO OUTPUTS
RF connector
N female
Monitor RF output
-44dBc±2dB from 87.5 to 108 MHz
Pilot/MPX
BNC connector
19 kHz or MPX, level 1 Vpp, internally adjustable
Mod. Output
BNC Connector
MODEL NOMINAL POWER CONNECTOR SIZE
MOZART 30 30 W N 1U x 19”
MOZART 50 50 W N 1U x 19”
MOZART 120 120 W N 2 U x 19”
MOZART 300 300 W N 2 U x 19”
MOZART 500 500 W N 2 U x 19”
MOZART 1000 1000 W DIN 7/16 2 U x 19”
Page 20

20 /87
SIZE & ELECTRICS
Power supply
110/220V single phase AC (+10 / -15 %) 50-60Hz/ ± 5%
Display Blue back panel; 2 raw 24 character LCD
Cooling Forced air, with external long life brushless ball bearing fan
Features and specifications subject to change without notice.
ENVIRONMENT
Storage temperature
-20°C TO + 60 °C
Operating temperature
0 °C TO + 50 °C
Guaranteed performance temperature
0 °C TO + 45 °C
Relative non-condensing humidity 90 % MA
Max operating altitude 3000 mt.
Max extraneous field strength
≤
10 V/m; ≤ 4 A/m
Page 21

21 /87
4 INSTALLATION AND ACTIVATION
4.1 INITIAL CHECK
The equipment becomes the property of the customer when the equipment is delivered to the
carrier. Carefully unpack the transmitter. Perform a visual inspection to determine that no apparent
damage has been incurred during shipment. All shipping materials should be retained until it is
determined that the unit has not been damaged. Claims for damaged equipment must be promptly
filed with the carrier or the carrier may not accept the claim.
The contents of the shipment should be as indicated on the packing list. If the contents are
incomplete, or if the unit is damaged electrically or mechanically, notify both the carrier and the
supplier.
CAUTION: Before switch the equipment on, ensure that all RF Loads, RF cables and connectors
are properly connected. To prevent damage to the amplifiers, it is essential that either the feeder and
antenna system or the dummy load have a good in band return loss.
Failure to observe the above caution and also the installation instructions of this amplifier may
cause damages to the amplifiers for which the supplier cannot be considered responsible.
PREVENTION OF ACCIDENTS
When it is used in normal applications and within the parameters defined in the technical
specifications, this equipment does not endanger health and safety, provided that normal operating
and engineering safety practices are observed and that it is used only by authorized, trained and
qualified personnel.
THERMIC AND ENVIRONMENTAL CONDITIONS
- A too high environmental temperature (in any case not higher than 45°C) shall cause a nonadequate rack cooling putting the equipment in hard working conditions.
- An air conditioner should be installed to keep the room temperature constant even in case of
external temperature variation.
Page 22

22 /87
4.2 CONNECTIONS
Install the transmitter so that the space over and under the equipment is sufficient for the cooling air
to flow through.
Before installing the equipment always make sure that the transmitter is not powered. This has the
purpose to prevent electrical shocks to the operators and damage to the equipment.
Before carrying out any other electrical connection, connect the rack to the station ground.
Connect the transmitting antenna cable or the cable related to the connection of the output
filter to the output connector of the unit (in the latest case connect the output of the filter to
the transmitting antenna) using a 50 Ohms coaxial cable.
In case the transmitter is not connected to an external control unit, check that the ENABLE
connector on the back panel is correctly inserted.
Connect the power cord to an operating source. Make sure that the power supply source
provides the nominal voltage prescribed.
Note: the unit is designed to operate with the nominal voltage ±15%. We suggest the installation of
spike suppressors, line conditioners, isolation transformers, AVR and/or UPS or other devices
useful to protect the equipment from eventual damages that can be caused by the mains fluctuations.
Page 23

23 /87
5 MENU DESCRIPTION
5.1 VISUALIZATION
The following pages are related to parameters that are visualized on the front panel: they are
indications of the actual operating parameters of the unit.
5.1.1 START PAGE
After the unit power on, the first page in the display shows information about the internal hardware
revision and supplier (first row), and about firmware revision and unit model (second row).
Fig. 5.1 – Start page
The page remains active for a few seconds before moving to the main menu.
5.1.2 MAIN MENU
This is the default page and it indicates the output power set by the customer (SET), the
transmission frequency in MHz, the real forward power in Watt (that can be different from SET in
case of an alarm, warning, failure or in case the unit is in OFF state), and the reflected power in
Watt.
Fig. 5.2 – Main menu
The unit moves to this page in case no key is pressed for 60 seconds.
Page 24
24 /87
5.2 VMETERS AND INFO MENU
In these menus it is possible to find the levels of the input channels, the internal voltages, currents,
temperatures and the software/hardware revisions.
In the Main Menu page press DOWN key to enter these pages and UP and DOWN keys to navigate
in the sub-menus.
[0]
Main Page
[1]
Output Modulation
[2]
Left and Right channels input level
[3]
Left and Right AES-EBU channels input level
[4]
MPX External, RDS External input levels
[5]
SCA and AUX input levels
[6]
Internal voltages and current
[7]
Heatsink temperature
[8]
Device information
Fig. 5.3 – Vmeters and Info menus flow graph
Page 25

25 /87
5.2.1 OUTPUT MODULATION
In this page the Total Output modulation level is indicated in KHz.
Fig. 5.4 – Output Total Modulation page
Pressing the UP or DOWN buttons you can move inside this menu and see the different pages
indicated here below.
5.2.2 LEFT AND RIGHT CHANNELS LEVEL
In this page the analogic Left and Right channels levels are indicated in dBu.
Fig. 5.5 – Analogic Left and Right input levels
5.2.3 AES-EBU LEFT AND RIGHT CHANNELS LEVEL
Pressing the DOWN button you can see the Left and Right levels for the AES-EBU input channels
indicated in dBFS.
Fig. 5.6 – AES-EBU Left and Right input levels
Page 26

26 /87
5.2.4 AUXILIARY CHANNELS LEVEL
Pressing the DOWN button you can see the MPX External and RDS External levels indicated in
dBu.
Fig. 5.7 – Auxiliary channels 1 input levels
Pressing the DOWN button you can see the SCA and AUX levels indicated in dBu.
Fig. 5.8 – Auxiliary channels 2 input levels
5.2.5 VOLTAGES AND CURRENT
This page allows the visualization of the unit analogic working values:
VPA = voltage that supplies the RF module in Volt.
IPA = current absorbed by the RF module in Ampere.
VPu = Main power supply voltage in Volt.
VT = Voltage Tuning (VCO working voltage) in Volt.
Fig. 5.9 – Voltages and Current page
Page 27
27 /87
5.2.6 HEATSINK TEMPERATURE
This page allows the visualization of the RF heatsink temperature in Celsius degrees.
Fig. 5.10 – Heatsink temperature page
5.2.7 DEVICE INFORMATION
This page allows the visualization of device model, manufacturer name, hardware and firmware
revisions.
Fig. 5.11 – Device information page
Page 28

28 /87
5.3 SETTINGS MENU
The following pages are related to the unit main parameters. To navigate on Setting menu press
LEFT or RIGHT key from Main Menu.
In case sub-menu is present, an arrow pointing downwards will be showed in the second row on the
right, press DOWN or UP to navigate on sub-menus.
[0]
Main Menu
[1]
Frequency
[2]
Setting Power
[3]
Operative Mode
[4]
Audio Selection
[5]
Sensitivity Set
[6]
Presettings
[7]
Alarms/Warnings
[8]
Memory Manage
[9]
History Log
[10]
Generals
Fig. 5.12 – Setting menu flow graph
Page 29

29 /87
5.3.1 FREQUENCY SET MENU
Press the LEFT or RIGHT keys to access the slide to program the frequency. Push the OK key to
enter the menu (a blinking arrow will be showed in the second row on the right), press UP key to
increase or DOWN key to decrease the frequency value. Confirm the new value pressing the OK
key or ESC key to exit without saving.
During the frequency change the PLL LOCK led will be switched off until the PLL will be locked
to the new frequency.
Fig. 5.13 – Set frequency menu
MIN value: 87.50 MHz MAX value: 108.00 MHz STEP: ±0.01MHz
Table 5.1 – Frequency permitted values
5.3.2 POWER SET MENU
To program the RF Power output in Watt, press the LEFT or RIGHT key up to arrive to the slide
here below. Press the OK key to enter the program mode (blinking arrow in second row on the
right).
In the first row the forward power value indicates the actual output power, in the second row the Set
Pout is the value that the customer is setting.
Fig. 5.14 – Set power menu
The value can be modified pressing UP and DOWN keys to increase or decrease the value. Confirm
new value and exit routine pressing the OK button or press ESC key to exit without saving.
The new power value is applied in real time.
Page 30

30 /87
NOMINAL POWER MIN POWER MAX POWER STEP
30 W 0 W 30 W 0.1 W
50 W 0 W 60 W 1 W
120 W 0 W 150 W 1 W
300 W 0 W 330 W 1 W
500 W 0 W 550 W 10 W
1000 W 0 W 1100 W 10 W
Table 5.2 – Setting power specifics
5.3.3 OPERATIVE MODE MENU
In the Operative Mode menu is possible activate/deactivate the various input channels depending on
the configuration MONO/STEREO in the Presettings Menu.
5.3.3.1 MONO ACTIVE
In case the MONO is active, the page in the Operative Mode menu will be the one here below:
Fig. 5.15 – Operative Mode MONO
Starting condition in case the configuration is changed from STEREO to MONO is always OFF.
To activate the desired channel press the OK key to enter the program mode (blinking arrow in
second row on the right).
To select Left or Right channel press UP or DOWN keys, press OK key to confirm the channel
selected or ESC key to exit routine without saving.
Fig. 5.16 – Operative Mode MONO channel selection
Page 31

31 /87
In case the AES-EBU is active (Presetting Menu), the enabled channel is relative to AES-EBU,
please select AES-EBU:Off for using the analogic input channels.
5.3.3.2 STEREO ACTIVE
In case the STEREO is active, in the Operative Mode is present a sub menu due to the possibilities
to activate the auxiliary channels:
[0]
STEREO selection
[1]
Auxiliary channel RDS
[2]
Auxiliary channel SCA
[3]
Auxiliary channel AUX
Fig. 5.17 – Operative Mode STEREO options
Starting condition for STEREO selection and auxiliary channels, in case the mode is changed from
MONO to STEREO, is always OFF.
In the STEREO selection can be selected the MPX External (rear connector) or the MPX Internal (if
Stereo Coder card is available) mode.
Fig. 5.18 – Operative Mode STEREO MPX
To activate the desired mode press the OK key to enter the program mode (blinking arrow in second
row on the right). Press UP or DOWN keys to select the desired mode. Press OK key to confirm or
ESC key to exit routine without saving.
Page 32

32 /87
5.3.3.3 AUXILIARY CHANNELS
To enable the auxiliary channels (available only in STEREO mode) navigate in the sub-menu with
the UP and DOWN keys until the channel desired and press the OK key to enter the program mode
(blinking arrow in second row on the right). Press UP or DOWN keys to change the ON/OFF state.
Press OK key to confirm or ESC key to exit routine without saving.
Fig. 5.19 – Auxiliary channels options
In case one auxiliary channel is enabled the led RDS/AUX in the frontal panel will be switched on.
5.3.4 AUDIO SELECTION MENU
In the Audio Selection sub-menu the regulations of input impedance, pre-emphasis and limiter are
available.
To navigate in the sub-menu press UP or DOWN keys.
[0]
Input Impedance
[1]
Preemphasis
[2]
Limiter
[3]
Limiter Value
Fig. 5.20 – Audio Selection menu options
Page 33

33 /87
5.3.4.1 INPUT IMPEDANCE
In this sub-menu the impedance of analogic Left and Right channels can be selected.
Fig. 5.21 – Input Impedance menu
To change the input impedance, press the OK key to enter the program mode (blinking arrow in
second row on the right). Press UP or DOWN keys to select the impedance value. Press OK key to
confirm or ESC key to exit routine without saving.
Impedance value: 600, 10K
Table 5.3 – Impedance permitted values
5.3.4.2 PRE-EMPHASIS REGULATION
In this sub-menu pre-emphasis value can be changed.
Fig. 5.22 – Pre-emphasis menu
To change the pre-emphasis value, press the OK key to enter the program mode (blinking arrow in
second row on the right). Press UP or DOWN keys to select the new value. Press OK key to
confirm or ESC key to exit routine without saving.
Pre-emphasis values: Linear, 50us, 75us
Table 5.4 – Pre-emphasis permitted values
In case the pre-emphasis is set different from Linear the led PRE EMPH on the frontal panel will be
switched on.
Page 34

34 /87
5.3.4.3 LIMITER REGULATION
In these sub-menus an upper limit for the output signal deviation can be enabled and regulated.
The menu Limiter permits to enable or disable the limiter, if the limiter is enabled the value can be
regulated in the next menu.
Fig. 5.23 – Enable limiter menu
To enable/disable the limiter press the OK key to enter the program mode (blinking arrow in second
row on the right). Press UP or DOWN keys to select the on/off state. Press OK key to confirm or
ESC key to exit routine without saving.
In case the Limiter is enabled the green led LIM on the frontal panel will switched on.
To adjust the limiter value, press DOWN key to select the Limiter value sub-menu.
Fig. 5.24 – Limiter value menu
To change the limiter value, press the OK key to enter the program mode (blinking arrow in second
row on the right). Press UP or DOWN keys to select the new value. Press OK key to confirm or
ESC key to exit routine without saving.
The limiter value is applied in real time and only if the limiter is enabled.
MIN value: 30 KHz MAX value: 180 KHz STEP: ±1 KHz
Table 5.5 – Limiter permitted values
Page 35

35 /87
5.3.5 SENSITIVITY MENU
In this menu it is possible to set the sensitivity value in of all available unit input channels, the
sensitivity level will induce a regulation of channels internal attenuators.
A sensitivity value equal to the relative channel input level will cause an output signal deviation of
75 KHz in case of mono signal or 71 KHz in case of stereo signal.
To navigate in this sub-menu press UP or DOWN keys until the channel desired.
Fig. 5.25 – Channels Sensitivity
To change the sensitivity level, press the OK key to enter the program mode (blinking arrow in
second row on the right). Press UP or DOWN keys to increase or decrease the value. Press OK key
to confirm or ESC key to exit routine without saving.
The sensitivity value is applied in real time and only if the relative channel is in ON state (see menu
Operat.Mode).
CHANNELS MIN value MAX value STEP
LEFT, RIGHT 0 dBu +15 dBu ±0.05 dB
AES-EBU LEFT, RIGHT -10 dBFS 0 dBFS ±0.05 dB
MPX Ext 0 dBu +15 dBu ±0.05 dB
RDS, SCA, AUX -16 dBu 0 dBu ±0.5 dB
Table 5.6 – Sensitivity permitted values
Page 36

36 /87
5.3.6 PRESETTING MENU
In this menu it is possible to set the other main parameters of the unit: MONO/STEREO mode,
channels deviation offset, pilot tone frequency and phase shift, AES-EBU and MPX/19KHz Out.
The menu layout is different depending on MONO, STEREO (MPX Int or MPX Ext) mode.
5.3.6.1 MODE: MONO/STEREO
To change the operational mode, select the first entry in the Presettings menu and press the OK key
to enter the program mode (blinking arrow in second row on the right).
Press UP or DOWN keys to select MONO or STEREO. Press OK key to confirm or ESC key to
exit routine without saving.
Fig. 5.26 – Presetting mode
Note: Now in the menu Operat.Mode the channels or the configuration MPX Internal/MPX
External (in case of STEREO mode) have to be activated.
Every change from MONO-to-STEREO or STEREO-to-MONO will set the channels and the MPX
Int/Ext in OFF state so the configuration has to be set again in the menu Operat.Mode.
If MONO mode is enabled the led MONO in the frontal panel will be switched on, in case of
STEREO MPX Internal is enabled the led STEREO will be switched on, in case of STEREO MPX
External is enabled the led MPX will be switched on.
Page 37

37 /87
5.3.6.2 PRESETTINGS IN MONO MODE
[0]
Mode Selection
[1]
Total Deviation Adjustment
[2]
AES-EBU Enable
[3]
AES-EBU Ratio
Fig. 5.27 – Presetting MONO mode menu
In MONO mode the options available are the fine adjustment of output signal deviation and the
AES-EBU controls. To navigate in these menus press UP or DOWN keys.
5.3.6.3 PRESETTINGS IN STEREO MPX INTERNAL MODE
[0]
Mode Selection
[1]
Total Deviation Adjustment
[2]
RDS Deviation Adjustment
[3]
SCA Deviation Adjustment
[4]
AUX Deviation Adjustment
[5]
19KHz/MPX Selection
[6]
Pilot Tone Deviation
Page 38

38 /87
[7]
Pilot Tone Phase Shift
[8]
AES-EBU Enable
[9]
AES-EBU Ratio
Fig. 5.28 – Presetting STEREO MPX Int mode menu
In STEREO mode MPX Internal enabled, the options available are the fine adjustment of output
signal and auxiliary channels deviation, 19KHz/MPX output selection, Pilot Tone regulation and
AES-EBU controls.
To navigate in these menus press UP or DOWN keys.
5.3.6.4 PRESETTINGS IN STEREO MPX EXTERNAL MODE
[0]
Mode Selection
[1]
Total Deviation Adjustment
[2]
RDS Deviation Adjustment
[3]
SCA Deviation Adjustment
[4]
AUX Deviation Adjustment
Table 5.7 - Presetting STEREO MPX Ext mode menu
Page 39

39 /87
5.3.6.5 TOTAL DEVIATION ADJUSTMENT
In this menu it is possible to adjust an internal circuit offset (in dB) to set the total output signal
deviation to 75KHz (in MONO mode) or 71KHz (in STEREO MODE) regardless the sensitivity
level set in the Sensitivity menu.
Fig. 5.29 – Presetting total deviation adjustment
To change the offset value, press the OK key to enter the program mode (blinking arrow in second
row on the right). Press UP or DOWN keys to increase or decrease the value. Press OK key to
confirm or ESC key to exit routine without saving.
MIN value: -10 dB MAX value: +10 dB STEP: ±0.05 dB
Table 5.8 – Total deviation adjustment permitted values
5.3.6.6 RDS, SCA, AUX DEVIATION ADJUSTMENT
In this menu it is possible to adjust an internal circuit offset (in dB) to set the particular auxiliary
channel deviation to 4KHz regardless the sensitivity level set in the Sensitivity menu.
This option is available only in STEREO mode.
Fig. 5.30 – Presetting auxiliary channels deviation adjustment
Press UP or DOWN key to select the channel desired. To change the offset value, press the OK key
to enter the program mode (blinking arrow in second row on the right). Press UP or DOWN keys to
increase or decrease the value. Press OK key to confirm or ESC key to exit routine without saving.
MIN value: -5 dB MAX value: +5 dB STEP: ±0.5 dB
Table 5.9 – Auxiliary channels deviation adjustment permitted value
Page 40

40 /87
5.3.6.7 19KHZ/MPX OUTPUT SELECTION
In this menu it is possible to select the output signal at the 19KHz/MPX OUT rear connector: the
19KHz signal or the MPX Internal signal.
This option is available only in STEREO MPX Internal mode.
Fig. 5.31 – Presetting 19KHz/MPX Out menu
To change the output, press the OK key to enter the program mode (blinking arrow in second row
on the right). Press UP or DOWN keys to select the desired output. Press OK key to confirm or
ESC key to exit routine without saving.
5.3.6.8 PILOT TONE DEVIATION
In this menu it is possible adjust the deviation of pilot tone, the standard value is 7 KHz (10% of
stereo signal deviation of 71 KHz). The deviation change is obtained through an incrementdecrement of the pilot tone level.
This option is available only in STEREO MPX Internal mode.
Fig. 5.32 – Pilot tone deviation adjustment
To change the deviation value, press the OK key to enter the program mode (blinking arrow in
second row on the right). Press UP or DOWN keys to increase or decrease the deviation value.
Press OK key to confirm or ESC key to exit routine without saving.
MIN value: 2 KHz MAX value: 15KHz STEP: ±0.05 KHz
Table 5.10 – Pilot tone deviation adjustment permitted values
Page 41

41 /87
5.3.6.9 PILOT TONE PHASE SHIFT
In this menu it is possible adjust the phase of 19KHz pilot tone. This option is available only in
STEREO MPX Internal mode.
Fig. 5.33 – Pilot tone phase adjustment
To change the phase value, press the OK key to enter the program mode (blinking arrow in second
row on the right). Press UP or DOWN keys to increase or decrease the value. Press OK key to
confirm or ESC key to exit routine without saving.
MIN value: -100° MAX value: +100° STEP: ±1°
Table 5.11 – Pilot tone phase adjustment permitted values
5.3.6.10 AES-EBU CONTROLS
In these menus it is possible enable/disable the AES-EBU interface. The menus are available in
MONO and STEREO MPX Internal modes.
Fig. 5.34 – AES-EBU interface enable menu
To enable/disable the AES-EBU interface, press the OK key to enter the program mode (blinking
arrow in second row on the right). Press UP or DOWN keys to select ON or OFF. Press OK key to
confirm or ESC key to exit routine without saving.
If the interface is enabled, the internal switch will commutate from analogic Left/Right channels to
digital Left/Right ones but the active channels set in the Operat.Mode menu will not change.
In case of interface enabled the AES-EBU led in the frontal panel will be switched on.
Page 42

42 /87
It is possible to change the AES-EBU interface Recovered Master Clock Frequency in the Ratio
menu.
Fig. 5.35 – AES-EBU Ratio menu
To change the AES-EBU Ratio, press the OK key to enter the program mode (blinking arrow in
second row on the right). Press UP or DOWN keys to select desired value. Press OK key to confirm
or ESC key to exit routine without saving.
Values available: 128, 256
Table 5.12 – AES-EBU Ratio permitted values
Page 43

43 /87
5.3.7 ALARMS MENU
In these menus it is possible to set the thresholds of intervention of alarms/warnings. In case an
event is verified an info will be saved in the history log and the warning or alarm led (depending on
event type) will be switched on.
To navigate in these menus press UP or DOWN keys.
[0]
Foldback Reflected
[1]
Warning Reflected
[2]
Warning Power Low
[3]
Alarm Power Low
[4]
Audio Low Level
[5]
Audio Low T1
[6]
Audio Low T2
[7]
Audio Over Level
[8]
Audio Over T1
[9]
Audio Over T2
[10]
Audio Event Type
Fig. 5.36 – Alarms/Warnings menu flow graph
Page 44

44 /87
5.3.7.1 WARNING FOLDBACK REFLECTED POWER
The unit is provided with a reflected power level proportional protection: in case the output
reflected power exceeds the foldback threshold value the unit enters in warning mode and the
output forward power is proportionally lowered to maintain the reflected power under the foldback
threshold level.
The folbadck threshold is indicated as percentage of nominal unit power. Standard factory
calibration is 15% of nominal power.
Fig. 5.37 – Foldback Reflected menu
To change the foldback threshold level, press the OK key to enter the program mode (blinking
arrow in second row on the right). Press UP or DOWN keys to select desired value. Press OK key
to confirm or ESC key to exit routine without saving.
MIN value: 0% MAX value: 100% STEP: ±1%
Table 5.13 – Foldback Reflected permitted values
5.3.7.2 WARNING REFLECTED POWER
In this menu it is possible to set a threshold value for a reflected power warning in similar way to
the previous menu.
The presence of this warning does not alter in any way the output forward power unlike by the
foldback reflected warning.
The Warning Reflected threshold is indicated as percentage of nominal unit power.
Fig. 5.38 – Warning Reflected menu
Page 45

45 /87
To change the Warning Reflected threshold level, press the OK key to enter the program mode
(blinking arrow in second row on the right). Press UP or DOWN keys to select desired value. Press
OK key to confirm or ESC key to exit routine without saving.
MIN value: 0% MAX value: 100% STEP: ±1%
Table 5.14 – Warning Reflected permitted values
To disable this warning set the Warning Reflected to 0%.
5.3.7.3 WARNING POWER LOW
In this menu it is possible to set a warning in case the forward power level drops below a threshold.
In case the forward power never exceeds the Warning Power Low threshold from the unit switch
ON the warning is generated after 40 seconds otherwise after 4 seconds.
The Warning Power Low threshold is indicated as percentage of nominal unit power.
Fig. 5.39 – Warning power Low menu
To change the Warning Power Low threshold, press the OK key to enter the program mode
(blinking arrow in second row on the right). Press UP or DOWN keys to select desired value. Press
OK key to confirm or ESC key to exit routine without saving.
MIN value: 0% MAX value: 100% STEP: ±1%
Table 5.15 – Warning power Low permitted values
To disable this warning set the Warning Power Low to 0%.
Page 46

46 /87
5.3.7.4 ALARM POWER LOW
In this menu it is possible to set an alarm in case the forward power level drops below a threshold in
a similar mode as previous menu.
In case the forward power never exceeds the Alarm Power Low threshold from the unit switch ON
the warning is generated after 40 seconds otherwise after 4 seconds.
The Alarm Power Low threshold is indicated as percentage of nominal unit power.
Fig. 5.40 – Alarm power Low menu
To change the Alarm Power Low threshold, press the OK key to enter the program mode (blinking
arrow in second row on the right). Press UP or DOWN keys to select desired value. Press OK key
to confirm or ESC key to exit routine without saving.
MIN value: 0% MAX value: 100% STEP: ±1%
Table 5.16 – Alarm power Low permitted values
To disable this alarm set the Alarm Power Low to 0%.
5.3.7.5 AUDIO LOW EVENT
The Audio Low warning/alarm is generated if the audio level at an active input channel drops below
a threshold set in the menu Audio Low Level for at least T1 seconds.
In presence of Audio Low warning/alarm in case the audio level exceeds the Audio Low threshold
for at least T2 seconds the warning/alarm status is automatically ended. This warning/alarm is
indicated also by the led NO AUDIO switched on in the frontal panel.
The timeouts T1 and T2 are set in the menus Audio Low T1 and Audio Low T2.
Fig. 5.41 – Audio Low Level menu
Page 47

47 /87
To change the Audio Low level, press the OK key to enter the program mode (blinking arrow in
second row on the right). Press UP or DOWN keys to select desired value. Press OK key to confirm
or ESC key to exit routine without saving.
MIN value: -20 dBu MAX value: +20 dBu STEP: ±0.1 dB
Table 5.17 – Audio Low Level permitted values
To setup the timeouts Audio Low T1 and T2 navigate to the relative menus with UP or DOWN
keys.
Fig. 5.42 – Audio Low timeout menus
To change the Audio Low timeouts, press the OK key to enter the program mode (blinking arrow in
second row on the right). Press UP or DOWN keys to select desired value. Press OK key to confirm
or ESC key to exit routine without saving.
MIN value: 0 sec MAX value: 1000 sec STEP: ±1 sec
Table 5.18 – Audio Low timeouts permitted values
To disable this warning/alarm set both the timeouts Audio Low T1 and T2 to 0 sec.
5.3.7.6 AUDIO OVER EVENT
The Audio Over warning/alarm is generated if the audio level at an active input channel exceeds a
threshold set in the menu Audio Over Level for at least T1 seconds.
In presence of Audio Over warning/alarm in case the audio level drops below the Audio Over
threshold for at least T2 seconds the warning/alarm status is automatically ended. This
warning/alarm is indicated also by the led NO AUDIO switched on in the frontal panel.
The timeouts T1 and T2 are set in the menus Audio Over T1 and Audio Over T2.
Fig. 5.43 – Audio Over Level menu
Page 48

48 /87
To change the Audio Over level, press the OK key to enter the program mode (blinking arrow in
second row on the right). Press UP or DOWN keys to select desired value. Press OK key to confirm
or ESC key to exit routine without saving.
MIN value: -20 dBu MAX value: +20 dBu STEP: ±0.1 dB
Table 5.19 – Audio Over Level permitted values
To setup the Audio Over timeouts navigate to the relative menus with UP or DOWN keys.
Fig. 5.44 – Audio Over timeout menus
To change the Audio Over timeouts, press the OK key to enter the program mode (blinking arrow in
second row on the right). Press UP or DOWN keys to select desired value. Press OK key to confirm
or ESC key to exit routine without saving.
MIN value: 0 sec MAX value: 1000 sec STEP: 1 sec
Table 5.20 – Audio Over timeouts permitted values
To disable this warning/alarm set both the timeouts Audio Over T1 and T2 to 0 sec.
5.3.7.7 ALARMS MENU
In this menu it is possible to configure the type of audio event for both Audio Low and Audio Over.
In case the audio event is configured as warning the yellow warning led will be switched on in the
frontal panel and in the history log the event will be saved as warning.
In case the audio event is configured as alarm, the red alarm led will be switched on in the frontal
panel and the event will be saved as alarm in the history log.
Fig. 5.45 – Audio events type menu
Page 49

49 /87
To change the Audio Event type, press the OK key to enter the program mode (blinking arrow in
second row on the right). Press UP or DOWN keys to select type desired. Press OK key to confirm
or ESC key to exit routine without saving.
TYPE AVAILABLE: Warning, Alarm
Table 5.21 – Audio events permitted types
5.3.8 MEMORY MENU
The unit can be completely configured in 6 different modes (Memories) and these configurations
are stored in the internal unit memory.
[0]
Active Memory
[1]
Edit Memory 0
[2]
Edit Memory 1
[3]
Edit Memory 2
[4]
Edit Memory 3
[5]
Edit Memory 4
[6]
Edit Memory 5
[7]
Clear Memory
Fig. 5.46 – Memory menu flow graph
Page 50

50 /87
5.3.8.1 ACTIVE MEMORY
The active Memory is the current configuration applied to the unit. Any parameter changed during
normal unit working mode is automatically applied and saved in the current active Memory.
The active Memory is indicated in the sub-menu Active.
Fig. 5.47 – Active Memory menu
To change the active Memory, press the OK key to enter the program mode (blinking arrow in
second row on the right). Press UP or DOWN keys to select Memory desired. Press OK key to
confirm or ESC key to exit routine without saving.
MEMORY AVAILABLE: M0, M1, M2, M3, M4, M5
Table 5.22 – Memory available
When a Memory is recalled the unit is reconfigured with the parameters saved in that particular
Memory.
5.3.8.2 EDITING A MEMORY
In these menus it is possible enable the editing of a Memory parameters, the editing is not available
for the Active Memory because for this particular Memory the parameters change is executed and
saved in real time.
Fig. 5.48 – Edit Memory menus
A Memory already manually edited has Full state otherwise is Empty. It has no sense to recall an
empty Memory but, if it is recalled, the empty Memory will be an exact copy of the last Active
Memory.
Page 51

51 /87
To enable the editing of a Memory navigate with UP or DOWN keys in the sub-menus up to the
desired Memory M, keep pressing OK key until the display shows the line
Fig. 5.49 – Enable Memory editing page
Press RIGHT key to enable the editing or LEFT key to exit, if the editing is confirmed the display
shows the following line
Fig. 5.50 – Ending Editing Memory page
If editing Memory is enabled, in the first row of every menu between the brackets the edited
Memory number will be alternated with the menu ID. Changing parameters in this modality does
not influence the unit on air working mode but the parameters are saved in the Memory edited.
Pressing ESC key will exit from editing Memory state without any change in that Memory.
To save the new parameters it is necessary return in the Memory menu
Fig. 5.51 - Memory menu during editing
And keep pressing the OK key until the display shows the line
Fig. 5.52 – Confirmation editing Memory page
Press RIGHT key to confirm the saving procedure or LEFT key to discard the editing.
Page 52

52 /87
5.3.8.3 CLEAR ALL MEMORY
It is possible clear all Memory configurations with the exception of the Active Memory one. To
clear all Memory navigate to the menu Clear all Memory with DOWN key.
Fig. 5.53 – Clear all Memory menu
Keep pressing the OK key until the display shows the line
Fig. 5.54 – Clear all Memory confirmation page
Press RIGHT key to confirm the cleaning operation, press LEFT key to exit without cleaning.
Page 53

53 /87
5.3.9 HISTORY MENU
In the History menu is present the list of events occurred during the unit operation. The events
recorded can be grouped in three types: alarm, warning and info.
The alarm is an event type that can compromise the normal unit operation, the warning doesn’t
compromise the unit operation but have to be examined to prevent alarms. The info is an
information about a unit change of state (for example passing in local mode, or exit from warning or
alarm state).
The menu shows always the last event happened
Fig. 5.55 – History menu
In the second row on the left the numbers 000 identify the last event (there is the possibility to
check the last 200 events), after the symbol “>” a brief event description is provided.
To see a total event information and the complete event list press OK key:
Fig. 5.56 – History menu event detail page
The first row shows the same message as the second row of previous menu, while in the second row
the information showed are in order: date, hour and code of event recorded.
Press UP or DOWN keys to navigate the event list press OK or ESC key to exit.
Page 54

54 /87
Here below the complete list of events recognized is indicated:
EVENT TYPE CODE
Max Current ALARM 0001
Max Environment Temp ALARM 0002
- [Not used] 0003 [Not used]
Foldback Reflected WARNING 0004
Reset INFO 0005
Max Heatsink Temp ALARM 0006 If Temperature > 68°C
Max Supply Temp ALARM 0007
- [Not used] 0008 [Not used]
Interlock Open WARNING 0009
Power On INFO 0010
Max Hardware Reflected ALARM 0011
Fan Warning WARNING 0012
Frequency Change INFO 0013
Change to Local INFO 0014
Change to Remote INFO 0015
Audio Low ALARM 0016 Alarm version
Power Low ALARM 0017 Alarm version
Switch ON INFO 0018
Switch OFF INFO 0019
Fault too many Alarms ALARM 0020
End PLL Unlock INFO 0021
PLL Unlock ALARM 0022
Audio Over ALARM 0023 Alarm version
End Foldback Reflected INFO 0024
End Hardware Reflected INFO 0025
End Power Low INFO 0026 For Alarm version
End Audio Low INFO 0027 For Alarm version
End Audio Over INFO 0028 For Alarm version
End Fan Warning INFO 0029
End Max Heatsink Temp INFO 0030
Fault Hardware Reflected ALARM 0031 Too many hardware reflected events
Power Low WARNING 0032 Warning version
RDS Alarm ALARM 0033
End RDS Alarm INFO 0034
Alarms Present ALARM 0035 At least 1 alarm present
Alarms Absent INFO 0036 No alarm present
Warnings Present INFO 0037 At least 1 warning present
Warnings Absent INFO 0038 No warning present
RF Present INFO 0039 If Pout > 10% of power set value
RF Absent INFO 0040 If Pout < 10% of power set value
- [Not used] 0041 [Not used]
- [Not used] 0042 [Not used]
Audio Low WARNING 0043 Warning version
End Audio Low INFO 0044 For Warning version
End Power Low INFO 0045 For Warning version
Audio Over WARNING 0046 Warning version
End Audio Over INFO 0047 For Warning version
NTP Synchronization WARNING 0048
End NTP Synchronization INFO 0049
Warning Reflected WARNING 0050
End Warning Reflected INFO 0051
Table 5.23 – Events list
Page 55

55 /87
Every Warning and Alarm event has the corresponding END info event to indicate the time instant
of ending from that particular warning/alarm condition.
5.3.10 GENERALS MENU
The Generals menu contains options as time and date set, the RS-485 address, the IP address and
netmask.
[0]
Set Hour
[1]
Set Minute
[2]
Set Second
[3]
Set Day
[4]
Set Month
[5]
Set Year
[6]
Set RS-485 address
[7]
IP address
[8]
Netmask
Fig. 5.57 – Generals menu flow graph
Page 56

56 /87
5.3.10.1 TIME SET
In these menus it is possible to set the time of day: this time is used in the history log menu during
the events saving.
To adjust the hour localize the menu
Fig. 5.58 – Set hour page
To change the hour, press the OK key to enter the program mode (blinking arrow in second row on
the right). Press UP or DOWN keys to select right value. Press OK key to confirm or ESC key to
exit routine without saving.
To adjust the minutes press UP or DOWN key
Fig. 5.59 – Set minute page
To change the minutes, press the OK key to enter the program mode (blinking arrow in second row
on the right). Press UP or DOWN keys to select right value. Press OK key to confirm or ESC key to
exit routine without saving.
To adjust the seconds press UP or DOWN key
Fig. 5.60 – Set second page
To change the seconds, press the OK key to enter the program mode (blinking arrow in second row
on the right). Press UP or DOWN keys to select right value. Press OK key to confirm or ESC key to
exit routine without saving.
Page 57

57 /87
5.3.10.2 DATE SET
In these menus it is possible to set the date: the date is used in the history log menu during the
events saving as the time of the day.
To adjust the day press UP or DOWN
key
Fig. 5.61 – Set day page
To change the current day, press the OK key to enter the program mode (blinking arrow in second
row on the right). Press UP or DOWN keys to select right value. Press OK key to confirm or ESC
key to exit routine without saving.
To adjust the month press UP or DOWN key
Fig. 5.62 – Set month page
To change the current month, press the OK key to enter the program mode (blinking arrow in
second row on the right). Press UP or DOWN keys to select right value. Press OK key to confirm or
ESC key to exit routine without saving.
To adjust the year press UP or DOWN key
Fig. 5.63 – Set year page
To change the current year, press the OK key to enter the program mode (blinking arrow in second
row on the right). Press UP or DOWN keys to select right value. Press OK key to confirm or ESC
key to exit routine without saving.
Page 58

58 /87
5.3.10.3 RS-485 ADDRESS MENU
In this menu it is possible set the RS-485 address in case the unit is used as slave device in a bus
system (for example a high power transmitter or a 1+1 system).
Navigate to the menu RS485 Address with UP or DOWN key.
Fig. 5.64 – Set RS-485 address page
To change the RS-485 address, press the OK key to enter the program mode (blinking arrow in
second row on the right). Press UP or DOWN keys to select the desired value. Press OK key to
confirm or ESC key to exit routine without saving.
5.3.10.4 NETWORK PARAMETERS
These are read only menus, the IP address and Netmask are set directly from webpage if webserver
option is available.
Fig. 5.65 – Unit IP address page
In this menu the actual unit IP address is showed.
Fig. 5.66 – Unit netmask page
In this menu the actual netmask is showed.
Page 59

59 /87
6 FRONT PANEL
Not all the functions are available from the LCD display: the most important ones are available
from the front panel keys and leds present on the unit front panel.
6.1 FRONT PANEL KEYS
Reset
In case the unit is completely blocked (Fault status) due for example to the repetition of an alarm
multiple times, the FAULT led will switch on and to restore the functioning of the unit it is
sufficient to press this key (Reset of the alarm/warning/fault status).
Local
In case the led LOCAL is switched on, the unit is in LOCAL mode and all the functions from the
front panel are enabled. If the led is off the unit is in REMOTE mode and it will accept only the
commands given by remote. To change the status of the led it is sufficient to press the key.
ON/OFF
In case the led ON/OFF is switched on, the unit is in ON mode and the RF power is enabled. If the
led is off the unit is in OFF mode (standby) and it is only powered but it will not give any output
power. To change the status of the led it is sufficient to press the key.
Page 60

60 /87
UP/DOWN/LEFT/RIGHT
The keys are available for the menus navigation and the parameter editing if the menu editing is
enabled.
OK
The key is available to enable the editing menu mode and to confirm the parameters change.
ESCAPE
The key is available to exit from editing menu mode without any change or to return to main menu
from any other menu.
UP
RIGHT
LEFT
DOWN
OK
Page 61

61 /87
6.2 FRONT PANEL LEDS
The frontal panel leds don’t change depending on units model. For the leds name see the Fig.2.1 or
Fig.2.3
6.2.1 STATUS LEDS
ALARM led
This led is switched on in case an alarm event is recognized. It is automatically switched off at the
end of the alarm event without the reset needed. It is still possible press reset key to clear the alarm
condition.
WARNING led
This led is switched on in case a warning event is recognized or in case of a parameter is saved or
read from unit internal Eeprom memory. It is automatically switched off at the end of the warning
event or when the read/write operation on internal Eeprom memory is terminated.
ON led
This led is switched on at the unit power on.
Page 62

62 /87
6.2.2 AUDIO LEDS
RDS/AUX led
This led is switched on if an auxiliary channel (RDS, SCA, AUX) is enabled.
MPX led
This led is switched on in case the STEREO MPX External mode is enabled.
NO AUDIO led
This led is switched on in case of Audio Low or Audio Over alarm/warning events.
AES EBU led
This led is switched on in case the AES-EBU interface is enabled.
LIM led
This led is switched on in case the limiter is enabled.
STEREO led
This led is switched on in case the STEREO MPX Internal mode is enabled.
PRE EMPH led
This led is switched on in case the preemphasis value set is different from Linear.
MONO led
This led is switched on in case the MONO mode is enabled.
Page 63

63 /87
6.2.3 CONTROL LEDS
PREF led
This led is reserved for future uses.
PLL LOCK led
This led is switched on when the PLL is locked to the frequency set value.
AUTO led
This led is reserved for future uses.
INTLK led
This led is switched on in case the rear connector ENABLE is closed.
Page 64

64 /87
6.2.4 COMMAND LEDS
ALARM RESET led
This led is switched on in case of unit fault. The unit enters in fault state when 5 alarm hardware
reflected events are recognized in 2 minutes. In this case a reset is necessary.
LOCAL led
This led is switched on in case the unit is in local mode.
RF ON led
This led is switched on in case the unit is switched on and the RF power is enabled. The output
power level is set in the relative menu.
Page 65

65 /87
7 REMOTE I/O (OPTIONAL)
The Remote I/O is an optional interface that provides the DB25 connector REMOTE to monitor
and control the unit through digital signals. The signals available are:
Pin Name I/O Function
1 TC_1 Tele Command 2 TC_3 Tele Command OFF
3 TC_5 Tele Command Change to MEMORY 0
4 TC_7 Tele Command Change to MEMORY 2
5 TC_9 Tele Command Change to MEMORY 4
6 TC_11 Tele Command 7 VCC_FIELD Vcc +12V
8 TS_11_TM4 Tele Signal ON
9 TS_9_TM2 Tele Signal LOCAL
10 TS_7/OUT_ANA7 Tele Signal AUDIO_OK
11 TS_5/OUT_ANA5 Tele Signal MEMORY 1
12 TS_3/OUT_ANA3 Tele Signal MEMORY 3
13 TS_1/OUT_ANA1 Tele Signal MEMORY 5
14 TC_2 Tele Command ON
15 TC_4 Tele Command RESET
16 TC_6 Tele Command Change to MEMORY 1
17 TC_8 Tele Command Change to MEMORY 3
18 TC_10 Tele Command Change to MEMORY 5
19 GND_OUT GND GND
20 TS_COM COMMON Tele Signals Common
21 TS_10_TM3 Tele Signal NO_FAULT
22 TS_8_TM1/OUT_ANA8 Tele Signal RF_OK
23 TS_6/OUT_ANA6 Tele Signal MEMORY 0
24 TS_4/OUT_ANA4 Tele Signal MEMORY 2
25 TS_2/OUT_ANA2 Tele Signal MEMORY 4
Table 7.1 – Remote I/O pinout
The particular unit state is verified if there is a short-circuit between the relative Tele Signal pin and
the Common pin (pin 20).
To send a command to the unit (only in remote state) is necessary a short-circuit between the
particular Tele Command pin and GND for at least 100ms.
Page 66

66 /87
8 WEB SERVER (OPTIONAL)
As option it is possible to add a remote webserver system via TCP/IP and SNMP.
A webserver board is installed on the exciter and, through an Ethernet port, it is possible to read the
main parameters of the transmitter and make all main settings.
NOTE: The WEB GUI commands work only if the unit is in REMOTE MODE.
Connect the unit to a LAN or directly to the computer using a cross cable. Enter the default address
from an internet browser. This address is indicated in the GENERALS menu on the front panel of
the unit.
Page 67

67 /87
8.1 WEB PAGES
8.1.1 MAIN PAGE
The default page is the MAIN page:
Fig. 8.1 – Webserver main page
Here all the information regarding the unit and the software are indicated:
1. Unit audio and RF state
2. Login Status: Administrator, Guest
3. Available web pages
4. Unit model and hardware/firmware revision
5. Webserver info and firmware build
1
2
3
4
5
Page 68

68 /87
8.1.2 LOGIN PAGE
To have the possibility to change the functioning parameters of the unit you need to enter as
administrator.
Here the Login page:
Fig. 8.2 – Webserver Login page
The standard Administration username and password:
FACTORY ADMIN ID: admin
FACTORY ADMIN PASSWORD: admin
FACTORY IP ADDRESS: 192.168.1.251
Page 69

69 /87
8.1.3 SETTINGS PAGE
In this page is present a view of the status of unit parameters, as normally indicated in the front
panel on the LCD display. If the login has been done it will be possible to change the values,
otherwise it is possible only to see them.
Fig. 8.3 – Webserver Setting page
The parameters available in this page are:
1. Frequency
2. Power Set
3. Audio options
4. Sensitivity option
5. AES-EBU options
6. Mono/Stereo and Auxiliary channels enable
7. Active Memory status
Page 70

70 /87
8.1.4 PRESETTINGS PAGE
In the Presettings page it is possible to see and change the status of all remains unit parameters. If
the login has been done it will be possible to change the values, otherwise it is possible only to see
them.
Fig. 8.4 – Webserver Presetting page
Parameters available are:
1. Mono/Stereo mode
2. Alarms and Warnings Settings
3. Deviation offsets adjustment
Page 71

71 /87
8.1.5 LOG PAGE
The LOG page allows the visualization and the download of the unit history (the register of all the
events happened with date, hour and event code). If the login has been done it will be possible to
download the file, otherwise it is possible only to see it.
Fig. 8.5 – Webserver Log page
The Log type can be configured as FULL or RECENT.
In FULL mode it is possible see the unit complete list of event saved, in RECENT mode it is
available a list of events starting from the selection of RECENT option.
The Reset current log button will restart only the RECENT mode of the Log. To restart the Log
FULL mode it is necessary to go on Administration page.
Page 72

72 /87
8.1.6 ADMINISTRATION PAGE
If the user is logged as administrator it is possible change all parameters related to the connection of
the unit to the network and the SNMP configuration.
Fig. 8.6 – Webserver Administration page
1
2
3
4
5
Page 73

73 /87
The parameters available are:
1. Network parameters: IP address, netmask and Gateway address.
2. SNMP configuration.
3. Username and password for both administrator and guest users.
4. NTP configuration
5. Buttons necessary to reconfigure the webserver board.
To save a new network or SNMP configuration press SAVE button after the new parameters are set.
To apply the new configuration press REBOOT button to restart the webserver board.
The RESTART LOG button will restart the FULL mode of webserver Log.
Page 74

74 /87
8.1.7 MODULATOR UPGRADE PAGE
If the login has been done it is possible to upgrade the firmware of the unit uploading the file from
this page. The upgrade will be automatically done once the file has been uploaded. The upload is
done in 2 steps:
• The software is uploaded into the web server board (web module) and stored in it
• The software is passed from the web module to the microprocessor of the unit
Fig. 8.7 – Webserver Modulator Upgrade page
To upgrade the modulator refer to the upgrading procedure.
Page 75

75 /87
8.1.8 WEBSERVER UPGRADE PAGE
If the login has been done it will be possible to upgrade the firmware of the webserver board
uploading the file from this page. The upgrade will be automatically done once the file has been
uploaded. The upgrade will be automatically done once the file has been uploaded. The upload is
done in 2 steps:
• The software is uploaded into the webserver board (web module) and stored in it
• The software is applied to the web server
Fig. 8.8 – Webserver Upgrade page
To upgrade the webserver board refer to the upgrading procedure.
Page 76

76 /87
8.2 UPGRADING PROCEDURES
8.2.1 UPGRADING THE MODULATOR FIRMWARE
The modulator firmware upgrade is available only with the webserver board installed.
The copies of modulator firmwares are always stored in the webserver board so it is possible the
downgrade in case of failed upgrading attempts.
To start the procedure please follow these points:
1. Power on the unit maintaining pressed the OK key to start the unit in bootloader mode.
Fig. 8.9 – Start in bootloader mode
2. Connect a PC to the unit using a crossover LAN cable. Open a browser and type the IP
address of the unit. Usually the boot time of webserver loading is 1 minute, after that the
webpage will be active.
3. Login as administrator.
4. Go to the “Modulator Upgrade” menu and press the “Sfoglia” button to select the new
firmware.
Fig. 8.10 – Modulator Upgrade page
Page 77

77 /87
5. Select the latest firmware .hex file and click “OPEN” (The file below is just an example,
please use the firmware provided by DB Elettronica).
Fig. 8.11 – New firmware selection
6. Click on “Upload” button and confirm the operation pressing “OK” button on the popup
window.
Fig. 8.12 – Upload the new firmware
Fig. 8.13 – Confirm the upload
Page 78

78 /87
7. The new firmware will be added on the list. Select it from the list and click on “Upgrade”
button.
Fig. 8.14 – Upgrade to the new firmware
8. The procedure starts erasing the flash, on the display of the transmitter the text “ERASE
FLASH” will show on.
Fig. 8.15 – Erase the flash before the upgrade
9. During the firmware upgrade on the display of the transmitter the text “upgrading …” will
show on.
Fig. 8.16 – Upgrade in working
10. The Control Board will be upgraded with the new firmware. The operation process will
take about 5 minutes. When the process is finished the text “END” will be shown at the end
of the log report.
Page 79

79 /87
Fig. 8.17 – Upgrade complete
When the upgrade is complete, the transmitter will be restarted automatically. In case of procedure
failed, power off the unit, wait some seconds and power on the unit. Now retry the upgrade
procedure again.
In case of new upgrading failed contact the assistance.
Page 80

80 /87
8.2.2 UPGRADING THE WEBSERVER BOARD FIRMWARE
To upgrade the webserver board please follow the next steps:
1. Connect a PC to the Mozart transmitter using a crossover LAN cable. Open a browser and
type the IP Address of transmitter.
2. Login as administrator.
3. Go to the “Webserver Upgrade” menu and click on “Sfoglia” button.
Fig. 8.18 – Webserver Upgrade page
4. Select the latest firmware .tgz file and click “OPEN”. (The file below is just an example,
please use the firmware provided by DB Elettronica).
Fig. 8.19 – Select the new webserver board firmware
Page 81

81 /87
5. Click on “Upload” button and confirm the operation pressing “OK” button.
Fig. 8.20 – Upload the firmware to webserver
Fig. 8.21 – Confirm the uploading
6. The following screen will be shown on while the process is running.
Fig. 8.22 – Busy state during upload procedure
Page 82

82 /87
7. The new firmware will be added on the list. Select it and click on “Upgrade” button.
Fig. 8.23 – New firmware ready to upgrade
8. Select “OK” to confirm the operation and “OK” after the message was read.
Fig. 8.24 – Confirmations to upgrade
9. Wait until the following screen will disappear
Fig. 8.25 – Upgrade in working
Page 83

83 /87
10. The webserver is ready to be upgraded. Go to “Administration” menu and click on the
“REBOOT” button. Confirm the operation pressing “OK” button. The webserver will be
restarted with the new firmware.
Fig. 8.26 – Reboot the webserver
Fig. 8.27 – Confirm the reboot
11. Wait until the process is finished. The operation process will take about 90 seconds.
Fig. 8.28 – Wait until the reboot is completed
Page 84

84 /87
8.3 SNMP PROTOCOL
SNMP (Simple Network Management Protocol) is used for monitoring and controlling a wide
variety of different units in a network.
A description of the unit - the MIB (Management Information Base) - must be loaded in the central
unit ("manager") from which the unit is monitored.
A monitored unit contains a program ("agent") which can answer queries from the manager and
execute commands. Furthermore, the agent may of its own accord generate a message (“trap” or
“inform”) and send it to the manager. In this way, the central unit can be informed of a fault.
8.3.1 MANAGEMENT INFORMATION BASE MIB
The MIBs required for monitoring and controlling the unit can be requested to assistance. The
packet IRT-TC-MIB.04.05.2007 contains a group of files:
Fig. 8.29 – List of file of MIB packet
Select and open the FM folder and load the file IRT-FM-SINGLETRANSMITTER-MIB in the
MIB browser of manager unit.
Page 85

85 /87
The supported protocol is SNMPv2c.
Fig. 8.30 – FM Single Transmitter MIB
Page 86

86 /87
8.3.2 MESSAGE TRAP AND INFORM
The events that can generate a trap or inform (depending on user configuration) are grouped in the
fmEventsST folder:
EVENT OID DESCRIPTION
fmSTTransmitterOpModeEvent .1.3.6.1.4.1.19831.1.1.3.1.0.1 Unit in ON state
fmSTRFPresentEvent .1.3.6.1.4.1.19831.1.1.3.1.0.2 RF present event recognized
fmSTFaultEvent .1.3.6.1.4.1.19831.1.1.3.1.0.3 Presence of alarms
fwSTWarningEvent .1.3.6.1.4.1.19831.1.1.3.1.0.4 Presence of Warnings
fmSTLocalModeEvent .1.3.6.1.4.1.19831.1.1.3.1.0.5 Unit in Local mode
Table 8.1 – Traps and Informs available
The Traps/Informs can be configured in the webpage on Administration menu.
Fig. 8.31 - Traps and Informs configuration
The trap/inform messages can be sent to 2 different IP address set in TRAP IP ADDRESS box with
the relative port.
Page 87

87 /87
In the TRAP TYPE box select the message type desired, trap or inform. If inform is selected, the
timeout the agent waits (if no answer from the manager) before re-send the inform message can be
set in the INFORMS TIMEOUT box, the number of inform retransmission can be set in INFORMS
RETRIES box.
The messages trap/inform have to be enable and can be enable singly. The enable is provided to the
OIDs (fmSTEventEnable folder):
EVENT OID DESCRIPTION
fmSTTransmitterOpModeEventEnable .1.3.6.1.4.1.19831.1.1.3.1.2.1.1 1=Enable, 2=Disable
fmSTRFPresentEventEnable .1.3.6.1.4.1.19831.1.1.3.1.2.1.2 1=Enable, 2=Disable
fmSTFaultEventEnable .1.3.6.1.4.1.19831.1.1.3.1.2.1.3 1=Enable, 2=Disable
fwSTWarningEventEnable .1.3.6.1.4.1.19831.1.1.3.1.2.1.4 1=Enable, 2=Disable
fmSTLocalModeEventEnable .1.3.6.1.4.1.19831.1.1.3.1.2.1.5 1=Enable, 2=Disable
8.3.3 COMMANDS AND STATE
Commands and State available through SNMP are summed in the following table:
EVENT OID TYPE DESCIPTION
fmSTTransmitterOpMode .1.3.6.1.4.1.19831.1.1.3.1.1.1 Read and Write 1=ON, 2=OFF
fmSTRFPresent .1.3.6.1.4.1.19831.1.1.3.1.1.2 Read only 1=Present, 2=Not Present
fmSTFault .1.3.6.1.4.1.19831.1.1.3.1.1.3 Read only 1=Fault, 2=No Fault
fwSTWarning .1.3.6.1.4.1.19831.1.1.3.1.1.4 Read only 1=Warning, 2=No Warning
fmSTLocalMode .1.3.6.1.4.1.19831.1.1.3.1.1.5 Read only 1=Local, 2=Remote
The commands are accepted by the unit only in remote mode and if the community strings are
correctly set for both read and write operations.
The community read/write strings have to be set both to the agent and manager units. In the
webpage can be set in the Administration menu.
 Loading...