

Page 1

Table of Contents
Introduction
Congratulations!. . . . . . . . . . . . . . . . . . . . . . . . . . . . . . . . . . . . . . . . . . . . . . . 3
What’s Included . . . . . . . . . . . . . . . . . . . . . . . . . . . . . . . . . . . . . . . . . . . . . . . 4
About This Guide . . . . . . . . . . . . . . . . . . . . . . . . . . . . . . . . . . . . . . . . . . . . . . 5
Getting Started
Minimum System Requirements . . . . . . . . . . . . . . . . . . . . . . . . . . . . . . . . . . . 7
Hardware Over view. . . . . . . . . . . . . . . . . . . . . . . . . . . . . . . . . . . . . . . . . . . . . 8
Software Overview . . . . . . . . . . . . . . . . . . . . . . . . . . . . . . . . . . . . . . . . . . . . . 9
Software Installation. . . . . . . . . . . . . . . . . . . . . . . . . . . . . . . . . . . . . . . . . . . 10
Hardware Installation . . . . . . . . . . . . . . . . . . . . . . . . . . . . . . . . . . . . . . . . . . 14
Capturing Video
Connecting Video Input . . . . . . . . . . . . . . . . . . . . . . . . . . . . . . . . . . . . . . . . . 15
Connecting an Optional Preview Monitor. . . . . . . . . . . . . . . . . . . . . . . . . . . . . 16
Capturing Video . . . . . . . . . . . . . . . . . . . . . . . . . . . . . . . . . . . . . . . . . . . . . . 17
Editing Video . . . . . . . . . . . . . . . . . . . . . . . . . . . . . . . . . . . . . . . . . . . . . . . . 18
Creating DVDs, VCDs, and S-VCDs . . . . . . . . . . . . . . . . . . . . . . . . . . . . . . . . 18
Outputting Video
Connecting Video Output . . . . . . . . . . . . . . . . . . . . . . . . . . . . . . . . . . . . . . . 19
Connecting an Optional Preview Monitor. . . . . . . . . . . . . . . . . . . . . . . . . . . . . 20
Outputting Video . . . . . . . . . . . . . . . . . . . . . . . . . . . . . . . . . . . . . . . . . . . . . 21
Using the Digital Media Card Reader
Digital Media Card Compatibility . . . . . . . . . . . . . . . . . . . . . . . . . . . . . . . . . . 23
Inserting a Smar tMedia Card . . . . . . . . . . . . . . . . . . . . . . . . . . . . . . . . . . . . 24
Inserting a CompactFlash Card . . . . . . . . . . . . . . . . . . . . . . . . . . . . . . . . . . . 25
Inserting a MultiMediaCard or Secure Digital Card . . . . . . . . . . . . . . . . . . . . . 26
Inserting a Memor y Stick Card . . . . . . . . . . . . . . . . . . . . . . . . . . . . . . . . . . . 27
Accessing a Card . . . . . . . . . . . . . . . . . . . . . . . . . . . . . . . . . . . . . . . . . . . . . 28
Formatting a Card . . . . . . . . . . . . . . . . . . . . . . . . . . . . . . . . . . . . . . . . . . . . 29
Removing a Card . . . . . . . . . . . . . . . . . . . . . . . . . . . . . . . . . . . . . . . . . . . . . 32
Troubleshooting
Frequently Asked Questions . . . . . . . . . . . . . . . . . . . . . . . . . . . . . . . . . . . . . 33
Technical Support
Interactive Support Site . . . . . . . . . . . . . . . . . . . . . . . . . . . . . . . . . . . . . . . . 39
Live Telephone Suppor t . . . . . . . . . . . . . . . . . . . . . . . . . . . . . . . . . . . . . . . . 40
Dazzle DVD Creation Station 200 User’s Guide • Table of Contents • Page 1
Page 2

Copyright SCM Micro. All rights reser ved. Trademarks are used for informational purposes, and remain the proper ty of their owners.
Part number 401304
Dazzle DVD Creation Station 200 User’s Guide • Page 2
Page 3
Introduction
Congratulations!
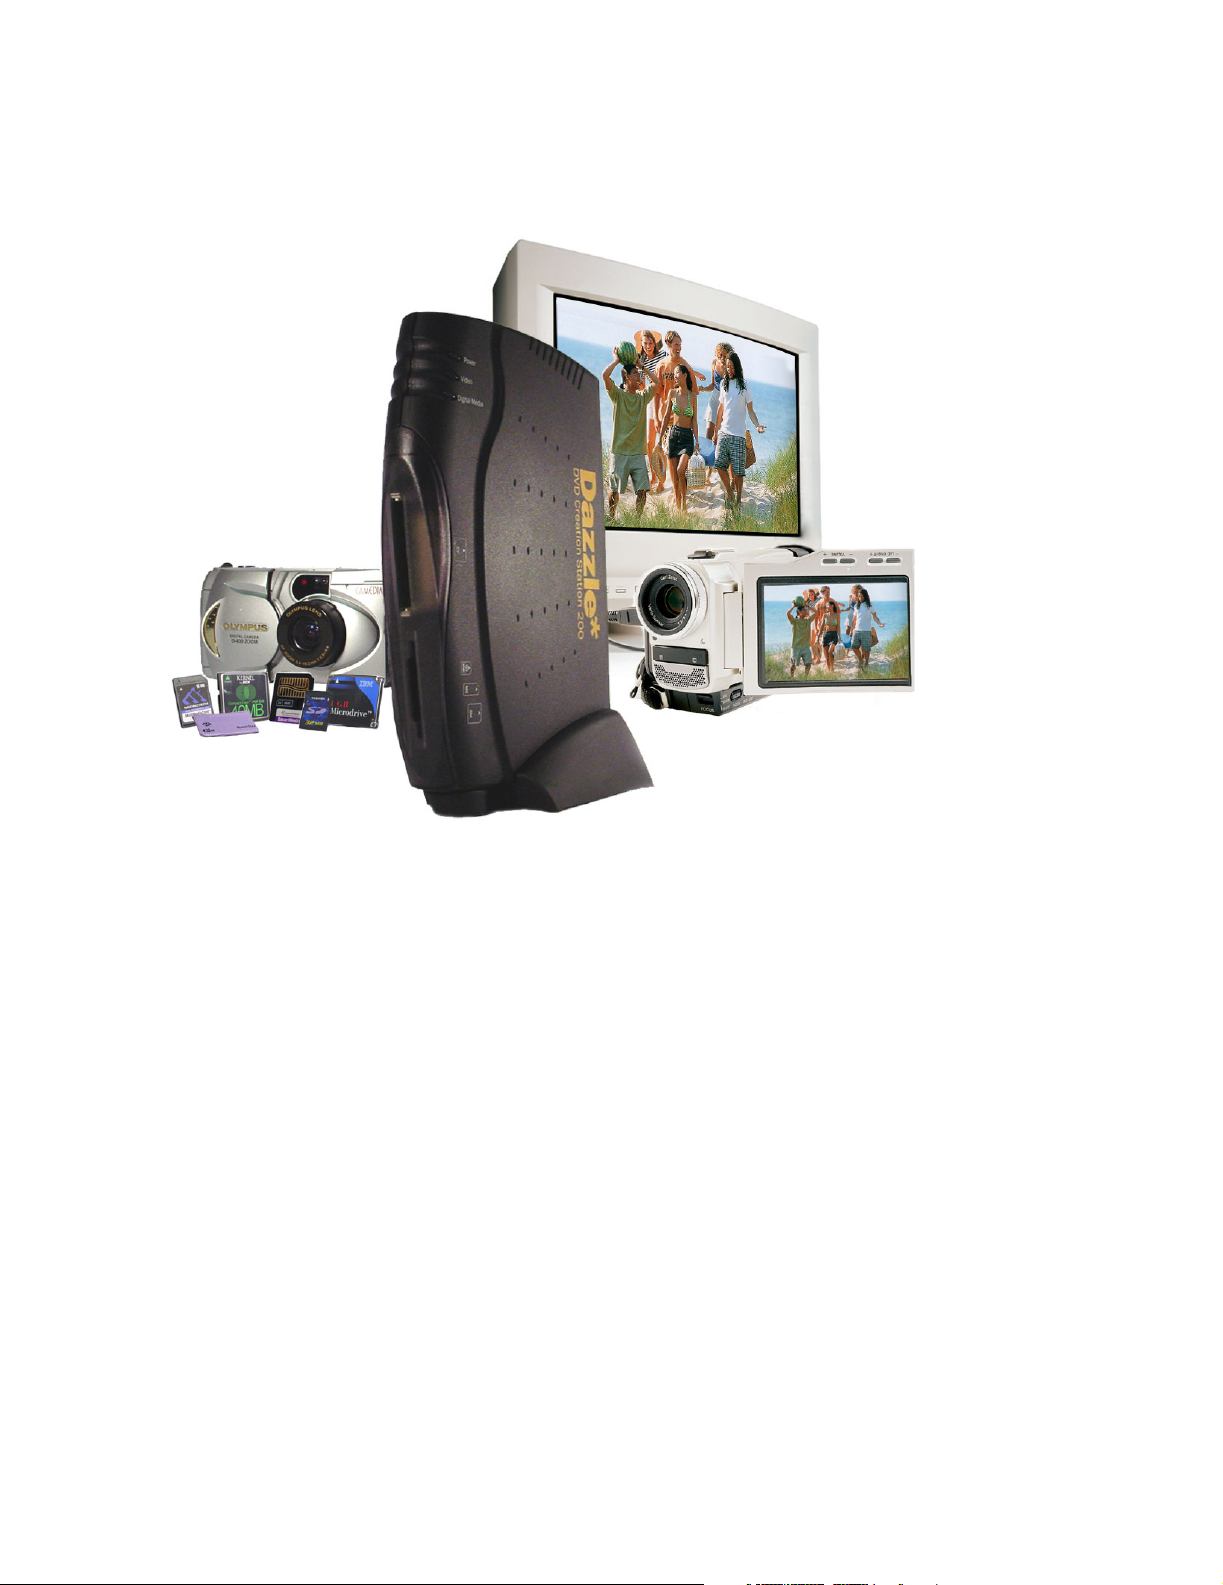
You have just purchased the Dazzle DVD Creation Station 200.
The Dazzle DVD Creation Station 200 (referred to as DCS 200 throughout this guide) is
the ultimate solution for creating videos and photo slideshows for DVD players. The DCS
200 captures DVD-quality video from camcorders, VCRs or TVs and also reads photos and
other files from your digital media cards. The DCS 200 includes Dazzle MovieStar 5 for
video editing, Dazzle DVD Complete for DVD authoring and burning, and Dazzle OnDVD
for creating digital photo albums to play on your DVD player. Don’t want to make DVDs yet?
The DCS 200 also lets you make video tapes, Video CDs, S-Video CDs, or Webcast video
across the Internet. The DCS 200 turns your PC into a true DVD Creation Station.
Dazzle DVD Creation Station 200 User’s Guide • Introduction • Page 3
Page 4
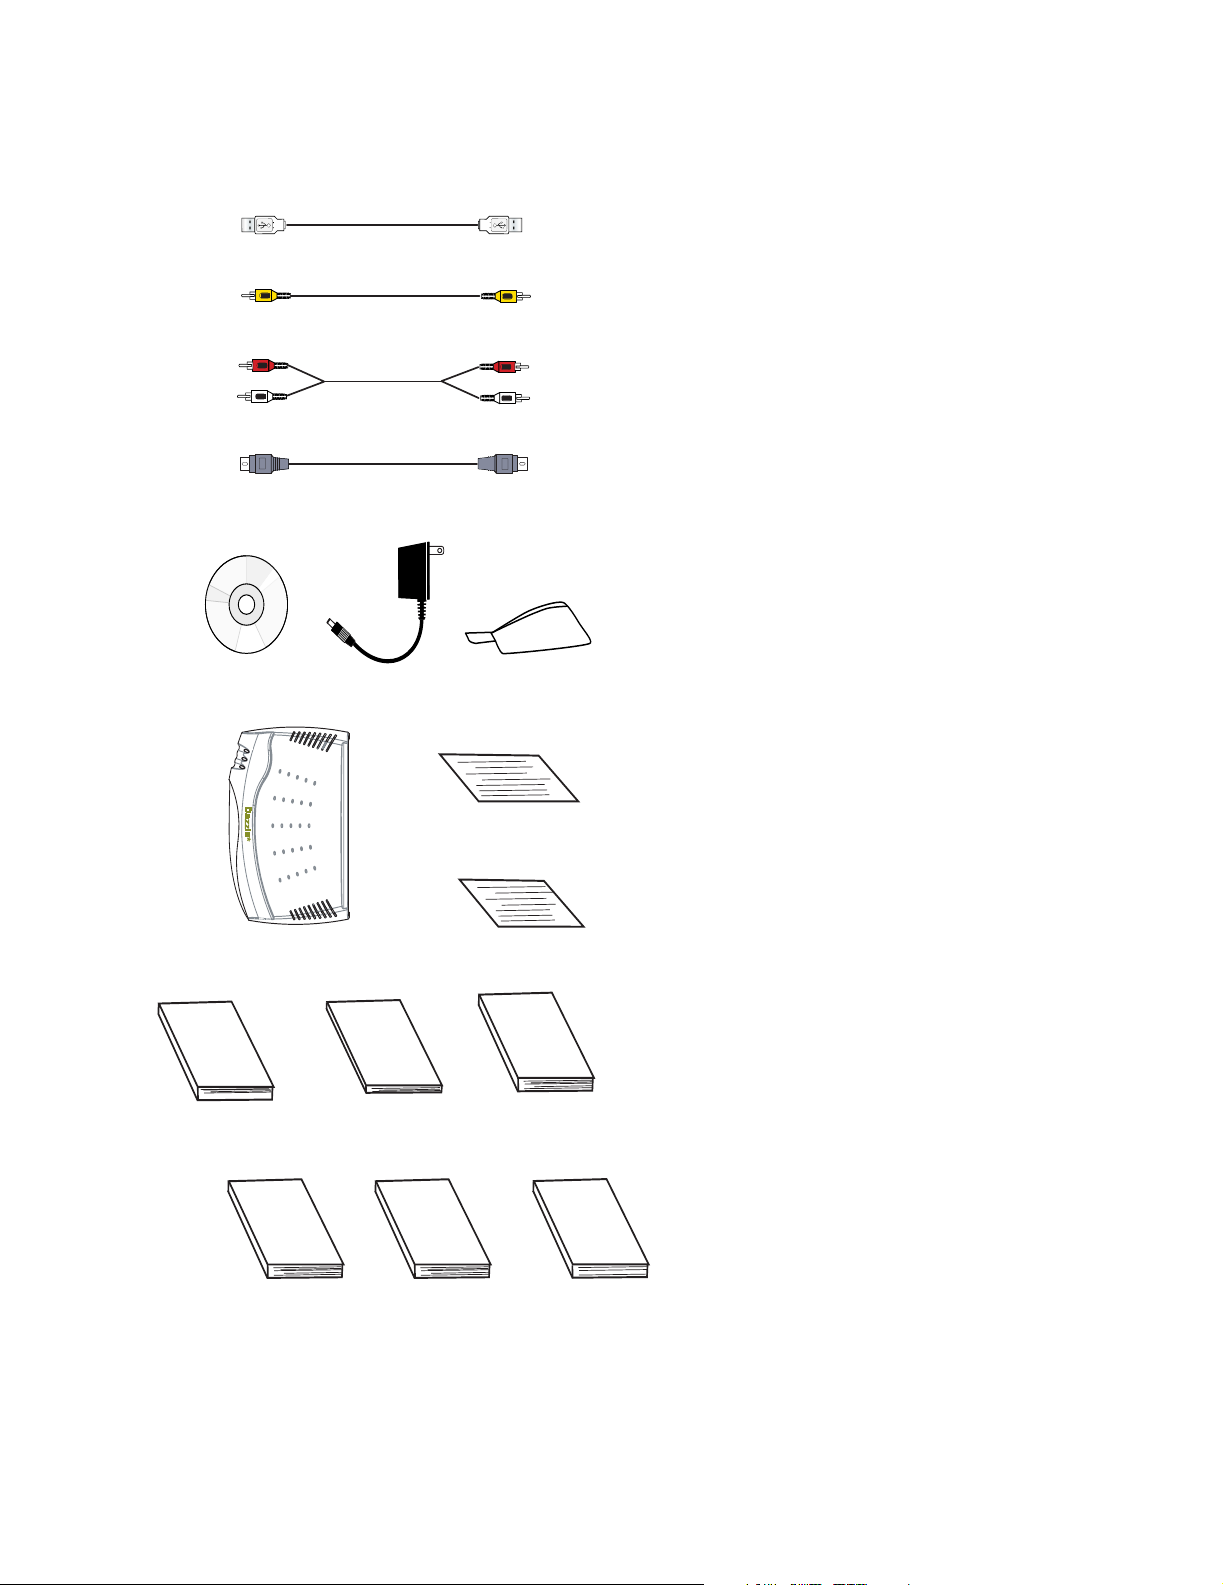
What’s Included
USB Cable
RCA
Video Cable
RCA
Audio Cable
S-Video Cable
Installation CD
DVD Creation Station™ 200 (DCS 200)
DCS 200
User's Guide
Power Adapter
DCS 200
Quickstart Guide
Stand
Registration Card
Warranty Card
MovieStar 5
User's Guide
DVD Complete
User's Guide
OnDVD
User's Guide
Technical Support
Information Kit
Note: Users’ guides may be provided in either hard copy or as electronic files.
Dazzle DVD Creation Station 200 User’s Guide • Introduction • Page 4
Page 5

Other Items You Might Need
For some video-related configurations, you may need additional audio and video
input/output cables. For example, if you are outputting to a VCR, you may want to connect
a TV monitor to the VCR to view your material. This requires the right kind of cable, which
varies depending on the VCR and monitor. It may be necessary to use a coaxial video
cable, which is usually included with VCRs. To use the DCS 200 with a device that
supports only mono audio, you need a Y-adapter to connect the left and right audio cables
to the DCS 200. A Y-adapter cannot convert mono to stereo, but it prevents the sound
from only being audible in the left or right channel.
These items are widely available in electronics stores.
About This Guide
This Guide explains how to use the Dazzle DCS 200. Following is a description of each
section:
“Getting Started” lists the minimum system requirements for the DCS 200, provides a
hardware and software over view, and describes the software and hardware installation
process.
“Capturing Video” explains how to connect video input, set up an optional preview monitor
for an input configuration, and capture video to your computer’s hard disk.
“Outputting Video” describes how to connect video output, set up an optional preview
monitor for an output configuration, and output video to your VCR or camcorder.
“Using the Digital Media Card Reader” shows you how to insert, access, format, and
remove digital media cards.
“Troubleshooting” provides solutions to possible problems and answers frequently asked
questions.
“Technical Suppor t” provides information on the Dazzle Interactive Support Site, and tells
you how to contact Dazzle Technical Suppor t.
Dazzle DVD Creation Station 200 User’s Guide • Introduction • Page 5
Page 6

Dazzle DVD Creation Station 200 User’s Guide • Page 6
Page 7

Getting Started
Minimum System Requirements
To use the DCS 200, your computer system must meet the following minimum
requirements:
CPU: 500 MHz processor
Hard Disk Requirement: Minimum 5400 RPM, 150MB for software installation
Operating System: Microsoft® Windows® 98 SE, Me, 2000, or XP
Video: 1024 x 768, 24-bit color, DirectX 8 or above
RAM: 128MB minimum
Sound: PC must have a sound card
Interface: USB 1.1 or above
CD-ROM or DVD-ROM Drive: For software installation
CD Burner: For VCD, S-VCD, or cDVD creation
DVD Burner (Any Format): For DVD creation
Dazzle DVD Creation Station 200 User’s Guide • Getting Started • Page 7
Page 8

Hardware Overview
You can connect your camcorder, VCR, or TV to the DCS 200 to capture DVD quality video
to your PC. All you have to do is connect your video source to the DCS 200 and click the
Capture button in MovieStar 5. The DCS 200 has an integrated DVD encoder chip, which
automatically converts video in real-time into the DVD format (MPEG-2) before it lands on
your hard disk. This process shrinks the video to about 1/4 of its original size while
retaining DVD quality. You not only save a lot of hard disk space, but since your video is
already in DVD format, you don’t have to conver t the video later.
Great videos are even better if you add still pictures for dramatic ef fect. The DCS 200’s
integrated digital media reader makes it easy to read photos directly of f the digital media
cards from your digital camera. The DCS 200 can read/write Type I and Type II
CompactFlash, Memory Stick, Smar tMedia, MultiMediaCard, SD Card, and
IBM Microdrive media.
LED Mode
Indicators
CompactFlash,
IBM Microdrive
Media Reader
Memory Stick,
MultimediaCard,
SD Card,
SmartMedia
Card Reader
S-Video
In /Out
RCA Video
In/Out
RCA Audio
In/Out
USB
Connector
Power
Connector
DCS 200/Front View DCS 200/Rear View
Dazzle DVD Creation Station 200 User’s Guide • Getting Started • Page 8
Page 9

Software Overview
The DCS 200 includes three Dazzle software applications: MovieStar 5, DVD Complete,
and OnDVD. Following is a description of each of these software applications.
MovieStar 5
MovieStar 5 makes editing your video easy, but it doesn’t leave out the powerful features
you want. Cut unwanted scenes and add 3D transitions, titles, and special effects. Add
your favorite background music to set the mood or do a voice-over narration to explain
important scenes. Use the stor yboard or timeline inter face for easy, yet professional
video editing. MovieStar 5 has Background Rendering, Smart Rendering and Fast
Rendering technology for superior speed and performance. MovieStar 5 lets you make
Real Media or Windows Media internet-ready streaming videos. Then upload them for free
to the Dazzle Webcasting site to share streaming video across the internet.
For instructions on editing video, refer to your MovieStar 5 User’s Guide.
DVD Complete
With DVD Complete, it’s easy to make DVDs like those created in Hollywood movie
studios. The DVD Complete project wizard guides you though five simple steps from
camcorder to DVD. All you need to know is what you like and DVD Complete does the rest.
For instructions on making DVDs, refer to your DVD Complete User’s Guide.
OnDVD
Digital cameras allow you to take an unlimited number of photographs that quickly pile up
on your computer and become difficult to manage. With OnDVD, you can take digital
pictures and turn them into photo albums for your DVD player. Simply select and arrange
your photos like an old-fashioned Slideshow and burn a CD. OnDVD makes it easy to turn
digital memories into home entertainment! For instructions on creating Slideshows, refer
to your OnDVD User’s Guide.
Note: You can access an electronic user guide for any of the above Dazzle software
applications by selecting Start>Programs, selecting the name of the desired product, and
then selecting the user guide for that product.
Dazzle DVD Creation Station 200 User’s Guide • Getting Started • Page 9
Page 10
Software Installation
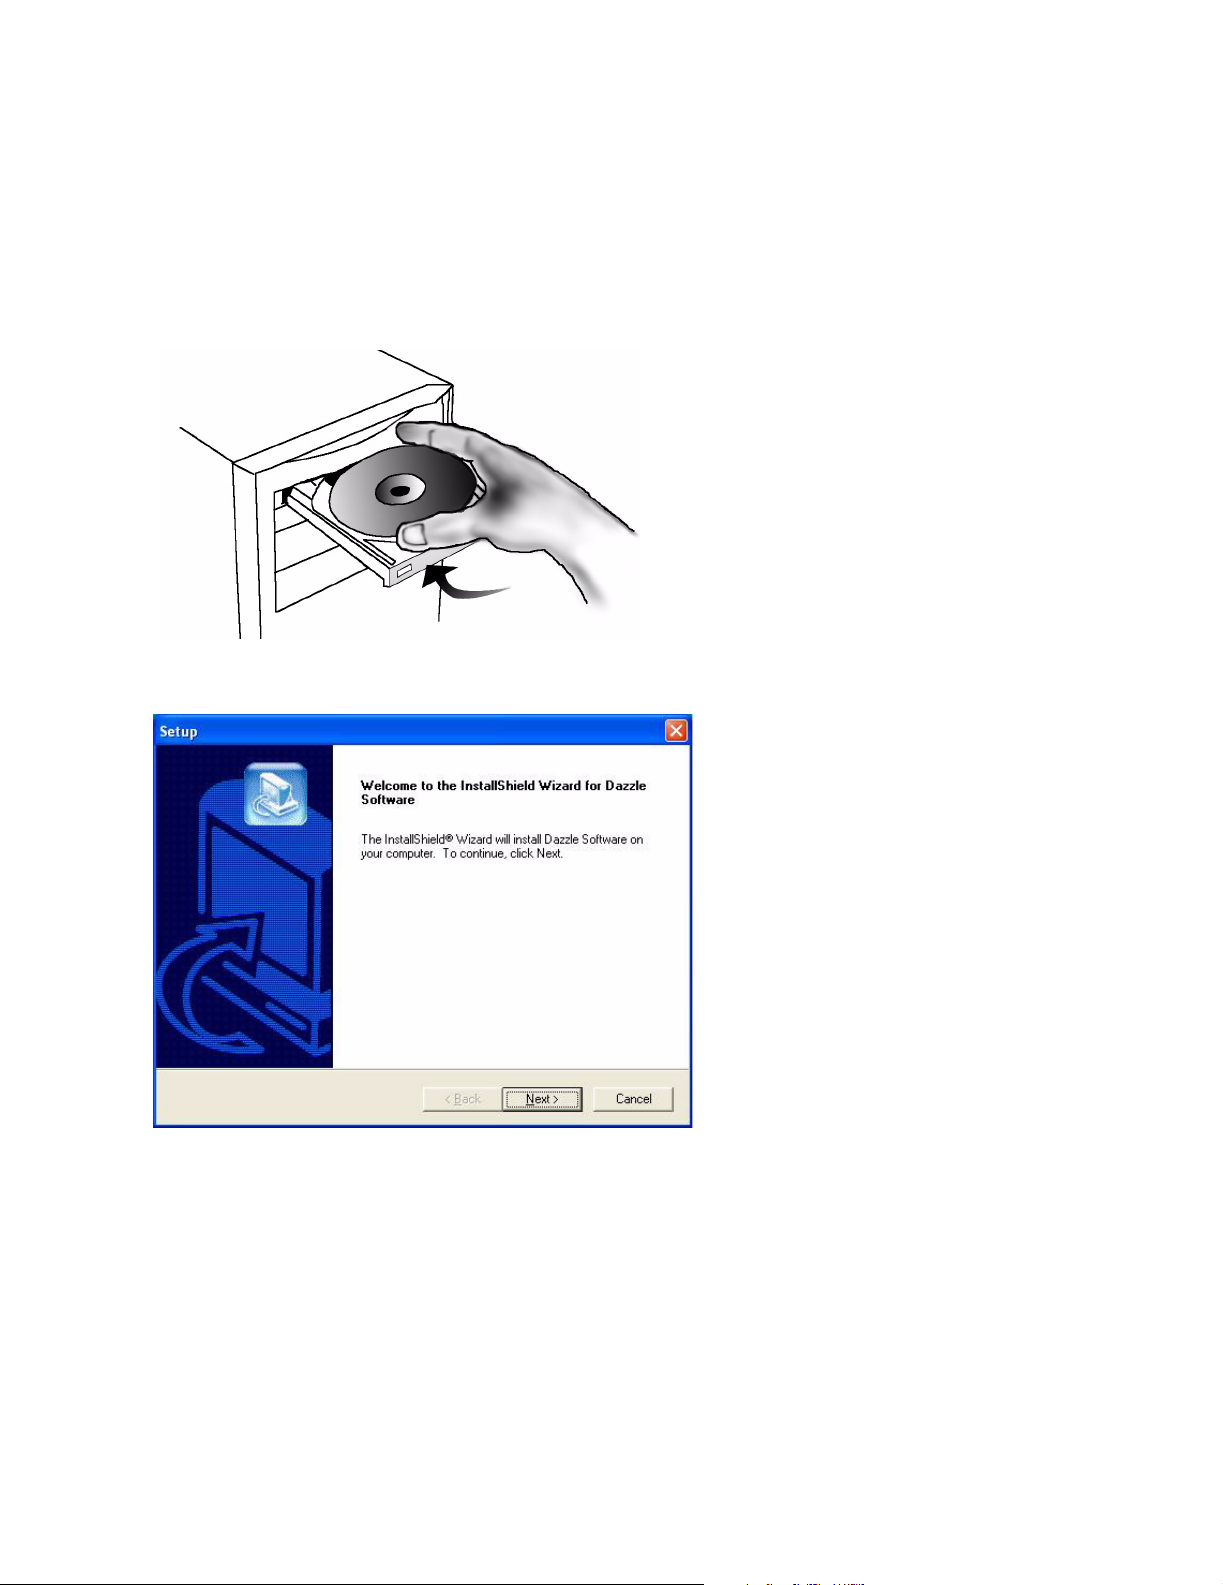
You must install the DCS 200 software before you connect the hardware. To install the
required DCS 200 drivers and the included software applications, follow these steps:
1. Insert the provided DCS 200 Installation CD in your computer’s
CD-ROM/DVD-ROM drive.
The InstallShield Wizard Welcome screen appears.
Dazzle DVD Creation Station 200 User’s Guide • Getting Started • Page 10
Page 11
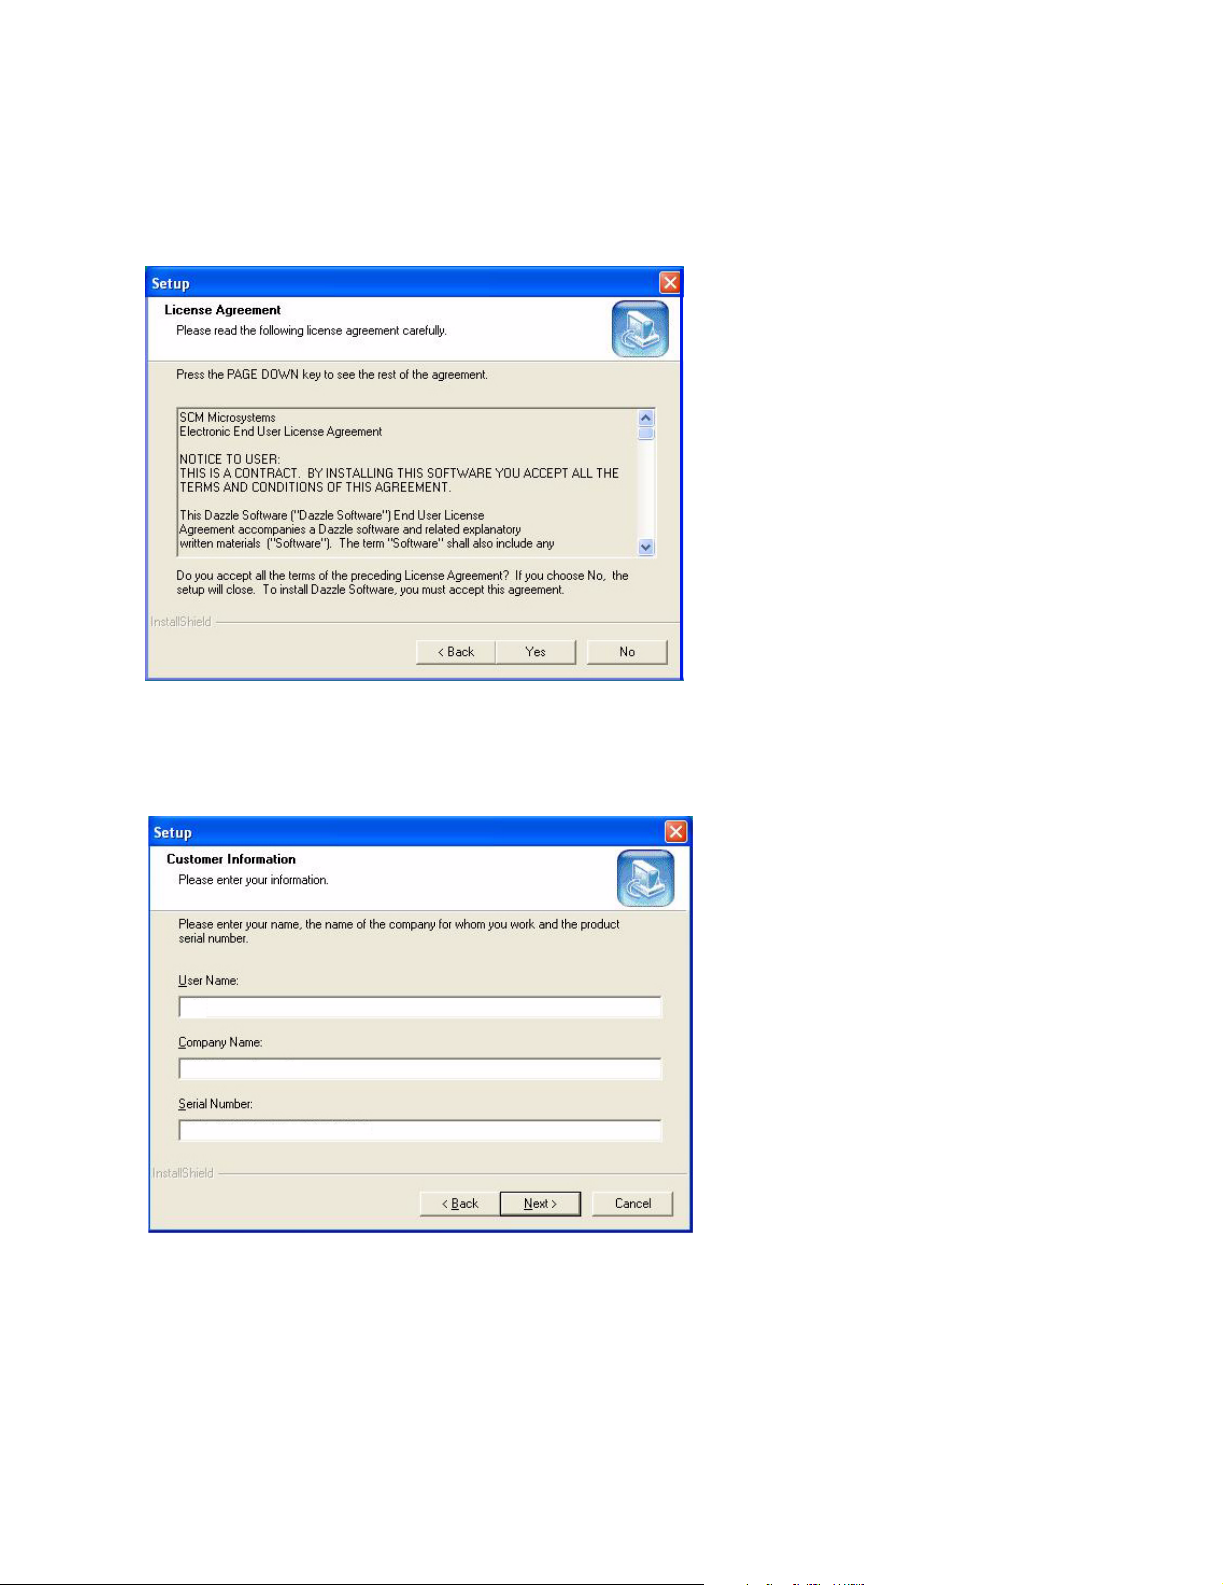
2. Click Next.
The License Agreement screen appears. To use the DCS 200, you must agree to the
terms of the license.
3. Click Yes to accept the license agreement.
The Customer Information screen appears.
Dazzle DVD Creation Station 200 User’s Guide • Getting Started • Page 11
Page 12
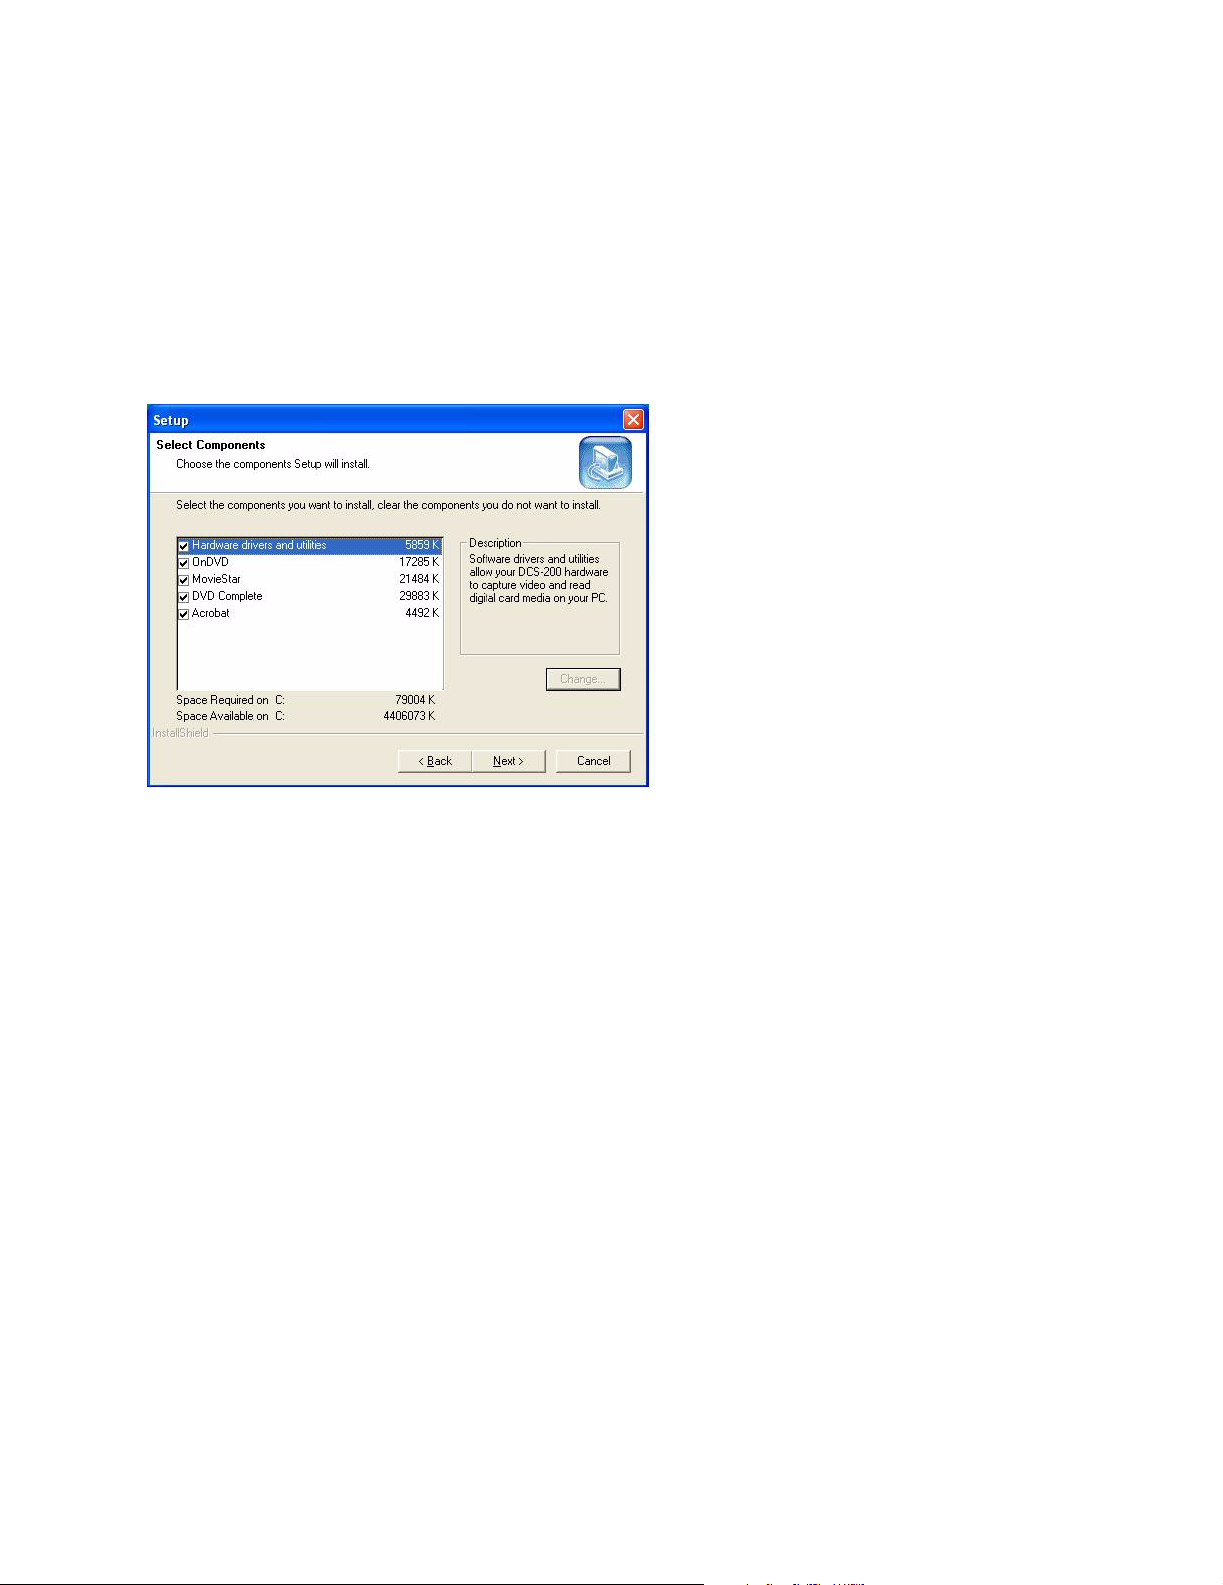
4. Enter your name, company name, and serial number, then click Next.
The Select Components screen appears. This screen allows you to select the drivers
and applications you want to install. Dazzle strongly recommends installing all the
components. The Hardware drivers and utilities are required for the video and card
reader operations. MovieStar is required for video capture and playback. DVD
Complete is required to design and burn DVDs. OnDVD is required to create
Slideshows. Acrobat is required to read the online Help files and electronic users’
guides.
5. Select the desired components and click Next.
The InstallShield Wizard installs the specified drivers and applications, and then
the Acrobat Reader 5 installer appears. You’ll need this application to access the
online Help files and electronic users’ guides.
Dazzle DVD Creation Station 200 User’s Guide • Getting Started • Page 12
Page 13

After installing all the software, the InstallShield Wizard confirms a successful
installation.
6. Click Finish to restart your computer and complete the installation.
After restarting your computer, a browser window appears with a message that
reminds you to check the Dazzle website for the latest updates and patches. Just click
on the link in the browser window to check for any critical updates to your software.
Dazzle DVD Creation Station 200 User’s Guide • Getting Started • Page 13
Page 14
Hardware Installation
After you install the DCS 200 software, you can install the hardware.
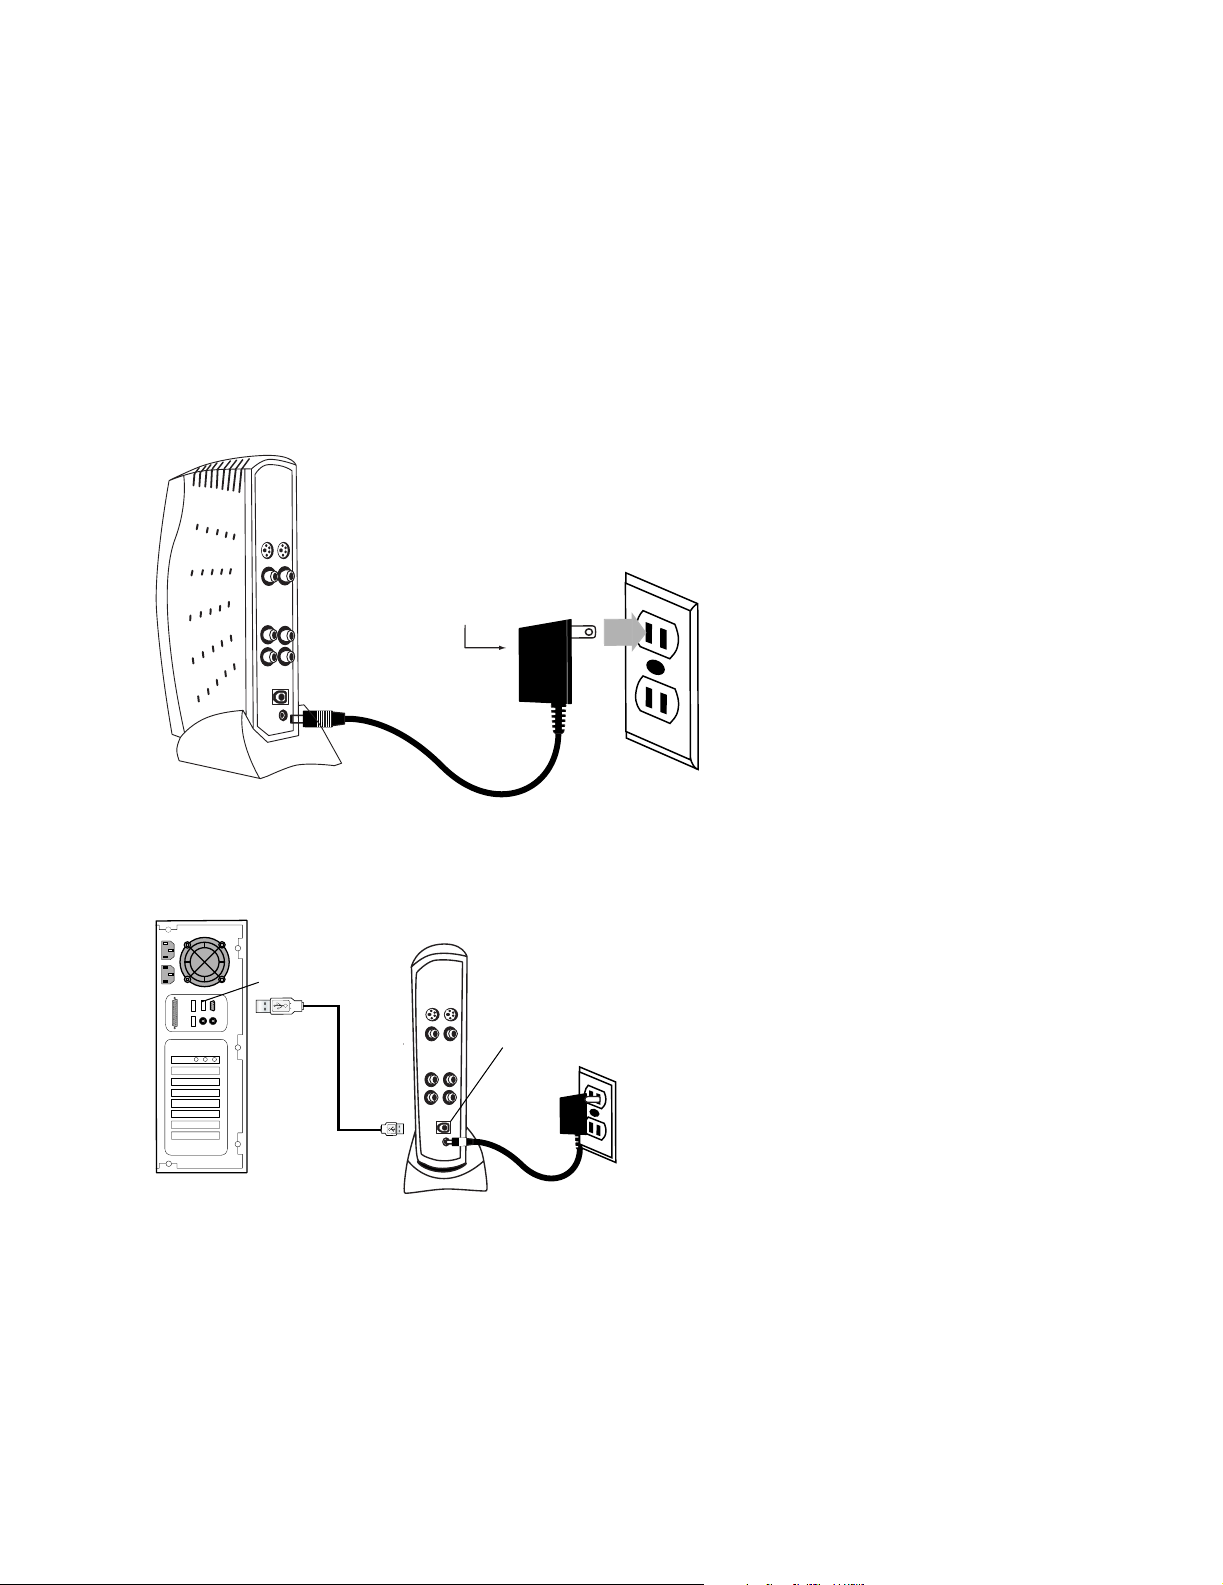
Installing the DCS 200 hardware is an easy, two step process, as described below.
1. Connect one end of the AC power cord to the back of the DCS 200 and the other end
to an electrical outlet.
To avoid damaging your DCS 200, use only the supplied power adapter.
DCS 200
Power Adapter
2. Connect one end of the supplied USB cable to the USB port on the back of the
DCS 200, then connect the other end to the USB port on your computer.
USB Port
USB Port
USB Cable
Dazzle DVD Creation Station 200 User’s Guide • Getting Started • Page 14
Page 15

Capturing Video
This section explains how to capture video from an analog source, such as a camcorder,
VCR, or TV, so you can edit the video and create special effects on your computer. You’ll
learn how to set up the DCS 200 for analog video input, which is converted into DVD
compatible video (MPEG-2) for use on your computer.
Note: Do not insert a digital media card in the DCS 200 card reader while capturing video.
Connecting Video Input
To connect your camcorder, VCR, or TV to the DCS 200 to capture DVD quality video, follow
these steps:
1. Connect one end of an RCA (composite) video cable (yellow) or S-video cable (black) to
the corresponding Video Out connector on the camcorder, TV, or VCR.
Note: S-video provides a higher quality video capture than composite video and should
be used if your camcorder, VCR, or TV has an S-Video output.
Note: Some TVs do not have Video Out connectors. For specific details, check the
documentation included with your TV.
2. Connect the other end of the video cable to the corresponding Video In connector at
the back of the DCS 200.
Note: Some camcorders do not have connectors for standard video cables, which are
included with the DCS 200. If your camcorder is not compatible with the supplied
cables, use the cables that were included with the camcorder.
3. Connect an RCA audio cable (red and white) from the Audio Out connectors on the
camcorder, VCR, or TV to the Audio In connectors at the back of the DCS 200.
Note: If your device only supports mono output, you need to use a Y-adapter.
The illustration on page 16 shows the above configuration.
Dazzle DVD Creation Station 200 User’s Guide • Capturing Video • Page 15
Page 16
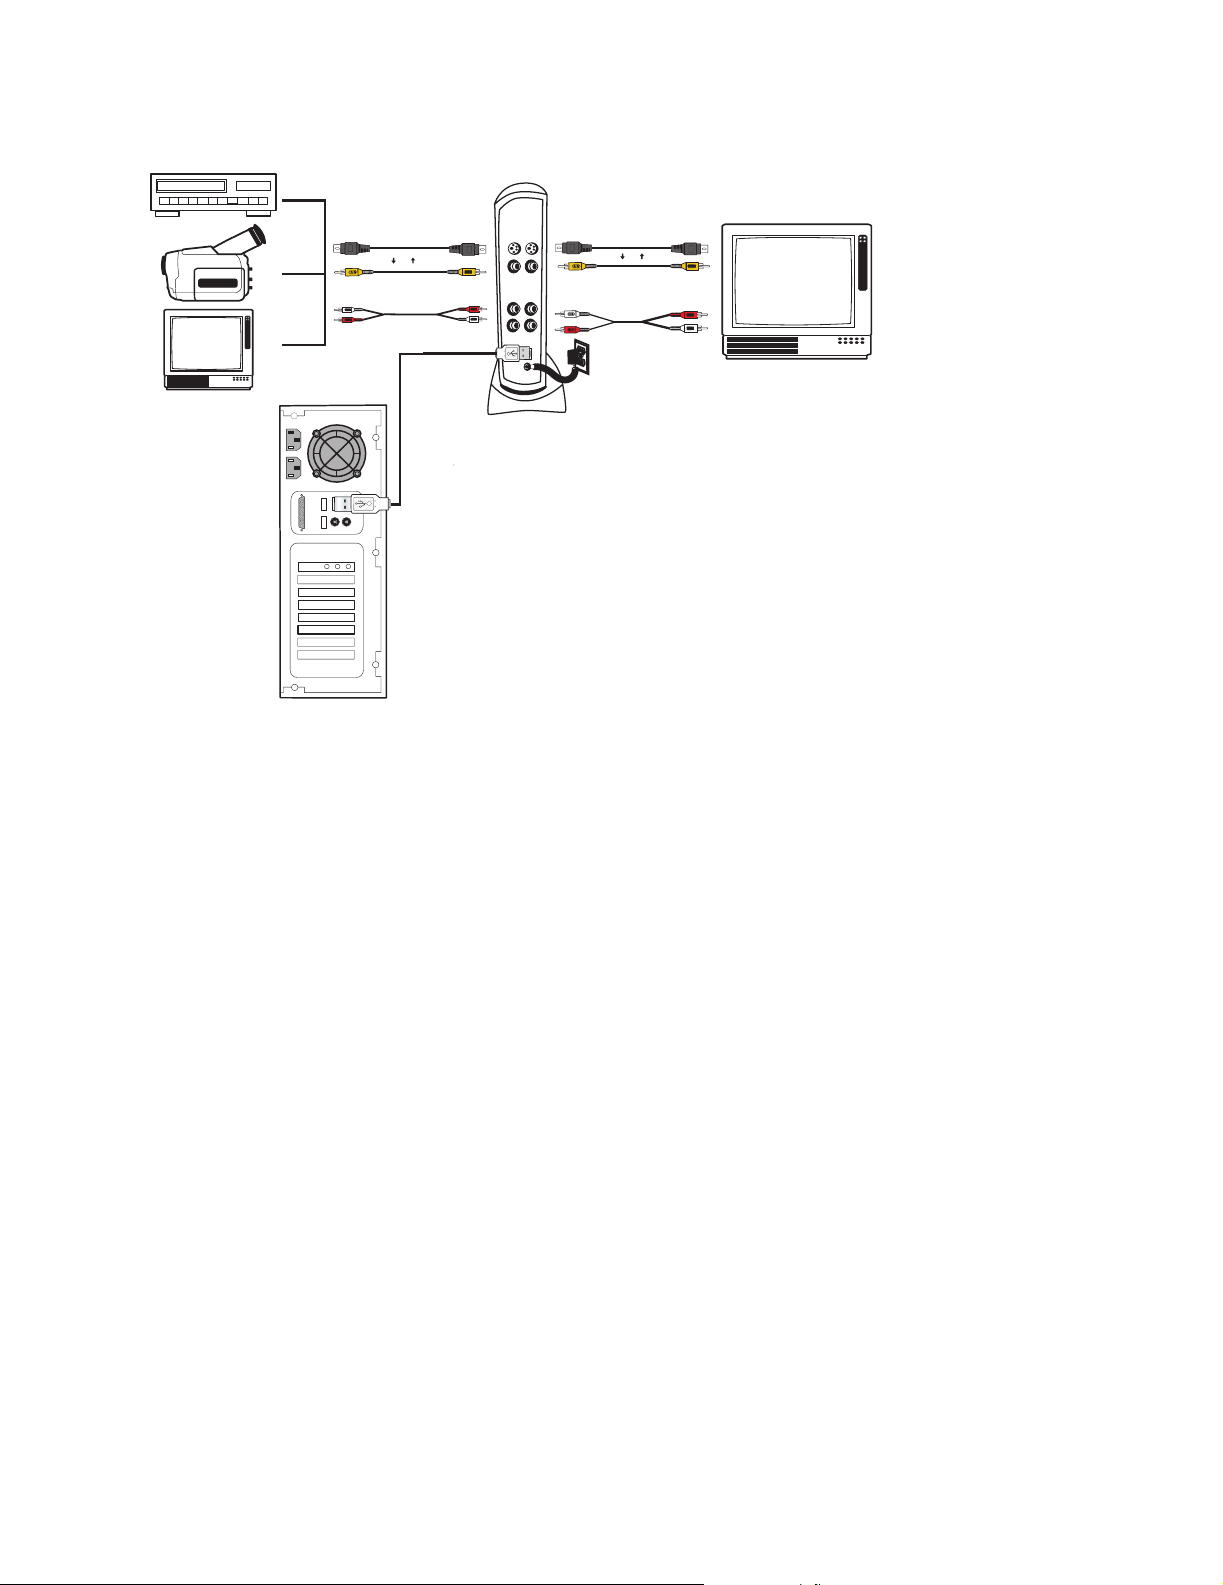
VHS
DCS 200
TV
S-Video Out
RCA Video Out
Audio Out
Or
S-Video In
RCA Video In
Audio In
S-Video Out
RCA Video Out RCA Video In
Audio Out
S-Video In
Or
TV
Audio In
Optional
Preview Monitor
Connecting an Optional Preview Monitor
Although you can preview your video in MovieStar 5, you may prefer to view it at full size on
a TV monitor. To connect an optional preview monitor, follow these steps:
1. Obtain an additional RCA (composite) video cable or S-Video cable (depending on your
configuration) and an additional RCA audio cable (these extra cables may have been
included with your camcorder and/or VCR).
2. Connect one end of the RCA video cable (yellow) or S-video cable (black) and connect
it to the corresponding Video Out connector on the back of the DCS 200.
3. Connect the other end of the video cable to the corresponding Video In connector on
your TV monitor.
Note: Some older model TVs may not have Video In connectors. For specific details,
check the documentation included with your TV.
4. Connect the RCA audio cable (red and white) from the Audio Out connector on the
back of the DCS 200 to the Audio In connector on the TV monitor.
Note: Your additional audio cable may have separate connectors for left and right, or
the connectors might be joined as shown in the illustration above. Remember that you
need to use a Y-adapter if your TV monitor only supports mono input.
IMPORTANT: Make sure that the TV monitor is set up properly to receive a video
signal. It might need to be set to “Line In,” “L1,” “L2,” “Aux” or a similar channel.
Check the monitor’s documentation for specific details.
Dazzle DVD Creation Station 200 User’s Guide • Capturing Video • Page 16
Page 17

Capturing Video
To capture video to your computer’s hard disk, follow the steps below (for more detailed
instructions on capturing video, see your MovieStar 5 User’s Guide).
1. Launch MovieStar 5.
The Project Profile dialog box appears. In this window, you can choose the type of
project you want to create, for example, making a DVD. Choosing the project profile at
this point speeds the video editing process, but you can always change your mind and
choose a different profile later. If you want to create a video tape, choose DV for your
project profile. In this window, you can also select a broadcast standard (NTSC or PAL).
2. Choose a project profile, then click OK.
3. Click the Capture button to display the Capture window.
4. Enter a name for your file, then select a file destination.
5. Select DCS 200 as the video device.
If you are using a camcorder and capturing from a previously recorded tape, set the
camcorder to Video Tape Recorder mode. If you want to capture live video from the
camcorder, set it to Camera mode. The DCS 200 converts the live video to MPEG and
stores it on your computer’s hard disk.
6. Specify whether you want to capture from the Composite (RCA) or S-Video input.
7. Go to the point on the tape where you want to begin capturing and press the
Pause button on your camcorder or VCR.
The video image appears in the Player window in MovieStar 5.
8. Click the red Record button in MovieStar 5.
There is a slight delay before MovieStar 5 begins recording.
9. Press the Play button on your camcorder or VCR to begin capturing the video.
10. Click the Stop button in MovieStar 5 when you want to end the video capture.
Dazzle DVD Creation Station 200 User’s Guide • Capturing Video • Page 17
Page 18

Editing Video
Now that your video has been captured, you can edit it with MovieStar 5. Cut out unwanted
scenes, splice together different clips and add Hollywood-style special effects like titles,
transitions, voice-overs and background music.
For detailed information on editing video, see your MovieStar 5 User’s Guide.
Creating DVDs, VCDs and S-VCDs
For instructions on creating DVDs, VCDs, S-VCDs, and Webcasting, see the supplied
MovieStar 5, DVD Complete, and OnDVD users’ guides.
Dazzle DVD Creation Station 200 User’s Guide • Capturing Video • Page 18
Page 19

Outputting Video
This section explains how to set up the DCS 200 for analog video output, so you can
transfer your edited video to a camcorder or VCR to create customized video tapes.
Note: If you have an optional preview monitor connected, you may need to disconnect it to
attach the camcorder or VCR that you want to record to. However, you may be able to
connect it to the output device as described later in this section.
Connecting Video Output
If your system is currently set up for video input, disconnect the audio and video cables
from the DCS 200 and the camcorder, VCR, or TV. You’ll need to use the cables to connect
video output. To connect your camcorder, VCR, or TV to the DCS 200 to output analog
video, follow these steps:
1. Take either an RCA (composite) video cable (yellow) or S-video cable (black) and
connect it to the corresponding Video Out connector on the back of the DCS 200.
Note: S-Video provides higher quality video capture than composite video and should
be used if your camcorder or VCR has an S-Video connection.
2. Connect the other end of the video cable to the corresponding Video In connector on
the camcorder, VCR, or TV.
Note: Some analog camcorders and some older model TVs do not have Video In con-
nectors. Check each device’s documentation for specific details.
3. Connect one end of the RCA audio cable (red and white) to the Audio Out connectors
on the back of the DCS 200.
4. Connect the other end of the RCA audio cable to the Audio In connectors on the
camcorder, VCR, or TV.
Note: If your device only supports mono input, you need to use a Y-adapter.
DCS 200
S-Video Out
RCA Video Out
Audio Out
Or
S-Video In
RCA Video In
Audio In
VHS
TV
Dazzle DVD Creation Station 200 User’s Guide • Outputting Video • Page 19
Page 20

IMPORTANT: Make sure that your camcorder, VCR, or TV is set up properly to receive
a video signal. It may be necessary to set your camcorder to VTR mode, while a VCR
or TV may need to be set to “Line In,” “L1,” “L2,” “Aux” or a similar channel.
Remember that you need to use a Y-adapter if your device only supports mono input.
Check your camcorder, VCR, or TV documentation for specific details.
Connecting an Optional Preview Monitor
If the connectors on your camcorder or VCR and your monitor are compatible, you can
connect a preview monitor as follows:
1. Obtain an additional RCA (composite) video cable or S-Video cable (depending on your
configuration) and an additional RCA audio cable (these extra cables were probably
included with your camcorder and/or VCR).
2. Take either the RCA video cable (yellow) or S-Video cable (black) and connect it from
the Video Out connector on the camcorder or VCR to the corresponding Video In
connector on the TV monitor.
3. Connect the RCA audio cable (red and white) from the Audio Out connectors on the
back of the camcorder or VCR to the Audio In connectors on the TV monitor.
Note: Your additional audio cable may have separate connectors for left and right, or
the connectors might be joined as shown in the illustration below. Remember that you
need to use a Y-adapter if your TV monitor only supports mono input.
If your TV monitor does not support the types of cables described above, you still may
be able to connect it using a coaxial cable. Many VCRs and most TVs have this type of
connector, and many VCRs come with a coaxial cable.
Connecting the TV monitor to the camcorder or VCR results in the configuration shown
below.
DCS 200
S-Video Out
RCA Video Out
Audio Out
S-Video In
Or
RCA Video In
VHS
Audio In
S-Video Out
RCA Video Out RCA Video In
Audio Out
Coaxial Out Coaxial In
S-Video In
Or
TV
Audio In
OR
IMPORTANT: Make sure that your camcorder or VCR and TV monitor are set up
properly to receive a video signal. It may be necessar y to set a camcorder to VTR
mode, while a VCR or TV monitor might need to be set to “Line In,” “L1,” “L2,” “Aux”
or a similar channel. Or, if the TV monitor is connected to a VCR with a coaxial cable,
you may need to set the monitor to channel 3 or 4. Check each device’s
documentation for specific details.
Dazzle DVD Creation Station 200 User’s Guide • Outputting Video • Page 20
Page 21

Outputting Video
For instructions on outputting your edited video to a camcorder or VCR, see your MovieStar
5 User’s Guide.
Note: The DCS 200 captures audio in LPCM format. Before you burn a VCD or S-VCD, you
must manually render your video file. This converts the audio stream to PCM format. If you
try to burn a non-rendered video file to a VCD or S-VCD in MovieStar 5, an error message
appears. For DVD burning, MovieStar 5 uses DVD Complete, which automatically converts
the audio stream to PCM format. If you want to use third-party DVD authoring software,
render your video files in MovieStar 5 before importing them into the authoring software.
For more information on third-party compatibility with the DCS 200, please contact your
software vendor.
Dazzle DVD Creation Station 200 User’s Guide • Outputting Video • Page 21
Page 22

Dazzle DVD Creation Station 200 User’s Guide • Page 22
Page 23

Using the Digital Media Card Reader
This section explains how to use the DCS 200 built-in card reader/writer with
digital media cards.
Note: Do not insert a digital media card in the DCS 200 card reader while capturing video.
*SmartMedia 3.3 Volt Only
Digital Media Card Compatibility
The DCS 200 is compatible with the following digital media cards:
• SSFDC Smart Media cards (3.3 Volt only), in current capacities of up to 128MB
• All current CompactFlash cards and cards in the CF II and CF+Type II formats, such as
the IBM Microdrive
• Most MultiMediaCards and Secure Digital formats
• Memory Stick and MagicGate Memor y Stick media
Note: Secure mode of Sony MagicGate is not supported.
Important: The lower media slot of the DCS 200 accepts Smar tMedia, Secure Digital,
MultiMediaCard, and Memor y Stick. You can inser t only one of the four supported media
types at one time.
Dazzle DVD Creation Station 200 User’s Guide • Using the Digital Media Card Reader • Page 23
Page 24

Inserting a SmartMedia Card
Before you insert a Smar tMedia card, be sure to place the DCS 200 in it’s stand with the
Dazzle logo on the right-hand side. To inser t a Smar tMedia Card, follow these steps:
1. Position the SmartMedia card in the direction shown in the illustration below.
Note: The DCS 200 accepts only 3.3V SmartMedia cards. It does not suppor t 5V
SmartMedia cards.
2. Insert the card in the lower media slot with the gold contacts on the right-hand side.
The card’s notch must be located in the lower corner.
Notice the notched corner of the Smar tMedia card. The notch appears on the
right-hand side when you are looking directly at the gold contacts on the top of a 3.3V
SmartMedia card (see the illustration below).
Caution: Be careful not to insert the SmartMedia card in the wrong direction. Be sure
to insert the Smar tMedia card with the gold contacts on the right-hand side. If it is
forced in, the card reader or the Smar tMedia card may be damaged, or data on the
card may be lost or corrupted. If the computer does not recognize the media, or if it
does not fit correctly, re-position the card and try reinser ting it.
3. Gently push the card in all the way until it locks in place.
Note: Do not insert a Smar tMedia card in the DCS 200 card reader while capturing
video.
SmartMedia Card Comparison (view of cards from top)
Left notch
indicates 5V card
Gold contacts
Write protect
area
Insert the SmartMedia
card into the lower slot
with the gold contacts
inserted first and facing to
the right.
5V SmartMedia card
(not compatible)
3.3V SmartMedia card
(compatible)
Right notch
indicates 3.3V card
Gold contacts
Write protect
area
Dazzle DVD Creation Station 200 User’s Guide • Using the Digital Media Card Reader • Page 24
Page 25

Inserting a CompactFlash Card
Before you insert a CompactFlash Card, be sure to place the DCS 200 in it’s stand with
the Dazzle logo on the right-hand side. To inser t a CompactFlash Card, follow these steps:
1. Position the CompactFlash card in the direction shown in the illustration below.
2. Insert the card in the top media slot with the connectors facing inward.
Make sure you position the card properly. All CompactFlash card manufacturers adhere
to a specification that requires a positive keying of the card.
Caution: Be careful not to insert the CompactFlash card in the wrong direction.
Make sure the connectors are facing inward and the card is not inser ted upside down.
If it is forced in, the card reader or CompactFlash card may be damaged or data on the
card may be lost or corrupted.
3. Gently push the card in all the way until it locks in place.
The card slides in on the molded rails and you should feel a slight amount of
resistance as the connectors make contact.
Important: If excessive force is required or the card just doesn’t seem to fit, do not
force the card in the reader. Contact Dazzle Technical Suppor t for assistance.
Note: Do not insert a CompactFlash card in the DCS 200 card reader while capturing
video.
Insert the CompactFlash
card into the top slot
with the connectors
facing inward. When
inserting the
CompactFlash card,
the media manufacturer’s
label should be on the
right-hand side.
Dazzle DVD Creation Station 200 User’s Guide • Using the Digital Media Card Reader • Page 25
Page 26

Inserting a MultiMediaCard or Secure Digital Card
Before you insert a MultiMediaCard or Secure Digital Card, be sure to place the DCS 200
in it’s stand with the Dazzle logo on the right-hand side. To inser t a MultiMedia or Secure
Digital Card, follow these steps:
1. Position the MultiMediaCard or Secure Digital card in the direction shown in the
illustration below.
A portion of the lower media slot is designed for the inser tion of MultiMediaCard/
Secure Digital cards.
2. Insert the card into the lower media slot with the gold contacts on the left-hand side.
Important: Notice the notched corner of the MultiMediaCard or Secure Digital card and
do not insert the MultiMediaCard/Secure Digital card in the wrong direction. To insert
properly, be sure that the card’s recessed notch is located in the lower corner.
You should see the media’s gold contacts on the left when inser ting it into the slot.
3. Push the card in all the way until it locks in place.
Caution: Insert the card gently. If it is forced in, the card reader or the actual card may
be damaged, or data on the card may be lost or corrupted. If excessive force is
required, or the card just doesn’t seem to fit, do not force the card in the reader.
Contact Dazzle Technical Suppor t for assistance.
Note: Do not insert a MultiMediaCard or Secure Digital Card in the DCS 200 card
reader while capturing video.
To utilize advanced features of Secure Digital cards as well as locking and encr yption
features, please refer to the documentation provided with your Secure Digital card or
host device.
MultiMediaCard/Secure
Digital portion of media
slot
Dazzle DVD Creation Station 200 User’s Guide • Using the Digital Media Card Reader • Page 26
Page 27

Inserting a Memory Stick Card
Before you insert a Memor y Stick Card, be sure to place the DCS 200 in it’s stand with the
Dazzle logo on the right-hand side. If you plan on writing to or deleting from your Memory
Stick card, make sure the card is not locked. The lock tab is located on the bottom of the
card. To insert a Memor y Stick Card, follow these steps:
1. Position the Memory Stick in the direction shown in the illustration below.
A portion of the lower media slot is designed for inser ting Memor y Stick media cards.
This portion utilizes the center of the media slot for Memor y Stick insertion.
2. Insert the Memor y Stick into the slot with the gold contacts on the left-hand side.
Important: Notice the rounded corner of the Memor y Stick card and be careful not to
insert the card in the wrong direction. To insert properly, be sure the card is positioned
with the rounded corner on top. You should see the gold contacts on the left when
inserting the media into the slot.
3. Gently push the Memory Stick in all the way until the card locks in place.
Caution: Insert the Memor y Stick gently. If it is forced in, the card reader or the
Memory Stick may be damaged, or data on the card may be lost or corrupted. If
excessive force is required, or the card just doesn’t seem to fit, do not force the card
in the reader. Contact Dazzle Technical Support for assistance.
Note: Do not insert a Memor y Stick card in the DCS 200 card reader while
capturing video.
Note: The secure mode of Sony MagicGate is not supported.
Note: The card’s
rounded corner must
be located at the top
when inserting.
Memory Stick
portion of media slot
Dazzle DVD Creation Station 200 User’s Guide • Using the Digital Media Card Reader • Page 27
Page 28

Accessing a Card
When your PC is running Windows (98 SE, 2000, Me, or XP) and the DCS 200 is
connected, two Removable Disk icons appear in My Computer with newly assigned drive
letters. The first Removable Disk icon represents the upper or CompactFlash slot.
The second Removable Disk icon represents the lower or Smar tMedia, Secure Digital,
MultiMediaCard, and Memory Stick slot.
If you are running Windows XP and you inser t a digital media card, a dialog box appears
that asks what you want to do with the files on the Removable Disk. You can access the
files by selecting from several options. This is a default feature of Windows XP. For all
other supported versions of Windows (including XP) you can access a card as follows:
1. Double-click on the card’s Removable Disk icon.
The contents of the card appear. You can now access the data on the card.
Digital cameras usually create one or more folders on a digital media card, which
contains your digital images. To display a digital image, open the folder(s), then
double-click on the icon(s) representing the digital image(s) you want to view.
Note: If a card is not inserted when you double-click a Removable Disk icon, a
message appears that says: Device not ready or Please insert a disk. If you see this
message, insert a card and tr y accessing the media again.
2. To transfer files between your computer and a card, use the basic Windows file
transfer functions. For example, drag and drop or copy and paste files from your
computer to a card or from a card to your computer.
DCS 200 Card Reader Removable Disk icons
Important: The lower slot of the DCS 200 accepts only one of the four supported
media types at a time. During usage, you can insert either Smar tMedia,
Secure Digital, MultiMediaCard, or Memor y Stick media into the lower slot of the DCS
200 at any one time. However, it is possible to use both the CompactFlash slot (upper
slot) and the lower slot concurrently.
Dazzle DVD Creation Station 200 User’s Guide • Using the Digital Media Card Reader • Page 28
Page 29

Formatting a Card
Sometimes it may be more convenient to format a digital media card in the DCS 200
rather than in your original digital device. In some cases, your device may not have a
format option, or you may be required or prompted to format a card. To format a digital
media card in the DCS 200, follow the steps below.
Caution: Formatting a CompactFlash, Smar tMedia, MultiMediaCard, Secure Digital, or
Memory Stick card completely erases any data stored on the card. If there are impor tant
images or files you want to safeguard for later use, save a backup copy on your hard drive,
CD-R drive, or other type of removable media before formatting a card.
Formatting CompactFlash, MultiMediaCard, Secure Digital,
SmartMedia, or Memory Stick Cards
The following procedure shows you how to format your digital media cards using the
DCS 200 Digital Media Reader formatting utilities. You can also format your cards using
the Windows formatting utility for your Operating System. Formatting your media using a
Windows formatting utility conforms only to Windows specifications. The DCS 200 Digital
Media Reader formatting utilities automatically per form additional operations, such as
deleting an existing partition and creating a new par tition and checking for and restoring
bad data blocks. In addition, each Digital Media Reader formatting utility has its own
unique features.
1. Click Start> Programs>Digital Media Reader.
Formatting options appear for each suppor ted media type (CFPREP for CompactFlash,
CARDPREP for MultiMediaCard and Secure Digital, SMPREP for Smar tMedia, and
MSPREP for Memory Stick).
Following is a description of each DCS 200 Digital Media Reader formatting utility:
CFPREP - Formats CompactFlash cards, providing one format option, which creates a
single formatted par tition on your card.
CARDPREP - Formats MultiMediaCards or Secure Digital cards, providing two format
options. In most cases, select DOS FAT (default option) to format your cards. In some
instances owners of MP3 players must format cards using the ROS MP3 option. For
more information on MP3 requirements, consult the manufacturer of your MP3 device
to find out if it uses the ROS MP3 file format.
SMPREP - Formats Smar tMedia cards, providing two format options. In most cases,
select Quick (default option) to format your cards. If you experience problems with your
SmartMedia card, you may want to select the Full option to completely erase and scan
your SmartMedia card for any bad data blocks.
Dazzle DVD Creation Station 200 User’s Guide • Using the Digital Media Card Reader • Page 29
Page 30

MSPREP - Formats Memor y Stick cards, providing two format options. In most cases,
select Quick (default option) to format your cards. If you experience problems with your
Memory Stick you may want to select the Full option to completely erase and scan
your Memory Stick for bad data blocks.
2. Select the formatting utility for your media type.
A dialog box appears for the appropriate formatting utility. Examples are shown below.
3. Click Start in the formatting utility dialog box for your media type.
A dialog box appears (similar to the example shown below) informing you that you are
about to erase all data on your media card.
Dazzle DVD Creation Station 200 User’s Guide • Using the Digital Media Card Reader • Page 30
Page 31

4. Click Yes (or OK) in the dialog box to begin formatting your media card.
The formatting process begins and a format status screen appears until the formatting
is complete.
When the formatting is complete, the Format Results dialog box appears, which
displays the formatting results.
5. Click OK in the dialog box to exit the formatting utility.
After formatting your digital media card, a dialog box (similar to the one shown below)
may appear recommending that you run the ScanDisk or CheckDisk utility. If you are
experiencing problems with your card, click Ye s to verify that data can be stored
reliably on all areas of your card. However, in day-to-day use you should not have to run
the utility and you can click No.
After running ScanDisk or CheckDisk, or selecting No in the dialog box, the first
formatting utility dialog box reappears.
6. Click Close in the formatting utility dialog box to exit the utility.
Dazzle DVD Creation Station 200 User’s Guide • Using the Digital Media Card Reader • Page 31
Page 32

Removing a Card
Before you remove a digital media card, make sure that the Digital Media LED at the front
of the DCS 200 is not flashing. The LED flashes when the DCS 200 is reading/writing data
on a card. Please wait until the read/write operations are complete and the LED stops
flashing before you remove a card. Removing a card during read/write access causes lost
or corrupted data.
To remove a card, grasp the end of the card with your thumb and index fingers, and remove
it from the appropriate slot.
Dazzle DVD Creation Station 200 User’s Guide • Using the Digital Media Card Reader • Page 32
Page 33

Troubleshooting
Frequently Asked Questions
If you experience difficulties with your DCS 200, please check the troubleshooting section
below for possible solutions. If the problems persist, please go to page 39 of this user’s
guide for information on contacting Dazzle Technical Support.
During installation, my DCS 200 is connected to my computer’s USB port, but does not
find the required drivers.
Before connecting the DCS 200 to your computer’s USB port, you must install the required
drivers and software. The necessary drivers and format utilities for your DCS 200 are
provided on the Installation CD. These drivers and utilities are installed at the same time
as MovieStar 5, DVD Complete, and OnDVD, as described in the “Software Installation”
section of this user’s guide. Please refer to this section for installation instructions.
I installed the required software and the DCS 200 is connected to my computer’s USB
port, but nothing happens when I inser t my digital media card.
The DCS 200 card reader is accessed as a removable disk, as described in “Accessing a
Card” in this user’s guide. If you are running Windows XP, and you inser t a digital media
card, a dialog box appears that asks what you want to do with the files on the Removable
Disk. You can select from several options. This is a default feature of Windows XP.
When using Windows 98 SE, Me, or 2000 you must access a digital media card through
its Removable Disk icon. You do this by opening My Computer where two Removable Disk
icons appear that represent your DCS 200 card reader. The first Removable Disk icon
represents the upper or CompactFlash slot. The second Removable Disk icon represents
the lower or SmartMedia, Secure Digital, MultiMediaCard, and Memory Stick slot.
Double-click on the respective Removable Disk icon to display the contents of the media
inserted in your card reader. This is where your digital images or data are located.
Digital cameras usually create one or more folders on a digital media card, which contains
your digital images. Depending on the digital camera you have, the folder names can vary.
Double-click on the respective folder name to access the digital images located in the
folder. You can display a preview by double-clicking on one of the image icons.
Dazzle DVD Creation Station 200 User’s Guide • Troubleshooting • Page 33
Page 34

When I insert a digital media card in my DCS 200 card reader, I cannot access my data.
Begin by placing the DCS 200 in its stand with the card reader media slots facing toward
you and the Dazzle Logo on the right-hand side.
If you are using a SmartMedia card, make sure you insert the card into the DCS 200 card
reader with the gold contacts on the right-hand side. For more information on inserting
your SmartMedia card, please refer to "Inserting a SmartMedia Card" in this user’s guide.
If you are using a MultiMediaCard or a Secure Digital card, make sure you insert the card
with the gold contacts on the left-hand side. For more information on inser ting your
MultiMediaCard or Secure Digital card, please refer to the section titled
"Inserting a MultiMediaCard or Secure Digital Card" in this user’s guide.
If you are using a CompactFlash card or IBM Microdrive, make sure you insert the card
with the card manufacturer’s label on the right-hand side and the CompactFlash
connectors facing inward. For more information on inserting a CompactFlash card or an
IBM Microdrive, please refer to the section titled "Inser ting a CompactFlash Card" in this
user’s guide.
If you are using a Memory Stick card, make sure you insert the media with the gold
contacts on the left-hand side. For more information on inser ting Memory Stick cards,
please refer to the section titled "Inserting a Memor y Stick Card" in this user’s guide.
How do I copy a file from a digital media card to my computer?
You can copy images and data from the DCS 200 to your computer using basic
Windows file transfer functions. For example, you can drag and drop or copy and paste
files from the DCS 200 to your computer.
For information regarding drag and drop copy and paste, please refer to your Windows
Help file, or Help and Support in Windows XP. You can find Help and Help and Support
under the Start button located in the lower left corner of your desktop. After you open
Windows Help, click on the Index tab to display the contents of Windows Help. Then scroll
down to, and double-click on copying files, folders. To access help information in Help and
Support on Windows XP, simply enter copy and paste in the search box.
When I try to write to my Memory Stick card, an error message appears that says:
The Memory Stick is write protected or locked.
Make sure the lock tab (located on the bottom of the Memory Stick card), is not in the lock
position. When this tab is in the lock position, the Memory Stick card is locked and
therefore write-protected. You cannot write to or delete from a Memor y Stick card until you
move this tab to the unlocked position.
Dazzle DVD Creation Station 200 User’s Guide • Troubleshooting • Page 34
Page 35

I connected the DCS 200 to my PC, installed the drivers and connected the
appropriate cables from my video source (TV, VCR, or Camcorder) to the DCS 200.
When I open the capture mode in MovieStar 5 and try to select a capture device, no
devices are listed.
Dazzle recommends that you install the DCS 200 drivers and software before
connecting the DCS 200 hardware to your PC. To resolve the problem described above,
insert the DCS 200 installation CD into your CD-ROM drive. If the auto-run process begins
automatically, cancel the installation. Then double-click on My Computer. Next, right-click
the drive letter corresponding to your CD-ROM drive, then select Explore in the drop-down
menu. The contents of the installation CD appear. You see a folder labeled Drivers.
Double-click the Drivers folder, then double-click the Setup.exe file. This begins the driver
software installation. Follow the on-screen instructions as directed, then restar t your
computer after the installation is complete. The DCS 200 driver software is installed and
you can now capture video.
When I connect my video source (TV, VCR, or Camcorder) to the DCS 200 unit using an
S-Video cable, I am unable to see video in the MovieStar 5 preview window.
Make sure your video is playing on your video source. Launch MovieStar 5 and select a
capture profile. Next, click the Capture button at the top of the MovieStar 5 window. Select
your device from the Video Device drop-down menu. Locate the red button with the circle
in it, directly below the MovieStar 5 preview window. Located to the right of the red button,
a drop-down box appears. Click the drop-down arrow and select S-Video. Your device is
now configured for S-Video capture.
When I try to capture video using the DCS 200 and MovieStar 5, the preview screen in
MovieStar 5 displays a green and black image.
Begin by closing and reopening MovieStar 5. Located below the profile option buttons (DV,
Video CD, S-Video CD, DVD, MultiMedia), a radio button appears with two options:
PAL/Europe and NTSC/USA. Make sure the NTSC/USA radio button is checked (has a
black dot in it).
Dazzle DVD Creation Station 200 User’s Guide • Troubleshooting • Page 35
Page 36

How do I increase my computer system’s resources for optimal video performance?
1. Enable Direct Memory Access (DMA).
2. Lower Hardware Acceleration.
3. Get the latest Video Adapter Drivers.
4. Get the latest DirectX Drivers and Digital Video Capture Update from Microsoft.
5. Delete Temporary Files.
6. Lower Screen Resolution and Color Depth to a maximum of 1024 x 768 24-bit.
7. Update Windows.
8. Update Windows Media Player.
9. Turn off the Windows Screen Saver.
• Right click on the Desktop.
• Select Properties.
• Select Screen Saver.
10. Close all other Applications (not for Windows 2000 or NT)
• Press <Ctrl-Alt-Delete> on your keyboard. The Close Program dialog box appears.
• Select a program other than Explorer and Systray.
• Click End Task.
• Repeat the above steps until Explorer and Systray are the only two open programs.
11. Set Windows Virtual Memory (Windows 98 SE, Me, only)
• Right click on My Computer.
• Select Properties.
• Select the Performance tab.
• Select the Virtual Memory button.
• Select the Choose Settings option.
• Set both numbers to 1 1/2 times the amount of physical memor y (RAM) installed on
your PC (maximum and minimum).
• Click OK.
• Click Yes .
Note: If you experience any problems after setting virtual memor y, set it back and
allow Windows to manage the file.
12. Run a disk defragmenting program to speed up your computer's data access
functions. (Windows 98 SE, Me only):
• Click Start.
• Click Run.
• Type Defrag.
Dazzle DVD Creation Station 200 User’s Guide • Troubleshooting • Page 36
Page 37

13. Disable Windows Visual Effects (Windows XP only):
• Open the System Properties.
• Click the Advanced tab.
• Click the Performance - Settings button.
• Click the Adjust for best performance radio button.
• Click OK.
• Click OK.
14. Set the Windows Page File (Windows XP only):
• Open the System Properties.
• Click the Advanced tab.
• Click the Performance - Settings button.
• Click the Advanced tab.
• Click the Change button.
• Select Custom Size.
• Enter 1 1/2 times the amount of physical memory (RAM) installed on your PC
for Initial Size and Maximum Size.
• Click the Set Button.
• Click OK three times.
• Restart your computer.
For more information regarding the above procedure, please visit the Dazzle Interactive
Support Site at www.Dazzle.com. Begin by clicking the Support link, then select
Interactive Support. Next, locate the GoTo FAQ Answer ID # Box, enter 301 into the
provided box, and click GO.
Dazzle DVD Creation Station 200 User’s Guide • Troubleshooting • Page 37
Page 38

Dazzle DVD Creation Station 200 User’s Guide • Page 38
Page 39

Technical Support
Interactive Support Site
The Dazzle DCS 200 is relatively easy to use and normally should not produce
complications. However, if you need assistance or have questions of any kind, our trained
staff members are ready to help. We highly recommend that you use the Dazzle Interactive
Support Site, as this is the fastest method of obtaining technical support for your Dazzle
product. Begin by visiting www.Dazzle.com, then click the Support link and select
Interactive Support. E-mail support is also available via our Interactive Suppor t Site.
Dazzle DVD Creation Station 200 User’s Guide • Technical Support • Page 39
Page 40

Live Telephone Support
Dazzle's live phone support can be reached 24 hours a day 7 days a week.
If you are calling Dazzle Technical Support for the first time, or if you are within your 30 day
free technical support window (30 days from placement of first suppor t call), contact
Dazzle at 203-315-4230.
If you have extended beyond your free 30 day technical support window, contact Dazzle at
800-570-9548 (charges apply). We highly recommend having your computer nearby when
calling to facilitate troubleshooting.
If you wish to contact Dazzle Technical Suppor t via fax, you may do so at 203-483-5985.
In the UK, please contact local support at (0) 9062 160 180 (25p/minute).
Dazzle DVD Creation Station 200 User’s Guide • Technical Support • Page 40
 Loading...