

Page 1
AIN
R
S
HELF
The Rain Collector Shelf provides a good mounting support for your Rain Collector II. The Rain Collector Shelf is designed to be attached to Davis’ Sensor
Mounting Arm, and all necessary hardware is included to complete this installation. The Rain Collector Shelf may also be adapted, however, for other
mounting needs. This instruction manual is designed to take you step-by-step
through the process required to install and use your Rain Collector Shelf.
Please take the time to read through this manual before beginning the process.
C
OMPONENTS
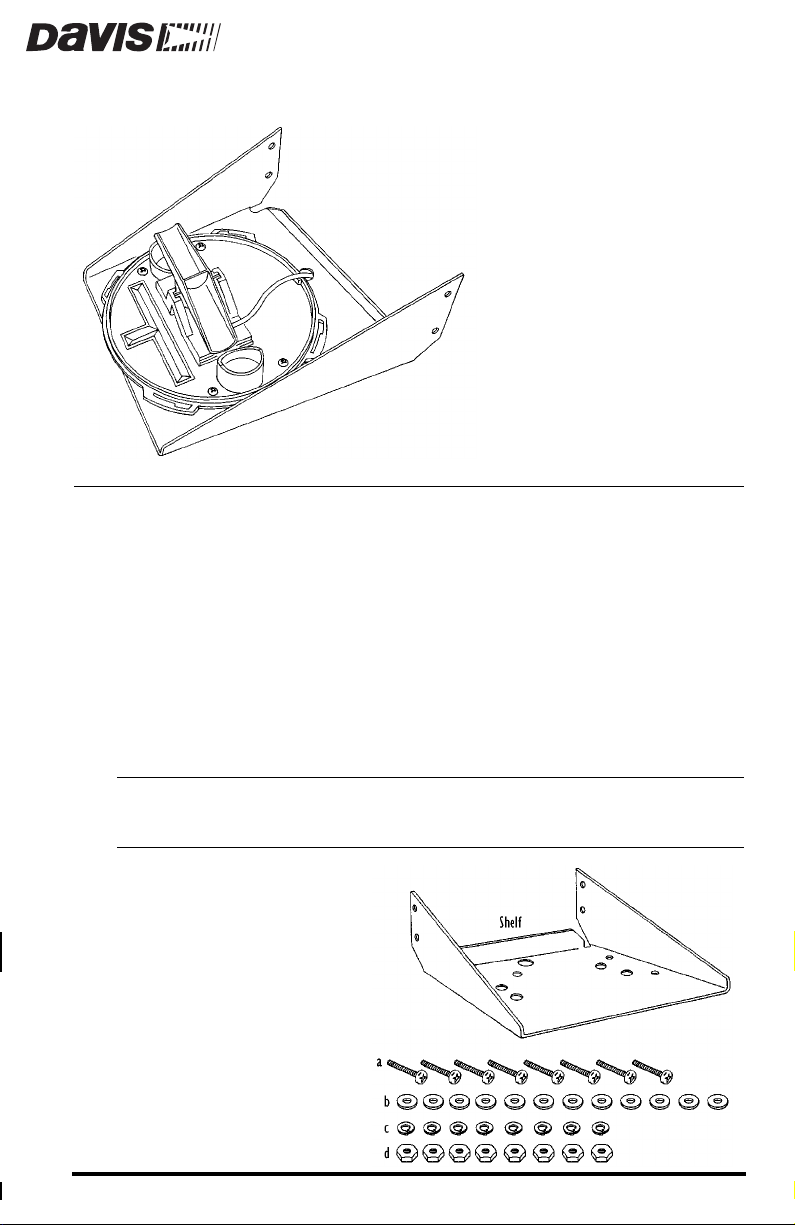
The Rain Collector Shelf includes the following components. Please make sure
you have all listed components before continuing.
OLLECTOR
C
M
ANUAL
Note:
The Rain Collector Shelf includes all hardware necessary to mount the shelf onto Davis’ Sensor
Mounting Arm. If you plan to mount the Rain Collector Shelf without the Sensor Mounting Arm,
you will need to supply some extra hardware (see “Tools and Materials Needed” on page 2).
✦
Shelf
Installation Hardware Kit
✦
a. Eight #8-32 x 3/4"
(19 mm) Screws
b. Twelve #8 Flat
Washers
c. Eight #8 Split Lock
Washers
d. Eight #8-32 Hex
Nuts
Product # 7704
Page 2

OOLS AND MATERIALS NEEDED
T
In addition to the components listed above, you will need some of the following tools and materials. Please be sure you have everything you need before
beginning the installation.
Medium Phillips Screwdriver
✦
✦
Wrench or Pliers
You may need some of the following materials in order to mount the Rain Collector Shelf on a post, wall, or other wooden surface.
One Piece of 2"x4" Wood
✦
Four Angle Brackets
✦
✦
Four Wood Screws
Four Lag Screws
✦
Adjustable Wrench or 11/32" (9 mm) Wrench or Nut Driver
✦
Page 2 Rain Collector Shelf Manual
Page 3
YPICAL
T
R
AIN
OLLECTOR
C
S
HELF
NSTALLATIONS
I
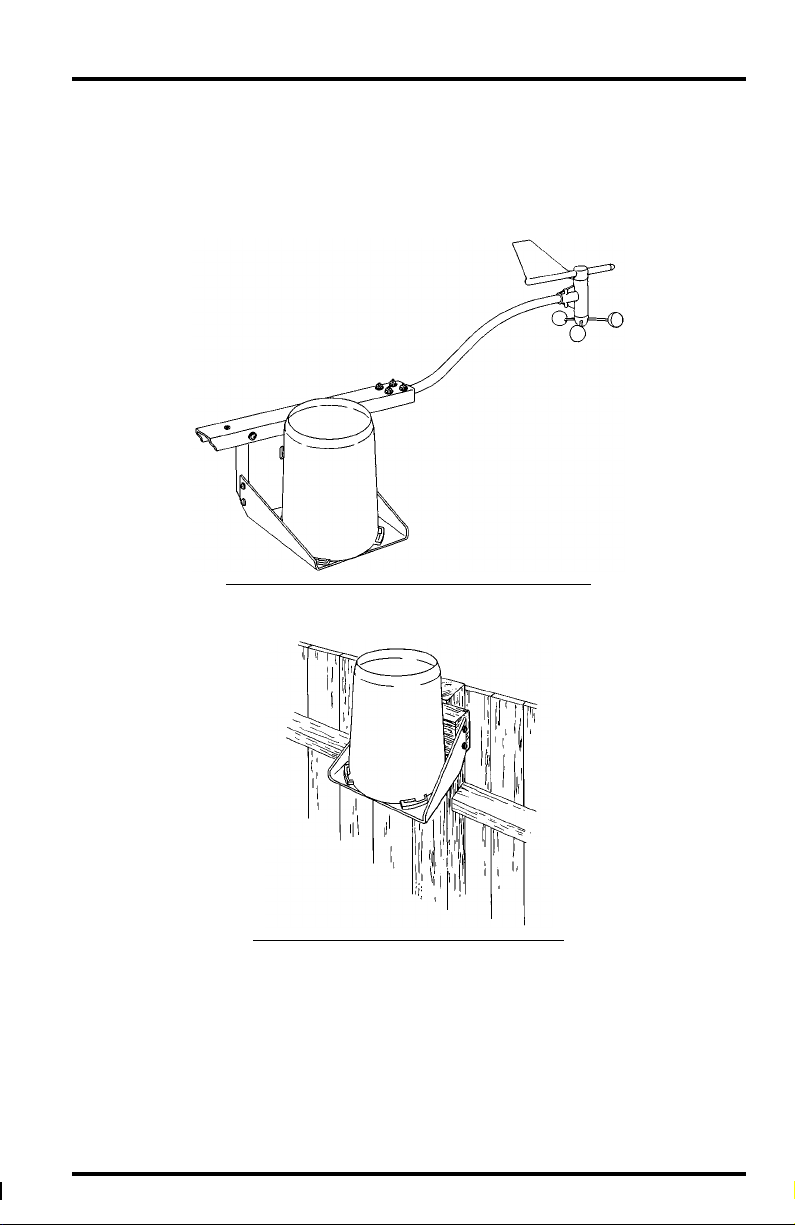
The illustrations below show two typical Rain Collector Shelf installations. The
first shows the Rain Collector Shelf attached to Davis’ Sensor Mounting Arm.
The second shows the Rain Collector Shelf attached to a wooden post (on a
fence in this case).
R
AIN
C
OLLECTOR
S
HELF
A
TTACHED
TO
S
ENSOR
M
OUNTING
A
RM
R
AIN
C
OLLECTOR
S
HELF
A
TTACHED
TO
W
OODEN
P
OST
Typical Rain Collector Shelf Installations Page 3
Page 4

OUNTING
M
THE
S
HELF
ONTO
THE
ENSOR
S
OUNTING
M
A
RM
1. Position the shelf so the holes in the sides line up with the holes in the Sensor Mounting Arm’s mounting bracket.
2. Place a #8 flat washer over the end of each #8-32 x 3/4" screw.
3. Slide one #8-32 x 3/4" screw (with washer) into each of the four holes on the side of
the shelf and through the holes in the Sensor Mounting Arm’s mounting bracket.
4. Attach the shelf to the mounting bracket using one #8 flat washer, one #8 split lock
washer, and one #8-32 hex nut on each of the screws.
Tighten until the shelf is securely attached to the mounting bracket.
M
OUNTING
THE
S
HELF
ONTO
THE
S
ENSOR
M
OUNTING
A
RM
Page 4 Rain Collector Shelf Manual
Page 5

OUNTING
M
General instructions for mounting onto a wall or a post are included below.
You will need to adapt these instructions to meet your needs. The illustration
below shows the two basic mounting methods.
1. If necessary, attach angle brackets to the shelf using the #8-32 x 3/4" screws, #8 flat
2. Attach the shelf or the angle brackets to the piece of wood or the mounting surface
3. If necessary, fasten the piece of wood (with shelf) to the mounting surface using four
THE
HELF
S
washers, #8 split lock washers, and #8-32 hex nuts provided.
using wood screws.
lag screws.
ONTO
A
ALL
OR
W
OST
P
M
Mounting the Shelf onto a Wall or Post Page 5
OUNTING
S
HELF
ONTO
W
ALL
P
OR
OST
A
Page 6

TTACHING
A
THE
R
AIN
OLLECTOR
C
II
TO
THE
S
HELF
1. Remove the Rain Collector II’s cone from the base.
Consult your Rain Collector II manual for instructions.
2. If necessary, detach the Rain Collector II from its current mounting surface by removing the screws from the base.
Consult your Rain Collector II manual for instructions.
3. Position the Rain Collector II base on the shelf so the holes on the base line up with
the holes in the shelf.
The four large holes in the shelf are for water runoff.
4. Insert one #8-32 x 3/4" screw into each of the holes.
5. Attach the Rain Collector II base to the shelf using a #8 flat washer, a #8 split lock
washer, and a #8-32 hex nut on each of the screws.
Tighten until the base is securely fastened to the shelf.
A
TTACHING
THE
C
R
AIN
OLLECTOR
II
S
TO
THE
HELF
6. Replace the Rain Collector II’s cone.
Consult your Rain Collector II manual for instructions.
Page 6 Rain Collector Shelf Manual
Page 7

AINTENANCE
M
Make certain the water runoff pathways between the base of the Rain Collector
II and the shelf remain unobstructed. Periodically check the runoff holes in the
shelf to make sure they do not become clogged.
NSTRUCTIONS
I
Maintenance Instructions Page 7
Page 8

Product Number: 7704
Davis Instruments Part Number: 7395-094
Rain Collector Shelf
Rev. B Manual (7/7/99)
This product complies with the essential protection requirements of the EC EMC
Directive 89/336/EC.
© Davis Instruments Corp. 1997. All rights reserved.
 Loading...