

Page 1
Mark 3 Sextant User’s Guide
00011.220, Rev. G
March 2021
How to Find Your Position
with the Mark 3 Sextant
Total pages 20
Trim to 5.5 x 8.5"
Black ink only
EDITED BY ROBERT B. KLEID
© 2021 Davis Instruments Corp.
Page 1 (front cover)
STANDARD
MARK 3
#011
Page 2
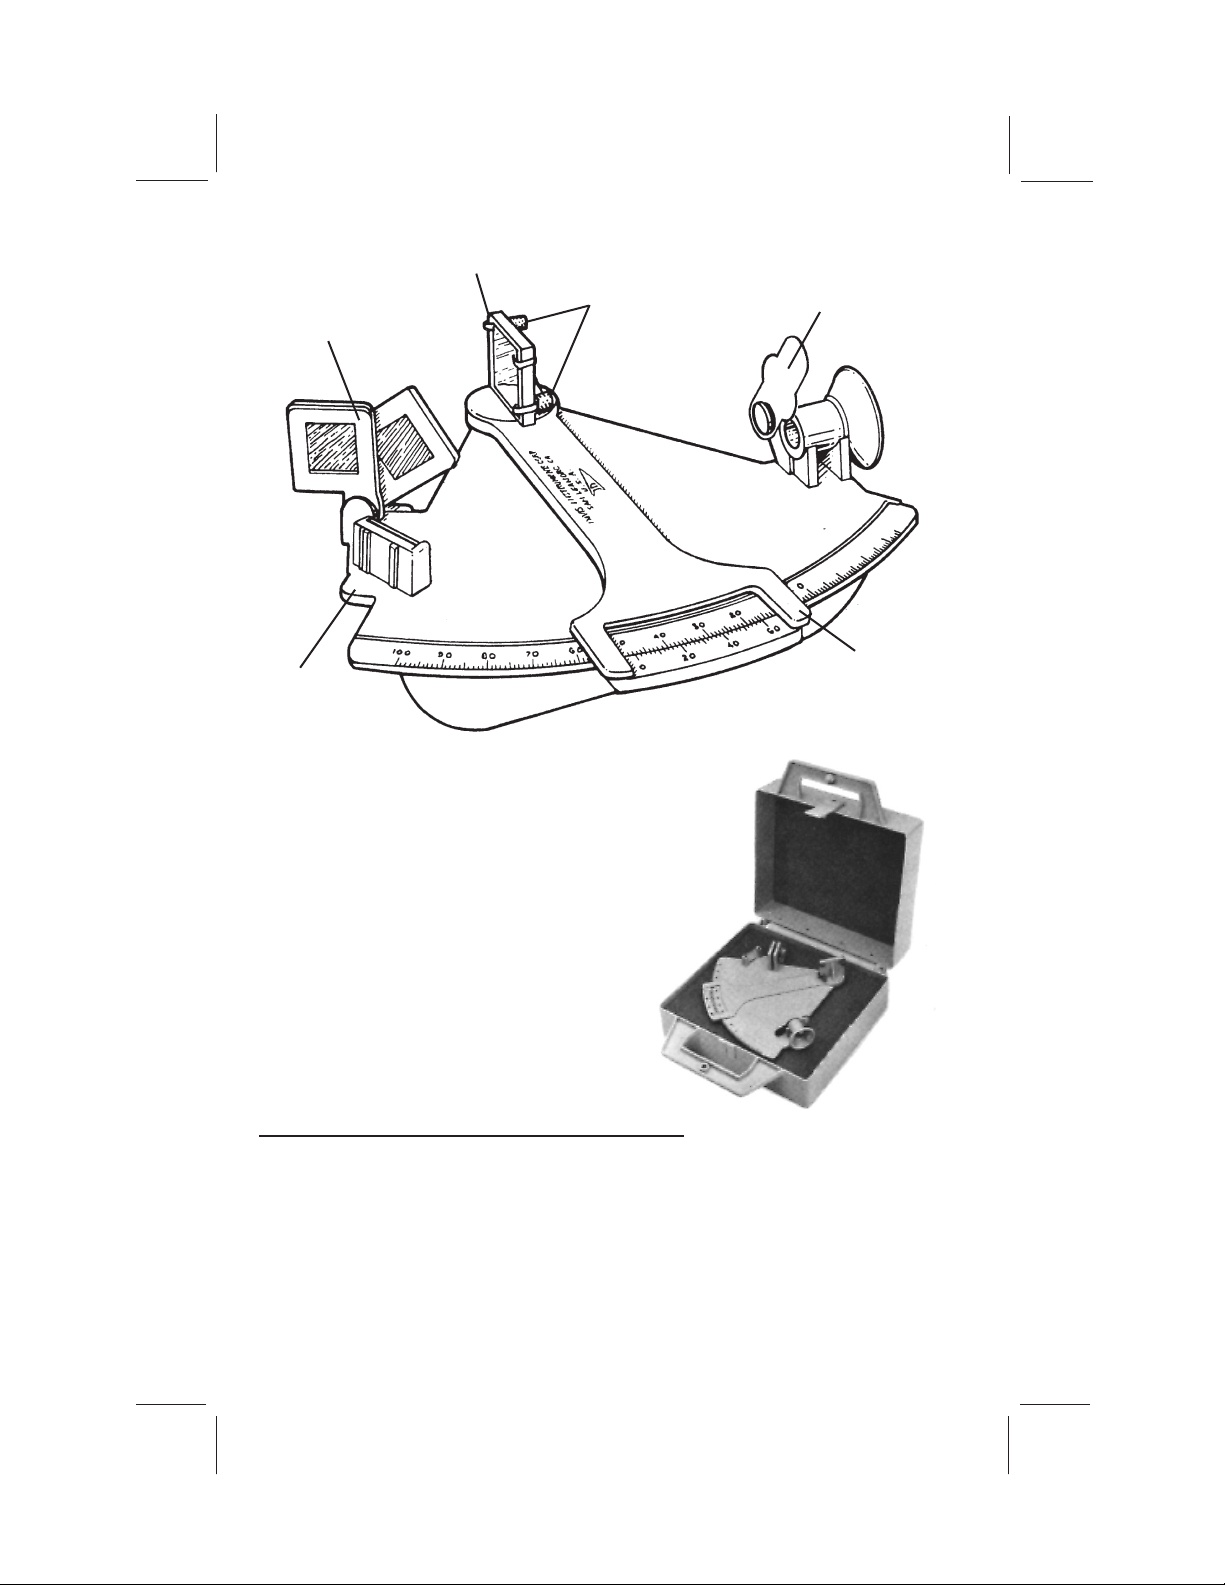
INDEX SHADES
INDEX MIRROR
ADJUSTMENT
SCREWS
HORIZON
SHADES
EYE
PIECE
HORIZON
MIRROR
OPTIONAL PROTECTIVE CASE
Contact your local dealer or Davis Instruments to
order.
R014A Sextant Case
R014B Foam Set for case
Mark 3 Sextant Userʼs Guide
Product #011
© 2021 Davis Instruments Corp. All rights reserved.
INDEX ARM
00011.220, Rev. G March 2021
Page 3
HOW TO FIND YOUR POSITION WITH A SEXTANT
This booklet has been written as an introduction to your new Davis sextant. By
studying its pages, you will learn how to operate your sextant, how to find the altitude of the sun, and how to use your readings to calculate location. The meridian
transit method of navigation described is both easily learned and simply
applied. When you finish reading, the mystery surrounding celestial navigation
and sextant use should disappear. Before becoming an accomplished navigator,
however, you will need to study those aspects of navigation which are beyond the
scope of this booklet.
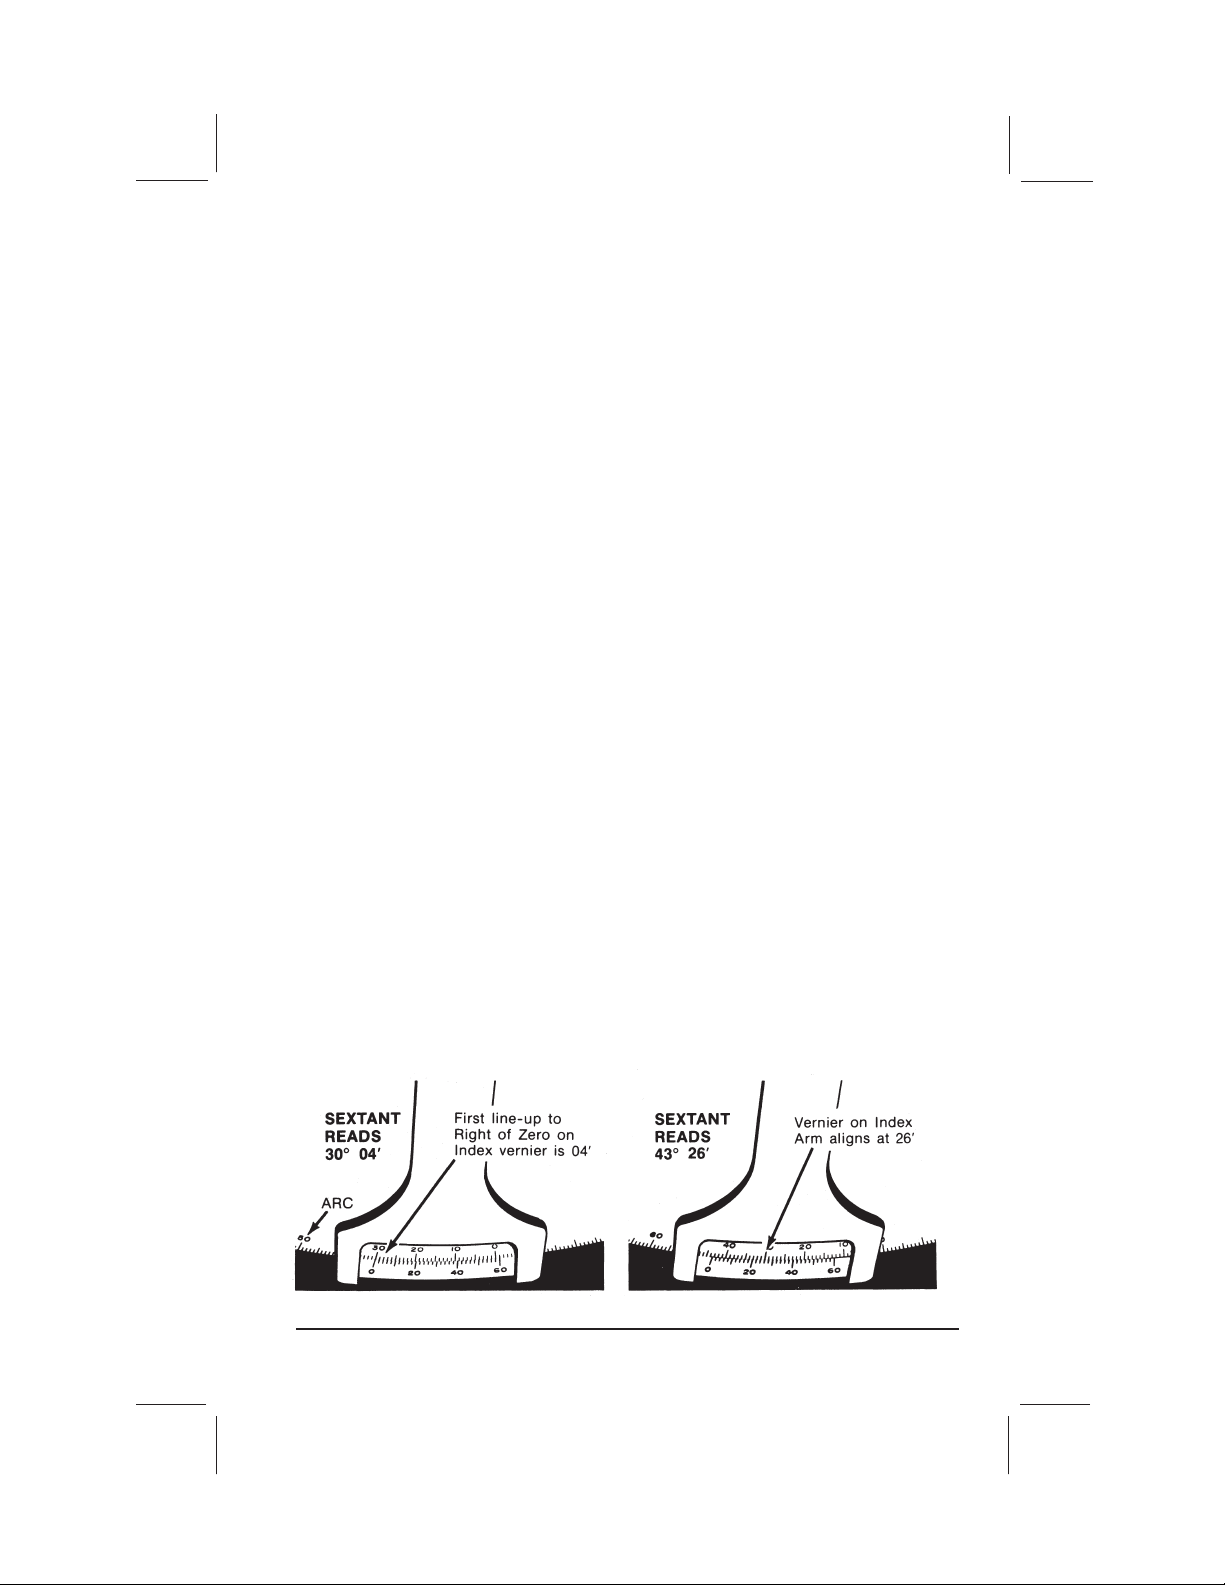
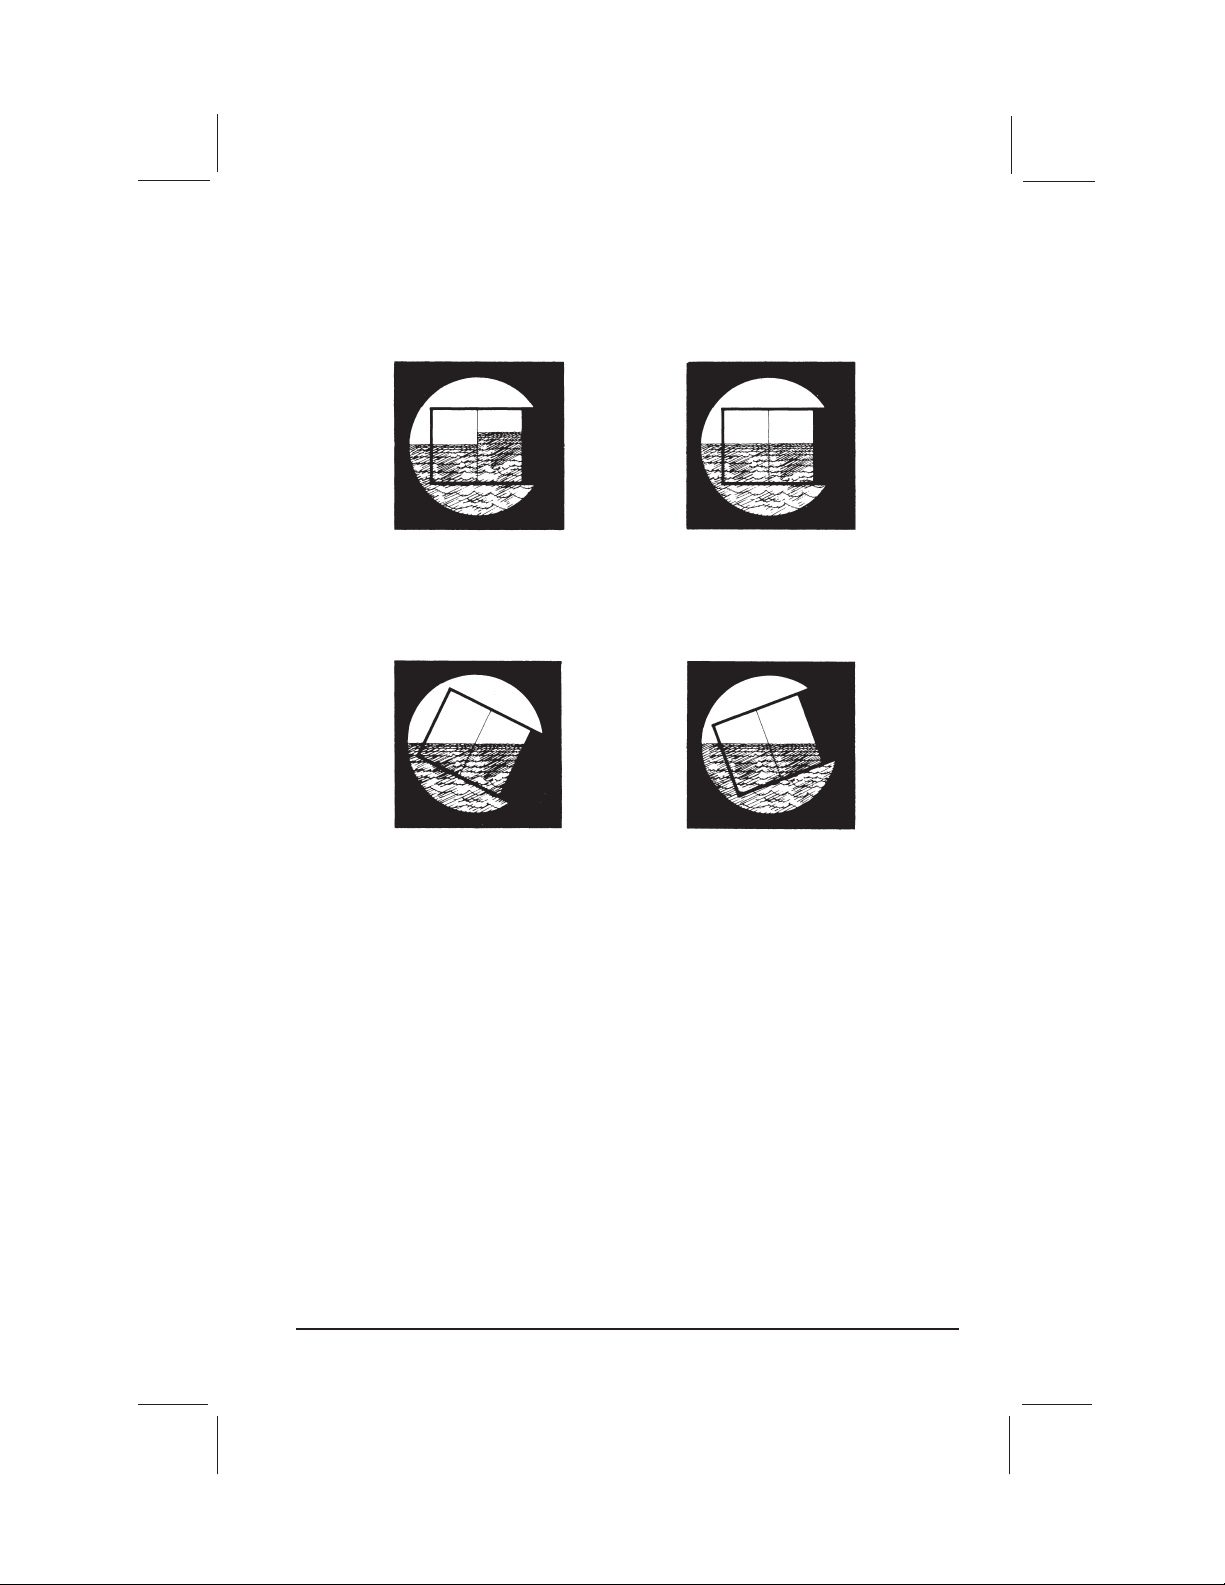
HOW TO READ THE VERNIER
There are two scales on the sextant. The scale on the frame is called the “arc,”
while the scale on the index arm is the “vernier.” Each division of the arc equals
one degree. Each division of the vernier equals two minutes (2'). To read the
number of degrees, find the lines on the arc which are closest to the zero mark on
the vernier. The zero mark is usually somewhere between two lines. The correct
arc reading is always that of the lower value, i.e., the line to the right of the zero
mark. To read fractions of a degree, find the division of the vernier which is in
alignment with a division of the arc.
To get a clear picture of how this works, set the zero on the vernier exactly
beneath any whole degree mark on the arc—letʼs say 30°. Now move the index
arm very slightly to the left until the first vernier mark to the right of the zero lines
up exactly with a mark on the arc. Since the marks on the vernier are 2' apart,
you have actually moved the index arm 2' beyond 30°; your sextant reads 30° 02'.
Now, move the index arm slightly further to the left so that the next division of the
vernier comes into alignment with a division of the arc. Your sextant now reads
30° 04' (Fig. 1).
As you continue moving the index arm, successive divisions of the vernier will
come into alignment with a division of the arc. When the last mark on the vernier
(60') is in alignment with a division of the arc, the sextant will read 31°. In figure 2
below, the sextant reads 43° 26'.
Figure 1
Figure 2
Page 1
Page 4
MARK 3 SEXTANT ADJUSTMENT
Adjusting your Mark 3 Sextant is easy and should be done each time it is used.
All adjustments are made with the index mirror, the large movable mirror at the
pivot of the index arm (it is not necessary to adjust the small horizon mirror, as
the unit construction makes it impossible to be very much in error). On a correctly
adjusted sextant, the index mirror is perpendicular to the frame and becomes parallel to the horizon mirror when the sextant reads zero.
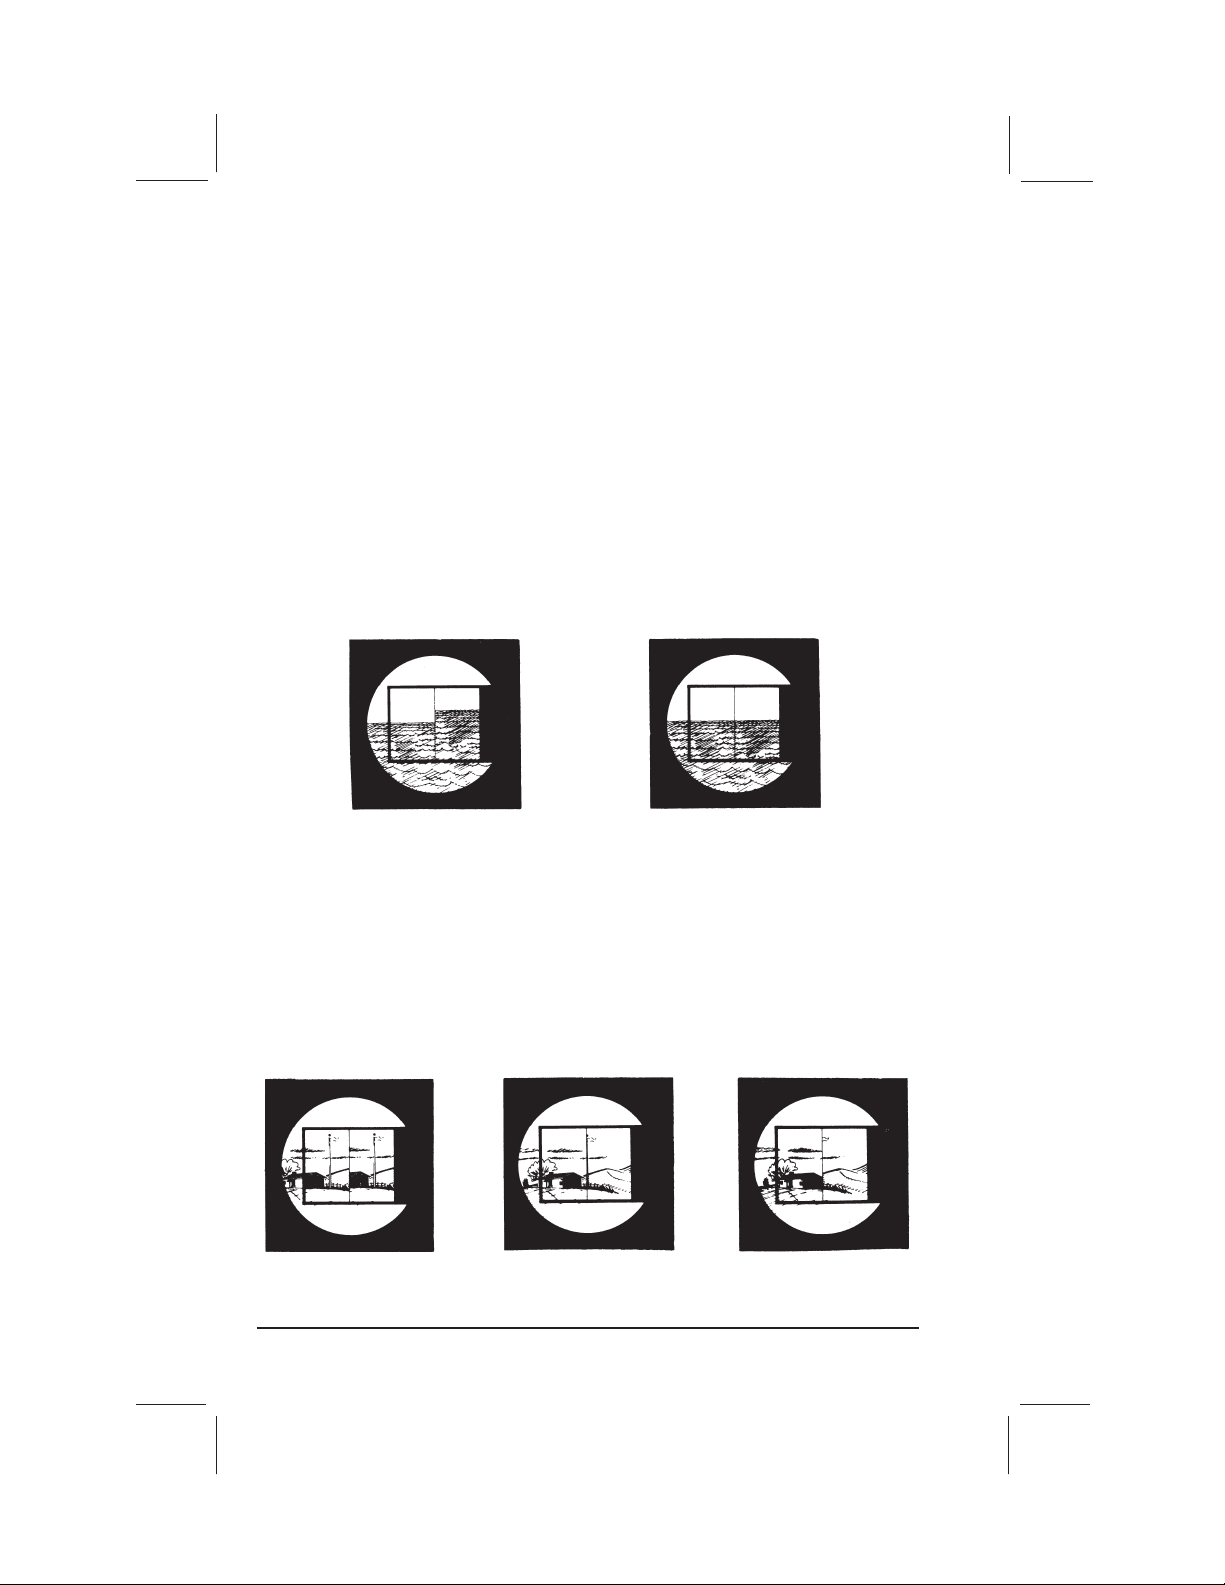
First, adjust the index mirror for “side error” by making it perpendicular to the
frame. Holding the sextant in your right hand, raise the instrument to your eye.
Look at any horizontal straight edge (the sea horizon, for example, or the roof of a
building al least one mile away) and move the index arm back and forth. The real
horizon will remain still while the mirror horizon will appear only when the scales
read close to zero. Line up the mirror horizon and the real horizon so that both
appear as a single straight line (fig. 3).
Mirror horizon is not aligned with
the real horizon—index arm is not
in proper position.
Mirror horizon and real horizon
form a single straight line—index
arm is properly positioned.
Figure 3
Now do a vertical adjustment. Without changing the setting, look through the
sextant at any vertical line (a flag pole, for example, or the edge of a building) and
swing the instrument back and forth across the vertical line. If the index mirror is
not perpendicular to the frame, the line will seem to jump to one side as the mirror
passes it. To correct this, slowly tighten or loosen the screw closest to the frame at
the back of the index mirror until the vertical line no longer appears to jump (fig. 4).
Index mirror screw
too tight.
Index mirror screw
correctly adjusted.
Index mirror screw
too loose.
Figure 4
Page 2
Page 5
Finally, remove the index error. Set the sextant at zero and look at the horizon.
With the sextant still held to your eye, turn the screw that is furthest from the frame
at the back of the index mirror until the two horizons move together and form one
straight line. The index mirror is now parallel to the horizon mirror (Fig. 5).
Index mirror not parallel to
horizon mirror.
On a correctly adjusted sextant, the real and mirror horizons remain in a single
line when the instrument is rocked from side to side (Fig. 6).
Figure 5
Index mirror parallel to
horizon mirror.
Figure 6
While you should know how to adjust your sextant for index error, it is not necessary to remove it entirely. It is standard practice to simply note the error and then
correct oneʼs reading for this amount each time the sextant is used (as much as
6' index error is allowable). To check for index error, hold the sextant in your right
hand and look at the sea horizon. By moving the index arm, line up the real and
mirror horizons so that both appear as a single straight line. Now, look at the
scale. If it reads zero, there is no index error. If the scale reads anything but zero,
there is an index error which must be added to or subtracted from each reading.
For example, if the scale reads +6' when the horizons are aligned, the 6ʼ is subtracted. If the reading is below the zero mark, for example –6', the 6' is added
(Note: for an index error of –6', the scale actually reads 54').
MEASURING THE SUN’S ALTITUDE
When looking at the sun through the sextant, be sure to use a sufficient number of shades to protect your eyes from the direct rays of the sun. Choose
the combination of index and horizon shades that gives you a clear image of the
sun without glare.
Page 3
Page 6

To measure the sun’s altitude, stand facing the sun with the sextant in your
right hand. With your left hand on the index arm, look through the eye piece at the
horizon and move the index arm until the sun is visible through the two mirrors
and index shades. Rock the entire sextant from side to side so that the sunʼs
image travels in a half-arc. Now, adjust the index arm to bring the sunʼs image
down to just touch the horizon (Fig. 7).
Figure 7
The sun’s image travels
in a short arc which just
touches the horizon.
Being careful not to disturb the setting, read the sunʼs altitude from the scales on
the sextant. Since all calculations in the Navigation Tables use the center of the
sun or moon, this lower limb reading must be adjusted for semi-diameter correction, shown later.
HEIGHT OF EYE
When measuring the altitude of the sun, we want to measure the angle formed by
a ray from the sun and a plane tangent to the earth at the point where the observer is standing. Due to the height of the eye of the observer, however, the visible
horizon actually falls below this theoretical plane (Fig. 8).
To correct for the height of
the eye, one must apply a
“dip correction.” Dip correc-
tion increases as the eye is
raised further above the surface of the water (Table 1)
and must always be subtracted from the sextant reading.
Table 1
Height of Eye Correction
Feet Meters Dip
5 1.5 2'
10 3.0 3'
15 4.5 4'
25 7.5 5'
40 12.0 6'
Page 4
Figure 8
Due to the height of the eye of the observer, the
visible horizon (H) falls below the plane (P) tan-
gent to the earth at the point where the observer
is standing.
Page 7

LATITUDE, LONGITUDE, and the NAUTICAL MILE
A great circle is a circle on the surface of the earth, the plane of which passes
through the center of the earth. A small circle is a circle whose plane does NOT
pass through the center of the earth. The equator and the meridians are great circles, while parallels of latitude are small circles which become progressively
smaller as the distance form the equator increases. At the poles (90° N or S),
they are but single points (Fig. 9).
Figure 9
The plane of a meridian (a great
circle) divides the earth into two
equal halves.
A nautical mile is equal to one minute of arc of a great circle. Since latitude is
measured north or south from the equator, it is measured along a meridian
(a great circle). One minute of latitude equals one nautical mile anywhere on the
earth. Since longitude is measured east or west from the prime meridian (zero
degrees) at Greenwich, England, it is measured along a parallel of latitude
(a small circle). One minute of longitude equals one nautical mile only at the
equator. Approaching the poles, one minute of longitude equals less and less of
a nautical mile (Fig. 10).
The plane of a parallel of latitude
(a small circle) divides the earth
into two unequal parts.
Figure 10
Note that the nautical mile is about
15% longer than the statute mile:
Nautical Mile Statute Mile
6076 feet 5280 feet
1852 meters 1609 meters
The earth measures 21,600 nautical
miles in circumference (24,856 statute
miles).
Page 5
Page 8

DECLINATION
Every star and planet, including the sun, has a ground position, i.e., the spot on
the earth directly beneath it. Standing at the sunʼs ground position (G.P.), you
would have to look straight up to see the sun; if you were to measure its altitude
with a sextant, you would find the altitude was 90°.
From the earth, the sun seems to move across the sky in an arc from east to
west. During certain times of the year, it is “moving” around the earth directly
above the equator or, in other words, the sunʼs G.P. is running along the equator.
Declination of the sun at this time is zero. However, the sunʼs G.P. does not stay
at the equator throughout the year. It moves north to a maximum of 231/2° N in
the summer of the northern hemisphere, and south to a maximum of 231/2° S in
the winter. The distance of the sunʼs G.P. from the equator, expressed in degrees
north or south, is known as the declination of the sun (Fig. 11).
Figure 11
In like manner, each star has a ground position and a declination. The decli-
nation of Polaris is 89° 05' N; it is nearly directly above the North Pole. In the
northern hemisphere, you can find your approximate position by taking a sight on
Polaris. The reading will vary depending upon the time of night but will never be
more than 55 miles off. This is a useful check each evening; the altitude of Polaris
will be your approximate latitude without adding or subtracting anything. If you
were to find the altitude of Polaris in the evening and again at dawn, your true latitude would be between the two measurements,
providing you did not change latitude between the
two sights. It is, of course, possible to calculate
oneʼs exact latitude from Polaris with the aid of the
Nautical Almanac, but such a discussion is beyond
the scope of this booklet.
To find POlaris, locate the pointers of the Big
Dipper (Fig. 12). Find a point in line with the pointers and five times the distance between them.
There, shining alone, is Polaris. The Big Dipper
revolves around Polaris, so be prepared to see the
diagram in any position.
Figure 12
Page 6
Page 9

FINDING LOCAL NOON & THE SUN’S ALTITUDE
AT MERIDIAN PASSAGE
A meridian is an imaginary line drawn on the earthʼs surface from pole to pole; a
local meridian is one which passes through the position of an observer. When the
sun crosses the local meridian, it is at its highest point. It is said to be in meridian
passage and the time is local noon. Local noon may vary a half an hour (and in
daylight savings time, one and one-half hours) from the noon shown on the clock,
due to both the equation of time (to be discussed later) and the fact that our
clocks are set to zone time. All clocks in a zone 15° wide show the same time.
To find local noon, follow the sun up with a series of sights, starting about half an
hour before estimated local noon. Note the time and the sextant reading carefully.
Take a sight about every three minutes until the sunʼs altitude is no longer
increasing. During meridian passage, the sun will seem to “hang” in the sky for a
short period at its highest point, going neither up nor down. Carefully note the
sextant reading. This is the sun’s altitude at meridian passage. To determine
the exact time of local noon, set your sextant at the same altitude as your first
sight. Wait for the sun to drop to this altitude, and note the time again. The time of
local noon is exactly half way between the times of the two sights.
Record the local time and the sextant reading when the sun was at the highest
point. These two readings will serve to locate your position. The time is used to
determine longitude and the sextant reading to determine latitude.
AN EXAMPLE OF A COMPLETE SIGHT
Let us assume for this example that your ship is sailing from San Francisco to
Hawaii and you have been using the sun to find your position each day. To allow
plenty of time to follow the sun up to its highest point, you make sure that you
have completed all your preparations by 10:00 a.m. local time. Your chart shows
yesterdayʼs position. From this position, you draw a line in the direction you are
traveling equal in length to the estimated number of miles to be traveled by noon
today. This is your “dead reckoning position” (D.R.), which will be compared with
your “noon sight.”
You note that you are standing on deck with your eye ten feet above the water
(for Dip correction) and that the index error of your sextant is +5'.
At about 11:20 a.m., you begin taking sights. At 11:23:30, your first sextant reading is 82° 56'. You continue recording the sunʼs altitude approximately every three
minutes until the sun seems to “hang” in the sky, dropping to a lower altitude at
your next sight. The maximum altitude of the sun, 84° 56', is the altitude of the
sun at meridian passage. You continue taking sights until 12:03:30, when the sun
Page 7
Page 10

has dropped to your original reading of 82° 56'. You know that the sun reached its
meridian at 11:43:30 (exactly half the time between 11:23:30 and 12:03:30). Next,
you find the Greenwich Mean Time (GMT) of your local noon by listening to the
radio time signal, correcting any error your watch may have had. In this example,
you tune in the time signal and find that GMT is now 22:10:00. Your watch reads
12:10:00, so it has no error. You know that your local noon occurred at GMT
21:43:30 (26 minutes 30 seconds ago).
You now have enough facts to work out your noon sight: the date, the time of
meridian passage (local noon), the altitude of the sun at meridian passage, the
height of your eye above the surface of the sea, and the index error of the sextant
you are using.
FINDING LONGITUDE
Meridians of longitude are measured east or west from the prime meridian (zero
degrees) at Greenwich, England. Because the ground position of the sun moves
around the earth at an average speed of 15° per hour (15 nautical miles per min-
ute), longitude may be calculated by comparing local noon with Greenwich
Mean Time. For example, if local noon occurred at 2:00 GMT, your longitude is
approximately 30° west of Greenwich (2 hours x 15°/ hour = 30°).
To determine oneʼs exact position, the equation of time must be applied. The
earth in its orbit around the sun does not travel at a constant speed. Clocks and
watches, therefore, keep the time of a fictitious or mean sun which travels at the
same average speed throughout the year, and the position of the true sun (as
seen from the northern half of the earth) is not always due south or 180° true at
noon by the clock. The difference in time between the true sun and the mean sun
is call the “equation of time.” The equation of time for any given day may be found
in a Nautical Almanac; its approximate value may be found in the student tables
at the end of this booklet.
Page 8
See figure 13 for a diagram based on this example.
Page 11

FINDING LATITUDE
The altitude of the sun at local noon may also be used to calculate latitude. First,
the measured altitude must be corrected for index error, height of eye, refraction,
and semi-diameter. Refraction correction is negligible for altitudes above 25°,
while the semi-diameter correction averages +0° 16' (semi-diameter correction
adjusts the sextant reading from an observation of the lower limb of the sun to
one of the center of the sun; 16' equals one-half the sunʼs diameter). After the
corrections are made, determine the declination of the sun from the Nautical
Almanac or from the approximate declination values at the end of this booklet.
Finally, calculate latitude by combining the altitude of the sun at local noon with
the declination of the sun from the navigation tables. Assuming you are north of
the sun, the following formula is used in northern latitudes:
Latitude = 90° – Corrected Altitude ± Declination of the Sun
When the sun is north of the equator, ADD the declination; when it is south of the
equator, SUBTRACT the declination.
See figure 14 for a diagram based on this example.
Page 9
Page 12

Presentations shown here are commonly used by navigators to help insure the
accuracy of their calculations:
Figure 13 Figure 14
Longitude Diagram
(view of earth looking at
the South Pole)
Latitude Diagram
(view of earth looking at
the Equator)
Figure 14
Position plot
on a chart.
SYSTEMS OF CELESTIAL NAVIGATION
The method described above for calculating your position is the oldest method
used since the introductions of the chronometer. Please note the following:
1. Latitude may be determined at noon if you know the corrected altitude of the
sun and its declination. You need not know the time. The accuracy of your calculation is limited only by the accuracy of measurement of the sunʼs altitude
and by the accuracy of the declination tables.
2. To determine longitude, you must know both the time of observation and the
equation of time. While your sextant gives highly accurate measurements,
practical difficulties inherent in this method normally preclude accuracy of more
than 10' of longitude.
Page 10
Page 13

A generalized system of position determination which enables you to use observation of the sun and other celestial bodies made at times other than noon
requires knowledge of the navigation triangle, circles of equal altitude, assumed
position, and associated navigation tables such as the Nautical Almanac and
Sight Reduction Tables. These systems of celestial navigation are thoroughly
studied and extensively used by serious navigators throughout the world.
Sets of work forms for the Sight Reduction Tables are used by nearly all navigators to help prevent errors and omissions in the calculation of celestial navigation
problems.
THE ARTIFICIAL HORIZON
At times, it is not possible to see the natural horizon. Sun or moon shots may still
be taken, with the aid of an artificial horizon—a simple device containing water or
oil shielded from the wind (see below). It may be used by individuals exploring
inland far from the sea, or by students or experienced navigators to practice
celestial navigation without traveling to large bodies of water.
Davis Instruments manufactures the Davis
#144 Artificial Horizon, pictured here. The
instrument is wind-proof and corrosion resistant; its reflecting surface is completely
enclosed. Two sun shades and a lid are
included.
To use an artificial horizon:
1. Position the artificial horizon on level ground or other steady place. One end of
the artificial horizon should face directly into the sun so that a shadow is cast at
the opposite end. The sides and end facing the sun should be shadow-free.
2. Looking into the center of the liquid, move your head about so that you can see
the sun reflected on the liquid surface.
3. Bring the sextant to your eye and move the index arm of the sextant until you
see two suns—on reflected on the liquid and a double-reflected image on the
mirrors.
Page 11
Page 14

4. Line the two suns up by continuing to move the index arm. For a lower limb
observation, bring the bottom of the mirror image into coincidence with the top
of the image on the liquid.
5. After the observation has been made, apply the index correction.
6. Halve the remaining angle and apply all other corrections (except for Dip or
height of eye correction, which is not applicable) to find the altitude of the sun.
Figure 16
Note: Since the sextant reading made with an artificial horizon must be halved,
the maximum altitude that you can observe with the artificial horizon is equal to
one-half the maximum arc graduation on your sextant. There may be several
hours around noon during which the sun is too high to take a sextant reading with
the artificial horizon, so plan sights for the morning or evening hours.
THE SEXTANT AS A PELORUS
Your sextant may also be used to find your position by sighting known land
objects such as lighthouses, small harbors, or any other land features that are
clearly recognizable on the chart. Pick out three features on the land. With the
sextant held horizontally, measure the angle between the center feature and one
of the other features, and note the angle on a piece of paper. As quickly as you
can, measure the angle between the center feature and the third feature. Lay out
the three angles on a piece of tracing paper so that the angles have a common
center point. Move the tracing paper around on the chart until the lines are positioned so as to run through the three features. The point of intersection of the
three angles is your position (Fig. 17).
Page 12
Page 15

Figure 17
Since the sextant does not have a compass, you donʼt need to worry about variation or deviation. However, you must use at least three lines of position.
THE SEXTANT AS A HELIOGRAPH
You can use the sextant mirror to flash the sunʼs rays several miles to attract
attention, or to signal another person who is too far away for your voice to reach.
If you know Morse code, you could even send a message.
1. Hold the sextant so that the index mirror (the larger of the two mirrors) is just
below the eye.
2. With your other arm extended and the thumb held upright, look at the person
you wish to signal.
3. Hold your thumb to a position just below the person, so that your eye (with the
mirror under it), your thumb, and the person are in a straight line (Fig. 18).
4. Using the mirror, flash the sun on your thumb. The sun flashes simultaneously
on the distant person.
Figure 18
Page 13
Page 16

STUDENT NAVIGATION TABLES
The tables on the following pages give the approximate declination and equation
of time of the sun. Latitude calculated with these values will be accurate to about
±15'. The tables are thus intended for study purposes only, although they may be
used for emergency navigation.
NAUTICAL ALMANACS, CHARTS and
TABLES
The Nautical Almanac is published yearly by
the U.S. Naval Observatory and the H.M.
Nautical Almanac Office, Royal Greenwich
Observatory, U.K. It may be purchased from
the superintendent of Documents, U.S.
Government Printing Office, Washington, D.C.,
or from many marine and chart dealers.
Sight reduction tables, plotting sheets and star
finders are also available from many marine
and chart dealers.
FURTHER RESOURCES
Books for learning celestial navigation are available in many maine stores and
larger bookstores. Most often recommended are The American Practical
Navigator (U.S. Navy Hydrographic Office) and Duttonʼs Navigation and Plotting
(U.S. Naval Institute). Other popular and regularly available titles are published by
Cornell Maritime Press and the International Marine Publishing Co.
Videos are available from larger marine dealers, video mail order houses, and
online.
Schools and courses are offered from local planetariums and community colleges in coastal areas. The U.S. Power Squadron (Raleigh, NC) also conducts
regional classes. Other schools and correspondence schools include the
International School of Sailing (Fort Lauderdale, FL) and Ocean Navigator
Training Courses (Portland, ME).
Home study classes may be ordered from the International Navigation School
(Toronto, Ontario, Canada), Starpath School of Navigation (Seattle, WA), Florida
Maritime Institute (Stuart, FL), The Annapolis Sailing School (Annapolis, MD), and
Coastal Navigation (Annapolis, MD).
Page 14
Page 17

REFERENCE:
Approximate Declination & Equation of Time
Page 15
Page 18

Page 16
Page 19

Page 17
Page 20

REPLACEMENT PARTS
Contact your local dealer or Davis
Instruments to order. Specify that your
sextant is the #011 Mark 3.
R011C Index & Horizon Mirrors
w. Springs, Screws, Nuts
CELESTIAL NAVIGATION
AT A GLANCE
Celestial Navigation
Quick Reference Card
This full-color, weatherproof plastic
card presents a simplified yet complete
celestial navigation system. Makes it
easy, proving that lengthy instruction is
not necessary to master the subject.
Includes everything you need: sextant
use and corrections, starfinder for 18
stars, data entry form and step-by-step
sight reduction and plotting procedures.
#132
OTHER DAVIS SEXTANTS
In addition to the Mark 3, Davis offers
two models of master marine sextants.
The Mark 15 offers professional
features—including micrometer drum,
traditional styling, and greater accuracy
than the Mark 3. Allows readings up to
2/10 minute of arc. 3 x 27 mm star
telescope. Precision machined, slow
travel gear and worm mechanism.
#026
The Mark 25 has all the features of the
Mark 15 plus LED lighting and the patented Beam Converger horizon mirror,
which replaces the conventional half-
silvered mirror. The Beam Converger
combines the horizon and astrobody
images into a single full-field view for
easy, reliable sights under the most difficult conditions. Constructed with
stronger and more stable materials to
make this the most accurate of the
Davis sextants.
#025
3465 Diablo Ave., Hayward, CA 94545 U.S.A.
Phone (510) 732-9229 • Fax (510) 732-9188
info@davisinstruments.com www.davisinstruments.com
File page 20 (back cover)
 Loading...