

Page 1

FMS 3.9.3
Page 2

DriveRight Fleet Management Software Version 3.9.3 Users Manual Rev. K (9/16/2009)
Product Number: 8186 Davis Instruments Part Number: 7395.194
Davis Instruments Corp. ©2009. All rights reserved.
This product complies with the essential protection requirements of the EC EMC
Directive 2004/108/EC; Low Voltage Directive 2006/95/EC; and Eco-Design Directive
2005/32/EC>0.5 watt no-load adapter.
DriveRight™ is a registered trademark of Davis Instrument Corp. CarChip™ is a trademark of Davis Instruments Corp. Windows™ is a trademark of Microsoft Corporation.
Page 3

Table Of Contents
DriveRight FMS Help....................................................................................................................... 1
Welcome to DriveRight Fleet Management Software ..................................................................... 1
Getting Started Menu................................................................................................................... 1
Getting Started Menu ...................................................................................................................... 1
Introduction to DriveRight FMS ....................................................................................................... 1
What's New for DriveRight FMS 3.9.3.............................................................................................2
Prior Release Notes ........................................................................................................................ 3
DriveRight Fleet Management Software v3.9.2 Release Notes............................................... 3
DriveRight Fleet Management Software v3.9.1 Release Notes............................................... 4
DriveRight Fleet Management Software 3.8 Release Notes ................................................... 5
DriveRight Fleet Management Software 3.7.2 Release Notes ................................................ 5
DriveRight Fleet Management Software 3.7.1 Release Notes ................................................ 5
DriveRight Fleet Management Software 3.7 Release Notes ................................................... 6
DriveRight Fleet Management Software 3.6 Release Notes ................................................... 7
DriveRight Fleet Management Software 3.5 Release Notes ................................................... 7
DriveRight Fleet Management Software 3.4 Release Notes ................................................... 8
DriveRight Fleet Management Software 3.3 Release Notes ................................................... 8
DriveRight Fleet Management Software 3.2 Release Notes ................................................... 9
DriveRight Fleet Management Software 3.1 Release Notes ................................................... 9
DriveRight Fleet Management Software 3.0 Release Notes ................................................. 10
Architecture.................................................................................................................................... 11
Database Selection Guidelines ..................................................................................................... 12
Converting 2.04-2.06/2.6.1 Database to DriveRight FMS Format ................................................ 13
Setup Overview ............................................................................................................................. 15
Tool Bar ......................................................................................................................................... 17
List of Toolbar Icons ............................................................................................................... 17
Quick Reference ........................................................................................................................ 19
FMS Quick Reference ................................................................................................................... 19
Data Management.................................................................................................................. 19
Data Management Reference Menu ............................................................................................. 19
i
Page 4

DriveRight FMS User's manual
Database Bac
kup Considerations ................................................................................................. 20
Active Database Size Recommendations ..................................................................................... 21
Backup........................................................................................................................................... 22
Restore .......................................................................................................................................... 23
Export Menu .................................................................................................................................. 25
Import Menu................................................................................................................................... 26
CarChip Quick Reference ...................................................................................................... 26
CarChip Quick Reference.............................................................................................................. 26
Adding Drivers, Vehicles and CarChips ........................................................................................ 26
CarChip Considerations ................................................................................................................ 27
CarChip Settings............................................................................................................................ 27
Downloading CarChip Guidelines.................................................................................................. 28
Download CarChip ........................................................................................................................ 28
DriveRight Quick Reference................................................................................................... 29
DriveRight Quick Reference .......................................................................................................... 29
Adding Drivers, Vehicles and DriveRights..................................................................................... 29
DriveRight Settings........................................................................................................................ 30
DriveRight Settings: Verify DriveRight Calibration ........................................................................ 30
DriveRight Settings: Setup GPS.................................................................................................... 31
Downloading Requirements .......................................................................................................... 32
Download DriveRight..................................................................................................................... 33
Download Palm.............................................................................................................................. 34
Mapping Quick Reference Menu............................................................................................ 36
Mapping Quick Reference Menu................................................................................................... 36
How to Create Maps...................................................................................................................... 36
Creating a Trip Map....................................................................................................................... 37
Creating a Day Map....................................................................................................................... 38
Creating an Accident Log Map ...................................................................................................... 38
Export: GPS to MapPoint .............................................................................................................. 39
Export: Accidents to MapPoint ...................................................................................................... 41
Import GPS Data Into MapPoint .................................................................................................... 42
How to View Maps......................................................................................................................... 43
ii
Page 5

Table Of Contents
Viewing Trip Maps
......................................................................................................................... 44
Viewing Day Maps......................................................................................................................... 44
Viewing Accident Log Maps .......................................................................................................... 44
Accident Log Map Features........................................................................................................... 45
Day Map Features ......................................................................................................................... 51
Viewing Trips in Overview Mode................................................................................................ 55
Viewing Individual Trips ............................................................................................................. 56
Viewing Trips in Overview Mode................................................................................................ 58
Viewing Individual Trips ............................................................................................................. 59
Trip Map Features ......................................................................................................................... 61
Mapping Menu............................................................................................................................... 69
DriveRight FMS Mapping Requirements....................................................................................... 70
Viewing GPS Plot Information ....................................................................................................... 71
Wireless Quick Reference Menu............................................................................................ 71
Wireless Quick Reference Menu ................................................................................................... 71
How to Add a Base Station............................................................................................................ 72
How to Add a Wireless On-Board Module..................................................................................... 73
How to Select an Operating Region .............................................................................................. 75
How to Scan for Wireless On-Board Modules............................................................................... 76
How to Set Up an Automatic Wireless Download ......................................................................... 78
How to Start a Manual Wireless Download ................................................................................... 80
How to Upgrade Firmware............................................................................................................. 81
Menu Commands....................................................................................................................... 83
Menu Commands Menu ................................................................................................................ 83
File Menu................................................................................................................................ 84
File Menu ....................................................................................................................................... 84
Backup........................................................................................................................................... 84
Restore .......................................................................................................................................... 86
Import Menu................................................................................................................................... 88
Import: FTP Import......................................................................................................................... 88
Import: Import Data From .............................................................................................................. 90
Import GPS Data Into MapPoint .................................................................................................... 91
iii
Page 6

DriveRight FMS User's manual
Export Menu
.................................................................................................................................. 92
Export: FTP Export ........................................................................................................................ 93
Export: GPS to MapPoint .............................................................................................................. 94
Export: Accidents to MapPoint ...................................................................................................... 96
Export: Export Data To .................................................................................................................. 97
Print ............................................................................................................................................... 98
Print Preview.................................................................................................................................. 99
Print Setup ..................................................................................................................................... 99
Clear Screen.................................................................................................................................. 99
Exit............................................................................................................................................... 100
Setup Menu .......................................................................................................................... 100
Setup Menu ................................................................................................................................. 100
Current Location .......................................................................................................................... 101
Users Menu ................................................................................................................................. 101
Users: Login................................................................................................................................. 102
Users: Browse/Add...................................................................................................................... 102
Users: Change Password............................................................................................................ 103
Preferences Menu ....................................................................................................................... 104
Preferences: Units ....................................................................................................................... 104
Preferences: Backup Options...................................................................................................... 105
Preferences: Download Options.................................................................................................. 106
Night and Weekend Settings ....................................................................................................... 108
Preferences: Database Browser.................................................................................................. 109
Host Mode Menu ......................................................................................................................... 109
Host Mode On.............................................................................................................................. 109
Host Mode Setup......................................................................................................................... 110
Remote Modem Setup - Using Hyper Terminal .......................................................................... 111
Communications Port - CarChip Settings.................................................................................... 115
Communications Port - DriveRight Settings................................................................................ 116
SmartCard Reader....................................................................................................................... 117
Default DriveRight Settings Menu ............................................................................................... 118
Default DriveRight Settings Wizard ............................................................................................. 118
iv
Page 7

Table Of Contents
Default DriveRight Settings
View/Set .......................................................................................... 120
Unit Settings ................................................................................................................................ 121
Safety Settings............................................................................................................................. 123
Timer Settings.............................................................................................................................. 124
Alarm Settings ............................................................................................................................. 125
Security Settings.......................................................................................................................... 126
GPS Settings - Default DriveRight Settings ................................................................................ 128
Default CarChip Settings ............................................................................................................. 129
Digital Input labels ....................................................................................................................... 130
Corporate Structure ..................................................................................................................... 131
DriveRight Menu................................................................................................................... 133
DriveRight Menu.......................................................................................................................... 133
Add DriveRight Wizard ................................................................................................................ 134
Download DriveRight................................................................................................................... 136
DriveRight Settings...................................................................................................................... 138
DriveRight Settings: View/Set...................................................................................................... 138
DriveRight Settings: Restore ....................................................................................................... 139
DriveRight Settings: Setup GPS.................................................................................................. 140
DriveRight Settings: Verify DriveRight Calibration ...................................................................... 141
Read Accident Log ...................................................................................................................... 142
Read Tamper Log........................................................................................................................ 143
Set Time and Date....................................................................................................................... 143
Set Odometer .............................................................................................................................. 144
Set Service Alarms ...................................................................................................................... 145
Set Drivers List ............................................................................................................................ 146
Clear DriveRight .......................................................................................................................... 148
CarChip Menu ...................................................................................................................... 148
CarChip Menu.............................................................................................................................. 148
Add New CarChip Wizard............................................................................................................ 149
CarChip Settings.......................................................................................................................... 151
CarChip Settings: View/Set ......................................................................................................... 151
CarChip Settings: Restore........................................................................................................... 153
v
Page 8

DriveRight FMS User's manual
Download CarChip
...................................................................................................................... 154
Set Time and Date....................................................................................................................... 154
Set CarChip LED ......................................................................................................................... 155
Set CarChip Alarm....................................................................................................................... 156
Set Anomalous Vehicle ............................................................................................................... 157
Reset Check Engine Light ........................................................................................................... 159
Display CarChip Memory............................................................................................................. 160
Clear CarChip Memory................................................................................................................ 160
SmartCard Menu .................................................................................................................. 161
SmartCard Menu ......................................................................................................................... 161
SmartCard Download .................................................................................................................. 161
Setup Card................................................................................................................................... 162
SmartCard Transfer to DriveRight............................................................................................... 164
Transfer to DriveRight Settings ................................................................................................... 164
Identification Settings - SmartCard.............................................................................................. 165
Calibration Settings - SmartCard................................................................................................. 167
Unit Settings - SmartCard............................................................................................................ 168
Timer Settings - SmartCard......................................................................................................... 169
Safety Settings - SmartCard........................................................................................................ 170
Alarm Settings - SmartCard......................................................................................................... 171
Security Settings - SmartCard ..................................................................................................... 173
GPS Settings - SmartCard .......................................................................................................... 174
Drivers List................................................................................................................................... 175
Clock Adjustment......................................................................................................................... 176
SmartCard Clear Transfer Data................................................................................................... 177
SmartCard Erase......................................................................................................................... 178
Wireless Menu...................................................................................................................... 178
Wireless Menu ............................................................................................................................. 178
Add New Base Station................................................................................................................. 179
Add New Wireless On-Board Module.......................................................................................... 180
Scan Wireless On-Board Modules .............................................................................................. 182
Setup Automatic Wireless Download .......................................................................................... 184
vi
Page 9

Table Of Contents
Start Manual
Wireless Download ................................................................................................ 186
Wireless Download Status........................................................................................................... 187
Upgrade Firmware....................................................................................................................... 189
Select Operating Region ............................................................................................................. 191
Database Menu .................................................................................................................... 192
Database Menu ........................................................................................................................... 192
Company Locations..................................................................................................................... 193
DriveRights .................................................................................................................................. 193
CarChips...................................................................................................................................... 194
Driver Groups .............................................................................................................................. 195
Wireless Devices ......................................................................................................................... 195
Drivers ......................................................................................................................................... 196
Fleets ........................................................................................................................................... 196
Vehicles ....................................................................................................................................... 197
Trips............................................................................................................................................. 197
Accident Logs .............................................................................................................................. 198
Tamper Logs................................................................................................................................ 199
Trip Addresses............................................................................................................................. 200
Days............................................................................................................................................. 200
Download Dates .......................................................................................................................... 201
GPS ............................................................................................................................................. 201
Odometer Logs ............................................................................................................................ 202
Safety Score ................................................................................................................................ 203
Trouble Codes ............................................................................................................................. 203
Readiness Codes ........................................................................................................................ 204
CarChip Parameter Logs............................................................................................................. 206
Maintenance ................................................................................................................................ 207
Filter For Deleting Trips ............................................................................................................... 208
Filter For Deleting Accident Logs ................................................................................................ 209
Filter For Deleting Tamper Logs.................................................................................................. 210
Filter For Deleting Days............................................................................................................... 211
Filter For Deleting Download Dates............................................................................................. 212
vii
Page 10

DriveRight FMS User's manual
Filter For
Deleting GPS ............................................................................................................... 213
Filter For Deleting Odometer Logs .............................................................................................. 215
Filter for Deleting CarChip Parameter Logs ................................................................................ 215
Reports Menu....................................................................................................................... 217
Reports Menu .............................................................................................................................. 217
Accident Log Report .................................................................................................................... 217
Driver Safety Score Report.......................................................................................................... 218
Driver Safety Score Summary Report ......................................................................................... 220
Exception Reports ....................................................................................................................... 221
Excessive Speed Report ............................................................................................................. 222
Night Driving Report .................................................................................................................... 223
Hard Braking Report.................................................................................................................... 224
Hard Acceleration Report ............................................................................................................ 226
Time Over Speed......................................................................................................................... 227
Database Reports........................................................................................................................ 228
Vehicles Report ........................................................................................................................... 228
Trip Addresses Report................................................................................................................. 229
Drivers Report.............................................................................................................................. 230
Usage Report............................................................................................................................... 230
Trip Summary Report .................................................................................................................. 232
Vehicle Activity Report................................................................................................................. 234
Graphical Day Report .................................................................................................................. 236
Tamper Logs Report.................................................................................................................... 238
Odometer Report......................................................................................................................... 240
Relationship Report ..................................................................................................................... 242
Days Since Last Download.......................................................................................................... 242
Wireless Download Status Report............................................................................................... 243
Mapping Menu...................................................................................................................... 244
Mapping Menu............................................................................................................................. 244
Open Map .................................................................................................................................... 244
Save Map..................................................................................................................................... 245
E-Mail Map
................................................................................................................................... 246
viii
Page 11

Table Of Contents
Select Mapping Tool.................................................................................................................... 247
Set Speed Ranges ...................................................................................................................... 247
Help Menu ................................................................................................................................... 248
Troubleshooting ....................................................................................................................... 249
Troubleshooting Menu................................................................................................................. 249
Device Communication Problems ............................................................................................... 249
Database Connection Problems.................................................................................................. 250
Wireless Device Communication Problems ................................................................................ 250
SmartCard Desktop Reader Device Communication Problems.................................................. 258
Installing Drivers for the SmartCard Desktop Reader.......................................................... 258
Miscellaneous Problems.............................................................................................................. 262
Contacting Davis Instruments...................................................................................................... 263
Index ............................................................................................................................................ 265
ix
Page 12

Page 13

DriveRight FMS Help
Welcome to DriveRight Fleet Management Software
Click on the topics below for help using DriveRight® Fleet Management Software (FMS) version
3.9.3:
Getting Started
Quick Reference
Menu Commands
Troubleshooting
| Getting Started | Quick Reference | Menu Commands | Troubleshooting
Home
September 17, 2009
Getting Started Menu
- How to get your DriveRight software rolling.
- Basic info and quick links for routine tasks.
- Everything you can do in DriveRight FMS.
- Help when you have problems.
Getting Started Menu
The following help topics will help you getting started with DriveRight Fleet Management
Software.
Introduction to FMS
What's New for DriveRight FMS 3.9.3
Release Notes for Versions 3.9.2, 3.9.1,
Architecture
Database Selection Guidelines
Converting VMS 2.04-2.06 Data for FMS
Setup Overview
Tool Bar
Back to Home
Home
| Getting Started | Quick Reference | Menu Commands | Troubleshooting
3.8, 3.7.2, 3.7.1, 3.7, 3.6, 3.5, 3.4, 3.3, 3.2, 3.1, and 3.0
Introduction to DriveRight FMS
1
Page 14

DriveRight FMS User's manual
The DriveRi
DriveRight data on your Windows-compatible computer. More specifically, FMS provides tools for
acquiring, sorting, tracking, analyzing and printing data, and viewing and printing reports for a
number of individual DriveRight consoles and CarChip devices at a number of different locations.
DriveRight FMS features include:
Tracking drivers, vehicles, locations, and service
Viewing, graphing, printing and saving "accident log" information
Multiple user levels
Ability to download DriveRight information via the optional SmartCard
Ability to download DriveRight and CarChip information via the optional Wireless
Tamper logs
Sorting data and creating reports according to user-defined selection criteria
Summarize data by day and by trip
Integrated Microsoft MapPoint, Google Earth
Compare vehicles, drivers, or groups of drivers
ght Fleet Management Software (FMS) allows you to store, view, and manipulate
System
Download System
TM
, and Google MapsTM support for mapping
of GPS data
FTP Export / FTP Import data
See also:
Architecture
Copyrights
Back to Getting Started
Home
| Getting Started | Quick Reference | Menu Commands | Troubleshooting
What's New for DriveRight FMS 3.9.3
DriveRight Fleet Management Software version 3.9.3 includes the following changes:
FMS is now compatible with MapPoint 2009.
A Graphical Day Report has been added and can be accessed from Reports > Graphical
Day Report menu.
A Hard Acceleration Report has been added to Reports > Exception Reports.
CarChip "restore settings" feature has been added to this release and can be accessed
from the CarChip > CarChip Settings > Restore. This command will reset the CarChip
settings with the database record of the selected CarChip.
2
Page 15

DriveRight FMS Help
A "Set Anomalous Vehicle" command is now available in FMS. The anomalous vehicle
can be set using Add New CarChip wizard. It can also be set through CarChip > Set
Anomalous Vehicle or CarChip > CarChip Settings > Set command. Please note that this
feature is not for pre-CAN versions of CarChip. Supported excepted vehicles and
protocols depend on the firmware version.
Oracle login password has been encrypted to improve security.
Connection and query timeout for Microsoft SQLServer has been increased to 120
seconds.
Calculation of Time Over Speed has been improved to be more accurate.
The calculation of Max Download Days in the Driver Safety Score report has been
modified for accuracy.
SmartCard Reader Driver has been upgraded in FMS Setup programs.
Print and Print Preview for the Accident Log Report have been fixed.
This release was built with CarChip.dll 3.2.2.0.
Back to Getting Started
Home
| Getting Started | Quick Reference | Menu Commands | Troubleshooting
Prior Release Notes
DriveRight Fleet Management Software v3.9.2 Release Notes
DriveRight Fleet Management Software version 3.9.2 includes the following changes:
TM
Google Earth
Users may select their mapping tool from
Mapping > Select Mapping Tool. Once a mapping tool is selected, Trip Maps, Day Maps
and Accident Log maps will be generated using the selected mapping tool. Mapping with
Google Maps requires an internet connection and a web browser to work. Mapping with
Google Earth requires a copy of that program, which may be downloaded at no charge
from Google’s web site.
New wireless device firmware version 10E0 is available in this release. User may update
the firmware of Base Stations and Wireless On-Board Modules through Wireless >
Upgrade Firmware.
To improve performance and reduce the file size of the Access database, FMS will
compact the database when the user exits if MS Access is the database type currently in
use. This process will not require the user's confirmation. In case of error, an error
message will be logged in EventLog.txt.
and Google MapsTM are added as additional mapping tools to MapPoint.
Import/Export, FTP Import/Export, and Backup/Restore features are now supported for
the database table TroubleCodes and ReadinessCodes.
3
Page 16

DriveRight FMS User's manual
The Database > Maintenance menu is now enabled/disabled properly according to user's
privileges.
In filter dialogs of Driver Safety Score report and Driver Safety Score Summary report,
the current location is used as default selection for Company Locations list.
The Company Name field in Add/Edit Company Location dialog is fixed to allow company
name up to 40 characters and will automatically scroll horizontally.
In Trip Summary Report, dashes are displayed for the Idle Time column if the trips are
from DR500.
This release was built with CarChip.dll 3.2.1.0.
DriveRight Fleet Management Software v3.9.1 Release Notes
DriveRight Fleet Management Software version 3.9.1 includes the following changes:
A new comprehensive report is added to this release to show Vehicle Activities. Users
can generate a report for a date range, selected vehicles, or drivers with exception limit
settings. This report can be viewed in FMS report viewer or in an Excel file. It can be
accessed from the Reports menu, and Email support has also been added to this report.
Weekend and Night settings have been moved from the Usage Report to the system
level and can be accessed from
Setup->Preferences. These settings are now shared by the Usage Report, Wireless
Download, and the Vehicle Activity Report.
The GPS map has been improved to show coordinates within (-3, 3).
This release was built with CarChip.dll 3.2.1.0.
DriveRight Fleet Management Software version 3.9. was a Beta Release, and included the
following changes:
Idle time feature (CarChip only) is implemented in this release. Idle time for each trip is
stored in database Trips table. A user may run the Trip Summary Report to show the idle
time for each trip and total idle time for a driver or vehicle. The report can be viewed in
FMS report viewer or in an Excel file, and Email support has also been added to this
report.
FMS is improved to handle trouble codes during download to avoid trouble codes missing
problems.
Oracle database migration issues to FMS 3.8 release are solved.
A problem was corrected wherein DriveRight type was not being displayed when adding
a new DriveRight device.
The text limit for user name and password was increased for FTP Import and Export.
This release was built with CarChip.dll 3.2.1.0.
4
Page 17

DriveRight FMS Help
DriveRight Fleet Management Software 3.8 Release Notes
DriveRight Fleet Management Software version 3.8 includes the following changes:
The CarChip Fleet Pro (# 8246) model is now supported in this release.
GPS has been implemented for CarChip Fleet Pro and is included in the CarChip
Settings and Add New CarChip Wizard -Parameters/GPS Settings dialog boxes in the
CarChip menu. The GPS setting allows you to turn on the GPS logging and subsequent
mapping feature. This setting works only with a CarChip Fleet Pro model connected to
the optional GPS (# 8251, 8128) modules. The GPS data is stored in the database and
allows you to create Trip Maps, Day Trips Maps and Accident Maps.
DriveRight Wireless Download System functionality has now been added for CarChip
Fleet Pro. Along with the CarChip Fleet Pro GPS/Wireless Interface Module (# 8251), the
Base Station (# 8130), Wireless On-Board Module (# 8129), and the Configuration Cable
for Wireless On-Board Module (# 8131) give your fleet the ability to download data
directly from CarChip Fleet Pro models to FMS without physically removing the
DriveRight devices from the vehicle. The data moves wirelessly from the vehicle to the
FMS database. The actions that can be taken when wirelessly downloading a Carchip
Fleet Pro can be edited in the Edit CarChip
dialog box.
The Download Options
sample downloading settings.
The Carchip Parameter Logs
The following dialog boxes have been added to supplement the CarChip Parameter Logs
database table: Filter for CarChip Parameter Logs
Filter for Deleting CarChip Parameter Logs
Audible alarm volume can now be adjusted in the Set CarChip Alarm
CarChip Fleet Pro model of Carchip.
Trouble codes are recorded during trips more accurately.
The Add New User
Structure as one of the application options.
The factors in the Driver Safety Report Formula
score more accurate.
MSDE installation is no longer supported by FMS installation. MSDE must be installed
manually before FMS is installed if MSDE is the database you which to use.
dialog box has changes to give you more flexibility in the speed
database table has been added to the Database Menu.
, Print CarChip Parameter Logs, and
.
dialog box for the
and Edit User dialog boxes have been changed to add Corporate
are improved to make the performance
DriveRight Fleet Management Software 3.7.2 Release Notes
DriveRight Fleet Management Software version 3.7.2 includes the following changes:
Fixed an issue regarding the PIN code transferred by the SmartCard Reader not being
recognized by the DriveRight Device.
Duplicate database record error issue was resolved.
DriveRight Fleet Management Software 3.7.1 Release Notes
5
Page 18

DriveRight FMS User's manual
Drive
Right Fleet Management Software version 3.7.1 includes the following changes:
Password encryption has been added for better security.
The ability to add multiple Super Users to the database added. Open the Update User
Privileges dialog box or Add New User dialog box to add or edit Users and change the
User Type.
The Driver Safety Score
when Km/hr is selected as the unit of measure in the Units
The CarChip
LED state, have been made by the user in FMS.
The ACS SmartCard Desktop Reader Proprietary Driver is the only driver to be used with
FMS. The ACS Proprietary Driver installation process has now been simplified. If the
PC/SC driver was installed, it must be removed
installed.
Database configuration process has been improved to enforce database security and
avoid object ownership problems in MS SqlServer database.
database table automatically updates if any changes, such as Alarm and
and Excessive Speed Report changed to accurately calculate
dialog box.
and the ACS Proprietary Driver must be
DriveRight Fleet Management Software 3.7 Release Notes
DriveRight Fleet Management Software version 3.7 includes the following changes:
DriveRight Wireless Download System functionality is added to FMS. The Wireless Menu
contains commands for configuring wireless devices, controlling the wireless
communication and downloading features for the Wireless Download System. These new
features, along with the Base Station (# 8130), Wireless On-Board Module (# 8129), and
the Configuration Cable for Wireless On-Board Module (# 8131) give your fleet the ability
to download data directly from the DriveRight devices to FMS without physically removing
the DriveRight devices from the vehicle. The data moves wirelessly from the vehicle to
the FMS database. The features that are added to support wireless download are:
o Wireless Menu
o Manual Wireless Download Icon added to FMS toolbar.
o Wireless Devices
o Wireless Download Status Report
FTP Export
possible database tables that you can export.
Add Users
DriveRight\Wireless Download System, CarChip and SmartCard Devices.
6
- The Wireless Menu, in conjunction with the Wireless On-Board
Module (# 8129), Base Station for Wireless Download System (# 8130), and the
Configuration Cable for Wireless On-Board Module (# 8131) allows you to create a
wireless connection between your fleet vehicles and the FMS software.
database table, Edit Base Station, Edit Wireless On-Board Module,
and Select Wireless Device Fields to Print
added to the Reports Menu.
dialog box now include the Wireless Download database table in the list of
dialog box now permits user accessibility definitions for the
added to the Database Menu.
Page 19

DriveRight FMS Help
Improved many features regarding the FMS database installation and configuration. See
The Database Selection Guide for more information and for the installation procedures
regarding these new improvements. The database improvements are:
o Fixed a previous issue with the User's PC name being used as a server alias name in
the SQLServer database configuration process.
o Stored procedures for installing and configuring the Oracle database are now
integrated into the FMS installation process. There is no need to create the stored
procedures manually unless FMS encounters problems when creating them.
o Database migration from a previous release to the current release has now become a
seamless feature. In previous releases, after FMS was upgraded, the connection with
the database had to be re-established. Now, FMS automatically uses the previously
configured database.
Data validation added to make sure that the ID numbers assigned to each CarChip and
DriveRight are unique.
The Pin Code and the Driver Logout time can now be transferred to the DriveRight via
the SmartCard.
The Current Location
is now displayed in the FMS title bar.
DriveRight Fleet Management Software 3.6 Release Notes
DriveRight Fleet Management Software version 3.6 includes the following changes:
Disable Console Login feature added to the Security Settings tab in the Review
DriveRight Security Settings dialog box, DriveRight Device Settings dialog box, and the
Default DriveRight Settings
Login feature on a DriveRight console if a SmartCard Reader is present. This feature is
available for DriveRight 600
Disable Console Login column added to the DriveRight
Console Login column displays the Console Login status of each DriveRight in the
database.
Disable Console Login added to DriveRight database table Print
Set Odometer
has been disabled for the DriveRight 600E device only.
dialog box. The Disable Console Login feature disables the
E devices only.
database table. The Disable
dialog box.
DriveRight Fleet Management Software 3.5 Release Notes
DriveRight Fleet Management Software version 3.5 includes the following changes:
The current selected location is now displayed on the title bar of FMS. This allows you to
know which location's data is currently being viewed through any window or table in the
FMS software.
Three new options in Database Menu: Readiness Code Database,
Database, and Batch Editing.
The Readiness Code Database
codes and the status of each code if you use the CarChip Fleet device.
allows you to view all the monitored readiness
Trouble Code
7
Page 20

DriveRight FMS User's manual
The Trouble Code Database
recorded in a vehicle using the CarChip Fleet device.
The Batch Editing
displayed in all the tables in the database of various trips.
The CarChip
logs speed measurements.
Miscellaneous Settings
Settings dialog box. Miscellaneous Settings allows you to control the settings for extra
features on the CarChip, such Alarm and LED. The CarChip Settings
allows you to chose the update interval the CarChip device now records speed.
Previously, the Vehicle Speed and Update Interval boxes were defaults and could not
be user defined. Now, the Interval at which vehicle speed is sampled can be selected.
A new option was added to the Download Options
the number of hours of GPS data you want the DriveRight device to store.
Fixed a previous issue with the DriveRight and FMS software not recording a second trip
that happens within the same minute as a previous trip. The DriveRight device and FMS
software now display all trips, even those having the same starting times.
New database stored procedures have been added. If the software is accessing a
database run on a MS SQL Server or Oracle server, some specialized installation may be
required. See The Database Selection Guide for more information and complete
instructions.
database table has changed to display the interval the CarChip device now
feature allows you to re-assign drivers or adjust speeds
has been added to the Add CarChip Wizard and to the CarChip
allows you to review any trouble code records
dialog box also
dialog box that allows you to specify
DriveRight Fleet Management Software 3.4 Release Notes
DriveRight Fleet Management Software version 3.4 includes the following changes:
New option in Setup Menu: Corporate Structure
you to create a hierarchical representation of fleets and how they are distributed
company wide. This feature is used in conjunction with the Driver Safety Score Report
the Reports Menu.
A new option in the Drive Safety Score Report: Specify Drivers with Mileage option,
which displays all drivers with mileage for the specified time period.
The Serial Port options for both DriveRight and CarChip changed to Communication Port
in the Setup Menu, with added USB support.
USB support for Fleet CarChips added.
. The Corporate Structure option allows
DriveRight Fleet Management Software 3.3 Release Notes
DriveRight Fleet Management Software version 3.3 includes the following changes:
The Inclusion of using an on-board and desktop reader and SmartCard system to transfer
data from the DriveRight 600 unit to a computer. This added feature has created the
following changes to the FMS software.
o New menu option in the Setup Menu: SmartCard Reader
SmartCard reader type. The SmartCard Reader requires USB driver installation
before the SmartCard Reader can be determined and set up.
. Lets you select the
in
8
Page 21

DriveRight FMS Help
o Ne
Download
Setup Card
Transfer to DriveRight
Clear Transfer Data
Erase
GPS Settings
and SmartCard menus. Allows you to turn the GPS logging and subsequent mapping
feature on. Works only with DriveRight 600 units with GPS modules.
w menu: SmartCard Menu
options for setting up, monitoring, and maintaining all the SmartCards and
DriveRights using the SmartCard System. The SmartCard menu options are:
- Downloads information stored on a card to a selected base from a
SmartCard Reader.
- Allows you to select user and vehicle information for a card.
- Uses the card to transfer settings and information to a
DriveRight or multiple DriveRight devices.
- Clears the settings and data that sets the DriveRight
- Erases all data stored on the SmartCard
included in the DriveRight Settings dialog box in the Setup, DriveRight
. The SmartCard menu contains several menu
DriveRight Fleet Management Software 3.2 Release Notes
DriveRight Fleet Management Software version 3.2 includes the following changes:
Automated mapping
of GPS data.
New Report: Driver Safety Score Summary
calculates driver scores and average scores for each month for a 3, 6, or 12 month time
period. Each driver’s score is calculated for each selected month and displayed in an
excel file. The data generated by this report is saved in the Safety Score table in the FMS
database. You can sort this report by end date score, report average scores, or driver
name and can choose to group the drivers by their location if multiple locations are
selected.
New database table: Safety Score
Summary Report.
Driver Safety Score Report
Driver Safety Score Report Formula
Exclusive Driver option added to the Vehicles Table
trip data to be assigned to the default driver even if other drivers are listed in the data.
The Tamper Log Report now displays the time between unplugging from a vehicle and
downloading a DriveRight as well as the time between downloading a DriveRight and
reconnecting it to a vehicle.
replaces Driver Performance Score Report.
. This table is generated by the Driver Safety Score
replaces Driver Performance Score Formula.
. The Drive Safety Score Summary report
. Selecting this option will cause all
DriveRight Fleet Management Software 3.1 Release Notes
The most important change in DriveRight Fleet Management Software version 3.1 is support for
the CarChip Fleet device. DriveRight FMS 3.1 also includes two new reports.
CarChip Fleet Support
Download CarChip Fleet data into the DriveRight FMS database.
9
Page 22

DriveRight FMS User's manual
Store trip info, accident logs, and tamper logs.
View and set CarChip Fleet configuration in both the device and FMS database.
Note: DriveRight FMS 3.1 does not store engine data and diagnostic trouble logs in the database.
This information can be downloaded and viewed using the CarChip software included on your
DriveRight FMS 3.1 CD.
New Reports
Time Over Speed Limit Exception Report
Days Since Last Download Report
DriveRight Fleet Management Software 3.0 Release Notes
DriveRight 3.0 is a total redesign of the earlier versions of the software. We designed and
developed the software with an aim to provide:
Robust database server support, to be able to handle large data.
Flexibility to configure and connect to more than one DataBase Management System
(DBMS).
Better Reports for both viewing and printing.
Improved Database Browser.
Better organization of data coming from different locations.
Improved user interface.
Important Features in DriveRight 3.0
Flexible Database support for almost any relational database which supports SQL
language, and has a OBDC driver.
Supports the following relational database servers: MySQL, Microsoft SQL Server and
Oracle.
Free support for MS Access and MSDE, which are ideal for small fleets with a single
user.
A location field was added to the database tables to facilitate ”r;rolling up” data which
makes it possible to manage data from many locations in one database.
FTP export and import data through the internet making it easier to move data from one
location to another.
Automatic backup and ”r;zipping” of data with the option of keeping a fixed number of
months in the database to help speed up operations.
The ”r;Add DriveRight” wizard makes adding a DriveRight to the program simpler and
less prone to mistakes.
Elimination of redundant reports and the addition of several new reports.
Reorganized reports menu with several new and redesigned reports.
10
Page 23

DriveRight FMS Help
Improved viewing and printing of reports.
New ”r;usage” report to help trace night and weekend driving.
Improved exception reports for Excessive Speed, Hard Braking, and Night Driving.
A ”r;Relationship” report that shows a list of all DriveRights, which vehicles they are
assigned to, along with a default driver if one has been assigned.
Improved browser with user-configurable colors, fonts, and field widths.
Simplified filter support to make it easier to select what you want.
Use of standard calendar control for specifying dates.
Email support for all Excel generated reports.
Supports Palm PDA download of DriveRight consoles.
Operational differences between DriveRight 3.0 and earlier versions
The operation of DriveRight 3.0 is very similar to 2.x, but there are some fundamental changes
that you should be aware of.
In 2.x the vehicle table contained all the information about a particular DriveRight, in
addition to information on the vehicle. However, in 3.0 a new table was introduced, the
DriveRights table, which stores DriveRight console information. Vehicle information is
stored in the vehicle table, and DriveRight information is stored in the new DriveRights
table. In 3.0 , a DriveRight must be ”r;assigned” to a vehicle. When your old data is
converted, for each vehicle in 2.x a new DriveRight and vehicle is created in the 3.0
database.
Note: A DriveRight is identified using it’s DriveRight ID, and a particular vehicle is identified
using it’s Vehicle ID.
Note: A ”r;relationship” report was added to the program to help clarify the relationship
between vehicles, DriveRights, and drivers.
The ”r;Set DriveRight” option in 2.06/2.6.1 appears as ”r;View/Set” in the
”r;DriveRight/DriveRight Settings” menu. Unlike 2.06/2.6.1, when changes are made to a
DriveRight using this option, they are also stored in the DriveRight table.
Adding a new DriveRight to the program can now be done more easily using the Add
New DriveRight wizard which steps you through the process and helps clarify where you
stand with respect to the calibration of the DriveRight.
You will also notice that every table now has a ”r;location” field. The location field was
added to facilitate ”r;rolling up” of data from many locations so they can be managed in
one database.
Back to Getting Started
Home
| Getting Started | Quick Reference | Menu Commands | Troubleshooting
Architecture
11
Page 24
DriveRight FMS User's manual
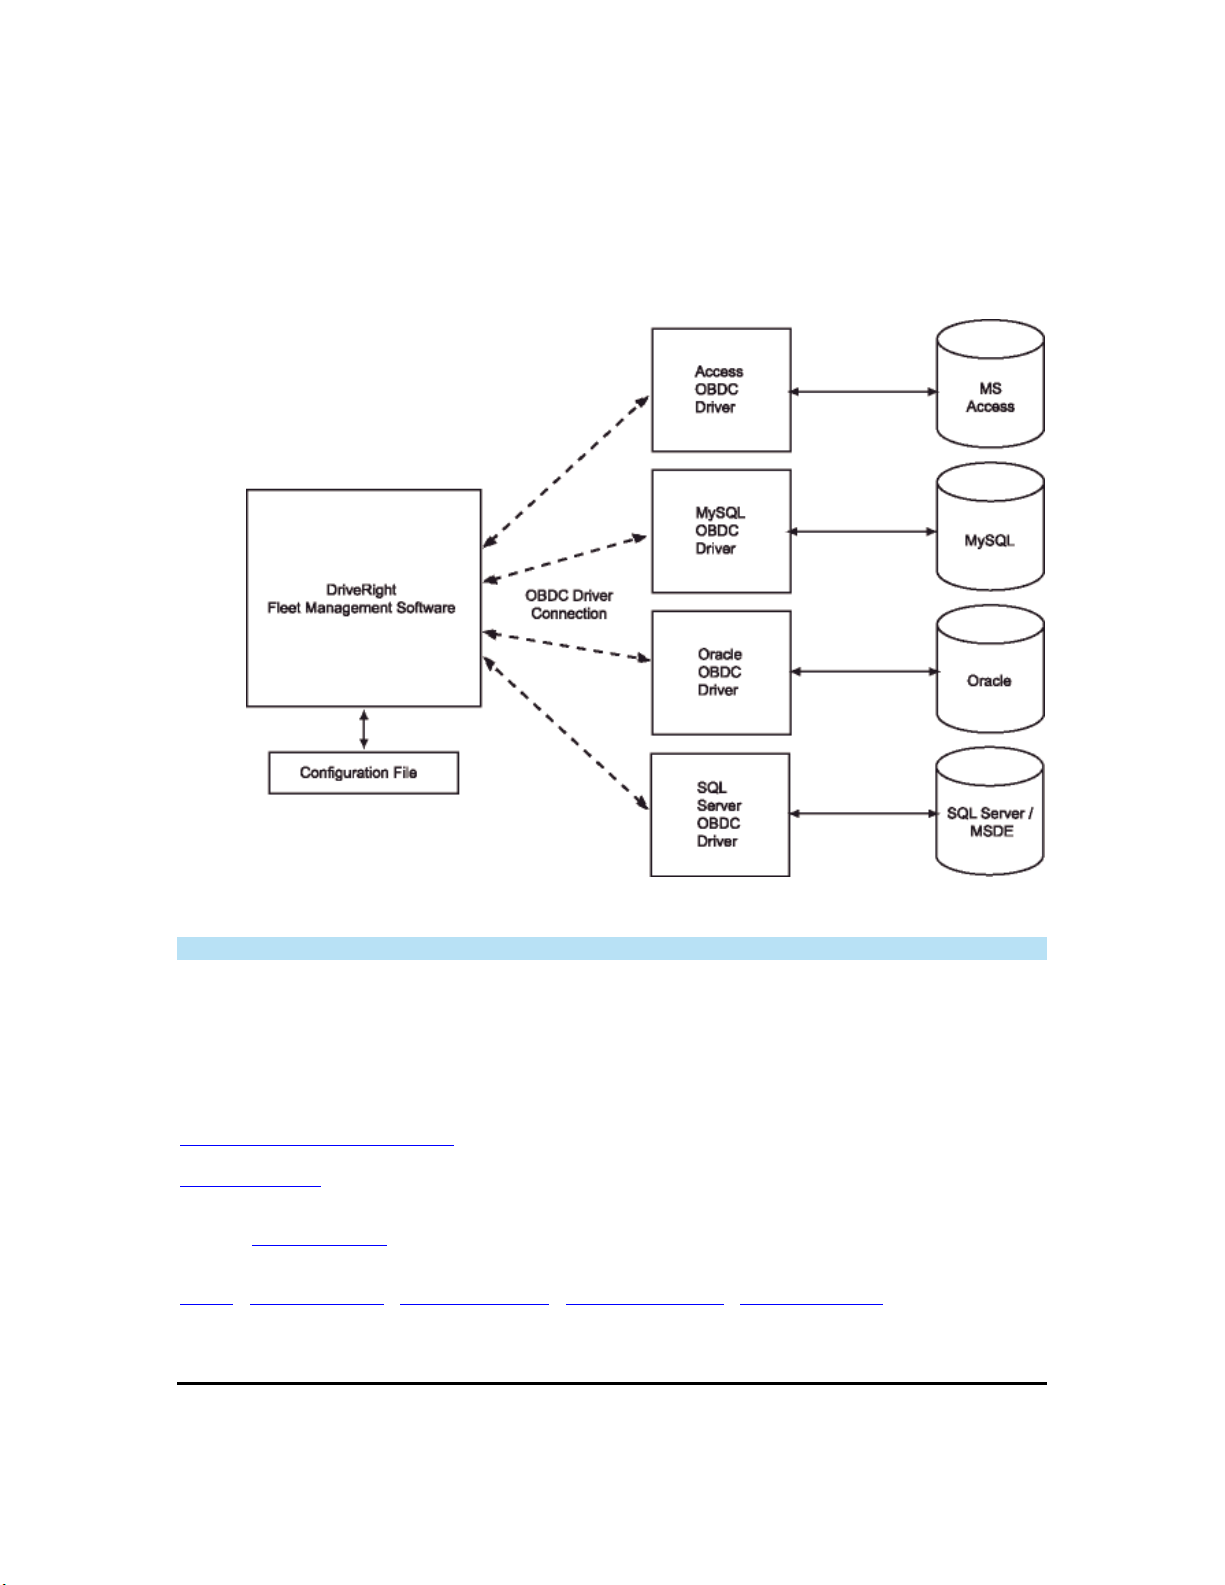
Drive
Right Fleet Management Software (FMS) architecture allows the software to be connected
to any of the Database Servers we support. The communication between DriveRight FMS and
Database is done through an OBDC connection by means of an OBDC driver. Currently
DriveRight FMS supports MS Access, My SQL, MSDE, SQL Server and Oracle databases. Other
databases may be added in the future.
The following figure illustrates how DriveRight FMS connects to the back-end Database Server.
Note: DriveRight can only be connected to one database at a time.
When DriveRight FMS is opened for the first time, the user is prompted to select the database
type to be used for this installation. Based on the user's selection, a connection is established to
one of the OBDC drivers. The database type is stored in the configuration file.
See also:
Database Selection Guidelines
Setup Overview
Back to Getting Started
Home
| Getting Started | Quick Reference | Menu Commands | Troubleshooting
Database Selection Guidelines
12
Page 25

DriveRight FMS Help
Please
installing a database for your installation. We included a printed copy of the Database Selection
Guide with your DriveRight FMS as well as a PDF version that can be found in the DriveRight
FMS program folder. The Database Selection Guide can also be downloaded from the
Automotive Support
DriveRight Fleet Management Software (FMS) supports the following databases.
Single-User Databases:
Multi-User Databases:
See also:
Architecture
Setup Overview
refer to the DriveRight FMS Database Selection Guide for information on choosing and
section of our web site.
o MS Access (Microsoft Access)
o MSDE (Microsoft Desktop/Data Engine)
o MySQL
o MS SQL Server (Microsoft SQL Server)
o Oracle
Back to Getting Started
| Getting Started | Quick Reference | Menu Commands | Troubleshooting
Home
Converting 2.04-2.06/2.6.1 Database to DriveRight FMS
Format
A separate conversion utility, OldToNew, has been included with the DriveRight FMS software to
allow the conversion of existing DriveRight 2.04, 2.05, 2.06 and 2.6.1 database files for use with
DriveRight FMS.
Note: This conversion utility can only be used with databases created by DriveRight 2.04, 2.05,
2.06 or 2.6.1. If you are using an earlier version of the DriveRight software you must first upgrade
to one of the supported versions.
Use the following procedure to convert your existing DriveRight database for use with DriveRight
FMS:
1. Install and run DriveRight FMS before you convert your data to the new format.
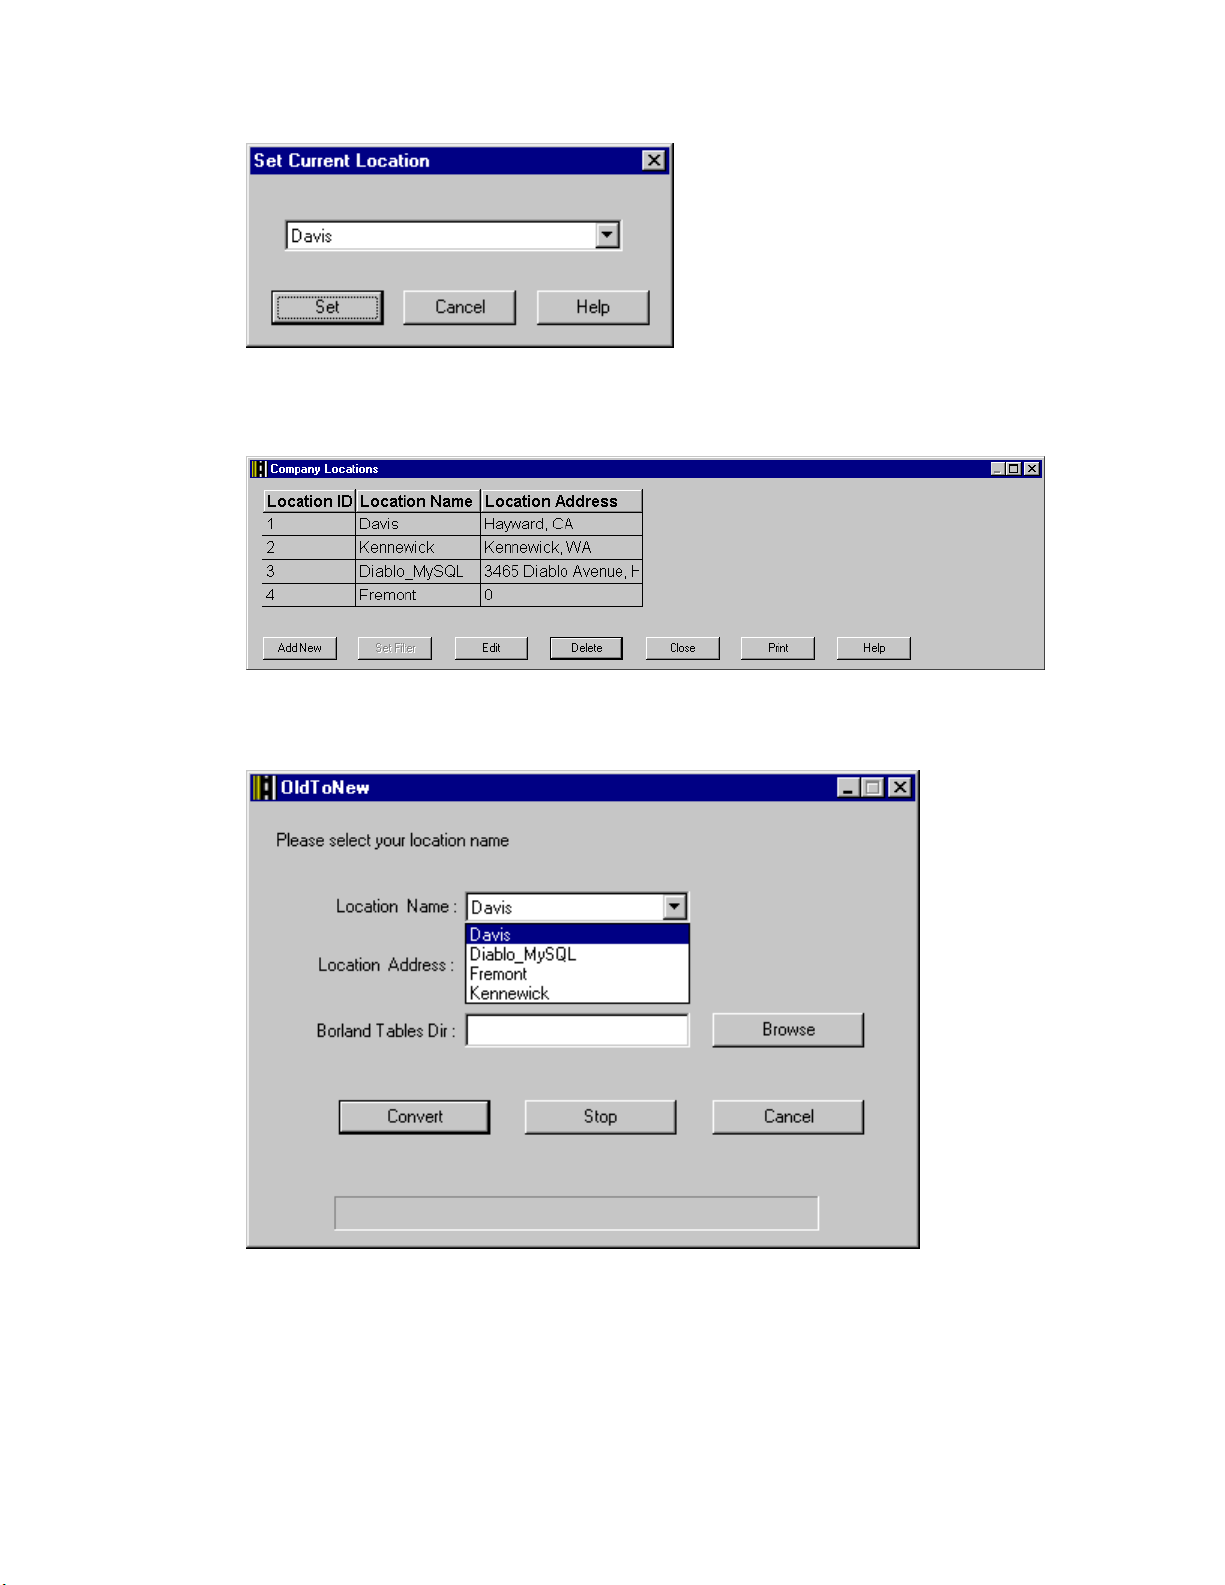
2. Verify the current location in DriveRight FMS using the Current Location command in the
Setup Menu. This location information will be associated with all the 2.x data when
converted into the new database format.
13
Page 26
DriveRight FMS User's manual
3. To import data to a new location, select the Company Locations command in the
Database Menu in DriveRight FMS, then click the Add New button in the Company Locations
browse window.
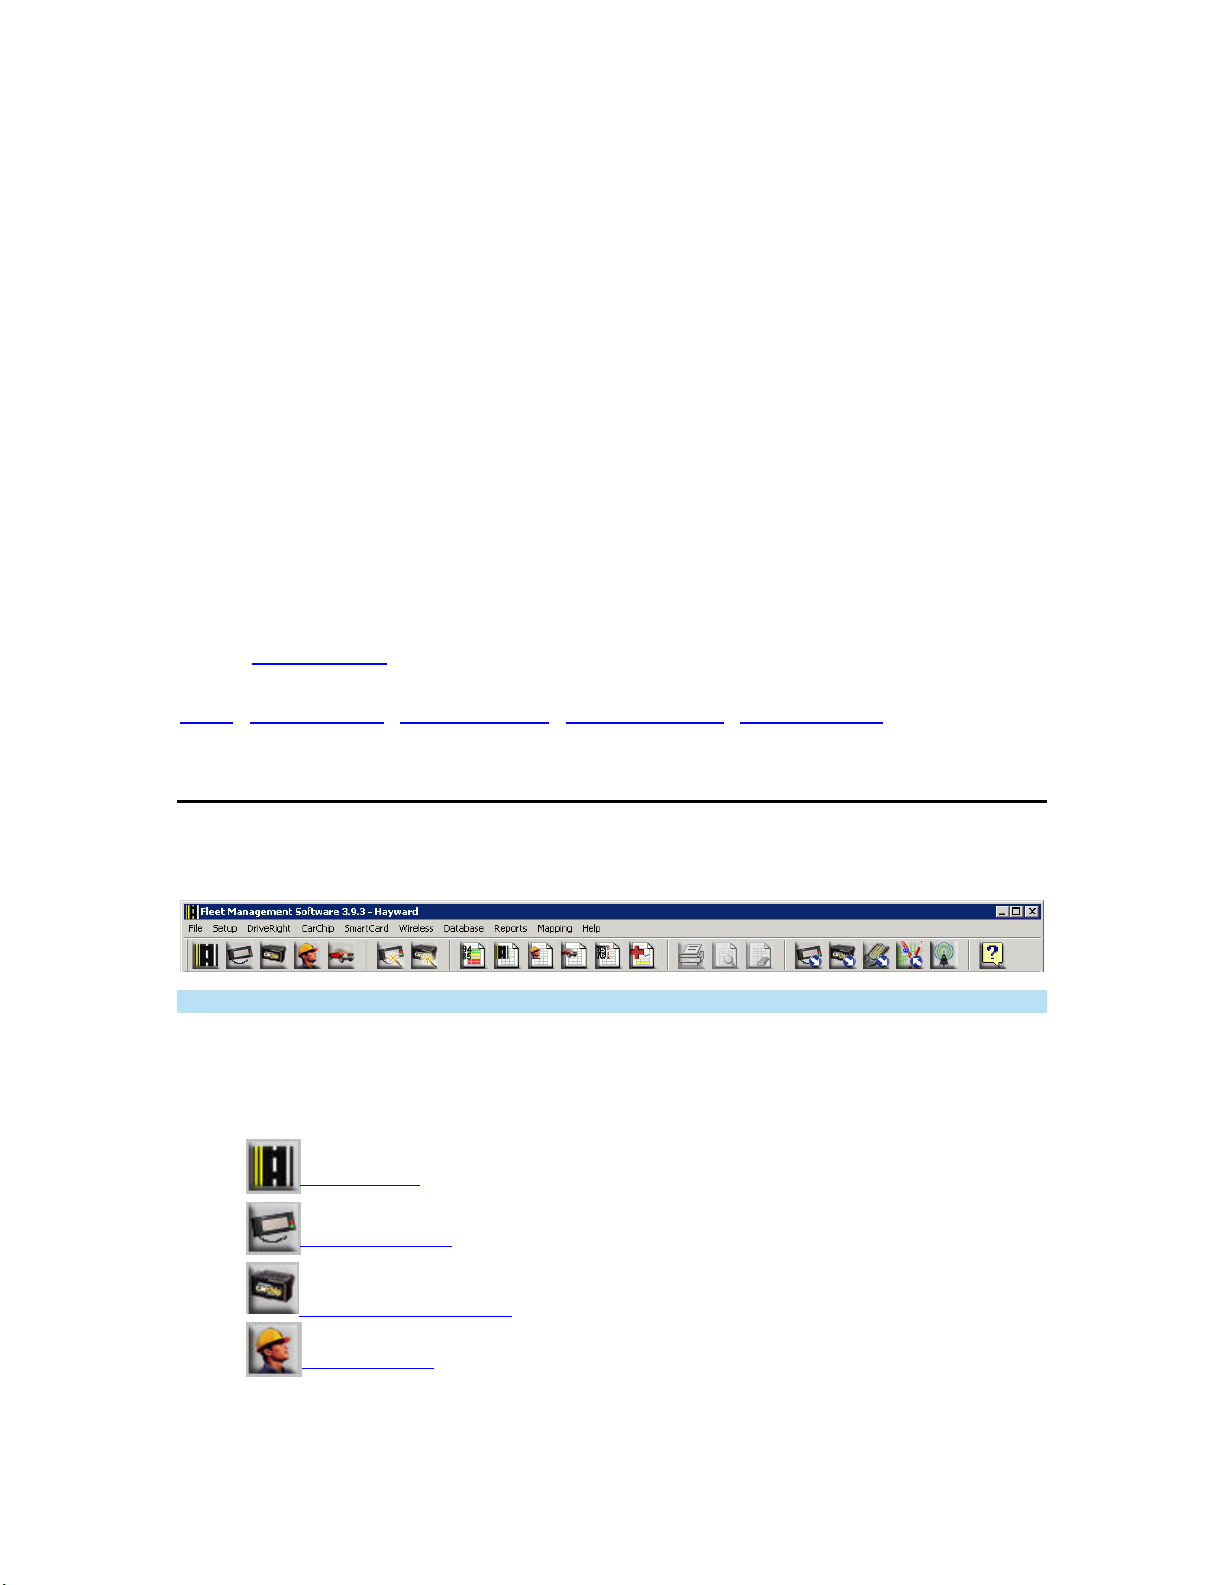
4. Go to Startup>Programs>DriveRight and run OldToNew.
5. To import data, select the location from the drop down list.
6. Click the Browse button to select the DriveRight 2.x tables directory (By default it is
C:\Program Files\DriveRight Software\tables).
7. Click the Convert button to start the conversion. Once the data is converted you will see a
success message.
14
Page 27

DriveRight FMS Help
Note: The conversion process can take a long time depending on the size of your 2.x database.
You can interrupt the conversion at any time by clicking the stop button, but this is not
recommended.
8. All the 2.x data has been converted into the new database format for DriveRight FMS.
9. Go to DriveRight FMS and view various tables using the Database Menu commands to
make sure the data has been converted properly.
Back to Getting Started
Home
| Getting Started | Quick Reference | Menu Commands | Troubleshooting
Setup Overview
The initial setup of your DriveRight FMS consists of the following operations:
1. Select and Install Database
Before you run the software for the very first time you will need to select the database to be used
with DriveRight FMS. Refer to the Database Selection Guide for information on choosing and
installing a database.
If you select MS Access, DriveRight FMS will install the necessary components during the FMS
installation. If you select MySQL, MSDE, MS SQL Server, or Oracle, you will need to install and
configure the database before installing DriveRight FMS. See Database Selection Guidelines
more information.
2. Install DriveRight FMS
Insert the DriveRight FMS CD and follow instructions.
3. Initial Program Configuration when you first run DriveRight FMS.
for
Refer to the DriveRight FMS Getting Started Guide for initial program configuration information.
4. Install the drivers for accessories you want to use.
Install drivers for the SmartCard Desktop Reader
Refer to the DriveRight FMS Getting Started Guide for instructions on installing the accessory
drivers. See Wireless Device Communication Problems
wireless device driver. See SmartCard Reader Device Communication Problems
installing or re-installing your SmartCard Desktop Reader Device driver.
5. Converting DriveRight 2.04, 2.05 & 2.06 Databases
If you have a DriveRight database created using version 2.04, 2.05, or 2.06 of the DriveRight
Vehicle Management Software, it needs to be converted for use with DriveRight FMS. Click this
link to display a help window that explains how to convert these databases (Convert Database
6. DriveRight FMS Software Setup
Check the following configuration preferences and make any necessary changes:
and wireless devices if you want to use them.
for help with installing or re-installing your
for help with
)
15
Page 28

DriveRight FMS User's manual
Set Units - Select your unit preferences for the data displayed in the dialog boxes,
database browser, and reports.
Backup Options
- Allows you to set the number of months of data to keep in the current
database.
Download Options
- Use this option to:
Synchronize the DriveRight device date and time with your computer after each
download.
Choose how the software will treat the Driver ID, If a downloaded device is either a
500, 600 or 600
E model. Once set, this preference will be uniform for all devices.
Customize the download options for CarChip devices.
To determine how the speed samples taken from the CarChip Fleet and CarChip
Fleet Pro are saved in the database.
7. Set Default DriveRight Settings Wizard
The values entered in this setup are used as default settings when you add new DriveRight
devices to the database. You can set DriveRight default values using the Default DriveRight
Settings Wizard in the Setup Menu. Check the default settings to make sure they suit your
application.
8. Set Default CarChip Settings
The values entered in this setup are used as default settings when you add new CarChip devices
to the database. You can set CarChip default values using the Default CarChip Settings
command in the Setup Menu. Check the default settings to make sure they suit your application.
Note: If you are using both DriveRight and CarChip devices in your fleet, be sure to set the Safety
Settings uniformly for both types of devices.
9. Select the Communications Port and Test Communications
Select Communications Port - DriveRight from the Setup Menu to select the
communications port used to connect to a DriveRight device.
Select Communications Port - CarChip from the Setup Menu to select the
communications port used to connect to a CarChip device.
Click Auto Detect in the Communications Port dialog box to test communication.
10. CarChip / DriveRight Considerations
If both a CarChip device and DriveRight console are installed in the same vehicle, you
will need to create duplicate entries in the DriveRight FMS databases for the vehicle and
driver. Otherwise you will see duplicate trip data in your DriveRight FMS reports.
If you have multiple communications ports, you can connect a CarChip to one
communications port and DriveRight to another. If you do not have multiple
communications ports we recommend you buy a serial switch box to switch between the
two devices or a serial extension cord to make plugging and unplugging the download
cables more convenient.
11. Building Your Database Tables
16
Page 29
DriveRight FMS Help
When you add a DriveRight or a CarChip you will need to assign a default vehicle. When
you add a vehicle you will need to assign a default driver. So, it is most efficient to add
the drivers first, the vehicles second and the DriveRights third.
1. Add all drivers.
2. Add all vehicles.
3. Add all DriveRights and CarChips.
When you add a CarChip you will need to assign it to either a vehicle or a driver. If you
assign CarChip to a vehicle, all the downloaded data is assigned to the default driver of
that vehicle. If you assign a CarChip to a driver, all the downloaded data is assigned to
that driver and the vehicle will be unallocated.
o If a CarChip will only be used in one vehicle, assign it to that vehicle.
o If a CarChip will be used by only one driver, assign it to that driver. A CarChip
assigned to a driver can be used in multiple vehicles.
12. Using the Software
You are now ready to start using DriveRight FMS.
Back to Getting Started
Home
| Getting Started | Quick Reference | Menu Commands | Troubleshooting
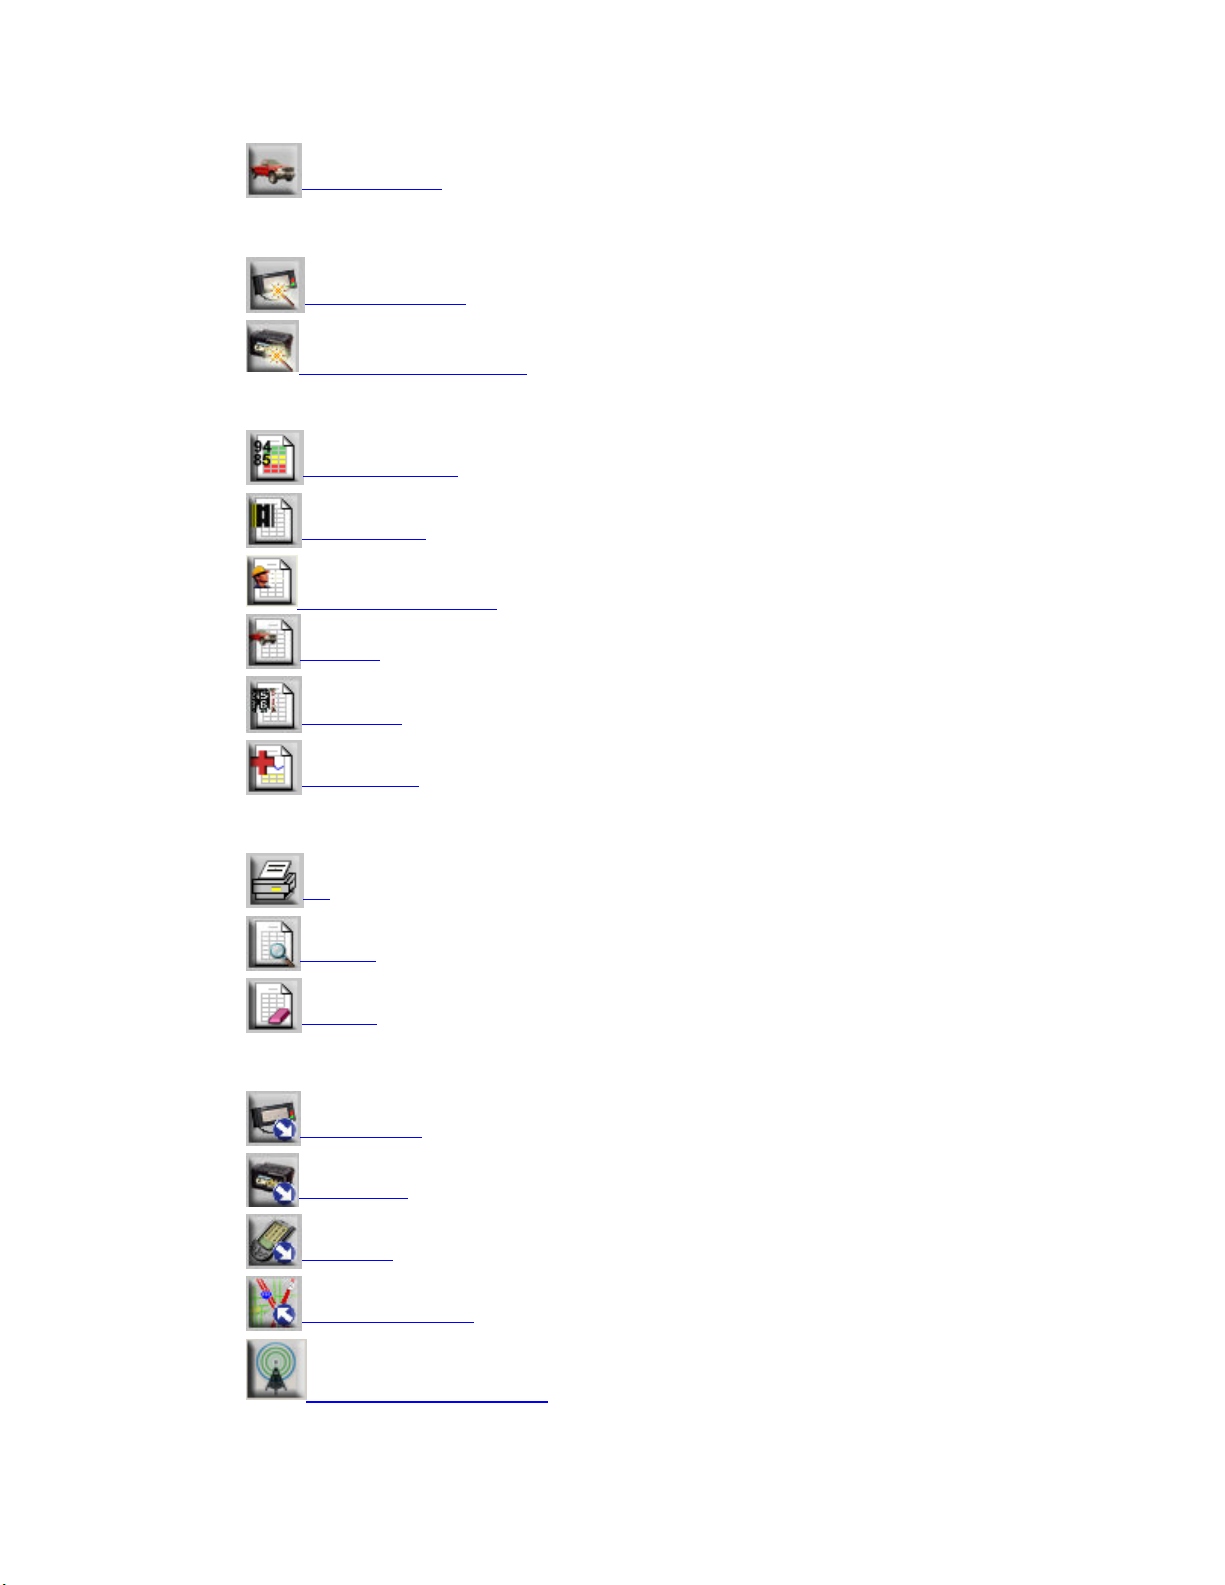
Tool Bar
To get information about an FMS menu or tool bar icon, click on the command or icon in the
illustration:
Note: To see the full toolbar, expand the Online Help window to full screen.
List of Toolbar Icons
Database Icons
View Trips Database
View DriveRight Database
View CarChip Database
View Drivers Database
17
Page 30
DriveRight FMS User's manual
View Vehicles Database
Add Device Icons
Add New DriveRight Wizard
Add New CarChip Wizard
Report Icons
Driver Safety Score Report
Trip Summary Report
Vehicle Activity Report
Usage Report
Odometer Report
Accident Log Report
File Menu Command Icons
Print
Print Preview
Clear Screen
Data Download/Export Icons
Download DriveRight
Download CarChip
Download Palm
Export GPS Data to MapPoint
18
Manual Wireless Download
Page 31

Help Icon
DriveRight FMS Help
Help Topics
Back to Getting Started
Home
| Getting Started | Quick Reference | Menu Commands | Troubleshooting
Quick Reference
FMS Quick Reference
Get More Information About:
Data Management
CarChip
DriveRight
Mapping
The Wireless Download System
Back to Home
Home
| Getting Started | Quick Reference | Menu Commands | Troubleshooting
Data Management
Data Management Reference Menu
Database Backup Considerations
Active Database Size Recommendations
Backup
Restore
Export Menu
Import Menu
Back to Quick Reference Menu
19
Page 32

DriveRight FMS User's manual
Home | Getting Started | Quick Reference | Menu Commands | Troubleshooting
Database Backup Considerations
If you have GPS-enabled DriveRight and CarChip Fleet Pro devices, you will rapidly accumulate
a large amount of data in the GPS
Parameter Logs database table due to the frequency of vehicle speed logging.
To avoid the database from becoming unmanageable, you can export both the GPS and CarChip
Parameter Logs database tables more frequently than your normal backup interval, and delete
GPS and Carchip Parameter Log data by using the Maintenance
data for your reports while at the same time decreasing the database size.
The following is an example of backing up and exporting information from the GPS table:
table due to the frequency of GPS logging and to the CarChip
. By doing this you still have trip
1. Set the Backup Options
number of months you want to keep active in the database.
2. Suppose that you have some DriveRights and CarChips with GPS data enabled. Your
GPS Table will grow much more rapidly than the Trips Table. But you still want to keep
the last three (3) months of trip data for reporting purposes.
3. Since DriveRight FMS does not support backup of individual database tables, use Export
to create individual backups of the GPS Table.
4. Refer to the Database Size Recommendations Table
should Export
manually repeat this process.
5. In this example, you want to keep one month of GPS data active in the database.
6. Select Export GPS from the Export Menu.
7. Enter a file name for the GPS export data similar to this: gps_10_apr_2007.txt.
Note: Be careful about naming the GPS export file so that you don't lose previously exported
data.
9. Go to the Database > Maintenance > GPS command
your export frequency from Step 5. In this example it is one month.
Note: The same process can be followed for exporting and deleting CarChip Parameter Log
records you no longer want to keep in your active database.
the GPS Table. Once you determine the export frequency, you will need to
(Preferences command in the Setup Menu) to select the
to determine how frequently you
and delete all GPS data older than
See also:
Active Database Size Recommendations
Preferences: Backup Options
Export Menu
Maintenance
Back to Quick Reference Menu
20
Page 33

DriveRight FMS Help
Home | Getting Started | Quick Reference | Menu Commands | Troubleshooting
Active Database Size Recommendations
The following recommendations are based on tests and calculations made with these
assumptions:
o 10 trips per day per vehicle
o Trip duration: 1 hour (10 hours driving time per day per vehicle)
o GPS data logged every 10 seconds
Note: If your fleet size exceeds the scenarios shown below, we recommend that you use a multiuser database.
Note: For multi-user databases, theoretically there is no fleet size limit. Still, we recommend that
you backup data once a month, keeping only the amount of data required for reporting purposes
in the active database, typically 3-6 months.
Recommendations Table
Scenario Number
of
Vehicles
No GPS
MSDE
with GPS
25 Up to 1 year Backup data once a month for application
50 Up to 9 months
100 Up to 6 months Backup data once a month for application
5 Up to 1 month Backup data every month for application
Amount of
Active
Data in
Database
Remarks and Recommendations
performance. Using backup options
maximum of 1 year of data in the active
database
Backup data once a month for application
performance. Using backup options
maximum of 9 months of data in the active
database
performance. Using backup options
maximum of 6 months of data in the active
database
performance. Using backup options
maximum of 1 months of data in the active
database
you can set
you can set
you can set
you can set
MS
Access
with GPS
10 Up to 1 month Backup data every month for application
performance. Using backup options
maximum of 1 months of data in the active
database
you can set
21
Page 34

DriveRight FMS User's manual
See also:
Active Database Size Recommendations
Preferences: Backup Options
Back to Quick Reference Menu
Home
| Getting Started | Quick Reference | Menu Commands | Troubleshooting
Backup
The Backup command is used to archive old data as a zip file. The backup files are stored in the
Backup sub-directory in the DriveRight FMS install directory. The Backup sub-directory is created
the first time you back up your data.
The backup zip files are named based on the start and end dates chosen for the backup. For
example, if you pick the dates between March 6, 2003 and March 27, 2003, the backup file will be
named 6March2003_27March2003.zip.
You can configure how much data to keep active after a backup by setting up your Preferences:
Backup Options in the Setup menu. Limiting the amount of data in the active database helps
prevent the database from growing into an unmanageable size.
To backup data:
1. Click Backup in the File menu. The Backup Files To dialog box is displayed.
2. From the Backup Files To dialog box select the folder where the backup file will be
written. The Backup Options dialog box is displayed.
22
Page 35

DriveRight FMS Help
Note: The Backup Options dialog box will not be displayed the first time you back up DriveRight
data.
3. In the Backup Options dialog box check your last backup date and specify whether to
backup the whole database or only those records falling within a specified time period. The start
date will always be initialized to the last backup date.
4. Click OK to initiate the backup or click Cancel to exit the dialog box without backing up
your database.
5. When the backup is finished, click OK to return to the program.
See Also:
Restore
Preferences: Backup Options
Back to File Menu
Home
| Getting Started | Quick Reference | Menu Commands | Troubleshooting
Restore
The Restore command is used to get a previously Backed up data back into the active database.
In this process you can pick one or more tables to be restored.
To restore data:
1. Click Restore in the File menu. The Restore Files From dialog box is displayed.
23
Page 36

DriveRight FMS User's manual
2. From the Restored Files From dialog box select a single zip file to restore, and then
click Restore. DriveRight FMS unzips the file and displays all the tables in the dialog, and
displays the following dialog box:
Note: You can only restore one .zip file at a time.
Note: The backup file filename is based on the start and end dates chosen for the backup.
3. You can either restore all the database tables or restore individual database tables. Click
Yes in the dialog box to restore all the tables. Click No to restore selected database tables.
4. If you are restoring selected database tables, select each table to be restored. Hold down
the Control key on your keyboard to select multiple tables. When you have finished making your
selection, click Restore to restore the tables or click Cancel to exit without restoring the tables.
24
Page 37

DriveRight FMS Help
5. When the files have been restored, click OK to return to the program.
See Also:
Backup
Back to File Menu
Home
| Getting Started | Quick Reference | Menu Commands | Troubleshooting
Export Menu
Use the export menu options to export DriveRight FMS data.
FTP Export
Export GPS to MapPoint
data in a format designed to be imported into mapping software.
Export Accidents to MapPoint
export accident GPS data in a format designed to be imported into mapping software.
- Use the FTP Export command to export database data to a remote site.
- Use the Export GPS to Mapping Software command to export GPS
- Use the Export Accidents to Mapping Software command to
Other Export Commands
a tab-delimited text file.
Back to File Menu
- Use the other export commands to export the indicated type of data in
25
Page 38

DriveRight FMS User's manual
Home | Getting Started | Quick Reference | Menu Commands | Troubleshooting
Import Menu
Use the Import Menu options to import DriveRight database data into DriveRight.
Import: FTP Import
Import: Import Data From
Import GPS Data into MapPoint
Back to File Menu
Home
| Getting Started | Quick Reference | Menu Commands | Troubleshooting
CarChip Quick Reference
CarChip Quick Reference
CarChip Considerations
Adding Drivers, Vehicles and CarChips
CarChip Settings
Downloading CarChip Guidelines
Download CarChip
Back to Quick Reference Menu
| Getting Started | Quick Reference | Menu Commands | Troubleshooting
Home
Adding Drivers, Vehicles and CarChips
Please refer to the following guidelines when adding new drivers, vehicles, and CarChips
devices.
A CarChip device must be assigned to either a vehicle or a driver.
Unlike DriveRight devices, a CarChip device can be easily switched from vehicle to
vehicle, as long as all the vehicles provide a supported OBDII port.
26
Page 39

DriveRight FMS Help
If a CarChip is assigned to a vehicle, the default driver of that vehicle will appear as the
driver on all downloaded data from that CarChip.
If a CarChip is assigned to a driver, then all data downloaded from that CarChip will be
associated with that driver and the vehicle will be listed as UNKNOWN VEHICLE.
If you just want to add a CarChip and you don’t yet have a vehicle or driver to assign, you
can select "UNKNOWN VEHICLE".
Based on your specific situation, you should carefully consider the options before
assigning a CarChip to either a vehicle or driver.
The Add New CarChip
of adding CarChips. It will also allow you to add drivers and vehicles if they are not
already in the database.
Back to Quick Reference Menu
Home
| Getting Started | Quick Reference | Menu Commands | Troubleshooting
command opens a wizard that will guide you through the process
CarChip Considerations
o If both a CarChip device and DriveRight console are installed in the same vehicle, you
will need to create two entries for the driver and two entries for the vehicle in the
DriveRight FMS database. Otherwise you will see duplicate trip data in your DriveRight
FMS reports.
o If you have multiple serial ports, you can connect CarChip to one serial port and
DriveRight to another. If you do not have multiple serial ports we recommend you buy a
serial switch box to switch between the two devices or a serial extension cord to make
plugging and unplugging the download cables more convenient.
o If you are using both CarChip and DriveRight devices, make sure both types of devices
use the same safety settings.
Speed Band 3 in CarChip should match Speed Limit in DriveRight.
Hard Braking in CarChip should match Decel Limit in DriveRight.
Hard Acceleration in CarChip should match Accel Limit in DriveRight.
o Unlike DriveRight, a CarChip can be assigned either to a vehicle or to a driver.
Back to Quick Reference Menu
Home
| Getting Started | Quick Reference | Menu Commands | Troubleshooting
CarChip Settings
The following commands allow you to view or change the settings on a CarChip:
View/Set
27
Page 40

DriveRight FMS User's manual
Restore
Back to CarChip Menu
| Getting Started | Quick Reference | Menu Commands | Troubleshooting
Home
Downloading CarChip Guidelines
You cannot download a CarChip device if any of the following conditions exist:
CarChip not present in the database.
CarChip not assigned to a Vehicle or to a Driver.
Unless every thing is configured properly, you cannot download from the device.
Back to Quick Reference Menu
Home
| Getting Started | Quick Reference | Menu Commands | Troubleshooting
Download CarChip
Use this command to download data from your CarChip data logger into your computer.
To download CarChip data:
1. Connect your CarChip device to your computer.
2. Select Download CarChip from the CarChip menu or select the Download CarChip
Icon from the tool bar. The Downloading Data dialog box appears.
2. The dialog box disappears when the download is complete.
3. Click Cancel only if you wish to abort the download before it is finished.
See also:
Downloading CarChip Guidelines
Back to CarChip Menu
28
Page 41

DriveRight FMS Help
Home | Getting Started | Quick Reference | Menu Commands | Troubleshooting
DriveRight Quick Reference
DriveRight Quick Reference
DriveRight Configuration
Adding Drivers, Vehicles and DriveRights
DriveRight Settings
Verify DriveRight Calibration
Setup GPS
Downloading Requirements
Download DriveRight
Download Palm
Database Menu
Reports Menu
Back to Quick Reference Menu
Home
| Getting Started | Quick Reference | Menu Commands | Troubleshooting
Adding Drivers, Vehicles and DriveRights
Please refer to the following guidelines when adding new drivers, vehicles, and DriveRight
devices.
The Add New DriveRight
process of adding DriveRights. It will also allow you to add drivers and vehicles if they are
not already in the database.
If you are adding a new driver, vehicle, and DriveRight, you should add the driver first,
the vehicle second, and the DriveRight last.
If you just want to add a vehicle and you don’t yet have a driver to assign, you can select
"UNALLOCATED DRIVER".
If you just want to add a DriveRight and you don’t yet have a vehicle to assign, you can
select "UNKNOWN VEHICLE".
Important: If you selected either a UNALLOCATED DRIVER or UNKNOWN VEHICLE, you
should change them to real entries before actually using the DriveRight in the field and
downloading it. Otherwise, the data will be assigned to the wrong entities and will affect the
results when you run Reports, etc.
command opens a wizard that will guide you through the
29
Page 42

DriveRight FMS User's manual
See also:
Add New DriveRight
Back to Quick Reference Menu
Home
| Getting Started | Quick Reference | Menu Commands | Troubleshooting
DriveRight Settings
The following commands allow you to view and or change the settings on a DriveRight device:
View/Set
Restore
Setup GPS
Verify DriveRight Calibration
Back to DriveRight Menu
Home
| Getting Started | Quick Reference | Menu Commands | Troubleshooting
DriveRight Settings: Verify DriveRight Calibration
The Calibrate DriveRight dialog box allows you to verify DriveRight calibration settings.
The Calibration Setting dialog box shows two installation methods. VSS (vehicle speed
sensor) installation and Reed Switch.
To verify the DriveRight console calibration:
1. Click on DriveRight Settings from the DriveRight Menu.
2. Select Verify DriveRight Calibration from the drop-down menu. A DriveRight
Calibration Message dialog box is displayed.
3. Click OK, Set or Cancel to continue, depending on the displayed message. The
Calibrate DriveRight dialog box is displayed.
30
Page 43

DriveRight FMS Help
4. If the DriveRight is using a reed switch for the speed sensor, make sure the Installation
Method indicates Reed Switch.
o Reed Switch: If the DriveRight device has been previously calibrated in the
vehicle or through the software, then DriveRight FMS automatically calculates
the Calibration number for your vehicle. We strongly recommend that you do not
change these values. The PPR for a reed switch is always ”1”.
5. If the DriveRight is using the vehicle's VSS for the speed sensor, make sure the
Installation Method indicates VSS.
o VSS: If the DriveRight device has been previously calibrated in the vehicle or
through the software, then DriveRight FMS automatically calculates the VSS
PPM (Pulses Per Mile), PPR (pulses per reading) and Calibration number for
your vehicle. Otherwise you must specify the PPM for your vehicle. Depending
on your selection, software calculates the PPR (pulses per reading) and
calibration values and fills the edit boxes with them.
6. If you are using the VSS, you can adjust the pulses per mile (PPM) from the drop down
list or enter the PPM in the edit box if necessary. We recommend that you not change these
settings if the DriveRight has been previously calibrated.
7. Click OK to save changes to the calibration, or click Cancel to exit without saving
changes.
Back to DriveRight Menu
Home
| Getting Started | Quick Reference | Menu Commands | Troubleshooting
| DriveRight Settings
DriveRight Settings: Setup GPS
Use this command to view and/or modify the GPS settings on a DriveRight device.
Note: This command only works with the DriveRight 600.
31
Page 44

DriveRight FMS User's manual
To setu
3. Set GPS Logging to On, Off, or DriveRight Speed Only.
p GPS logging:
1. Select DriveRight Settings from the DriveRight Menu.
2. Select Setup GPS from the DriveRight Settings drop down list. The Setup GPS
Logging Interval dialog box is displayed.
o Select On to enable GPS logging.
o Select Off to disable GPS logging.
o Select DriveRight Speed Only to log the DriveRight speed without the GPS
coordinates. No GPS unit is required to enable this option.
4. Enter the desired logging interval and indicate a time unit of either seconds (Sec) or
minutes (Min). Logging Hours indicates how much data can be stored at the selected interval.
5. Click Set to save the changes or click Cancel to exit without changing the settings
Back to DriveRight Menu
Home
| Getting Started | Quick Reference | Menu Commands | Troubleshooting
| DriveRight Settings
Downloading Requirements
You cannot download a DriveRight if any of the following conditions exist:
DriveRight not present in the database.
DriveRight not assigned to a Vehicle.
Note: The same conditions also apply to Host Mode and Palm Download.
Back to Quick Reference Menu
Home
| Getting Started | Quick Reference | Menu Commands | Troubleshooting
32
Page 45

DriveRight FMS Help
Download DriveRight
The Download DriveRight command transfers trip data from the connected DriveRight device to
the DriveRight database.
To download your DriveRight:
1. Connect your DriveRight console to your computer and make sure the DriveRight is
"awake". Press the MODE key if there is nothing on the LCD display.
2. Select Download DriveRight in the DriveRight Menu. The following Download Status
box is displayed:
Note: You will see the Cancel button only if you are downloading a DriveRight 600.
3. You may lose GPS data for earlier trips if the DriveRight console is not downloaded for
an extended period of time. In this case you will see a warning message similar to this:
4. If the calibration in the DriveRight console does not match the calibration in the database,
you will see a warning message similar to this:
33
Page 46

DriveRight FMS User's manual
5. When the data has finished downloading the following dialog box is displayed:
6. Press Enter or click OK to continue.
See also:
Downloading DriveRight Guidelines
Back to DriveRight Menu
Home
| Getting Started | Quick Reference | Menu Commands | Troubleshooting
Download Palm
Versions of DriveRight FMS 3.0 and later offer a feature to download data from multiple
DriveRight devices from a Palm device. You will need the DriveRight Palm Download Kit, #8181,
in order to use this command.
Note: To download a DriveRight console data into the software using Palm Download, the
DriveRight should be present in the database. If you try to download a DriveRight which is not
present in the database, you will get an error message.
To download your Palm:
1. Select Download Palm in the DriveRight Menu.
2. The first time you download a Palm, the following dialog box is displayed. Select the
directory which contains your Palm backup databases and click OK.
34
Page 47

DriveRight FMS Help
3. Each time after the first time, when you use the Download Palm command, the following
dialog box appears showing the selected Palm backup directory.
4. Click Browse to select a different backup directory, click OK to use this displayed
directory, or click Cancel to exit.
5. If you click OK, the Download Status dialog box is displayed.
35
Page 48

DriveRight FMS User's manual
6.
dialog box is displayed:
7. Click OK to continue.
Back to DriveRight Menu
Home
When the data has finished downloading the Palm Download, Download Successful
| Getting Started | Quick Reference | Menu Commands | Troubleshooting
Mapping Quick Reference Menu
Mapping Quick Reference Menu
How to Create Maps
How to View Maps
Mapping Menu
DriveRight FMS Mapping Requirements
Back to FMS Quick Reference Menu
Home | Getting Started | Quick Reference | Menu Commands | Troubleshooting
How to Create Maps
| Mapping Menu
How to Create Maps
DriveRight FMS can create three different maps from your GPS data. You can also export GPS
data for use in third-party mapping software such as MS MapPoint.
Creating a Trip Map
Creating a Day Map
Creating an Accident Log Map
Export: GPS to MapPoint
Export: Accidents to MapPoint
36
Page 49

Import GPS Data Into MapPoint
DriveRight FMS Help
Back to FMS Quick Reference
| Mapping Quick Reference
| Getting Started | Quick Reference | Menu Commands | Troubleshooting
Home
Creating a Trip Map
Click the Map button in the Trips browse window to create a map from a trip record.
To create a Trip Map:
1. Select the Trips command in the Database menu. The Filter For Trips dialog box
displayed.
2. Select your desired Trips filter options.
3. Click OK to show the Trips browse window.
4. Highlight a trip record then click Map to generate a Trip Mapping Report for that trip.
Depending on the mapping tool you have selected, the map is displayed in the DriveRight
FMS program window, Google Earth
TM
, or Google MapsTM in a web browser.
Note: If you are using Internet Explorer as your web browser and have selected Google Maps as
your mapping tool, you may see the following message when Internet Explorer begins to create a
Trip Map:
is
To allow Internet Explorer to finish creating the map, click on the message and then click "Allow
Blocked Content" in the resulting pop-up message. When the Security Warning window
displays, click "Yes" and Google Maps will generate the Trip Map.
See also:
Viewing Trip Maps
Map Navigation
Viewing GPS Plot Information
Back to Mapping Overview
| Getting Started | Quick Reference | Menu Commands | Troubleshooting
Home
37
Page 50

DriveRight FMS User's manual
Creating a Day Map
Click the Map button in the Days browse window to create a map for all trips taken on the same
day.
To create a Day Map:
1. Click Days in the Database menu. The Filter for Days
2. Select your desired filter options.
3. Click OK to show the Days browse window.
4. Highlight a day record, then click Map to generate the Day Mapping Report.
Depending on the mapping tool you have selected, the map is displayed in the DriveRight
FMS program window, Google Earth
Note: If you are using Internet Explorer as your web browser and have selected Google Maps as
your mapping tool, you may see the following message when Internet Explorer begins to create a
Day Map:
To allow Internet Explorer to finish creating the map, click on the message and then click "Allow
Blocked Content" in the resulting pop-up message. When the Security Warning window
displays, click "Yes" and Google Maps will generate the Day Map.
See also:
Viewing Day Maps
TM
, or Google MapsTM in a web browser.
is displayed.
Map Navigation
Back to Mapping Overview
| Getting Started | Quick Reference | Menu Commands | Troubleshooting
Home
Creating an Accident Log Map
You can create an Accident Log Report Map by selecting the Output to: Map or Output to: Both
Map and Excel options when you create the Accident Log Report.
To create a Accident Log Map:
38
Page 51

DriveRight FMS Help
1. Select
2. Select the desired Accident Log filter options, being sure to select Map or Both Map and
3. Click OK to create the Accident Log Mapping Report.
Note: If you are using Internet Explorer as your web browser and have selected Google Maps as
your mapping tool, you may see the following message when Internet Explorer begins to create
an Accident Log Map:
To allow Internet Explorer to finish creating the map, click on the message and then click "Allow
Blocked Content" in the resulting pop-up message. When the Security Warning window
displays, click "Yes" and Google Maps will generate the Accident Log Map.
See also:
Viewing Accident Log Maps
the Accident Log command in the Reports menu. The Filter for Accident Logs
displayed.
for the report output.
Excel
is
Back to Mapping Overview
| Getting Started | Quick Reference | Menu Commands | Troubleshooting
Home
Export: GPS to MapPoint
Note: This feature is only enabled if you have chosen MapPoint as your mapping tool. This
feature is not supported in Google MapsTM or Google EarthTM.
To export GPS data:
1. Go to File > Export.
2. Select GPS to MapPoint in the drop-down Export menu.
The GPS Fields dialog box displays.
39
Page 52

DriveRight FMS User's manual
3. Click Select All to check all fields. Click Clear All to clear all fields. Click in the box for
each field to toggle the check on and off.
Note: Only the checked GPS fields will be exported. These key fields should always be selected:
GPS DateTime, Speed, High Speed, Latitude and Longitude.
4. Click OK in the GPS Fields box to continue, click Cancel to exit. If you click OK, the
Export GPS To dialog box is displayed.
3. The default file name is GPS.TXT and the default directory is the DriveRight FMS install
directory. You can edit or change the file name directly in the text box. You can also change the
directory in which the exported GPS data file will be saved.
40
Page 53

DriveRight FMS Help
4.
5. Click Browse to view the GPS data before you export it.
6. Click OK when you are ready to export the GPS data or click Cancel to exit without
exporting data. If you click OK, the exported GPS data will be saved in a file ready to be imported
into your mapping software.
See also:
Import GPS Data Into MapPoint
Back to File Menu
Home
Click Set Filter to narrow the selection of GPS data to be exported.
| Export Menu
| Getting Started | Quick Reference | Menu Commands | Troubleshooting
Export: Accidents to MapPoint
Note: This feature is only enabled if you have chosen MapPoint as your mapping tool. This
feature is not supported in Google MapsTM or Google EarthTM.
To export accident log data:
1. Go to File > Export.
2. Select Accident to MapPoint.
The Export AccidentLogs To dialog box is displayed.
2. Select the file directory in which to save the accident log files.
41
Page 54

DriveRight FMS User's manual
3.
desired.
4. Click Export to create the accident log data file or click Cancel to exit. If you click OK,
the exported Accident Log data will be saved in a file ready to be imported into your mapping
software.
To import data into MapPoint:
Verify the file name for the accident log file. You can edit the name in the dialog box if
1. Start the MapPoint application.
2. Select Import Data Wizard from the Data menu.
3. Using the File dialog box find select the ACCIDENTLOGS.TXT file and click on Open.
4. "Tab" should be selected to separate the data. Click Next.
5. All the fields you exported will appear in the next dialog. Column headings are included
and should be detected by the program. All the columns should have <Other Data> as
their data type except Lat and Long. Check to make sure the Lat and Long were
detected correctly. If they are not, correct them. Click Finish.
6. Select Multiple Symbol and click Next. These instructions show you how to color code
accident log points by speed at T0. T0 is the middle point of the accident log.
7. In "Select the data filed or column to map" list, select time_TO. In "Divide the data you
chose above by" list, select <None>. In "Show the data by" list, select Latitude &
Longitude. Click Next.
8. Enter the speed divisions you want to use and the color for each division.
9. Click Finish to plot the points.
10. In the left frame, right click on "time_T0 by Latitude & Longitude". Select "Properties".
Open the Balloon tab and select time_T0, accidentDateTime and any other fields you
want to view.
11. Zoom in enough to see individual points, right click on a point, and pick "Show
Information", to look at data for that particular point.
12. MapPoint allows you to navigate around on the map pretty well. Some useful keystrokes
are ’r;+’ to zoom in and ’r;-’r; to zoom out. Also, you can draw a box around an area and
then click in it to zoom into it. You can scroll the map using your mouse by just
positioning the mouse cursor on the side of the map you want to scroll into.
Back to File Menu
| Getting Started | Quick Reference | Menu Commands | Troubleshooting
Home
| Export Menu
Import GPS Data Into MapPoint
Exported GPS Data can be easily importing into MS MapPoint using the MapPoint Import Data
Wizard.
To import GPS data into MapPoint:
42
Page 55

DriveRight FMS Help
1.
Start the MapPoint application.
2. Select Import Data Wizard from the Data menu.
3. Using the File dialog box find select the GPS.TXT file and click Open.
4. "Tab" should be selected to separate the data. Click Next.
5. All exported fields appear in the next dialog box. Column headings are included and
should be detected by the program. All the columns should have <Other Data> as their
data type except Latitude and Longitude. Check to make sure the Latitude and
Longitude were detected correctly. If they are not, correct them. Click Finish.
6. Select Multiple Symbol and click Next. These instructions show you how to color code
accident log points by speed at T0. T0 is the middle point of the accident log.
7. In "Select the data filed or column to map" list, select highSpeed. In "Divide the data you
chose above by" list, select <None>. In "Show the data by" list, select Latitude &
Longitude. Click Next.
8. Enter the speed divisions you want to use and the color for each division.
9. Click Finish to plot the points.
10. In the left frame, right click highSpeed by Latitude & Longitude. Select Properties.
Open the Balloon tab and select gpsDateTime, highSpeed and any other fields you want
to view.
11. Zoom in enough to see individual points, right click on a point, and select Show
Information, to look at data for that particular point.
12. MapPoint allows you to navigate around on the map pretty well. Some useful keystrokes
are ’+’ to zoom in and ’-’ to zoom out. Also, you can draw a box
around an area and then click in it to zoom into it. You can scroll the map using your
mouse by just positioning the mouse cursor on the side of the map you want to scroll into.
See also:
Export: GPS to Mapping Software
Back to File Menu
| Getting Started | Quick Reference | Menu Commands | Troubleshooting
Home
How to View Maps
| Export Menu
How to View Maps
Viewing Trip Maps
Viewing Day Maps
43
Page 56

DriveRight FMS User's manual
Viewing Accident Log Maps
Back to FMS Quick Reference
| Getting Started | Quick Reference | Menu Commands | Troubleshooting
Home
| Mapping Quick Reference
Viewing Trip Maps
The following topics will help you view and understand Trip Maps.
Trip Map Features
Click this link for information on Trip Map features in MapPoint, Google Maps, and Google Earth.
Map Navigation
Click this link for explanations of navigating in map windows in MapPoint, Google Maps, and
Google Earth.
Viewing GPS Plot Information
Click this link for an explanation of viewing GPS plot information in MapPoint.
Back to Mapping Quick Reference Menu
| How to View Maps
Home
| Getting Started | Quick Reference | Menu Commands | Troubleshooting
Viewing Day Maps
The following topics will help you view and understand Day Maps. Click on any topic for more
details on using Day Maps.
Day Map Features
Map Navigation
Viewing GPS Plot Information
Back to Mapping Quick Reference Menu
Home
| Getting Started | Quick Reference | Menu Commands | Troubleshooting
| How to View Maps
Viewing Accident Log Maps
The following topics will help you view and understand Accident Log Maps. Click on any link for
more details on using Accident Log Maps.
Accident Log Map Features
44
Page 57

Map Navigation
Viewing GPS Plot Information
DriveRight FMS Help
Back to Mapping Quick Reference Menu
Home
| Getting Started | Quick Reference | Menu Commands | Troubleshooting
Accident Mapping
| How to View Maps
Accident Log Map Features
If you are using MapPoint as your mapping tool, an Accident Log Map consists of the following
key elements:
Title Bar
The title bar at the top of the map window shows the type of map, the company location,
DriveRight ID, driver name, and date of the trip.
Overview Map
The overview map shows the general area of the map and is located on the left side of the
window just below the title bar.
Legend
A legend of map symbols is located just below the Overview Map.
Each Accident Log pushpin represents an Accident Log record. Pushpins are indicated
by yellow triangles on Accident Log Maps viewed with MapPoint, as shown below.
45
Page 58

DriveRight FMS User's manual
Map Windo
The Accident Log Report map puts an accident pushpin on the location of each accident in the
Accident Log Report.
To see a summary of the accident information, click an accident log pushpin. In
To see a Trip Map
w
MapPoint, these pushpins are indicated by a yellow triangle, as shown in the Map
Window legend.
.
of the trip in which an accident occurred, double-click the accident
pushpin. Refer to Viewing Trip Maps
for information on viewing the Accident Trip Map.
Full Map View
46
Page 59

DriveRight FMS Help
If you are using Google Maps as your mapping tool, an Accident Log Map consists of the
following key elements (click any heading to display more detail):
Views
In the upper-right corner of the window, you can click the Map, Satellite, or Terrain buttons to
display different views, including aerial images and street-level imagery.
Navigation Controls
Use this tool to navigate left, right, up, or down, or to zoom in or out in the Google Map window.
You can also click and drag anywhere on the map to move it in any direction, or use your
keyboard's up, down, left, or right arrows to move north, south, east, or west, respectively.
47
Page 60

DriveRight FMS User's manual
Legend
Each Accident Log pushpin represents an Accident Log record. Pushpins are indicated by yellow
triangles on Accident Log Maps viewed with Google Maps, as shown below.
Info Window
This window displays additional information when you click on any accident pushpin.
48
Page 61

DriveRight FMS Help
For more detailed instructions on all of the controls and features of Google Maps, go to Basics -
The Google Maps User Guide at:
http://maps.google.com/support/bin/answer.py?hl=en&answer=68259.
If you are using Google Earth as your mapping tool, an Accident Log Map includes the following
key elements (click any heading to display more detail):
Navigation Controls
Use this tool to navigate left, right, up, or down, or to zoom in or out in the Google Earth window.
You can also click and drag anywhere on the 3D map to move it in any direction, or use your
keyboard's up, down, left, or right arrows to move north, south, east, or west, respectively.
Because the Google Earth map is a 3D image, when you "pan" in any direction, you are
presented with an image that simulates that you are rotating the Earth on its axis.
A detailed explanation of how to use the "North-up" button, the Look and Move joysticks, and the
Zoom slider are listed below the image.
49
Page 62

DriveRight FMS User's manual
1. Click the north-up button to reset the view so that north is at the top of the screen. Click
and drag the ring to rotate your view.
2. Use the Look joystick to look around from a single vantage point, as if you were turning
your head. Click an arrow to look in that direction or continue to press down on the
mouse button to change your view. After clicking an arrow, move the mouse around on
the joystick to change the direction of motion.
3. Use the Move joystick to move your position from one place to another. Click an arrow to
look in that direction or continue to press down on the mouse button to change your view.
After clicking an arrow, move the mouse around on the joystick to change the direction of
motion.
4. Use the zoom slider to zoom in or out (+ to zoom in, - to zoom out) or click the icons at
the end of the slider. As you move closer to the ground, Google Earth swoops (tilts) to
change your viewing angle to be parallel to the Earth's surface. You can turn off this
automatic tilt (Tools > Options > Navigation > Navigation controls; Mac: Google Earth >
Preferences > Navigation > Navigation controls).
Hide/Show Sidebar
Click this control (at the top of the window) to conceal or display the side bar (Search, Places and
Layers panels).
Legend
Each Accident Log pushpin represents an Accident Log record. Pushpins are indicated by yellow
triangles on Accident Log Maps viewed with Google Earth, as shown below.
50
Page 63

DriveRight FMS Help
Info Window
This window displays additional information when you click on any accident pushpin.
For more detailed instructions on all of the controls and features of Google Earth, go to The
Google Earth User Guide at:
http://earth.google.com/intl/en/userguide/v4/#navcontrols.
Back to Mapping Quick Reference Menu
| Getting Started | Quick Reference | Menu Commands | Troubleshooting
Home
Day Mapping
| Mapping Menu
Day Map Features
If you are using MapPoint as your mapping tool, a Day Map consists of the following key
elements. Click any of these five headings for additional details about each element of MapPoint
Day Maps.
Title Bar
The title bar at the top of the map window shows the type of map, the company location,
DriveRight ID, driver name, and date of the trip.
Overview Map
The overview map shows the general area of the map and is located on the left side of the
window just below the title bar.
51
Page 64

DriveRight FMS User's manual
Legend
A legend of map symbols is located just below the Overview Map.
Each pushpin in the Day Map indicates a GPS record
. A different pushpin color identifies
each trip taken on the selected day.
You can create a single trip map for any trip in a Day Map by double-clicking a pushpin
from that trip. See Viewing Trip Maps
for more info on viewing a single trip map.
Double-clicking on a pushpin in the mapped trip will return the map to the normal Day
Map showing multiple trips.
Map Window
The Day Map plots all of the trips taken by a vehicle on the selected day. A different color Day
Map pushpin is used for each trip From inside the map window you can move
the window, zoom a selected area
, zoom in and out, and view GPS data.
the area shown in
52
Page 65

DriveRight FMS Help
Full Map View
53
Page 66

DriveRight FMS User's manual
If you are using Google Maps as your mapping tool, a Day Map consists of the following key
elements (click any heading to display more detail):
Views
In the upper-right corner of the window, you can click the Map, Satellite, or Terrain buttons to
display different views, including aerial images and street-level imagery.
Navigation Controls
Use this tool to navigate left, right, up, or down, or to zoom in or out in the Google Map window.
You can also click and drag anywhere on the map to move it in any direction, or use your
keyboard's up, down, left, or right arrows to move north, south, east, or west, respectively.
54
Page 67

Legend
In Google Maps, Day Trips can be viewed in two ways:
DriveRight FMS Help
1. as an Overview, showing all of the trips for one day in a single view
2. as individual trips, showing each trip by itself
Viewing Trips in Overview Mode
To see all of the trips for one day in Overview mode, click the pulldown menu in the upper-left
corner and select Overview.
When viewing all trips in Overview mode, the colored symbols at the bottom left corner of the
map indicate which symbols on the Overview correspond to individual trips for that day.
DriveRight FMS supports up to 64 trips (represented on the map by eight shapes and eight
colors) on a single Day Map. The eight shapes and eight colors are used to represent multiple
55
Page 68

DriveRight FMS User's manual
trips, and a
re shown below. The shapes and colors are used in the order shown. This means
that Trip 1 is shown with a black circle, Trip 2 with a red circle, and Trip 8 with a purple circle. Trip
9 will be shown with a black star, trip 10 with a red star, and so on, to a maximum of 64 trips.
Shapes:
Colors:
Viewing Individual Trips
To see a single trip for the selected day, click the pulldown menu in the upper-left corner and
select any one of the indicated time periods.
When viewing a single trip on the Day Map, the colored circles at the bottom left corner of the
map now indicate the vehicle's speed range at each GPS plot point during the selected trip
shown on the map. Also, Trip Start and Trip End pushpins are shown, which indicate the start and
end of the selected trip.
56
Page 69

DriveRight FMS Help
Info Windo
w
This window displays additional information when you click on any trip marker.
For more detailed instructions on all of the controls and features of Google Maps, go to Basics -
The Google Maps User Guide at:
http://maps.google.com/support/bin/answer.py?hl=en&answer=68259.
If you are using Google Earth as your mapping tool, a Day Map includes the following key
elements (click any heading to display more detail):
Navigation Controls
Use this tool to navigate left, right, up, or down, or to zoom in or out in the Google Earth window.
You can also click and drag anywhere on the 3D map to move it in any direction, or use your
keyboard's up, down, left, or right arrows to move north, south, east, or west, respectively.
Because the Google Earth map is a 3D image, when you "pan" in any direction, you are
presented with an image that simulates that you are rotating on the Earth's axis.
A detailed explanation of how to use the "North-up" button, the Look and Move joysticks, and the
Zoom slider are listed below the image.
57
Page 70

DriveRight FMS User's manual
1. Click the north-up button to reset the view so that north is at the top of the screen. Click
and drag the ring to rotate your view.
2. Use the Look joystick to look around from a single vantage point, as if you were turning
your head. Click an arrow to look in that direction or continue to press down on the
mouse button to change your view. After clicking an arrow, move the mouse around on
the joystick to change the direction of motion.
3. Use the Move joystick to move your position from one place to another. Click an arrow to
look in that direction or continue to press down on the mouse button to change your view.
After clicking an arrow, move the mouse around on the joystick to change the direction of
motion.
4. Use the zoom slider to zoom in or out (+ to zoom in, - to zoom out) or click the icons at
the end of the slider. As you move closer to the ground, Google Earth swoops (tilts) to
change your viewing angle to be parallel to the Earth's surface. You can turn off this
automatic tilt (Tools > Options > Navigation > Navigation controls; Mac: Google Earth >
Preferences > Navigation > Navigation controls).
Hide/Show Sidebar
Click this control (at the top of the window) to conceal or display the side bar (Search, Places and
Layers panels).
Legend
In Google Earth, Day Maps can be viewed in two ways:
1. as an Overview, showing all of the trips for one day in a single view
2. as individual trips, showing each trip by itself
Viewing Trips in Overview Mode
58
Page 71

DriveRight FMS Help
To see
all of the trips for one day in Overview mode, locate the Places section of the legend on
the left side of the Google Earth Day Map. Click the Overview button in the Temporary Places
folder for your selected day and a Day Map will display showing all of the trips for the selected
day.
When viewing all trips in Overview mode, the colored symbols at the bottom left corner of the
map indicate which symbols on the Day Mapcorrespond to individual trips for that day.
DriveRight FMS supports up to 64 trips (represented on the map by eight shapes and eight
colors) on a single Day Map. The eight shapes and eight colors are used to represent multiple
trips, and are shown below. The shapes and colors are used in the order shown. This means
that Trip 1 is shown with a black circle, Trip 2 with a red circle, and Trip 8 with a purple circle. Trip
9 will be shown with a black star, trip 10 with a red star, and so on, to a maximum of 64 trips.
Shapes:
Colors:
Viewing Individual Trips
59
Page 72

DriveRight FMS User's manual
To see
button, and a new map is displayed showing the selected trip.
When viewing a single trip on the Day Map, the colored circles at the bottom left corner of the
map now indicate the vehicle's speed ranges during the selected trip shown on the map. Also,
pushpins are displayed showing the Trip Start and Trip End points, as shown below.
a single trip for the selected day, click any of the "time-period" buttons below the Overview
Info Window
This window displays additional information when you click on any trip marker.
60
Page 73

DriveRight FMS Help
For more detailed instructions on all of the controls and features of Google Earth, go to The
Google Earth User Guide at:
http://earth.google.com/intl/en/userguide/v4/#navcontrols.
Back to Mapping Quick Reference Menu
Home | Getting Started | Quick Reference | Menu Commands | Troubleshooting
Trip Mapping
| Mapping Menu
Trip Map Features
If you are using MapPoint as your mapping tool, a Trip Map consists of the following key
elements: (Click any heading to display more detail.)
Title Bar
The title bar at the top of the map window shows the type of map, the company location,
DriveRight ID, driver name, and date of the trip.
61
Page 74

DriveRight FMS User's manual
Overview Map
The overview map shows the general area of the map and is located on the left side of the
window just below the title bar.
Legend
A legend of map symbols is located just below the Overview Map.
A realistic looking pushpin indicates the starting and stopping points in a Trip Map.
Round pushpins indicate the GPS plot points in a trip.
When viewing a trip map, the round pushpin colors indicate vehicle speed.
Use the Set Speed Ranges
command in the Mapping Menu to set the number of speed
ranges and the speeds included in each range.
Map Window
The Trip map window plots the GPS record to show where the vehicle went, when the trip started
and stopped, and indicates vehicle speed over the course of the trip. From inside the map
62
Page 75

DriveRight FMS Help
wind
ow you can navigate around the map's location, zoom in and out, and view data for individual
GPS records.
Full Map View
63
Page 76

DriveRight FMS User's manual
If you are using Google Maps as your mapping tool, a Trip Map consists of the following key
elements (click any heading to display more detail):
Views
In the upper-right corner of the window, you can click the Map, Satellite, or Terrain buttons to
display different views, including aerial images and street-level imagery.
Navigation Controls
Use this tool to navigate left, right, up, or down, or to zoom in or out in the Google Map window.
You can also click and drag anywhere on the map to move it in any direction, or use your
keyboard's up, down, left, or right arrows to move north, south, east, or west, respectively.
64
Page 77

DriveRight FMS Help
Info Window
This window displays additional information when you click on any trip marker.
Legend
In Google Maps a legend of map symbols is located just below the Overview Map.
Realistic looking pushpins indicate the starting and stopping points on a Trip Map, and
each one is labeled with the start and stop time.
65
Page 78

DriveRight FMS User's manual
Round pushpins indicate the GPS plot points in a trip.
The different colored round pushpins indicate different vehicle speeds at different GPS
plot points, as shown in the legend of map symbols (below).
For more detailed instructions on all of the controls and features of Google Maps, go to Basics -
The Google Maps User Guide at:
http://maps.google.com/support/bin/answer.py?hl=en&answer=68259.
If you are using Google Earth as your mapping tool, a Trip Map includes the following key
elements (click any heading to display more detail):
Navigation Controls
Use this tool to navigate left, right, up, or down, or to zoom in or out in the Google Earth window.
You can also click and drag anywhere on the 3D map to move it in any direction, or use your
keyboard's up, down, left, or right arrows to move north, south, east, or west, respectively.
Because the Google Earth map is a 3D image, when you "pan" in any direction, you are
presented with an image that simulates that you are rotating on the Earth's axis.
A detailed explanation of how to use the "North-up" button, the Look and Move joysticks, and the
Zoom slider are listed below the image.
66
Page 79

DriveRight FMS Help
1. Click the north-up button to reset the view so that north is at the top of the screen. Click
and drag the ring to rotate your view.
2. Use the Look joystick to look around from a single vantage point, as if you were turning
your head. Click an arrow to look in that direction or continue to press down on the
mouse button to change your view. After clicking an arrow, move the mouse around on
the joystick to change the direction of motion.
3. Use the Move joystick to move your position from one place to another. Click an arrow to
look in that direction or continue to press down on the mouse button to change your view.
After clicking an arrow, move the mouse around on the joystick to change the direction of
motion.
4. Use the zoom slider to zoom in or out (+ to zoom in, - to zoom out) or click the icons at
the end of the slider. As you move closer to the ground, Google Earth swoops (tilts) to
change your viewing angle to be parallel to the Earth's surface. You can turn off this
automatic tilt (Tools > Options > Navigation > Navigation controls; Mac: Google Earth >
Preferences > Navigation > Navigation controls).
Hide/Show Sidebar
Click this control (at the top of the window) to conceal or display the side bar (Search, Places and
Layers panels).
Info Window
This window displays additional information when you click on any trip marker.
67
Page 80

DriveRight FMS User's manual
Legend
In Google Earth a legend of map symbols is located just below the Overview Map.
Realistic looking pushpins indicate the starting and stopping points on a Trip Map, and
each one is labeled with the start and stop time.
Round pushpins indicate the GPS plot points in a trip.
The different colored round pushpins indicate different vehicle speeds at different GPS
plot points, as shown in the legend of map symbols (below).
68
Page 81

DriveRight FMS Help
For more detailed instructions on all of the controls and features of Google Earth, go to The
Google Earth User Guide at:
http://earth.google.com/intl/en/userguide/v4/#navcontrols.
Back to Mapping Quick Reference Menu
Home | Getting Started | Quick Reference | Menu Commands | Troubleshooting
| Mapping Menu
Mapping Menu
Note: DriveRight FMS Mapping requires Microsoft MapPoint, Google EarthTM, or Google MapsTM.
To use Google Earth you must have the Google Earth application installed on your computer (go
to http://earth.google.com/ for a free download). To use Google Maps you must have any of the
following three web browsers installed on your computer:
Internet Explorer
Firefox
Safari
The following commands are available in the Mapping Menu:
Open Map
Save Map
E-Mail Map
Select Mapping Tool
69
Page 82

DriveRight FMS User's manual
Set Speed Range
See also:
Mapping Quick Reference Menu
DriveRight FMS Mapping Requirements
Back to Menu Commands
Home
| Getting Started | Quick Reference | Menu Commands | Troubleshooting
DriveRight FMS Mapping Requirements
The following equipment and software are required to use DriveRight FMS mapping functions:
For DriveRight 600:
DriveRight 600 (# 8156)
DriveRight GPS Module (# 8157)
For DriveRight 600
DriveRight 600e ( # 8126)
DriveRight GPS/Wireless Interface Module (# 8127)
E:
GPS Module (# 8128)
For CarChip Fleet Pro:
CarChip Fleet Pro (# 8246)
CarChip GPS/Wireless Interface Module (# 8251)
GPS Module (# 8128)
MapPoint Mapping:
Microsoft MapPoint 2002, 2004, or 2006
Note: Davis Instruments recommends that you do not use MapPoint version 2009.
This version is not compatible with FMS version 3.9.2.
In addition to the system requirements for DriveRight FMS 3.2 or later, Microsoft
recommends a minimum of 64 MB of memory to run MapPoint.
MS MapPoint or MapPoint Control Run-Time must be installed on the computer running the
DriveRight FMS.
Google Mapping:
TM
Google Earth
and a web browser (Internet Explorer, Firefox, or Safari)
an internet connection
70
Page 83

DriveRight FMS Help
B
ack to Mapping Quick Reference Menu
Home
| Getting Started | Quick Reference | Menu Commands | Troubleshooting
Viewing GPS Plot Information
Each push-pin symbol used to plot a trip represents a DriveRight GPS record. You can display
the GPS data for one of the plot points by clicking the push-pin. An information box opens for the
symbol displaying the GPS coordinates, DriveRight ID, GPS date and time, day of the week, and
driver ID.
To modify the MapPoint GPS data display:
Note: Your GPS data can only be modified if you have chosen MapPoint as your mapping tool. If
you have chosen Google MapsTM or Google EarthTM as your mapping tool, you cannot change the
displayed GPS data.
1. Place the cursor inside the plot symbol legend window.
2. Select the Properties right-click mouse command.
3. Click on the Balloon tab at the top right of Properties dialog box. All the available GPS
data parameters are listed in the dialog box.
4. Check a parameter to include it in the displayed plot information.
5. Removing a check will remove that parameter from the summary.
Back to Mapping Quick Reference Menu
Home | Getting Started | Quick Reference | Menu Commands | Troubleshooting
Wireless Quick Reference Menu
Wireless Quick Reference Menu
The Wireless Menu lets you configure the wireless devices in your Wireless Download System,
perform wireless scans and downloads, and upgrade wireless device firmware. The following
quick reference menu helps you get started using the Wireless Download System.
How to Add a Base Station
How to Add a Wireless On-Board Module
How to Select an Operating Region
How to Scan for Wireless On-Board Modules
How to Set Up an Automat
How to Start a Manual Wireless Download
ic Wireless Download
71
Page 84

DriveRight FMS User's manual
How to Upgrade Firmware
Back to FMS Quick Reference Menu
| Getting Started | Quick Reference | Menu Commands | Troubleshooting
Home
| Wireless Menu
How to Add a Base Station
The Add New Base Station dialog box configures the Base Station to wirelessly communicate
with Wireless On-Board Modules and allows you to assign a position to it that makes it easily
identifiable throughout FMS.
To add a new Base Station:
1. Connect your Base Station to the computer's USB port.
2. Select Add New Base Station from the Wireless Menu. If this is the first time a Base
Station or Wireless On-Board Module has been added to FMS, the Select Operating
Region dialog box displays.
3. Select among the three choices displayed: North America, Europe, or Other. The
operating region determines the power level of the wireless devices. Select Europe if the
power levels of the wireless devices must not exceed CE certification requirements of
less than 10 dBm. Select North America if the power levels of the wireless devices must
not exceed FCC or IC certification requirements of less than 30 dBm. Select Other if the
operating region is not North America or Europe.
4. Click OK to save the operating region information or click Cancel to exit without saving.
The Add New Base Station dialog box displays.
72
Page 85

DriveRight FMS Help
The dialog box displays the location and the Position text field. If the Base Station
belongs to a different location, select the correct location from the Current Location
box before adding the Base Station.
5. Enter a position description in the Position text box. The maximum number of characters
for the Position text box is 32.
6. Click Add to add the new Base Station or Cancel to exit the dialog box without saving
the new Base Station.
If you clicked Add, a dialog box is displayed to confirm that the Base Station has been
added to FMS.
7. Click OK to exit the dialog box.
dialog
Back to FMS Quick Reference Menu
Home
| Getting Started | Quick Reference | Menu Commands | Troubleshooting
| Wireless Quick Reference Menu
How to Add a Wireless On-Board Module
To add a new Wireless On-Board Module:
1. Use the Configuration Cable to connect the Wireless On-Board Module to your computer.
2. Select Add New Wireless On-Board Module from the Wireless Menu.
If this is the first time a Base Station or Wireless On-Board Module has been added to
FMS, the Select Operating Region dialog box displays.
73
Page 86

DriveRight FMS User's manual
3. Select among the three choices displayed: North America, Europe, or Other. The
operating region determines the power level of the wireless devices. Select Europe if the
power levels of the wireless devices must not exceed CE certification requirements of
less than 10 dBm. Select North America if the power levels of the wireless devices must
not exceed FCC or IC certification requirements of less than 30 dBm. Select Other if the
operating region is not North America or Europe.
Once an operating region has been selected, the Add New Wireless On-Board Module
dialog box displays.
The dialog box displays the location the Wireless On-Board Module belongs to and the
Vehicle ID/Lic. Plate drop-down list box.
4. Select a Vehicle ID or license plate number from the Vehicle ID/Lic Plate drop-down list
box, or select Automatic. Selecting a Vehicle ID or License plate from the drop down list
assigns the Wireless On-Board Module to that vehicle. Click Browse to display the
Vehicles
database table. Review the full list of available vehicles to better determine the
vehicle that gets assigned to the Wireless On-Board Module. Select Automatic if you do
not want to select a vehicle at this time. The next time either Scan Wireless On-Board
Modules or Start Manual Wireless Download is selected, or an Automatic Wireless
Download has occurred, the correct Vehicle ID will be assigned to the Wireless On-Board
Module based on the vehicle information stored on the DriveRight device.
5. Click Add to add the new Wireless On-Board Module or Cancel to exit the dialog box
without saving the new Wireless On-Board Module.
If you clicked Add, the New Wireless On-Board Module dialog box displays, confirming
that the Wireless On-Board Module has been added to FMS and is configured for use
with your wireless fleet.
74
Page 87

DriveRight FMS Help
6. Click OK to exit the dialog box.
Once the Wireless On-Board Module has been added to the FMS database, it can be installed in
its assigned vehicle or any vehicle in your fleet if you selected Automatic in the Vehicle ID/Lic
Plate drop-down list box. See the DriveRight GPS/Wireless System Installation Manual for
more information on its installation and proper usage.
Note: The Wireless On-Board Module should only be installed to its assigned vehicle unless
Automatic is selected when adding the module.
Back to FMS Quick Reference Menu
Home
| Getting Started | Quick Reference | Menu Commands | Troubleshooting
| Wireless Quick Reference Menu
How to Select an Operating Region
The Select Operating Region dialog box lets you select an operating region to the wireless
device(s). Selecting a region adjusts the operating legal power of the wireless device(s).
1. Select Select Operating Region from the Wireless Menu. The Select Operating
Region dialog box displays.
The Select Operating Region dialog box displays automatically the first time you select
Add New Base Station
the Wireless Menu. The same operating region selection applies to all wireless devices
added to the database.
, Add New Wireless On-Board Module, or Upgrade Firmware from
2. Select among the three choices displayed: North America, Europe, or Other. The
operating region determines the power level of the wireless devices. Select Europe if the
75
Page 88

DriveRight FMS User's manual
power level
less than 10 dBm. Select North America if the power levels of the wireless devices must
not exceed FCC or IC certification requirements of less than 30 dBm. Select Other if the
operating region is not North America or Europe.
3. Click OK to save the operating region information or click Cancel to exit without saving.
Note: Changing the operating region at any time only affects the settings of the subsequently
added wireless devices, not the ones that have been previously added to the system. To reconfigure the setting for previously added devices, remove the wireless device(s) from the
Wireless Devices database table in the Database menu, reconnect the device(s), change the
operating region for the device(s), then add the wireless device(s) back into the database.
Back to FMS Quick Reference Menu
Home
| Getting Started | Quick Reference | Menu Commands | Troubleshooting
s of the wireless devices must not exceed CE certification requirements of
| Wireless Quick Reference Menu
How to Scan for Wireless On-Board Modules
The Scan Wireless On-Board Modules dialog box uses the Base Station(s) to scan all of the
Wireless On-Board Modules in the current location and displays the wireless communication
status of each Wireless On-Board Module.
Note: At the top of each hour, the Wireless On-Board Module is turned off by the DriveRight or
Carchip device for up to five minutes. This is done to allow the DriveRight or CarChip to turn on
the GPS module to refresh the satellite position periodically. This occurs even without a GPS
module being physically connected to your DriveRight or Carchip device. FMS will not be able to
communicate with the Wireless On-Board Module(s) during this time.
1. Select Scan Wireless On-Board Modules from the Wireless Menu. The Scan Wireless
On-Board Modules displays a list of all the Wireless On-Board Modules in your
database associated with the currently selected location.
76
Page 89

DriveRight FMS Help
2. Click Start to scan all of the Wireless On-Board Modules. As the Base Station scans for
the Wireless On-Board Modules, the status of each of the modules displays under the
Status column.
The color box provides a visual representation of the status for each of the Wireless On-Board
Modules in the database. The color is updated throughout the scan process. The Status column
on the right hand side of the dialog box also documents the status for each module. The possible
statuses are:
77
Page 90

DriveRight FMS User's manual
Not Yet - The Base Station has not yet scanned for the Wireless On-Board Module.
Searching for Vehicle - The Base Station is currently searching for the Wireless On-
Board module.
Successful - The Base Station has successfully found and communicated with
Wireless On-Board Module.
Failed - The Base Station has not successfully communicated with or found errors in
communicating with the Wireless On-Board Module. The scan will continue to search for
the "Failed" Wireless On-Board Modules until the maximum of 10 retries has been
reached. The following is a status list that corresponds to the red color box:
Vehicle ID Mismatch - The Wireless On-Board Module is not installed in the assigned
vehicle. To correct this problem, select the Wireless On-Board Module's record in the
Wireless Devices
dialog box displays information about the On-Board Module. Change the Vehicle ID field
of the Wireless On-Board Module to Automatic to allow FMS to find the Vehicle's ID
automatically. You can also install the Wireless On-Board Module into the assigned
vehicle.
Device Not Assigned - The DriveRight has not been assigned to a vehicle, the Carchip
has not been assigned to a vehicle or a driver, or the DriveRight or CarChip has not been
added to the FMS Database. Add the DriveRight
corresponding vehicle
database table and click Edit. The Edit Wireless On-Board Module
or CarChip and assign it to the
or driver.
Device Not Available - FMS is able to communicate with the Wireless On-Board
module, but is not able to get a response from the device (DriveRight or CarChip) which
is connected to the Wireless On-Board Module. Try to restore power to the device or
reconnect the device to fix the problem.
Vehicle Not Found - The Vehicle and Wireless On-Board Module are not within range of
the Base Station. This status also occurs when there is an error communicating with the
DriveRight or CarChip device. See Wireless Device Communication Problems
information.
3. Click Stop to abort the scan before it is completed or click Close to close the dialog box
once the scan has completed. Please note that if you stop scanning before it completes the scan,
the last vehicle it scans automatically contains a failed status.
Note: Since it is not required to select a vehicle when adding a new Wireless On-Board Module,
Unknown is displayed under the Vehicle ID column to indicate that a vehicle has not been
assigned to a Wireless On-Board Module.
Back to FMS Quick Reference Menu
Home
| Getting Started | Quick Reference | Menu Commands | Troubleshooting
| Wireless Quick Reference Menu
for more
How to Set Up an Automatic Wireless Download
The Setup Automatic Wireless Download dialog box lets you select when to automatically
download some or all vehicles that are wirelessly connected to FMS.
Note: FMS has to be running for the Automatic Wireless Download to occur.
78
Page 91

DriveRight FMS Help
1. Select Setu
p Automatic Wireless Download from the Wireless Menu. The Setup
Automatic Wireless Download dialog box lets you select the vehicles you want to
automatically download daily.
By default, a vehicle associated with a newly added Wireless On-Board Module is
automatically placed in the Vehicles in Download Queue list. This also applies to
"Unknown" vehicles.
The Available Vehicles list shows all available vehicles for the current location
. The
Vehicles in the Download Queue list shows the vehicles selected for automatic wireless
download.
2. Click >>, All>>, <<, or All<< to move the vehicles between these two lists.
3. Enter the time FMS will begin the automatic download process in the Start Time box or
click the Up or Down arrow buttons to change the start time. The default time is 6:00 PM.
4. Enter the amount of time you would like FMS to search for the selected vehicles in the
Duration box or click the Up or Down arrow buttons to increment or decrement the
hours. The duration allows you to prolong the time for retries when the Wireless OnBoard Modules are not immediately available for download, because they are either out
of range or currently powered off.
5. Check the Include Weekend box to automatically download all seven days of the week.
"Weekend" is defined in the Night and Weekend Settings
dialog box. If the start time
selected in this dialog box falls within the "weekend" time frame selected in the Night
and Weekend Settings dialog box, download will not take place during the day or days
included in the "weekend" definition unless the Include Weekend box is checked.
79
Page 92

DriveRight FMS User's manual
6. Click OK to save the auto
automatically download the Wireless On-Board Modules or click Cancel to exit without
saving.
Note: Since it is not required to select a vehicle when adding a new Wireless On-Board Module,
Unknown is displayed under the Vehicle ID column to indicate that a vehicle has not been
assigned to a Wireless On-Board Module.
Note: Only one wireless download process is allowed at a time. If an automatic download is
scheduled during a manual download, the automatic download will be delayed until the manual
download is completed. If the duration period for the Automatic Download has expired before the
manual download has finished, Automatic Download will not take place for that day.
Back to FMS Quick Reference Menu
Home
| Getting Started | Quick Reference | Menu Commands | Troubleshooting
matic wireless download settings and prepare FMS to
| Wireless Quick Reference Menu
How to Start a Manual Wireless Download
Different from the Automatic Wireless Download, The Start Manual Wireless Download dialog
box lets you select some or all vehicles in your fleet to wirelessly download immediately once you
press Start Download.
1. Select Start Manual Wireless Download from the Wireless Menu or click the Manual
Wireless Download Icon from the toolbar. The Start Manual Wireless Download dialog
box lets you select the vehicles you want to download at this time.
80
The Available Vehicles list shows all available vehicles for the displayed location. The
Page 93

DriveRight FMS Help
Vehicles in the Do
download.
2. Click >>, All>>, <<, or All<< to move the vehicles between these two lists.
3. Enter the amount of time you would like FMS to search for the selected vehicles in the
Duration box or click the Up or Down arrow buttons to increment or decrement the
hours. The duration allows you to prolong the time for retries when the Wireless OnBoard Modules are not immediately available for download, because they are either out
of range or currently powered off.
4. Click Start Download to start the download or click Cancel to cancel the manual
download.
The Wireless Download Status
Note: Since it is not required to select a vehicle when adding a new Wireless On-Board Module,
Unknown is displayed under the Vehicle ID column to indicate that a vehicle has not been
assigned to a Wireless On-Board Module.
Note: Only one wireless download process is allowed at a time. If you select Start Manual
Wireless Download from the Wireless Menu while an automatic wireless download is in progress
or the Wireless Download Status dialog box is currently displaying, the Do You Want to Suspend
Automatic Wireless Download dialog box displays. If you click Yes, the Automatic Download will
be suspended until the manual download is completed. If the duration period for the Automatic
Download expires before the manual download has finished, Automatic Download will not take
place for that day.
wnload Queue list shows the vehicles selected for manual wireless
dialog box displays when you click Start Download.
Back to FMS Quick Reference Menu | Wireless Quick Reference Menu
Home
| Getting Started | Quick Reference | Menu Commands | Troubleshooting
How to Upgrade Firmware
The Upgrade Firmware dialog box lets you update the firmware for both the wireless Base
Station and Wireless On-Board Modules.
Note: To upgrade the firmware, connect the wireless device(s) to the USB port(s) of the
computer. Both the Wireless On-Board Module and the Base Station share the same firmware.
To upgrade the firmware:
1. Select Upgrade Firmware from the Wireless Menu.
If this is the first time any wireless device has been connected to FMS, the Select
Operating Region dialog box displays.
81
Page 94

DriveRight FMS User's manual
2. Select among the three choices displayed: North America, Europe, or Other. The
operating region determines the power level of the wireless devices. Select Europe if the
power levels of the wireless devices must not exceed CE certification requirements of
less than 10 dBm. Select North America if the power levels of the wireless devices must
not exceed FCC or IC certification requirements of less than 30 dBm. Select Other if the
operating region is not North America or Europe.
Once an operating region has been selected, the Upgrade Firmware dialog box
displays.
3. Select a wireless device that you would like to upgrade from the Select Device to
Upgrade drop-down list. The device is listed either as Base Station or Wireless On-Board
Module. If you have multiple Base Stations connected, select the Base Station by its
position.
4. Click Upgrade if the Current Firmware Version is not the same as the Latest Firmware
Version to upgrade the device firmware. A dialog box is displayed to confirm that the
firmware has been upgraded successfully:
82
Page 95

DriveRight FMS Help
5. Click OK to exit the dialog box.
6. Click Refresh if you have connected another device to your computer. The Select
Device to Upgrade drop-down list refreshes to include the newly connected device(s).
7. Click Close once you are finished upgrading all the wireless devices.
Back to FMS Quick Reference Menu | Wireless Quick Reference Menu
Home
| Getting Started | Quick Reference | Menu Commands | Troubleshooting
Menu Commands
Menu Commands Menu
The following commands are available in the Main Menu:
File Menu
Setup Menu
DriveRight Menu
CarChip Menu
SmartCard Menu
Wireless Menu
Database Menu
Reports Menu
Mapping Menu
Help Menu
Back to Home
| Getting Started | Quick Reference | Menu Commands | Troubleshooting
Home
83
Page 96

DriveRight FMS User's manual
File Menu
File Menu
The following commands are available in the File Menu:
Backup
Restore
Import
Export
Print
Print Preview
Print Setup
Clear Screen
Exit
Back to Menu Commands
Home
| Getting Started | Quick Reference | Menu Commands | Troubleshooting
Backup
The Backup command is used to archive old data as a zip file. The backup files are stored in the
Backup sub-directory in the DriveRight FMS install directory. The Backup sub-directory is created
the first time you back up your data.
The backup zip files are named based on the start and end dates chosen for the backup. For
example, if you pick the dates between March 6, 2003 and March 27, 2003, the backup file will be
named 6March2003_27March2003.zip.
You can configure how much data to keep active after a backup by setting up your Preferences:
Backup Options in the Setup menu. Limiting the amount of data in the active database helps
prevent the database from growing into an unmanageable size.
To backup data:
1. Click Backup in the File menu. The Backup Files To dialog box is displayed.
84
Page 97

DriveRight FMS Help
2. From the Backup Files To dialog box select the folder where the backup file will be
written. The Backup Options dialog box is displayed.
Note: The Backup Options dialog box will not be displayed the first time you back up DriveRight
data.
3. In the Backup Options dialog box check your last backup date and specify whether to
backup the whole database or only those records falling within a specified time period. The start
date will always be initialized to the last backup date.
4. Click OK to initiate the backup or click Cancel to exit the dialog box without backing up
your database.
5. When the backup is finished, click OK to return to the program.
85
Page 98

DriveRight FMS User's manual
See Also:
Restore
Preferences: Backup Options
Back to File Menu
Home
| Getting Started | Quick Reference | Menu Commands | Troubleshooting
Restore
The Restore command is used to get a previously Backed up data back into the active database.
In this process you can pick one or more tables to be restored.
To restore data:
1. Click Restore in the File menu. The Restore Files From dialog box is displayed.
2. From the Restored Files From dialog box select a single zip file to restore, and then
click Restore. DriveRight FMS unzips the file and displays all the tables in the dialog, and
displays the following dialog box:
86
Page 99

DriveRight FMS Help
Note: You can only restore one .zip file at a time.
Note: The backup file filename is based on the start and end dates chosen for the backup.
3. You can either restore all the database tables or restore individual database tables. Click
Yes in the dialog box to restore all the tables. Click No to restore selected database tables.
4. If you are restoring selected database tables, select each table to be restored. Hold down
the Control key on your keyboard to select multiple tables. When you have finished making your
selection, click Restore to restore the tables or click Cancel to exit without restoring the tables.
5. When the files have been restored, click OK to return to the program.
See Also:
Backup
Back to File Menu
Home
| Getting Started | Quick Reference | Menu Commands | Troubleshooting
87
Page 100

DriveRight FMS User's manual
Import Menu
Import Menu
Use the Import Menu options to import DriveRight database data into DriveRight.
Import: FTP Import
Import: Import Data From
Import GPS Data into MapPoint
Back to File Menu
Home
| Getting Started | Quick Reference | Menu Commands | Troubleshooting
Import: FTP Import
FTP (File Transfer Protocol) Import allows you to import DriveRight data from a remote site. Use
this procedure for FTP Import only. Use the Import: Other Import Commands
other import commands.
Note: Before you start this operation, contact your systems administrator for your FTP account
information.
procedure for all
To use FTP Import:
1. Select Import from the File Menu.
2. Select FTP Import from the Import drop-down menu. The FTP Import dialog box is
displayed.
88
 Loading...