

Page 1
#151
• Made from Fome-Cor®plastic, laminated with heavy
duty aluminum foil
• Mounts on mast, rigging, spreader, outriggers, etc.
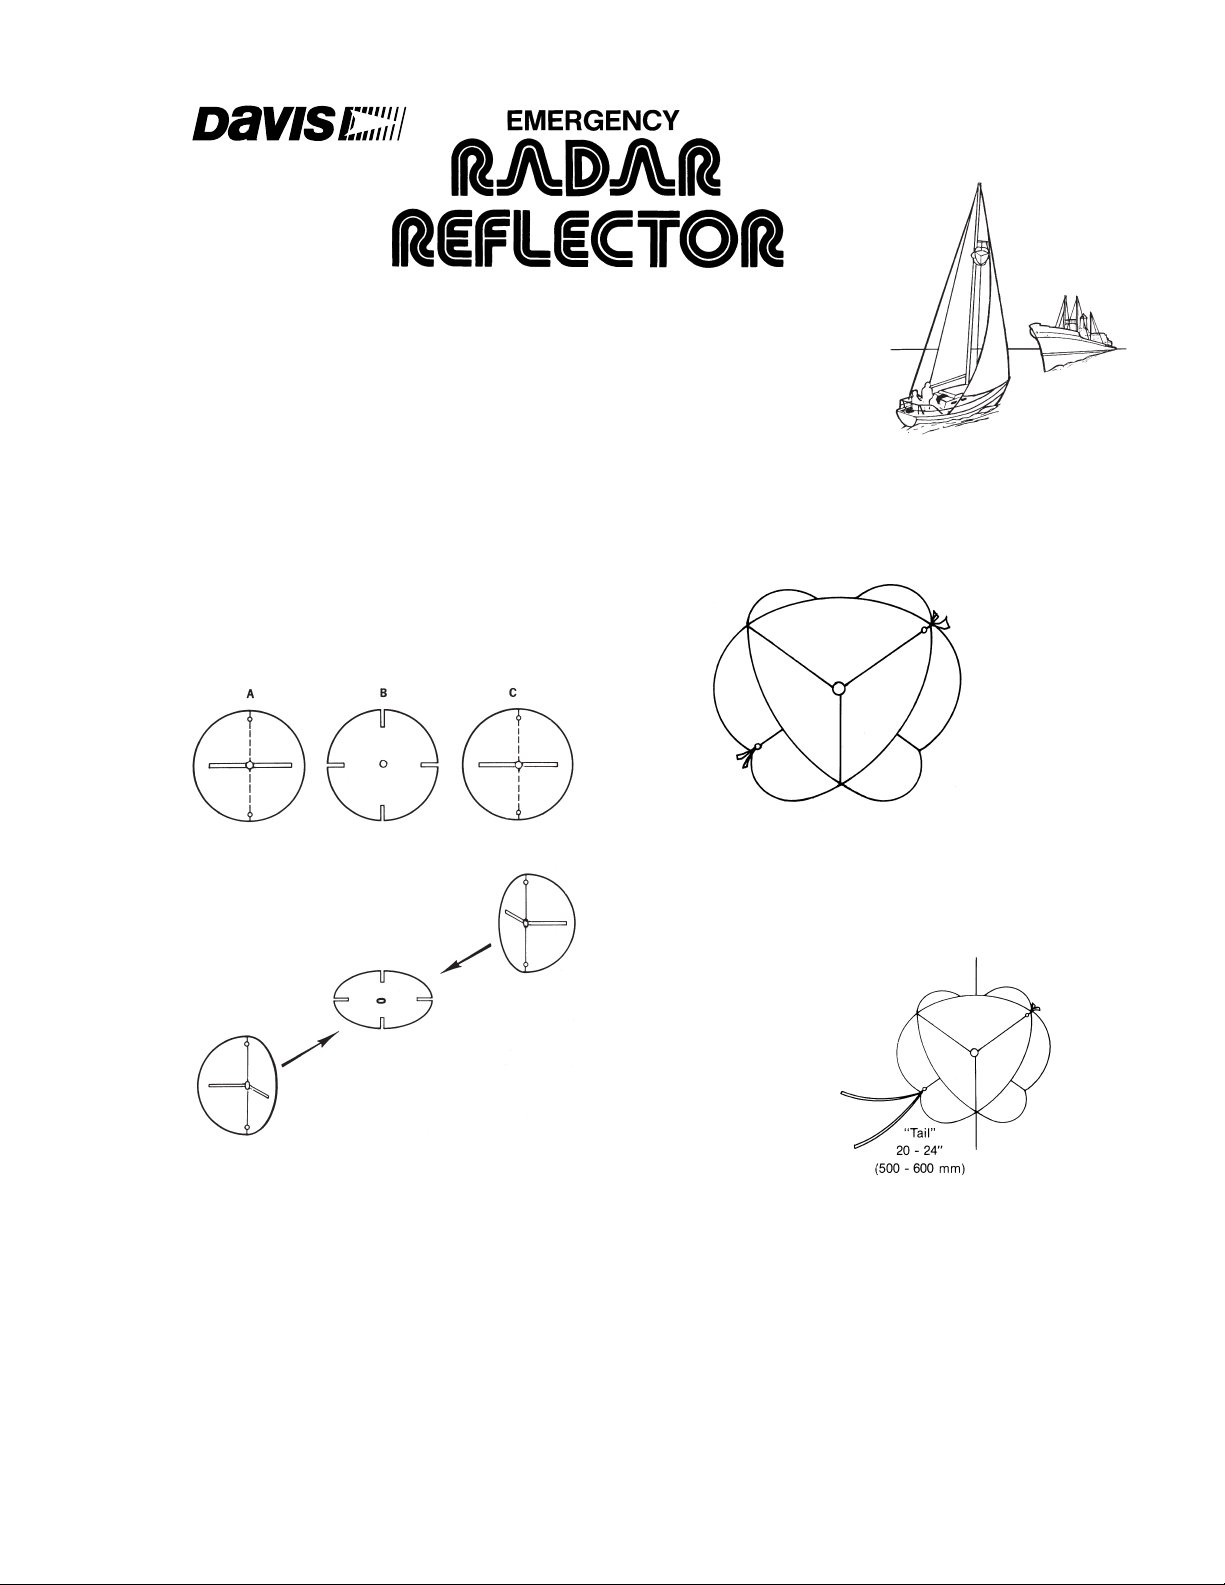
1. With scored line facing you, fold discs A and C
toward you to a 90° angle.
2. Holding disk B horizontal, slide disc A into
disc B through centered slot, engaging slots in
disc B.
3. Repeat on other side of disc B, using disk C.
4. Important: After assembling radar reflector,
securely lash two corners using 1/16" (1.6 mm)
synthetic line.
Unit can be disassembled and stowed flat.
ASSEMBLY INSTRUCTIONS
Optional Use of Windvane Tail
To counteract rotation, a double strand of synthetic
line 1/8 to 3/16" (3.2 to
4.8 mm) tied to a lower
corner hole forms a
windvane tail as shown.
Tail becomes more
effective as wind
increases.
INSTALLATION INSTRUCTIONS…
See next page.
Page 2
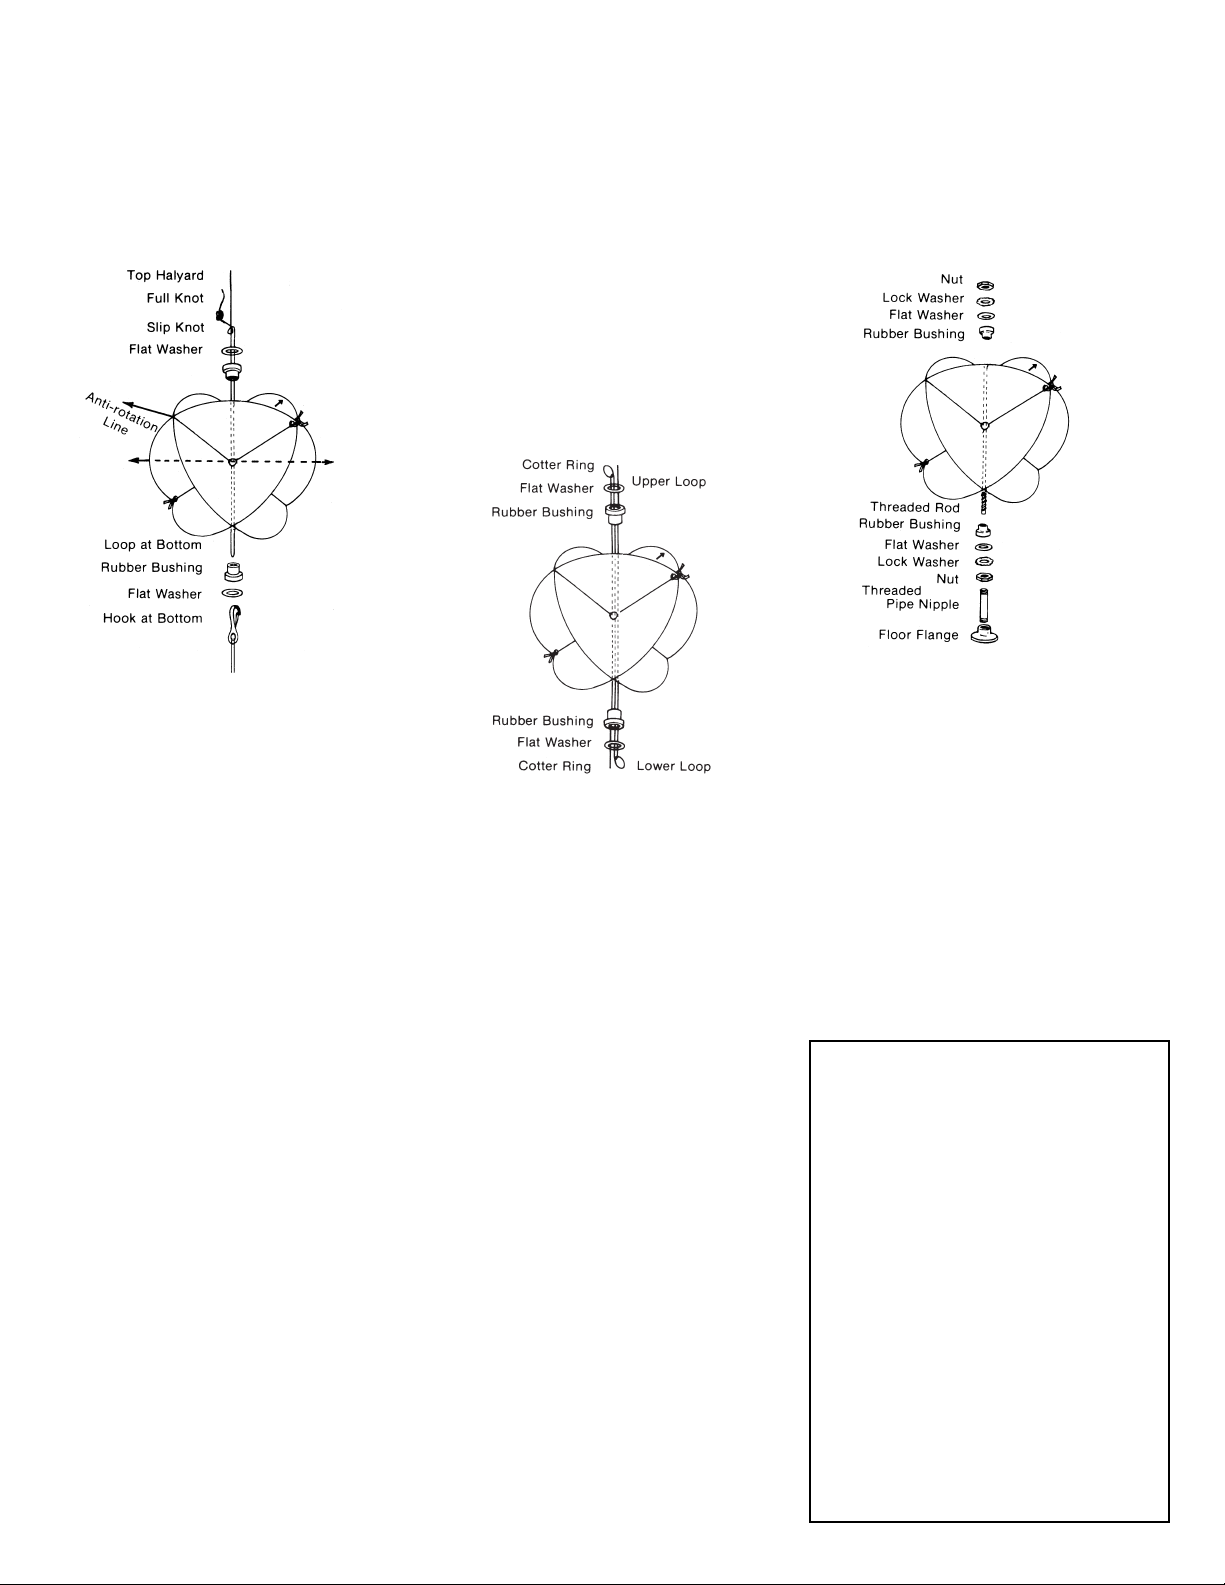
HALYARD INSTALLATION—
SINGLE LOOP
1. Place assembled radar reflector on a flat
surface with arrow in top corner, as
shown in Figure 1.
2. Form an open loop of 1/8" (3.2 mm) synthetic line and feed into center hole of top
corner and through to opposite (bottom)
corner. The tip of a screwdriver helps do
this. Warning: Feeding through other corners can make a weak installation.
3. At top and bottom, feed on Rubber
Bushings, small ends inward, and follow
with Flat Washers.
4. Slip a hook or cotter ring through end of
loop on bottom to secure bottom side.
5. On top side, tie short loose end of line in
a slip-knot around “fixed” line or top halyard and then put a knot in the end of the
short, loose line.
6. Pull out slack in the line and attach a line
or halyard to the hook or cotter ring on the
bottom side.
7. Stretch lines vertically to maintain “catch
rain” position.
8. Rotation and bouncing of the radar reflector on its lines do not degrade performance and, in fact, may be advantageous
under most conditions in establishing the
best average echo response 360° around
the horizon.
Continuous and rapid rotation, however,
can damage or break the support lines. To
prevent this, attach light line from a corner
or the center of the radar reflector to any
convenient side point, as shown in
Figure 1.
ALTERNATIVE HALYARD
INSTALLATION—DOUBLE LOOP
1. Place assembled radar reflector on a flat
surface with arrow in top corner, as
shown in Figure 2.
2. Form double loop of 1/8" (3.2 mm) plastic
line and feed into center hole of top corner
and through to opposite (bottom) corner.
The tip of a screwdriver helps do this.
Warning: Feeding through other corners
can make a weak installation.
3. At top and bottom, feed on Rubber
Bushings, small ends inward, and follow
with Flat Washers.
4. Slip a cotter ring through end of loop on
both top and bottom sides to secure both
loops.
5. Pull out slack in the line and stretch vertically to maintain “catch rain” position. By
loosening the line, the radar reflector can
be relocated higher or lower on the line.
NOTE: In both halyard installations, normal
line tension automatically causes the bushings to fit snugly into the top and bottom corners and hold the radar reflector firmly but
without damage.
PERMANENT OR HARD MOUNTING
A 1/4" (6.4 mm) or 5/16" (8.0 mm) diameter threaded metal rod can be passed
from top to bottom corner in place of the
cord loop, as shown in Figure 3.
INSTALLATION INSTRUCTIONS Maintains reflector in optimum “catch rain” or “6-corner” position
Figure 1.
Halyard installation, single loop.
Figure 2.
Halyard installation, double loop.
Figure 3.
Permanent or hard mounting.
Rubber Bushings and Flat Washers are added
at top and bottom. Lock washers and nuts are
then installed and tightened snugly.
The threaded rod can be used to carry bails at
top and bottom for attachment of lines, can be
lashed to an oar or mast in emergencies, or
the bottom end of a longer threaded rod can
be pinner or epoxied into a pipe nipple at the
bottom. A pipe floor flange can then be used
to mount the radar reflector assembly onto
any suitable surface.
CAUTION: Prevent nipples or nuts
from unscrewing by themselves.
Some type of thread lock adhesive, such as
anaerobic Devcon “Super-Lock,” is helpful,
but we strongly recommend pinning or
safety wiring of threaded parts.
HELPFUL HINTS: Maintain the height of
the radar reflector as high as possible above
deck. Prevent shadowing by keeping it as
far away as possible from metal masts, wet
sails, etc.
IMPORTANT NOTICE: No matter what
method is employed to mount the radar
reflector, it is the responsibility of the user
to make periodic inspections of lines and
fittings to insure that no condition is developing which could lead to mounting failure.
Page 3

3465 Diablo Ave., Hayward, CA 94545 U.S.A.
Phone (510) 732-9229 • Fax (510) 732-9188
info@davisnet.com www.davisnet.com
151_Inst.pdf June 2005
Replacement Parts
Contact your dealer or Davis Instruments to order
replacement parts.
R151A Rubber Bushings and Washers (2 each)
 Loading...