

Page 1

DriveRight
®
5HPRWH'RZQORDG.LW
Product #8188
Page 2

TABLE OF CONTENTS
INTRODUCTION . . . . . . . . . . . . . . . . . . . . . . . . . . . . . . . . . . . . . . . . . . . . 2
U
SER REQUIREMENTS . . . . . . . . . . . . . . . . . . . . . . . . . . . . . . . . . . . . . . 2
K
IT COMPONENTS . . . . . . . . . . . . . . . . . . . . . . . . . . . . . . . . . . . . . . . . . 3
For pre-programming the field modem: . . . . . . . . . . . . . . . . . . . . . . . . . . . . . . .3
For downloading data from the field: . . . . . . . . . . . . . . . . . . . . . . . . . . . . . . . . .3
CONFIGURING THE FIELD MODEM . . . . . . . . . . . . . . . . . . . . . . . . . . . . . . 3
P
RE-PROGRAMMING THE FIELD MODEM . . . . . . . . . . . . . . . . . . . . . . . . . 5
E
XECUTING A DOWNLOAD . . . . . . . . . . . . . . . . . . . . . . . . . . . . . . . . . . . 6
Actions on the Host Computer . . . . . . . . . . . . . . . . . . . . . . . . . . . . . . . . . . . . .7
Actions in the Field 7
TROUBLESHOOTING . . . . . . . . . . . . . . . . . . . . . . . . . . . . . . . . . . . . . . . . 8
A
PPENDIX: COURIER V.EVERYTHING SETUP . . . . . . . . . . . . . . . . . . . . . . 9
Product Number: 8188
Davis Instruments Part Number: 7395 .15 0
Remote Download Kit
Rev. B (September 25, 2002)
© Davis Instruments Corp. 2002. All rights reserved.
This product complies with the essential protection requirements of the EC
EMC Directive 89/336/EC.
DriveRight is a registered trademark of Davis Instruments Corp. Windows is a
trademark of Microsoft Corporation.
Page 3

Introduction
The DriveRight Remote Download Kit allows you to download DriveRight data from any standar d phone line to a hos t computer r unning
DriveRight Vehicle Management Software (VMS). The DriveRight
unit connects to a user-supplied modem which, when powered up,
automatically dials the host computer and downloads the data.
This manual describes how to pre-program the US Robotics CourierV.
Everything modem to dial and download when switched on. It also
details how to connect a DriveRight unit to the pre-programmed
modem for downloading.
User Requirements
To use this kit, you must supply the following equipment:
Host computer
❏
A PC running DriveRight VMS that has a modem
(referred to as “host modem”) and a phone number.
This computer, when operating in host mode, will receive
downloaded DriveRight data.
❏
Field mode m
A modem with power-on dial-up capabilities that the
driver can use in the field to download data to the host
computer. This manual provides instructions for configuring and programming the US Robotics Courier V. Every-
thing modem.
NOTE: You may use any modem with power-on dial-up capabi lities
(i.e., can dial a pre -set phone numb er automatic ally when
you turn it on). However, not all modems respond to the
same commands or act the same way on power up. If you
purchase a modem other than the US Robotics Co ur ie r V.
Everything, you will need to modify the instructions presented here using th e documentation provi ded with your specific modem.
❏ DriveRight unit
A DriveRight data logger/display unit used to monitor
and store driving informat ion.
1
Page 4

Kit Components
Before you begin, please make sure your Remote Download Kit
includes the following components.
For pre-programming the field modem:
❏
Null modem cable
A grey cable with telephone plugs to connect the PC to
the modem.
❏
DB9 connector and DB25 connector
Nine-pin and 25-pin female PC connectors with telephone plugs.
DB25 modem connector
❏
A 25-pin male modem connector with a telephone plug.
For downloading data from the field:
❏ DriveRight download cabel
A black interface cable to connect the Drive-Right to the
modem.
NOTE:The DB25 modem connector that you use when pre-pro-
gramming the modem is necessary for field use as well. In
the field, it connects the mode m to t he field modem cable.
Configuring the Field Modem
The following instructions explain how to pre-program the US Robotics Courier V. Everything modem to work cor r e ctly w it h the Dr iv eRigh t
(see note on page 1).
This manual shows how to use the Windows 95
accessory to program the field modem but, if you like, you may use
any other communications application. You may use any computer,
host or non-host, to configure and pre-program the field modem.
™
HyperTerminal
1. Make sure that the field modem’s dip switches are set as follows:
Dip Switch #1234 5678910
Setting
off off off ON ON off off ON off off
NOTE: These DIP switch setti ngs on ly appl y to the US Robotics Cou-
rier V. Everything modem.
2
Page 5
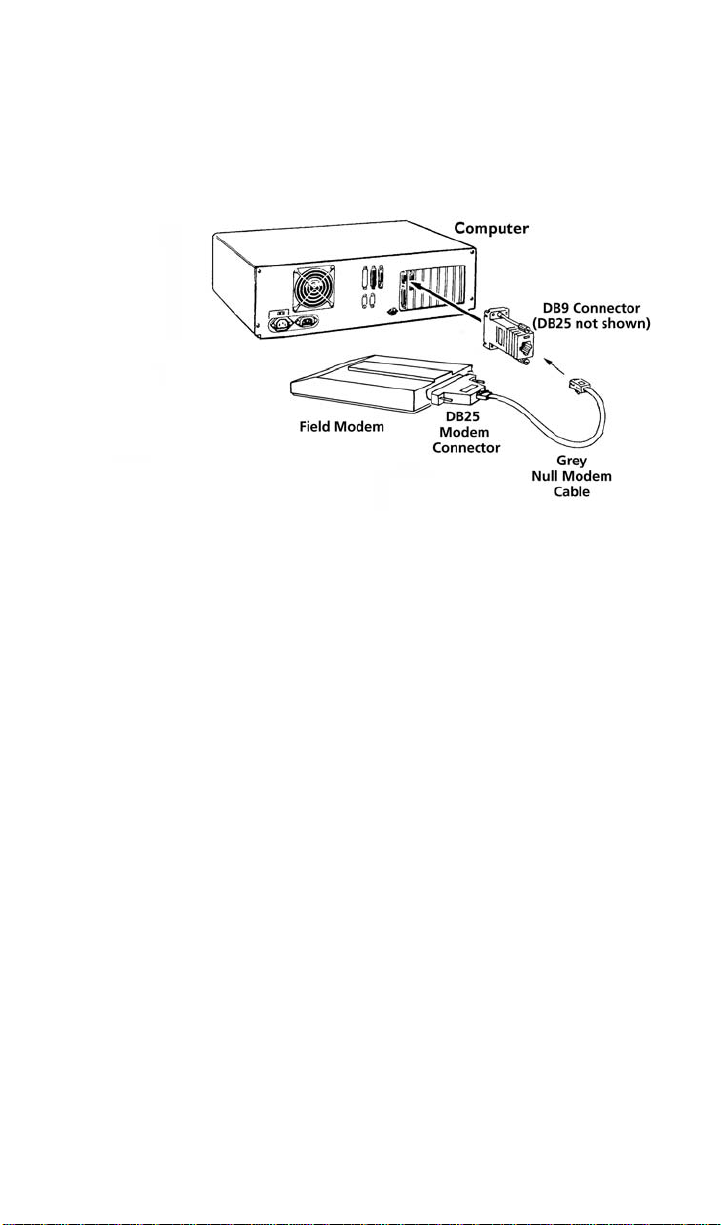
2. Connect the field modem to your PC.
Attach the DB25 modem co nnector to the back of the field
modem. Then, find a free 9-pin or 25-pin serial port in your PC
and plug in either the DB9 or DB25 connector. And, finally,
link the modem and PC connectors using the grey null modem
cable.
NOTE: Make sure you use the grey cable. The black serial port cable
provided with the DriveRight software will not work for preprogramming the field modem.
3. Turn the modem on.
4. On the host computer, run the HyperTerminal application. To open HyperTerminal, click the Start button, then click Programs, then Accessories, and select HyperTerminal. A New Connection dialog box appears. Click Cancel.
5. Set the serial port.
For HyperTerminal to communicate with the modem, it needs
to know which serial port you are using.
a. To set the serial port, click the File menu and select Proper-
ties.
b. In the dialog box that appears, select the serial port the field
modem is using from the Connect Using drop down list. If
you are not sure, try selecting Direct to COM1 or Direct to
COM2 - one should work.
c. Click OK in the New Connection Properties dialog box
4. Save your settings.
To save your settings, click the File menu and select Save As
and name your modem link. You can then click on the phone
icon with that name to start HyperTerminal next time.
3
Page 6

5. Test the connection. In the HyperTerminal window, type (in ALL CAPS as shown)
AT
and press Enter. If “OK” appears in the window, you are communicating with the field modem (go on to “Pre-Programming
the Field Modem” on page 4).
If you do not get an OK, type
ATE1V1Q
and press Enter. Then type
AT
again and press Enter. You should be able see the “AT” as you
type it, and you should receive an OK back. (If you receive an
OK, go on to “Pre-Programming the Field Modem” on page 4.)
If you do not receive an OK, c heck all you r connec tions a nd try
again. If you still have no success, try switching to a different
serial port (see step 5 on page3).
Pre-Programming the Field Modem
Once the HyperTerminal connection is secure, you are ready to preprogram the field modem. To set the modem to automatically download when turned on, follow the steps below. You should receive an
OK after each entered command, unless stated otherwise.
1. Set autodial capability.
To configure the modem to automatically dial when switched
on, type
ATS13=16
and press Enter.
2. Set the phone number for automatic dialing.
To set the phone number of the host computer, type
AT&Z0=202-55 5-0455
where “0” is zero and “202-555-0455” is the number of the host
computer. Then press Enter.
4
Page 7

3. Ensure error-free transmission.
To configure the modem to use a standard error detection protocol, type
AT&M4
and press Enter.
4. Save the setup.
To save the setup in non-volatile memory so it will load when
the modem is turned on, type
AT&W
and press Enter.
NOTE: If you are NOT using the US Robotics Courier V. Everything, set
the field modem to operate in quiet mode. Quiet mode ensures th at
the DriveRight uni t does not interpret chance mode m responses as
commands. Type
ATEQ1W
and press Enter. You will not receive an OK after this command
(nor would you see your commands echoed in the HyperTerminal
window if you continue d t o enter them) becaus e t he modem is in
quiet mode.
5. Exit HyperTerminal.
6. Te st the field modem.
To test the field modem, execute a download. It may be helpful, for this first download, to have the field modem and host
computer in the same room so you can see both at once - in
which case, you need two separate phone lines. However, if
two lines are not possible, simply execute a download “from
the field” as a driver would.
See the following section for instructions on executing a download. If the download fails, see the troubleshooters on page 7.
Executing a Download
Executing a download is quite simple once the field modem is preprogrammed, but it does require some actions both on the host computer and in the field.
5
Page 8

Actions on the Host Computer
1. Make sure the host computer is connected to the phone line
and number you pre-set in step 2 on page 4.
Host Computer
Host Modem
(External shown)
2. Run DriveRight VMS.
See software manual for instructions on how to run VMS.
3. Set the host computer to host mode.
In VMS, click the Setup menu, then Host Mode, and select Host
Mode On.
NOTE: Because the host computer has to be in host mode to receive the
downloads, it is a good idea to set up a schedule for downloading. For example, yo u c an instruct drivers to download anytime after business hours and then set the host computer to host
mode as the last task of the day.
Alternativ ely, you can dedicate one computer full-time as th e
host and export data from it periodically to another computer for
analysis and reportin g.
Actions in the Field
1. Make the DriveRight unit and mo de m con nectio ns a s sh ow n below.
NOTE: Plug the phone line coming from the wall jack into the modem input
marked “jack” or “line” (not “phone”)
To Host Computer
Field Modem
DriveRight
Unit
Download Cable
Modem
Connector
6
Page 9

2. Press MODE on the DriveRight unit to “wake it up” if necessary.
Make sure the DriveRight display shows the Current Screen
(i.e. the screen with the CURRENT indicator box displayed).
3. Turn the modem on.
If the modem is already on, turn it off and then on again.
The modem should automatically dial the host computer on
start-up. The host computer should answer the call and download the data.. When the CD light on the modem goes out, the
download is complete. The download should never ta ke more
than five minutes.
4. Set the modem for next use.
When the download is complete, tur n th e field modem of f and
unplug the DriveRight. You can leave the field modem
plugged into the phone line, if you like, and plug a standard
phone into the “phone” input on the modem. The phone will
function norma lly when the modem is off.
All future downloads can be executed with th ese four st eps. If,
for some reason, the downlo ad does not work , see “Troubleshooting” on page 7.
Troubleshooting
If you are having trouble completing a successful download, double
check the following items. At the end of the checklist, we’ ve prov ided
a complete listing of the Courier V. Everything settings as a reference.
If, after consulting these troubleshooters, you still are unable to solve
the problem, please call our tech suppo rt at 1-510-732-7814 (or email:
support@davisne t. com) for further assistance.
❏
Check all connections.
Also, make sure that:
❏ the phone line is plugged into the “jack” or “line”
input on the modem;
❏ the download cable is securely plugged into the
modem and the DriveRight unit;
❏
Check that the DriveRight unit is “awake” and showing the
Current Screen (i.e., that the CURRENT indicator box
shows on the display) before turning the modem on.
❏ Check that the host computer is in host mode.
See “Set the host computer to host mode.” on page 6.
7
Page 10

❏ Check that the phone number you pre- programmed is
correct.
You can call the host computer using a standard phone
and double check that the host answers and gives you a
modem tone.
❏
Check the programming of the modem to be sure you have
entered each command correctly.
Make sure that you typed each command in ALL CAPS
as shown.
For your reference, the complete Courier V. Everyth ing
modem DriveRight setup is provided in the appendix on
page 7.
Appendix: Courier V.Everything Setup
The complete US Robotics Courier V. Everything modem settings for
DriveRight:
B0 C1 E0 F1 M1 Q1 V1 X1
BAUD=2400 PARITY=N WORDLEN=8
DIAL=TONE ON HOOK TIMER
&A1&B0&C1&D2&G0&H0&I0&K1&L0&M4&N0
S00=000S01=000S02=043S03=013S04=010S05=008S06=002S07=060
S08=002S09=006S10=014S11=070S12=050S13=016S14=001S15=000
S16=000S17=000S18=000S19=000S20=000S21=010S22=017S23=019
S24=150S25=005S26=001S27=000S28=008S29=020S30=000S31=000
S32=009S33=000S34=000S35=000S36=000S37=000S38=000S39=000
S40=000S41=000S42=126S43=200S44=015S45=000S46=000S47=000
S48=000S49=000S50=000S51=000S52=000S53=000S54=064S55=000
S56=000S57=000S58=000S59=000S60=000S61=000S62=000S63=000
S64=000S65=000S66=000S67=000S68=000S69=000S70=000
&P0&R1&S0&T5&U0&X0&Y1%N6#CID=0
LAST DIALED #: 2933529
FCC PART 15 CLASS B REGISTRATION WARNING
This equipment has been tested and found to comply with the limi ts for a Class B di git al devi ce, pursuant to P art
15 of the FCC Rules. These limits are designed to provide reasonable protection against harmful interference in
a residential installation. This equipment generates, uses, and can radiate radio frequency energy and, if not
installed and used in accordance with the instructions, may cause harmful interference to radio communications.
However, there is no guarantee that interference will not occur in a particular installation. If this equipment does
cause harmful interference t o r adio or television reception, which can b e deter mi ned b y tu rning the equipment on
and off, the user is encouraged to try to correct the interference by one or more of the following measures:
❏ Reorient or relocate the receiving antenna.
❏ Increase the separation between the equipment and receiver.
❏ Connect the equipment into an outlet on a circuit different from that to which
the receiver is connected.
❏ Consult the dealer or an experienced radio/TV technician for help.
Changes or modifications not expressly approve d in writing by Davis Instr uments m ay void the user’ s authority to
operate this equipment.
3465 Diablo Avenue, Hayward, CA 94545-2778 U.S.A.
510-732-9229 • Fax: 510-732-9188
E-mail: info@davisnet.com • www.davisnet.com
 Loading...