

Page 1
Page 2

H.264 Network Video Streaming Server
NVS-20
Contents
Warnings and Precautions......................................................4
Warranty....................................................................................5
Disclaimer of Product & Services..........................................6
Disposal.....................................................................................6
Product Overview.....................................................................7
Features................................................................................7
Front Panel................................................................................8
Rear Panel.................................................................................9
System Diagram .....................................................................10
How to set up the NVS-20......................................................11
Connect live video and audio to the NVS-20 ......................11
Connect the NVS-20 to the local IP network.......................11
Connect power to the NVS-20 ............................................11
Select the input connection to be streamed........................11
How to find the NVS-20 on an IP network............................12
How to use the NVS20 IP Finder utility software................12
NVS-20 Login using a web browser .....................................14
Default Login details............................................................14
NVS-20 web browser Home page .........................................15
Live option...........................................................................15
Record option......................................................................15
Status option........................................................................15
Setting option ......................................................................15
Setting > Live stream set up - Protocols..............................16
HLS protocol........................................................................16
RTSP protocol.....................................................................16
2
Page 3

H.264 Network Video Streaming Server
NVS-20
RTMP protocol.....................................................................16
Setting > Live stream set up .................................................17
St ream Server Selection .....................................................18
Input Source Selection........................................................18
RTMP Publish URL.............................................................18
Video T uning .......................................................................18
Encoder setup.....................................................................18
Audio Setup.........................................................................18
Video bit rate and mode......................................................19
Setting > Network set up .......................................................20
DHCP Enable......................................................................20
DHCP Disable.....................................................................20
Setting > Firmware update ....................................................21
Setting > Account set up.......................................................22
Setting > Restore default.......................................................23
Restore Factory default via mode button............................23
Recording the stream to USB 2.0 media..............................24
Pen Drive video capacity.....................................................24
Stream Record process.........................................................25
Live tab – HLS protocol.........................................................26
Live tab – RTSP protocol.......................................................27
Live tab – RTMP protocol......................................................28
Port Forwarding on your firewall / router ............................29
LED Status & Button Behaviour ...........................................30
LED S tatus ..........................................................................30
Mode Button Behaviour.......................................................30
Specifications.........................................................................31
3
Page 4

H.264 Network Video Streaming Server
NVS-20
Warnings and Precautions
1. Read all of these warnings and save them for later reference.
2. Follow all warnings and instructions marked on this unit.
3. Unplug this unit from the wall outlet before cleaning. Do not use liquid or aerosol
cleaners. Use a damp cloth for cleaning.
4. Do not use this unit in or near water.
5. Do not place this unit on an unstable cart, stand, or table. The unit may fall,
causing serious damage.
6. Slots and openings on the cabinet top, back, and bottom are provided for
ventilation. To ensure safe and reliable operation of this unit, and to protect it from
overheating, do not block or cover these openings. Do not place this unit on a bed,
sofa, rug, or similar surface, as the ventilation openings on the bottom of the
cabinet will be blocked. This unit should never be placed near or over a heat
register or radiator. This unit should not be placed in a built-in installation unless
proper ventilation is provided.
7. This product should only be operated from the type of po wer source indicated on
the marking label of the AC adapter. If you are not sure of the type of power
available, consult your Datavideo dealer or your local power company.
8. Do not allow anything to rest on the power cord. Do not locate this unit where the
power cord will be walked on, rolled over, or otherwise stressed.
9. If an extension cord must be used with this unit, make sure that the total of the
ampere ratings on the products plugged into the extension cord do not exceed the
extension cord’s rating.
10. Make sure that the total amperes of all the units that are plugged into a single wall
outlet do not exceed 15 amperes.
11. Never push objects of any kind into this unit through the cabinet ventilation slots,
as they may touch dangerous voltage points or short out parts that could result in
risk of fire or electric shock. Never spill liquid of any kind onto or into this unit.
12. Except as specifically explained elsewhere in this manual, do not attempt to
service this product yourself. Opening or removing covers that are marked “Do Not
Remove” may expose you to dangerous voltage points or other risks, and will void
your warranty. Refer all service issues to qualified service personnel.
13. Unplug this product from the wall outlet and refer to qualified service personnel
under the following conditions:
a. When the power cord is damaged or frayed;
b. When liquid has spilled into the unit;
c. When the product has been exposed to rain or water;
d. When the product does not operate normally under normal operating
conditions. Adjust only those controls that are covered by the operating
instructions in this manual; improper adjustment of other controls may result in
damage to the unit and may often require extensive work by a qualified
technician to restore the unit to normal operation;
e. When the product has been dropped or the cabinet has been damaged;
f. When the product exhibits a distinct change in performance, indicating a need
for service.
4
Page 5

H.264 Network Video Streaming Server
NVS-20
Warranty
Standard Warranty
• Datavideo equipment is guaranteed against any manufacturing defects for
one year from the date of purchase.
• The original purchase invoice or other documentary evidence should be
supplied at the time of any request for repair under warranty.
• Damage caused by accident, misuse, unauthorized repairs, sand, grit or
water is not covered by this warranty.
• All mail or transportation costs including insurance are at the expense of
the owner.
• All other claims of any nature are not covered.
• Cables & batteries are not covered under warranty.
• Warranty only valid within the country or region of purchase.
• Your statutory rights are not affected.
Two Year Warranty
• All Datavideo products purchased after 01-Oct.-2008 qualify for a free one
year extension to the standard Warranty, providing the product is
registered with Datavideo within 30 days of purchase. For information on
how to register please visit www.datavideo.com or contact your local
Datavideo office or authorized Distributors
• Certain parts with limited lifetime expectancy such as LCD Panels, DVD
Drives, Hard Drives are only covered for the first 10,000 hours, or 1 year
(whichever comes first).
Any second year warranty claims must be made to your local Datav ide o office
or one of its authorized Distributors before the extended warranty expires.
5
Page 6
H.264 Network Video Streaming Server
NVS-20
Disclaimer of Product & Services
The information offered in this instruction manual is intended as a guide only.
At all times, Datavideo Technologies will try to give correct, complete and
suitable information. However, Datavideo Technologies cannot exclude that
some information in this manual, from time to time, may not be correct or may
be incomplete. This manual may contain typing errors, omissions or incorrect
information. Datavideo Technologies always recommend that you double
check the information in this document for accuracy before making any
purchase decision or using the product. Datavideo Technologies is not
responsible for any omissions or errors, or for any subsequent loss or damage
caused by using the information contained within this manual. Further advice
on the content of this manual or on the product can be obtained b y contacting
your local Datavideo Office or dealer.
Disposal
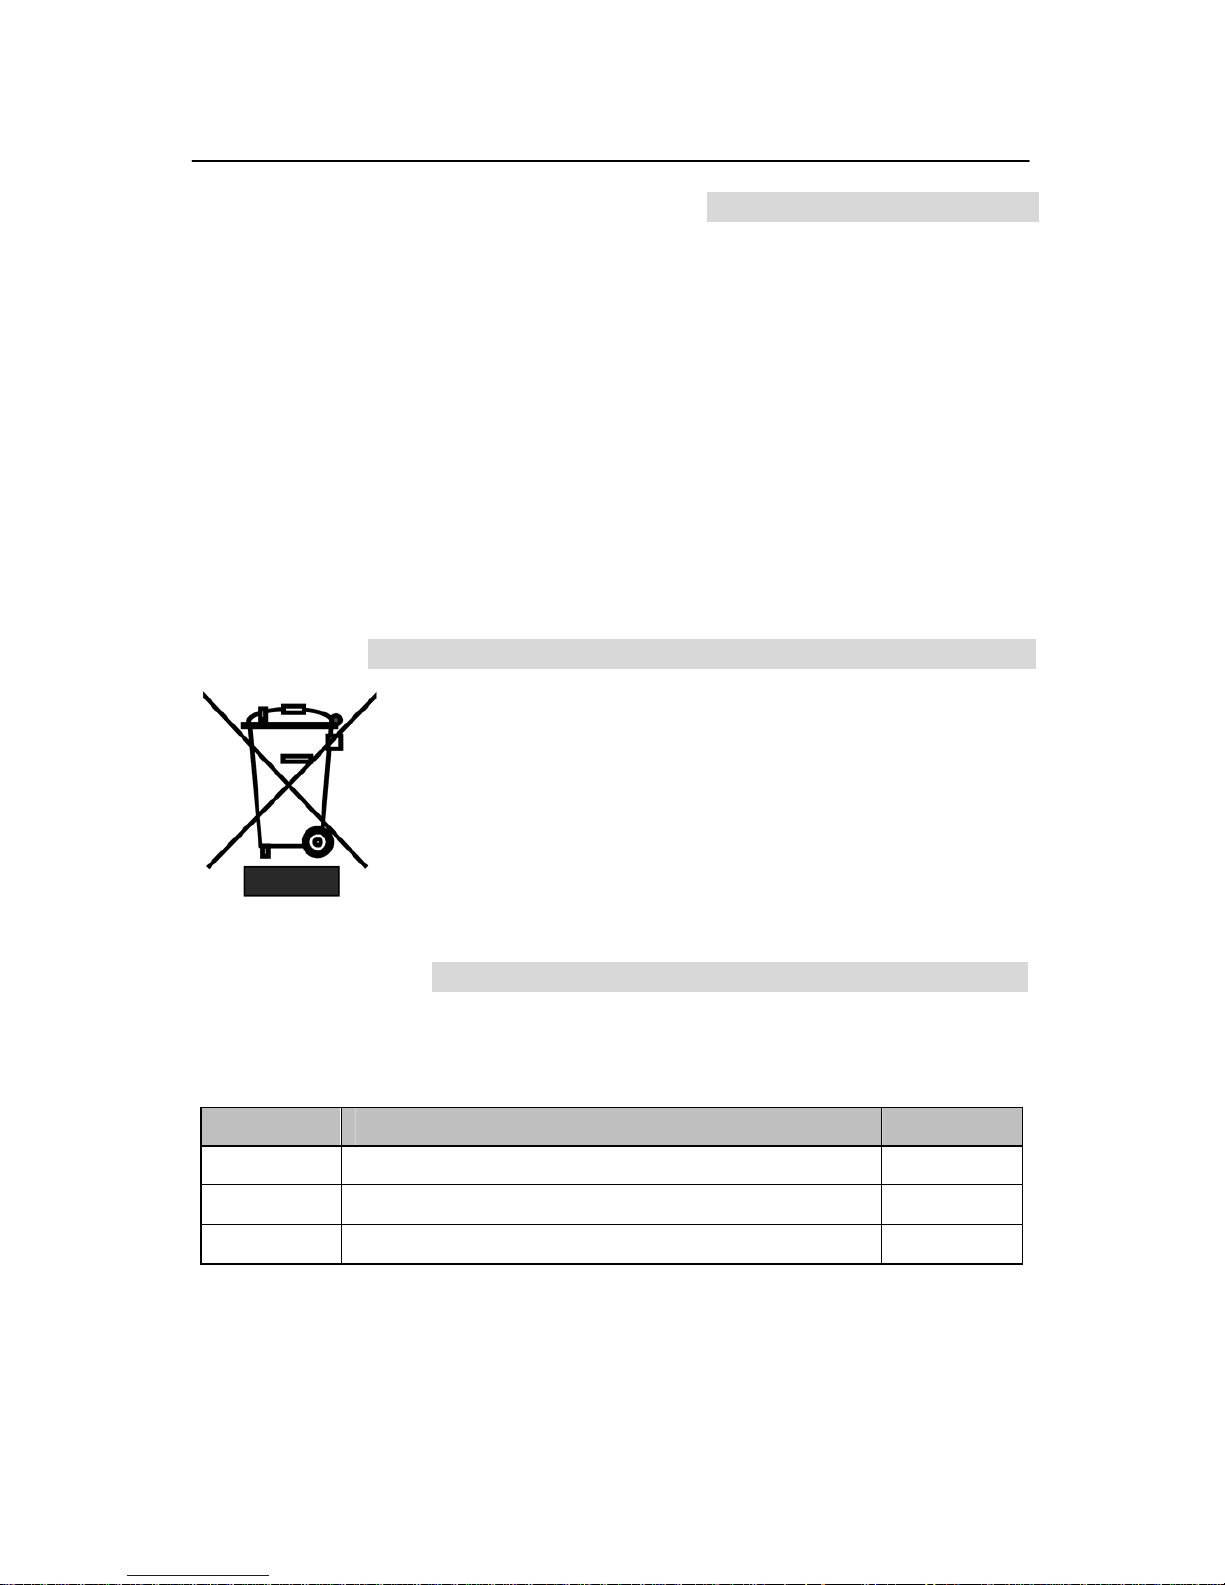
For EU Customers only - WEEE Marking
This symbol on the product indicates that it will not be
treated as household waste. It must be handed over to the
applicable take back scheme for the recycling of Waste
Electrical and Electronic Equipment. For more detailed
information about the recycling of this product, please
contact your local Datavideo office.
Packing List
The following items should be in the box. If any items are missing please
contact your supplier.
Item No. Description Quantity
1 NVS-20 Unit 1
2 Accessory kit* 1
3 Instruction Manual 1
6
Page 7

H.264 Network Video Streaming Server
NVS-20
Product Overview
The Datavideo NVS-20 is a broadcast qualit y, H.264 network streaming server.
This unit makes it easy to share HD or SD video over local or global IP
networks. Equipped with HDMI, SDI and Composite video inputs the NVS-20
is designed for live event streaming at up-to 6Mbps. The NVS-20 supports the
following streaming protocols:
• HLS [HTTP Live Streaming]
• RTP / RSTP
• RTMP [Flash]
The NVS-20 can be set up and controlled us ing almost any device with a web
browser. Users can confirm real-time video with audio through the same web
browser based user interface. The encoded video stream can then be
delivered to a single browser, a group of clients on a LAN or even a Content
Delivery Network.
That’s Datavideo, sharing the value!
Features
• Broadcast quality HD / SD H.264 network streaming
• Quick and easy setup
• H.264 Encoding
Video Inputs - Choose from:
• HD / SD-SDI [BNC]
• HDMI
• CVBS [BNC]
Audio Inputs:
• Unbalanced RCA Phono sockets
or
• Balanced 3pin XLR
Encoded Video Stream:
• H.264 / AVC up to High Profile Level 4.0
• Up to 1920x1080 @ 30 fps
• Configurable bitrate up to 6Mbps
Control
• Web user interface for configuration and control
7
Page 8
H.264 Network Video Streaming Server
NVS-20
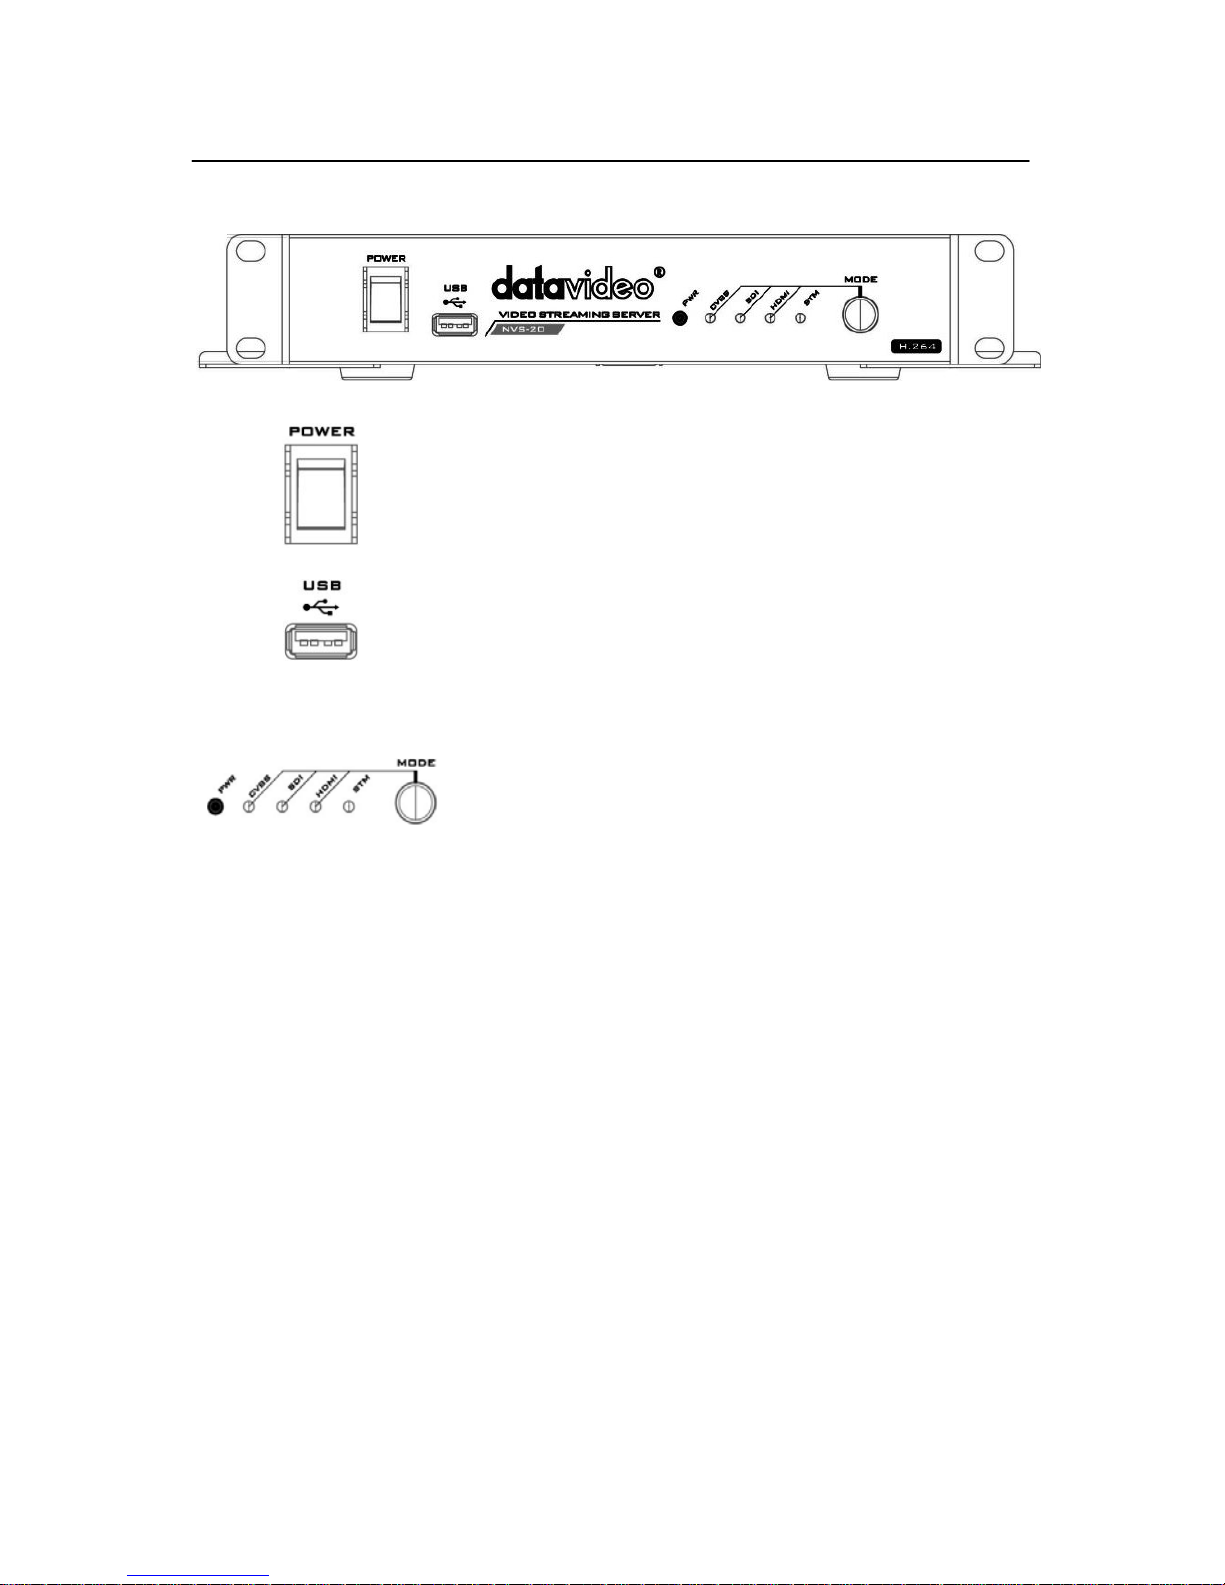
Front Panel
Power On/Off Switch
Switches the power On / Off
USB
USB 2.0 interface for connecting external storage
Mode Select
Mode Button - Select Input source between
CVBS / SDI / HDMI.
STM - Displays the stream server status
PWR - Displays the power status
See page 30 also.
Restore factory defaults from the front panel.
From power off. Press and hold in the mode button
and turn on the NVS-20 power; keep holding the
mode button for 40 seconds. When released the
NVS-20 will take a further 30 seconds to finish the
boot up process. Remember to login with the
default username and password as shown on page
22.
8
Page 9
H.264 Network Video Streaming Server
NVS-20
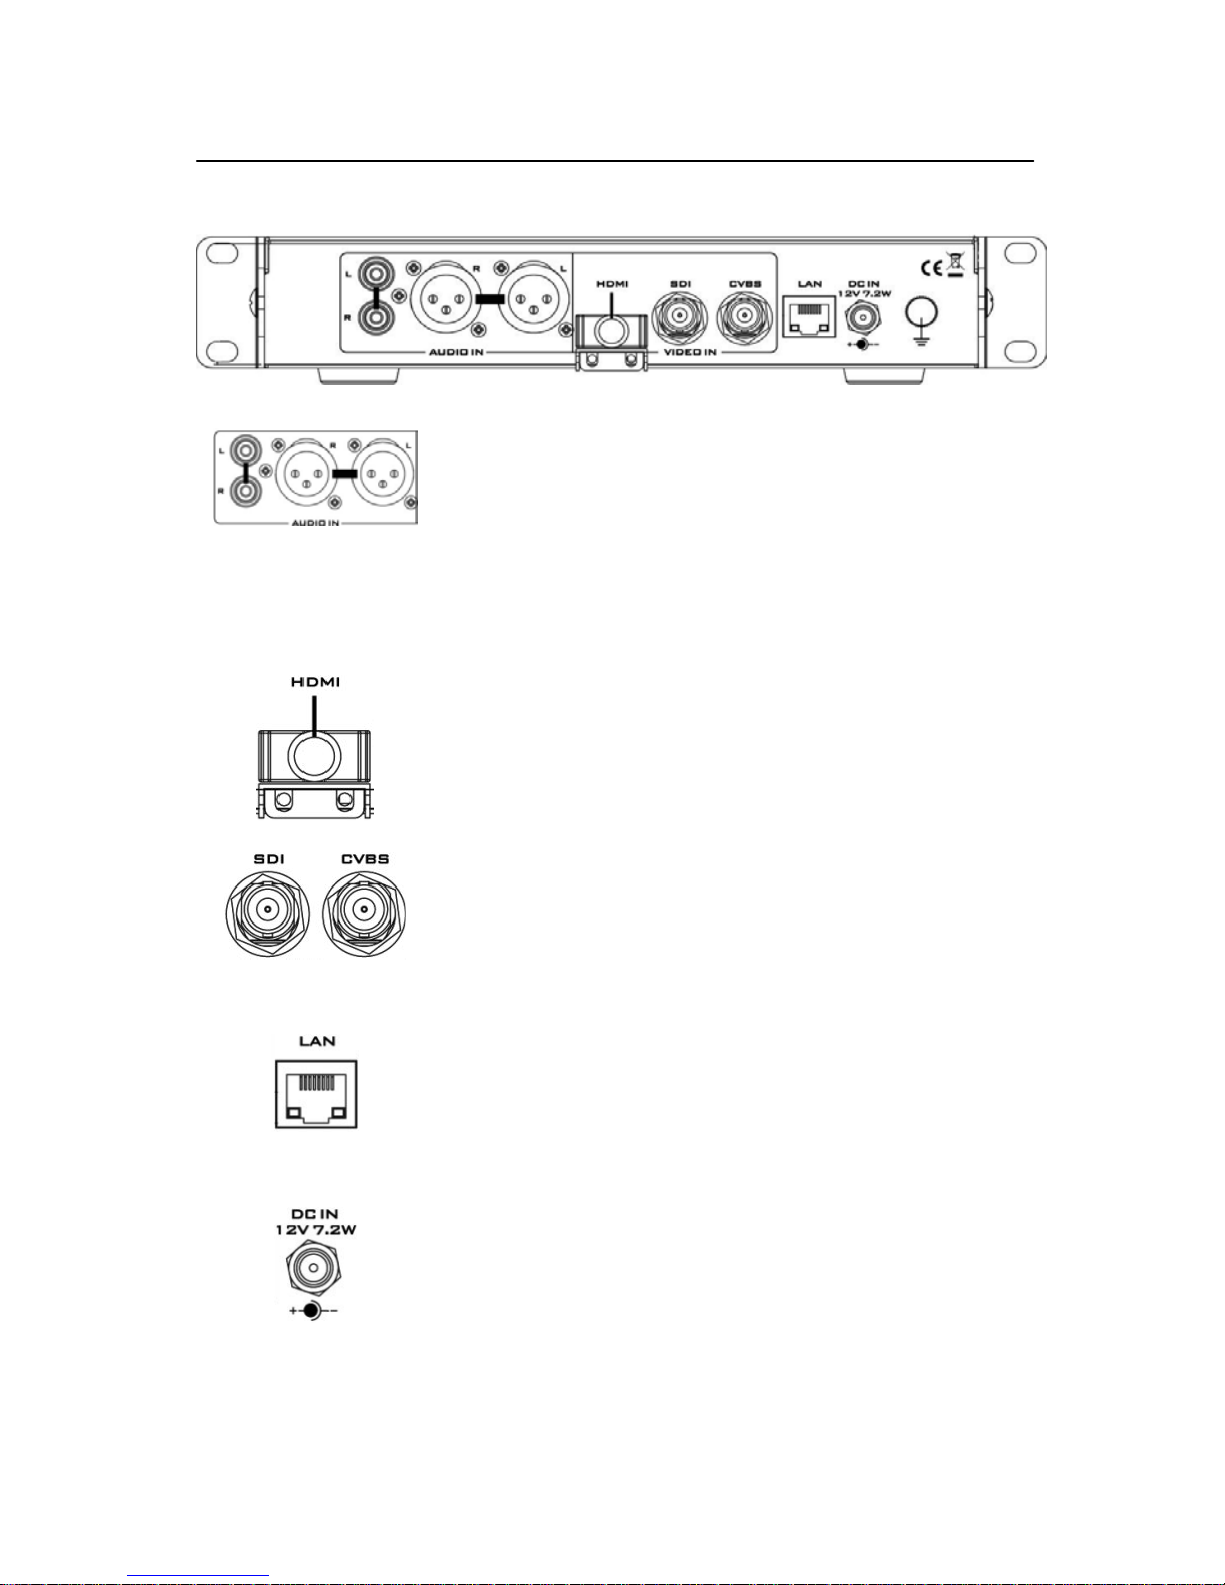
Rear Panel
AUDIO IN (XLR)
Supports two channels XLR Balanced Audio Input.
AUDIO IN (RCA)
RCA stereo for a line level auxiliary analogue audio
source, such as a CD player or tape deck. If you are
using more than two sources via an external audio
mixer, connect the audio mixer’s line level output to this
unbalanced audio input.
HDMI IN
HDMI digital signal input connector.
CVBS IN
Composite video input: takes a BNC connector from the
composite output of a VCR, camera, DVD player, etc.
SDI IN
BNC connector for SDI input.
Ethernet Port (RJ-45)
10/100M base Ethernet Network interface
DC In Socket
Connect the supplied 12V PSU to this socket. The
connection can be secured by screwing the outer
fastening ring of the DC In plug to the socket.
9
Page 10
H.264 Network Video Streaming Server
NVS-20
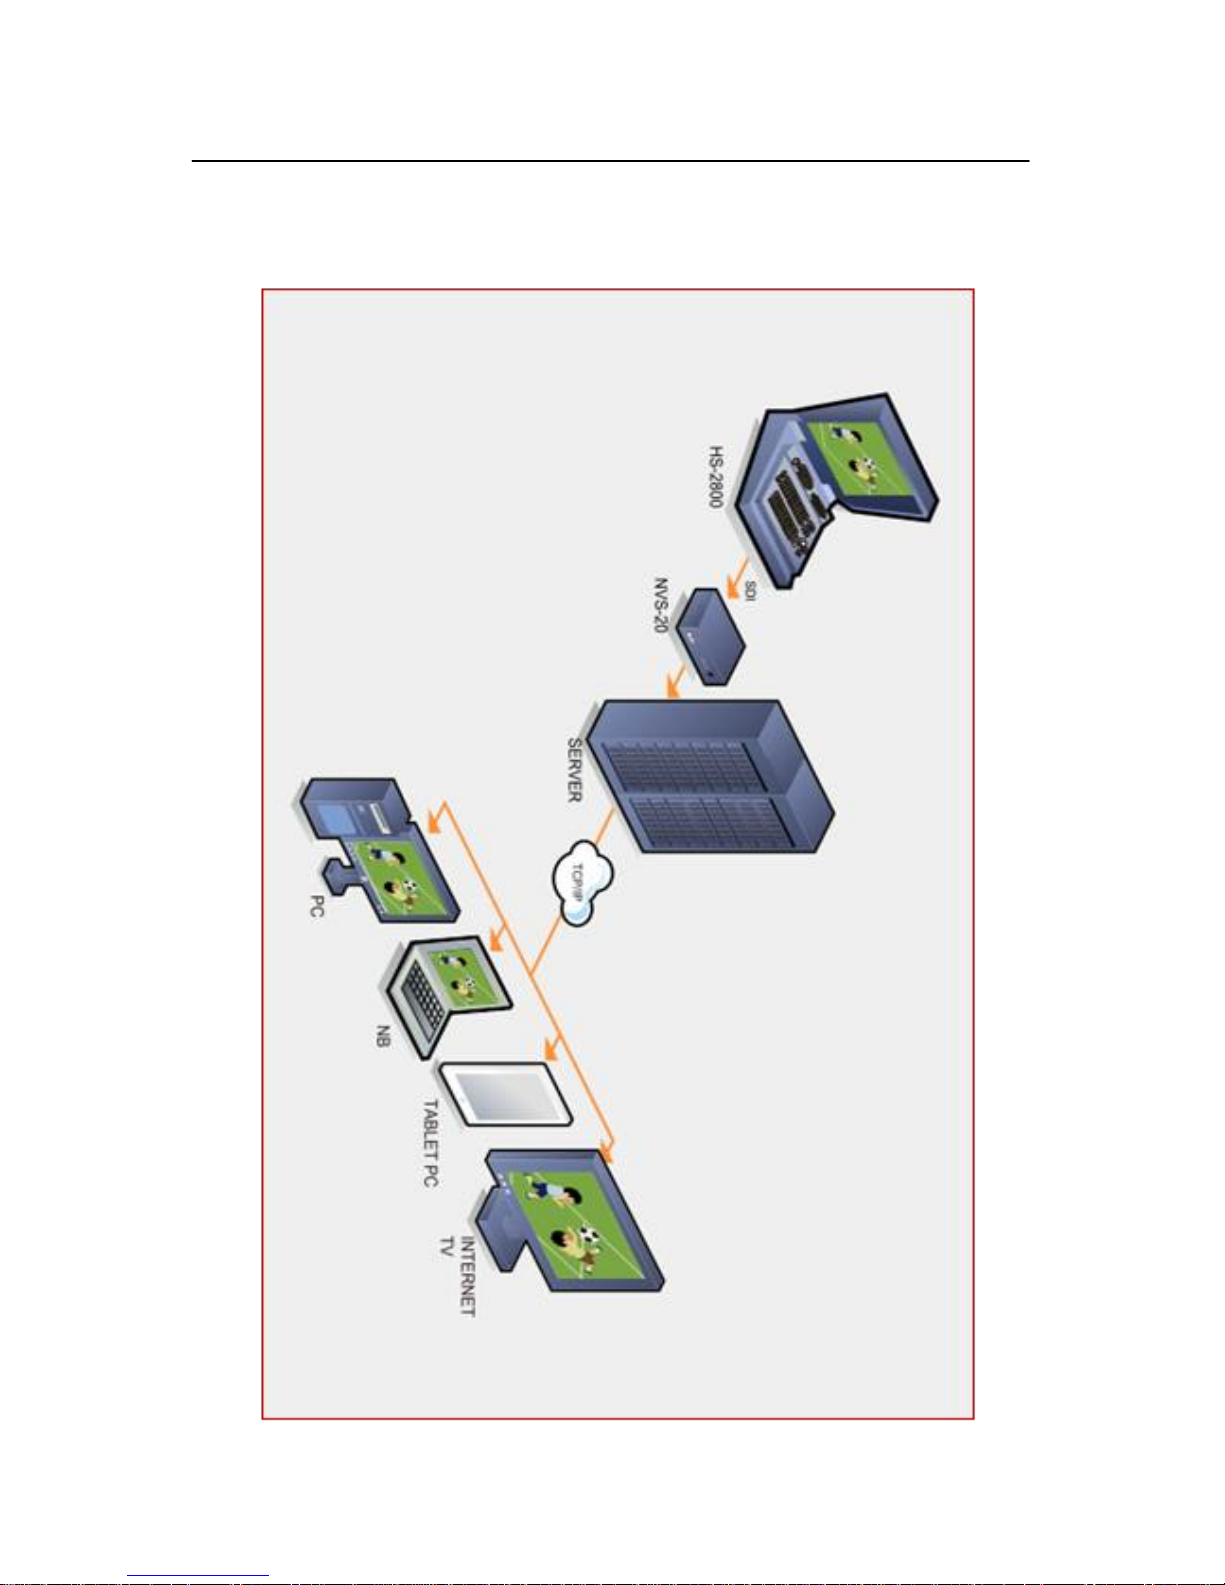
System Diagram
10
Page 11

H.264 Network Video Streaming Server
NVS-20
How to set up the NVS-20
As we see from the System Diagram on the previous page the Datavideo
NVS-20 is designed to sit between the video source equipment and the
delivery IP network.
Connect live video and audio to the NVS-20
Referring to page 9, connect your live video and au dio source cabling to the
rear panel of the NVS-20.
Connect the NVS-20 to the local IP network
Referring to page 9, connect an RJ-45 Ethernet cable to the rear panel of the
NVS-20 from the local IP network. This could be from an office LAN face plate
on the wall or direct to an existing LAN network router / switch.
Connect power to the NVS-20
The NVS-20 comes with its own power supply unit which connects it to a
normal wall/power outlet. The unit can also be powered from a Datavideo PD2 power distribution unit. The power or PWR LED on the front of the NVS -20
should glow red when connected and switched on. The unit takes
approximately 1 minute to start so please be patient and wait for the power
LED to change to green.
Select the input connection to be streamed
The MODE button on the fron t panel of the NVS-20 is used to select the live
video input connected to the rear of the un it. Press this b utton to cycle thro ugh
the HDMI, SDI and Composite [CVBS] inputs.
Each time the button is pressed an LED will light for the selected source, the
default at power on is HDMI. If no source video is detected then the LED will
flash red. If a live video source is detected then the LED will change to stead y
green.
The STM or stream LED will go green once the unit is correctly configured by
computer IP connection.
11
Page 12

H.264 Network Video Streaming Server
NVS-20
How to find the NVS-20 on an IP network
As we see from the System Diagram on page 10, the Datavideo NVS-20 is
designed to sit between the video source equipment and the delivery IP
network.
By default, once the physical connections have been made, the NVS-20 will
try to obtain an IP Address from the DHCP network server. As we wil l se e
this can be changed later to a Static IP address if required.
How to use the NVS20 IP Finder utility software
Datavideo supply a free, Windows based
utility, called NVS-20 IP Finder.
T
he first time this software is used on the computer you may need to allow it
permission through your computers firewall / anti-virus software in order for it
to be able to scan or search the local network.
When first launched the NVS-20 IP Finder utility displays the IP address of the
computer being used in the bottom left of the utility window.
Make a note of the IP Address for the computer.
12
Page 13

H.264 Network Video Streaming Server
NVS-20
When the utility scans the LAN that the c omputer is connected to, it displays
the current IP address and MAC ID for any NVS-20 units found on this local IP
network.
Make a note of the NVS-20 IP Address.
The IP address may differ from the example shown below.
If you are using an Apple computer then you can use an alternative utilit y app
such as Fing or Network Analyzer Lite.
13
Page 14

H.264 Network Video Streaming Server
NVS-20
NVS-20 Login using a web browser
From the previous pages we now know the IP address of our computer and
the NVS-20. If the first three numbers of both are the same then we should be
able to use a web browser to login and configure the NVS-20.
Compatible browsers such as Google Chrome, Firefox, Opera or even Safari
can be used. Please note that Internet Explorer can also be used, but you
may need to enable compatibility view and pop up windows within the
browser first.
Type the numbers of the IP address for the NVS-20 into the search bar of the
browser. Remember to include the dots in between the numbers. When
entered you will then be asked to login to the NVS-20 via a pop up window.
Default Login details
All NVS-20 units are delivered from the factory with the same default user
name and password. This can be changed at a later stage to suit your needs.
User Name = admin Password = 000000 [Zero six times]
For details of how to change the default login see page 22.
14
Page 15

H.264 Network Video Streaming Server
NVS-20
NVS-20 web browser Home page
Once we have logged into the NVS-20 we are presented with the Home page.
From this screen we can select from the following options; Settings, Status,
Record or Live.
Live option
When clicked, the Live option tab will open a new page. This page will display
either the live video stream or a link to be copied into another video web
streaming application such VLC player or a Content Delivery Network page.
For more information see page 26 to page 28.
Record option
When clicked, the Record option tab will open a new page. The NVS-20 can
be connected to an external USB 2.0 hard drive or pen drive. When the USB
media is connected, the NVS-20 can record video to the device. The recording
time is limited by the recording bit rate and free space available on the USB
device.
For more information see page 25.
Status option
When clicked, the Status option tab will open a new page. The current
streaming settings in use will be displayed.
Setting option
When clicked, the Setting option tab will open a new page. There are five
sections of settings which can be looked at. These are: Live Stream Set Up,
Network Set Up, Firmware Update, Account Set Up and Restore Default
15
Page 16

H.264 Network Video Streaming Server
NVS-20
Setting > Live stream set up - Protocols
Before using the NVS-20, it is best to decide what streaming protocol best
suits your purpose.
HLS protocol
Use the NVS-20 to provide an IP video stream to several apple b ased clien ts
or tablet computers such as an iPad, iPhone or Mac Book running the Safari
browser. HLS carries both video and audio to the iOS device. Note that HLS
latency may be up to 10 seconds behind live events depending on the
settings used.
RTSP protocol
Use the NVS-20 to provide an IP video stream [UDP] to a small group of
clients on a LAN or WAN. Video can be monitored via free client software
such as VLC Player. RTSP does not work well with some tablet computers.
RTSP is open for viewing by anyone on the same network with the stream
details or link. It can be sent across the internet, but each client added will
add data load to the NVS-20, as each video stream is set up individually.
RTSP may be limited to three viewing clients before the NVS-20 becomes
choppy and video stream fails.
RTMP protocol
Use the NVS-20 to provide a single IP video stream [TCP] to a server on a
Wide Area Network [WAN] like the internet or to a small group of clients on a
private Local Area Network [LAN].
The server on the WAN could be the server of a Content Delivery Network
[CDN], such as Ustream, L iveStream or Justin.tv. To use a CDN you may
need to register for a free / trial account first and then some costs may be
involved at a later stage. You only provide one video stream to the CDN and
they share that IP video feed with multiple viewers. This means less work for
you and the NVS-20 too. CDNs differ in tariffs and the way they operate so it
is best to do your own research beforehand.
The server on a WAN could also be your own Wowza server. Wowza servers
are a bespoke CDN solution, typically for large organisations, where you
brand the look and feel of the delivery network plus the video stream itself.
Again it is best to do your own research beforehand.
16
Page 17

H.264 Network Video Streaming Server
NVS-20
Setting > Live stream set up
Before using the NVS-20, it is best to decide what streaming settings best
match your purpose and the network and pro tocol being used. These settings
may be confirmed through your own trial and error tests, you may be limited
by the speed of your connection through the network or to the internet and you
may also find standardised settings in your Content Delivery Network’s FAQs
page.
Datavideo have programmed default settings for each of the NVS-20 protocols
to give you a starting point that should deliver both pictures and audio to a
target client or computer. It may be necessary to adjust these NVS-20 settings
further.
17
Page 18

H.264 Network Video Streaming Server
NVS-20
Stream Server Selection
This setting allows you to choose one of three transmission protoc ols [ HLS,
RTSP, RTMP ] or to switch the current video stream off. The default is stream
off.
NOTE:
All setting changes will not be actioned on the NVS-20 u ntil the Apply
button has been clicked and the NVS-20 configuration progress bar has
completed at 100%.
Input Source Selection
Use this setting to switch between the physical video inputs on the rear panel
of the NVS-20. The default is HDMI.
RTMP Publish URL
This option is only shown if RTMP is chosen under Stream Server Selection.
Here you would place the RTMP web address for your WAN based server or
CDN account.
Leave this option empty if you only wish to view the RTMP stream directly
from the NVS-20 on the local IP network using the Live tab in the web browser.
Video Tuning
Video brightness, contrast, hue and saturation can be changed for HDMI and
CVBS inputs only. SDI video can be adjusted on the source equipment before
it is delivered to the NVS-20. The default setting is 128 from a range 0 to 255.
Encoder setup
H.264 Encode relates to the version of codec to be used. Some early third
party set top boxes cannot decode the later H.264 versions. Where possible
use the latest version to ensure the best video codec is in use.
Audio Setup
Audio Source can be fed into the NVS-20 in two ways. Embedded into the
digital video stream as with HDMI and SDI audio inputs [DIG] or with separate
analogue XLR/ RCA phone inputs [Analogue]. As analogue audio level
standards differ between the EBU and SMPTE areas this also needs to be set
under Analogue Audio System. The quality of the audio, bit rate in Kbps, can
also be set.
18
Page 19

H.264 Network Video Streaming Server
NVS-20
Video bit rate and mode
The NVS-20 video bit rate is the conversion level from video into data so that
it can be sent across an IP network. The higher the bit rate the better the
quality of the picture. For example; Standard Definition pictures may look
acceptable at 1000 Kbps. However, High Definition pictures may be
unacceptable at 1000 Kbps. Also remember that high bit rates will use more
bandwidth across the IP network. This may be okay within a Gigabit office
LAN but may be limited by the speed / bandwidth of your internet connection.
The NVS-20 also has two bit rate modes VBR or Variable Bit Rate and CBR or
Constant Bit Rate. Set the NVS-20 to VBR to efficiently send video data
across an IP network but this is also a trade off against picture quality. CBR
provides better video quality but is less data and bandwidth efficient when sent
across an IP network.
NOTE:
All setting changes will not be actioned on the NVS-20 u ntil the Apply
button has been clicked and the NVS-20 configuration progress bar has
completed at 100%.
19
Page 20

H.264 Network Video Streaming Server
NVS-20
Setting > Network set up
DHCP Enable
If this radio button is selected the NVS-20 will attempt to obtain an IP address
automatically using DHCP when it is connected to an office LAN or router.
This IP address could change each time the NVS-20 is power cycled. T he
IP address for the NVS-20 will be within the IP range used by the office
network or router. For more information on how to locate the NVS-20 on a
DHCP network see page 12.
DHCP Disable
If this radio button is selected the NVS-20 will use a Static IP Address. A
static IP address does not change after the unit is power cycled. This
makes the NVS-20 easier to locate on the network.
If you wish to set up a static IP address on your office network then please
speak with your network administrator or local I.T. support for advice. They will
also be able to confirm the IP address for the Default Gateway to the internet.
20
Page 21

H.264 Network Video Streaming Server
NVS-20
Setting > Firmware update
From time to time Datavideo may release new firmware to either add new
features or to fix reported bugs in the current NVS-20 firmware. Customers
can update the NVS-20 firmware themselves if they wish or they can contact
their local dealer or reseller for assistance should they prefer this method.
This section describes the firmware update process and it should take
approximately 10 minutes total time to complete.
The current NVS-20 settings should be noted. Once started the update
process should not be interrupted as this could result in a non-responsive
unit.
As well as a working NVS-20 you will need:
The latest update file for the NVS-20. This can be obtained from your
local Datavideo dealer or office.
A computer with web browser on the same IP network as the NVS-20.
The current IP address and settings of the NVS-20.
1. Log in with the NVS-20 serv er as normal usi n g the computer web bro wser.
2. Click Setting then turn “Stream OFF” under Stream Server and apply.
3. Select Firmware Update and then Browse to the firmware file.
4. Press Start button to upgrade the NVS-20 firmware.
Note:
After the firmware update yo u may need to locate the NVS-20 on the
network, see page 8. The units settings may also need to be changed back.
21
Page 22

H.264 Network Video Streaming Server
NVS-20
Setting > Account set up
The NVS-20 has one admin user account and password. T his account is used
to keep the NVS-20 secure and gives access to the streaming settings.
Default user name = admin Default password = 000000 [Zero six times]
This section describes how to change the default username and password
shown above to something new which is more secure.
Please be careful and memorize the new login details as the old / default
login is deleted during this process.
1. Log in with the NVS-20 serv er as normal usi n g the computer web bro wser.
2. Click Setting then turn “Stream OFF” under Stream Server and apply.
3. Click Account Setup then enter the current user name and password.
4. The next screen will then request the new login user name and password.
The new password will need to be entered twice to confirm it.
5. When apply change is clicked you will be asked to log in again with the
new details.
NOTE: Please be careful and memorize the new login details as the old or
default login is deleted during this process.
22
Page 23

H.264 Network Video Streaming Server
NVS-20
Setting > Restore default
There are several settings that can be used within the NVS-20 a nd from time
to time you may wish to restore the out of the factory default settings.
NOTE:
This feature will also reset the NVS-20 login d etails to the default user
name and password shown on page 22.
1. Log in with the NVS-20 serv er as normal usi n g the computer web bro wser.
2. Click Setting then Restore Default.
3. Click the Restore to Default button to confirm that you wish to proceed.
4. Once the unit has restarted login with the default user name and
password shown on page 22.
The factory default streaming settings should then be set as:
Stream Server
: OFF
Input Source
: HDMI
Resolution
: 1920 x 1080
Framerate
: 50 fps
Brightness
: 128
Contrast
: 128
Hue
: 128
Saturation
: 128
Sharpness
: 128
H.264 Level
: 3.1
H.264 Profile
: Main
Audio Stereo
: Stereo
Audio Bitrate
: 384 Kbps
Video Bitrate
: 3000 Kbps
Video Rate Mode
: VBR
Audio Source
: DIG
Analog Audio System
: EBU
Restore Factory default via mode button
The NVS-20 can also be restored to the factor y defaults from the front panel.
From power off. Press and hold in the mode button and turn on the NVS-20
power; keep holding the mode button for 40 seconds. When released the
NVS-20 will take a further 30 seconds to finish the boot up process.
Remember to login with the default username and password as shown on
page 22.
23
Page 24

H.264 Network Video Streaming Server
NVS-20
Recording the stream to USB 2.0 media
The NVS-20 is capable of recording the streamed video and audio into an
MPEG2 TS file on a connected USB 2.0 pen drive.
If the video being fed to the NVS-20 is High Definition 1080i video then the
recorded file will also match this resolution. If the video being fed to the N VS20 is Standard Definition NTSC then the rec orde d file will match this resolutio n
instead.
The USB 2.0 pen drive should be formatted FAT32 in order for the NVS-20
to recognise when it is connected. If the USB connected media is incompatible
or cannot be seen then the NVS-20 will show No USB storage device is
connected.
Pen Drive video capacity
A 4GB USB 2.0 pen drive can store just over two hours of video and audio
when using the default NVS-20 settings. If the bit rate is changed in Live
stream setup settings to a higher rate, the available recor ding time will be less
on the same size pen drive.
Note: Make sure your USB pen drive is empty before starting the stream
recording process. The NVS-20 may over write any older files already on the
USB pen drive when space is low.
Note: FAT32 will limit the file size to 2GB. Additional files will be created by
the NVS-20 as each 2GB file limit is reached. Files will be numbered
sequentially.
24
Page 25

H.264 Network Video Streaming Server
NVS-20
Stream Record process
1. Log in with the NVS-20 server as normal using the web browser.
2. Check and change the Live Stream Setup settings as necessary using
the Setting tab.
3. Connect the USB 2.0 media into the USB port on the NVS-20 front panel.
4. Click the Record tab and then the Start Record button.
5. Click on the USB Storage icon to view the root directory of the attached
USB 2.0 media. This opens a new web page [example below], which can
be refreshed, to show the growing NVS20_xxxx.ts stream file.
6. Click the Record tab and then the Stop Record button once the media is
nearly full or the event being recorded is finished.
25
Page 26

H.264 Network Video Streaming Server
NVS-20
Live tab – HLS protocol
Once the IP address of the NVS-20 is known enter this IP address into the
Safari web browser address bar on the iPad or iOS device. See page 12 also.
Enter the set username and password for the NVS-20 to access the Home
screen. See page 14 also.
Tap on Settings and cha nge the protocol to HLS. Adjust the encoding set tings
as necessary then tap Apply.
Once the progress bar has finished tap the Live tab and the video stream will
be displayed on the iPad or iOS device.
26
Page 27

H.264 Network Video Streaming Server
NVS-20
Live tab – RTSP protocol
Once the IP address of the NVS-20 is known, enter this IP address into the
web browser address bar on the computer or device. See page 12 also.
Enter the set username and password for the NVS-20 to access the Home
screen. See page 14 also.
Tap on Settings and change the protocol to RTSP. Adjust the encoding
settings as necessary then click Apply.
Once the progress bar has finished tap the Live tab and an RTSP web link to
the video stream will be displayed.
Enter this RTSP web link from the NVS-20 Live tab into VLC Media Player
using the path Media > Open Network Stream.
27
Page 28

H.264 Network Video Streaming Server
NVS-20
Live tab – RTMP protocol
Once the IP address of the NVS-20 is known enter this IP address into the
web browser address bar on the computer. See page 12 also.
Enter the set username and password for the NVS-20 to access the Home
screen. See page 14 also.
Tap on Settings and change the protocol to RTMP.
If you are sending the NVS-20 stream to a Content Delivery Network [CDN]
enter your CDN Publish URL here.
Leaving the RTMP Publish URL field empty will cause the NVS-20 to act as
the local RTMP server. Adjust the encoding settings as necessary then click
Apply.
Once the progress bar has finished the Live tab should confirm the RTMP
Publish URL details if you are sending the NVS-20 stream to a CDN.
If you are using the NVS-20 as the local RTMP server then the Live tab will
show a video stream player window. Click the Play icon in the lower left corner
to start playback of the RTMP stream.
28
Page 29

H.264 Network Video Streaming Server
NVS-20
Port Forwarding on your firewall / router
So that the NVS-20 video stream can be seen on the internet (beyond the
default gateway) certain network related ‘ports’ should be opened on your
router or firewall. Your local network administrator or I.T. support should be
able to help you with this.
Enable the “port forwarding” function or open below ports within the router
settings.
Web Server/HLS RTSP RTMP
80 8554 (over TCP) 1935 (RTMP)
8000 (over HTTP) 8080 (RTMPT)
8080 (over HTTP) 8081 (RTMPS)
29
Page 30

H.264 Network Video Streaming Server
NVS-20
LED Status & Button Behaviour
LED Status
Function State Description
a. Off Power off
b. Red system booting up & Program initializing
c. Green Ready. with Interface LED
Power
LED
d. Blinking System error
a. Off Stream off
Stream
b. On Stream on
a. Off Program not initialized
b. On Source input OK
Blinking while no source input
c. Blinking Red
Blinking while invalid source input
Interface
d. Blinking Green USB storage enable
Mode Button Behaviour
Function Behaviour Description LED
Stream On/Off
Hold for 3 seconds
until Stream LED
Start/Stop Stream
Stream LED on/off for starting
or stopping
Once press
Change to next
(HDMI->SDI->CVBS->)
Interface LED changed
Interface
changed while
Stream Off
Twice quickly USB storage Interface Green LED blinking
Once press
Stop Stream ->
change to next
(HDMI->SDI->CVBS->)
Start Stream
1.streaming LED off
2. Interface LED changed
3. Stream LED ON
(If there is a valid source
input)
Interface
changed while
Stream On
Twice quickly USB storage Interface Green LED blinking
30
Page 31

H.264 Network Video Streaming Server
NVS-20
Specifications
1 x BNC for HD/SD-SDI(75 ohm)
1 x BNC for CVBS (75 ohm)
Video Input
1 x HDMI (Ver 1.3)
SDI embedded audio ( 2 channels)
2 x XLR/RCA for Analog audio (2 channels)
Audio Input
HDMI embedded audio ( 2 channels)
Output
1x RJ-45 Female (10/100M Ethernet)
1x USB 2.0 Type A for file output to USB storage
Video Encode
H.264 / AVC video CODEC, up to High Profile Level 4.0
Configurable Bit-rate up to 6Mbps
Supported Video
Resolution
1080 @ 50P / 59.94P / 60P
(50P/59.94P/60P input, 25P/30P record/output)
1080 @ 50i / 59.94i / 60i
720 @ 50P / 59.94P / 60P
576@ 50i, 480 @ 59.94i
Audio Encoding
AAC-LC audio CODEC
Sample rate:48KHz,16bit
Configurable Bit-rate up to 384Kbps
Network Feature
DHCP Client
Streaming feature:
- HLS/RTSP/RTMP Server (One protocol at a time)
- Supports up to 3 clients
Monitoring
5 x LED status indicators
(HDMI/SDI/CVBS/Streaming/Power)
Storage
USB 2.0 Mass Storage
File system: FAT32
Control Web UI for system configuration and control
Update Firmware upgradable by web UI
Power Input AC 100 ~ 240V Switching Adaptor, output DC 12V / 1.5 A
Power Consumption 7.2W
Environmental
Conditions
Operating temperature.:0~50℃
Storage temperature:-10~60℃
31
Page 32

H.264 Network Video Streaming Server
NVS-20
32
Service & Support
 Loading...