

Page 1
Network Video Server
NVS-10
INSTRUCTION MANUAL
www.datavideo-tek.com
Rev 120310
Page 2

Table of Contents
Warnings and Precautions .............................................................................................................................. 2
Warranty .......................................................................................................................................................... 3
Standard Warranty........................................................................................................................................... 3
Two Year Warranty .......................................................................................................................................... 3
Disposal ........................................................................................................................................................... 3
Packing List ..................................................................................................................................................... 3
Introduction ...................................................................................................................................................... 4
Features ........................................................................................................................................................... 4
Minimum System requirements ....................................................................................................................... 4
Connections and Controls ............................................................................................................................... 5
Front Panel ...................................................................................................................................................... 5
Rear Panel ....................................................................................................................................................... 6
NVS-10 IP Finder software set up ................................................................................................................... 7
Download ActiveX Control ............................................................................................................................... 9
NETWORK VIDEO SERVER Setup .............................................................................................................. 12
HOME Setup .................................................................................................................................................. 12
Stream Setup ................................................................................................................................................. 13
Networking Setup .......................................................................................................................................... 14
IP Setting ....................................................................................................................................................... 14
Point to Point Protocol over Ethernet (PPPoE) Setting ................................................................................. 15
Dynamic DNS (DDNS) Setting ...................................................................................................................... 16
System Setup ................................................................................................................................................ 17
System Setting ............................................................................................................................................... 17
How to Upgrade NVS-10 Firmware ............................................................................................................... 18
Setting Date and Time ................................................................................................................................... 19
User Setup ..................................................................................................................................................... 20
User Authorization ......................................................................................................................................... 20
Add / Modify User .......................................................................................................................................... 20
Delete User .................................................................................................................................................... 21
Select Language ............................................................................................................................................ 21
Understanding Network IP Addresses ........................................................................................................... 22
Useful TCP IP tools ....................................................................................................................................... 22
IPCONFIG ..................................................................................................................................................... 22
PING .............................................................................................................................................................. 22
Example NVS-10 Set Ups ............................................................................................................................. 23
Service & Support .......................................................................................................................................... 24
1
Page 3

Warnings and Precautions
1. Read all of these warnings and save them for later reference.
2. Follow all warnings and instructions marked on this unit.
3. Unplug this unit from the wall outlet before cleaning. Do not use liquid or aerosol cleaners. Use a
slightly damp cloth for cleaning.
4. Do not use this unit in or near water.
5. Do not place this unit on an unstable surface, cart, stand, or table. The unit may fall, causing
serious damage.
6. Any slots and openings on the case top, back, and bottom are provided for ventilation. To ensure
safe and reliable operation of this unit, and to protect it from overheating, do not block or cover
these openings. Do not place this unit on a bed, sofa, rug, or similar surface, as the ventilation
openings may become blocked. This unit should never be placed near or over a heat source or
radiator. This unit should not be placed in a built-in installation unless proper ventilation is provided.
7. This product should only be operated from the type of power source indicated on the marking label
of the AC adapter. If you are not sure of the type of power available, consult your Datavideo dealer
or your local power company.
8. Do not allow anything to rest on the power cord. Do not locate this unit where the power cord will be
walked on, rolled over, damaged or otherwise stressed.
9. If an extension cord must be used with this unit, make sure that the total of the ampere ratings on
the products plugged into the extension cord do not exceed the extension cord’s rating.
10. Make sure that the total amperes of all the units that are plugged into a single wall outlet do not
exceed 15 amperes.
11. Never push objects of any kind into this unit through the case ventilation slots, as they may touch
dangerous voltage points or short out parts that could result in risk of fire or electric shock. Never
spill liquid of any kind onto or into this unit.
12. Except as specifically explained elsewhere in this manual, do not attempt to service this product
yourself. Opening or removing covers that are marked “Do Not Remove” may expose you to
dangerous voltage points or other risks, and will void your warranty. Refer all service issues to
qualified service personnel.
13. Unplug this product from the wall outlet and refer to qualified service personnel under the following
conditions:
a. When the power cord is damaged or frayed;
b. When liquid has spilled into the unit;
c. When the product has been exposed to rain or water;
d. When the product does not operate normally under normal operating conditions. Adjust
only those controls that are covered by the operating instructions in this manual; improper
adjustment of other controls may result in damage to the unit and may often require
extensive work by a qualified technician to restore the unit to normal operation;
e. When the product has been dropped or the case has been damaged;
f. When the product exhibits a distinct change in performance, indicating a need for service.
2
Page 4
Warranty
Standard Warranty
Datavideo equipment is guaranteed against any manufacturing defects for one year from the date
of purchase.
The original purchase invoice or other documentary evidence should be supplied at the time of any
request for repair under warranty.
Damage caused by accident, misuse, unauthorized repairs, sand, grit or water is not covered by
this warranty.
All mail or transportation costs including insurance are at the expense of the owner.
All other claims of any nature are not covered.
Cables & batteries are not covered under warranty.
Warranty only valid within the country or region of purchase.
Your statutory rights are not affected.
Two Year Warranty
All Datavideo products purchased after 01-Oct.-2008 qualify for a free one year extension to the standard
Warranty, providing the product is registered with Datavideo within 30 days of purchase. For information on
how to register please visit www.datavideo-tek.com or contact your local Datavideo office or authorized
Distributor.
Certain parts with limited lifetime expectancy such as LCD Panels, DVD Drives, Hard Disk Drives are only
covered for the first 10,000 hours, or 1 year (whichever comes first).
Any second year warranty claims must be made to your local Datavideo office or one of its authorized
Distributors before the extended warranty expires.
Disposal
For EU Customers only - WEEE Marking
This symbol on the product indicates that it should not be treated as household waste. It
must be handed over to the applicable take-back scheme for the recycling of Waste
Electrical and Electronic Equipment. For more detailed information about the recycling of
this product, please contact your local Datavideo office.
Packing List
Items Description Q’ty
1 NVS-10 Network Video Server 1
2 Switching Adaptor DC 12V/1.2A 1
3 BNC Male to RCA Female Cable 1
4 3 RCA to 3 RCA Cable 1
5 NVS-10 IP Finder software CD 1
5 Instruction Manual 1
3
Page 5

Introduction
The Datavideo NVS-10 is referred to a simple MPEG-4 Network Video Server. The NVS-10 accepts a
Composite (CVBS) input and allows the output to be viewed on a PC monitor after transmission via an
Ethernet network connection. The main output can be received by any PC connected to the same network.
The NVS-10 supports both NTSC and PAL video input standards. Users can view real-time video with
audio at a variety of data rates through the Web Browser User Interface.
Features
Composite (CVBS) signal Input.
Supports NTSC/PAL inputs (auto detection).
Video Compression MPEG-4, SP
Real-time Encode 30fps @ Full-D1 (720 * 480 / 576)
Supports Video bit rate up to 4 Mbps (64K ~ 4Mbps)
Supports audio bit rate up to 384 Kbps
Allows setting for Brightness, Contrast, Saturation and Hue.
Ethernet port: RJ45 Connection for 10/100Mbit Ethernet networking
Supported Protocols: TCP/IP, ICMP, HTTP, RTSP, NTP, UPnP, PPPoE
Can be set up and accessed via supplied IP Finder software and or Web Browser User Interface
Embedded Stereo Audio via RCA or XLR inputs
Minimum System requirements
Operating system: Microsoft Windows 2000, XP, Vista (for IP Finder Software)
RJ45 Ethernet Connection for access to 10/100Mbit Ethernet network
Browser: Internet Explorer 6.0 or above
2GB RAM or higher and DirectX 8.1 or higher.
4
Page 6
Connections and Controls
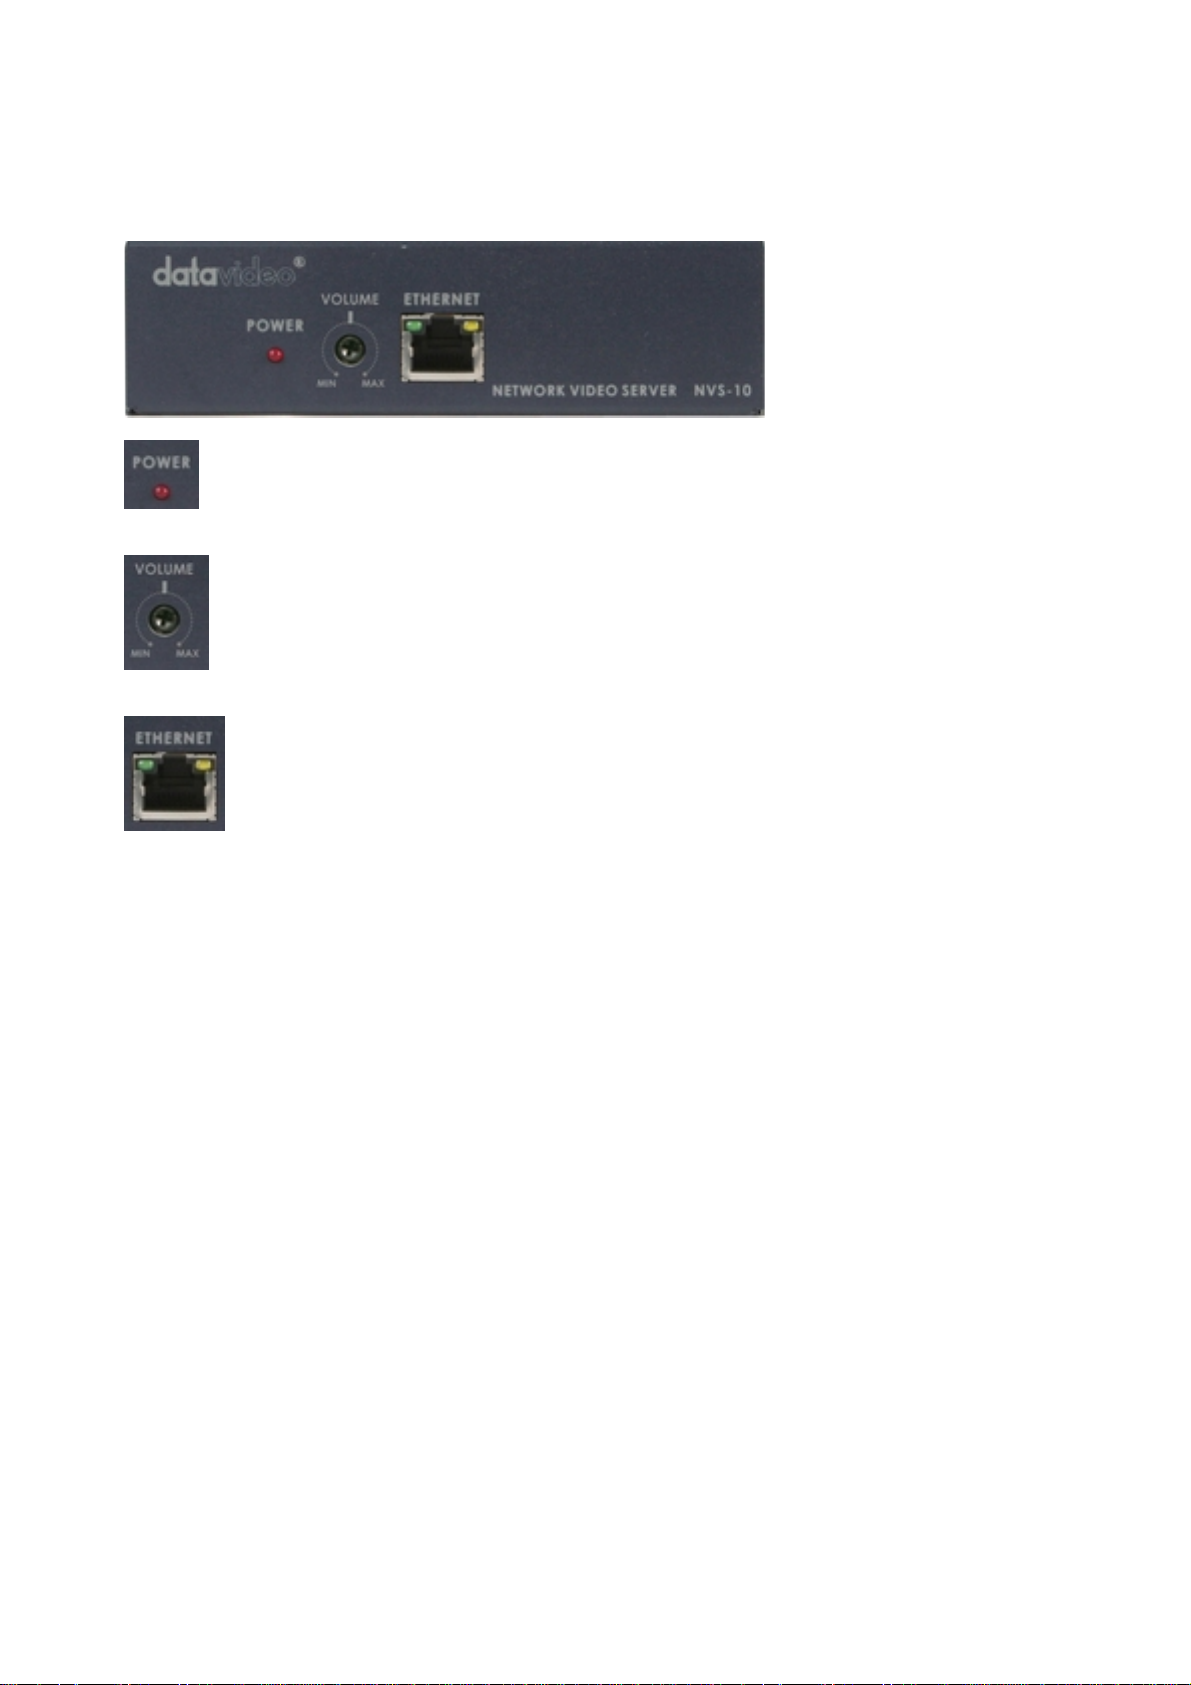
Front Panel
Power LED
LED light in Red color for power on and stand by status, and no light in
disconnecting DC in.
Volume Control (VR)
Adjust input volume for XLR and RCA Audio inputs.
Ethernet Port (RJ-45)
100/10M base Ethernet Network interface
5
Page 7
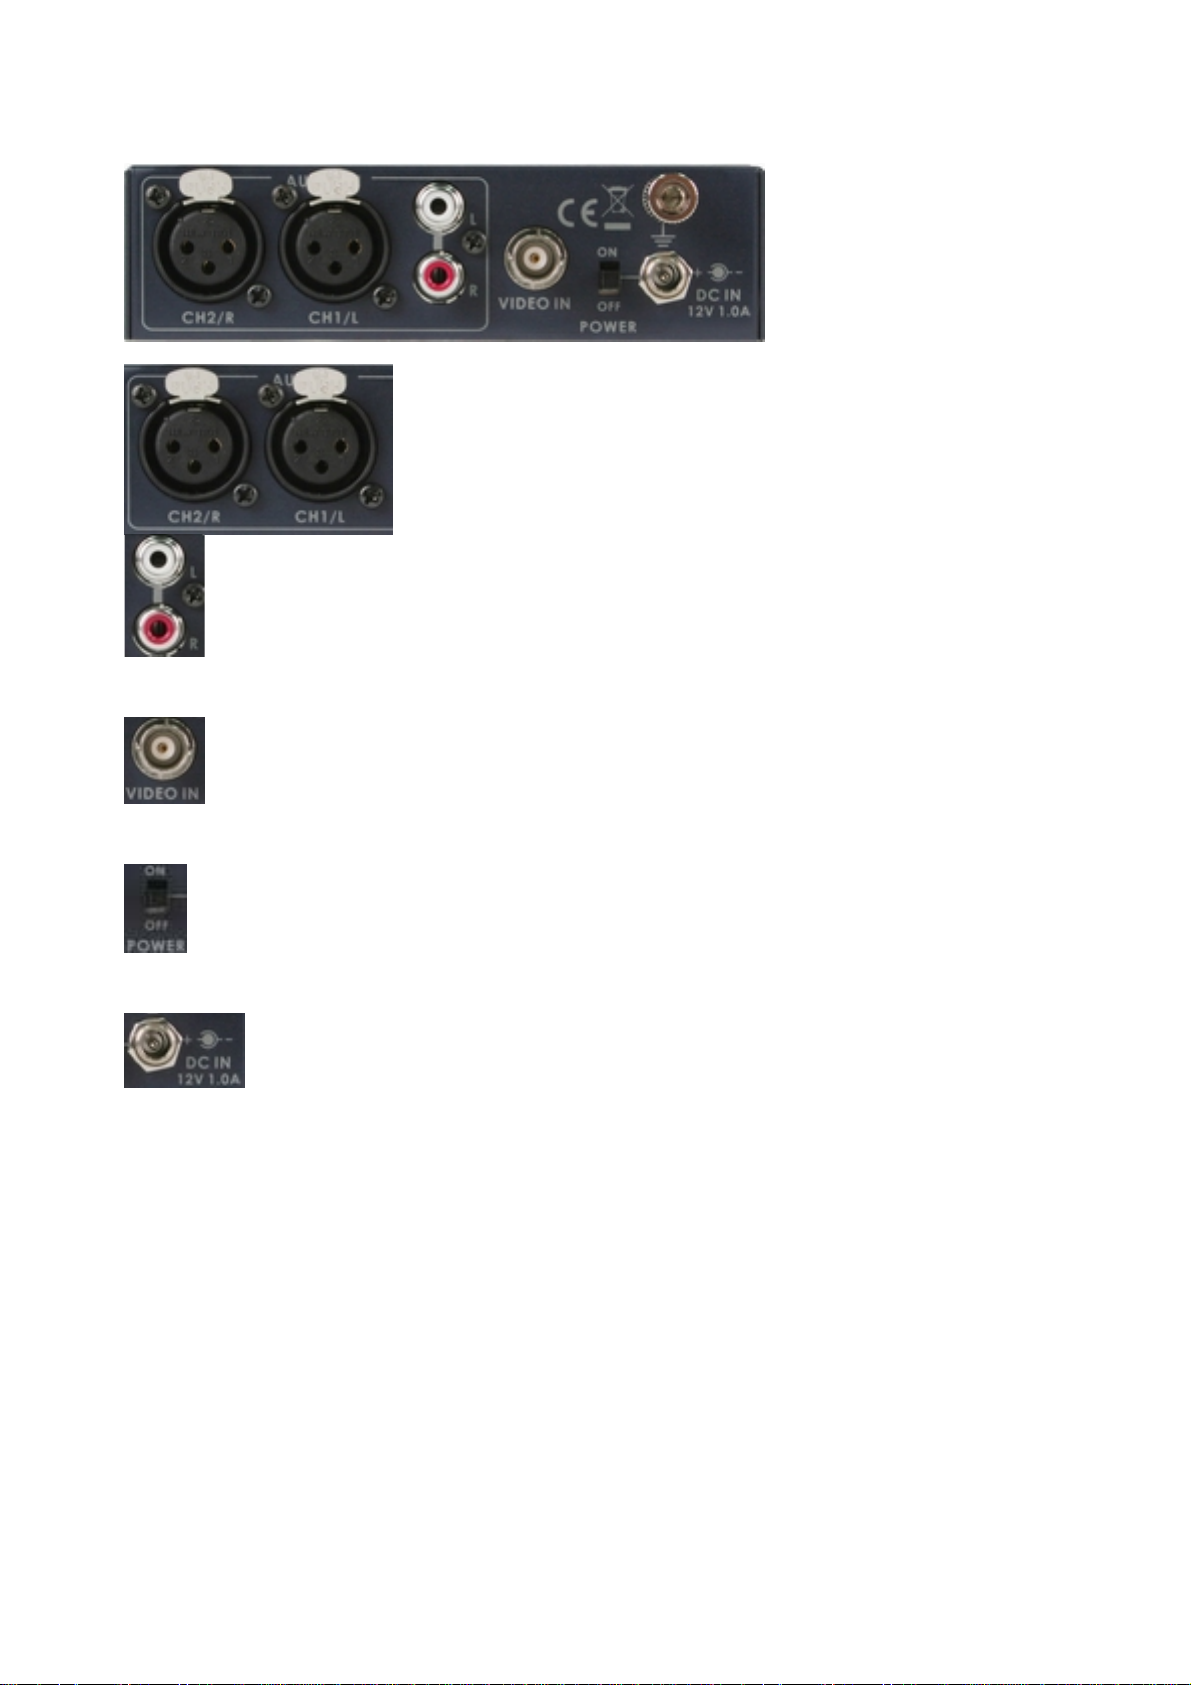
Rear Panel
AUDIO IN (XLR)
Supports two channels XLR Balanced Audio Input.
AUDIO IN (RCA)
RCA stereo for a line level auxiliary analog audio source, such as a CD
player or tape deck. If you are using more than two sources via an
external audio mixer, connect the audio mixer’s line level output to this
unbalanced Audio input.
Video In
Composite video input: takes a BNC connector from the composite output
of a VCR, camera, DVD player, etc.
Power On/Off Switch
Switches the power On / Off
DC In Socket
Connect the supplied 12V 1A PSU to this socket. The connection can be
secured by screwing the outer fastening ring of the DC In plug to the
socket.
6
Page 8
NVS-10 IP Finder software set up
1. Please install the NVS-10 IP Finder software by running the Setup.exe on the supplied CD.
2. Follow the on screen prompts of the NVS-10 IP Finder set up wizard.
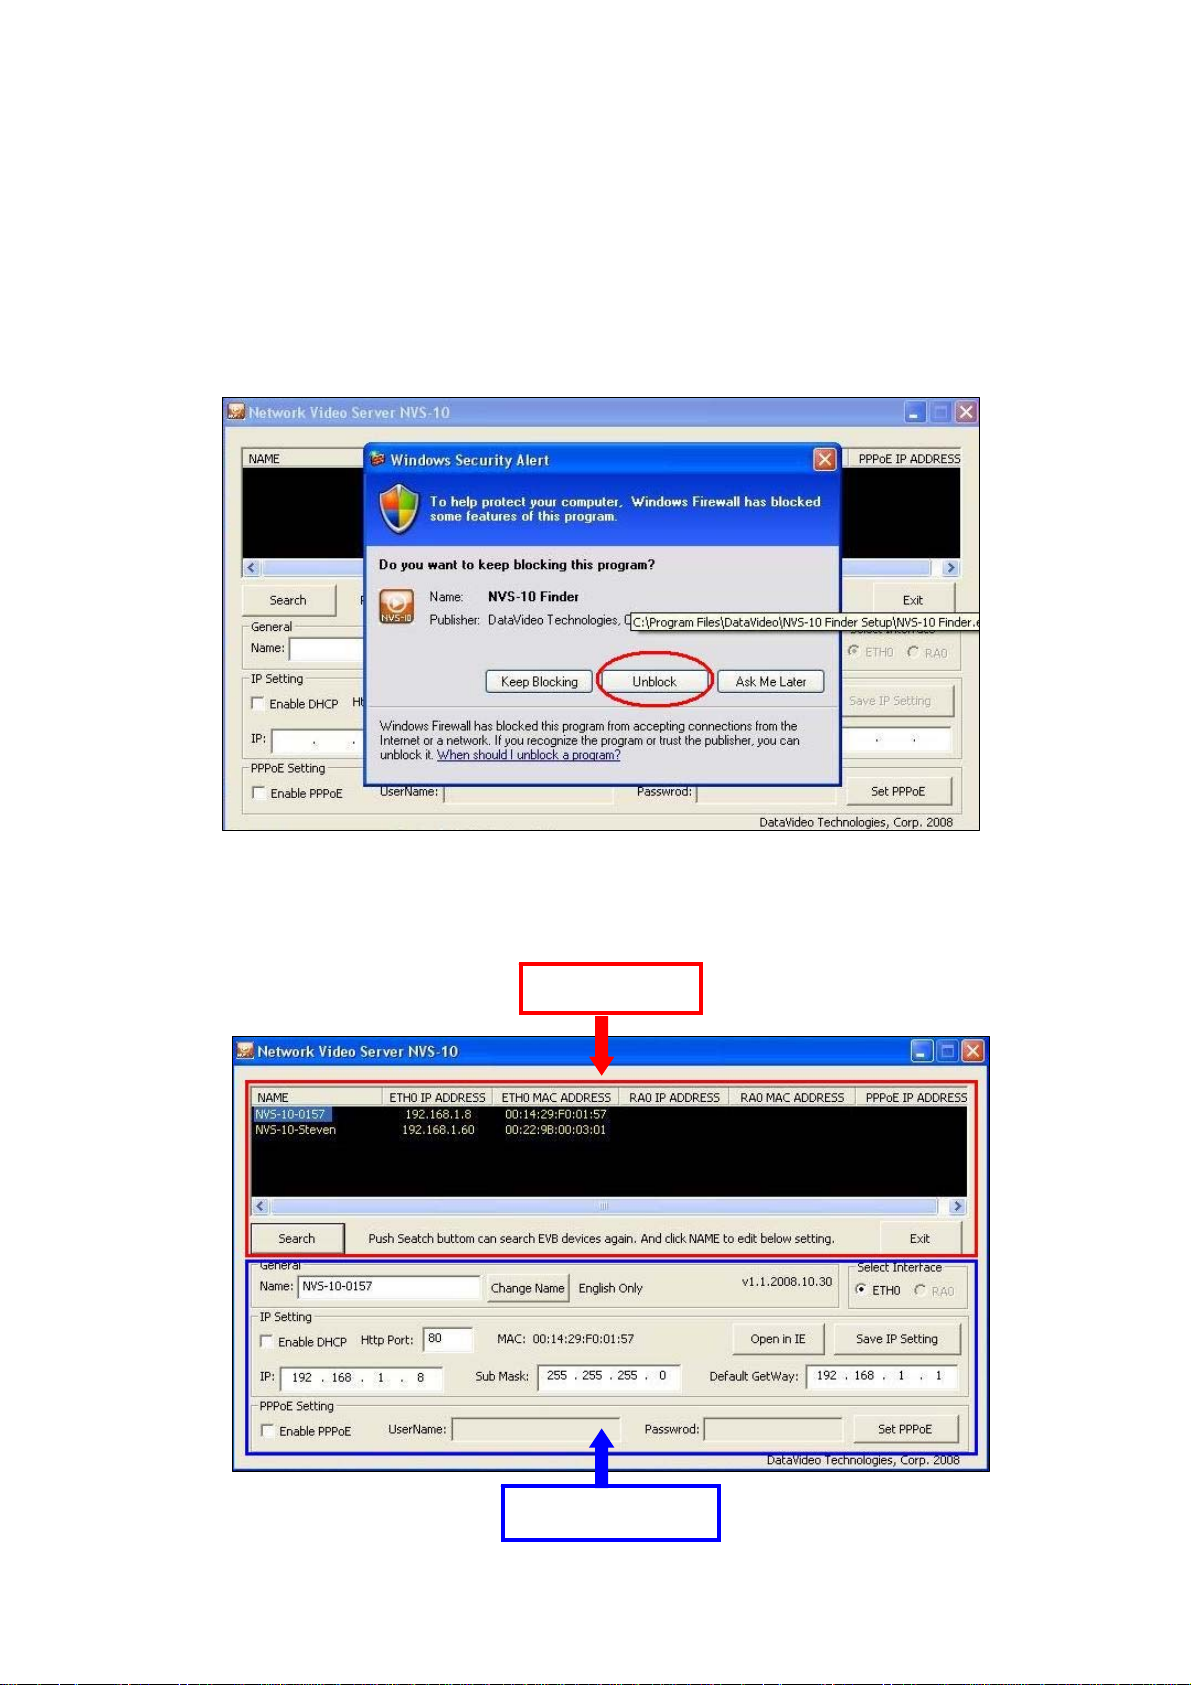
3. Double click the NVS-10 Finder Icon that has been created on your desktop to launch the software.
4. When running the software for the first time, click the Unblock button to allow the software to
communicate through your computer Firewall application.
5. NVS-10 Finder is split into two main areas. The top half is the Search Area which displays all discovered
NVS-10 devices on your network. The bottom half of the display is the Settings Area, this allows you to
change the NVS unit IP address, enable DHCP, change the device name etc…
Search Area
Settings Area
7
Page 9

6. Click on the Search button and wait a few seconds. All powered NVS-10 devices in the local network will
eventually be discovered and their details displayed in the black box as below.
7. Click on an NVS-10 device name and then edit its settings as below.
8. Clicking Open in IE will open the NVS-10 IE browser interface.
8
Page 10

Download ActiveX Control
1. When you visit the IP address page of the NVS-10 for the first time via a web browser, IE will ask you to
download and install the required ActiveX controls to your PC.
2. Click Install ActiveX Control…
9
Page 11

3. Click OK button to install ActiveX control to your PC
4. If you can’t download the ActiveX control or do not see the request, please follow the method below. You
may need to change some security controls related to ActiveX in your Internet Options also.
10
Page 12

5. Enable ActiveX in Security controls.
6. Enable ActiveX controls.
11
Page 13

NETWORK VIDEO SERVER Setup
HOME Setup
This screen is the live view and settings page.
Set screen size on 1x Set screen size on 1/2x (50%)
Set screen size on 2x Set screen size on Full
Print Screen
Snap Shot Screen Start Record
Set photo file save location and save photo
Set record file save location and start / stop record
Select or browse for a file to play back
Start / Close play back of file
12
Page 14

Stream Setup
The Stream menu enables you to configure video and audio settings.
Video Parameters
Quality Select a bit rate value from either
64k, 128k, 256k, 512k, 750k, 1 M, 2 M, 3 M or 4 Mbps
Resolution Select a resolution value: one of four options can b e selected
1. Full D1:720*480 or 720*576
2. Half D1:352*480 or 352*576
3. CIF: 352*288
4. QCIF: 176*144
Brightness Input brightness range: 0 ~ 255. (050)
Contrast Input contrast range: 0 ~ 255 (100)
Saturation Input saturation range: 0 ~ 255 (160)
Hue Input hue range: 0 ~ 200 (000)
Audio Parameters
Audio Audio On/Off
Transmission Protocol
Port Transport stream port range: 1 ~ 65534 (8089)
13
Page 15

Networking Setup
The Networking menu enables you to configure all network-related settings. There are three main topics,
accessed via the selection at the left menu: IP Setting, PPPoE, DDNS.
IP Setting
Complete all the fields as required. You may not require all the fields. For instance, you will not need to
complete the static IP address fields if you are installing the NVS-10 on a network that allocates IP
addresses using DHCP.
Click the
button to confirm your settings
14
Page 16

Point to Point Protocol over Ethernet (PPPoE) Setting
If you connect to your network via PPPoE, check the Enable checkbox and complete all fields under
Configuration. Set your username, password, and MTU setting.
Click the
button to confirm your settings.
Once successfully configured, status details will be displayed under Status.
Note: Please use the PPPoE data provided by your ISP company or I.T. department.
15
Page 17

Dynamic DNS (DDNS) Setting
DDNS allows PPPoE or DHCP dynamic IP users to access the NVS-10 using a single domain name over
the internet. The NVS-10 supports DDNS and meets the Bynamix Network Service, Inc. standard.
If you wish to use this feature please go to
obtain a username and password. Enter this domain name, username, and password into the DDNS
settings screen above.
Click the
When the IP address of the NVS-10 changes, it will then notify its new IP address to DDNS automatically
and then the NVS-10 can be discovered using a domain name instead of an IP address.
button to confirm your settings.
http://www.dyndns.com to register your domain name and
16
Page 18

System Setup
Read this section to learn about the System menu settings and options.
System Setting
Click on the System menu title or tab to access the system configuration screen below:
This displays all system information, including firmware version, Upnp, device name and also allows you to
upgrade the firmware of your unit should you need to.
In Device Name, you can type in a new name for the NVS-10 and click the apply button to change the
device name. The current NVS-10 firmware version is also displayed below this Device Name.
Please leave the Upnp Service enabled so that it is always on.
In Utilities section, you can reset to factory defaults or remotely reboot and allow firmware upgrade.
Under Reset to Factory Default, click the apply button restore all factory set defaults.
Once selected a confirmation dialogue appears. Click OK if you wish to proceed.
17
Page 19

How to Upgrade NVS-10 Firmware
From time to time Datavideo may release new Firmware for the NVS-10 unit. Please check with your local
dealer or Datavideo office to obtain the latest Firmware.
Under the browser System Settings for Admin users you have the Firmware Upgrade option; here you have
the ability to upgrade the system firmware version.
Click the
Click the “OK” button to next step.
Click the “Yes” button to next step.
Firmware upgrading.....
Once the upgrade process is complete, click the “Reboot” button to proceed.
button to locate the folder where the firmware update is stored.
Please click the “Yes” button to confirm and reboot the NVS-10 Finder.
18
Page 20

Setting Date and Time
Choose to either Synchronize with a Network Time Server or your Current PC Time.
If you select Synchronize with Network Time Server, choose your time zone, enter NTP server details,
along with another server if necessary. You can also enable daylight saving time by checking the Daylight
Saving Time checkbox.
19
Page 21

User Setup
The User menu enables you to configure all user settings. There are three main topics, accessed via the
selection on this menu: User Authorization, Add/Modify User and Delete User.
User Authorization
The User menu enables you to configure all user authorization settings.
Here you can enable user check or login by clicking the check box next to Enable and then click the apply
button. When you enable user check this means the first time any user opens the NVS-10 browser
homepage they must enter a valid user name and password to login.
Add / Modify User
Here you can add and modify up to 10 user login accounts.
Select a User Group for each login user name and password that you wish to create.
Admin: No limits of authority, allows all unit settings to be changed.
Note: Always create at least one user with Admin rights.
User: Can only access the HOME menu for the live view, record and playback options.
Note: The User option does not have any rights to modify Stream or IP settings.
20
Page 22

Once you have selected the user group and keyed in the user name, password and confirmed the same
password, click the apply button to add or modify this user.
Delete User
Here you can delete an existing user login account.
Select a user name from the group that you wish to delete then click the apply button to delete the chosen
user from that group.
Note: Always leave at least one user name with Admin rights on the NVS-10.
Select Language
Select Language allows the user to choose from English, Traditional Chinese and Simplified Chinese
browser menus.
21
Page 23

Understanding Network IP Addresses
Network IP Address
This is the computers version of a postal address – no really, let me explain.
In a postal address you have the house number, the street name, the city name and the country. Now think
how the postal service sorts the mail. They look at the bottom line first to direct it to the right country, then
the right city, the right street and finally it is posted to the correct house. A network IP address has 4
groups of numbers an example could be 192.168.1.10 - Each number in an IP address narrows down
where on the network the data is going. Think of the first numbers as the country, the second as the city,
the third as the street and finally the last (octet) as the house number.
Ports
Ah... you say… well what about this port number then? Easy, the port number relates to the program and
type of data being sent. Different programs within Windows ‘listen’ and ‘talk’ on different port numbers. So
going back to the postal service example above the port would be the name of the person who the letter (or
data packet) is addressed to.
Routers and Switches
Most networks already built into an office will have the cabling hidden in the walls. These cables will run
back to a router, switch or server room. These switches and routers act like postal sorting offices. They
read a data packet on the network (letter) and see the IP address and then send it in the right direction until
it reaches the right computer. These routers and switches are also cross over devices so they only need
straight through RJ45 cables connected to them. These straight through RJ45 cables are also referred to
as patch leads. If you were doing a direct connection from a PC/Laptop to an IP device such as an NVS-10
then you would need an RJ45 cross over cable as there is no cross over device in between.
Clients and Servers
Let us go back to our postal service example. Servers are the main sorting offices (or sources of data) on
the network and Clients are the people (or the computing devices) receiving the mail or data. It’s a little
harder to explain because an NVS-10 can be referred to as a Video Streaming Server which feeds video
data via a network connection to computer browser clients like Internet Explorer.
DCHP and Static IP
Dynamic Host Control Protocol (or DHCP) is an automated way of a Client network machine getting its IP
address from the existing network DHCP Server. Every time the Client machine is switched off its DHCP IP
Address is lost and the next time it is switched on it has to request a new IP address which may be different.
This is ok for a computer but may make life difficult for an NVS-10 set up. Static IP addresses (a reserved
address on the network) can be used instead but a human being called a Network Administrator keeps a
track of these special IP addresses. These addresses need to be unique and set up properly for a network
to be working correctly. This type of Static IP address is better for setting up an NVS-10 when it is attached
to an existing DHCP network.
Useful TCP IP tools
A variety of tools already exist for setting up and trouble shooting IP networks such as Windows Network
Connections under Control Panel and MS-DOS commands such as PING and IPCONFIG. Used in the
correct way they will be invaluable.
IPCONFIG
In Windows XP choose START menu, RUN and type COMMAND then when the MS-DOS window opens
type IPCONFIG/ALL and press the Enter key. The information shown is a clue to the IP set up of the PC
and current network. Type EXIT and press the Enter key to exit this window.
PING
In Windows XP choose START menu, RUN and type COMMAND then when the MS-DOS window opens
type PING 192.168.1.10 and press the Enter key. The information shown is confirming if there is a network
device (PC, NVS-10 or Server etc) on that IP Address. PING can also be used to PING a device by its DNS
name too. Type EXIT and press the Enter key to exit this window.
22
Page 24

Example NVS-10 Set Ups
Below is the simplest or initial set up with an NVS-10 unit.
Below is a second example of an NVS-10 set up.
Note that an RJ45 Cross Over Ethernet cable
is used between the NVS-10 and the computer
as it is a direct connection with no routing or
switching device in between.
You will also see that the first 3 numbers in the
IP address for both the NVS-10 and the
computer have been set the same. This allows
them to find and communicate with each other
quickly and easily because they are both within
the same local network configuration.
This time there are more computers so we
need something to share access to the NVS10
so we use a Router or a Switch. Note we are
using static IP addresses to organize the
network logically so that all items on the
network have the first 3 numbers or octets the
same. The last number or octet is unique to
the device.
To keep devices separated logically a lower
number is given to the device running or
serving the network (NVS-10) and client
devices (computers) are given a higher
number. So the last octet IP number for an
NVS-10 could be 1 to 10 and the computers
could be 20 to 254. Never use 0 and 255 as
the octet number as these are reserved for
special use by servers, routers and other
devices that may be on or joining the network.
23
Page 25

Service & Support
It is our goal to make your products ownership a satisfying experience. Our supporting staff are available to
assist you in setting up and operating your system. Please refer to our web site www.datavideo-tek.com for
answers to common questions, support requests or contact your local office below.
Datavideo Global Website:
Datavideo Corporation
Tel: +1 562 696 2324 Fax: +1 562-698-6930 E-Mail: contactus@datavideo.us
Datavideo Technologies Europe BV
Tel: +31-30-261-96-56 Fax: +31-30 261-96-57 E-Mail: service@datavideo.nl
Datavideo UK Limited
Tel: +44 1457 851 000 Fax: +44 1457 850 964 E-Mail: sales@datavideo.co.uk
Datavideo Technologies Co., Ltd
Tel: +886 2 8227 2888 Fax: +886-2-8227-2777 E-mail: service@datavideo.com.tw
Datavideo Technologies China Co., Ltd
Tel: +86 21-5603 6599 Fax:+86 21-5603 6770 E-mail: service@datavideo.cn
Datavideo Technologies (S) PTE LTD
Tel: +65-6749 6866 Fax: +65-6749 3266 E-mail: service@datavideo.sg
Datavideo HK Ltd
Tel: +852 2833 1981 Fax: +852-2833-9916 E-mail: info@datavideo.com.hk
All the trademarks are the properties of their respective owners.
Datavideo Technologies Co., Ltd. All rights reserved 2018.
www.datavideo-tek.com
G082060502E1
24
 Loading...